


 Loading...
HP iLO 3 User Guide
Abstract
This guide provides information about configuring, updating, and operating HP ProLiant servers by using the HP iLO 3 firmware. This document is intended for system administrators, HP representatives, and HP Authorized Channel Partners who are involved in configuring and using HP iLO 3 and HP ProLiant servers.
This guide discusses HP iLO for HP ProLiant servers and HP ProLiant BladeSystem server blades. For information about iLO for Integrity servers and server blades, see the HP website at http://www.hp.com/go/integrityiLO.
HP Part Number: 616301-006
Published: March 2014
Edition: 1
© Copyright 2011, 2014 Hewlett-Packard Development Company, L.P
Confidential computer software. Valid license from HP required for possession, use or copying. Consistent with FAR 12.211 and 12.212, Commercial Computer Software, Computer Software Documentation, and Technical Data for Commercial Items are licensed to the U.S. Government under vendor's standard commercial license.
The information contained herein is subject to change without notice. The only warranties for HP products and services are set forth in the express warranty statements accompanying such products and services. Nothing herein should be construed as constituting an additional warranty. HP shall not be liable for technical or editorial errors or omissions contained herein.
Acknowledgements
Microsoft, Windows, Windows NT, Windows XP, and Windows Vista are U.S. registered trademarks of Microsoft Corporation.
Intel is a trademark of Intel Corporation in the U.S. and other countries.
Java is a registered trademark of Oracle and/or its affiliates.

Contents |
|
1 Introduction to iLO.................................................................................... |
12 |
iLO web interface................................................................................................................... |
12 |
iLO RBSU............................................................................................................................... |
13 |
iLO mobile app...................................................................................................................... |
13 |
iLO scripting and command line............................................................................................... |
13 |
2 Setting up iLO.......................................................................................... |
14 |
Preparing to set up iLO............................................................................................................ |
14 |
Connecting iLO to the network................................................................................................. |
16 |
Setting up iLO by using iLO RBSU............................................................................................. |
16 |
Configuring a static IP address by using iLO RBSU.................................................................. |
17 |
Managing iLO users by using iLO RBSU................................................................................ |
18 |
Adding user accounts.................................................................................................... |
18 |
Editing user accounts..................................................................................................... |
20 |
Removing user accounts................................................................................................. |
20 |
Setting up iLO by using the iLO web interface............................................................................ |
21 |
Logging in to iLO for the first time............................................................................................. |
21 |
Activating iLO licensed features................................................................................................ |
22 |
Installing the iLO drivers........................................................................................................... |
22 |
Microsoft device driver support............................................................................................ |
23 |
Linux device driver support.................................................................................................. |
23 |
VMware device driver support............................................................................................. |
24 |
3 Configuring iLO....................................................................................... |
25 |
Updating firmware.................................................................................................................. |
25 |
Updating firmware by using an online method....................................................................... |
25 |
Performing an in-band firmware update............................................................................ |
25 |
Performing an out-of-band firmware update....................................................................... |
26 |
Updating firmware by using an offline method....................................................................... |
26 |
Obtaining the iLO firmware image file.................................................................................. |
26 |
Updating the iLO firmware by using a browser...................................................................... |
27 |
Using language packs............................................................................................................ |
28 |
Installing a language pack.................................................................................................. |
28 |
Selecting a language pack................................................................................................. |
29 |
Configuring the default language settings.............................................................................. |
30 |
Configuring the current language settings.............................................................................. |
30 |
Uninstalling a language pack.............................................................................................. |
30 |
iLO licensing.......................................................................................................................... |
31 |
Free iLO 60-day evaluation license....................................................................................... |
31 |
Installing an iLO license by using a browser.......................................................................... |
32 |
Managing iLO users by using the iLO web interface.................................................................... |
32 |
Viewing local user accounts................................................................................................ |
33 |
Viewing directory groups.................................................................................................... |
34 |
Adding or editing local user accounts................................................................................... |
34 |
Password guidelines...................................................................................................... |
36 |
IPMI/DCMI users.......................................................................................................... |
36 |
Administering directory groups............................................................................................ |
37 |
Deleting a user account or a directory group......................................................................... |
39 |
Configuring iLO access settings................................................................................................ |
39 |
Configuring service settings................................................................................................. |
39 |
Configuring IPMI/DCMI settings.......................................................................................... |
40 |
Configuring access options................................................................................................. |
40 |
Contents 3
Logging in to iLO by using an SSH client............................................................................... |
43 |
Configuring iLO security.......................................................................................................... |
43 |
General security guidelines................................................................................................. |
43 |
iLO RBSU security.......................................................................................................... |
44 |
iLO Security Override Switch administration...................................................................... |
44 |
TPM support...................................................................................................................... |
45 |
User accounts and access................................................................................................... |
46 |
User privileges.............................................................................................................. |
46 |
Login security................................................................................................................ |
46 |
Administering SSH keys...................................................................................................... |
46 |
About SSH keys............................................................................................................ |
46 |
Authorizing a new SSH key............................................................................................ |
47 |
Deleting SSH keys......................................................................................................... |
48 |
Authorizing SSH keys from an HP SIM server.................................................................... |
48 |
Administering SSL certificates.............................................................................................. |
48 |
Viewing SSL certificate information.................................................................................. |
49 |
Obtaining and importing an SSL certificate...................................................................... |
49 |
Configuring directory settings.............................................................................................. |
51 |
Configuring authentication and directory server settings..................................................... |
52 |
Running directory tests................................................................................................... |
54 |
Viewing directory test results...................................................................................... |
56 |
Using the directory test controls ................................................................................. |
58 |
Using encryption................................................................................................................ |
58 |
Viewing encryption enforcement settings........................................................................... |
59 |
Modifying the AES/DES encryption setting....................................................................... |
60 |
Connecting to iLO by using AES or 3DES encryption..................................................... |
60 |
Enabling FIPS Mode...................................................................................................... |
60 |
Disabling FIPS Mode..................................................................................................... |
61 |
Configuring iLO for HP SSO................................................................................................ |
61 |
Configuring iLO for HP SSO........................................................................................... |
62 |
Viewing trusted certificates............................................................................................. |
63 |
Adding trusted certificates.............................................................................................. |
64 |
Extracting the HP SIM server certificate........................................................................ |
65 |
Removing trusted certificates........................................................................................... |
65 |
Configuring Remote Console security settings......................................................................... |
65 |
Configuring Remote Console Computer Lock settings.......................................................... |
65 |
Configuring the Integrated Remote Console Trust setting (.NET IRC)...................................... |
67 |
Configuring the Login Security Banner.................................................................................. |
67 |
Configuring iLO network settings.............................................................................................. |
69 |
Viewing network settings..................................................................................................... |
69 |
Configuring general network settings.................................................................................... |
72 |
Configuring IPv4 settings.................................................................................................... |
74 |
Configuring IPv6 settings.................................................................................................... |
76 |
Configuring SNTP settings................................................................................................... |
79 |
Configuring and using the iLO Shared Network Port.................................................................... |
80 |
Enabling the iLO Shared Network Port feature....................................................................... |
81 |
Enabling the iLO Shared Network Port feature through iLO RBSU......................................... |
82 |
Enabling the iLO Shared Network Port feature through the iLO web interface........................ |
82 |
Re-enabling the iLO Dedicated Network Port......................................................................... |
83 |
Enabling the iLO Dedicated Network Port through iLO RBSU............................................... |
83 |
Enabling the iLO Dedicated Network Port through the web interface.................................... |
83 |
Configuring iLO Management settings....................................................................................... |
84 |
Installing the Insight Management Agents.............................................................................. |
84 |
Configuring SNMP alerts.................................................................................................... |
84 |
SNMP traps.................................................................................................................. |
85 |
4Contents
Configuring SNMP alert destinations.................................................................................... |
85 |
Configuring Insight Management integration......................................................................... |
86 |
Using the iLO RBSU................................................................................................................ |
87 |
Accessing the iLO RBSU...................................................................................................... |
87 |
Configuring NIC and TCP/IP settings.................................................................................... |
87 |
Configuring DNS/DHCP settings......................................................................................... |
88 |
Configuring global settings by using iLO RBSU....................................................................... |
89 |
Configuring serial CLI options by using iLO RBSU................................................................... |
90 |
4 Using iLO................................................................................................ |
92 |
Using the iLO web interface..................................................................................................... |
92 |
Browser support................................................................................................................. |
92 |
Logging in to iLO............................................................................................................... |
92 |
Handling an unknown authority........................................................................................... |
93 |
Using the iLO controls......................................................................................................... |
94 |
Language pack support...................................................................................................... |
94 |
Viewing iLO overview information............................................................................................. |
94 |
Viewing system information................................................................................................. |
94 |
Viewing status information................................................................................................... |
96 |
Viewing the active iLO sessions............................................................................................ |
96 |
Viewing iLO system information................................................................................................ |
97 |
Viewing health summary information.................................................................................... |
97 |
Viewing fan information...................................................................................................... |
98 |
Viewing temperature information ....................................................................................... |
100 |
Viewing temperature sensor data................................................................................... |
100 |
Viewing power information............................................................................................... |
101 |
Viewing processor information........................................................................................... |
103 |
Viewing memory information............................................................................................. |
104 |
Viewing network information............................................................................................. |
104 |
Viewing drive information................................................................................................. |
105 |
Using the iLO Event Log......................................................................................................... |
106 |
Viewing the iLO Event Log................................................................................................. |
106 |
Saving the iLO Event Log................................................................................................... |
108 |
Clearing the iLO Event Log................................................................................................ |
108 |
Using the Integrated Management Log.................................................................................... |
109 |
Viewing the IML............................................................................................................... |
109 |
Marking a log entry as repaired........................................................................................ |
111 |
Adding a maintenance note to the IML............................................................................... |
111 |
Saving the IML................................................................................................................ |
111 |
Clearing the IML.............................................................................................................. |
112 |
Using iLO diagnostics............................................................................................................ |
112 |
Resetting iLO through the web interface.............................................................................. |
113 |
Using the HP Insight Management Agents................................................................................ |
114 |
Using the Integrated Remote Console...................................................................................... |
114 |
.NET IRC requirements...................................................................................................... |
115 |
Microsoft .NET Framework............................................................................................ |
115 |
Microsoft ClickOnce.................................................................................................... |
115 |
Java IRC requirements...................................................................................................... |
115 |
Recommended client settings........................................................................................ |
116 |
Recommended server settings....................................................................................... |
116 |
Configuring the Java IRC keyboard layout for Linux systems.......................................... |
116 |
Starting the Remote Console.............................................................................................. |
116 |
Acquiring the Remote Console........................................................................................... |
118 |
Using the Remote Console power switch............................................................................. |
119 |
Using iLO Virtual Media from the Remote Console................................................................ |
119 |
Contents 5
Using Shared Remote Console (.NET IRC only).................................................................... |
119 |
Using Console Capture (.NET IRC only).............................................................................. |
120 |
Viewing Server Startup and Server Prefailure sequences................................................... |
121 |
Saving Server Startup and Server Prefailure video files..................................................... |
121 |
Capturing video files................................................................................................... |
122 |
Viewing saved video files............................................................................................. |
122 |
Using Remote Console hot keys.......................................................................................... |
122 |
Creating a hot key...................................................................................................... |
122 |
Resetting hot keys........................................................................................................ |
124 |
Using the text-based Remote Console...................................................................................... |
124 |
Using the iLO Virtual Serial Port......................................................................................... |
124 |
Configuring the iLO Virtual Serial Port in the host system RBSU.......................................... |
125 |
Configuring the iLO Virtual Serial Port for Linux............................................................... |
128 |
Configuring the iLO Virtual Serial Port for the Windows EMS Console................................ |
129 |
Using the Text-based Remote Console (Textcons).................................................................. |
129 |
Customizing the Text-based Remote Console................................................................... |
130 |
Using the Text-based Remote Console............................................................................ |
131 |
Using Linux with the Text-based Remote Console.............................................................. |
131 |
Using iLO Virtual Media........................................................................................................ |
131 |
Virtual Media operating system information......................................................................... |
133 |
Operating system USB requirement................................................................................ |
133 |
Using Virtual Media with Windows 7............................................................................ |
133 |
Operating system considerations: Virtual Floppy/USB key................................................ |
133 |
Changing diskettes................................................................................................. |
133 |
Operating system considerations: Virtual CD/DVD-ROM.................................................. |
134 |
Mounting a USB Virtual Media CD/DVD-ROM on Linux systems................................... |
134 |
Operating system considerations: Virtual Folder ............................................................. |
134 |
Using iLO Virtual Media from the iLO web interface............................................................. |
135 |
Viewing and modifying the Virtual Media port................................................................ |
135 |
Viewing and ejecting local media................................................................................. |
136 |
Connecting scripted media........................................................................................... |
136 |
Viewing and ejecting scripted media............................................................................. |
136 |
Using iLO Virtual Media from the Remote Console................................................................ |
137 |
Using a Virtual Drive................................................................................................... |
137 |
Using a physical drive on a client PC........................................................................ |
137 |
Using an image file................................................................................................ |
137 |
Using an image file through a URL (IIS/Apache)......................................................... |
137 |
Using the Create Media Image feature (Java IRC only)..................................................... |
137 |
Creating an iLO disk image file................................................................................ |
138 |
Copying data from an image file to a physical disk.................................................... |
138 |
Using a Virtual Folder (.NET IRC only)............................................................................ |
139 |
Setting up IIS for scripted Virtual Media.............................................................................. |
139 |
Configuring IIS............................................................................................................ |
139 |
Configuring IIS for read/write access............................................................................. |
140 |
Inserting Virtual Media with a helper application............................................................ |
141 |
Sample Virtual Media helper application....................................................................... |
141 |
Configuring Virtual Media Boot Order................................................................................ |
142 |
Changing the server boot order.................................................................................... |
142 |
Changing the one-time boot status................................................................................ |
143 |
Using the additional options......................................................................................... |
143 |
About server power.............................................................................................................. |
143 |
Brownout recovery........................................................................................................... |
143 |
Graceful shutdown........................................................................................................... |
144 |
Power efficiency............................................................................................................... |
144 |
Using iLO Power Management............................................................................................... |
144 |
6Contents
Managing the server power.............................................................................................. |
144 |
Configuring the System Power Restore Settings..................................................................... |
146 |
Viewing server power usage.............................................................................................. |
146 |
Viewing the current power state......................................................................................... |
148 |
Viewing the server power history........................................................................................ |
149 |
Configuring power settings................................................................................................ |
149 |
Configuring Power Regulator settings............................................................................. |
149 |
Configuring power capping settings.............................................................................. |
151 |
Configuring SNMP alert settings................................................................................... |
151 |
Configuring the persistent mouse and keyboard.............................................................. |
152 |
Using iLO with Onboard Administrator.................................................................................... |
152 |
Using the Active Onboard Administrator............................................................................. |
152 |
Starting the Onboard Administrator GUI............................................................................. |
153 |
Toggling the enclosure UID light......................................................................................... |
153 |
Enclosure bay IP addressing.............................................................................................. |
154 |
Dynamic Power Capping for server blades.......................................................................... |
154 |
iLO virtual fan................................................................................................................. |
154 |
iLO option....................................................................................................................... |
154 |
IPMI server management....................................................................................................... |
155 |
Using iLO with HP Insight Control server deployment ................................................................ |
156 |
5 Integrating HP Systems Insight Manager.................................................... |
157 |
HP SIM features.................................................................................................................... |
157 |
Establishing SSO with HP SIM................................................................................................ |
157 |
iLO identification and association........................................................................................... |
157 |
Viewing iLO status in HP SIM............................................................................................. |
157 |
iLO links in HP SIM.......................................................................................................... |
158 |
Viewing iLO in HP SIM System(s) lists.................................................................................. |
158 |
Receiving SNMP alerts in HP SIM........................................................................................... |
158 |
HP SIM port matching........................................................................................................... |
158 |
Reviewing iLO license information in HP SIM............................................................................ |
159 |
6 Directory services................................................................................... |
160 |
Directory integration benefits.................................................................................................. |
160 |
Choosing a directory configuration to use with iLO.................................................................... |
160 |
Kerberos support.................................................................................................................. |
161 |
Domain controller preparation........................................................................................... |
161 |
Realm names.............................................................................................................. |
161 |
Computer accounts...................................................................................................... |
161 |
User accounts............................................................................................................. |
161 |
Generating a keytab................................................................................................... |
162 |
Key version number................................................................................................ |
162 |
Windows Vista....................................................................................................... |
162 |
Universal and global user groups (for authorization)........................................................ |
163 |
Configuring iLO for Kerberos login..................................................................................... |
163 |
Using the iLO web interface.......................................................................................... |
163 |
Using XML configuration and control scripts.................................................................... |
164 |
Using the CLI, CLP, or SSH interface.............................................................................. |
164 |
Time requirement............................................................................................................. |
164 |
Configuring single sign-on................................................................................................ |
164 |
Internet Explorer.......................................................................................................... |
164 |
Firefox....................................................................................................................... |
165 |
Chrome..................................................................................................................... |
165 |
Verifying single sign-on (HP Zero Sign In) configuration......................................................... |
166 |
Login by name................................................................................................................ |
166 |
Schema-free directory integration............................................................................................ |
166 |
Contents 7
Setting up schema-free directory integration......................................................................... |
167 |
Active Directory prerequisites........................................................................................ |
167 |
Introduction to Certificate Services............................................................................ |
167 |
Installing Certificate Services.................................................................................... |
167 |
Verifying Certificate Services.................................................................................... |
167 |
Configuring Automatic Certificate Request................................................................. |
167 |
Schema-free setup using the iLO web interface................................................................ |
168 |
Schema-free setup using scripts..................................................................................... |
168 |
Schema-free setup with HP Directories Support for ProLiant Management Processors............. |
168 |
Schema-free setup options............................................................................................ |
169 |
Minimum login flexibility......................................................................................... |
169 |
Better login flexibility.............................................................................................. |
169 |
Maximum login flexibility......................................................................................... |
169 |
Schema-free nested groups........................................................................................... |
169 |
Setting up HP extended schema directory integration................................................................ |
170 |
Features supported by HP schema directory integration......................................................... |
170 |
Setting up directory services.............................................................................................. |
170 |
Schema documentation..................................................................................................... |
171 |
Directory services support................................................................................................. |
171 |
Schema required software................................................................................................. |
171 |
Schema Extender........................................................................................................ |
172 |
Schema Preview window......................................................................................... |
172 |
Setup window........................................................................................................ |
173 |
Results window...................................................................................................... |
173 |
Management snap-in installer....................................................................................... |
174 |
Directory services for Active Directory................................................................................. |
174 |
Active Directory installation prerequisites........................................................................ |
174 |
Installing Active Directory............................................................................................. |
175 |
For the schema-free configuration............................................................................. |
175 |
For HP extended schema......................................................................................... |
175 |
Snap-in installation and initialization for Active Directory.................................................. |
176 |
Creating and configuring directory objects for use with iLO in Active Directory.................... |
176 |
Directory services objects............................................................................................. |
177 |
Active Directory snap-ins......................................................................................... |
178 |
Role Restrictions tab................................................................................................ |
179 |
Lights Out Management tab......................................................................................... |
181 |
Directory services for eDirectory......................................................................................... |
182 |
eDirectory installation prerequisites................................................................................ |
182 |
Snap-in installation and initialization for eDirectory.......................................................... |
182 |
Example: Creating and configuring directory objects for use with iLO devices in eDirectory... |
182 |
Directory services objects for eDirectory......................................................................... |
186 |
Role Managed Devices........................................................................................... |
186 |
Members tab......................................................................................................... |
186 |
Role Restrictions tab..................................................................................................... |
187 |
Time restrictions...................................................................................................... |
188 |
Enforced client IP address or DNS name access......................................................... |
188 |
eDirectory Lights-Out Management................................................................................ |
189 |
User login using directory services.......................................................................................... |
190 |
Directory-enabled remote management.................................................................................... |
190 |
Creating roles to follow organizational structure................................................................... |
191 |
Using existing groups.................................................................................................. |
191 |
Using multiple roles..................................................................................................... |
191 |
How directory login restrictions are enforced....................................................................... |
192 |
Restricting roles........................................................................................................... |
193 |
Role time restrictions............................................................................................... |
193 |
8Contents
Role address restrictions.......................................................................................... |
193 |
User restrictions........................................................................................................... |
193 |
User address restrictions.......................................................................................... |
193 |
User time restrictions............................................................................................... |
194 |
Creating multiple restrictions and roles........................................................................... |
195 |
Using bulk import tools..................................................................................................... |
196 |
HP Directories Support for ProLiant Management Processors utility............................................... |
196 |
Compatibility.................................................................................................................. |
196 |
HP Directories Support for ProLiant Management Processors package..................................... |
197 |
Using HP Directories Support for ProLiant Management Processors......................................... |
197 |
Finding management processors................................................................................... |
197 |
Upgrading firmware on management processors............................................................. |
200 |
Selecting a directory access method.............................................................................. |
201 |
Naming management processors.................................................................................. |
202 |
Configuring directories when HP extended schema is selected........................................... |
202 |
Configuring directories when schema-free integration is selected........................................ |
206 |
Setting up management processors for directories............................................................ |
207 |
7 Troubleshooting...................................................................................... |
209 |
iLO 3 POST LED indicators..................................................................................................... |
209 |
Kernel debugging................................................................................................................. |
209 |
Event log entries................................................................................................................... |
210 |
Hardware and software link-related issues................................................................................ |
213 |
Login issues......................................................................................................................... |
213 |
Login name and password not accepted............................................................................. |
214 |
Directory user premature logout......................................................................................... |
214 |
iLO management port not accessible by name..................................................................... |
214 |
iLO RBSU unavailable after iLO and server reset................................................................... |
214 |
Unable to access the login page........................................................................................ |
215 |
Secure Connection Failed error when using Firefox browser................................................... |
215 |
Unable to return to login page after an iLO flash or reset...................................................... |
216 |
Unable to access Virtual Media or graphical Remote Console................................................ |
216 |
Unable to connect to iLO after changing network settings...................................................... |
216 |
Unable to connect to iLO processor through NIC.................................................................. |
216 |
Unable to log in to iLO after installing iLO certificate............................................................ |
216 |
Unable to connect to iLO IP address................................................................................... |
216 |
Blocked iLO ports............................................................................................................. |
217 |
Troubleshooting alert and trap issues....................................................................................... |
217 |
Unable to receive HP SIM alarms (SNMP traps) from iLO....................................................... |
217 |
Incorrect authentication code.................................................................................................. |
217 |
Using the iLO Security Override Switch for emergency access..................................................... |
218 |
Troubleshooting license installation.......................................................................................... |
218 |
Troubleshooting directory issues ............................................................................................. |
218 |
User contexts do not appear to work.................................................................................. |
218 |
Directory user does not log out after directory timeout has expired......................................... |
218 |
Problems generating keytab by using ktpass.exe.................................................................. |
218 |
Directory login fails............................................................................................................... |
219 |
Troubleshooting Remote Console issues................................................................................... |
219 |
Java IRC applet displays red X when Firefox is used to run Java IRC on Linux client .................. |
219 |
Unable to navigate single cursor of Remote Console to corners of Remote Console window....... |
219 |
Remote Console text window not updated correctly.............................................................. |
219 |
Mouse or keyboard not working in .NET IRC or Java IRC...................................................... |
219 |
.NET IRC sends characters continuously after switching windows ........................................... |
220 |
Java IRC does not display correct floppy and USB-key device................................................. |
220 |
Caps Lock out of sync between iLO and Java IRC................................................................. |
221 |
Contents 9
Num Lock out of sync between iLO and Shared Remote Console............................................ |
222 |
Keystrokes repeat unintentionally during Remote Console session............................................ |
222 |
Session leader does not receive connection request when .NET IRC is in replay mode............... |
222 |
Keyboard LED does not work correctly................................................................................ |
222 |
Inactive .NET IRC............................................................................................................. |
222 |
.NET IRC failed to connect to server................................................................................... |
223 |
File not present after copy from .NET IRC virtual drives to USB key.......................................... |
223 |
.NET IRC takes a long time to verify application requirements................................................ |
223 |
.NET IRC fails to start....................................................................................................... |
224 |
.NET IRC cannot be shared............................................................................................... |
224 |
Troubleshooting SSH issues.................................................................................................... |
225 |
Initial PuTTY input slow..................................................................................................... |
225 |
PuTTY client unresponsive.................................................................................................. |
225 |
SSH text support from text-based Remote Console session...................................................... |
225 |
Troubleshooting video and monitor issues................................................................................ |
225 |
User interface does not display correctly............................................................................. |
225 |
iLO Virtual Floppy media applet unresponsive.......................................................................... |
225 |
Troubleshooting text-based Remote Console issues.................................................................... |
225 |
Unable to view Linux installer in text-based Remote Console................................................... |
225 |
Unable to pass data through SSH terminal.......................................................................... |
226 |
VSP-driven selection during the serial timeout window sends output to BIOS redirect instead of |
|
VSP................................................................................................................................ |
226 |
Scrolling and text appear irregular during BIOS redirection................................................... |
226 |
Troubleshooting miscellaneous issues....................................................................................... |
226 |
Cookie sharing between browser instances and iLO............................................................. |
226 |
Shared instances......................................................................................................... |
226 |
Cookie order.............................................................................................................. |
227 |
Displaying the current session cookie............................................................................. |
227 |
Preventing cookie-related issues.................................................................................... |
227 |
Unable to get SNMP information from HP SIM..................................................................... |
228 |
Unable to upgrade iLO firmware........................................................................................ |
228 |
Recovering from a failed iLO firmware update...................................................................... |
228 |
iLO network Failed Flash Recovery..................................................................................... |
229 |
Testing SSL...................................................................................................................... |
229 |
Resetting iLO................................................................................................................... |
230 |
Resetting iLO to the factory default settings by using iLO RBSU............................................... |
230 |
Server name still present after System Erase Utility is executed................................................ |
231 |
Certificate error when navigating to iLO web interface.......................................................... |
231 |
Resolving a browser certificate error: Internet Explorer...................................................... |
232 |
Resolving a browser certificate error: Firefox................................................................... |
233 |
8 Support and other resources.................................................................... |
235 |
Information to collect before you contact HP............................................................................. |
235 |
How to contact HP................................................................................................................ |
235 |
Registering for Software Technical Support and Update Service.................................................. |
235 |
How to use Software Technical Support and Update Service.................................................. |
235 |
HP Support Center................................................................................................................ |
235 |
HP authorized resellers.......................................................................................................... |
236 |
Related information............................................................................................................... |
236 |
9 Documentation feedback......................................................................... |
237 |
A iLO license options................................................................................. |
238 |
B Directory services schema........................................................................ |
239 |
HP Management Core LDAP OID classes and attributes............................................................. |
239 |
Core classes.................................................................................................................... |
239 |
10 Contents
Core attributes................................................................................................................. |
239 |
Core class definitions....................................................................................................... |
239 |
hpqTarget.................................................................................................................. |
239 |
hpqRole..................................................................................................................... |
240 |
hpqPolicy................................................................................................................... |
240 |
Core attribute definitions................................................................................................... |
240 |
hpqPolicyDN.............................................................................................................. |
240 |
hpqRoleMembership.................................................................................................... |
240 |
hpqTargetMembership................................................................................................. |
241 |
hpqRoleIPRestrictionDefault........................................................................................... |
241 |
hpqRoleIPRestrictions................................................................................................... |
241 |
hpqRoleTimeRestriction................................................................................................. |
242 |
Lights-Out Management specific LDAP OID classes and attributes................................................ |
242 |
Lights-Out Management classes......................................................................................... |
242 |
Lights-Out Management attributes...................................................................................... |
242 |
Lights-Out Management class definitions............................................................................. |
242 |
hpqLOMv100............................................................................................................. |
242 |
Lights-Out Management attribute definitions........................................................................ |
243 |
hpqLOMRightLogin...................................................................................................... |
243 |
hpqLOMRightRemoteConsole........................................................................................ |
243 |
hpqLOMRightVirtualMedia........................................................................................... |
243 |
hpqLOMRightServerReset.............................................................................................. |
243 |
hpqLOMRightLocalUserAdmin....................................................................................... |
244 |
hpqLOMRightConfigureSettings..................................................................................... |
244 |
C OID support for certificates...................................................................... |
245 |
Glossary.................................................................................................. |
247 |
Index....................................................................................................... |
250 |
Contents 11

1 Introduction to iLO
The iLO software can remotely perform most functions that otherwise require a visit to the servers at the data center, computer room, or remote location. iLO allows you to do the following:
•Monitor server health. iLO monitors temperatures in the server and sends corrective signals to the fans to maintain proper server cooling. iLO also monitors firmware versions and the status of fans, memory, the network, processors, power supplies, and server hard drives.
•Access a high-performance and secure Integrated Remote Console to the server from anywhere in the world if you have a network connection to the server.
There are two versions of the Integrated Remote Console:
◦.NET IRC
◦Java IRC
General references to the Remote Console apply to both the .NET IRC and Java IRC, unless otherwise specified.
•Use the shared .NET IRC to collaborate with multiple server administrators.
•Remotely mount high-performance Virtual Media devices to the server.
•Use Virtual Power and Virtual Media from the GUI, the CLI, or the iLO scripting toolkit for many tasks, including the automation of deployment and provisioning.
•Securely and remotely control the power state of the managed server.
•Monitor the power consumption and server power settings.
•Use local or directory-based user accounts to log in to iLO.
•Configure Kerberos authentication, which adds the HP Zero Sign In button to the login screen.
•Use iLO language packs to switch between English and another supported language.
For more information about the iLO 3 features, see http://www.hp.com/go/iLO3.
iLO web interface
The iLO web interface groups similar tasks for easy navigation and workflow. It is organized in a navigational tree view located on the left side of the page. The top-level branches are Information,
Remote Console, Virtual Media, Power Management, Network, and Administration. If you have a ProLiant server blade, the BL c-Class branch is included.
When using the iLO web interface, note the following:
•Each high-level iLO branch has a submenu that you can display by clicking the + icon to the left of that branch. Each menu topic displays a page title that describes the information or settings available on that page. The page title might not reflect the name that is displayed on the menu option.
•Assistance for all iLO pages is available from the iLO help pages. To access page-specific help, click the ? icon on the upper right side of the page.
•Typical administrator tasks are available from the Administration and Network branches of the iLO web interface. These tasks are described in “Setting up iLO” (page 14) and “Configuring iLO” (page 25).
•Typical user tasks are available from the Information, Remote Console, Virtual Media, Power Management, and BL c-Class branches of the iLO web interface. These tasks are described in “Using iLO” (page 92).
12 Introduction to iLO
For more information about iLO functionality and integration, see the following:
•“Integrating HP Systems Insight Manager” (page 157)
•“Directory services” (page 160)
•“Troubleshooting” (page 209)
iLO RBSU
You can use the iLO ROM-based setup utility to configure network parameters, global settings, and user accounts. iLO RBSU is designed for the initial iLO setup, and is not intended for continued iLO administration. iLO RBSU is available whenever the server is booted, and can be run remotely through the Remote Console. Press F8 during POST to enter iLO RBSU.
You can disable iLO RBSU in the iLO RBSU Global Settings preferences or in the iLO web interface. Disabling iLO RBSU prevents reconfiguration from the host unless the iLO Security Override Switch is set.
For more information about using iLO RBSU, see the following:
•“Setting up iLO by using iLO RBSU” (page 16)
•“iLO RBSU security” (page 44)
•“Using the iLO RBSU” (page 87)
iLO mobile app
The HP iLO mobile app provides access to the Remote Console of your HP ProLiant server from your mobile device. The mobile app interacts directly with the iLO processor on HP ProLiant servers, providing total control of the server at all times as long as the server is plugged in. For example, you can access the server when it is in a healthy state or when it is powered off with a blank hard drive. As an IT administrator, you can troubleshoot problems and perform software deployments from almost anywhere.
For more information about the iLO mobile app, see http://www.hp.com/go/ilo/mobileapp.
iLO scripting and command line
You can use the iLO scripting tools to configure multiple iLO systems, to incorporate a standard configuration into the deployment process, and to control servers and subsystems.
The HP iLO Scripting and Command Line Guide describes the syntax and tools available to use iLO 3 through a command line or scripted interface.
iLO RBSU 13

2 Setting up iLO
The iLO default settings enable you to use most features without additional configuration. However, the configuration flexibility of iLO enables customization for multiple enterprise environments. This chapter discusses the initial iLO setup steps. For information about additional configuration options, see “Configuring iLO” (page 25).
Complete the initial setup steps:
1.Decide how you want to handle networking and security. For more information, see “Preparing to set up iLO” (page 14).
2.Connect iLO to the network. For more information, see “Connecting iLO to the network” (page 16).
3.If you are not using dynamic IP addressing, configure a static IP address by using iLO RBSU. For more information, see “Setting up iLO by using iLO RBSU” (page 16).
4.If you are using the local accounts feature, set up your user accounts by using iLO RBSU or the iLO web interface. For more information, see “Setting up iLO by using iLO RBSU” (page 16) or “Setting up iLO by using the iLO web interface” (page 21).
5.Install an iLO license. For more information, see “Activating iLO licensed features” (page 22).
6.If required, install the iLO drivers. For more information, see “Installing the iLO drivers” (page 22).
Preparing to set up iLO
Before setting up an iLO management processor, you must decide how to handle networking and security. The following questions can help you configure iLO:
1.How should iLO connect to the network?
For a graphical representation and explanation of the available connections, see “Connecting iLO to the network” (page 16).
Typically, iLO is connected to the network through one of the following:
•A corporate network that both the NIC and the iLO port are connected to. This connection enables access to iLO from anywhere on the network and reduces the amount of networking hardware and infrastructure required to support iLO. However, on a corporate network, traffic can hinder iLO performance.
•A dedicated management network with the iLO port on a separate network. A separate network improves performance and security because you can physically control which workstations are connected to the network. A separate network also provides redundant access to the server when a hardware failure occurs on the corporate network. In this configuration, iLO cannot be accessed directly from the corporate network.
2.How will iLO acquire an IP address?
To access iLO after connecting it to the network, the iLO management processor must acquire an IP address and subnet mask by using either a dynamic or static process.
•A dynamic IP address is set by default. iLO obtains the IP address and subnet mask from DNS or DHCP servers. This method is the simplest.
•A static IP address is used if DNS or DHCP servers are not available on the network. A static IP address can be configured by using iLO RBSU. For more information, see “Configuring a static IP address by using iLO RBSU” (page 17).
IMPORTANT: If you plan to use a static IP address, you must have the IP address before starting the iLO setup process.
14 Setting up iLO
3.What access security is required, and what user accounts and privileges are needed?
iLO provides several options to control user access. Use one of the following methods to prevent unauthorized access:
•Local accounts—Up to 12 user names and passwords can be stored in iLO. This is ideal for small environments such as labs and small-sized or medium-sized businesses.
•Directory services—Use the corporate directory to manage iLO user access. This is ideal for environments with a large number of users. If you plan to use directory services, consider enabling at least one local administrator account for alternate access.
For more information about iLO access security, see “Configuring iLO security” (page 43).
4.How do you want to configure iLO?
iLO supports various interfaces for configuration and operation. This guide discusses the following interfaces:
•Use iLO RBSU when the system environment does not use DHCP, DNS, or WINS. For more information, see “Setting up iLO by using iLO RBSU” (page 16).
•Use the iLO web interface when you can connect to iLO on the network by using a web browser. You can also use this method to reconfigure an iLO management processor. For more information, see “Setting up iLO by using the iLO web interface” (page 21).
Other configuration options not discussed in this guide follow:
•HP Scripting Toolkit—This toolkit is a server deployment product for IT experts that provides unattended automated installation for high-volume server deployments. For more information, see the HP Scripting Toolkit for Linux User Guide and the HP Scripting Toolkit for Windows User Guide.
•Scripting—You can use scripting for advanced setup of multiple iLO management processors. Scripts are XML files written for a scripting language called RIBCL. You can use RIBCL scripts to configure iLO on the network during initial deployment or from an already deployed host.
The following methods are available:
◦HP Lights-Out Configuration Utility (HPQLOCFG)—The HPQLOCFG.EXE utility replaces the previously used CPQLOCFG.EXE utility. It is a Windows command line utility that sends XML configuration and control scripts over the network to iLO.
◦HP Lights-Out Online Configuration Utility (HPONCFG)—A local online scripted setup utility that runs on the host and passes RIBCL scripts to the local iLO. HPONCFG requires the HP iLO Channel Interface Driver.
◦Custom scripting environments—The iLO scripting samples include a Perl sample that can be used to send RIBCL scripts to iLO over the network.
◦SMASH CLP—A command-line protocol that can be used when a command line is accessible through SSH or the physical serial port.
For more information about these methods, see the HP iLO 3 Scripting and Command Line Guide.
iLO sample scripts are available at the following website: http://www.hp.com/support/ iLO3.
Preparing to set up iLO 15

Connecting iLO to the network
You can connect iLO to the network through a corporate network or a dedicated management network.
•In a corporate network, the server has two network port types (server NICs and one iLO NIC) connected to the corporate network, as shown in Figure 1 (page 16).
Figure 1 Corporate network diagram
Main NIC |
Client PCs |
|
|
||
iLO |
Corporate |
|
Hub/Switch |
||
Network |
||
Main NIC |
|
|
iLO |
|
|
|
Management Client |
•In a dedicated management network, the iLO port is on a separate network, as shown in Figure 2 (page 16).
Figure 2 Dedicated management network diagram
|
|
Client PCs |
Main NIC |
Hub/Switch |
Corporate |
|
||
Main NIC |
|
Network |
iLO |
Hub/Switch |
|
|
|
|
|
Dedicated |
|
iLO |
iLO Management |
|
Network |
|
|
|
|
Management Client |
Setting up iLO by using iLO RBSU
HP recommends using iLO RBSU to set up iLO for the first time and to configure iLO network parameters for environments that do not use DHCP, DNS, or WINS.
16 Setting up iLO

Configuring a static IP address by using iLO RBSU
This procedure is required only if you are using a static IP address. When you are using dynamic IP addressing, your DHCP server automatically assigns an IP address for iLO.
NOTE: To simplify installation, HP recommends using DNS or DHCP with iLO.
To configure a static IP address:
1.Optional: If you access the server remotely, start an iLO remote console session. You can use the .NET IRC or Java IRC.
2.Restart or power on the server.
3.Press F8 in the HP ProLiant POST screen. The iLO RBSU screen appears.
4.Disable DHCP:
a.Select Network→DNS/DHCP, and then press Enter. The Network Autoconfiguration window opens.
b.Select DHCP Enable, as shown in Figure 3 (page 17).
Figure 3 iLO RBSU Network Autoconfiguration window
c.Press the spacebar to set DHCP Enable to OFF, and then press F10 to save the changes.
Setting up iLO by using iLO RBSU 17
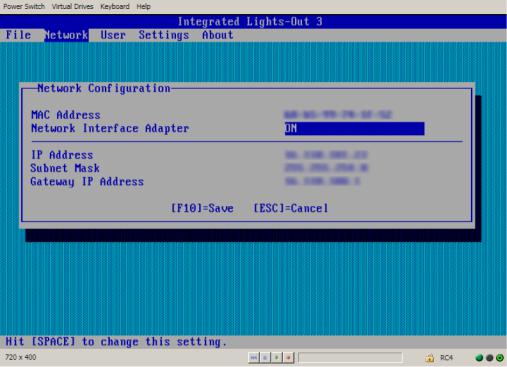
5.Enter the network settings:
a.Select Network→NIC and TCP/IP, and then press Enter. The Network Configuration window opens.
b.Enter the appropriate information in the IP Address, Subnet Mask, and Gateway IP Address fields, as shown in Figure 4 (page 18).
Figure 4 iLO RBSU Network Configuration window
c. Press F10 to save the changes.
6.Select File→Exit to exit iLO RBSU.
The changes take effect when you exit iLO RBSU.
Managing iLO users by using iLO RBSU
You can use iLO RBSU to perform the following user management tasks:
•“Adding user accounts” (page 18)
•“Editing user accounts” (page 20)
•“Removing user accounts” (page 20)
Adding user accounts
To add local iLO user accounts:
1.Optional: If you access the server remotely, start an iLO remote console session. You can use the .NET IRC or Java IRC.
2.Restart or power on the server.
3.Press F8 in the HP ProLiant POST screen. iLO RBSU starts.
4.Select User→Add, and then press Enter.
The Add User screen appears, as shown in Figure 5 (page 19).
18 Setting up iLO
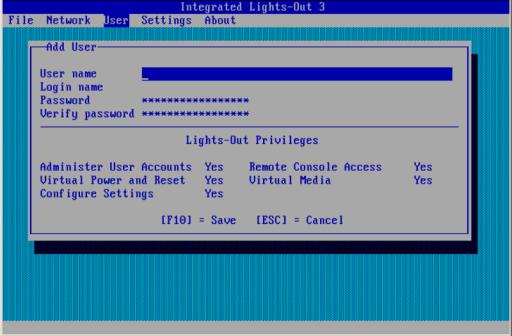
Figure 5 iLO RBSU Add User window
5.Enter the following user account details:
•User name appears in the user list on the User Administration page. It does not have to be the same as the Login name. The maximum length for a user name is 39 characters. The user name must use printable characters. Assigning descriptive user names can help you to easily identify the owner of each login name.
•Login name is the name you must use when logging in to iLO. It appears in the user list on the User Administration page, on the iLO Overview page, and in iLO logs. The Login name does not have to be the same as the User name. The maximum length for a login name is 39 characters. The login name must use printable characters.
•Password and Verify password set and confirm the password that is used for logging in to iLO. The maximum length for a password is 39 characters. Enter the password twice for verification.
6.Select from the following iLO privileges. To enable a privilege, set it to Yes. To disable a privilege, set it to No.
•Administer User Accounts—Enables a user to add, edit, and delete local iLO user accounts. A user with this privilege can change privileges for all users. If you do not have this privilege, you can view your own settings and change your own password.
•Remote Console Access—Enables a user to remotely access the host system Remote Console, including video, keyboard, and mouse control.
•Virtual Power and Reset—Enables a user to power-cycle or reset the host system. These activities interrupt the system availability. A user with this privilege can diagnose the system by using the Generate NMI to System button.
•Virtual Media—Enables a user to use the Virtual Media feature on the host system.
•Configure iLO Settings—Enables a user to configure most iLO settings, including security settings, and to remotely update the iLO firmware. This privilege does not enable local user account administration.
After iLO is configured, revoking this privilege from all users prevents reconfiguration using the web interface, HPQLOCFG, or the CLI. Users who have access to iLO RBSU or
Setting up iLO by using iLO RBSU 19
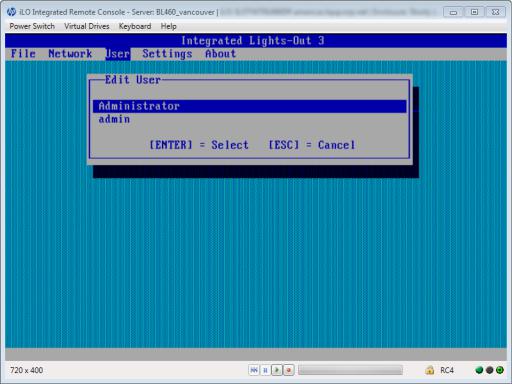
HPONCFG can still reconfigure iLO. Only a user who has the Administer User Accounts privilege can enable or disable this privilege.
7.Press F10 to save the new user account.
8.Repeat step 4 through step 7 until you are done creating user accounts.
9.Select File→Exit to exit iLO RBSU.
Editing user accounts
To edit a local iLO user account:
1.Optional: If you access the server remotely, start an iLO remote console session. You can use the .NET IRC or Java IRC.
2.Restart or power on the server.
3.Press F8 in the HP ProLiant POST screen. The iLO RBSU screen appears.
4.Select User→Edit, and then press Enter.
The Edit User screen appears, as shown in Figure 6 (page 20).
Figure 6 Editing user accounts
5.Select the user name that you want to edit, and then press Enter.
6.Update the user name, login name, password, or user privileges, and then press F10 to save the changes.
7.Select File→Exit to exit iLO RBSU.
Removing user accounts
To remove a local iLO user account:
1.Optional: If you access the server remotely, start an iLO remote console session. You can use the .NET IRC or Java IRC.
2.Restart or power on the server.
20 Setting up iLO
3.Press F8 in the HP ProLiant POST screen. The iLO RBSU screen appears.
4.Select User→Remove, and then press Enter.
The Remove User screen appears, as shown in Figure 7 (page 21).
Figure 7 Removing user accounts
5.Select the user that you want to remove, and then press Enter. The iLO RBSU prompts you to confirm the request.
6.Press Enter to confirm the request.
7.Select File→Exit to exit iLO RBSU.
Setting up iLO by using the iLO web interface
You can use the iLO web interface to configure iLO if you can connect to iLO on the network by using a web browser. You can also use this method to reconfigure an iLO management processor.
Access iLO from a remote network client by using a supported browser and providing the default DNS name, user name, and password. For information about the DNS name and default user account credentials, see “Logging in to iLO for the first time” (page 21).
For information about the configuration procedures available in the iLO web interface, see “Configuring iLO” (page 25).
Logging in to iLO for the first time
The iLO firmware is configured with a default user name, password, and DNS name. Default user information is located on the serial number/iLO information pull tab attached to the server that contains the iLO management processor. Use these values to access iLO remotely from a network client by using a web browser.
Setting up iLO by using the iLO web interface 21

NOTE: The serial number/iLO information pull tab is double-sided. One side shows the server serial number, and the other side shows the default iLO account information. The same information is printed on a label attached to the chassis.
The default values follow:
•User name—Administrator
•Password—A random eight-character alphanumeric string
•DNS name—ILOXXXXXXXXXXXX, where the Xs represent the serial number of the server
If you enter an incorrect user name and password, or a login attempt fails, iLO imposes a security delay. For more information about login security, see “Login security” (page 46).
IMPORTANT: HP recommends changing the default values after you log in to iLO for the first time. For instructions, see “Managing iLO users by using the iLO web interface” (page 32).
Activating iLO licensed features
To activate iLO licensed features, install an HP iLO license. iLO licenses activate functionality such as graphical Remote Console with multi-user collaboration, video record/playback, and many more advanced features. For licensing information and installation instructions, see “iLO licensing” (page 31).
Installing the iLO drivers
iLO is an independent microprocessor running an embedded operating system. The architecture ensures that the majority of iLO functionality is available, regardless of the host operating system. The iLO drivers enable software such as HPONCFG and the HP Insight Management Agents to communicate with iLO. Your OS and system configuration determine the driver requirements.
The iLO drivers are available from the HP Service Pack for ProLiant and the HP website.
•For Windows, Red Hat, and SLES—Download the SPP from http://www.hp.com/go/spp/ download and use it to install the iLO drivers.
For information about using the SPP, see the SPP documentation.
•For Windows, Red Hat, and SLES—Download the iLO drivers from the HP Support Center:
1.Navigate to the technical support page on the HP website: http://www.hp.com/support.
2.Select a country or region and a language. The HP Support page opens.
3.Click the Drivers & Downloads link.
4.In the search box, enter the server model that you are using (for example, DL360). A list of servers is displayed.
5.Click the link for your server.
The HP Support Center page for the server opens.
6.Click the link for the server operating system.
7.Download the iLO drivers.
•For VMware—Download the iLO drivers from the vibsdepot section of the Software Delivery Repository website at http://downloads.linux.hp.com/SDR/index.html.
Follow the installation instructions provided with the downloaded software.
22 Setting up iLO

For OS-specific driver information, see the following:
•“Microsoft device driver support” (page 23)
•“Linux device driver support” (page 23)
•“VMware device driver support” (page 24)
Microsoft device driver support
When you are using Windows with iLO, the following drivers are available:
•HP ProLiant iLO 3/4 Channel Interface Driver for Windows—This driver is required for the operating system to communicate with iLO. Install this driver in all configurations.
•HP ProLiant iLO 3/4 Management Controller Driver Package for Windows—This package includes the following components:
◦hpqilo3core provides iLO Management Controller Driver support.
◦hpqilo3service provides the HP ProLiant Health Monitor Service and HP ProLiant System Shutdown Service.
◦hpqilo3whea is a helper service for Windows Hardware Error Architecture, which passes information between iLO and the operating system in the event of a hardware fault.
IMPORTANT: The Management Controller Driver Package is required to support Automatic Server Recovery and the HP Insight Management Agents or HP Insight Management WBEM Providers (if installed). For more information, see “Configuring iLO Management settings” (page 84).
Linux device driver support
When you are using Linux with iLO, the following drivers are available:
•HP ProLiant Channel Interface Device Driver (hpilo)—This driver manages agent and tool application access to iLO.
•HP System Health Application and Command Line Utilities (hp-health)—A collection of applications and tools that enables monitoring of fans, power supplies, temperature sensors, and other management events. This RPM contains the hpasmd, hpasmlited, hpasmpld, and hpasmxld daemons.
IMPORTANT: These drivers are standard for SUSE Linux Enterprise Server 11, Red Hat 5, and Red Hat 6.
For open-source Linux distributions (Ubuntu, Debian, Fedora, and others), the hpilo driver is part of the Linux kernel, so the driver is loaded automatically at startup.
Use the following commands to load the iLO drivers:
rpm -ivh hpilo-<d.vv.v-pp.Linux_version.arch>.rpm
rpm -ivh hp-health-<d.vv.v-pp.Linux_version.arch>.rpm
Where <d> is the Linux distribution and version, <vv.v-pp> are version numbers, and <arch> is the architecture (i386 or x86_64).
Use the following commands to remove the iLO drivers:
rpm -e hpilo
rpm -e hp-health
Installing the iLO drivers |
23 |
VMware device driver support
When you are using VMware with iLO, the following driver is available:
HP ProLiant Channel Interface Device Driver (hpilo)—This driver manages agent, WBEM provider, and tool application access to iLO. It is included in the customized HP VMware images. For raw VMware images, the driver must be installed manually.
24 Setting up iLO

3 Configuring iLO
Typically, an advanced or administrative user who manages users and configures global and network settings configures iLO. This guide provides information about configuring iLO by using the iLO web interface and iLO RBSU.
TIP: You can also perform many iLO configuration tasks by using XML configuration and control scripts or SMASH CLP. For information about using these methods, see the HP iLO 3 Scripting and Command Line Guide, HP Scripting Toolkit for Linux User Guide, and HP Scripting Toolkit for Windows User Guide.
Updating firmware
Firmware updates enhance iLO functionality with new features, improvements, and security updates. You can download the latest firmware from the following website: http://www.hp.com/support/ ilo3.
Users who have the Configure iLO Settings privilege or host operating system Administrator/root privileges can update iLO firmware. If the iLO Security Override Switch is set, any out-of-band user can update the firmware.
Due to the security enhancements in iLO 3 1.50 and later, the firmware image file is larger than previous releases. To accommodate the larger firmware image file, you must have iLO 3 1.20 or later installed to upgrade to iLO 3 1.50 or later. Upgrading from earlier firmware versions is not supported.
To downgrade from iLO 3 1.50 or later to an earlier firmware version, you must disable FIPS Mode. For instructions, see “Using encryption” (page 58).
You can update the iLO firmware by using an online or offline method. For more information, see “Updating firmware by using an online method” (page 25) or “Updating firmware by using an offline method” (page 26)
Updating firmware by using an online method
When you use an online method to update the firmware, no server reboot is required. You can update the firmware and reset iLO without affecting the availability of the server host operating system. The online update method can be performed in-band or out-of-band.
Performing an in-band firmware update
When you use this method to update the iLO firmware, the iLO firmware is sent to iLO directly from the server host operating system. The HP ProLiant Channel Interface Driver is required for host-based iLO firmware updates. During a host-based firmware update, the iLO firmware does not verify login credentials or user privileges because the host-based utilities require a root login (Linux and VMware) or Administrator login (Windows).
You can use the following in-band firmware update methods:
•iLO Online ROM Flash Component—Use an executable file to update iLO while the server is operating. The executable file contains the installer and the firmware package. You can download an iLO Online ROM Flash Component from the following HP website: http:// www.hp.com/support/ilo3.
•HPONCFG—Use the HP Lights-Out Online Configuration Utility to configure iLO by using XML scripts. Download the iLO firmware image and the Update_Firmware.xml sample script. Edit the sample script with your setup details, and then run the script.
Sample scripts are available at http://www.hp.com/support/ilo3. For more information about scripting, see the HP iLO 3 Scripting and Command Line Guide.
Updating firmware 25

For instructions about obtaining the iLO firmware image, see “Obtaining the iLO firmware image file” (page 26).
Performing an out-of-band firmware update
When you use this method to update the iLO firmware, you use a network connection to communicate with iLO directly.
You can use the following out-of-band firmware update methods:
•iLO web interface—Download the iLO Online ROM Flash Component and install it by using the iLO web interface. For instructions, see “Updating the iLO firmware by using a browser” (page 27).
•HPQLOCFG—Use the HP Lights-Out Configuration Utility to configure iLO by using XML scripts. Download the iLO firmware image and the Update_Firmware.xml sample script. Edit the sample script with your setup details, and then run the script.
Sample scripts are available at http://www.hp.com/support/ilo3. For more information about scripting, see the HP iLO 3 Scripting and Command Line Guide.
For instructions about obtaining the iLO firmware image, see “Obtaining the iLO firmware image file” (page 26).
•HPLOMIG (also called HP Directories Support for Management Processors)—Download the HP Directories Support for Management Processors executable file to access the directory support components. One of the components, HPLOMIG, can be used to discover multiple iLO processors and update their firmware in one step. You do not need to use directory integration to take advantage of this feature. For more information, see “Upgrading firmware on management processors” (page 200).
•SMASH CLP—Access SMASH CLP through the SSH port, and use standard commands to view firmware information and update the firmware.
For more information about SMASH CLP, see the HP iLO 3 Scripting and Command Line Guide.
NOTE: The SMASH CLP method for updating firmware is not supported for upgrading to iLO 3 1.50 or later.
Updating firmware by using an offline method
When you use an offline method to update the firmware, you must reboot the server by using an offline utility. Examples of offline firmware updates include the following:
•HP Service Pack for ProLiant—Use the HP Service Pack for ProLiant to install the firmware update. For more information, see the following website: http://www.hp.com/go/spp.
•Windows or Linux Scripting Toolkit—Use the Scripting Toolkit to configure several settings within the server and update firmware. This method is useful for deploying to multiple servers. For instructions, see the HP Scripting Toolkit for Linux User Guide or HP Scripting Toolkit for Windows User Guide.
Obtaining the iLO firmware image file
The .bin file from the iLO Online ROM Flash Component is required for some of the methods you can use to update the iLO firmware.
To download the iLO Online ROM Flash Component file, and then extract the .bin file:
1.Navigate to the technical support page on the HP website: http://www.hp.com/support.
2.Select a country or region and a language. The HP Support page opens.
26 Configuring iLO
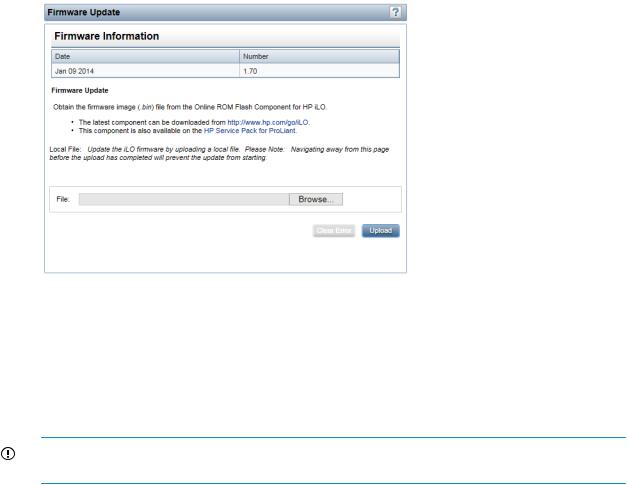
3.Click the Drivers & Downloads link.
4.In the search box, enter the server model that you are using (for example, DL360). A list of servers is displayed.
5.Click the link for your server.
The HP Support Center page for the server opens.
6.Click the link for your server operating system.
7.Follow the onscreen instructions to download the iLO Online ROM Flash Component file.
8.Double-click the downloaded file, and then click the Extract button.
9.Select a location for the extracted files, and then click OK.
The firmware image is a file similar to ilo3_<yyy>.bin, where <yyy> represents the firmware version.
Updating the iLO firmware by using a browser
You can update the iLO firmware from any network client by using a supported browser. For a list of supported browsers, see “Using the iLO web interface” (page 92).
To update the iLO firmware:
1.Obtain the firmware image file. For instructions, see “Obtaining the iLO firmware image file” (page 26).
2.Navigate to the Administration→iLO Firmware page.
The Firmware Update page opens, as shown in Figure 8 (page 27).
Figure 8 Firmware Update page
3.Click Browse (Internet Explorer or Firefox) or Choose File (Chrome), and then specify the location of the firmware image file in the File box.
4.Click Upload to start the update process.
The firmware update will not start if you navigate away from the Firmware Update page before the upload is complete.
The iLO firmware receives, validates, and then flashes the firmware image. After the firmware flashes and resets, iLO logs you out and the browser reconnects.
IMPORTANT: Do not interrupt a firmware update. If a firmware update is interrupted or fails, attempt it again immediately. Do not reset iLO before reattempting the update.
Updating firmware 27
5. To start working with the updated firmware, clear your browser cache, and then log in to iLO.
If an error occurs during a firmware update, see “Unable to upgrade iLO firmware” (page 228).
If an iLO firmware update is corrupted or canceled, and iLO is corrupted, see “iLO network Failed Flash Recovery” (page 229).
Using language packs
Language packs enable you to easily switch the iLO web interface from English to a supported language of your choice. Language packs currently provide translations for the iLO web interface,
.NET IRC, and Java IRC.
Consider the following when using language packs:
•You must have the Configure iLO Settings privilege to install a language pack.
•You can install one additional language pack at a time. Uploading a new language pack replaces the currently installed language pack, regardless of the language pack version.
•The language pack firmware is independent of the iLO firmware. Setting iLO to the factory default settings does not remove an installed language pack.
•The Java IRC and .NET IRC use the language of the current iLO session.
•For localization support with the Java IRC on Windows systems, you must select the correct language in the Regional and Language Options Control Panel.
•For localization support with the Java IRC on Linux systems, make sure that the fonts for the specified language are installed and available to the JRE.
•If an installed language pack does not include the translation for a text string, the text is displayed in English.
•When you update the iLO firmware, HP recommends downloading the latest language pack to ensure that the language pack contents match the iLO web interface.
iLO 3 firmware version 1.50 or later requires version 1.50 or later of the iLO language pack.
•iLO uses the following process to determine the language of your session:
1.If you previously logged in to the iLO web interface on the same computer using the same browser, and you have not cleared the cookies, the language setting of the last session with that iLO processor is used.
2.If there is no cookie, the current browser language is used if it is supported by iLO and the required language pack is installed. The supported languages are English (en), Japanese (ja), and Simplified Chinese (zh).
3.Internet Explorer only: If the browser language is not supported, the OS language is used if the language is supported by iLO, and the required language pack is installed.
4.If there is no cookie, and the browser or OS language is not supported, iLO uses the configured default language. For more information, see “Configuring the default language settings” (page 30).
Installing a language pack
1.Navigate to the iLO software download website: http://www.hp.com/support/ilo3.
2.Download the language pack to your local computer.
3.Navigate to the Administration→Access Settings→Language page, as shown in Figure 9 (page 29).
28 Configuring iLO
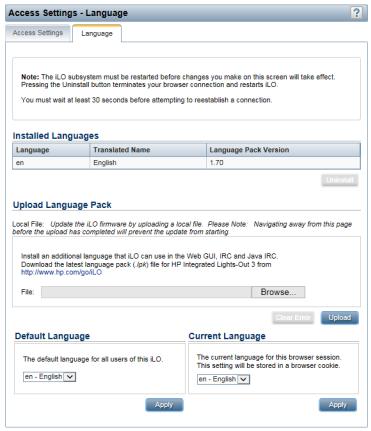
Figure 9 Access Settings – Language page
4.Click Browse (Internet Explorer or Firefox) or Choose File (Chrome) in the Upload Language Pack section.
5.Select the downloaded language pack, and then click Open. The following message appears:
Only one language pack is supported at a time. If a language pack is already installed, it will be replaced with this upload. iLO will automatically reboot after installing the new language pack. Are you sure you want to install now?
6.Click OK to continue.
If you have a previously installed language pack, this language pack will replace it.
7.Click Upload.
iLO will automatically reboot after installing a language pack. This will end your browser connection with iLO.
Wait at least 30 seconds before you attempt to re-establish a connection.
Selecting a language pack
After you have installed a language pack, you can select it in the following ways:
•From the login page, as shown in Figure 10 (page 30).
Using language packs 29

Figure 10 Login page Language menu
•From the toolbar located on the bottom right side of the iLO web interface, as shown in Figure 11 (page 30).
Figure 11 Toolbar Language menu
•From the Administration→Access Settings→Language page. For instructions, see “Configuring the current language settings” (page 30).
Configuring the default language settings
To set the default language for the users of this instance of the iLO firmware:
1.Navigate to the Administration→Access Settings→Language page, as shown in Figure 9 (page 29).
2.Select a value in the Default Language menu.
The available languages are English and any other language for which a language pack is installed.
3.Click Apply.
Configuring the current language settings
To set the current language of this browser session:
1.Navigate to the Administration→Access Settings→Language page, as shown in Figure 9 (page 29).
2.Select a value in the Current Language menu.
The available languages are English and any other language for which a language pack is installed.
3.Click Apply.
Uninstalling a language pack
1.Navigate to the Administration→Access Settings→Language page, as shown in Figure 9 (page 29).
2.Click the Uninstall button in the Installed Languages section. The following message appears:
Applying new settings requires an iLO reset.
Would you like to apply the new settings and reset iLO now?
30 Configuring iLO
Loading...