


 Loading...
HP Integrated Lights-Out
User Guide
for HP Integrated Lights-Out firmware 1.91
Part Number 382327-003
May 2007 (Third Edition)
© Copyright 2005, 2007 Hewlett-Packard Development Company, L.P.
The information contained herein is subject to change without notice. The only warranties for HP products and services are set forth in the express warranty statements accompanying such products and services. Nothing herein should be construed as constituting an additional warranty. HP shall not be liable for technical or editorial errors or omissions contained herein.
Confidential computer software. Valid license from HP required for possession, use or copying. Consistent with FAR 12.211 and 12.212, Commercial Computer Software, Computer Software Documentation, and Technical Data for Commercial Items are licensed to the U.S. Government under vendor’s standard commercial license.
Microsoft, Windows, Windows NT, and Windows XP are U.S. registered trademarks of Microsoft Corporation. Windows Server 2003 is a U.S. trademark of Microsoft Corporation. Windows Vista is either a registered trademark or trademark of Microsoft Corporation in the United States and/or other countries. AMD is a trademark of Advanced Micro Devices, Inc. .Java is a U.S. trademark of Sun Microsystems, Inc.
Audience assumptions
This document is for the person who installs, administers, and troubleshoots servers and storage systems. HP assumes you are qualified in the servicing of computer equipment and trained in recognizing hazards in products with hazardous energy levels.

Contents |
|
Operational overview ................................................................................................................... |
9 |
Guide overview ........................................................................................................................................ |
9 |
New in this release of iLO .......................................................................................................................... |
9 |
iLO overview .......................................................................................................................................... |
10 |
Typical usage ............................................................................................................................... |
10 |
HP ProLiant Essentials Rapid Deployment Pack Integration................................................................... |
11 |
iLO browser interface overview................................................................................................................. |
11 |
Supported server operating system software...................................................................................... |
12 |
Supported browsers and client operating systems .............................................................................. |
13 |
Linux browser configuration ............................................................................................................ |
13 |
Configuring iLO.......................................................................................................................... |
14 |
iLO configuration options ......................................................................................................................... |
14 |
iLO RBSU ..................................................................................................................................... |
14 |
Browser-based setup ...................................................................................................................... |
15 |
Integration with RILOE II accessory boards........................................................................................ |
15 |
Network connection overview ................................................................................................................... |
16 |
Connect to the network .................................................................................................................. |
16 |
Configure the IP address ................................................................................................................ |
17 |
Installing iLO device drivers ...................................................................................................................... |
18 |
Microsoft Windows NT, Windows 2000, and Windows Server 2003 Driver Support............................ |
18 |
Novell NetWare Server Driver Support ............................................................................................ |
19 |
Red Hat Linux and SuSE Linux server driver support ........................................................................... |
19 |
Enabling advanced iLO functionality.......................................................................................................... |
20 |
Licensing ...................................................................................................................................... |
21 |
Activating iLO licensed features using a browser ............................................................................... |
22 |
Administration ........................................................................................................................................ |
22 |
User administration........................................................................................................................ |
23 |
Global settings.............................................................................................................................. |
24 |
Network settings............................................................................................................................ |
26 |
SNMP/Insight Manager settings...................................................................................................... |
28 |
Directory Settings .......................................................................................................................... |
30 |
Upgrade iLO firmware ................................................................................................................... |
30 |
Certificate administration................................................................................................................ |
31 |
SSH Key Administration ................................................................................................................. |
32 |
Two-Factor Authentication Settings ................................................................................................... |
33 |
Hot-plug keyboard................................................................................................................................... |
34 |
Keyboard definitions...................................................................................................................... |
34 |
Hot-plug keyboard recommended usage........................................................................................... |
34 |
Hot-plug keyboard troubleshooting .................................................................................................. |
35 |
Terminal Services pass-through option........................................................................................................ |
36 |
Terminal Services Client requirements............................................................................................... |
36 |
Enabling the Terminal Services Pass-Through option ........................................................................... |
38 |
Remote Console and Terminal Services clients ................................................................................... |
39 |
Terminal Services troubleshooting .................................................................................................... |
40 |
iLO Shared Network Port ......................................................................................................................... |
40 |
Contents |
3 |
iLO Shared Network Port requirements............................................................................................. |
40 |
iLO Shared Management Port features and restrictions ....................................................................... |
41 |
Enabling the iLO Shared Network Port feature................................................................................... |
41 |
Re-enabling the dedicated iLO management port............................................................................... |
43 |
Shared Network Port VLAN ...................................................................................................................... |
43 |
Enabling and configuring VLAN using the iLO interface...................................................................... |
44 |
Enabling and configuring VLAN using RBSU ..................................................................................... |
44 |
Enabling and configuring VLAN using XML....................................................................................... |
45 |
ProLiant BL p-Class configuration ............................................................................................................... |
45 |
ProLiant BL p-Class user requirements ............................................................................................... |
45 |
Static IP bay configuration .............................................................................................................. |
45 |
HP BladeSystem setup .................................................................................................................... |
48 |
iLO security ................................................................................................................................ |
53 |
Security features...................................................................................................................................... |
53 |
General security guidelines....................................................................................................................... |
53 |
Password guidelines ...................................................................................................................... |
53 |
Certificates ................................................................................................................................... |
54 |
iLO Security Override Switch administration...................................................................................... |
55 |
Securing RBSU........................................................................................................................................ |
55 |
Encryption .............................................................................................................................................. |
56 |
Remote Console Computer Lock ................................................................................................................ |
56 |
User accounts ......................................................................................................................................... |
57 |
Privileges...................................................................................................................................... |
58 |
Login security ................................................................................................................................ |
58 |
Global security settings .................................................................................................................. |
58 |
Two-factor authentication.......................................................................................................................... |
58 |
Setting up two-factor authentication for the first time ........................................................................... |
58 |
Two-factor authentication login........................................................................................................ |
60 |
Two-factor authentication user certificates ......................................................................................... |
61 |
Using two-factor authentication with directory authentication ............................................................... |
62 |
Directory settings..................................................................................................................................... |
63 |
Configuring Directory Settings......................................................................................................... |
64 |
Directory tests ............................................................................................................................... |
65 |
Using iLO .................................................................................................................................. |
66 |
Logging in to iLO for the first time.............................................................................................................. |
66 |
Progressive delays for failed browser login attempts........................................................................... |
66 |
Help ............................................................................................................................................ |
66 |
System Status.......................................................................................................................................... |
66 |
Status Summary............................................................................................................................. |
67 |
iLO Status..................................................................................................................................... |
67 |
Server Status................................................................................................................................. |
67 |
iLO Event Log................................................................................................................................ |
68 |
Integrated Management Log ........................................................................................................... |
69 |
Server and iLO diagnostics ............................................................................................................. |
69 |
Remote Console ...................................................................................................................................... |
71 |
Remote Console option .................................................................................................................. |
71 |
Remote Console Information option.................................................................................................. |
72 |
Enhanced features of the Remote Console......................................................................................... |
72 |
Optimizing performance for graphical Remote Console...................................................................... |
73 |
Remote Console hot keys................................................................................................................ |
75 |
Singleand dual-cursor modes for graphical Remote Console .............................................................. |
77 |
Acquiring the Remote Console ........................................................................................................ |
78 |
Contents |
4 |
Virtual Serial Port .................................................................................................................................... |
78 |
Windows® EMS Console ............................................................................................................... |
79 |
Virtual Serial Port and Linux ............................................................................................................ |
81 |
Virtual Serial Port and serial BREAK ................................................................................................. |
82 |
Virtual devices ........................................................................................................................................ |
83 |
Virtual power ................................................................................................................................ |
83 |
Power Regulator for ProLiant ........................................................................................................... |
84 |
Virtual media ................................................................................................................................ |
86 |
Virtual indicators ........................................................................................................................... |
95 |
ProLiant BL p-Class Advanced management ................................................................................................ |
95 |
Rack View .................................................................................................................................... |
97 |
iLO control of ProLiant BL p-Class server LEDs .................................................................................. |
102 |
ProLiant BL p-Class alert forwarding ............................................................................................... |
103 |
Directory services...................................................................................................................... |
104 |
Overview of directory integration ............................................................................................................ |
104 |
Benefits of directory integration ............................................................................................................... |
104 |
Advantages and disadvantages of schema-free directories and HP schema directory ..................................... |
105 |
Setup for Schema-free directory integration............................................................................................... |
107 |
Active Directory preparation ......................................................................................................... |
108 |
Schema-free browser-based setup .................................................................................................. |
109 |
Schema-free scripted setup............................................................................................................ |
109 |
Schema-free HPLOMIG-based setup ............................................................................................... |
110 |
Schema-free setup options ............................................................................................................ |
110 |
Schema-free nested groups ........................................................................................................... |
111 |
Setting up HP schema directory integration............................................................................................... |
111 |
Features supported by HP schema directory integration .................................................................... |
111 |
Setting up directory services.......................................................................................................... |
112 |
Schema documentation ................................................................................................................ |
113 |
Directory services support ............................................................................................................. |
113 |
Schema required software ............................................................................................................ |
113 |
Schema installer .......................................................................................................................... |
113 |
Management snap-in installer........................................................................................................ |
116 |
Directory services for Active Directory ............................................................................................ |
116 |
Directory services for eDirectory .................................................................................................... |
125 |
User login using directory services ................................................................................................. |
133 |
Directory-enabled remote management ....................................................................................... |
134 |
Introduction to directory-enabled remote management................................................................................ |
134 |
Creating roles to follow organizational structure........................................................................................ |
134 |
Using existing groups................................................................................................................... |
135 |
Using multiple roles...................................................................................................................... |
135 |
How directory login restrictions are enforced ............................................................................................ |
136 |
Restricting roles ........................................................................................................................... |
136 |
User restrictions........................................................................................................................... |
137 |
Creating multiple restrictions and roles ........................................................................................... |
139 |
Using bulk import tools........................................................................................................................... |
140 |
Certificate services .................................................................................................................... |
141 |
Introduction to certificate services ............................................................................................................ |
141 |
Installing certificate services .................................................................................................................... |
141 |
Verifying directory services..................................................................................................................... |
141 |
Configuring Automatic Certificate Request ................................................................................................ |
142 |
Lights-Out directories migration utilities........................................................................................ |
143 |
|
Contents 5 |
Introduction to Lights-Out migration utilities ............................................................................................... |
143 |
Compatibility ........................................................................................................................................ |
143 |
Pre-migration checklist............................................................................................................................ |
144 |
HP Lights-Out directory package.............................................................................................................. |
144 |
HPQLOMIG operation ........................................................................................................................... |
145 |
Finding management processors.................................................................................................... |
145 |
Upgrading firmware on management processors............................................................................. |
147 |
Selecting a directory access method .............................................................................................. |
148 |
Naming management processors .................................................................................................. |
149 |
Configuring directories when HP Extended schema is selected .......................................................... |
150 |
Configuring directories when schema-free integration is selected ....................................................... |
151 |
Setting up management processors for directories............................................................................ |
152 |
HPQLOMGC operation.......................................................................................................................... |
153 |
Launching HPQLOMGC using application launch............................................................................ |
154 |
HP Systems Insight Manager integration ...................................................................................... |
156 |
Integrating iLO with Systems Insight Manager ........................................................................................... |
156 |
Systems Insight Manager functional overview............................................................................................ |
157 |
Systems Insight Manager identification and association.............................................................................. |
157 |
Systems Insight Manager status ..................................................................................................... |
157 |
Systems Insight Manager links....................................................................................................... |
158 |
Systems Insight Manager systems lists............................................................................................. |
158 |
Receiving SNMP alerts in Systems Insight Manager ................................................................................... |
159 |
Systems Insight Manager port matching ................................................................................................... |
159 |
Reviewing Advanced Pack license information in Systems Insight Manager................................................... |
160 |
Troubleshooting iLO .................................................................................................................. |
161 |
Minimum requirements........................................................................................................................... |
161 |
iLO POST LED indicators ........................................................................................................................ |
161 |
Event log entries.................................................................................................................................... |
163 |
Hardware and software link-related issues ................................................................................................ |
166 |
Hardware................................................................................................................................... |
166 |
Software .................................................................................................................................... |
166 |
Login issues .......................................................................................................................................... |
166 |
Login name and password not accepted......................................................................................... |
167 |
Directory user premature logout..................................................................................................... |
167 |
iLO Management Port not accessible by name ................................................................................ |
167 |
iLO RBSU unavailable after iLO and server reset.............................................................................. |
168 |
Inability to access the login page................................................................................................... |
168 |
Inability to access iLO using Telnet................................................................................................. |
168 |
Inability to access virtual media or graphical remote console ............................................................ |
168 |
Inability to connect to iLO after changing network settings ................................................................ |
168 |
Inability to connect to the iLO Diagnostic Port.................................................................................. |
168 |
Inability to connect to the iLO processor through the NIC.................................................................. |
169 |
Inability to log in to iLO after installing the iLO certificate.................................................................. |
169 |
Firewall issues............................................................................................................................. |
170 |
Two-factor authentication login failure ............................................................................................ |
170 |
Proxy server issues....................................................................................................................... |
171 |
Troubleshooting alert and trap problems .................................................................................................. |
171 |
Inability to receive Insight Manager 7 or Systems Insight Manager alarms (SNMP traps) from iLO |
......... 171 |
iLO Security Override switch......................................................................................................... |
171 |
Authentication code error message ................................................................................................ |
172 |
Troubleshooting directory problems ......................................................................................................... |
172 |
I can not log in using domain/name format but I can using the full distinguished name......................... |
172 |
|
Contents 6 |
ActiveX controls are enabled and I see a prompt but the domain/name login format does not work |
....... 172 |
User contexts do not appear to work.............................................................................................. |
173 |
Troubleshooting mouse problems............................................................................................................. |
173 |
Local USB mouse and Linux .......................................................................................................... |
173 |
Mouse issue using SuSE Linux ....................................................................................................... |
174 |
Remote Console mouse control issue .............................................................................................. |
174 |
Emulating a PS/2 keyboard in a headless server environment ........................................................... |
174 |
Troubleshooting Remote Console problems ............................................................................................... |
174 |
Linux Remote Console .................................................................................................................. |
175 |
Remote Console applet has a red X when running Linux client browser............................................... |
175 |
Inability to navigate the single cursor of the Remote Console to corners of the Remote Console window.. 175 |
|
Remote Console no longer opens on the existing browser session ...................................................... |
175 |
Remote console text window not updating properly.......................................................................... |
176 |
Remote Console turns gray or black ............................................................................................... |
176 |
Troubleshooting SSH and Telnet problems ................................................................................................ |
176 |
Initial PuTTY input slow................................................................................................................. |
176 |
PuTTY client unresponsive with Shared Network Port ........................................................................ |
176 |
SSH text support from a Remote Conosle session ............................................................................. |
177 |
Troubleshooting terminal services problems............................................................................................... |
177 |
Terminal Services button is not working .......................................................................................... |
177 |
Terminal Services proxy stops responding....................................................................................... |
177 |
Troubleshooting video and monitor problems ............................................................................................ |
177 |
General guidelines ...................................................................................................................... |
177 |
Telnet displays incorrectly in DOS® ............................................................................................... |
177 |
Video applications not displaying in the Remote Console.................................................................. |
178 |
Troubleshooting Virtual Media problems .................................................................................................. |
178 |
Virtual drive listing....................................................................................................................... |
178 |
Virtual Media applet has a red X and will not display ...................................................................... |
178 |
Virtual Floppy media applet is unresponsive.................................................................................... |
178 |
Troubleshooting miscellaneous problems .................................................................................................. |
178 |
Cookie sharing between browser instances and iLO ........................................................................ |
178 |
How do I access legacy BL p-Class pages? ..................................................................................... |
180 |
ProLiant Power Regulator option deactivated ................................................................................... |
180 |
Inability to get SNMP information from Systems Insight Manager ....................................................... |
181 |
Incorrect time or date of the entries in the event log.......................................................................... |
181 |
Inability to upgrade iLO firmware .................................................................................................. |
181 |
Enclosure bay static IP changes do not take effect............................................................................ |
183 |
iLO does not respond to SSL requests ............................................................................................. |
184 |
Testing SSL ................................................................................................................................. |
184 |
Resetting iLO............................................................................................................................... |
184 |
Rack view does not display components ......................................................................................... |
185 |
Server name still present after ERASE utility is executed .................................................................... |
185 |
Troubleshooting a remote host....................................................................................................... |
185 |
Directory services schema .......................................................................................................... |
186 |
HP Management Core LDAP OID classes and attributes.............................................................................. |
186 |
Core classes ............................................................................................................................... |
186 |
Core attributes ............................................................................................................................ |
186 |
Core class definitions ................................................................................................................... |
186 |
Core attribute definitions .............................................................................................................. |
187 |
Lights-Out Management specific LDAP OID classes and attributes ................................................................ |
190 |
Lights-Out Management classes ..................................................................................................... |
190 |
Lights-Out Management attributes .................................................................................................. |
190 |
Lights-Out Management class definitions......................................................................................... |
190 |
Contents 7 |
|
Lights-Out Management attribute definitions |
.................................................................................... 191 |
Technical support...................................................................................................................... |
193 |
HP contact information........................................................................................................................... |
193 |
Before you contact HP............................................................................................................................ |
193 |
Acronyms and abbreviations...................................................................................................... |
194 |
Index....................................................................................................................................... |
200 |
Contents 8

Operational overview
In this section |
|
Guide overview ....................................................................................................................................... |
9 |
New in this release of iLO ......................................................................................................................... |
9 |
iLO overview ......................................................................................................................................... |
10 |
iLO browser interface overview................................................................................................................ |
11 |
Guide overview
The HP iLO management processor provides multiple ways to configure, update, operate, and manage servers remotely. The HP Integrated Lights-Out User Guide describes each feature and how to use the feature with the web-based interface and ROM-Based Setup Utility. The HP Integrated Lights-Out Management Processor Scripting and Command Line Resource Guide describes the syntax and tools available to use iLO through a command line or scripted interface.
New in this release of iLO
Version 1.91 added support for:
•Virtual DVD virtual media ("iLO Virtual CD/DVD-ROM" on page 90)
•Kernel debugger ("Using a remote Windows Kernel Debugger" on page 80)
•Remote Console Computer Lock (on page 56)
•Schema-free nested groups (on page 111)
•Improved license options ("Enabling advanced iLO functionality" on page 20)
•Support for Red Hat Enterprise Linux 5 and Microsoft® Vista™ Version 1.80 added support for:
•Schema-free directories ("Setup for Schema-free directory integration" on page 107)
•Two-factor authentication ("Two-Factor Authentication Settings" on page 33)
•Power regulator reporting ("Power Regulator for ProLiant" on page 84)
•SSH key authorization ("SSH Key Administration" on page 32)
•Virtual USB key drive ("iLO Virtual Floppy/USB Key" on page 87)
•Shared network port virtual LAN ("Shared Network Port VLAN" on page 43)
•Remote Console Acquire ("Acquiring the Remote Console" on page 78)
iLO 1.80 no longer supports:
•Netscape browser on Linux clients
•Shipping of Softpaq of binary image (The binary image has been replaced by online flash components.)
Operational overview 9
iLO overview
Three versions of iLO are available:
•iLO Standard enables essential remote control and management capabilities as standard features on next-generation ProLiant ML/DL servers. With iLO Standard, you can perform basic system administration tasks remotely. You can also access system management information at any time. These remote control capabilities reduce the need for onsite support.
•iLO Advanced provides comprehensive Lights-Out remote management capabilities for ProLiant servers. iLO Advanced gives you the freedom to enable full remote control of your ProLiant servers. You can perform the same tasks remotely that you can at the terminal, regardless of server or operating system conditions. iLO Advanced is also suitable for routine administration, giving you a single tool for any situation. Further, iLO Advanced features comprehensive data encryption, enterprise-class user authentication and the ability to isolate iLO traffic on separate networks.
•iLO Select is an optional Lights-Out upgrade for ProLiant BL servers. iLO Select also provides a costeffective upgrade to advanced Lights-Out functionality on ProLiant 300 and 500 Series servers that are managed using iLO Standard, text-based remote consoles, typically found in Linux environments.
For information about the features available in each version of iLO, see "Licensing (on page 21)."
Typical usage
iLO remotely performs most functions that otherwise require a visit to servers in the data center, computer room, or in a remote location. The following are a few examples of how you can use iLO features:
•iLO Remote Console and virtual power enables you to view a stalled remote server with blue-screen conditions and restart the server without onsite assistance.
•iLO Remote Console enables you to change BIOS settings when necessary.
•iLO technology provides a high-performance remote console that enables you to remotely administer operating systems and applications in everyday situations.
•iLO virtual CD/DVD-ROM or floppy drive enables you to install an operating system or flash system firmware over the network from images on your workstations or on centralized web servers.
•iLO scripting enables you to use virtual power and virtual media in other scripting tools to automate deployment and provisioning.
These examples illustrate how iLO is used to manage HP ProLiant servers from your office, home, or travel location. As you begin using iLO and defining your specific infrastructure requirements, refer to this guide for additional ways to simplify your remote server management needs.
The common usage model for iLO is a client PC running a supported browser using DHCP and DNS protocols connected to one or more iLO devices.
Another way to access iLO functionality is through the scripting interface. The scripts are text files written in XML called RIBCL. You can use RIBCL scripts to configure iLO on the network, during initial deployment, or from a previously deployed host. RIBCL also supports operations such as power on control.
Additionally, iLO functionality that can be accessed from the SMASH CLP is a low bandwidth interface that provides functionality similar to the web interface. The CLP is designed for users who prefer a nongraphical interface over a telnet or SSH connection.
iLO supports various interfaces for configuration and operation. This guide details the following interfaces:
Operational overview 10
•iLO RBSU (on page 14)
•A browser-based web interface ("iLO browser interface overview" on page 11)
See the HP Integrated Lights-Out Management Processor Scripting and Command Line Resource Guide for information about using the following interfaces:
•CPQLOCFG is a Microsoft® Windows® utility that sends RIBCL scripts to iLO over the network.
•CPQLODOS is a DOS deployment utility (part of the HP SmartStart Scripting Toolkit) that runs on the host during SmartStart or RDP deployment.
•Perl is a scripting language that can be used from Linux clients to send RIBCL scripts to iLO over the network.
•HPONCFG is a utility that runs on the host and passes RIBCL scripts to the local iLO. There are Windows® and Linux versions of this utility, which require the HP iLO Management Interface Driver.
•The SMASH CLP is accessible through the following access methods: telnet, SSH, virtual serial port, or physical serial port.
Remote Console (on page 71), Virtual Media (on page 86), the Terminal Services Pass-Through option (on page 36), and Directory services (on page 104) are advanced features. See "Licensing (on page 21)" for more information.
HP ProLiant Essentials Rapid Deployment Pack Integration
HP ProLiant Essentials Rapid Deployment Pack integrates with iLO to allow the management of remote servers and the performance of remote console operations regardless of the state of the operating system or hardware.
The Deployment Server provides the ability to use the power management features of iLO to power on, power off, or cycle power on the target server. Each time a server connects to the Deployment Server, the Deployment Server polls the target server to see if a LOM management device is installed. If installed, the server gathers information including the DNS name, IP address, and first user name. Security is maintained by requiring the user to enter the correct password for that user name.
For more information about the ProLiant Essentials Rapid Deployment Pack, refer to the documentation that ships on the ProLiant Essentials Rapid Deployment Pack CD or the HP website (http://www.hp.com/servers/rdp).
iLO browser interface overview
The iLO browser interface groups similar tasks for easy navigation and work flow. These tasks are grouped into high-level tabs across the top of the iLO interface. These tabs are always visible (for easy access) and include System Status, Remote Console, Virtual Media, Power Management, and Administration.
Each high-level iLO tab has a menu on the left side of the interface with various options. This menu changes every time you select a different high-level tab and reflects the options available within each high-level tab. Each menu option displays a page title, which is a description of the information or settings available on that page and might not reflect the name displayed on the menu option.
Assistance for all iLO pages is available through iLO Help. Links on each help page provide summary information about the features of iLO and helpful information to optimize its operation. To access pagespecific help, click ? on the right side of the browser window.
Operational overview 11
Typical user tasks access the System Status, Remote Console, Virtual Media, and Power Management tabs of the iLO interface. These tasks are discussed in the "Using iLO (on page 66)" section of this user guide.
The Administration tab is typically used by an advanced or administrative user who must manage users, configure global and network settings, and configure or enable the more advanced functions of iLO. These tasks are discussed in the sections "Configuring iLO (on page 14)" and "iLO security (on page 53)" of this guide.
Specific subject areas of iLO functionality and integration are discussed in:
•Directory services (on page 104)
•Directory-enabled remote management (on page 134)
•Certificate services (on page 141)
•Lights-Out directories migration utilities (on page 143)
•HP Systems Insight Manager integration (on page 156)
•Troubleshooting iLO
•Directory services schema (on page 186)
Supported server operating system software
iLO is an independent microprocessor running an embedded operating system. The architecture ensures that the majority of iLO functionality is available, regardless of the host operating system.
Graceful host-operating-system shutdown and Systems Insight Manager integration require health drivers and Management Agents or remote console access.
iLO provides two interface drivers:
•iLO Advanced Server Management Controller Driver (health driver)—This driver provides system management support, including monitoring of server components, event logging, and support for the Management Agents.
•iLO Management Interface Driver—This driver enables system software and SNMP Insight Agents to communicate with iLO.
These drivers and agents are available for the following network operating systems:
•Microsoft®
o Windows® 2000 Server
o Windows® 2000 Advanced Server o Windows Server™ 2003
o Windows Server™ 2003, Web Edition
o Windows Server™ 2003, Enterprise Edition (EM64T) o Windows Small Business Server™ 2003
•Red Hat
o Red Hat Enterprise Linux 4 o Red Hat Enterprise Linux 5
•SUSE
o SUSE LINUX Enterprise Server 9 (x86 and AMD64/EM64T)
Operational overview 12
oSUSE LINUX Enterprise Server 10 (x86 and AMD64/EM64T)
•Novell
oNetWare 6.5
Supported browsers and client operating systems
The following browsers and operating systems are supported:
•Microsoft® Internet Explorer 6 with Service Pack 1 or later
o This browser is supported on Microsoft® Windows® products.
o If you are using single-cursor mode in Remote Console or virtual media, Java™ JVM is required. HP supports Java™ 1.4.2. To download the recommended JVM for your system configuration, refer to the HP website (http://www.hp.com/servers/manage/jvm).
•Microsoft® Internet Explorer 7
o This browser is supported on Microsoft® Windows® products.
o If you are using single-cursor mode in Remote Console or virtual media, Java™ JVM is required. HP supports Java™ 1.4.2. To download the recommended JVM for your system configuration, refer to the HP website (http://www.hp.com/servers/manage/jvm).
•Firefox 2.0
o This browser is supported on Red Hat Enterprise Linux 3 Workstation and Novell Linux Desktop 9.
o If you are using Remote Console or virtual media, Java™ 1.4.2 is required. To download the recommended JVM for your system configuration, refer to the HP website (http://www.hp.com/servers/manage/jvm).
•Mozilla 1.7.3
o This browser is supported on Red Hat Enterprise Linux 3 Workstation and Novell Linux Desktop 9.
o If you are using Remote Console or virtual media, Java™ 1.4.2 is required. To download the recommended JVM for your system configuration, refer to the HP website (http://www.hp.com/servers/manage/jvm).
Certain browsers and operating system combinations might not work correctly, depending on their implementations of the required browser technologies.
Linux browser configuration
The font configuration of the desktop and browser can affect the placement of tab menus within the iLO user interface. A fixed font of 12 points is required for proper placement.
To change the font size in Mozilla, open the Preferences menu and set minimum font size to 12 on the Appearance, Fonts screen.
Operational overview 13

Configuring iLO
In this section |
|
iLO configuration options ........................................................................................................................ |
14 |
Network connection overview.................................................................................................................. |
16 |
Installing iLO device drivers..................................................................................................................... |
18 |
Enabling advanced iLO functionality......................................................................................................... |
20 |
Administration ....................................................................................................................................... |
22 |
Hot-plug keyboard.................................................................................................................................. |
34 |
Terminal Services pass-through option....................................................................................................... |
36 |
iLO Shared Network Port ........................................................................................................................ |
40 |
Shared Network Port VLAN ..................................................................................................................... |
43 |
ProLiant BL p-Class configuration .............................................................................................................. |
45 |
iLO configuration options
iLO comes preconfigured with default factory settings, including a default user account and password. If iLO is connected to a network running DNS or DHCP, you can use it immediately without changing any settings. For greater security and reliability, you can connect iLO to a separate dedicated management network.
Some advanced features require the operating system ("Supported server operating system software" on page 12) drivers be installed.
iLO offers several configuration options:
•iLO RBSU (on page 14)
•Browser-based setup (on page 15)
•Remote scripted setup using CPQLOCFG
•Local scripted deployment using CPQLODOS
•Local on-line scripted setup using HPONCFG
iLO RBSU
HP recommends iLO RBSU to initially set up iLO and configure iLO network parameters for environments that do not use DHCP and DNS or WINS. RBSU provides the basic tools to configure iLO network settings and user accounts to get iLO on the network.
iLO RBSU is designed to assist you with setting up iLO on a network. iLO RBSU is not intended for continued administration. RBSU is available every time the server is booted and can be run remotely using the iLO Remote Console. You can use RBSU to configure network parameters, directory settings, global settings, and user accounts.
iLO RBSU can be disabled in the Global Settings preferences. Disabling iLO RBSU prevents reconfiguration from the host unless the iLO Security Override Switch is set.
Configuring iLO 14
To run iLO RBSU:
1.Restart or power up the server.
2.Press the F8 key when prompted during POST. The iLO RBSU runs.
3.If prompted, enter a valid iLO user ID and password with the appropriate iLO privileges (Administer User Accounts>Configure iLO Settings). Default account information is located on the iLO Default Network Settings tag attached to the server containing the iLO management processor. If iLO has not been configured to present a login challenge to the RBSU, no prompt will appear.
4.Make and save any necessary changes to the iLO configuration.
5.Exit iLO RBSU.
HP recommends using DNS or DHCP with iLO to simplify installation. If DNS/DHCP cannot be used, use the following procedure to disable DNS and DHCP and configure the IP address and the subnet mask:
1.Restart or power up the server.
2.Press the F8 key when prompted during POST. The iLO RBSU runs.
3.Enter a valid iLO user ID and password with the appropriate iLO privileges (Administer User Accounts>Configure iLO Settings). Default account information is located on the iLO Default Network Settings tag.
4.Select Network>DNS/DHCP, press the Enter key, and then select DHCP Enable. Press the spacebar to turn off DHCP. Be sure that DHCP Enable is set to Off, and save the changes.
5.Select Network>NIC>TCP/IP, press the Enter key, and enter the appropriate information in the IP Address, Subnet Mask, and Gateway IP Address fields.
6.Save the changes.
7.Exit iLO RBSU. The changes take effect when you exit iLO RBSU.
Browser-based setup
Use the browser-based setup method if you can connect to iLO on the network using a browser. You can also use this method to reconfigure a previously configured iLO.
1.Access iLO from a remote network client using a supported Web browser, and provide the default DNS name, user name, and password. Default DNS name and account information is located on the iLO Network Settings tag attached to the server containing the iLO management processor.
When you successfully log onto iLO, you can change the default values of the network, user, and SNMP alerting settings through the Web browser interface.
2.Enter the activation key to enable iLO Advanced features.
If the iLO Advanced features are licensed, you can deploy your operating system using the Virtual Floppy Drive and install operating system drivers and Insight Manager agents on the remote host server using the graphical Remote Console.
For ProLiant BL p-Class servers, iLO Advanced functionality is already enabled and cannot be disabled.
Integration with RILOE II accessory boards
RILOE II is supported as an option in servers with iLO. Previous generations of the Remote Insight boards, such as the Remote Insight board/PCI and the original RILOE, are not supported in servers with iLO.
Configuring iLO 15
iLO firmware detects the presence of RILOE II and automatically disables iLO functionality. Additionally, if iLO firmware detects the presence of the original RILOE, and iLO displays an invalid configuration message.
To re-enable iLO functionality after a RILOE II is removed, use the Security Override Switch and iLO RBSU (on page 14). Select Settings>Enabled for the Enable Lights-Out functionality setting.
Network connection overview
There are three general network connection scenarios. iLO can be connected on:
•A corporate network with both ports connected to the corporate network. In this configuration, the server has two network ports (one server NIC, and one iLO NIC) connected to a corporate network. This connection enables access to iLO from anywhere on the network. On a corporate network, however, network traffic can hinder iLO performance.
A corporate network configuration reduces the amount of networking hardware and infrastructure required to support iLO because iLO uses existing DNS and DHCP servers and routers.
•A dedicated management network with the iLO port on a separate network. A separate network improves performance and security, and provides redundant access to the server when a hardware failure occurs on the corporate network. In this configuration, iLO cannot be accessed directly from the corporate network.
A separate network increases the security of the management network because you can physically control which workstations are connected to the network.
•An iLO Shared Network Port using the server's NIC instead of the dedicated iLO management NIC for server management. This configuration simplifies the network and reduces total network cost. Fewer cables, hubs, and switches are needed because both regular and iLO network traffic comes through the system NIC.
The main disadvantage of using the iLO Shared Network Port for iLO server management is the lack of speed compared to the dedicated iLO management NIC. As a result, not all iLO management features are available through the iLO Shared Network Port configuration.
Connect to the network
Typically iLO is connected to the network in one of two ways. iLO can be connected through a:
Configuring iLO 16
, PROLIANT ESSENTIALS ILO Manual")
•Corporate network where both ports are connected to the corporate network. In this configuration, the server has two network ports (one server NIC, and one iLO NIC) connected to a corporate network.
•Dedicated management network where the iLO port is on a separate network.
Configure the IP address
This step is necessary only if you are using a static IP address. When using dynamic IP addressing, your DHCP server will automatically assign an IP address for iLO. HP recommends using DNS or DHCP with iLO to simplify installation
To configure a static IP address, use the iLO RBSU with the following procedure to disable DNS and DHCP and configure the IP address and the subnet mask:
1.Restart or power up the server.
2.Press the F8 key when prompted during POST. The iLO RBSU runs.
3.Select Network>DNS/DHCP, press the Enter key, and then select DHCP Enable. Press the spacebar to turn off DHCP. Be sure that DHCP Enable is set to Off, and save the changes.
Configuring iLO 17

4.Select Network>NIC>TCP/IP, press the Enter key, and enter the appropriate information in the IP Address, Subnet Mask, and Gateway IP Address fields.
5.Save the changes.
6.Exit iLO RBSU. The changes take effect when you exit iLO RBSU.
Installing iLO device drivers
The SmartStart Firmware Maintenance CD contains all of the necessary support for your server, or you can download all the necessary iLO support drivers from the HP website (http://www.hp.com/servers/lights-out).
To download the drivers:
1.Click the iLO graphic.
2.Select Software and Drivers.
The iLO Management Interface Driver allows system software like SNMP Insight Agents and the Terminal Services Pass-Through service to communicate with iLO.
Microsoft Windows NT, Windows 2000, and Windows Server 2003 Driver Support
The device drivers that support the iLO are part of the PSP that is located on the HP website (http://www.hp.com/support) or on the SmartStart CD. Before you install the Windows® drivers, obtain the Windows® documentation and the latest Windows® Service Pack.
iLO pre-requisite files for Microsoft®
The CPQCIDRV.SYS file provides the iLO Management Interface Driver support.
The CPQASM2.SYS, SYSMGMT.SYS, SYSDOWN.SYS files provide the iLO Advanced Server Management Controller Driver support.
Installing or updating the iLO drivers for Microsoft®
The PSP for Microsoft® Windows® products includes an installer that analyzes system requirements and installs all drivers.
The PSP is available on the HP website (http://www.hp.com/support) or on the SmartStart CD.
NOTE: If you are updating the iLO drivers, be sure that the iLO is running the latest version of the iLO firmware. The latest version can be obtained as a Smart Component from the HP website (http://www.hp.com/servers/lights-out).
To install the drivers in the PSP, download the PSP from the HP website (http://www.hp.com/support), run the SETUP.EXE file included in the download, and follow the installation instructions. For additional information about the PSP installation, read the text file included in the PSP download.
Configuring iLO 18
Novell NetWare Server Driver Support
The device drivers required to support iLO are part of the PSP that is located on the SmartStart CD and the HP website (http://www.hp.com/support).
iLO pre-requisite files for NetWare
The CPQHLTH.NLM file provides the Health Driver for NetWare.
The CPQCI.NLM file provides the iLO Management Interface Driver support.
Installing or updating iLO drivers for NetWare
The PSP for Novell NetWare includes an installer that analyzes system requirements and installs all drivers. The PSP is available on the HP website (http://www.hp.com/support) and on the SmartStart CD.
When updating iLO drivers, be sure iLO is running the latest version of the iLO firmware. The latest version can be obtained as a Smart Component from the HP website (http://www.hp.com/servers/lightsout).
To install the drivers, download the PSP from the HP website (http://www.hp.com/support) to a NetWare server. After the PSP has been downloaded, follow the NetWare component installation instructions to complete the installation. For additional information about the PSP installation, read the text file included in the PSP download.
When using NetWare 6.X, a RAGE-XL video driver is provided by the operating system and should be used for best results.
Red Hat Linux and SuSE Linux server driver support
The device drivers required to support iLO for Red Hat Linux and SuSE Linux are located on the SmartStart CD, Management CD, or on the HP website (http://www.hp.com/support).
iLO pre-requisite files for Red Hat and SuSE Linux files
You can download the PSP files containing the iLO driver, the foundation agents, and health agents from the HP website (http://www.hp.com/support). The instructions on how to install or update the iLO driver are available on the website. The HP Management Agents for Linux are:
•ASM package (hpasm) which combines the health driver, IML viewer, foundation agents, health agent, and standard equipment agent into one package.
•RSM package (hprsm) which combines the RIB driver, rack daemon, RIB agent, and rack agent into one package.
Configuring Linux font size
To change the font size:
1.Open the KDE Control Center panel and set the fonts.
2.Start Mozilla Firefox, and configure the fonts using the Fonts—Control Center. Set the minimum font size to 12.
Configuring iLO 19
Installing or updating iLO Linux and SUSE drivers
If necessary, uninstall earlier agents. To uninstall earlier agents, execute the following:
•rpm -e cmanic
•rpm -e hprssm
•rpm -e hpasm
To load the health and iLO driver packages use the following commands :
rpm –ivh hpasm-d.vv.v-pp.Linux_version.i386.rpm
rpm –ivh hprsm-d.vv.v-pp.Linux_version.i386.rpm
where: d is the Linux distribution and version and vv.v-pp are version numbers.
For additional information, refer to the Software and Drivers website (http://www.hp.com/support). To remove the health and iLO drivers, use the following commands:
rpm –e hprsm
rpm –e hpasm
For additional information, refer to the Software and Drivers website (http://www.hp.com/support).
Enabling advanced iLO functionality
The Licensing page enables you to view the current license status and enter a key to activate iLO license features. The iLO version number and current license information appear in this section. If a license is installed, the license number appears. Evaluation licenses are also shown. To install a license, see "Activating iLO licensed features using a browser (on page 22)" to install a license.
You must use a license key to activate certain iLO features. Optional licenses activate features that are not bundled with an unlicensed system.
iLO Select license enables access to the following iLO features in addition to iLO standard features:
•Directory-enabled authentication and authorization ("Directory-enabled remote management" on page 134)
•Power regulator for ProLiant (on page 84)
•Scripted virtual media (on page 86)
•Applet virtual media (on page 86) (including Virtual Floppy and Virtual CD)
•Two-factor authentication ("Two-Factor Authentication Settings" on page 33)
In addition to iLO Standard and Select features, the iLO Advanced Pack enables access to the following features in addition to iLO Standard and Select features:
•Graphical remote console (on page 71)
•Terminal Services pass-through option (on page 36)
Advanced features are enabled by licensing the optional iLO Advanced Pack. The iLO Advanced Pack contains an activation key that you must enter to enable advanced features. Advanced features can be evaluated using an evaluation key.
Configuring iLO 20
A free 60-day evaluation license is available for download on the HP website (http://h10018.www1.hp.com/wwsolutions/ilo/iloeval.html). The evaluation license activates and accesses iLO Advanced features. You can only install one evaluation license per iLO. After the evaluation period, an iLO Advanced license is required to continue using the advanced features. iLO Advanced features automatically deactivate when the evaluation license key expires.
Licensing
License keys activate optional iLO features not bundled with an unlicensed system. For additional information, see the HP website (http://h18004.www1.hp.com/products/servers/proliantessentials/valuepack/licensing.html).
An asterisk (*) indicates that a feature is not supported on all systems.
•iLO Standard (unlicensed):
o Virtual power and reset control
o Remote serial console through POST only o Event logs
o UID light*
o DMTF SMASH CLP o RIBCL/XML scripting o Browser access
o SSH access
o Shared network port* o Serial access*
•iLO Select:
o Directory integration o Power Regulator
o Scripted virtual media
o Remote Windows® Kernel debugging capability o Applet-based virtual media
o Two-factor authentication
•iLO Advanced:
o Directory integration
o Power Regulator monitoring o Scripted virtual media
o Kernel debugging
o Applet-based virtual media o Two-factor authentication
o Terminal Services integration o Remote Console
In addition to standard iLO single-server licenses, two other licensing options are available:
Configuring iLO 21

•The Flexible Quantity License Kit allows customers to purchase a single software package, one copy of the documentation, and a single license key to activate the exact number of licenses requested.
•The Activation Key Agreement is available for customers planning a volume purchase of ProLiant Essentials and Insight Control software, typically in conjunction with new ProLiant servers that is acquired on a regular basis.
Activating iLO licensed features using a browser
1.Log in to iLO through a supported browser.
2.Select the Administration tab.
3.Click Licensing to display the iLO Licensing activation screen.
4.Enter the activation key in the space provided.
5.Click Install. The EULA confirmation appears. The EULA details are available on the HP website (http://www.hp.com/servers/lights-out) and with the Advanced Pack License kit.
6.Click OK.
The advanced features of iLO are now enabled.
Administration
The options available in the Administration tab enable you to manage user settings, SNMP alerting through integration with Systems Insight Manager, security settings, licensing, certificate administration, directory settings, and network environment settings. This section also provides a firmware upgrade option that enables you to keep iLO current.
Configuring iLO 22

User administration
User Administration enables you to manage the user accounts stored locally in the secure iLO memory. Directory user accounts are managed using MMC or ConsoleOne snap-ins. Using the User Administration screen, you can add a new user, view or modify an existing user's settings, or delete a user.
iLO supports up to 12 users with customizable access rights, login names and advanced password encryption. Individual user's abilities are controlled by privileges. Each user can have privileges customtailored to their access requirements.
To support more than 12 users, iLO Advanced enables integration with virtually unlimited directory-based user accounts.
Adding a new user
IMPORTANT: Only users with the Administer User Accounts privilege can manage other users on iLO.
You can assign a different access privilege to each user. Each user can have a unique set of privileges, designed for the tasks that the user must perform. Access to critical functions, such as Remote Console, Managing Users, Virtual Power button, and other features can be denied.
To add a new user to iLO:
1.Log on to iLO using an account that has the Administer User Accounts privilege. Click
Administration.
2.Click User Administration. A screen similar to the one shown appears.
3.Click Add.
4.Complete the fields with the necessary information for the user being added.
5.When the user profile is complete, click Save User Information to return to the User Administration screen. To clear the user profile form while entering a new user, click Restore User Information.
Configuring iLO 23

Viewing or modifying an existing user's settings
IMPORTANT: Only users with the Administer User Accounts privilege can manage other users on iLO. All users can change their own password using the View/Modify User feature.
1.Log on to iLO using an account that has the Administer User Accounts privilege. Click
Administration.
2.Click User Administration, and select from the list the name of the user whose information you want to change.
3.Click View/Modify.
4.Change the user information in the fields that require modification. After changing the fields, click Save User Information to return to the User Administration screen. To recover the user's original information, click Restore User Information. All changes made to the profile will be discarded.
To modify user certificate information, refer to the "Two-factor authentication user certificates (on page 61)" section.
Deleting a user
IMPORTANT: Only users with the Administer User Accounts privilege can manage other users on iLO.
To delete an existing user's information:
1.Log on to iLO using an account that has the Administer User Accounts privilege. Click
Administration.
2.Click User Administration and select from the list the name of the user whose information you want to change.
3.Click Delete User. A pop-up window is displayed asking, Are you sure you want to delete the selected user? Click OK.
Global settings
The Global Settings option enables you to view and modify iLO security settings. With the Global Settings option you can configure the Remote Console time-out and iLO ports to be used for the iLO Web Server, Remote Console, and Virtual Media. These settings are applied globally, regardless of individual user settings.
Configuring iLO 24

You must have the Configure iLO Settings privilege to change these settings. Users that do not have the Configure iLO Settings privilege can only view assigned settings. To manage this privilege, use the Configure Local Device Settings in the directory administration snap-ins for directory users.
The Global Settings option enables you to define the following functions:
•Idle Connection Timeout (minutes)
•Enable Lights-Out Functionality
•Passthrough Configuration
•Enable iLO ROM-Based Setup Utility
•Require Login for iLO RBSU
•Show iLO during POST
•Remote Console Port Configuration
•Remote Console Data Encryption
•Enable Remote Console Acquire
•SSL Encryption Strength
•Current Cipher
•Web Server Non-SSL Port
•Web Server SSL Port
•Virtual Media Port
•Remote Console Port
•Terminal Services Port
•Secure Shell (SSH) Port
Configuring iLO 25
•Secure Shell (SSH) Status
•Serial Command Line Interface Status
•Serial Command Line Interface Speed (bits/second)
•Minimum Password Length
•Remote Keyboard Model
To change iLO global settings:
1.Log in to iLO using an account that has the Configure iLO Settings privilege. Click Administration.
2.Click Global Settings.
3.Change global settings by entering your selections.
4.After completing any parameter changes, click Apply to save the changes.
For more information, see the HP Integrated Lights-Out Management Processor Scripting and Command Line Resource Guide.
Network settings
The Network Settings option enables you to view and modify the NIC IP address, subnet mask, and other TCP/IP-related settings. From the Network Settings screen, you can enable or disable DHCP and, for servers not using DHCP, you can configure a static IP address.
You must have the Configure iLO Settings privilege to change these settings. Users that do not have the Configure iLO Settings privilege can only view the assigned settings.
To change network settings for iLO:
1.Log in to iLO using an account that has the Configure iLO Settings privilege. Click Administration.
2.Click Network Settings.
3.Change the network settings as needed.
Configuring iLO 26
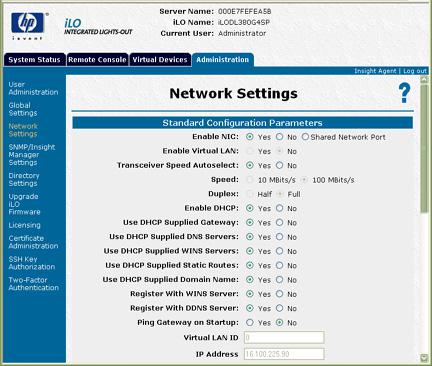
4.After completing any parameter changes, click Apply to complete the changes.
When you click Apply, iLO restarts, and your browser connection to iLO terminates. To re-establish a connection, wait 60 seconds before launching another web browser session and logging in.
For more information, see the HP Integrated Lights-Out Scripting and Command Line Resource Guide.
iLO diagnostic port configuration parameters
The iLO Diagnostic Port on the front of ProLiant BL p-Class servers enables you to access and troubleshoot server issues by using a diagnostic cable. The iLO Diagnostic Port uses a static IP address. It does not use DHCP to obtain an IP address, register with WINS or dynamic DNS, or use a gateway. The diagnostic port cable should not be left plugged in without an active network connection, as it will cause degraded network performance on the standard iLO network port.
In Network Settings, you can configure specific diagnostic port information. For more information on using the diagnostic port and the diagnostic cable, refer to the Setup and Installation Guide for the blade server.
The following are the fields that can be configured for the diagnostic port:
•Enable NIC
If Enable NIC is set to Yes, the diagnostic port is enabled.
•Transceiver Speed Autoselect
•Speed
•Duplex
•IP Address
Use this parameter to assign a static IP address to iLO on your network. By default, the IP address is assigned by DHCP. By default, the IP address is 192.168.1.1 for all iLO Diagnostic Ports.
Configuring iLO 27

•Subnet Mask
o Use the subnet mask parameter to assign the subnet mask for the iLO Diagnostic Port. By default, the subnet mask is 255.255.255.0 for all iLO Diagnostic Ports.
o The use of the diagnostic port is automatically sensed when an active network cable is plugged in to it. When switching between the diagnostic and back ports, you must allow 90 seconds for the network switchover to complete before attempting connection through the Web browser.
NOTE: The diagnostic port will not switch over if an active Remote Console session or a firmware update is in progress.
Recovering from a failed iLO firmware update
In the event that an iLO firmware update has failed, there are various recovery options. For all of these options, you need a current firmware image. HP does not recommended downgrading iLO firmware, and the version you have could be corrupt.
1.Download the latest iLO firmware. iLO downloads are available on the HP website (http://h18004.www1.hp.com/support/files/lights-out/us/index.html).
2.Determine if the update failed.
a.Can you ping iLO?
b.Can you log in?
c.Does the iLO Option ROM prompt appear during host POST?
d.Are the iLO status LEDs strobing in a regular pattern? Examine the iLO status LEDs inside the server to see if they are strobing in a regular pattern from LED 8, 7, 6, 5, 4, 3, 2, 1. If the iLO LED pattern is visible, proceed to step 4.
3.Attempt to re-flash over the network.
You might be able to initiate a firmware update using RIBCL or a browser.
If network flash failed, try the on-line flash component. Components are available for both Windowst® and Linux.
4.If the on-line flash component failed, try the ROMPAQ diskette.
a.Build the ROMPAQ diskettes and boot the host using disk 1.
b.You might need to set the iLO Security Override Switch for ROMPAQ to succeed. Restore the Security Override Switch after the flash process is complete.
SNMP/Insight Manager settings
The SNMP/Insight Manager Settings option enables you to configure SNMP alerts, generate a test alert, and configure integration with Systems Insight Manager.
Enabling SNMP alerts
iLO supports up to three IP addresses to receive SNMP alerts. Typically, the addresses used are the same as the IP address of the Systems Insight Manager server console.
You must have the Configure iLO Settings privilege to change these alert settings. Users that do not have the Configure iLO Settings privilege can only view the assigned settings.
The following alert options are available in the SNMP/Insight Manager Settings screen:
Configuring iLO 28

•Enable iLO SNMP Alerts
•Forward Insight Manager Agent SNMP Alerts
•Enable SNMP Pass-thru
•Enable p-Class Alert Fowarding (displayed on p-Class servers only)
For more information, see the HP Integrated Lights-Out Management Processor Scripting and Command Line Resource Guide.
To configure alerts:
1.Log in to iLO using an account that has the Configure iLO Settings privilege.
2.Select SNMP/Insight Manager Settings in the Administration tab.
3.Enter up to three IP addresses to receive SNMP alerts.
4.Select the alert options you want iLO to support.
5.Click Apply Settings.
Generating test alerts
Test alerts are generated by means of the SNMP/Insight Manager Settings in the Administration section of the iLO navigation frame. These alerts include an Insight Manager SNMP trap and are used to verify the network connectivity of iLO in Systems Insight Manager. Only users with the Configure iLO Settings privilege can send test alerts.
Click Apply Settings to save any changes made to SNMP Alert Destinations before sending a test alert. To send a test alert:
1.Select SNMP/Insight Manager Settings in the Administration tab.
2.Click Send Test Alert to generate a test alert and send it to the TCP/IP addresses saved in the SNMP Alert Destinations fields.
Configuring iLO 29

3.After generating the alert, a confirmation screen is displayed.
4.Check the Systems Insight Manager console for receipt of the trap.
Configure Insight Manager integration
iLO enables you to configure the URL (DNS name or IP address) of the Insight Manager Web Agents running on the host server. You can also configure the level of data returned with Systems Insight Manager identification information.
NOTE: The expected entry in the Insight Manager Web Agent URL field is the IP address or the DNS name only. The protocol (for example, "http://") and a port ID (for example, ":2301") should not be entered.
The link to the Insight Web Agents is found on the blue header bar, next to the Log out link.
Directory Settings
The Directory Settings screen enables you to configure and test your directory services. For additional information on directories, refer to "Directory services (on page 104)." For additional information on directory configuration parameters, refer to "Configuring Directory Settings (on page 64)."
Upgrade iLO firmware
Firmware upgrades enhance the functionality of iLO. The firmware upgrade can be done from any network client using a supported Web browser. Only users with the Update iLO Firmware privilege can upgrade the iLO firmware. The most recent firmware for iLO is available on the HP website.
To upgrade the iLO firmware using a supported Web browser:
1.Log on to iLO using an account that has the Configure iLO Settings privilege.
2.Click Upgrade iLO Firmware in the Administration tab.
3.Enter the file name in the New firmware image field or browse for the file.
Configuring iLO 30
Loading...