


HP BUSINESS INKJET 2200SE, BUSINESS INKJET 2250, BUSINESS INKJET 2250TN, BUSINESS INKJET 2200XI Manual
Acknowledgments
HP ColorSmart III, PhotoREt III, and HP ZoomSmart Scaling Technology are trademarks of Hewlett-Packard Company.
Microsoft®, MS Windows®, Windows®, and Windows NT® are U.S. registered trademarks of Microsoft Corporation.
Macintosh® and Apple® are registered trademarks of Apple Computer, Inc.
UNIX® is a registered trademark of the Open Group.
Novell® and NetWare® are registered trademarks of Novell Corporation.
Pentium® is a registered trademark of Intel Corporation.
Notice
The information contained in this document is subject to change without notice.
Hewlett-Packard makes no warranty of any kind with regard to this material, including, but not limited to, the implied warranties of merchantability and fitness for a particular purpose.
Hewlett-Packard shall not be liable for errors contained herein or for incidental or consequential damages in connection with the furnishing, performance, or use of this material.
No part of this document may be photocopied, reproduced, or translated to another language without the prior written consent of
Hewlett-Packard Company.
6/2000

contents
|
contents |
|
|
|
|
contents |
i |
|
welcome |
1-1 |
|
Using this Guide |
1-1 |
|
getting started |
2-1 |
|
Understanding the Printer’s Parts and Functions |
2-1 |
|
Understanding the Control Panel Buttons and LED |
2-2 |
|
Understanding the LCD Display |
2-3 |
|
Setting Up |
2-3 |
|
Setting the LCD Language Preference |
2-3 |
|
software installation |
3-1 |
|
Installing the Printer Software for Local Printing |
3-1 |
|
Installing under Windows 95, Windows 98, |
|
|
Windows NT 4.0, and Windows 2000 |
3-1 |
|
Installing under Windows 3.1 |
3-2 |
|
Installing the Printer Software for Network Printing |
3-2 |
|
Setting Up Your Printer on a Macintosh Computer |
3-3 |
|
network printing |
4-1 |
|
Network Basics |
4-1 |
|
Network Printing Configurations |
4-1 |
|
Client-Server Configuration |
4-1 |
|
Peer-to-Peer Configuration |
4-2 |
|
Installing the Printer on a Network with an |
|
|
HP JetDirect Print Server (Recommended) |
4-2 |
|
Sharing the Printer on a Network |
4-3 |
|
Network Support Materials |
4-5 |
|
LCD messages |
5-1 |
|
Information Menu |
5-1 |
|
Paper Handling Menu |
5-2 |
|
Maintenance Menu |
5-2 |
|
Printing Menu |
5-2 |
|
Configuration Menu |
5-3 |
|
Reset Menu |
5-3 |
|
Postscript Menu |
5-3 |
|
EIO Menu |
5-3 |
|
Resetting the EIO Card |
5-5 |
|
Understanding Printer Messages |
5-5 |
|
troubleshooting |
6-1 |
|
General Troubleshooting Tips |
6-1 |
|
HP Business Inkjet 2200/2250 Quick Checkup |
6-1 |
|
Paper is Jammed in the Printer |
6-2 |
|
i

Printing a Configuration Page |
6-4 |
Printing a Diagnostic Test Page |
6-4 |
Customer Support |
6-5 |
Internet |
6-5 |
HP Telephone Support |
6-5 |
specifications |
7-1 |
Printer Specifications |
7-1 |
Ordering Information |
7-4 |
HP Supplies and Accessories |
7-4 |
HP Premium Transparency Film |
7-4 |
HP Premium Inkjet Paper |
7-4 |
HP Premium Inkjet Heavyweight Paper |
7-4 |
HP Premium Photo Paper |
7-4 |
HP Photo Paper |
7-4 |
HP Professional Brochure and Flyer Paper |
7-5 |
Ink Cartridges |
7-5 |
HP No. 11 Printheads |
7-5 |
Accessories |
7-5 |
Networking Accessories |
7-5 |
Minimum Printing Margins |
7-6 |
Regulatory Notice |
7-6 |
Power Cord Statement |
7-6 |
LEDs Classification |
7-6 |
Energy Consumption |
7-6 |
Safety Information |
7-7 |
Hewlett-Packard Limited Warranty Statement |
7-7 |
Extent of Limited Warranty |
7-7 |
Limitations of Warranty |
7-8 |
Limitations of Liability |
7-8 |
Local Law |
7-9 |
appendix |
8-1 |
Supported Media |
8-1 |
index |
I |
ii

welcome
welcome
The HP Business Inkjet 2200/2250 provides for quick, professional printing when connected directly to your PC or in a network environment. Its high quality output and vibrant colors on paper up to 8.5" x 14" (216 x 356 mm) will help bring creativity and professionalism to any document you print.
Using this Guide
Use the Reference Guide to quickly locate basic information about your printer. This guide includes the following sections:
•Getting Started—Shows how to set up your printer.
•Software Installation—Explains how to install your printer software on different operating system.
•Network Printing—Contains an introduction to network printing and lists currently available web links to online setup and configuration information you can use with various network environments.
•Troubleshooting—Helps you solve printer problems and explains how to access customer care.
•Specifications—Lists information about cartridge part numbers, supported media, tray capacity, and system requirements.
For a complete overview of your printer, see the User's Guide. An electronic copy of the User's Guide is available on the Starter CD.
1-1

getting started
getting started
Understanding the Printer’s Parts and Functions
Note: All purple-colored parts of the printer are movable.
1.Paper guides–Guides the paper into the printer.
2.Tray 1–Holds the standard paper.
3.Output tray–Collects the printed pages.
4.Envelope guide–Slides to fit the width of an envelope.
5.Tray 2–Optional paper tray (standard with the HP Business Inkjet 2250TN).
6.Envelope feed–Holds a single envelope to feed into the printer.
7.Top cover–Allows you to view the interior of the printer.
8.Carriage latch–Locks the printhead cover.
9.Printhead cover–Lifts for removing each printhead from its color-coded socket. Includes a hook that must be engaged with the carriage latch for the printer to operate.
10.Ink cartridge door–Gives access to the ink cartridges.
11.Printhead access cover–Gives access to the printheads. The access cover must be closed to print.
2-1

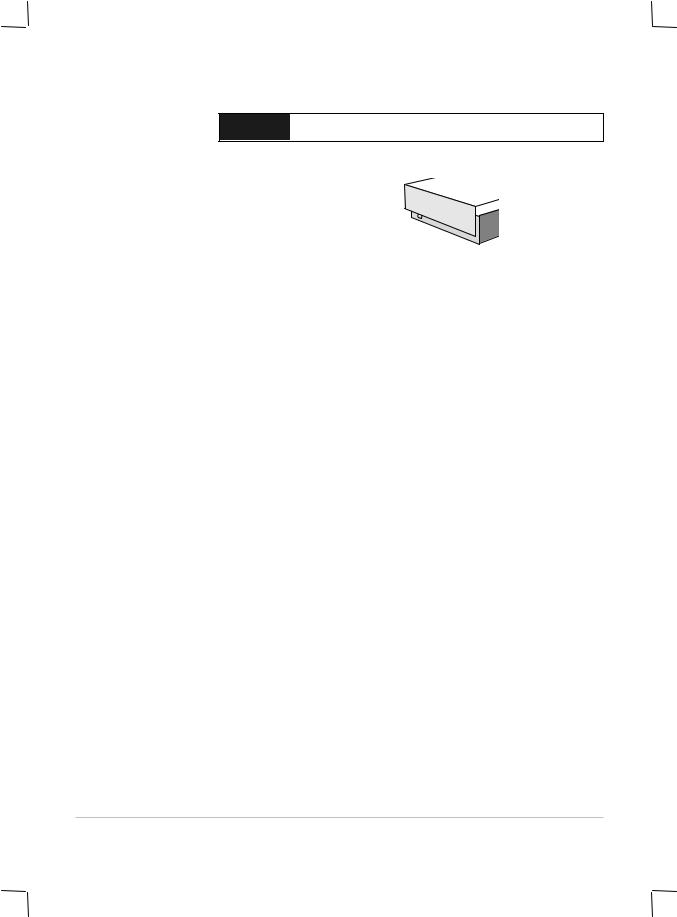
1.Power input–Attach power cord here.
2.EIO Slot–Install an HP JetDirect EIO printer server or the HP PS/PCL5 Kit upgrade card.
3.EIO Slot–Install an HP JetDirect EIO printer server or the HP PS/PCL5 Kit upgrade card.
4.Parallel port–Attach parallel cable here.
Note: Do not install two HP JetDirect EIO print server cards. Cards can be installed in either slot. You can install two cards at the same time, but one must be an
HP PS/PCL5 Kit upgrade card and the other an HP JetDirect EIO print server card.
Understanding the Control Panel Buttons and LED
8
1.Menu–Cycles through the Control Panel menus.
2.Item–Cycles through the selected menu’s items.
3.Value–Cycles through the selected menu item’s values.
4.LCD Panel–Displays printer messages.
5.Resume–Continues a print job that is waiting and selects values from item menus.
6.Cancel–Cancels the current print job. The time it takes to cancel depends on the size of the print job. Press this button once only to cancel a queued print job.
7.Power–Turns the printer OFF and ON.
8.LED–Lights up when the printer is online (green). Blinks when the printer is printing (green) and when the printer is in an error state (amber).
2-2

Understanding the LCD Display
The LCD display shows status messages and the remaining ink levels in the ink cartridges.
Messages appear here
|
|
|
|
|
|
|
|
|
|
|
|
|
|
|
|
|
|
|
|
|
|
|
|
|
|
|
|
|
|
|
|
|
|
|
|
|
|
|
|
|
|
|
|
|
|
|
|
|
|
|
|
|
|
|
|
|
|
|
|
|
Black |
Cyan |
|
Magenta Yellow |
|||||||||||||||
Setting Up
1.Unpack the printer and remove the packing tape and shipping material from inside the printer and trays.
2.Install Tray 2 (optional).
3.Connect the power cord.
4.Turn on the printer and install the ink cartridges.
5.Install the printheads.
6.Load the paper.
7.Set LCD language preference.
8.Connect the parallel cable or network cable.
9.Install the printer software.
Setting the LCD Language Preference
1.Ensure that the printer is turned OFF.
2.Press and hold the Value button and turn ON the printer.
3.Press the Value button to scroll through the language list.
4.Press the Resume button to confirm the language selection.
2-3
software
software installation
Installing the Printer Software for Local Printing
During installation you can choose Typical or Custom installation. Custom installation lets you choose the components you want to install. The following table shows which components are installed for each installation type.
Component |
Description |
2200 |
2250 |
||
|
|
|
|
|
|
HP Business Inkjet |
Installs the |
HPA |
|
Custom |
|
2200/2250 Printer |
printer driver |
|
|
|
|
PCL5 |
|
|
|||
Driver |
for your printer. |
||||
|
|
|
|||
PS |
|
|
|||
|
|
||||
|
|
|
|
|
|
HP Business Inkjet |
Installs the Toolbox. The |
|
|
||
2200/2250 |
Toolbox provides additional |
|
|
||
Toolbox |
printer controls, status |
|
|
||
|
windows, and troubleshooting |
|
|
||
|
information. |
|
|
|
|
|
|
|
|
||
Program Group |
Adds an HP Business Inkjet |
|
|
||
|
program group to the start |
|
|
||
|
menu. |
|
|
|
|
|
|
|
|
||
Printer Matching |
Installs fonts on your computer |
|
|
||
Fonts |
that match the fonts in the |
|
|
||
|
printer. |
|
|
|
|
|
|
|
|
|
|
Installing under Windows 95, Windows 98, Windows NT 4.0, and Windows 2000
For Windows NT 4.0/Windows 2000 users
•You must have administrator privileges to install a printer driver.
To Install the Printer Driver
1.Start Microsoft Windows and make sure no other Windows applications are running.
2.Insert the Starter CD into your CD-ROM drive. The installation program runs automatically.
3-1

If the installation program does not run automatically, click Start, select Run, and at the command line box, type the letter of your computer’s CD-ROM drive followed by: \SETUP (for example, type D:\SETUP).
3.Click Install Printer Driver from the Starter CD menu.
4.Select the language of the printer software that you want to install and click OK.
5.Click Next and then click Accept to accept the terms of the license agreement.
6.Select Connected directly to this computer. Follow the instructions that appear on the screen to complete the printer driver installation.
Installing under Windows 3.1
To install the printer software under Windows 3.1, you must have an:
•HP Business Inkjet 2250 printer, or
•HP Business Inkjet 2200 printer with the HP Postscript/PCL5 Kit upgrade (C5935A).
1.Start Microsoft Windows and make sure no other Windows applications are running.
2.Insert the Starter CD into the CD-ROM drive.
3.From the Program Manager select File, Run.
4.At the command line box, type the letter of your CD-ROM drive followed by: \WIN31\X\<language>\OEMSETUP.INF where X is the driver you wish to install (PS or PCL5) and <language> is your language preference. For example, type D:\WIN31\PS\ENU\OEMSETUP.INF to install the Postscript driver in English. For a list of languages and their abbreviations, see page 4-4.
5.Follow the instructions that appear on the screen to complete the driver installation.
Installing the Printer Software for Network Printing
Before installing the printer software, make sure the HP JetDirect EIO print server card is installed in your printer and connected to the network.
Note: The HP Business Inkjet 2250TN comes with an HP JetDirect EIO print server card preinstalled.
To Install the Printer Driver
1.Start Microsoft Windows and make sure no other Windows applications are running.
3-2

2.Insert the Starter CD into your CD-ROM drive. The installation program runs automatically.
If the installation program does not run automatically, click Start, select Run, and at the command line box, type the letter of your computer’s CD-ROM drive followed by: \SETUP (for example, type D:\SETUP).
3.Click Install Printer Driver from the Starter CD menu.
4.Select the language of the printer software that you want to install and click OK.
5.Click Next and then click Accept to accept the terms of the license agreement.
6.Select Connected via the network.
7.Select Client Setup if the printer is connected to a server or someone's machine. Select Server or Peer-to-Peer Setup if you are setting up a print server for the first time, or if you will print directly to HP JetDirect EIO print server installed in your printer. If you are not sure how to connect your network printer, ask your network administrator, or see the next section, Network Printing for more information.
Setting Up Your Printer on a Macintosh Computer
Connect your printer to a Macintosh computer via an HP JetDirect print server.
Before connecting your printer to the JetDirect server, make sure your printer is an:
•HP Business Inkjet 2250 printer with an HP JetDirect card, or
•HP Business Inkjet 2200 printer with the HP Postscript/PCL5 Kit upgrade and an HP JetDirect card.
These cards can be purchased as accessories (see HP Supplies and Accessories for more information).
1.Connect the Ethernet cable to the printer and the JetDirect server.
3-3
2.Print the configuration page to determine the AppleTalk printer name. For instructions of printing a configuration page, see page 6-4.
3.Insert the Starter CD into the CD-ROM drive. Double-click the Installer icon located in the INSTALLER\<language> folder of the Starter CD, where <language> is your language preference.
For example, the INSTALLER\ENU folder contains the Installer icon for the English driver. For a list of languages and their abbreviations, see the page 4-5.
4.Follow the instructions on the screen to complete the installation.
5.Double-click the Desktop Printer Utility icon in the
APPLE EXTRAS\APPLE LASERWRITER SOFTWARE folder of the hard drive.
6.Select LaserWriter8, followed by Printer (AppleTalk) and click OK.
7.Change the PPD to HP Business Inkjet 2250.
8.Change the AppleTalk Printer by selecting the AppleTalk Zone and then selecting your printer (refer to the configuration page you printed).
9.Click Create and the printer icon appears on your desktop.
3-4
networking
network printing
The HP Business Inkjet 2200/2250 can be shared on a network. It can be connected directly to a network using an HP JetDirect print server or attached to a computer that is connected to a network.
Network Basics
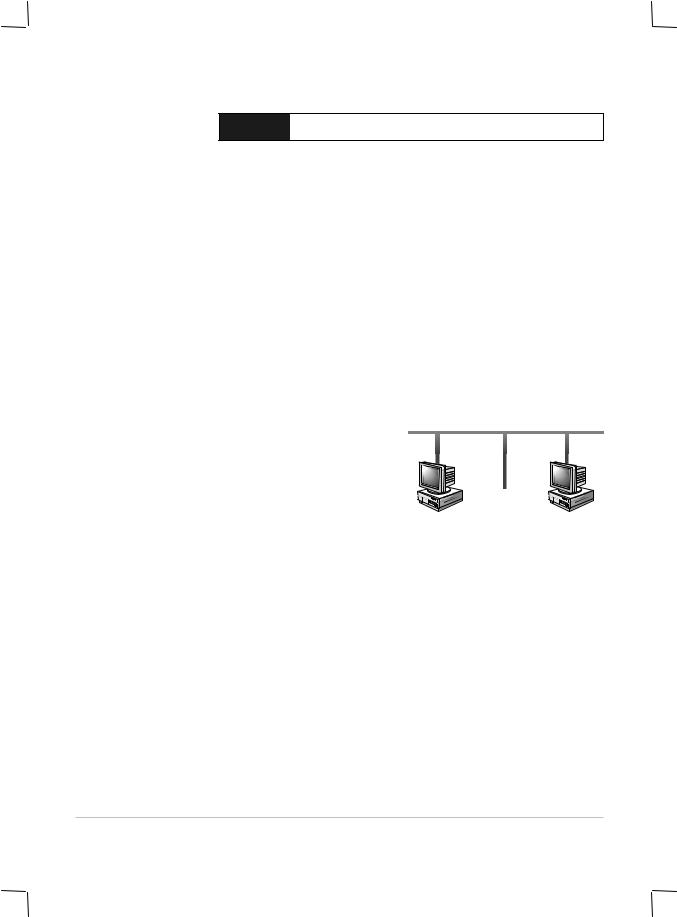
Networks consist of computers connected together to share information and resources, such as printers. On a "client-server" network, client computers send print jobs to dedicated server computers that control the use of each printer. On a "peer-to-peer" network, dedicated servers are not used to control printers. Instead, each computer is configured to send print jobs directly to the printer.
Network Printing Configurations
There are two basic types of network printing configurations: client-server and peer-to-peer.
Peer-to-peer printing. Individual computers manage their print jobs.
Client-server printing. Server manages print jobs.
Server
Client-Server Configuration
Client-server printing is typically used in medium to large networks where dedicated computer servers manage the printing needs of many users. Client-server networks use network operating systems (NOS) such as Novell NetWare and Windows NT Server 4.0, or Windows 2000.
4-1
 Loading...