


owner’s manual
Compact Disc Changer

INTRODUCING THE RCA CD-9400
Your RCA CD-9400 Compact Disc Changer is the next step in CD changer technology. It lets you load up to 101 CDs.
This lets you select up to 100 CDs for continuous play and gives you more musical variety without your having to continually remove and load CDs. You can also load a single CD for easy, one-time play.
The CD-9400’s advanced design makes the CD changer simple to operate. Be sure to pay attention to the “Special Features” section of this manual so you can understand and take advantage of everything the CD-9400 can do.
Your CD-9400’s features include:
Multiple Compact Disc Racks Plus Single Play — let you load up to 100 CDs for continuous or programmed play, plus a single CD for easy, one-time play.
Sequence Programming — lets you program up to 36 selections (a single track or an entire CD) to play in any order you choose.
Remote Control — lets you control the CD changer from a distance.
Custom Playback — lets you assign loaded CDs into any of three custom CD groups, and play only the CDs assigned to the group.
Random Play — randomly selects and plays all tracks on a single CD, up to 100 tracks on CDs in a custom CD group or on all CDs.
Repeat Play — automatically repeats a single track, all tracks on a single CD, all tracks in a custom CD group, all tracks on all loaded CDs, or a programmed sequence.
Digital Output — lets you connect your CD changer to another digital device.
Best Selection Memory — lets you save up to 20 of your favorite tracks for one-touch playback.
Previous Playback — plays 10 seconds from each of the 20 most recently played CDs to help you locate a CD you want to listen to again.
Hi-lite Scan — helps you locate a CD or track by playing 10 seconds from the first track of each CD, or 10 seconds from each track on all CDs.
Audible Search — helps you locate a particular section of the music by playing the CD rapidly in either direction.
Automatic Search Music System — lets you easily locate and play any track on a CD.
Memory-Hold Function — remembers which CD is playing when you turn off the CD-9400 and begins playing from the first track of that CD when you turn it back on.
Synchro Record — lets you synchronize recording when you connect the CD changer to a compatible cassette deck.
1-Bit DAC — uses the latest in digital-to-analog conversion circuitry to accurately reproduce all sound levels with virtually no distortion.
©1999 Tandy Corporation.
All Rights Reserved.
2

IMPORTANT SAFETY INSTRUCTIONS
This CD Changer is made and tested to meet exacting safety standards. It meets both UL and FCC requirements and complies with safety performance standards of the US Department of Health and Human Services.
WARNING: TO REDUCE THE RISK OF FIRE OR ELECTRIC SHOCK, DO NOT EXPOSE THIS APPLIANCE TO RAIN OR MOISTURE.
CAUTION
RISK OF ELECTRIC SHOCK.
DO NOT OPEN.
CAUTION: TO REDUCE THE RISK OF ELECTRIC SHOCK, DO NOT REMOVE COVER OR BACK. NO USER-SERVICEABLE PARTS INSIDE. REFER SERVICING TO QUALIFIED SERVICE PERSONNEL.
This symbol is intended to alert you to the presence of uninsulated dangerous voltage inside the product that can cause shock. Do not open the product’s case.
This symbol is intended to alert you to important operating and maintenance instructions in this owner’s manual.
Warnings:
•This CD Changer uses a laser. Because of possible eye injury, only a qualified service person should remove the cover or attempt to service this device.
•The use of controls or adjustments, or the performance of procedures other than specified herein, can result in hazardous exposure to laser light.
Careful attention is devoted to quality standards in the manufacture of your CD changer, and safety is a major factor in its design. However, safety is also your responsibility.
This section lists important information that will help you properly use and enjoy your CD changer and accessories. Read all the included safety and operating instructions before using your CD changer, follow them closely, and retain them for future reference.
Heed Warnings — Follow all warnings on the product and in the operating instructions.
Cleaning — Unplug this product from the wall outlet before cleaning. Use only a damp cloth for cleaning. Do not use liquid or aerosol cleaners.
Attachments — Do not use attachments/accessories not recommended by the product manufacturer, as they might create a hazard.
Water and Moisture — Do not use this product near water (for example, near a bathtub, washbowl, kitchen sink, or laundry tub; in a wet basement; or near a swimming pool).
Accessories — Do not place this product on an unstable cart, stand, tripod, bracket, or table. The product may fall, causing serious injury to a child or adult, and serious damage to the product. Use only with a cart, stand, tripod, bracket, or table recommended by the manufacturer or sold with the product. Follow the manufacturer’s instructions for mounting, and use a recommended mounting accessory.
Carts — Move the product on a cart carefully. Quick stops, excessive force, and uneven surfaces may cause the product/cart to overturn.
Ventilation — Slots and openings in the cabinet provide ventilation, ensure reliable operation, and protect from overheating. Do not block or cover these openings, and do not place the product on a bed, sofa, rug, or other similar surface. Do not place the product in a built-in bookcase or rack unless it provides proper ventilation as specified by the manufacturer.
Power Sources — Operate this product using only the power source indicated on its marking label. If you are not sure of your home’s power type, consult your product dealer or local power company.
Polarization — This product is equipped with a polarized AC line plug (a plug having one blade wider than the other). This plug will fit in the power outlet only one way. This is a safety feature. If you cannot insert the plug fully into the outlet, try reversing the plug. If the plug still doesn’t fit, contact your electrician to replace your obsolete outlet. Do not defeat the safety purpose of the polarized plug. If you need an extension, use a polarized cord.
Power-Cord Protection — Route power-supply cords so they are not likely to be walked on or pinched by items placed on or against them, paying particular attention to cords at plugs, convenience receptacles, and the point where they exit from the product.
Lightning — For added protection for this product during a lightning storm, or when it is left unattended and unused for long periods of time, unplug it from the wall outlet and disconnect the antenna or cable system. This will prevent damage to the product due to lightning and power-line surges.
Overloading — Do not overload wall outlets, extension cords, or integral convenience receptacles, as this can result in a risk of fire or electric shock.
Objects and Liquids — Never push objects of any kind into this product through openings, as they may touch dangerous voltage points or short out parts that could result in a fire or electric shock. Never spill liquid of any kind on the product.
Servicing — Do not attempt to service this product yourself, as opening or removing covers may expose you to dangerous voltage or other hazards. Refer all servicing to qualified service personnel.
Damage Requiring Service — Unplug this product from the wall outlet and refer servicing to qualified service personnel under the following conditions:
•When the power-supply cord or plug is damaged.
•If liquid has been spilled or objects have fallen into the product.
•If the product has been exposed to rain or water.
•If the product does not operate normally by following the operating instructions. Adjust only those controls that are covered by the operating instructions, as an improper adjustment of other controls may result in damage and will often require extensive work by a qualified technician to restore the product to normal operation.
•If the product has been dropped or damaged in any way.
•When the product exhibits a distinct change in performance.
Replacement Parts — When replacement parts are required, be sure the service technician uses replacement parts specified by the manufacturer or having the same characteristics as the original part. Unauthorized substitutions may result in fire, electric shock, or other hazards.
Safety Check — Upon completion of service or repairs to this product, ask the service technician to perform safety checks to determine that the product is in proper operating condition.
Wall or Ceiling Mount — The product should be mounted to a wall or ceiling only as recommended by the manufacturer.
Heat — The product should be situated away from heat sources such as radiators, heat registers, stoves, or other products (including amplifiers) that produce heat.
3

CONTENTS |
|
Preparing Your CD Changer ..................................................................................................... |
5 |
Connecting the CD Changer to Your Receiver/Amplifier ........................................................................................... |
5 |
Connecting to Another Digital Audio Product ........................................................................................................... |
5 |
Connecting Power ..................................................................................................................................................... |
5 |
Connecting to a Cassette Deck’s Synchro Jack ........................................................................................................... |
5 |
Installing the Remote Control’s Batteries .................................................................................................................... |
6 |
Using a Receiver’s Remote Control with the CD Changer .......................................................................................... |
6 |
Basic Operating Instructions ................................................................................................... |
7 |
Using the Remote Control ......................................................................................................................................... |
7 |
Loading CDs in the Rack ........................................................................................................................................... |
7 |
Loading a CD in the Single Play Slot ......................................................................................................................... |
8 |
Using the Demo ........................................................................................................................................................ |
8 |
Playing CDs .............................................................................................................................................................. |
9 |
Checking the Time Remaining and Elapsed on a CD ............................................................................................... |
10 |
Special Features ..................................................................................................................... |
11 |
Quickly Selecting Tracks ......................................................................................................................................... |
11 |
Searching for a Section of a Track ............................................................................................................................ |
11 |
Assigning CDs to a Custom CD Group .................................................................................................................... |
11 |
Checking the Custom Group Contents .............................................................................................................. |
11 |
Erasing All the CDs from a Custom Group ........................................................................................................ |
11 |
Storing Your Best Tracks .......................................................................................................................................... |
12 |
Scanning Previous CDs ........................................................................................................................................... |
12 |
Using Hi-Lite Scan .................................................................................................................................................. |
12 |
Repeating Tracks, CDs, and Sequences .................................................................................................................... |
12 |
Playing Tracks in Random Order ............................................................................................................................. |
13 |
Programming a Sequence ........................................................................................................................................ |
13 |
Programming a Sequence While a CD is Playing................................................................................................ |
14 |
Erasing a Programmed Selection ........................................................................................................................ |
14 |
Clearing a Programmed Sequence...................................................................................................................... |
14 |
Storing a Pause within a Programmed Sequence for Recording to Cassette ........................................................ |
14 |
Care and Maintenance ........................................................................................................... |
15 |
Caring for CDs ........................................................................................................................................................ |
15 |
Caring for the CD-9400 .......................................................................................................................................... |
15 |
Precautions for Use ............................................................................................................................................ |
15 |
CD Care Tips ..................................................................................................................................................... |
15 |
FCC Information ..................................................................................................................................................... |
16 |
Troubleshooting ...................................................................................................................................................... |
16 |
Index to Features by Control Name ....................................................................................... |
17 |
Self-Diagnostics...................................................................................................................... |
18 |
Specifications ......................................................................................................................... |
19 |
4
PREPARING YOUR CD CHANGER
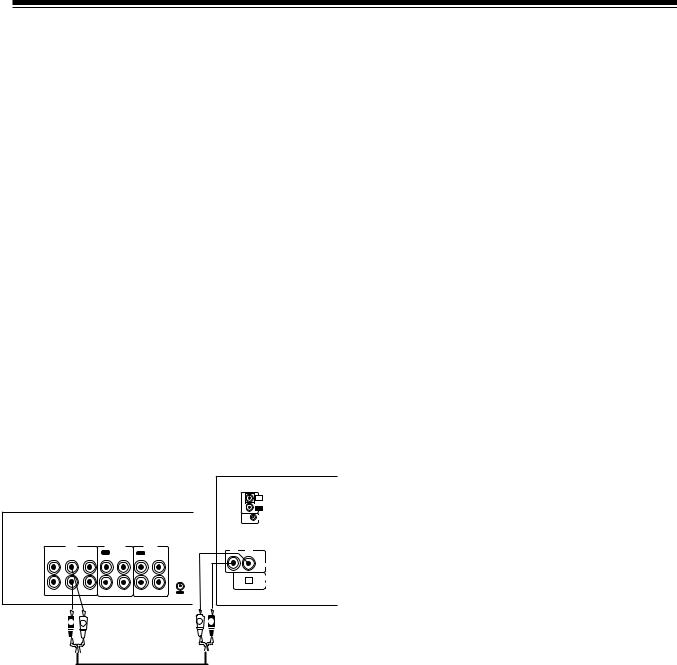
CONNECTING THE CD CHANGER TO YOUR RECEIVER/AMPLIFIER
Caution: Do not connect the CD changer to AC power until you complete all other connections.
1.Select a location for your CD changer that is near your receiver/amplifier and a standard AC outlet.
2.Plug one end of the supplied audio cable into the CD changer’s L (left) and R (right) LINE OUT jacks, matching the red plug to the red R LINE OUT jack and the white plug to the white L LINE OUT jack.
3.Plug the other end of the audio cable into the receiver’s or amplifier’s left and right CD, AUX, or TAPE input jacks.
Cautions
•Do not connect the CD changer to the receiver’s or amplifier’s PHONO inputs.
•Do not place the CD changer on top of the receiver/ amplifier or any other component that gets hot.
Note: If you place the CD changer too near other audio components or their wires, you might hear a hum when you play a CD. Move the components or their wires to eliminate the hum.
CONNECTING TO ANOTHER DIGITAL AUDIO PRODUCT
You can connect the CD changer to another digital audio product such as a digital recorder. You need an optical cable (available through your local RadioShack store) for this connection. To make the connection, remove the protective dust cap from the digital jacks, and connect the optical cable to the jacks.
Note: Be sure to leave the dust cap in place when you are not using the jack.
CONNECTING POWER
After you have connected the CD changer to your receiver or amplifier, plug the CD changer’s power cord into a standard AC outlet.
Caution: To prevent electric shock, the plug’s blades are polarized and fit only one way. If the plug does not fit easily, turn it over and try again. Do not force the plug into any AC outlet.
Note: Do not connect the CD changer’s power cord to an amplifier or other switched outlet. The CD changer loses memorized settings when power is removed.
IN |
CD Changer |
CONTROL |
|
OUT |
|
Receiver/Amplifier |
CD•DECK |
SYNCHRO |
|
|
|
INPUT |
|
TAPE/DCC |
TAPE 2 |
|
R |
L |
|
PHONO |
CD |
VCR/ |
REC |
PLAY |
REC __ PLAY |
|
||
|
L |
LD |
|
L |
L |
|
|
|
|
L |
|
|
|
|
|||
|
|
|
|
|
|
CONTROL |
|
LINE OUT |
|
|
|
|
|
|
|
|
|
|
|
|
|
|
|
|
|
DIGITAL OUT |
|
|
|
|
|
|
|
|
OPTICAL |
|
R |
R |
|
R |
R |
OUT |
|
|
|
R |
L |
|
|
|
L |
R |
|
CONNECTING TO A CASSETTE DECK’S SYNCHRO JACK
The Synchro-Record feature lets you easily copy CDs to cassette tapes. If you have a cassette deck that has a CD•DECK SYNCHRO jack, the CD changer can automatically start and stop with the cassette deck. Connect the CD•deck synchro-cord, supplied with the cassette deck, to the CD changer’s and cassette deck’s CD•DECK SYNCHRO jacks.
For details on connection and operation refer to the cassette deck’s owner’s manual.
5
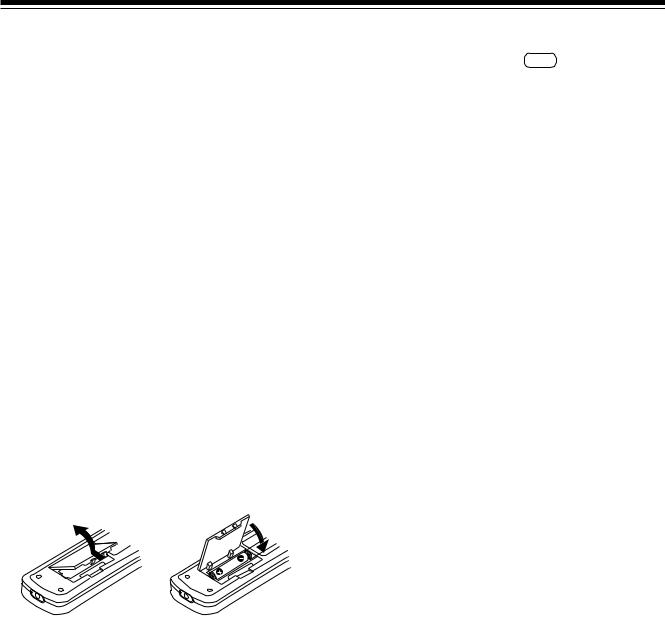
INSTALLING THE REMOTE CONTROL’S BATTERIES
Your CD changer’s remote control requires two AA batteries (not supplied) for power. We recommend alkaline batteries, available from your local RadioShack store.
l.Press in the battery compartment cover’s latch and lift off the cover.
2.Put two fresh AA batteries into the compartment as indicated by the polarity symbols (+ and –) marked inside.
3.Replace the cover.
Cautions:
•Use only fresh batteries of the required size and recommended type.
•Do not mix old and new batteries, different types of batteries (standard, alkaline, or rechargeable) or rechargeable batteries of different capacities.
•Always remove old or weak batteries. Batteries can leak chemicals that can damage electronic circuits.
•If you do not plan to use the remote control for a month or more, remove and store the batteries.
Note: If the remote’s range is reduced, replace the batteries immediately.
USING A RECEIVER’S REMOTE CONTROL WITH THE CD CHANGER
If your receiver/amplifier has an OSR mark, the receiver/ amplifier’s remote can control some of the CD changer’s functions.
Plug one end of the supplied control cable into the CD changer’s CONTROL IN jack. Plug the other end of the cable into the receiver/amplifier’s CONTROL OUT jack.
Notes:
•This connection disables the CD changer’s infrared sensor. Aim the remote control at the receiver/amplifier’s infrared sensor.
•When you connect the CD changer to your receiver by digital output only, the receiver’s remote control does not operate your CD changer.
For details on connection and operation, refer to the receiver/amplifier’s owner’s manual.
6
 Loading...