


|
|
|
|
|
|
EN |
|
SAFETY INSTRUCTIONS |
|
||
IMPORTANT TO BE READ AND OBSERVED |
|||
Download the complete instruction manual on http://docs .hotpoint.eu or call the phone number
shown on the warranty booklet.
Before using the appliance, read these safety instructions. Keep them nearby for future reference. These instructions and the appliance itself provide important safety warnings, to be observed at all times. The manufacturer declines any liability for failure to observe these safety instructions, for inappropriate use of the appliance or incorrect setting of controls.
 Very young children (0-3 years) should be kept away from the appliance. Young children (3-8 years) should be kept away from the appliance unless continuously supervised. Children from 8 years old and above and persons with reduced physical, sensory or mental capabilities or lack of experience and knowledge can use this appliance only if they are supervised or have been given instructions on safe use and understand the hazards involved. Children must not play with the appliance. Cleaning and user maintenance must not be carried out by children without supervision.
 WARNING: The appliance and its accessible parts become hot during use. Care should be taken to avoid touching heating elements.
Children less than 8 years of age shall be kept away unless continuously supervised.
 WARNING: If the hob surface is cracked, do not use the appliance - risk of electric shock.
 WARNING: Danger of fire: Do not store items on the cooking surfaces.
 CAUTION: The cooking process has to be supervised. A short cooking process has to be supervised continuously.
 WARNING: Unattended cooking on a hob with fat or oil can be dangerous - risk of fire. NEVER try to extinguish a fire with water: instead, switch off the appliance and then cover flame e.g. with a lid or a fire blanket.
 Do not use the hob as a work surface or support. Keep clothes or other flammable materials away from the appliance, until all the components have cooled down completely - risk of fire.
PERMITTED USE
 CAUTION: the appliance is not intended to be operated by means of an external switching device, such as a timer, or separate remote controlled system.
 Thisapplianceisintendedtobeusedinhousehold and similar applications such as: staff kitchen areas in shops, offices and other working environments; farm houses; by clients in hotels, motels, bed & breakfast and other residential environments.
 No other use is permitted (e.g. heating rooms).
 This appliance is not for professional use. Do not use the appliance outdoors.
INSTALLATION
 The appliance must be handled and installed by two or more persons - risk of injury. Use protective gloves to unpack and install - risk of cuts.
 Installation, including water supply (if any), electrical connections and repairs must be carried out by a qualified technician. Do not repair or replace any part of the appliance unless specifically stated in the user manual. Keep children away from the installation site. After unpacking the appliance, make sure that it has not been damaged during transport. In the event of problems, contact the dealer or your nearest After-sales Service. Once installed, packaging waste (plastic, styrofoam parts etc.) must be stored out of reach of children - risk of suffocation. The appliance must be disconnected from the power supply before any installation operation - risk of electric shock. During installation, make sure the appliance does not damage the power cable - risk of fire or electric shock. Only activate the appliance when the installation has been completed.
 Carry out all cabinet cutting operations before fitting the appliance and remove all wood chips and sawdust.
 If the appliance is not installed above an oven, a separator panel (not included) must be installed in the compartment under the appliance.
ELECTRICAL WARNINGS
 It must be possible to disconnect the appliance from the power supply by unplugging it if plug is accessible, or by a multi-pole switch installed upstream of the socket in accordance with the wiring rules and the appliance must be earthed in conformity with national electrical safety standards.
  Do not use extension leads, multiple sockets or adapters. The electrical components must not be accessible to the user after installation. Do not use the appliance when you are wet or barefoot. Do not operate this appliance if it has a damaged power cable or plug, if it is not working properly, or if it has been damaged or dropped.
 If the supply cord is damaged, it must be replaced with an identical one by the manufacturer, its service agent or similarly qualified persons in order to avoid a hazard - risk of electric shock.
CLEANING AND MAINTENANCE
 WARNING: Ensure that the appliance is switched off and disconnected from the power supply before performing any maintenance operation; never use steam cleaning equipment - risk of electric shock.

 Do not use abrasive or corrosive products, chlorine-based cleaners or pan scourers.
DISPOSAL OF PACKAGING MATERIALS
The packaging material is 100% recyclable and is marked with the recycle symbol .
The various parts of the packaging must therefore be disposed of responsibly and in full compliance with local authority regulations governing waste disposal.
DISPOSAL OF HOUSEHOLD APPLIANCES
This appliance is manufactured with recyclable or reusable materials. Dispose of it in accordance with local waste disposal regulations. For further information on the treatment, recovery and recycling of household electrical appliances, contact your local authority, the collection service for household waste or the store where you purchased the appliance. This appliance is marked in compliance with European Directive 2012/19/EU, Waste Electrical and Electronic Equipment (WEEE). By ensuring this product is disposed of correctly, you will help prevent negative consequences for the environment and human health.
The symbol  on the product or on the accompanying documentation indicates that it should not be treated as domestic waste but must be taken to an appropriate collection center for the recycling of electrical
and electronic equipment.
ENERGY SAVING TIPS
Make the most of your hot plate’s residual heat by switching it off a few minutes before you finish cooking.
The base of your pot or pan should cover the hot plate completely; a container that is smaller than the hot plate will cause energy to be wasted. Cover your pots and pans with tight-fitting lids while cooking and use as little water as possible. Cooking with the lid off will greatly increase energy consumption.
Use only flat-bottomed pots and pans.
DECLARATION OF CONFORMITY
This appliance meets the Ecodesign requirements of European Regulation n. 66/2014, in compliance with the European standard EN 60350 2.

EN
INSTALLATION
•The cooktop must be set into a worktop between 20 mm and 50 mm deep.
•There must be nothing between the cooktop and the oven (cross rails, brackets, etc.).
•The distance between the lower face of the glass ceramic hob and the cupboard or separating panel must be at least 20 mm.
•If the cooktop is to be installed next to a column unit, leave a distance of at least 100 mm from the edge of the cooktop to the side of the column unit.
•For built-in dimensions and installation see the picture in this paragraph.
•A minimum distance must be maintained between the hob and the hood above it. Please refer to the user manual of the hood for more informations.
min. 20 mm
•Apply the supplied gasket to the cooktop (unless it has already been fitted), after having cleaned its surface.
•Do not install the cooktop near a dishwasher or washing machine, so that the electronic circuits do not come into contact with steam or moisture, which could damage them.
•If an oven (from our range of ovens) is installed beneath the cooktop, make sure that it is equipped with a cooling system.If the temperature of the electronic circuits exceeds the maximum permitted temperature, the cooktop will switch off automatically; in this case, wait for a few minutes until the internal temperature of the electronic circuits reaches a tolerable level, at which point it will be possible to switch the hob on again.
PLACING THE HOB
After the electrical connection (see the chapter “Electrical connection”).Position each fixing clips on the dedicated slots on the lateral sides of the hob as shown in the picture. Then push the hob inside the cut out and check that the glass is flat and parallel to the worktop. The fixing clips are designed for every type of worktop material (wood, marble, etc).
1 |
4x |
2 |
DIMENSIONS AND DISTANCES TO BE MAINTAINED
i |
L |
Min. 40 cm |
Min.10 cm |
Min. 7 cm |
580 X 510 mm |
mm |
580 mm |
|
|
R = Min. 6,5 mm |
min 20 mm |
|
0 |
Max. 8 mm |
|||
42/46 |
510 mm |
|
560+2 |
mm |
|
|
|
Min. 70 mm |
|
||
|
|
|
|
||
|
|
|
|
|
|
|
490 |
0 |
mm |
|
|
|
+2 |
|
|
||
|
552 mm |
|
|
|
|
ELECTRICAL CONNECTION
Electrical connection must be made before connecting the appliance to the electricity supply.
Installation must be carried out by qualified personnel who know the current safety and installation regulations. Specifically, installation must be carried out in compliance with the regulations of the local electricity supply company.
Make sure the voltage specified on the data plate located on the bottom of the appliance is the same as that of the home. Regulations require that the appliance be earthed: use conductors (including the earth conductor) of the appropriate size only.
CONNECTION TO THE TERMINAL BLOCK
For the electrical connection, use an H05RR-F cable as specified in the table below.
CONDUCTORS |
AMOUNT x SIZE |
|||||||||||||
|
|
|
|
|
|
|
|
|
|
|
|
|
|
|
220-240V |
~ + |
|
|
|
|
|
|
|
|
|
|
|
|
3 x 4 mm2 |
|
|
|
|
|
|
|
|
|
|
|
|
|||
|
|
|
|
|
|
|
|
|
|
|
|
|||
|
|
|
|
|
|
|
|
|
|
|
|
|||
230-240V |
~ + |
|
|
|
|
|
|
|
|
|
|
|
|
3 x 4 mm2 (Australia only) |
|
|
|
|
|
|
|
|
|
|
|
|
|||
|
|
|
|
|
|
|
|
|
|
|
|
|||
220-240V |
3~ + |
|
|
|
|
|
|
|
|
|
|
|
|
4 x 1,5 mm2 |
|
|
|
|
|
|
|
|
|
|
|
|
|||
|
|
|
|
|
|
|
|
|
|
|
|
|||
380-415V |
3N~ + |
|
|
|
|
|
|
5 x 1,5 mm2 |
||||||
|
|
|
|
|
|
|||||||||
|
|
|
|
|
|
|||||||||
|
|
|
|
|
|
|||||||||
380-425V 2N~ + |
|
|
|
|
4 x 1,5 mm2 |
|||||||||
|
|
|
|
|
||||||||||
|
|
|
|
|
||||||||||
|
|
|
|
|
||||||||||
B A
The appliance must be connected to the electricity supply by means of an all-pole disconnect switch with minimum contact gap of 3 mm.
ATTENTION: the power supply cable must be long enough to allow the cooktop to be removed from the worktop and must be positioned so as to avoid damage or overheating caused by contact with the base.
NOTE: the yellow/green earth wire must be connected to the terminal with the symbol  and must be longer than the other wires.
•Remove approx. 70 mm of the cable sheath from the power supply cable (B).
•Strip approx. 10 mm of sheath from the wires. Then insert the power supply cable into the cable clamp and connect the wires to the terminal block as indicated in the connection diagram placed close to the terminal block itself.
•Secure the power supply cable (B) by means of the cable clamp.
•Close the terminal board with the cover (A) securing it with the screw provided.
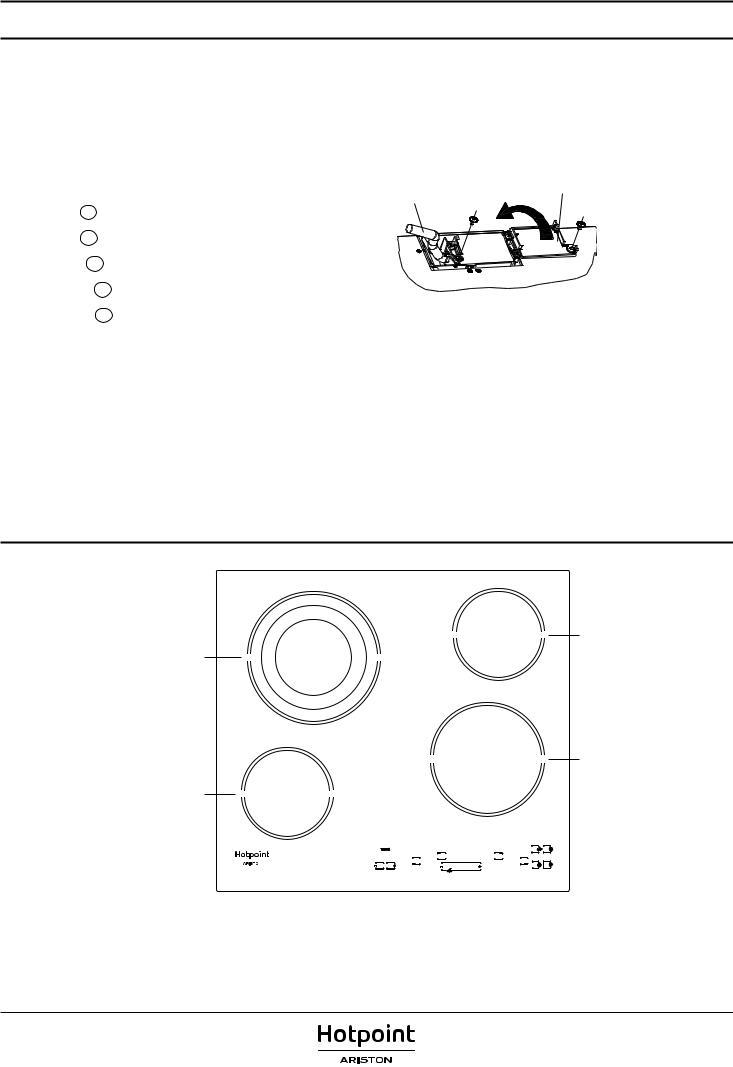
•After the electrical connection, fit the hob from the top and hook it to the support springs, according to the illustration.
PRODUCT DESCRIPTION
145 mm
120/165/210 mm
180 mm
145 mm
EN
CONTROL PANEL
Boiling Dual/Triple zone
Zone selection controls and display
|
|
|
|
|
Melting |
|
|
|
|
|
|
|
|
|
|
|
|
||
|
|
|
|
|
|
|
|
|
|
|
|
|
|
|
|
|
|
|
|
|
|
|
|
|
|
|
|
||
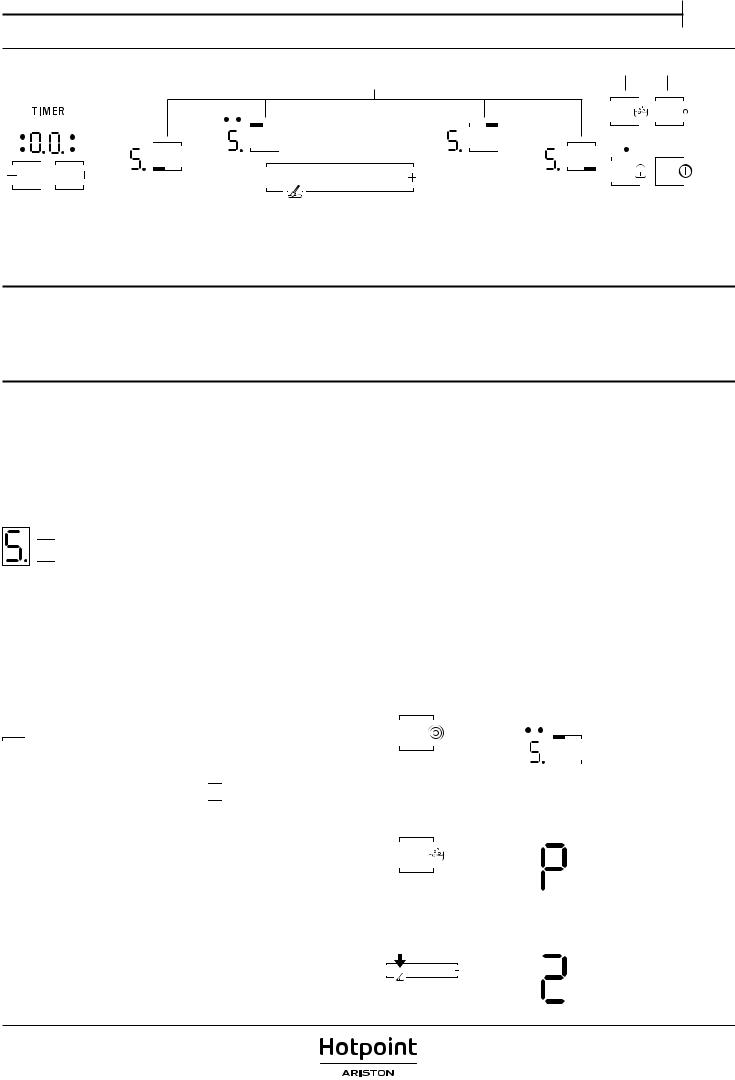
Timer controls |
|
Power setting control |
Control On/Off |
||||||
and display |
|
|
|
panel lock |
|||||
FIRST TIME USE
After connecting the hob to the electrical power supply, the control panel is locked. To unlock the control panel, touch the control for 2 seconds.
The control panel lock indicator switches off and the hob can be used. Read the “Control panel lock” paragraph for more details.
DAILY USE
SWITCHING THE HOB ON/OFF
To switch the hob on, touch the  control until the cooking zone displays light up.
To switch off, touch the same control until the displays switch off. All the cooking zones are deactivated.
If within 10 seconds of switching on, no function is selected, the hob switches off automatically.
SWITCHING ON AND ADJUSTING COOKING ZONES
Power indicator display
Selected cooking zone indication
(the dot blinks when there is a Timer active on that zone)
Place the pot on the desired cooking zone and switch on the hob. Activate the selected cooking zone by touching the corresponding “Zone selection control”. “5” will appear on the display. Slide the finger over the “Power setting control” to select the required power level, from min. 0 to max. 9. To confirm theselectionwait10seconds ortouchagainthesame “Zoneselectioncontrol”.
DEACTIVATION OF COOKING ZONES
To switch off the cooking zone, select the level “0” with the “Power setting control”.
The cooking zone switches off and, if still hot, the letter “H” appears on the zone display.
 CONTROL PANEL LOCK
This function locks the controls to prevent accidental activation of the hob.
To activate the control panel lock, touch  control; an acoustic signal sounds and a luminous indicator appears on the display. The control panel is locked except for the switching off function.
To deactivate the control panel lock, repeat the activation procedure. The presence of water, liquid spilled from pots or any objects resting on the controls can accidentally activate or deactivate the control panel lock.
TIMER
The timer can be used to set the cooking time for a maximum of 99 minutes (1 hour and 39 minutes) for all the cooking zones.
Select the cooking zone to be used, touch the timer “–” or “+” controls and a beep signals the function. The display shows “00”. The Timer value can be decreased and increased by keeping the finger on the controls “+” or “–”. After the Timer value selection, the display continue to blink for 10 seconds before the countdown starts.
When the set time has elapsed, an acoustic signal sounds and the cooking zone switches off automatically. To deactivate the timer, select the cooking zone, touch the Timer controls “–” and “+” simultaneously.
IMPORTANT:
•The dot blinking next to the power level display shows that the Timer function is active on that zone.
•In case of more than one timer active, display shows the timer with the shorter duration and corresponding indicator blinks.
 RESIDUAL HEAT INDICATOR
If the display shows  , the cooking zone is still hot. If the residual heat indicator of a given cooking zone is lit, that zone can be used, for example, to keep a dish warm or to melt butter.
When the cooking zone cools down, the display goes off.
IMPORTANT: To avoid a permanent damage the hob:
•do not use pots with bottoms that are not flat;
•do not use metal pots with enamelled bottom;
•do not place hot pots/pans over the control panel.
SPECIAL FUNCTION
|
|
BUTTON |
FUNCTION |
VISUAL |
DESCRIPTION |
|
|
|
NAME |
INDICATION |
|
|
|
|
|
|
The control activates the double or triple |
|
|
|
|
1 or 2 LEDs |
zone (if available). After positioning the |
|
|
|
|
pot/accessory on the chosen cooking |
|
|
|
|
|
switch on: |
|
|
|
|
|
zone, switch on the hob and select the |
|
|
|
|
|
|
|
|
|
|
Dual/Triple |
|
cooking zone. Select the power level and |
|
|
|
|
touch the control one time to activate |
|
|
|
|
zone |
|
thedualzoneortwotimestoactivatethe |
|
|
|
|
|
triple zone. To deactivate the function, |
|
|
|
|
|
simply touch the same button. LEDs |
|
|
|
|
|
near the zone display are switched on |
|
|
|
|
|
only when the function is active for the |
|
|
|
|
|
selected zone. |
|
|
|
|
|
This function sets the zone maximum |
|
|
|
|
|
power(forexampletoquicklybringwater |
|
|
|
|
Display shows: |
to the boil). After positioning the pot/ |
|
|
|
|
accessory on the chosen cooking zone, |
|
|
|
|
|
|
switch on the hob, select the cooking |
|
|
|
|
|
zoneandtouchtheboilingcontrols.After |
|
|
|
Boiling |
|
6 minutes of usage of this function, the |
|
|
|
|
|
appliance automatically sets the zone to |
|
|
|
|
|
level 9. To deactivate the function simply |
|
|
|
|
|
touch the same control or lower the |
|
|
|
|
|
power level with “–”. It is possible to use |
|
|
|
|
|
this function in combination with dual/ |
|
|
|
|
|
triple zone function. |
|
|
|
|
|
This function sets a power level that |
|
|
|
|
Display shows: |
is suitable for slowly melting delicate |
|
|
|
|
|
products without compromising their |
|
|
|
|
|
sensory quality (chocolate, butter, etc.). |
|
|
|
Melting |
|
After positioning the pot/accessory on |
|
|
|
|
the chosen cooking zone, switch on |
|
|
|
|
|
||
|
|
|
|
|
|
|
|
|
|
|
the hob, select the cooking zone and |
|
|
|
|
|
touch the power setting control over |
|
|
|
|
|
the melting icon. The function melting |
|
|
|
|
|
corresponds to power level “2”. |
The hob is also equipped with the “auto shut off” function that switch off the cooking zone if no power level modification is done after a specific time frame depending on the power setting itself. In the table there is the time duration of each power level.
POWER LEVEL |
AUTO SHUT OFF TIME |
|
|
1 |
10 hours |
2 |
5 hours |
3 |
5 hours |
4 |
4 hours |
5 |
3 hours |
6 |
2 hours |
7 |
2 hours |
8 |
2 hours |
9 |
1 hour |
POWER LEVEL TABLE
POWER LEVEL |
TYPE OF COOKING |
LEVEL USE |
||
(indicating cooking experience and habits) |
||||
|
|
|
||
Maximum |
Boiling |
Fast heating |
Ideal for rapidly increasing the temperature of food to fast boiling in the |
|
case of water or rapidly heating cooking liquids. |
||||
|
|
|||
power |
|
|
|
|
|
Frying – boiling |
Ideal for browning, starting to cook, frying frozen products, fast boiling. |
||
|
|
|||
|
9 – 7 |
Browning – slow frying – boiling – |
Ideal for slow frying, maintaining a high boil, cooking and grilling (short |
|
|
|
|||
High power |
|
grilling |
duration, 5-10 minutes). |
|
|
|
|
||
|
Browning – cooking – stewing – slow |
Ideal for slow frying, maintaining a low boil, cooking and grilling |
||
|
|
|||
|
7 – 5 |
frying – grilling |
(medium duration, 10-20 minutes), preheating. |
|
|
Cooking – stewing – slow frying – |
Ideal for stewing, maintaining a gentle boil, cooking and grilling (long |
||
|
|
|||
|
|
grilling |
duration). |
|
|
|
|
|
|
Medium power |
|
|
Ideal for prolonged cooking (rice, sauces, roasts, fish) with liquids (e.g. |
|
|
Cooking – simmering – thickening – |
water, wine, broth, milk), creaming pasta. |
||
|
4 – 3 |
|||
|
|
|||
|
creaming pasta |
Ideal for prolonged cooking (volumes of less than a litre: rice, sauces, |
||
|
|
|||
|
|
|
||
|
|
|
roasts, fish) with liquids (e.g. water, wine, broth, milk). |
|
|
|
|
Ideal for softening butter, gently melting chocolate, thawing small |
|
|
|
Melting – defrosting – keeping |
products and keeping just-cooked food hot (e.g. sauces, soups, |
|
Low power |
2 – 1 |
minestrone). |
||
food hot – creaming risottos |
|
|||
|
|
Ideal for keeping just-cooked food hot, creaming risottos and keeping |
||
|
|
|
||
|
|
|
serving dishes warm (with induction-suitable accessory). |
|
|
|
|
|
|
MAINTENANCE AND CLEANING
 Disconnect the appliance from the power supply.
•Do not use steam cleaning equipment.
•Do not use abrasive sponges or scouring pads as they may damage the glass.
•After each use, clean the hob (when it is cool) to remove any deposits and stains from food residue.
•Sugar or foods with a high sugar content can damage the hob and must be immediately removed.
•Salt, sugar and sand could scratch the glass surface.
•Use a soft cloth, absorbent kitchen paper or a specific hob cleaner (follow the Manufacturer’s instructions).
•Spills of liquid in the cooking zones can cause the pots to move or vibrate.
•After cleaning the hob, dry thoroughly.
EN
TROUBLESHOOTING
If the hob will not operate correctly, before calling the After-Sales Service, refer to the Troubleshooting Guide to determine the problem.
•Read and follow the instructions given in the section “Daily use”.
•Consult the table below for instructions.
•Check that the electricity supply has not been shut off.
•Dry the hob thoroughly after cleaning it.
If after the above checks the fault still occurs, get in touch with the nearest After Sales Service.
FAILURE DESCRIPTION |
POSSIBLE CAUSES |
MEASURE |
|
|
|
|
|
|
Missing power supply. |
Check that power supply is on. |
|
|
|
|
|
The hob does not switch on. |
Wrong connection of the |
Call a qualified technician to check the cable connection. |
|
main cable. |
|||
|
|
||
|
|
|
|
|
Hob failure. |
Call after sales service. |
|
|
|
|
|
The hob switch on but "F" alternately to “L” is shown |
Strong light over the hob |
Reduce light over the control panel, restart the hob |
|
on each display. |
during start up. |
(disconnect and reconnect to the power supply). |
|
|
|
|
|
The hob switch on but "F" alternately to one of "0, A, C, |
Hob failure. |
Restart the hob (disconnect and reconnect to the power |
|
E, t, H, J, U, 5, 3, 4, r" symbol is shown on the displays. |
|
supply), if the problem persists call after sales service. |
|
Heater does not heat up but the display is on. |
Hob failure. |
Call after sales service. |
|
|
|
|
|
|
One or more buttons are |
Remove any object or liquid that is placed over the control |
|
The hob plays 3 acoustic signals and then shut off. |
continuously pressed for |
||
panel. |
|||
|
more than 3 seconds. |
||
|
|
||
|
|
|
|
Not possible to switch the hob off. |
Hob failure. |
Disconnect the hob from power supply and call After sales |
|
service. |
|||
|
|
||
|
|
|
|
|
|
The on/off cycle allows the power regulation of the |
|
The heater is not continuously on, it switches on and |
|
heater and is completely normal. In some cases a thermal |
|
Normal functioning of the |
protection could switch off the heater for some time to |
||
off cyclically even if on the display the power lever |
hob. |
avoid the glass damage. Examples of such cases are: |
|
does not change. |
|
cooking long time at high power level, usage of pots |
|
|
|
smaller than the heating element, pot bottoms not flat. |
|
|
|
|
|
The hob switch on but "F" alternately to "c" is shown |
|
Wait until control panel temperature cool down. The hob |
|
Control panel overheating. |
will automatically switch on when the temperature drops |
||
on the displays. |
|
below operating limit. |
|
|
|
||
|
|
|
AFTER-SALES SERVICE
In order to receive a more complete assistance, please register your product on www.hotpoint.eu/register.
BEFORE CALLING THE AFTER-SALES SERVICE:
1.See if you can solve the problem by yourself with the help of the suggestions given in the TROUBLESHOOTING.
2.Switch the appliance off and back on again to see if the fault persists.
IF AFTER THE ABOVE CHECKS THE FAULT STILL OCCURS, GET IN TOUCH WITH THE NEAREST AFTER-SALES SERVICE.
To receive assistance, call the number shown on the warranty booklet or follow the instructions on the website www.hotpoint.eu.
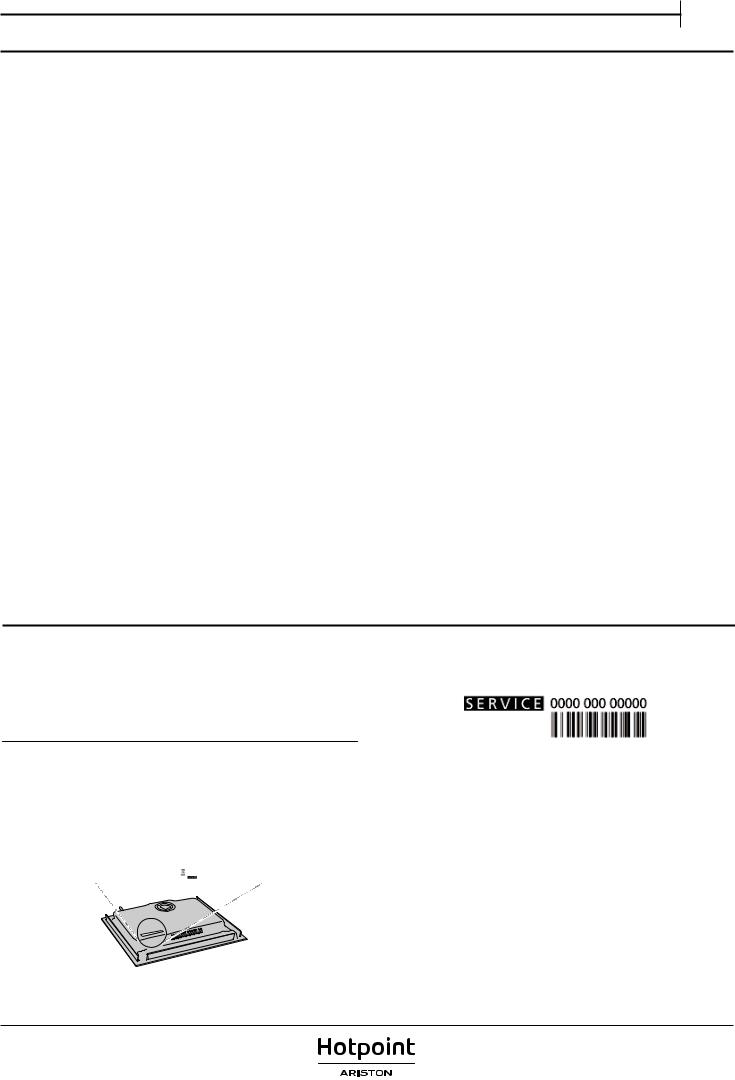
When contacting our Client After sales service, always specify:
•a brief description of the fault;
•the type and exact model of the appliance;
|
Type: XXX |
Mod.: XXX |
01 |
|
XXXX XXX XXXXX |
XX XXXX XXXXX |
|||
|
XXXXXXXXXXXXXXXXXXXX |
|
|
|
|
|
|
||
Made in X |
XXXXXXXXXXXXXXX |
|
|
|
|
|
|
|
|
XXXXXXXXXXXXXXXXXXXXXX |
|
|
|
|
|
||||
|
XXXXXXXXXXXXXXXXXXXXXXXXXXXXXXXXXXXXXXXXXXXXXXXXXXXXXXXXXXXXXXXXXXXXXXXXX |
|
|
||||||
•the service number (number after the word Service on the rating plate). The service number is also indicated on the guarantee booklet;
•your full address;
•your telephone number.
If any repairs are required, please contact an authorized after-sales service (to guarantee that original spare parts will be used and repairs carried out correctly).
400011243926

УКАЗАНИЯ ПО БЕЗОПАСНОСТИ |
|
|
|
RU |
|
|
ПРОЧТИТЕ И СОБЛЮДАЙТЕ |
||||
Загрузите полную версию инструкции по |
ИСПОЛЬЗОВАНИЕ ПО НАЗНАЧЕНИЮ |
|
|||
эксплуатации с сайта http://docs.hotpoint.eu или |
ОСТОРОЖНО!Данныйприборнепредназначен |
||||
позвоните по номеру телефона, указанному в |
для работы с управлением от внешнего |
||||
гарантийном буклете. |
переключающего устройства, такого как таймер, |
||||
|
|
или пульта дистанционного управления. |
|
||
Прежде чем пользоваться прибором, прочтите |
Данный |
прибор |
предназначен |
для |
|
данную инструкцию по безопасности. Сохраняйте |
использования в домашних и аналогичных |
||||
ее под рукой для обращения в будущем. |
условиях, например: кухни для работников на |
||||
В настоящей инструкции и на самом приборе |
фабриках, в офисах и других организациях; |
||||
содержатся важные указания по безопасности. |
деревенские гостевые дома; номера отелей, |
||||
Их необходимо прочесть и выполнять постоянно. |
мотелей и прочие заведения гостиничного типа. |
||||
Изготовительснимаетссебявсякуюответственность |
Запрещается использовать прибор для любых |
||||
за последствия несоблюдения настоящих указаний |
других целей (например, для обогрева |
||||
по безопасности, ненадлежащего использования |
помещений). |
|
|
||
прибора или неправильные рабочие настройки на |
Данный прибор не предназначен для |
||||
пульте управления. |
профессиональногоиспользования.Неиспользуйте |
||||
Не разрешайте маленьким детям (0-3 лет) |
прибор на открытом воздухе. |
|
|||
подходить к прибору. Дети в возрасте от 3 до |
УСТАНОВКА |
|
|
||
8 лет могут находиться рядом с прибором только |
Для перемещения и установки прибора |
||||
под постоянным присмотром. Дети, начиная с |
требуется участие двух или более человек - |
||||
8-летнего возраста, лица с ограниченными |
опасность травм. При распаковке и установке |
||||
физическими, |
сенсорными или умственными |
следует использовать защитные перчатки во |
|||
способностями и лица, не имеющие достаточных |
избежание порезов. |
|
|
||
знаний и навыков, могут пользоваться прибором |
Установку, в том числе подключение к системе |
||||
только под присмотром или после того, как |
водоснабжения (при наличии) и выполнение |
||||
получатуказанияпобезопасномуиспользованию |
электрических соединений, а также ремонтные |
||||
прибора и осознают имеющиеся опасности. Не |
работы должен выполнять квалифицированный |
||||
позволяйте детям играть с прибором. Дети не |
персонал. |
Запрещается |
ремонтировать |
или |
|
должны осуществлять чистку и уход за прибором |
заменять части прибора, за исключением случаев, |
||||
без надзора со стороны взрослых. |
особо оговоренных в руководстве пользователя. |
||||
ВНИМАНИЕ! Прибор и его доступные части |
Не разрешайте детям подходить близко к месту |
||||
нагреваютсявпроцессеиспользования.Соблюдайте |
установки. После распаковки прибора проверьте |
||||
осторожность во избежание прикосновения к |
его на предмет возможных повреждений во время |
||||
нагревательным элементам. Дети младше 8 лет |
транспортировки. В случае обнаружения проблем |
||||
могут находиться рядом с прибором только под |
обращайтесь к продавцу или в ближайший центр |
||||
постоянным присмотром взрослых. |
послепродажногообслуживания.Послеустановки |
||||
ВНИМАНИЕ! |
Если поверхность варочной |
отходы упаковочных |
материалов (пластик, |
||
панели треснула, не используйте прибор - |
пенопластовые детали и т.д.) должны храниться в |
||||
опасность поражения электрическим током. |
недоступном для детей месте во избежание |
||||
ВНИМАНИЕ! Во избежание пожара не |
опасности удушения. Перед выполнением любых |
||||
оставляйте предметы на варочной панели. |
операций по установке отключите прибор от |
||||
ОСТОРОЖНО!Держитеподконтролемпроцесс |
электросети-опасностьпораженияэлектрическим |
||||
приготовления пищи. Кратковременный процесс |
током. При установке соблюдайте осторожность, |
||||
приготовлениятребуетпостоянногонаблюдения. |
чтобы не повредить сетевой шнур корпусом |
||||
ВНИМАНИЕ! Оставление варочной панели без |
прибора - опасность пожара и поражения |
||||
присмотра при приготовлении блюд на масле или |
электрическим током. Не включайте прибор до |
||||
жире опасно - опасность пожара. Не пытайтесь |
завершения установки. |
|
|
||
тушить возгорание водой: выключите прибор и |
Прежде чем встраивать прибор, выполните |
||||
накройте пламя крышкой или противопожарным |
все столярные работы, удалите все стружки и |
||||
покрывалом. |
|
опилки. |
|
|
|
Не используйте варочную панель в качестве |
Если прибор устанавливается не над духовкой, |
||||
рабочей поверхности или опоры. Держите |
разместите отделяющую панель (не входит в |
||||
одежду и другие горючие предметы вдали от |
комплект поставки) в мебельном модуле под |
||||
прибора,покавсеегочастиполностьюнеостынут |
прибором. |
|
|
|
|
- опасность пожара. |
|
|
|
|
|
 Loading...