


 Loading...
INTRODUCTION
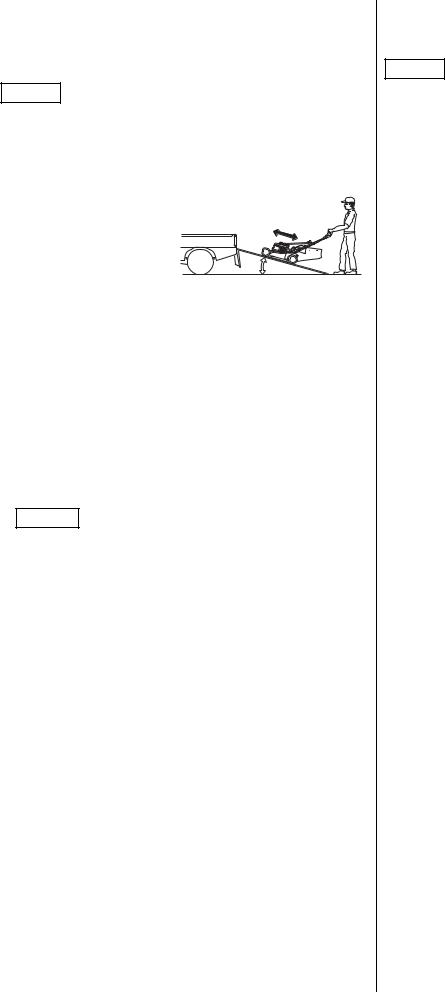
Thank you for purchasing a Honda lawnmower!
This manual covers the operation and maintenance of the Honda HRX537HYEA and HRX537HZEA lawnmowers.
We want to help you get the best results from your new mower and to operate it safely. This manual contains the information on how to do that; please read it carefully.
This manual should be considered a permanent part of the lawnmower and should remain with it if it is resold.
If you have a problem or questions concerning the mower, contact your supplying dealer.
We recommend that you read the warranty policy to fully understand your rights and responsibilities. The warranty policy is a separate document provided by your dealer.
Honda Power Equipment Mfg., Inc. reserves the right to make changes at any time without notice and without incurring any obligation.
No part of this publication may be reproduced without written permission.
SAFETY MESSAGES
Pay special attention to statements preceded by the following words:
DANGER
WARNING
CAUTION
You WILL be KILLED or SERIOUSLY HURT if you don’t follow instructions.
You CAN be KILLED or SERIOUSLY HURT if you don't follow instructions.
You CAN be HURT if you don't follow instructions.
Each message tells you what the hazard is, what can happen, and what you can do to avoid or reduce injury.
DAMAGE PREVENTION MESSAGES
You will also see other important messages that are preceded by the following word:
|
Your lawnmower or other property can be |
|
NOTICE |
||
damaged if you don’t follow instructions. |
||
|
The purpose of these messages is to help prevent damage to your lawnmower, other property, or the environment.
00X39VH7 V040
OWNER’S MANUAL
(Original instructions)
HRX537HYEA • HRX537HZEA
PEDESTRIAN CONTROLLED |
|
ENGLISH |
|||
LAWNMOWER |
|
||||
|
|
||||
|
|
|
|
|
|
|
|
|
|
FRANÇAIS |
|
|
|
|
|
|
|
|
|
|
|
|
|
|
|
|
|
ESPAÑOL |
|
CONTENTS |
|
|
|
|
|
|
|
|
|
||
|
|
|
DEUTSCH |
||
Safety Label Location . . . . . . |
. 3 |
Maintenance Schedule . . . . . |
13 |
||
INTRODUCTION . . . . . . . . . . . |
. 1 |
MAINTENANCE . . . . . . . . . . . . |
13 |
|
|
SAFETY MESSAGES . . . . . . . . |
1 |
The Importance of |
|
|
|
SAFETY INSTRUCTIONS . . . . . |
2 |
Maintenance . . . . . . . . . . . . . |
13 |
|
|
Product Identification Plate . . . |
3 |
Engine Maintenance . . . . . . . |
14 |
|
|
COMPONENT |
|
Control Cable |
|
|
|
IDENTIFICATION |
3 |
. . . . . . . . . . . . . .Adjustments |
15 |
|
|
Cutting means Removal and |
|
|
|||
SET-UP |
4 |
|
|
||
Installation |
16 |
|
|||
CONTROLS |
4 |
ITALIANO |
|||
Grass catcher Cleaning and |
|
||||
PRE-OPERATION CHECKS |
5 |
|
|||
Replacement |
17 |
||||
Engine Oil Level |
6 |
||||
TRANSPORTING. . . . . . . . . . . |
17 |
||||
Fuel . . . . . . . . . . . . . . . . . . . . . |
6 |
STORAGE . . . . . . . . . . . . . . . . |
18 |
||
OPERATION . . . . . . . . . . . . . . . |
9 |
TROUBLESHOOTING |
19 |
||
Mowing Precautions . . . . . . . . |
9 |
||||
Starting the Engine . . . . . . . . . |
9 |
SPECIFICATIONS . . . . . . . . . . |
20 |
|
|
Operating the Controls for |
|
Honda Warranty Conditions, |
|
|
|
|
EC Declaration of Conformity, |
|
|
||
. . . . . . . . . . . . . . . . .Mowing |
10 |
|
|
||
Stopping the Engine |
11 |
Honda Distributor Locations |
|
|
|
|
NEDERLANDS |
||||
Safe Mowing Practices |
11 |
. .Last page |
|||
|
|||||
Mowing Tips. . . . . . . . . . . . . . |
12 |
|
|
|
|
© 2004 – 2016 American Honda Motor Co., Inc.—All Rights Reserved |
|
||||
|
|||||
C4 |
|
HPE.2016.07 |
|
||
|
|
PRINTED IN U.S.A. |
|
||
ENGLISH |
1 |

SAFETY INSTRUCTIONS
WARNING
To ensure safe operation –
•Read instructions carefully, and become familiar with controls and proper use of equipment.
•Use the lawnmower for the purpose it is intended for, that is mowing and collecting grass. Any other use could be dangerous or damage the equipment.
•Never allow children or people unfamiliar with these instructions to use the lawnmower. Local regulations may restrict the age of the operator.
•Never mow when:
–People, especially children, or pets are nearby.
–User is under medication or has swallowed substance known to affect judgment or reactions.
–There is a risk of adverse weather such as lightning or a storm.
•Keep in mind that the operator or user is responsible for injuries or hazards occurring to other people or their property.
•While mowing, always wear substantial footwear and long trousers. Do not operate the equipment when barefoot or wearing sandals.
•Thoroughly inspect the area where the equipment is to be used, and remove all objects which may be thrown by the machine (stones, branches, wires, bones, etc...).
•WARNING - Petrol is highly flammable:
–Store fuel in containers specifically designed for this purpose.
–Refuel outdoors only, before starting the engine, and do not smoke while refueling or handling fuel.
–Never remove the cap of the fuel tank or add petrol while the engine is running or when the engine is hot.
–If petrol is spilled, do not attempt to start the engine, but move the machine away from the area of spillage, and avoid creating any source of ignition until the petrol vapors have dissipated.
–Install fuel caps securely.
–Before tipping the lawnmower to maintain the cutting means or drain oil, remove fuel from the tank.
•Replace faulty mufflers.
•Before using, always visually inspect to see that the cutting means, cutting-means bolts, and cutting-means enclosure are not worn or damaged. Replace worn or damaged cutting means and cutting-means bolts in sets to preserve balance.
•Do not operate the engine in a confined space where dangerous carbon monoxide fumes can collect.
•Mow only in daylight or good artificial light.
•If there is a risk of adverse weather such as lightning or a storm, stop operation.
•Avoid operating the equipment in wet grass, where possible.
•While mowing, always keep the safety distance to the cutting means, which is provided by the handle length.
•Walk, never run. Do not let yourself be pulled by the lawnmower.
•Always be sure of your footing on slopes. Mow across the face of slopes, never up and down.
•Exercise extreme caution when changing direction on slopes.
•Do not mow slopes of more than 20°.
•Use extreme caution when pulling the lawnmower toward you.
•Stop the cutting means if the lawnmower has to be tilted for transporting, when crossing surfaces other than grass, and when transporting the lawnmower to and from the area to be mowed.
•Never operate the lawnmower with defective guards or shields, or without safety devices such as discharge guard and/or grass catcher.
•Do not change the engine governor setting or over-speed the engine.
•Disengage the cutting-means control and drive clutch control before starting the machine.
•Start the engine carefully according to the instructions and with feet well away from the cutting means.
•Do not tilt the lawnmower when starting the engine.
Start the lawnmower on a level surface, free of high grass or obstacles.
•Keep hands and feet away from rotating parts.
Do not start the engine when standing in front of the discharge opening.
•Never pick up or carry a lawnmower while the engine is running.
•Stop the engine and disconnect the spark plug cap:
–Before any operation under the cutting-means enclosure or the discharge chute.
–Before checking, cleaning, or working on the lawnmower.
–After striking a foreign object. Inspect the lawnmower for damage and make repairs before restarting and operating the lawnmower.
–If lawnmower starts to vibrate abnormally, Check immediately the cause of the vibration and perform the necessary repair.
•Stop the engine in the following cases:
–Whenever you leave the lawnmower.
–Before refueling the lawnmower.
•Stop the cutting means in the following cases:
–When installing or removing the grass catcher.
–Before adjusting the cutting height.
•Reduce the throttle setting during engine shut-down, and turn the fuel valve off at the conclusion of mowing.
•Using any attachments other than those recommended in this manual may cause damage to your lawnmower and such damage will not be covered by your guarantee.
•Keep all nuts, bolts, and screws tight to be sure the equipment is in safe working condition. Regular maintenance is an essential aid to user’s safety and retaining a high level of performance.
•Never store the equipment with petrol in the tank inside a building where fumes may reach an open flame, spark or high temperature source.
•Allow the engine to cool before storing in any enclosure.
•To reduce the fire hazard, keep the lawnmower, especially the engine and silencer, the petrol storage area, and battery compartment (if applicable) free of grass, leaves, or excessive grease.
Do not leave container of grass cuttings in or near a building.
•If the fuel tank has to be drained, this should be done outdoors with a cold engine.
•Check the grass catcher frequently for wear or deterioration.
•Do not use the machine with worn or damaged parts.
Part must be replaced, not repaired. Replace worn or damaged parts with Honda genuine parts.
Cutting means must always must always bear the mark Honda and the reference number. Non equivalent quality parts may damage the machine and be prejudicial to your safety.
•Wear thick gloves when removing or installing the cutting means or when cleaning the cutting-means enclosure.
When tightening or loosening the cutting-means bolts, use a wooden block to prevent the cutting means from rotating.
•Always make sure the correct balance of the cutting means when sharpening.
•Wear eye protection.
2 |
ENGLISH |

SAFETY LABEL LOCATION |
|
|
COMPONENT IDENTIFICATION |
|
|
This label warns you of potential hazards that can cause serious |
|
||||
injury. Carefully read the meaning. If the label comes off or becomes |
|
||||
hard to read, contact your dealer for a replacement. |
|
[14] |
[12] |
||
Letter |
Meaning |
|
|
||
|
|
|
|
||
|
A |
|
|
D |
|
|
5 |
6 |
7 |
10 |
|
1 |
4 |
|
|
|
|
|
|
|
[2] |
2 |
3 |
Pb |
[1] |
|
|
8 |
1 |
9 |
[3] |
[5] |
A, D 1. Read the owner’s manual before using the mower. |
|
|
A [LABEL] |
|||
2. Risk of projections: Keep third persons away from the area during use. |
[11] |
|
||||
3. Risk of cuts. Rotating cutting means: Do not put hands or feet inside |
|
[6] |
||||
|
the cutting-means enclosure. Disconnect the spark plug cap before |
|
||||
|
performing any operation of maintenance or repairs. |
|
|
|
||
4. Do not operate without either rear discharge guard or grass catcher in |
|
|
||||
|
place. |
|
|
|
[10] |
|
5. No sparks, flames, smoking. |
|
|
|
|
|
|
6. |
Wear eye protection. |
|
|
|
|
|
7. |
Keep out of reach of children. |
|
|
|
|
|
8. |
Corrosive substance - Can cause blindness or severe burns. |
[9] |
[4] |
|||
9. |
Explosive gases - Shield eyes. |
|
|
|
||
10. Recycle - Contains lead. |
|
|
|
|
|
|
|
11 |
12 |
|
13 |
C [LABEL] |
[7] |
|
[8] |
[13] |
|
|
|
B |
D [LABEL] |
|
11. Read the owner’s manual before using the mower.
12. The engine emits toxic carbon monoxide. Do not run in an enclosed area.
13. Petrol is highly flammable. Stop the engine before |
|
refueling. |
[21] |
PRODUCT IDENTIFICATION PLATE |
|
|
[20] |
|
|||
Letter |
|
Meaning |
|
|
|
||
|
|
|
|
|
|||
|
|
|
|
|
11 |
[19] |
|
|
|
|
|
|
|
[15] |
|
|
|
|
|
|
10 |
|
|
|
|
|
|
|
|
|
|
C |
|
|
|
|
9 |
|
|
|
|
|
|
|
8 |
|
[16] |
|
|
|
|
|
7 |
|
|
|
|
|
3.2kW |
|
6 |
|
|
|
|
|
|
|
|
[17] |
|
|
|
|
|
|
|
|
|
1 |
2 |
3 |
4 |
5 |
|
[9] |
[18] |
|
|
|
|
|
|
|
B [LABEL] |
1. |
Sound power level guaranteed |
6. |
Year of manufacture |
|
|
|
|
|
|
|
|
|
|
|
Cutting-means control |
||||
|
according to directive |
7. |
Weight in kilograms |
|
|
|
|
|
|
|
|
1 |
Handlebar |
|
12 |
(Starts and stops the cutting |
|||
|
2000/14/EC |
8. |
Serial number |
|
|
||||
|
|
|
|
|
|
means) |
|||
2. |
Conformity mark according to |
9. |
Model |
|
|
|
|
|
|
|
|
|
|
|
|
||||
|
EC directive |
10.Name and address of |
|
2 |
Shift lever |
|
13 |
Button |
|
3. |
Conformity mark optional |
|
authorized |
|
|
|
|
|
|
|
|
3 |
Throttle lever |
|
|
Drive clutch control |
|||
4. |
Nominal power in kilowatts |
|
representative |
|
|
|
|
14 |
(Transmission control which |
|
|
|
|
|
|||||
5. |
Maximum operating engine |
11.Name and address of |
|
4 |
Cutting-means enclosure |
|
|
drives the rear wheels) |
|
|
speed |
|
Manufacturer |
|
|
|
|
|
|
|
|
|
5 |
Rear discharge guard |
|
15 |
Handlebar adjust knob (2) |
||
Name and address of manufacturer and authorized representative are |
|
|
|||||||
|
|
|
|
|
|
||||
written in the “EC Declaration of Conformity” CONTENT OUTLINE in this |
|
6 |
Fuel tank cap |
|
16 |
Clip Director knob |
|||
Owner’s Manual. |
|
|
|
|
|
|
|
|
|
|
|
|
7 |
Muffler |
|
17 |
Fuel valve |
||
Record the frame and engine serial numbers in the space below. you |
|
|
|
|
|
|
|||
|
8 |
Oil filler cap |
|
18 |
Air cleaner |
||||
will need these numbers when ordering parts and when making |
|
|
|||||||
|
|
|
|
|
|
||||
|
9 |
Cutting height adjustment lever (4) |
|
19 |
Carburetor |
||||
technical or warranty inquires. |
|
|
|
|
|||||
|
|
|
|
|
|
|
|
||
Frame serial number: _______-___________ |
|
10 |
Grass catcher |
|
20 |
Spark plug cap |
|||
|
|
|
|
|
|
||||
|
11 |
Key switch (HZEA only) |
|
21 |
Recoil starter |
||||
Engine serial number: _______-___________ |
|
|
|||||||
|
|
|
|
|
|
||||
|
|
|
|
|
|
||||
Date of purchase: ______/______/_______
ENGLISH |
3 |

SET-UP
UNPACKING
Remove all the cardboard from around the handlebar.
HANDLEBAR SETUP
1.Turn the handlebar adjust knobs [1] 90 degrees into the unlock position (page 7).
2.Move the handlebar into the
mowing position so that the locating pins align with either the upper, middle, or lower holes on the handlebar mounting brackets.
3. Turn the adjust knobs 90 |
[1] |
degrees into the lock position |
|
and the pins will snap into the |
|
holes and lock into position. |
|
BATTERY (HZEA TYPE)
The lawnmower has an internal charging system. Under normal mowing usage it is not necessary to charge or maintain the battery.
The mower is shipped with the ignition key in the parts bag. Install the key in the key switch.
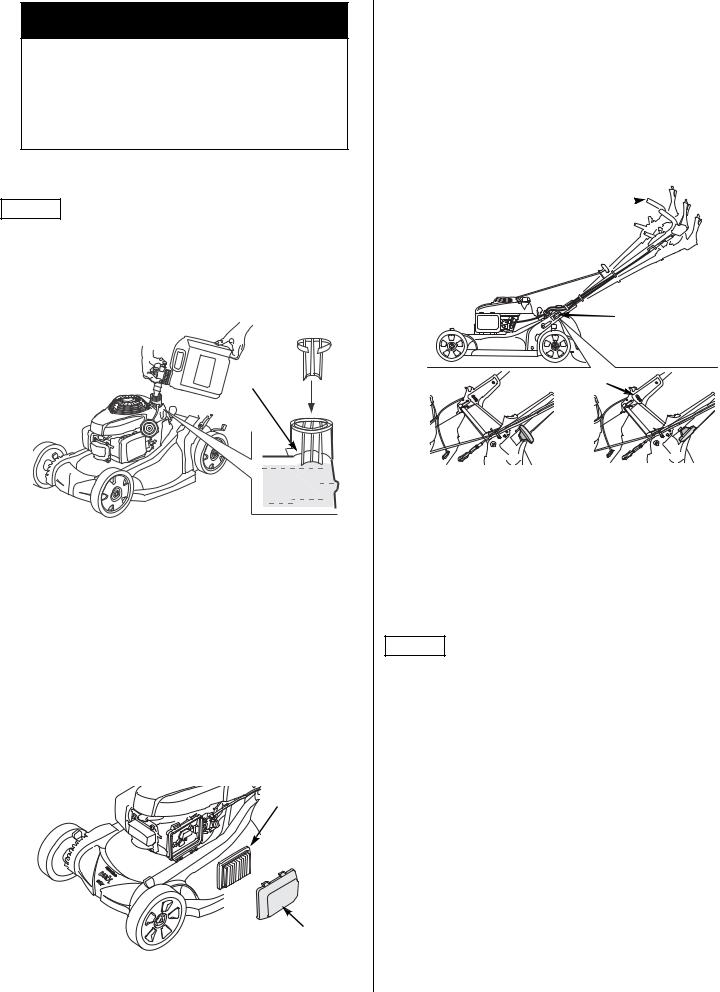
GRASS CATCHER ASSEMBLY
1.Slide the grass catcher frame [1] into the grass catcher [2] and install the plastic clips [3] as shown.
[2]
|
[3] |
[1] |
|
2. Lift the cutting-means |
|
enclosure [4] and install |
[4] |
the grass catcher. |
|
ENGINE OIL
The mower is shipped WITHOUT OIL in the engine.
Add enough SAE 10W-30 API service category SJ or later oil to bring the oil level between the upper limit [2] and lower limit [3] marks on the dipstick [1] as shown.
Refill amount: 0,35 ~ 0,40 L |
|
Do not overfill the engine with |
[1] |
oil. If the engine is overfilled, the |
|
excess oil may get transferred to |
|
the air cleaner housing and air filter. |
|
|
[2] |
|
[3] |
FUEL
Refer to page 4.
BEFORE USING YOUR LAWNMOWER
Before using the lawnmower, all mower operators must read the following chapters:
•SAFETY INSTRUCTIONS (page 2)
•CONTROLS (page 4)
•PRE-OPERATION CHECKS (page 5)
•OPERATION (page 9)
•MAINTENANCE SCHEDULE (page 13)
CONTROLS
FUEL VALVE
The fuel valve [1] opens and closes the connection between the fuel tank and the carburetor.
OFF
ON |
[1] |
THROTTLE LEVER
The throttle lever [1] controls the following functions:
[1] |
|
FAST |
For starting the engine and |
|
|
|
for mowing. |
|
|
SLOW |
For idling the engine. |
|
|
|
For stopping the engine. |
|
|
STOP |
(HZEA type; Turn the key |
|
|
|
switch OFF to stop the |
|
|
|
engine.) |
|
|
|
|
4 |
ENGLISH |

ENGINE SWITCH [1] (HZEA TYPE)
[1]
|
OFF |
Stops the engine. |
|
|
|
|
|
|
|
Running position |
|
|
ON |
(the key switch must be |
|
in the ON position to |
|||
|
|
||
|
|
use the recoil starter). |
|
|
|
|
|
|
START |
Operates the electric |
|
starter. |
|||
|
|
|
CUTTING-MEANS CONTROL
The button [1] and cutting-means control lever
[2] start and stop cutting [2] [1] means rotation.
DRIVE CLUTCH CONTROL
The drive clutch control [1] engages and disengages the transmission.
[1]
SHIFT LEVER
The shift lever [1] selects and controls the mower’s drive speed.
With the shift lever [1] all the |
|
way back [A] and the drive |
[A] |
clutch control engaged, the |
|
mower will move slowly or not |
|
at all. Use a slow speed for |
|
mowing thick grass or |
|
maneuvering in small areas. |
[B] |
Use position [B] for maximum |
[1] |
self-propelled speed in large, |
|
open areas, and for transport. |
|
CUTTING HEIGHT ADJUSTMENT LEVERS
There are seven adjustment settings. The cutting height figures are approximate. The actual height of cut grass will vary with lawn and soil conditions.
There is one adjustment lever [1] for each wheel.
CLIP DIRECTOR KNOB
1
19 mm
32 mm
46 mm
62 mm
75 mm
88 mm
2 

 101 mm
3
4
[1]
The Clip Director knob [1] |
[1] |
controls grass catching, |
|
mulching, and rear |
|
discharge. The knob has |
|
ten adjustment positions. |
|
PRE-OPERATION CHECKS
ARE YOU READY TO MOW?
Be sure to wear protective clothing. Long pants and eye protection can lower your risk of injury from thrown objects. Wear footwear that protects your feet and won’t let you slip if you mow on slopes or uneven ground.
CHECK YOUR LAWN
For your safety and for the safety of others, always inspect the area before mowing.
Objects
Anything that can be picked up by the cutting means and thrown is a potential hazard to you and others. Look for things like stones, sticks, bones, and wire. Remove them from the mowing area.
People and Pets
People and animals near the mowing area can move into your path or into a position where they could be struck by thrown objects. Clear the area of people, especially children, and pets. Their safety is your responsibility.
ENGLISH |
5 |

Lawn
Check the length and condition of the grass, so that you will know what cutting height and mowing speed to use.
Avoid mowing wet grass. Not only will wet grass clog your mower deck and collect in clumps on the lawn, it also gives poor traction, increasing your risk of losing your footing.
CHECK YOUR MOWER
Cutting Means
1. Move the throttle lever to the STOP position (page 4).
2. Move the fuel valve to the OFF position (page 4).
3. Disconnect the spark |
|
plug cap from the |
|
spark plug (page 14). |
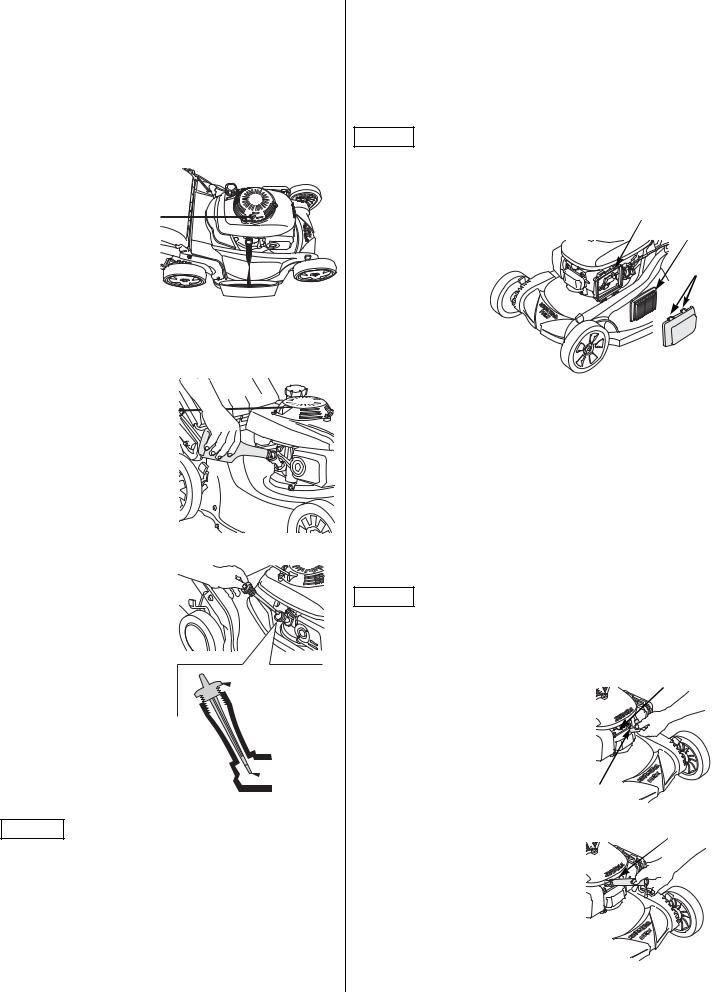
[2] |
4. Tilt the mower to the
right so the fuel cap [1] is up. This will help
prevent fuel leakage,
motor oil seeping into the air filter, and hard starting.
5.Inspect the cutting means [1] for damage, cracks, and excessive wear, rust, or corrosion.
NORMAL 
TRAILING EDGE
EXCESSIVELY WORN
TRAILING EDGE
NORMAL WORN BENT CRACKED
WARNING
A worn, cracked, or damaged cutting means can break, and pieces of the damaged cutting means can become dangerous projectiles.
Thrown objects can cause serious injury.
Inspect the cutting means regularly, and do not operate the mower with a worn or damaged cutting means.
A dull cutting means can be sharpened, but a cutting means that is worn out, bent, cracked, or otherwise damaged must be replaced. A worn or damaged cutting means can break, causing cutting means pieces to be thrown from the mower.
When a cutting means needs sharpening or replacement, take the lawnmower to an authorized Honda dealer. Or, if you have a torque wrench, you can remove and install the cutting means yourself.
Check that the cutting means bolts [2] are tight (page 17).
Engine Oil Level
Check the engine oil level with the engine stopped and the mower on a level surface.
Use 4-stroke motor oil that meets or exceeds the requirements for API service classification SJ or later. Always check the API service label on the oil container to be sure it includes the letters SJ or later.
SAE 10W-30 is recommended |
|
|
|
|
|
|
|
|
for general use. Other |
|
|
|
|
30 |
|
|
|
viscosities shown in the chart |
|
|
|
|
|
|
||
|
|
|
|
|
|
|
||
may be used when the average |
|
|
5W-30 • 10W-30 |
|
|
|||
temperature in your area is |
|
|
|
|
||||
0 |
20 |
40 |
60 |
80 |
100°F |
|||
within the indicated range. |
||||||||
|
-20 |
-10 |
0 |
10 |
20 |
30 |
40°C |
|
NOTICE |
|
|
|
|
|
|
|
|
•Running the engine with a low oil level can cause engine damage.
•Using nondetergent oil can shorten the engine’s service life, and using 2-stroke oil can damage the engine.
1.Remove the oil filler cap/dipstick [1], and wipe the dipstick clean.
2.Insert the dipstick into the filler neck. Do not screw it down. Remove the dipstick and check the oil level.
3.If the oil level is near the low level mark [3], add the recommended oil to bring the level up to the high limit mark [2]. Do not overfill.
4.Install and tighten the filler cap/dipstick [1] securely.
Fuel
 [1]
[1]
 [2]
[2]  [3]
[3]
This engine is certified to operate on unleaded petrol with a research octane rating of 91 or higher.
We recommend refueling after each use to minimize the air present in the fuel tank.
Refuel in a well-ventilated area before starting the engine. If the engine has been running, allow it to cool. Never refuel the mower inside a building where petrol fumes may reach flames or sparks.
You may use regular unleaded petrol containing no more than 10% ethanol (E10) or 5% methanol by volume. In addition, methanol must contain cosolvents and corrosion inhibitors. Use of fuels with content of ethanol or methanol greater than shown above may cause starting and/or performance problems. It may also damage metal, rubber, and plastic parts of the fuel system. In addition, ethanol is hygroscopic, which means it attracts and retains water in the fuel system. Engine damage or performance problems that result from using a fuel with percentages of ethanol or methanol greater than shown above are not covered by warranty.
If your equipment will be used on an infrequent or intermittent basis, (more than 4 weeks before next use) please refer to the Fuel section of the STORAGE chapter (page 18) for additional information regarding fuel deterioration.
6 |
ENGLISH |
WARNING
Petrol is highly flammable and explosive.
You can be burned or seriously injured when handling fuel.
•Stop the engine and allow to cool.
•Keep heat, sparks, and flame away.
•Handle fuel only outdoors.
•Wipe up spills immediately.
Never use stale or contaminated petrol or an oil/petrol mixture. Avoid getting dirt or water in the fuel tank.
NOTICE
Fuel can damage paint and plastic. Be careful not to spill fuel when filling your fuel tank. Damage caused by spilled fuel is not covered under warranty.
Remove the fuel tank cap and check the fuel level. Refill the tank if the fuel level is low. Refuel carefully to avoid spilling fuel. Do not overfill; there should be no fuel in the filler neck [1].
[1]
After refueling, tighten the fuel tank cap securely.
Move the mower at least 3 meters away from the fueling source and site before starting the engine.
Fuel Storage Container
Store your petrol in a clean, plastic, sealed container approved for fuel storage. Close the vent (if equipped) when not in use, and store the container away from direct sunlight. If it will take more than 3 months to use the fuel in the container, we suggest adding a fuel stabilizer to the fuel when you fill the container.
Air Cleaner Inspection
Remove cover [1]. Make sure the filter [2] is clean and in good condition. A dirty air filter will restrict air flow to the carburetor, reducing engine performance. Refer to page 14 for air cleaner service.
[2]
[1]
Handlebar Height Adjustment
Handlebar height can be adjusted to three positions: high [1], middle [2], and low [3].
1.Turn the handlebar adjust knobs [5] 90 degrees into the unlock [7] position.
2.Move the handlebar [4] up or down, so the locating pins align with either the higher, middle, or lower holes on the handlebar mounting brackets [6].
3.Turn the adjust knobs 90 degrees into the lock position [8] and the pins will snap into the holes and lock into position.
[1]
[2]
[4] 
[3]
|
[5] |
|
[6] |
[7] |
[8] |
Grass Catcher
A lawnmower works like a vacuum cleaner; it blows air through the catcher, which traps the grass clippings. Always empty the grass catcher before it becomes filled to the limit of its capacity. Catching performance will diminish after the catcher becomes about 90% filled. Also, the catcher is easier to empty when it is not packed full.
Inspection
During normal use, the grass catcher material is subject to deterioration and wear.
NOTICE
Frequently inspect the grass catcher for tears, holes, and excessive wear. Check for necessary replacement. Make sure the new catcher meets the original specifications.
If the grass catcher needs replacement, you can remove and install a catcher yourself (page 17).
ENGLISH |
7 |
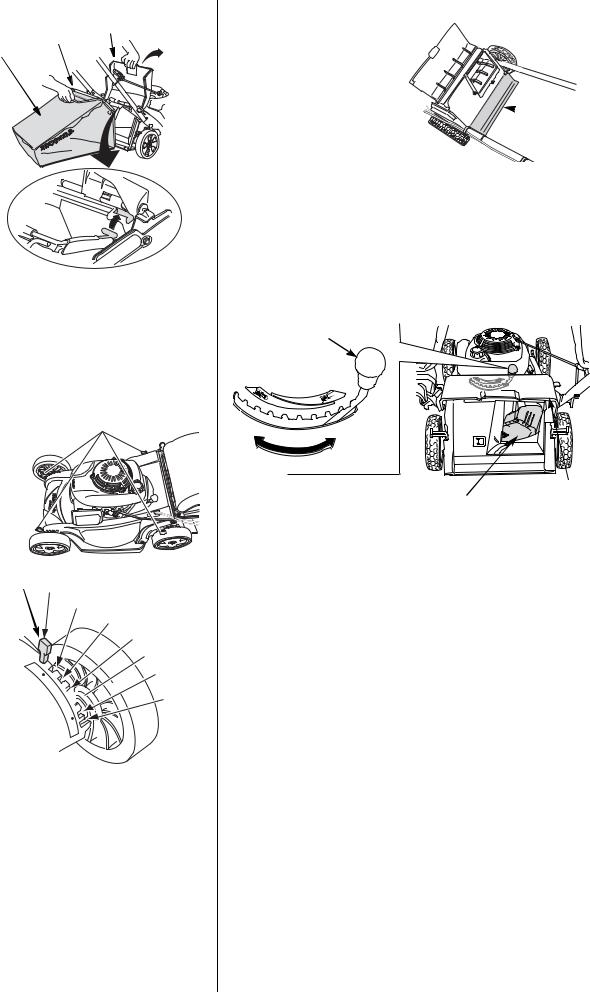
Installation |
|
1. Raise the |
[1] |
cutting-means |
[3] |
enclosure [1], and |
[2] |
|
|
use the grass |
|
catcher handle [3] to |
|
hook the grass |
|
catcher [2] onto the |
|
mower deck as |
|
shown. |
|
2. Release the |
|
cutting-means |
|
enclosure to secure |
|
the grass catcher. |
|
Removal
1. Raise the cutting-means
enclosure, grasp the grass catcher
handle, and remove the grass catcher.
2.Release the cutting-means enclosure.
3.When the grass catcher is clear of the cutting-means enclosure, you can lift it through the handlebar opening, or you can remove it to the rear of the mower below the handlebar.
Cutting Height
Check the mower deck cutting height settings, and be sure that all four adjustment levers [1] are set to the same cutting height position.
To adjust cutting height, pull each adjustment lever [1] toward the wheel, and move it into another notch.
If you are not sure what cutting height to select, start with a high setting and check the appearance of the lawn after mowing a small area. Then readjust cutting height if necessary.
[1]
[1]19 mm
|
32 mm |
|
46 mm |
|
62 mm |
|
75 mm |
1 |
88 mm |
2 

 101 mm
3
4
Rear Shield
During normal use the rear shield [1] is subject to deterioration and wear. Remove the grass catcher and raise the cutting-means enclosure [2] to check the rear shield for cracks or tears. If the rear shield is excessively worn, have it replaced by your authorized Honda servicing dealer.
Clip Director
Clip Director Knob Adjustment


 [2]
[2]
 [1]
[1]
Adjust the Clip Director knob [1] in any one of the ten positions to achieve the desired mowing results.
To adjust the Clip Director knob, pull the knob downward and towards the rear of the mower. The knob adjusts a sliding door [2] from the fully open BAG position to the fully closed MULCH position (see the following page).
[1]
CUTTING-
[2] (fully closed) MEANS ENCLOSURE
If a high resistance is noticed when moving the Clip Director knob from side-to-side, excessive grass may have built up on top of the sliding door.
Some grass accumulation in the discharge chute is normal when the Clip Director is fully closed. To remove this grass, close the cutting-means enclosure, fully open the Clip Director, start the engine, and engage the cutting-means control lever several times.
Important Safety Precaution
Always turn the engine off and disconnect the spark plug cap before lifting the cutting-means enclosure to view or clean around the sliding door. This will prevent contact with the rotating cutting means and prevent objects from being thrown into the discharge area.
Sliding Door Position
The sliding door [2] can be positioned to produce different mowing results. If the preferred sliding door position is unknown, install a grass catcher and begin mowing with the Clip Director knob [1] all the way to the BAG position. Check the appearance of the lawn. As the knob is moved towards the MULCH position, more grass will be
8 |
ENGLISH |
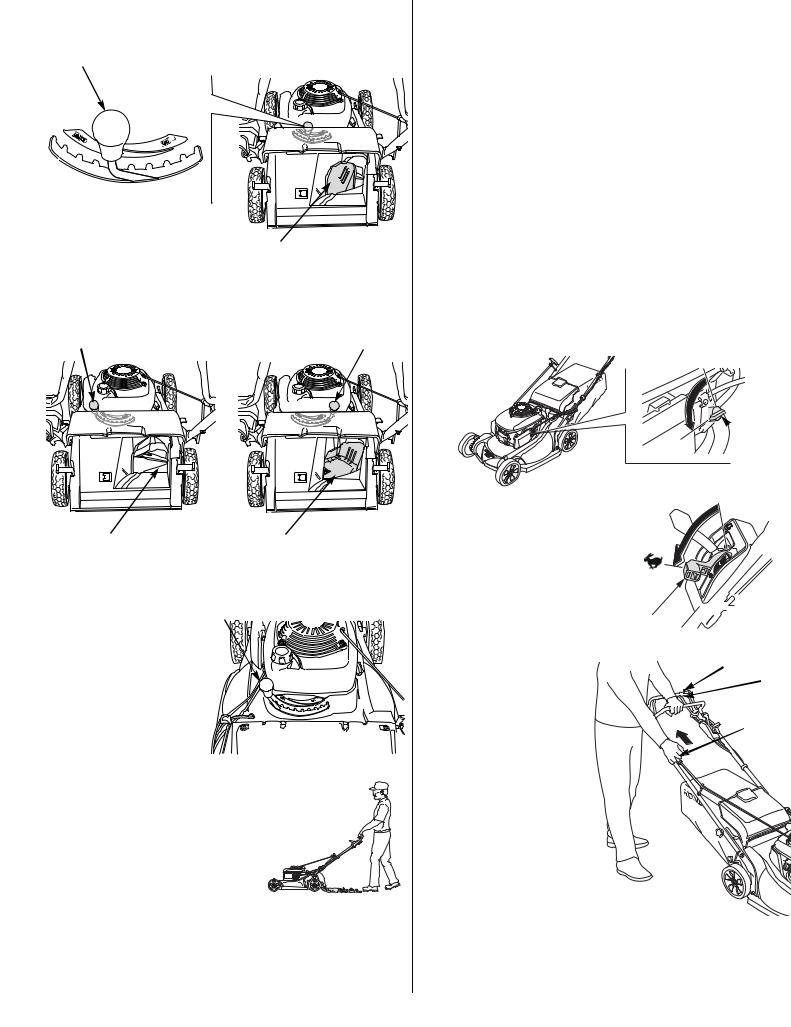
recycled back into the lawn. Adjust the Clip Director knob until the desired result is achieved.
|
GRASS CATCHING OR REAR |
|||||||||||||
[1] |
DISCHARGE AND SOME MULCHING |
|||||||||||||
|
|
|
|
|
|
|
|
|
|
|
|
|
|
|
|
|
|
|
|
|
|
|
|
|
|
|
|
|
|
|
|
|
|
|
|
|
|
|
|
|
|
|
|
|
|
|
|
|
|
|
|
|
|
|
|
|
|
|
|
|
|
|
|
|
|
|
|
|
|
|
|
|
|
|
|
|
|
|
|
|
|
|
|
|
|
|
|
|
|
|
|
|
|
|
|
|
|
|
|
|
|
|
|
|
|
|
|
|
|
|
|
|
|
|
|
|
|
|
|
|
|
|
|
|
|
|
|
|
|
|
|
|
|
|
|
|
|
|
|
|
|
|
|
|
|
|
|
|
|
|
|
|
|
|
|
|
|
|
|
|
|
|
|
|
|
|
|
|
|
|
|
|
[2] (50% open) |
|||||||||
FULL GRASS CATCHING OR |
|
|
|
|
FULL MULCHING |
||||||||||||
|
|
REAR DISCHARGE |
|
|
|
|
|
|
|
|
|
|
|||||
|
|
|
|
|
|
|
|
|
|
||||||||
|
|
[1] (BAG position) |
|
|
|
|
[1] (MULCH position) |
||||||||||
|
|
|
|
|
|
|
|
|
|
|
|
|
|
|
|
|
|
|
|
|
|
|
|
|
|
|
|
|
|
|
|
|
|
|
|
|
|
|
|
|
|
|
|
|
|
|
|
|
|
|
|
|
|
|
|
|
|
|
|
|
|
|
|
|
|
|
|
|
|
|
|
|
|
|
|
|
|
|
|
|
|
|
|
|
|
|
|
|
|
[2] (fully open) |
[2] (fully closed) |
Rear Discharge |
|
To discharge clippings to the |
[1] |
rear, remove the grass catcher |
|
and position the Clip Director |
|
knob [1] in the BAG range. |
|
Maximum rear discharge will
occur when the Clip Director knob is all the way to the left (BAG) position. As the Clip Director knob is moved toward the right (MULCH) position, less grass will be discharged though the rear cutting-means enclosure.
OPERATION
MOWING PRECAUTIONS
Before operating the mower for the first time, please review SAFETY INSTRUCTIONS (page 2) and PRE-OPERATION CHECKS (page 5).
Even if you have operated other mowers, take the time to become familiar with how this mower works, and practice in a safe area until you build up your skills.
For your safety, do not start or operate the engine in an enclosed area such as a garage. Your mower's exhaust contains poisonous carbon monoxide gas that can collect rapidly in an enclosed area and cause illness or death.
FREQUENCY OF USE
If your equipment will be used on an infrequent or intermittent basis, (more than 4 weeks before next use) please refer to the Fuel section of the STORAGE chapter (page 18) for additional information regarding fuel deterioration.
STARTING THE ENGINE
1. Turn the fuel valve [1] to the ON position.
ON  [1]
[1]
2.Move the throttle lever [1] to the fast ( ) position.
O
T
S
|
[1] |
|
3. HYEA type:. |
[2] |
|
Pull the starter grip [1] |
||
[3] |
||
lightly until you feel |
|
|
resistance, then pull |
|
|
briskly. Return the starter |
[1] |
|
grip gently. |
||
|
To keep the cutting means from turning and to prevent the mower from moving forward, always release the cutting-means control lever [2] and drive clutch control [3] when you pull the starter.
ENGLISH |
9 |

HZEA electric start type:
Turn the starter key switch to the
START ( ) position. Let the key
return to the ON (I) position when the engine starts.
The starter should not be cranked for more than 5 seconds at a time. If
the engine fails to start, release the switch and wait 10 seconds before operating the starter again.
If the battery does not have
sufficient charge to start the engine, possibly due to a long storage period, use the recoil starter to start the engine for at least one mowing session. The battery should have sufficient charge after one mowing session (approximately 1 hr).
HZEA manual start:
Turn the starter key switch ON.
The engine switch must be in the ON ( ) position to start the engine with the recoil starter.
Move the throttle lever to the FAST ( ) position.
Place your foot on the mower deck step. Pull the starter grip lightly
until you feel resistance, then pull briskly. Return the starter grip gently.
4. Put the throttle lever [1] in the FAST ( ) position to mow or
to the SLOW ( ) position to [1] idle.
To ensure easy restarting and maximum performance from the Auto Choke System, start mowing as soon as the engine starts and allow the engine to run for at least three minutes before stopping the engine.
High Altitude Operation
At high altitude, the standard carburetor air-fuel mixture will be too rich. Performance will decrease, and fuel consumption will increase. A very rich mixture will also foul the spark plug and cause hard starting.
High altitude performance can be improved by specific modifications to the carburetor. If you always operate your mower at altitudes above 1,500 meters, have a Honda dealer perform this carburetor modification.
Even with carburetor modification, engine power will decrease about 3.5% for each 300 meter increase in altitude. The effect of altitude on power will be greater than this if no carburetor modification is made.
NOTICE
When the carburetor has been modified for high altitude operation, the air-fuel mixture will be too lean for low altitude use. Operation at altitudes below 1,500 meters with a modified carburetor may cause the engine to overheat and result in serious engine damage. For use at low altitudes, have your authorized Honda dealer return the carburetor to original factory specifications.
OPERATING THE CONTROLS FOR MOWING
Throttle Lever
For best cut quality, always mow with the throttle lever [1] in the FAST ( ) position. When the cutting means rotates at the preset fast speed, it creates a strong fan action that lifts and cuts grass more efficiently.
Do not try to increase the preset engine speed; the cutting means could fracture and come apart.
Cutting-means Control Lever
To start cutting means rotation, press the yellow button [1] on top of the cutting-means control lever [2], then push the lever forward and hold it against the handlebar.
Release the cutting-means control lever [2] to stop the cutting means.
[1]
[2]
[1]
Operate the cutting-means control lever with a quick and complete motion, so the
cutting-means control is always either fully engaged or disengaged. This will help to prevent stalling the engine, and it will help prevent damage to the cutting-means control mechanism.
Drive Clutch Control
Push the drive clutch control [1] forward to propel the mower forward.
For self-propelled mowing, |
[2] |
[3] |
|
press the yellow button [2] |
|||
|
|||
|
|
||
on top of the |
|
|
|
cutting-means control |
|
|
|
lever [3], push the |
|
|
|
cutting-means control |
|
|
|
lever forward to the |
|
|
|
handlebar, and then push |
|
[1] |
|
the drive clutch control [1] |
|
||
|
|
||
forward. |
|
|
Release the drive clutch control [1] to stop the mower's forward movement.
You can control mower speed with the drive clutch control [1]. The mower will move gradually faster as you push the lever forward. If you push the lever all the way up to the handlebar, the mower will move at the speed determined by the shift lever setting.
Shift Lever
Use the shift lever to select the forward speed at which you wish to mow.
Do not use the throttle lever to adjust your forward speed. The throttle lever must remain in the fast position for good mowing performance. Otherwise, cut quality suffers.
Use the lower speed range for mulching and catching, the higher speed range for transporting.
THROTTLE 

With the shift lever all the way back and the drive clutch control engaged, the mower will move slowly or not at all.
10 |
ENGLISH |
STOPPING THE ENGINE
1.Release the drive clutch control [1] and cutting-means control lever [2].
[2]


[1]
2.HYEA type: Move the throttle lever [1] to the STOP ( )
position to stop the engine. |
[1] |
|
HYEA TYPE
HZEA type: Move the throttle lever to the STOP position and then turn the key switch to the
OFF ( ) position.
HZEA TYPE
3.When the mower is not in use,
turn the fuel valve to the OFF position.
OFF
4.If your equipment will not be used for 3 to 4 weeks, we recommend running the engine’s carburetor out of fuel. You can do this by leaving the fuel valve OFF, restarting the engine and running it out of fuel. See “Storage” on page 18 for periods of inactivity that exceed 4 weeks.
SAFE MOWING PRACTICES
For your safety, keep all four wheels on the ground, and be careful to avoid losing your footing and your control of the mower. Keep a firm grip on the handlebar, and walk, never run, with the mower. Be very careful when mowing uneven or rough ground.
If stuck, do not kick or shove the mower with your foot. Use the handlebar to control the mower.
DANGER
The cutting means are sharp and spin at high speed.
If you come in contact with a spinning cutting means, it will cut you severely and can amputate fingers and toes.
•Wear protective footwear.
•Keep your hands and feet away from the mower deck while the engine is running.
•Stop the engine before performing any adjustment, inspection, or maintenance.
Stability
Mow across slopes, not up and down. Avoid steep slopes (more than 20°), and be careful when changing direction. Mowing on a slope when the grass is damp or wet could cause you to slip, fall, and lose control of the mower.
Obstacles
Use the side of the mower to cut close to large obstacles, such as fences or walls.
Release the drive clutch control to
disengage the drive when mowing around trees and other obstacles. Push the mower around obstacles for better directional control. Be careful when mowing over obstacles embedded in the lawn, such as sprinkler heads, paving, edging, etc. Avoid anything that sticks up above the surface of the lawn.
If the cutting means hits something, or if the mower starts to vibrate, stop the engine immediately and check for damage. Striking objects may damage the cutting means, bend the crankshaft, and/or break the mower deck or other components. Vibration usually indicates serious trouble.
WARNING
A worn, cracked, or damaged cutting means can break, and pieces of the damaged cutting means can become dangerous projectiles.
Thrown objects can cause serious injury.
Inspect the cutting means regularly, and do not operate the mower with a worn or damaged cutting means.
The warranty does not cover parts damaged by accident or collision.
Gravel and Loose Objects
Gravel, loose stones, and landscaping material can be picked up by the mower and thrown many feet with enough force to cause serious personal injury and/or property damage. The best way to prevent potential injury from thrown objects is to release the cutting-means control lever to stop the cutting means before reaching areas with gravel, loose stones, or landscaping material.
ENGLISH |
11 |
MOWING TIPS
When to Mow
Most grasses should be mowed when they have grown 12 ~ 25 mm above their recommended height.
More frequent mowing is required for mulching than for catching. For best results, you may need to mow the lawn twice a week during the growing season.
Cutting Height
Consult a local nursery or lawn and garden center for cutting height recommendations and advice about specific types of grasses and growing conditions in your area.
If you look closely, you'll see that most grass has stems and leaves. If you cut off the leaves, you'll scalp the lawn. Let the grass recover between mowings. Your mower will work better, and your lawn will look better.
LONG ENOUGH
TOO SHORT
If your grass gets too tall, cut it once at the highest cutting height setting, and then mow again in 2 or 3 days. Don't take off more than one third of total grass height in any one mowing, or brown patches may develop.
Cutting height adjustment levers are explained in the CONTROLS chapter (page 4).
Cutting Width
For an even lawn finish, overlap each mowing swath by a few centimeters. If the grass is very tall or thick, use more overlap and a narrower mowing swath.
Cutting Means Speed
The cutting means must spin very fast to cut properly. Always use the fast throttle setting, and keep the engine running at maximum speed.
If engine speed drops, it could mean the engine is being overloaded by the cutting means trying to cut too much grass. Mow a narrower swath, move the mower slower, or raise the cutting height.
Cutting Means Sharpness
A sharp cutting means cuts cleanly. A dull cutting means tears the grass, leaving shredded ends that turn brown. When your cutting means doesn't cut cleanly anymore, have it sharpened or replaced.
Dry Grass
If the ground is too dry, mowing will stir up a lot of dust. Besides being unpleasant to work in, too much dust will clog the carburetor air filter.
If dust is a problem, water your lawn the day before mowing. Mow when the grass is dry to your touch, but the soil is still moist.
Wet Grass
Wet grass is slippery and can make you lose your footing. Also, wet grass clippings will clog the mower deck and collect in clumps on the lawn. Always wait for wet grass to dry before mowing.
Fallen Leaves
Your mower can be used to pick up fallen leaves for disposal. If using the mower to catch large amounts of fallen leaves, and not for mowing, set the cutting height adjustment levers so the front of the mower deck is one or two settings higher than the rear. To start, position the Clip Director knob in the #9 position (not quite full mulching). This setting will allow the leaves to be recirculated and recut until the particles are small enough to pass though the sliding door opening and into the grass catcher.
Depending on the size, type, and water content of the leaves, it may be necessary to open the sliding door to allow for best catching results. Using the sliding door correctly will allow better grass catcher filling, resulting in less grass catcher emptying. Be sure there are no obstacles, including rocks, hidden under the leaves.
If you want to mulch fallen leaves into your lawn, don't let the leaf cover get too deep before you begin. For best results, start mulching while grass still shows through the leaf cover. Position the Clip Director knob in the MULCH position. In places where fallen leaves completely cover the grass, remove the leaves by raking, or use the grass catcher so your mower can pick them up for disposal.
Clogged Cutting-means Enclosure
Before clearing a clogged cutting-means enclosure, stop the engine and turn the fuel valve to the OFF position. With the spark plug cap disconnected, tilt the mower so the air cleaner side is up.
Clear a clogged cutting-means enclosure with a stick, not your hands.
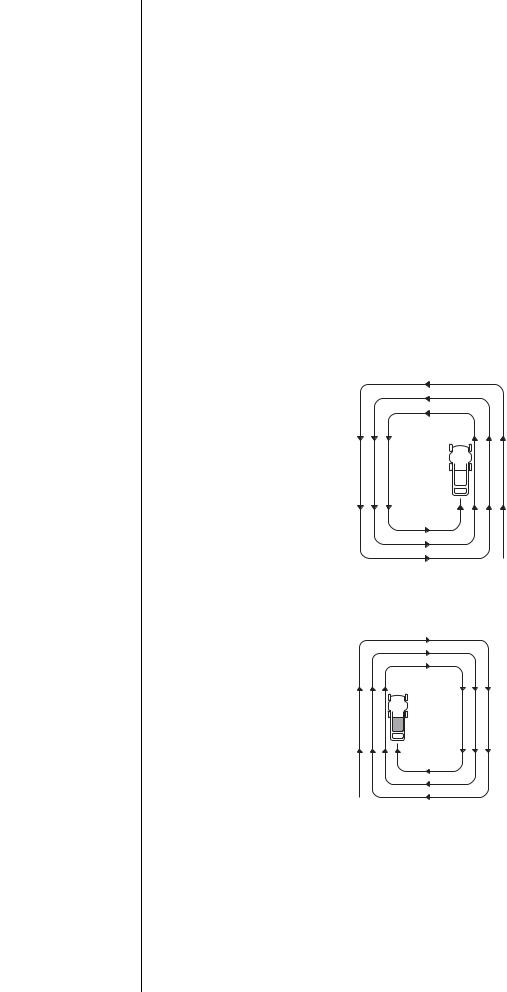
Mowing Patterns
Your Honda mower will work most efficiently if you use the following mowing patterns as much as possible. Mower deck and equipment design, and the direction in which the cutting means rotate, cause these mowing patterns to give the best results.
Mulching
Use a counterclockwise mowing pattern when the Clip Director knob is in the full MULCH position. If the lawn has an irregular shape, or many obstacles, divide it into sections where you can use counterclockwise mowing patterns.
MULCHING PATTERN
Catching
Use a clockwise mowing pattern. This will give the best Clip Director and catching performance, leaving the least amount of clippings on the lawn.
CATCHING & REAR-DISCHARGE
PATTERN
Rear Discharge Mowing
Remove the grass catcher and close the cutting-means enclosure. Adjust the Clip Director knob to the desired setting and begin mowing in a clockwise mowing pattern. If the lawn has an irregular shape, or many obstacles, divide it into sections.
12 |
ENGLISH |

MAINTENANCE
THE IMPORTANCE OF MAINTENANCE
Good maintenance is essential for safe, economical, and trouble-free operation. It will also help reduce air pollution.
To help you properly care for your mower, the following pages include a maintenance schedule, routine inspection procedures, and simple maintenance procedures using basic hand tools. Other service tasks that are more difficult, or require special tools, are best handled by professionals and are normally performed by a Honda technician or other qualified mechanic.
The maintenance schedule applies to normal operating conditions. If you operate your mower under unusual conditions, consult an authorized Honda dealer for recommendations applicable to your individual needs and use.
Remember that your Honda dealer knows your mower best and is fully equipped to maintain and repair it.
To ensure the best quality and reliability, use only new, Honda Genuine parts or their equivalents for repair and replacement.
WARNING
Improper maintenance, or failure to correct a problem before operation, can cause a malfunction in which you can be seriously hurt or killed.
Always follow the inspection and maintenance recommendations and schedules in this owner’s manual.
Maintenance safety
Some of the most important safety precautions follow. However, we cannot warn you of every conceivable hazard that can arise in performing maintenance. Only you can decide whether or not you should perform a given task.
WARNING
Failure to properly follow maintenance instructions and precautions can cause you to be seriously hurt or killed.
Always follow the procedures and precautions in this owner’s manual.
Safety Precautions
•Make sure the engine is off before you begin any maintenance or repairs. This will eliminate several potential hazards:
–Carbon monoxide poisoning from engine exhaust.
Be sure there is adequate ventilation whenever you operate the engine.
–Burns from hot parts.
Let the engine and exhaust system cool before touching.
–Injury from moving parts.
Do not run the engine unless instructed to do so.
•Read the instructions before you begin, and make sure you have the tools and skills required.
•To reduce the possibility of fire or explosion, be careful when working around petrol. Use only a nonflammable solvent, not petrol, to clean parts. Keep cigarettes, sparks, and flames away from all fuel-related parts.
MAINTENANCE SCHEDULE
Perform at every indicated month/year or operating hour interval, whichever comes first.
Regular Service |
Item |
Page |
|
Period |
|||
|
|
||
|
|
|
|
Before each use |
Check: Grass catcher |
page 4 |
|
|
Check: Cutting means |
page 6 |
|
|
Check: Operation of the |
page 6 |
|
|
cutting-means control |
||
|
Check: Engine oil level |
page 6 |
|
|
Check: Air filter |
page 7 |
|
|
Check: Rear shield |
page 8 |
|
|
Check: Cutting-means bolt torque |
page 16 |
|
|
|
|
|
First month |
Change: Engine oil |
page 14 |
|
or 5 hours |
|
|
|
|
|
|
|
First 25 hours |
Clean: Air filter 1 |
page 14 |
|
|
Adjust: Cutting-means control cable2 |
|
|
|
Adjust: Drive clutch cable 2 |
|
|
|
Adjust: Throttle cable 2 |
|
|
Every 6 months |
Change: Engine oil 1 |
page 14 |
|
or 50 hours |
Clean: Air filter 1 |
page 14 |
|
Every year |
6 month items above plus: |
|
|
or 100 hours |
Check-adjust: Spark plug |
page 14 |
|
|
Clean: Spark arrester 3 (if equipped) |
page 15 |
|
|
Check: Operation of the |
|
|
|
cutting-means control |
page 6 |
|
|
Grease: Pinion gears 2 |
|
|
|
Adjust: Throttle cable 2 |
|
|
|
Adjust: Drive clutch cable 2 |
|
|
|
Adjust: Valve clearance 2 |
|
|
|
Adjust: Idle speed 2 |
|
|
|
Clean: Fuel tank 2 |
|
|
Every 2 years |
Yearly items above plus: |
|
|
or 150 hours |
Replace: Air filter |
page 14 |
|
|
Replace: Spark plug |
page 14 |
|
|
Inspect-grease: Rear wheel adjuster |
|
|
|
bushing 2 |
|
|
Every 2 years |
Check: Fuel lines replace if |
|
|
|
necessary 2 |
|
1.Service more frequently when used in dusty areas.
2.These items should be serviced by an authorized Honda servicing dealer, unless you have the proper tools and are mechanically proficient. Refer to the Honda shop manual for service procedures.
3.In Europe and other countries where machinery directive 2006/42/EC is enforced, this cleaning should be done by your servicing dealer.
Failure to follow this maintenance schedule could result in non-warrantable failures.
ENGLISH |
13 |
ENGINE MAINTENANCE
Engine Oil Change
Drain the oil while the engine is warm. Warm oil drains quickly and completely.
1.Put the throttle lever in the STOP position and turn the fuel valve OFF. This will reduce the possibility of fuel leakage (page 4).
2.Wipe the oil filler area clean, and then remove the oil filler cap/dipstick.
3.Place a suitable container
next to the mower to catch
the used oil, and then tilt the
mower on its right side. The used oil will drain through the filler neck. Allow the oil to drain completely.
Please dispose of used motor
oil and the containers in a manner that is compatible
with the environment. We
suggest you take it in a sealed container to your local recycling center or service station for reclamation. Do not throw it in the trash, pour it on the ground or pour it down a drain.
4.Fill with the recommended oil (page 6).
Refill amount: 0.35 ~ 0.40 L
Do not overfill. Measure the oil level as shown.
5.After changing the engine oil and before starting the engine, check the oil level with the mower on a level surface:
a.Remove the filler cap/dipstick [1].
b.Wipe the dipstick clean.
c.Insert and remove the dipstick without screwing it into the filler neck. Check the oil level shown on the dipstick.
d.If the oil level is below the low level mark [3], add oil to reach the high limit mark [2] on the dipstick. Do not overfill. If the engine is overfilled, the excess oil may get transferred to the air cleaner housing and air cleaner filter.
 [1]
[1]
 [2]
[2]  [3]
[3]
NOTICE
Running the engine with a low oil level can cause engine damage.
e. Screw in the filler cap/dipstick securely.
Air Cleaner Service
A properly maintained air filter will help prevent dirt from entering your engine. Dirt entering the carburetor can be drawn into small passages in the carburetor and cause premature engine wear. These small passages can become blocked, causing starting or running problems. Always use an air filter specified for your engine to ensure it seals and performs as designed. You will need to clean the filter more frequently if you operate the engine in very dusty conditions.
NOTICE
Operating the engine without an air filter, or with a damaged filter, will allow dirt to enter the engine, causing rapid engine wear. This type of damage is not covered by the warranty.
1.Press down on the air cleaner cover [1] tabs, and then remove the cover.
2.Remove the filter [2] from the air cleaner housing [3].
3.Inspect the filter, and replace it if it is damaged.
[3]
[2]
[1]
4.Clean the filter by tapping the filter
several times on a hard surface to remove dirt, or blow compressed air (not exceeding 207 kPa) through the filter from the inside. Never try to brush off dirt; brushing will force dirt into the fibers.
5.Wipe dirt from the inside of the air cleaner housing and cover, using a moist rag. Be careful to prevent dirt from entering the air duct that leads to the carburetor.
6.Reinstall the filter and cover.
Spark Plug Service |
|
Required spark plugs: |
NGK - BPR5ES |
NOTICE
Incorrect spark plugs can cause engine damage.
For good performance, the spark plug [1] must be properly gapped and free of deposits.
1. Disconnect the spark plug cap [2], |
[1] |
|
and remove any dirt from around the |
||
|
||
spark plug area. |
|
|
[2] |
2. Remove the spark plug with a spark |
[3] |
plug wrench [3]. |
|
14 |
ENGLISH |
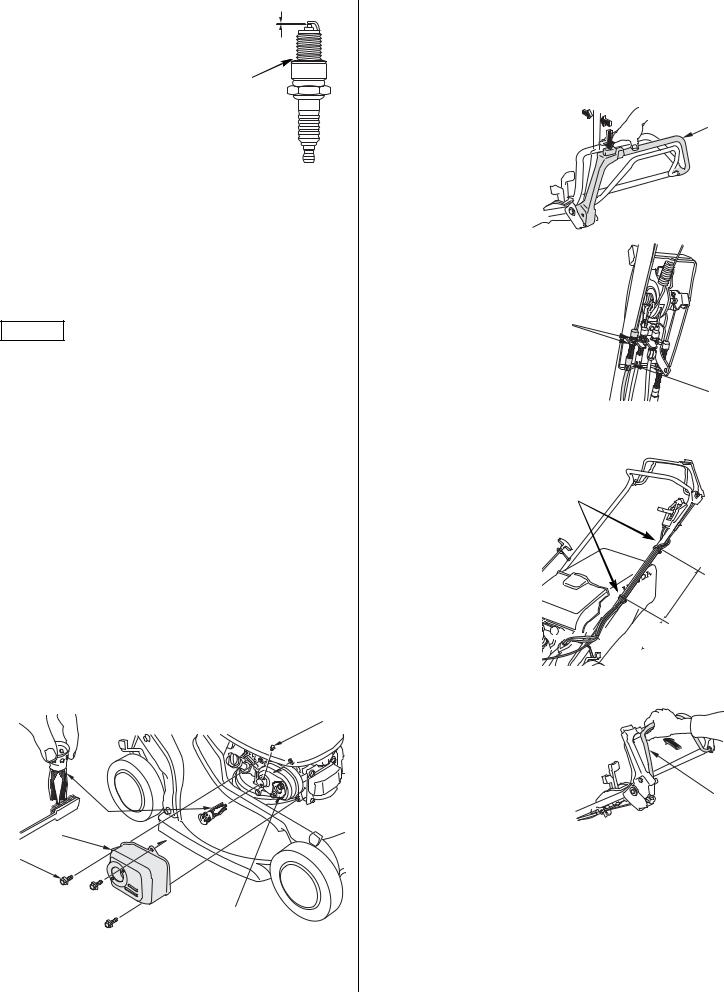
3.Inspect the spark plug. Replace it if the electrodes are worn or if the insulator is cracked or chipped.
Clean the spark plug with a wire brush if you are going to reuse it.
4.Measure the spark plug electrode gap with a suitable gauge. The gap should be 0.7 ~ 0.8 mm. Correct the gap, if necessary, by carefully bending the side electrode.
5.Install the spark plug carefully, by hand, to avoid cross-threading.
0.7 ~ 0.8 mm
[4]
6.After the spark plug seats, tighten with a spark plug wrench to compress the washer.
If reinstalling the old spark plug, tighten 1/8 to 1/4 turn after the spark plug seats.
If installing a new spark plug, tighten 1/2 turn after the spark plug seats to compress the washer [4].
NOTICE
A loose spark plug can overheat and damage the engine. Overtightening the spark plug can damage the threads in the cylinder head.
7. Install the spark plug cap on the spark plug.
Spark Arrester Service
In Europe and other countries where machinery directive 2006/42/EC is enforced, this cleaning should be done by your servicing dealer.
The spark arrester must be serviced every 100 hours to keep it functioning as designed.
1.Allow the engine to cool, and then remove the three bolts [1] from the muffler shield [2] using a 10 mm socket wrench.
2.Remove the muffler shield [2].
3.Remove the screw [4].
4.Remove the spark arrester [3] from the muffler [5].
5.Check for carbon deposits on the spark arrester and the exhaust port. Brush carbon deposits away. Be careful to avoid damaging the spark arrester screen.
6.Install the spark arrester in the muffler.
7.Install the muffler components on the engine, and tighten the three bolts securely.
[4]
[3]
[2]
[1]
[5]
CONTROL CABLE ADJUSTMENTS
Cutting-means Control Cable
Measure free play at the top of the cutting-means control lever [1], while holding the button down. Free play should be 10 ~ 15 mm. If adjustment is necessary:
1. Loosen the locknuts [2]
with a 10 mm wrench, and |
[1] |
|
move the adjuster [3] up |
||
10 ~ 15 mm |
||
or down as required. |
||
|
2. Tighten the locknuts and recheck free play.
3. Start the engine outdoors, and operate the cutting-means control lever.
If the cutting means does not start or stop as it should, with correct cable adjustment, take the mower to an authorized [2]
Honda dealer for repair.
[3]
Drive Clutch Cable Adjustment
1. With the engine stopped,
position the control cable
bands [1] as shown.
[1]
2. Pull the shift lever all the way back to the stop position.
3. Start the engine and move
the throttle lever to the
FAST position.
280 mm


 120 mm
4. Engage the drive clutch control [2] and confirm the following:
a. Mower does not self-propel.
b. Mower begins to self-propel |
|
|
or creeps very slowly forward |
[2] |
|
when the shift lever is moved |
||
|
||
one notch forward. |
|
If the mower does not operate as outlined above, go to
step 5. If the mower does operate as outlined above, adjustment is not required.
ENGLISH |
15 |
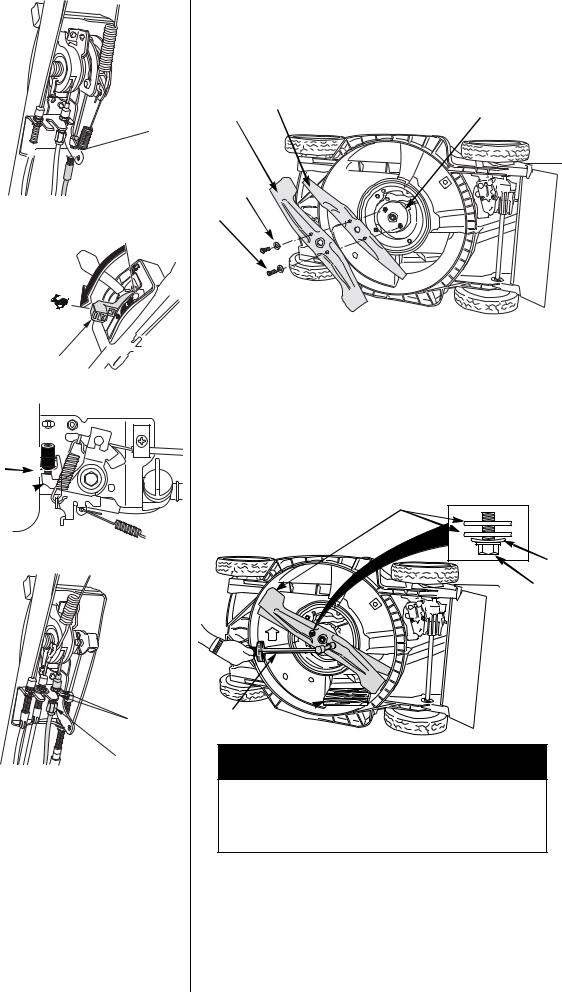
5. Loosen the top [3] and bottom [4] drive clutch cable locknuts with a 10 mm wrench. Move the adjuster [5] up or down, as required, until the mower operates as outlined in step 4. Tighten the locknuts.
[3]


 [4]
[4] 
 [5]
[5]
Throttle Cable Adjustment
1.Move the throttle lever [1] to the fast position [2].
2. Remove air cleaner cover.
[1]
3.Check that the control lever [3] just touches the
stopper screw [4]. If adjustment is required, proceed to step 5.
[4]
[3] 
4. Loosen lock nuts [5] with a 10 mm wrench. Move adjuster [6] up or down as required to achieve the
setting in step 3. Retighten locknuts [5].
[5]
[6]
CUTTING MEANS REMOVAL AND INSTALLATION
If you remove the cutting means for sharpening or replacement, you will need a torque wrench for installation. Wear heavy gloves to protect your hands.
CUTTING MEANS SHARPENING: To avoid weakening the cutting means, or causing imbalance or poor cutting, the cutting means should be sharpened by trained staff at an authorized Honda dealer.
CUTTING MEANS REPLACEMENT: Use Honda Genuine replacement cutting means or their equivalent.
Cutting Means Removal
1.HYEA: Put the throttle lever in the STOP position. HZEA: Turn the key to the OFF position.
2.Disconnect the spark plug cap. Tilt the mower to the right so the fuel cap is up. This will help prevent fuel leakage, motor oil seeping
into the air filter, and hard starting.
[3] |
[4] |
[5] |
|
[2]
[1]
3.Use a 14 mm (6 point) socket wrench and remove the two cutting-means bolts [1] and special washers [2] from the cutting-means control assembly [5]. Use a wooden block to prevent the cutting means from turning when removing the bolts.
4.Remove the upper [4] and lower cutting means [3].
Cutting Means Installation
1.Clean dirt and grass from around the cutting means mounting area.
2.Install the cutting means [3] and [4] using the two cutting-means bolts [1] and special washers [2] as shown.
[3][4]
[2] |
[1]
[7][6] 


WARNING
Operating this mower with only one cutting means will result in an improperly seated cutting means that can be thrown from the mower and seriously hurt or kill someone.
Always use both cutting means as a set.
Be sure to install the special washers with the concave side toward the cutting means and the convex side toward the head of the bolt.
The cutting-means bolts are specially designed for this application and must not be replaced with other bolts.
16 |
ENGLISH |
3.Tighten the cutting-means bolts with a torque wrench [7]. Use a wooden block [6] to prevent the cutting means from turning.
Cutting-means bolt torque: 49 ~ 59 N·m
If you do not have a torque wrench, have an authorized Honda dealer tighten the cutting-means bolts before you use the mower. If the cutting-means bolts are overtightened, they could break. If the cutting-means bolts are not tightened enough, they could loosen or come out. In either case, it would be possible for the cutting means to fly off while you are operating the mower.
GRASS CATCHER CLEANING AND REPLACEMENT
Cleaning
Wash the catcher with a garden hose, and allow it to dry completely before use; a wet catcher will clog quickly.
Replacement
Replace a worn or damaged catcher with a Honda replacement catcher or its equivalent.
Removal
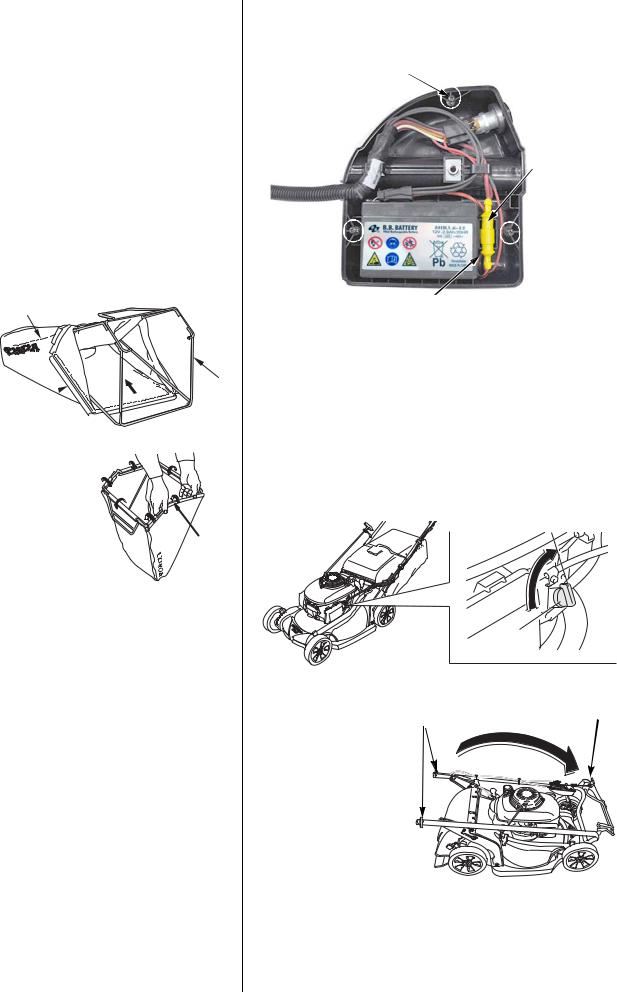
1.Unclip the plastic edges [1] of the catcher [2] from the frame [3].
2.Remove the catcher from the frame.
[2]
[3]
[1] 
Installation
1. Insert the catcher frame [3] into the catcher [2], as shown above.
2. Clip the plastic edges [1] of the catcher onto the frame.
[1]
CHARGING THE BATTERY (HZEA TYPE)
The lawnmower engine has an internal charging system. Under normal mowing usage it is not necessary to charge or maintain the battery.
If the mower fails to start or has been stored for an extended period:
•Start the lawnmower using the recoil starter manually for one mowing session. This should charge the battery sufficiently to use the electric starter.
•If you prefer, there is an optional AC powered battery charger available from your Honda dealer.
•If the lawnmower fails to start (after manually starting for one mowing session) check for a blown fuse.
•If it still fails to start, take the lawnmower to an authorized Honda servicing dealer.
REPLACING A FUSE
The electric starter circuit and battery are protected by a 30 amp fuse [1] and 3 amp fuse [2]. If the 30 amp fuse burns out, the electric starter will not operate and if the 3 amp fuse burns out, the battery will not charge. The engine can be started manually if either fuse burns out.
1.Remove the battery cover by removing the three cover mounting screws [3].
2.Remove and inspect the fuses. If they are burned out, replace with the correct fuse.
Never use a fuse with a rating other than shown. Serious damage to the electrical system or a fire can result.
[3]
 [1]
[1]
[2]
If a frequent fuse failure occurs, it usually indicates a short circuit or an overload in the electrical system. Take the mower to an authorized Honda servicing dealer for repair.
TRANSPORTING
Before Loading
If the engine has been running, allow it to cool for at least 15 minutes before loading the mower on the transport vehicle. A hot engine and exhaust system can burn you and can ignite some materials.
Turn the fuel valve to the OFF position. This will prevent carburetor flooding and reduce the possibility of fuel leakage.
OFF
Handlebar Folding |
|
|
|
1. Remove the grass |
[1] |
[2] |
|
catcher. You can |
|||
|
|
||
place it on top of the |
|
|
|
engine, with the |
|
|
|
catcher opening to the |
|
|
|
front. |
|
|
2. Turn the handlebar adjust knobs [1] 90°
into the unlock position.
3. Fold handlebar [2] over mower.
When folding the handlebar, be careful to avoid kinking or pinching the control cables.
ENGLISH |
17 |
Loading and Unloading
Position the mower so all four wheels are on the bed of the transport vehicle. Tie the mower down with rope or straps, and block the wheels. Keep the tie-down rope or straps away from the controls, adjustment levers, cables, and the carburetor.
NOTICE
To prevent losing control of or damaging the mower, do not use the drive system when going up or down a loading ramp.
To prevent damaging the drive system, do not engage the clutch when the mower is rolling backwards.
1. Turn the fuel valve to the OFF position.
2. Use a suitable loading ramp.
Adjust the loading ramp so |
|
|
that it is inclined at an angle of |
|
|
less than 15°. If a loading |
|
|
ramp is not available, two |
15° |
|
people should lift the mower |
||
|
on and off the transport vehicle while keeping the mower level.
STORAGE
Proper storage is essential for keeping your lawnmower troublefree and looking good. The following steps will help protect the mower from rust and corrosion, and make the engine easier to start when you use the lawnmower again.
Cleaning
1.Wash the lawnmower, including the underside of the cutting-means enclosure.
Engine
Wash the engine by hand, and be careful to prevent water from entering the air cleaner.
NOTICE
Using a garden hose or pressure washing equipment can force water into the air cleaner. Water in the air cleaner will soak the filters and can enter the carburetor or engine cylinder, causing damage.
Water contacting a hot engine can cause damage. If the engine has been running, allow it to cool for at least a half hour before washing.
Cutting-means Enclosure
If using a garden hose or pressure washing equipment to clean the cutting-means enclosure, be careful to avoid getting water into controls and cables, or anywhere near the engine air cleaner or muffler opening.
Before washing the underside of the cutting-means enclosure, be sure the throttle lever is in the STOP position and the fuel valve is in the OFF position. Tilt the lawnmower to the right so the fuel cap is up. This will help to prevent fuel leakage and hard starting due to carburetor flooding. Wear heavy gloves to protect your hands from the cutting means.
Grass Catcher
Remove the catcher from the mower, and wash it with a garden hose or pressure washing equipment. Allow the catcher to dry completely before storage.
2.After washing the lawnmower, wipe dry all accessible surfaces.
3.With the mower in an upright position, start the engine outdoors, and let it run until it reaches normal operating temperature to evaporate any water remaining on the engine.
4.Stop the engine and allow it to cool.
5.After the lawnmower is clean and dry, touch up any damaged paint, and coat other areas that may rust with a light film of oil.
Fuel
NOTICE
Depending on the region where you operate your equipment, fuel formulations may deteriorate and oxidize rapidly. Fuel deterioration and oxidation can occur in as little as 30 days and may cause damage to the carburetor and/or fuel system. Please check with your servicing dealer for local storage recommendations.
Petrol will oxidize and deteriorate in storage. Old petrol will cause hard starting, and it leaves gum deposits that clog the fuel system. If the petrol in your mower deteriorates during storage, you may need to have the carburetor and other fuel system components serviced or replaced.
The length of time that petrol can be left in your fuel tank and carburetor without causing functional problems will vary with such factors as blend, your storage temperatures, and whether the fuel tank is partially or completely filled. The air in a partially filled fuel tank promotes fuel deterioration. Very warm storage temperatures accelerate fuel deterioration. Fuel deterioration problems may occur within a few months, or even less if the petrol was not fresh when you filled the fuel tank.
Short Term Storage (30-90 days)
If your equipment will not be used for 30 to 90 days, we recommend the following to prevent fuel-related problems:
1.Add fuel stabilizer following the manufacturer’s instructions.
When adding a fuel stabilizer, fill the fuel tank with fresh petrol. If only partially filled, air in the tank will promote fuel deterioration during storage. If you keep a container of petrol for refueling, be sure that it contains only fresh petrol.
If it will take more than 3 months to use the fuel in your storage container, we suggest adding a fuel stabilizer to the fuel when you fill the container.
2.After adding a fuel stabilizer, run the engine outdoors for 10 minutes to be sure that treated petrol has replaced the untreated petrol in the carburetor.
3.Turn the fuel valve to the OFF position.
4.Continue to run the engine until it stops from the lack of fuel in the carburetor fuel bowl. Running time should be less than 3 minutes. Note:
–All stabilizers have a shelf life and their performance will deteriorate over time.
–Fuel stabilizers will not reconstitute stale fuel.
Long Term or Seasonal Storage (greater than 90 days)
Start the engine and allow it to run long enough to empty all the petrol from the entire fuel system (including the fuel tank). Do not allow petrol to remain in your engine for more than 90 days of inactivity.
Fuel system damage or engine performance problems resulting from neglected storage preparation are not covered under the Distributor’s Warranty.
Engine Oil
Change the engine oil (page 14).
18 |
ENGLISH |

Engine Cylinder |
|
|
If the mower is to be stored for more than |
[1] |
|
3 months, remove the spark plug |
||
|
||
(page 14). Pour 5 ~ 10 cm³ of clean |
|
|
engine oil into the cylinder [1]. Pull the |
|
|
starter rope several times to distribute |
|
|
the oil in the cylinder. Reinstall the spark |
|
|
plug. |
|
|
Pull the starter rope slowly until |
|
|
resistance is felt, then return the starter |
|
grip gently. This will close the valves so moisture cannot enter the engine cylinder.
Placing in Storage
Since your mower will be stored with petrol in the fuel tank and carburetor, it is important to reduce the hazard of petrol vapor ignition. Select a well-ventilated storage area away from any appliance that operates with a flame, such as a furnace, water heater, or clothes dryer. Also avoid any area with a spark-producing electric motor, or where power tools are operated.
If possible, avoid storage areas with high humidity, because that promotes rust and corrosion.
Place the mower with its wheels on a level surface. Tilting can cause fuel or oil leakage.
The handlebar can be folded for compact storage (page 17).
With the engine and exhaust system cool, cover the mower to keep out dust. A hot engine and exhaust system can ignite or melt some materials. Do not use sheet plastic as a dust cover. A nonporous cover will trap moisture around the mower, promoting rust and corrosion.
Removing from Storage
Check your mower as described in PRE-OPERATION CHECKS.
If the cylinder was coated with oil during storage preparation, the engine will smoke briefly at startup. This is normal.
TROUBLESHOOTING
ENGINE WILL NOT START
Possible Cause |
Correction |
|
|
Fuel valve OFF |
Turn the fuel valve ON (page 4). |
|
|
Throttle lever in the wrong |
Move the throttle lever to the FAST |
position |
position. (page 10). |
|
|
Starter turns slow or not at all |
• Use the recoil starter for at least one |
(HZEA type) |
mowing session to allow the battery to |
|
charge (page 9) |
|
• Check for blown fuse (page 17) |
|
|
Out of fuel |
Refuel (page 4). |
|
|
Bad fuel; mower stored without |
Refuel with fresh petrol (page 4). |
treating the petrol, or refueled |
|
with bad petrol |
|
|
|
Spark plug faulty, fouled, or |
Gap or replace the spark plug |
improperly gapped |
(page 14). |
|
|
Spark plug wet with fuel |
Dry and reinstall the spark plug. |
(flooded engine) |
|
|
|
Fuel filter clogged, carburetor |
Take the mower to an authorized |
malfunction, ignition malfunction, |
Honda servicing dealer or refer to the |
valves stuck, etc. |
shop manual for repair. |
|
|
LOSS OF POWER
Possible Cause |
Correction |
|
|
Throttle not set to FAST |
Move the throttle to FAST (page 10). |
|
|
Grass is too tall to cut |
Raise the cutting height (page 8), cut a |
|
narrower swath, use a slower ground |
|
speed (page 10), or cut more |
|
frequently. |
|
|
Cutting-means enclosure is |
Clean out the cutting-means enclosure |
clogged |
(page 12). |
|
|
Air cleaner is clogged |
Clean or replace the air cleaner |
|
(page 14). |
|
|
Bad fuel; mower stored without |
Refuel with fresh petrol (page 4). |
treating petrol, or refueled with |
|
bad petrol |
|
|
|
Fuel filter clogged, carburetor |
Take the mower to an authorized |
malfunction, ignition malfunction, |
Honda servicing dealer or refer to the |
valves stuck, etc. |
shop manual for repair. |
|
|
VIBRATION
Possible Cause |
Correction |
|
|
Grass and debris lodged under |
Clean out the cutting-means enclosure |
the cutting-means enclosure |
(page 12). |
|
|
Cutting means loose, bent, |
Tighten loose cutting-means bolts |
damaged, or unbalanced by |
(page 16). |
improper sharpening |
If cutting means are found to be bent or |
|
damaged, take the lawnmower to an |
|
authorized Honda servicing dealer for |
|
inspection. |
|
|
Mechanical damage, such as a |
Take the mower to an authorized |
bent crankshaft |
Honda servicing dealer or refer to the |
|
shop manual for repair. |
|
|
MOWING AND GRASS CATCHING PROBLEMS
Possible Cause |
Correction |
|
|
Engine speed is too slow to cut |
Move the throttle lever to the FAST |
well |
position (page 4). |
|
|
Lawnmower is moving too fast for |
Shift to a slow speed (page 10). |
lawn conditions |
|
|
|
Cutting height adjustment levers |
Set all levers at the same cutting height |
set at different positions |
position (page 5). |
|
|
Grass catcher overfilled or |
Empty the grass catcher. Wash the |
clogged |
grass catcher if it is clogged with dirt |
|
(page 17). |
|
|
Cutting-means enclosure is |
Clean out the cutting-means enclosure |
clogged |
(page 12). |
|
|
Cutting means dull, worn, or |
Sharpen or replace the cutting means if |
damaged |
necessary (page 16). |
|
|
Wrong cutting means installed |
Install correct cutting means (page 16). |
|
|
PARTS
Item |
Part Number |
Air Cleaner |
17211-Z8B-901 |
Spark Plug |
98078-55846 |
Cutting Means |
72531-VH7-000 (upper) |
|
72511-VH7-000 (lower) |
Cutting-means Bolt |
90105-960-710 |
Bolt Washer |
90502-VG3-000 |
ENGLISH |
19 |

SPECIFICATIONS
MODEL |
HRX537C4 |
||||
TYPE |
HYEA |
|
HZEA |
||
DESCRIPTION CODE |
MAGA |
||||
GENERAL |
|
|
|
|
|
Length |
1,825 mm |
||||
Handlebar height |
1,115 mm |
||||
(Middle position) |
|||||
|
|
|
|
||
Dry mass |
44.7 kg |
|
46.4 kg |
||
Width |
585 mm |
||||
Cut width |
530 mm |
||||
Cut height adjustments |
19 mm, 32 mm, 46 mm, |
||||
|
62 mm, 75 mm, 88 mm, 101 mm |
||||
Grass catcher capacity |
85 L |
||||
Sound pressure level at |
|
|
|
|
|
operator’s ears (According |
85 dB(A) |
||||
to EN ISO 5395-1:2013) |
|
|
|
|
|
Uncertainty |
1 dB(A) |
||||
Sound power level |
96 dB(A) |
|
97 dB(A) |
||
measured (According to |
|
|
|
|
|
2000/14/EC directive) |
|
|
|
|
|
Uncertainty |
1 dB(A) |
|
1.1 dB(A) |
||
Sound power level |
98 dB(A) |
||||
guaranteed (According to |
|
|
|
|
|
2000/14/EC directive) |
|
|
|
|
|
Vibration transmitted |
3.8 m/s2 |
|
3.3 m/s2 |
||
(According to EN ISO |
|
|
|
|
|
5395-1:2013) |
|
|
|
|
|
Uncertainty |
1.9 m/s2 |
|
1.7 m/s2 |
||
ENGINE |
|
|
|
|
|
Model |
GCV190 |
|
|||
Type |
4-stroke, single cylinder, vertical shaft, OHC |
|
|||
Displacement |
187 cc |
|
|||
Bore and stroke |
69 x 50 mm |
|
|||
Cooling |
Forced air |
|
|||
Lubrication |
Splash and spray |
|
|||
Compression ratio |
8,5:1 |
|
|
||
Maximum speed |
2,850 –100 |
min-1 |
|
||
|
+0 |
|
|
|
|
Idle speed |
1,700 ± 150 min-1 |
|
|||
Ignition system |
Transistorized magneto |
|
|||
Spark plug |
NGK: BPR5ES |
|
|||
Spark plug gap |
0.7 ~ 0.8 mm |
|
|||
Air cleaner |
Dry element type |
|
|||
Recommended fuel |
Unleaded petrol with a research |
|
|||
|
octane number (RON) of 91 or higher |
|
|||
Fuel tank capacity |
0.93 L |
|
|||
Recommended oil |
SAE 10W-30, API SJ or later |
|
|||
Engine oil capacity |
0.50 L |
|
|||
|
* Refill amount: 0.35 ~ 0.40 L |
|
|||
* Actual amount will vary due to residual oil in the engine. Always use the dipstick to confirm the actual level (see page 4).
DRIVE
Type |
Hydrostatic |
Engine to transmission |
V-belt |
Main clutch |
Fluid type |
Mower speed |
1.6 m/s |
(engine @ 2,850 min-1) |
|
Recommended fluid |
Honda hydrostatic |
20 |
ENGLISH |
INTRODUCTION
Madame, Monsieur,
Vous venez de faire l’acquisition d’une tondeuse à gazon Honda et nous vous remercions de votre confiance.
Ce manuel traite de l’utilisation et de l’entretien des tondeuse Honda HRX537HYEA, HRX537HZEA.
Ce manuel, concu pour vous aider, contient toutes les informations pour vous permettre d’utiliser votre tondeuse dans les meilleures conditions et en toute sécurité. Dans ce but, lisez-le attentivement.
Ce manuel est une partie intégrante de la tondeuse et, en cas de revente, doit l’accompagner.
En cas de problème ou encore pour toute question relative à la tondeuse, adressez-vous à votre concessionnaire Honda ou revendeur.
Honda Power Equipment Mfg., Inc. se réserve le droit d’apporter des modifications à tout moment, sans préavis et sans aucune obligation de sa part.
Cette publication ne peut être reproduite en totalité ou en partie sans autorisation écrite.
MESSAGES DE SECURITE
Il convient de prêter une grande attention aux rubriques précédées des mots suivants :
DANGER
AVERTISSEMENT
ATTENTION
DANGER ABSOLU de MORT ou de BLESSURE GRAVE si les instructions ne sont pas respectées.
Vous POUVEZ être TUE ou GRAVEMENT BLESSE si vous ne suivez pas les instructions.
Vous POUVEZ être BLESSE si vous ne suivez pas les instructions.
Chaque message vous indique de quel danger il s’agit, ce qui peut arriver et ce que vous pouvez faire pour éviter toute blessure ou en diminuer le risque.
MESSAGES DE PREVENTION DES DOMMAGES
Vous apercevrez aussi d’autres messages importants précédés du mot suivant :
|
Votre tondeuse ou autres biens peuvent être |
|
AVIS |
||
endommagés si vous ne suivez pas les instructions. |
||
|
Le but de ces messages est de vous aider à préserver votre tondeuse, vos biens ou ceux d’autrui, ainsi qgnesue l’environnement, de tout dommage possible.
© 2016 American Honda Motor Co., Inc.—Tous droits réservés
MANUEL DE L’UTILISATEUR
(Notice originale)
HRX537HYEA • HRX537HZEA
TONDEUSE Á GAZON
FRANÇAIS
TABLE DES MATIERES
INTRODUCTION. . . . . . . . . . . . . 1 MESSAGES DE SECURITE. . . . 1 CONSIGNES DE SÉCURITÉ . . . 2 Emplacement de L’Etiquette de Securite . . . . . . . . . . . . . . . . . . 3
Plaque D’Identification Du Produite . . . . . . . . . . . . . . . . . . 3
IDENTIFICATION DES COMPOSANTS. . . . . . . . . . . . . . 3 INSTALLATION. . . . . . . . . . . . . . 4 COMMANDES . . . . . . . . . . . . . . 4 VERIFICATIONS AVANT UTILISATION . . . . . . . . . . . . . . . 5
Niveau d’huile moteur. . . . . . . . 6 Carburant . . . . . . . . . . . . . . . . . 6 FONCTIONNMENT. . . . . . . . . . . 9 Precautions A Prendre Pour La Tonte . . . . . . . . . . . . . . . . . . . . 9 Demarrage Du Motuer . . . . . . . 9 Commandes De Tonte . . . . . . 10 Arret Du Moteur . . . . . . . . . . . 11
TONDRE EN TOUTE SECURITE .. . . . . . . . . . . . . . . 10 Conseils Pour La Tonte . . . . . 11
ENTRETIEN. . . . . . . . . . . . . . . . 13 Importance de L’Entretien . . . . 13 Calendrier D’Entretien . . . . . . . 13 Entretien Du Moteur . . . . . . . . 14 Reglage Des Cables De Commande . . . . . . . . . . . . . . . 15 Montage Et Demontage
De La organe de coupe. . . . . . 16 Nettoyage Du Bac De Rammassage Et
Remplacement . . . . . . . . . . . . 17 TRANSPORT . . . . . . . . . . . . . . . 17 RANGEMENT . . . . . . . . . . . . . . 18 SPÉCIFICATIONS . . . . . . . . . . . 20 Conditions D’application De La Garantie Honda,
CE-Déclaration de conformité, Informtions de Localisation des Distributeurs. . . . . . . dernière page
FRANÇAIS |
1 |
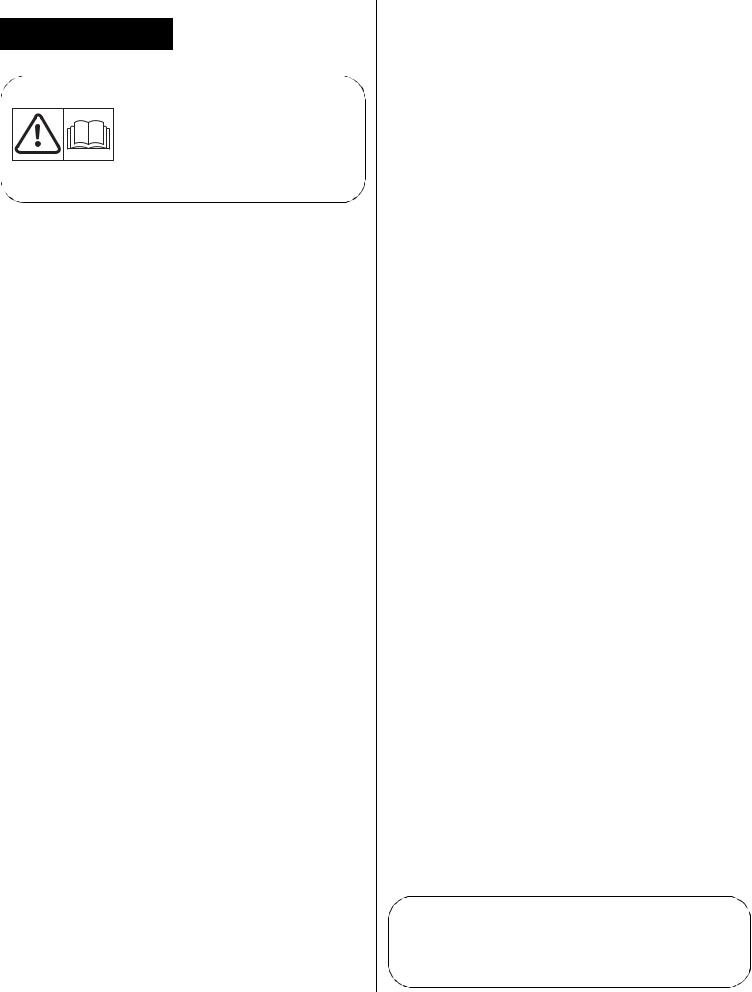
CONSIGNES DE SÉCURITÉ
AVERTISSEMENT
Pour une utilisation en toute sécurité –
•Lisez attentivement les instructions, familiarisez-vous avec les différents leviers et le maniement correct de la tondeuse.
•Ne permettez en aucun cas, l’utilisation de la tondeuse aux enfants ou aux personnes n’ayant pas lu les instructions du manuel. La réglementation locale restreint peut-être l’emploi des tondeuses avant l’âge de la majorité.
•Ne tondez jamais à proximité d’enfants ou d’animaux.
•N’oubliez pas que l’utilisateur est responsable des dommages ou risques encourus par une tierce personne ou ses biens.
•Durant la tonte, portez toujours de solides chaussures fermées et des pantalons longs. N’utilisez pas la tondeuse si vous êtes pieds-nus ou si vous portez des sandales.
•Inspectez soigneusement la zone à tondre et enlevez tout objet pouvant être projeté par la tondeuse.
•L’essence est un produit très inflammable :
–Gardez l’essence dans des bidons réservés à cet effet.
–Faites le plein d’essence à l’extérieur seulement et ne fumez pas durant cette opération.
–Ajoutez de l’essence avant de démarrer le moteur. Ne retirez jamais le bouchon du réservoir d’essence lorsque le moteur est en marche ou lorsqu’il est encore chaud.
–Si de l’essence s’est répandue sur le sol, éloignez la tondeuse de cet endroit avant de la démarrer et évitez de créer des étincelles jusqu’à ce que les vapeurs d’essence se dissipent tout à fait.
–Refermez bien les bouchons d’essence.
•Remplacez des silencieux défectueux.
•Avant toute utilisation, inspectez la tondeuse pour vous assurer que la ou les organe de coupe, vis de organe de coupe et carter de l’appareil ne sont ni endommagés ni usés. Remplacez l’ensemble des organe de coupe usées ou abîmées ainsi que les vis, afin de garantir une efficacité maximale.
•Ne faites pas fonctionner le moteur dans un local confiné ou peu aéré où les émanations de monoxyde de carbone peuvent s’accumuler.
•Tondez seulement durant la journée ou sous une bonne lumière artificielle.
•Évitez, autant que possible, d’utiliser l’appareil quand l’herbe est mouillée.
•Lors de la tonte sur pente :
–Ayez le pied ferme et sûr.
–Tondez la pente transversalement, jamais de bas en haut.
–Marchez, ne courez jamais.
–Faites attention lors des changements de direction sur les pentes.
–Évitez de tondre les pentes trop raides.
•Soyez très prudent lorsque vous inversez la direction ou que vous tirez l’appareil vers vous.
•Arrêtez les organe de coupe, si la tondeuse doit être basculée lors d’un transport, en dehors des zones de tonte ou lors du transport de la tondeuse en direction ou à partir de l’endroit à tondre.
•N’utilisez pas la tondeuse si ses carters de protection sont défectueux, ou si ses dispositifs de sécurité sont manquants (protecteur d’éjection et/ou bac de ramassage en place, par exemple).
•N’essayez pas de faire des réglages de hauteur de roues lorsque l’appareil est en marche.
•Ne modifiez jamais le réglage du régulateur de vitesse du moteur et ne mettez jamais le moteur en surrégime.
•Débrayez tous les leviers de commande de organe de coupe ou d’avance avant de démarrer l’appareil.
•Avec précaution, démarrez la machine en suivant les indications données et en prenant garde d’éloigner vos pieds des organe de coupe.
•Ne penchez pas la tondeuse lors du démarrage.
•N’approchez ni les pieds ni les mains de toute pièce en rotation. Éloignez-vous de l’ouverture de goulotte d’éjection à tout moment.
•Ne portez ou ne transportez jamais une tondeuse en marche.
•Arrêtez le moteur et débranchez les fils de bougies :
–Avant de dégager la tondeuse de tout objet ou matière qui l’obstrue.
–Avant de vérifier, nettoyer ou travailler sur la tondeuse.
–Après avoir heurté un corps étranger. Inspectez la tondeuse et repérez les dégâts éventuels, effectuez les réparations avant de redémarrer et manœuvrer l’appareil.
–Si la tondeuse commence à vibrer anormalement, vérifiez-la immédiatement.
•Arrêtez le moteur :
–Dès que vous vous éloignez de la tondeuse.
–Avant de refaire le plein d’essence.
–Avant de retirer le bac de ramassage ou l’adaptateur de décharge latérale.
•Réduisez la position du levier des gaz durant l’arrêt du moteur et fermez la valve d’arrivée d’essence lorsque vous avez terminé de tondre.
•Assurez-vous que tous les boulons, écrous et vis sont bien serrés afin que la machine puisse fonctionner en toute sécurité.
•Ne rangez jamais la tondeuse contenant de l’essence dans un local où les émanations pourraient atteindre une flamme ou étincelle.
•Laissez refroidir le moteur avant de ranger l’appareil dans un local.
•Pour réduire tout risque d’incendie, débarrassez le moteur, le silencieux, le compartiment de batterie (le cas échéant) et le réservoir d’essence, de toutes particules d’herbe, feuilles ou excès de graisse.
•Examinez souvent le bac de ramassage pour en détecter la détérioration et l’usure.
•Pour raisons de sécurité, remplacez toutes les pièces usagées ou détériorées.
•Si vous désirez vider le réservoir d’essence, faites-le dehors.
•Portez des lunettes de protection.
2 |
FRANÇAIS |

EMPLACEMENT DE L’ETIQUETTE DE SECURITE |
|
IDENTIFICATION DES COMPOSANTS |
||||
Cette étiquette est destinée à vous mettre en garde contre les |
|
|
||||
dangers potentiels qui peuvent être à l’origine de blessures graves. |
|
|
||||
Lisez attentivement cette étiquette. Si elle venait à se décoller ou |
|
[12] |
||||
devenait illisible, contactez votre concessionnaire qui vous fera |
[14] |
|||||
parvenir une étiquette de remplacement. |
|
|
|
|
|
|
Lettre |
Symboles |
|
|
|
|
|
A |
|
|
D |
|
|
|
|
5 |
6 |
7 |
10 |
|
|
1 |
4 |
|
|
|
|
[2] |
|
|
|
|
|
[1] |
|
2 |
3 |
|
Pb |
[3] |
[5] |
|
8 |
1 |
9 |
|
A [L’ETIQUETTE] |
|
|
|
|
1. |
Lire le manuel d'utilisateur avant utilisation de la tondeuse. |
[11] |
|
|
||
A, D |
2. |
Risque de projection. Tenir les tierces personnes en dehors de la zone |
|
|
[6] |
||
|
pendant l'utilisation. |
|
|
|
|
||
|
3. |
Risque de coupure. organe de coupe tournante. Ne pas introduire les |
|
|
|
||
|
|
mains et pieds dans l'enceinte de organe de coupe. Débrancher le |
|
|
|
||
|
|
capuchon de bougie avant toute opération d'entretien ou de |
[10] |
|
[4] |
||
|
|
réparation. |
|
|
|
|
|
|
4. |
Ne pas utiliser la tondeuse sans le enceinte de l’organe de coupe ou |
|
|
|
||
|
|
le bac de ramassage. |
|
|
|
|
|
|
5. |
Éloigner des étincelles et des flammes; défense de fumer. |
[9] |
|
|
||
|
6. |
Porter une protection oculaire. |
|
|
|
|
|
|
7. |
Garder hors de la portée des enfants. |
|
|
|
|
|
|
8. |
Produit corrosif – Peut provoquer la cécité ou des brûlures graves. |
|
|
|
||
|
9. |
Vapeurs explosives – Protéger les yeux. |
|
C [L’ETIQUETTE] |
|
|
|
|
10. Recycler – Contient du plomb. |
|
|
|
[7] |
||
|
|
11 |
12 |
13 |
|
[8] |
[13] |
|
|
|
|
||||
D [L’ETIQUETTE]
B
|
11. Lire le manuel d'utilisateur avant utilisation de la tondeuse. |
|
|
|
|
|||||
|
12. Le moteur dégage du monoxyde de carbone qui est un gaz |
|
|
|
|
|||||
|
toxique. Ne jamais le faire fonctionner dans un endroit clos. |
|
|
|
|
|||||
|
13. L’essence est très inflammable et explosive. Avant de faire le |
|
[21] |
|
|
|||||
|
plein de carburant, arrêter le moteur et le laisser se refroidir. |
|
|
|
||||||
|
|
[20] |
|
|
||||||
PLAQUE D’IDENTIFICATION DU PRODUITE |
|
|
|
|||||||
|
[19] |
|
[15] |
|||||||
Lettre |
|
Symboles |
|
|
|
|
||||
|
|
|
|
|
|
|||||
|
|
|
|
|
11 |
|
|
|
[16] |
|
|
|
|
|
|
|
|
|
|
||
|
|
|
|
|
10 |
|
|
|
[17] |
|
C |
|
|
|
|
9 |
|
[9] |
[18] |
||
|
|
|
|
|
|
|||||
|
|
|
|
|
8 |
|
|
B [L’ETIQUETTE] |
||
|
|
|
|
|
7 |
|
|
|
Commande de l’organe de |
|
|
|
|
|
|
6 |
|
|
|
||
|
|
|
|
3.2kW |
1 |
Guidon |
12 |
coupe (pour le de‘marrage et l‘arrét |
||
|
1 |
2 |
3 |
4 |
5 |
|
|
|
de l’organe de coupe) |
|
|
2 |
Levier de changement de vitesse |
13 |
Bouton de commande de |
||||||
|
|
|
|
|
|
|||||
1. Niveau de puissance acoustique |
6. |
Année de fabrication |
organe de coupe |
|||||||
|
|
|
|
|||||||
|
garanti selon la directive |
|
|
7. |
Poids en kilogrammes |
3 |
Manette des gaz |
|
Levier d’embrayage |
|
|
2000/14/EC |
|
|
8. |
Numéro de série |
|
|
14 |
d’avancement (commande de |
|
2. |
Marque de conformité selon la |
|
9. |
Modèle |
4 |
Enceinte de l’organe de coupe |
|
transmission qui entraine les roues |
||
|
EC-directive |
|
|
10.Nom et adresse du |
|
|
|
arriere) |
||
3. |
Marque de conformité optional |
|
|
reprèsentant autorisè |
5 |
Garde d'évacuation arrière |
15 |
Bouton de blocage du guidon |
||
4. |
Puissance nominale en kilowatts |
11.Nom et adresse du |
|
|
|
Bouton de commande de la |
||||
5. |
Vitesse maximale du moteur |
|
|
|
fabricant |
6 |
Bouchon de réservoir d’ essence |
16 |
||
|
|
|
tonte |
|||||||
|
|
|
|
|||||||
Nom et adresse du du constructeur et autorisé representitive sont écrits |
7 |
Silencieux ou pot d’échappement |
17 |
Soupape de combustible |
||||||
dans le "CE declaraton de conformité" Aperçu du contenu dans le manuel |
||||||||||
|
|
|
|
|||||||
du propriétaire. |
|
|
|
|
8 |
Bouchon de l’orifice de |
18 |
Filtre â air |
||
Notez les numéros de série du châssis et du moteur dans l’emplacement |
remplissage de l’huile |
|||||||||
ci-dessous. Vous en aurez besoin pour commander des pièces détachées |
|
Leviers de réglage de hauteur de |
|
|
||||||
et pour toute question d’ordre technique ou relative à la garantie. |
9 |
19 |
Carburateur |
|||||||
Numéro de série du châssis : _______-________________ |
|
coupe (4) |
|
|
||||||
10 |
Bac de ramassage |
20 |
Capuchon de bougie |
|||||||
Numéro de série du moteur : _________-________________ |
||||||||||
11 |
Commutateur a cle‘(HZEA) |
21 |
Poignée de démarreur |
|||||||
Date d’achat : _______ / ______ / _____ |
|
|||||||||
FRANÇAIS |
3 |

INSTALLATION
DÉBALLAGE
Enlevez le carton autour du guidon.
INSTALLATION DU GUIDON
1.Tournez les boutons de réglage du guidon [1] sur 90 degrés en position de déverrouillage (page 7).
2.Déplacez le guidon en
position de tonte de manière à |
|
|
ce que les goupilles de |
|
|
positionnement s'alignent |
|
|
avec les orifices supérieurs, |
|
|
intermédiaires ou inférieurs |
|
|
situés sur les supports de |
[1] |
|
montage du guidon. |
||
|
3. Tournez les boutons de réglage sur 90 degrés en
position de verrouillage et les goupilles s'enclenchent dans les orifices et se bloquées.
BATTERIE (TYPE HZEA)
Le moteur de la tondeuse à gazon dispose d'un système interne de recharge. En condition normale d'utilisation de la tondeuse, la recharge ou l'entretien n'est pas nécessaire.
La tondeuse à gazon est livrée avec la clé de contact dans le sac des pièces. Introduire la clé dans l'interrupteur à clé.
INSTALLATION DU BAC DE RAMASSAGE
Faites glisser le cadre du bac de ramassage [1] dans le bac de ramassage [2] et placez les clips en plastique [3], voir illustration.
[2]


 [3]
[3]  [1]
[1]
Enlevez la protection de |
[4] |
la décharge [4] et |
|
installez le bac de |
|
ramassage. |
|
HUILE MOTEUR
La tondeuse est expédiée SANS HUILE dans le moteur.
Ajoutez suffisamment d'huile SAE 10W-30 API de catégorie SJ pour amener le niveau d'huile entre les marques de limite supérieure [2] et de limite inférieure [3] sur la jauge (voir illustration).
Plein : 0,35 ~ 0,40
Ne dépassez pas les limites de remplissage d'huile. Si le moteur a trop d’huile, l’excédent pourrait se transférer au filtre à air et à ses pièces.
ESSENCE
Reportez-vous à la page 6.
 [1]
[1]
 [2]
[2]  [3]
[3]
AVANT D'UTILISER LA TONDEUSE À GAZON
Avant d'utiliser la tondeuse à gazon, tous les utilisateurs de la tondeuse doivent prendre connaissance des chapitres suivants :
•CONSIGNES DE SECURITE (page 2)
•COMMANDES (page 4)
•VERIFICATIONS AVANT UTILISATION (page 5)
•FONCTIONNEMENT (page 9)
•CALENDRIER D’ENTRETIEN (page 13)
COMMANDES
SOUPAPE DE COMBUSTIBLE
La soupape de combustible [1] ouvre et
ferme l’écoulement entre 


 le réservoir du carburant


 et le carburateur.


FERME

 [1] OUVERT
LEVIER DES GAZ
Le levier des gaz [1] commande les fonctions suivantes:
[1] |
|
RAPIDE |
Pour démarrer un moteur et |
|
pour tondre. |
||
|
|
|
|
|
|
LENT |
Pour mettre le moteur au |
|
|
|
ralenti. |
|
|
|
Pour arrêter le moteur. (Sur le |
|
|
|
modèle HRX537HZEA, |
|
ARRET |
tournez le commutateur à clé |
|
|
|
|
en position OFF pour arrêter |
|
|
|
le moteur) |
4 |
FRANÇAIS |
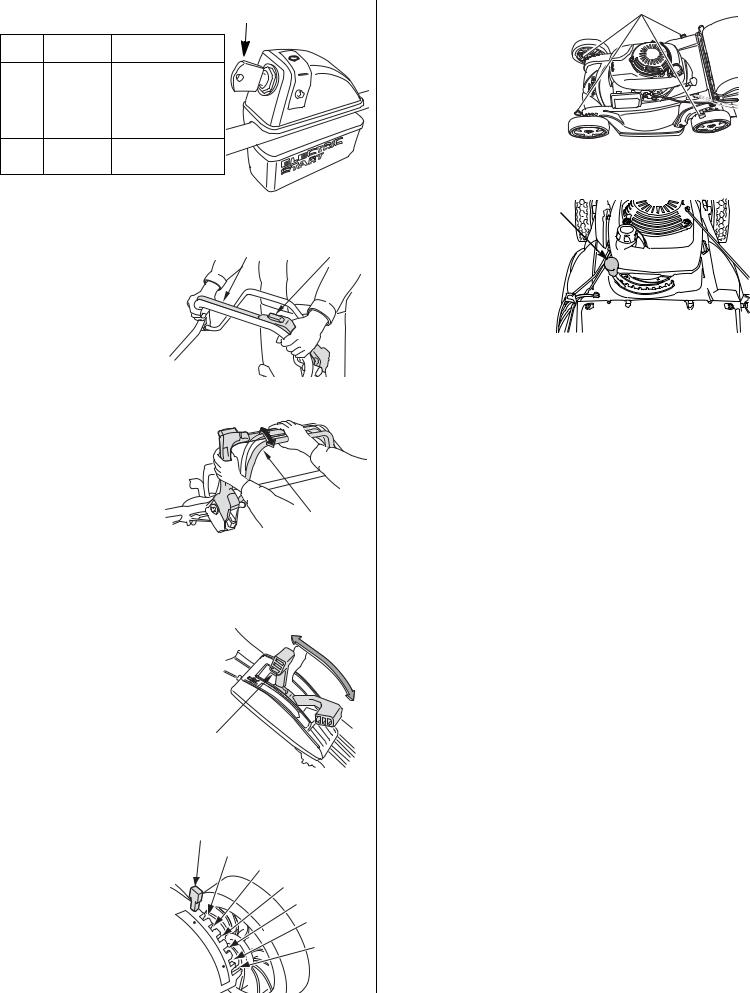
COMMUTATEUR DU MOTEUR [1] |
[1] |
||
(TYPE HZEA) |
|
|
|
|
ARRÊT |
Arrête le moteur. |
|
|
|
Position de marche |
|
|
|
(le commutateur à clé |
|
|
MARCHE |
doit être en position |
|
de marche [ON] pour |
|
||
|
|
pouvoir utiliser le |
|
|
|
démarreur). |
|
|
DÉMARRER |
Fait fonctionner le |
|
démarreur électrique. |
|
||
COMMANDE DE L’ORGANE DE COUPE
Le bouton [1] et le commande de l’organe de
coupe [2] commandent le [2] [1] début et l’arrêt de la rotation
de la organe de coupe.
LEVIER D’EMBRAYAGE D’AVANCEMENT
Le levier d’embrayage d’avancement [1] engage et désengage la transmission.
[1]
LEVIER DE
CHANGEMENT DE VITESSE
Le levier de changement de vitesse [1] sélectionne et commande la vitesse de la tondeuse.
Avec le levier de changement de |
[A] |
|
vitesse [1] reculé à fond [A] et le |
||
|
||
levier d’embrayage d’avancement |
|
|
embrayé, la tondeuse se déplacera |
|
|
lentement, voire pas du tout. Utilisez |
|
|
une vitesse lente pour tondre de |
[B] |
|
l’herbe épaisse ou pour manœuvrer |
||
|
||
sur des surfaces réduites. |
[1] |
|
|
Utilisez la position [B] pour atteindre la vitesse autotractée maximum sur
les grandes surfaces ouvertes et pour le transport.
LEVIERS DE RÉGLAGE DE LA HAUTEUR DE COUPE
Les roues de la tondeuse peuvent être réglées à l'une des sept valeurs. Les hauteurs de coupe sont approximatives. La hauteur réelle du gazon à couper varie selon les conditions de la pelouse et du sol.
1
19 mm
32 mm
46 mm
62 mm
75 mm
88 mm
2 

 101 mm
3
4
Il y a un levier de réglage [1] |
[1] |
sur chaque roue. |
|
BOUTON DE COMMANDE
DE LA TONTE
Le bouton de commande |
[1] |
|
de la tonte [1] contrôle la |
||
|
||
mise en sac, le broyage et |
|
|
la décharge arrière. Il |
|
|
dispose de dix positions |
|
|
de réglage. Il dispose de |
|
|
dix positions de réglage. |
|
VERIFICATIONS AVANT UTILISATION
ÊTES-VOUS PRÊT À TONDRE?
Assurez-vous que vous portez des vêtements de protection. Le port de pantalons longs et de lunettes peut réduire le risque de blessure par un objet projeté. Portez des chaussures qui protégeront vos pieds et vous empêcheront de glisser si vous tondez sur des pentes ou sur des surfaces irrégulières.
INSPECTION DE LA PELOUSE
Pour votre sécurité et celle de ceux qui vous entourent, procédez à l’inspection de la pelouse avant de la tondre.
Objets
Tout objet pouvant être saisi par la (les) organe de coupe et projeté est un danger pour vous et les autres. Débarrassez la pelouse d’objets tels que : les os, les cailloux, les bâtons ou les fils métalliques.
Personnes et animaux
Les personnes et animaux se trouvant près de la zone à tondre, pourraient vous gêner ou être blessés par un objet projeté par les organe de coupe. Par sécurité, éloignez les animaux et personnes, les enfants en particulier, de la zone de tonte.
Pelouse
Vérifiez la hauteur et l’état de l’herbe pour déterminer quelle hauteur de coupe et quelle vitesse choisir.
Eviter de tondre une pelouse mouillée. Non seulement cela encrasse le carter de tonte et crée des paquets d’herbe sur la pelouse, mais le manque d’adhérence au sol augmente le risque de perte d’équilibre.
FRANÇAIS |
5 |

VERIFIEZ VOTRE TONDEUSE
Organe de coupe
1. Placez la manette
des gaz sur la position ARRET (page 4).
2. Placez la soupape de combustible sur la position FERME (page 4).
3. Déconnecter le |
[2] |
capuchon de bougie |
|
d'allumage de la |
[1] |
bougie d'allumage |
|
(page 14). |
|
4.Inclinez la tondeuse vers la droite de sorte que le bouchon de carburant est en hausse. Cela aidera à prévenir les fuites de carburant, l'huile de moteur infiltrer dans le filtre à air, et le démarrage difficile.
5.Examiner les organe de coupe [1] pour déceler d'éventuels dommages, des fissures ou des traces de rouille ou de corrosion excessive.
NORMALE
USURE
EXAGEREE
NORMALE USURE TORDUE FISSUREE EXAGEREE
AVERTISSEMENT
Une organe de coupe usée, fendue ou abîmée peut se casser et ses morceaux peuvent devenir de dangereux projectiles.
Les objets projetés par la organe de coupe peuvent entraîner de graves blessures.
Vérifiez régulièrement l’état de la organe de coupe et n’utilisez pas la tondeuse si la organe de coupe est trop usée ou endommagée.
Une organe de coupe usée peut être aiguisée mais une organe de coupe usée à l’excès, tordue, fendue ou autre, doit être remplacée. En effet, une organe de coupe trop usée ou abîmée peut se casser et ses morceaux être violemment projetés.
Lorsqu’une organe de coupe a besoin d’être affûtée ou remplacée, vous pouvez porter la tondeuse chez un concessionnaire Honda ou bien vous pouvez l’aiguiser vous-même si vous possédez une clé dynamométrique.
Vérifiez que les boulons [2] sont bien serrés (page 16).
Niveau d’huile moteur
Vérifiez le niveau d’huile, avec le moteur arrêté et la tondeuse mise à niveau.
Utilisez une huile moteur 4 temps qui remplit les conditions du service de classification SJ ou équivalent de l’API. Veuillez vérifier chaque fois que les lettres SJ ou équivalents sont bien sur l’étiquette SERVICE API du bidon d’huile.
SAE 10W-30 est recommandé |
|
|
|
|
|
|
|
|
pour un usage général. |
|
|
|
|
30 |
|
|
|
D’autres grades de viscosité |
|
|
|
|
|
|
||
|
|
|
|
|
|
|
||
(voir tableau), sont |
|
|
5W-30 • 10W-30 |
|
|
|||
recommandés selon la marge |
|
|
|
|
||||
0 |
20 |
40 |
60 |
80 |
100°F |
|||
de la température moyenne de |
||||||||
votre région. |
-20 |
-10 |
0 |
10 |
20 |
30 |
40°C |
|
AVIS
•Faire fonctionner la tondeuse sans le niveau d’huile requis peut détériorer le moteur.
•L’utilisation d’une huile non détergente peut abréger la vie du moteur et une huile moteur 2 temps peut également l’endommager.
1.Retirez le bouchon de remplissage d’huile/jauge [1] et essuyez bien la jauge.
2.Introduisez la jauge dans le goulot de remplissage mais sans la revisser. Vérifiez le niveau d’huile sur la jauge.
3.Si le niveau d’huile est proche du repère de niveau inférieur [3], ajoutez alors la quantité d’huile nécessaire pour ramener le niveau jusqu’au repère supérieur [2]. Ne dépassez pas le repère supérieur.
4.Remettez le bouchon/jauge [1] et vissez-le à fond.
Carburant
 [1]
[1]
 [2]
[2]  [3]
[3]
Ce moteur est certifié pour fonctionner à l'essence sans plomb avec un indice d'octane recherche minimal de 91.
Nous recommandons de refaire le plein après chaque utilisation pour minimiser la présence d'air dans le réservoir de carburant.
Faites le plein d’essence dans un endroit bien aéré avant de démarrer le moteur. Si le moteur est déjà chaud, attendez qu’il refroidisse. Ne faites jamais le plein d’essence dans un local mal ventilé où les vapeurs pourraient s’accumuler et entrer en contact avec une flamme ou une étincelle.
Vous pouvez utiliser de l'essence sans plomb contenant 10% d'éthanol maximum (E10) ou 5% de méthanol par volume. En outre, le méthanol doit contenir des cosolvents ainsi que des inhibiteurs de corrosion. Si vous utilisez du carburant dont la teneur en éthanol ou méthanol est supérieure aux spécifications stipulées ci-dessus, le démarrage et/ou la performance risquent d'être affectés. En outre, les pièces métalliques, en caoutchouc et en plastique du circuit de carburant pourraient subir des dommages. En outre, l'éthanol est hygroscopique, ce qui signifie qu'il attire et retient l'eau dans le circuit d'alimentation de carburant. Les dommages au moteur ou problèmes de performance provenant d'un carburant aux pourcentages d'éthanol ou de méthanol supérieurs à ceux stipulés ci-dessus ne sont pas couverts par la garantie.
6 |
FRANÇAIS |

Si votre matériel est destiné à être utilisé peu fréquemment ou par périodes, (plus de 4 semaines entre deux utilisations) merci de consulter le paragraphe sur le « Carburant » du chapitre STOCKAGE (page 18) pour en savoir plus sur le risque de dégradation du carburant.
AVERTISSEMENT
L’essence est une substance hautement inflammable et explosive.
En manipulant de l’essence, vous pouvez être brûlé ou sérieusement blessé.
•Arrêtez le moteur et éloignez-le de la chaleur, des flammes et des étincelles.
•Manipulez l’essence à l’extérieur seulement.
•Essuyez immédiatement tout débordement.
N’utilisez jamais une essence éventée ou contaminée ou encore un mélange essence/huile. Evitez de mettre de la terre ou de l’eau dans le réservoir.
AVIS
L’essence peut endommager des surfaces telles que la peinture et le plastique. Faites attention de ne pas en faire couler lors du remplissage du réservoir. Les dégâts causés par de l’essence répandue ne sont pas couverts par la garantie.
Retirez le bouchon d’essence et vérifiez le niveau d’essence. Si le niveau d’essence est bas, remplissez le réservoir en faisant bien attention de ne pas en faire couler à côté. Ne le remplissez pas à ras bord (il ne doit pas y avoir d’essence dans le col de remplissage [1]).
 [1]
[1]
Après avoir fait le plein, refermez le bouchon en serrant à fond.
Eloignez la tondeuse d'au moins 3 m de toute source de carburant et site de remplissage avant de mettre le moteur en marche.
Container de Stockage du Carburant
Stockez votre carburant dans un container en plastique propre hermétiquement fermé spécialement conçu pour cela. Fermez l'évent (si un évent est présent) lorsque le container n'est pas utilisé, et conservez le container à l'abri de la lumière directe du soleil. S'il vous faut plus de 3 mois pour consommer tout le carburant stocké dans le container, nous suggérons d'ajouter du stabilisateur de carburant au carburant lorsque vous remplissez le container.
S'il reste du carburant dans votre container de stockage à la fin de la saison, l'Environmental Protection Agency (EPA) recommande d'ajouter l'essence au réservoir de carburant de votre véhicule.
Inspection du filtre à air |
|
|
Retirez le couvercle |
[2] |
|
[1]. Assurez-vous |
|
|
que le filtre [2] soit |
[1] |
|
propre et en bon |
||
|
||
état. Un filtre à air |
|
|
sale limite l’arrivée |
|
|
d’air au carburateur, |
|
|
réduisant ainsi la |
|
|
performance du |
|
|
moteur. Voir page 14 |
|
|
pour l’entretien du |
|
|
filtre à air. |
|
Réglage de la hauteur du guidon
La hauteur du guidon peut être réglée dans trois positions : haute [1], moyenne [2] et basse [3].
1.Tournez les boutons de réglage du guidon [5] sur 90 degrés en position de déverrouillage.
2.Déplacez le guidon [4] en haut ou en bas de manière à ce que les goupilles de positionnement s'alignent avec les orifices supérieurs, intermédiaires ou inférieurs situés sur les supports de montage du guidon [6].
3.Tournez les boutons de réglage sur 90 degrés en position de verrouillage [8] et les goupilles s'enclenchent dans les orifices et se bloquées.
[1]
[2]
[4] 
[3]
|
[5] |
|
[6] |
[7] |
[8] |
Bac de ramassage
La tondeuse fonctionne comme un aspirateur ; elle projette de l’air dans le sac qui attrappe ainsi les brins d’herbe. Veillez à toujours vider le sac avant qu’il ne soit plein. Les performances du ramassage diminuent à partir de 90% de remplissage du sac. De plus, le sac est plus facile à vider lorsqu’il n’est pas plein à ras bords.
Inspection
En utilisation normale, le matériau du bac de ramassage est soumis à la détérioration et à l'usure.
AVIS
Fréquemment vérifier qu’il ne comporte pas de trous, de déchirures et qu’il n’a pas été soumis à une usure excessive. Un bac de ramassage s’use avec le temps, même avec un fonctionnement normal de la machine, et il faudra le remplacer tôt ou tard.
Si le bac de ramassage est à remplacer, vous pouvez le faire vous-même (Voir page 17).
FRANÇAIS |
7 |
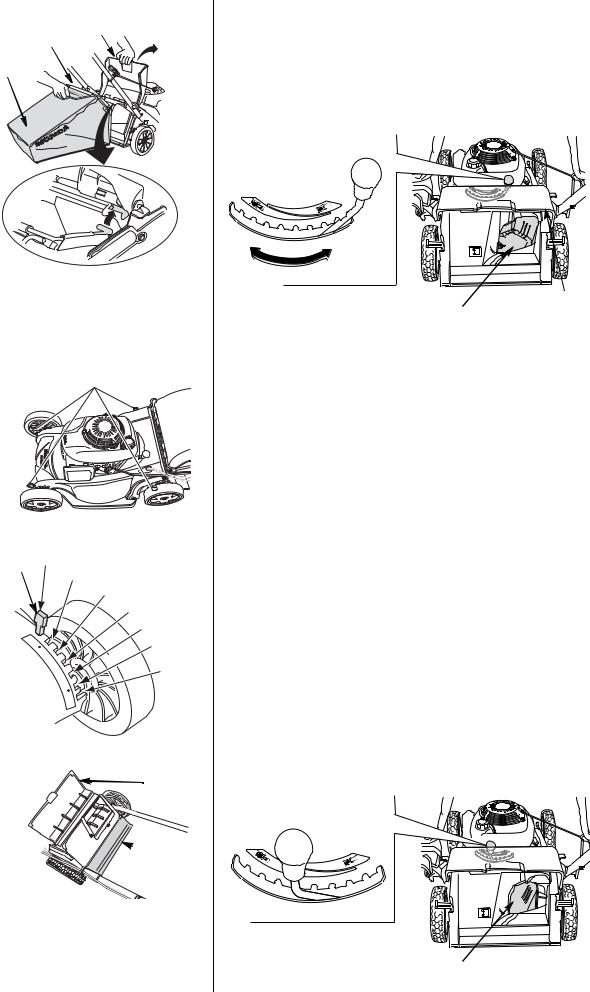
Installation |
|
|
1. Soulevez la enceinte |
[1] |
|
de l’organe de coupe |
[3] |
|
[1], utilisez la poignée |
[2] |
|
du bac de ramassage |
||
|
||
[3] et accrochez le |
|
|
bac de ramassage [2] |
|
|
sur le carter de tonte |
|
|
comme indiqué. |
|
2. Relâchez la décharge latérale et bloquez le bac de ramassage.
Retrait
1. Soulevez la décharge latérale, attrappez la poignée du bac de ramassage et retirez le sac.
2.Relâchez la décharge latérale.
3.Lorsque le bac de ramassage est dégagé de la décharge latérale, vous pouvez le saisir à travers l’ouverture du guidon ou vous pouvez le retirer à l’arrière de la tondeuse sous le guidon.
Hauteur de coupe
Vérifiez la hauteur de coupe du carter de tonte et assurez-vous que les 4 leviers [1] sont dans la même position de hauteur de coupe.
Afin de régler la hauteur de tonte, tirez chaque levier de réglage [1] vers la roue et bloquez-le sur le cran désiré.
Si vous n’êtes pas sûr de la hauteur de tonte à adopter, commencez par la plus haute et examinez les résultats obtenus sur une petite surface. Puis réglez la hauteur si nécessaire.
[1]
1
[1]
19 mm
32 mm
46 mm
62 mm
75 mm
88 mm
2 

 101 mm
3
4
Déflecteur arrière
Lors d'une utilisation normale, le déflecteur arrière [1] subit l'usure et des détériorations. Retirez le bac de ramassage et soulevez le capot de vidage [2] pour vérifier la présence éventuelle de fissures ou de déchirures sur le déflecteur arrière. Si celui-ci est usé à l'extrême, faites-le remplacer par un technicien d'intervention Honda agréé.
[2]
 [1]
[1]
Direction de la tonte
Réglage du bouton de commande de la tonte
Réglez le bouton de commande de la tonte [1] dans l'une des dix positions pour obtenir les résultats de tonte souhaités.
Pour régler le bouton de commande de la tonte, tirez le bouton vers le bas et vers l'arrière de la tondeuse. Le bouton règle la porte coulissante [2] de la position SAC totalement ouverte à la position BROYAGE totalement fermée.
[1]
|
PROTECTION |
[2] (totalement fermée) |
DÉCHARGE |
La résistance élevée que vous pouvez rencontrer lors du déplacement du bouton de commande de tonte d'un côté à l'autre peut être le résultat d'une accumulation de gazon en haut de la porte coulissante.
Il est normal de constater une certaine accumulation d'herbe dans l'ouverture d'éjection lorsque le commande de la tonte est entièrement fermé. Pour enlever cette herbe, fermer le clapet d'éjection, ouvrir entièrement le commande de la tonte, démarrer le moteur et actionner à plusieurs reprises le levier de commande de la organe de coupe.
Importantes Consignes De Securite
Coupez toujours le moteur et déconnectez le capuchon de la bougie avant de soulever la protection de décharger pour voir ou nettoyer autour de la porte coulissante. Vous éviterez ainsi le contact avec les organe de coupe en mouvement et empêcherez que des objets ne soient jetés dans la zone de décharge.
Position de la porte coulissante
Vous pouvez repositionner la porte coulissante [2] pour obtenir différents résultats de tonte. Si la position souhaitée de la porte coulissante n'est pas connue, installez un bac de ramassage et commencez à tondre avec le bouton de commande de la tonte [1] totalement en position SAC. Vérifiez l'effet sur la pelouse. Au fur et à mesure que le bouton est déplacé vers la position BROYAGE, une quantité supérieure de gazon est recyclé sur la pelouse. Réglez le bouton de commande de tonte jusqu'à ce que vous obteniez les résultats souhaités.
MISE EN SAC OU DECHARGE
ARRIERE ET UN PEU DE BROYAGE
[1]
[2] (ouvert à 50 %)
8 |
FRANÇAIS |

MISE EN SAC OU DECHARGE
ARRIERE TOTALE
[1] (position SAC)
[2] (totalement ouverte)
Décharge arrière |
|
|
Pour décharger la tonte vers |
[1] |
|
l'arrière, enlevez le sac de |
||
|
||
décharge et placez le |
|
|
bouton de commande de |
|
|
tonte [1] dans la plage SAC. |
|
BROYAGE TOTAL
[1] (position BROYAGE)
[2] (totalement fermée)
Une décharge arrière maximum se produit lorsque le bouton de commande de tonte se trouve totalement à gauche en position (SAC). Au fur et à mesure que le bouton de commande de tonte est déplacé vers la position droite (BROYAGE), moins de gazon est déchargé par la protection de décharge arrière.
FONCTIONNMENT
PRECAUTIONS A PRENDRE POUR LA TONTE
Avant d’utiliser la tondeuse pour la première fois, veuillez lire les
CONSIGNES DE SECURITE page 2, VERIFICATIONS AVANT page 5.
Même si vous avez déjà utilisé d’autres tondeuses à gazon, prenez le temps de bien savoir comment cette tondeuse fonctionne et entraînez-vous dans un endroit sans danger jusqu’à ce que vous soyez familiarisé avec ses particularités.
Pour votre sécurité, évitez de démarrer ou de faire fonctionner l’appareil dans un endroit fermé tel qu’un garage par exemple. Les émanations de votre tondeuse contiennent un gaz toxique (monoxyde de carbone) et peuvent s’accumuler rapidement et provoquer des malaises, voire la mort.
FRÉQUENCE D'UTILISATION
Si vous prévoyez de ne pas utiliser votre tondeuse à gazon fréquemment ou de l'utiliser de façon intermittente (plus de 4 semaines entre deux utilisations), veuillez vous reporter à la section « Essence » du chapitre RANGEMENT (page 17) pour en savoir plus sur la détérioration du carburant.
DEMARRAGE DU MOTUER
1. Placez la soupape de combustible [1] sur la position OUVERT.
OUVERT 
 [1]
[1]
2.Placez la manette des gaz [1] sur la position de rapide ( ).
O
T
S
|
[1] |
3. Type HYEA: |
[2] |
Tirez légèrement le |
[3] |
démarreur [1] jusqu’à ce |
|
que vous sentiez une |
|
résistance puis tirez |
[1] |
brusquement. Ramenez |
|
doucement le démarreur à |
|
sa position. Pour |
|
empêcher la ou les organe |
|
de coupe de tourner et la |
|
tondeuse d’avancer, |
|
relâchez toujours le levier |
|
de commande de organe |
|
de coupe [2] et le levier |
|
d’embrayage |
|
d’avancement [3] lorsque |
|
vous servez du démarreur. |
|
Type HZEA démarre electre:
Tourner la clé de contact en position
START ( ) . Laisser la clé revenir
en position ON (I) lorsque le moteur démarre.
Ne pas faire tourner le démarreur
pendant plus de 5 secondes à la fois. Si le moteur ne démarre pas, relâcher le contact et attendre 10 secondes avant d'actionner à
nouveau le démarreur.
Si la batterie n'est pas suffisamment chargée pour démarrer le moteur, en raison éventuellement d'une période de stockage prolongée, utiliser le démarreur à lanceur pour démarrer le moteur pendant au moins une séance de tonte. La batterie doit garder une charge suffisante après une séance de tonte (environ 1 heure).
FRANÇAIS |
9 |
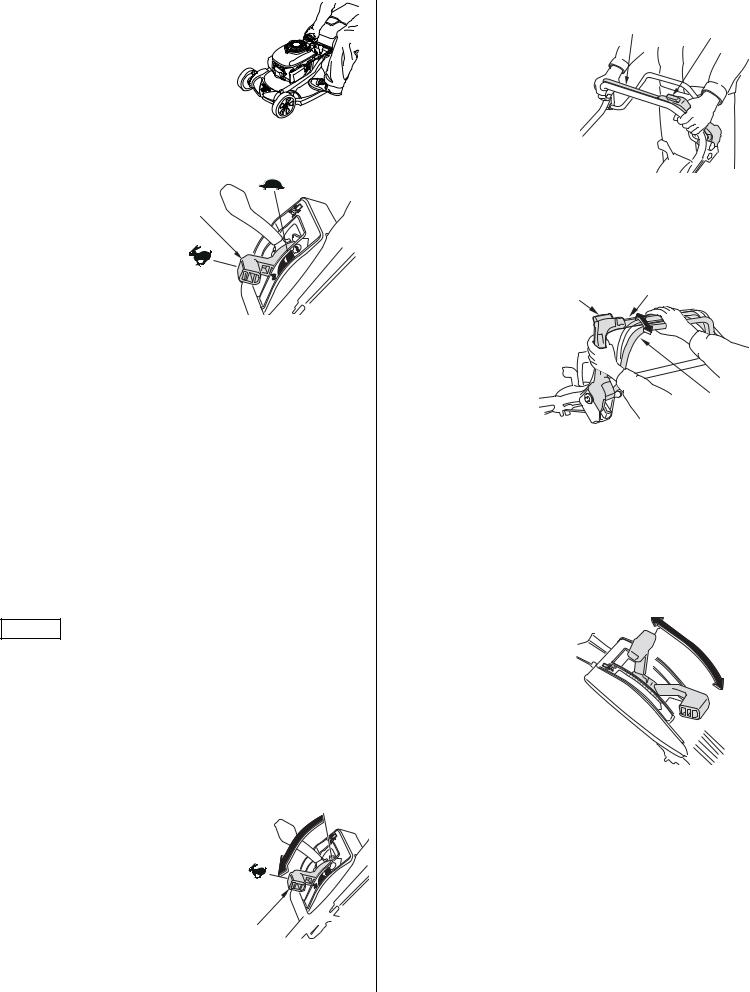
Type HZEA Démarrage manuel :
Tournez le commutateur à clé et mettez-le en position ON.
Déplacez le levier de commande des gaz sur la position rapide.
Placez votre pied sur la marche du carteur de la tondeuse. Tirez légèrement la poignée du démarreur
jusqu’à ce que vous sentiez une résistance puis tirez brusquement. Ramenez doucement le démarreur à sa position.
4.Placez le levier de commande des gaz [1] sur
la position rapide ( ) pour |
[1] |
tondre ou dans la position |
|
lente ( ) pour tourner au |
|
ralenti. |
|
Pour assurer un redémarrage facile et la performance maximale de
l'Auto Choke System™,
laisser le moteur fonctionner durant au moins trois minutes, après avoir démarré un moteur froid, avant de l'arrêter. Ce temps de fonctionnement minimum sera plus long si la température est inférieure à 21 °C.
Fonctionnement en haute altitude
En haute altitude, le mélange standard essence/air du carburateur est beaucoup trop riche : les performances diminuent et la consommation d’essence augmente. Un mélange très riche encrasse la bougie et occasionne des difficultés de démarrage.
On peut améliorer les performances en haute altitude, en effectuant certaines modifications du carburateur. Si vous faites fonctionner votre tondeuse à une altitude supérieure à 1500 mètres au-dessus du niveau de la mer, faites exécuter ces modifications par votre concessionnaire Honda.
Même avec les modifications appropriées apportées au carburateur, la puissance du moteur diminue de 3,5% pour chaque 300 mètres d’altitude. Les effets de l’altitude sur la puissance du moteur sont supérieurs si aucune modification du carburateur n’est faite.
AVIS
Lorsque le carburateur a été modifié pour un fonctionnement en altitude, le mélange air/essence est trop léger pour une utilisation à basse altitude. Le fonctionnement d’une tondeuse à basse altitude, moins de 1500 mètres, dont le carburateur a été modifié pour la haute altitude, provoque une surchauffe du moteur et peut endommager gravement ce dernier. Pour une utilisation à basse altitude, demandez à votre concessionnaire Honda de ramener le moteur aux spécifications d’origine de fabrication.
COMMANDES DE TONTE
Levier de commande des gaz
Pour une meilleure qualité de coupe, il convient de toujours tondre avec le levier de commande des gaz [1] en position RAPIDE ( ). Lorsque la organe de coupe tourne à grande vitesse, l’effet de ventilation accru soulève et coupe l’herbe plus efficacement.
N’essayez pas de dépasser cette |
[1] |
|
|
vitesse pré-réglée car les organe de |
|
coupe pourrait se briser et être éjectée. |
|
Commande de l’organe de coupe |
|
|
Pour faire tourner la organe de |
[2] |
|
coupe, appuyez sur le bouton jaune |
||
[1] |
||
[1] situé au-dessus du commande |
|
|
de l’organe de coupe [2], puis |
|
|
poussez le levier vers l’avant et |
|
|
maintenez-le contre le guidon. |
|
Relâchez le commande de l’organe de coupe [2] pour arrêter la organe
de coupe.
Manipulez le commande de l’organe de coupe d’un geste précis et rapide afin que le contrôle de la
organe de coupe soit complètement engagé ou désengagé. Cela évite au moteur de caler et prolonge la durée de vie du mécanisme de commande de organe de coupe.
Levier d’embrayage de vitesse
Poussez le levier d’embrayage d’avancement [1] vers l’avant pour faire avancer la tondeuse.
Pour les tondeuses |
[2] |
[3] |
autotractées, appuyez sur le |
|
|
|
|
|
bouton jaune [2] situé |
|
|
au-dessus du commande de |
|
|
l’organe de coupe [3], tirez |
|
|
ce levier vers le guidon et |
|
|
poussez le levier |
|
|
d’embrayage d’avancement |
|
|
[1] vers l’avant. |
|
[1] |
Relâchez le levier d’embrayage de vitesse [1]
pour arrêter la tondeuse.
Vous pouvez contrôler la vitesse de la tondeuse grâce au levier d’embrayage d’avancement [1]. La tondeuse accélère progressivement si vous poussez le levier vers l’avant. Si vous poussez le levier au maximum vers le haut jusqu’au guidon, la tondeuse avance à la vitesse déterminée par le réglage du levier de vitesse.
Levier de changement de vitesse |
|
Vous utiliserez le levier de |
OR |
changement de vitesse pour |
|
sélectionner la vitesse de tonte. |
N’utilisez pas la manette des gaz
pour régler la vitesse de la tondeuse. Pour obtenir une bonne
qualité de coupe, la manette des gaz doit rester dans la position
rapide.
Utilisez les vitesses élevées pour le broyage et la mise en sac, les vitesses inférieures pour le transport.
Pour immobiliser la tondeuse ou la
THROTTLE 


ralentir, ramenez le levier de vitesse complètement vers l’arrière et engagez le levier d’embrayage de vitesse.
10 |
FRANÇAIS |
Loading...