


Honda Lawn Mower
Owner’s Manual
&
Service Record Booklet
HRU19K1 / HRU19M1 / HRU197K1 / HRU197M1 HRU196K1 / HRU196M1 / HRU216K2 / HRU216M2
Read and understand this Owners Manual before operating your Honda mower and ensure that you have identified the information applicable to your particular model mower.

Thank you for purchasing a Honda lawn mower.
This manual covers the operation and maintenance of the Honda lawn mower range.
We want to help you get the best results from your mower and to operate it safely. This manual contains the information on how to do that; please read it carefully.
This manual should be considered a permanent part of the lawn mower and should remain with it, if it is resold.
If you have a problem or questions concerning the mower, contact your supplying dealer.
SAFETY MESSAGES
Pay special attention to statements preceded by the following words:
You WILL be KILLED or SERIOUSLY HURT if you don’t follow instructions.
You CAN be KILLED or SERIOUSLY HURT if you don’t follow instructions.
You CAN be HURT if you don’t follow instructions.
Each message tells you what the hazard is, what can happen, and what you can do to avoid injury.
DAMAGE PREVENTION MESSAGES
You will also see other important messages that are preceded by the following word:
|
Your lawn mower or other property can be damaged if you don’t |
|
NOTICE |
||
follow instructions. |
The purpose of these messages is to help prevent damage to your lawn mower, other property, or the environment.
Do not use this lawn mower except for mowing lawns.
Illustrations in this manual are for instructional purposes only and may not be exact representations. All information contained in this manual is based on the latest product information available at the time of publication. Honda Australia Motorcycle and Power Equipment Pty. Ltd. reserves the right to make changes at any time without notice. No part of this publication may be reproduced, stored in a retrieval system, or transmitted in any form by any means, electronic, mechanical, photocopying, recording, or otherwise, without the prior written permission of Honda Australia Motorcycle and Power Equipment Pty. Ltd. This includes text, figures and tables.
Honda Australia Motorcycle and Power Equipment Pty. Ltd.
ABN 96 006 662 862 (trading as Honda MPE).
1

CONTENTS
1. WARRANTY................................................................................................ |
4 |
Honda limited Warranty............................................................................ |
4 |
2. SAFETY INSTRUCTIONS.............................................................................. |
5 |
3. COMPONENT IDENTIFICATION.................................................................. |
7 |
4. CONTROLS................................................................................................. |
9 |
Fuel Valve............................................................................................ |
9 |
Throttle Lever...................................................................................... |
9 |
Blade Control Lever............................................................................ |
10 |
Drive Clutch Lever.............................................................................. |
11 |
Cutting Height Adjustment Lever....................................................... |
12 |
Shift Lever.......................................................................................... |
13 |
Front Guard........................................................................................ |
14 |
5. PRE-OPERATION CHECKS......................................................................... |
15 |
ARE YOU READY TO MOW? .................................................................... |
15 |
CHECK YOUR LAWN................................................................................. |
15 |
CHECK YOUR MOWER.............................................................................. |
16 |
Blades................................................................................................. |
16 |
Engine Oil Level.................................................................................. |
19 |
Fuel.................................................................................................... |
20 |
Air Cleaner......................................................................................... |
21 |
Grass Bag ........................................................................................... |
21 |
Cutting Height.................................................................................... |
23 |
6. OPERATION.............................................................................................. |
24 |
MOWING PRECAUTIONS.......................................................................... |
24 |
STARTING THE ENGINE............................................................................ |
24 |
Throttle Lever.................................................................................... |
25 |
Blade Control Lever............................................................................ |
27 |
Drive Clutch Lever.............................................................................. |
28 |
Shift Lever.......................................................................................... |
29 |
STOPPING THE ENGINE............................................................................ |
30 |
2

CONTENTS - continued
SAFE MOWING PRACTICES....................................................................... |
31 |
MOWING TIPS.......................................................................................... |
33 |
7. TRANSPORTING/STORAGE....................................................................... |
36 |
BEFORE LOADING.................................................................................... |
36 |
LOADING AND UNLOADING..................................................................... |
36 |
STORAGE PREPARATION.......................................................................... |
37 |
Handlebar Folding.............................................................................. |
40 |
STORAGE PRECAUTIONS.......................................................................... |
41 |
8. MAINTENANCE........................................................................................ |
42 |
THE IMPORTANCE OF MAINTENANCE..................................................... |
42 |
MAINTENANCE SAFETY............................................................................ |
43 |
MAINTENANCE SCHEDULE....................................................................... |
44 |
ENGINE MAINTENANCE........................................................................... |
45 |
Engine Oil Change.............................................................................. |
45 |
Engine Oil Recommendations............................................................ |
46 |
Air Cleaner Service............................................................................. |
47 |
Spark Plug Service.............................................................................. |
48 |
Carburettor Modification for Altitude operation.............................. |
50 |
Fuel Recommendations..................................................................... |
50 |
BLADE REMOVAL & INSTALLATION......................................................... |
51 |
GRASS BAG CLEANING & REPLACEMENT................................................ |
56 |
9. TROUBLESHOOTING................................................................................ |
57 |
10. SPECIFICATIONS..................................................................................... |
59 |
11. OPERATOR SAFETY FEATURES................................................................ |
62 |
12. SET UP INSTRUCTIONS........................................................................... |
63 |
13.SERVICE SCHEDULE SHEET....................................................................... |
65 |
3

1. HONDA limited WARRANTY
Honda* warrants each new Honda lawn mower to be free from defects in material and workmanship for the period detailed on your warranty registration form.
The Honda warranty is limited. In order to qualify, the service schedule sheets located at the back of this manual must be completed. Any Authorised Honda Lawnmower Dealer will repair any part that proves defective within the limits of this warranty at no charge to the owner for parts and labour. All parts replaced under this warranty become the property of Honda. Transportation costs for the product either to or from the dealer is the responsibility of the owner.
This warranty will not apply to:
•Any part which has been subject to misuse, negligence, accidental damage, improper or inadequate maintenance, or improper storage.
•Repairs rendered necessary by, or arising from, the use of other than genuine Honda parts.
•Normal maintenance items, including, but not limited to, adjustment of valves, cleaning of carburettor, fuel strainer and air filter.
•Normal replacement of service items, including but not limited to spark plug, air filter and cutting blades.
•Deterioration of any item due to normal use, fair wear and exposure unless due to a defect in material or workmanship.
•Any work or adjustment performed by persons other than Authorised Honda Lawnmower Dealers, nor damage resulting therefrom.
The benefits conferred by this warranty are in addition to all other rights and remedies in respect of the product which the purchaser has under the Trade Practices Act 1974 and/or any relevant State or Territory Acts. Where permitted, the liability of Honda shall be limited at its option to the repair or the replacement of the mower.
NOTE: For full details of the Honda Warranty policy, coverage and conditions please go to www.hondampe.com.au, under the banner “Owning a Honda”.
*Honda is: Honda Australia Motorcycle and Power Equipment Pty. Ltd. ABN 96 006 662 862, Private Bag No. 19, Somerton, Victoria, 3062. These warranty conditions apply to Australia only. Purchasers in other countries should refer to their local distributor for warranty conditions.
4

2. SAFETY INSTRUCTIONS
To ensure safe operation
Read and understand the Owner’s Manual before operating the mower. Failure to do so could result in personal injury or equipment damage.
Read instructions carefully, become familiar with controls and proper use of equipment.
Never allow children or people unfamiliar with these instructions to use the lawn mower.
Never mow while people, especially children, or pets are nearby.
Keep in mind that the operator is responsible for accidents or hazards that occur to people or their property.
While mowing, always wear substantial footwear and long trousers. Do not operate the equipment when barefoot or wearing open sandals.
Thoroughly inspect the area where the equipment is to be used and remove all objects which may be thrown by the mower.
Petrol is highly flammable:
-Store fuel in containers specifically designed for this purpose
-Refuel outdoors only and do not smoke while refuelling
-Add fuel before starting the engine. Never remove the cap of the fuel tank or add petrol while the engine is running or when the engine is hot.
-If petrol is spilled, do not attempt to start the engine but move the mower away from the area of spillage and avoid creating any source of ignition until the petrol vapours have dissipated.
Before using, always visually inspect to see that the blades, blade bolt(s) and mower housing are not worn or damaged. Replace worn or damaged blades and bolt(s) in sets to preserve balance.
Do not operate the engine in a confined space where dangerous carbon monoxide fumes can collect.
Mow only in daylight or good artificial light.
Avoid operating the equipment in wet grass, where feasible.
Mowing on slopes:
-Always be sure of your footing on slopes.
-Mow across slopes, never up and down.
-Walk, never run.
-Exercise extreme caution when changing direction on slopes.
-Do not mow on slopes of 20 degrees or more for extended periods.
5

2. SAFETY INSTRUCTIONS - continued
Use extreme caution when reversing or pulling the lawn mower toward you.
Stop the blades if the lawn mower has to be tilted for transporting, when crossing surfaces other than grass and when transporting the lawn mower to and from the area to be mowed.
Never operate the lawn mower with defective guards or shields, or without guard devices (for example, discharge guard).
Do not attempt to make cutting height adjustments while the engine is running.
Do not change the engine governor setting or over-speed the engine.
Disengage drive clutch before starting the engine.
Always start the engine according to the instructions and keep hands and feet well away from the blades and discharge opening at all times..
Do not tilt the lawn mower when starting the engine.
Do not start the engine when standing in front of the discharge opening.
Do not put hands or feet near or under rotating parts.
Never pick up or carry a lawn mower while the engine is running.
Stop the engine and disconnect the spark plug cap:
-Before clearing a blockage or unclogging the mower.
-Before checking, cleaning or working on the mower.
-After striking a foreign object. Inspect the mower for damage and make repairs before restarting and operating the mower.
-If the mower starts to vibrate abnormally, check immediately.
Stop the engine:
-Whenever you leave the mower.
-Before refuelling the mower. Allow to cool before refuelling.
Reduce the throttle setting during engine shut down and turn the fuel valve off at the conclusion of mowing ( Except Auto Choke models).
Keep all nuts, bolts and screws tight to be sure the mower is in safe working condition.
Never store the mower with petrol in the tank inside a building where fumes may reach an open flame or spark. Allow the engine to cool before storing in any enclosure.
To reduce the fire hazard, keep the engine, muffler and petrol tank area free of grass, leaves or excessive grease.
Replace worn or damaged parts for safety.
If the fuel tank has to be drained, this should be done outdoors.
Wear eye protection.
6

3. COMPONENT IDENTIFICATION
HRU216M2 / K2 SHOWN
HRU197K1 / M1
7

3. COMPONENT IDENTIFICATION - continued
( 21” Models only )
Record the frame and engine numbers and serial codes, and date of purchase, in the space below. You will need this information when ordering parts and when making technical or warranty inquiries.
Frame Serial Number:
Engine Serial Number:
Date of Purchase:
8
4. CONTROLS
DESCRIPTION OF CONTROLS
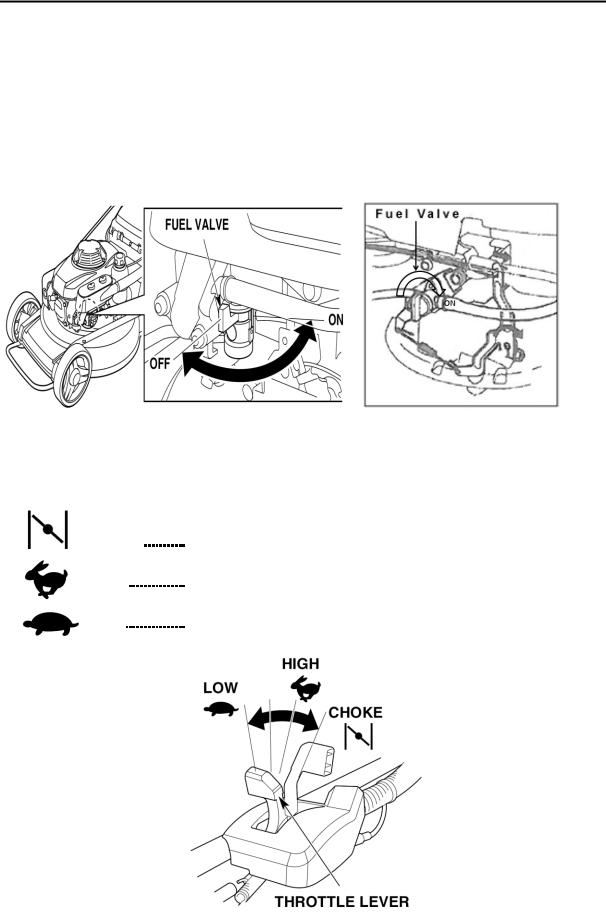
Fuel Valve
The fuel valve opens and closes the fuel passage from the fuel tank to the carburettor. The fuel valve must be ON to start and operate the mower. The fuel valve should be kept OFF when the mower is not in use.
NOTE: Fuel Valve may vary in appearance depending on engine model.
Throttle Lever |
|
|
|
|
|
|
CHOKE |
For starting a cold engine ( Not for HRU19K1 or HRU19M1 ) |
|
HIGH |
For restarting a warm.engine and for mowing |
|
LOW |
For idling the engine |
|
|
|
9
4. CONTROLS – continued
Blade Control Lever ( HRU196M1 and all 21” Models )
This lever is connected to the Roto-Stop blade control system. The blades will not turn unless the blade control button is pushed in conjunction with the blade control lever being pushed forward.
Depress Blade Control Button before pushing the Lever Forward or Blades will not rotate
NOTE: Engine will Stop in this position on models fitted with Fly Wheel Brake
10

4. CONTROLS - continued
Drive Clutch Lever ( 21” Models Only )
The drive clutch lever engages (push forward) and disengages (release) the transmission that drives the rear wheels. The drive clutch lever should only be engaged after the engine has been started.
11

4. CONTROLS - continued
Cutting Height Adjustment Lever
All wheels of the mower can be adjusted at the same time with one lever.
The cutting heights listed are approximate. The actual height of cut grass will vary with lawn and soil conditions.
Move the adjuster forward to lower and back to raise the cutter housing.
NOTE: The 19” models have the Height Adjustment Lever on the left hand side, so the above figures will be reversed.
12

4. CONTROLS - continued
Shift Lever ( 21” Models Only )
The shift lever selects and controls the self-propelled drive speed.
For mowing thick grass or manoeuvring in small areas.
For intermediate self-propelled mowing speed.
For maximum self-propelled transport speed.
13
4. CONTROLS - continued
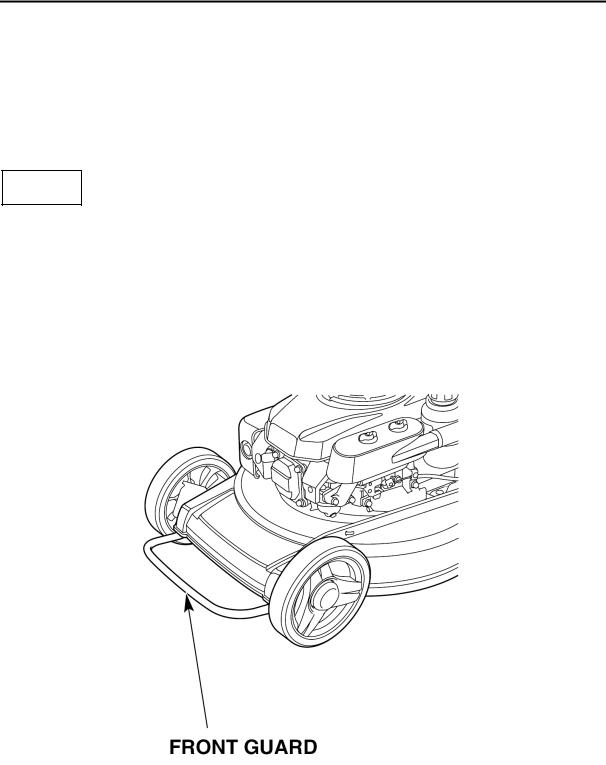
Front Guard ( 21” Models Only )
Use the front guard when lifting the lawn mower, the front guard can also be utilised to tie down lawnmower for transportation.
NOTICE
Do not step on the front guard.
Have the front guard replaced by an authorised Honda service dealer whenever it is deformed.
14

5. PRE-OPERATION CHECKS
ARE YOU READY TO MOW?
Be sure to wear protective clothing. Long pants and eye protection can lower your risk of injury from thrown objects. Wear footwear that protects your feet and won’t let you slip if you mow on slopes or uneven ground.
CHECK YOUR LAWN
For your safety and for the safety of others, always inspect the area before mowing.
OBJECTS
Anything which can be picked up by the blades and thrown is a potential hazard to you and others. Look for things like stones, sticks, bones and wire. Remove them from the mowing area.
PEOPLE & PETS
People and animals near the mowing area can move into your path or into a position where they could be struck by thrown objects. Clear the area of people, especially children, and pets. Their safety is your responsibility.
LAWN
Check the length and condition of the grass, so you will know what cutting height and mowing speed to use.
Avoid mowing wet grass. Not only will wet grass clog your cutter housing and collect in clumps on the lawn, it also gives poor traction, increasing your risk of losing your footing.
15

5. PRE-OPERATION CHECKS - continued
CHECK YOUR MOWER
Blades
Before each use, check the cutter blades for damage or excessive wear.
To avoid severe personal injury, disconnect the spark plug cap to prevent accidental starting, and wear heavy gloves to protect your hands from the cutter blades.
1.Stop the engine and turn the fuel valve to the OFF position.
2.Disconnect the spark plug cap from the spark plug (see page 48).
3.Remove the grass bag (if installed).
4.Tilt the mower to the right, so the carburettor side is up. This will help to prevent fuel leakage, oil contamination of the air cleaner and hard starting.
NOTE: Remember, Fuel Valve may appear different depending on engine model.
16
5.PRE-OPERATION CHECKS - continued
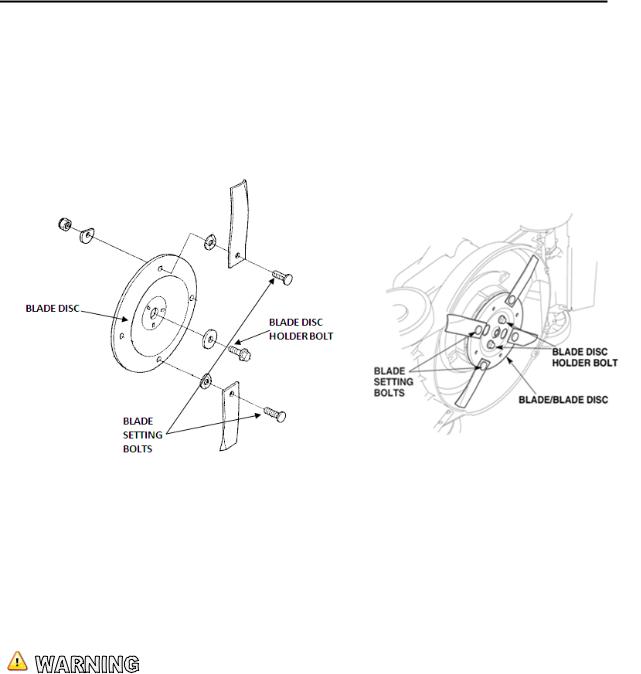
5.Inspect the blades for wear and damage.
6.Check that the blade setting bolts and the blade disc holder bolt are tight
(see page 51).
|
Two Blades Models |
Four Blade Models |
||
|
|
|||
|
|
|
|
|
|
|
|
|
|
|
|
|
|
|
Never operate the mower with worn, damaged, split or dented blades. A piece of blade which breaks off and is thrown outwards can cause serious bodily injuries.
17

5. PRE-OPERATION CHECKS - continued
NOTICE
Blade wear is increased when the mower is used on sandy soils. Inspect the blades more often when the mower is used in sandy conditions.
or 12mm – for
19” Models
A dull blade can be sharpened, but a blade that is worn out, bent, cracked or otherwise damaged must be replaced. A worn or damaged blade can break, causing blade pieces to be thrown from the mower.
When a blade needs sharpening or replacement, take the lawn mower to an authorised Honda servicing dealer. Uneven or incorrect sharpening can cause imbalance and vibration. If you have a torque wrench and the other correct tools, you can remove and install the blades yourself (see page 51).
18

5. PRE-OPERATION CHECKS - continued
Engine Oil Level
Check the engine oil level with the engine stopped and the mower on a level surface.
1.Clean the area around the oil filler cap.
2.Remove the oil filler cap, and wipe the dipstick clean.
3.Insert the dipstick without screwing it into the filler neck. Remove it and check the oil level shown on the dipstick.
4.If the oil level is low, add the recommended oil (see page 46) to reach the upper limit mark on the dipstick. Do not overfill.
5.After checking the engine oil level, screw in the oil filler cap/dipstick securely.
NOTE: OIL FILLER CAP / DIPSTICK MAY VARY IN APPEARANCE
DEPENDING ON ENGINE TYPE.
19
5. PRE-OPERATION CHECKS - continued
Fuel
Refuel in a well-ventilated area before starting the engine. If the engine has been running, allow it to cool. See page 50 for fuel recommendations.
Remove the fuel filler cap and check the fuel level. Refill the tank if the fuel level is low. Refuel carefully to avoid spilling fuel. Do not overfill; there should be no fuel over the limit mark. After refuelling, tighten the fuel filler cap securely.
DO NOT OVERFILL FUEL TANK – NOTE “LEVEL” MARK.
“LEVEL” MARK MAY VARY DEPENDING ON ENGINE TYPE.
Petrol is highly flammable and explosive.
You can be burned or seriously injured when handling fuel.
Stop the engine and keep heat, sparks and flame away.
Handle fuel only outdoors.
Wipe up spills immediately.
Do not smoke while refuelling the mower. Never refuel the mower inside a building where petrol fumes may reach flames or sparks. Keep petrol away from appliances with pilot lights, barbecues, electric appliances, etc.
NOTICE
Fuel can damage paint and some plastic. Be careful not to spill fuel when filling your fuel tank. Damage caused by spilled fuel is not covered under warranty.
20
 Loading...