

Page 1

E-9232T Server
USERGUIDE
®
Page 2

Page 3

Contents
Chapter 1: Checking Out Your Gateway Server . . . . . . . . . . . . . . . . . . . . . . . 1
Front . . . . . . . . . . . . . . . . . . . . . . . . . . . . . . . . . . . . . . . . . . . . . . . . . . . . . . . . . . . . . . 2
Back . . . . . . . . . . . . . . . . . . . . . . . . . . . . . . . . . . . . . . . . . . . . . . . . . . . . . . . . . . . . . . 3
Interior . . . . . . . . . . . . . . . . . . . . . . . . . . . . . . . . . . . . . . . . . . . . . . . . . . . . . . . . . . . . 4
System board . . . . . . . . . . . . . . . . . . . . . . . . . . . . . . . . . . . . . . . . . . . . . . . . . . . . . . 5
Getting Help . . . . . . . . . . . . . . . . . . . . . . . . . . . . . . . . . . . . . . . . . . . . . . . . . . . . . . . . 5
Gateway Web site . . . . . . . . . . . . . . . . . . . . . . . . . . . . . . . . . . . . . . . . . . . . . 5
Chapter 2: Setting Up Your Server. . . . . . . . . . . . . . . . . . . . . . . . . . . . . . . . . . 7
Setting up the hardware . . . . . . . . . . . . . . . . . . . . . . . . . . . . . . . . . . . . . . . . . . . . . 8
Protecting from power source problems . . . . . . . . . . . . . . . . . . . . . . . . . . . . . . . . 8
Starting your server . . . . . . . . . . . . . . . . . . . . . . . . . . . . . . . . . . . . . . . . . . . . . . . . . 8
Understanding the power-on self-test . . . . . . . . . . . . . . . . . . . . . . . . . . . . 9
Turning off your server . . . . . . . . . . . . . . . . . . . . . . . . . . . . . . . . . . . . . . . . . . . . . 10
Setting up the operating system . . . . . . . . . . . . . . . . . . . . . . . . . . . . . . . . . . . . . . 10
Initial hardware settings . . . . . . . . . . . . . . . . . . . . . . . . . . . . . . . . . . . . . . . . . . . . . 10
Chapter 3: Maintaining Your Server . . . . . . . . . . . . . . . . . . . . . . . . . . . . . . . 11
Caring for your server . . . . . . . . . . . . . . . . . . . . . . . . . . . . . . . . . . . . . . . . . . . . . . 12
Cleaning your server . . . . . . . . . . . . . . . . . . . . . . . . . . . . . . . . . . . . . . . . . . 12
Preparing for system recovery . . . . . . . . . . . . . . . . . . . . . . . . . . . . . . . . . . . . . . . . 13
Recording the BIOS configuration . . . . . . . . . . . . . . . . . . . . . . . . . . . . . . . 13
System administration . . . . . . . . . . . . . . . . . . . . . . . . . . . . . . . . . . . . . . . . . . . . . . 13
Gateway Systems Manager . . . . . . . . . . . . . . . . . . . . . . . . . . . . . . . . . . . . 13
Server security . . . . . . . . . . . . . . . . . . . . . . . . . . . . . . . . . . . . . . . . . . . . . . 14
Updating the baseboard management controller firmware . . . . . . . . . . . . . . . . . 14
Using your Server Companion DVD . . . . . . . . . . . . . . . . . . . . . . . . . . . . . . . . . . . . 15
Server Companion DVD contents . . . . . . . . . . . . . . . . . . . . . . . . . . . . . . . . 15
Viewing documents . . . . . . . . . . . . . . . . . . . . . . . . . . . . . . . . . . . . . . . . . . . 15
Installing drivers and programs . . . . . . . . . . . . . . . . . . . . . . . . . . . . . . . . . 15
Booting the Server Companion DVD . . . . . . . . . . . . . . . . . . . . . . . . . . . . . 16
Chapter 4: Installing Components. . . . . . . . . . . . . . . . . . . . . . . . . . . . . . . . . . 17
Preparing to install components . . . . . . . . . . . . . . . . . . . . . . . . . . . . . . . . . . . . . . 18
Selecting a place to work . . . . . . . . . . . . . . . . . . . . . . . . . . . . . . . . . . . . . . 18
Gathering the tools you need . . . . . . . . . . . . . . . . . . . . . . . . . . . . . . . . . . 18
Preventing static electricity discharge . . . . . . . . . . . . . . . . . . . . . . . . . . . . . . . . . . 18
Accessing the internal components . . . . . . . . . . . . . . . . . . . . . . . . . . . . . . . . . . . . 19
Opening the server case . . . . . . . . . . . . . . . . . . . . . . . . . . . . . . . . . . . . . . . 19
Removing the bezel assembly . . . . . . . . . . . . . . . . . . . . . . . . . . . . . . . . . . 20
Removing the processor air duct . . . . . . . . . . . . . . . . . . . . . . . . . . . . . . . . 21
Installing the processor air duct . . . . . . . . . . . . . . . . . . . . . . . . . . . . . . . . 22
Installing the bezel assembly . . . . . . . . . . . . . . . . . . . . . . . . . . . . . . . . . . . 23
Closing the server case . . . . . . . . . . . . . . . . . . . . . . . . . . . . . . . . . . . . . . . . 24
Installing drives . . . . . . . . . . . . . . . . . . . . . . . . . . . . . . . . . . . . . . . . . . . . . . . . . . . . 25
Installing or replacing a fixed or removable-media drive . . . . . . . . . . . . 25
Installing or replacing a hard drive . . . . . . . . . . . . . . . . . . . . . . . . . . . . . . 27
i
Page 4

Contents
Configuring your onboard RAID solution . . . . . . . . . . . . . . . . . . . . . . . . . . . . . . . . 28
Configuring the onboard SATA RAID solution . . . . . . . . . . . . . . . . . . . . . . 28
Installing memory . . . . . . . . . . . . . . . . . . . . . . . . . . . . . . . . . . . . . . . . . . . . . . . . . . 34
Memory online sparing . . . . . . . . . . . . . . . . . . . . . . . . . . . . . . . . . . . . . . . . 35
Installing PCI expansion cards . . . . . . . . . . . . . . . . . . . . . . . . . . . . . . . . . . . . . . . . 35
Replacing the processor . . . . . . . . . . . . . . . . . . . . . . . . . . . . . . . . . . . . . . . . . . . . . 38
Replacing a power supply module . . . . . . . . . . . . . . . . . . . . . . . . . . . . . . . . . . . . . 40
Replacing a fan . . . . . . . . . . . . . . . . . . . . . . . . . . . . . . . . . . . . . . . . . . . . . . . . . . . . 42
Replacing the CMOS battery . . . . . . . . . . . . . . . . . . . . . . . . . . . . . . . . . . . . . . . . . . 43
Replacing the system board . . . . . . . . . . . . . . . . . . . . . . . . . . . . . . . . . . . . . . . . . . 44
Chapter 5: Using the BIOS Setup Utility . . . . . . . . . . . . . . . . . . . . . . . . . . . . .47
Opening the BIOS Setup utility . . . . . . . . . . . . . . . . . . . . . . . . . . . . . . . . . . . . . . . . 48
Updating the BIOS . . . . . . . . . . . . . . . . . . . . . . . . . . . . . . . . . . . . . . . . . . . . . . . . . . 48
Recovering the BIOS . . . . . . . . . . . . . . . . . . . . . . . . . . . . . . . . . . . . . . . . . . . . . . . . 49
Resetting BIOS passwords . . . . . . . . . . . . . . . . . . . . . . . . . . . . . . . . . . . . . . . . . . . 50
Updating or recovering the BMC . . . . . . . . . . . . . . . . . . . . . . . . . . . . . . . . . . . . . . 50
Updating or recovering the BMC firmware . . . . . . . . . . . . . . . . . . . . . . . . 50
Chapter 6: Troubleshooting . . . . . . . . . . . . . . . . . . . . . . . . . . . . . . . . . . . . . . .51
Telephone support . . . . . . . . . . . . . . . . . . . . . . . . . . . . . . . . . . . . . . . . . . . . . . . . . 52
Before calling Gateway Customer Care . . . . . . . . . . . . . . . . . . . . . . . . . . . 52
Telephone support . . . . . . . . . . . . . . . . . . . . . . . . . . . . . . . . . . . . . . . . . . . 52
Tutoring and training . . . . . . . . . . . . . . . . . . . . . . . . . . . . . . . . . . . . . . . . . . . . . . . 53
Safety guidelines . . . . . . . . . . . . . . . . . . . . . . . . . . . . . . . . . . . . . . . . . . . . . . . . . . . 53
Error messages . . . . . . . . . . . . . . . . . . . . . . . . . . . . . . . . . . . . . . . . . . . . . . . . . . . . 53
Troubleshooting . . . . . . . . . . . . . . . . . . . . . . . . . . . . . . . . . . . . . . . . . . . . . . . . . . . 57
First steps . . . . . . . . . . . . . . . . . . . . . . . . . . . . . . . . . . . . . . . . . . . . . . . . . . 57
Battery replacement . . . . . . . . . . . . . . . . . . . . . . . . . . . . . . . . . . . . . . . . . . 57
Beep codes . . . . . . . . . . . . . . . . . . . . . . . . . . . . . . . . . . . . . . . . . . . . . . . . . 58
LED information . . . . . . . . . . . . . . . . . . . . . . . . . . . . . . . . . . . . . . . . . . . . . . 59
BIOS . . . . . . . . . . . . . . . . . . . . . . . . . . . . . . . . . . . . . . . . . . . . . . . . . . . . . . . 60
Optical drive . . . . . . . . . . . . . . . . . . . . . . . . . . . . . . . . . . . . . . . . . . . . . . . . 60
Expansion cards . . . . . . . . . . . . . . . . . . . . . . . . . . . . . . . . . . . . . . . . . . . . . 60
Hard drive . . . . . . . . . . . . . . . . . . . . . . . . . . . . . . . . . . . . . . . . . . . . . . . . . . 60
Internet . . . . . . . . . . . . . . . . . . . . . . . . . . . . . . . . . . . . . . . . . . . . . . . . . . . . 61
Keyboard . . . . . . . . . . . . . . . . . . . . . . . . . . . . . . . . . . . . . . . . . . . . . . . . . . . 61
Memory . . . . . . . . . . . . . . . . . . . . . . . . . . . . . . . . . . . . . . . . . . . . . . . . . . . . 61
Monitor . . . . . . . . . . . . . . . . . . . . . . . . . . . . . . . . . . . . . . . . . . . . . . . . . . . . 61
Power . . . . . . . . . . . . . . . . . . . . . . . . . . . . . . . . . . . . . . . . . . . . . . . . . . . . . . 62
Processor . . . . . . . . . . . . . . . . . . . . . . . . . . . . . . . . . . . . . . . . . . . . . . . . . . . 62
Appendix A: Server Specifications . . . . . . . . . . . . . . . . . . . . . . . . . . . . . . . . . . . . . . 63
System specifications . . . . . . . . . . . . . . . . . . . . . . . . . . . . . . . . . . . . . . . . . . . . . . . 64
System board specifications . . . . . . . . . . . . . . . . . . . . . . . . . . . . . . . . . . . . . . . . . . 64
Environmental specifications . . . . . . . . . . . . . . . . . . . . . . . . . . . . . . . . . . . . . . . . . 65
Electronic specifications . . . . . . . . . . . . . . . . . . . . . . . . . . . . . . . . . . . . . . . . . . . . . 66
ii
Page 5

www.gateway.com
Memory map . . . . . . . . . . . . . . . . . . . . . . . . . . . . . . . . . . . . . . . . . . . . . . . . 66
Interrupts . . . . . . . . . . . . . . . . . . . . . . . . . . . . . . . . . . . . . . . . . . . . . . . . . . . 66
Additional specifications . . . . . . . . . . . . . . . . . . . . . . . . . . . . . . . . . . . . . . . . . . . . . 67
Appendix B: BIOS Settings . . . . . . . . . . . . . . . . . . . . . . . . . . . . . . . . . . . . . . . . . . . . . . 69
Appendix C: Legal Information. . . . . . . . . . . . . . . . . . . . . . . . . . . . . . . . . . . . . . . . . . 79
iii
Page 6

Contents
iv
Page 7

CHAPTER 1
Checking Out Your Gateway Server
• Front
• Back
• Interior
• System board
• Getting Help
1
Page 8
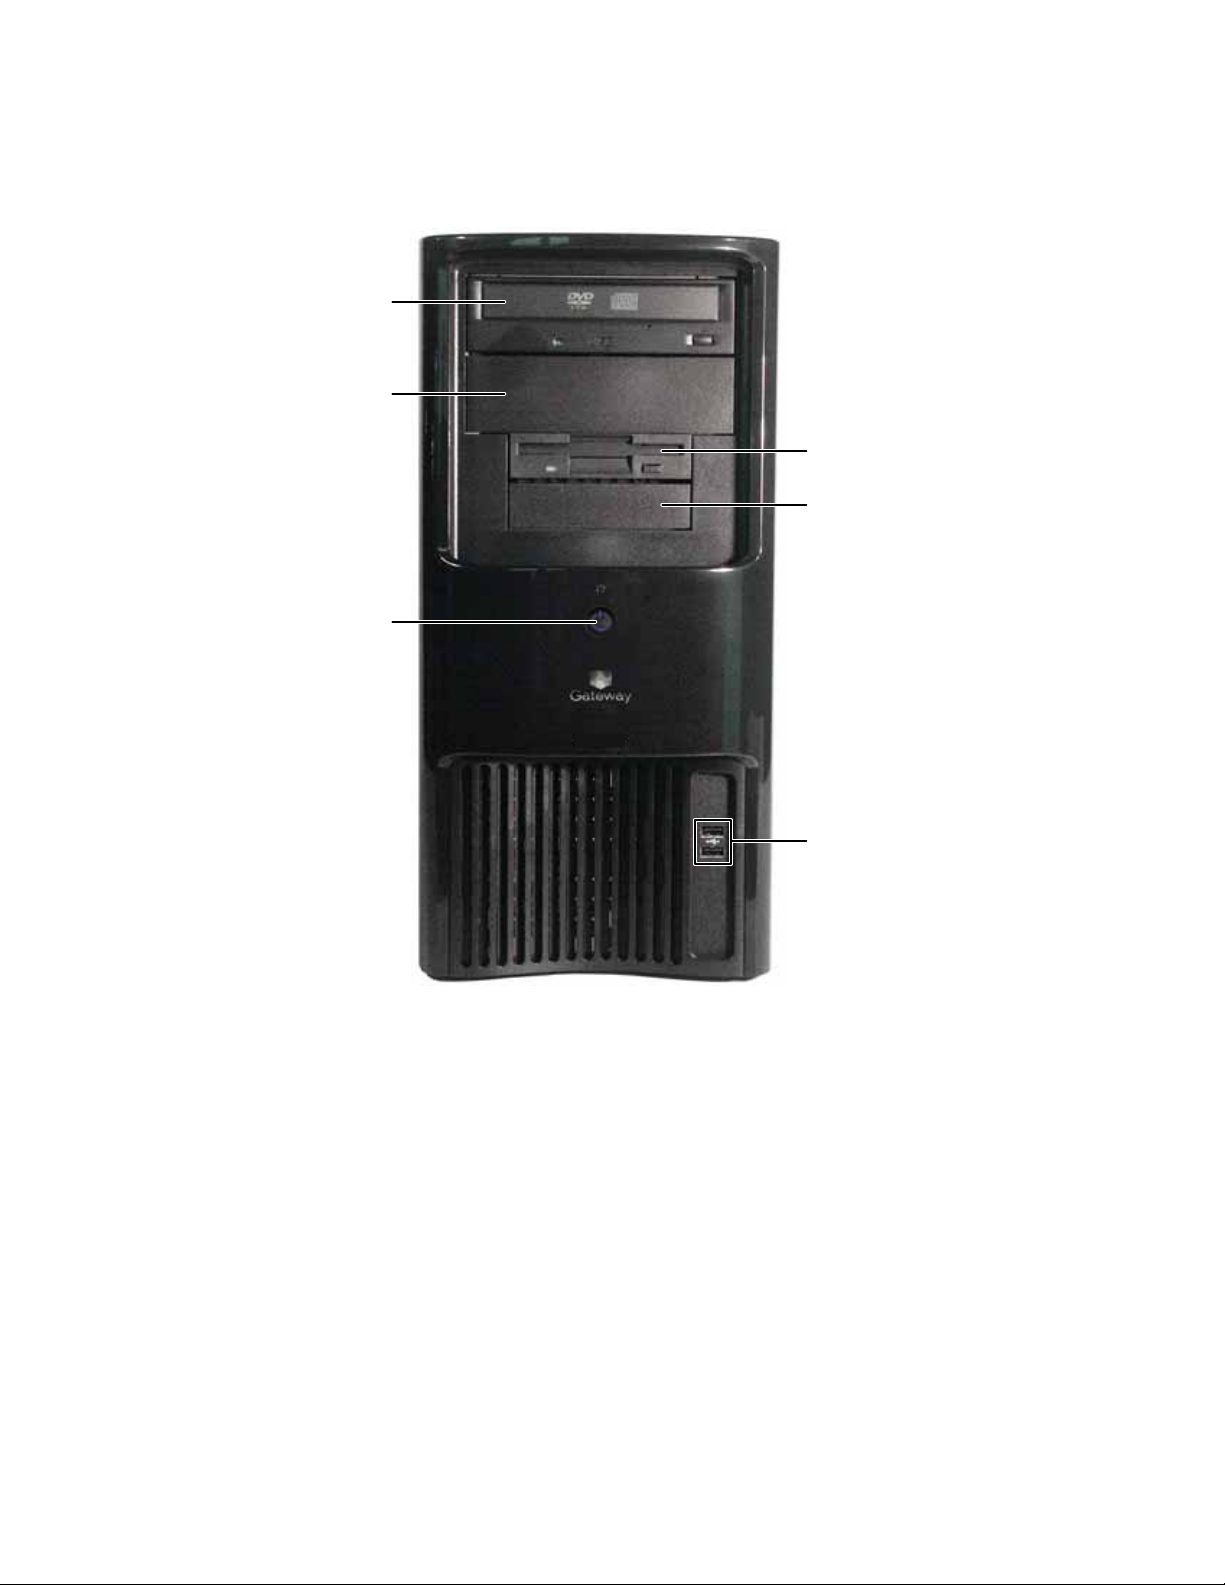
Front
CHAPTER 1: Checking Out Your Gateway Server
DVD/CD drive
Additional 5.25-inch drive bay
Diskette drive
Additional 3.5-inch drive bay
Power button/
Power indicator LED
E-9232T
USB ports
2
Page 9
Back
www.gateway.com
Power connector
Cover release lever
Power supply voltage switch
Kensington lock slot
Rear chassis fan
Power supply module
NIC (RJ-45) ports (2)
USB ports (4)
Serial port
Video port
System management port
(RJ-45)
Keyboard port
Mouse port
Card retention bar
PCI slots (shown with
EMI shields in place)
3
Page 10

Interior
CHAPTER 1: Checking Out Your Gateway Server
5.25-inch drive
bays
3.5-inch drive
bays
Front fan
Processor air duct
Internal 3.5-inch
drive bays
Power supply module
Cover release latch
Memory
slots
Battery
Back fan
4
Page 11

System board
www.gateway.com
Power connector
Memory slots
Diskette drive
connector
IDE connector
Headsink and
processor
Configuration
jumpers
Main power connector
IPMB connector
USB and NIC ports
USB and NIC ports
CMOS Battery
Serial port
SATA connectors
VGA port
System management
port (RJ045)
Keyboard an d mouse
ports)
PCIe slot 1 - PCI Express x16
PCIe slot 2 - PCI Express x4
PCI slot 3 - PCI Express x8
PCI slot 4 - Runs at 32-bits
PCI slot 5 - Runs at 32-bits
Getting Help
In addition to your operating system’s documentation, you can use the following information
resources to help you use your server.
Gateway Web site
Gateway provides a variety of information on its Web site to help you use your server.
Visit the Gateway Web site at support.gateway.com
• Technical documentation and product guides
• Technical tips and support
• Updated hardware drivers
• Order status
• Frequently asked questions (FAQs)
for:
5
Page 12

CHAPTER 1: Checking Out Your Gateway Server
6
Page 13

CHAPTER 2
Setting Up Your Server
• Setting up the hardware
• Protecting from power source problems
• Starting your server
• Turning off your server
• Setting up the operating system
• Initial hardware settings
7
Page 14

CHAPTER 2: Setting Up Your Server
Setting up the hardware
To make sure that your working environment is safe:
• Use a clean, dry, flat, stable surface for your server. Allow at least 6 inches at the back of
the server for cabling and air circulation.
• Use the instructions on your server’s setup poster to set up your hardware.
War ning
Your server comes with a 3-wire AC power cords fitted with the correct plug
style for your region. If these plugs do not match the connector on your UPS or
wall outlet, do not attempt to modify the plugs in any way. Use a UPS or wall outlet
that is appropriate for the supplied AC power cords.
• Use an uninterruptible power supply (UPS) with surge protection for protection from power
outages and power spikes.
• Avoid subjecting your server to extreme temperature changes. Do not expose your server
to direct sunlight, heating ducts, or other heat-generating objects. Damage caused by
extreme temperatures is not covered by your warranty. As a general rule, your server is
safest at temperatures that are comfortable for you.
• Keep your server and magnetic media away from equipment that generates magnetic
fields, such as unshielded stereo speakers. Strong magnetic fields can erase data on both
diskettes and hard drives. Even a telephone placed too close to the server may cause
interference.
Protecting from power source problems
Line conditioners, and uninterruptible power supplies can help protect your server against power
source problems.
Line conditioners
A line conditioner protects your server from the small fluctuations in voltage from an electrical
supply. Most servers can handle this variation, called line noise, without problems. However,
some electrical sources include more line noise than normal. Line noise can also be a problem
if your server is located near, or shares a circuit with, a device that causes electromagnetic
interference, such as a television or a motor.
Some uninterruptible power supplies include simple line-conditioning capabilities.
Uninterruptible power supplies
Use an uninterruptible power supply (UPS) to protect your server from data loss during a total
power failure. A UPS uses a battery to keep your server running temporarily during a power
failure and lets you save your work and shut down your server. You cannot run your server for
an extended period of time while using only the UPS. Be sure to use a UPS with surge protection.
To buy a UPS, contact Gateway Customer Care, Gateway Sales, or visit accessories.gateway.com
For more information on contacting Customer Care, see “Telephone support” on page 52.
Starting your server
Caution
When you connect peripheral devices to the server, make sure that your server and
devices are turned off and the power cords are unplugged.
.
8
Before you start your server for the first time:
• Make sure that the server and monitor are plugged into a power outlet or UPS and that
the UPS (if you are using one) is turned on.
• Make sure that all cables are connected securely to the correct ports and jacks on the back
of the server.
Page 15

www.gateway.com
To start the server:
1 Press the power button.
Power button/power
indicator LED
When the power
indicator LED is...
Blue The server is turned on.
Off The server is turned off.
Slowly blinking Low power state (S1 — S3)
If nothing happens when you press the power button:
It means...
• Make sure that the UPS, if you are using one, is connected securely to an electrical
outlet, turned on, and working correctly.
• Make sure that the monitor is connected to the server, plugged into the power outlet
or UPS, and turned on. You may also need to adjust the monitor’s brightness and
contrast controls.
2 The first time you turn on the server, any pre-installed operating system may begin asking
you for configuration settings. See your operating system’s documentation for instructions
on configuring advanced settings for your specific network.
Selecting the boot device
To select which device your server boots from:
1 During server startup, press F10. The Boot menu opens.
2 Select the device you want to boot from. Common choices include:
• Removable Dev. (Removable device)
• ATAPI CDROM (CD or DVD drive)
• Hard Drive
• NVIDIA Boot Agent
Understanding the power-on self-test
When you turn on your server, the power-on self-test (POST) routine checks the server memory
and components. If POST finds any problems, the server displays error messages. Write down
any error messages that you see, then see “Error messages” on page 53 and “Beep codes” on
page 58 for troubleshooting information.
9
Page 16
CHAPTER 2: Setting Up Your Server
Turning off your server
Every time you turn off your server, first shut down the operating system. You may lose data
if you do not follow the correct procedure.
War ning
The power button on the server does not turn off server AC power. To remove
AC power from the server, you must unplug both AC power cords from the wall outlet
or power source. The power cords are considered the disconnect device to the main (AC)
power.
To turn off the server:
1 See the operating system’s documentation or online help for instructions on shutting down
the operating system. Whenever possible, you should use the operating system’s shut
down procedure instead of pressing the power button.
2 If your server did not turn off automatically, press the power button. If nothing happens
when you press the power button, press and hold it for five seconds and the server will
turn off.
Caution
If you routinely turn off your server (daily or weekly), do not unplug the
server or use the On/Off switch on the UPS. Regularly cutting off all power to your
server may cause the CMOS battery to fail prematurely.
Setting up the operating system
If you ordered your server with the operating system already installed by Gateway, in most cases
it is completely installed and the basic settings are already configured. The Windows Small
Business Server operating system may require additional installation, depending on the version
you ordered. See your operating system’s documentation for instructions on completing the
installation or configuring advanced settings for your specific network.
If you are installing an operating system because it was not already installed by Gateway, see
the appropriate installation guide for instructions.
Initial hardware settings
Your server comes from the manufacturer with the correct initial hardware settings to operate
your server as configured. However, at some point you might want to change settings to reflect
a tasking change, a change in security requirements, or the addition of new resources to your
server.
General hardware settings, as well as the onboard RAID solution, can be changed by using the
BIOS Setup utility. Add-in RAID solutions must be configured using the specific RAID console which
accompanied that solution.
For information on the BIOS Setup utility, see “Using the BIOS Setup Utility” on page 47. For
information on BIOS settings, see “BIOS Settings” on page 69. For information on setting up your
onboard RAID and the RAID BIOS Console utility, see “Configuring your onboard RAID solution”
on page 28. For information on a specific RAID console for an add-in RAID solution, see the
documentation on that hardware which accompanied your RAID solution.
10
Page 17

CHAPTER 3
Maintaining Your Server
• Caring for your server
• Preparing for system recovery
• System administration
• Updating the baseboard management controller
firmware
• Using your Server Companion DVD
11
Page 18

CHAPTER 3: Maintaining Your Server
Caring for your server
To extend the life of your server:
• Be careful not to bump or drop your server.
• When transporting your server, we recommend that you put it in the original packaging
materials.
• Keep your server and magnetic media away from equipment that generates magnetic
fields.
• Avoid subjecting your server to extreme temperatures. Do not expose your server to
heating ducts or other heat-generating objects. Damage caused by extreme temperatures
is not covered by your warranty. As a general rule, your server is safest at temperatures
that are comfortable for you.
• Keep all liquids away from your server. When spilled onto server components, almost any
liquid can result in expensive repairs that are not covered under your warranty.
• Avoid dusty or dirty work environments. Dust and dirt can clog the internal mechanisms
and can cause the server to overheat.
Cleaning your server
Keeping your server clean and the vents free from dust helps keep your server performing at
its best. Your server cleaning kit could include:
• A soft, lint-free cloth
• Glass cleaner
• An aerosol can of air with a narrow, straw-like extension
• Isopropyl alcohol
• Cotton swabs
• A tape drive cleaning cartridge (if a tape drive is installed)
• A CD or DVD drive cleaning kit
Cleaning tips
War ning
When you shut down your server, the power turns off, but some electrical
current still flows through your server. To avoid possible injury from electrical
shock, unplug the power cords and all other cables connected to the server.
• Always turn off your server and other peripheral devices before cleaning any components.
• Use a damp, lint-free cloth to clean your server and other parts of your server system. Do
not use abrasive or solvent cleaners because they can damage the finish on components.
• Keep the cooling vents free of dust. With your server turned off and unplugged, brush
the dust away from the vents with a damp cloth, but be careful not to drip any water into
the vents.
Cleaning the keyboard
You should clean the keyboard occasionally by using an aerosol can of air with a narrow,
straw-like extension to remove dust and lint trapped under the keys.
If you spill liquid on the keyboard, turn off your server and turn the keyboard upside down to
let the liquid drain. Let the keyboard dry completely before trying to use it again. If the keyboard
does not work after it dries, you may need to replace it. Keyboard damage resulting from spilled
liquids is not covered by your warranty.
Cleaning the screen
Caution
The flat panel display screens are made of specially coated glass and can be
scratched or damaged by abrasive or ammonia-based glass cleaners.
12
Page 19

www.gateway.com
If your computer screen is a flat panel display, use only a damp, soft cloth to clean it. Never
spray water directly onto the screen.
- OR If your computer screen is not a flat panel display, use a soft cloth dampened with glass cleaner
to clean the screen. Never spray cleaner directly onto the screen.
Cleaning the tape drive
If you use a tape drive to back up your files, regular maintenance will lengthen the life of the
drive. To maintain the drive’s reliability:
• Clean the drive monthly with the cleaning cartridge included with the drive.
• Remove the tape from the drive whenever the drive is not in use.
Preparing for system recovery
If your system files are corrupted, you may not be able to start the server from the hard drive.
Startup diskettes or bootable media such as CDs or DVDs let you start the server and attempt
to fix the problem. See your operating system’s documentation or online help for instructions
on creating startup media.
Some operating systems also let you create an emergency repair diskette to back up critical
operating system files. See your operating system’s documentation or online help for instructions
on using an emergency repair diskette.
Recording the BIOS configuration
To help keep track of your custom changes to BIOS settings and to prepare for system recovery,
you should record your BIOS configuration after you have your server set up and working.
To record your BIOS configuration:
1 Print the appendix for BIOS Settings in this guide.
2 Restart your server, then press F2 when the Gateway logo screen appears during startup.
The BIOS Setup utility opens.
3 Record the BIOS settings on your printout.
System administration
Gateway Systems Manager
Gateway Systems Manager (GSM) lets you manage multiple computers on a Windows network
from a single window, then implement commands and policies across the network with a single
action. With Gateway Systems Manager, you can run system management tasks which are
triggered by certain events or conditions.
For more information, refer to the Gateway Baseboard Management Controller (BMC) User Guide
at support.gateway.com
information in the program’s online help.
(by selecting this server from the list). You can also find additional
13
Page 20

Server security
CHAPTER 3: Maintaining Your Server
Using BIOS security passwords
To prevent unauthorized use of the server, you can set server startup passwords. Set an
administrator password to prevent unauthorized access to the BIOS Setup utility.
To set the BIOS security passwords:
1 Restart your server, then press F2 when the Gateway logo screen appears during startup.
The BIOS Setup utility opens.
2 Select the Security menu.
3 Select Set Supervisor Password.
4 Type the password and press ENTER, then type it again and press ENTER.
5 Save your changes and close the BIOS Setup utility.
To remove a BIOS security password:
1 Restart your server, then press F2 when the Gateway logo screen appears during startup.
The BIOS Setup utility opens.
2 Select the Security menu, then select the password to remove.
3 Enter the current password, then press ENTER.
4 For the new password, leave the password field blank, then press ENTER. The password is
removed.
Tip
Passwords can also be cleared using jumpers on the system board. For
instructions, see “Resetting BIOS passwords” on page 50.
Updating the baseboard management controller firmware
The baseboard management controller (BMC) performs several system management functions
such as:
• Monitoring server components (FRU) and sensor data records (SDR) (the information
provided depends on the option selected)
• Managing non-volatile storage for the system event log and sensor data records
• Interfacing with the emergency management port to send alerts and interact with remote
management systems
• Fault resilient booting (the extent depends on the option selected)
You should update the BMC firmware when Gateway Customer Care has instructed you to update
it.
To update the BMC firmware:
1 Download the BMC firmware zip file from support.gateway.com.
2 Read the release notes for the firmware update.
3 Follow the instructions on the Web site or in the readme.txt file in the downloaded zip file
to update the firmware.
4 When the BMC update is complete, reboot your server.
14
Page 21

www.gateway.com
Using your Server Companion DVD
You can use your Server Companion DVD to:
• Install hardware drivers
• Install programs
• View server documentation
Server Companion DVD contents
The Server Companion DVD is a tool you can use to help maintain your server. The DVD contains:
• Computer and component documentation
• Drivers and utilities for servers running Windows 2003 Server
Viewing documents
The DVD contains documents for your server and for some optional components. You can view
the documents with the Acrobat® Reader® version 4.0 and above.
To view documents:
1 Insert the Server Companion DVD into the DVD drive on a computer running the Windows
operating system. The Gateway Application and Driver Recovery window opens.
- OR -
If the window does not open, run the file Runmenu.exe on the DVD.
2 Click Documentation. The server document list opens.
3 Click the title of the document you want to view. The document opens.
4 To access files manually, open the Docs\Manuals folder on the Server Companion DVD.
To install Acrobat Reader 7:
• Click the link for Acrobat on the Documentation page.
- OR -
Run Docs\Reader\app21279\Setup.exe from the Server Companion DVD.
Installing drivers and programs
You can install drivers and programs directly onto the server by using the Server Companion
DVD. You can also extract drivers onto diskette from the DVD at any Windows workstation.
Important
The Server Companion DVD’s Gateway Application and Driver Recovery utility works
only in Windows operating systems.
To install drivers and programs at the server:
1 Insert the Server Companion DVD into your server’s DVD drive. The Gateway Application
and Driver Recovery window opens.
- OR -
If the window does not open automatically, run the file Runmenu.exe on the DVD.
A list of programs and drivers that you can install appears in the Drivers and Application
Recovery list.
2 Click the program or driver you want to install, then click Install. Follow any on-screen
instructions.
15
Page 22

CHAPTER 3: Maintaining Your Server
To access the files manually:
• Open the Drivers folder on the Server Companion DVD, then open the appropriate
subfolder.
To extract drivers and programs to diskettes:
1 Insert the Server Companion DVD into your server’s DVD drive. The Gateway Application
and Driver Recovery window opens.
- OR -
If the window does not open automatically, run the file Runmenu.exe on the DVD.
2 Click Extract Drivers.
3 Click your server model and server operation system at the right of the window, then click
Search. A list of programs and drivers that you can create diskettes for appears in the
Drivers and Application Recovery list.
4 Click the program or driver you want to extract, then click Extract. Follow any on-screen
instructions.
To access the files manually:
• Open the Drivers folder on the Server Companion DVD, then open the appropriate
subfolder.
Booting the Server Companion DVD
By booting the Server Companion DVD you can re-install the operating system, repair applications
and drivers, or exit to the command prompt.
Important
Although the Server Companion DVD is bootable, it does not include network
operating system files and is not intended to restore your operating system.
To boot to this DVD:
1 With your server turned on, insert the Server Companion DVD into the DVD drive.
2 Restart your server. A message appears asking you to select an option.
3 Press any key to boot from the DVD. The Gateway Options Main Menu appears.
4 Follow any on-screen instructions.
You can use the options in this menu to reformat your hard drive, create mass-storage
driver disks, or reload selected applications.
16
Page 23

CHAPTER 4
Installing Components
• Preparing to install components
• Preventing static electricity discharge
• Accessing the internal components
• Installing drives
• Configuring your onboard RAID solution
• Installing memory
• Installing PCI expansion cards
• Replacing the processor
• Replacing a power supply module
• Replacing a fan
• Replacing the CMOS battery
• Replacing the system board
17
Page 24

CHAPTER 4: Installing Components
Important
You must open your server case to install components. If you are not comfortable
with these procedures, get help from a more experienced computer user or computer
service technician, or contact Gateway Customer Care.
Preparing to install components
Selecting a place to work
Work on your server in an area that:
• Is clean (avoid dusty areas)
• Is a low-static environment (avoid carpeted areas)
• Has a stable surface on which to set your server
• Has enough room to place all of your server parts
• Is near a grounded outlet so you can test your server after installation
• Is near a telephone (in case you need help from Gateway Customer Care). The telephone
must be directly connected to a telephone jack and cannot be connected to your server.
Gathering the tools you need
Some tools and supplies that you may need to work on your server are:
• A notebook to take notes
• A Phillips screwdriver
• A small flat-blade screwdriver
• Small containers to store various types of screws
• A grounding wrist strap (available at most electronic stores)
Preventing static electricity discharge
War ning
To avoid exposure to dangerous electrical voltages and moving parts, turn off your
server and unplug the power cords and modem cable before opening the server case.
The components inside your server are extremely sensitive to static electricity, also known as
electrostatic discharge (ESD).
Caution
ESD can permanently damage electrostatic discharge-sensitive components in the
server. Prevent ESD damage by following ESD guidelines every time you open the server
case.
Before working with server components, follow these guidelines:
• Turn off the server, then unplug the power cords and all other cables.
• Press the power button to drain any residual power from the server.
18
War ning
To prevent risk of electric shock, do not insert any object into the vent holes
of the power supply module.
• Wear a grounding wrist strap (available at most electronics stores) and attach it to a bare
metal part of the server. You can also touch a bare metal surface on the back of the server
with your finger.
• Avoid static-causing surfaces such as carpeted floors, plastic, and packing foam.
• Avoid working on the server when your work area is extremely humid.
Page 25
www.gateway.com
• Remove components from their antistatic bags only when you are ready to use them. Do
not lay components on the outside of antistatic bags because only the inside of the bags
provide electrostatic protection.
• Always hold expansion cards by their edges or their metal mounting brackets. Avoid
touching the edge connectors and components on the cards. Never slide expansion cards
or components over any surface.
Accessing the internal components
Opening the server case
Caution
For correct cooling and air flow, always reinstall the side panel and the air duct (if
included) before you turn on the server. Operating the server without the cover in place
can damage server components.
Because the components inside your server are extremely sensitive to static electricity, make sure
that you follow the instructions at the beginning of this chapter to avoid static electricity damage.
To open the server case:
1 Follow the instructions in “Preventing static electricity discharge” on page 18.
2 Turn off the server, then unplug the power cords and all other cables connected to the
server.
War ning
This server may have two power cords. To disconnect internal AC power,
you must unplug both power cords.
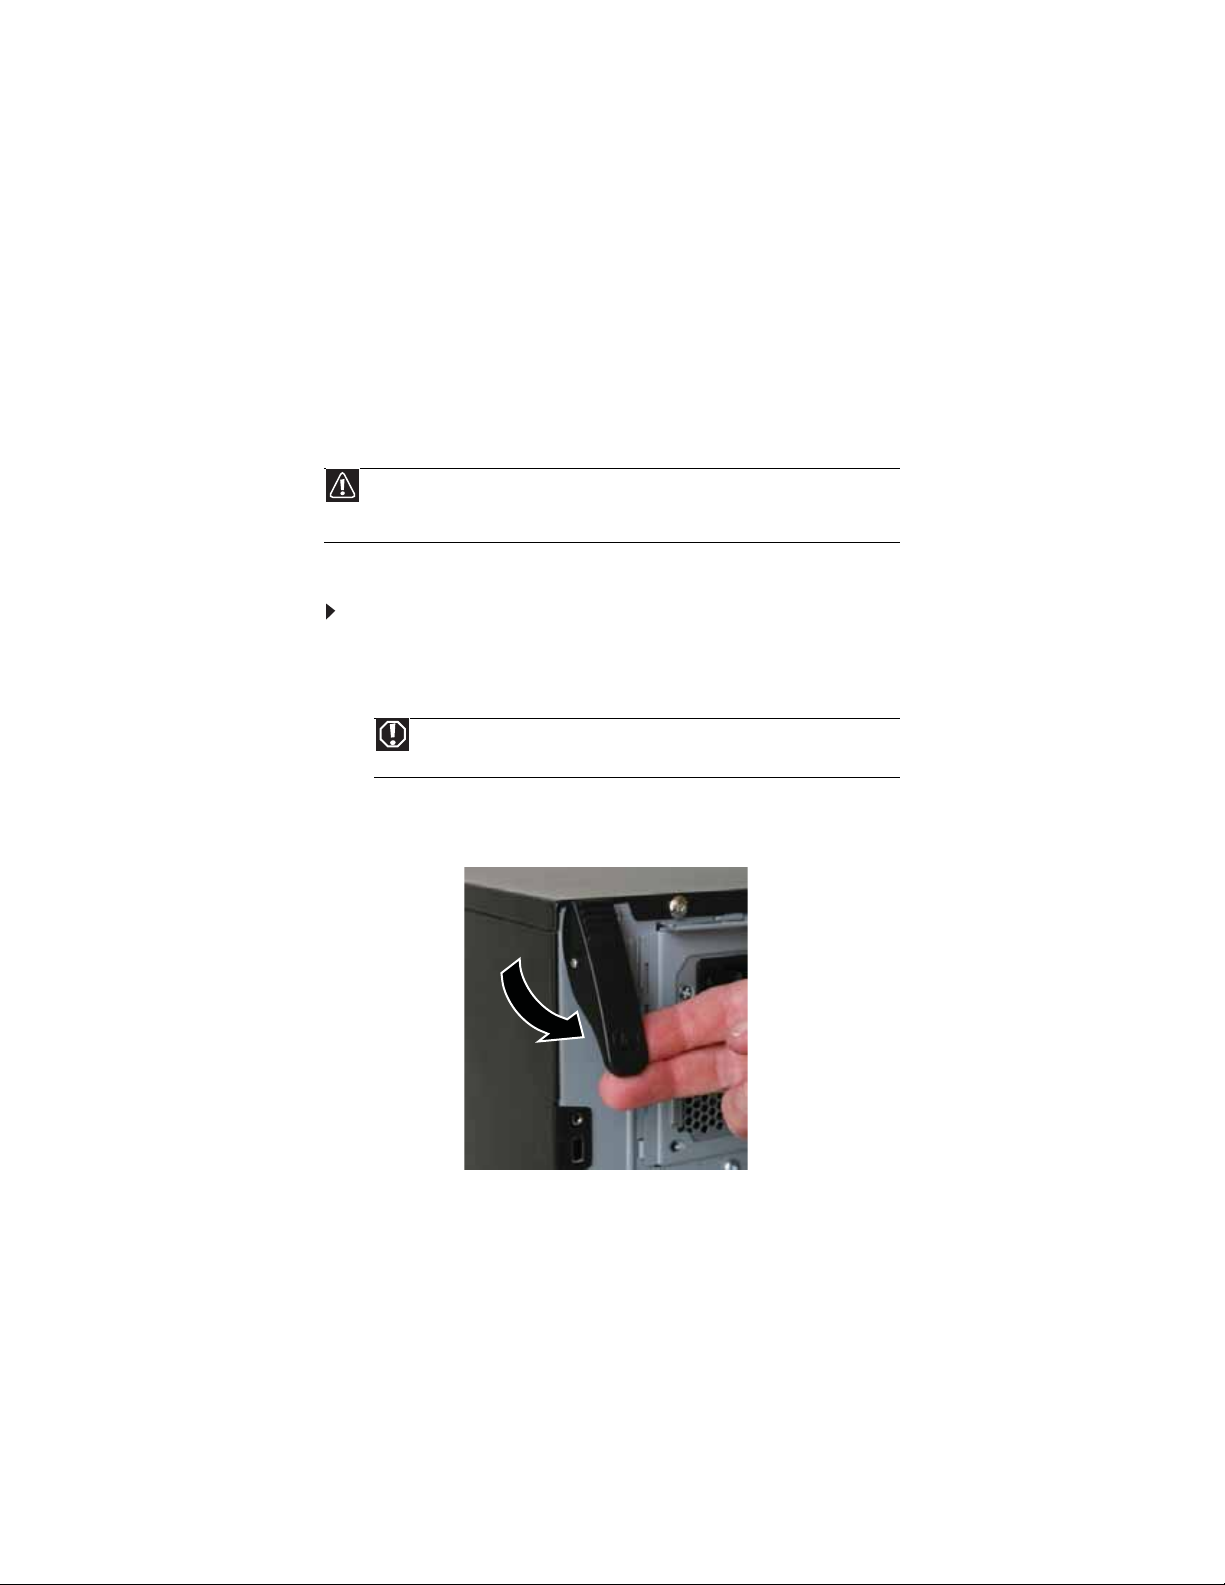
3 Remove the case cover thumbscrew.
4 Lift the cover release lever.
19
Page 26
CHAPTER 4: Installing Components
5 Swing the side panel away from the computer.
6 Lift the panel away from the server and place it out of the way.
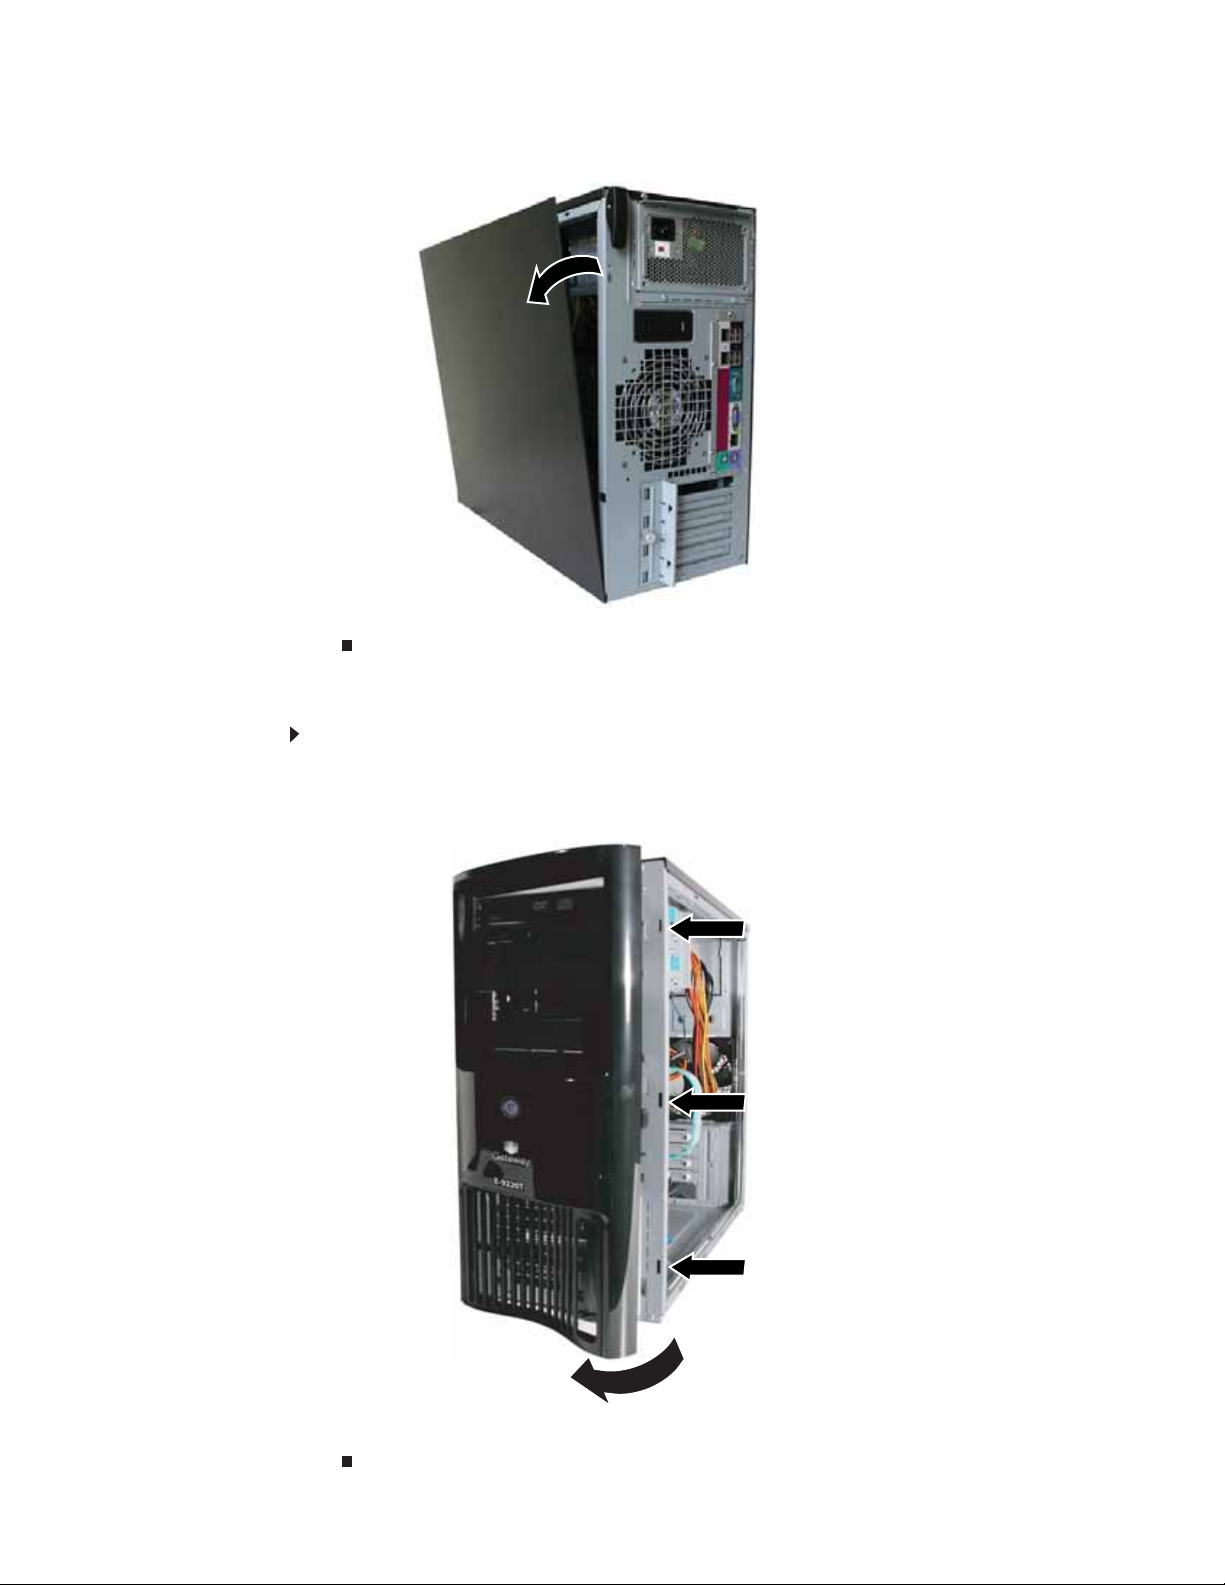
Removing the bezel assembly
To remove the bezel assembly:
1 Follow the instructions in “Opening the server case” on page 19.
2 After removing the side panel, press the three black plastic tabs (positions indicated by
the arrows) to release the right side of the bezel.
20
3 Swing the right side of the bezel out until the left side of the bezel can be disengaged
from the left side of the computer, then remove the bezel.
Page 27
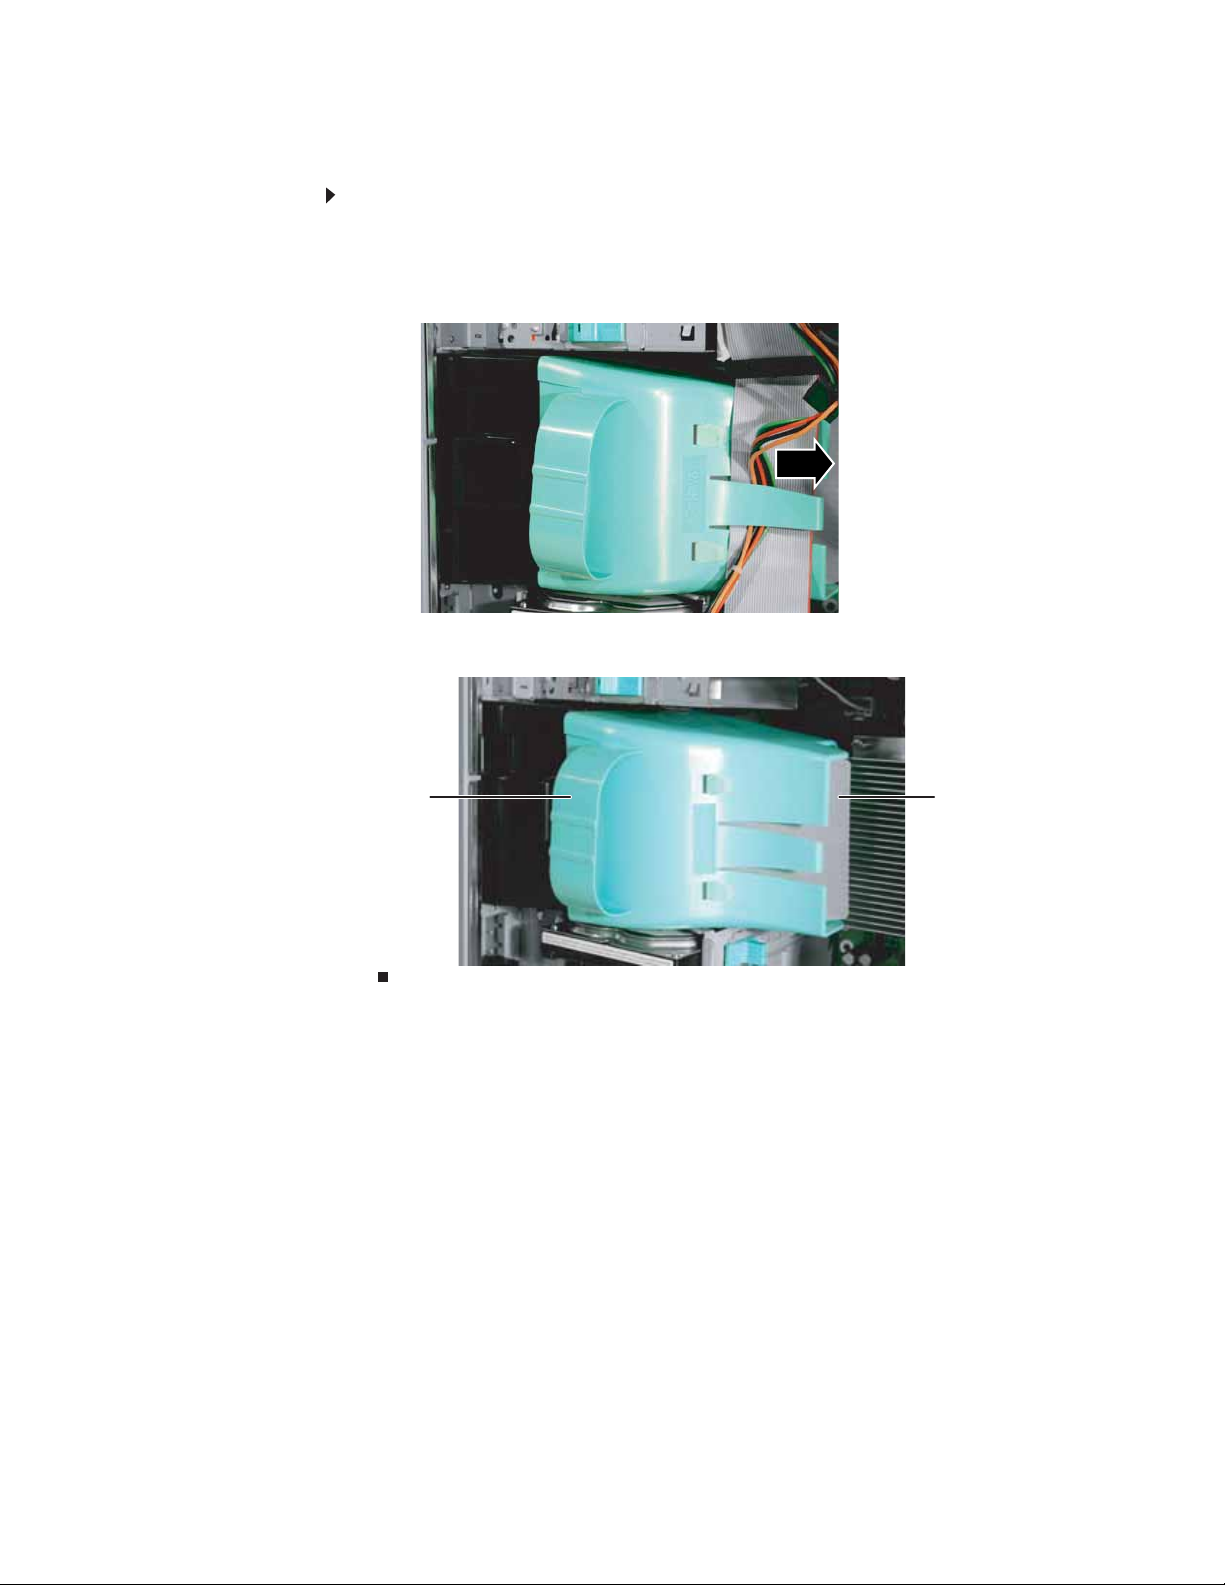
Removing the processor air duct
To remove the processor air duct:
1 Follow the instructions in “Preventing static electricity discharge” on page 18.
2 Follow the instructions in “Opening the server case” on page 19.
3 Remove the cables from the air duct cable clip.
4 Grasp the air duct handle and remove the processor air duct from the chassis.
www.gateway.com
Air duct
handle
Processor air duct
21
Page 28

CHAPTER 4: Installing Components
Installing the processor air duct
Important
Be careful not to snag or unplug the fan cable when you install the processor air duct.
To install the processor air duct:
1 Align the left side of the processor air duct with the front fan and insert the installation
tabs on the bottom of the air duct into the installation holes in the side of the chassis.
Processor air duct
installation tabs
Processor air duct
installation holes
2 Press the processor air duct into place.
3 Place the diskette cable and hard drive power cable behind the cable clip on the processor
air duct.
22
Page 29

Installing the bezel assembly
Important
If you have installed any new drives in the external drive bays, make sure to remove
the corresponding filler panels in the bezel before installing it.
To install the bezel assembly:
1 Insert the tabs on the left side of the bezel into the slots in the left side of the computer.
www.gateway.com
2 Swing the right side of the bezel in to insert the tabs on the right side of the bezel into
the slots on the right side of the computer.
3 Press the right side of the bezel firmly until it snaps into place.
23
Page 30

Closing the server case
To close the server case:
1 Make sure that all of the internal cables are arranged inside the case so they will not be
pinched when you close the case.
2 Align the panel tabs into the bottom case notches, then swing the side panel toward the
top of the computer to secure it into place.
CHAPTER 4: Installing Components
3 Replace the case cover thumbscrew.
4 Reconnect the power cords and all other cables.
24
Page 31

Installing drives
Your server’s basic configuration includes one CD or DVD drive and one 3.5-inch diskette drive.
Your server also has an additional 5.25-inch drive bay and 3.5-inch drive bay.
Your server can have as many as four SATA (standard) or SCSI (optional) drives in three internal
drive bays and one external fixed drive bay (the bottom 3.5-inch bay).
www.gateway.com
CD or DVD drive
5.25-inch drive bay
As you prepare to install drives, remember:
• Do not use the top 5.25-inch drive bay for drives which have electronic components
exposed on the top. Drive mounting rails at the top of the bay may damage any exposed
electronic components.
• Before you install a drive, see the drive’s documentation for information on configuring
the drive, setting drive jumpers, and attaching cables.
• IDE drives can be configured as master, slave, or cable-select.
• If cable-select is available (drive assignments will be marked on the cable), the IDE cable
assigns the master/slave positions to the drives it connects. You can override these
assignments using the jumpers on the drives.
• If cable-select is not available and only one drive is attached to an IDE controller cable,
configure the drive as master if it is a CD or DVD drive. If two drives of any type are
attached to the cable, configure one as master and one as slave.
• You may need to configure the drives you install using the BIOS Setup utility. Press F2 at
startup to open the BIOS Setup utility.
Installing or replacing a fixed or removable-media drive
3.5-inch floppy drive
3.5-inch external drive bay
Use these instructions to install or replace a diskette, CD, DVD, hard drive, or tape drive.
To install a drive in an external drive bay:
1 Follow the instructions in “Preventing static electricity discharge” on page 18.
2 Follow the instructions in “Opening the server case” on page 19.
25
Page 32

CHAPTER 4: Installing Components
3 If you are replacing a CD, DVD, or diskette drive, go to Step 6, otherwise follow the
instructions in “Removing the bezel assembly” on page 20.
4 If you are adding a new drive to an available drive bay, remove the EMI shield from the
bay by pulling the shield out of the bay.
EMI shield
5 Slide the green drive retainer lever toward the back of the drive bay, then go to Step 8.
6 Disconnect the old drive’s cables from the back of the drive.
7 Slide the green drive retainer lever toward the back of the drive bay, then pull the drive
out of the bay.
Drive retainer lever
8 Set any jumpers on the new drive. See the drive’s documentation for further instructions.
Important
If you are installing a hard drive in the bottom, external 3.5-inch drive bay,
the green drive retainer lever will not slide forward to lock the drive into place.
Instead, you must use a screw to secure the drive in the bay.
9 Slide the new drive into the drive bay allowing it to protrude enough to line up with the
bezel when it is replaced, then push the green drive retainer lever toward the front of the
drive bay to lock the drive into place.
Tip
When installing a CD, DVD, tape drive, or diskette drive, if the green drive
retainer lever will not slide forward all the way to lock the drive into place, move
the drive slightly, until the lever can be moved forward enough to lock the drive
into place.
10 Connect the power and data cables.
11 Follow the instructions on “Installing the bezel assembly” on page 23.
12 Follow the instructions in “Closing the server case” on page 24.
26
Page 33

www.gateway.com
r
Installing or replacing a hard drive
Important
To install a hard drive in the bottom external 3.5-inch drive bay, follow the
instructions in “To install a drive in an external drive bay:” on page 25.
Use these instructions to install or replace a hard drive.
To install a hard drive in an internal drive bay:
1 Follow the instructions in “Preventing static electricity discharge” on page 18.
2 Follow the instructions in “Opening the server case” on page 19.
3 If you are replacing a drive, go to Step 4.
- OR If you are adding a new drive to an available drive bay, slide the green drive retainer lever
toward the front of the drive bay, then go to Step 6.
4 Disconnect the old drive’s cables from the front of the drive.
5 Slide the green drive retainer lever toward the front of the drive bay, then pull the drive
out of the bay.
Drive retainer leve
6 Set any jumpers on the new drive. See the drive’s documentation for further instructions.
7 Slide the new drive into the drive bay as far as it will go, then slide the green drive retainer
lever toward the back of the drive bay to lock the drive into the bay.
Tip
If the green drive retainer lever will not slide back all the way to lock the
drive into place, move the drive slightly, until the lever can be moved back enough
to lock the drive into place.
8 Connect the power and data cables.
9 Follow the instructions in “Closing the server case” on page 24.
10 Format and partition the drive as necessary.
27
Page 34

CHAPTER 4: Installing Components
Configuring your onboard RAID solution
Your server comes equipped with an onboard chipset for a SATA RAID solution, which supports
RAID levels 0 (striping), 1 (mirroring), 5 (distributed data and parity), and 10 (RAID 0 + 1). You
enable the onboard RAID solution in the BIOS (See “RAID Setup” on page 76) and configure RAID
by launching the appropriate RAID BIOS console during the boot process.
Configuring the onboard SATA RAID solution
Level Description and use Pros Cons Number of
drives
0 Data divided into blocks and
distributed sequentially (pure
striping). Use for non-critical data
that requires high performance.
1 Data duplicated on another disk
(mirroring). Use for read-intensive,
fault-tolerant systems.
5 Stripes data at a block level across
several drives and distributes parity
among the drives. No single disk is
devoted to parity.
10 A combination of RAID 1 and RAID
0. Raid 0 is used for performance,
and RAID 1 is used for fault
tolerance.
High data
throughput for
large files.
100 percent
data
redundancy,
providing fault
tolerance.
Fast and
redundant
Fast and
redundant
No fault tolerance.
Data is lost if a drive
fails.
More disk space
required. Reduces
usable disk space to
the size of the
smallest drive.
Reduced
performance during
rebuilds.
More disk space
required. Reduces
usable disk space to
75% of total storage
in the disk array.
An additional drive
required.
One or two
(on this
server)
Two Yes
Three Yes
Four Yes
Fault
Tolerant
No
28
Page 35

www.gateway.com
To launch the SATA RAID BIOS console:
1 Restart your server.
2 Press F2 when the Gateway logo screen appears during startup. The BIOS Setup utility
opens.
3 From the Main BIOS menu, select the Advanced menu.
4 Select the Integrated Devices sub-menu. The Integrated Devices sub-menu opens.
29
Page 36

CHAPTER 4: Installing Components
5 Select the NV RAID Configuration sub-menu. The NV RAID Configuration sub-menu opens.
6 For the NV RAID Configuration option, click Enabled.
7 Select the SATA channels your hard drives are connected to and set them to Enabled.
8 Exit the BIOS Setup utility.
9 Restart your server. During the boot process you will see the following message:
10 Press F10. The RAID BIOS console opens.
11 Configure the RAID options, then exit the RAID BIOS console.
12 Reboot the server.
30
Page 37

www.gateway.com
To configure the SATA RAID solution:
1 Open the RAID BIOS console as described in the previous procedure. The Define a New
Array screen opens.
2 Select a RAID Mode from the list at the top left of the screen.
31
Page 38

CHAPTER 4: Installing Components
3 Select a Stripping Block size from the list at the top right of the screen.
4 Highlight the free disk you want to use from the list on the left side of the screen.
32
Page 39

www.gateway.com
5 Press the right arrow key to move the disk to the Array Disks list on the right side of the
screen. Do this for all disks you want to use in the array.
6 Press F7 to finish creating the array. When the confirmation box opens, press Y to clear
the data on the disks.
33
Page 40

CHAPTER 4: Installing Components
The Array List opens showing the disks in the array.
7 To make the array bootable, press B (Set Boot) to change Boot No to Boot Yes.
8 Exit the RAID Configuration utility and reboot the server.
Installing memory
Caution
Use only 667 Mhz compliant, 240-pin, SDRAM unbuffered ECC DIMM memory
modules.
The system board supports 4 DDR2 667 MHz vertical DIMMs to provide up to 8 GB of memory
with ECC support. The 667 MHz differential memory clocks are driven by the AMD processor with
length matching and impedance controlled through all the DIMM slots. Supported DIMM sizes
include 256 MB, 512 MB, 1 GB, and 2 GB.
The BIOS configures the memory controller to run in either single channel or dual channel mode,
depending on the following:
• If one or more fully populated DIMM banks are detected, the memory controller will run
in dual channel mode.
• If only a single DIMM is present, the memory controller will run in single channel mode.
DIMM banks must be populated using the following guidelines:
• DIMM banks must be populated in order, starting with Bank 0.
• Dual rank DIMMs must be populated before single rank DIMMs.
Channel B DIMM 2
Channel A DIMM 2
Channel B DIMM 1
Channel A DIMM 1
34
Page 41

www.gateway.com
To install or replace memory:
1 Follow the instructions in “Preventing static electricity discharge” on page 18.
2 Follow the instructions in “Opening the server case” on page 19.
3 Pull the plastic tabs (1) away from the sides of the memory module slot. If you are replacing
a memory module, lift the old memory module (2) out of the slot.
4 Align the notch on the new module with the notch in the memory module slot and press
the module firmly into the slot. The tabs on the sides of the memory slot should secure
the memory module automatically.
5 Follow the instructions in “Closing the server case” on page 24.
6 Restart your server and open the BIOS Setup utility. Verify the System Memory listed in
the Main menu. When you exit the BIOS Setup utility, make sure that the operating system
loads completely.
Memory online sparing
The chipset on the system board in the server supports memory online sparing, which can provide
a way to prevent data loss in case of DIMM failure. If a DIMM failure does occur, a DIMM fault
LED adjacent to the DIMM slot will light orange to indicate the failed memory module.
Using memory online sparing, one DIMM per channel (selectable in the BIOS setup utility) is used
as a memory spare (the spare DIMM must be equal to, or larger than, the largest DIMM in that
channel). If a DIMM begins to fail, the contents of the failing DIMM is copied to the spare DIMM
in that channel. When all of the data is copied, the primary DIMM is automatically removed from
service. Since one DIMM per channel is always maintained as a spare, a maximum of only 75%
of the installed memory is usable. Memory online sparing is configured in the BIOS.
Installing PCI expansion cards
Caution
This server does not have PCI hot-plug capability. Do not attempt to install or remove
a PCI card without turning off your server and disconnecting it from the AC power source.
Use the following chart to determine the PCI slot into which you should install your expansion
card.
PCI slot Description
1 PCI Express - x16
2 PCI Express - x4
3 PCI Express - x8
4 PCI - Runs at 32-bits
5 PCI - Runs at 32-bits
35
Page 42

CHAPTER 4: Installing Components
PCI slot 1
PCI slot 2
PCI slot 3
PCI slot 4
PCI slot 5
To replace, add, or reseat a PCI expansion card:
1 Follow the instructions in “Preventing static electricity discharge” on page 18.
2 Follow the instructions in “Opening the server case” on page 19.
3 If you are replacing a card, disconnect any cables that are attached to the old card.
4 Loosen the captive thumbscrew on the card retention bar and swing the bar out from the
back of the chassis.
Card retention bar
Captive thumbscrew
5 If you are replacing a card, remove the old expansion card. To loosen the card you can
slightly rock the card end-to-end, but do not bend the card sideways.
Caution
Do not touch the contacts on the bottom part of the expansion card.
Touching the contacts can cause electrostatic damage to the card.
36
Page 43

www.gateway.com
6 Press the new card into the expansion slot. To help insert the card you can slightly rock
the card end-to-end, but do not bend the card sideways.
7 Swing the card retention bar back into place and tighten the captive thumbscrew.
Card retention bar.
Captive thumbscrew
37
Page 44
CHAPTER 4: Installing Components
8 Connect any cables to the card. For more information, see the instructions in the card’s
documentation.
9 Follow the instructions in “Closing the server case” on page 24.
10 See the card’s documentation for software installation instructions.
Replacing the processor
War ning
The processors and heatsink may be hot if the computer has been running. Also,
there may be sharp edges on the heatsink. Consider wearing protective gloves.
The system board has a single AM2 CPU socket which supports one AMD® Opteron™ or Athlon™
processor with 3.0 GHz Hyper Transport Bus. The system connects with the nVIDIA MCP 55
through the Hyper Transport Bus. The server automatically detects the processor each time you
turn it on. Whenever you install a new processor, you should first install the most current version
of the BIOS. For instructions, see “Updating the BIOS” on page 48.
Caution
A heatsink must be installed on the processor. Installing a processor without a
heatsink could damage the processor.
To replace a processor:
1 Install the most current BIOS version. For instructions, see “Updating the BIOS” on page 48.
2 Follow the instructions in “Preventing static electricity discharge” on page 18. Make sure
that you turn off the server, then unplug the power cord(s) and all other cables connected
to the server.
3 Follow the instructions in “Accessing the internal components” on page 19.
4 Loosen the four screws holding the heatsink to the processor, then lift the heatsink off
the processor.
38
Screw
Screw
Caution
The heatsink has Thermal Interface Material (TIM) on the bottom. Be careful
not to damage this material when you remove the heat sink from the processor.
If removing the heatsink also pulls the processor out of the processor socket, the
processor could be damaged.
Screw
Screw
Page 45

www.gateway.com
5 Unlock the retention lever and lift it up to release the processor.
6 Lift the processor out of the socket and place it in a static-free bag or case for storage.
7 Insert the new processor into the socket, making sure that the gold triangle on the corner
is situated as shown in the following illustration.
Caution
The processor only fits the socket when oriented as indicated. Do not force
the processor into the socket to avoid bending the pins or damaging the processor.
If the processor does not fit completely, check its orientation and check for bent
pins.
Gold triangle
39
Page 46

CHAPTER 4: Installing Components
8 When the processor is oriented correctly and in place, press it firmly into the socket, rotate
the retention lever into place until it clicks.
Caution
The heatsink has Thermal Interface Material (TIM) located on the bottom of
it. Use caution when you unpack the heat sink so you do not damage the TIM. If
you are reusing the original heatsink, make sure that the TIM on the bottom of
the heatsink is not damaged. If the TIM is damaged, you should remove the old
TIM, then apply new TIM to the bottom of the heatsink.
9 Place the heatsink down onto the processor, then gently tighten the heatsink retaining
screws to secure it into place.
10 Follow the instructions in “To close the server case:” on page 24.
Replacing a power supply module
War ning
The power supply modules in this server contain no user-serviceable parts. Only a
qualified computer technician should service the power supply modules.
Your server comes with 3-wire AC power cords fitted with the correct plug style for your
region. If this plug does not match the connector on your surge protector, UPS, or wall
outlet, do not attempt to modify the plug in any way. Use a UPS or wall outlet that is
appropriate for the supplied AC power cords.
If your server uses the optional hot-swappable, redundant power supplies and one of the two
power supplies fails, the other power supply module supports the server while you replace the
failed module. You do not need to turn off the server or disconnect peripheral devices to replace
a failed power supply module.
To replace a power supply module:
1 If you only have one power supply module, turn off your server.
2 If you have two power supply modules, examine the LED indicators on the back of each
power supply module to identify the failed module. The power supply module has failed
if the orange (right) LED indicator is on.
Power supply handle
Power supply fault LED
Power connector
Power supply latch
Power on LED
40
3 Unplug the power cord from the failed power supply module.
Page 47

www.gateway.com
4 While pressing the green latch on the power supply module, grasp the handle and pull
the module straight out from the server.
5 Slide the new power supply module into the empty power supply bay until the green latch
snaps into place.
6 Plug the power cord into the new power supply module.
41
Page 48

Replacing a fan
Important
Make sure that you replace a fan with an identical replacement fan.
To replace a front fan:
1 Follow the instructions in “Preventing static electricity discharge” on page 18.
2 Follow the instructions in “Opening the server case” on page 19.
3 Remove the processor air duct by following the instructions in “Removing the processor
air duct” on page 21.
4 Unplug the fan cable from the fan connector on the system board.
Fan retention tab
CHAPTER 4: Installing Components
Fan release tab
Fan handle
Fan retention tab
Fan cable
5 Grasp the fan handle and press the fan release tab, then disengage the fan and move it
away from the chassis.
6 Pull the fan from the chassis.
7 Insert the new fan into the opening left by the old fan, then insert the fan retention tabs
and fan release tab into the chassis until it snaps into place.
8 Plug the fan cable into the fan connector on the system board.
9 Replace the processor air duct by following the instructions in “Installing the processor air
duct” on page 22.
10 Follow the instructions in “Closing the server case” on page 24.
42
Page 49

www.gateway.com
To replace a back fan:
1 Follow the instructions in “Preventing static electricity discharge” on page 18.
2 Follow the instructions in “Opening the server case” on page 19.
3 Unplug the fan cable from the fan connector on the system board.
Fan cable
Fan retention screw
4 Unscrew the four fan retention screws holding the fan to the back of the chassis.
5 Pull the fan from the chassis, noting the orientation.
Important
Make sure that the new fan is oriented the same way (air flow) as the old fan.
6 Insert the new fan into the chassis, then replace the fan retention screws.
7 Plug the fan cable into the fan connector on the system board.
8 Follow the instructions in “Closing the server case” on page 24.
Replacing the CMOS battery
War ning
There is a danger of explosion if battery is incorrectly replaced. Replace only with
the same or equivalent type of battery recommended by the manufacturer. Dispose of used
batteries following the manufacturer’s instructions.
If the server clock does not keep time or the settings in the BIOS Setup utility are not saved when
you turn off the server, replace the CMOS battery with an equivalent battery.
To replace the battery:
1 Print the appendix for BIOS Settings in this guide.
2 Follow the instructions in “Opening the BIOS Setup utility” on page 48.
Fan retention screw
43
Page 50

CHAPTER 4: Installing Components
3 Record the BIOS settings on your printout, then close the utility.
4 Turn off your server, then follow the instructions in “Preventing static electricity discharge”
on page 18.
5 Follow the instructions in “Opening the server case” on page 19.
6 Locate the old battery on the system board and note its orientation (see “System board”
on page 5 for the general location of the battery). You will need to install the new battery
the same way.
Battery retention clip
7 Push the battery retention clip away from the battery until the battery pops up.
8 Remove the old battery.
9 Make sure that the positive (+) side of the new battery is facing correctly, then press the
new battery into the socket until it snaps into place.
10 Follow the instructions in “Closing the server case” on page 24.
11 Turn on the server.
12 Press F2 when the Gateway logo screen appears during startup. The BIOS Setup utility
opens.
13 Restore any BIOS settings that you wrote down in Step 3.
14 Save all your settings and close the BIOS Setup utility.
Replacing the system board
To replace the system board:
1 Follow the instructions in “Preventing static electricity discharge” on page 18.
2 Follow the instructions in “Opening the server case” on page 19.
3 Remove the processor air duct by following the instructions in “Removing the processor
air duct” on page 21.
4 Remove the memory modules by following the instructions in “Installing memory” on
page 34.
5 Remove all of the expansion cards by following the instructions in “Installing PCI expansion
cards” on page 35.
6 Remove the heat sink and processor by following the instructions in “Replacing the
processor” on page 38.
7 Disconnect the power and data cables from the system board, noting their locations and
orientation. (You will reconnect the cables after you install the new board.)
44
Page 51

www.gateway.com
8 Remove the seven screws securing the system board to the case.
Screw Screw
Screw
Screw
Screw
Screw
Screw
9 Pull the system board away from the case and carefully remove it, then place it in a
static-free bag on a stable work surface.
10 Insert the new system board into the case, aligning the holes in the board with the threaded
standoffs on the side of the case.
11 Secure the system board to the case with the seven (7) screws you removed previously.
12 Reinstall the memory by following the instructions in “Installing memory” on page 34.
13 Reinstall the processor and heatsink by following the instructions in “Replacing the
processor” on page 38.
14 Connect the power and data cables.
15 Reinstall the expansion cards by following the instructions in “Installing PCI expansion
cards” on page 35.
16 Follow the instructions in “Closing the server case” on page 24.
17 Turn on your server.
18 Press F2 when the Gateway logo screen appears during startup. The BIOS Setup utility
opens.
19 Check BIOS settings to make sure that they detect the server’s new hardware, then save
your changes (if any) and close the BIOS Setup utility.
45
Page 52

CHAPTER 4: Installing Components
46
Page 53

CHAPTER 5
Using the BIOS Setup Utility
• Opening the BIOS Setup utility
• Updating the BIOS
• Recovering the BIOS
• Resetting BIOS passwords
• Updating or recovering the BMC
47
Page 54

CHAPTER 5: Using the BIOS Setup Utility
Opening the BIOS Setup utility
The BIOS Setup utility stores basic settings for your server. These settings include basic hardware
configuration, resource settings, and password security. These settings are stored and saved even
when the power is off.
Caution
The options in the BIOS Setup utility have been set at the factory for optimal
performance. Changes to these settings will affect the performance of your server.
Before changing any settings, write them down in case you need to restore them later.
You can record the settings on a printout of this guide’s appendix for “BIOS Settings” on
page 69.
To open the BIOS Setup utility:
1 Restart your server, then press F2 when the Gateway logo screen appears during startup.
The BIOS Setup utility opens.
When you select menu items, the Item Specific Help box on the right side of the screen
displays specific information about the selection. The command bar across the bottom of
the screen shows the keys you press to access help, navigate through the menus, and
perform other tasks.
2 Select one of these menus:
• Main gives you access to basic information and settings related to your server’s
hardware and configuration.
• Advanced gives you access to information and settings for PCI, peripheral devices,
memory, and the chipset.
• Boot gives you access to information and settings for startup features and startup
sequences.
• Security gives you access to settings related to system access passwords. For more
information, see “Server security” on page 14.
• Server gives you access to settings for system management, console redirection, event
log configuration, and fault-resilient boot settings.
• Exit gives you access to options for closing the BIOS Setup utility.
Updating the BIOS
To update the BIOS:
1 Print the appendix for “BIOS Settings” on page 69.
2 Restart your server, then press F2 when the Gateway logo screen appears during startup.
3 Record any custom BIOS settings on your printout.
4 Download the BIOS update files from support.gateway.com.
5 Follow the instructions on the Web site or the readme.txt file in the downloaded zip file
to update the BIOS.
6 After you have updated the BIOS, restart your server and load the default BIOS values.
7 Enter any custom BIOS settings you recorded in Step 3, then save your changes and close
the BIOS Setup utility.
48
Page 55

Recovering the BIOS
If you encounter a problem while you are updating the BIOS, such as a power outage, the BIOS
update may not be successful. If the system continues to try to boot from the new, corrupted
BIOS, you can manually recover the old BIOS so you can try another update.
Important
This method does not work if the keyboard is connected through the KVM switch.
To create a recovery disk:
1 Download 646MS100.WPH (the system BIOS for your server) from the Gateway Support
Web page, then rename the file to BIOS.WPH.
2 Download CRISDISK.ZIP (a Crash Recovery Diskette utility) from the Gateway Support Web
page, then uncompress it to a folder.
3 Copy BIOS.WPH (the file you renamed) to the same folder.
4 Insert a blank, formatted floppy disk into your diskette drive.
5 Run CRISDISK.BAT to create the recovery disk.
To recover the BIOS:
1 Follow the instructions in “Preventing static electricity discharge” on page 18. Make sure
that you turn off the server, then unplug the power cord(s) and all other cables connected
to the server.
2 Follow the instructions in “Opening the server case” on page 19.
www.gateway.com
Caution
Moving the jumper while the power is on can damage your server. Always
turn off the server and unplug the power cords and all other cables before changing
the jumper.
3 Remove the jumper across pins 1-2 of header J5 and place the jumper across pins 2-3 (as
shown in the illustration).
4 Follow the instructions in “Closing the server case” on page 24.
5 Insert the recovery disk into the diskette drive.
6 Turn on your server and wait until you hear “beep-beep-beep,” then turn off your server
again.
7 Follow the instructions in “Opening the server case” on page 19.
8 Place the jumper back onto pins 1-2.
9 Follow the instructions in “Closing the server case” on page 24.
10 Reboot the server and verify that the recovery was successful.
49
Page 56

CHAPTER 5: Using the BIOS Setup Utility
Resetting BIOS passwords
To reset BIOS passwords, you must either reset and clear all BIOS settings, or use the Clear
Password jumper. To reset all BIOS settings, follow the instructions in “Resetting BIOS passwords”
on page 50.
To clear the BIOS password(s):
1 Follow the instructions in “Preventing static electricity discharge” on page 18. Make sure
that you turn off the server, then unplug the power cord(s) and all other cables connected
to the server.
Caution
Moving the jumper while the power is on can damage your server. Always
turn off the server and unplug the power cords and all other cables before changing
the jumper.
2 Follow the instructions in “Opening the server case” on page 19.
3 Remove the jumper across pins 1-2 of header J54-A, then place the jumper across pins 2-3.
J54A (reset) jumper
4 Follow the instructions in “Closing the server case” on page 24.
5 Reconnect the power cords and turn on the server. The BIOS password(s) is cleared.
6 Turn off the server, then disconnect the power cords and all other cables connected to
the server.
7 Follow the instructions in “Opening the server case” on page 19.
8 Place the jumper back onto pins 1-2.
9 Follow the instructions in “Closing the server case” on page 24.
Updating or recovering the BMC
Updating or recovering the BMC firmware
50
To update or recover the BMC firmware:
1 Download the BMC firmware zip file from support.gateway.com.
2 Read the release notes for the firmware update.
3 Follow the instructions on the Web site or in the readme.txt file in the downloaded zip file
to update the firmware.
4 When the BMC update is complete, reboot your server.
Page 57

• Telephone support
• Tutoring and training
• Safety guidelines
• Error messages
• Troubleshooting
CHAPTER 6
Troubleshooting
51
Page 58

CHAPTER 6: Troubleshooting
Telephone support
Before calling Gateway Customer Care
If you have a technical problem with your server, follow these recommendations before
contacting Gateway Customer Care:
• Make sure that your server is connected correctly to a grounded AC outlet that is supplying
power.
• If a peripheral device, such as a keyboard or mouse, does not appear to work, make sure
that all cables are plugged in securely and plugged into the correct port or jack.
• If you have recently installed hardware or software, make sure that you have installed it
following the instructions provided with it. If you did not purchase the hardware or
software from Gateway, see the manufacturer’s documentation and technical support
resources.
• If you have “how to” questions about using a program, see:
• The program’s online Help
• The program’s documentation
• Your operating system’s documentation
• The software or hardware manufacturer’s Web site
• See “Troubleshooting” on page 57.
• Have your client ID, serial number (usually located on the back of your server case), and
order number available, along with a detailed description of your issue, including the exact
text of any error messages, and the steps you have taken.
• Make sure that your server is nearby at the time of your call. The technician may have
you follow appropriate troubleshooting steps.
• Consider using Gateway’s online technical support. Gateway’s Web site has FAQs, tips, and
other technical help. You can also use the Web site to e-mail Customer Care. For more
information, visit Gateway’s Customer Care Web site at support.gateway.com.
Telephone support
Gateway offers a wide range of customer service, technical support, and information services.
Telephone numbers
You can access the following services through your telephone to get answers to your questions:
Resource Service description How to reach
Gateway’s
fee-based software
tutorial service
Gateway Customer
Care
Sales, accounting,
and warranty
Get tutorial assistance for software issues. 800-229-1103 (charged to your
Talk to a Gateway Customer Care representative
about a non-tutorial technical support question.
Get information about available systems, pricing,
orders, billing statements, warranty service, or
other non-technical issues.
credit card)
877-485-1464 (US) (say the word
“Server”) 800-846-3609 (Canada
and Puerto Rico)
605-232-2191
(all other countries)
800-846-2000 (US)
888-888-2037 (Canada)
52
Page 59

Tutoring and training
Gateway's Customer Care professionals cannot provide hardware and software training. Instead,
Gateway recommends the following training resources.
Resource Service description For more information
www.gateway.com
Gateway Learning
Libraries
Safety guidelines
While troubleshooting your server, follow these safety guidelines:
• Never remove the top panel while your server is turned on and while the modem cable
and the power cords are connected.
• Do not attempt to open the monitor. To do so is extremely dangerous. Even if the power
is disconnected, energy stored in the monitor components can be dangerous. Also, opening
the monitor voids its warranty.
• Make sure that you are grounded correctly before opening the server. For more information
about preventing damage from static electricity, see “Preventing static electricity
discharge” on page 18.
• After you complete any maintenance task where you have to open the server case, make
sure that you close the case and reconnect all cables before you restart your server.
War ning
To avoid bodily injury, do not attempt to troubleshoot your server problem if:
- The power cords or plugs are damaged
- Liquid has been spilled into your server
- Your server was dropped
- The case was damaged
Instead, unplug your server and contact a qualified computer technician.
A variety of courses and tutorials are available on
CD. Select from several easy-to-use learning
libraries.
www.gateway.com/training
Error messages
These messages often indicate procedural errors such as typing an incorrect keystroke or trying
to save a file to a write-protected diskette. Some messages, however, may indicate a problem
that requires further troubleshooting.
Memory messages
Gate20 Error
The BIOS is unable to correctly control the system board’s Gate A20 function, which controls
access of memory over 1 MB. This may indicate a problem with the system board.
Boot messages
Boot Failure ...
This is a generic message indicating the BIOS could not boot from a particular device. This
message is usually followed by other information concerning the device.
Invalid Boot Diskette
A diskette was found in the drive, but it is not configured as a bootable diskette.
53
Page 60

CHAPTER 6: Troubleshooting
Drive Not Ready
The BIOS was unable to access the drive because it indicated it was not ready for data transfer.
This is often reported by drives when no media is present.
A: Drive Error
The BIOS attempted to configure the A: drive during POST, but was unable to correctly configure
the device. This may be due to a bad cable or faulty diskette drive.
Insert BOOT diskette in A:
The BIOS attempted to boot from the A: drive, but could not find a correct boot diskette.
Reboot and Select proper Boot device or Insert Boot Media in selected Boot device
BIOS could not find a bootable device in the system and/or removable media drive does not
contain media.
NO ROM BASIC
This message occurs on some systems when no bootable device can be detected.
Storage Device messages
Primary Master Hard Disk Error
The IDE/ATAPI device configured as Primary Master could not be correctly initialized by the BIOS.
This message is typically displayed when the BIOS is trying to detect and configure IDE/ATAPI
devices in POST.
Primary Slave Hard Disk Error
The IDE/ATAPI device configured as Primary Slave could not be correctly initialized by the BIOS.
This message is typically displayed when the BIOS is trying to detect and configure IDE/ATAPI
devices in POST.
Secondary Master Hard Disk Error
The IDE/ATAPI device configured as Secondary Master could not be correctly initialized by the
BIOS. This message is typically displayed when the BIOS is trying to detect and configure IDE/ATAPI
devices in POST.
Secondary Slave Hard Disk Error
The IDE/ATAPI device configured as Secondary Slave could not be correctly initialized by the BIOS.
This message is typically displayed when the BIOS is trying to detect and configure IDE/ATAPI
devices in POST.
Primary Master Drive - ATAPI Incompatible
The IDE/ATAPI device configured as Primary Master failed an ATAPI compatibility test. This
message is typically displayed when the BIOS is trying to detect and configure IDE/ATAPI devices
in POST.
Primary Slave Drive - ATAPI Incompatible
The IDE/ATAPI device configured as Primary Slave failed an ATAPI compatibility test. This message
is typically displayed when the BIOS is trying to detect and configure IDE/ATAPI devices in POST.
Secondary Master Drive - ATAPI Incompatible
The IDE/ATAPI device configured as Secondary Master failed an ATAPI compatibility test. This
message is typically displayed when the BIOS is trying to detect and configure IDE/ATAPI devices
in POST.
54
Secondary Slave Drive - ATAPI Incompatible
The IDE/ATAPI device configured as Secondary Slave failed an ATAPI compatibility test. This
message is typically displayed when the BIOS is trying to detect and configure IDE/ATAPI devices
in POST.
Page 61

www.gateway.com
S.M.A.R.T. Capable but Command Failed
The BIOS tried to send a S.M.A.R.T. message to a hard disk, but the command transaction failed.
This message can be reported by an ATAPI device using the S.M.A.R.T. error reporting standard.
S.M.A.R.T. failure messages may indicate the need to replace the hard disk.
S.M.A.R.T. Command Failed
The BIOS tried to send a S.M.A.R.T. message to a hard disk, but the command transaction failed.
This message can be reported by an ATAPI device using the S.M.A.R.T. error reporting standard.
S.M.A.R.T. failure messages may indicate the need to replace the hard disk.
S.M.A.R.T. Status BAD, Backup and Replace
A S.M.A.R.T. capable hard disk sends this message when it detects an imminent failure.
This message can be reported by an ATAPI device using the S.M.A.R.T. error reporting standard.
S.M.A.R.T. failure messages may indicate the need to replace the hard disk.
S.M.A.R.T. Capable and Status BAD
A S.M.A.R.T. capable hard disk sends this message when it detects an imminent failure.
This message can be reported by an ATAPI device using the S.M.A.R.T. error reporting standard.
S.M.A.R.T. failure messages may indicate the need to replace the hard disk.
System configuration messages
DMA-2 Error
Error initializing secondary DMA controller. This is a fatal error, often indication a problem with
system hardware.
DMA Controller Error
POST error while trying to initialize the DMA controller. This is a fatal error, often indication a
problem with system hardware.
Checking NVRAM..Update Failed
BIOS could not write to the NVRAM block. This message appears when the FLASH part is
write-protected or if there is no FLASH part (System uses a PROM or EPROM).
Microcode Error
BIOS could not find or load the CPU Microcode Update to the CPU. This message only applies to
INTEL CPUs. The message is most likely to appear when a brand new CPU is installed in a system
board with an outdated BIOS. In this case, the BIOS must be updated to include the Microcode
Update for the new CPU.
NVRAM Checksum Bad, NVRAM Cleared
There was an error in while validating the NVRAM data. This causes POST to clear the NVRAM data.
Resource Conflict
More than one system device is trying to use the same non-shareable resources (Memory or I/O).
NVRAM Ignored
The NVRAM data used to store Plug’n’Play (PnP) data was not used for system configuration in
POST.
NVRAM Bad
The NVRAM data used to store Plug’n’Play (PnP) data was not used for system configuration in
POST due to a data error.
Static Resource Conflict
Two or more Static Devices are trying to use the same resource space (usually Memory or I/O).
55
Page 62

CHAPTER 6: Troubleshooting
PCI I/O conflict
A PCI adapter generated an I/O resource conflict when configured by BIOS POST.
PCI ROM conflict
A PCI adapter generated an I/O resource conflict when configured by BIOS POST.
PCI IRQ conflict
A PCI adapter generated an I/O resource conflict when configured by BIOS POST.
PCI IRQ routing table error
BIOS POST (DIM code) found a PCI device in the system but was unable to figure out how to
route an IRQ to the device. Usually this error is causing by an incomplete description of the PCI
Interrupt Routing of the system.
Timer Error
Indicates an error while programming the count register of channel 2 of the 8254 timer. This
may indicate a problem with system hardware.
Interrupt Controller-1 error
BIOS POST could not initialize the Master Interrupt Controller. This may indicate a problem with
system hardware.
Interrupt Controller-2 error
BIOS POST could not initialize the Slave Interrupt Controller. This may indicate a problem with
system hardware.
CMOS messages
CMOS Date/Time Not Set
The CMOS Date and/or Time are invalid. This error can be resolved by readjusting the system
time in AMIBIOS Setup.
CMOS Battery Low
CMOS Battery is low. This message usually indicates that the CMOS battery needs to be replaced.
It could also appear when the user intentionally discharges the CMOS battery.
CMOS Settings Wrong
CMOS settings are invalid. This error can be resolved by using AMIBIOS Setup.
CMOS Checksum Bad
CMOS contents failed the Checksum check. Indicates that the CMOS data has been changed by
a program other than the BIOS or that the CMOS is not retaining its data due to malfunction.
This error can typically be resolved by using AMIBIOS Setup.
Miscellaneous messages
Keyboard Error
Keyboard is not present or the hardware is not responding when the keyboard controller is
initialized.
Keyboard/Interface Error
Keyboard Controller failure. This may indicate a problem with system hardware.
56
System Halted
The system has been halted. A reset or power cycle is required to reboot the machine. This
message appears after a fatal error has been detected.
Page 63

Troubleshooting
First steps
War ning
To avoid bodily injury, do not attempt to troubleshoot your server problem if:
- The power cords or plugs are damaged
- Liquid has been spilled into your server
- Your server was dropped
- The case was damaged
Instead, unplug your server and contact a qualified computer technician.
Try these steps first before going to the following sections:
• Make sure that the power cords are connected to your server and an AC outlet and that
the AC outlet is supplying power.
• If you use a surge protector or a UPS, make sure that it is turned on and is rated to handle
the power required by your server.
• If you added or removed server components before the problem started, review the
installation procedures you performed and make sure that you followed each instruction.
You may need to remove the device, uninstall the device’s software, then reinstall the
device.
• If an error message appears on the screen, write down the exact message before calling
Gateway Customer Care. For instructions, see “Telephone support” on page 52.
• Restart your server, then open the BIOS Setup utility by pressing and holding F2 while your
server restarts. Check your configuration settings.
• When diagnosing problems, press the non-maskable interrupt (NMI) button to put the
server into a halt state. For the location of the button, see “Front” on page 2.
• If an error occurs in a program, see its documentation or online help.
www.gateway.com
Battery replacement
War ning
To avoid bodily injury, do not attempt to troubleshoot your server problem if:
- The power cords or plugs are damaged
- Liquid has been spilled into your server
- Your server was dropped
- The case was damaged
Instead, unplug your server and contact a qualified computer technician.
If you have problems after installing a new CMOS battery, try each of the following items, closing
the case and restarting the server after each try:
• Restart your server, then open the BIOS Setup utility by pressing and holding F2 while your
server restarts. Correct any discrepancies.
• Remove the top panel by following the instructions in “Opening the server case” on
page 19, then make sure that all cables inside the case are attached securely. Also, make
sure that the colored cable edges are aligned correctly and that the connectors do not miss
any pins.
• If you have the correct test equipment, make sure that the new battery has power.
Although unlikely, your new battery may be defective.
57
Page 64

Beep codes
Beeps Description Troubleshooting steps
CHAPTER 6: Troubleshooting
Whenever a recoverable error occurs during the power-on self-test (POST), the BIOS displays an
error message that describes the problem. The BIOS also sounds a beep code (one long tone
followed by two short tones) during POST if the video configuration fails (a faulty video controller)
or if an expansion card is not functioning correctly. One short beep indicates the BIOS will boot
the operating system. No error found.
A PCI expansion card (for example, a RAID controller) can also issue audible errors by itself, usually
consisting of one long tone followed by a series of short tones. For more information on the
beep codes issued, check the documentation for that device.
The following table shows POST error beep codes. Prior to system video initialization, BIOS uses
these codes to inform you of error conditions.
1 Memory refresh timer error Reseat the memory modules or replace with
2 Parity error in the first 64 KB of memory. Same as for 1 beep.
3 Base memory read/write test error Same as for 1 beep.
4 System board timer not operational. Possible system board malfunction. To eliminate
5 A processor on the system board generated an
error.
6 The keyboard controller (8042) may be
defective. The BIOS cannot switch to Protected
mode.
7 General exception error (processor exception
error).
modules you know are good.
the possibility of an add in-card problem,
remove all expansion cards.
If the beep code occurs even when all expansion
cards have been removed, the system board is
at fault.
If the beep code does not occur when the
expansion cards have been removed, one of the
cards is causing the problem. Install the cards
one at a time until the problem happens again.
When the beep code returns, the most recent
card you installed is at fault.
Remove one of the processors if two are
installed, then try a known good processor in
the first socket.
Same as for 4 beeps.
Remove the keyboard to see if the error goes
away. If it does, try a known good keyboard.
Same as for 4 beeps.
Same as for 5 beeps
58
8 Display memory error (system video adapter). If the system video adapter is an add-in card,
9 The ROM checksum value does not match the
value encoded in the BIOS.
10 The shutdown register for CMOS RAM failed. Same as for 4 beeps.
11 The cache memory test failed. Same as for 4 beeps.
replace or reseat the video adapter. If the video
adapter is integrated into the system board, the
board may be faulty. Try using an add-in card.
Same as for 4 beeps.
Page 65

LED information
See the following table for a description of this server’s LEDs and the information they provide:
LED Name Function Location Color Description
www.gateway.com
ID Aid in server
System Fault Visible fault
Hard drive tray
LEDs
NIC status LEDs Identify NIC states Control panel and
identification
warning
Indicate drive
status and activity
Control panel and
back of system
board
Control panel Red Off - System normal
On each hard drive
tray
back I/O panel
RJ-45 connectors
Yellow
(front)
Blue (back)
Blue or red Blue (On) - Hard drive present
Blue (front)
On - Server identification
enabled
Blinking - Non-critical system
fault
On - Critical system fault
(system needs to be shut down
and serviced)
Blue (Blinking) - Hard drive
activity
Red (On) - Hard drive fault
Red (Blinking) - Hard drive
rebuilding
Off - No hard drive access
Blue (On) - Link
Blue (Blink) - Activity
Off - No link
Power LED Identify the power
state of the system
AC power LED Identify power
supply fault
Green/
Orange
(back)
Control panel Blue Off - Power is off
Power supply
module
Green or
Orange
LED 1 Green (On) - NIC linked
LED 1 Green (Blinking) - NIC 1
Gbps activity
LED 1 (Off) - No link
LED 2 Orange (On) Link speed
1Gbps
LED 2 Green (On) - Link at
100 Mbps
LED 2 Green (Off) - Link at
10 Mbps
Blinking - Power saving state
(S1, S3, or S4)
On - Power is on
Green (On) - Power supply good
and receiving power
Orange (On) - Power supply
critical event causing shutdown
Orange (Blinking) - Close to
protection threshold or over
within 15 seconds
Off - Power supply not receiving
power
59
Page 66

BIOS
Optical drive
CHAPTER 6: Troubleshooting
The settings in the BIOS Setup utility are not retained
• Replace the CMOS battery. For instructions, see “Replacing the CMOS battery” on page 43.
Your server does not recognize an optical drive
• Restart your server, then open the BIOS Setup utility by pressing and holding F2 while your
server restarts. Make sure that the IDE controllers are enabled. For more information, see
“Using the BIOS Setup Utility” on page 47.
• Reinstall the device driver. For instructions, see Using Your Server Companion DVD.
• Make sure that the drive is configured correctly by following the instructions in the drive’s
documentation.
• Turn off your server, then remove the drive and push it in again to make sure the drive
is seated correctly. For instructions, see “Installing or replacing a fixed or removable-media
drive” on page 25.
Your optical drive tray does not open
• Press a straightened paper clip wire into the optical drive’s manual eject hole. The drive
tray opens.
• If this problem happens frequently while the server is turned on, the drive may be defective.
Expansion cards
Your server does not recognize an expansion card
Hard drive
The hard drive cannot be accessed, or you receive a “General failure reading drive C” error
message
You receive a “Non-system disk” or “disk error” error message
• Restart your server.
• Make sure that you have installed the necessary software or driver. For instructions, see
the card’s documentation.
• Reseat the expansion card and riser card. For instructions, see “Installing PCI expansion
cards” on page 35.
• If a diskette is in the diskette drive, eject it and restart your server by pressing the reset
button.
• Restart your server by pressing the reset button.
• Turn off your server, then remove all hard drives and push them in again to make sure
the drives are seated correctly. For instructions, see “Installing or replacing a hard drive”
on page 27.
• If your server has been subjected to static electricity or physical shock, you may need to
reinstall the operating system.
• Eject the diskette from the diskette drive, then press ENTER.
• Make sure that your hard drive has an active partition. For more information, see “The
master boot record is corrupted” on page 61.
60
Page 67

Internet
www.gateway.com
You are having problems with a SATA drive
• For normal SATA drives (not SATA RAID), check the BIOS setup utility to see if the BIOS has
recognized the drive.
• Make sure that the power cable and SATA cables are attached securely to the drive cage.
• If the drive is not detected, try a different SATA port.
• Try swapping SATA cables between drives to determine if the cable is defective.
• Try listening to the drive to determine if the drive is spinning up. If not, the drive may be
defective.
The master boot record is corrupted
• In a Windows network operating system, repair the master boot record using FDISK.
To repair the master boot record:
• At the command prompt, type fdisk/mbr, then press ENTER.
You cannot connect to the Internet
• Make sure that your account with your Internet Service Provider (ISP) is set up correctly.
Contact your ISP technical support for help.
• Make sure that you do not have a problem with your modem.
Keyboard
Memory
Monitor
Liquid has been spilled into the keyboard
• If you spilled liquid in the keyboard, turn off your server and unplug the keyboard. Clean
the keyboard and turn it upside down to drain it. Let the keyboard dry before using it
again. If the keyboard does not work after it dries, you may need to replace it. This type
of damage is not covered by your server’s warranty.
Memory errors were detected during server start up
• Open your server and make sure that the memory modules are installed correctly. For
instructions, see “Installing memory” on page 34.
• A memory module may be defective. If possible, try another memory module and see if
the error repeats.
Your server is running but there is no picture
• Adjust the brightness and contrast controls to the center position.
• Make sure that the monitor is plugged in and turned on. If the monitor is turned on, the
power LED should be lit.
• Check the cable for bent or damaged pins.
• Connect your monitor to another computer, or connect a monitor that you know works
to your server.
61
Page 68

Power
CHAPTER 6: Troubleshooting
The color is not uniform
Make sure that the monitor warms up for at least 30 minutes before making a final judgment
about color uniformity.
Make sure that:
• The monitor is not positioned too close to another monitor, electric fan, or fluorescent light.
• You demagnetize the screen using the monitor’s degauss feature. For more information
on degauss, see the monitor’s documentation.
A horizontal line or wire is visible across the CRT monitor screen
The monitor may use thin damper wires, located approximately 1/3 of the way from the upper
and lower screen edges, to stabilize the internal aperture grille. These wires are most obvious
when the monitor displays a white background. The aperture grille allows more light to pass
through the screen for brighter colors and greater luminescence. The damper wire is a critical
part of the overall monitor design and does not negatively affect the monitor’s function.
You press the power button, but the server does not turn on
• If the power button LED is green, the server is turned on, but you may not be seeing an
image on the monitor. For monitor troubleshooting, see “Monitor” on page 61.
• If your server is plugged into a surge protector or UPS, make sure that the surge protector
or UPS is connected securely to an electrical outlet, turned on, and working correctly. One
way to check this is to plug the server directly into a wall outlet, bypassing the surge
protector or UPS.
• Make sure that the electrical outlet is working by plugging a working device, such as a
lamp, into the outlet, then turning it on to test the outlet.
• Open your server and make sure that the power supply module cage cable is connected
correctly to the system board.
Processor
When you turn on the server, it makes several short beeps
• The short beeps indicate the server has encountered some type of error. See “Beep codes”
on page 58.
Your server does not recognize a new processor
• Make sure that the processor is fully seated in its socket. The processor should be
recognized automatically if it is installed correctly.
62
Page 69

APPENDIX A
Server Specifications
63
Page 70

APPENDIX A: Server Specifications
The following specifications are for the standard configuration. Your server may contain optional
equipment. All specifications are subject to change.
System specifications
Case size
Weight
Fans
Ports
Drives
(removable
media)
Hard Drives
Power supply
modules
Operating
systems
Certifications
Tower (with standard power supply): 8 × 16.5 × 19.8 inches
(2 03.2 × 419.2 × 502.7 cm )
Tower (with redundant power supplies) 8 × 16.5 × 22.2 inches
(2 03.2 × 419.2 × 563 cm )
Approximately 32 lbs (14.5 kg) (varies by configuration)
■
PS/2 keyboard/mouse (2)
■
USB (6)
■
Serial (1)
■
VGA (1)
■
RJ-45 LAN (2)
Two 5.25” external drive bays.
Two 3.5 ” exte rna l dr ive bays .
Optional drives:
■
3.5-inch diskette
■
CD-ROM, CD-R, or DVD-ROM
■
Tape drive
Support for as many as four 3.5” SATA, SATA II, or SAS drives
Supports full-height PCI expansion cards up to 10.8 inches (27.5 cm) long
Single 400 W fixed power supply (standard), or
Two 520 W, hot-swap, redundant power supply modules (optional) .
■
■
■
Red Hat Linux Enterprise 4.0 32/64 bit Editions
■
SuSe Linux Enterprise 10.0 32/64 bit Editions
■
FCC Class B
■
UL
■
cUL
System board specifications
Single AM2 socket
Supports one (1) AMD Athlon or one (1) AMD Opteron 1200 Series processor
with 3.0 GHz Hyper Transport Bus
NVIDIA nFORCE 3600 (MCP55 Professional)
Memory
64
Four DIMM slots support as many as 8 GB total memory
DDR2 667Mhz ECC Unbuffered DIMM modules
DIMM organization x72 ECC
240-pin DIMMs (256 MB, 512 MB, 1 GB, or 2 GB only)
Page 71

www.gateway.com
PCI device/slot
Video
RAID
LAN
ACPI
Hardware
Monitor
PCI slots:
■
Slot 1 - PCI Express x16
■
Slot 2 - PCI Express x4
■
Slot 3 - PCI Express x8
■
Slot 4 - PCI 32-bit
■
Slot 5 - PCI 32-bit
Integrated Matrox G200 Graphics Core with 2.25 MB
Up to 1280 × 1024, 8 bpp or 1024 × 768, 16 bpp
Six Serial ATA 2.0 ports from the MCP55 supporting entry level RAID
functionality, including RAID levels 0, 1, 5, and 10.
On-board Marvel Ethernet NIC
■
10Base-T/100Base-TX/1000Base-T
■
PXE support
ACPI compliance
Supports S0 and S4
Main logic board sensors:
■
Voltage sensors
■
Temperature sensors
■
Adaptive fan speed control and fan speed detection
Environmental specifications
The following specifications identify maximum environmental conditions. At no time should the
server run under conditions which violate these specifications.
Variable Requirements
Temperature
Altitude
Humidity
Shock
AC input power
Maximum rate of change: 18°F (10°C) per hour
Nonoperating: -4° to 140°F (-20° to 60°C)
Operating: 41° to 95°F (5° to 35°C); derated 0.9°F (0.5°C) for every
1,000 feet (305 meters)
12,500 feet (3,810 meters) maximum
Operating: 20% to 80% relative, non-condensing
Nonoperating: 20% to 90% relative non-condensing at 86° F (30° C)
Operating: 2.0 g, 11 msec, ½ sine
Packaged: Operational after 18-inch free fall (cosmetic damage might
occur)
100-127 V, 10.0 A, 50/60 Hz max.
200-240 V, 5.0 A, 50/60 Hz max.
65
Page 72

APPENDIX A: Server Specifications
Electronic specifications
Memory map
Address Range (hex) Amount Function
0 to 07FFFFh 640 KB DOS region, base system memory
0A0000h to 0BFFFFh 128 KB Video or SMM memory
0C0000h and 0DFFFFh 128 KB Expansion card BIOS and buffer area
0E0000h to 0FFFFFh 128 KB System BIOS
0E0000h to 0EFFFFh 2 MB Extended system BIOS
FC000000h to FFFFFFFFh 64 MB PCI memory space
Interrupts
The following table reflects a typical configuration, but you can change these interrupts. Use this
information to determine how to program each interrupt. The actual interrupt map is defined
using configuration registers in the ICH5-R (I/O controller). I/O Redirection Registers in the I/O
APIC are provided for each interrupt signal. The signals define hardware interrupt signal
characteristics for APIC messages sent to local APIC(s).
Important
If you disable an IDE controller to free the interrupt for that controller, you must
physically unplug the IDE cable from the system board. Simply disabling the drive by
configuring the BIOS does not make the interrupt available.
I
Interrupt Description
IRQ0 Timer/counter, HPET #0 in legacy
IRQ1 Keyboard controller
IRQ2 Slave controller INTR output. In APIC mode
IRQ3 Serial port A
IRQ4 Serial port B
IRQ5 Parallel port
IRQ6 Diskette controller
IRQ8 Real-time clock/HPET#1 in legacy
IRQ9 Generic, Option for SCI
IRQ10 Generic, Option for SCI
IRQ11 HPET #2, option for SCSI, TCO
IRQ12 Mouse controller
IRQ13 System interrupt/FERR
replacement Mode. In APIC mode, cascade
from 8259 controller 1
Timer/counter, HPET #0
replacement mode
66
Page 73

www.gateway.com
Interrupt Description
IRQ14 Primary ATA, legacy mode
PIRQA USB 1.1 controller 1 and 4
PIRQB Video
PIRQC USB 1.1 controller 3, Native IDE, SATA
PIRQD USB 1.1 controller 2
PIRQE Option for SCI, TCO, HPET #0,1,2
PIRQF Option for SCI, TCO, HPET #0,1,2
PIRQG Option for SCI, TCO, HPET #0,1,2
PIRQH USB 2.0 EHCI controller 1, Option for SCI,
TCO, HPET #0,1,2
Ser IRQ SIO3
Additional specifications
For more information about your server, such as memory size, hard drive size, and processor
type, visit Gateway’s Support page at support.gateway.com
additional Gateway documentation and detailed specifications for your own server.
. The Support page also has links to
67
Page 74

APPENDIX A: Server Specifications
68
Page 75

APPENDIX B
BIOS Settings
69
Page 76

APPENDIX B: BIOS Settings
If you ever need to restore your BIOS settings, such as after a system board change, a record
of the settings will make the process much easier. You can print this appendix, then record your
custom BIOS settings on the printout. Only settings which can be changed are listed. For a
complete list of viewable BIOS settings, run the BIOS Setup utility.
To view all BIOS settings:
1 Restart your server
2 Press F2 when the Gateway logo screen appears during startup. The BIOS Setup utility
opens.
3 Select menus and submenus to display setting information.
Caution
Setting the wrong values in the Advanced Menu may cause the server to
malfunction.
BIOS menu BIOS submenu Setting Value
Main
System Overview
AMIBIOS (Version, Build date,
System ID, Version), Processor
(Type, Speed, Count)
Advanced
System Memory (Size)
System Time HH:MM:SS
System Date DAY MM/DD/YYYY
CPU Configuration Module Version
Physical count
Logical count
Manufacturer and type
Revision
Cache L1
Cache L2
Speed
Current FSB Multiplier
Maximum FSB Multiplier
Able to Change Freq.
uCode Patch Level
70
GART Error Reporting Enabled
Disabled
MTRR Mapping Continuous
Discrete
Memory
Configuration
Page 77

www.gateway.com
BIOS menu BIOS submenu Setting Value
IDE Configuration
Memory Performance Mode Non-Redundant
Interleaved
Single Channel
Mirror
Mirrors branch space
Between branches
Total Memory Capacity
Memory Redundancy Non-Redundant
Mirror
DIMM 1 (Size)
(Not Installed)
DIMM 2 (Size)
(Not Installed)
DIMM 3 (Size)
(Not Installed)
DIMM 4 (Size)
(Not Installed)
OnBoard IDE Controller Disabled
Enabled
Serial-ATA Devices Disabled
Device 0
Device 0/1
Device 0/1/2
nVidia RAID Setup Selects RAID Setup
Primary IDE Master (auto-detected)
Primary IDE Slave (auto-detected)
Serial-ATA 0 Primary Channel (auto-detected)
Serial-ATA 0 Secondary
Channel
Serial-ATA 1 Primary Channel (auto-detected)
Serial-ATA 1 Secondary
Channel
sub-menu.
Selects IDE
Configuration
sub-menu.
Selects IDE
Configuration
sub-menu.
Selects IDE
Configuration
sub-menu.
(auto-detected)
Selects IDE
Configuration
sub-menu.
Selects IDE
Configuration
sub-menu.
(auto-detected)
Selects IDE
Configuration
sub-menu.
71
Page 78

APPENDIX B: BIOS Settings
BIOS menu BIOS submenu Setting Value
Super I/O
Configuration
Serial-ATA 2 Primary Channel (auto-detected)
Serial-ATA 2 Secondary
Channel
Hard Disk Write Protect Disabled
IDE Detect Time Out (Sec) 0, 5, 10, 15, 20, 25, 30,
ATA(PI ) 80Pin Cable Detection Host & Device
Onboard Floppy Controller Disabled
Floppy A Disabled
Serial Port 1 Address Disabled
Selects IDE
Configuration
sub-menu.
(auto-detected)
Selects IDE
Configuration
sub-menu.
Enabled
35
Host
Device
Enabled
1.44 MB 3½”
2.88 MB 3½”
3F8
2F8
3E8
2E8
IPMI 2.0
Configuration
Remote Access
Configuration
USB Configuration
Serial Port 1 IRQ IRQ3
IRQ4
IRQ10
IRQ11
PS/2 Keyboard Present
PS/2 Mouse Present
(Nothing shown)
(Nothing shown)
USB Devices Enabled (List of
USB devices detected by BIOS)
Legacy USB Support Disabled
Enabled
Auto
USB 2.0 Controller Mode FullSpeed (12 Mbps)
HiSpeed (480 Mbps)
BIOS EHCI Hand-Off Disabled
Enabled
72
Page 79

www.gateway.com
BIOS menu BIOS submenu Setting Value
PCI Configuration
USB Mass Storage Device
Configuration
NIC 1 PXE Option ROM Disabled
NIC 2 PXE Option ROM Disabled
NIC 3 PXE Option ROM Disabled
NIC 4 PXE Option ROM Disabled
NIC 5 PXE Option ROM Disabled
NIC 6 PXE Option ROM Disabled
PCIe Port1 Option ROM Disabled
PCIe Port2 Option ROM Disabled
Selects USB Mass
Storage Device
Configuration
submenu with USB
Device enable
Enabled
Enabled
Enabled
Enabled
Enabled
Enabled
Enabled
Enabled
Boot
PCIe Port3 Option ROM Disabled
Enabled
PCI-X Port1 ROM Disabled
Enabled
Boot Settings
Configuration
Quick Boot Disabled
Enabled
Quiet Boot Disabled
Enabled
Wait For ‘F1 If Error Disabled
Enabled
Hit ‘F2’ Message Delay Disabled
Enabled
Boot Device Priority
1st Boot Device Varies (Specifies boot
sequence from the
available devices.)
nth Boot Device Varies (Specifies boot
sequence from the
available devices.)
Hard Disk Drives
73
Page 80

APPENDIX B: BIOS Settings
BIOS menu BIOS submenu Setting Value
Security
1st Drive Varies (Specifies boot
sequence from the
available devices.)
nth Drive Varies (Specifies boot
sequence from the
available devices.)
Removable Drive
1st Drive Varies (Specifies boot
sequence from the
available devices.)
nth Drive Varies (Specifies boot
sequence from the
available devices.)
CD/DVD Drives
1st Drive Varies (Specifies boot
sequence from the
available devices.)
nth Drive Varies (Specifies boot
sequence from the
available devices.)
Supervisor Password
(Installed/Not installed)
Server
User Password (Installed/Not
installed)
Change Supervisor Password
(Set or clear Supervisor
password)
User Access Level No Access
View Only
Limited
Full Access
Change User Password (Set or
clear User password)
Password Check Disabled
Enabled
Boot Sector Virus Protection Disabled
Enabled
Power & Reset Switches Inhibit Disabled
Enabled
NMI control switch inhibit Disabled
Enabled
Remote Access
Configuration
74
Page 81

www.gateway.com
BIOS menu BIOS submenu Setting Value
IPMI Configuration
Remote Access Disabled
Serial Port Number (Base
address and IRQ)
Serial Port Mode 115200 8,n,1
Flow Control None
Redirection After BIOS POST Disabled
Termin al Type ANSI
VT-UTF8 Combo Key Support Disabled
Status of BMC
BMC Firmware Revision
Enabled
COM1
57600 8,n,1
19200 8,n,1
09600 8,n,1
Hardware
Software
Boot Loader
Always
VT100+
VT-UTF8
Enabled
View BMC Event Log Provides data on
Clear BMC System Event Log
Disable PEF No
Restore on AC Power
Loss
Wake on RING
function
Exit
Save Changes and Exit (F10)
Discard Changes and Exit
Discard Changes
Load Optimal Defaults
Load Custom Defaults
Save Custom Defaults
event log
Yes
Power Off
Power On
Last State
Disabled
Enabled
The following second level submenus are accessed from the submenu indicated in the first
column.
75
Page 82

APPENDIX B: BIOS Settings
BIOS submenu BIOS 2nd level
submenu
IDE
Configuration
RAID Setup nVidia RAID Function Enabled
BIOS submenu BIOS 2nd level
submenu
Setting Value
Disabled
SATA 0 Primary Channel Enabled
Disabled
SATA 0 Secondary Channel Enabled
Disabled
SATA 1 Primary Channel Enabled
Disabled
SATA 1 Secondary Channel Enabled
Disabled
SATA 2 Primary Channel Enabled
Disabled
SATA 2 Secondary Channel Enabled
Disabled
Setting Value
IDE
Configuration
Primary IDE Master
(All IDE drives)
(Below is shown information
and options appropriate to
drive type)
Device Device information
Vendor Device vendor
Size Device size
LBA Mode Device LBA mode
Block Mode Device block mode
PIO Mode Device PIO mode
Async DMA Device Async DMA mode
Ultra DMA Device Ultra DMA mode
S.M.A.R.T. Device S.M.A.R.T. support
Type Not Installed
Auto
CD/DVD
ARMD
LBA/Large Mode Disabled
Auto
76
Block (Multi-Sector Transfer)
Mode
Disabled
Auto
Page 83

www.gateway.com
BIOS submenu BIOS 2nd level
submenu
BIOS submenu BIOS 2nd level
submenu
USB
Configuration
USB Mass Storage
Device Configuration
Setting Value
PIO Mode Auto
0
1
2
3
4
DMA Mode Auto
SWDMA 0-2
MWDMA 0-2
UWDMA 0-6
S.M.A.R.T. Auto
Disabled
Enabled
32Bit Data Transfer Disabled
Enabled
Setting Value
USB Mass Storage Reset Delay 10 Sec
Device #1 Only displayed if a device
Emulation Type Auto
Device #n Only displayed if a device
Emulation Type Auto
20 Sec
30 Sec
40 Sec
is detected. Includes a
DeviceID string returned
by the USB device.
Floppy
Forced FDD
Hard Disk
CDROM
is detected. Includes a
DeviceID string returned
by the USB device.
Floppy
Forced FDD
Hard Disk
77
Page 84

APPENDIX B: BIOS Settings
78
Page 85

APPENDIX C
Legal Information
79
Page 86

APPENDIX C: Legal Information
Important safety information
War ning
Always follow these instructions to help guard against personal injury and damage
to your Gateway system.
Your Gateway system is designed and tested to meet the latest standards for safety of information technology equipment. However, to ensure safe use of this product, it is important that the
safety instructions marked on the product and in the documentation are followed.
Setting up your system
■
Read and follow all instructions marked on the product and in the documentation before you operate your system. Retain all s afety and operating instruc tions for future use.
■
Do not use this product near water or a heat source such as a radiator.
■
Set up the system on a stable work surface.
■
The product should be operated only from the type of power source indicated on the rating label.
■
If your computer has a voltage selector switch, make sure that the switch is in the proper position for your area. The voltage selector switch is set at the factor y to the correct voltage.
■
Openings in the co mputer case are provided for ventilation. Do not block or cover these openings. Make sure you provide a dequate space, at least 6 inches (15 cm), around the system for
ventilation when you set up your work area. Never insert objects of any kind into the computer ventilation openings.
■
Some products are equipped with a three-wire power cord to make sure that the product is properly grounded when in use. The plug on this cord will fit o nly into a grounding-type outlet.
This is a safety feature. If you are unable to insert the plug into an outlet, contact an electrician to install the appropriate outlet.
■
If you use an extension cord with this system, m ake sure that the total ampere rating on the products plugged into the extension cord does not exceed the extension cord ampere rating.
■
If you r system is fitte d with a TV Tuner, cab le, or sat ellite receiver card, make sure that the antenna or cable system is electrically grounded to provide some protection against voltage su rges
and buildup of static charges.
Care during use
■
Do not walk on the power cord or all ow anything to rest on it.
■
Do not spill anything on the system.
■
Some products have a replaceable CMOS battery on the system board. There is a danger of explosion if the CMOS battery is replaced incorrectly. Replace the battery with the s ame or
equivalent type recommended by the manu facturer. Dispose of batteries according to the manufacturer’s instructions.
■
When the computer is turned off, a small a mount of electrical current still flows through the computer. To avoid electrical shock, always unplug all power cables and modem cables from the
wall outlets before cleaning the system.
War ning
This unit has two power supplies. To remove power from all internal circuitry you
must disconnect both power cords.
■
Unplug the system from the wall outlet and refer servicing to qualified personnel if:
■
The power cord or plug is damaged.
■
Liquid has been spilled in to the system.
■
The system does not operate properly when the operating instructions are followed.
■
The system was dropped or the cabinet is damaged.
■
The system performance changes.
Replacement parts and accessories
Use only replaceme nt parts and acces sories recommended by Gateway.
War ning
To reduce the risk of fire, use only No. 26 AWG or larger telecommunications line
cord.
Important
Do not use Gateway products in areas classified as hazardous locations. Such areas
include patient care areas of medical and dental facilities, oxygen-laden environments, or
industrial facilities.
80
Page 87
www.gateway.com
Regulatory compliance statements
United States of America
Federal Communications Commission (FCC)
Unintentional emitter per FCC Part 15
FCC Part 15 Class B Statement
This device has been tested and fou nd to comply with the limits for a Class B digital device, pursuant to Part 15 of the FCC rules. These limits are designed to provide reasonable p rotection
against harmful interfere nce in a residential installation. This equipment generates, uses, and can radiate radio frequency energy and, if not installed and used in accordance with the
instruc tions, m ay cause h armful in terferen ce to radio or televi sion reception. However, there is no guarantee that interference will not occur in a particular installation. If thi s equipment does
cause interference to radio and television reception, which c an be determined by turning the equipment off and o n, the user is encouraged to try to correct the interference by one or more of
the following measures:
■
Reorient or rel ocate the receiving antenn a
■
Increase the separation between the equipment and receiver
■
Connect the equipment to an outlet on a dif ferent circuit from that to which the receiver is connected
■
Consult the dealer or an experienced radio/TV technician for help.
Compliance Accesso ries: The accessories associated with this equi pment are: shielded video cable when an external monitor is connected. These accessories are required to b e used in order
to e nsu re c ompl ia nce w ith FCC rul es.
Caution
Changes or modifications not expressly approved by Gateway could void the FCC
compliance and negate your authority to operate the product.
Telecommunications per FCC part 68
(applicable to products fitted with USA modems)
Your modem complies with Part 68 of the Federal Communications Commissio n (FCC) rules. On the computer or modem card is a label that contains the FCC registration number and R inger
Equivalence Number (REN) for this device. If requested, this information must b e provided to the telephone company.
An FCC-compliant telephone line cord with a modular plug is required for use with this device. The modem is designed to be connected to the telephone network or premises wiring using a
compatible modular jack which is Part 68 -compliant. See installation instru ctions for details.
The Ringer Equivalence Number (REN) is used to determine the number of devices which may be connected to the telephone line. Excessive RENs on a telephone line may result in the devices
not ringing in response to an incoming call. In most areas, the sum of RENs should not exceed five (5.0). To be certain of the number of devices that may be connected to a line, as determined by
the total RENs, contact the local telephone company.
If this device causes harm to the telephone ne twork, the telephone company will notify you in advance that temporary discontinuance of service m ay be required. The telephone company may
request that you disconnect the equipment until the problem is resolved.
The telephone company may make changes in its facilities, equipment, operations, or procedures that could affect the operation of this equipment. If this happens, the telephone company will
provide advance notice in o rder for you to make necessary mod ifications to maintain uninterrup ted service.
This equipment cannot be u sed on telephone company-provided coin service. Connection to par ty line service is subj ect to state tariffs. Contact the state public utility commission or public
service commissio n for information.
When programming or making test calls to emergency numbers:
■
Remain on the line and briefly explai n to the dispatcher the reason for the call.
■
Perform such activities in the off-peak hours such as early morning o r late evenings.
The United States Telephone Consumer Protection Act of 1991 makes it u nlawful for any person to use a computer or other electronic device to send any message via a telephone fax machine
unless such message clearly contains, in a margin at the top or bottom of each transmitted page or on the first page of the tra nsmission, the date and time it is sent, an identification of the
business, other entity, or other individual sending the message, and the telephone number of the sending machine or such business, other entity, or individual. Refer to your fax
communication software documentation for details on how to comply with the f ax-branding requirement.
FCC declaration of conformity
Responsible party:
Gateway Companies, Inc.
610 Gateway Drive, North Sioux City, SD 57049
(605) 232-2000 Fax: (605) 232-2023
Product:
■
Gateway E-9232T Server
For unique identification of the product configuration, ple ase submit the 10-digit serial number found on the product to the responsible party.
This device complies with Part 15 of the FCC Rules. Operation of this product is subject to the following two conditions: (1) this d evice may not cause harmful interference, and (2) this device
must accept any interference received, including inter ference that may cause undesired operation.
81
Page 88

APPENDIX C: Legal Information
Caution
Changes or modifications not expressly approved by Gateway could void the FCC
compliance and negate your authority to operate the product.
UL Warning
Before removing or installing the chassis cover, make sure that the system power is not turned on or connec ted to AC power.
Canada
Industry Canada (IC)
Unintentional emitter per ICES-003
This digital apparatus does not exceed the Class A lim its for radio noise emissions from digital apparatus as set out in the radio interference regulations of Industry Canada.
Le présent appareil numérique n’émet pas de bruits radioélectriques dépassant les lim ites applicables aux appareils numériques de Classe A prescrites dans le règlement sur le brouillage
radioélectrique édicté par Industrie Canada.
Telecommunications per Industry Canada CS03
(for products fitted with an IC-compliant modem)
The Industry Canada label identifies certified equipment. This certification means that the equipment meets cer tain telecommunications network protec tive, operation, and safety
requirements. The Department does not guarantee the equipm ent will operate to the users’ satisfaction.
Bef ore ins tal lin g th is e qui pme nt, u ser s sh oul d ma ke s ure t hat it is p ermissible to be connected to the facilities o f the local telecommunications company. The equipment must also be installed
using an acceptable metho d of connection. In so me cases, the inside wiring a ssociated with a single-line individual service may be ex tended by means of a certifi ed connector assembly. The
customer should be aware that compliance w ith the above conditions may not prevent degradation of s ervice in some situations.
Repairs to certified equipment should be made by an authorized Canadian maintenance facility designated by the supplier. Any repairs or alterations made by the user to this equipment, or
equipment malfunctions, may give the telecom munications company cause to request the user to disconnect the eq uipment.
War ning
To avoid electrical shock or equipment malfunction do not attempt to make electrical
ground connections by yourself. Contact the appropriate inspection authority or an
electrician, as appropriate.
Users should make sure, for their own protection, that the electrical ground connections of the power utility, telephone lines, and internal metallic water pipe system, i f present, are connected
together. This precaution may be particular ly important in rural areas.
The Ringer Equivalence Number (REN) assigned to each terminal device provides an indication of the maximum number of terminals allowed to be connected to a telephone interface. The
termination on an inter face may consist of any combination of devices subject only to the requirement that the sum of the Ringe r Equivalence Numbers of all the devices does not exceed 5.
Laser safety statement
All Gateway systems equipped with CD and DVD drives comply with the appropriate safety standards, including IEC 825. The laser devices in these components are classifi ed as “Class 1 Laser
Products” under a US Department of Health a nd Human Services (DHHS) Radiation Performance Standard. Should the unit ever need servicing, contact an authorized service location.
War ning
Use of controls or adjustments or performance of procedures other than those
specified in this manual may result in hazardous radiation exposure. To prevent exposure
to laser beams, do not try to open the enclosure of a CD or DVD drive.
California Proposition 65 Warning
War ning
This product contains chemicals, including lead, known to the State of California to
cause cancer and/or birth defects or reproductive harm.
82
Page 89

www.gateway.com
Environmental information
The product you have purchased contains extracted natural resources that have been used in the manufactu ring process. This product may contain substances known to be hazardous to the
environment or to human health.
To prevent releases of harmful substances into the environment and to maximize the use of our natural resources, Gateway p rovides the following info rmation on how you ca n responsibly
recycle or reuse most of the m aterials in your “end of life” product.
Waste Electrical and El ectronic Equipment (commonl y known as WEEE) shou ld never be disposed of in the municipal wa ste stream (residential garbage collecti on). The “Crossed-Out Waste Bin”
label affixed to this product is your reminder to disp ose of your “end of life” product properly.
Substances such as glass, plastics, and cer tain chemical compounds are highly recoverable, recyclable, and reusable. You can do your part for the environment by
following these simple steps:
■
When your electrical or elec tronic equipment is no longer useful t o yo u, “t ake it b ack ” to you r lo cal or r egi ona l was te c oll ect ion administration for recycling.
■
In so me cas es, you r “end of l ife” p roduct may be “trad ed in” f or cred it towa rds the purch ase of new G ateway e quipm ent. Ca ll Gate way to see if this program is
available in your area.
■
If you need further assis tance in recycling, reusing, or trading in your “end of life” product, you may contact us at the Customer Care number listed in your produc t’s
user guide and we will be glad t o help you with your e ffort.
Finally, we suggest that you practice other environmentally friendly actions by understanding and using the energy-saving features of this product (wh ere applicable),
recycling the inner and outer packaging (including shipping containers) this product was delivered in, and by disposing of or recycling used batteries proper ly.
With your help, we can reduce the amount of natural resources needed to produce electrical and electronic equipment, minimize the use of landfills for the disposal of “end of life” products, and
generally improve our quality of life by ensuring that potentially hazardous substances are not released into the environment and are disposed o f properly.
Notices
Copyright © 2007 Gateway, Inc.
All Rights Reserved
7565 Irvine Center Drive
Irvine, CA 92618-2930 USA
All Rights Reserved
This publication is protected by copyright and all rights are reserved. No part of it may be reproduced or transmitted by any means or in any form, witho ut prior consent in writing from
Gateway.
The information in this ma nual has been carefully checked and is believed to be accurate. However, changes are made periodically. These changes are incorporated in newer publi cation
editions. Gateway may improve and/or change produc ts described in this publication at any time. Due to continuing system improvements, Gateway is not responsible for ina ccurate
information which may appear in this manual. For the latest product updates, consult the Gateway Web site at www.gateway.com
special, exemplary, incidental, or conseq uential damages resulting from any defect or omission in this manual, even if advised of th e possibility of such dama ges.
In the interest of continue d produc t develop ment, Ga teway reser ves the right to make improvements in this manual and the products it describes at any time, witho ut notices or obligation.
. In no event will Gateway be liable for direct, indirect,
Trademark Acknowledgments
Trademarks used herein are trademarks or registered trademarks of Gateway, Inc. in the United States and other countries. All other brands and product names are trademarks or registered
trademarks of their respective companies.
83
Page 90

APPENDIX C: Legal Information
84
Page 91

Index
Numerics
5.25-inch drive
installing
location 2
25, 27
A
accessories
safety precautions
add-in card
see card
administrator password
Advanced menu
BIOS Setup utility 48
B
battery
replacing
troubleshooting
beep codes 58
bezel assembly
installing
removing 20
BIOS
recovering 49
resetting passwords 50
settings 69
troubleshooting 60
BIOS Setup utility
menus 48, 70
navigating through 48
opening 48
passwords 14, 50
recording configuration 13
settings 70
submenus 76, 77
troubleshooting 60
BMC
recovering
boot
device
menu 9
Boot menu
BIOS Setup utility
23
9
57
50
48
C
card
installing
reseating 35
retention levers 3
slot location 5, 35
troubleshooting 60
case
interior
opening 19
CD or DVD drive
35
4
80
14
installing
location 2
cleaning
keyboard
screen 12
servers 12
tape drive 13
CMOS battery 43
see battery
conditioner
line
configuring
onboard RAID
connections
keyboard
LAN 3
lock slot 3
monitor 3
mouse 3
network 3
parallel 3
power 3
RJ-45 3
serial 3
USB 2, 3
VGA 3
control panel
location
cover panel
removing
replacing 24
cover release latch
location
25, 27
12
8
28
3
2
19
2
D
DDR SDRAM
see memory
device drivers
installing
DIMM
see memory
diskette drive
installing
location 2
replacing 25, 27
display
troubleshooting
documentation
Gateway Web site
Server Companion DVD 15
drive bays
location 2
drivers
installing 15
drives
CD
15
25, 27
61
2, 25, 27
configuring 25
diskette 2, 25, 27
DVD 2
installing 25
installing 5.25-inch 25, 27
installing CD 25, 27
installing diskette 25, 27
replacing 25
tape 13
troubleshooting 60
DVD
Server Companion
DVD drive
see CD or DVD drive
15
E
electronic specifications 66
electrostatic discharge (ESD) 18
environmental specifications 65
error messages 53
Exit menu
BIOS Setup utility
expansion card
see card
48
F
fans
installing
location 3
rear 3
replacing 42
finding specifications 67
42
G
Gateway 5
Customer Care 52
Learning Libraries 53
Web address 5
H
hard drive
indicator 2
LED indicator 2
troubleshooting 60
heat sink
installing
help
5
telephone support
tutoring 53
hot-swap
power supply module
hot-swap drives
location
38
52
40
2
85
Page 92

Contents
I
IDE
cables
drive configuration 25
indicators 2
LED 9
information
LED
installing
5.25-inch drive
add-in card 35
bezel assembly 23
card 35
CD or DVD drive 25, 27
CMOS battery 43
diskette drive 25, 27
expansion cards 35
fans 42
heat sink 38
media drive 25, 27
memory 34
PCI card 35
power supply module 40
processor 38
system board 44
interior
case
Internet connection
troubleshooting
interrupts 66
IRQ assignments 66
25
59
25, 27
4
J
jacks
see connections
K
Kensington lock slot 3
keyboard
cleaning
port 3
troubleshooting 61
12
L
LAN jack 3
LED
indicators
information 59
power/sleep 9
LEDs
system board
line conditioners 8
lock
Kensington
key 2
2, 9
59
3
61
location 2, 3
M
Main menu
BIOS Setup utility 48
maintenance
cleaning 12
cleaning case 12
cleaning keyboard 12
cleaning screen 12
general guidelines 12
recording BIOS configuration
13
master boot record 61
memory
installing
map 66
online sparing 35
troubleshooting 61
messages 53
monitor
cleaning
port 3
troubleshooting 61
motherboard
see system board
mouse port
34
12
3
N
network jack 3
NMI 57
non-maskable interrupt 57
O
onboard RAID
configuring 28
onboard SATA RAID 28
online memory sparing 35
opening case 19
operating system
setting up 10
optical drive
troubleshooting 60
P
parallel port 3
password
resetting BIOS
supervisor 14
user 14
ports
see connections
POST (power-on self-test)
power
50
button
cord connector 3
indicator 2, 9
LED 2
line conditioners 8
protecting from surges 8
reset button 2
source problems 8
static electricity 18
troubleshooting 62
uninterruptible power supply
power supply
uninterruptible 8
power supply module
installing 40
power/sleep LED 9
power-on self-test 9
processor
heat sink
installing 38
replacing 38
troubleshooting 62
2, 8, 9, 10
(UPS) 8
38
R
RAID configuration
onboard SATA 28
RAM
see memory
rear fan
recovering
removing
replacing
resources
RJ-45 jack 3
3
BIOS
BMC 50
see installing
fans
processor 38
see installing
interrupts
memory map 66
49
42
66
S
safety
general precautions
guidelines for
troubleshooting
static electricity 18
screen
cleaning 12
troubleshooting 61
9
SDRAM
see memory
security
8, 80
53
86
Page 93

www.gateway.com
set passwords 14
setting up in BIOS 14
supervisor password 14
system 14
user passwords 14
using password 14
Security menu
BIOS Setup utility 48
serial number 52
serial port 3
Server Companion DVD 15
Server menu
BIOS Setup utility 48
setting up
hardware 8
operating system 10
safety precautions 8, 12, 80
Setup utility
see BIOS Setup utility
sparing
memory online
specifications 63, 67
electronic 66
environmental 65
system board 64
starting server 8
static electricity 18
supervisor password
see administrator password
Support
system 64
system board
system board LEDs 59
system configuration
system interrupts 66
system recovery
67
administration 13
control 13
security 14
specifications 64
startup 8
components
installing 44
replacing 44
specifications 64
thumbscrew location 3
protecting with passwords
14
recording BIOS configuration
13
35
5
Customer Care
resources 52
tips before contacting 52
telephone support 52
training
53
CD
Gateway Learning Libraries
53
troubleshooting
add-in card
battery 57
beep codes 58
BIOS 60
card 60
error messages 53
expansion card 60
general guidelines 57
general safety guidelines 53
hard drive 60
Internet connection 61
keyboard 61
LED information 59
master boot record 61
memory 61
monitor 61
optical drive 60
power 62
power source problems 8
processor 62
safety guidelines 53
technical support 52
telephone support 52
video 61
turning off server 10
turning on server 8
52
60
U
uninterruptible power supply
(UPS)
updating the BIOS 48
UPS 8
USB ports
location
user password 14
8
2, 3
V
VGA port 3
W
Web site
Gateway
5
T
tape drive
cleaning
technical support
13
87
Page 94

www.gateway.com
88
Page 95

Page 96

A MAN E-9232T USR G DE R1 9/07
 Loading...