


USER GUIDE
Gateway® E-824R/E-826R SuperLoader™ 3

Contents
Chapter 1: Introduction . . . . . . . . . . . . . . . . . . . . . . . . . . . . . . . . . . . . . . . . . . . . . . . . . . . . . .1
Introduction . . . . . . . . . . . . . . . . . . . . . . . . . . . . . . . . . . . . . . . . . . . . . . . . . . . . . . . . . . . . . 2
Features . . . . . . . . . . . . . . . . . . . . . . . . . . . . . . . . . . . . . . . . . . . . . . . . . . . . . . . . . . . . . . . . . 2
Gateway E-824R DLT-V4 SuperLoader 3 . . . . . . . . . . . . . . . . . . . . . . . . . . . . . . 2
Gateway E-826R LTO-3 SuperLoader 3 . . . . . . . . . . . . . . . . . . . . . . . . . . . . . . . . 3
Bar code reader . . . . . . . . . . . . . . . . . . . . . . . . . . . . . . . . . . . . . . . . . . . . . . . . . . . . . . 3
Accessories . . . . . . . . . . . . . . . . . . . . . . . . . . . . . . . . . . . . . . . . . . . . . . . . . . . . . . . . . . 3
Enclosure components . . . . . . . . . . . . . . . . . . . . . . . . . . . . . . . . . . . . . . . . . . . . . . . . . . 4
Front . . . . . . . . . . . . . . . . . . . . . . . . . . . . . . . . . . . . . . . . . . . . . . . . . . . . . . . . . . . . . . . . 4
Back . . . . . . . . . . . . . . . . . . . . . . . . . . . . . . . . . . . . . . . . . . . . . . . . . . . . . . . . . . . . . . . . . 5
Product components . . . . . . . . . . . . . . . . . . . . . . . . . . . . . . . . . . . . . . . . . . . . . . . . 6
Getting Help . . . . . . . . . . . . . . . . . . . . . . . . . . . . . . . . . . . . . . . . . . . . . . . . . . . . . . . . . . . . 6
External Backup CD . . . . . . . . . . . . . . . . . . . . . . . . . . . . . . . . . . . . . . . . . . . . . . . . . . 6
Gateway Web site . . . . . . . . . . . . . . . . . . . . . . . . . . . . . . . . . . . . . . . . . . . . . . . . . . . 7
Chapter 2: Installing and Setting Up your Autoloader . . . . . . . . . . . . . . . . . . . . . . . . . .9
Overview . . . . . . . . . . . . . . . . . . . . . . . . . . . . . . . . . . . . . . . . . . . . . . . . . . . . . . . . . . . . . . . 10
Preparation . . . . . . . . . . . . . . . . . . . . . . . . . . . . . . . . . . . . . . . . . . . . . . . . . . . . . . . . . . . . 10
Choosing a location . . . . . . . . . . . . . . . . . . . . . . . . . . . . . . . . . . . . . . . . . . . . . . . . 11
UL requirements . . . . . . . . . . . . . . . . . . . . . . . . . . . . . . . . . . . . . . . . . . . . . . . . . . . . 11
Unpacking the autoloader . . . . . . . . . . . . . . . . . . . . . . . . . . . . . . . . . . . . . . . . . . 12
Installation . . . . . . . . . . . . . . . . . . . . . . . . . . . . . . . . . . . . . . . . . . . . . . . . . . . . . . . . . . . . . 13
Rack mounting the autoloader . . . . . . . . . . . . . . . . . . . . . . . . . . . . . . . . . . . . . . 13
General preparation for rack mount installation . . . . . . . . . . . . . . . . . . . . . 14
Installing and removing the V-rail kit . . . . . . . . . . . . . . . . . . . . . . . . . . . . . . . . 14
Connecting the SCSI and power cables . . . . . . . . . . . . . . . . . . . . . . . . . . . . . . 20
Preparing the host and making sure the connection is correct . . . . . . . 22
Installing the device drivers . . . . . . . . . . . . . . . . . . . . . . . . . . . . . . . . . . . . . . . . . 22
Setup . . . . . . . . . . . . . . . . . . . . . . . . . . . . . . . . . . . . . . . . . . . . . . . . . . . . . . . . . . . . . . . . . . 24
Configuring the autoloader . . . . . . . . . . . . . . . . . . . . . . . . . . . . . . . . . . . . . . . . . 24
Setting the time . . . . . . . . . . . . . . . . . . . . . . . . . . . . . . . . . . . . . . . . . . . . . . . . . . . . 29
Setting the Change mode . . . . . . . . . . . . . . . . . . . . . . . . . . . . . . . . . . . . . . . . . . . 30
Chapter 3: Operating your Autoloader . . . . . . . . . . . . . . . . . . . . . . . . . . . . . . . . . . . . . . 35
Using the operator's panel . . . . . . . . . . . . . . . . . . . . . . . . . . . . . . . . . . . . . . . . . . . . . 36
Entering the passwords . . . . . . . . . . . . . . . . . . . . . . . . . . . . . . . . . . . . . . . . . . . . . 36
Logging out . . . . . . . . . . . . . . . . . . . . . . . . . . . . . . . . . . . . . . . . . . . . . . . . . . . . . . . . 37
Using cartridges . . . . . . . . . . . . . . . . . . . . . . . . . . . . . . . . . . . . . . . . . . . . . . . . . . . . . . . . 37
Inserting a single cartridge . . . . . . . . . . . . . . . . . . . . . . . . . . . . . . . . . . . . . . . . . . 38
Moving a single cartridge . . . . . . . . . . . . . . . . . . . . . . . . . . . . . . . . . . . . . . . . . . . 39
Ejecting a single cartridge . . . . . . . . . . . . . . . . . . . . . . . . . . . . . . . . . . . . . . . . . . 40
Using magazines and magazine blanks . . . . . . . . . . . . . . . . . . . . . . . . . . . . . . . . . 41
Magazine Load/Unload command . . . . . . . . . . . . . . . . . . . . . . . . . . . . . . . . . . 42
Installing a magazine . . . . . . . . . . . . . . . . . . . . . . . . . . . . . . . . . . . . . . . . . . . . . . . 42
i

Contents www.gateway.com
Installing a magazine blank . . . . . . . . . . . . . . . . . . . . . . . . . . . . . . . . . . . . . . . . . .43
Removing a magazine . . . . . . . . . . . . . . . . . . . . . . . . . . . . . . . . . . . . . . . . . . . . . . .43
Removing a magazine blank . . . . . . . . . . . . . . . . . . . . . . . . . . . . . . . . . . . . . . . . .43
Changing the orientation of a magazine or magazine blank . . . . . . . . . .44
Manually operating the magazine . . . . . . . . . . . . . . . . . . . . . . . . . . . . . . . . . . .45
Replacing a magazine or magazine blank . . . . . . . . . . . . . . . . . . . . . . . . . . . . . . .47
Viewing status information . . . . . . . . . . . . . . . . . . . . . . . . . . . . . . . . . . . . . . . . . . . . . .47
Viewing the autoloader status . . . . . . . . . . . . . . . . . . . . . . . . . . . . . . . . . . . . . . .47
Viewing the firmware version . . . . . . . . . . . . . . . . . . . . . . . . . . . . . . . . . . . . . . . .48
Viewing the status of the magazine slots . . . . . . . . . . . . . . . . . . . . . . . . . . . .49
Viewing the tape drive status . . . . . . . . . . . . . . . . . . . . . . . . . . . . . . . . . . . . . . . .49
Viewing the tape drive version . . . . . . . . . . . . . . . . . . . . . . . . . . . . . . . . . . . . . .50
Viewing Ethernet information . . . . . . . . . . . . . . . . . . . . . . . . . . . . . . . . . . . . . . .50
Running an inventory . . . . . . . . . . . . . . . . . . . . . . . . . . . . . . . . . . . . . . . . . . . . . . . . . . .50
Data compression . . . . . . . . . . . . . . . . . . . . . . . . . . . . . . . . . . . . . . . . . . . . . . . . . . . . . . .51
Chapter 4: Managing and Monitoring your Autoloader . . . . . . . . . . . . . . . . . . . . . . .53
On-board Remote Management overview . . . . . . . . . . . . . . . . . . . . . . . . . . . . . . .54
Opening On-board Remote Management . . . . . . . . . . . . . . . . . . . . . . . . . . . .54
Viewing status information . . . . . . . . . . . . . . . . . . . . . . . . . . . . . . . . . . . . . . . . . .54
Feedback on pages . . . . . . . . . . . . . . . . . . . . . . . . . . . . . . . . . . . . . . . . . . . . . . . . . .55
Using the Configuration page . . . . . . . . . . . . . . . . . . . . . . . . . . . . . . . . . . . . . . . . . . .55
System Operations options . . . . . . . . . . . . . . . . . . . . . . . . . . . . . . . . . . . . . . . . . .55
Setting security options . . . . . . . . . . . . . . . . . . . . . . . . . . . . . . . . . . . . . . . . . . . . .59
Using the Updates page . . . . . . . . . . . . . . . . . . . . . . . . . . . . . . . . . . . . . . . . . . . . . . . .61
Using the Diagnostics page . . . . . . . . . . . . . . . . . . . . . . . . . . . . . . . . . . . . . . . . . . . . .62
Running diagnostic tests . . . . . . . . . . . . . . . . . . . . . . . . . . . . . . . . . . . . . . . . . . . .62
Viewing Error or History logs . . . . . . . . . . . . . . . . . . . . . . . . . . . . . . . . . . . . . . . .62
Diagnostics . . . . . . . . . . . . . . . . . . . . . . . . . . . . . . . . . . . . . . . . . . . . . . . . . . . . . . . . .62
Identification . . . . . . . . . . . . . . . . . . . . . . . . . . . . . . . . . . . . . . . . . . . . . . . . . . . . . . . .63
Performing a System Reset . . . . . . . . . . . . . . . . . . . . . . . . . . . . . . . . . . . . . . . . . .63
Using the Commands page . . . . . . . . . . . . . . . . . . . . . . . . . . . . . . . . . . . . . . . . . . . . .63
Inventory . . . . . . . . . . . . . . . . . . . . . . . . . . . . . . . . . . . . . . . . . . . . . . . . . . . . . . . . . . .64
Set to Home . . . . . . . . . . . . . . . . . . . . . . . . . . . . . . . . . . . . . . . . . . . . . . . . . . . . . . . .64
Sequential operations . . . . . . . . . . . . . . . . . . . . . . . . . . . . . . . . . . . . . . . . . . . . . . .64
Chapter 5: Troubleshooting your Autoloader. . . . . . . . . . . . . . . . . . . . . . . . . . . . . . . . .65
Overview . . . . . . . . . . . . . . . . . . . . . . . . . . . . . . . . . . . . . . . . . . . . . . . . . . . . . . . . . . . . . . .66
Safety guidelines . . . . . . . . . . . . . . . . . . . . . . . . . . . . . . . . . . . . . . . . . . . . . . . . . . . . . . . .66
Understanding POST . . . . . . . . . . . . . . . . . . . . . . . . . . . . . . . . . . . . . . . . . . . . . . . . . . . .66
Performing a POST . . . . . . . . . . . . . . . . . . . . . . . . . . . . . . . . . . . . . . . . . . . . . . . . . .67
Interpreting the POST results . . . . . . . . . . . . . . . . . . . . . . . . . . . . . . . . . . . . . . . .67
Running diagnostic tests from the front panel . . . . . . . . . . . . . . . . . . . . . . . . . . .67
Setting the security . . . . . . . . . . . . . . . . . . . . . . . . . . . . . . . . . . . . . . . . . . . . . . . . . .68
Stopping a diagnostic test . . . . . . . . . . . . . . . . . . . . . . . . . . . . . . . . . . . . . . . . . . .68
Front panel diagnostic tests . . . . . . . . . . . . . . . . . . . . . . . . . . . . . . . . . . . . . . . . .69
ii

www.gateway.com
Running diagnostic tests remotely . . . . . . . . . . . . . . . . . . . . . . . . . . . . . . . . . . . . . . 70
Diagnostics using On-board Remote Management . . . . . . . . . . . . . . . . . . 70
Checking for errors . . . . . . . . . . . . . . . . . . . . . . . . . . . . . . . . . . . . . . . . . . . . . . . . . . . . . 70
Hard error log display . . . . . . . . . . . . . . . . . . . . . . . . . . . . . . . . . . . . . . . . . . . . . . . 74
Error code field description . . . . . . . . . . . . . . . . . . . . . . . . . . . . . . . . . . . . . . . . . 75
Before contacting Gateway Customer Care . . . . . . . . . . . . . . . . . . . . . . . . . . . . . 81
Telephone support . . . . . . . . . . . . . . . . . . . . . . . . . . . . . . . . . . . . . . . . . . . . . . . . . . . . . 83
Tutoring and training . . . . . . . . . . . . . . . . . . . . . . . . . . . . . . . . . . . . . . . . . . . . . . . 83
Returning the autoloader for service . . . . . . . . . . . . . . . . . . . . . . . . . . . . . . . . . . . . 84
Preparing the autoloader for shipment . . . . . . . . . . . . . . . . . . . . . . . . . . . . . . 84
Removing the autoloader from a rack . . . . . . . . . . . . . . . . . . . . . . . . . . . . . . . 84
Packing the autoloader . . . . . . . . . . . . . . . . . . . . . . . . . . . . . . . . . . . . . . . . . . . . . 85
Contents
Appendix A: Logs . . . . . . . . . . . . . . . . . . . . . . . . . . . . . . . . . . . . . . . . . . . . . . . . . . . . . . . . . . 87
Basic information logs . . . . . . . . . . . . . . . . . . . . . . . . . . . . . . . . . . . . . . . . . . . . . . . . . . 88
Log descriptions . . . . . . . . . . . . . . . . . . . . . . . . . . . . . . . . . . . . . . . . . . . . . . . . . . . . . . . 88
Autoloader logs . . . . . . . . . . . . . . . . . . . . . . . . . . . . . . . . . . . . . . . . . . . . . . . . . . . . 88
Error codes . . . . . . . . . . . . . . . . . . . . . . . . . . . . . . . . . . . . . . . . . . . . . . . . . . . . . . . . . . . . . 89
Soft logs . . . . . . . . . . . . . . . . . . . . . . . . . . . . . . . . . . . . . . . . . . . . . . . . . . . . . . . . . . . . 91
Update logs . . . . . . . . . . . . . . . . . . . . . . . . . . . . . . . . . . . . . . . . . . . . . . . . . . . . . . . . 92
Boot logs . . . . . . . . . . . . . . . . . . . . . . . . . . . . . . . . . . . . . . . . . . . . . . . . . . . . . . . . . . . 92
Tape drive logs . . . . . . . . . . . . . . . . . . . . . . . . . . . . . . . . . . . . . . . . . . . . . . . . . . . . . . . . . 92
Tape drive error logs . . . . . . . . . . . . . . . . . . . . . . . . . . . . . . . . . . . . . . . . . . . . . . . . 92
SCSI check condition error logs . . . . . . . . . . . . . . . . . . . . . . . . . . . . . . . . . . . . . 92
POST failure logs . . . . . . . . . . . . . . . . . . . . . . . . . . . . . . . . . . . . . . . . . . . . . . . . . . . . . . . 94
Appendix B: Specifications . . . . . . . . . . . . . . . . . . . . . . . . . . . . . . . . . . . . . . . . . . . . . . . . . 95
Physical specifications . . . . . . . . . . . . . . . . . . . . . . . . . . . . . . . . . . . . . . . . . . . . . . . . . . 96
Autoloader performance specifications . . . . . . . . . . . . . . . . . . . . . . . . . . . . . . . . . 96
Environmental specifications . . . . . . . . . . . . . . . . . . . . . . . . . . . . . . . . . . . . . . . . . . . 96
Autoloader power specifications . . . . . . . . . . . . . . . . . . . . . . . . . . . . . . . . . . . . . . . . 97
Autoloader vibration specifications . . . . . . . . . . . . . . . . . . . . . . . . . . . . . . . . . . . . . 98
Autoloader shock specifications . . . . . . . . . . . . . . . . . . . . . . . . . . . . . . . . . . . . . . . . 98
Tape drive specifications . . . . . . . . . . . . . . . . . . . . . . . . . . . . . . . . . . . . . . . . . . . . . . . 98
LTO-3 drive specifications . . . . . . . . . . . . . . . . . . . . . . . . . . . . . . . . . . . . . . . . . . . 98
DLT-V4 drive specifications . . . . . . . . . . . . . . . . . . . . . . . . . . . . . . . . . . . . . . . . . 99
Appendix C: Safety, Regulatory, and Legal Information . . . . . . . . . . . . . . . . . . . . . 101
Index. . . . . . . . . . . . . . . . . . . . . . . . . . . . . . . . . . . . . . . . . . . . . . . . . . . . . . . . . . . . . . . . . . . . . 107
iii

Contents www.gateway.com
iv

CHAPTER 1
Introduction
•Introduction
•Features
•Enclosure components
•Getting Help
1

CHAPTER 1: Introduction www.gateway.com
Introduction
This guide provides information on the installation, configuration, and general
use of the Gateway® E-824R and E-826R autoloaders.
These autoloaders are compatible with most operating systems and
environments that support the SCSI interface, but require either direct support
from the operating system or a compatible backup application to take full
advantage of their many features.
Features
Each autoloader is an automated system that includes a tape drive and one or
two magazines for tape cartridges. Your application can automatically load and
unload tape cartridges as required for data backup or data retrieval. The
autoloaders provide a compact, high capacity, low-cost method for unattended
data backup.
Each SuperLoader 3™ contains either a DLT-V4 tape drive (E-824R), or an LTO-3
tape drive (E-826R) and one or two magazines containing as many as eight
cartridges each. A single cartridge can be inserted directly through a
password-protected mailslot (front loading slot). From the mailslot, the
cartridge can be inserted into the tape drive (if there is no cartridge already in
the drive), or you can load the cartridge into a magazine slot (if there is no
cartridge already in the slot).
The front panel on the autoloader includes a liquid crystal display (LCD) screen
and four function keys. A scrolling menu on the LCD screen lets you get
information from the autoloader and enter commands. The front panel also
includes two LEDs, which indicate the autoloader's status and error condition.
The SuperLoader 3 connects to your host server through a SCSI connection,
letting the host send data and commands automatically. You can also connect
to the autoloader using an Ethernet connection, to perform administrative
functions and download system updates.
Gateway E-824R DLT -V4 SuperLoader 3
The Gateway E-824R DLT-V4 SuperLoader 3 is SCSI-3 compatible and operates
as a single SCSI ID/two LUN data storage device. It is equipped with a DLT-V4
tape drive and can hold as many as sixteen DLT VS1 data cartridges, when using
two magazines. This provides a compressed capacity of 5.1 Terabytes of data
and a sustained data transfer rate of 36 GB per hour (native) or as high as 72
GB per hour compressed (assuming 2:1 compression).
2

www.gateway.com
Gateway E-826R LTO-3 SuperLoader 3
The Gateway E-826R LTO-3 SuperLoader 3 is SCSI-3 compatible and operates as
a single SCSI ID/two LUN data storage device. It is equipped with an LTO-3 tape
drive and contains as many as sixteen Ultrium 3 data cartridges, when using two
magazines, which provides a compressed capacity of 6.4 Terabytes of data and
a sustained data transfer rate of 245 GB per hour (native), or as high as 490 GB
per hour compressed (assuming 2:1 compression).
Bar code reader
A bar code reader is enclosed within the body of the autoloader. The bar code
reader automatically scans each cartridge in the magazine when the power is
turned on, after a reset, after an import or export, or when a re-inventory
command is issued (see “Running an inventory” on page 50). Other than that,
there is no user interface with the bar code reader through the front panel
operator controls or LCD screen. The information from each label is stored in
memory and is available through SCSI and On-board Remote Management to
the computer's operating system or backup application upon request.
If you use the bar code reader, you must apply or slide the bar code labels into
the appropriate slot on the right side of each cartridge. The labels must conform
to ANSI/AIM BC1 -1995 Uniform Symbology Specification Code 39. A set of bar
code labels is included with the autoloader.
Features
Accessories
The following accessories are shipped with the autoloader:
■ SCSI host cable
■ SCSI terminator
■ Hardware to rack mount the autoloader
■ T8 and T10 TORX
■ One magazine blank
■ Power cable
■ Documentation CD containing all of the documentation
■ Bar code labels
®
L-Key drivers
3

CHAPTER 1: Introduction www.gateway.com
Enclosure components
Front
Left magazine or blank
Power switch
Front panel LCD screen
Mailslot (front
loading slot)
Front panel LEDs
Right magazine or blank
Function keys
4

www.gateway.com
Back
Power
switch
Power
connector
Enclosure components
Fan vent
RJ-45 Ethernet
connector
68-pin HD SCSI
connectors
Fan vent
5

CHAPTER 1: Introduction www.gateway.com
Product components
Getting Help
# Accessory
1 SCSI cable
2SCSI terminator
3 Power cable
4 Setup poster
5 CD (documentation)
6 Magazine blank
7 Bar code labels
8 TORX T8 and T10 L-key drivers
In addition to your autoloader’s documentation, you can use the following
information resources to help you use your autoloader.
External Backup CD
6
Use the External Backup CD to access file utilities, Windows 2003 Server drivers,
and documentation for your autoloader and its components.

www.gateway.com
Gateway Web site
Getting Help
Gateway provides a variety of information on its Web site to help you use your
autoloader.
Visit the Gateway Web site at support.gateway.com
■ Technical documentation and product guides
■ Technical tips and support
■ Updated hardware drivers
■ Order status
■ Frequently asked questions (FAQs)
for:
7

CHAPTER 1: Introduction www.gateway.com
8

CHAPTER 2
Installing and Setting Up your Autoloader
•Overview
• Preparation
•Installation
•Setup
9

Chapter 2: Installing and Setting Up your Autoloader www.gateway.com
Overview
Preparation
1 Prepare to install your new E-824R or E-826R (see “Preparation” on
page 10).
2 Identifying the correct SCSI bus types (see “SCSI bus requirements” on
page 10).
Installation
1 Install the autoloader in a computer rack. (see “Rack mounting the
autoloader” on page 13
2
Connect the autoloader to the server. (see “Connecting the SCSI and
power cables” on page 20).
3 Set the SCSI ID for the autoloader (see “Setting the SCSI ID” on page 25).
4 Turn on the autoloader on to make sure that it passes the Power-on Self
Test (PO ST ).
).
Whenever you power cycle the
autoloader, allow 10 seconds before
turning the power back on. The power
supply requires at least two to three
seconds for the capacitors to discharge.
This ensures a complete system reset on
power down and may avoid system
Caution
Preparation
The autoloader is not compatible with a
High-voltage Differential (HVD) SCSI bus.
Important
Setup and configuration
Set up the host and make sure that the connection is correct (see “Preparing
the host and making sure the connection is correct” on page 22).
errors.
Before you install your new Gateway autoloader, unpack it carefully and inspect
it for any damage that might have occurred during shipping.
Make sure that the work area is free from conditions that could cause
electrostatic discharge (ESD). Discharge static electricity from your body by
touching a known grounded surface, such as your computer's metal chassis.
SCSI bus requ iremen ts
You must connect the autoloader to one of the following SCSI bus types:
■ Ultra 160 SCSI-3, LVD/MSE SCSI bus
■ Ultra 320 SCSI-3, LVD/MSE SCSI bus
The maximum number of autoloaders
supported per SCSI bus is two.
10
Important
Your SCSI host adaptor card must also support the SCSI bus type used to
connect the autoloader.

www.gateway.com
Choosing a location
Preparation
Choose a location that meets the following criteria. The autoloader uses
standard rack mounting hardware and must be flat and level.
Criteria Description
Rack requirements Standard 19-inch rack with 2U (3.5 inches) of available rack space.
Room temperature 50–95° F (10–35° C)
Power source AC power voltage: 100–127 VAC; 200–240 VAC
Line frequency: 50–60 Hz
Locate the AC outlet near the autoloader. The AC power cable is the product’s
main disconnect device and must be easily accessible at all times.
Weight 31 lb. (14.1 kg) unloaded
38 lb. (17.2 kg) loaded with 2 magazines, 16 cartridges
Air Quality Minimize sources of particulate contamination. Avoid areas near frequently
used doors and walkways, cooling or exhaust vents, stacks of supplies that
collect dust, printers, and smoke-filled rooms.
Excessive dust and debris can damage tapes and tape drives.
UL requirements
Humidity 20–80% RH (non-condensing)
Clearance Back: Minimum of 17 inches (43.2 cm)
Front: Minimum of 27 inches (68.6 cm)
Sides: Minimum of 2 inches (5.08 cm)
Elevated operating ambient temperature
When installed in a closed multi-unit rack assembly, the operating ambient
temperature of the rack environment may be greater than the room ambient
temperature. Therefore, consideration should be given to installing the
equipment in an environment compatible with the manufacturer’s maximum
recommended ambient temperature.
Reduced air flow
When you install the autoloader in a rack, make sure that there is adequate air
flow for safe operation.
Mechanical loading
When you install the autoloader in a rack, make sure that you do not load the
rack unevenly (for example, all of the equipment in the top section of the rack).
11

Chapter 2: Installing and Setting Up your Autoloader www.gateway.com
Overloading the circuit
When you connect the autoloader to the electrical supply circuit, do not
overload the circuit.
Reliable grounding
Make sure that the electrical circuit providing power to your autoloader has a
reliable ground. Pay particular attention to supply connections other than direct
connections to the branch circuit, such as the use of power strips.
Unpacking the autoloader
If the room in which you are working
differs from the temperature in which the
autoloader was shipped or stored by
30°F (15°C) or more, let the autoloader
environment for at least 12 hours before
acclimate to the surrounding
opening the shipping carton.
Important
If your autoloader was ordered as a
one-magazine autoloader, be sure to
remove the plastic shipping insert from
the magazine bay before connecting or
operating your autoloader. Insert either a
magazine or a magazine blank into the
bay. The autoloader does not function
without both magazine bays equipped
Important
with either a magazine or a magazine
blank.
Before you begin, clear a desk or table so that you can unpack the autoloader.
You also need to select an open 2U computer rack location near the server that
will host the autoloader.
To unpack and inspect the autoloader:
1 Clear a table or desk so that you have room to unpack the autoloader.
2 Inspect the shipping box for damage. If you notice any damage, report it
to the shipping company immediately.
3 Open the shipping box and remove the accessories package. Set the
accessories package aside for now.
4 Lift the autoloader and padding out of the box and place it on the work
surface, top facing up. Do not set the autoloader on the front, back, or
either side.
5 Carefully remove the shipping padding from the left and right sides of the
autoloader. Then remove the autoloader from the bag. Save the packing
materials in case you need to move or ship the autoloader in the future.
6 Remove the shipping filler block and replace it with the right magazine
or magazine blank.
12

www.gateway.com
Installation
Rack mounting the autoloader
The autoloader can be rack mounted using the V-rail kit (included).
The following illustration shows minimum clearances for rack mount
installation:
Tap e
magazine
Installation
27.0” (686 mm)
Minimum clearance to load
or unload a magazine from
the system
Clearance to door inside a rack
2.0” (51 mm)
Minimum side
clearance (both sides)
1.0” (25 mm)
Minimum cle arance to load
a tape through the mailslot
6.0” (152 mm)
Tap e
Front
Autoloader
Minimum clearance between the
back of the autoloader and the
inside of the rack (using standard
mounting brackets adjusted to
their closest setting)
Back
3.4” (86 mm)
13

Chapter 2: Installing and Setting Up your Autoloader www.gateway.com
General preparation for rack mount installation
To prepare for rack mount installation:
Failure to take these safety steps may
result in personal injury or equipment
Warnin g
damage.
1 Lower the cabinet feet.
2 Extend the cabinet’s anti-tip device, if available.
An anti-tip device may be extendable legs or similar equipment used to
stabilize the cabinet. This anti-tip equipment is to help avoid
over-balancing the cabinet when installing or removing equipment.
Do not remove the top cover of the
autoloader during the installation
process. Removing the top cover could
result in damage to the autoloader.
Caution
3 Make sure that the cabinet and all rack mounted equipment have a
reliable ground connection.
4 Make sure that the total current of all rack mounted components
(including the autoloader) does not exceed the current rating of the power
distribution unit or outlet receptacles.
5 Secure the help of at least one other person. At least two people are
required to safely install the autoloader into a rack cabinet.
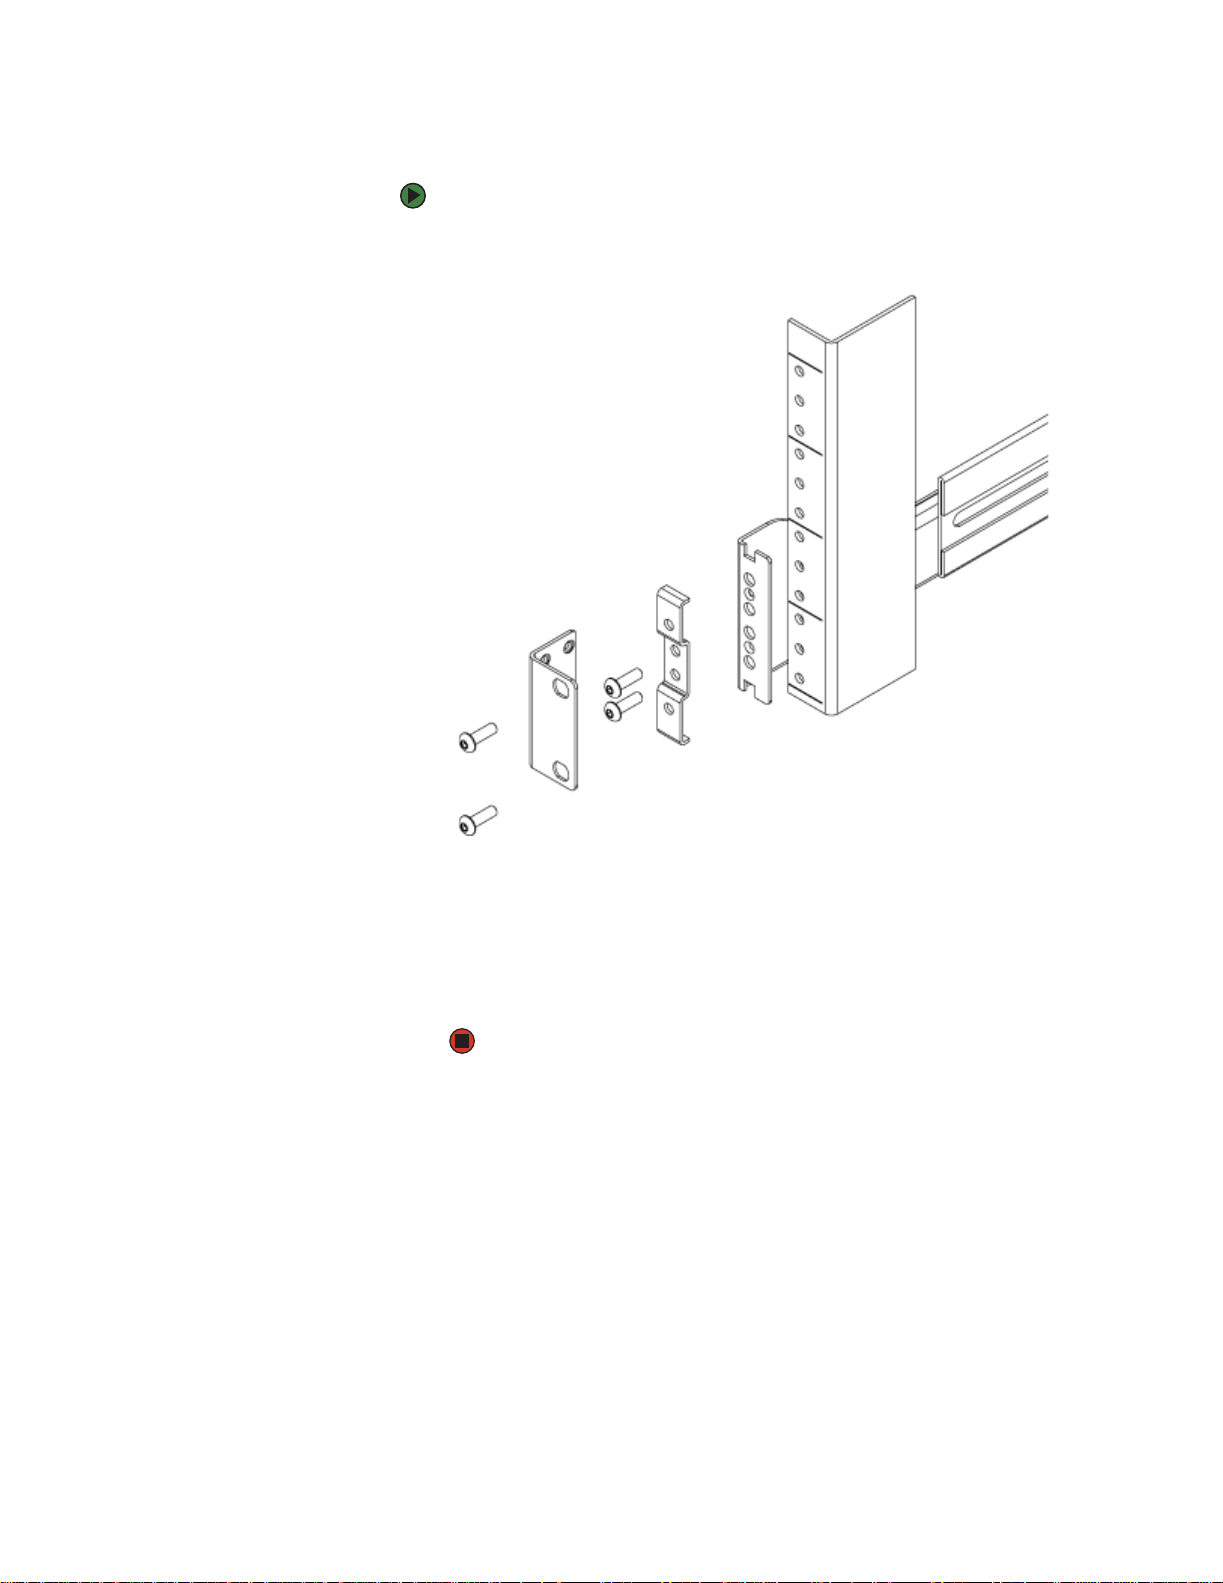
Installing and removing the V-rail kit
The V-rail is a set of rails, plates, and mounting hardware that lets you install
the autoloader into a rack. This is not a slide rail kit, but allows some movement
from the rack cabinet for easier access or removal of the autoloader.
The V-rails come already mounted to the chassis of your SuperLoader3.
Requirements
The V-rail can be used in many rack cabinet structures.
Front to rear rail spacing range is 25.75 – 34.50 inches (654.05 – 876.30 mm).
This range accommodates varying cabinet depths. The vertical rail thickness is
either 0.080 inch (2.03 mm) or .105 inch (7.14 mm).
Vertical rail hole types
The V-rail can be used with the following rack hole types:
■ .375 inch (9.53 mm) square through-holes
■ .281 inch (7.14 mm) diameter through-holes
■ 10-32 UNF-2B threaded holes
■ M6–1-6H threaded holes
14

www.gateway.com
Installation
Left rail assembly
Right rail assembly
Accessory pieces
Besides the rail parts themselves, there are two plates included with the rail kit.
These plates are used for various rack mountings. The front cover plate is used
on all rack rails. The 10-32 inside nut plate is used on the .375 inch square-hole
rails, the .280 diameter rails, and the M6 rails.
Front cover
plate used on
all rack rails
10-32 inside
nut plate used
on .375
square-hole
rails, and .280
and M6 rails
15

Chapter 2: Installing and Setting Up your Autoloader www.gateway.com
Installation in a .375 square-hole rack
To install the rail in a .375 square-hole rack:
1 Identify the correct mounting holes on the vertical rail, making sure that
the selected holes are on the same level as the mounting holes on the
other three vertical rails.
Vertical rail
Front cover
Autoloader tab
(autoloader not
shown)
2 Mount the front cover plate to the vertical rail in the identified holes by
plate
10-32 inside
nut plate
Rail
assembly
using 10-32 x .625 bolts in the center two holes of the plate.
3 Install the chassis into the rack by aligning the chassis-mounted rails with
the mounted rail assemblies, then pushing the chassis into the rack.
4 Secure the chassis into the rack by bolting the autoloader tabs to the
upper and lower holes in the front cover plate using 10-32 x .625 bolts.
16

www.gateway.com
Installation
Installation in a .280 Diameter thru-hole rack
To install the rail in a .280 diameter thru-hole rack:
1 Identify the correct mounting holes on the vertical rail, making sure that
the selected holes are on the same level.
The upper and lower tabs of the inside
plate do not enter the holes of the rack.
They deform when secured.
Important
Vertical rail
Front cover
Autoloader tab
(autoloader not
shown)
2 Mount the front cover plate to the vertical rail in the identified holes by
plate
10-32 inside
nut plate
Rail
assembly
using M6 (.200”) threaded bolts in the center two holes of the plate.
3 Install the chassis into the rack by aligning the chassis-mounted rails with
the mounted rail assemblies, then pushing the chassis into the rack.
4 Secure the chassis into the rack by bolting the autoloader tabs to the
upper and lower holes in the front cover plate using M6 (.200”) threaded
bolts.
17
Chapter 2: Installing and Setting Up your Autoloader www.gateway.com
Installation in a 10-32 threaded-hole rack
To install the rail in a 10-32 threaded-hole rack:
1 Identify the correct mounting holes on the vertical rail, making sure that
the selected holes are on the same level.
Vertical rail
Front cover
Autoloader tab
(autoloader not
shown)
plate
Rail
assembly
2 Mount the front cover plate to the vertical rail in the identified holes by
using 10-32 x .625 bolts in the center two holes of the plate.
3 Install the chassis into the rack by aligning the chassis-mounted rails with
the mounted rail assemblies, then pushing the chassis into the rack.
4 Secure the chassis into the rack by bolting the autoloader tabs to the
upper and lower holes in the front cover plate using 10-32 x .625 bolts.
18

www.gateway.com
Installation
Chassis-m ounted r ails
The following illustrations show various views of the chassis-mounted rail
system.
Rail parts
Chassis rail
close-up
Rails installed
on a chassis
19

Chapter 2: Installing and Setting Up your Autoloader www.gateway.com
Using long
autoloader brackets.
The chassis mounted
on a rack.
Using short
autoloader brackets.
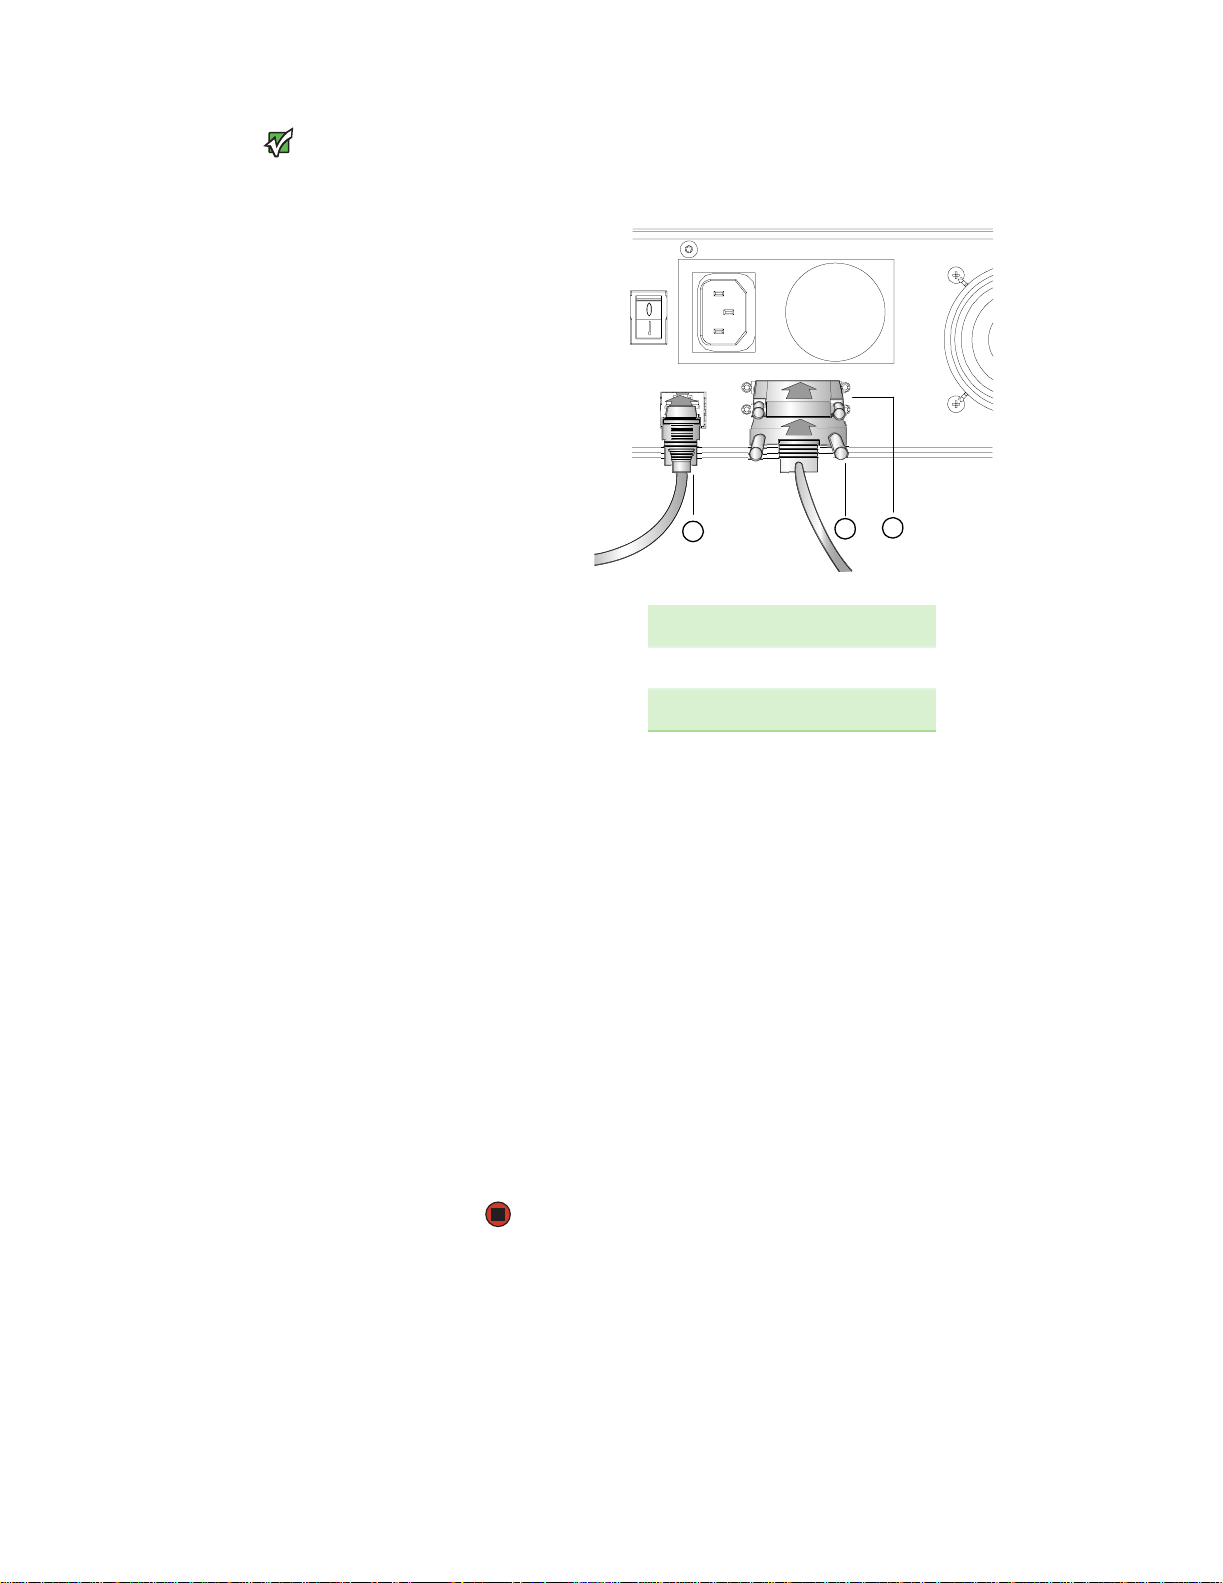
Connecting the SCSI and power cables
To connect the SCSI and power cables:
1 Shut down and turn off the selected server. Turn off all attached accessory
devices, such as printers and other SCSI devices.
2 Attach one end of the SCSI cable (included in the accessory kit) to one of
the connectors on the back panel of the autoloader.
Back view of
mounted chassis.
20
www.gateway.com
Installation
If the supplied SCSI cable does not fit the
connector on your SCSI host adapter, you
have an incompatible SCSI host adapter.
Contact your Gateway representative or
your SCSI host adapter manufacturer for
Important
information.
3 Attach the other end of the SCSI cable to the connector on the SCSI host
adapter or to the connector on the previous device on the SCSI bus.
3
1
2
1 Ethernet cable
2SCSI cable
3 SCSI terminator
4 Attach the terminator to the remaining SCSI connector on the back panel
of the autoloader (if the autoloader is the last or only device on the SCSI
bus). Otherwise, attach the cable to the next device on the SCSI bus. Make
sure that the last device on the SCSI bus is correctly terminated.
5 Plug the power cable into the power connector on the back panel of the
autoloader.
6 Plug in the power cable to the nearest correctly grounded power outlet.
7 Turn on the autoloader by setting the power switch on the front panel to
the ON position. Check the LCD screen to make sure the autoloader is
receiving power. If it is not, check the power connections and your power
source.
8 Turn on any other devices you turned off earlier.
9 During the Power-on Self Test (POST), both LEDs are illuminated briefly,
followed by only the Ready/Activity LED flashing. When the initialization
sequence is complete, the LCD screen displays the Home screen.
10 Turn on the server.
21

Chapter 2: Installing and Setting Up your Autoloader www.gateway.com
Preparing the host and making sure the connection is correct
If necessary, install a SCSI host adapter, software, and compatible drivers. Refer
to the manuals for the host computer and SCSI host adapter for detailed
instructions. In addition, follow these general guidelines:
■ When the host server is powered on, install software or drivers that are
compatible with the autoloader (see “Installing the device drivers” on
page 22). Most backup software packages require an additional module
to communicate with the autoloader robotics.
■ If the host server is connected to a network, check with the system
administrator before turning off power.
■ Use correct procedures to prevent electrostatic discharge (ESD). Use
wrist-grounding straps and anti-static mats when handling internal
components.
■ Make sure that the host server has an open expansion slot.
■ Make sure that your backup application supports the SCSI host adapter.
■ Depending on the server configuration, you may need to change the
SCSI ID of the autoloader (see “Setting the SCSI ID” on page 25).
■ Make sure that the autoloader is correctly terminated. If the autoloader is
the only SCSI device other than the SCSI host adapter on the selected SCSI
bus, it must be terminated. Likewise, if the autoloader is physically the last
SCSI device on the SCSI bus, it must be terminated. Only the devices
physically at the beginning and end of the SCSI bus should be terminated.
If the host is located at the beginning of the SCSI bus, the host HBA is
usually terminated internally.
Installing the device drivers
Device drivers are required if you intend
to use the Microsoft Windows 2003
native backup application. Commercial
backup applications provide all
necessary device driver support.
Microsoft Windows NT
native support for autoloaders. You must
use a backup application with Microsoft
No drivers are needed for Redhat 3.0,
Solaris 8, Solaris 9, and Solaris 10.
Commercial backup applications
provide all necessary device driver
Important
®
does not include
Windows NT.
support.
There are two device drivers associated with the autoloader. One for the
autoloader itself, and a second for the tape drive within the autoloader.
Tape drive device driver
To install the tape drive device driver for Microsoft Windows 2003:
1 Make sure that you are logged on to the host server with administrator
privileges.
2 Download the latest drivers. Save the drivers to your host computer.
■ For the either model, go to support.gateway.com.
■ Open the device manager (refer to your specific OS documentation
for instructions). For example, right-click the My Computer icon on
the Windows desktop, click Manage, then click Device Manager.
■ The drive should be listed under the ? Other Devices item as
Unknown Medium Changer Device.
3 Right-click the appropriate listing, click Uninstall, then click OK to confirm
that you want to remove the device.
4 Click Action in the upper-left corner of the Computer Management dialog
box.
22

www.gateway.com
Installation
5 Click Scan for Hardware Changes. Windows 2003 scans for the
SuperLoader 3 drive. The drive appears under ?Other Devices again.
6 Right-click the appropriate listing, then click Properties.
7 Select the Driver tab, then click Update Driver.
8 When the Upgrade Device Driver Wizard appears, click Next.
9 Click Display a list..., then click Next.
10 Scroll down and click Tape Drive, then click Next.
11 Select the appropriate directory for your drive.
12 Click the SuperLoader 3 (drive) entry, then click Next.
13 Click Next to install the driver.
14 Click Finish.
15 Click Device Properties to make sure that the driver has been installed.
The drive now appears in Device Manager under Tape Dri ves as a (drive
type) SCSI Sequential Device and is ready to use.
The autoloader uses the SuperLoader 3
Important
Windows drivers.
Autoloader device driver
To install the autoloader device driver for Microsoft Windows 2003:
1 Make sure that you are logged on to the host server with administrator
privileges.
2 Download the latest drivers from support.gateway.com. Save the drivers
to your host computer.
3 Right-click the My Computer icon on the Windows desktop, then click
Manage, Device Manager.
The autoloader should be listed under Medium Changers as Unknown
Medium Changer Device.
4 Right-click the Unknown Medium Changer Device listing, click
Uninstall, then click OK to confirm that you want to remove the device.
5 Click Action in the upper-left corner of the Computer Management dialog
box.
6 Click Scan for Hardware Changes.
Windows 2003 scans for the autoloader. The autoloader appears under
Medium Changers again.
7 Right-click the Unknown Medium Changer Device listing, then click
Properties.
8 Select the Driver tab.
9 When the Upgrade Device Driver Wizard appears, click Next.
10 Click Display a list..., then click Next.
23

Chapter 2: Installing and Setting Up your Autoloader www.gateway.com
11 Browse to the location where you saved the drivers on the host computer,
then click OK.
12 Click the SuperLoader 3 entry, then click Next.
13 Click Next again to install the driver.
14 Click Finish.
15 Close the Device Properties dialog box.
The autoloader now appears in Device Manager under Medium Changers
and is ready to use.
Setup
When you first power on the autoloader, it automatically runs a POST (Power-on
Self Test). During the POST, the left (green) LED flashes. After the POST, the left
(green) and right (amber) LED flash alternately back and forth. Do one of the
following:
The front panel requires a six-digit
password to change the configuration
(see “Setting passwords” on page 33). The
LCD front panel default password for the
Administrator is 000000. The default
password for the Operator is 111111.
Important
Configuring the autoloader
■ If the autoloader powers on successfully, continue configuring the
autoloader (see “Configuring the autoloader” on page 24).
■ If the autoloader does not power on successfully, make sure that:
■ The power switch is on.
■ The power cable is inserted correctly.
■ The SCSI bus is terminated.
■ The SCSI cable is connected to the autoloader and host computer.
■ No error code appears on the autoloader LCD.
■ If you cannot resolve the problem yourself, contact Gateway Customer
Care (see “Getting Help” on page 6).
When you first power on the autoloader, the setting for the Internet Protocol
(IP) address is static with the address 192.168.20.128. If you want to use
Dynamic Host Configuration Protocol (DHCP) to change the IP address, see
“Setting the IP address” on page 26. To determine the IP address when using
DHCP, view the Ethernet status information (see “Setting Ethernet” on page 26).
To configure the autoloader, start with the Main menu on the front panel. If the
Main menu is not already visible on the LCD, press E
NTER.
24
When you first power on the autoloader, the default is set with no password
protection. However, after you set the security option, all the configuration
functionality is password-protected. You need an administrator-level password
to configure the autoloader (see “Default username and password” on page 55
for On-board Remote Management or “Setting security options” on page 59 for
the front panel).

www.gateway.com
Setup
The front panel menu has the following options:
To configure the autoloader, you must make sure that the setup includes the
following:
■ SCSI ID(s). For the autoloader, there is a single SCSI ID.
■ Magazine(s).
■ Ethernet IP address (if you are not using DHCP).
■ SNMP server IP address only if SNMP is being used.
■ Time server IP address (or the time zone, date, and time, if configuring
manually)—only if a time server is being used.
■ Control mode.
■ Security option.
Setting the SCSI ID
Each SCSI device attached to a server or workstation must have a unique SCSI
ID. For the autoloader, you need one SCSI ID.
To set the SCSI ID:
1 If the Main menu is not already visible, press ENTER. The Main menu opens.
2 Click Configuration, then press ENTER. The Configuration submenu opens.
3 Scroll to SCSI ID, then press ENTER.
25

Chapter 2: Installing and Setting Up your Autoloader www.gateway.com
4 Scroll to the number you want to set as the autoloader's SCSI ID, then press
NTER. “Cycle Power new SCSI ID” appears on the LCD.
E
5 Press and hold the power button on the front panel until “System
Shutdown wait 60 sec” appears on the LCD, then release the button.
“Power Off” then appears on the LCD and the autoloader shuts off.
6 Press the power button again to turn on the autoloader. The new SCSI ID
is now in effect.
Setting Ethernet
Ethernet is the method used by the autoloader to access a network. With an
Ethernet connection, you can remotely access the autoloader over the network.
To use the Ethernet connection, you must define the following:
■ A dynamic or static IP address for the autoloader (required)
■ A subnet mask (required)
■ An IP gateway (optional)
■ A Simple Network Management Protocol (SNMP) server (optional)
■ A time server, or set the time and time zone manually (optional)
Setting the IP address
An IP address is the address of any device attached to a network. Each device
must have a unique IP address. IP addresses are written as four sets of numbers
separated by periods ranging from 0.0.0.0 up to and including 255.255.255.255.
IP addresses are either permanent or dynamically assigned. A permanent, or
static, address remains the same each time the device connects to the network
server. A dynamic address may change each time the device connects to the
network server using Dynamic Host Configuration Protocol (DHCP).
To set a dynamic IP address:
1 From the Main menu, click Configuration, then press ENTER. The
Configuration submenu opens.
2 Scroll to Ethernet, then press ENTER. The Ethernet submenu opens.
3 Scroll to Set IP, then press ENTER. The Set IP screen opens.
4 Scroll to DHCP, then press ENTER. “Please reboot to use DHCP” appears on
the LCD screen.
5 Press and hold the power button on the front panel until “System
Shutdown wait 60 sec” appears on the LCD, then release the button.
“Power Off” appears on the LCD, then the autoloader shuts off.
6 Press the power button again to turn on the autoloader. The IP address is
changed.
26

www.gateway.com
Setup
To set a static IP address:
1 From the Main menu, click Configuration, then press ENTER. The
Configuration submenu opens.
2 Scroll to Ethernet, then press ENTER. The Ethernet submenu opens.
3 Scroll to Set IP, then press ENTER. The Set IP screen opens.
4 Scroll to Static IP, then press ENTER. The cursor automatically appears at
the first digit.
5 At each position of the IP address, use the up and down arrows to change
the value of each digit. Press E
When you have advanced through all of the digits of the IP address, the
autoloader displays “Enter to save.”
NTER to advance the cursor to the next digit.
If you make a mistake, press ESC to
backspace to the digit you want to
Important
change.
6 Press ENTER. The Configuration submenu appears and the static IP is now
in effect. You do not need to reboot the autoloader.
7 Press ESC or Enter to return to the Ethernet submenu.
Setting the subnet mask
Creating a subnet mask is a method of splitting IP networks into a series of
subgroups, or subnets, to improve performance or security.
To set a subnet mask:
1 From the Main menu, click Configuration, then press ENTER. The
Configuration submenu opens.
2 Scroll to Ethernet, then press ENTER. The Ethernet submenu opens.
3 Scroll to Set Subnet Mask, then press ENTER. The cursor automatically
appears at the first digit.
4 At each position of the Subnet Mask address use the up and down arrows
to change the value of each digit. Press E
next digit.
When you have advanced through all of the digits of the subnet mask
address, the autoloader displays “Enter to save.”
NTER to advance the cursor to the
If you make a mistake, press ESC to
backspace to the digit you want to
Important
change.
5 Press ENTER. “New Subnet Mask xxx.xxx.xxx” appears on the LCD. You do
not need to reboot the autoloader.
6 Press ESC or ENTER to return to the Ethernet submenu.
27

Chapter 2: Installing and Setting Up your Autoloader www.gateway.com
Setting an IP gateway
A gateway is a node on a network that allows access to another network.
To set an IP gateway:
1 From the Main menu, click Configuration, then press ENTER. The
Configuration submenu opens.
2 Scroll to Ethernet, then press ENTER. The Ethernet submenu opens.
3 Scroll to Set Gateway, then press ENTER. The cursor automatically appears
at the first digit.
4 At each position of the gateway address use the up and down arrows to
change the value of each digit. Press E
next digit.
When you have advanced through all of the digits of the gateway address,
the autoloader displays “Enter to save.”
NTER to advance the cursor to the
If you make a mistake, press ESC to
backspace to the digit you want to
Important
change.
5 Press ENTER. “New Gateway is xxx.xxx.xxx” appears on the LCD. You do not
need to reboot the autoloader.
6 Press ESC or ENTER to return to the Ethernet submenu.
Setting the SNMP server
An SNMP server monitors a network by processing reporting activity in each
network device (hub, router, bridge, and so on). The server uses this information
to define what is available from each device and what can be controlled (turned
off, on, and so on).
To set an SNMP server:
1 From the Main menu, click Configuration, then press ENTER. The
Configuration submenu opens.
2 Scroll to Ethernet, then press ENTER. The Ethernet submenu opens.
3 Scroll to Set SNMP Server, then press ENTER. The cursor automatically
appears at the first digit.
4 At each position of the SNMP server address use the up and down arrows
to change the value of each digit. Press E
next digit.
NTER to advance the cursor to the
28
If you make a mistake, press ESC to
backspace to the digit you want to
Important
change.
When you have advanced through all of the digits of the SNMP server
address, the autoloader displays “Enter to save.”
5 Press ENTER. “New SNMP Server xxx.xxx.xxx” appears on the LCD. You do
not need to reboot the autoloader.
6 Press ESC or ENTER to return to the Ethernet submenu.

www.gateway.com
Setting the time
Setup
The system time is displayed by On-board Remote Management and is used
internally when logging events and errors. The system time is either regular time
or power-on time. Regular time is Month/Date/Year Time, such as Nov/21/2004
19:28. Power-on time is Power On Cycles/Power On Hours. For example, POC:
00121, POH: 00002:07:45 where POC is the number of times the system has
booted since it was manufactured, and POH is the number of hours, minutes,
and seconds since the last system boot. If regular time is known, it is used,
otherwise power-on time is used.
The system time setting on the autoloader must be reset after each power up.
The time can be reset automatically if a time server is configured.
Setting the time server
You can connect the autoloader to a SNTP-compatible time server to supply the
correct date and time. The autoloader uses this information to time-stamp
information in its memory.
To set a time server:
1 From the Main menu, click Configuration, then press ENTER. The
Configuration submenu opens.
If you make a mistake, press ESC to
Important
backspace to the digit you want to
change.
2 Scroll to Ethernet, then press ENTER. The Ethernet submenu opens.
3 Scroll to Set Time Server, then press ENTER. The cursor automatically
appears at the first digit.
4 At each position of the time server address use the up and down arrows
to change the value of each digit. Press E
NTER to advance the cursor to the
next digit.
When you have advanced through all of the digits of the time server
address, the autoloader displays “Enter to save.”
5 Press ENTER. “New Time Server xxx.xxx.xxx” appears on the LCD. You do not
need to reboot the autoloader.
6 Press ESC or ENTER to return to the Ethernet submenu.
To set the time zone:
1 From the Main menu, click Configuration, then press Enter. The
Configuration submenu opens.
2 Scroll to Time, then press ENTER. The Time submenu opens.
3 Scroll to Set Timezone, then press ENTER. The Time Zone screen appears,
letting you set the hours. The cursor automatically appears at the first digit.
4 Scroll to set the number of hours difference between your local time and
Greenwich Mean Time (GMT).
29

Chapter 2: Installing and Setting Up your Autoloader www.gateway.com
5 Scroll to set the number of minutes difference between your local time
and GMT, then press E
6 Press ESC or ENTER to return to the Main menu.
NTER. The new time zone is set.
To set the date and time:
1 From the Main menu, click Configuration, then press ENTER. The
Configuration submenu opens.
2 Scroll to Time, then press ENTER. The Time submenu opens.
3 Scroll to Set Date/Time, then press ENTER. The Date/Time screen appears,
letting you set the date and time. The cursor automatically appears at the
first digit.
4 The first four digits represent the current year. At each position of the year,
use the up and down arrows to change the value of each digit. Press E
to advance the cursor to the next digit.
5 The next two digits represent the current month. At each position of the
month, use the up and down arrows to change the value of each digit.
Enter a leading 0 if the month is a single digit. Press E
NTER to advance the
cursor to the next digit.
NTER
Setting the Change mode
6 The next two digits represent the current day. At each position of the day,
use the up and down arrows to change the value of each digit. Enter a
leading 0 if the day is a single digit. Press E
NTER to advance the cursor to
the next digit.
7 The next two digits represent the current hour. At each position of the
hour, use the up and down arrows to change the value of each digit. Enter
a leading 0 if the hour is a single digit. Press E
NTER to advance the cursor
to the next digit.
8 The last two digits represent the current minute. At each position of the
minute, use the up and down arrows to change the value of each digit.
Enter a leading 0 if the minute is a single digit. Press E
NTER to advance the
cursor to the next digit.
9 Press ENTER to save.
10 Press ESC to return to the Main menu.
You can set the autoloader Change mode to either Random or Sequential. The
default change mode is Random.
In Random mode either you or the backup software can specify which cartridge
you want to use and where you want it to go. You will probably use this mode
the most.
30

www.gateway.com
Setup
The Sequential mode supports certain backup applications that do not manage
media. During backup, when one cartridge is read or written to the end of the
tape the autoloader, automatically returns that cartridge to its slot and loads
the cartridge from the next higher numbered slot to the tape drive to be read
or written to. This continues until the backup has sequentially accessed and
used all available cartridges. The autoloader does not move the media until the
host requests the tape drive to unload the tape through a SCSI unload
command.
In Sequential mode, the medium changer
does not appear in the Device Manager.
The medium changer reappears in
Device Manager if you return the system
to Random mode. This is to allow for
operating systems that do not support
Important
multiple LUNS.
In Seq Cycle mode, which is an option of the Sequential mode, the autoloader
automatically starts over with magazine slot 1 when the last cartridge is used
(slot 16 or the highest filled slot). If this change mode is not set, the autoloader
stops when the last cartridge available has been used. In Seq Cycle mode the
autoloader continues to cycle until you stop it.
To set the Change mode:
1 From the Main menu, click Configuration, then press ENTER. The
Configuration submenu opens.
2 Scroll to Change Mode, then press Enter. The mode options appear. A
check mark appears next to the currently enabled mode.
3 Do one of the following:
■ To leave the mode the same, press Esc.
■ To modify the change mode, scroll to the mode to you want, then
press Enter. “Reboot to enable new mode” appears on the LCD.
4 Press and hold the power button on the front panel until “System
Shutdown wait 60 sec” appears on the LCD, then release it. “Power Off”
then appears on the LCD and the autoloader shuts off.
5 Press the power button again to turn on the autoloader. The new change
mode is now in effect.
Sequential mode operations
If you enable Sequential mode, you must use the Sequential Ops submenu under
the Commands menu to operate the autoloader after you reboot.
■ The Start command lets you load the first cartridge.
■ The Resume command lets you continue from the next unused slot, if you
stopped the cycle.
■ The Stop command lets you stop the cycle.
To start Sequential mode operation:
1 From the Main menu, scroll to Commands, then press ENTER. The
Commands submenu opens.
2 Scroll to Sequential Ops, then press ENTER. The Sequential Ops submenu
opens.
3 Scroll to Start, then press ENTER. “Moving first tape to drive” appears on
the LCD.
31

Chapter 2: Installing and Setting Up your Autoloader www.gateway.com
To stop Sequential mode operation:
1 From the Main menu, scroll to Commands, then press ENTER. The
Commands submenu opens.
2 Scroll to Sequential Ops, then press ENTER. The Sequential Ops submenu
opens.
3 Scroll to Stop, then press ENTER. “Ejecting tape from drive” appears on the
LCD.
To resume Sequential mode operation:
1 From the Main menu, scroll to Commands, then press ENTER. The
Commands submenu opens.
2 Scroll to Sequential Ops, then press ENTER. The Sequential Ops submenu
opens.
3 Scroll to Resume, then press ENTER. “Moving next tape to drive” appears
on the LCD.
Setting security
You can add security to the front panel by password-protecting the autoloader's
functionality. The security setting only protects the front panel functionality.
The default setting is Off, meaning that no password is required. However, you
can enable the security option so that users must enter a password to access
functionality.
Security option
When you first turn on the autoloader, the security option is set to Off. Use the
following procedure to enable the security option. You must have an
administrator-level password to set passwords.
To set the Security option:
1 From the Main menu, scroll to Configuration, then press ENTER. The
Configuration submenu opens.
2 Scroll to Security. If a check mark appears after the word Security, the
security option is On. If no check mark appears, the security option is Off.
3 To change the option, press ENTER. For example, if the security option was
set to On, it is now set to Off, and no check mark appears.
Setting magazines
32
In some cases, autoloader owners have been charged Independent Software
Vendor (ISV) licensing fees for two-magazine SuperLoader 3s, even though only
one magazine was configured. This happened because the ISV software
registered the autoloader as a two-magazine device, regardless of the number
of magazines actually configured. You can set the number of magazines in the
autoloader.

www.gateway.com
Setup
To set the number of magazines:
1 From the Main menu, scroll to Configuration, then press ENTER. The
Configuration submenu opens.
2 Scroll to Magazines, then press ENTER. The Magazines submenu opens.
3 Select either Right, Left, or Both to indicate the magazines installed in the
autoloader.
Setting passwords
Many operations on the autoloader are password-protected to make sure that
data integrity is safe. You can set passwords to the Administrator level and to
the Operator level. Operator-level users have access to the Commands and
Status menus. Administrator-level users have access to all functionality.
To set a password:
1 From the Main menu, scroll to Configuration, then press ENTER. The
Configuration submenu opens.
If you make a mistake, press ESC to
Important
backspace to the digit you want to
change.
2 Scroll to Set Password, then press ENTER.
3 To set a password to the operator level, scroll to Operator. To set a
password to the administrator level, scroll to Administrator. Press ENTER.
The Set Password screen opens.
4 Press ENTER. If you are not logged in as Administrator, press ENTER again
to log in. A text box appears above the first asterisk.
5 The cursor automatically appears at the first character of the password.
6 At each position of the password, use the up and down arrows to change
the value of each character. Press E
NTER to enter the character and advance
the cursor to the next number. The text box above the asterisk disappears
and another text box appears above the next asterisk.
7 Repeat step Step 6 to enter the remaining digits of the password. When
you have entered six numbers, the autoloader displays “Submit Password”
below the asterisks.
8 Press ENTER to submit the password. “Password Successfully changed”
appears on the LCD.
9 Press ENTER. The Operator and Administrator options reappear. You can
either enter another password, or press E
SC or ENTER, as necessary, to
return to the Main menu.
33

Chapter 2: Installing and Setting Up your Autoloader www.gateway.com
Getting lost passwords
You can reset front panel passwords to
the factory defaults from On-board
Remote Management. However, if the
On-board Remote Management
passwords are lost, you must contact
Customer Care. If you must contact
Customer Care, be at the host computer
with On-board Remote Management on
line. From the Main screen, click
Configuration. The User name and
Password screen opens. The Customer
Care representative needs the number
surrounded by asterisks to locate and
reset your password. This is your “realm
Important
If you forget the administrator-level password, you cannot access the
autoloader's functionality to enter a new password. In this case, you must call
Customer Care (see “Getting Help” on page 6). When you call, have the
autoloader connected to the Ethernet and On-board Remote Management
open.
number.”
34

CHAPTER 3
Operating your Autoloader
• Using the operator's panel
• Using cartridges
• Using magazines and magazine blanks
• Replacing a magazine or magazine blank
• Viewing status information
• Running an inventory
• Data compression
35

CHAPTER 3: Operating your Autoloader www.gateway.com
Using the operator's panel
The operator's panel consists of two LEDs, four buttons, and a 2-line by
16-character LCD screen. The operator's panel provides everything you need to
monitor autoloader status and to control all of its functions.
If security is enabled and you try to
execute a command without entering a
password, the autoloader displays the
Enter Password screen until you enter a
password. Once you enter a password
(see “Default username and password”
on page 55 for On-board Remote
Management or “Setting passwords” on
page 33 for the front panel), the
autoloader takes you back to the
command screen that you were at before
you entered a password.
Important
Entering the passwords
1 Power switch 5 Scroll down button
2 Front panel LCD screen 6 Escape
3 Front panel LEDs 7 Enter
4 Scroll up button
All of the functionality accessed from the scrolling menu is password-protected.
Two levels of security are built into the menu. The lower-level security is the
operator level and the higher-level security is the administrator level. There is
one password for each level. (See “Default username and password” on page 55
for On-board Remote Management or “Setting passwords” on page 33 for the
front panel.)
The administrator password allows access to all of the functionality available.
The operator password allows access to all of the functionality in the Command
and Status submenus.
Many functions on the autoloader may be password-protected to make sure
that data remains safe. To access the menu items necessary to execute these
functions, you must first enter your password (see “Setting passwords” on
page 33). All passwords for the front panel are six numeric digits long.
36

www.gateway.com
Logging out
Using cartridges
When you enter a password, all password-protected functionality is available
until you close your browser session. If you do not use the front panel for 10
minutes, the Main screen reappears on the LCD. When the Main screen
reappears, the autoloader has automatically logged you out. You must re-enter
your password again to access the menu functionality.
To log out of the autoloader:
1 From the Main menu, scroll to Commands, then press ENTER. The
Commands submenu opens.
You can also press ESCAPE to log out.
Continue pressing E
SCAPE until the Main
screen appears.
Using cartridges
Tips & Tricks
Whenever you see Enter or Eject on the
front panel menu, it means the tape
enters and leaves the autoloader through
the mailslot. Whenever you see Load or
Unload, it means the tape is loaded into
or unloaded from the tape drive.
If a tape cartridge is holding the mailslot
door open on power up, the robot cannot
move. The system detects that the
mailslot door is open but cannot detect
the presence of the tape. If the mailslot
door is open, the bar code scanner laser
light may shine out the door and
potentially cause physical injury.
With the mailslot door open, do not insert
your hand through the mailslot door. This
is to prevent bodily injury from the robot.
Precautions are in place to prevent the
robotic mechanism functioning in this
Tips & Tricks
Warnin g
circumstance.
2 Scroll to Log Out, then press ENTER. “Session Complete” appears on the
LCD.
Typically, when you first install the autoloader, you load your cartridges into the
magazines, then load the magazines into the autoloader. However, you can
insert and eject cartridges individually using the mailslot, or you can eject a
magazine, manually load and unload cartridges, then load the magazine back
into the autoloader. The autoloader automatically detects the presence of a
cartridge in the magazine slot.
If you try to perform an illegal operation, the autoloader refuses to perform the
operation. For example, if you try to load a cartridge through the mailslot to the
drive but the drive already contains a cartridge, the mailslot does not unlock.
If you try to unload a cartridge from the drive while the autoloader is writing
to the tape, the command is not initiated until the write command is completed.
37

CHAPTER 3: Operating your Autoloader www.gateway.com
If the tape cartridge is holding the
mailslot door open during operation, the
system keeps track of the tape movement
and continues robotic motion. This can
occur if the robot ejects the cartridge out
through the mailslot door.
Important
Inserting a single cartridge
When you want to load a single cartridge into the autoloader, you can use the
mailslot. However, if the Security option is turned on, you have to enter a valid
password to unlock the mailslot before you can load a cartridge (see “Default
username and password” on page 55 for On-board Remote Management or
“Setting passwords” on page 33 for the front panel). When you insert a cartridge
through the mailslot, you can load it into the tape drive or store it in a magazine
slot.
To insert a cartridge into the tape drive:
1 From the Main menu, scroll to Commands, then press ENTER. The
Commands submenu opens.
2 Scroll to Enter, then press ENTER. The Enter submenu opens.
3 Scroll to To Drive, then press ENTER. The message “Insert Tape, Push Until
Prompted” appears on the LCD.
For the autoloader, push in the cartridge
until it stops. The cartridge should be
about 3 inches (7.5 cm) inside the
mailslot. This may require that you push
and have your fingers well within the
mailslot opening. After insertion, the end
of the cartridge should be visible at the
back of the mailslot opening.
Important
4 Insert the cartridge into the mailslot. After approximately five seconds, the
system automatically verifies that a cartridge is inserted and continues the
process. The message “Tape Loaded” appears when the process is
successfully completed.
5 After you have inserted the cartridge, press ENTER.
If the insert cartridge function fails, the cartridge ejects, the message
“Missed Tape” appears, and you must perform Step 3 and Step 4 again.
38

www.gateway.com
Using cartridges
To insert a cartridge into a magazine slot:
1 From the Main menu, scroll to Commands, then press ENTER. The
Commands submenu opens.
2 Scroll to Enter, then press ENTER. The Enter submenu opens.
3 Scroll to To Locat i o n , then press ENTER. The message “Insert Tape, Push
Until Prompted” appears on the LCD.
For the autoloader, push in the cartridge
until it stops. The cartridge should be
about 3 inches (7.5 cm) inside the
mailslot. This may require that you push
and have your fingers well within the
mailslot opening. After insertion, the end
of the cartridge should be visible at the
back of the mailslot opening.
Important
Moving a single cartridge
4 Insert the cartridge. After approximately five seconds, the system
automatically verifies that a cartridge is inserted and continues the
process. The message “Tape Loaded” appears when the process is
successfully completed.
5 After you have inserted the cartridge, press ENTER.
If the load cartridge function fails, the cartridge ejects, the message
“Missed Tape” appears, and you must perform Step 3 and Step 4 again.
6 Scroll through the magazine slots and view their status until you find the
appropriate slot. Slots that are occupied by a data cartridge are indicated
by an asterisk (*). Scroll to the slot where you want to store the cartridge,
then press E
NTER.
You can move a single cartridge from one location to another inside the
autoloader.
To move a single cartridge:
1 From the Main menu, scroll to Commands, then press ENTER. The
Commands submenu opens.
2 Scroll to Move, then press ENTER. The Move screen appears under From:.
If you select an empty From: location, “No Source Tape” appears on the
LCD. Choose a different location.
3 Scroll to the current location of the cartridge you want to move. Slots that
are occupied by a data cartridge are indicated by an asterisk (*).
4 From To : , scroll to the location to which you want to move the cartridge.
Slots that are occupied by a data cartridge are indicated by an asterisk (*).
Press E
NTER.
If you select a To : location that is already occupied, “Destination Full”
appears on the LCD. Choose a different location.
39

CHAPTER 3: Operating your Autoloader www.gateway.com
Ejecting a single cartridge
When you want to remove a single cartridge from the autoloader, you can
specify the cartridge you want by bar code or location, or choose the cartridge
currently in the tape drive.
To eject a cartridge by bar code:
1 From the Main menu, scroll to Commands, then press ENTER. The
Commands submenu opens.
2 Scroll to Eject, then press ENTER. The Eject submenu opens.
3 Scroll to Tape , Mailslot, then press ENTER.
4 Scroll to By Barcode. A bar code label appears.
5 Scroll to the label that corresponds to the cartridge you want to eject, then
press E
To eject a cartridge by location:
1 From the Main menu, scroll to Commands, then press ENTER. The
Commands submenu opens.
NTER.
2 Scroll to Eject, then press ENTER. The Eject submenu opens.
3 Scroll to Tape , Mailslot, then press ENTER.
4 Scroll to By Location.
Slots that are occupied by a data cartridge are indicated by an asterisk (*).
If Auto Clean is enabled, the slot that is occupied by a cleaning tape is
indicated with an “at” (@) sign. Scroll to the slot containing the cartridge
you want to eject.
5 Press ENTER. The cartridge you want is ejected from the mailslot.
To eject a cartridge from the tape drive:
1 From the Main menu, scroll to Commands, then press ENTER. The
Commands submenu opens.
2 Scroll to Eject, then press ENTER. The Eject submenu opens.
3 Scroll to Cartridge, then press ENTER.
4 Scroll to From Drive, then press ENTER. The cartridge you want is ejected
from the mailslot.
40

www.gateway.com
Using magazines and magazine blanks
Magazine - right side (with
left side handle installed)
Using magazines and magazine blanks
Magazines are not interchangeable
between drive types. Order the
appropriate part numbers when
Important
replacing these items.
Magazine - left side (with
left side handle installed)
The autoloader cannot run unless both magazine openings are correctly closed.
One way you can close the openings is to use two magazines. If you use only
one magazine, then you must fill the other magazine opening with a magazine
blank for the autoloader to become operational.
41

CHAPTER 3: Operating your Autoloader www.gateway.com
Ejecting a magazine
When you want to remove several cartridges at once, eject the magazine(s) first.
To eject a magazine:
1 From the Main menu, scroll to Commands, then press ENTER. The
Commands submenu opens.
2 Scroll to Eject, then press ENTER. The Eject submenu opens.
3 Scroll to Right Magazine or Left Magazine, then press Enter.
You should hear a distinctive popping sound as the appropriate magazine
is ejected from the autoloader. “Left magazine has been ejected” or “Right
magazine has been ejected” appears on the LCD.
To prevent damage to the autoloader or
the magazine, use both hands to support
the entire length of the magazine when
removing a magazine.
Caution
4 Grasp the magazine by the handle with one hand and slide it out,
Magazine Load/Unload command
When issuing a Load/Unload command to the autoloader, the system
automatically ejects the right magazine.
1 Remove the right magazine.
2 Replace the right magazine with a magazine blank.
3 Issue the Load/Unload command again. The system then ejects the left
4 If you want to put the magazine in the right bay, replace the magazine
supporting it underneath with the other hand.
After you eject a magazine, you must fully remove it or fully reinstall it
before powering off the autoloader. Before returning a magazine to the
autoloader, manually turn the wheels on the side of the magazine. If they
move freely, the cartridges are correctly seated. If the wheels do not turn
freely, check the cartridges and remove or replace as needed.
To remove the left magazine using the Load/Unload command:
magazine.
blank in the right bay with a cartridge magazine.
Installing a magazine
42
To install a magazine into the autoloader:
1 Grasp the magazine by the handle with one hand and support it
underneath with the other hand.
2 Slide the magazine into the magazine bay until it clicks.
Make sure that you position the magazine correctly. It should slide into
the magazine bay smoothly. If you meet resistance, make sure that the
magazine is correctly oriented.

www.gateway.com
Using magazines and magazine blanks
Be careful not to turn the knobs on the
side of the magazine (see “Manually
operating the magazine” on page45)
while the magazine is partially inserted
into the autoloader. Doing so may cause
damage to the magazine or the
Caution
autoloader.
Installing a magazine blank
The magazine blank is correctly installed
when you feel it click into place and the
front of the blank is flush with the front
panel of the autoloader.
Caution
Removing a magazine
The magazine is correctly installed when you feel it click into place and
the front is flush with the front panel. “Left Mag Inserted” or “Right Mag
Inserted” appears on the LCD. The autoloader automatically proceeds to
run an inventory.
To install a magazine blank:
1 Grasp the magazine blank by the handle with one hand and guide the
blank into the magazine bay.
2 Slide the magazine blank into the magazine bay until it stops.
In most cases, you can remove a magazine by using the Eject command on the
front panel menu. If you need to remove the magazine when the autoloader is
powered off, you must remove it manually. Contact Customer Care (see “Getting
Help” on page 6) for more information.
Removing a magazine blank
To remove a magazine using the front panel:
1 On the menu, scroll to Commands, then press ENTER. The Commands
submenu opens.
2 Scroll to Eject, then press ENTER. The Eject submenu opens.
3 Scroll to Right Magazine or Left Magazine, depending on which
magazine you want to eject, then press E
The magazine pops forward so that the front of the magazine is no longer
flush with the front panel.
4 With one hand, grasp the magazine by the handle and slide it forward to
remove. Place your other hand under the magazine to support it and
prevent it from falling.
Your autoloader comes equipped with either two magazines, or one magazine
and one magazine blank. The autoloader does not function without both
magazine bays equipped with either a magazine or a magazine blank.
NTER.
43

CHAPTER 3: Operating your Autoloader www.gateway.com
To remove a magazine blank:
1 Pull the magazine blank straight out.
2 Replace with another magazine blank or a cartridge magazine (see
“Installing a magazine” on page 42).
Changing the orientation of a magazine or magazine blank
A magazine or magazine blank can be configured to fit in the right or left
magazine bay. The handle must be removed, the magazine turned, and the
appropriate handle attached to match the orientation of the magazine or blank.
To remove and attach a magazine handle, you need a #1 PHILLIPS® screwdriver.
Right side of magazine
Left side of magazine
Magazine blank (left
side handle shown)
44

www.gateway.com
Using magazines and magazine blanks
To change the orientation of a magazine or magazine blank:
1 Remove the magazine or magazine blank from the autoloader, if it is
installed.
2 Remove the two screws that attach the handle to the front of the magazine
or magazine blank.
Screws
3 Unsnap the handle carefully, being careful not to break the hinge.
4 Rotate the magazine or magazine blank 180 degrees so that what was the
5 Attach the appropriate left or right handle to the front of the rotated
6 Install the two screws to attach the handle securely to the magazine or
Manually operating the magazine
We recommend that you fully remove the
magazine to load and unload cartridges.
Damage to the magazine or the
cartridge could result if you rotate the
magazine before it is fully removed.
Caution
There are two knobs on the side of the magazine opposite the side with the
cartridge slots, one on each end. You can move the slots within the magazine
by turning these two knobs and aligning a slot with one of the two openings.
You can use the openings in the magazine to load and unload cartridges from
the eight slots within each magazine.
front of the magazine is now the back.
magazine or magazine blank by snapping the handle onto the front of the
magazine or magazine blank.
magazine blank.
45

CHAPTER 3: Operating your Autoloader www.gateway.com
Loading cartridges
To load cartridges into a fully ejected magazine:
1 Center a slot within one of the openings located on the side of the
magazine.
2 Correctly orient the cartridge.
There is a keying feature in each slot that
Important
only lets you fully insert the cartridge one
way.
3 Fully insert the cartridge into the slot.
When pushing the cartridge into the slot, you should feel a small
resistance (detente) until the cartridge is correctly latched into the slot. All
forward progress stops when the cartridge is fully inserted.
Unloading cartridges
You can remove a cartridge the same way you insert it.
To unload cartridges from a fully ejected magazine:
46
1 Pull the ejected magazine until the first large upper slot is accessible.
2 Use the knobs on the side of the magazine to center the slot and cartridge
you want in the first opening on the cartridge slot side of the magazine.
Do not expose more than the first large upper slot when manually
operating the magazine.
3 Using your thumb and index finger, pull out the cartridge. You should feel
a small resistance, but continue to pull the cartridge until it comes free.

www.gateway.com
Identifying slots
Each slot has an identification number that is exposed when the slots are in the
upper section of the magazine. With the magazine removed from the
autoloader, you can see the identification mark on the top side of the magazine
through one of two windows on the upper surface of the magazine.
Each magazine has a unique identification number indicating whether it is the
right or left magazine. The left magazine is number 1 and the right magazine
is number 9.
Replacing a magazine or magazine blank
Replacing a magazine or magazine blank
If your autoloader was ordered as a
one-magazine autoloader, make sure
that you remove the plastic shipping
insert from the magazine bay before
autoloader. Insert either a magazine or a
either a magazine or a magazine blank.
Handles are either right or left. They are
connecting or operating your
magazine blank into the bay. The
autoloader does not function without
both magazine bays equipped with
not interchangeable between the left
and right sides of the autoloader.
Caution
To replace a cartridge magazine or magazine blank, you need to remove the
current magazine or blank, then install the new magazine or blank.
Important
Viewing status information
From the scrolling menu on the LCD, you can view the autoloader status,
firmware version, element status, tape drive status, tape drive version, and
Ethernet information.
Viewing the autoloader status
The autoloader status provides information about:
■ Whether a magazine is installed or not
■ SCSI connection status
■ Ethernet connection status
■ Whether the bar code reader is installed or not
To view the autoloader status:
1 From the Main menu, scroll to Status, then press ENTER. The Status
submenu opens.
2 From the Status submenu, scroll to Autoloader, then press Enter. The
Autoloader submenu opens.
47

CHAPTER 3: Operating your Autoloader www.gateway.com
3 From the Autoloader submenu, scroll to Status, then press Enter. A list of
messages similar to the following appears:
Status Message Description
Magazines L=* The left magazine is present.
R=* The right magazine is present.
Viewing the firmware version
SCSI ID A digit 0 through 15
(default 5)
Mode Random The change mode is set to Random.
SEQUENTIAL The change mode is set to Sequential.
BC Reader Yes or No A bar code reader is present.
The assigned SCSI ID for the autoloader.
To view the current firmware version:
1 From the Main menu, scroll to Status, then press ENTER. The Status
submenu opens.
2 Scroll to Autoloader, then press ENTER. The Autoloader submenu opens.
3 Scroll to Version, then press ENTER. A list of messages appears on the LCD.
The firmware version is listed as Firmware: VX.XX (where X.XX is the current
installed version of the firmware).
Field Description
48
Firmware The number indicates the firmware version.
EDC The number indicates the Error Correction Code that was generated
when the firmware was installed. The autoloader uses this number to
make sure that the firmware and the memory holding the firmware
are good.
HW Rev The number indicates the hardware version.
ME Rev The number indicates the mechanical version.

www.gateway.com
Viewing the status of the magazine slots
The element status reports the status of the magazine slots. The status indicates
whether a slot contains a cartridge or not, and which slot is allocated as the
cleaning cartridge's slot.
To view an element's status:
1 From the Main menu, scroll to Status, then press ENTER. The Status
submenu opens.
2 Scroll to Autoloader, then press ENTER. The Autoloader submenu opens.
3 Scroll to Element Status, then press ENTER.
You can scroll through each of the slots. Slots that are occupied by a data
cartridge are indicated by an asterisk (*). The empty slot that is assigned
to a cleaning cartridge is indicated with an exclamation point (!). The slot
that is occupied by a cleaning cartridge is indicated with an “at” sign (@).
4 Scroll to the slot containing the cartridge for which you want to see the
label, or the cartridge you want to move, then press E
Status screen opens, showing the bar code label for that cartridge. A Move
command also appears on the screen.
Viewing status information
NTER. The Element
The Move command appears only if the
Important
security is disabled or if you are logged in
as Administrator or Operator.
Viewing the tape drive status
If you want to move the cartridge, scroll until the location you want to
move to appears under To : , then press E
NTER.
- OR -
If you do not want to move the cartridge, press E
SC.
To view the tape drive status:
1 From the Main menu, scroll to Status, then press ENTER. The Status
submenu opens.
2 Scroll to Drive, then press ENTER. The Drive submenu opens.
3 Scroll to Status, then press ENTER. A list of messages appears. These
messages may include:
Field Description
SCSI ID Indicates the drive’s SCSI ID number.
Compression Indicates whether the tape drive compression is enabled or disabled.
Drive Tape Indicates whether the tape drive is present or not.
49

CHAPTER 3: Operating your Autoloader www.gateway.com
Viewing the tape drive version
To view the tape drive version:
1 From the Main menu, scroll to Status, then press ENTER. The Status
submenu opens.
2 Scroll to Drive, then press ENTER. The Drive submenu opens.
3 Scroll to Ver sion, then press ENTER. A list of messages appears. These
messages may include:
Field Description
Product Type Indicates the type of drive installed.
Version Indicates the firmware version of the drive.
Viewing Ethernet information
Running an inventory
The autoloader automatically runs an inventory whenever you turn it on or
insert a magazine. An inventory checks each magazine slot, the drive, the picker
(the mechanism that grabs the tape from the library and moves it to the drive),
and the mailslot to determine if a cartridge is present. If a cartridge is present,
the autoloader also reads the bar code label, if available. If you need to run an
additional inventory, you can do it manually.
To view the Ethernet information:
1 From the Main menu, scroll to Status, then press ENTER. The Status
submenu opens.
2 Scroll to Ethernet, then press ENTER. A list of messages appears. These
messages may include:
Field Description
MAC Address Indicates the unique network identifier associated with the
autoloader.
IP Address Indicates the static IP address or currently assigned dynamic IP
address. The text "DHCP" appears for a dynamic ID address.
Network Indicates whether the autoloader is connected to the network and at
what speed.
50

www.gateway.com
Data compression
No bar code labels can be read if there is
Important
a tape in the picker.
Data compression
To perform an inventory manually:
1 From the Main menu, scroll to Commands, then press ENTER. The
Commands submenu opens.
2 Scroll to Inventory, then press ENTER. The autoloader scans the bar codes
of all the cartridges present.
Compressing the data means that the tape drive can write more data to the
same amount of tape. Compression also increases the performance of the data
transfers from or to the SCSI bus. Data compression is drive dependent and
cannot be set from the front panel or On-board Remote Management. Your
backup application package may also have information on compression. The
front panel display indicates whether data compression is enabled or disabled.
51

CHAPTER 3: Operating your Autoloader www.gateway.com
52

CHAPTER 4
Managing and Monitoring your Autoloader
• On-board Remote Management overview
• Using the Configuration page
• Using the Updates page
• Using the Diagnostics page
• Using the Commands page
53

CHAPTER 4: Managing and Monitoring your Autoloader www.gateway.com
On-board Remote Management overview
Only use the Diagnostic command when
the autoloader is known to be idle and
unavailable to host backup/restore
applications. Use of the diagnostic
commands from On-board Remote
Management should not be issued while
the autoloader is being used by host
applications. The autoloader recognizes
when the drive or autoloader is executing
failures. A
resulting in a failed appli cation, such as a
host commands and responds
appropriately to prevent application
Diagnostic command being
issued between host application
commands may not be recognized
failed backup/restore job.
Your Gateway® E-824R or E-826R SuperLoader 3 includes an Ethernet interface
to permit remote administration of the autoloader. The interface, called
On-board Remote Management, includes a Web server that provides a
Hypertext Markup Language (HTML)-based graphic user interface (GUI) for ease
of use.
Many of the operations that you perform from the front panel you can also
perform remotely using On-board Remote Management. These functions
include moving tapes, accessing sequential operations, accessing system
operations options, accessing networking options, accessing security options,
running diagnostic tests, and performing system updates.
Important
Important
To log out of the system, you must close
your browser to end the session.
Opening On-board Remote Management
On-board Remote Management has an HTML interface, which means you use
a browser to open it. The following Web browsers are supported:
■ For Microsoft Windows—Microsoft Internet Explorer 5.5 or later
■ For Microsoft Windows 2003—Microsoft Internet Explorer 6.0 (with latest
security patches)
■ Netscape 7.0 or later
■ For Redhat
■ For Solaris — Mozilla 1.4 or later
■ Firefox™ 1.0
®
2.1—Mozilla™ 1.4 or later
When using the On-board Remote
Management page with Microsoft
Internet Explorer, be sure to enable the
Tools>Internet Options menu selection
Allow META REFRESH option.
On Internet Explorer version 6.0, this
feature is controlled through the
under the Security tab.
Viewing status information
54
Important
You need an operator password to access the Commands page, and you need
an administrator password to access the Configuration, Diagnostics, and
Updates pages (see “Default username and password” on page 55 for On-board
Remote Management or “Setting passwords” on page 33 for the front panel).
To open On-board Remote Management:
1 From your computer, open your Web browser.
2 In the browser's address field, enter the IP address for your autoloader (see
“Viewing Ethernet information” on page 50). The Home page appears in
your browser window.
Status information appears on the right-hand side of the Home page and on
every page of On-board Remote Management except the Updates page. The
status information is updated automatically every 10 seconds. You can also click
Refresh Status to get an immediate update of the system.

www.gateway.com
Using the Configuration page
The menu headings also appear at the top of every page. To access the
functionality under the menu heading, click the specific menu heading. The first
time that you connect, On-board Remote Management prompts you for your
username and password, then displays the opening page for that menu.
Default username and password
The default username for On-board Remote Management is guest. The default
password is guest.
The username and password are case sensitive and should be entered in all
lower case letters. The default username and password are valid if no usernames
have been configured.
Time display
The time displayed is either regular time or power-on time. Regular time is
Month/Date/Year time, such as Nov/21/2004 19:28. Power-on time is Power On
Cycles (POC)/Power On Hours (POH), such as POC:00121, POH:00002:07:45.
■ POC (5-digit number) is the number of times the system has booted since
it was manufactured.
■ POH is the number of hours, minutes, and seconds that the system has
been on since the current boot occurred.
Feedback on pages
If there is feedback from the system when you submit a request, the feedback
appears beneath the submit button. In some cases, you may have to scroll to
see the feedback information.
Using the Configuration page
The Configuration page includes a submenu on the left-hand side of the page.
You can set the system operations, networking, and security options from this
page.
System Operations options
The options listed under System Operations include SCSI ID, Mode,
Compression, Cleaning Tape, Magazines, and System Time.
SCSI ID
You can change the drive's SCSI ID from On-board Remote Management.
To change the SCSI ID:
1 From any page, click Configuration. The Configuration screen opens.
2 Under System Operations, select SCSI ID.
55

CHAPTER 4: Managing and Monitoring your Autoloader www.gateway.com
You must perform a system reset before
the new SCSI ID takes effect, or you can
use the front panel to power cycle your
You must perform a system reset before
the new mode takes effect, or you can use
the front panel to power cycle your
Important
autoloader.
Important
autoloader.
3 Click to select a number to assign for the new SCSI ID.
4 Click Submit.
Mode
You can set the autoloader Mode to either Random or Sequential. The default
Mode is Random. For additional information on Mode, see “Setting the Change
mode” on page 30.
To set the Mode:
1 From any page, click Configuration. The Configuration screen opens.
2 In the Mode section of the page, the current mode is marked. To change
the mode, select a different option. The Sequential Cycle check box is
ignored if Sequential mode is not selected.
3 Click Submit.
Compression
Compression cannot be changed from
Important
the front panel or On-board Remote
Management of the autoloader.
For the autoloader, data compression is drive-dependent. The front panel and
On-board Remote Management display whether or not compression is enabled.
Compressing the data means that the drive can write more data to the same
amount of tape. Compression also increases the performance of the data
transfers from or to the SCSI bus.
Compression is enabled or disabled in your 3rd party backup software (such as
Veritas, Yosemite, NetBackup, or Microsoft backup).
To view the compression setting:
■ From any page, click Configuration. The Configuration screen opens.
Under the Compression heading, the current compression setting is
shown as Compression Enabled or Compression Disabled.
Cleaning tape
To enable or disable the Auto Clean function, you must also designate a slot for
the cleaning tape cartridge. If a slot has not been designated, the box shows
None.
To designate the cleaning tape slot:
1 Load a cleaning tape into an empty slot using the Commands page.
2 Enable or disable Auto Clean by selecting the check box.
56

www.gateway.com
Using the Configuration page
To set Auto Clean:
1 From any page, click Configuration. The Configuration screen opens.
If Auto Clean is disabled, the cleaning
tape is automatically ejected through the
mailslot. Cleaning is managed by the
backup package you have installed
Important
instead.
2 Scroll to Cleaning Tape. If a check mark appears in the box next to Auto
Clean, the option is enabled. To disable Auto Clean, click the box to
remove the check mark.
- OR -
If no check mark appears in the box next to Auto Clean, the option is
disabled. To enable Auto Clean, click the box to enter a check mark.
3 Under Cleaning Tape Location, select the appropriate slot location where
you installed the cleaning tape. If Auto Clean is disabled, cleaning is
managed by the backup package you have installed instead.
4 Click Submit.
Setting the magazines
This setting is used to report the number of tape cartridges (storage elements)
and the element address to the SCSI host. This setting must match the physical
configuration in order for correct information to be reported. This setting only
affects the information reported to the SCSI host and does not affect the access
to magazine slots from the front panel or On-board Remote Management.
Those interfaces are based on the physical configuration.
When configured for both magazines, the autoloader always reports 16 tape
cartridges to the SCSI host. This allows the removal and reinstallation of
magazines without affecting what is reported to the host. When configured for
left or right, the autoloader always reports eight tape cartridges to the SCSI host.
The element addresses vary depending on which magazine is configured. If left
or right is selected, and both magazines are physically installed, the front panel
and On-board Remote Management lets you access the other magazine, but
the SCSI host does not have access to it.
To set the Magazines option:
1 From any page, click Configuration. The Configuration screen opens.
2 Scroll to Magazines. The Magazines options are shown. A check mark
appears after the currently enabled mode.
3 To leave the Magazines mode unchanged, press ESC.
- OR -
To change the Magazines configuration, scroll to the setting you want,
click the appropriate check box, then click Submit. These settings include
Both, Right, and Left.
The message “This will require a power cycle and ISV configuration
change. Enter To Continue” is displayed. To continue with the change,
press Submit. The message “Please power cycle the tape autoloader and
reconfigure the ISV app.” displays.
57

CHAPTER 4: Managing and Monitoring your Autoloader www.gateway.com
Setting the system time
The system time is displayed by On-board Remote Management and it is used
internally for logging events and errors (see “Setting the time” on page 29).
The time must be reset after each power up. The time can be reset automatically
if a time server is configured (see “Setting Ethernet” on page 26). Otherwise, the
time must be set manually from the front panel or through On-board Remote
Management. The time zone setting is not lost when powered off.
When setting the time zone from
On-board Remote Management, it
automatically corrects for daylight
savings time. From the front panel of the
autoloader, you have to correct for
daylight savings time manually.
Important
To set the system time:
1 Using the first list next to Time Zone, select the number of hours
difference between your local time and Greenwich Mean Time (GMT).
For example, if you live in Colorado, the time difference is - 6 hours during
Mountain Daylight Time (MDT) and - 7 hours during Mountain Standard
Time (MST).
2 Below the Time Zone field, select the current month from the list.
3 In the Day field, type the current day of the month.
4 In the Ye a r field, type the current year.
5 In the Hour box, type the current hour in 24-hour format.
6 In the Minute box, type the current minute.
7 Click Submit to save the information.
Setting network options
When you originally installed the autoloader, you set the Ethernet
configurations through the front LCD panel. However, you can modify them
through On-board Remote Management. The options include Current Network
Parameters, Set IP, and Set Network Configuration.
58
To view the Current Network Parameters:
1 From any page, click Configuration. The Configuration screen opens.
2 Click Networking. The Current Network Parameters area shows the
current IP address, MAC address, and the speed setting for the Ethernet
connection.
In the Set IP section, if a check mark appears in the box next to DHCP, the
dynamic IP address option is enabled. This means that with every reset of
the system, the IP address may change depending on the network
administrator's settings.
To set the IP address:
1 Click the box to remove the check mark from the DHCP field, if applicable.
2 In the IP address fields, type the static IP address using the TAB key to move
from box to box.

www.gateway.com
Setting security options
Using the Configuration page
3 To change the IP address from a static address to a dynamic address, click
the box next to DHCP.
To set the network configuration:
1 To change the values of the subnet mask, gateway, Simple Network
Management Protocol (SNMP) server, or the time server, type in the new
address, using the T
2 Click Submit.
AB key to move from box to box.
When you enable the security option, users must enter a password to access
the autoloader's front panel functionality (see “Default username and
password” on page 55). A password allows either administrator-level access or
operator-level access (see “Setting security” on page 32).
To set security:
1 From any page, click Configuration. The Configuration screen opens.
2 Click Security on the left side of the screen. The System Security section
of the screen displays.
3 To enable front panel security, click the box next to Front Panel Security
Enabled.
If the box is blank, the security option for the front LCD panel is not
enabled.
4 Click Submit.
To reset the front panel password:
1 From any page, click Configuration. The Configuration screen opens.
2 Click Security on the left side of the screen. The System Security section
of the screen displays.
3 Click the box next to Reset Front Panel Password. A check mark appears.
4 Click Submit.
To set User Administration:
1 From any page, click Configuration, then press ENTER. The Configuration
submenu opens.
2 Click Security on the left side of the screen. The System Security section
of the screen displays.
59

CHAPTER 4: Managing and Monitoring your Autoloader www.gateway.com
To view the list of currently defined users,
click Su bmit with Select User Type.
Important
3 From the list next to Select User Type, select Operator 1, Operator 2,
Administrator 1, or Administrator 2.
4 In the Username field, type a user name.
5 In the Password field, enter the new password.
6 In the Verify Password field, re-enter the same new password.
7 Click Submit.
Client Authorization Control
Client Authorization Control lets list IP addresses that are authorized to perform
functions on the autoloader using On-board Remote Management.
To set the Client Authorization Control:
1 From any page, click Configuration. The Configuration screen opens.
2 Click Security on the left side of the screen.
3 Scroll to Client Authorization Control. In this section is a list of the IP
addresses that are authorized to perform functions using On-board
Remote Management for this specific autoloader. There are two sets of IP
address boxes. You can individually enable, disable, and configure each
set.
■ If enabled, each set can be used to specify either a range of IP
addresses or a pair of specific IP addresses that are allowed to
administer this autoloader. A set can also be used to specify a single
IP address if the desired IP address is entered into both the “a” and
“b” portions of the set. When a set is used to specify a range of IP
addresses, the “b” portion of each address set must be greater than
or equal to the “a” portion of that address set.
■ If neither set is enabled, any IP client can administer the autoloader.
If a single set is enabled, only clients that pass the test specified by
that set are allowed administrator access. If both sets are enabled,
any client that passes either of the two filter tests can administer
the autoloader.
The Web server always allows any client to view the status information of
the autoloader, regardless of the authorized client list or the overlap
control policy.
4 Click the box to select Enable or Disabled.
5 Type the IP addresses in the appropriate boxes.
6 Click Submit to save.
60

www.gateway.com
Using the Updates page
Client overlap control
Client Overlap Control is a management policy on controlling how the Web
server handles overlapping control requests from multiple clients on the
authorized client list. The options include No Locking, Full Locking, and
Time-Based Locking.
■ No Locking—allows multiple clients to have unrestricted access to
control the system as long as they are on the authorized client list.
■ Full Locking—permits only one authorized client to issue control
requests at a time. This client must release the lock by clicking the Home
option in the upper frame of the page to permit other authorized clients
to have control access.
■ Time-Based Locking—is similar to Full Locking in that only one
authorized client can have control access at once, but the lock is
automatically released after the specified number of seconds of inactivity
have elapsed.
■ Home—is used to release a full or time-based lock and permit another
user to access the system
To set the client overlap control:
Locking is only available to users on the
authorized client list.
1 From any page, click Configuration. The Configuration screen opens.
Important
Important
To log out of the system, you must close
your browser to end the session.
2 Click Security on the left side of the screen.
Caution
By entering an incorrect range of IP
addresses, a user could possibly lock out
all IP clients from administering the
autoloader. If this occurs, you can restore
the default values by running Restore
Default from the front panel
Configuration Menu.
3 Select a security option from the Client Overlap Control options.
4 Click Submit.
Using the Updates page
A Microsoft issue can keep a user from
updating drive or loader firmware over
the On-board Remote Management
interface. This can occur under Windows
Server 2003 with Service Pack 1 (SP1), or
if a user has installed Microsoft Security
Update MS05-019. This problem appears
with a 6F Communication Error message
on the front panel with the warning light
on. On-board Remote Management
continues to report the autoloader status
Microsoft has described a workaround
for this problem in their product with
Technical Support Article 898060
(http://support.microsoft.com/default.as
px?scid=898060). If this problem occurs,
the autoloader should be restarted to
avoid further communication errors.
Important
as Initialization.
You can browse to find system updates, then upload the updates. Updates are
available at support.gateway.com
system.
To get system updates:
1 From any page, click Updates. The Firmware Update screen opens.
2 Click Browse to navigate to the host system for the update file. The file
should end in an .img extension.
3 Click Upload. A confirmation box opens.
4 Click OK. The autoloader automatically uploads the new code and
processes it to the system.
for download to the hard drive on the host
61

CHAPTER 4: Managing and Monitoring your Autoloader www.gateway.com
Using the Diagnostics page
From the Diagnostics page, you can run various tests on the autoloader. You can
also view error and history logs, test progress, identify the autoloader in a rack,
or reset the system.
Running diagnostic tests
The diagnostic tests available on the autoloader include:
■ Loader—Self Test
■ Loader—Health Check
■ Loader—Picker Test
■ Loader—Magazine Test
■ Loader—Inventory Test
Viewing Error or History logs
To view error or history logs:
Diagnostics
1 From any page, click Diagnostics. The Diagnostics screen opens.
2 Under View Error and History Logs, click View Logs.
You can also save the logs to a file by clicking Save Logs. If you save the
logs to a file, you must select a destination folder within 60 seconds.
■ View Logs lets you view a summary of the hardware, software, and
update logs for the autoloader.
■ Save Logs saves detailed log information to a file for the
autoloader. On some browsers, after saving logs, it may be
necessary to click Home to continue using the On-board Remote
Management function.
To view the various diagnostic options:
1 From any page, click Diagnostics. The Diagnostics screen opens.
2 Select the diagnostic test that you want to run from the Tes t menu.
3 Specify a loop count, if desired.
4 Click Start Test. To halt a test in progress, click Stop Test.
62
5 To view the status of the test while the test is running, click View
Diagnostic Test Progress, then click View Status. A separate screen
indicates which test is running and the current status of the diagnostic
test.
6 To refresh the status information, click View Diagnostic Test Progress,
then click View Status again.

www.gateway.com
Identification
Performing a System Reset
Using the Commands page
You can use the Identification feature of the autoloader by requesting the LCD
backlight to flash for a specified number of seconds. This can be helpful in
identifying the location of the autoloader in an equipment room.
To use the identification feature:
1 From any page, click Diagnostics. The Diagnostics screen opens.
2 Under Identification, type the number of seconds in the Time (secs) field.
3 Click Identify. The LCD backlight flashes on the autoloader for the
specified number of seconds.
You use System Reset when making SCSI ID changes, mode changes, magazine
changes, and IP address changes. A system reset takes at least three minutes if
there is a tape in the drive, or approximately 30 seconds otherwise.
To perform a system reset:
1 From any page, click Diagnostics. The Diagnostics screen opens.
2 Under the System Reset section, click System Reset.
Using the Commands page
You can move tapes, run a system inventory, reset the picker to its home
position, or perform sequential operations from the Commands page. You can
also request that a tape be moved from one position to another from a remote
location.
To move a tape:
1 From any page, click Commands. The Commands screen opens.
2 From the Moving Tapes section of the page, click the menu under From:
and select the current location of the tape that you want to move.
You can also click the slot on the graphic
of the autoloader magazine to select and
Tips & Tricks
move a cartridge.
3 From the menu under To :, select the location to which you want to move
the tape, then click Submit.
63

CHAPTER 4: Managing and Monitoring your Autoloader www.gateway.com
Inventory
The autoloader automatically runs an inventory whenever you power it on or
insert a magazine. If you need to run an inventory in addition to this, you can
use On-board Remote Management to do it remotely.
To run an inventory:
1 From any page, click Commands. The Commands screen opens.
2 Click Inventory. The autoloader immediately starts an inventory.
Set to Home
If the autoloader is not able to successfully execute a Moving Tapes or an
Inventory command, try executing a Set to Home command, then retry the
move or inventory command again.
The Set to Home command resets the autoloader from an unexpected internal
condition.
Sequential operations
To use the Set to Home command:
1 From any page, click Commands. The Commands screen opens.
2 Click Set to Home. This executes a reset command to the autoloader.
The Sequential Operations mode supports certain backup applications that do
not manage media. The loader must be in Sequential mode, selected from the
Configuration page, to use Sequential Operations. During backup, when one
cartridge is read or written to the end of the tape, the autoloader automatically
returns that cartridge to its designated slot and loads the cartridge from the
next higher numbered slot to the tape drive to be read or written to. This
continues until the backup software stops accessing the drive or until all the
cartridges have been sequentially accessed. The autoloader does not move the
media until the host requests the tape drive to unload.
To use the Sequential Operations mode:
1 From any page, click Commands. The Commands screen opens.
2 Scroll to Sequential Operations, then click Start. This moves the first
available cartridge from the storage slot to the drive.
You mu st pe rf orm a Start or Resume
Important
command to load a cartridge into the
tape drive before starting a host backup.
64
■ To stop Sequential Operations, click Stop. This removes the
cartridge from the drive and places it back into the cartridge's
previous storage slot.
■ To resume Sequential Operations, click Resume. This moves the
next cartridge to the tape drive.

CHAPTER 5
Troubleshooting your Autoloader
•Overview
• Safety guidelines
• Understanding POST
• Running diagnostic tests from the front panel
• Running diagnostic tests remotely
• Checking for errors
• Before contacting Gateway Customer Care
• Telephone support
• Returning the autoloader for service
65

CHAPTER 5: Troubleshooting your Autoloader www.gateway.com
Overview
This chapter describes various troubleshooting and diagnostic tools available
for use with the autoloader.
Only use the Diagnostics Commands
when the autoloader is known to be idle
and unavailable to host backup/restore
applications. Use of the Diagnostic
Commands from On-board Remote
Management should not be issued while
the autoloader is being used by host
applications. The autoloader recognizes
when the drive or autoloader are
executing host commands and responds
appropriately to prevent application
failures. A Diagnostic command being
issued between host application
commands may not be recognized
appropriately, resulting in a failed
application, such as a failed
Caution
backup/restore job.
Safety guidelines
To avoid bodily injury, do not attempt to
troubleshoot your autoloader problem if:
- Power cords or plugs are damaged
- Liquid has been spilled into your server
- Your autoloader was dropped
Instead, unplug your autoloader and
contact a qualified computer technician.
If your autoloader was damaged during
- The case was damaged
shipment from Gateway, contact
Gateway Customer Care.
Warnin g
The Power On Self Test (POST) and diagnostic tests are helpful tools for testing
the autoloader’s functionality and for troubleshooting errors. With the results
from the POST and diagnostic tests, you can determine how well the autoloader
is working and locate any problems.
The diagnostics section describes the POST and its various tests. This section
also explains how to perform diagnostic tests from the front panel and
On-board Remote Management.
While troubleshooting your autoloader, follow these safety guidelines:
■ Never remove a magazine while your autoloader is accessing data or
backing up files.
■ Make sure that you are grounded correctly before working on the
autoloader.
Understanding POST
Every time you turn on the autoloader, the POST checks all of the autoloader’s
basic components. If you experience problems with the autoloader, the POST
is a good method to determine if any major parts are malfunctioning.
66
POST Test Description
MICROP Tests the microprocessor’s general-purpose registers.
IRAM Tests the microprocessor’s internal RAM.
Addr Lines Bit walks the SRAM address lines.
SRAM Tests the 512 k SRAM.
Code Chksum Verifies the Flash image checksum.
EERom Checks the EERom area and verifies the checksums.

www.gateway.com
Performing a POST
Running diagnostic tests from the front panel
POST Test Description
PLL Clock Tests that the microprocessor’s PLL is synchronized correctly.
LCD Verifies that the LCD is present and working correctly.
Ethernet Configures and verifies communication with the Ethernet chip.
Barcode Verifies that the bar code reader is present and performs a hardware
handshake.
Temperature Sense Passes/Fails the MDM and configures the AHIM temperature
sensors.
MDM Verifies that the MDM is present and checks the sensors.
Fan Verifies that the fan is operating correctly.
If you experience errors while operating your autoloader, you may need to
reboot the autoloader to perform a POST.
Whenever you power cycle the
autoloader, allow 10 seconds before
turning the power back on. The power
supply requires at least two to three
seconds for the capacitors to discharge.
This ensures a complete system reset on
power down and may avoid system
Caution
errors.
To reboot the autoloader:
1 Hold down the power button until “System Shutdown Please Wait...”
appears.
2 Release the power button. The autoloader turns off.
3 Wait 10 seconds, then press the power button again to turn the autoloader
on. POST runs automatically.
Interpreting the POST results
While the POST is running, a progress indicator showing the name of the test
displays on the front panel. If the autoloader is working correctly, the message
“System Ready” and the current configuration display after the POST completes
successfully.
If the autoloader is not working correctly, error messages appear on the front
panel (see “Checking for errors” on page 70).
Running diagnostic tests from the front panel
On-board Remote Management lets you
request all diagnostic tests, but any tests
that require a cartridge to be inserted
times-out unless you manually insert the
cartridge at the appropriate time.
Important
Diagnostic tests let you calibrate parts of the autoloader, check the condition
of parts, or test the autoloader’s functionality. From the front panel, you can
perform all of the diagnostic tests. Because certain tests require you to manually
insert a cartridge, you can perform only some of the diagnostic tests using
On-board Remote Management (see “Running diagnostic tests remotely” on
page 70)
.
67

CHAPTER 5: Troubleshooting your Autoloader www.gateway.com
Setting the security
When you enable the security function, the diagnostic tests are password
protected to ensure data integrity. To access any of the diagnostic tests, you
must first enter an Administrator password. If you do not enter the password,
you are prompted to enter the password when you attempt to perform a
diagnostic test.
To enter an Administrator Password:
1 From the Main menu, scroll to Commands, then press ENTER. The
Commands submenu opens.
2 Scroll to Enter Password, then press ENTER. The Enter Password submenu
opens.
3 Scroll to Administrator, then press ENTER. The Login screen opens with a
row of asterisks. A text box appears above the first asterisk.
4 In the textbox, scroll to the first number of the password, then press ENTER.
The text box above the asterisk disappears and another text box appears
above the next asterisk.
5 Repeat Step 4 to enter the remaining numbers of your password.
Press ESC to backspace to a previous text
Tips & Tricks
box, if necessary.
Stopping a diagnostic test
When you have finished entering your password, “Submit Password”
appears on the LCD below the asterisks.
6 Press ENTER to submit your password. The display returns to the Enter
Password submenu.
At times you may need to stop a diagnostic test while it is in progress. Certain
diagnostic tests even require you to stop them or they run continuously. To stop
a diagnostic test while it is running, use the Halt Test function. When you select
Halt Test, any picker or magazine functions complete, then the diagnostic test
is stopped.
To perform a Halt Test from the front panel:
1 While the diagnostic test is running, press ESC. The Diagnostics submenu
opens.
2 Scroll to Halt Test, then press ENTER. “User Abort” appears.
3 Press ENTER to return to the Diagnostics submenu. Refer to On-board
Remote Management for any test results.
68
To perform a Halt Test from On-board Remote Management:
1 Select Halt Test from the Diagnostics submenu, then click Submit.
2 Select View Status to see the results of the command. “Test Stopped”
appears, along with any text results.

www.gateway.com
Front panel diagnostic tests
Running diagnostic tests from the front panel
You can perform the following diagnostic tests using the front panel:
■ Halt Test
■ Loader—Self Test
■ Loader—Health Check
■ Loader—Picker Test
■ Loader—Magazine Test
■ Loader—Inventory Test
To perform any of the front panel diagnostic tests:
1 From the Main menu, scroll to Diagnostics, then press ENTER. The
Diagnostics submenu opens.
2 Scroll to the test that you want to run, then press ENTER. If you are already
logged in as Administrator, the test begins executing immediately.
- OR -
If you are not logged in, you are asked to enter the Administrator
password. Do the following:
a From the front panel, enter the administrator password by using
the up and down arrows to select each digit, then press ENTER to
move to the next digit. To move to the previous digit, press E
b When you have entered the entire six-digit password, you are asked
to press E
NTER one more time to submit the password. If the
SC.
password is incorrect, you are asked to re-enter it using the same
procedure. Otherwise, you are returned to the Diagnostics
submenu. Press E
3 The message “Running Test” appears while the test is running. To stop the
NTER to run the desired test.
test, see “Stopping a diagnostic test” on page 68.
The “Loader—Health Check” test displays an ongoing progress indicator
while executing. When the test is finished, either the message “Test
Successful” appears or the message “Test Failed” and an error code
appear.
4 If the test is successful, press ENTER to return to the Diagnostics test menu.
For detailed results of a test, use On-board Remote Management to
retrieve the diagnostic test status (see “Diagnostics using On-board
Remote Management” on page 70).
- OR -
If the test is not successful, use the error code to evaluate the problem.
(See the table of error codes on page 72.)
69

CHAPTER 5: Troubleshooting your Autoloader www.gateway.com
Running diagnostic tests remotely
You can perform the following diagnostic tests from On-board Remote
Management:
On-board Remote Management lets you
request all diagnostic tests, but any tests
that require a cartridge to be inserted
times-out unless you manually insert the
cartridge at the appropriate time.
Important
■ Loader—Self Test
■ Loader—Health Check
■ Loader—Picker Test
■ Loader—Magazine Test
■ Loader—Inventory Test
Diagnostics using On-board Remote Management
Many tests can be run using On-board Remote Management.
To perform On-board Remote Management diagnostic tests:
1 Open a Web browser and connect to the autoloader (see “Setting the IP
address” on page 26). The On-board Remote Management Main menu
appears.
2 Click the Diagnostics heading. A login window appears.
3 Type an Administrator user name and a password, then click ENTER. The
Diagnostics submenu appears.
4 Select the test you want to perform from the Diagnostics menu, then click
Start Test. To halt a test in progress, click Stop Test.
Checking for errors
The selected diagnostic test runs. While the test is running, you can view
the status of the test. To view the status, from the View Diagnostic Test
Progress, click View Status.
Errors prevent the autoloader from completing a specific action. When an error
occurs, two things can happen:
■ No error message appears, but the autoloader fails to complete the action.
■ An error message appears on the front panel or in the On-board Remote
Management screen (see “Hard error log display” on page 74).
When either of these things occur, the system generates a log of the error. You
can use these error logs to determine the type of error, when it occurred, and
what parts of the autoloader it affects. The error logs also describe what you
must do to fix the error, or which parts of the autoloader need to be repaired
or replaced.
Different types of error logs are generated for the autoloader and the tape drive.
70

www.gateway.com
Checking for errors
■ Autoloader error logs provide information if the errors relate to data
cartridge movement.
■ Tape drive error logs provide information if the errors relate to the tape
drive's read/write performance.
Is there an error?
Yes
Check Application
logs
Is the problem related to the motion of
cartridges within the autoloader?
Yes
No
No
No corrective
action required
Is the problem related to the operation of
the tape drive?
Ye s
While there are other types of logs
Important
besides error logs, the other types of logs
will not help you troubleshoot errors.
Instead, they provide you with basic
information (see “Basic information logs”
on page 88).
Check autoloader
logs
Check tape
drive logs
The autoloader generates four types of logs. For troubleshooting errors, you will
only use one type, Hard Error logs. The screen displays the error message and
the Hard Error logs record all hard error events.
71

CHAPTER 5: Troubleshooting your Autoloader www.gateway.com
To troubleshoot hard errors, you may
need to power cycle, repair, or replace the
Important
autoloader.
The following table lists the error messages that are displayed on the LCD and
the error code.
Screen Display Error Code
Command Started 20
System Failure 21
System Busy 22
Timeout Error 23
Software Error 24
Hardware Error 25
Invalid Element 29
Invalid Element Status 2A
Elem Table Bad 2B
POST Fail 30
System Error 31
User Abort 36
Limits Failed 39
Drive Error 3A
Drive Reported a Hardware Error 3B
Drive Requires Cleaning 3C
Drive Error 3D
Drive Load Error 3E
Drive Unload Err 3F
Media Thread Err 40
Media UnThrd Err 41
Media MAM/Info Err 42
Invalid Media 43
Expired Media 44
Unknown Media 45
72
Code Chksum 47
Hardware Error 48
System Offline 49

www.gateway.com
Checking for errors
Screen Display Error Code
System Locked 4A
Insert Magazine or Blank 4B
Operating Temp Exceeded 4C
Drv Init Err 60
Drive Logging In 61
Drive Logout Err 62
Drive Cmd Failed 63
Drive Cmd Timeout 64
Drive Cmd Abort 65
Rejected Command 66
Drive Not Ready 67
Drive Comm Err 6D
Drv Comm Failure 6E
Communication Error 6F
Drive must be empty 72
Loader File too large 73
Flash Erase Fail 74
Flash Program Fail 75
Unknown Section 76
Update Timeout 78
Loader File Bad 7C
Bad Flash Type 7D
Not Calibrated A4
No Source Tape A5
No Magazine A6
Mail Slot Full A7
Destination Full A8
Picker Full A9
Dropped Tape BD
Missed Tape BE
73

CHAPTER 5: Troubleshooting your Autoloader www.gateway.com
Screen Display Error Code
Jammed Tape BF
Jammed Tape DF
Time Zone change E8
By barcode F7
Write Protect FA
Cleaning Tape FB
Load Tape FC
Invalid Tape Format FD
Hard error log display
You can retrieve Hard Error logs through On-board Remote Management. Partial
information about Hard Error logs can be retrieved from the front panel and
SCSI. The front panel and SCSI display only the most important information for
each log.
Whenever the autoloader generates a Hard Error log, the On-board Remote
Management automatically displays the log information. For the other retrieval
methods, you must request the information.
Hard Error logs contain three main fields. By interpreting the information in
these fields, you can determine how to troubleshoot errors.
To retrieve Hard Error log information from the front panel:
1 From the front panel LCD, scroll to Diagnostics, then press ENTER. The
Diagnostics submenu opens.
2 Scroll to Error Logs, then press ENTER. The Error Log submenu opens.
3 Scroll to Hard, then press ENTER. The log information is displayed.
To retrieve Hard Error log information from On-board Remote Management:
1 From any screen, click Diagnostics. The Diagnostics screen opens.
2 Click View Logs.
3 If you want to save logs to your hard drive, click Save Logs. If you save a
log to a file, you must select a destination folder within 60 seconds.
74

www.gateway.com
Checking for errors
These errors appear on the LCD screen.
Field Description
Time Stamp The time the event occurred. This field helps
correlate the event with a possible
application interruption. If the autoloader is
unable to acquire the correct time/date from
the SNTP time server, or the front panel, the
time stamp contains values indicating the
power cycle number and the time an entry
was written relative to that power cycle,
listed as Power On Hours (POH).
The autoloader has no internal real-time
clock and requires the user to set the time of
day from the front panel or the network
interface (SNTP).
Error Code The type of error and action to which the
event is related. This field helps identify what
caused the event to occur.
Context The event’s software register information.
Error code field description
Error codes appear as 8-character strings made up of either letters or numbers
for a total of 32 bits. The following table shows the block descriptor for the Hard
Error log codes.
Bit Description
0–3 Error Location
4–7 Error Location
8–11 Error Location
12–15 Error Location
16–19 Error Type
20–23 Error Type
24–27 Task ID
28–29 Task ID
30–31 Recovery Action
75

CHAPTER 5: Troubleshooting your Autoloader www.gateway.com
Error code field descriptions
Field Description
Recovery Action Defines what the autoloader does, based on the event that occurred.
■
If the value is 0, the autoloader will continue operations because this is
typically a soft, recoverable event, or an event that is just recording an
action.
■
If t he val ue is o ther th an 0, t hen yo u must reboot the au toloa der in o rder
to recover from the event. The reboot happens automatically.
Task ID: Defines what firmware task was being performed at the time of the event. This ID is presented
in Hex format.
00 System Timer
01 Loader Manager
02 Picker
03 Magazine Left
04 Magazine Right
07 Drive Manager
08 Bar Code Reader
09 Front Panel
0A IP
0B Diagnostic
0C Error
0D Code Update
0E ADI
0F Drive Manager Timer
11 HTTP
12 SNTP
13 SCSI
14 SPI
20 Idle
3E Watch Dog
3F Un-handle Interrupt
Error: Defines the type of error or event that did occur. Follow the suggested actions to troubleshoot each
type of error.
Software Location ID: Defines a location in the firmware internal to the task being performed. This
ID is used by firmware engineering to identify what part of the actual firmware task detected the event.
76

www.gateway.com
Checking for errors
Error code number, description, and suggested action
Error Description Suggested Actions
00–25 General Software flags Check for a Hard Error log. If an error appears in the Hard Error
log, power cycle the autoloader and run the Loader—Health
Check test.
Check our Web site for firmware updates.
If all previous steps fail, contact Customer Care.
26 Message Send ID error Check the SCSI bus cables and terminators.
Check the host adapter.
Power cycle the autoloader. Repeat checks after power cycle.
If all previous steps fail, contact Customer Care.
27 Message Bad Check the SCSI bus cables and terminators.
Check the host adapter.
If all previous steps fail, contact Customer Care.
28 Message parameter Bad Check the host device driver.
Check the host application.
Check the SCSI bus cables and terminators.
Check the host adapter.
Power cycle the autoloader. Repeat checks after power cycle.
If all previous steps fail, contact Customer Care.
29 Invalid Element Check the host device driver.
Check the host application.
Power cycle the autoloader. Repeat checks after power cycle.
If all previous steps fail, contact Customer Care.
2A Invalid Element Status Check the host device driver.
Check the host application.
Power cycle the autoloader. Repeat checks after power cycle.
If all previous steps fail, contact Customer Care.
2B–2F Firmware tables and stacks invalid Check for a Hard Error log. If an error appears in the Hard Error
log, power cycle the autoloader and run the Loader—Health
Check test.
Check our Web site for firmware updates.
30 POST Failure Make sure that the magazines are fully seated.
Power cycle.
If all previous steps fail, contact Customer Care.
31–38 System Monitoring type events Check for a Hard Error log. If an error appears in the Hard Error
log, power cycle the autoloader and run the Loader—Health
Check test.
Check our Web site for firmware updates.
If all previous steps fail, contact Customer Care.
3A Drive Error Check the Drive Log Sense for Drive errors. If the drive is still
logging errors, contact customer support.
If the drive is logging try a different piece of media.
If the drive fails with two different pieces of media, contact
Customer Care.
77

CHAPTER 5: Troubleshooting your Autoloader www.gateway.com
Error Description Suggested Actions
3B Drive Hardware Error Power cycle the autoloader, then check the Drive Log Sense for
drive errors. If the drive still reports a hardware error, contact
Customer Care.
3C Drive Needs Cleaning Install a cleaning tape into the autoloader. On the Configuration
page, Cleaning Tape, set “Auto Clean” to Enabled. The
autoloader automatically cleans the drive.
3D Drive Error Check the Drive Log Sense for Drive errors. If the drive is still
logging errors, contact Customer Care.
If the drive is logging try a different piece of media.
If the drive fails with two different pieces of media, contact
Customer Care.
3E Load Error Make sure that the cartridge does not have labels or other
matter anywhere on the cartridge except where labels are
expected to be placed.
Try to load a different piece of media.
If multiple pieces of media fail, contact Customer Care.
3F Unload Error Make sure that the cartridge does not have labels or other
matter anywhere on the cartridge except where labels are
expected to be placed.
Try to load a different piece of media.
If multiple pieces of media fail, contact Customer Care.
49 Offline No action required.
4A Door Locked No action required.
4B Open Front Install the magazine or magazine blank.
Replace the magazine or magazine blank (try a second one if
possible).
If all previous steps fail, contact Customer Care.
4C Over Temp Make sure that the temperature of the autoloader inlet air is
within specifications.
Clear debris from any opening of the autoloader, both in front
and in the back.
Make sure that the fan is working. If the fan is bad, contact
Customer Care.
60–69 Internal communications events Power cycle.
If the previous step fails, contact Customer Care
A0–A4 Picker Servo Errors Run the Loader–Health Check test.
If repeated events appear in the Hard Errors log, power cycle the
autoloader. Repeat test after power cycle.
If all previous steps fail, contact Customer Care.
78

www.gateway.com
Checking for errors
Error Description Suggested Actions
A5 Source Element Empty Make sure that the expected source has a cartridge.
Run the Loader–Health Check test.
If the source is a magazine, replace the cartridge in that slot with
a different cartridge and try again. If error continues, replace the
magazine.
If the source is the tape drive, make sure that the tape drive has
a cartridge and it was ejected.
Power cycle the autoloader.
If the error continues, contact Customer Care
A6 Source Magazine Missing Make sure that the magazine is installed correctly into the
autoloader.
Remove and reinsert the magazine again.
Try a second magazine, if possible.
Power cycle the autoloader.
If the error continues, contact Customer Care
A7 Mailslot full Make sure that the magazine is installed correctly in the
autoloader.
Remove and reinsert the magazine again.
Try a second magazine, if possible.
Power cycle the autoloader.
If all previous steps fail, contact Customer Care.
A8 Destination Element Full Make sure the expected destination does not have a cartridge.
Run the Loader–Health Check test.
If the destination is a magazine, install and remove a cartridge
from the selected slot and try again. If error continues, replace
the magazine.
If the destination is the tape drive, make sure that the tape drive
does not have a cartridge.
Power cycle the autoloader.
If the error continues, contact customer support.
If the cartridge is in the mailslot opening, remove it.
Make sure that the mailslot is fully closed.
Make sure that there is no debris in the mailslot opening.
A9 Picker Full This means that the move cannot be executed because the
picker already contains a tape.
Look in the front of the autoloader and confirm that the picker
is full.
Run the Loader–Health Check test.
If all previous steps fail, contact Customer Care.
AA Picker Cartridge Sensor Error This means that the system has detected a possible problem
with the cartridge present sensor inside the picker (turntable).
Look in the front of the autoloader and confirm that the picker
is full.
Run the Loader–Health Check test.
If all previous steps fail, contact Customer Care.
AB Drive Path Sensor Error Run the Loader–Health Check test.
Power cycle the autoloader.
If all previous steps fail, contact Customer Care.
79

CHAPTER 5: Troubleshooting your Autoloader www.gateway.com
Error Description Suggested Actions
AC Mail Slot Door Sensor Error Insert a cartridge into the autoloader through the mailslot.
Power cycle the autoloader.
If all previous steps fail, contact Customer Care.
AD Mail Slot Solenoid Error Insert a cartridge into the autoloader through the mailslot.
Power cycle the autoloader.
If all previous steps fail, contact Customer Care.
AE Unknown Servo Error Run the Loader–Health Check test.
If the previous step fails, contact Customer Care.
AF Error Log Information Event No action required.
B0–BF Error Events related to the picker not
rotating or translating correctly
C0 Unknown Motor Error Run the Loader–Health Check test.
D0 Magazine Solenoid Bad Check the Task ID in the Hard Error log to determine if the
D1 Magazine Present Sensor Bad Check the Task ID in the Hard Error log to determine if the
D2–D4 Position Sensor Bad Check the Task ID in the Hard Error log to determine if the
Run the Loader–Health Check test.
Power cycle the autoloader.
If all previous steps fail, contact Customer Care.
Power cycle the autoloader.
If all previous steps fail, contact Customer Care.
problem is the right or the left magazine.
Remove and reinsert the magazine. Make sure that the
magazine slides freely, and clicks and locks into place.
Power cycle the autoloader.
Try a different magazine.
If all previous steps fail, contact Customer Care.
problem is the right or the left magazine.
Remove and reinsert the magazine.
Power cycle the autoloader.
Make sure that the sensor is not blocked by debris.
If all previous steps fail, contact Customer Care.
problem is the right or the left magazine.
Remove and reinsert the magazine.
Try a different magazine, if possible.
Power cycle the autoloader.
If all previous steps fail, contact Customer Care
80
D5–DE Cartridge flags located on the magazine
may be bad or the sensor to detect the
flags may have a problem.
DF Jammed Cartridge Check the Task ID in the Hard Error log to determine if the
Check the Task ID in the Hard Error log to determine if the
problem is the right or the left magazine.
Remove and reinsert the magazine.
Try a different magazine, if possible.
Make sure that the sensor is not blocked by debris.
Power cycle the autoloader.
If all previous steps fail, contact Customer Care.
problem is the right or the left magazine.
Power cycle the autoloader.
If all previous steps fail, contact Customer Care.

www.gateway.com
Before contacting Gateway Customer Care
Before contacting Gateway Customer Care
If you have a technical problem with your autoloader, follow these
recommendations before contacting Gateway Customer Care:
■ Make sure that your autoloader is connected correctly to a grounded
AC outlet that is supplying power.
■ If you have recently installed new hardware, make sure that you have
installed it following the instructions provided with it. If you did not
purchase the hardware from Gateway, see the manufacturer’s
documentation and technical support resources.
■ See “Running diagnostic tests from the front panel” on page 67.
■ Have your client ID, serial number (located on the back of your
autoloader case), and order number available, along with a
detailed description of your issue, including the exact text of any
error messages, and the steps you have taken.
■ Make sure that your autoloader is nearby at the time of your call.
The technician may have you follow appropriate troubleshooting
steps.
■ Consider using Gateway’s Internet Customer Care. Gateway’s Web
site has FAQs, tips, and other technical help. You can also use the
Web site to e-mail Customer Care. For more information, visit
Gateway’s Customer Care Web site at support.gateway.com
.
Errors that you may experience with your autoloader can range from severe
hardware damage to simple connection problems. Before you return your
autoloader, you may be able to fix the problem yourself by following some basic
troubleshooting procedures.
Other than drive cleaning, there is no recommended routine maintenance of
the autoloader.
The front LCD provides some troubleshooting capabilities, but is limited.
On-board Remote Management provides more detailed information about the
present state of the autoloader and past performance, and is more helpful for
troubleshooting errors.
The following table describes the probable causes and suggested actions for
problems that you may encounter.
Problem Suggested Action
The front panel does not display
information.
The user starts a code update from the
front panel without inserting a tape.
The autoloader does not respond on the
front panel SCSI bus or Ethernet. Bug
checks appear immediately after loading
a new version of firmware.
The connection to the LCD has failed.
Use On-board Remote Management to troubleshoot error.
Power cycle the autoloader.
The firmware is corrupted.
Reload the firmware.
The autoloader does not turn on. The power cable or source is malfunctioning, or the autoloader is
incorrectly configured.
Check all outlets and power cables for correct connection.
Contact Customer Care.
81

CHAPTER 5: Troubleshooting your Autoloader www.gateway.com
Problem Suggested Action
■
The front panel and light indicators do
not turn on.
The front panel does not display
information, but light indicators above
the front panel are turned on.
The autoloader does not communicate
with the host system through the SCSI
bus.
Make sure that the autoloader is plugged in.
■
Make sure that the power switch on the back is turned on.
■
Make sure that the drive carrier assembly is locked into the autoloader
chassis with the four screws supplied.
■
Contact Customer Care
■
Connect to the autoloader, using On-board Remote Management with
an Ethernet connection and issue a System Reset from the Diagnostics
page.
■
Make sure that the drive carrier assembly is locked into the autoloader
chassis with the four screws supplied.
■
On the front panel, press and hold the power switch for 15 seconds,
then turn the rear power switch off. Wait 60 seconds and turn the rear
power switch back on.
■
Contact Customer Care.
■
Make sure that the SCSI cables are connected to the rear of the
autoloader and that the correct LVD host controller card is installed.
■
Make sure that the SCSI cables are not damaged or crimped and the
total SCSI cable length does not exceed the maximum required length.
■
Make sure that a LVD SCSI terminator is attached to both the first and
last SCSI device on the SCSI bus.
■
Make sure that the autoloader SCSI ID is set to a unique SCSI ID that
is not used by any other SCSI device on the same SCSI bus.
■
Issue a System Reset either by using the On-board Remote
Management Diagnostic page or by turning off power from the front
panel.
■
Contact Customer Care.
The tape drive responds on the SCSI bus
to the host, but the autoloader does not
respond.
The autoloader does not communicate
with the host system through the
Ethernet.
The application software reports a failure
locating a piece of media or fails to move
a piece of media as requested.
The applicatio n software reports an error
while reading or writing a piece of
media.
■
Make sure that the autoloader LUN is set to 1. On the front panel,
select Status, Drive, then select Status.
■
Go to the Configuration menu and make sure that the mode is set to
Random.
■
If the SCSI ID is unique, check SCSI cables and terminators.
■
Make sure that the host application and the device drivers are
installed with the most current patches to support the autoloader.
■
Make sure that the Ethernet cable is connected to the correct hub.
■
Check the Ethernet configuration settings through the front panel
LCD. If the DHCP server is available, Ethernet status should indicate
DHCP, other wise, you must set a unique IP address and a subnet mask.
■
Power off the autoloader by turning off the system from the front
panel LCD and turning it back on.
■
Contact Customer Care.
■
Use the On-board Remote Management tool and make sure that the
media is in the expected location internal to the autoloader.
■
Using On-board Remote Management diagnostic tool, execute the
Loader–Health Check command.
■
Issue a System Reset either by using On-board Remote Management
Diagnostics page System Reset, or by turning the power off from the
front panel.
■
Contact Customer Care.
■
Try a different piece of media.
■
Issue a System Reset either by using On-board Remote Management
Diagnostics page System Reset, or cycle the power from the front
panel.
■
Contact Customer Care.
82

www.gateway.com
Problem Suggested Action
Timeout Error Mechanical problems with magazines, or too many tapes with
Other failures occur.
T elephone support
Telephone support
“non-bar code” labels (such as handwritten labels).
Eject and reseat the magazines or remove tapes with handwritten
labels. Such labels greatly increase initialization time.
■
Issue a System Reset either by using On-board Remote Management
Diagnostics page System Reset, or cycle the power from the front
panel.
■
Contact Customer Care.
Gateway offers a wide range of customer service, technical support, and
information services.
Telephone numbers
Resource Service description NEW How to reach
Gateway’s
fee-based
software tutorial
service
Gateway
Customer Care
Sales, accounting,
and warranty
Tutoring and training
You can access the following services through your telephone to get answers
to your questions:
Get tutorial assistance for software issues. 800-229-1103 (charged to your
credit card)
Talk to a Gateway Customer Care representative about a
non-tutorial technical support question.
Get information about available systems, pricing, orders, billing
statements, warranty service, or other non-technical issues.
Gateway's Customer Care professionals cannot provide hardware and software
training. Instead, Gateway recommends the following training resources.
877-485-1464 (US)(option #6)
800-846-3609 (Canada and Puerto
Rico)
605-232-2191
(all other countries)
800-846-2000 (US)
888-888-2037 (Canada)
Resource Service description For more information
Gateway Learning
Libraries
Service methods subject to change without notice or obligation.
A variety of courses and tutorials are available on CD.
Select from several easy-to-use learning libraries.
www.gateway.com/training
83

CHAPTER 5: Troubleshooting your Autoloader www.gateway.com
Returning the autoloader for service
If you need to return the autoloader to the factory for service, first make sure
which customer-replaceable unit (CRU) that you need to return and return only
that CRU, which may or may not be the entire autoloader.
documentation CD contain instructions
for upgrading/replacing the cartridge
The various guides on the
magazine and the rail kit
customer-replaceable units (CRUs).
Important
After you determine the CRU to replace, contact customer support to obtain
return authorization (RA) and shipping information. When you have the RA
number, use the following procedure.
Preparing the autoloader for shipment
If you must return the complete autoloader for service, use these steps to
prepare the autoloader for shipment.
To prepare the autoloader for shipment:
Do not ship cartridges, cables, or
terminators if you are returning the
autoloader to the factory.
Important
1 Remove all cartridges from the autoloader.
2 Turn off the autoloader on the front panel.
3 Remove the power, Ethernet, and SCSI cables, and any terminators from
the autoloader.
Removing the autoloader from a rack
To remove the autoloader from a rack:
Injury may occur if the autoloader is not
supported when you remove the front
screws. The screws are holding up the
front of the autoloader.
84
1 Loosen the four screws that connect the two support brackets to the two
autoloader brackets.
2 Loosen the four screws on the front of the autoloader that attach the two
front tabs (support brackets) to the front rails. Do not remove the screws
completely at this time.
3 Remove the four screws at the back of the autoloader that connect the
support brackets (two screws per bracket) to the autoloader brackets.
4 While supporting the front of the autoloader, remove the four front screws.
Caution
5 Using two people, or an appropriately rated mechanical lift, remove the
autoloader from the rack by sliding the autoloader out and supporting it
from the bottom. The person handling the back of the autoloader must
depress the locking tab on the support bracket while sliding the
autoloader forward.
6 Loosen the four screws and remove the autoloader brackets from the back
of the autoloader.
7 Place the autoloader into the original packaging box. If you no longer have
the original packaging, contact your service representative to purchase
the packaging kit.

www.gateway.com
Packing the autoloader
Returning the autoloader for service
Use the original packing material to pack the autoloader: the shipping
container, two foam insert packing pieces, the accessory kit box (or the filler
tube if your autoloader did not come with an accessory kit box), and the
antistatic bag. You will also need packing tape.
To pack the autoloader:
1 Place the antistatic bag over the autoloader.
2 Place a foam endcap on each side of the autoloader, then make sure that
the pieces fit snugly onto the autoloader.
One end of the foam insert has a curved
piece. This end of the foam insert is
designed to fit the front of the
Important
autoloader.
3 Place the autoloader down into the shipping box and push the back of
the autoloader towards the back end of the box.
4 Insert the empty accessory kit box (or filler tube) into the shipping box at
the front end of the autoloader in the space between the autoloader foam
inserts and the shipping container.
5 Place any necessary paperwork on top of the autoloader inside the box.
6 Close and seal the box.
7 Place the shipping label on the box.
85

CHAPTER 5: Troubleshooting your Autoloader www.gateway.com
86

Appendix A
Logs
• Basic information logs
•Log descriptions
•Error codes
• Tape drive logs
•POST failure logs
87

Appendix A: Logs www.gateway.com
Basic information logs
Whenever any system or application actions occur, the autoloader or tape drive
generate logs recording the actions. You can use some of these logs to
troubleshoot errors. These logs are described in Chapter 5 “Troubleshooting
your Autoloader”. The other logs contain diagnostic and history information
and are explained in this section.
This section describes the logs for the autoloader and the tape drive. It contains
a description of each log type including the log's block descriptor and field
descriptions.
Log descriptions
The autoloader and tape drive generate different types of logs. Autoloader logs
provide information if the error relates to data cartridge movement. Tape drive
logs provide information on the tape drive's read/write performance.
Although there are several types of logs, all of them have the same basic format
and are interpreted in the same manner.
Autoloader logs
The autoloader generates four types of logs.
■ “Soft logs” on page 91
■ “Update logs” on page 92
■ “Boot logs” on page 92
The last type of log, the Hard Error log, is used for troubleshooting purposes
and are described in “Hard error log display” on page 74.
You can retrieve and view each of the six log types through different methods.
The following table indicates the ways in which you can retrieve each log type.
Log Type http Front Panel SCSI
Soft Yes Ye s No
Update Yes Yes No
Boot Yes No No
Ha rd Yes Ye s Ye s
88

www.gateway.com
Error codes
Error codes
The logs contain three main fields.
Field Description
Time Stamp The time the event occurred. This field helps correlate the event with a possible
application interruption. If the autoloader is unable to acquire the correct time/date
from the Simple Network Time Protocol (SNTP) server, or the front panel, the time
stamp contains values indicating the power cycle number and the time an entry
was written relative to that power cycle, listed as power on hours (POH).
The autoloader has no internal real-time clock and requires the user to set the time
of day from the front panel or acquire time through the network interface through
an SNTP server.
Error Code The type of error or action to which the event is related. This field helps identify
what caused the event to occur (see “Error codes” on page 89).
Context The event’s software register information.
Error codes appear as eight-character strings made up of either letters or
numbers for a total of 32 bits.
Field Description
Recovery Action Defines what the autoloader does, based on the event that occurred.
If the value is 0, the autoloader continues operations because this is typically a soft,
recoverable event, or an event that is just recording an action for when the development
team may be working on enhancements.
If the value is other than 0, then you must reboot the autoloader in order to recover from
the event. The reboot happens automatically.
Task ID: Defines what firmware task was being performed at the time of the event.
Task ID (in Hex) Description
00 System Timer
01 Loader Manager
02 Picker
03 Magazine Left
04 Magazine Right
07 Drive Manager
08 Barcode Reader
09 Front Panel
0A IP
0B Diagnostic
89

Appendix A: Logs www.gateway.com
Field Description
0C Error
0D Code Update
0E ADI
0F Drive Manager Timer
11 HTTP
12 SNTP
13 SCSI
14 SPI
20 Idle
3E Watch Dog
3F Un-handle Interrupt
Error Type: Defines the type of error or event that occurred.
Code Descri ptions
00–25 General Software flags
26 Message Send ID error
27 Message Bad
28 Message parameter Bad
29 Invalid Element
2A Invalid Element Status
2B–2F Firmware tables and stacks invalid
30 Post Failure
31–38 System Monitoring type events
39 Limits Error
3A Drive Reset
3B Drive Hardware
90
3C Drive Needs Cleaning
3D Drive Error
3E Load Error
3F Unload Error
4A Door Locked

www.gateway.com
Error codes
Field Description
4B Open Front
4C Over Temp
60–69 Internal communication events
A0–A4 Picker Servo Errors
A5 Source Element Empty
A6 Source Magazine Missing
A7 Destination Magazine Missing
A8 Destination Element Full
A9 Picker Full
AA Picker Cartridge Sensor Error
AB Drive Path Sensor Error
AC Mail Slot Door Sensor Error
AD Mail Slot Solenoid Error
AE Unknown Servo Error
AF Error Log Information Event
B0–BF Error Events related to the picker not rotating or translating correctly
C0 Unknown Motor Error
D0 Magazine Solenoid Bad
D1 Magazine Present Sensor Bad
D2–D4 Position Sensor Bad
D5–DE Cartridge flags located on the magazine may be bad or the sensor to detect the flags may
have a problem
DF Jammed Cartridge
Software Location ID: Defines a location in the firmware internal to the task being performed. This ID is used by
firmware engineering to identify what part of the actual firmware task detected the event.
Soft logs
Soft logs record the autoloader's history during different conditions. They are
similar to hard logs but may have been overwritten by a recovery action.
91

Appendix A: Logs www.gateway.com
Update logs
Update Logs record firmware changes and upgrades in the autoloader. An
Update Log also records when hardware is updated or changed.
Boot logs
Boot logs keep track of the boot status in terms of number of hours the
autoloader has been powered on, the number of times the autoloader has been
rebooted, and the reason for the reboot.
T ape drive logs
Tape drive error logs
The tape drive generates six types of logs. For troubleshooting errors, you
should only use the SCSI Check Condition Error log.
Partial information about tape drive error logs can be retrieved from SCSI. All
tape drive error logs contain three main fields: Event Log Number, Event
Number or Name, and POH/PC.
Field Description
Event Log Number A sequence number that indicates the order in which the event was logged.
Event Number or Name This field appears in every event log, but varies depending on the event type. This
POH/PC The tracking information for how many power-on-hours (POH) the drive has had
In addition to these main fields, each type of log contains specialized fields.
SCSI check condition error logs
SCSI Check Condition Error logs record SCSI events that are sent to the host
when a command fails. These logs may be related to the events logged
previously, indicating that the event created a check condition that the host
should know about.
field indicates the type of log.
since it was shipped. This is how many hours the drive has had power applied
regardless of the number of times it is turned on and off. POH is updated once every
60 minutes that the drive has had power applied to it without interruptions.
Power cycles (PC) is how many times the drive has experienced a power-on cycle.
Each time a drive logs a Hard Event, it increments this count as well.
92
Field Description
Media ID (MID) A Media ID which is an internal identification number, written to the media the first
time the media is used, to aid in tracking the media to the different events. This
ID does not correlate to any media ID used by application software.

www.gateway.com
Tape drive logs
Field Description
Sense Key The SCSI equivalent of Sense Key as defined by the SCSI standard.
ASC/ASCQ The SCSI equivalent of Additional Sense Code (ASC) and Additional Sense Code
Qualifier (ASCQ) as defined by the SCSI standard.
Sense Key Definition
0h No Sense. This is an indicator that the drive did not have an error but that the host system may have
sent an incorrect command or that a field in the changing parameters information was not correct. This
is also an indicator that a request to move the tape past an EOD or a read of a filemark may have been
attempted.
1h Recovered Error. The drive had a recoverable error. This is one in which the drive detected something
that may not be correct, but that the problem would not prevent the drive from functioning correctly. It
may be just an indicator of an event that the drive was able to correct. For example, a Cleaning Requested
status shows that the drive requires a cleaning tape, but still functions correctly without it. This sense key
is only recorded in the logs if it is a Cleaning Requested condition.
2h Not Ready. The drive is not ready for tape functionality. This is not reported in the drive log pages.
3h Medium Error. The drive was not able to read or write successfully to the tape. Look at the Event Logs
and correlate the events with media and system logs to determine if this is due to media or the drive.
This sense key is recorded in the drive logs.
4h Hardware Error. The drive has detected an error condition related to the hardware. You need to refer
to the Sense Key and ASCQ, along with other event logs to best understand the error. Based on the log
information, replace the appropriate component. This sense key is logged each time it is reported.
5h Illegal Request. The requested command had an incorrect parameter defined and you need to review
the actual command and parameter to determine what was wrong. This is not logged in the drive logs.
6h Unit Attention. A condition exists that impacts the drive's functionality. Examples include a SCSI Bus
reset or a transition from Ready to Not Ready. A reset is required because the Mode Page setting may
change after a reset and the host needs to know that. This sense key is not logged in the drive logs.
7h Data Protected. The media currently in the drive is write-protected. This can be a hardware or software
write protect. This sense key is not logged in the drive logs.
8h Blank Check. While reading, writing, or doing a search on the media, the drive encountered a EOD mark
or a long gap was detected. A long gap may be the result of a drive stopping the write command without
doing the correct command termination. This sense key is not reported in the drive logs.
Bh Aborted Command. Command aborted. Generated when the drive aborts a command.
Dh Volu me Overfl ow. The tape drive has reached the physical EOT and can no longer write data to the tape.
This sense key is not reported in the drive logs.
Eh Miscompare. During the drive self tests, the drive detected a data miscompare while executing the
internal test. This error would be an indicator that the drive should be returned for repair.
ASC/ASCQ Description Suggested Action
0C/00 Write Error. Drive was not able to
successfully write the data to the tape.
Problem may be the tape cartridge or the drive.
If the problem continues, contact customer support.
93

Appendix A: Logs www.gateway.com
ASC/ASCQ Description Suggested Action
11/00 Unrecoverable Read Error. After
14/00 Entity Not Found. A logical block that was
47/00 SCSI Parity Error. SCSI bus
80/01 Cleaning Required. The drive has
POST failure logs
Important
This event type only indicates each time
the test ran and experienced the error
condition.
Problem may be the tape cartridge or the drive.
exhausting the read recovery algorithms,
the drive was not able to read the data
correctly.
written on the tape was not found while
trying to read the data.
communications problem.
detected a condition in which a cleaning
tape must be used.
These events indicate that the autoloader or tape drive detected a failure when
power was applied. POST may have failed during a reset and retry.
If the problem continues, contact customer support.
Problem may be the tape cartridge or the drive. Check drive
logs to correlate events that may have led up to this
condition.
If the problem continues, contact customer support.
Check SCSI cables, terminators, and all devices attached to
the SCSI bus.
Use a cleaning tape or different media. Check drive logs to
review related events. If this persists with multiple media
after cleaning, the drive may need to be replaced. If related
to a single piece of media, replace that tape cartridge.
If the problem continues, contact customer support.
94
:
Field Description
Last Fail The type of failure that was experienced.

Appendix B
Specifications
• Physical specifications
• Autoloader performance specifications
• Environmental specifications
• Autoloader power specifications
• Autoloader vibration specifications
• Autoloader shock specifications
• Tape drive specifications
95
 Loading...