


Gateway® E-4650
System Manual


Contents
Preface. . . . . . . . . . . . . . . . . . . . . . . . . . . . . . . . . . . . . . . . . . . . . . . . . . . . . . . . . . . . . . v
Conventions used in this manual . . . . . . . . . . . . . . . . . . . . . . . . . . . . . . . . . . . . . . . v
Getting additional information . . . . . . . . . . . . . . . . . . . . . . . . . . . . . . . . . . . . . . . . . . vi
1 Checking Out Your Gateway Computer . . . . . . . . . . . . . . . . . . . . . . . . . 1
Gateway Mid-Tower front . . . . . . . . . . . . . . . . . . . . . . . . . . . . . . . . . . . . . . . . . . . . . 2
Gateway Mid-Tower back . . . . . . . . . . . . . . . . . . . . . . . . . . . . . . . . . . . . . . . . . . . . . 4
Heceta IV hardware management . . . . . . . . . . . . . . . . . . . . . . . . . . . . . . . . . . . . . . 7
2 System Setup . . . . . . . . . . . . . . . . . . . . . . . . . . . . . . . . . . . . . . . . . . . . . . . . . . . 9
Setting up your computer . . . . . . . . . . . . . . . . . . . . . . . . . . . . . . . . . . . . . . . . . . . . . 9
Starting your computer . . . . . . . . . . . . . . . . . . . . . . . . . . . . . . . . . . . . . . . . . . . . . . 10
Understanding the Power-On Self-Test . . . . . . . . . . . . . . . . . . . . . . . . . . . . . . 11
Setting up the operating system . . . . . . . . . . . . . . . . . . . . . . . . . . . . . . . . . . . . 11
Turning off your computer . . . . . . . . . . . . . . . . . . . . . . . . . . . . . . . . . . . . . . . . . . . . 12
Restarting your computer . . . . . . . . . . . . . . . . . . . . . . . . . . . . . . . . . . . . . . . . . . . . 13
3 Working with the Gateway Mid-Tower case . . . . . . . . . . . . . . . . . . . . 15
Preventing static electricity discharge . . . . . . . . . . . . . . . . . . . . . . . . . . . . . . . . . . . 15
Opening and closing . . . . . . . . . . . . . . . . . . . . . . . . . . . . . . . . . . . . . . . . . . . . . . . . 17
Adding or replacing drives . . . . . . . . . . . . . . . . . . . . . . . . . . . . . . . . . . . . . . . . . . . . 21
Preparing to add or replace a drive . . . . . . . . . . . . . . . . . . . . . . . . . . . . . . . . . 21
Drive cabling information . . . . . . . . . . . . . . . . . . . . . . . . . . . . . . . . . . . . . . . . . 22
Adding or replacing drives . . . . . . . . . . . . . . . . . . . . . . . . . . . . . . . . . . . . . . . . 22
Replacing expansion cards . . . . . . . . . . . . . . . . . . . . . . . . . . . . . . . . . . . . . . . . . . . 30
Replacing the power supply . . . . . . . . . . . . . . . . . . . . . . . . . . . . . . . . . . . . . . . . . . 33
Replacing the system board . . . . . . . . . . . . . . . . . . . . . . . . . . . . . . . . . . . . . . . . . . 35
Installing memory . . . . . . . . . . . . . . . . . . . . . . . . . . . . . . . . . . . . . . . . . . . . . . . . . . 37
Installing or replacing RIMM memory . . . . . . . . . . . . . . . . . . . . . . . . . . . . . . . . 37
Replacing the battery . . . . . . . . . . . . . . . . . . . . . . . . . . . . . . . . . . . . . . . . . . . . . . . 42
4 Using the BIOS Setup Utility . . . . . . . . . . . . . . . . . . . . . . . . . . . . . . . . . . . 45
About the BIOS Setup utility . . . . . . . . . . . . . . . . . . . . . . . . . . . . . . . . . . . . . . . . . . 45
Updating the BIOS . . . . . . . . . . . . . . . . . . . . . . . . . . . . . . . . . . . . . . . . . . . . . . . . . 48
Setting the BIOS configuration jumper . . . . . . . . . . . . . . . . . . . . . . . . . . . . . . . . . . 49
5 Managing Your Computer . . . . . . . . . . . . . . . . . . . . . . . . . . . . . . . . . . . . . . 51
Protecting against power source problems . . . . . . . . . . . . . . . . . . . . . . . . . . . . . . . 51
i

Surge suppressors . . . . . . . . . . . . . . . . . . . . . . . . . . . . . . . . . . . . . . . . . . . . . . .51
Line conditioners . . . . . . . . . . . . . . . . . . . . . . . . . . . . . . . . . . . . . . . . . . . . . . . .52
Uninterruptible power supplies . . . . . . . . . . . . . . . . . . . . . . . . . . . . . . . . . . . . . .52
Power management . . . . . . . . . . . . . . . . . . . . . . . . . . . . . . . . . . . . . . . . . . . . . . . . .53
Using Standby mode . . . . . . . . . . . . . . . . . . . . . . . . . . . . . . . . . . . . . . . . . . . . .54
Changing power settings . . . . . . . . . . . . . . . . . . . . . . . . . . . . . . . . . . . . . . . . . .55
Changing the power scheme . . . . . . . . . . . . . . . . . . . . . . . . . . . . . . . . . . . . . . . 55
Changing advanced power settings . . . . . . . . . . . . . . . . . . . . . . . . . . . . . . . . . .57
Activating Hibernate mode . . . . . . . . . . . . . . . . . . . . . . . . . . . . . . . . . . . . . . . . .58
Installing an Uninterruptible Power Supply in Windows XP . . . . . . . . . . . . . . .59
Protecting your computer from viruses . . . . . . . . . . . . . . . . . . . . . . . . . . . . . . . . . .61
Managing hard drive space . . . . . . . . . . . . . . . . . . . . . . . . . . . . . . . . . . . . . . . . . . .63
Checking hard drive space . . . . . . . . . . . . . . . . . . . . . . . . . . . . . . . . . . . . . . . .63
Using Disk Cleanup . . . . . . . . . . . . . . . . . . . . . . . . . . . . . . . . . . . . . . . . . . . . . .64
Checking the hard drive for errors . . . . . . . . . . . . . . . . . . . . . . . . . . . . . . . . . . .65
Defragmenting the hard drive . . . . . . . . . . . . . . . . . . . . . . . . . . . . . . . . . . . . . .67
Backing up files . . . . . . . . . . . . . . . . . . . . . . . . . . . . . . . . . . . . . . . . . . . . . . . . .69
Using the Scheduled Task Wizard . . . . . . . . . . . . . . . . . . . . . . . . . . . . . . . . . .70
Cleaning your computer . . . . . . . . . . . . . . . . . . . . . . . . . . . . . . . . . . . . . . . . . . . . . .71
Cleaning the exterior . . . . . . . . . . . . . . . . . . . . . . . . . . . . . . . . . . . . . . . . . . . . .71
Cleaning the keyboard . . . . . . . . . . . . . . . . . . . . . . . . . . . . . . . . . . . . . . . . . . . .72
Cleaning the screen . . . . . . . . . . . . . . . . . . . . . . . . . . . . . . . . . . . . . . . . . . . . . .72
Cleaning the mouse . . . . . . . . . . . . . . . . . . . . . . . . . . . . . . . . . . . . . . . . . . . . . .72
Checking system health with LANDesk . . . . . . . . . . . . . . . . . . . . . . . . . . . . . . .74
System recovery . . . . . . . . . . . . . . . . . . . . . . . . . . . . . . . . . . . . . . . . . . . . . . . . . . . .75
Creating a startup diskette . . . . . . . . . . . . . . . . . . . . . . . . . . . . . . . . . . . . . . . . .75
Keeping a record of system configuration . . . . . . . . . . . . . . . . . . . . . . . . . . . . .75
Using your System Restoration CD . . . . . . . . . . . . . . . . . . . . . . . . . . . . . . . . . .75
6 Troubleshooting . . . . . . . . . . . . . . . . . . . . . . . . . . . . . . . . . . . . . . . . . . . . . . . .77
Introduction . . . . . . . . . . . . . . . . . . . . . . . . . . . . . . . . . . . . . . . . . . . . . . . . . . . . . . . .77
Troubleshooting checklist . . . . . . . . . . . . . . . . . . . . . . . . . . . . . . . . . . . . . . . . . . . . .77
Verifying your configuration . . . . . . . . . . . . . . . . . . . . . . . . . . . . . . . . . . . . . . . .77
Troubleshooting guidelines . . . . . . . . . . . . . . . . . . . . . . . . . . . . . . . . . . . . . . . .78
Battery installation problems . . . . . . . . . . . . . . . . . . . . . . . . . . . . . . . . . . . . . . . . . .78
CD drive problems . . . . . . . . . . . . . . . . . . . . . . . . . . . . . . . . . . . . . . . . . . . . . . . . . .80
Computer problems . . . . . . . . . . . . . . . . . . . . . . . . . . . . . . . . . . . . . . . . . . . . . . . . .82
Diskette drive problems . . . . . . . . . . . . . . . . . . . . . . . . . . . . . . . . . . . . . . . . . . . . . .84
Hard drive problems . . . . . . . . . . . . . . . . . . . . . . . . . . . . . . . . . . . . . . . . . . . . . . . . .85
Memory problems . . . . . . . . . . . . . . . . . . . . . . . . . . . . . . . . . . . . . . . . . . . . . . . . . . .86
Modem problems . . . . . . . . . . . . . . . . . . . . . . . . . . . . . . . . . . . . . . . . . . . . . . . . . . .87
Peripheral/adapter problems . . . . . . . . . . . . . . . . . . . . . . . . . . . . . . . . . . . . . . . . . .88
Printer problems . . . . . . . . . . . . . . . . . . . . . . . . . . . . . . . . . . . . . . . . . . . . . . . . . . . .89
ii

Video problems . . . . . . . . . . . . . . . . . . . . . . . . . . . . . . . . . . . . . . . . . . . . . . . . . . . . 90
Error messages . . . . . . . . . . . . . . . . . . . . . . . . . . . . . . . . . . . . . . . . . . . . . . . . . . . . 92
Beep codes . . . . . . . . . . . . . . . . . . . . . . . . . . . . . . . . . . . . . . . . . . . . . . . . . . . . . . . 94
A Reference Data . . . . . . . . . . . . . . . . . . . . . . . . . . . . . . . . . . . . . . . . . . . . . . . . . 97
Intel 850 ATX System Board Technical Reference . . . . . . . . . . . . . . . . . . . . . . . . 97
Features . . . . . . . . . . . . . . . . . . . . . . . . . . . . . . . . . . . . . . . . . . . . . . . . . . . . . . 97
System board layout . . . . . . . . . . . . . . . . . . . . . . . . . . . . . . . . . . . . . . . . . . . . . 98
BIOS configuration jumper settings . . . . . . . . . . . . . . . . . . . . . . . . . . . . . . . . 103
Specifications . . . . . . . . . . . . . . . . . . . . . . . . . . . . . . . . . . . . . . . . . . . . . . . . . 104
B Safety, Regulatory, and Legal Information . . . . . . . . . . . . . . . . . . . . 107
Index . . . . . . . . . . . . . . . . . . . . . . . . . . . . . . . . . . . . . . . . . . . . . . . . . . . . . . . . . . . . . . 119
iii

iv

Preface
Conventions used in this manual
Throughout this manual, you will see the following conventions:
Convention Description
ENTER Keyboard key names are printed in small capitals.
TRL+ALT+DEL A plus sign means to press the keys at the same time.
C
Setup Commands to be entered, options to select, and messages that
appear on your monitor are printed in bold.
User’s Guide Names of publications are printed in italic.
Viewpoint All references to front, back, left, or right on the computer are based
on the computer being in a normal, upright position, as viewed from
the front.
Important A note labeled important informs you of special
circumstances.
Caution A caution warns you of possible damage to equipment or
loss of data.
Warning A warning indicates the possibility of personal injury.
Conventions used in this manual v

Getting additional information
Log on to the technical support area of www.gatewayatwork.com to find
information about your computer or other Gateway products. Some types of
information you can access are:
■ Hardware driver and program updates
■ Technical tips
■ Service agreement information
■ Technical documents and component information
■ Frequently asked questions (FAQs)
■ Documentation for peripherals or optional components
■ Online technical support
vi

Checking Out Your Gateway Computer
This chapter provides basic information about your Gateway computer. Read
this chapter to find out:
■ Where components and connectors are located
■ What accessories are available
These illustrations show typical computer systems. Your computer system may
not look exactly the same.
1
1
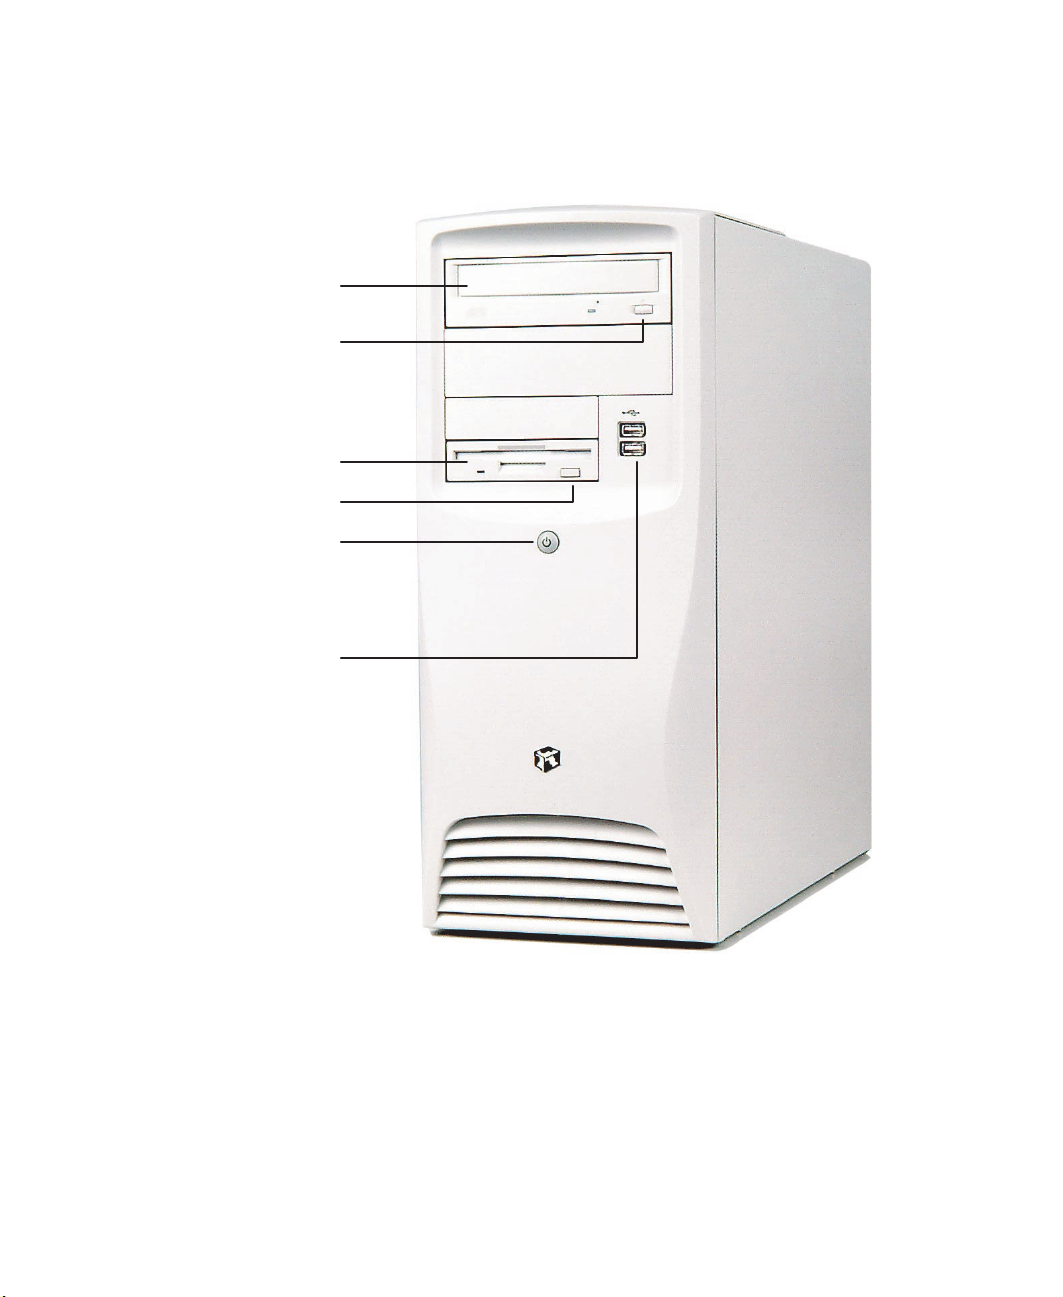
Gateway Mid-Tower front
CD/DVD drive
CD/DVD eject button
Diskette drive
Diskette eject button
Power button
USB 2.0 ports
2 Checking Out Your Gateway Computer

Component Icon Description
CD/DVD drive Use a CD drive for installing software programs,
playing audio CDs, and accessing data.
Use a DVD drive for installing software programs,
playing audio CDs and DVDs, and accessing data.
CD/DVD eject button Press this button to open the CD/DVD drive tray.
Diskette drive Use this drive to store smaller files on diskettes.
Diskette eject button Press this button to eject an inserted diskette.
Power button Press this button to turn the power on or off. You can
also configure the power button to operate in
Standby/Resume mode or Hibernate mode. For more
information on changing power button settings, see
“Power management” on page 53.
USB 2.0 ports Plug USB (Universal Serial Bus) devices (such as a
USB Iomega™ Zip™ drive, scanner, or camera) into
these ports.
Legacy support for USB keyboards and mice require
that they be plugged into a USB 1.1 port. Plug USB
keyboards or mice into the USB 1.1 ports located on
the back of the computer.
Gateway Mid-Tower front 3

Gateway Mid-Tower back
Power connector
Voltage selector switch
Mouse port
Keyboard port
USB 1.1 ports
Serial port
Parallel port
Network jack
USB 2.0 ports
Analog monitor port
Digital monitor port
TV out port
Joystick/MIDI port
Modem jack
Shipping
screw
Cover
release
levers
Line out 2 jack
Line out 1 jack
Microphone jack
Line in jack
4 Checking Out Your Gateway Computer
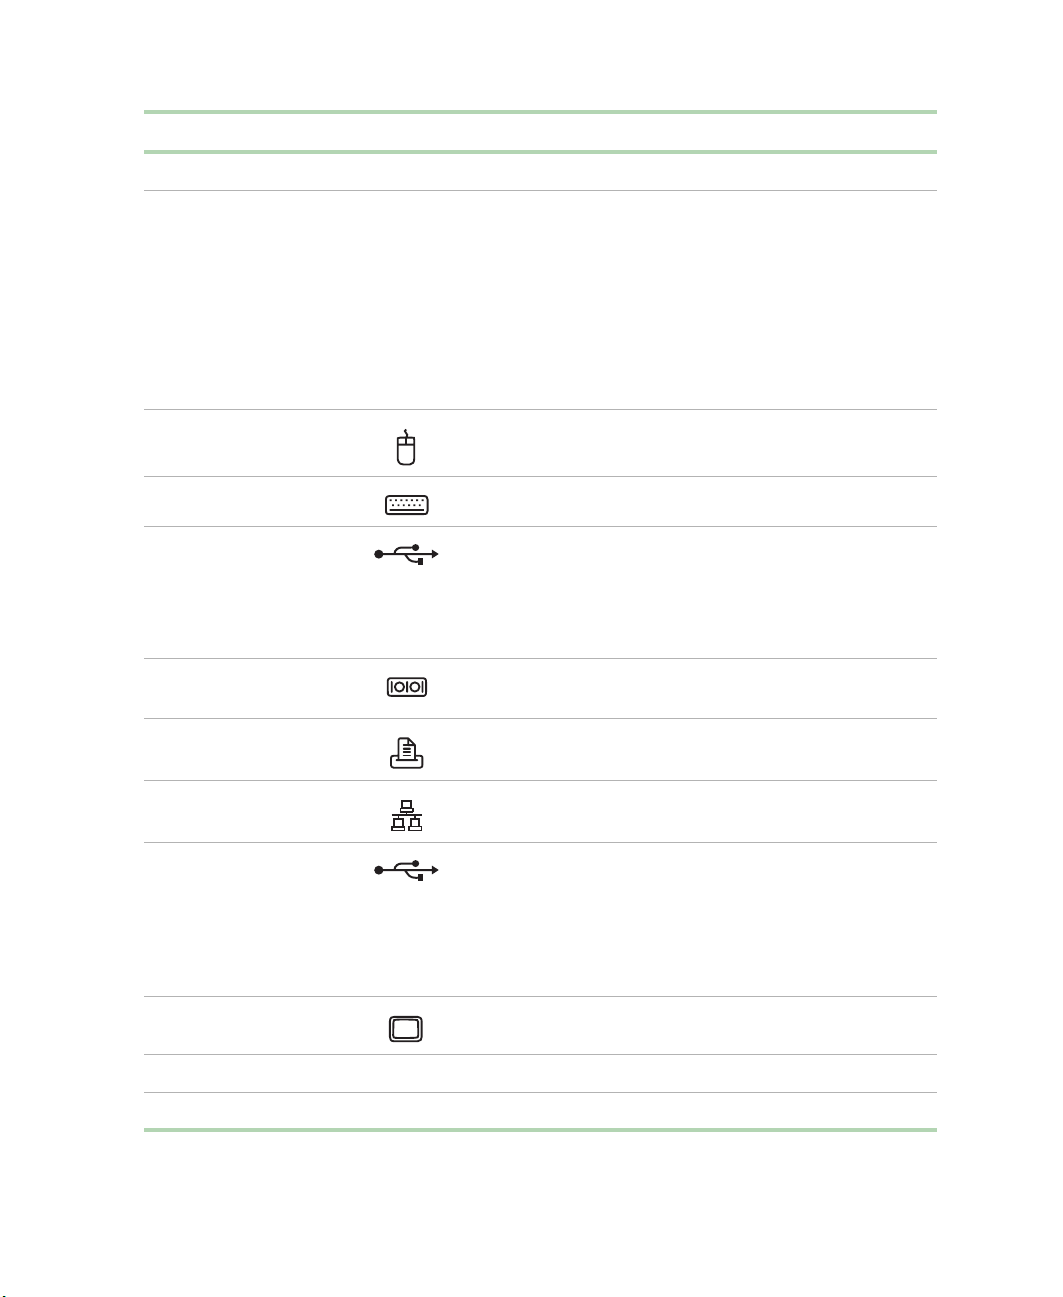
Component Icon Description
Power connector Plug the power cable into this connector.
Voltage selector switch Before turning on the computer, make sure that the switch
is in the proper position for the correct power available.
In the United States, the utility power is supplied at a
nominal 115 volts at 60 Hz. The power supply is always
set to this when the computer is operating in the United
States. In other areas of the world, such as Europe, the
utility power is supplied at 230 volts at 50 Hz. If the
computer is operating in an environment such as this, the
voltage selector switch needs to be moved to 230.
Mouse port Plug a Personal System/2
Keyboard port Plug a PS/2 keyboard into this port.
USB 1.1 ports Plug USB (Universal Serial Bus) devices (such as a USB
keyboard, scanner, or camera) into these ports.
Legacy support for USB keyboards and mice require that
they be plugged into a USB 1.1 port. Plug USB keyboards
or mice into the USB 1.1 ports.
Serial port Plug a serial device (such as a digital camera) into this
port.
®
(PS/2) mouse into this port.
Parallel port Plug a parallel device (such as a printer) into this port.
Network jack Plug an Ethernet 10/100 network cable into this jack.
USB 2.0 ports Plug USB (Universal Serial Bus) devices (such as a USB
keyboard, scanner, or camera) into these ports.
Legacy support for USB keyboards and mice require that
they be plugged into a USB 1.1 port. Plug USB keyboards
or mice into the USB 1.1 ports located on the back of the
computer.
Analog monitor port Plug an external analog monitor into this port.
Digital monitor port Plug an external digital monitor into this port.
TV out port Plug a television into this port.
Gateway Mid-Tower back 5

Component Icon Description
Joystick/MIDI port Plug a joystick or MIDI device into this port.
Modem jack Plug a modem cable into this jack.
Line out 2 (rear out) jack Rear Out. Plug powered speakers or an external amplifier
into this jack. This jack is color-coded black.
Line out 1 (speakers)
jack
Microphone jack Plug a microphone into this jack. This jack is color-coded
Line in jack Plug an external audio input source (such as a stereo) into
Shipping screw Remove the shipping screw prior to using the cover release
Cover release levers Use the cover release levers to open the side panel for
Speakers. Plug powered speakers, an external amplifier,
or headphones into this jack. This jack is color-coded
green.
red.
this jack so that you can record sound on your computer.
This jack is color-coded blue.
levers to open the side panel. For more information on
opening your case, see “Opening and closing” on page 17.
access to the inside of the case. For more information on
opening your case, see “Opening and closing” on page 17.
6 Checking Out Your Gateway Computer

Heceta IV hardware management
Heceta IV is an integrated data acquisition system that lets you monitor the
status of your system hardware. Monitored information includes internal
temperature, fan speed, voltage, and chassis intrusion (to alert you in the
event of case cover removal). The features of the hardware management
system can be accessed through LANDesk
provides a quick system health indicator.
®
Client Manager, which also
Heceta IV hardware management 7

8 Checking Out Your Gateway Computer

System Setup
Setting up your computer
Use the instructions on the Setup Poster that came with your computer to
assemble your computer.
You should prepare a safe working environment before assembling your
computer by following these guidelines:
■ Use a clean, flat, and stable surface for your computer. Allow at least
6 inches at the rear of the computer for cabling and air circulation.
■ Obtain a grounded (three-prong) AC surge-protected power strip. A
surge-protected power strip helps protect against AC power fluctuations.
■ Protect your computer from extreme temperature and humidity. Do not
expose your computer to direct sunlight, heater ducts, or other
heat-generating objects.
■ Keep your computer away from equipment that generates magnetic
fields, such as unshielded stereo speakers. Even a telephone placed too
close to the computer may cause interference.
2
■ Plug the computer into a wall outlet or power strip that is easily
accessible.
Important Keep the computer boxes and packing material in case you
need to send the computer to Gateway for repairs. If you
return your computer in different packaging, your warranty
may be voided.
Setting up your computer 9

Starting your computer
Before you start your computer for the first time:
■ Make sure that the voltage selector switch on the back of the computer
is set to the correct voltage for your area. This switch is set at the factory
to the correct voltage (see “Gateway Mid-Tower back” on page 4 for the
voltage selector switch location).
■ Make sure all cables are firmly connected to the proper ports on the back
panel of the computer.
Caution Make sure your computer and peripherals are turned off
and unplugged from the power outlet when you connect
peripherals to the computer, or you might damage the
computer or the peripherals.
■ Make sure the computer and monitor are plugged into an AC outlet or
power strip and that the power strip is turned on.
To start the computer:
1 If you have connected the computer components to a power strip, make
sure all the computer components are turned off, then turn on the power
strip.
2 Turn on the monitor.
3 Turn on any other components connected to the computer, such as
speakers, a printer, or a scanner.
4 Turn on the computer.
If nothing happens when you turn on the computer:
■ Make sure that the power cables are securely plugged in and that
your power strip (if you are using one) is plugged in and turned on.
■ Make sure the monitor is connected to the computer, plugged into
the power strip or AC outlet, and turned on. You may also need
to adjust the brightness and contrast controls on the monitor.
10 System Setup

Understanding the Power-On Self-Test
When you turn on your computer, the Power-On Self-Test (POST) routine
checks the computer memory and components. To see this information on
the screen, press T
Important The computer starts very quickly. If your monitor requires
The computer displays error messages if POST finds any problems. Write down
any error messages that you see. If you continue to have problems, these error
messages may help Gateway Technical Support diagnose the cause.
AB during POST.
time to warm up, you may not see the messages. If you
are having problems, you may need to wait for the monitor
to warm up and then restart the computer. If you are trying
to enter Setup, press F1 before the monitor warms up.
Setting up the operating system
The first time you start your computer, the operating system takes a few
minutes to set up.
Refer to your operating system documentation for specific questions regarding
the operating system.
To complete the operating system setup:
1 After the computer starts, the start-up wizard opens. Continue by clicking
Next.
2 Type the requested information in the appropriate text boxes. When you
have finished typing the information, continue by clicking
Important Any ID or key numbers requested to complete the
operating system setup are either on a sticker attached to
the computer or in the documentation provided.
Starting your computer 11
Next.

3 Continue following the instructions and selecting options in the start-up
wizard dialog boxes, clicking
the wizard tells you to restart the computer.
If you need to return to the previous dialog box to change any of your
entries, click
Back.
Next to move through the dialog boxes, until
4 Restart your computer. The setup is complete.
Turning off your computer
To turn off your computer:
■ In Windows XP, click Start, then click Turn Off Computer, then Turn Off.
Windows shuts down and turns off your computer.
- OR -
In Windows Me, Windows 2000, Windows 98, or Windows NT, click
Start, then select Shut Down. In the Shut Down Windows dialog box, select
Shut Down, then click OK.
Important If for some reason you cannot use the Turn Off Computer
or Shut Down option in Windows to shut down your
computer, press and hold the power button for about five
seconds.
12 System Setup

Restarting your computer
If your computer does not respond to keyboard or mouse input, you may have
to close programs that are not responding. If closing unresponsive programs
does not restore your computer to normal operation, you may have to restart
the computer.
To close unresponsive programs and restart your computer:
1 Press CTRL+ALT+DEL. A window opens that lets you close a program that
is not responding.
2 In Windows XP, Windows Me, Windows 2000, or Windows 98, select the
program that is not responding.
- OR -
In Windows NT, click
responding.
Task Ma nag er, then select the program that is not
3 Close the program by clicking End Task.
4 If the computer does not respond, turn off the computer power, wait ten
seconds and turn the power on again.
Important If the computer does not turn off immediately, you may
need to press and hold the power button for about five
seconds.
As a part of the regular startup process, a program to check the disk status
runs automatically. When the checks are finished, Windows starts.
Restarting your computer 13

14 System Setup

Working with the Gateway Mid-Tower case
3
Preventing static electricity discharge
The components inside your computer are extremely sensitive to static
electricity, also known as electrostatic discharge (ESD).
Caution ESD can permanently damage electrostatic discharge
sensitive components in the computer. Prevent ESD
damage by following ESD guidelines every time you open
the computer case.
Warning To avoid exposure to dangerous electrical voltages and
moving parts, turn off your computer and unplug the power
cord and modem cable before opening the case.
Before opening the computer case, follow these guidelines:
■ Turn off the computer power.
■ Wear a grounding wrist strap (available at most electronics stores) and
attach it to a bare metal part of the computer.
Warning To prevent risk of electric shock, do not insert any object
into the vent holes of the power supply.
Preventing static electricity discharge 15

■ Touch a bare metal surface on the back of the computer.
■ Unplug the power cord and modem cable.
Before working with computer components, follow these guidelines:
■ Avoid static-causing surfaces such as carpeted floors, plastic, and packing
foam.
■ Remove components from their antistatic bags only when you are ready
to use them. Do not lay components on the outside of antistatic bags
because only the inside of the bags provide electrostatic protection.
■ Always hold expansion cards by their edges or their metal mounting
brackets. Avoid touching the edge connectors and components on the
cards. Never slide expansion cards or components over any surface.
16 Working with the Gateway Mid-Tower case
Opening and closing
The Gateway Mid-Tower case provides toolless access to internal components.
Warning To avoid exposure to dangerous electrical voltages and
moving parts, turn off your computer, then unplug the
power and modem cords before opening the case.
To open the Gateway Mid-Tower case:
1 Turn off the computer.
2 Following all static electricity discharge precautions, disconnect the
power cord and all other cables.
3 Drain any residual power from the computer by pressing the power
button.
4 For stability, place the computer on its side.
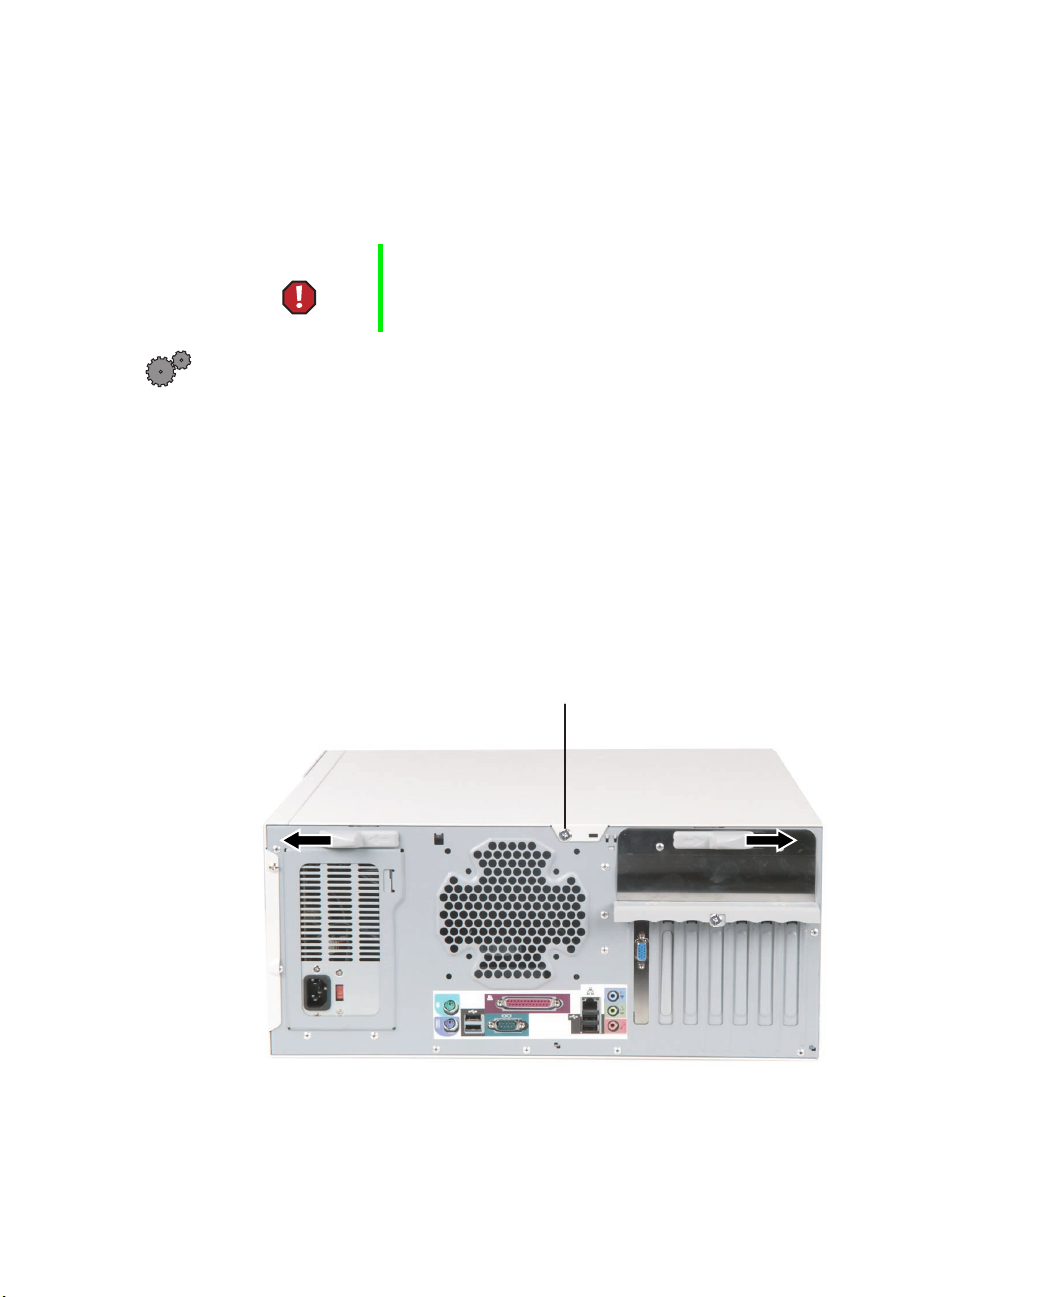
5 Remove the shipping screw, then push the cover release levers away from
each other.
Shipping screw
Opening and closing 17

6 Swing the side panel away from the case.
18 Working with the Gateway Mid-Tower case
To close the Gateway Mid-Tower case:
1 For more stability, place the computer on its side.
2 Make sure all of the internal cables are arranged inside the case so they
will not be pinched when you close the case.
Opening and closing 19

3 Align the door tabs into the case notches.
4 Swing the side panel toward the case until the release levers lock.
5 Return the computer to its upright position.
6 Reconnect the cables and power cord.
20 Working with the Gateway Mid-Tower case

Adding or replacing drives
Preparing to add or replace a drive
One 3.5-inch diskette drive, one 3.5-inch hard drive, and one CD drive are
included with your computer. You can add one additional half-height 3.5-inch
tape storage or disk storage device.
As you prepare to install drives, keep the following in mind:
■ To remove and install drives, use an antistatic wrist strap.
■ If you remove a drive, place it in an antistatic bag or container.
■ Before you install a drive, see the drive documentation for information
on configuring the drive, setting any jumpers on the drive, and attaching
cables to the drive.
■ If you are installing a drive that requires a controller card, install the card
before you install the drive.
■ IDE cables automatically assign master/slave positions to the drives they
connect. You can override these assignments using the jumpers on the
drives.
■ IDE hard drives can be configured as single, master, or slave. IDE CD
drives can be configured as master or slave. Configure the drives by using
the drive-select jumpers located on the drives.
■ You may need to configure the drives you install using the BIOS Setup
utility. Press F1 at start up to open the BIOS Setup utility.
Adding or replacing drives 21

Drive cabling information
Your computer includes three different types of drive cables. Each drive cable
is clearly labeled, indicating cable-type and showing which end is connected
to the appropriate connector on the system board and which end is connected
to the drive.
Use the diskette drive connector cable to connect the diskette drive. Use the
standard IDE connector cable to connect IDE devices such as CD drives and
standard IDE hard drives. Use the 80-conductor IDE cable to connect
DMA-100-compatible hard drives.
Important The CD drive may be connected to the primary IDE
controller and the hard drive may be connected to the
secondary IDE controller. Drive assignments will reflect the
correct configuration from the factory.
Adding or replacing drives
Use these procedures to replace 5.25-inch drives such as CD/DVD drives,
3.5-inch drives such as diskette drives, and hard drives.
To add or replace a CD/DVD or diskette drive:
1 Open the case by following the procedure “To open the Gateway
Mid-Tower case:” on page 17.
2 Return the case to its upright position.
22 Working with the Gateway Mid-Tower case

3
If you are adding a new drive, press in on the two bezel release tabs, then
swing open the front bezel.
Adding or replacing drives 23

4 If you are adding a new drive, remove the drive bay bezel cover for the
bay into which you are installing the new drive.
3.5-inch drive bay
bezel cover tab
5.25-inch drive bay
bezel cover tab
24 Working with the Gateway Mid-Tower case

5
If you are adding a new drive, remove the EMI shield for the bay into
which you are installing the new drive.
EMI shields
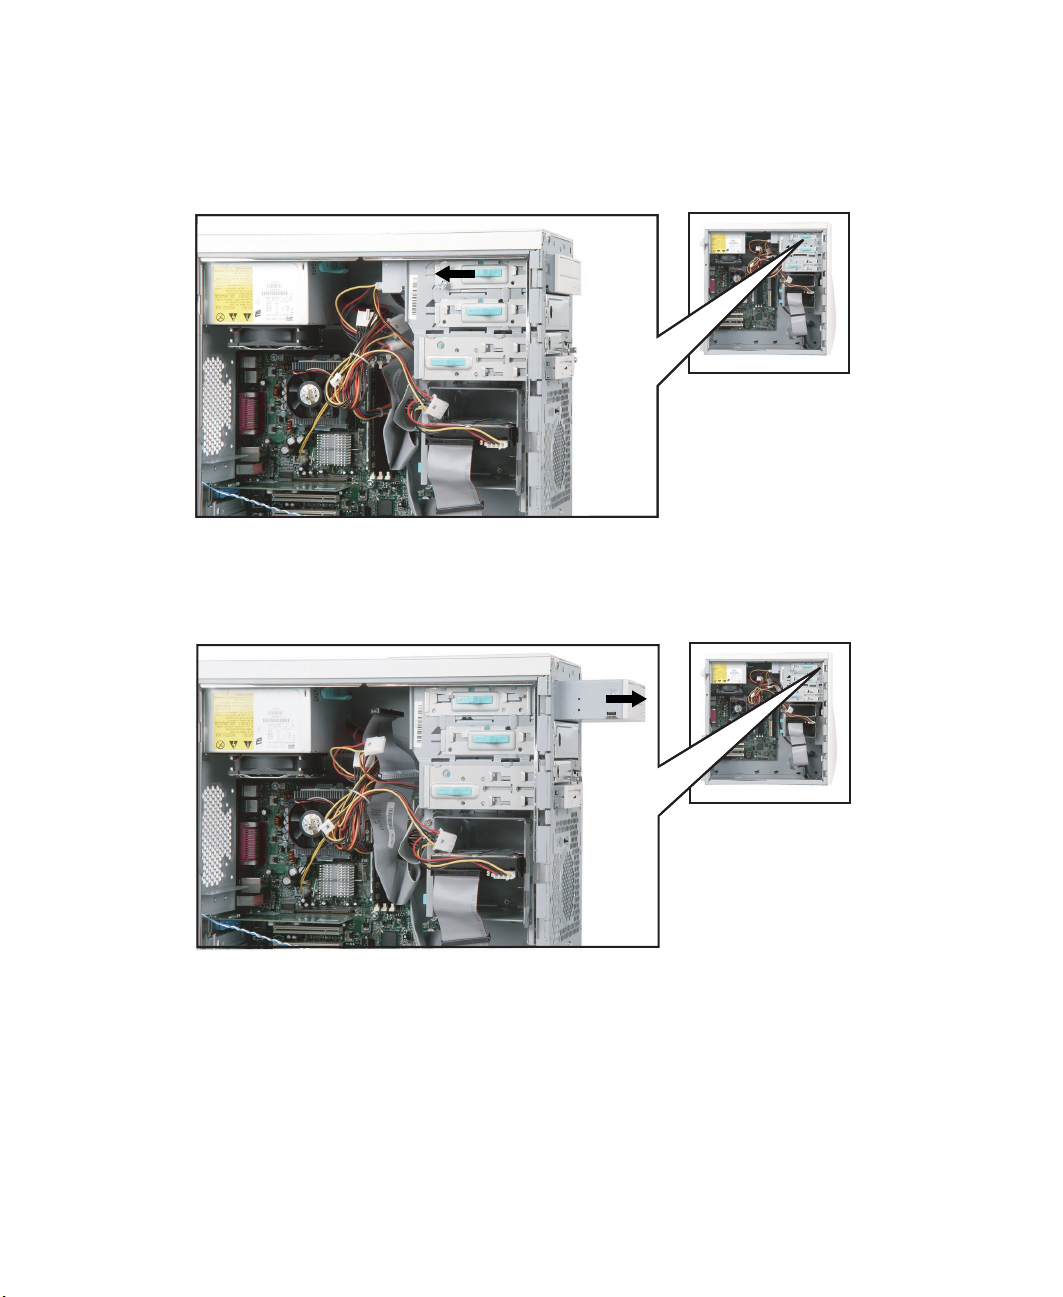
6 If you are replacing a drive, disconnect the drive cables, noting their
locations and orientation. (You will reconnect the cables after you install
the new drive.)
Adding or replacing drives 25
7 If there is a shipping screw installed next to the release lever, remove the
screw, then unlock the drive bay by sliding the release lever back toward
the back of the case.
8 If you are replacing a drive, remove the old drive by sliding it forward
and out of the drive bay.
26 Working with the Gateway Mid-Tower case

9
Set any jumpers on the new drive. See the drive manual for further
instructions.
10 Slide the new drive into the drive bay until it settles into the indentation,
then lock it into place by sliding the release lever toward the front of
the case.
11 Connect the drive cables according to the instructions in the drive
manual.
12 Close the case by following the procedure “To close the Gateway
Mid-Tower case:” on page 19.
Adding or replacing drives 27

To replace a hard drive:
1 Open the case by following the procedure “To open the Gateway
Mid-Tower case:” on page 17.
2 Return the case to its upright position.
3 Disconnect the drive cables, noting their locations and orientation. (You
will reconnect the cables after you install the new drive.) See the drive
manual for further instructions.
Power cable
28 Working with the Gateway Mid-Tower case
Data cable

4
Slide the green release lever out toward the open side of the case, then
remove the drive by sliding it out of the drive bay.
5 Set any jumpers on the new drive. See the drive manual for further
instructions.
6 Slide the new drive in and lock it into place by sliding the release lever
toward the inside of the case.
7 Connect the drive cables according to the instructions in the drive
manual.
8 Close the case by following the procedure “To close the Gateway
Mid-Tower case:” on page 19.
Adding or replacing drives 29

Replacing expansion cards
An expansion card is a card used in the computer to add functionality to the
system. Use the following procedures to replace, add, or reseat an expansion
card.
To replace, add, or reseat an expansion card:
1 Open the case by following the procedure “To open the Gateway
Mid-Tower case:” on page 17.
2 For more stability, place the computer on its side.
3 Disconnect any cables that are attached to the card, noting their locations
and orientation. (You will reconnect the cables after you install the new
card.)
4 Remove the card retention cover thumb-screw that secures the card
retention cover to the case.
30 Working with the Gateway Mid-Tower case
Card retention cover thumb-screw

5
While holding the expansion card retention cover open, remove the
expansion card.
You can slightly seesaw the card end-to-end to loosen the card, but do
not bend the card sideways.
Caution Do not touch the contacts on the bottom part of the
expansion card. Touching the contacts can cause
electrostatic damage to the card.
6 While holding the retention cover open, install the new card into the
expansion slot.
You can slightly seesaw the card end-to-end to help insert the card, but
do not bend the card sideways.
Replacing expansion cards 31

7 Lock the card in place by pushing the expansion card retention cover
inward, then secure the expansion card retention cover with the card
retention cover thumb-screw.
8 Reconnect any cables to the card.
9 Close the case by following the procedure “To close the Gateway
Mid-Tower case:” on page 19.
10 Refer to the guide that came with the card for any special software
installation instructions.
32 Working with the Gateway Mid-Tower case

Replacing the power supply
To replace a Gateway Mid-Tower case power supply:
1 Open the case by following the procedure “To open the Gateway
Mid-Tower case:” on page 17.
2 Return the computer to its upright position.
3 Disconnect the power supply cables from all components, noting their
locations and orientation. (You will reconnect the cables after you install
the new power supply.)
4 Flip the power supply retention clip out.
Replacing the power supply 33

5 While supporting the power supply with your hand, remove the power
supply by sliding it toward the front of the case, then outward.
6 Install the new power supply into the case by reversing the actions you
took in Step 4, then lock the new power supply into place by flipping
the power supply retention clip in.
7 Reconnect the power supply cables.
8 Close the case by following the procedure “To close the Gateway
Mid-Tower case:” on page 19.
34 Working with the Gateway Mid-Tower case

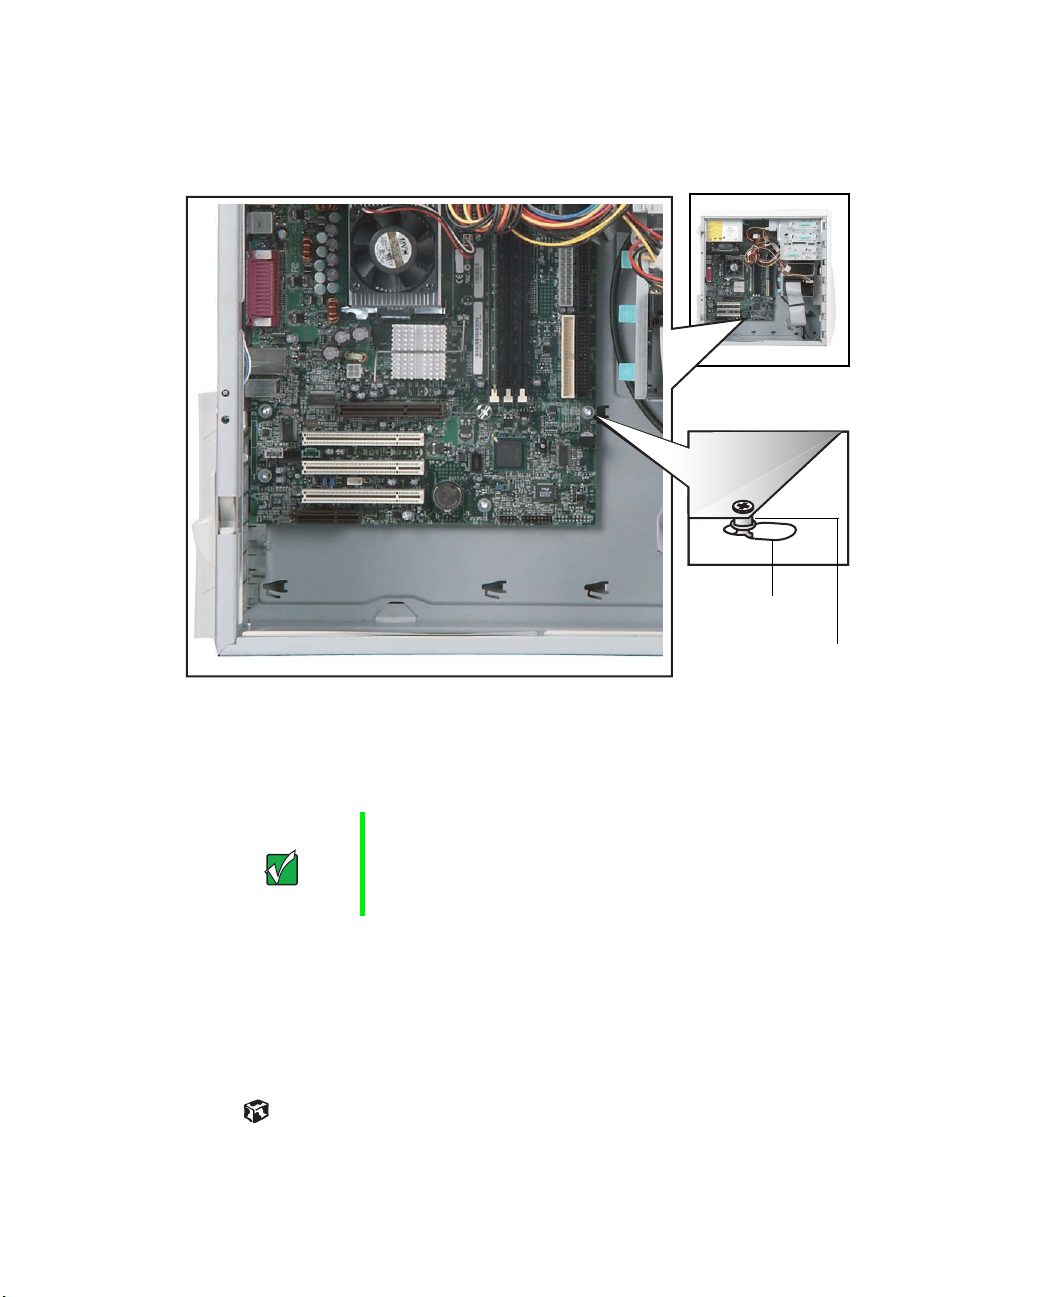
Replacing the system board
To replace the system board:
1 Open the case by following the procedure “To open the Gateway
Mid-Tower case:” on page 17.
2 Remove all of the expansion cards by following the procedure “To replace,
add, or reseat an expansion card:” on page 30.
3 Disconnect the power and data cables from the system board, noting their
locations and orientation. (You will reconnect the cables after you install
the new board.)
4 Remove the thumb screw using a screwdriver, coin, or your fingers.
Thumb screw
Replacing the system board 35
5 Remove the system board by sliding the board toward the front of the
case. The system board standoffs slide out of the keyhole slots.
Keyhole slot
Standoff
6 Slide the new system board into the keyhole slots and lock it into place
with the thumbscrew.
Important The new system board must have special standoffs
(pem studs) mounted on the bottom of the board. If
necessary, use the standoffs from the original system
board.
7 Connect the power and data cables.
8 Install the expansion cards by following the procedure in “To replace,
add, or reseat an expansion card:” on page 30.
9 Close the case by following the procedure “To close the Gateway
Mid-Tower case:” on page 19.
36 Working with the Gateway Mid-Tower case

Installing memory
When you upgrade your computer memory, make sure that you install the
correct type of memory module for your computer. For more information
about your computer’s memory type, see “Specifications” on page 104.
Installing or replacing RIMM memory
You need to use a combination of Rambus Interface Memory Modules
(RIMMs) and Continuity-RIMMs (C-RIMMs). All memory slots must be filled
with either a RIMM or a C-RIMM.
RIMMs
RIMM memory has a metal cover on one or both sides of the module.
C-RIMMs
C-RIMMs are placeholders that let the memory modules work. A C-RIMM does
not have a metal cover on either side of the module.
Installing memory 37

Tips & Tricks Identifying identical RIMM modules
Identical RIMM modules must share the same five specifications shown in the
example below.
Number of RDRAMs
Module Memory Capacity
ECC Support
(blank = no ECC support
ECC = ECC support)
64MB/8 ECC
RAMBUS 800-45
t
RAC
Memory Speed
To install or replace RIMM or C-RIMM memory:
1 Open the case by following the procedure “Opening and closing” on
page 17. Make sure that you remove all external cables and the power
cord.
2 Find the memory module banks, sometimes called expansion slots, on
your system board.
38 Working with the Gateway Mid-Tower case

3
If you are removing a RIMM module from the memory module bank,
gently pull the plastic tabs away from the sides of the memory module
and remove it.
- OR -
If you are removing a C-RIMM module from the memory module bank,
gently pull the plastic tabs away from the sides of the module and remove
it.
Installing memory 39
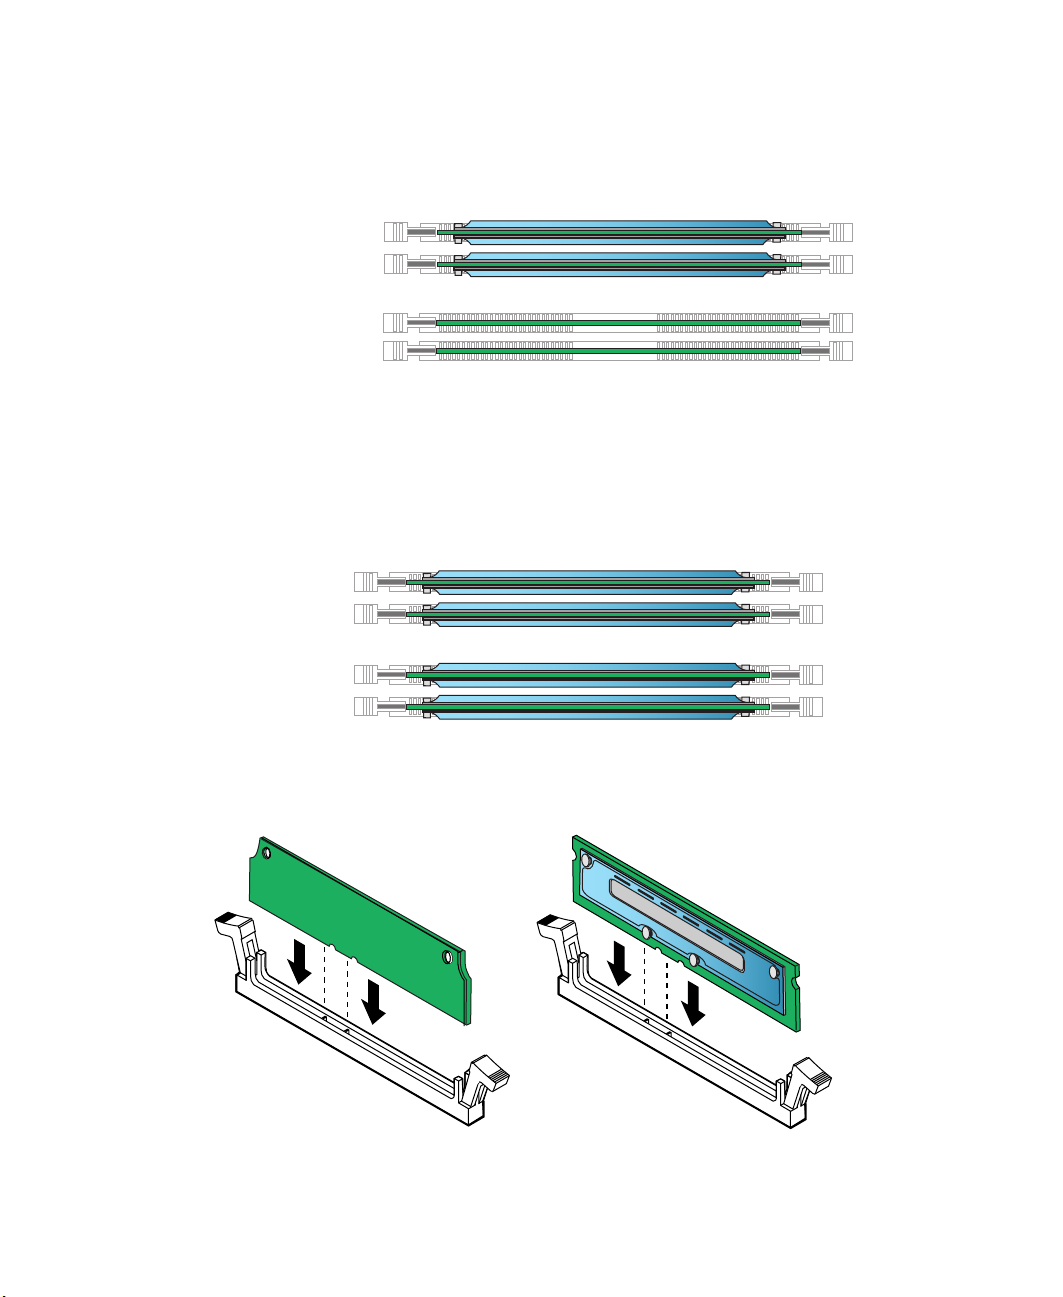
4 If you are installing two memory modules into one dual-channel (two
slots per bank) bank (RIMM BANK 0), install two identical RIMMs in
RIMM BANK 0 and two C-RIMMS in RIMM BANK 1 on the system board.
RIMM BANK 0
RIMM modules
RIMM BANK 1
C-RIMM modules
- OR -
If you are installing four memory modules into two dual-channel banks
(RIMM BANK 0 and RIMM BANK 1), install two identical RIMMs in
RIMM BANK 0 and two identical RIMMs in RIMM BANK 1 on the system
board.
RIMM BANK 0
RIMM modules
RIMM BANK 1
RIMM modules
Make sure that you align the notches on the RIMM and C-RIMM with
the notches on the memory module bank and press firmly into the bank.
40 Working with the Gateway Mid-Tower case

5
Make sure that the tabs on the sides of the RIMM and C-RIMM secure
the memory module in the slot. When the module is secure, you will
hear a click as both tabs lock.
6 Close the case by following the procedure “To close the Gateway
Mid-Tower case:” on page 19.
7 Turn on the computer. Windows starts and the Windows desktop appears.
8 In Windows XP, click Start, then select Control Panel, Performance and
Maintenance
shown at the bottom of the System Properties window in the
- OR -
, then System. The amount of memory in your computer is
General tab.
In Windows Me, Windows 2000, or Windows 98, right-click the
Computer
icon, then select Properties. The amount of memory in your
My
computer is shown at the bottom of the System Properties window in
the
General tab.
Installing memory 41

Replacing the battery
The battery provides power for the computer real-time clock and CMOS
memory, which stores the computer configuration information.
If your battery is failing you may notice your computer clock slowing down
and giving you the incorrect time. If so, open the BIOS Setup utility and make
note of any custom values in the various menus before replacing the battery.
Replacing the battery resets the BIOS Setup utility to its default values.
Warning There is a danger of explosion if the battery is incorrectly
replaced. Replace the battery only with the same or
equivalent type recommended by the manufacturer.
Dispose of used batteries according to the manufacturer’s
instructions.
Attention Il y a danger d’explosion s’il y a replacement incorrect de
la batterie.
Remplacer uniquement avec une batterie du même type
ou d’un type équivalent recommandé par le constructeur.
Mettre au rebut les batteries usagées conformément aux
instructions du fabricant.
When disposing of used batteries, check local and national laws regarding
disposal of toxic or dangerous waste.
To replace the battery:
1 Restart the computer and start the BIOS Setup utility by pressing F1 when
you are prompted to do so.
2 Verify that all your settings are currently correct, then from the Exit menu,
select
Save Custom BIOS Settings. For more information about the BIOS
Setup utility program, see “Using the BIOS Setup Utility” on page 45.
3 Turn off the computer and disconnect the power cord, modem cable (if
installed), and all external peripheral devices.
4 Remove the cover. (See “Opening and closing” on page 17 and
“Preventing static electricity discharge” on page 15.)
42 Working with the Gateway Mid-Tower case

5
Locate the battery on the system board (see “System board layout” on
page 98). The battery is circular and has the positive pole mark (+) on
the top.
6 Place the edge of a small flat-head screwdriver under the battery and lift
it up until it pops out of the socket.
7 Press the new battery in the socket with the positive pole up. Make sure
you have pressed the battery down far enough for it to contact the base
of the socket (it should snap into place).
8 Close the case by following the procedure “To close the Gateway
Mid-Tower case:” on page 19.
9 Open the BIOS Setup utility, then select Load Custom BIOS Settings from
the
Exit menu.
Replacing the battery 43

44 Working with the Gateway Mid-Tower case

Using the BIOS Setup Utility
About the BIOS Setup utility
The computer’s BIOS has a built-in setup utility that lets you configure several
basic computer characteristics. The settings are stored in battery-backed RAM
and are retained even when the power is off.
Important The computer starts very quickly. If your monitor requires
time to warm up, you may not see the messages. If you
are having problems, you may need to wait for the monitor
to warm up and then restart the computer. If you are trying
to enter Setup, press F1 before the monitor warms up.
4
About the BIOS Setup utility 45

Start the BIOS Setup utility by restarting the computer, then pressing F1 when
the Gateway logo screen appears during startup. The Main BIOS Setup utility
screen opens. It may not look exactly like the screen shown below.
BIOS Setup Utility
Maintenance Main Advanced Security Power Boot Exit
AMI BIOS Version :
BIOS Build Date :
BIOS ID :
Processor Type :
Processo r Speed :
System Memory :
System Time :
System Date :
XX.XX.XX
XX/XX/XX
XXXXXXXX
Pentium III(tm)
800MHz
128 MB
[XX:XX:XX]
[Thu XX/XX/XXXX]
← → Select Screen
↑ ↓Select Item
- + Change Field
Tab Select Field
F1 General Help
F10 Save & Exit
ESC Exit
As you select items on the Main menu or in submenus, you see specific
information related to the current selection in the Item Specific Help box.
The command bar shows the keystrokes necessary to access help, navigate
through the menus, and perform other functions.
■ F1 opens the Help screen, providing general help for using the BIOS Setup
utility.
■ The ↑ (up arrow) and ↓ (down arrow) keys select items in the menu.
■ The ← (left arrow) and → (right arrow) keys move you between the
menus.
■ ENTER either moves you to a submenu screen when a selected item is
preceded by > or activates a selected field.
■ ESC closes the screen you are in and returns you to the previous screen
or opens a dialog box allowing you to exit from the BIOS Setup utility.
■ F10 opens a screen that lets you save all settings, then exit the BIOS Setup
utility.
46 Using the BIOS Setup Utility

The main screen has the following menu selections at the top of the screen:
■ Maintenance lets you clear Setup passwords and enable extended
configuration mode. The maintenance menu is only displayed when the
BIOS configuration jumper is set to configure (see “Setting the BIOS
configuration jumper” on page 49 for more information).
■ Main gives you access to basic information and settings related to your
computer hardware and configuration.
■ Advanced gives you access to information and settings for computer
resources, hardware, and computer configuration.
■ Security gives you access to settings related to computer access passwords
and security settings.
■ Power gives you access to information and settings for power
management features.
■ Boot gives you access to information and settings for boot features and
boot sequences.
■ Exit gives you access to options for exiting the BIOS Setup utility.
Refer to the Help box on the right side of the BIOS Setup screens for
information about menu items.
About the BIOS Setup utility 47

Updating the BIOS
If you need a new version of the BIOS, you can download the BIOS update
from technical support area on the Gateway Web site
(www.gatewayatwork.com) and install the new version from a diskette.
To update the BIOS you need to perform the following tasks in sequence:
1 Create a bootable diskette
2 Save the current BIOS settings
3 Create the BIOS update diskette
4 Update the BIOS
5 Load the BIOS settings
Follow the detailed instructions for updating the BIOS that are included in
the self-extracting file that you can download from the technical support area
of Gateway’s Web site.
48 Using the BIOS Setup Utility

Setting the BIOS configuration jumper
The system board has a configuration jumper related to the BIOS. Place a
jumper on specific pins to reset the CMOS settings to the BIOS defaults or to
erase a misplaced or forgotten password. For more information on the location
and use of the configuration jumper, see “BIOS configuration jumper settings”
on page 103.
Caution Moving a jumper while the power is on can damage your
computer. Always turn off the computer and unplug the
power cord from the computer before changing jumper
settings.
Setting the BIOS configuration jumper 49

50 Using the BIOS Setup Utility

Managing Your Computer
Protecting against power source problems
Surge suppressors, line conditioners, and uninterruptible power supplies can
help protect your computer against power source problems.
Surge suppressors
During a power surge, the voltage level of electricity coming into your
computer can increase to far above normal levels and cause data loss or system
damage. Protect your computer and peripheral devices by connecting them
to a surge protector, which absorbs voltage surges and helps prevent them from
reaching your computer.
Warning High voltages can enter your computer through both the
power cord and the modem connection. Help protect your
computer by using a surge protector. If you have a
telephone modem, use a surge protector that has a
modem jack. If you have a cable modem, use a surge
protector that has an antenna/cable TV jack. During an
electrical storm, unplug both the surge protector and the
modem.
5
Protecting against power source problems 51

When purchasing a surge suppressor:
■ Make sure the surge suppressor meets the appropriate product safety
certification for your location, such as Underwriters Laboratories (UL).
■ Check the maximum amount of voltage the suppressor allows to pass
through the line. The lower the voltage that the suppressor allows to pass
through, the better the protection for your computer.
■ Check the energy absorption (dissipation) rating. The higher the energy
absorption rating, the better the protection for your computer.
■ Check for line-conditioner capabilities. A line conditioner smooths out
some of the normal line noise (small voltage fluctuations) of an electrical
supply.
Line conditioners
A line conditioner protects your computer from the small fluctuations in
voltage from an electrical supply. Most computers can handle this variation,
called line noise, without problems. However, some electrical sources include
more line noise than normal. Line noise can also be a problem if your
computer is located near, or shares a circuit with, a device that causes
electromagnetic interference, such as a television or a motor.
Some surge suppressors and uninterruptible power supplies include simple
line-conditioning capabilities.
Uninterruptible power supplies
Use a standby uninterruptible power supply (UPS) to protect your computer
from data loss during a total power failure. A UPS uses a battery to keep your
computer running temporarily during a power failure and lets you save your
work and shut down your computer. You cannot run your computer for an
extended period of time while using only the UPS.
52 Managing Your Computer

Power management
Computer equipment can account for a significant portion of energy use in
the home and office environment. You may not want to shut down your
computer each time you leave it, especially if you plan to be away for only
a short time. Windows lets you use the following modes to conserve energy
when the system is not in use:
■ Standby - while your computer is in Standby mode, it switches to a low
power state where devices, such as the monitor and drives, turn off and
the entire system uses less power.
■ Hibernate - (also called save to disk) writes all current memory (RAM)
information to the hard drive, then turns the computer completely off.
The next time you turn on the computer, it reads the memory
information from the hard drive and opens the programs and documents
that were open when you activated Hibernate mode.
Power management 53

Using Standby mode
Always save your work before using the Standby mode. Once in
Standby mode, your computer reduces or turns off the power to most devices
except memory. However, the information in the memory is not saved to the
hard drive. If power is interrupted, the information is lost.
The table below shows how to use Standby mode.
If your computer
...and you want to... ...then
is...
Off Start up Press the power button.
On Enter Standby mode In Windows XP, click Start, then click
Turn Off Computer, then click
Stand By.
- OR -
In Windows Me, Windows 2000,
Windows 98, click Start, then select
Shut Down, Stand By, then click OK.
On Enter Hibernate
mode (must be
enabled)
In Standby or
Hibernate mode
On Shut down Click Start, then click
Exit Standby or
Hibernate mode
In Windows XP, click Start, then click
Turn Off Computer, press and hold
HIFT, then click Hibernate.
S
- OR -
In Windows 2000, click Start, then
select Shut Down, Hibernate, then
click OK.
Move the mouse or press any key on
the keyboard.
Turn off computer or Shut Down,
then click Tur n off or Shut Down.
or
Important If for some reason you cannot use the Turn Off Computer
or Shutdown options in Windows to shut down your
computer, press the power button for about five seconds.
54 Managing Your Computer

Changing power settings
You can change power management settings, such as the power button
function and power-saving timers, by changing power settings in Windows.
You can also adjust power schemes and adjust advanced power settings.
Power schemes (groups of power settings) let you change power saving options
such as when the monitor or hard drive is automatically turned off. You can
also select one of the defined power schemes or create a custom power scheme.
Advanced power settings let you assign different power saving modes to the
power button.
Help and
Support
For more information on changing power settings, click
Start, then select Help and Support or Help.
Changing the power scheme
To change the power scheme:
1 In Windows XP, click Start, then select Control Panel. Click Performance
and Maintenance
- OR -
In Windows Me, Windows 2000, or Windows 98, click
Settings, then Control Panel. The Control Panel window opens. If you do
not see the
Panel options
. The Performance and Maintenance window opens.
Power Options or Power Management icon, click view all Control
.
Start, then select
Power management 55

2 Click/Double-click the Power Options or Power Management icon. The
Power Options Properties dialog box opens.
3 Select a power scheme from the Power Scheme list.
- OR -
Set the timers for
then save your custom power scheme by clicking
name for the scheme.
4 Save the changes by clicking OK.
56 Managing Your Computer
System standby, Turn off monitor, and Turn off hard disks,
Save As and typing a

Changing advanced power settings
To change advanced power management settings:
1 In Windows XP, click Start, then select Control Panel. Click Performance
and Maintenance
- OR -
. The Performance and Maintenance window opens.
In Windows Me, Windows 2000, or Windows 98, click
Settings, then Control Panel. The Control Panel window opens. If you do
not see the
Panel options
Power Options or Power Management icon, click view all Control
.
Start, then select
2 Click/Double-click the Power Options or Power Management icon. The
Power Options Properties dialog box opens.
3 Click the Advanced tab.
4 Change the settings, then save them by clicking OK.
Power management 57

Activating Hibernate mode
To activate Hibernate mode:
1 In Windows XP, click Start, then select Control Panel. Click Performance
and Maintenance
- OR -
. The Performance and Maintenance window opens.
In Windows Me, Windows 2000, or Windows 98, click
Settings, then Control Panel. The Control Panel window opens. If you do
not see the
Panel options
Power Options or Power Management icon, click view all Control
.
Start, then select
2 Click/Double-click the Power Options or Power Management icon. The
Power Options Properties dialog box opens.
3 Click the Hibernate tab.
4 Select the Enable hibernation check box, then click Apply. Hibernate mode
is no w an opti on you can select in the Power S chemes a nd Advance d tabs.
5 Click OK.
58 Managing Your Computer

To place your computer into hibernation:
■ To use hibernation as a power savings mode, open the Power Options
dialog box, click the
one of the power settings, then save the changes by clicking
■ To manually place your computer into hibernation:
■ In Windows XP, click Start, then click Turn off computer, then hold
the Shift key down while clicking
- OR -
■ In Windows Me, Windows 2000, or Windows 98, click Start, then
Shut Down, Hibernate, then OK.
Power Schemes or Advanced tab, select Hibernate as
OK.
Standby.
Installing an Uninterruptible Power Supply in Windows XP
To install an Uninterruptible Power Supply in Windows XP:
1 Click Start, then select Control Panel. Click Performance and Maintenance.
The Performance and Maintenance window opens.
2 Click the Power Options icon. The Power Options Properties dialog box
opens.
Power management 59
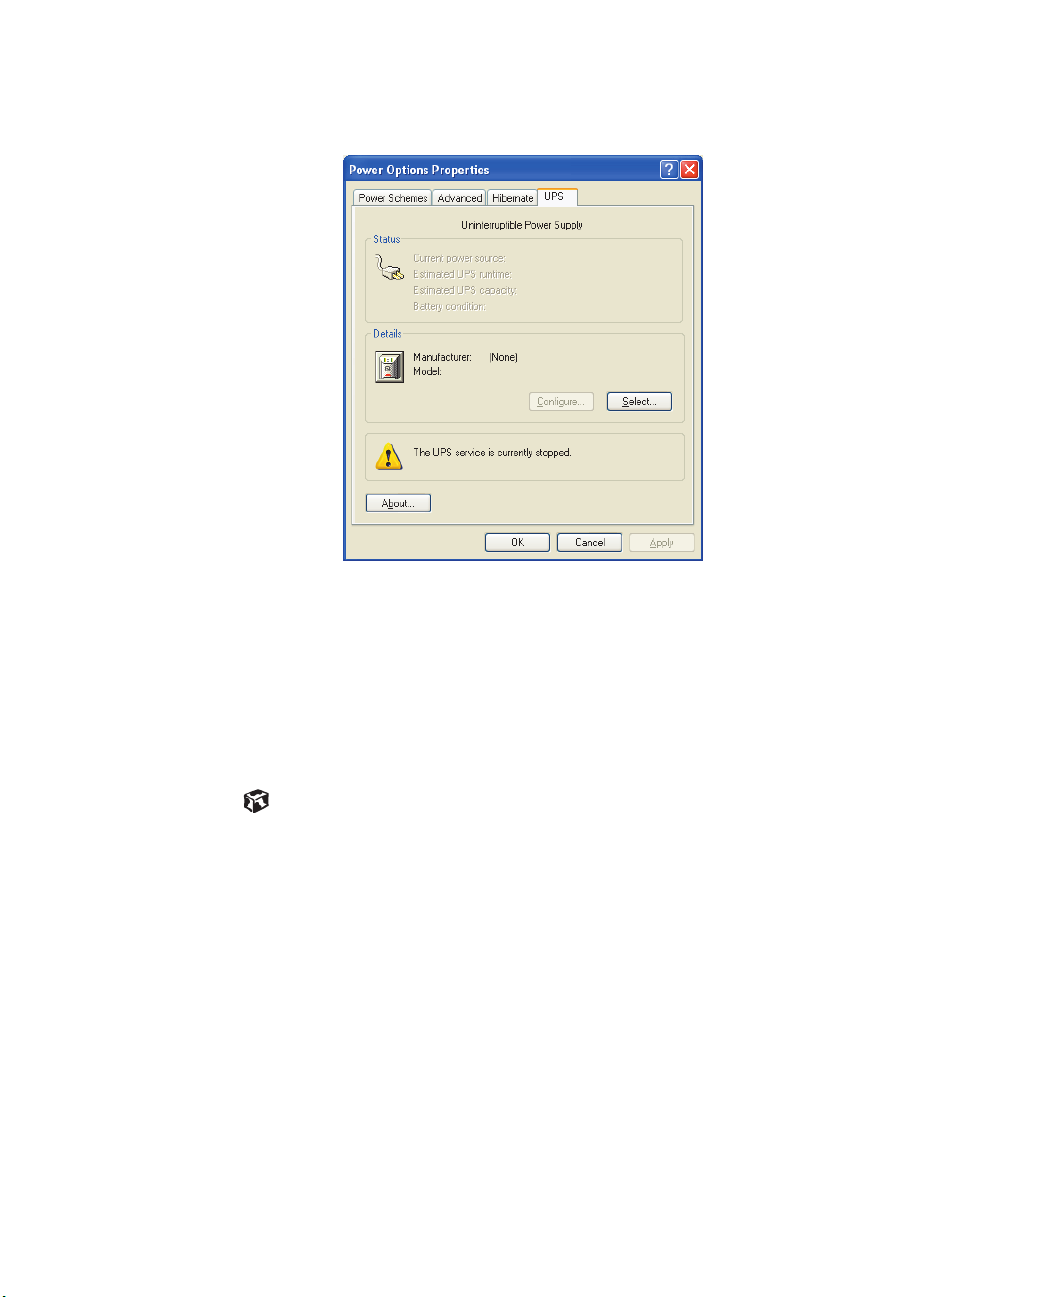
3 Click the UPS tab.
4 Click Select. The UPS Selection dialog box opens.
5 Select the manufacturer and model of the UPS device.
6 Click the serial port where the UPS device is attached.
7 Click Finish.
8 Click OK.
60 Managing Your Computer

Protecting your computer from viruses
A virus is a program that attaches itself to a file on a computer, then spreads
from one computer to another. Viruses can damage data or cause your
computer to malfunction. Some viruses go undetected for a period of time,
because they are activated on a certain date.
Protect your computer from a virus by:
■ Using your Norton
are on diskettes, attached to e-mail messages, or downloaded from the
Internet.
■ Checking all programs for viruses before installing them.
■ Disabling macros on suspicious Microsoft Word and Excel files. These
programs will warn you if a document that you are opening contains a
macro that might have a virus.
■ Periodically updating your Norton AntiVirus program to protect against
the latest viruses.
®
AntiVirus program to check files and programs that
Help and
Support
For more information on protecting your computer from
viruses, click Start, then select Help and Support or Help.
To scan for viruses:
1 Click Start, then select All Programs, Norton AntiVirus, then Norton
AntiVirus 2002
2 Click Scan for Viruses.
3 Select the type of scan you want to make in the Scan area, then under
Actions, click
. Norton AntiVirus opens.
Scan.
Protecting your computer from viruses 61

To remove a virus:
1 Find and remove the virus immediately using Norton AntiVirus.
2 Turn off your computer and leave it off for at least 30 seconds.
3 Turn on the computer and rescan for the virus.
To update Norton AntiVirus:
1 Click Start, then select All Programs, Norton AntiVirus, then LiveUpdate -
Norton AntiVirus
2 Follow the on-screen instructions to update your Norton AntiVirus
program with the latest virus protection files.
3 When the program has finished, click Finish.
. The LiveUpdate wizard opens.
62 Managing Your Computer

Managing hard drive space
Windows provides several utilities you can use to manage your hard drive.
Checking hard drive space
Help and
Support
For more information on checking hard drive space, click
Start, then select Help and Support or Help.
To check hard drive space:
1 In Windows XP, click Start, then select My Computer.
- OR -
In Windows Me, Windows 2000, or Windows 98, double-click the
Computer
2 Right-click the drive that you want to check for available file space, then
select
icon.
Properties. Drive space information appears.
My
Managing hard drive space 63

Using Disk Cleanup
Delete unneeded files, such as temporary Windows files, to free hard drive
space.
Help and
Support
For more information on using Disk Cleanup, click Start,
then select Help and Support or Help.
To use the Windows Disk Cleanup program:
1 In Windows XP, click Start, then select My Computer. The My Computer
window opens.
- OR -
In Windows Me, Windows 2000, or Windows 98, double-click the
Computer
2 Right-click the hard drive that you want to delete files from, then select
Properties. The System Properties dialog box opens at the General tab.
icon. The My Computer window opens.
My
3 Click Disk Cleanup. The Disk Cleanup dialog box opens.
64 Managing Your Computer

4
Select the check box beside each file type you want to delete. For more
information about file types you can delete, read the descriptions in the
Disk Cleanup dialog box.
5 Click OK, then click Ye s.
Checking the hard drive for errors
The Error-checking program in Windows XP and Windows 2000 or ScanDisk
program in Windows Me and Windows 98 examines the hard drive for
physical flaws and file and folder problems. These programs correct file and
folder problems and mark flawed areas on the hard drive so that Windows
does not use them.
If you use your computer several hours every day, you probably want to run
Error-checking or ScanDisk once a week. If you use your computer less
frequently, once a month may be adequate. Also use Error-checking or
ScanDisk if you encounter hard drive problems.
Help and
Support
For more information on checking the hard drive for errors,
click Start, then select Help and Support or Help.
To checking the hard drive for errors:
1 In Windows XP, click Start, then select My Computer.
- OR -
In Windows Me, Windows 2000, or Windows 98, double-click the
Computer
2 Right-click the hard drive that you want to check for errors, then select
Properties. The System Properties dialog box opens.
icon.
My
Managing hard drive space 65
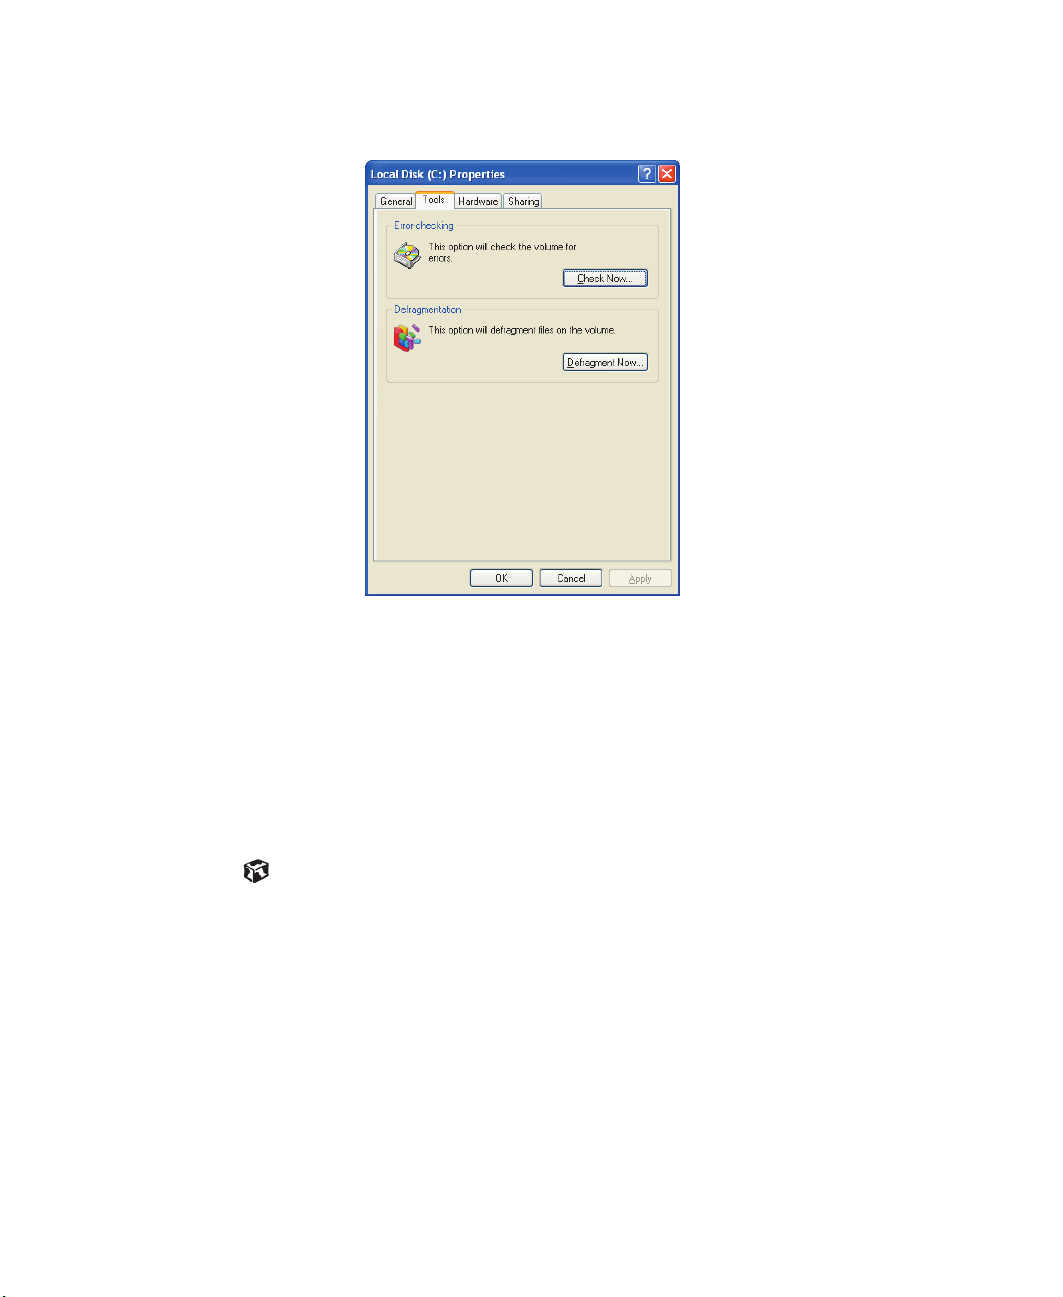
3 Click the Too ls tab.
4 Click Check Now.
5 Select the options to use, then click Start. For help, press F1. Windows
checks the drive for errors. This process may take several minutes.
6 Correct any problems that are found by following the on-screen
instructions. After Windows has finished checking the drive for errors,
it provides a summary of the problems that it found.
7 Click OK.
66 Managing Your Computer

Defragmenting the hard drive
When working with files, sometimes Windows divides the file information
into pieces and stores them in different places on the hard drive. This is called
fragmentation, and it is normal. In order for the computer to use a file,
Windows must search for the pieces of the file and put them back together.
This process slows the hard drive performance.
The Disk Defragmenter program organizes the data on the drive so that each
file is stored as one unit rather than as multiple pieces scattered across
different areas of the drive. Defragmenting the information stored on the drive
can improve hard drive performance.
While the Disk Defragmenter program is running, do not use your keyboard
or mouse because using them may continuously stop and restart the
defragmenting process. Also, if you are connected to a network, log off before
starting Disk Defragmenter. Network communication may stop the
defragmentation process and cause it to start over.
Help and
Support
For more information on defragmenting your hard drive,
click Start, then select Help and Support or Help.
To run Disk Defragmenter:
1 In Windows XP, click Start, then select My Computer.
- OR -
In Windows Me, Windows 2000, or Windows 98, double-click the
Computer
2 Right-click the hard drive that you want to defragment, then select
Properties. The System Properties dialog box opens.
icon.
My
Managing hard drive space 67

3 Click the Too ls tab.
4 Click Defragment Now.
5 If Disk Defragmenter does not start automatically, click Start or
Defragment
.
6 Disk Defragmenter shows its progress on the screen. When finished, Disk
Defragmenter asks if you want to quit the program.
7 Click Close or Ye s.
68 Managing Your Computer

Backing up files
Backing up files and removing them from the hard drive frees space for new
files on the hard drive. It also protects you from losing important information
if the hard drive fails or you accidentally delete files.
You should back up your files regularly to a writable CD (if you have a CD-R
or CD-RW drive) or to diskettes. Use a backup device, such as a CD-R, CD-RW,
or Zip drive, to do a complete hard drive backup. If you do not have a
high-capacity backup device and you want to purchase one, you can contact
Gateway’s Add-on Sales department or visit our Web site at www.gateway.com.
Help and
Support
For more information on backing up files, click Start, then
select Help and Support or Help.
Managing hard drive space 69
Using the Scheduled Task Wizard
The Scheduled Task Wizard lets you schedule maintenance tasks such as
running Disk Defragmenter and Error-checking or ScanDisk.
Help and
Support
For more information on using the Scheduled Task Wizard,
click Start, then select Help and Support or Help.
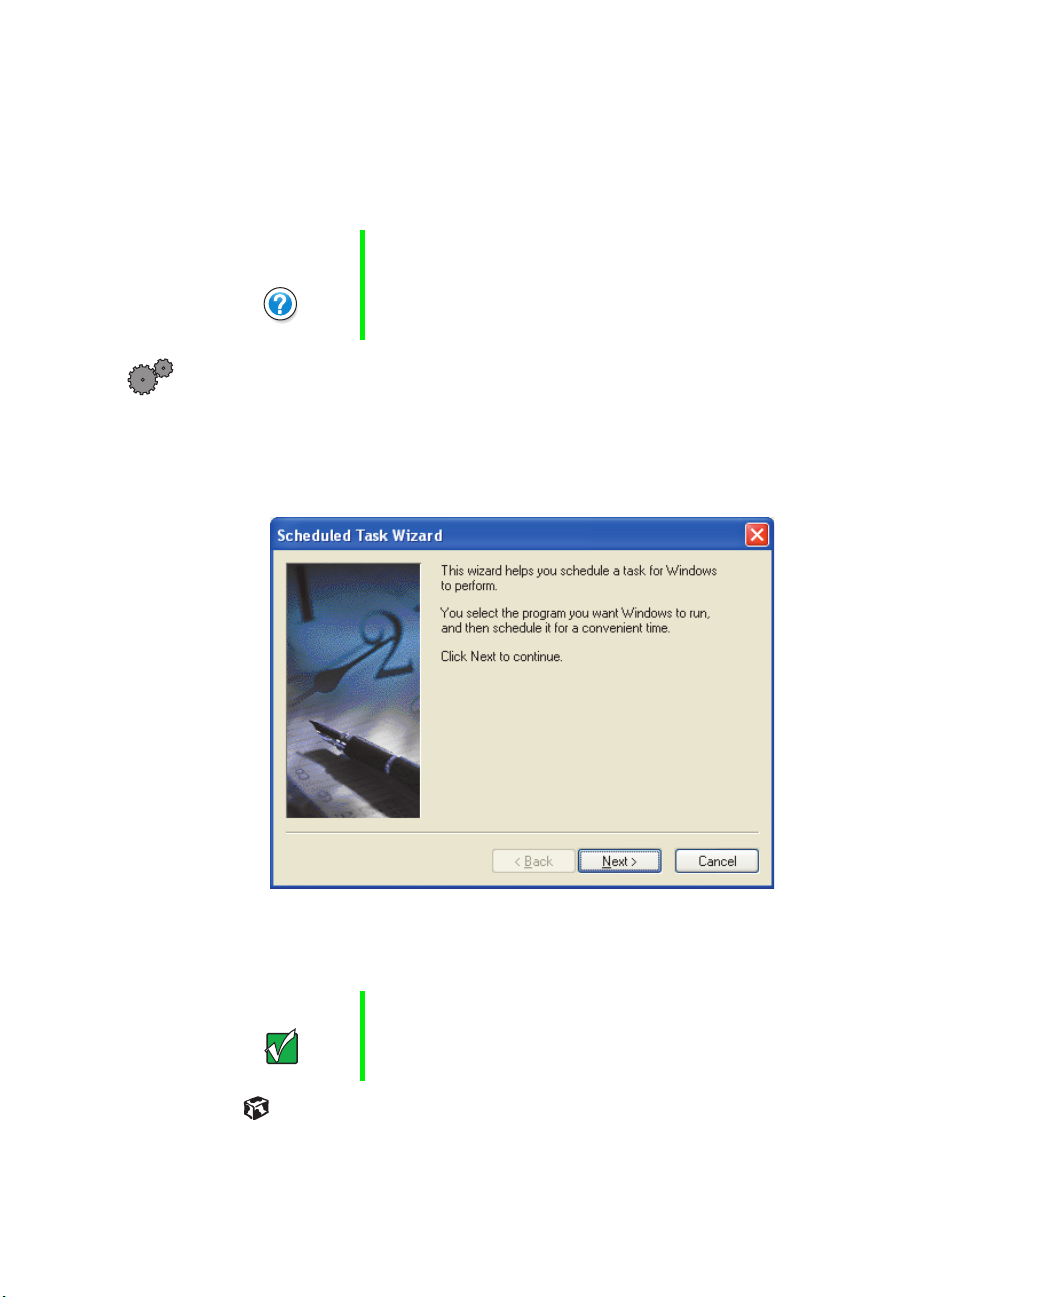
To start the Scheduled Task Wizard:
1 Click Start, then select All Programs, Accessories, System Tools, then
Scheduled Tasks. The Scheduled Tasks window opens.
2 Double-click Add Scheduled Task. The Scheduled Tasks Wizard opens.
3 Click Next, then select the Scheduled Task Wizard option you want to
create and follow the screen prompts to customize the task.
Important
Your computer must be on during scheduled
tasks
70 Managing Your Computer
.

Cleaning your computer
Keeping your computer clean and the vents free from dust helps keep your
system performing at its best. You may want to gather these items and put
together a computer cleaning kit:
■ A soft cloth
■ Window cleaner (not for use on LCD panels)
■ An aerosol can of air that has a narrow, straw-like extension
■ Isopropyl alcohol
■ Cotton swabs
■ A CD/DVD drive cleaning kit
Cleaning the exterior
Warning When you shut down your computer, the power turns off,
but some electrical current still flows through the computer.
To avoid possible injury from electrical shock, unplug the
power cord and modem cable from the wall outlets.
Always turn off the computer and other peripherals before cleaning any
components.
Use a damp, lint-free cloth to clean the computer and other parts of your
system. Do not use abrasive or solvent cleaners because they can damage the
finish on components.
Your computer is cooled by air circulated through the vents on the case, so
keep the vents free of dust. With the computer turned off and unplugged,
brush the dust away from the vents with a damp cloth. Be careful not to drip
any water into the vents. Do not attempt to clean dust from the inside the
computer.
Cleaning your computer 71

Cleaning the keyboard
You should clean the keyboard occasionally by using an aerosol can of air with
a narrow, straw-like extension to remove dust and lint trapped under the keys.
If you spill liquid on the keyboard, turn off the computer and turn the unit
upside down. Let the liquid drain, then let the keyboard dry before trying to
use it again. If the keyboard does not work after it dries, you may need to
replace it.
Cleaning the screen
If your computer screen is an LCD panel, use a soft cloth and water to clean
the screen. Squirt a little water on the cloth (never directly on the screen),
and wipe the screen with the cloth.
Caution An LCD screen is made of specially coated glass and can
be scratched or damaged by abrasive or ammonia-based
window cleaners.
- OR -
If your computer screen is not an LCD panel, use a soft cloth and window
cleaner to clean the monitor screen. Squirt a little cleaner on the cloth (never
directly on the screen), and wipe the screen with the cloth.
Cleaning the mouse
If you have a mouse and the mouse pointer begins moving erratically across
the screen or becomes difficult to control precisely, then cleaning the mouse
will likely improve its accuracy.
Help and
Support
72 Managing Your Computer
For a video demonstration on cleaning the mouse, click
Start, then select Help and Support or Help.

To clean your mouse:
1 Turn the mouse upside down.
2 Rotate the retaining ring on the bottom of the mouse counter-clockwise.
3 Remove the retaining ring and mouse ball.
4 Remove any dust, lint, or dirt from the mouse ball with a soft cloth.
5 Clean the mouse rollers with a cotton swab dipped in isopropyl alcohol.
6 Replace the mouse ball and lock the retaining ring into place.
Cleaning your computer 73

Checking system health with LANDesk
LANDesk® Client Manager is a desktop management interface (DMI) that lets
you monitor the health of your system components. Through LANDesk, you
can view software and hardware properties. You can also set LANDesk to notify
you when system resources reach certain levels.
To install LANDesk Client Manager:
1 In the C:\DMI folder on your hard drive, double-click the Setup icon to
launch the install wizard.
2 Follow the instructions that appear on the screen. If you are prompted
for a password during the installation process, type lowtco.
LANDesk Client Manager comes with complete electronic documentation and
online help. Refer to these documents and the program’s Help for more
information.
If you need to restore LANDesk from the System Restoration CD and are
prompted for a password, type lowtco and press E
NTER.
74 Managing Your Computer

System recovery
Take advanced precautions that will allow you to restart your system and
recover damaged files in the event that your hard drive is damaged, or your
BIOS or system files get corrupted.
Creating a startup diskette
If your computer hard drive is damaged, you may not be able to start the
computer from the hard drive. A startup diskette is a bootable diskette that
enables you to start the computer and attempt to fix the problem.
Some operating systems prompt you to create a startup diskette as part of the
setup process and some will allow you to create one at any time. Refer to the
software documentation or see the online help for your operating system for
specific instructions.
Keeping a record of system configuration
Some operating systems allow you to print a summary of the configuration
of your system and the memory allocation. This printed summary can provide
information to reset your system configuration properly if the information
is lost or help you troubleshoot your system. Refer to the software
documentation or see the online help for your operating system for specific
instructions.
Using your System Restoration CD
The System Restoration CD included with your system can be used to:
■ Install hardware drivers
■ Reinstall selected software applications, such as LANDesk Client Manager
■ Reinstall the operating system
Instructions for each operating system are provided with the System
Restoration CD.
System recovery 75

76 Managing Your Computer

Troubleshooting
Introduction
If your computer does not operate correctly, re-read the instructions for the
procedures you have performed. If an error occurs within a program, consult
the documentation supplied with the program. This section identifies
solutions to some possible problems.
Troubleshooting checklist
Before turning on the computer, make sure that:
■ The power cord is connected to the AC power-in connector and an AC
outlet.
■ The AC outlet is supplying power.
■ If a power strip is used, it is turned on, and the circuit breaker is set.
■ The voltage selection switch on the computer power supply reflects the
proper voltage.
6
Verifying your configuration
If your computer is not operating correctly, the BIOS may contain an invalid
configuration parameter. Open the BIOS Setup utility and check your
configuration settings. (See “About the BIOS Setup utility” on page 45.)
Introduction 77

Troubleshooting guidelines
As you troubleshoot your computer, keep the following guidelines in mind:
■ Never remove the case cover while the computer is turned on.
■ Do not attempt to open the monitor. Even if the power is disconnected,
stored energy in the monitor components can inflict a painful or harmful
shock.
■ If a peripheral does not work, make sure that all of the connections are
secure.
■ If you see an error message on the screen, write it down, word for word.
You may be asked about it when calling Gateway Technical Support.
■ Only qualified personnel should open the computer for maintenance.
■ If you are qualified to maintain the computer yourself, make sure you
are properly grounded before opening the computer case. For more
information on preventing electrostatic damage to the computer, see
“Preventing static electricity discharge” on page 15 if you have a Gateway
Mid-Tower case.
Battery installation problems
If you have problems after installing the new battery, try each of the items
listed below:
■ Turn off the computer and make sure that all exterior cables are attached
and secured to the correct connectors.
■ Make sure that all power switches are on. If the computer is plugged into
a power strip or surge protector, make sure it is turned on also.
■ Enter the BIOS Setup utility and compare the settings on the screen with
your notes or the computer hardware manuals. Correct any discrepancies.
78 Troubleshooting

■ Turn off the computer, remove the cover, and make sure that all cables
inside the case are attached securely. Also, make sure that the colored
cable edges are aligned correctly and that the connectors do not miss any
pins. Disconnect and reconnect the cables. Close the case as described
on page 17, then turn on the computer.
■ Turn off the computer, remove the cover and, if you have the proper test
equipment, make sure that the new battery has power. (Although
unlikely, your new battery may be defective.) Close the case as described
on page 17, then turn on the computer.
Battery installation problems 79

CD drive problems
An audio CD produces no sound.
Probable cause Solution
The CD is loaded incorrectly Make sure the label is facing up, then try again.
The speakers are not
connected
The speaker volume is turned
down
The speakers may be muted
through the Multimedia
volume control
The speakers may be faulty Connect a set of headphones to the line out
The sound card may not be
installed correctly
Make sure the speaker cables are connected
properly and securely.
Check the volume control and turn it up if
necessary.
Make sure mute controls are turned off. To
make sure mute is turned off:
In Windows XP, click Start, then select
Control Panel. Click Sounds, Speech, and
Audio Devices, then Adjust the system
volume. Make sure that the Mute check box
is not selected.
In Windows Me, Windows 2000, Windows 98,
and Windows NT, double-click the speaker
icon in the lower right corner of the taskbar and
make sure that the Master Out, CD Audio,
MIDI, Digital, and Wave Mute check boxes are
not selected.
jack to test the output. If they work, replace the
speakers.
Open the computer, then reseat the sound
card. Make sure the cables are connected
properly. Some computers do not have sound
cards because sound capabilities are built into
the system board.
The CD drive audio cable
may be installed incorrectly
80 Troubleshooting
Open the computer and make sure the cables
are connected properly. Some computers do
not have sound cards because sound
capabilities are built into the system board.

An audio CD will not play.
Probable cause Solution
The CD is loaded incorrectly Make sure the label is facing up, then try again.
The CD is scratched or dirty Try cleaning the CD with a lint-free cloth. Make
sure the CD is not scratched.
The computer does not recognize the CD drive.
Probable cause Solution
The CD is not intended for PC
use
The CD drive needs to be
added as new hardware
The secondary IDE device
may be disabled
The CD cables are not
installed correctly
The CD drive may be
defective
Make sure the CD is PC-compatible.
In the Control Panel window, double-click Add
New Hardware. Follow the on-screen
instructions for adding the drive.
Restart your computer, then press F1 to open
the BIOS Setup utility program. From the
Advanced | IDE Configuration menu, set the
IDE Controller to Both and the Secondary
IDE Master to Auto.
Open the computer and make sure all cables
between the CD controller and the CD drive
are connected correctly.
Replace the CD drive.
CD drive problems 81

Computer problems
The computer will not start up.
Probable cause Solution
The computer is not
connected to an AC outlet
The voltage selection switch
is not set correctly
Make sure the power cable(s) are connected
correctly to an operating AC power source.
Make sure the voltage selection switch is set
correctly for your area.
The computer is non-responsive.
Probable cause Solution
An error occurred while
running a program or your
computer may be out of
memory
The heatsink is not properly
seated on the processor.
Restart your computer. If the computer is still
non-responsive, press and hold in the power
button for 5 seconds to turn the computer off.
Turn the computer back on and follow the
on-screen instructions.
Reseat the heatsink.
The keyboard does not work.
Probable cause Solution
A key was pressed while the
computer was starting up
Clear the stuck key, then turn off the computer,
wait for a few seconds, then turn the computer
back on.
The keyboard is not plugged
in or connected properly
Something spilled into the
keyboard
The keyboard is defective Try a keyboard you know is working.
82 Troubleshooting
Make sure the cable is plugged in correctly.
Turn off the computer. Turn the keyboard
upside down to drain, then turn it over and let
it dry before using the keyboard again.

The mouse does not work.
Probable cause Solution
The mouse is not plugged in
or connected properly
The mouse driver did not load
when the computer started
The mouse is defective Try a mouse that you know is working.
Make sure the cable is plugged in correctly.
Load the appropriate mouse driver manually or
contact Gateway Technical Support.
Computer problems 83

Diskette drive problems
The computer does not recognize the diskette drive.
Probable cause Solution
The diskette drive may be
configured incorrectly
The drive cables are not
connected properly
Restart your computer, then press F1 to open
the BIOS Setup utility. In the Advanced |
Diskette Configuration menu, make sure that
the diskette drive parameters are set correctly.
Open the computer and make sure all cables
are correctly connected to the system board.
The diskette drive will not read, write, or format.
Probable cause Solution
The diskette is not
IBM-formatted
The diskette is corrupted Check the diskette for errors. If you have
The diskette is
write-protected
Make sure the diskette you are trying to use
is IBM-compatible. If it is, try reformatting it. If
it is not, get a compatible diskette.
detected and corrected errors, try accessing
the diskette again.
Make sure the write-protection window on the
upper-right corner of the diskette is closed
(unprotected).
The diskette drive LED illuminates continuously.
Probable cause Solution
The diskette is corrupt Remove the diskette from the drive. If the light
The cable to the drive is not
connected properly
84 Troubleshooting
remains on, try restarting the computer.
Open the computer and make sure the cable
is connected properly between the diskette
drive and its controller. Make sure the pins are
not bent or misaligned.

Hard drive problems
The computer does not recognize the IDE drive.
Probable cause Solution
The primary IDE device may
be configured incorrectly
The drive may not be
configured properly
The drive cables are not
connected properly
The drive controller is not
seated properly
Restart your computer, then press F1 to open
the BIOS Setup utility. From the Advanced |
IDE Configuration menu, set the IDE
Controller to Both and the Primary IDE
Master to Auto.
Consult the hard drive user’s guide for
instructions on how to configure the drive.
Configure the drive correctly.
Open the computer and make sure all cables
to the controller card are connected correctly.
Some computers do not have IDE controller
cards because the IDE controller is built into
the system board.
Open the computer and reseat the drive
controller. Some computers do not have IDE
controller cards because the IDE controller is
built into the system board.
Hard drive problems 85

Memory problems
The computer detected memory errors during start up.
Probable cause Solution
Memory was added or
removed, and the new
configuration was not saved
in BIOS Setup utility
The memory was installed
incorrectly
A memory chip is faulty Replace the card with the faulty chip.
Open the BIOS Setup utility and save the new
memory configuration.
Make sure the memory is seated and oriented
correctly.
Third-party diagnostic programs can help
determine which chip or memory segment is
failing.
86 Troubleshooting

Modem problems
The computer does not recognize the modem.
Probable cause Solution
The modem has not been
added as new hardware
The modem is not connected
to a live phone jack
The phone jack is in use If the modem shares the jack with another
Add the modem as new hardware.
Make sure the line connected to the modem is
working and plugged into the appropriate port
on the modem (line port).
device, make sure the other device does not
have the port open (for example, someone is
on the phone, or another modem is in use).
Modem problems 87

Peripheral/adapter problems
The computer does not recognize an adapter card.
Probable cause Solution
The interrupt or I/O address
is set incorrectly
The card was not configured
through the software
The card was not installed
correctly
Check the address configuration of the adapter
card and make sure that it does not conflict
with another card in the computer.
Configure the card with the appropriate
software.
Make sure that the jumpers are configured
correctly, then reseat the card.
88 Troubleshooting

Printer problems
The printer will not turn on.
Probable cause Solution
The printer is not plugged in Make sure the power cable is plugged into a
The printer is not turned on Make sure the printer’s power switch is
The printer is defective Try another printer, if one is available.
The printer is turned on but will not print.
Probable cause Solution
working power source.
pressed or set to the On position. If the printer
is turned on, the green power LED should be
illuminated.
The printer is not connected
to the computer
The printer is not designated
as the default printer
The printer has not been
added to the computer.
The printer is not on-line
(ready)
Make sure the data cable is properly
connected between the printer and the
computer. Check the connector and cable for
bent or broken pins.
If the printer that you are trying to print to is
not the default printer, make sure you have
selected it through the program’s printer setup
function.
In the Printers window, double-click Add
Printer. Follow the on-screen instructions for
adding the new printer.
Make sure the on-line or ready light is on, or
the display indicates “Ready.”
The printer prints garbled text.
Probable cause Solution
The wrong driver is being
used for the selected printer
In the Printers window, click to select the
printer, click File, then select Properties.
Make sure the printer is using the correct
printer driver. If not, install the correct one.
Printer problems 89

Video problems
The computer is running but the screen is blank.
Probable cause Solution
The monitor is not turned on Make sure the monitor is plugged in and turned
on. If the monitor is turned on, the green power
LED should illuminate.
The monitor’s data cable is
not connected
The connector or cable is
damaged
The monitor brightness and
contrast controls are turned
down
System board memory is not
seated properly - indicated by
a beep
The monitor is defective Connect a working monitor to the computer.
Make sure the monitor data cable is connected
to the video controller on the back of the
computer.
Check the connector and cable for bent or
damaged pins.
Adjust the brightness and contrast knobs to the
center position.
Open the computer and reseat the system
board memory.
The image on the screen is dim or difficult to read.
Probable cause Solution
The monitor brightness and
contrast controls are turned
down
Light is glaring off the display Position the monitor away from the sun or other
Adjust the brightness and contrast knobs until
the text becomes clear.
light source.
The monitor may be old Replace the monitor.
90 Troubleshooting

The color monitor displays everything in black and white.
Probable cause Solution
The computer was turned on
before the monitor
The display type is set
incorrectly
Make sure the monitor is turned on, then
restart the computer.
In the Control Panel window, double-click
Display, set the display to the appropriate
video type and resolution, then restart the
computer.
The displayed characters are garbled.
Probable cause Solution
The video cable is damaged Make sure the cable and connectors are in
good condition (no bent pins or broken wires).
The display setup is incorrect In the Control Panel window, double-click
Display and check the settings. The correct
video type should be selected, along with a
supported resolution. Check your monitor and
video controller documentation for details.
The video is distorted.
Probable cause Solution
The monitor controls are not
properly adjusted
The connector or cable is
damaged
The surge protector or UPS is
damaged
The monitor is too close to a
source of electrical
interference
The monitor needs to be
degaussed
Adjust the monitor controls until the text
becomes clear. (See your monitor
documentation for more information.)
Make sure the cable and connectors are in
good condition (no bent pins or broken wires).
Disconnect the monitor power cable and
connect it directly to the power source.
Move the monitor away from sources of
electrical interference, such as televisions,
unshielded speakers, microwave ovens,
fluorescent lights, and metal beams or shelves.
Turn off the computer and monitor for at least
a half hour, then restart the computer.
Video problems 91

Error messages
This section lists common error messages that you may see. These messages
often indicate procedural errors such as an incorrect keystroke or a
write-protected diskette. Some messages, however, may indicate a problem
that requires you to consult the troubleshooting section of this manual.
Error message Description
GA20 Error An error occurred with Gate A20 when
switching to protected mode during the
memory test.
Pri Master HDD Error
Pri Slave HDD Error
Sec Master HDD Error
Sec Slave HDD Error
Pri Master Drive - ATAPI Incompatible
Pri Slave Drive - ATAPI Incompatible
Sec Master Drive - ATAPI Incompatible
Sec Slave Drive - ATAPI Incompatible
A: Drive Error No response from diskette drive.
Cache Memory Bad An error occurred when testing L2 cache.
CMOS Battery Low The battery may be losing power. Replace the
CMOS Display Type Wrong The display type is different than what has
CMOS Checksum Bad The CMOS checksum is incorrect. CMOS
CMOS Settings Wrong CMOS values are not the same as the last
Could not read sector from corresponding
drive.
Corresponding drive is not an ATAPI device.
Run Setup to make sure device is selected
correctly.
Cache memory may be bad.
battery soon.
been stored in CMOS. Check the BIOS Setup
utility to make sure the type is correct.
memory may have been corrupted. Run the
BIOS Setup utility to reset values.
boot. These values have either been
corrupted or the battery has failed.
CMOS Date/Time Not Set The time and/or date values stored in CMOS
DMA Error Error during read/write test of DMA controller.
92 Troubleshooting
are invalid. Run the BIOS Setup utility to set
correct values.
 Loading...