


 GARDENA®
T 1030 D
Art. 1825-28
GB Operating Instructions
Water Timer electronic
FIN Käyttöohje
Elektroninen kasteluajastin
SBruksanvisning
Bevattningstimer electronic
DK Brugsanvisning
Vandingsur electronic
NBruksanvisning
Vanningstimer electronic
EST Kasutusjuhend
Kastmistaimer electronic
LT Eksploatavimo instrukcija
Elektroninis laistymo laikmatis
LV Lietošanas instrukcija
Elektroniskais laistīšanas taimeris
LV LT EST N DK S FIN GB

GB
GARDENA Water Timer electronic T 1030 D
Welcome to the Garden of GARDENA...
Translation of the original instructions from German.
Please read these operating instructions carefully and observe the notes given. Use these instructions to familiarise yourself with the Water Timer electronic and its proper use as well as the notes on safety.
For safety reasons, children and young people under 16 as well as anyone who is not
APersons with reduced physical or mental abilities may use the product only if they are
supervised or instructed by a responsible person.
v Please keep these operating instructions in a safe place.familiar with these operating instructions may not use the Water Timer.
Contents |
1. Where to Use Your GARDENA Water Timer . . . . . . . . . . . . . . . . . . . |
. 3 |
|
|
2. |
Safety Instructions . . . . . . . . . . . . . . . . . . . . . . . . . . . . . . . . . . . . . . . . . . . . . |
. 3 |
|
3. |
Function . . . . . . . . . . . . . . . . . . . . . . . . . . . . . . . . . . . . . . . . . . . . . . . . . . . . . . . . |
. 5 |
|
4. |
Putting Your Water Timer into Operation . . . . . . . . . . . . . . . . . . . . . . |
. 6 |
|
5. |
Operating Your Water Timer . . . . . . . . . . . . . . . . . . . . . . . . . . . . . . . . . . . |
. 8 |
|
6. |
Putting Your Water Timer Out of Operation . . . . . . . . . . . . . . . . . . . |
13 |
|
7. |
Trouble-Shooting . . . . . . . . . . . . . . . . . . . . . . . . . . . . . . . . . . . . . . . . . . . . . . |
14 |
|
8. |
Technical Data . . . . . . . . . . . . . . . . . . . . . . . . . . . . . . . . . . . . . . . . . . . . . . . . . |
15 |
|
9. |
Service / Warranty . . . . . . . . . . . . . . . . . . . . . . . . . . . . . . . . . . . . . . . . . . . . . |
16 |
2

1. Where to Use Your GARDENA Water Timer
Intended use |
The GARDENA Water Timer is intended for private use in |
|
domestic and hobby gardens, exclusively for outdoor use, to |
|
control sprinklers and watering systems. |
Please note |
|
The GARDENA Water Timer must not be used for industrial |
|
|
purposes or in conjunction with chemicals, foodstuffs, |
|
easily flammable and explosive materials. |
|
|
2. Safety Instructions
Use: Warning!
V Only use the Water Timer outdoors.
The water timer is not approved for indoor use.
The minimum operating pressure is 0.5 bar, the maximum operating pressure is 12 bar. The minimum flow rate is 20 I/h.
vCheck the filter in the sleeve nut regularly and clean if necessary.
vDo not pull the hose connected to the Water Timer and avoid tensile strain.
GB
3

GB
Battery: |
For functional safety reasons, only use a 9V alkali- |
|
manganese (alkaline) battery type IEC 6LR61. |
|
The Water Timer will only run for approx. 1 year if the new |
|
alkaline battery has a nominal voltage of at least 9V. |
|
v Check the battery before you buy it. |
Putting your Water Timer |
To prevent water entering the battery compartment, the Water |
into operation: |
Timer must only be mounted in a perpendicular position with |
|
the sleeve nut pointing upwards. |
|
After you have selected the watering program, the Water Timer |
|
opens at the selected starting time. To avoid getting wet when |
|
operating the Water Timer, connect the hose or turn off the tap |
|
before selecting the program. Alternatively, the control unit can |
|
be removed for programming. |
Water flow: |
The max. temperature for the water is 40 °C. |
|
v Only use clear fresh water. |
4
3. Function |
|
|
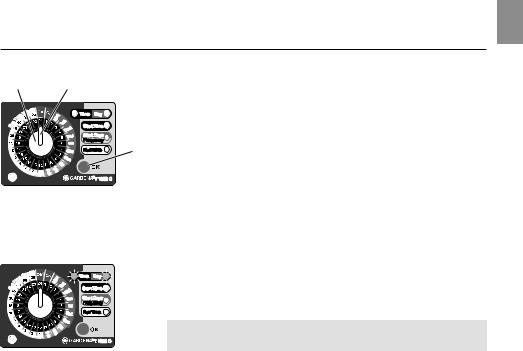
Control knob and OK button: |
The GARDENA Water Timer electronic allows you to set different |
|
A |
B |
watering cycles for different watering times independent of whether |
you are using a sprinkler, a sprinkler system installation or drip- |
||
|
|
head watering system to irrigate your garden. |
|
Your Water Timer electronic will water your garden completely |
|
automatically according to the program you choose. You can set |
C |
the timer to water your garden early in the morning or late at night |
when water evaporates the least, or while you are away on holiday. |
A Control knob
B Control knob pointer C OK button
Battery status display:
You simply program the time (to the nearest hour), day, watering starting time / cycle / days and duration by turning the pointer B of the control knob A to the correct time and pressing the
OK button C.
The Water Timer opens at the starting time you have selected.
The 2 LEDs Time and Day flash to indicate that the battery is flat.
vReplace the battery (see 4. Putting Your Water Timer into
Operation “Inserting the Battery”).
The functional safety of the water timer depends on the capability of the battery.
If you change the battery the program is not saved. You must reprogram the Water Timer (see 5. Operation).
GB
5

GB
4. Putting Your Water Timer into Operation
Inserting the battery:
1 |
3 |
zP |
1. Press the release button 1 and remove the control unit 2 from the housing of the Water Timer.
2. Insert the battery 3 in the battery compartment. Pay attention to the polarity zP (+/ – markings).
The Time LED flashes.
3. Re-attach the control unit 2 to the housing.
Make sure you exchange the battery |
2 |
at the right time to prevent the Water Timer failing due to a low battery when you are away for longer periods of time.
Make sure that the time the battery has been in operation and the time you are planning to be away does not add up to more than a year.
Even if the battery is almost empty, the Water Timer ensures that an open valve is always closed since less energy is required to close the valve than to open it.
6
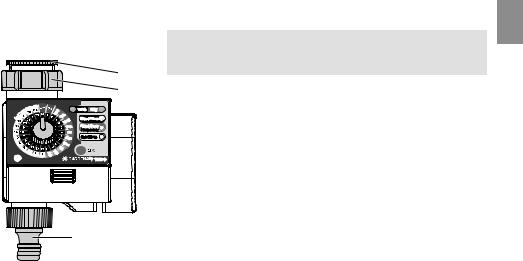
Connecting your Water Timer:
5 |
4 |
GB
The Water Timer is fitted with a sleeve nut 4 for taps with G 1"
(33.3 mm) thread. The adaptor supplied 5 allows the Water Timer to be connected to taps with a G ³⁄ " (26.5 mm) thread.
1.For tap with a G ³⁄ " (26.5 mm) thread: Screw adaptor 5 on to the tap manually (do not use pliers).
2.Screw sleeve nut 4 of the Water Timer on to the adaptor thread by hand (do not use pliers).
3.Screw tap connector 6 on to the Water Timer.
4.Open the tap.
6 |
7
 Loading...