


46 |
V |
Art. 4044 |
46 |
VD |
Art. 4046 |
DBetriebsanleitung
Benzin-Rasenmäher
GB Operating Instructions
Petrol Lawnmower
FMode d’emploi
Tondeuse thermique
NL Gebruiksaanwijzing
Benzine grasmaaier
SBruksanvisning
Bensindriven Gräsklippare
DK Brugsanvisning
Benzinplæneklipper
FI Käyttöohje
Bensiinikäyttöinen ruohonleikkuri
NBruksanvisning
Bensindrevet Gressklipper
46 VDA |
Art. 4047 |
51 VDA |
Art. 4051 |
IIstruzioni per l’uso
Rasaerba a scoppio
EInstrucciones de empleo
Cortacésped de gasolina
PManual de instruções
Máquina de cortar relva a gasolina
PL Instrukcja obsługi
Kosiarka spalinowa
HHasználati utasítás
Benzines fűnyíró
CZ Návod k obsluze
Benzínová sekačka na trávu
SK Návod na obsluhu
Benzínová kosačka
H PL P E I N FI DK S NL F GB D
SK CZ

GB
GARDENA Petrol Lawnmower 46 V / 46 VD / 46 VDA / 51 VDA
Translation of the original German operating instructions.
Please read these operating instructions carefully and observe the notes given. Use these operating instructions to familiarise yourself with the correct usage and safety instructions for the Petrol Lawnmower.
For safety reason children and young people under 16 and people who have not read these operating instructions must not use this Petrol Lawnmower. People with limited physical or mental capacities may only use the product if they are supervised or instructed by a responsible person.
|
v Please keep these operating instructions in a safe place. |
|
|
Contents: |
1. |
Range of use for your GARDENA Petrol Lawnmower . . . . . . |
16 |
|
2. |
Safety Instructions . . . . . . . . . . . . . . . . . . . . . . . . . . . . . . . . . |
17 |
|
3. |
Function . . . . . . . . . . . . . . . . . . . . . . . . . . . . . . . . . . . . . . . . . |
18 |
|
4. |
Assembly . . . . . . . . . . . . . . . . . . . . . . . . . . . . . . . . . . . . . . . . |
19 |
|
5. |
Operation . . . . . . . . . . . . . . . . . . . . . . . . . . . . . . . . . . . . . . . . |
20 |
|
6. |
Putting out of Operation. . . . . . . . . . . . . . . . . . . . . . . . . . . . . |
23 |
|
7. |
Maintenance. . . . . . . . . . . . . . . . . . . . . . . . . . . . . . . . . . . . . . |
23 |
|
8. |
Trouble-Shooting . . . . . . . . . . . . . . . . . . . . . . . . . . . . . . . . . . |
25 |
|
9. |
Technical Data . . . . . . . . . . . . . . . . . . . . . . . . . . . . . . . . . . . . |
27 |
|
10. |
Service / Warranty . . . . . . . . . . . . . . . . . . . . . . . . . . . . . . . . . |
28 |
1. Range of use for your GARDENA Petrol Lawnmower
Purpose:
Please note:
The GARDENA petrol lawnmower is designed for cutting lawns in and around the garden. Do not use the mower on a slope steeper than 10° maximum.
Warning! For environmental and transport safety reasons the petrol lawnmower is supplied without motor oil. Therefore, the crankcase of the engine must be filled with motor oil prior to use (see 7. Maintenance), otherwise the engine will be damaged!
To prevent injury, the lawnmower must not be used for trimming bushes, hedges, shrubs, for cutting and pruning of climbers or grass on roofs or in balcony boxes.
In addition, the lawnmower must not be used for chopping up branches, twigs or for levelling irregularities in the soil.
16
2. Safety Instructions
v Please read the notes on safety on the petrol lawnmower.
Warning!
v Please read the operating instructions before using the mower!
Danger!
Risk of injury!
v Keep bystanders away!
Danger!
Danger of injury from the blade bar!
v Keep fingers and feet away from sharp cutting tool!
DANGER!
Danger of asphyxiation from breathing in poisonous gases!
v The mower must not be used in closed or poorly ventilated areas.
RISK OF EXPLOSION!
v Do not fill with fuel with the engine running!
DANGER OF COMBUSTION!
Engine is hot!
Warning!
v Before working on the blade bar remove spark
plug connector. See the enclosed engine operating instructions!
Check each time you use the mower:
Before using, always visually inspect to see that the blades, blade bolts and cutter assembly are not worn or damaged. Replace worn or damaged blades and bolts in sets to preserve balance. Never operate the lawnmower with defective guards, or without safety devices, for example deflectors and/or grass catchers, in place. Replace damaged or worn parts. Never disable safety devices.
Keep all nuts, bolts and screws tight to be sure the equipment is in safe working condition.
Check the grass to be cut before you start work. Remove any foreign bodies present (e. g. stones, branches).
The blade bar must be regularly checked for damage and if necessary repaired properly.
When doing this life the mower up at the front so that no petrol / oil gets into the air filter or exhaust.
Operation:
This petrol lawnmower can cause serious injuries! You are responsible for the safety of the working area.
Walk, never run.
Do not tilt the lawnmower when starting the engine or switching on the motor, except if the lawnmower has to be tilted for starting.
In this case, do not tilt it more than absolutely necessary and lift only the part which is away from the operator. Do not tip the mower over to the side when mowing.
Do not start the engine when standing in front of the discharge chute.
Never lift or carry the mower with the engine running.
Only use the mower for the purposes outlined in the operating instructions.
Wear sturdy shoes and long trousers to protect your legs. Keep fingers and feet away from the blade bar and the ejection chute!
Make sure you always take up a safe and stable stance whilst working, especially on slopes.
Be particularly careful if you change direction on a slope.
For wheeled rotary machines, mow across the face of slopes, never up and down.
Be careful when going backwards. Risk of stumbling!
Look out for foreign bodies when working (e. g. stones).
Interruptions of work:
Do not leave the mower unattended in the workplace. Should you stop working store the mower in a safe place.
v Remove the spark plug connector!
Should you stop work to go to work somewhere else with the mower, be sure to switch the mower off while you are going there.
Environmental influences:
Only work when visibility is good.
Familiarise yourself with the surroundings of your working area. Check for possible risks which might be not audible due to the noise of the machine.
17
GB
GB
Make sure that there are no other people (especially children) or animals anywhere near the working area.
Stop the engine and disconnect the spark plug wire, make sure that all moving parts have come to a complete Stopp and, where a key is fitted remove the key: after striking a foreign object. Inspect the lawnmower for damage and make repairs before restarting and operating the lawnmower.
Never use the mower when it is raining or in damp or wet conditions.
Please observe any local restrictions or noise levels.
Petrol engine notes:
Warning! Fuel is highly inflammable. Fuel must be stored only in containers authorised for the purpose. The fuel must be filled only outdoors; do not smoke during filling. Fill with petrol prior to use; the petrol cap must not be removed and no petrol may be added if the engine is running or is hot. If petrol is spilled during filling, the engine must not be started until the spilled petrol has been wiped up and the mower has been removed from the area where the fuel
was spilled. You must not attempt to start the engine until the petrol vapours have dissipated.
To avoid the danger of fire, keep the engine and exhaust free from grass, leaves, grease or oil and away from combustible materials.
There is danger of carbon monoxide poisoning. Do not let the engine run in closed spaces.
When filling with petrol and oil, ensure that no foreign bodies (e. g. grass) get into the engine.
Always check the oil level before mowing.
For security reasons, replace the tank lid if damaged.
Never store a mower with fuel in the tank in a room where petrol fumes could come into contact with an open flame.
If the fuel tank has to be drained, this should be done outdoors.
Reduce the throttle setting during engine shut down and, if the engine is provided with a shut-off valve, turn the fuel off at the conclusion of mowing.
Do not change the engine governor settings or overspeed the engine.
v Follow the enclosed engine operating instructions.
3. Function
Mowing tips: |
If grass residue is left in the discharge opening, pull mower |
|
backwards about 1 m so that the grass residue can drop out |
|
downwards. |
|
To produce a well-maintained lawn. we recommend cutting the |
|
lawn regularly once a week if possible. The lawn becomes thicker |
|
if cut frequently. |
|
After relatively long intervals between mowing (holiday lawn), |
|
first of all cut in one direction with the cutting height as high as |
|
possible, then cut in the crosswise direction at the cutting |
|
height required. |
|
If possible, only cut the grass when it is dry, if the grass is damp, |
|
the cutting pattern will be uneven. |
Mulching tips: |
You will achieve the best mulching results by cutting the grass |
|
regularly once or twice a week depending on the amount the |
|
grass has grown. |
|
|
|
For mulching the grass must be mown no more than 1/3 of |
|
its height. The cut height must be set at 4 cm at least (for |
|
very dense grass the cut height may have to be set higher). |
|
|
|
So that the grass mulch can rot down properly, mulch when the |
|
grass is as dry as possible. Mulching is not recommended for |
|
lawns with a great deal of moss or very matted grass. The moss |
|
and weeds must be removed by scarifying. |
18 |
|
When mowing with the mulch unit the cut grass is returned to the grass as a self fertiliser and there are no waste lawn clippings.
4. Assembly |
GB |
|
|
|
|
|
|
|
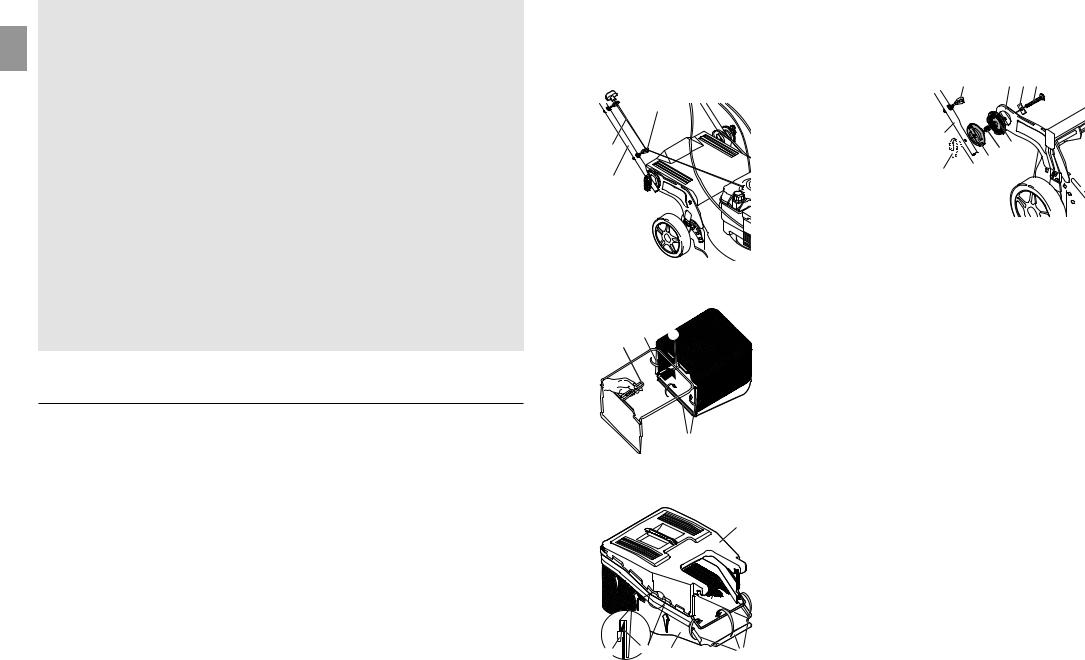
Fitting the handle:
 9
9
0
6
1.Push the screw 1 with the square washer 2 through the hole in the handle 3.
2.Put the handle lock 4 with
spring 5, handle 6 and round |
6 |
|
washer 7 on the screw 1 and |
||
|
||
tighten with the wing nut 8 |
|
|
When doing this the eyes 9 |
8 |
|
must be on the same side as the |
starter cord 0.
3.Thread the starter cord 0 through the two eyes 9 on the handle 6.
93 2 1


 7
7 454
454
Fitting the collection bag |
1. |
Feed the bow-shaped handle q into the Collecting Bag so that |
|
(44 V / 46 VD / 46 VDA): |
|
the handle w is on the top. |
|
|
|
2. |
Fold the safety straps e around the handle q. |
e |
q |
|
|
w |
|
|
|
e
Fitting the collection bag |
|
1. Place the collection bag cover r onto the collecting bag t |
|
(51 VDA): |
|
|
from the top so that ALL the eyes a are positioned over the |
|
|
|
hook b. |
|
r |
2. |
Push the Collecting Bag cover r down onto the collecting |
|
|
bag t until all hooks b engage securely. |
|
|
|
|
|
|
|
3. |
Fold the safety straps e around the handle. |
ßa ßb t 

 e
e
19

5. Operation
GB |
DANGER! |
|
|
Danger of physical injury from the blade bar! |
|||
|
|||
|
v Before making any adjustments wait for the |
||
|
blade bar to stop, put on suitable working |
||
|
gloves and remove the spark plug connector. |
||
Adjust the handle inclination: |
The handle can be set to any body size by setting the angle of |
||
|
inclination. |
|
|
8 |
1. Undo both wing nuts 8 until |
|
|
the handle 6 can be inclined. |
|
||
|
|
||
|
2. Set the required handle |
6 |
|
|
inclination. |
||
|
8 |
||
|
3. Tighten both wing nuts 8. |
||
|
|
||
6
Setting the cut height:
z
1
u
|
The cut height can be set centrally in six stages. |
||
|
46 V / 46 VD: |
30 / 40 / 50 / 60 / 70 / 80 mm |
|
|
46 VDA / 51 VDA: 25 / 35 / 45 / 65 / 75 / 95 mm |
||
|
1. |
Pull the handle z towards the wheel u until the lock is |
|
2 |
|
released. |
|
2. |
Set the required cut height by rotating the handle z. |
||
|
The cut height set will be shown in mm on the cut height |
||
idisplay i on the mower.
3.When the cut height has been selected engage the handle z in the appropriate locking position again.
Mowing with mulch unit:
o


 p
p


a
DANGER!
Foreign bodies thrown out of the mower can cause injuries!
v Only lift the protective flap o when the engine is turned off and the blade bar has stopped.
Inserting mulch unit:
1.Lift protective flap o and push the mulch unit p into the ejection chute until it stops.
2.Fit the retaining spring a to the top of the mulch unit p and the bottom of the housing.
This stops the mulch unit p falling out.
Removing the mulch unit:
v Lift the protective flap o, unhook the retaining spring a from the housing and remove the mulch unit p.
o
Mowing with the collection bag:
s

 o
o
Starting the mower:
Do not grasp the ejection chute with your hand.
If the protective flap o is released it will close automatically and cover the ejection chute.
The protective flap o is designed in such a way that mowing can take place even if the protective flap is closed without the mulch unit or Collecting Bag. The cuttings are then left on the lawn.
DANGER!
Foreign bodies thrown out of the mower can cause injuries!
v Only lift the protective flap o when the engine is turned off and the blade bar has stopped.
The mulch unit must be removed before mowing with the collection bag (see Mowing with mulch unit).
The collecting bag must be emptied as soon as grass cuttings are left on the lawn while mowing.
1.Lift the protective flap o and remove the grass collection bag s from the handle.
2.Empty the grass collection bag s, lift up the protective flap o and replace the grass collection bag s at the back of the housing.
DANGER !
Danger of physical injury if the mower does not switch off automatically!
v The security devices fitted to the mower (safety swich, drive lever) must not be removed or bypassed.
ATTENTION!
Damage to the engine!
The engine must be filled with oil before starting.
v See 7. Maintenance for instructions on filling the engine with oil.
The drive handle / lever must not be removed from the handle when starting.
GB
20 |
21 |
 Loading...