


G R O U N D S C H O O L
1 GROUND SCHOO L
Helicopters - Basic Principles and Handling
This chapter is intended as a strictly practical guide for those who know little or nothing about how to fly a helicopter. It concentrates on what you need to know as a pilot and contains very little aerodynamic theory. Helicopters are untidy pragmatical machines which defy any attempt at elegant theoretical analysis, but the basic principles are simple enough. Once you understand what the controls do, and where the pitfalls are, flying a helicopter is (like any other job requiring more than one hand) mainly a matter of coordination and practice. In this writer’s experience, it seems to be easier than learning to juggle - you have a lot more time to think about what happens next.
Conventional Helicopter Layout
- Main and Tail Rotors
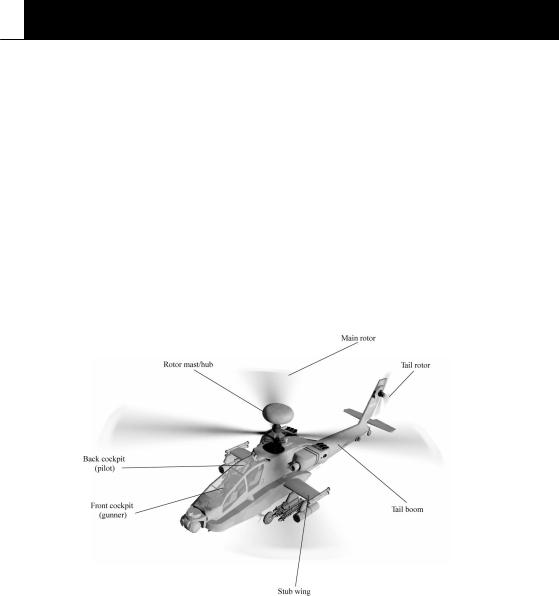
Diagram 6.1: Conventional attack helicopter layout
The general layout of a conventional helicopter has a large main rotor and a much smaller tail rotor, driven by powerful turboshaft engines. The main rotor, as you probably know, provides the thrust which lifts the helicopter and moves it forward (or backward, or sideways). The tail rotor’s purpose is less obvious.

GROUND SCHOO L 2
Imagine yourself sitting in a swivel chair, with your feet tucked up so the chair can spin freely. Your arms are above your head, supporting the middle of a long heavy plank. The plank is the helicopter’s main rotor and you are the engine. The swivel chair is the rest of the helicopter, off the ground and free to pivot. Now start spinning the plank round and round like a rotor. As you do this, you’ll find yourself spinning around in the opposite direction to the rotor. The harder you spin the rotor, the faster you spin yourself - and in this example, there’s nothing you can do to stop yourself spinning except put your feet on the ground, which equates to landing the helicopter. This tendency for the engine to spin the whole helicopter in the opposite direction to the main rotor can be called Main Rotor Torque Effect.
The tail rotor solves this problem by creating a thrust in the opposite direction to the main rotor torque effect. Its small size is compensated by the fact that it’s mounted at the end of a long lever (the tail-boom) which magnifies its effect. Also, by changing the amount of thrust the tail rotor produces you can pivot the whole helicopter on the spot, in either direction.
How Rotors Work
A rotor is simply a set of long thin wings attached to a central hub. The wings are more commonly called Rotor Blades, and when the rotor is spinning, the whole assembly is often referred to as the Rotor Disc. Just as in an ordinary aircraft, the wings generate a lift force when they are moved through the air. How much lift a wing generates is governed by three factors:
1: The Density of the Air
The atmosphere is densest (and provides most lift) at sea level. As you climb above sea level the density decreases and the wing produces less lift. Air temperature also affects density – hot air is less dense than cold air, and gives less lift. ‘Hot and high’ is the worst combination of conditions, and in practical terms this means you can lift less weight and have less ‘performance’ available.
2: The Wing’s Speed Through the Air
The faster a wing moves through the air, the more lift it generates. In sophisticated modern helicopters the rotors spin up to a set flying speed before take-off and hardly change speed in flight, unless you demand more power than the engines can provide or something goes wrong with the engines or the transmission system. You don’t control lift by changing the rotor speed, so at first sight this factor seems irrelevant – and it is indeed irrelevant in hovering or vertical flight. However, when the helicopter is moving forward at high speed this factor becomes critically important, and determines the maximum safe flying speed – and what happens when you exceed it [see page 6.19 – Retreating Blade Stall].
3 GROUND SCHOO L
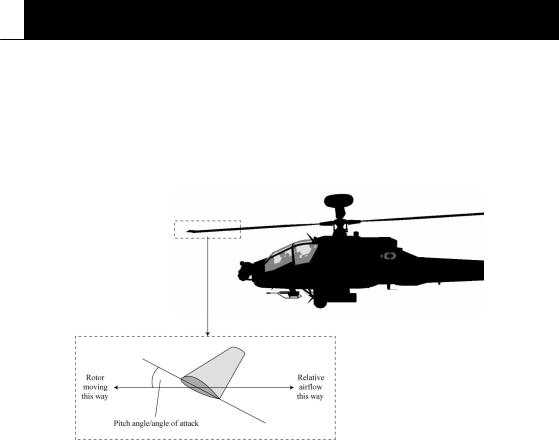
3: The Angle at Which the Wing Meets the Airflow
This is generally known as the Angle of Attack and up to a point which varies with the wing design, the greater the angle of attack the more lift the wing generates (and the more power is required to drive it through the air at a given speed). All of the helicopter’s main flying controls work by changing the pitch angle of the main or tail rotor blades.
Diagram 6.2: Rotor pitch angle/angle of attack in still air
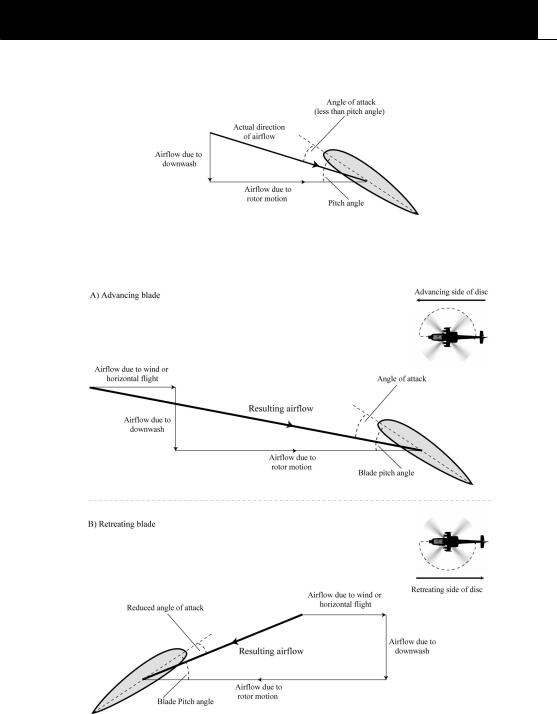
If the rotor were operating in still air, pitch angle and angle of attack would be identical, but this situation exists only in the first few seconds as the rotor spins up [diagram 6.2]. Once the rotor is spinning it sets up a constant air current (the rotor downwash) through the rotor disc. This means that the effective angle of attack is less than the blade pitch angle – though not much less because the rotor’s speed is generally much higher than the speed of the air current down through the disc [diagram 6.3].
If there is an air current across the disc (as there is when you are hovering in a wind or moving over the ground at any significant speed) this also changes the effective angle of attack (and airspeed) of the rotor blades [diagram 6.4]. Blades advancing into the wind have a higher angle of attack (and higher airspeed), and generate more lift than the retreating blades. At the same time, the effect of the downwash air current is reduced because you are constantly moving into undisturbed air.
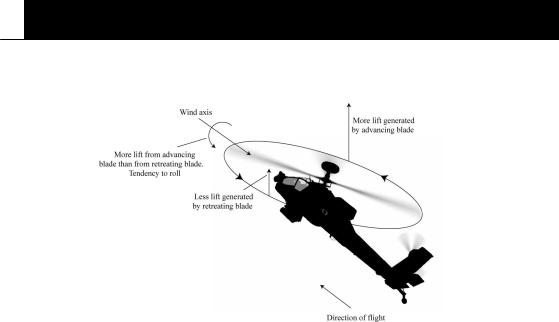
The net result is that the rotor generates more lift altogether (‘Translational Lift’), and more lift on the advancing than on the retreating side of the disc, so there is a slight tendency to roll (a ‘rolling moment’) around the wind axis – an imaginary line through the center of the helicopter drawn in the direction of the airflow [diagram 6.5].
GROUND SCHOO L 4
Diagram 6.3: Pitch angle/angle of attack with rotor downwash
Diagram 6.4: Pitch angle/angle of attack with airflow across rotor disc
5 GROUND SCHOO L
Diagram 6.5: Rolling moment with airflow across rotor disc
Flying Controls of a Helicopter
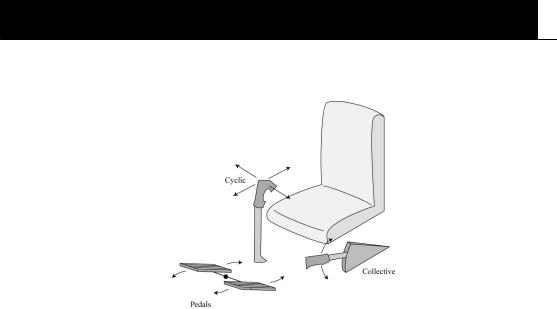
Three controls are used to fly a helicopter; the collective lever, the cyclic stick, and the yaw pedals [diagram 6.6]. Each has a Primary (main) and a Secondary (side) effect.
Collective Lever:
This is mounted on the left side of the seat, and pivots up and down about its back end, like the handbrake on most European cars. It is used with the left hand, and has a friction clamp so that when you take your hand off, it stays in the position where you left it. The three phrases commonly used to describe what you can do with it are ‘raising the collective’, ‘lowering the collective’, and ‘bottoming the collective’. All three are simple, literal descriptions.
When you raise the collective, you are increasing the angle of attack of all the main rotor blades by the same amount, so that the rotor generates more thrust. Lowering the collective has the opposite effect. Bottoming the collective reduces main rotor thrust to effectively nothing. If you were hovering, raising the collective would cause the helicopter to climb straight up, lowering the collective would cause the helicopter to descend. This is the primary effect of the collective control.
The secondary effect of the collective is due to the fact that it takes more power to drive the rotor through the air at a high angle of attack than at a low one. In older (or simpler) helicopters, the pilot has to use a twist-grip on the collective lever to add or reduce power. More sophisticated modern helicopters do this automatically. In either case, because the engine must develop more or less power, the main rotor torque effect becomes larger or
GROUND SCHOO L 6
Diagram 6.6: Main flying controls
smaller and the whole helicopter tends to start rotating one way or the other. The yaw pedals [see page 6.7 – Yaw Pedals] are used to counter this tendency.
Cyclic Stick:
The cyclic stick (commonly called ‘the cyclic’) is mounted centrally in front of the pilot’s seat, with a pivot at the base which allows it to be tilted forward, backward and to either side. It is normally held with the right hand, and spring-loaded to a more or less central, upright position.
When you tilt the cyclic away from the upright position, each main rotor blade changes its angle of attack as it moves around the hub. Over half the circle, the angle of attack is greater than the level set by the collective, producing more lift, while over the other half it is less, and less lift is generated. The maximum and minimum points are the same for all blades, so the main rotor’s thrust is tilted in the same direction as the cyclic stick itself, the helicopter itself tilts the same way, and starts to move over the ground in that same direction.
Proper handling of the cyclic (especially at low speeds, or in the hover) demands a light touch and intelligent anticipation or the helicopter will slide and wallow about in an apparently endless series of overcorrections. A student pilot’s first attempts to hover on the spot will usually have spectators gasping with laughter and alarm by turns – especially in variable winds.

7 GROUND SCHOO L
Yaw Pedals:
The two yaw pedals (also called ‘torque pedals’ or just ‘pedals’) are mounted in the obvious place for pedals, one at each end of a bar which pivots in the middle. Push one pedal forward and the other moves back by the same amount. They operate on the tail rotor in much the same way that the collective operates on the main rotor, by changing the pitch (and hence the angle of attack) of all the blades at once, thus increasing and decreasing the tail rotor’s thrust, or even reversing its direction. As described above, they are used to pivot the helicopter on the spot (a ‘pedal turn’), and to keep the helicopter pointing in your chosen direction when the collective is raised or lowered by compensating for the changing strength of the main rotor torque effect.
Pushing on the left pedal turns the helicopter to the left, and vice versa for the right pedal. In this respect they work like the rudder pedals of an aircraft – and in exactly the opposite sense to a bike’s handlebars. This can confuse beginners, but practice will quickly sort you out – and it seems to do no permanent harm to your ability to steer a bike.
Putting it all Together
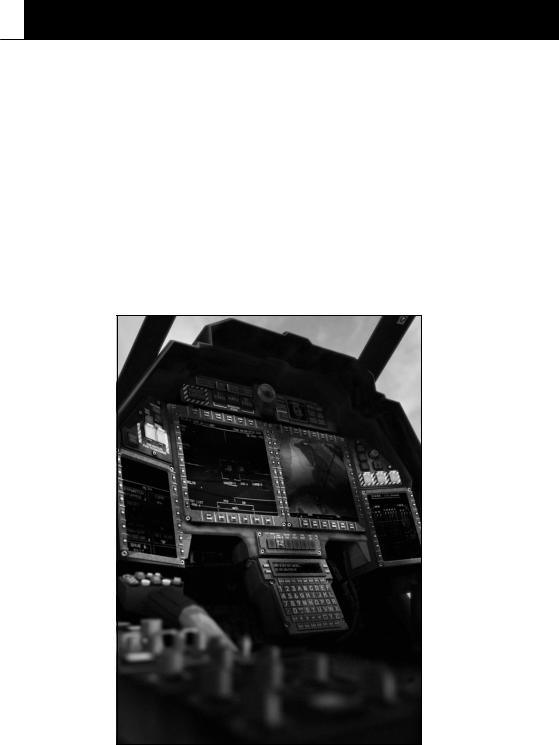
Now that you’ve been told what each of the controls does by itself, it’s time to show how they’re used together when actually flying a helicopter. We’ll look at the sequence of actions required to take off, transition to forward flight, climb and dive, make gentle turns, slow to a stop and land. Read through the exercise before trying it out for the first time. It is worth emphasising that all your control movements (‘control inputs’) should be as smooth and deliberate as possible. Sudden, violent control inputs are to be avoided. Make sure that you know where to find airspeed, altitude and vertical velocity readouts on the Head-Up Display (HUD).
1: Taking Off and Rising to the Hover
We’ll start with the helicopter sitting on the ground, engines running and rotor spun up to flying speed, in calm conditions. In order to lift off we need to raise the collective slowly and carefully, until we have just enough lift to raise the helicopter off the ground and start climbing vertically. At the same time, we need to feed in some pedal. If we don’t do this, then as soon as the weight comes off the wheels, we’ll start slewing round on the spot because of the main rotor torque effect. This is one excellent reason for raising the collective gently – the harder you yank on the collective, the bigger the torque effect.

GROUND SCHOO L 8
Ground Effect
If you were very slow and cautious in raising the collective, you may find that the helicopter slowly rises a short distance and comes to the hover a few feet off the ground without any change in the collective setting. If this happens, you can congratulate yourself on having demonstrated ground effect. The helicopter is, in effect, riding on an air cushion produced by the rotor downwash. Ground effect magnifies the lifting power available for a given collective setting, but the effect falls off quite rapidly with height, and disappears altogether at a height equal to the diameter of the rotor disc. Rough or sloping ground, violent manoeuvering or strong, gusty winds will all tend to spill the air cushion, push it off to one side, or prevent it forming in the first place, so a wise pilot is cautious about depending on ground effect for the lift needed to stay airborne.
In any case, for our first transition to forward flight we want to climb rather higher than this – say to a minimum of 100 feet/30 meters. As you approach the desired height, ease the collective down slightly and wait to see the effect. Remember that the helicopter has momentum – the faster you were climbing (or descending), the longer it will take for your vertical speed to change till it actually reflects the new collective setting. As you lower the collective, you’ll also need to coordinate with pedal input. With practice, you can anticipate the effects of your control inputs, but be careful in the early stages – it’s hard to avoid over-correcting.
2: Transition From the Hover to Forward Flight
Once you’re above the minimum height and your climb rate is reduced to a low figure (a perfect hover is too much to expect, but DON’T start this exercise while descending!), check that there is a long clear run ahead, with no high obstacles. If necessary, use the pedals to turn onto a clear heading. Now, without changing the collective setting, ease the cyclic a little forward and hold it there, watching the HUD altitude readout. You’ll see three effects from this control input:
1)The helicopter tilts forward.
2)The helicopter starts to accelerate forward.
3)The helicopter starts to lose height.
Effects 1 and 2 are easy enough to understand – we’re tilting the rotor disc, which tilts the helicopter and directs some of the main rotor thrust forwards, accelerating us forward. The third effect is more indirect, but obviously important. We started in the hover (or very nearly so), with the main rotor producing just enough thrust (directed straight down) to support the helicopter’s weight. Now we have tilted the rotor disc (and its thrust vector) in order to accelerate forwards. This leaves less thrust acting straight down to support the helicopter’s weight, so it starts to descend. In order to maintain height, we must raise the collective slightly (not forgetting the pedal input), increasing the total main rotor thrust so that its downwards component is large enough to support the full weight of the helicopter. At the risk of stating the obvious, it should be pointed out that this effect applies whenever the cyclic is tilted away from the central position in ANY direction – the further away from the central position, the smaller the lift component.

9 GROUND SCHOO L
Translational Lift
As the helicopter gathers speed, you’ll find that you start gaining height again. This is due to a phenomenon called Translational Lift, which is hard to explain simply, but is basically due to the fact that the angle of the airflow passing through the main rotor has changed due to the tilting of the rotor disc and the helicopter’s motion (translation) through the air. This increases the effective angle of attack of the main rotor blades, producing more thrust. Translational lift appears at quite low speeds, but disappears again with rising speed – and its effects are felt whether the helicopter moves forwards, sideways or backwards.
3: Climbing and Diving
To gain height in a helicopter flying forwards, you can a) pull back on the cyclic, b) raise the collective, or c) use both controls together or in sequence – this is what normally happens. If you just pull back on the cyclic, the helicopter’s nose will rise and it will start to climb, but it will also start to lose forward speed – you’re redirecting the main rotor thrust so that you have more lift force and less horizontal thrust. Provided that the cyclic is still forward of the central (hover) position, forward speed will stabilize at a lower figure than you started with.
If you simply raise the collective (with pedal input) in forward flight, you’re increasing the main rotor thrust without changing its angle, so you have more lift AND more thrust available. The helicopter will climb and accelerate. If you want to climb without losing or gaining speed, you need to pull back on the cyclic AND simultaneously raise the collective.
In a similar (though not identical) way, you can lose height using cyclic input or collective input or both. If you push forward on the cyclic you will lose height and gain speed (more horizontal thrust, less lift). If you lower the collective you will lose both height and speed (less total thrust, so less horizontal thrust and less lift).
Once you appreciate the effects of the controls and have some experience in using them, you can choose the right combination of cyclic and collective inputs to make the helicopter do what you want, up to the limits of performance.
GROUND SCHOO L 10
Diagram 6.7: Lift and thrust components

11 GROUND SCHOO L
4: Turning in Forward Flight
When the helicopter is hovering or flying at low speed, if you want to turn you do it mainly or exclusively with the pedals. At higher forward speeds, turning is accomplished by tilting the cyclic left or right to bank the helicopter just like a fixed-wing aircraft, though there is no need to use pedal inputs to coordinate the turn. If you fly sustained or steeply-banked turns, however, you’ll need to either raise the collective (with pedal input) or ease back on the cyclic, sacrificing some forward speed. If you do neither then you’ll lose height because banking tilts the rotor disc (and thrust vector) further away from the vertical, trading off lift for the sideways thrust component which causes the turn [diagram 6.7].
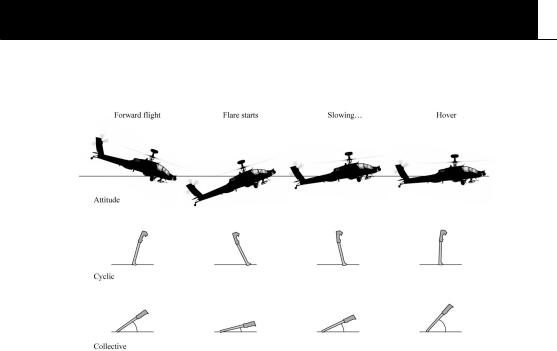
5: Slowing to the Hover from Forward Flight
This technique is called Flaring, and is essentially similar for all wing-borne flying machines, though the helicopter variant is the most complex and demanding since it requires precisely coordinated use of all three controls. The object of the exercise is to slow to a stop in the minimum distance without losing or gaining height. Losing height can be unhealthy for obvious reasons, while gaining height (and exposing yourself unnecessarily) is in military terms ‘tactically unsound’ – a phrase normally used as a diplomatic substitute for ‘lethally stupid’.
Throughout this maneuver you should constantly scan the HUD altimeter/vertical velocity indicator (to see and correct altitude changes) and the view forward (to crosscheck the altimeter and keep yourself heading in a straight line).
You start the maneuver by pulling back on the cyclic to tilt the helicopter backwards – use a moderate nose-up angle to start with, and experiment with steeper angles as you gain experience and confidence. This directs the rotor thrust backwards, which will tend to slow you down, but it also increases the rotor blades’ effective angle of attack, and therefore the total thrust – which means that you’ll climb unless you simultaneously lower the collective.
As the helicopter slows, main rotor thrust diminishes (slowly raise the collective to compensate), and as you approach the hover you’ll need to ease the cyclic forward again to bring the helicopter level, simultaneously raising the collective to the hover setting. [Diagram 6.8] shows the relationship between cyclic and collective movements for the whole maneuver. Pedal is used as necessary to compensate for collective movement and to keep the helicopter straight.
6: Landing Problems and Techniques
Though we’ve just gone through the Flare maneuver, with the emphasis on slowing to the hover without gaining or losing height, this technique generally needs modifying to convert it into a sensible approach to a landing. The reason for this is that unless you’re already flying very low indeed, the flare will leave you hovering higher than you want to be for a safe and sensible vertical descent to touchdown. The problem is mainly one of visibility, and is particularly acute in combat helicopters.
Visibility Factors
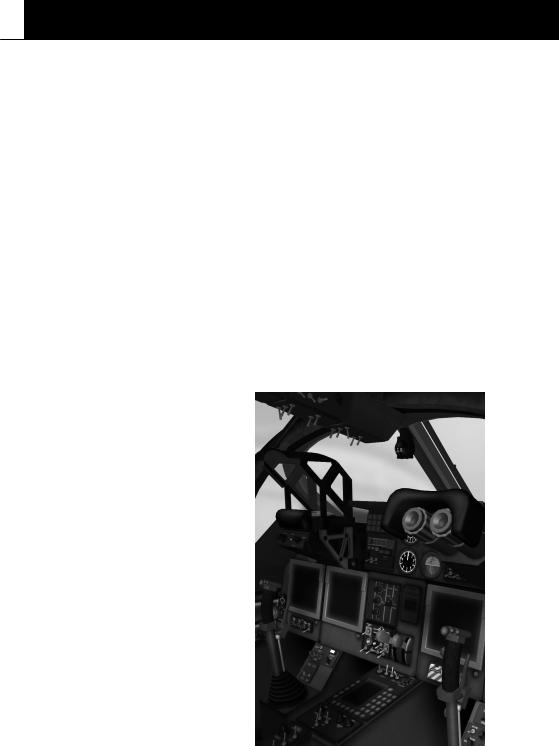
In a combat helicopter with a classical crew arrangement (gunner in front of pilot, both on
GROUND SCHOO L 12
Diagram 6.8: Coordinating cyclic and collective in the flare
the centerline), you as pilot have an excellent field of view to either side. Your forward view is restricted by the gunner’s cockpit and the length of the nose in front of you (more of a problem in the hover or the flare than in forward flight), and your view behind is obstructed to either side by engine pods, stub wings and armament and totally obscured directly behind by the solid bulk of the fuselage. You have no view at all straight down, so whenever you’re descending vertically you are effectively exploring the unknown, tail-end first. It’s a lot like trying to sit down in the dark in an area infested with scorpions.
You need to touch down at a chosen point on a reasonably smooth, level surface, preferably without striking anything with your main or tail rotors. A combat helicopter’s main rotor system is amazingly robust – it’s designed to support tons of helicopter through violent maneuvers and shrug off cannon shells. If you’re prepared to explain the damage to your maintenance crew and superior officers you can chop down small trees with it and still fly away. The tail rotor, however, is smaller and inevitably more delicate. It also projects further beyond the main rotor disc than any other part of the helicopter, and it’s right in the middle of your blind spot behind.
Though you can largely compensate for the restricted view by doing pedal turns, and by picking visual reference points on either side, descending vertically from a high hover is usually far more trouble than it’s worth [see also page 6.20 – Vortex Ring Effect]. The normal helicopter landing approach is very much like a fixed-wing aircraft’s, until you reach the final stages.
13 GROUND SCHOO L
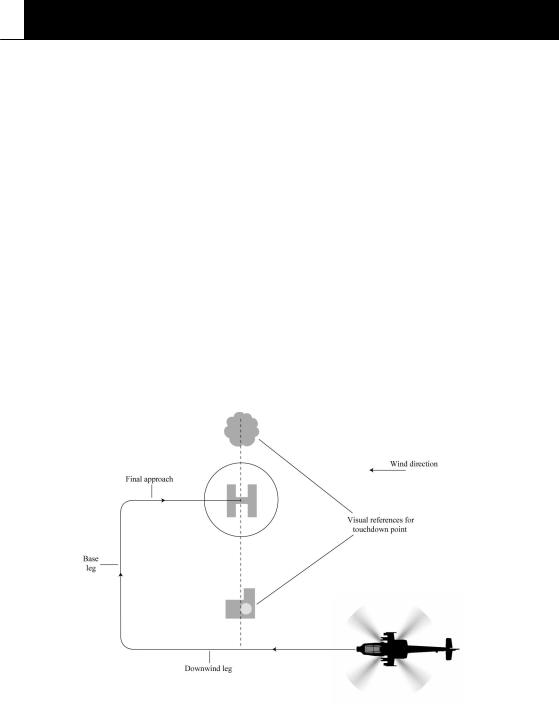
Circuit Pattern
The obvious conclusion is that whenever you’re landing in an unfamiliar area with potential hazards and obstructions you should always check it first. The standard technique for doing this is to fly a ‘circuit’ [diagrams 6.9 and 6.10].
The first piece of information you need is the wind direction and if possible its strength and gustiness. You may know this already, it may be provided for you by someone on the ground with a radio (or a set of marker panels), or if not then you can usually observe it for yourself by looking for drifting smoke, flags or other such clues.
The reason why wind direction is important is that you should try to land with your nose pointing into the wind. While this is a nearly inviolable rule for fixed-wing aircraft because it reduces speed over the ground and the length of the landing run, helicopter pilots have more choice in the matter [see page 6.18 – Sideways]. Nevertheless, your life will be easier if you can land facing into wind.
The wind direction (or the layout of the site) establishes the direction of your landing approach, and the orientation of the circuit pattern. Use the downwind and base legs of the circuit to inspect the landing area and reduce your height and speed. As you pass the touchdown point on the downwind leg, look for visual reference points on either side which you can use to locate yourself once the touchdown point has disappeared under your nose.
Diagram 6.9: Circuit pattern for a clear landing area
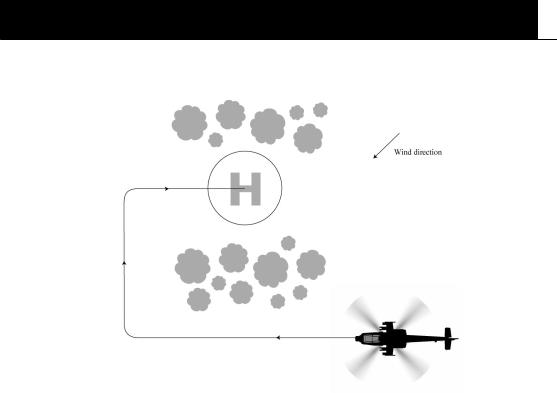
GROUND SCHOO L 14
Diagram 6.10: Circuit pattern for an obstructed landing area
The size of the pattern, your entry height and speed should be determined by the size and nature of the landing area, and the likelihood of enemy action. If the landing site is large and unobstructed (and the enemy isn’t watching or shooting) then you can afford a large circuit, entering high (say 500-1000 feet/150-300 meters) and at relatively high speed. If the landing area is cramped and obstructed, or you wish to avoid enemy attention, you should fly a much smaller, tighter circuit, entering at lower speed and altitude.
Final Approach
You should ideally make your final descent towards the touchdown point with the helicopter as nearly level as possible. Avoid pushing the collective forward to dive at the ground, and try to ensure that by the time you reach this stage you’re travelling slowly enough that a very moderate flare – or ideally a constant slightly nose-up attitude – will be enough to bring you to the hover a few feet above your touchdown point. Now all you have to do is gently lower the collective and touch down.
If you find yourself too high and/or too fast on the final approach, you should abandon the landing and go around again [diagram 6.11]. If you attempt to kill off speed using a radical flare at low altitude then you risk striking your tail rotor on the ground. If you try to descend at too steep an angle from an excessively high approach then you’ll suffer from all the
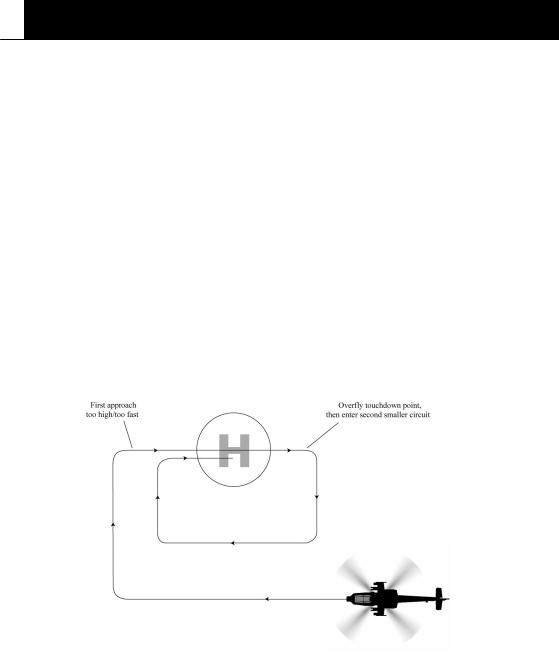
15 GROUND SCHOO L
visibility problems we discussed earlier, plus running the risk of Vortex Ring Effect [diagram 2.14]. Just raise the collective to arrest your descent (or climb if there are obstacles to clear), fly on over and past the touchdown point, and turn into another circuit – smaller, lower and slower than the first. Keep it in mind that you’ll find it much easier to establish the second circuit if you continue some way along the approach line past the touchdown point before you turn.
We Don’t Need no Stinking Circuits!
Oh yes, you do. It’s not just a piece of textbook ritual. The procedure described above may seem formal and longwinded but it really is useful. Not only does it give you the chance to scout the landing area, but the sequence of legs and turns lets you judge and adjust your speed and rate of descent relative to the touchdown point – and the turns can be used to kill off a great deal of speed. A straight-in approach looks much simpler and is perfectly practical for landing in the middle of a wide open airfield, but as soon as you have to deal with obstructions and previously unseen landing sites, the circuit pattern is much safer, usually faster, and saves a great deal of wear and tear on your nerves.
Diagram 6.11: Going around again
GROUND SCHOO L 16
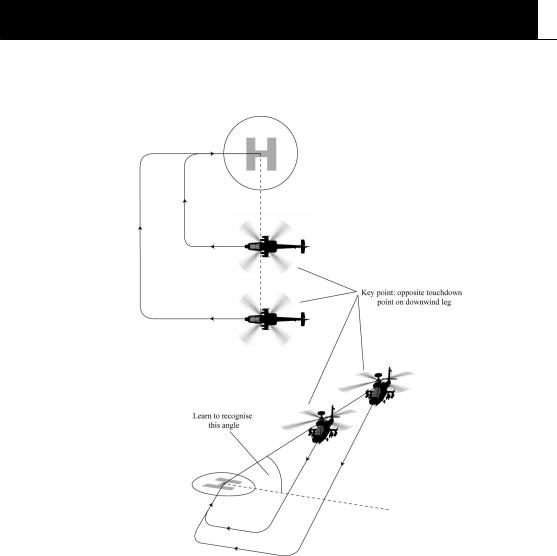
Diagram 6.12: Judging offset and height in the circuit
The key to a successful circuit of any size is to select the correct combination of height and lateral offset (between downwind and final legs). This can be done by learning to recognize the angle, or range of angles, you see when you look down on the touchdown point from the downwind leg. This skill, like any other, can only be acquired by means of practice.
17 GROUND SCHOO L
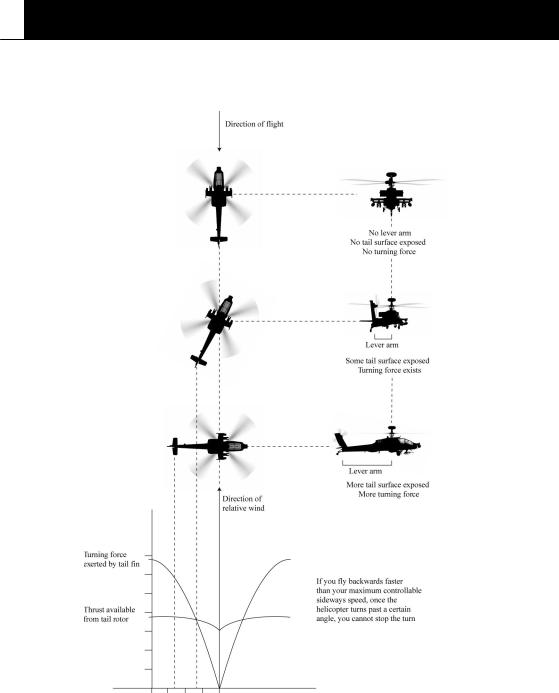
Diagram 6.13: Turning forces in backwards flight

GROUND SCHOO L 18
Sideways, Backwards and Crosswinds
If you have absorbed and understood the basic principles of helicopter flight it should be obvious that you can fly the helicopter in any direction from the hover, without turning, by tilting the cyclic the way you want to go. You can also hover on the spot in a wind blowing from any direction by tilting the cyclic into the wind. There are, however, a few pitfalls which should be pointed out.
Weather-Cocking
The helicopter’s tailboom is there for two main reasons. We’ve already mentioned that it provides a convenient mounting point for the tail rotor, outside the worst of the main rotor downwash, and at the end of a long lever arm. Those same factors also make it the best place to mount a vertical fin (or fins) very like what you find at the tail end of most fixedwing aircraft, and serving exactly the same purpose; to provide automatic directional stability in fast forward flight, just like the fletching of a dart or an arrow.
The tail fin works against you when you try to fly sideways or hover in a cross-wind, generating a force which tends to turn the helicopter’s nose into the relative wind. The whole helicopter acts like a weather-vane. To counter this effect you must use pedal inputs
– and the faster you fly (or the stronger the crosswind) the larger the input needed to maintain heading. Eventually you’ll reach a point where the tail rotor simply cannot provide any more thrust, and the nose will inexorably turn into the relative wind. This is one of the main reasons why a helicopter’s maximum sideways speed is much lower than the maximum forward speed – and a wise pilot will always try to avoid flight regimes which can only be maintained by jamming any control hard against its stops.
Stability in Backwards Flight
Backwards flight is something that obviously needs to be done carefully – you can’t see where you’re going, and you’re flying tail rotor first. There are less obvious problems which affect you even if you have unlimited space for maneuver, or if you’re simply trying to hover in a strong tail-wind. The explanation involves some basic physics, but the diagram should help you grasp what’s going on.
The strength of the turning force generated by the tail fin depends mainly on three factors:
1)The speed of the relative wind.
2)How large a surface the tail fin presents to the relative wind.
3)The effective length of the tail fin’s lever-arm with respect to the relative wind and the helicopter’s center of mass, which we can assume will be more or less directly under the
main rotor hub.
Taking these factors in order; 1) more airspeed means more force. In fact, because the force is proportional to the square of the airspeed, a little more speed means a lot more force. 2) When the tail is pointing straight into the wind, it is exposing the least possible area and generating the least possible force. As the tail swings out across the wind, it presents more and more surface area, generating more and more force. 3) When the tail is pointing straight into the wind, it is in line with the center-of-mass and there is no leverage. As the

19 GROUND SCHOO L
tail swings out across the wind, the length of the lever-arm increases and so does the turning force. Factors 2 and 3 both reach their maximum when the helicopter is broadsideon to the wind, as it is when you’re flying sideways.
Because the tail fin exerts no turning effect when pointing straight into the relative wind (and the helicopter’s fuselage is generating little or no more drag than it does when flying forwards) it is possible to accelerate to much higher speeds in backwards than in sideways flight.
The catch comes when the tail turns out of line. The moment any turning force is generated, it tends to turn the helicopter even further off the wind, generating even more turning force, and so on in a vicious circle. At high speeds this happens so quickly that you have very little time to correct the swing, and if you are moving faster than your maximum stable sideways speed, once the swing goes beyond a certain point you don’t have enough tail-rotor thrust to stop it anyway.
At this point you’ve lost control of the turn, which is almost exactly like a handbrake turn or U-turn in a car. The helicopter swaps ends in an instant, the main rotor blades flap and thrash madly, and if you’re lucky they don’t smash the cockpit canopy or chop off the tail boom as the rotor disc tries to re-align itself with the suddenly and violently changing attitude of the rotor mast.
It is possible (and even potentially tactically useful) to perform milder variants of this manoeuvre under control, but work up to it cautiously. Approach it as you would approach the problem of performing a backflip while whirling a sharp sword around your head.
Hazards and Emergencies:
Landing on Slopes
When necessary, it is entirely possible to land safely on a smooth moderate slope, but the technique needs practice. Though at first sight it might seem natural to land facing up the slope, the preferred direction is sideways, facing into the wind. If you don’t think the helicopter will be stable standing across the slope, then the slope is too steep, and you must find somewhere else.
Approach as normal, but slow your final descent so that you hover with your uphill wheel just touching the ground. Now very gently lower the collective, and as the helicopter leans, move the cyclic in the opposite direction so that the rotor disc remains horizontal. Once both wheels are on the ground, carefully lower the collective to transfer the weight to the wheels, keeping the rotor disc horizontal, to oppose the pull of gravity, rather than tilting it to match the cross-slope.
Take-off can be accomplished by simply reversing the landing drill. The important things are to keep the rotor disc horizontal and to use a very delicate touch on the collective when the wheels are on the ground.
Retreating Blade Stall
We have already talked about the difference in lift developed by the advancing and retreating blades of the main rotor in horizontal flight, which is due to the difference in their effective airspeeds. Lift is directly and sensitively proportional to airspeed, but for any given
GROUND SCHOO L 20
wing at any angle of attack there will be a critical speed below which lift suddenly collapses
– the wing stalls. For any reasonably powerful or streamlined helicopter, the maximum safe airspeed is determined by the speed at which the retreating rotor blade starts to stall.
In this situation, you suddenly start to lose lift on the retreating blade side, and the helicopter rolls towards it. Provided that you are not diving too steeply, you may be able to reduce speed by lowering the collective and pulling back on the cyclic before you lose control, but beware of violent panicky maneuvers, which may stall more blade area or set the blades flapping violently.
Like all aerodynamic effects, retreating blade stall is affected by air density and by temperature. It will happen at lower speeds at higher altitudes and/or higher temperatures.
Vortex Ring Effect
The commonest visible example of a vortex ring (or ring vortex) is a smoke-ring. In fact they are quite a widespread phenomenon, but like all flow patterns they are usually impossible to see directly. All you need to start one is a stream with a more or less circular crosssection (like your rotor downwash) which satisfies certain other conditions.
In a helicopter, you can unintentionally create a vortex ring around your main rotor if you make a sustained high-speed descent vertically or at a steep angle. Once the ring has formed, it is surprisingly stable, and moves with you as you descend. The extra downwash
Diagram 6.14: Vortex rings

21 GROUND SCHOO L
of the circulating vortex ring destroys most of the main rotor’s lift, and you cannot escape by raising the collective – you will only pump energy into the ring’s circulation. You are already descending too fast to escape downwards and outrun it. The only way out is to use the cyclic to move laterally, because lateral movement disrupts the vortex, just as vertical movement maintains it.
Coping with Reduced Power
If you lose an engine in a powerful twin-engined helicopter like the Comanche or the Hokum you can still fly, land and take off, provided that you don’t try to lift heavy weights in hot and high conditions or leap tall buildings at a single bound. The keys to achieving this are translational lift and ground effect. Every time you raise the collective for more lift you put more strain on the surviving engine, and the rotor speed may slow to dangerous levels.
Ground effect multiplies your main rotor lift and may let you hover with reduced power. It also provides a convenient low-friction environment in which to accelerate to a speed where translational lift can let you climb out of ground effect. When approaching for a landing, or descending and decelerating for any other reason, let yourself gently down at a shallow angle or a low speed, or both. The ground effect cushion is no deeper than your main rotor diameter.
If you cannot even hover in ground effect, you may still be able to achieve a running landing, if space is available. The approach is flown very like a low speed approach to a runway in a fixed-wing aircraft. Just as in an aircraft, you round out your descent by pulling smoothly back on the cyclic before you touch the ground so that you kiss it gently rather than crash into it at an angle. At the same time you must avoid plunging your tail-rotor into the ground.
If you’re running out of horizontal speed but close to the ground you can probably afford to raise the cyclic to slow the last seconds of descent. If you run out of forward speed and rotor rpm at the same time, you’d better hope that you don’t have too far to fall.
Running takeoffs are also possible if space, surface and wind direction permit. The idea here is to accelerate on the ground to a speed where translational lift will let you lift off and (you hope) climb. If you can’t climb out of ground effect then you need a clear run to a lower altitude, or another rolling landing. Failing these, you’re in trouble.
Autorotations
If a helicopter loses all engine power in flight, it can still be landed without serious damage or injury provided that the pilot does everything right, and there is a clear space in the right place for a landing. The technique and options vary according to your height when power is lost.
1) Loss of Power at Altitude
The standard Autorotation procedure assumes that the helicopter is flying at 500 feet / 150 meters or more. The key technique is to preserve the rotational energy stored in the main rotor system (treating it as a giant flywheel) until it can be used up in the last few seconds of flight to halt your descent and lower the helicopter more or less smoothly to the ground.

GROUND SCHOO L 22
Two steps are essential to accomplish this. In the first place, as soon as the engine thrust disappears you must instantly bottom the collective, which reduces the main rotor pitch angle to its lowest value and minimizes the drag on the rotor blades. At the same time, if you have the height and space to maneuver, you should try to preserve the helicopter’s forward motion and minimize the rate of descent by using the cyclic to trim your speed to the minimum-rate-of-descent figure – about 70-80 knots/130-150 kmh. The resulting airflow will actually drive the main rotor around, just as it does in an autogyro (which has a powered propeller to give it forward speed, which drives its unpowered rotor). This is what the word Autorotation means. It is to a helicopter what gliding flight is to a fixedwing aircraft.
Unfortunately, a heavy combat helicopter glides about as well as a fast jet does. Because of the low speeds involved, and the rotor’s ability to deliver braking thrust straight down, it is still possible to land safely, but a very steep descent may be required to keep the main rotor turning. Your pull-out/round-out maneuver must be finely judged to avoid either hitting the ground in the dive or finding yourself running out of airspeed and rotor rpm with the ground still an uncomfortable distance below.
At the same time as the collective is bottomed and the cyclic trimmed, the pilot must also scan the area below and ahead (and preferably upwind) for the best place to put down and steer towards it. There is no time for hesitation or indecision in this sequence unless you have a great deal of height to spare. Action and decision must be nearly instantaneous, and once you’ve made your choice of landing area you are committed.
2) Loss of Power at Low Level
This is a more likely scenario for an attack helicopter than the classic autorotation described above. Your options are essentially limited to flaring more or less straight ahead, and/or raising the collective to convert rotational energy into braking thrust before you hit the ground. The helicopter will probably take severe damage, but its structure is designed to absorb energy and protect the crew in precisely this situation. Combat helicopter crews can expect to survive crashes which would be instantly fatal in most kinds of aircraft.
23 GROUND SCHOO L
Tactical Flying
The most important, most fundamental piece of advice for a brand-new attack helicopter pilot who knows more about fast jets than ground combat is to stop thinking like a fighter pilot and start thinking like an infantryman or a tank commander. Cover, vantage points, fields of fire, and lines of retreat are everything. Fly high and fast in the neighbourhood of the enemy and you simply expose yourself.
Unless you are planning a slashing surprise attack on a known enemy position, every time you come to a skyline which may expose you to an enemy on the other side you should either avoid it or creep up to it and peer cautiously over the top. A pair, or a larger unit of attack helicopters advancing to contact with the enemy should ideally leapfrog forward in the classic pattern of advancing infantry; one group holds position at a point which combines cover with good fields of view and fire, while the other group scuttles forward to the next vantage point, to cover the next advance.
Withdrawal or retreat is also usually handled the same way, with one group providing covering fire, or at least attracting the enemy's attention while the other group concentrates on falling back to the next available cover while minimizing their own exposure.
Security: Cover, Speed and Maneuver
Using Cover
Crests, valleys, forests, rivers with steep or wooded banks, sunken roads and buildings can all provide cover. At the personal level and on a small scale, everyone who has ever played hide- and-seek understands the concept well. The difference between this and the military concept of cover is mainly one of scale. Hiding yourself is rarely difficult in any normal environment. Hiding troops, vehicles or helicopters requires the use of much larger obstacles and, especially, landscape. For a helicopter there is no better form of cover available than high ground between you and the enemy.
When you know roughly where the enemy is, it is not too difficult to identify the 'dead ground' which he cannot see or sweep with fire. These are the areas you can use to approach, to launch an attack, to hide, or to retreat safely. If the terrain favors you, and you exploit it

GROUND SCHOO L 24
properly, you may be able to approach, attack and withdraw without exposing yourself for longer than it takes to fire.
On the other hand, there may not be continuous cover between your current position and the place where you want to go next. If the target is stationary you need to get closer, you must now risk exposed dashes between dead zones. If the target is moving, however, its dead ground changes rapidly, and if you can predict how it will change, you can often use broken cover as effectively as the continuous kind.
Valleys and depressions are the best places to find dead ground, since they can shield you from view all around, or at least over wide angles, but the same is obvious to any competent enemy, and roads often run down valleys. Cover is valuable to everyone, and the enemy may have got there first.
Obstacles like hills, woods or groups of buildings provide a different sort of cover. If the enemy is moving, you must move around your cover to stay behind it. Clearings in woods, or open spaces surrounded by buildings, can be considered as shallow depressions or valleys.
Moving from cover to cover may be the safest way to advance, but it doesn't guarantee complete safety. Whenever you expose yourself, consider what you can do if the enemy appears over the horizon at the worst possible moment.
Using Speed and Maneuver
If you don't have cover, then the next best things are speed and agility. A helicopter stationary in the open is an easy high-value target. A helicopter flying slowly, or in a straight line, is not much harder to hit. If you must expose yourself to enemy fire, try to build up speed before you break cover, and fly a tight three-dimensional zigzag. Don't just put your head down and run; change your path every few seconds. The gain in safety under fire is well worth the minor loss of speed. If you must fly straight, to line up for an attack with unguided rockets, for example, then try to zigzag vertically. The vertical zigzag is your best tactic against radar-directed gunfire from any direction except close ahead and behind.
Offensive Tactics
Just as there are two basic forms of defence; cover on the one hand, maneuver on the other, there are two corresponding modes of attack available to a combat helicopter; Sniping and Slashing. Each has its advantages and disadvantages. Be prepared to use both, and to switch rapidly from one mode to the other.
Sniping Attack
This method is usually the safer of the two, especially against a numerous enemy. As the description suggests, you set yourself up in cover and expose yourself only as much as is necessary to pick your targets and fire, though if you're using the older-model laser-guided Hellfire in the Comanche, or the laser-guided Vikhr missile in the Hokum, you will have to stay exposed long enough to keep your sights on the target until the missile reaches it.
If you don't have a fire-and-forget missile available, this means that in some ways you're safer sniping from close range. The missile flight time is shorter, and so you are exposed
25 GROUND SCHOO L
for less time while you guide it.
The best way to use this technique at the individual level is to fire a single missile, or a short salvo, duck back into cover, and move to a new position before popping up (or sideways) to shoot again. If two or more helicopters cooperate, taking turns to attack from widely separated positions, the technique is even more effective.
At a slightly higher tactical level, the sniping attack is also a relatively low-risk way to grab the enemy's attention and focus it in one direction, while a second force approaches to strike from a fresh direction, preferably the enemy's flank (side) or rear.
Slashing Attack
Used properly, this technique resembles a cavalry charge, or a firing pass by a groundattack aircraft. As noted above, as the range closes your weapons' flight time grows shorter, and your unguided weapons also become more accurate. If you can surprise the enemy and make your run from an unexpected direction, you will have a vital few seconds - how

GROUND SCHOO L 26
long depends on the enemy's state of readiness - before sensors and weapons can be reoriented against you. You must make the most of this grace period to take out the enemy's most dangerous air defense systems.
Another vitally important question to consider is what happens at the end of your run. If you do not succeed in suppressing the enemy's air defense systems, then you will need to find cover quickly. Don't even think about turning round and retreating to your starting position - you must keep your speed up and open the range as fast as possible, dodging as hard as you can.
As ever, intelligent cooperation can vastly increase the effectiveness of the tactic, and reduce the risks. If several helicopters attack from different directions simultaneously, the enemy must divide the available defensive fire between them. Another tactical variation worth considering is to attack in a series of waves. As the first wave passes the enemy's position and the defenses swing to follow them, a second attack wave may enjoy a few seconds of immunity while the defenses re-orient against them - and this also takes the pressure off the first wave as it retreats.
A well-executed slashing attack can be devastating, but used wrongly, this tactic will devastate your own forces. The classic example of the wrong way to take the offensive comes from the mass infantry attacks of the first world war. If the enemy knows where you're coming from; if his weapons are already pointed in your direction; if his forces are behind cover while you must cross open ground, then you are inviting disaster.
Another situation where the basic principles of the slashing attack are important is the unexpected engagement. If you must cover ground quickly, and a cautious leapfrog advance is not possible, then every time you cross a ridgeline or come around a bend in a valley you may find the enemy in your path. Unless he saw you coming he'll be just as surprised as you. If you have the weight of fire to do him serious damage, or there is cover available beyond, a hasty slashing attack may be the best form of defense - your fastest way out of a dangerous situation.
Defensive Tactics
In those cases where attack is not a practicable form of defense - when faced with superior forces in open ground, for example - the first essentials are cover and a line of retreat. Ducking into cover without a line of retreat amounts to trapping yourself. Mobility is the helicopter's prime asset, and its only defense against area weapons like large blast warheads or submunitions clusters. Remember that when the enemy knows where you're hiding he can attack you with mortars or artillery, even if you are out of sight, or outflank your position by advancing around it, either with ground forces or other helicopters.
The only guaranteed counter to a properly executed flanking maneuver is to retreat. If you don't have the space and the cover to do this, then outside intervention may be your only hope. The moral of the story is simple - keep your line of retreat open, especially in a sniping engagement. If it is threatened by enemy movement, use it straight away while you still can. If you know in advance that you're going to have to make a fighting withdrawal, pick out in advance the places where you can turn and fire back at your pursuers, and be aware of places where you can find friendly fire support. Lead the enemy to them if

27 GROUND SCHOO L
possible.
Air-to-Air Tactics
If you have to fight another combat helicopter, or an aircraft, remember the mantra "this is not a jet fighter". To a fighter pilot, altitude is a resource, a source of potential energy to be converted into speed. To you, as a combat helicopter pilot, altitude means exposure to enemy ground fire. Speed, too, works differently for a helicopter pilot. If an enemy aircraft makes a high-speed slashing attack on you while your own speed is low, the advantage swings to you as soon as the enemy is past. He is the prisoner of his own momentum, you can pedal-turn and launch your own weapons from his blind spot.
Use cover and ambush tactics when the enemy is chasing you. When you're chasing him, beware of the same tactics. Some classic air-to-air doctrines still apply to helicopter combat; If you're part of a formation attacked by enemy helicopters, the formation should split up. At the least, the enemy must divide his forces to pursue the different elements. If the enemy leaves any of your elements unengaged, these should then turn around and come in on the enemy's own tail.
Another classic air-combat tactic that may work for you is turning towards your opponent's approach. This brings your own weapons to bear and shortens his firing time.
Using Ground-attack Weapons in Air Combat
Even if you're not carrying specialized air-to-air missiles, you should be aware of the antiaircraft potential of your ground-attack weapons. Cannon, rockets and anti-tank missiles may all be usable, if less than ideal. If you have to use these weapons against aircraft, try to do it at short range, and set up a low-deflection shot from ahead or behind. Remember that your guided weapons may fly a pursuit path to the target, rather than an intercept path, which reduces their effective range. Anti-tank missiles also generally have lower acceleration and top speeds, higher drag, and much less agility than anti-aircraft missiles - launching a Hellfire at a passing or retreating fast jet is most likely to achieve nothing more than the waste of an expensive missile.

COMANCHE VERSUS HOKUM
1 COMANCHE VERSUS HOKUM
RAH-66 Comanche
Carrying on the design tradition of American attack helicopters with the tandem cockpit and turreted nose cannon, the RAH-66 Comanche also brings a suite of new technologies shaped to fit the US Army’s 21st century vision. It is a vision often described using terms such as efficiency, economy, flexibility and rapid-deployment. With the reduction of military strength after the cold war and the increasing involvement of the US Army in "Operations Other Than War", it has become evident that future forces need to be of a higher quality. They need to deploy anywhere in the world rapidly and win in combat with the minimum number of casualties.
Combining systems initially developed for the Apache and Light Helicopter Experimental (LHX) program with new high-technology systems, the Boeing Sikorsky RAH-66 Comanche represents the state-of-the-art in attack helicopters.
Visually, the most striking feature is the exterior body shape. Using what is known as low observable (LO) properties, the fuselage is designed to reflect radar energy away from any transmission source. Boeing claims the radar signature is around 1/300th of current aircraft. To maintain a low radar profile, stores can be hidden in IRAMS (Integrated Retractable Munitions System), this is an internal weapons bay capable of holding 6 Hellfire missiles.
 Loading...