

F A L C O N 3 . 0
i
FLIGHT MANUAL

ii
F A L C O N 3 . 0
Program Credits
Original Design Concept:
Gilman “Chopstick” Louie
Simulation Team:
Erick “Jetbuster” Jap
Gary “RC” Stottlemyer
Kuswara “Porkchop” Pranawahadi
Les “Vulture” Watts
Interface Team:
Scot “Woof” Bayless
Michael “Papa Bear” Mancuso
Ian “Blue Macaw” Falicov
Daniel “Bullfrog” Deremiah
Additional Programming:
Farah “Stinger” Soebrata
Don “Blaster” Harlow
Rebecca “Stormtrooper” Ang
Donald “Cal” Tsang
Lee “Vaporizer” Powell
Product Manager:
Scot “Woof” Bayless
Digital Actors:
“Smokin’ Joe” Ward
Scot “Woof” Bayless
Russel “Blue Jay” Reiss
Matt “Mack Daddy” Carlström
Zachary “Defiant” Fuller
Tony Beccia
Daniel “Bullfrog” Deremiah
Marisa “No. 19” Ong
Bill Hall
Elizabeth Chambers
Shannon Lee
Stunt Effects:
Matt “Mack Daddy” Carlström
Elizabeth Chambers
World Building:
Anthony “KnötHead” Chiang
Daniel “Bullfrog” Deremiah
“Smokin’ Joe” Ward
Peter “Bandit” Ward
Eric “Violator” Grotke
Bradd “Bluto” Huddle
Art:
Matt “Mack Daddy” Carlström
Dan “Dolphin” Guerra
Chuck “Bunhead” Butler
Louis “Cantoni” Sremac
Zachary “Defiant” Fuller
Animation Direction, Special Effects
and Camera:
Matt “Mack Daddy” Carlström
Zachary “Defiant” Fuller
Sound and Music:
Paul “Moggy” Mogg
Quality Assurance:
Kurt “Goat Killer” Boutin
Brett “Flying Crip” Amick
Steve “Scorpion” Blankenship
Stephen “Buster” Keith
Lawrence “Hairball” Kevin
Mike “Mad Mongoose” Nebeker
Russel “Blue Jay” Reiss

F A L C O N 3 . 0
iii
Additional Quality Assurance:
Evan “Baron” Birkby
Eric “Cerebus” Chin
William “T-Square” Chin
Mike “Izzy” Isgur
Douglas “Opus” Lin
David “Wotan” Wessman
Beta Testers:
Frank “Turk” Bartolotta
Tom “KC” Basham
Terry “Pinecone” Carraway
James “Hawk” Cook
Alvin “Moondog” Dickerson
Matt “Mythman” Dimmic
Steve “Auger” Edwards
Mark “Endo” Estephanian
Mike “Black Viper” Hartmann
Buzz “Ballistic” Hoffman
Eric “Reckless” Pearson
Dave “Lawman” Reichlein
Donald “Blue Max” Rinker
Kevin “Thrusty” Turner
Michael “Misha” Vario
Steve “FT” Wartofsky
Mike “Moondawg” Weksler
Printed in the United States of America
Third Edition, December 1995
10 9 8 7 6 5 4 3
Manual Credits
Writing:
Robert “Spaceman” Giedt
Howard “Whiplash” Bornstein
Pete “Boomer” Bonanni
Kyle “Bulldog” Brink
“Smokin’ Joe” Ward
Steve “White Knight” Perrin
Editing:
Robert “Spaceman” Giedt
Marisa “No. 19” Ong
“Smokin’ Joe” Ward
Kyle “Bulldog” Brink
Maggie “Milagro” Brown
Technical Illustrations:
Chuck “Bunhead” Butler
Layout:
Van Winkle Design Group
Photos Courtesy of:
Armed Forces Journal
Aviation Week
General Dynamics
U.S. Department of Defense
Pete Bonanni
Gilman Louie
Dick Stamm
Special Thanks:
Shelley Addison, Tom Byron, the Customer Support crew, Erik Flom, Barbara Gleason, Rosann Goodrow, Rita
Harrington, Guymond Louie, Ann McCue, Lisa Meucci, Michael Nelson, Hallie Park, Terry Thompson, our Production
Department, Mike Hatfield at General Dynamics, Bob Carter of ThrustMaster, Ron Haidenger of Advanced Gravis,
Joseph Colligan of Delta Lithograph, Linotext (Rod Hume), the Typesetting Shop in Oakland (Charlie Pettler, Rick
Banker and Tinamarie Goldman), Air Combat USA in Fullerton (“Hollywood,” “Dooley,” “Club” and the rest of the
guys), all the folks at Cermoss for helping dupe the disks, MapLink, and last but not least, Kevin Goyer and the 25th
Aircraft Maintenance Unit for sharing their personal memories of Desert Storm

iv
F A L C O N 3 . 0
Falcon 3.0 © 1991 Sphere, Inc. Falcon 3.0 is a trademark and Spectrum HoloByte is a
registered trademark of Sphere, Inc. All Rights Reserved. Head to Head is a registered
trademark of Hasbro, Inc. and is used under license. Other trademarks are the property
of their respective holders.
SECTION
S E C T I O N I : I N T R O D U C T I O N
I
INTRODUCTION
1

2
Introduction
Strapped into your seat, you scan the Iraqi landscape for bogeys. Nothing. Martyrs’ Bridge ought
to be easy to take out. Suddenly, a high-pitched warning screeches at you. Your radar lights up
like Times Square on the First. “2 bogeys at 11, 30 miles,” you radio to your wingman, almost
shouting. “Roger, moving to intercept,” he responds. A quick check of the threat indicator shows
they haven’t spotted you yet since they’re not breaking off. You and your wingie break combat
spread, swing wide and try to pince them from the rear. Just before you attack, they catch your
radar and break off. “Get ’em!” you yell, firing off a burst of rounds at the leader as he zips by
while your wingie takes off after the other bandit.
Getting a closer look, your heart leaps into your throat as you notice that these planes are fast
and lethal MiG-29s. Muttering sighs of relief that their radar didn’t spot you first, you break hard
after the leader. He pulls up into a roll, and you follow keeping your energy high, then break down
just after he makes his descent. Dead in your sights, you select and arm a Sidewinder, then fire
it in his direction. Like he knew it was coming, the MiG dives fast to avoid the missile, dumping
flares, and then pulls up hard. Your shallow dive catches him with his energy depleted, so you
switch to guns and lay into him. Flames erupt from his engine and flak rains from his wounded
bird. Spiraling downward toward the Tigris, the MiG pilot ejects just before his plane shatters
like a used firecracker. The other MiG sees his comrade go down and bugs out towards Baghdad.
During this time your wingman got shot up and a dirty smear on his tail says that he’s got one
helluva fuel leak. “I’m a dot,” your wingie yells, pulling back and heading for home. “Roger,”
you reply. Only four more miles to that bridge. Gotta go for it.
You drop to 2,000 feet to avoid radar — then home in on the bridge. “If those Iraqi tanks get
there before me, Army’s gonna have my head.” Two miles to target, approaching visual.
Martyrs’ Bridge comes into range, and you click to your GBU. Target lock, FIRE! The bomb
glides through the air and slams into the center of the bridge, turning it into a hulk of twisted
metal. As you wing around and head for home, you’re already thinking ahead to your next
assignment…
Welcome to the world of Falcon 3.0, the most complete and accurate flight simulator on the
market today. Strap yourself in and prepare for combat!
F A L C O N 3 . 0

S E C T I O N I : I N T R O D U C T I O N
3
About
Falcon® 3.0
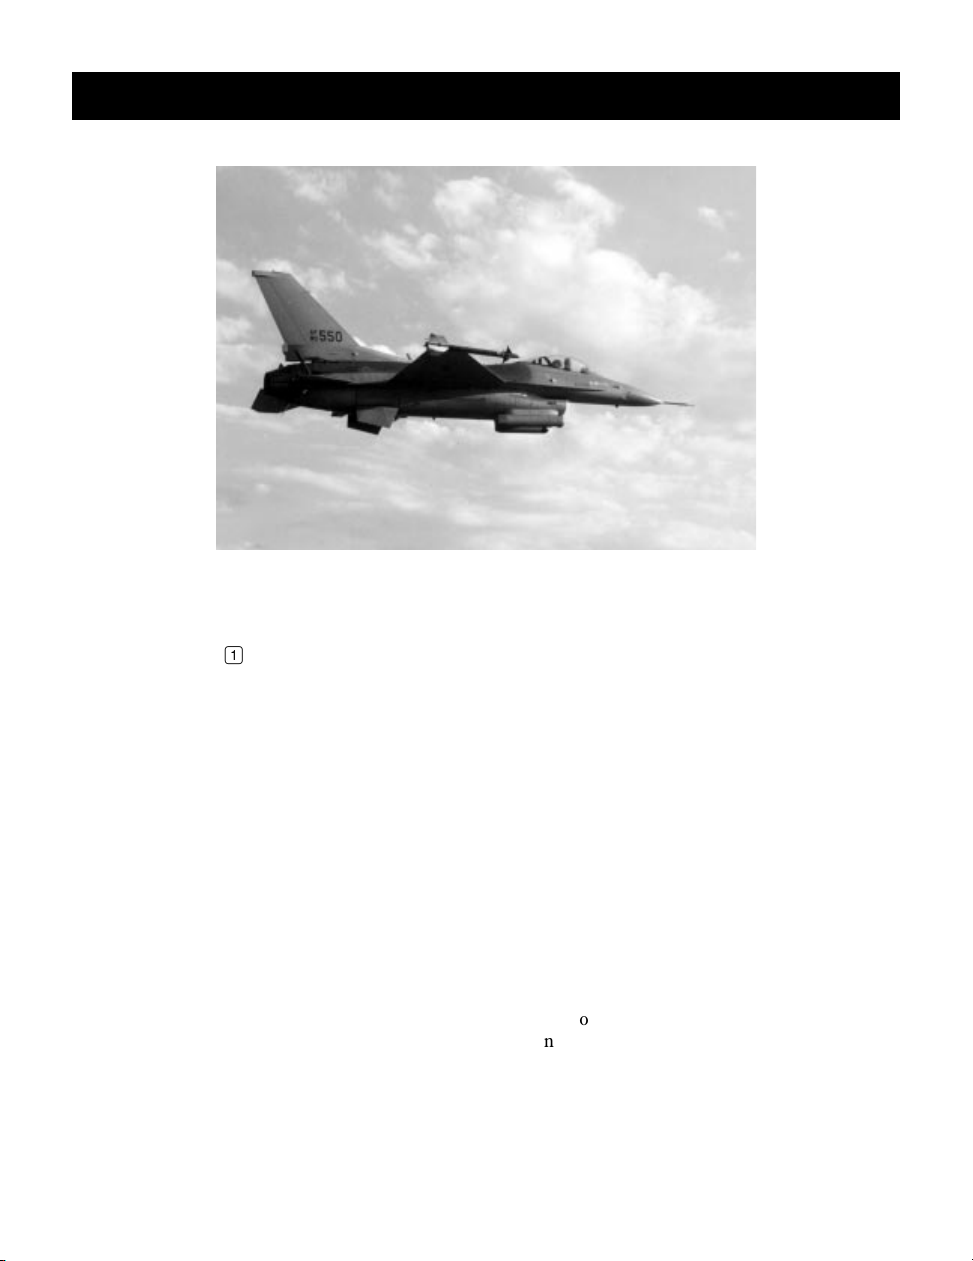
Falcon 3.0 is first and foremost a simulator of the F-16 Fighting Falcon — a dogfighting
aircraft with the additional capability of air-to-ground bombing. It is not only one of the most
maneuverable (and inexpensive) planes in the United States’ arsenal of aircraft, but it’s also
a favorite of experienced combat pilots. Falcon 3.0 has been designed to provide the most
authentic simulation of air combat possible on your computer.
Inside Falcon 3.0 are actually three games in one: the Instant Action mode for the novice
flight sim pilot, the Red Flag training ground/mission editor where budding pilots can
prepare for combat, and the Campaign mode in which you take the part of a squadron
commander and lead your pilots to victory or defeat on one of three real-world battlefields.
Instant Action is designed for the novice pilot or the player who is interested in “mixing it
up” without a lot of complexity. All you’ve got in this mode is your F-16 and lots of enemies.
Instant Action can also serve as basic training for the simulation; you can learn how to fly
and observe the characteristics of the various enemy aircraft. You will be scored based on
the number of air and ground targets destroyed and the accuracy of the weapons you fired.
Instant Action is fully described in Section II: Instant Action.
One feature of Red Flag is the set of training lessons described in Section VI: Air Combat
School. These lessons will lead you through the operation of your F-16, from basic flight
to air combat manuevers. They also cover the operation of the aircraft’s avionic and weapon
systems. Another feature of Red Flag is the mission editor which allows you to create your
own missions involving a great variety of air and ground forces.
The Campaign is the heart of Falcon 3.0. In the Campaign, you play the role of a squadron
commander in one of three theaters of conflict: Panama, Israel or Kuwait. You assign the
pilots of your squadron to various missions to achieve victory. You also take the role of the
lead pilot on all missions; your skills determine the outcome of every mission and eventually
the outcome of the war. The computer controls your wingmen and the overall course of the
conflict. The progress of the campaign is strongly influenced by your success or failure on
the battlefield, so no two campaigns will ever be exactly alike.
In addition to the three major modes of play described above, Falcon 3.0 has other features:
ACMI (Air Combat Maneuvering Instrumentation), which allows you to record and review
mission action, a Configuration section for customizing game features, and a Communications mode that allows you to battle your friends head-to-head using a modem, network or
a direct connection.
™

4
How to approach this manual
Don’t worry about the length of this book — by no means do you need to read it all to
experience the thrill of Falcon 3.0. While a lot of the manual describes how to play the game,
not every section needs to be tackled at once.
Before continuing with this manual, you should turn to Section III: Installation and
Loading and read the Installation and Loading procedures. This section will explain where
to find the Install program and how it operates. It will tell you how to load the game and
configure your system to utilize expanded memory (EMS).
Next, you should turn to Section IV: War Room, which gives a brief overview of Falcon
3.0’s interface and describes how to get to the various areas of the game. From the War
Room, you can choose to fly around in Instant Action (Section II), to change some of the
hardware or software options for the game (Section X), or to edit one of your squadrons
(Section V). After setting up a squadron, you can either go on a training mission (Section
VI) or begin a new campaign (Section VIII).
F A L C O N 3 . 0
SECTION
S E C T I O N I I : I N S T A N T A C T I O N
II
INSTANT
ACTION
5
6
Instant Action
Instant Action puts you into the air immediately. No setup, no required objectives, no hassle
— just straight piloting.
If you haven’t already installed Falcon 3.0, install it according to the directions in Section
III: Installation and Loading. To enter Instant Action, load Falcon 3.0. You will see an
introductory sequence followed by the title screen and game credits.
F A L C O N 3 . 0
Welcome to the War Room
The screen that follows is the War Room. Using the keyboard or the mouse, you can access
other sections of the game by selecting one of the various monitors in the War Room.
If you have gone to the Configuration area before, go there now, select the Beginner button
and return. If you want to adjust the settings to make it more difficult or more realistic, please
see Section X: Configuration for full instructions.
If you have never gone to the Configuration screen before, don’t worry; you’ll automatically
start at the Beginner setting.
Selecting the large screen at the upper left of the War Room exits you to DOS; selecting the
large monitor at the upper right launches you straight into Instant Action.
Zero to 450 in six seconds
After some video animations, you will find yourself airborne, cruising at 450 knots directly
over an enemy ground installation.
Start fighting — you’re on your own, with unlimited fuel, weapons and time. Every radar
contact is hostile, every dot on the horizon is the enemy, and everything on the ground
wants you shot down. The goal is simple: see how long you can last and how many of them
you can take with you before you buy the farm.
S E C T I O N I I : I N S T A N T A C T I O N
Time out!
The game can be paused by pressing P. A paused game can be restarted the same way.
Pressing q will also halt the game as well as bring up the menu bar. A number of options,
discussed in Section IX: Flight, are available through the various menu selections. Return
to play by pulling down the FILE menu and selecting Return to Game.
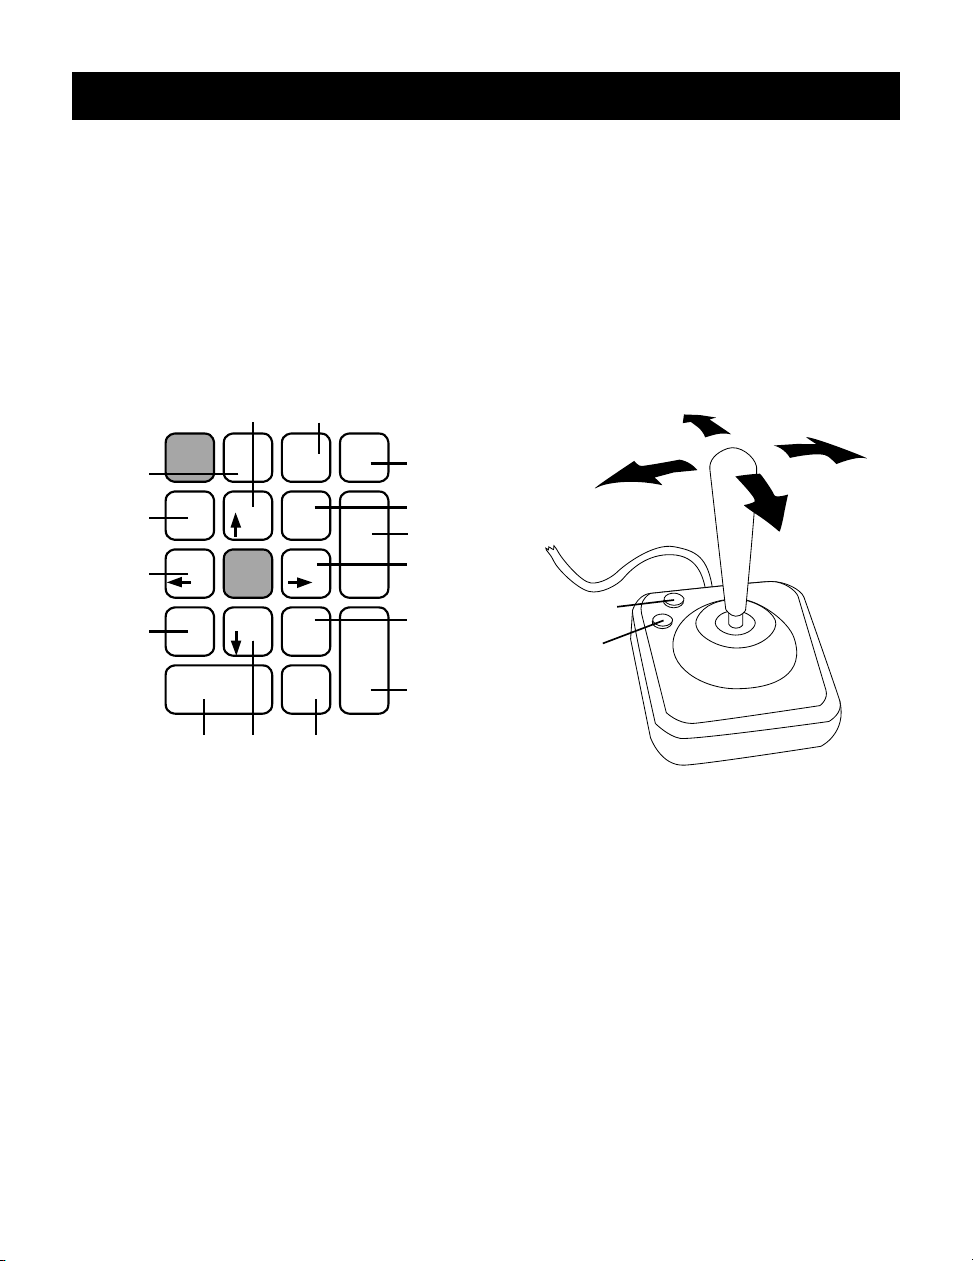
Controlling the plane
The Quick Reference Card has a full keyboard command listing, but here are the basics.
Padlock
Mil/AB switch
Left
view
Bank
left
Front
view
Nose
down
Num
Lock
/
789
Home Pg Up
456
123
End Pg Dn
0
Ins Del
view
*
.
-
+
Enter
Throttle –
Right view
Throttle +
Bank right
Rear view
Air-to-air
weapons select
Fire weapon
Weapons
7
Nose down
Bank right
Bank left
Nose up
select
Drop
flares
Nose
Drop
chaff
up
To bank left or right, just push the stick to that side. Pull back on the stick to climb, and push
forward on the stick to dive. Pull back and bank simultaneously to turn tighter. If you are
using the keyboard, the arrow keys take the place of the stick.
Control the throttle with + and -. Watch the RPM Indicator on the right side of the cockpit
as you increase and decrease the power; for dogfighting, 60%–80% power is optimum. But
if you need to extend or are just plain out of airspeed, kick in the afterburners with /. When
you first fire the ’burners, you will see “AB1” displayed in the MIL/AB Indicator, next to the
RPM Indicator. This means you are in the first stage of afterburner. Use < and > to scale
through the five afterburner stages. Shut down the afterburners with /.
8
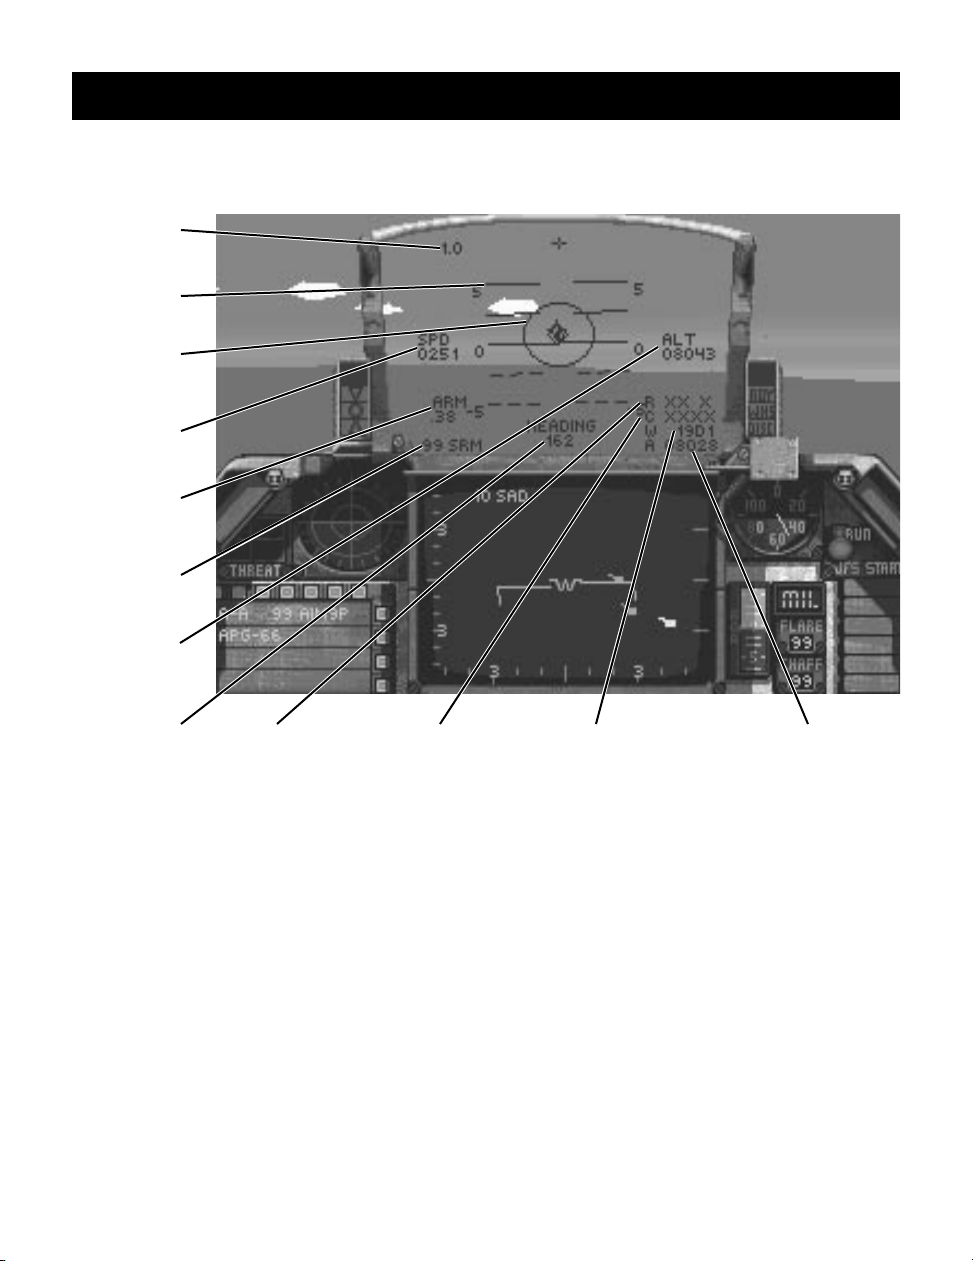
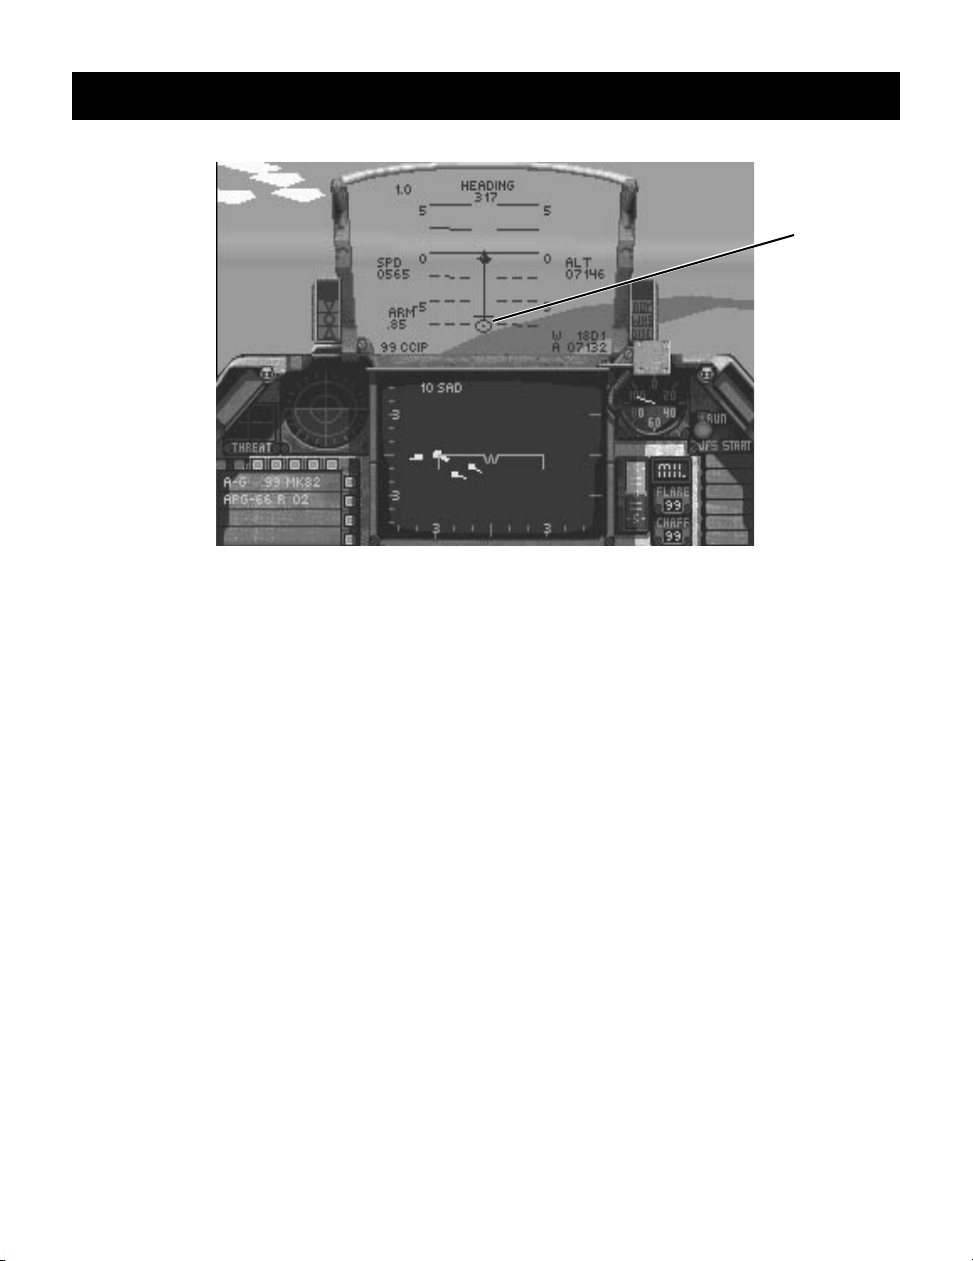
The Head-Up Display (HUD)
G Force
Indicator
Pitch
Ladder
Aiming
Reticle
Airspeed
Mach
Indicator
HUD Mode
Indicator
Altitude
Above
Sea Level
F A L C O N 3 . 0
Heading Range
to Target
Pause the game for a moment. Now look at the center of your screen, where all the green
writing is. The area within this metal frame is the HUD.
The symbols
The tiny circle in the center is the Center Point; its purpose is to help keep the pilot’s
attention focused in chaotic situations.
The larger circle around the Center Point is the Aiming Reticle. In general, any target within
the aiming reticle has a good chance of being hit, assuming it is in range and you are locked
on. Within the Aiming Reticle, a number of different targeting aids may appear. These will
be discussed later.
Overlaid on the Aiming Reticle is the Pitch Ladder, a wide band of lines with numbers next
to them. The lines are parallel to the horizon, and the numbers at either end indicate the
plane’s pitch in degrees. Zero degrees is parallel to the ground, 90 degrees is pointing
straight up, and -90 degrees is pointing straight down.
At the top of the HUD is the plus sign. If an air-to-air target is within visual range, a line will
extend from the plus sign in the direction of the selected target.
Closure
Rate
Distance to
Waypoint
Altitude Above
Ground

S E C T I O N I I : I N S T A N T A C T I O N
The figures
Centered in the bottom of the HUD is your current heading in degrees, where 000 is due
north, 090 is due east, 180 is due south and 270 is due west. Next to the heading will be the
Waypoint Caret which tells you which way to turn to head to your next waypoint. For
example, if the heading read “270>,” you should bank to the right to reach your next
waypoint. When you are heading directly towards your waypoint, the Waypoint Caret will
read “>xxx<.”
Next to the heading, in the lower right-hand corner of the HUD, are four numbers. The top
one is the range to the current target in feet. The next is the closure rate — your speed
relative to the target. If your closure rate is positive, then you are approaching your target
at that speed (in knots). If it is negative, then your target is pulling away at that rate. The third
number is the distance to the next waypoint. The bottom number is your altitude above
terrain, which shows how high above the dirt you are.
Above the range figure, at the middle of the right-hand side of the HUD, is your altitude in
feet. This is how high above sea level you are — not how far above terrain your plane is.
At the top left of the HUD is a number indicating how many Gs you are pulling and whether
they are negative or positive. This is only of concern if you are playing with Redout/Blackout
active (see Section X: Configuration).
The number displayed below the G readout, about the midpoint of the left side of the HUD,
is your airspeed in knots.
The Mach Indicator (a number with a decimal point) is below. This is your speed in Mach
numbers; 1.0 is equal to the speed of sound, 2.0 is twice the speed of sound, and so on.
Below the Mach indicator is the number “99” followed by a three- or four-letter code. The
number “99” indicates that you have unlimited armament; the letter code indicates what
HUD mode you are in. The HUD mode automatically changes when a new weapons system
is selected. The various modes (CCIP, DGFT, ILS, SRM, STRF and so on) are explained in
detail in Section IX: Flight.
9
How to shoot
The Stores Control Panel in the lower left-hand corner of your Front View shows what
weapons mode you are in, either “A-A” (Air-to-Air) or “A-G” (Air-to-Ground). If you are in
A-A mode, press B to switch to A-G; in A-G mode, press e to switch to A-A. The
panel also shows which weapons system is currently active. In A-G mode, B will
cycle through the various air-to-ground weapons. If you are in A-A mode, cycle through the
air-to-air weapons by pressing e.
10
F A L C O N 3 . 0
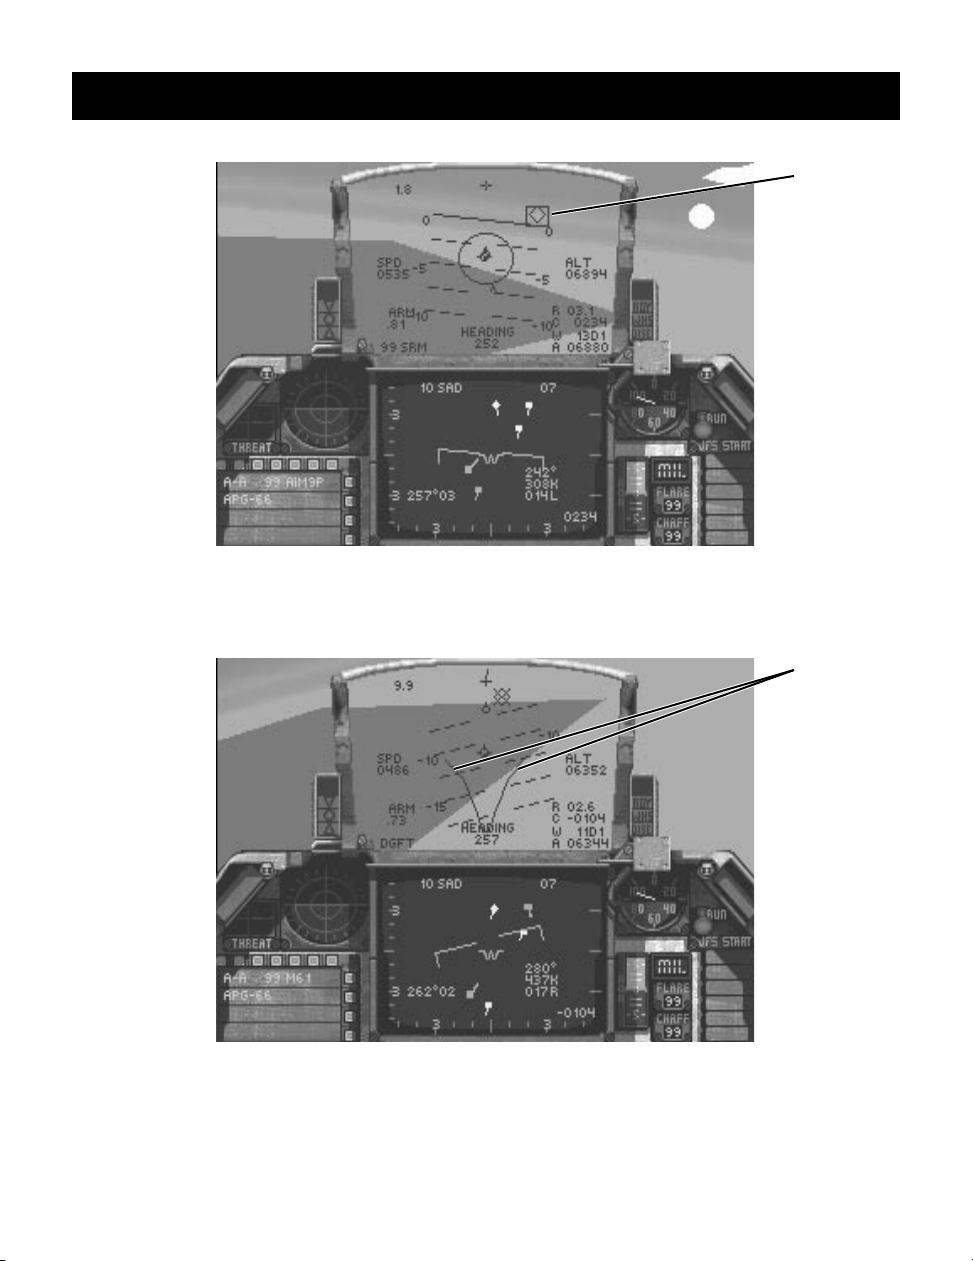
Target
Diamond
In A-A mode with any of the missiles selected, a diamond will appear within the Aiming
Reticle. This shows where the missile is seeking. When an enemy enters the Aiming Reticle
and is within visual range, the missile will automatically lock on and the Aiming Reticle will
flash as long as the lock is maintained. Hit z to fire the missile.
Gun
Funnel
In A-A mode with the M61A1 gun active, a pair of lines will appear within the Aiming Reticle.
As you maneuver, these lines will curve and sweep up or down, forming what is known as
the funnel. The point of the funnel, where the two lines meet, is where shells from the gun
will arrive. A good rule of thumb for ranging and accuracy: if both of the target’s wingtips
touch the sides of the funnel, it is within range and likely to be hit. Hit z to fire.
S E C T I O N I I : I N S T A N T A C T I O N
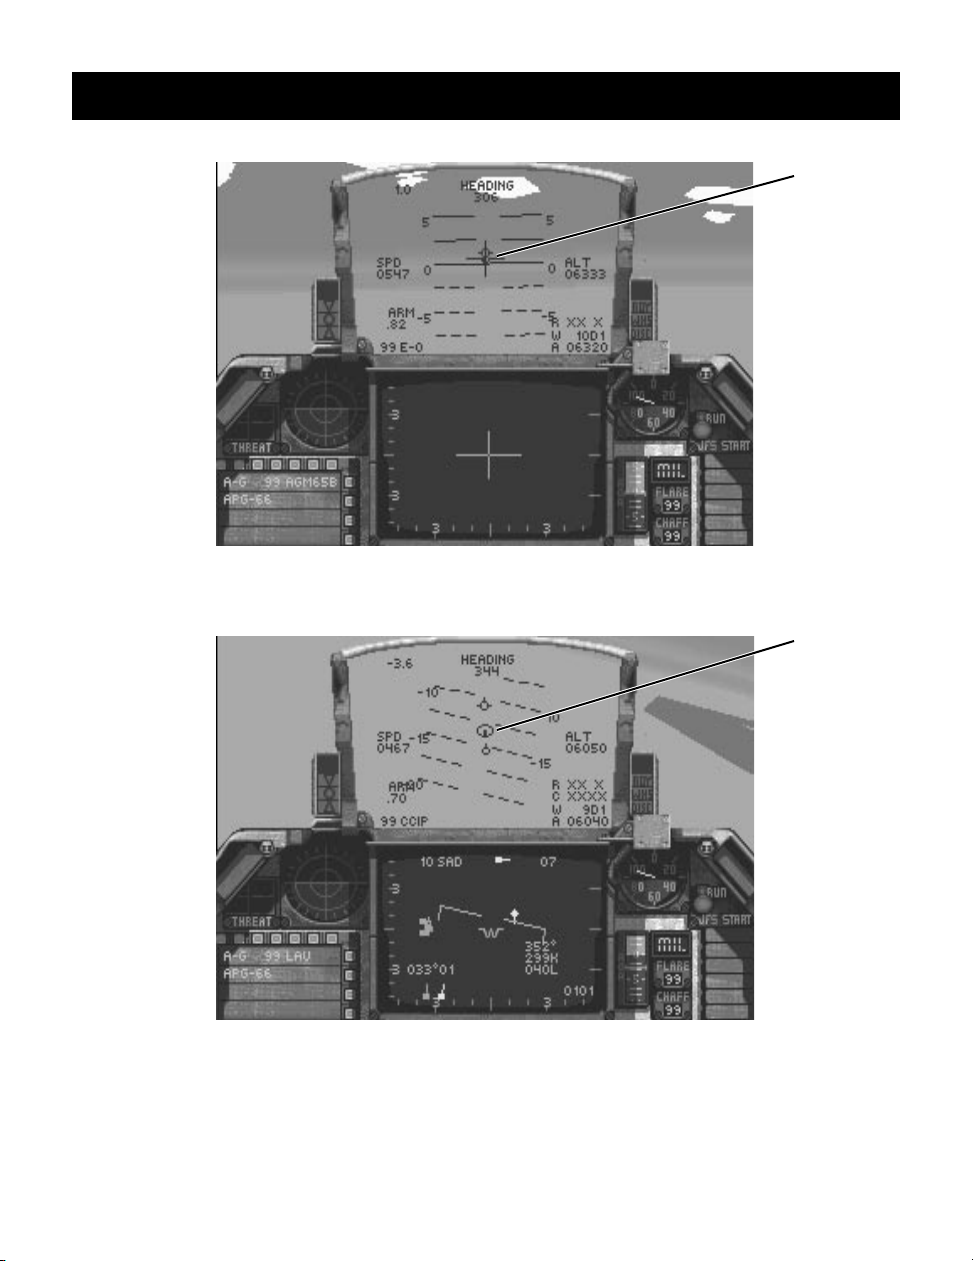
In A-G mode with AGM-65Bs, AGM-65Ds or GBU-15s selected, cross hairs will appear in
the middle of the Aiming Reticle. When a target enters the Aiming Reticle, the cross hairs
will automatically lock on and follow the target. Press z to fire.
11
Cross
Hairs
Bombsight
In A-G mode with LAUs or with the gun selected, the bombsight (a targeting dot with a circle
around it) will appear near the Center Point. When the dot is on the target, press z
to fire.
12
F A L C O N 3 . 0
Bombsight
With all other A-G weapons, weapons delivery requires two actions: designating the target
and releasing the weapon. A bombsight similar to that used for the gun and LAU rockets
will appear with a line extending upwards from the targeting dot. When the target is in the
targeting circle at the base of the line, hit z once. This designates the target,
identifying it for the on-board bombing computer. If you continue flying over the target, the
computer will automatically release the bomb at the correct time to strike the target you
selected. Or you can release it yourself by pressing z any time after designating.
Pressing z twice quickly will release a bomb immediately.
The radar
Below the HUD is the Radar/Electro-Optical (REO) Display. This is where the various
radar and weapons guidance systems display their information. There are two REO Display
modes; one is for air-to-air combat, and one is for air-to-ground.
S E C T I O N I I : I N S T A N T A C T I O N
13
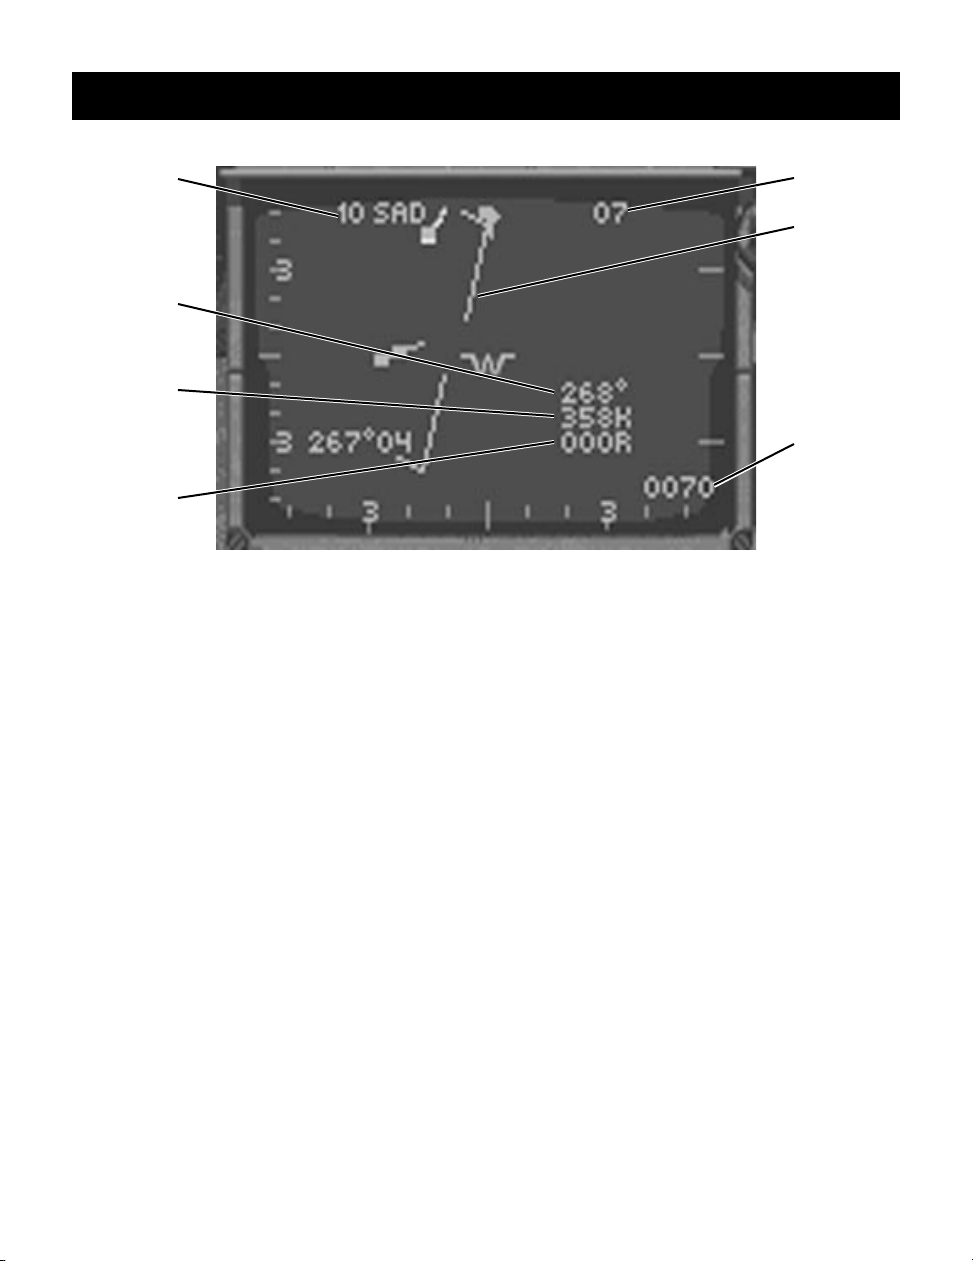
Radar
Scale
Target’s
Heading
Target’s
Airspeed
Target’s
Aspect
Angle
Target’s
Altitude
Waterline
Closure
Rate
In air-to-air mode, your plane’s position will be in the center of the REO display. Any plane
above the center will be in front of you, and any plane below the REO’s center will be behind
you. The long green line across the center is called the waterline and shows your roll (your
plane’s left-right tilt in relationship to the ground). The ends of the waterline bend toward
the ground to aid in orientation.
In the upper left corner is a number followed by the letters “SAD” (Situation Awareness
Display). The number shows the scale of the display. The number “20,” for example, means
that it is 20 miles from the top of the display to the waterline. The scale will automatically
change as necessary.
In the upper right corner of the REO Display is a two-digit number. This is the enemy’s
altitude in thousands of feet.
Near the lower right corner of the A-A REO Display are three numbers. The top one is the
target’s heading in degrees, the middle one is the target’s airspeed in knots, and the bottom
one is the aspect angle to the target. Aspect angle is covered in Section VI: Air Combat
School.
In the very bottom of the right side is the closure rate, which is also displayed in the HUD.
If you have any radar contacts, they will be shown on your REO Display. The target you are
tracking will show up as a diamond; any other contacts will be displayed as squares. The
color of the square or diamond indicates the contact’s relative altitude as compared to your
F-16’s altitude:
j Orange targets are more than 3,000 feet below you.
j White targets are within 3,000 feet of you in altitude.
j Blue targets are over 3,000 feet above you.
The line extending outward behind each radar contact shows the contact’s direction of
travel. To track a different target, press T.
14
In air-to-ground mode, Maverick missiles and GBUs use the REO to display a video picture
from their target acquisition sensors. When you have selected either of these weapons, the
REO will display a set of cross hairs and video of any targets picked up by the sensor.
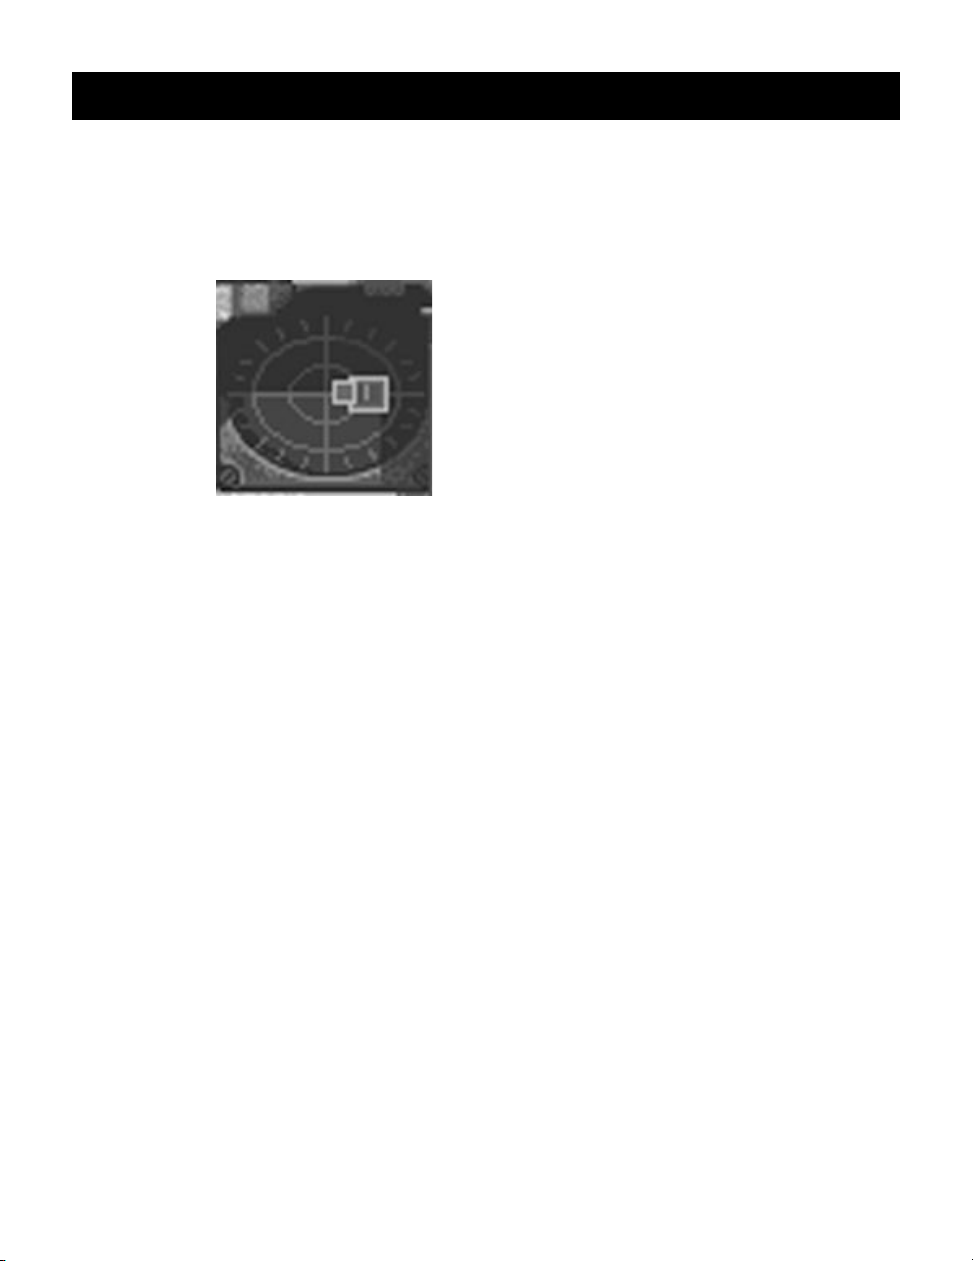
Using the Threat Warning System
The circular screen to the left of the REO Display is the Threat Warning Indicator. Any
enemy with active radar will show up as a blip on this screen. The screen is divided by two
lines. Anything above the horizontal line is in front of your plane, and everything below the
line is behind you. The shape of the blip indicates what is emitting the radar signals:
diamonds are enemy aircraft, large squares are enemy surface-to-air missiles, and small
squares are air-to-air missiles in flight. The numbers inside the blips indicate the type of
radar being used (which is not important in Instant Action).
To the left of the Threat Indicator is the Threat Warning Panel. If enemy radar locks onto
your plane, the “LCK” light will come on. If a missile is launched at you, the “LNH” light will
warn you.
F A L C O N 3 . 0
S E C T I O N I I : I N S T A N T A C T I O N
Have a look around
You have many different views to help you see your adversaries and your position. Select
these views by pressing the number keys 1 through 0 or j, y, h, and u
(«1, 3, 7 and 9 on the numeric keypad).
In all five outside views, 1 will zoom in, 2 will zoom out and 3 and 4 will rotate
the image.
Press 1 to switch to Satellite View, which shows your plane from above.
Press 2 to switch to Ground View, which shows your plane from below.
Press 7 to switch to the Wingman View, which is not active because you are on your own
in Instant Action.
Switch to Track View by pressing 9. This shows your plane from behind if no enemies are
in view. If enemies are in sight, the view will always keep the target and your plane visible
at the same time. Also, if you’ve got a missile coming inbound, this view will keep it in sight.
The Chase View also shows your plane from behind, but as if the camera were chasing you
— it lags behind your maneuvers slightly, whereas the tracking view does not. Press 0
(zero) to switch to the chase plane view.
Select the Left View from the cockpit by pressing h («7 on the numeric keypad) or 4.
Switch to the Right View by pressing u («9 on the numeric keypad) or 6. Check your
six, or Rear View, by pressing y («3 on the numeric keypad) or 5.
Press j (1 on the numeric keypad) to return to the Front View.
15

16
Level advancement
After you destroy a certain number of enemy aircraft, you will automatically advance to the
next level of Instant Action play. Every enemy pilot in this new wave of aircraft will have an
Enemy Logic Level set one higher than what you selected in the Configuration screen. (For
example, if you had Enemy Logic Level set to VETERAN in the Configuration screen, the
next wave of aircraft will have Ace pilots.) After the Ace aircraft wave, all pilots in subsequent
logic level are set to Ace.
Scoring
Instant Action is the only part of Falcon 3.0 in which a score is kept. The score for destroying
any air or ground target is determined by the difficulty of the feat. The skill, the aircraft and
the weapons of a defeated pilot all add up to determine the point value of a dogfight victory.
In addition, the presence of multiple bogeys in the area will increase the value of both air
and ground targets. Although you have been given unlimited weapons, every missile fired
and every bomb dropped subtracts from your point total. Then, your base score will be
multiplied based on your realism setting in the Configuration area. So, if you want a high
score, don’t waste your weapons. This is good practice for the campaign anyway, since every
weapon will be precious at the higher levels of realism.
To erase the Instant Action high scores list, simply erase the file
FALCON3 directory. Type del topten e at the DOS prompt.
Good luck and watch your six!
F A L C O N 3 . 0
TOPTEN from your
SECTION
S E C T I O N I I I : I N S T A L L A T I O N A N D L O A D I N G
III
INSTALLATION
AND LOADING
17

18
Installation and Loading introduction
Please read this chapter for instructions on how to install and load Falcon 3.0. In addition,
if you have any trouble getting the game to run, please refer to the troubleshooting section
at the end of this section.
Contents of the package
Your Falcon 3.0 package should contain:
j Falcon 3.0 CD-ROM
j Falcon 3.0 Flight Manual
j Falcon 3.0 Quick Reference Card
System requirements
The minimum system requirements for Falcon 3.0 are:
j IBM PC 80386 or 80486 compatible
j 1MB RAM
j 602K (616,448 bytes) of free conventional memory
j DOS 5.0 or later
j VGA graphics
j CD-ROM drive
j Hard drive with 11MB free
We recommend the following:
j Joystick, dual joysticks, CH FlightStick Pro, ThrustMaster Flight Control System
(FCS) or rudder pedals
j ThrustMaster Weapons Control System (WCS)
j Mouse
j Ad Lib, Sound Blaster, Roland MT-32 or Roland LAPC-1 sound card
j 2MB RAM with EMS (expanded memory)
j Expanded memory manager, such as EMM 386, QEMM or 386Max
j Null-modem serial cable or modem for two-player communications
For optimum performance, you should have the following:
j IBM PC 80486 compatible
j 4MB RAM with EMS (expanded memory)
j 602K (616,448 bytes) of free conventional memory
j DOS 5.0 or later
j 16-bit VGA graphics
j Double-speed CD-ROM drive
F A L C O N 3 . 0

S E C T I O N I I I : I N S T A L L A T I O N A N D L O A D I N G
j Hard drive with 11MB free
j Dual joysticks, CH FlightStick Pro with rudder pedals, or ThrustMaster FCS and WCS
with rudder pedals
j Sound Blaster and either a Roland MT-32 or Roland LAPC-1 sound card
How to install
Before starting the installation, please be sure you have the proper CD-ROM software
installed on your machine. If you are unsure whether you have the proper software installed
on your computer, consult your CD-ROM owner’s manual for more information.
Please follow the instructions below only if you are running DOS 5.0 through DOS 6.22. If
you are running Windows 95, please refer to the “Compatibility with Windows” section.
1. Insert the Falcon 3.0 disc in your CD-ROM drive.
2. Type d: e at the DOS prompt. (If your CD-ROM drive is a letter other than D, type
that letter instead.)
3. Type install e at the DOS prompt.
4. Click on “View and print Readme” to view the Readme file which contains important
last-minute information. Use the mouse or arrow keys to read the entire file. If you wish
to print the Readme file for future reference, click the Print Readme button. When you
are finished, click the Exit button to return to the main menu.
5. Click on “Install game.”
6. Click on “Install standard version.” The next screen checks to see if your computer
system meets the system requirements for Falcon 3.0. The three columns onscreen
are a description of the requirement category, the game’s requirement and the
detected value on your computer. If a system requirement is highlighted in yellow, you
will be able to install Falcon 3.0 but may have problems running it. If a particular
requirement is highlighted in red, you cannot install Falcon 3.0.
7. If a particular system requirement is highlighted in red, click on “Suggest Fix” for
possible solutions on solving the problem.
8. Click the OK button to continue.
9. Select a hard drive from the list in the left window. Make sure you have enough hard
drive space (at least 11MB free). Click OK to continue.
10. The next screen allows you to change the destination directory where Falcon 3.0 will
be installed. The default directory is \FALCON3. If you wish to change the path, press
the B key to erase “\FALCON3” and type in a new name. Otherwise, click the
OK button to continue.
11. Click the Install button to confirm that the source drive (your CD-ROM drive),
destination drive and destination path are correct.
19

20
12. The installer will begin to copy files from the Falcon 3.0 CD-ROM to your hard drive.
The bar in the upper left-hand corner displays the completion percentage of the
installation. If you need to stop the installation, click the Abort button.
13. After all the files have been copied to your hard drive, a summary of “suggested fixes”
will be displayed as well as instructions on how to load the game.
Configuring your memory
The most common problem in running Falcon 3.0 is finding enough free conventional
memory. Most IBM PC compatible computers come standard with at least 1MB RAM. The
first 640K RAM is known as conventional memory. Physical memory above 1MB RAM is
known as extended memory. Some of Falcon 3.0’s features use expanded memory (EMS).
Memory managers (such as EMM386, QEMM or 386Max) can convert extended memory
to expanded memory.
Due to the realism and complexities of the game, Falcon 3.0 requires a lot of free
conventional memory to operate: 602K or 616,448 bytes.
If you do not have enough free conventional memory, an error message will be displayed:
“Falcon version 3.05 requires 602K (616,448 bytes) of free conventional RAM.”
Type mem e at the DOS prompt to see how much free conventional memory you have.
The number on the line “largest executable program size” must be at least 616,448 bytes in
order to run Falcon 3.0.
Finding free memory
To configure your computer with as much available conventional memory as possible, you
must load DOS high. Check your
“DOS=HIGH,UMB.”
A commercial memory manager such as QEMM or 386Max can improve your computer’s
performance by using less conventional memory. Run your memory manager’s optimization program to free up as much conventional memory as possible. If you’re using DOS 6.0
or later, type memmaker e at the DOS prompt. If you’re using QEMM, type
optimize e. If you’re using 386Max, type maximize e.
Falcon 3.0 will not run if you have any RAM-resident programs (such as RAM disks, DOS
shells, print spoolers, etc.) running in the background. You can try loading them into high
memory instead of conventional memory. You can also temporarily disable them by
temporarily modifying your
F A L C O N 3 . 0
CONFIG.SYS file to make sure it includes the line
AUTOEXEC.BAT and CONFIG.SYS files so they do not load TSRs.

S E C T I O N I I I : I N S T A L L A T I O N A N D L O A D I N G
Creating a boot disk
If you are still having problems freeing up enough conventional memory, the simplest
solution is to create a special floppy disk called a “boot disk.” Use this disk to configure your
computer when you turn it on. The boot disk contains versions of your computer’s startup
files (
AUTOEXEC.BAT and CONFIG.SYS) that will work with Falcon 3.0. When you are done
playing with the games, you can remove the boot disk, restart your computer and return to
your original configuration.
If you are running DOS 5.0 through DOS 6.22, we have supplied batch files for different
configurations. Before you start, make sure you have a blank floppy disk available.
1. Insert a blank disk into your floppy drive.
2. To create a bootable system disk, type format a: /s e at the DOS prompt.
3. Type cd\falcon3 e to change to your \FALCON3 directory.
4. Type one of the following depending on your computer system:
bootemm to create a boot disk that configures 1MB of EMS as well as works for
Packard Bell and IBM PS/1 computers
bootmice to create a boot disk that configures 1MB of EMS and loads the mouse
driver high
bootdspc to create a boot disk for a computer running DoubleSpace (not
DriveSpace)
bootnet to create a boot disk that loads the network drivers, IPX and NET5
5. If you are using a software compression driver on your hard drive (such as Stacker or
Super Stor), you may need to modify your boot disk. Edit the
disk to include the device driver and load it high with the Devicehigh command.
Consult the manual for your software compression utility if you need further instructions on how to load the driver into high memory.
6. To use your boot disk, turn off your computer, insert the boot disk into the floppy drive
and then restart your computer.
CONFIG.SYS file on the boot
21

22
F A L C O N 3 . 0
Boot disk examples
The AUTOEXEC.BAT and CONFIG.SYS files below show examples for different computer configu-
rations if you are running DOS 5.0 through DOS 6.22.
For mouse, 1MB EMS and EMM386:
AUTOEXEC.BAT
prompt $p$g
path c:\dos;c:\cd
lh c:\mouse\mouse
CONFIG.SYS
device=c:\dos\himem.sys
device=c:\dos\emm386.exe 1024 ram
buffers=30,0
files=30
dos=high,umb
stacks=0,0
For QEMM, DoubleSpace, mouse and SCSI:
AUTOEXEC.BAT
path c:\dos;c:\qemm;c:\msmouse;c:\utils;c:\bat
prompt $p$g
c:\msmouse\omouse.com (replace with your mouse driver)
CONFIG.SYS
device=c:\qemm\qemm386.sys ram
dos=high
files=30
buffers=30
stacks=0,0
device=c:\qemm\loadhi.sys c:\dos\dblspace.sys /move
(DoubleSpace driver)

S E C T I O N I I I : I N S T A L L A T I O N A N D L O A D I N G
Compatibility with Windows
Unfortunately, Falcon 3.0 will not run under Windows 3.0 or Windows 3.1.
Although we do not recommend running Falcon 3.0 under Windows 95, it can be done if you
run the game in MS-DOS mode only and if you can free up enough conventional memory
(602K or 616,448 bytes).
MS-DOS mode in Windows 95
To install Falcon 3.0 under Windows 95, switch to MS-DOS mode:
1. Select “Shut Down…” from the Start menu.
2. Select “Restart the computer in MS-DOS mode?” from the dialog box.
3. You will see the DOS prompt (which will usually look like C:\WINDOWS).
4. Insert the Falcon 3.0 disc into your CD-ROM drive.
5. Change to your CD-ROM drive by typing d: e (if your CD-ROM drive is a letter
other than D, substitute that letter instead).
6. Type install e to start the Falcon 3.0 installer and follow the instructions under
“How to install.”
Windows 95 boot disk
The biggest problem in getting Falcon 3.0 to run under Windows 95 is freeing up enough
conventional memory (602K or 616,448 bytes). The easiest way to free up enough
conventional memory under Windows 95 is to use a boot disk. We have created a utility that
creates a boot disk specifically for Windows 95, available online at our Customer Support
BBS, America Online, GEnie, CompuServe, FTP site and other locations. Look for the file
named
FAL95.EXE. Download the file and follow the instructions in the Readme file to create
a Windows 95 boot disk for Falcon 3.0.
23

24
F A L C O N 3 . 0
You can also create your own Windows 95 boot disk for Falcon 3.0 by following the
instructions below:
1. Insert a blank disk into your floppy drive.
2. Double-click the icon for “My Computer.”
1
3. Right-click on the icon for your floppy drive, usually “3
4. Select “Format…” from the pop-down menu.
5. In the Format dialog box, select “Full” for “Format type” and click to put a checkmark
next to “Copy system files” under “Other options.”
6. Click on the Start button.
7. After the floppy disk has been formatted, click on the Close button to exit the Format
dialog box.
8. From the Start menu, select Notepad from the Accessories program group.
9. Type the following:
prompt $p$g
path c:\windows;c:\windows\command;c:\dos
loadhigh mouse
c:
10. Select “Save” from the File menu.
11. Click twice on the icon that moves up one level. (The icon looks like a folder with an
up arrow.)
12. Double-click the icon for your floppy drive, usually “3
13. Click in the box next to “File name:” and type autoexec.bat.
14. Click the Save button.
15. Select “New” from the File menu.
16. Type the following:
device=c:\windows\himem.sys
device=c:\windows\emm386.exe 2048 ram
dos=high,umb
buffers=30
files=30
stacks=0,0
17. Select “Save” from the File menu.
18. Click in the box next to “File name:” and type config.sys.
19. Click the Save button.
20. Close the Notepad accessory program.
21. In order to use your mouse in Falcon 3.0, you must copy a mouse driver onto this boot
disk. The mouse driver is usually named something like
is usually located in a directory called \MOUSE.
⁄2" Floppy (A:).”
1
⁄2" Floppy (A:).”
MOUSE.COM or MOUSE.EXE and

S E C T I O N I I I : I N S T A L L A T I O N A N D L O A D I N G
22. From the Start menu, select Windows Explorer.
23. Right-click on the icon for your hard drive (usually C:).
24. Select “Find…” from the pop-down menu.
25. In box for “Named:” type mouse.
26. Look for a file called
27. To copy the mouse driver to your boot disk, drag the icon for
to the floppy drive icon, which is usually “31⁄2" Floppy (A:)” and is located in the window
for “My Computer.”
28. To use the boot disk, insert it into your floppy drive and select “Shut Down…” Choose
“Restart your computer?” in the next dialog box. After your computer reboots, you
should now have enough free conventional memory to install and run Falcon 3.0. Use
this boot disk each time you want to play Falcon 3.0.
EMS (expanded memory)
Falcon 3.0 takes advantage of EMS if you have at least 1MB of EMS. EMS can be used in
different ways: to run the ACMI, to load altitude and object data (for faster access), and to
play the digitized radio messages. The latter three options can be turned on and off from the
System Setup screen.
To check how much EMS you have, type mem e at the DOS prompt. The number next
to “bytes free EMS memory” tells you how much available EMS you have. You will need a
memory manager (such as EMM386, QEMM or 386Max) to convert extended memory into
expanded memory. See your memory manager’s manual for information on how to
configure your system for expanded memory.
If your computer has only 1MB RAM total, we recommend using your memory manager to
load other device drivers (mouse, network, etc.) into high memory. You will be unable to
hear the digitized radio messages or use the ACMI replay. You will be able to play in
Communications mode, but unless your network drivers are loaded high, you can’t play
over a Novell NetWare-compatible network.
If your computer has 2MB RAM total, you can edit your
EMS. This will allow you to hear digitized radio messages and place the altitude and object
data into expanded memory. If you don’t have enough EMS remaining to use the ACMI, you
may want to turn off some of the other options.
If your computer has at least 4MB RAM total, you should be able to load all the altitude and
object data into expanded memory as well as hear the digitized radio messages. This will
also give you enough EMS to use the ACMI. The more available EMS you have, the longer
your ACMI replay can be.
MOUSE.EXE or MOUSE.COM in the list of found files.
MOUSE.EXE or MOUSE.COM
CONFIG.SYS file to have 1MB (1024K)
25

26
Troubleshooting
If Falcon 3.0 is freezing with a blank screen as soon as you try to run the game, the problem
is most likely caused by an error in your Falcon 3.0 configuration file. The easiest way to fix
this problem is to delete the
you’re in the \FALCON3 directory. After you load the game, go to the System Setup screen
in Configuration and select the correct hardware options.
If Falcon 3.0 is freezing with a blank screen and you have an Acer motherboard, you need
to use
\UTILS\ACER directory on your Falcon 3.0 CD-ROM. See the
information.
If you are having video flickering problems and your video card is based on a Tseng
ET4000/w32 chip set, you need to use the supplied replacement files to solve the problem.
The files are located in the \UTILS\TSENG directory on your Falcon 3.0 CD-ROM. See the
TSENG.TXT file for more information.
If you want greater control of your joystick, you may want to load
information on this joystick utility, please read the
directory on your Falcon 3.0 CD-ROM.
F A L C O N 3 . 0
FALCON3.DEF file by typing del falcon3.def e when
ACER.COM, a utility we supply to solve the problem. The utility is located in the
ACER.TXT file for more
TMSTICK.COM. For more
TMSTICK.TXT file in the \UTILS\TMSTICK
Compatibility with
Unfortunately, because the Classic version of Falcon 3.0 is the latest version, it is not
compatible with any of the add-on programs: Operation: Fighting Tiger, MiG-29 or Hornet:
Naval Strike Fighter. You cannot install any of these add-on programs to this version of
Falcon 3.0.
Falcon 3.0
add-ons

SECTION
S E C T I O N I V : W A R R O O M
IV
WAR ROOM
27

28
Before reading this section of the manual, be sure you have installed Falcon 3.0 and loaded the
program. Complete instructions for installation and loading can be found in Section III:
Installation and Loading.
War Room introduction
After you have loaded Falcon 3.0 and progressed through the intro screens, you arrive at
the War Room. The War Room is the main menu for Falcon 3.0. Here, you can enter any of
the other major areas of the program: Instant Action, Configuration, ACMI or Communications. In addition, you can remove or create a squadron and place that squadron in the Red
Flag training area or into a full-blown campaign.
Whenever you exit from any section of the game (Campaign, Red Flag, Instant Action, etc.),
you will return to this screen.
War Room operations
The War Room is arranged into three major sections: the World Map, the Squadron area
and the TV Monitors. When the red light next to a particular section is illuminated, you can
select that section. If the light is not lit, you may need to do something else first before you
can enter the area.
F A L C O N 3 . 0
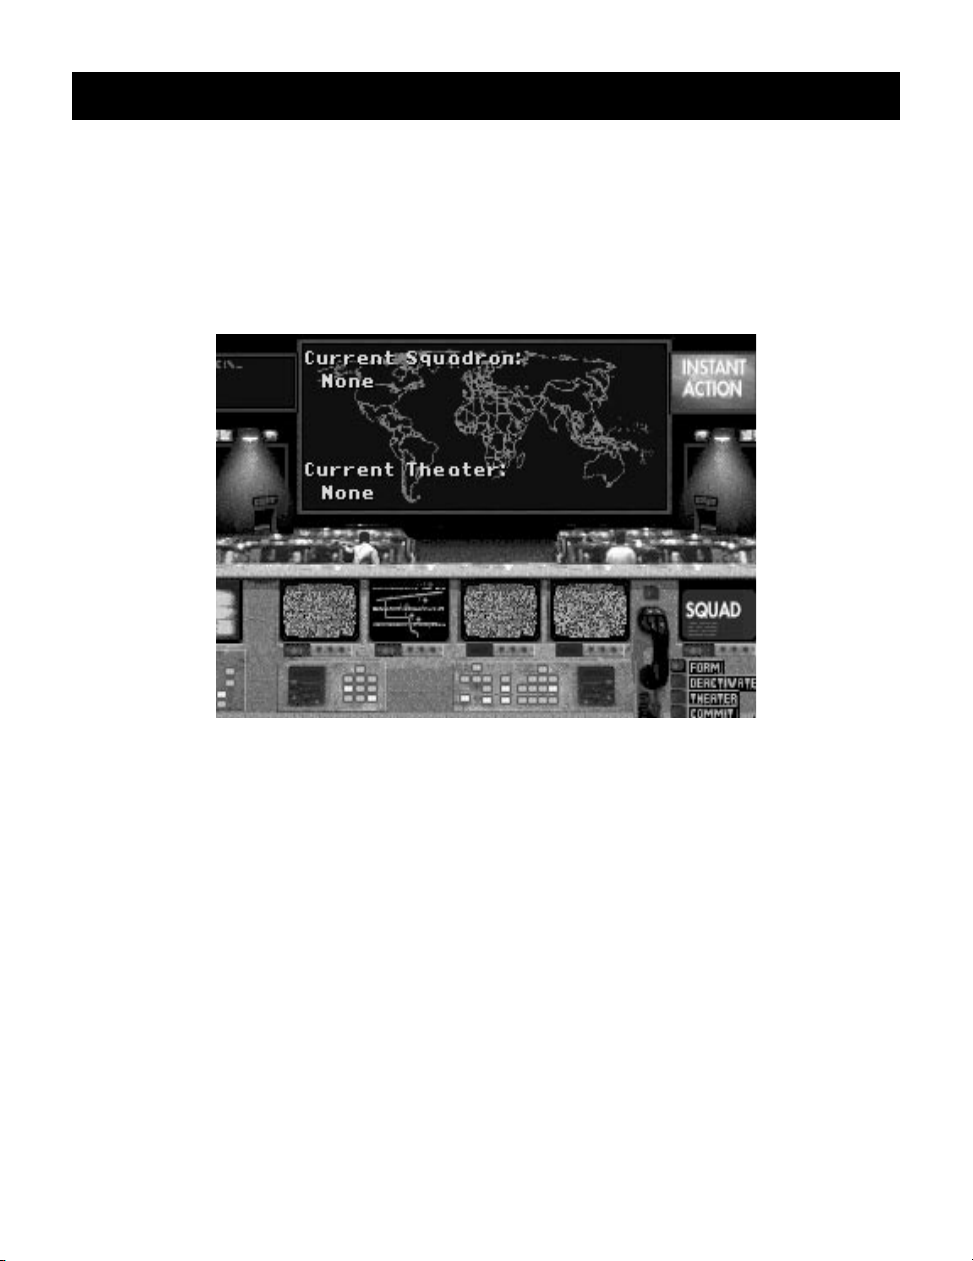
World Map
The World Map displays information about your current squadron and theater. It also
shows the geographical area where your campaign is located. If you have a squadron
selected and that squadron is assigned to a theater, the world map will display a small box
on the map which shows where that theater can be found.

S E C T I O N I V : W A R R O O M
Squadron
The lower right-hand corner of the screen is where you select, delete or create a squadron
for use in a campaign or the Red Flag training grounds. Before you can start a campaign or
enter Red Flag, you need to choose or create a squadron.
Squadrons are the basic unit in Falcon 3.0. Although you as an individual pilot fly a single
F-16, the rest of the aircraft on your flight are flown by other (computer-controlled) pilots.
Squadrons are the equivalent of “saved games” in Falcon 3.0. You can have up to six
squadrons active at any given time.
Each of the squadron options is located in the lower-right hand corner of the War Room.
FORM button
Select the FORM button when you want to create a new squadron from scratch. Before the
first time you form a squadron, the information on the World Map will indicate that you have
no squadron or theater selected. When you select the FORM button, you can then choose
your squadron’s patch using the the arrows in the SQUAD monitor.
This button will be lit if there are fewer than six squadrons already created.
SQUAD (Squadron) monitor
After selecting the FORM button, up and down arrows will appear in this monitor. To choose
an insignia, select the green arrows to scroll through your choices. Each insignia comes
with its own squadron name attached. When you find an insignia you like, click on the
insignia itself to select it. If you are using the keyboard, move your cursor to the left of the
arrows and then press e. You will know that you’ve selected the insignia if the arrows
to the right of the monitor disappear. You are now ready to choose a theater or enter the Red
Flag training area.
The SQUAD button will be lit if you have previously created a squadron. You can cycle
through this monitor to view the available squadrons until you find the one you want.
29
DEACTIVATE button
This button is used to remove a squadron from active duty. When you click this button, the
currently displayed squadron insignia (as well all the pilots and their statistics) will be
deleted — never to be seen again! If you select this button, you will be asked if you want to
continue with the operation.
This button will be lit if there is a squadron already selected from the SQUAD monitor.
WARNING: As mentioned above, this option will delete all records about the current squadron,
including pilots, statistics and the like. Use this option with extreme caution.
THEATER button
Once you have chosen a squadron to command, you can select a theater for your campaign
by using this button. Each time you select the THEATER button, a box will appear on the
World Map indicating the geographical area of the current theater. Keep clicking on this
button until you have picked the theater you want to fly in.

30
TV monitors
F A L C O N 3 . 0
If you choose a new theater for a squadron already engaged in a campaign, all information
about that campaign will be lost and your squadron will restart in the new theater. To make
sure that you don’t accidentally erase an existing campaign, you will be prompted for
confirmation.
This button will be lit if a squadron is already selected from the SQUAD monitor.
COMMIT button
Now that you’ve chosen a new squadron and a theater, you can start up a campaign by
selecting the COMMIT button. This will bring you to the War Update screen (see Section
VIII: Campaign for more information).
In addition, if you have a previous squadron in an existing campaign, selecting this button
will bring you to the exact point you were when you last exited the campaign.
This button will be lit if a squadron and theater are already selected.
Telephone
Selecting the telephone to the left of the SQUAD monitor will bring you to the Squadron
Ready Room. Here, you can edit pilot names and faces, view the top pilots in your squadron,
or transfer pilots to another squadron. Complete details on this room can be found in the
next section, Section V: Squadron Ready Room.
This button will be lit if a squadron is already selected from the SQUAD monitor.
Selecting each of the TV monitors brings you to a different area in the game.
INSTANT ACTION monitor
Enter Instant Action by selecting the monitor in the upper right-hand corner of the screen.
This area of the program is designed to get you in the air to mix it up right away. It is also
a useful training tool for learning the various weapons systems and their operations. The
Instant Action area is fully explained in Section II: Instant Action.
You can choose this monitor at any time. Instant Action is totally independent from your
squadrons, so you don’t need to choose a squadron before selecting this monitor.
CONFIG (Configuration) monitor
Select the first monitor from the left to access the Configuration area. Here, you can adjust
a number of options to customize the game. Some of the things you can customize are the
flight control input device, EMS settings, sound options and the difficulty level variables. A
number of factors (such as collisions, flight model and enemy logic) comprise each
difficulty level, and you have the option to change any or all of them. The Configuration area
is described in Section X: Configuration.
You can choose this monitor at any time.

S E C T I O N I V : W A R R O O M
ACMI monitor
Access the ACMI area by choosing the second monitor from the left at the bottom of the
screen. The Air Combat Maneuvering Instrumentation (ACMI) area allows you to review
your missions from two different perspectives after their completion. First, you can view the
actions of your plane using a VCR-like interface. You can view how you accomplished an
objective from a number of different views. Second, you have the option to see a particular
portion of your flight from a tactical perspective. Here, you will see every plane involved in
the engagement in a wireframe view from any angle and can follow the course of every
missile fired. A description of how ACMI operates can be found in Section XI: ACMI.
You can choose this monitor at any time.
COMMS (Communications) monitor
To go to the Communications area, select the third monitor from the left at the bottom of
the screen. In the Communications area, two or more players can dogfight head-to-head via
network, modem or direct-connect. For an added challenge, you can coordinate on joint
missions in a Campaign.
You can only select the Comms monitor after choosing a squadron. If you haven’t already
selected a pilot, selecting Comms brings you to the Pilot Transfer section of the Squadron
Ready Room. If you have selected a pilot, selecting Comms brings up the Communication
Setup screen.
RED FLAG monitor
Enter Red Flag by clicking on the fourth monitor from the left. Red Flag is designed both
to be a training ground where new pilots learn air-to-air and air-to ground mission skills and
a testing area for tactics against a number of opponents and targets. You can choose from
a number of preset training missions, or you can design your own mission. All of this takes
place in the Nevada desert and is described in the Section VII: Red Flag. The training part
of Red Flag is described in Section VI: Air Combat School.
This button will be lit if there is a squadron already selected from the SQUAD monitor.
31
Exit to DOS
The monitor in the upper left-hand corner will exit you to DOS. This is the quickest way to
end the game from the War Room. If you aren’t in this room, you can easily exit to DOS
without returning here by pressing aX.

32
Before you begin…
If you want to change how you control your plane (keyboard or joystick), your difficulty
characteristics or sound options, you might want to go to the Configuration area before play.
In this area, simply make your choices and then select DONE to exit. For more information,
see Section X: Configuration.
F A L C O N 3 . 0

SECTION
S E C T I O N V : S Q U A D R O N R E A D Y R O O M
V
SQUADRON
READY ROOM
33

34
Squadron Ready Room introduction
The Squadron Ready Room is where you can view all the important information about your
currently selected squadron. Choose a squadron and then select the telephone from the
War Room to access the Squadron Ready Room. Here, you can view your squadron’s best
pilots in Sierra Hotel and check out the current statistics for your individual pilots and
complete squadron. You can also transfer pilots from one squadron to another and select
a pilot to fly using Falcon 3.0’s Communications mode.
The Squadron Ready Room has four areas: Sierra Hotel, Pilot Information, Squadron
Records and Pilot Transfer. To exit the room and return to the War Room, select the
telephone on the file cabinet.
F A L C O N 3 . 0
Sierra
Hotel
Pilot
Information
War
Room
Pilot
Transfer
Squadron
Records
Sierra Hotel
To view the best pilots in your squadron, select the large whiteboard on the upper left side
of the room. The Sierra Hotel displays the list of outstanding pilots in your squadron for
everyone to admire.

S E C T I O N V : S Q U A D R O N R E A D Y R O O M
Pilot
This is the name of your ace pilot. Pilots will be listed in order of recognition, from top to
bottom.
Sorties
The number of sorties is how many missions your pilot has flown. Each time a pilot goes out
on a mission, his sortie total increases.
Kills
This is the number of confirmed kills that pilot has accumulated to date. Confirmed kills
include any downed enemy aircraft (fighters, bombers, transports, helicopters, etc.) that
have been seen by a witness other than the pilot himself.
Status
A pilot’s status can be one of the following: Active (currently in the squadron and ready to
fly), MIA (Missing In Action — when a pilot is shot down and falls into enemy hands), KIA
(Killed In Action) or Back in x (this is the number of days in the campaign before this pilot
can return to active duty).
Pilot Information
To view an individual pilot’s performance record, select the lower left-hand pilot next to the
file cabinet. The Pilot Information screen will display information about a particular pilot and
will also allow you to change his name, face and callsign.
35
To choose a pilot to view, simply select a name from the monitor in the upper right corner
of the screen. Information on the pilot will be displayed below his name, face and callsign.

36
F A L C O N 3 . 0
Pilot abilities
Every pilot has four ability scores, and each of them has a range from 1–100, where 1 is the
lowest score and 100 is the highest score. For Dogfighting, Bombing Accuracy and Flying
Ability, the first number is the current state of the pilot, while the second number is the
maximum ability score for that statistic.
A pilot’s ability score can be increased above his maximum by training and successful
missions. Ability scores can be temporarily decreased by the amount of Fatigue a pilot is
suffering from.
Dogfighting: This skill represents the level of applied BFM (Basic Fighter Maneuvers) and
ACM (Air Combat Maneuvers) that a pilot can utilize in a combat environment. This
includes overall situational awareness and having an “instinct” of what an enemy aircraft
might do next.
Bombing Accuracy: The Bombing Accuracy ability represents the degree of skill a
particular pilot has for bombing both moving and stationary targets. In addition, this skill
also represents the amount of intelligence the pilot has in recognizing enemy from allied
targets and the precise point to release a bomb so that it will cause the most structural
damage on a building, bridge, etc.
Flying Ability: Flying Ability differs from the Dogfighting skill because the former is
represented by non-dogfight flying accuracy only. Avoiding radar and SAMs, flying at high
speeds at low altitudes, flying close over rolling landscape, etc. fall under the Flying Ability
rating. A pilot with high Flying Ability will understand the proper way to fly into a target area
just under the radar or fool radar using radar-avoidance tactics.
Fatigue: The Fatigue skill represents the amount of physical and emotional stress/
endurance a pilot can endure. The lower the Fatigue ability, the less effective he or she will
be in performing his combat duties. Degradation of the Fatigue ability is based directly on
how many sorties an individual pilot has flown. Each time a pilot flies on a mission, his or
her Fatigue skill goes down. However, if a pilot sits out a possible mission, he or she will
regain Fatigue points due to rest.
When the Fatigue skill decreases, the other skills decrease as well. This simulates how
repeated exposure to combat is draining on a pilot’s faculties.
Number of sorties flown
This is the number of sorties (missions) flown by that pilot.
Enemy aircraft shot down
This number indicates how many confirmed kills that pilot has accumulated. Every aircraft
in the game has been categorized according to capability and role.
Class A Fighters: Fighter aircraft that are equal or above equal to an F-16 in capability.
Examples: Su-27, MiG-29 and Mirage F1.
Class B Fighters: Fighter aircraft that are below an F-16 in capability. Examples: MiG-21,
MiG-23 and Mirage III.
Striker/Bombers: Strike aircraft or pure bombers. Examples: Tu-22 and Su-24.
Close Air/Attack Aircraft: Close Air Support (CAS) or Fighter/Attack aircraft. Examples:
Su-25 and Tornado.

S E C T I O N V : S Q U A D R O N R E A D Y R O O M
Helicopters: Military attack or reconnaissance helicopters. Examples: Mi-24 and SA 342.
Transports/AWACS: Transport/cargo aircraft or AWACS search aircraft. Examples:
IL-76 and AN-12.
Ground targets destroyed
This is the number of ground targets that pilot has destroyed. The four categories indicates
the degree of difficulty it takes to destroy that target.
Class A Target: A target that requires pinpoint bombing or that may shoot back. Examples:
bunkers and SAM sites.
Class B Target: A hard target that requires a heavy bomb load to destroy. Examples:
runways and bridges.
Class C Target: A target that requires a medium-sized bomb or missile to destroy.
Examples: medium-sized buildings and tanks.
Class D Target: A soft target that can be destroyed with a cluster bomb or small iron bombs.
Examples: infantry, jeeps and trucks.
Button selections
Pilot roster: To view the statistics of a particular pilot, highlight the pilot’s name on the
video monitor.
Name: Use this button to change the name of the currently selected pilot. A name can be
up to 12 letters long.
Callsign: Use this button to change the callsign of the current pilot. A callsign can be up to
15 letters long. Any radio messages you receive from this pilot in combat will use the callsign
rather than the name.
Change Face: Use this button to cycle through the available faces for the current pilot.
Awards: This button will change the left side of the screen to display any awards the pilot
has received. Awards are given to deserving pilots who have excelled in combat. To
redisplay the pilot information, select the Information button (which replaced the Awards
button in the menu).
Done: Select this button when you are ready to return to the Squadron Ready Room.
37

38
Squadron Records
To look at your squadron’s statistics, select the small whiteboard on the upper right side of
the room. The Squadron Records board contains most of the same information as the Pilot
Information screen, but on a a squadron level.
The left-hand side of the screen displays the squadron’s insignia, name and Squadron
Commander. Just below these are the combined records of all the pilots in that squadron.
F A L C O N 3 . 0
Number of missions flown
This is the number of missions run by that squadron. It will include all theaters the squadron
has ever taken part in. This number, however, will never exceed the sortie count. One mission
may have more than one aircraft flying; each aircraft is counted towards the sortie count. For
example, if a mission has eight aircraft on it, there will be eight sorties on that one mission.
Number of sorties flown
This is the combined number of sorties flown by all the pilots in that squadron.
Enemy aircraft shot down
This number totals all the enemy aircraft downed by the pilots in that squadron. Each of the
enemy aircraft categories is described in the Pilot Information section.
Ground targets destroyed
This number totals all the ground targets destroyed by the pilots in that squadron. Each of
the ground target categories is described in the Pilot Information section.

S E C T I O N V : S Q U A D R O N R E A D Y R O O M
Number of pilots active
When a squadron is formed, you will have 30 pilots on your roster. You may lose some due
to casualties or fatigue. You can regain pilots when replacements arrive in a campaign. This
number indicates how many are ready for active duty.
Number of pilots killed
This indicates the number of pilots killed in action (KIA), whether by enemy gunfire or pilot error.
Number of pilots MIA
This indicates the number of pilots missing in action (MIA). A pilot becomes MIA after
ejecting behind enemy lines and not being rescued.
Pilot Transfer
To transfer a pilot from one squadron to another or to select him for Communications mode,
select the file cabinet. This brings you to the Pilot Transfer screen.
39
The left-hand side of this screen displays one of the other squadrons in the game, while the
monitor on the right-hand side displays the pilots in your squadron. To transfer a pilot from
your squadron to the other squadron, first select a name from the monitor on the right. Then
select a name from the list on the left-hand side. The two names will then change places.
Pilot roster: The pilots in the monitor on the right-hand side are the pilots in your squadron.
Squadron: This button will change the squadron on the left-hand side to another of the
squadrons in the game. If you haven’t created any other squadrons, this button will be
grayed out.
Pilot Information: You need to select a pilot from your squadron before choosing this
button. Selecting this button will bring you to the Pilot Information screen described earlier.
The only difference is that when you select Done from that screen, you will return to the Pilot
Transfer screen.

40
War Room
F A L C O N 3 . 0
Comms.: Before selecting this button, you need to choose a pilot from your roster. This is the
pilot you will bringing into the communications part of Falcon 3.0. After you select this button,
you will be transferred to the Communications Setup screen to set up your communications
session. See Section XII: Communications for more details on communications.
Done: This button will return you to the Squadron Ready Room.
Select the phone on the file cabinet to return to the War Room.

SECTION
S E C T I O N V I : A I R C O M B A T S C H O O L
VI
AIR COMBAT
SCHOOL
41

42
Air Combat School introduction
Welcome to Air Combat School. Here, you’ll learn everything you ever wanted to know
about your F-16 Fighting Falcon. Each lesson is designed to teach you one or two key
aspects of flying or fighting. Once you’ve finished your training, you’ll have the knowledge
and experience to mix it up with the best of them. Even if you already know how to fly, these
lessons will teach you important specifics to survive in a combat environment.
There are a couple of things to remember before we begin:
1. Work through the lessons by the numbers.
Each lesson has been planned to take advantage of items learned in previous lessons. This
way, you can build on your knowledge without getting confused or lost. When learning a
lesson, keep working on it until you are successful and then proceed to the next lesson.
2. Always fly these lessons in Intermediate skill level.
To change your skill level to Intermediate, you’ll need to go to the Configuration area. This
will ensure that your F-16’s instrumentation will operate as described in the lessons.
1. From the War Room, select the first monitor on the left at the bottom of the screen.
2. When the Difficulty Levels screen appears, choose “Intermediate” from the Skill Level
heading on the left-hand side of the screen.
3. When that light illuminates, choose “Done” from the upper right corner of the screen.
For more information on the Configuration area, see Section X: Configuration.
F A L C O N 3 . 0
Loading the training lessons
The training lessons are a part of the Red Flag area. To load a mission:
1. From the War Room, choose a squadron to fly from the monitor in the lower right-hand
corner of the screen. For more information on selecting a squadron, see Section IV:
War Room.
2. Now select the first monitor to the left of the phone to enter Red Flag.
3. On the next screen, choose your training lesson by scrolling the window in the upper
right-hand corner of the screen. Once you’ve highlighted the name of the mission you
want to run (e.g., LESSON1, LESSON2, etc.), select the Load Mission button. Then,
select the F-16 Pilots button.
4. Hit the e key to continue past the F-16 Pilots screen. This will bring you to the F-16
Armament screen.
5. Now, read the lesson description in the manual. When you are ready to try the lesson,
select the Takeoff button. This will place you in the cockpit of your F-16.
6. After the mission is over, select the Red Flag Control button from the Debriefing screen
to bring you back to the Red Flag Control screen.

S E C T I O N V I : A I R C O M B A T S C H O O L
Training lesson breakdown
Here are descriptions of the various missions in this section:
Lesson 1: Takeoff and Flight. This lesson teaches you how to take off and the basics of
flying your F-16.
Lesson 2: Head-Up Display and G Forces. Here, you learn the basic features of the
Head-Up Display (HUD). You’ll also learn about positive and negative G
forces.
Lesson 3: View Manipulation. All the outside and inside views (except Padlock View)
are described and taught here.
Lesson 4: Landing. This covers how to land using the Instrument Landing System
(ILS), its corresponding HUD mode and the Angle of Attack (AOA) System.
Review 1: Takeoff–Landing. This review covers the first four lessons, from takeoff to
landing.
Lesson 5: Weapons Selection and Situation Awareness Mode (SAM) Radar. This
lesson teaches the basics of weapon selection and firing as well as a basic
knowledge of the Radar/Electro-Optical (REO) display.
Lesson 6: Air-to-Air Weapons Delivery. This lesson instructs you on how to read your
air-to-air HUD modes and how to fire your weapons effectively.
Lesson 7: Air-to-Ground Weapons Delivery. Similar to Lesson 6, this lesson teaches
how to use all the air-to-ground weapons by describing the A-G HUD modes.
Lesson 8: Padlock View. This is an entire lesson on how to use the 360° Padlock View.
You will learn how to read all the displays to gain a superior position on your
enemy.
Review 2: A-A/A-G Engagement. This complete mission covers all of Lessons 1–8:
takeoff, air-to-air dogfight against a variety of enemy aircraft, air-to-ground
destruction of a nuclear power plant and landing at your home airfield.
43
General briefing
So, you want to learn how to fly? Everything you need to know comes from me. The name’s
Mike Barstow, and I’m your instructor for these sessions. You can call me Mike or by my
handle, “Threepoint.” I’ll explain that one later. Listen to me, and you’ll do fine. Don’t listen
and your bird may get foxtrot uniform in the sky, if you know what I mean.
There are a couple of things you need to know before you grab the stick and go hog wild.
First of all, be gentle with the plane. She doesn’t require much prodding to do what you want,
so there’s no need to go slamming your stick back and forth when making a turn. Ease into
it. Second and most important is listen carefully to what I say. Hey, it may sound obvious,
but the easiest way to learn is through me. I’m not going to steer you wrong, so you don’t
have to worry.
Anyway, enough of all that. Got your equipment ready? Helmet? Skull cap? G suit?
Parachute? Ok, let’s go.

44
Overview: Lessons 1–4
These first four lessons are designed with the novice in mind. Even you hotshots out there
who don’t think you need this stuff should go through these. Why, you ask? Because every
jet handles differently, and the F-16A is no exception.
Lessons 1–4 will teach you all the fundamentals of the F-16: how to read the instruments,
the head-up display (HUD), controlling your bird’s flight, all the different views and (last but
not least) the two most important parts of flight, takeoff and landing. After these lessons are
finished, you’ll be able to do all these things and more.
Lesson 1: Takeoff and Flight
One of the most dangerous activities in today’s modern fighter jet is the takeoff. It appears
so easy that it lures inexperienced pilots into a false sense of security. Don’t let that scare
you — if you’ve got the proper training (like I’m going to give you), takeoffs will be almost
automatic. Just let ol’ Mike guide you through it. No problems.
This lesson will cover how to use your plane’s directional control (the “stick”), throttle and
afterburners, autopilot and a couple other features. So go ahead, hit the Takeoff button so
we can begin.
Before you begin
The first thing you’ll see is the front view out of your cockpit. Don’t be overwhelmed by the
ton of dials and stuff in front of you. We’ll get to it all in due time. The first two things you
want to concentrate on are the directional control and the throttle.
F A L C O N 3 . 0
The stick
Mil/AB switch
Left
view
Bank
left
Front
view
The directional controller in your F-16 is simply called the “stick.” You use it for controlling
the plane’s pitch and roll (up, down, left and right movements). It’s the single most
important piece of equipment on your plane because without it you can’t fly.
Padlock
Num
Lock
Nose
down
/
view
*
789
Home Pg Up
456
123
End Pg Dn
Nose
up
.
Drop
chaff
0
Ins Del
Drop
flares
-
+
Enter
Throttle –
Right view
Throttle +
Bank right
Rear view
Air-to-air
weapons select
Bank left
Fire weapon
Weapons
select
Nose down
Nose up
Bank right

S E C T I O N V I : A I R C O M B A T S C H O O L
For the sake of simplicity, I’m going to assume you’re using a keyboard or a joystick for
flying around. If you have a different type of controller (two joysticks or a ThrustMaster),
check Section IX: Flight for complete flying instructions. The keyboard and joystick
controls are fairly simple, and I’ll describe them below.
When you get in the air, don’t be yanking around on the stick. It doesn’t require much effort
to turn your bird, so be gentle.
Climbing and diving
Pulling back on the stick makes your plane climb (gain altitude), while pushing the stick
forward makes your plane dive (nose toward the ground).
Banking left and right
If you push the stick to the left or right, you begin a gradual turn. To increase the speed of
your turn, push the stick to one side or another while pulling back on the stick.
RPM Indicator and throttle control
The first dial you will have to know about is the RPM Indicator. You can find it at the far right
of the cockpit. Currently it is at 0, meaning you haven’t started the engine yet. You can
increase your RPMs by pressing the + key and decrease them by pressing the - key. The
maximum amount of throttle you should apply without releasing the wheel brakes is about
60% RPM.
In addition to your standard thrust (known as Mil Power), you also have a five-stage
afterburner for extra acceleration. To engage the afterburner, press the / key. (Note the
indicator just below the RPM Indicator changes from “MIL” to “AB”.) To increase the
afterburner stages (and thus increase your speed), press >. To decrease a stage, press <.
Since the afterburner uses a ton of fuel, you should generally only use it for takeoffs and to
outrun the enemy.
45
Takeoff
Now that you’re familiar with the stick and throttle controls, it’s time to take off. First, check
out the upper middle screen with the green letters and numbers. This is your Head-Up
Display, better known as the HUD. The HUD shows you all the necessary information about
your F-16 and its weapons. For takeoff, we’re only interested in three of the items — the rest
will be covered in the next lesson.
The Head-Up Display
Look to the left side of the HUD. This is the Airspeed Scale, and it tells you how fast your
aircraft is going. In the middle of the HUD is a series of horizontal bars called the Pitch
Ladder. This shows you your current angle of climb (or dive). On the far right side of the
HUD is the Altitude Scale which shows your current altitude in thousands of feet.

46
F A L C O N 3 . 0
Airspeed
Scale
Pitch
Ladder
Altitude
Scale
Start ’er up
Go ahead and engage the engine by pressing and holding the + key until the indicator
reaches about 60%. Now kick in the afterburners / and watch the Airspeed Scale. Just after
it reaches 15 (150 knots), ease the stick back gently to about 10° on the Pitch Ladder. Don’t
let your speed go beyond 20 (200 knots), or you’ll burn your tires clean off.
Landing gear
Right after you get in the air, be sure to raise your landing gear by pressing the G key. Flying
around with your landing gear up at speeds over 300 knots will cause permanent damage
to your aircraft as well as hamper your maneuverability in the air. You can tell that your gear
has been raised if the Wheel Status Light goes out on the right side of the cockpit and all
lights go out on your AR/NWS (Air Refuel/Nose Wheel Steering System) Light just to the
right of the HUD.
Now that you’ve raised your gear, look at the Pitch Ladder. Keep it at 20°–30° until your
Altitude Scale reaches 8.0 (8,000 feet). Now, level off by pushing forward on the stick until
the Pitch Ladder is at 0° and then turn off your afterburner by pressing /. Congrats, you’re
in the air!
Fly around
Now that you’re up in the sky, fly around a bit to get used to your plane. Make nice, gentle
movements on the stick and keep an eye on your Altitude Scale. If it drops below 2,000 feet,
level out and then gain a little more altitude.
Pause key
If you think your plane is going out of control or you accidentally hit some unfamiliar key,
you can press P to pause your aircraft in mid-flight. Now you can stop, take a breather, and
figure out where you are or what you just did. When you are ready to continue flying, just
press P again.

S E C T I O N V I : A I R C O M B A T S C H O O L
Speed brakes and flaps
If you want to temporarily reduce speed without reducing the amount of engine thrust,
toggle the speed brakes on or off with the B key. You can use your flaps («F«) to help slow
you down when landing. However, make sure you don’t lower your flaps at speeds over 400
kts, or you’ll shear them right off. Keep flying around until you feel comfortable with the
controls, and then we’ll talk about the autopilot.
Autopilot
The computerized autopilot is used in a number of ways, but is primarily designed to follow
your predesigned route in and out of your mission area. It will also follow enemy planes in
an attempt to get behind them in a dogfight.
To engage the autopilot, press the A key. You can now watch as the plane will level, fly to
a point north of your air base, then return to land. Before the plane returns to your home
airfield, press the \ key. This will bring up the HUD for the Instrument Landing System
(ILS). Watch the horizontal and vertical bars as they line up in a cross. I’ll give you all the
details about the ILS HUD in Lesson 4, when I teach you how to land.
Accelerated mode
When you’re in autopilot, you can hold down the t key to speed up your flight. The
accelerated mode will increase actions in the outside world by a factor of 4x. You can also
lock accelerated mode by pressing st. Don’t try accelerated mode unless you’re in
autopilot, or you’ll smack into the ground so fast it’ll make your head swim.
On the ground
Once you’ve landed and your plane has come to a stop, engage the wheel brakes by pressing
the W key. You always need to set the wheel brakes when you stop on the runway. Now,
press q to bring up the menu bar and select End Mission from the FILE menu. You’ve
just completed your first lesson and are well on your way to becoming “ace of the base.”
47
Lesson 1 review:
In this lesson, you learned the following:
j Stick controls
j Throttle and afterburner controls
j Wheel brakes
j Raising the landing gear
j Pause key
j Speed brakes and flaps
j HUD basics: Airspeed Scale, Pitch Ladder and Altitude Scale
j Autopilot
j Accelerated mode
j Menu bar (End Mission)
Next lesson, you’ll learn everything you ever wanted to know about your HUD.

48
Lesson 2: The Head-Up Display (HUD)
Your HUD is the most important instrument in your plane (actually, it’s a combination of
instruments all wrapped up in one) and is essential to flying. It contains vital information
relating to your F-16’s airspeed, altitude, heading and weapons information. If your HUD
gets knocked out in combat, you’re up sierra creek without a paddle.
This short lesson will teach you all the basics about your HUD and how to toggle between
different HUD modes. We’ll talk about specific HUD modes and how to use your weapons
in Lessons 5–7.
Before you begin
You’re going to start out with your plane on the runway. Don’t worry about controlling the
plane for now; simply prepare to put your plane in autopilot and then watch the readouts.
Below is a diagram of where everything on the HUD is. You should refer to this whenever
necessary when I’m describing this stuff.
F A L C O N 3 . 0
Airspeed
Scale
Mach
Indicator
Max G
Force
Indicator
G Force
Indicator
HUD Mode
Indicator
Flight Path
Marker
Heading
Scale
Center
Point
Altitude
Scale
Pitch
Ladder
Altitude
Indicator

S E C T I O N V I : A I R C O M B A T S C H O O L
Takeoff
In this lesson, don’t bother to take off manually. Instead put the plane in autopilot («A«) and
watch the HUD. You learned about your Airspeed Scale, Pitch Ladder and Altitude Scale in
the previous lesson, but let’s go over them once again.
Airspeed Scale
Located on the far left-hand side of the HUD, the Airspeed Scale measures your plane’s
current true airspeed (TAS) in knots. You can read this scale by looking at the hash mark
with the “T” above it. True airspeed is adjusted for error based on altitude and air density.
Altitude Scale
The Altitude Scale is located on the far right-hand side of the HUD. It measures your current
altitude above sea level in thousands of feet. The hash mark in the middle of the scale is where
you should read your altitude.
Pitch Ladder
The Pitch Ladder (the horizontal bars in the center of your HUD) shows your current
degree of climb or dive. If you are climbing, these bars will be solid. If you are diving, these
bars will be dashed.
Major HUD features
In addition to the Airspeed Scale, Altitude Scale and Pitch Ladder, the F-16’s HUD has many
more features. I won’t explain every little feature, because some of them relate only to
specific HUD modes. I’ll talk about those in later lessons.
Don’t worry about memorizing all these instruments at once; just familiarize yourself with
them for now.
49
Heading Scale
This scale shows your F-16’s heading. The Heading Scale will be along the bottom of all airto-air HUD modes and at the top of all air-to-ground HUD modes. In this scale, 0° is north,
90° is east, 180° is south and 270° is west. Read the current heading by looking at the hash
mark in the lower middle of the Heading Scale.
You’ll also notice a small upside-down “v” moving around the bottom of the scale. That’s the
Waypoint Caret and shows you the direction of the next “waypoint” on your flight route.
When you plan out a mission, each point where you change direction or where you plan to
take an action is called a waypoint.
Flight Path Marker
The Flight Path Marker is used to show changes in your flight direction. When you pull back
on the stick, the Flight Path Marker will correspondingly move to show you which direction
you are heading. If you let go of the stick, the Flight Path Marker will slowly drift back to
the center of the HUD.
Center Point
The Center Point is located in the exact middle of most HUD modes and is used with the Flight
Path Marker as a reference for which direction your plane’s nose is pointing. If you are not
moving the stick, the Flight Path Marker will be positioned directly over the Center Point.

50
F A L C O N 3 . 0
HUD Mode Indicator
This display is located as the last line in the lower left-hand corner of the HUD. It’s used to
show which weapon system (and corresponding HUD mode) is currently selected on your
aircraft. We’ll discuss this in depth when we talk about specific HUD modes in later lessons.
G Force Indicator
The G Force Indicator (located just above the Airspeed Scale) measures the current amount
of Gs your plane is currently pulling. Gs are the amount of gravity acting on you and your
plane at any one time. At 9 Gs, blood flows away from your head and you begin to blackout.
In addition, if you do -3 Gs (nosing your plane down, for example) too much blood flows to
your head and you will begin to redout. Basically, if you start to blackout or redout, ease off
the stick until your vision comes back in focus.
Max G Force Indicator
You can find this display in the lower left-hand corner of the HUD, just above the Weapon
Indicator (the second line from the bottom). This shows the maximum amount of Gs you
have pulled since you stepped into the aircraft.
Mach Indicator
This display (the third line from the bottom in the lower left-hand corner) shows your
airspeed as a percentage of the speed of sound. The speed of sound is Mach 1.0.
Altitude Indicator
The bottom number in the lower right-hand corner of the HUD displays your current
altitude above ground level (AGL). This differs from the Altitude Scale, because the Altitude
Indicator shows altitude above your current terrain, while the Altitude Scale shows altitude
above sea level.
Cruising around
When the plane levels off at 14,000 feet, take your plane off autopilot (with the A key). Kick
in your afterburners («/«) and increase the staging (hit the > key twice) so that the display
below the RPM Indicator reads “AB3.” This is a good time for your first lesson in G forces.
Positive and negative Gs
I hate negative Gs. All pilots hate negative Gs. You will learn to hate negative Gs. Negative
Gs are the most uncomfortable thing a pilot can experience because you feel like your
stomach is flying up through your mouth. Also, the pressure on your head feels like an 800pound gorilla is giving you a headlock. Let’s go ahead and push some negative Gs, so you
can see what it feels like and not do it again, ok?
Right now, you’re probably flying at about 630 knots (kts). Now push the nose down. See
that! You start to redout almost immediately. This is G Force Lesson Number One: avoid
negative Gs whenever possible. Let’s try this experiment again, but this time we’ll pull
positive Gs to execute the same maneuver.
Level the plane out (either manually or by autopilot until the plane levels). Once level, turn
off your autopilot if you had it engaged. Now, we’ll execute the same dive, but pulling
positive Gs instead of negative. Bank your plane to the left until the plane turns upside-down
and then pull back on the stick. Dive down for a while and then bank to the right and pull
back on the stick until you level out. See how much easier that was? Not to mention that you

S E C T I O N V I : A I R C O M B A T S C H O O L
are able to make the same maneuver in a shorter time. Your plane is three times more
maneuverable in positive Gs than it is in negative Gs.
Landing
Ok, now that you’ve had your G force lesson, it’s time to land. Just like you did in Lesson 1,
turn on the ILS HUD mode (the \ key) and then engage the autopilot. After landing, turn
on your wheel brakes (W). Now, go to the menu bar (q) and select End Mission from the
FILE menu.
Lesson 2 review:
In this lesson, you learned about the following items on the HUD:
j Heading Scale and Waypoint Caret
j HUD Mode Indicator
j G Force Indicator
j Max G Force Indicator
j Mach Indicator
j Altitude Indicator
In addition you learned the basics of G forces:
j Redout
j Blackout
j Positive and negative Gs
Next lesson, you’ll learn about all the different inside and outside views. I’ll also explain the
best and worst times to use each of these views. Anyway, on to the next lesson.
51
Lesson 3: View Manipulation
Ok, you can look at your F-16 in a number of different ways. Some of them take the
perspective from inside the cockpit, while some look at your plane from the outside. You can
even watch the path of your missile or look at a missile from your target’s point of view.
In this lesson I’m going to teach you when to use certain views to your best advantage in both
combat and non-combat situations. And, yes, there are times that you absolutely shouldn’t
use a particular view. I’ll talk about those as well.
In the plane
Here you are, back in your plane on the runway. Before you take off, let’s take a look through
your inside views and I’ll tell you what you are seeing.

52
F A L C O N 3 . 0
Front View
This is the old, familiar view from the last two lessons. It’s the most useful of the views
because it contains a number of vital instruments including the HUD, Radar and Threat
Warning Indicator. Press 3 (or 1 on the numeric keypad) to look out the Front View.
Left View
Press the 4 key (or 7 on the numeric keypad) to look out the left side of your cockpit. The
Left View gives you access to a number of instruments, including the Fuel Indicator,
Landing Gear Lights, AVTR Status Light and Tape Indicator, IFF Light, Backup Airspeed
Indicator and the Compass. This view is useful for checking out these instruments, but isn’t
very good in combat situations.

S E C T I O N V I : A I R C O M B A T S C H O O L
Right View
Press the 6 key (or 9 on the numeric keypad) to look out the right side of your cockpit.
Here you’ll see a clock displaying the current mission time and your Caution Light Panel.
The caution lights are used to indicate damage to your plane. If you hear a frantic highpitched tone or a warning voice, you better look here to find out what’s wrong. As with the
Left View, this view isn’t good in combat.
53
Rear View
This doesn’t show you any instruments, but it’s useful to look out for enemy planes that
might be sneaking up on you. You can also use it for checking up on your wingmen. Press
5 (or 3 on the numeric keypad) to look behind you.

54
Up View
This simulates you looking straight up from your chair. It’s somewhat useful if you are
inverted or when you’re in air combat and observing an enemy plane. Press the U key to
look up.
Cockpit scrolling
If you press the m key when using any of the inside views (except the Up View), you
will look either up or down in that cockpit view. Change to the Front View (the 3 key) and
press the m key. See how it works? Each of the inside views has independent
scrolling, so you can choose to look up or down. This scrolling feature makes the inside
views more useful for air combat.
Outside views
Most of the outside views are fun to fly in but are extremely poor for combat. If it’s a combat
situation, switch back to Front View, Track View or Padlock View. I’ll explain Padlock View
in Lesson 8.
Just to let you know, all the outside view keys can be found on the top row of the keyboard.
Track View
The first major outside view is Track View. Right now you’ll see a fixed view from a camera
directly behind your aircraft. If your plane rolls, the camera will roll with you. When you get
in combat, you’ll see your plane and any plane you’ve locked onto (including your
wingman). This makes it really easy to track an opponent. Switch to this view now by
pressing the 9 key.
F A L C O N 3 . 0
View Status Box
The first thing you’ll notice about any one of the outside views is that box at the bottom of
the screen. This is the View Status Box, and it shows you current info about your view.
Everything’s pretty self-explanatory except the “Zoom” Indicator. Let’s go over this now.
Zoom keys
When you’re in an outside view, you can zoom in and out on your bird to see it from closer
or farther away. Press 1 to zoom in and 2 to zoom out. Notice that when you press these
keys, the Zoom Indicator will increase or decrease. The max zoom level is 15 and the
minimum is 1. Go ahead and set it up for zoom level 5.
Rotate keys
In any of the outside views, you can rotate around your plane horizontally or vertically.
Rotate clockwise by pressing and holding the 3 key. If you want to go back the other way
(counterclockwise), hold the 4 key down.
To circle your plane vertically, press and hold the s and 3 keys down together. If you
want to rotate the other direction, hold down the s and 4 keys together.
Finally, if you want a finer rotation on your views, hold down the c key with any of the
above combinations.
If you got lost or if you’re looking at your plane at a really weird angle, hit the 3 key to get
back to the Front View. Then select whichever outside view you want.

S E C T I O N V I : A I R C O M B A T S C H O O L
Takeoff
Well, after all that you’re ready to take off. From the Track View, pan around your aircraft,
so you are looking at its side. Now, go ahead and use your autopilot («A«) for takeoff. This
way, you get a great view of your bird as it streaks off the runway.
Once the plane levels off (at about 10,000 feet), take your plane off autopilot («A) and we’ll
start up on some of the other outside views.
Satellite and Ground Views
These two views are almost identical. The Satellite View («1«) looks at your plane from directly
overhead, while the Ground View («2«) checks out your plane from directly below. You can
also use the Rotate and Zoom keys on these views to see your plane from various angles. By
the way, in case you didn’t figure it out already, these two views are really lousy in combat.
Wingman View
In case you haven’t noticed, you’ve got a wingman on this flight. If you go to the Track View,
you can pan around and see him. (He’ll probably be right behind you.) If you want to take
a look at things from his perspective, hit the 7 key. Now you can rotate around him and
watch your own plane.
Rotate around in this view until you are looking at your own plane. Now, roll out and watch what
happens. Your wingie will lag behind a bit, then follow your plane. Hit A to go back to autopilot.
The best time to use Wingman View is just before a combat situation when you are sending
him out to execute a particular maneuver.
55
Chase View
(By the way, this is one of my faves.) Hitting the 0 (zero) key brings up the Chase View.
This gives you the angle from directly behind your plane like in Track View, but watch what
happens if you nose your bird down.
Take your plane off autopilot («A«) and then go ahead and push down on the stick. There will
be a slight lag, then the view will follow your plane. Fly around a bit and watch the results.
This is a great view when flying around, but just like most of the outside views, it’s really
crummy to dogfight in.
Missile, Enemy and Target Views
These three views are used only when you’re shooting at someone or something. The Q
key toggles between these views, and you can use the Rotate and Zoom keys on these views.
The Missile View follows the path of a fired missile, while the Enemy View shows you the
point of view from a targeted enemy plane or ground target. The Target View is behind airto-air targets; see Section IX: Flight for more details on all these views.
Padlock View
This view will be covered in depth in Lesson 8, but I’ll go into it briefly here. Basically, what
you’ve got is a 360° inside-the-cockpit view. Here, you can padlock (keep your eyes fixed)
on your enemy at all times. As an enemy plane shoots past your F-16, your eyes will never
leave that plane. With this view, you have a much better chance of defeating your enemy.
You can hit 8 (or * on the numeric keypad) to see the Padlock View. There won’t be
anything there right now except your wingman, but you can see how it works.

56
Landing
Ok, now go back to the Track View («9«) and hit A to have your bird finish its route and land.
Set your wheel brakes and then go ahead and select End Mission like you did in the previous
two lessons.
Lesson 3 review:
In this lesson, you learned about the following inside views:
j Front View j Left View
j Right View j Rear View
j Up View j Cockpit scrolling
You also learned about outside views:
j View Status Box j Track View
j Satellite and Ground Views j Wingman View
j Chase View j Missile, Enemy and Target Views
Finally, you learned how to manipulate your outside views:
j Rotate keys j Zoom keys
In the last lesson of this section, you will finally learn how to land. You’ve seen it on autopilot,
now live the adventure!
Lesson 4: Landing
And you thought taking off was hard! A bad takeoff can end your trip real early, but you never
live down the embarrassment of a crash landing. Don’t worry, though: by the time you run
through this lesson a few times, you’ll be landing in your sleep.
This lesson will cover the “racetrack” method of landing — the ILS HUD mode, the angle
of attack (AOA) system, using the rudder and abort procedures.
F A L C O N 3 . 0
Before you begin
In order to land using your Instrument Landing System (ILS), you need to approach a
runway that broadcasts ILS signals. At Nellis, there is only one air base that is set up to
broadcast ILS signals, but each campaign theater may have multiple air bases equipped with
this system.
This is the first lesson that you’re going to start out in the air. Don’t worry, you’ve got a little
“play” time before you have to worry about landing. Your plane is going to start due north
of the runway at 8,000 feet, about nine or so miles out. Keep your hands off the controls for
now, so I can explain a few things first.
The two main instruments designed to help you land are the ILS HUD mode and the AOA
System. Both systems help you line up for that perfect approach angle.

S E C T I O N V I : A I R C O M B A T S C H O O L
Instrument Landing System (ILS) HUD mode
First thing you want to do before approaching your home airstrip is engage the ILS HUD
mode. Do so now by pressing the \ key; then press the P key to pause. Now the circle in
your HUD will be replaced by notched horizontal and vertical bars, the Glide Slope
Deviation (GSD) Bar and the Localizer Deviation (LD) Bar. Your goal when landing is to
align these bars so that they form a perfect cross.
LD Bar
The LD Bar measures your offset from the center of the runway. You want to align the
vertical bar so that its center is in the middle of the HUD. If the LD Bar is to the right of
center, you need to bank right. If it’s to the left of center, you need to bank left.
57
GSD BarLD Bar
GSD Bar
The GSD Bar measures your vertical angle to the runway. When the middle of the LD Bar
is in the center of the HUD, you’re approaching the runway at a proper angle. If the GSD
Bar is above the center of the HUD, you are coming in too low. On the other hand, if it’s below
the center point, you’re not low enough.
Angle of Attack (AOA) System
The AOA System consists of two indicators: the AOA Indexer and the AOA Indicator. Both
indicators are used to display your aircraft’s angle of attack. The main difference between
the two is that the AOA Indexer shows it with a series of lights while the AOA Indicator uses
a numerical scale.
AOA Indexer
The AOA Indexer is located just to the left of the HUD and basically illuminates one of three
lights. These lights won’t come on until you engage the ILS HUD mode. A perfect angle of attack
and landing approach is when the center circle is lit.
If the top caret is on, it means that your AOA is too high because your airspeed is too low. To correct
this, increase your airspeed by adding power or nosing your bird down to a proper angle.
If the bottom caret is on, it means that your AOA is too low because your airspeed is too high. You
should nose your plane up a little or use your speed brakes or flaps to bleed off airspeed until the
center AOA light comes on.

58
AOA Indicator
The AOA Indicator is located just to the right of the REO Display and immediately below
the RPM Indicator. You can use this to judge your AOA for landing or when you are in
combat. This indicator works in conjunction with the AOA Indexer to assist you in landing.
This indicator color-codes your AOA — light blue if you have a positive AOA, red if you have
a negative AOA. A perfect AOA for landing is between positive 10°–13°. If your AOA is above
13°, the top caret on the AOA Indexer will light up. If your AOA is below 10°, the bottom caret
on the AOA Indexer will turn on.
Using all these things
You’re probably saying to yourself, “Great, Mike, you’ve told us how these things work, but
how do they work?” Don’t worry, I’m getting to that.
Before you unpause the game to release your plane, make sure that you understand the
concepts I explained above. If you read it again and still don’t get it, you can either take a
look at the landing portion of Section IX: Flight or follow along with my walk-through.
Perhaps at the end of the lesson, you will get a better grasp of what I’m saying.
F A L C O N 3 . 0
Heading
First, you need to be facing your runway. It’s important to note that your ILS HUD mode
won’t tell you if you are facing the wrong direction, so you need to know the direction of your
runway. (For example, you could have the GSD and LD Scales lined up with perfect AOA,
but you might be flying perpendicular to your runway.)
Take your aircraft off pause by pressing the P key and start to line up your bird with the
approaching runway. In this lesson, you start out eight miles due north of the airfield, with
a heading of due south. You can find out how far away you are from the runway by looking
at the lower right-hand corner of the HUD. The Waypoint Indicator will show the number

S E C T I O N V I : A I R C O M B A T S C H O O L
of miles to the next waypoint (which is your airfield) followed by the letter “D” and then a
“2” representing the waypoint number. Also, take a look at the Waypoint Caret on the
Heading Scale to help you align yourself to your airstrip.
Your landing approach heading should be somewhere around 180°. (Check the Heading
Scale to see if that’s true.) Don’t worry about your AOA for now; just make sure you’re facing
that runway.
First runway approach
As you approach the airstrip, keep a close eye on the Waypoint Caret to make sure that
you’re heading the right direction. You’ll also want to reduce your speed to about 400 kts
and begin to descend at a rate of 1,000 feet/mile. Play around with the angle of descent until
you feel comfortable with it, but it should be somewhere around -7°.
One key thing to remember is that most runways are aligned to the compass points: 0°, 90°,
180° and 270°. When you get within visual range of the end of a runway, you can see a
number at the beginning of that runway. That’s the angle you need to be heading for a
straight approach (either 0, 9, 18 or 27 for the above four compass points).
Five miles to base
When you reach the five mile marker, you should be at about 5,000 feet. Now, you want to
drop your airspeed to about 350 kts for your initial approach. Keep descending at 1,000 feet/
mile until you reach about 2,000 feet.
Two miles to base
At the two mile marker, you should be somewhere around 2,000 feet altitude. It doesn’t
matter if you’re a little high or low; just be sure to keep it at about 2,000 feet. You should get
a visual sighting of the runway about now, so you’re going to want to descend and line up
parallel with the runway you want to land on.
59
Parallel the runway
Once you’re lined up with the runway, you should be at about 400 feet or so above it. Keep
this altitude as you fly over the runway. When you’re past the runway, you want to start
making a gentle 180° left turn and keep turning until you’re flying back the way you came.
You’ll want to keep your airspeed at around 250 knots when you’re making your turn.
Return approach
On this downward leg, you’ll want to remain about 300–400 feet and about 250 knots. Now’s the
time to drop your landing gear («G«). You’ll notice that the top and bottom lights of your AR/NWS
Status Indicator have lit up and your Wheel Status Light has turned on. Since dropping the gear
causes drag on your aircraft, increase throttle to keep your airspeed at about 250 kts.
Go ahead and check your Left View to see where the airstrip is. You should remain parallel to
your runway at all times. Switch back to the Front View when you’ve aligned with the runway.

60
Second runway approach
When you get about two to three miles past the end of the runway, you’ll want to make your
second 180° turn to the left. If you keep the same angle of turn that you used in your first turn,
you should be perfectly aligned when your 180 is finished. This should put you about two or three
miles away from the runway, lined up with it. Pause the game now and read on for a bit.
Angle of attack
Once you are heading the right direction, you’re going to need to get those horizontal and
vertical bars to form a cross. If they’re not already, start to wrangle them into position. Only
worry about one of the scales at a time. If your GSD Bar is below the center of the HUD, nose
down. If it’s above, pull up. Same goes for the LD Bar. If it’s to the left of center, move left
and vice versa.
While you’re watching the ILS bars, keep an eye on the AOA system. Remember, it should
be between 10°–13°. When you have a perfect AOA, the center light in the AOA Indexer will
light up.
Airspeed
If you manage to get the two scales to form a cross but can’t seem to get a perfect AOA, you
are probably going in too fast or too slow. Check your AOA Indexer to see which of the two
reasons it is. Adjust your airspeed so that you’re coming in at about 250 kts.
Using the rudder
Once you get under 450 kts, you can use the rudder pedals on your F-16 to help fine tune
your horizontal movement when lining up with the runway. Simply hold down the [ key
to apply left rudder or the ] key to apply right rudder. This will slide your plane gently to
one side or the other on your approach. Unpause the game now and try to get your AOA
aligned. Keep “riding the beam” as you approach the runway.
F A L C O N 3 . 0
Landing
Aborting
This is where nerves come into play. If for some reason, you aren’t approaching at the right
angle or your AOA is incorrect, immediately abort your landing. Increase throttle to 80% and
pull your nose up. You’ll now have to wing around and follow the same procedure for another
pass. Don’t be too hard on yourself if you have to abort. Landing is tricky business and
requires a lot of practice.
Just before your plane touches down, make sure that your AOA is not less than 8° and your
airspeed is between 160–190 kts, or else you’ll be doing a nosedive into the runway. Try to
aim for the beginning of the runway, so that you’ll have a greater distance to stop your plane.
As soon as you touch down, reduce throttle and push the nose of your plane down so the
nose wheel comes down on the runway. Immediately after the nose wheel touches the
ground, engage your speed brakes and flaps until you come to a complete stop. Now go
ahead and set your wheel brakes, so your bird won’t roll off the runway. There you have it,
a perfect landing! I didn’t get the moniker “Threepoint” for nothing, you know.

S E C T I O N V I : A I R C O M B A T S C H O O L
In closing
This lesson, I set you up to start out almost perfectly lined up with the airfield. In the real
world, you won’t have that luxury. You need to remember three ingredients (heading, AOA
and airspeed) before you get ready to land. With time and practice, you’ll know which
instrument to view at any given time.
Lesson 4 review:
In this lesson, you learned the following things:
j Instrument Landing System (ILS) HUD mode
j Glide Slope Deviation (GSD) Scale
j Localizer Deviation (LD) Scale
j Angle of Attack (AOA) System
j AOA Indexer
j AOA Indicator
j Waypoint Indicator
j Rudder keys
j Landing approach
The final lesson in this section is a review of the first four. I’ll give you some general
guidelines, but mostly it’ll all be up to you. Good luck.
61
Review 1: Takeoff–Landing
Now that you’ve flexed your bird’s muscle and learned a few things about her, it’s time to
check that knowledge. I’m not going to teach you anything new in this lesson — it’s going
to be strictly review.
You’re going to start out on your home runway, take off, circle around to the left, come in
behind the runway and land the plane. Simple. I’ll be around to help you out if you’ve got
some problems, but I’m handing over the stick to you. And, we’re off!
On the runway
Go ahead and power up to 60% and let ’er rip. Kick in the afterburners and pull up when you
reach 160 kts or so.
Takeoff
Raise your landing gear and keep climbing at an angle of about 20°. Keep this angle until you
reach 15,000 feet, then level off. When you get to 15,000 feet, turn off your AB.
Circle around
As I said in the intro, you’re going to circle around to the left and make a landing heading
due north (0°). You’re going to want to head 270°, then turn to 180°, then veer to 90° before
finally heading north again. I’ll explain what to do below.

62
Change heading to 270°
Right now, your heading should be 0°. Bank left until your heading is 270°, then level off.
Change heading to 180°
Go ahead and fly for about a minute or so and then bank left until you come to a heading of
180°. Level off and continue flying.
Pass by the airfield
Keep flying straight and level; then take a look out the left side of your cockpit and watch
as you pass by the airfield in the distance.
Change heading to 90°
After you fly by the airfield, keep flying for a minute or so. Now, bank left again until you
come to a heading of 90°, then level off again.
Change heading to 0°
Locate your airfield by looking out the left side of the cockpit. Right before the airfield comes
into the middle of your view, start to bank left until you are heading 0°. Now, level off.
Engage ILS and begin descent
Turn on your ILS and check how far away you are from base. Right now, you should be about
15 or so miles from your airfield. Remember, you want to be at 10,000 feet when you are 10
miles away, so begin your descent now until you achieve that height and distance. Also,
power your bird down to 450 kts when you get there.
Approach (five miles)
Keep the ILS bars in a cross while you make your descent. When you approach five miles
from base, slow down to about 270 kts and ease her in.
F A L C O N 3 . 0
Landing
In conclusion
Approach (two miles)
Once you get within two miles, drop your airspeed to 250 kts and lower your landing gear.
Use those rudder controls to fine tune your approach.
Pass over the runway
After you’re aligned with the runway, pass over it and make the first of your two 180° turns.
Parallel the runway and go about two miles out before starting your second 180° turn. Now,
line ’er up and check your ILS bars.
Your AOA should be between 10°–13° now, but if it isn’t, you may want to abort and repeat
the procedure. Aim for the start of the runway and when you touch ground, nose the plane
forward and reduce speed immediately. Open up the speed brakes and flaps to drop your
airspeed. When you come to a stop, engage the wheel brakes and you’re finished!
Well that’s all. Now, if you want, you can keep running this review mission until you’ve
perfected it or else practice takeoff or landing using Lesson 1 or 4. If you did this review
perfectly, congratulations! You’ve now graduated to weapons school.

S E C T I O N V I : A I R C O M B A T S C H O O L
Overview: Lessons 5–8
Well, you made it through basic training. By now, you should have a general familiarity with
cockpit controls and an overall view of the HUD. These next four lessons are based on
concepts you learned in Lessons 1–4, so if you didn’t understand something in those
lessons, be sure to review them before continuing.
The following four lessons are to establish your combat readiness. We’ll go over the
standard radar (called Situation Awareness Mode, or SAM), how to read your Threat
Warning Indicator to find enemy aircraft, how to select and fire your weapons, all the air-toair and air-to-ground HUD modes and their operation, and how to use the Padlock View in
an A-A combat environment. After you complete these lessons, you should be able to
compete with the best of them.
Lesson 5: Weapon Selection and SAM Radar
Ok, hotshot! Now’s the time for your real test. It’s all well and good to fly about with no enemy
in sight, but now you’ve got to prepare for combat. The first things you need to know before
you get in the heat of battle are how to select and fire your weapons as well as how to find
enemy aircraft and get their info from your radar scope. Once you master these, you’ll be
able to figure out where that bandit is coming from and maybe even shoot him down.
This lesson will teach you how to choose weapons from your Stores Control Panel and how
to launch those weapons. In addition, you’ll learn how to interpret your Threat Warning
Indicator and how to read the standard mode of the Radar/Electro-Optical display (aka the
REO, or simply the radar).
The type of radar you will be learning here is called Situation Awareness Mode (SAM) radar.
SAM radar is the default radar setting of the “Intermediate” skill level. Situation Awareness
Display (SAD) radar mode is fully described in Section II: Instant Action, while the High
Fidelity Radar (HFR) mode is explained in Section IX: Flight.
63
Before you begin
If you haven’t done so already, click the Takeoff button now. When you get in the cockpit,
pause the game and continue reading the lesson. After you’ve got some of the basics, I’ll tell
you when to begin flying around.
Weapon selection and firing
Before you get into a fierce knife fight, you need to know which weapons you have on board
and how to fire them. Seems simple, right? Well, to the untrained eye, it can get really
confusing. Just listen along for now while I go over it.
Stores Control Panel (SCP)
You can view all of your onboard weapons in the display in the lower-left hand corner of your
front cockpit. The Stores Control Panel will tell you not only what you’ve got, but how many
of each weapon you have left.

64
F A L C O N 3 . 0
The top line in the SCP shows what type of weapon is currently loaded, either “A-A” (air-toair) or “A-G” (air-to-ground). Right after that is the amount and type of the current weapon
loaded. The weapons you can see on the SCP may differ because you may select different
weapons on different missions.
The second line reads “APG-66” and tells you that your radar is turned on. You may
sometimes want to turn your radar to standby to avoid detection by enemy radar and SAMs.
To find out the number and type of every weapon you have on board, you can hit the V key.
Unpause the simulation, and keep pressing the V key until you have returned to the SCP’s
standard display.
Selecting a weapon
Your F-16 carries two basic types of weapons: air-to-air and air-to-ground. Air-to-air weapons
include heat-seeking missiles, radar-guided missiles and guns. Air-to-ground arms include
missiles, iron bombs, cluster bombs or guns.
To change to your A-G weapons, simply hit the B key. Keep hitting the B
key to check out the remainder of your A-G stores. The weapon name will appear on the first
line of your SCP. Also notice that the displays on the radar and HUD change each time you
select a new weapon. I’ll talk about the HUD more in Lesson 7.
You can select your A-A weapons by pressing the e key. Just as with the A-G weapons,
keep hitting the e key to view your A-A stores. Toggle through your weapons systems
until the words “4 AIM9M” appear in your SCP. This will select and arm your AIM-9M
Sidewinder missiles.
Firing a weapon
I know it’s a waste of a missile, but go ahead and launch one of your Sidewinders now by
pressing the z key. If you’re using a joystick, one of the buttons will launch the
missile and the other one will toggle through your A-A stores.
Whether you are using an A-A or A-G weapon, the z key will always act as your
trigger. Go ahead and pause the game again while I talk about target selection.
Changing targets
In a situation with multiple A-A or A-G targets, you can toggle through targets within radar
range by pressing the T key. This Target Select Key will come in handy because there may
be times where your targeted aircraft is a lesser threat than another in the area. For example,
you may be targeting an AN-12 transport when there’s a MiG-29 right at you!

S E C T I O N V I : A I R C O M B A T S C H O O L
This key works for ground targets as well. You might want to fire a Maverick at a tank, switch
to another tank and launch a second missile all on your approach dive. Keep the Target
Select Key in mind as I go into Lessons 6, 7 and 8.
Finding the enemy
Ok, now that you know how to select and fire your weapons, you need to be able to locate
your foe. Your F-16 has three devices to find out where an enemy plane is: the radar, the
Threat Indicator and the HUD. Use the radar first to locate the enemy, and when he gets
in range of your weapon, take a look at the HUD and Threat Indicator to see where he is
heading. First, I’ll talk about your Radar/Electro-Optical (REO) Display.
Radar/Electro-Optical (REO) Display
Directly below your HUD is the REO, simply known as the radar display. The radar is the
primary device that you need to locate and lock on an enemy plane or ground target. For
now, I’m just going to talk about what the different numbers and such mean on your A-A
radar. I’ll discuss how to use specific weapon systems in Lessons 6 and 7.
Right now, your radar screen will be pretty much blank, save for a couple of numbers at the
top. Unpause the simulation now and keep an eye on your radar. When a light green blip
appears on your display, press P to pause again.
Viewing the radar
First, let’s go over some basics. In Situation Awareness Mode (SAM), your plane is assumed
to be at the bottom of the radar screen pointing “up.” The green square is an enemy plane.
As enemy aircraft close in on your position, they will move from the top of the radar screen
down toward the bottom. When you have achieved a radar lock on the enemy aircraft, the
square will turn into a diamond.
65
Radar ranges
SAM radar is fairly simple because you don’t have to manually change the radar scanning
range. The radar will automatically change its scanning range between either 20 miles or
10, depending on how far away the closest enemy aircraft is. You can tell how large the
scanning range is by looking at the upper left-hand corner of the REO.
This 20 mile range means that there is 20 miles between the top of the radar display and the
bottom. Right now, the bogey should be about 15 miles away (about 75% up from the bottom
of the screen). Unpause the simulation again and watch as the bogey slowly moves down
the screen. Pause the game again when a series of numbers appears on the right-hand side
of the REO and the green square changes to a diamond.
REO symbology
Now the upper left corner should read “10 SAM,” (Situation Awareness Mode), meaning
that the REO has changed to the 10-mile scanning range and is tracking a single target.
Since you are within 10 miles of the enemy plane, you’ll see the targeting info on the righthand side of the screen. Your screen should look something like this:

66
Enemy
Altitude
Enemy
Heading
Enemy
Airspeed
Aspect
Angle
F A L C O N 3 . 0
Enemy
Bearing
Enemy altitude: The number in the upper right-hand corner is the enemy’s altitude (in
thousands of feet) above terrain level. It should read somewhere around 10(000).
Enemy heading: This is the heading (in degrees) that the enemy aircraft is flying. You can
compare your own heading (on the heading scale) with his to see what direction you need
to fly to overtake him.
Enemy airspeed: This shows the airspeed (in knots) of the enemy aircraft. It’s useful
because you can compare it against your own speed and adjust accordingly.
Aspect angle: This is the horizontal angle measured from the tail of the enemy aircraft to
the nose of your plane. Optimally, you want to have the aspect angle be 0° (directly behind
the enemy’s 6 o’clock). The number of degrees will be followed by a direction (either R for
right or L for left).
Enemy
Distance
Closure
Rate

S E C T I O N V I : A I R C O M B A T S C H O O L
Bandit
67
Aspect angle
45°R
F-16
Enemy bearing: This is the compass direction from your F-16 to the enemy plane. In this
case, 0° means he is directly in front of you and you’re on his six.
Enemy distance: This shows how far away (to the closest mile) the enemy aircraft is. The
fourth number up from the bottom right-hand corner of the HUD will display the same
distance (in tenths of miles).
Closure rate: This number indicates the amount (in knots) that you are gaining or losing
on the enemy aircraft. A positive number means you’re closing in, while a negative number
means you’re losing ground. Closure rate is generally used when you are following an
aircraft rather than in a head-on pass, because when you’re following someone, you need
to know if you’re gaining or losing ground.
What does all this mean to me?
Glad you asked. Every readout on the REO is important for air combat, which is why I’m
going over all the radar stuff in a separate lesson. For now, keep all these concepts in mind
as I go over the Threat Warning System and I’ll explain how to actually use everything later.
Threat Warning System
The Threat Warning System has two major components: the Threat Warning Panel and the
Threat Warning Indicator.
Threat Warning Panel
This panel has two lights on it that warn you of nearby threats. The LCK (Lock-on) Light
flashes if an enemy plane, radar-guided missile or surface-to-air missile (SAM) is locked
onto your F-16. You should take evasive maneuvers or activate an electronic countermeasures (ECM) pod if you have one.
The LNH (Launch) Light flashes when a SAM, radar-guided missile or heat-seeking missile
has been launched. You should quickly take a look around to find out where the missile is
so you can take evasive action, dump chaff and flares, and turn on your ECM.

68
F A L C O N 3 . 0
Threat Warning Indicator
The Threat Indicator is a passive warning device that shows you the position of enemy
aircraft, SAMs and radar-guided missiles within 30 miles. Different shaped “blips” can
appear in this indicator, each type of blip representing a different threat.
When you look at the Threat Indicator, your F-16 is in the center of the two circles, facing
“up” the screen. The top hemisphere of this indicator is the forward viewing half of your
aircraft, while the lower hemisphere is the lower half of your plane. The dividing line for the
top and bottom hemispheres runs through the wingtips of your plane. Stronger signals are
displayed closer to the TWI’s center, while weaker radars are displayed toward the outer
edge.
1
Three different types of blips can appear on the Threat Indicator:
1) Diamond – an enemy plane is within 30 miles of your F-16. Inside this diamond will
be a number from 0 to 6. This number corresponds to the radar band the enemy plane
is emitting. From this, the computer can roughly determine the type of enemy
aircraft.
2) Large green square – a radar installation within 30 miles is painting you. The number
inside this square indicates whether that radar is continuous wave (1) or pulsedoppler (2).
3) Small green square – an active-homing, radar-guided missile or SAM has been
launched within 30 miles of your F-16.
The Threat Indicator is mostly used when you actually get into a dogfight and to warn you
of impending threats. Then, you’ll need to use it for “situational awareness” of your combat
surroundings.
How to use your radar
This lesson isn’t designed to teach you how to engage an enemy or what tactics you should
be using. This lesson gives you the enemy plane dead in your sights, so you really won’t have
to worry about maneuvering. The game should still be paused right now, so we can step our
way though the radar acquisition process.

S E C T I O N V I : A I R C O M B A T S C H O O L
Step 1: Obtain visual sighting
If you look out the HUD, you should see the Target Designator box on the horizon. That’s
the bogey, just about coming into view. You want to aim your jet toward that box so you can
get a good shot off.
In modern jet combat, you only see your enemy for a very short time since both of you are
racing at supersonic speeds. Don’t worry: he’ll get bigger in your sights soon enough.
Step 2: Check your IFF
In actual combat, you’ve gotta make sure that you’re not going to fire on your buddies flying
CAP for you. Before you even get ready to launch a missiles, hit the N key. This will check
out the targeted plane on your IFF (Identification Friend or Foe) device. If you get a loud
“squawk” from your instrument panel, the plane you’re targeting is a friendly… don’t shoot
at him. If you hear nothing, it is an enemy plane.
Step 3: Check distance, bearing and heading
Take a look at the enemy’s distance in the REO. The distance should be somewhere around
10 miles. It’s important to keep flicking your eye back to this number so you don’t overshoot
the enemy.
Since the enemy plane is within 10 miles of your F-16, you’ll also need to check out his
bearing (on the left side of the REO). You want to keep aiming at him, so keep an eye on that
number and be prepared to head in that direction. His approximate bearing can be quickly
found in the Threat Indicator. Also, take a look at his heading, so you can anticipate which
direction he is aiming for.
69
Step 4: Check relative altitudes
Look at your altitude on the Altitude Scale and compare your current altitude with the
enemy plane’s altitude. They should be about the same, but if they aren’t, you’re going to
want to correct yours to correspond with his.
Step 5: Check missile lock
You have a radar lock if the blip on your radar screen is diamond-shaped. When you achieve
a missile lock on a plane, the circle in the middle of your HUD (called the Aiming Reticle)
will start to flash. Keep your target inside the reticle and, as it approaches, fire your missile.
When you use guns, you need to get in really close and lead your enemy before you fire. This
is called “pulling lead” or “lead pursuit” and requires you to point the nose of your aircraft
in front of the nose of the enemy aircraft so that the bullets and target arrive at the same
place. Check out the following diagram.

70
Engage!
F A L C O N 3 . 0
Guns
Ok, now unpause the simulation and follow the five steps I just mentioned. Make sure to
keep the enemy near the center of your HUD. If, for some reason, he goes off the screen,
look at the top of your HUD for a line pointing down from a cross. This is the Target Locator
Line, and it’s pointing in the direction of the targeted enemy aircraft. You can also find out
his relative position by looking at the Threat Indicator.
The other numbers on your REO are mostly useful if you are engaging an aircraft from the
rear since they display info, such as closure rate and aspect angle, that will require you to
compensate to achieve missile lock.
After you’ve blasted him out of the sky, hit the autopilot to return to base. By the way, did
you notice what type of computer-controlled plane you were going up against? That was a
late-model MiG, the MiG-27.
One last hint
Keep a steady hand. You don’t want to be flailing around on the stick so much that you lose
sight of the enemy.
If you didn’t manage to grasp the radar concepts, go ahead and keep running the lesson until
you’ve got the hang of it. It is pretty tricky, so don’t get disappointed if you don’t get it at first.
These fundamentals are the basis for the next lesson where we’ll go into the different A-A
HUD modes.
Other scenarios
Lesson 5’s scenario had an enemy plane coming at you head-on. If you want to try the same
scenario but with the enemy in a different position, try the following lessons: LESSON5L
puts the MiG-27 on your left side heading north, LESSON5R puts the MiG-27 on your right
side heading north and LESSON5B puts the MiG-27 directly on your tail heading north.

S E C T I O N V I : A I R C O M B A T S C H O O L
Lesson 5 review:
In this lesson, you learned the following about your weapons:
j Stores Control Panel (SCP) and how to view all weapons
j Selecting A-A and A-G weapons
j Firing a weapon
j Changing targets
In addition, you learned the basics of Situation Awareness Mode (SAM) radar:
j Viewing the radar
j Radar ranges
j How to read enemy altitude, heading, airspeed, bearing and distance
j Aspect angle
j Closure rate
You also learned about the Threat Warning System:
j Threat Warning Panel: LCK (Lock) Light and LNH (Launch) Light
j Threat Indicator and how to read it
Finally, you learned how to use these two systems together:
j Step 1: Obtain visual sighting
j Step 2: Check IFF
j Step 3: Check distance, bearing and heading
j Step 4: Check relative altitudes
j Step 5: Check missile lock
Next stop, the different A-A HUD modes. If you understood this lesson, those’ll be a piece
of cake.
71
Lesson 6: Air-to-Air Weapons Delivery
The last lesson taught you how to fire your weapons and how to read your REO. This lesson
will describe all the different A-A weapons, how and when to use them, and how to interpret
their HUD displays.
First, I’ll talk about basic stuff you’ll find in all the A-A HUD modes. Then, I’ll go into the AA missile HUD modes: their characteristics, their strengths and weaknesses, and when and
how to fire your A-A weapons. Finally, we’ll talk about the A-A gun HUD mode and when it
should be used.
In the air
Since you’re going to be starting out right in front of a Mirage III, once you get in the cockpit,
pause the game and read on.

72
A-A HUD mode basics
Most of the important weapon firing information is on your HUD. You gotta know how to
read it if you want to be successful in air combat. Let’s go over the basics first.
F A L C O N 3 . 0
Diamond X
(TD Box)
Aspect
Angle
Indicator
HUD
Mode
Indicator
Target
Locator Line
HUD Mode Indicator
Aside from the Stores Control Panel, the HUD Mode Indicator is the easiest way to tell
which weapon is currently selected. If any weapon but the A-A gun is selected, there will be
a number in front of it displaying how many of that weapon you have left. The last line in the
lower left-hand side of the HUD will have one of the following: SRM (AIM-9P or AIM-9M
missile), MRM (AIM-120 missile) or DGFT (M61A1 gun).
Target Locator Line
Extending from the small “+” at the top of the HUD, the Target Locator Line helps you find
the enemy aircraft you are currently targeted on. You can find the enemy aircraft by
following the direction of this line.
Aiming
Reticle
5 Mile
Radar
Ranging
Scale
Target
Distance
Indicator
5 Mile Radar Ranging Scale
This scale is located to the left of the Altitude Scale and only appears when you are within
five miles of an enemy plane. A small caret will appear at the top of the vertical bar and move
downward as you approach the enemy. The top of the vertical bar indicates a distance of five
miles while the bottom of the bar is zero miles (that is, right on top of you).
Target Distance Indicator
The Target Distance Indicator is the first line in the lower right-hand corner of the HUD.
It shows your distance from the targeted enemy aircraft within tenths of miles.

S E C T I O N V I : A I R C O M B A T S C H O O L
Aspect Angle Indicator
This indicator duplicates the aspect angle reading in the lower right-hand corner of your
REO. For an example of aspect angle and how it’s measured, see the previous lesson.
Target Designator Box
The Target Designator box indicates where your current target is — if it’s within the viewing
range of the HUD. If you see the TD box but no target inside it, this means that the target
is beyond visual range.
If the enemy aircraft is in your front quarter but off to one side of the HUD, the Target
Designator Box will change to a diamond with an “X” through the center of it. This is known
as the Diamond X. To change it back to a box, just head toward that diamond until the target
enters the HUD again.
A-A missile HUD modes
Your F-16 can carry three different A-A missiles: the AIM-9P Sidewinders, the AIM-9M
Sidewinders and the AIM-120 AMRAAM. Each of them has a few HUD items in common
which I’ll talk about now.
Missile Seeker Head
Within the perimeter of all A-A missile HUD modes, a small diamond represents the
missile’s seeker head. On the AIM-9M, the seeker head will bounce around the HUD, only
coming to rest when it locks on a target. The other two A-A missiles keep the seeker head
stationary in the center of the HUD.
73
Aiming Reticle
The circle in the center of your HUD is called the Aiming Reticle. Optimally, you want your
target somewhere within this circle before you fire your missile. When you have achieved
a missile lock on your target, the Aiming Reticle will flash. Keep the enemy plane within the
reticle and then fire your missile.
The major difference between the displays for the three different A-A missiles is the size of
the reticle which is measured in milliradians (MR). The larger the reticle, the easier it is to
keep your target within its confines and the easier it is to hit it. Of the three missiles,
the AIM-9P has the smallest kill circle (35 MR), the AIM-9M has a 100 MR kill circle and
the AIM-120 has a 145 MR kill circle.
Aspect Angle Caret
This indicator graphically shows the aspect angle. With the caret, an aspect angle of 180°
is at the 12 o’clock position and 0° is at the 6 o’clock position.

74
F A L C O N 3 . 0
180°
90° R
An easy way to figure out the aspect angle is to pretend that the point of the caret is the nose
of the enemy plane. For example, if the enemy plane is at the bottom of the reticle (0°), the
point of the caret is facing away from your plane, just like the actual enemy plane’s heading.
AIM-9P Sidewinder
The AIM-9P Sidewinder is a rear-aspect, heat-seeking missile. Rear-aspect means that you
need to shoot at an aircraft’s rear quarter for the best chance to hit your target.
Sidewinders make a “growling” sound when they are seeking a target. When they achieve
a lock, this growl turns to a high-pitched whine. At the same time, the Aiming Reticle will
flash. This is the best time to launch your missile.
The AIM-9P is the most common A-A missile you will find in a campaign setting since they
are the least expensive A-A missile (although not as accurate as the AIM-9M or AMRAAM).
Therefore, you should have plenty in supply. Their disadvantages are that they are rearaspect only and have a smaller aiming reticle (both of which make it more difficult to lock
onto a target). The effective range of the AIM-9P is 6 miles.
Firing the AIM-9P
Go ahead and unpause the game and aim at the retreating Mirage III. Keep heading toward the
enemy until the Sidewinder whines and your reticle flashes. Launch your missile and keep your
nose pointed at the enemy plane. Watch as the computer plane explodes into flames. Good shot!
Now, go ahead and pause the game again while I talk about the next missile system.
90° L
0°
AIM-9M Sidewinder
Unlike the AIM-9P, the AIM-9M is a more advanced heat-seeking missile. The AIM-9M is
an all-aspect heat-seeking missile, which means that it’s not as important to aim at the rear
quarter of an enemy before firing, as it is with an AIM-9P. The major differences between
the two Sidewinders are their aiming areas, reticle sizes and availability in a campaign. Also,
the missile seeker head will be bouncing around the HUD until it locks on a target and then
it will drift toward the Target Designator Box.
The effective range of the AIM-9M is 6 miles, although it can be fired up to 10 miles. Since the aiming
reticle is larger than the AIM-9P’s, it is easier to lock on an enemy plane. The AIM-9M costs a lot
more to build and is in greater demand than the -9P, so they will be in shorter supply in a campaign.

S E C T I O N V I : A I R C O M B A T S C H O O L
Firing the AIM-9M
If you want, you can unpause the game and then select the AIM-9M missile by pressing the
e key once. Turn your bird until you are heading due north (0°) and fly for a couple of
minutes. Another Mirage III will appear on your radar scope and in your HUD. Keep him
in your sights, and when you achieve a lock-on, fire away. Another hit! Think you’re getting
good at this? Wait’ll you try it in real combat, bucko. Go ahead and pause the game again.
Jammed Sidewinders
Even though Sidewinders are heat-seeking missiles, their seeker heads are slaved to your
F-16 radar system. This allows you to target a Sidewinder by locking your radar onto a
specific aircraft. The drawback is that if your radar is being jammed by enemy ECM, your
Sidewinders will not lock at all. This problem can be solved by switching your radar to a nontracking mode (such as ACM) or by switching your radar off.
AIM-120 AMRAAM
The AIM-120 AMRAAM (Advanced Medium-Range Air-to-Air Missile) is a radar-guided
missile designed to be fired from beyond visual range (BVR). It has an incredible range of
30 miles and a huge Aiming Reticle. In addition, the seeker head will stay in the center of
the HUD until it locks on a target. Then it will drift over to that target and the reticle will flash.
Its two drawbacks are that it’s very ineffective at close range and it has an enormously
expensive price tag. This cost factor means that you’re not going to get a heck of a lot of them
in a campaign.
Firing the AIM-120
All right, unpause the game and head north again. Choose the AIM-120 missile and watch
your HUD. Soon, you’ll see the Target Designator Box on your screen. Aim for it and watch
your reticle. Before you can see the plane, the reticle will flash. Go ahead and launch a
missile at this third Mirage III. The missile should impact just as the Mirage gets into view.
Once you get him, change to A-A guns and then pause the game again.
75
A-A gun HUD mode
The one major feature of the M61A1 gun HUD mode is the M61 Aiming Funnel. It’s pretty
simple to use, so let’s go over it now.

76
To finish off
F A L C O N 3 . 0
M61 Aiming Funnel
The Aiming Funnel is the series of two lines that intersect in the center of the HUD. Unpause
the game, level out and head north. Now, pull up on the stick. See how the two lines trail
down the HUD? The bullets from your gun will end up at the smallest point of the funnel.
M61A1 Cannon
You can only use your guns within one mile of an enemy target. Any farther away and you
won’t hit a thing. Your objective is to get the wingtips of the enemy aircraft between the
edges of the funnel. Gun ammo is cheap compared to missiles, so you’ll always have enough
in a campaign.
You don’t want to use your gun on a large aircraft like a transport, because a few bullet holes
aren’t going to bring down one of those monsters. Reserve the gun for fighter jets or as a
last resort.
Firing the M61A1
Unpause the game now and aim for the oncoming MiG-23. When he gets within visual, try
to place his wingtips at both edges of the narrow part of the funnel. Then lay into him with
the M61A1. With any luck, the aircraft will erupt in flame. If not, keep trying until you get
the hang of it.
Well, that’s all for the A-A HUD modes. They’re pretty easy to grasp once you’ve had a little
practice. If you feel you need more work, keep running this lesson and use the different
A-A weapons on any of the planes. When you’re finished, simply select End Mission from
the menu bar.
Lesson 6 review:
In this lesson, you learned these things found on all A-A HUD displays:
j Master Arm Indicator
j HUD Mode Indicator
j Target Locator Line
j 5 Mile Radar Ranging Scale
j Target Distance Indicator
j Aspect Angle Indicator
j Target Designator Box and Diamond X
You also learned specifics on A-A missile HUD modes:
j Missile Seeker Head
j Aiming Reticles and their differences
j Aspect Angle Caret
j AIM-9P Sidewinder
j AIM-9M Sidewinder
j AIM-120 AMRAAM

S E C T I O N V I : A I R C O M B A T S C H O O L
In addition, you learned about the A-A gun HUD mode:
j M61 Aiming Funnel
j M61A1 Cannon
Next lesson, I’ll go into the A-G HUD modes and their operations. Then you’ll learn what
it’s like to be a target, not a fighter.
Lesson 7: Air-to-Ground Weapons Delivery
Last lesson, I went over all the A-A HUD modes and their operations. Now you’re going to
get down to the nitty-gritty… literally. This is where you’ll learn about air-to-mud bombing
techniques, when and when not to use certain weapons, and what A-G HUD modes look like.
To begin with, I’ll go over basic info on the air-to-ground (A-G) HUD modes and REO. Next,
I’ll talk about the specific A-G weapons, starting with the various missiles. Then, I’ll talk
about how to drop iron bombs using the Continuously Computed Impact Point (CCIP)
bombing system. I’ll conclude with how to operate the rocket launcher and M61 cannon.
This lesson is in two parts: LESSON7A deals with the A-G missiles, while LESSON7B
teaches you about the iron bombs and the rocket launcher. Go ahead and load LESSON7A
for now.
Flying around
You’re starting in the air over Nellis’ gunnery range. There are a ton of targets here, so you’ll
have plenty to shoot at. First, pause the game and I’ll talk about your basic A-G HUD mode.
77
A-G HUD mode basics
HUD Mode
Indicator
The main difference between the A-G and A-A HUD is the location of the Heading Scale.
In A-G HUD modes, the Heading Scale is on the top of the HUD rather than on the bottom.
This may seem weird at first, but it does make sense. When dropping iron bombs, the aiming
cue is usually at the bottom of the HUD. If the Heading Scale were there, the display would
be too cluttered and your view of the aiming cue would be obscured.
Target
Distance
Indicator

78
Two general things are found on all A-G HUD displays:
HUD Mode Indicator
The function of this indicator is the same as in the A-A HUD display, but the display will be
one of the following: CCIP (Mk82/82HD/83/84 iron bombs, CBU-84 cluster bomb and
LAU-5003A rocket launcher), E-O (AGM-65B missile and GBU-15 guided bomb), A-R
(AGM-45A and AGM-88A anti-radiation missiles), I-R (AGM-65D missile), DUR (BLU-107/
B demolition bomb) or STRF (M61A1 cannon).
Target Distance Indicator
In certain A-G HUD modes, the Target Distance Indicator appears to show you the distance
to your current target.
Ground Map radar
The Ground Map (GM) radar is used to find and identify ground targets. It has a 20-mile
range and you can zoom in to 16x magnification. A complete description of Ground Map
radar can be found in Section IX: Flight.
A-G missiles
Your F-16 can carry four different types of A-G missiles: the AGM-65B Maverick, the AGM65D Maverick, the AGM-45A Shrike and the AGM-88A HARM. Since each class of weapon
(Maverick and anti-radiation missiles) works in different ways, we’ll talk about them
separately.
AGM-65 Mavericks
Both of the Maverick missiles have a maximum range of 12 miles and are used on smaller
ground units such as trucks and tanks. They can also be used to hit bunkers, but they aren’t
so hot against bridges or large buildings. The main difference between the two is the
method they use to track a target and when they should be used. Unpause the game now
and hit the B key until AGM65B appears in the Stores Control Panel. Then go ahead
and pause again.
F A L C O N 3 . 0
AGM-65B Maverick (Electro-optical)
The electro-optical (EO) version of the Maverick is generally used in daytime and good
weather conditions. Since the Maverick uses a TV sensor in its nose, it does not track as well
in the nighttime as it does in daytime. It also the better choice when firing at a target that’s
against a large heat source (like the desert floor) since the infrared signature will not fool
the missile.

S E C T I O N V I : A I R C O M B A T S C H O O L
AGM-65D Maverick (Infrared)
The infrared (IR) version of the Maverick is primarily used in the nighttime where the heat
signatures of various ground object is more pronounced and not obscured by the earth’s
heat. It also can be fired in bad weather because it tracks solely by IR.
Firing the AGM-65 Mavericks
Right now, we’ve only loaded the AGM-65B version of the Maverick, but both types work
the same way. Go ahead and unpause the game. You should be at about 3,000 feet, heading
due north (0°). Start pointing your nose earthward and look for some brown specks on the
ground. (Green and gray tanks are the good guys, and black tanks are already destroyed.)
That’s a tank park, ripe for the picking. Aim the cross hairs at one of the tanks and watch
your REO. When the image of the tank appears in the REO, go ahead and fire by pressing
the z. Both of the Mavericks are fire-and-forget missiles so you can press T to
switch to another tank and launch another missile. The locking system is fairly automatic,
so it’s a no-brainer to hit those sitting ducks. Pause the game again while I talk about the
radar-hunters.
79
AGM-45A Shrike and AGM-88A HARM
These two missiles are designed for use against radar installations and mobile radar units.
The primary differences between the Shrike and the HARM are their maximum ranges,
their availability in a campaign and which type of radar targets they are effective against.
AGM-45A Shrike
The Shrike has a maximum range of 12 miles and is only used against continuous wave
(CW) radar. CW radar is used by almost every enemy defense system except the SA-8 SAM.
You’re more likely to get these missiles in a campaign because they cost a whole lot less than
the HARM.

80
A-G bombs
F A L C O N 3 . 0
AGM-88A HARM
The HARM’s range is a whopping 30 miles and is effective against both CW radar and pulsedoppler (PD) radar emissions. Its broad range of targets and expensive price tag make it
difficult to obtain in a campaign setting.
Firing the AGM-45A and AGM-88A
Unpause the game and hit the B key until AGM45 appears in the SCP. At first
glance, the Shrike and HARM HUD modes look like the Maverick HUD modes. You’ll
notice that the cross hairs automatically track to the nearest radar-emitting target. That’s
the main HUD difference between these missiles and the Mavericks. Also, if you lock onto
a radar-emitting target and that target leaves the HUD’s region, the lock-on will remain as
long as it’s within the forward arc of your plane. The Mavericks will break lock if the target
is outside of the HUD.
Right now, you should be at about 2,000–3,000 feet. Once a target is acquired (when the
cross hairs move to a radar-emitting target), go ahead and fire away by pressing z.
With a HARM, you can be a lot farther away from the target before firing because of its long
range. Circle around again and take another shot if you missed. Then, go ahead and select
End Mission from the FILE menu and load LESSON7B for the second half of this lesson.
With free-fall munitions, you’ve got a lot of choices: Mk82, Mk82HD, Mk83 and Mk84 iron
bombs, CBU-84 cluster bomb, and the BLU-107/B Durandal anti-runway bomb. Each type
of bomb is used in a different situation, but the method of dropping them is exactly the same.
Of course, you can’t drop iron bombs if your plane is upside-down or inverted.
Mk82 iron bomb
Mk82s are generally used against soft targets such as infantry and light armor. It can also
be used against small buildings, but then you should drop a few just to make sure. You can
get a lot of Mk82s in a campaign since each F-16 can hold up to 24 of them.
Mk82HD Snakeye
The Snakeye has the same amount of explosive as the standard Mk82, but this bomb is used
for low-altitude releases. Since the Snakeye has fins to slow down the bomb, it will always
land far enough behind your plane that you won’t get caught in the explosion. You can use
this bomb against the same targets as the regular Mk82.
Mk83 iron bomb
The Mk83 is a good bomb to use against medium-sized targets such as average buildings,
petroleum, oil and lubricant (POL) tanks and railroad shelters. One thing to think about is
that this bomb weighs twice as much (1,000 lbs) as a Mk82. So, don’t lug the 83s around if
you could be using the 82s instead.
Mk84 iron bomb
This is the largest and heaviest of the iron bombs. You can use Mk84s on the largest
buildings, power plants, bridges, bunkers, factories and protected aircraft hangars. These
suckers make one humongous crater when they land. Their major drawback is that they
weigh nearly 2,000 lbs each so your Falcon’ll fly like a stuffed pig.

S E C T I O N V I : A I R C O M B A T S C H O O L
CBU-84 cluster bomb
When you release a cluster bomb, you’re not just dropping one single weapon: you’re
dropping over 200 little bombs. The CBU-84 is great against a group of lightly armored
vehicles or infantry because the CBU disperses over a fairly wide area and hits a lot of
targets.
BLU-107/B Durandal
The Durandal’s only use is against runways. Release this weapon just like the other iron
bombs, but the Durandal’s effect kicks in on impact. It buries itself in the runway and then
explodes outward, making repairs far more difficult than a standard iron bomb.
Before you start
First thing you need to do is find a target to hit. In this part of the lesson, you’ll be starting
at about 5,000 feet with a number of targets due north. I’ve given you a number of Mk82s
to play around with. Don’t drop ’em all in one place.
Dive down a bit until you see some specks in the distance. That’s the same tank park you
hit in the first part of this lesson. Go ahead now, unpause and select your Mk82 bombs. Then
pause the game as I explain how to ripple your bombs.
Rippling bombs
Ripple bombs when you want to drop a lot of bombs over one target. For example, if you’ve
got 24 Mk82 bombs on your F-16, you can set the ripple anywhere from 2–24 (in multiples
of two). This way, you won’t have to keep flying back just to drop a couple bombs.
You can increase and decrease the ripple count by pressing the ' and ; keys respectively.
The ripple number is on the second line of the Stores Control Panel, displayed as “R” and
then a two-digit number.
81
Dropping bombs
All the bombs I just talked about are released using the Continuously Computed Impact
Point (CCIP) method of bombing. With CCIP, there are two major stages before a bomb is
released: the target designation stage and the release stage.
Target designation stage
You’ll notice a couple of new features on your HUD: the Bombsight and the Displayed
Impact Line. The Bombsight is the circle and dot at the bottom of the HUD, while the
Displayed Impact Line is the vertical line that is above the Bombsight. The Bombsight is
also known as the CCIP Pipper or “death dot.”
First, dive down a little so that you can see the tanks a little better. Then, line up the pipper
with the tank and designate the target by pressing z. This will change the way your
HUD looks.

82
F A L C O N 3 . 0
Time Impact
Bar
Display
Impact Line
Bombsight
Release stage
Now that you’ve chosen a target, you need to release your bombs. You may have noticed
that the Displayed Impact Line has lengthened to the full height of the HUD. A horizontal
line called the Time Impact Bar should be about halfway between the Center Point and the
top of the HUD. The Time Impact Bar lets you know when the bombs are going to be
released. If you keep flying straight and level, the bar will slowly move down the Displayed
Impact Line until it reaches the Center Point, at which time the bombs will drop. If, however,
the Time Impact Bar is twice as thick as normal, your onboard computer is notifying you that
it isn’t a good time to drop bombs because of your plane’s awkward position in relation to
the target.
You can also drop the bombs prematurely by pressing the z. Remember, the greater
the angle of descent you have before choosing the target, the less time before your bombs
impact after release. After you’ve dropped some Mk82s, go ahead and change weapons so
that the SCP reads LAU and then pause the game again.
A-G rockets
While the HUD Mode Indicator still displays CCIP, the firing method for the LAU 5003A
rocket launcher is very different than that for the iron bombs.
LAU 5003A rocket launcher
Each LAU pod you load onto your aircraft holds 19 small air-to-ground missiles. Since you
load them in pairs, you’ll have a minimum of 38 rockets when you load ’em. Since you fire
them individually, don’t worry about wasting your shots. The LAU’s rockets are most
effective against soft targets such as light armor, infantry, trucks and jeeps.
Firing the LAU 5003A
Wing around to the tank park again, at about 2,000 feet, and look for some jeeps. If you can’t
find any, go ahead and look for some tanks. For this demonstration, it doesn’t really matter
what you shoot at. The center of your HUD has a fixed pipper showing the direction of your
missiles. Point your pipper at the target and launch a few missiles by pressing the z
a few times. Fairly simple, isn’t it? Once you’ve shot up a few targets, fly back to about 2,000
feet, change weapons so that the SCP shows M61 and then pause the game again.

S E C T I O N V I : A I R C O M B A T S C H O O L
A-G gun
The HUD mode for the A-G M61A1 cannon looks very similar to the HUD mode for the LAU,
but the difference is that the M61A1 pipper moves around based on which direction your
F-16’s nose is pointing. The cannon isn’t very effective in A-G combat, being used only to
strafe infantry and other very soft targets. Generally, you’re not going to use your M61
cannon in A-G combat unless you are otherwise out of ordnance.
Firing the M61A1 cannon
To shoot up some targets, wing around again and look for some trucks. When you find them,
drop down to 1,000 feet and point your nose at the trucks. After you get them in your sights,
hold down the z as you riddle them full of holes. If you drop below 300 feet, pull up
and swing around again.
A final word
If you have any other questions about any of the A-G HUD modes, you might want to check
out Section IX: Flight for more details or rerun these two lessons. A-G attacks, especially
CCIP bombing, is a tricky thing. It takes a lot of time and practice to perfect. Keep working
at it: in a while you’ll be bombing things left and right.
Lesson 7 review:
In this lesson, you learned these things about the A-G HUD modes:
j Master Arm Indicator
j HUD Mode Indicator
j Target Distance Indicator
In addition, you learned how to use the following A-G missiles:
j AGM-65B Maverick (EO)
j AGM-65D Maverick (IR)
j AGM-45A Shrike
j AGM-88A HARM
You also were instructed on how to use the various A-G bombs:
j Mk82, Mk82HD, Mk83 and Mk84 iron bombs
j CBU-84 cluster bomb
j BLU-107/B Durandal
Finally, you were taught how to use the A-G rocket launcher and A-G gun:
j LAU 5003A rocket launcher
j M61A1 cannon and strafing
In the last lesson, I’ll give you some pointers on how to use the Padlock View for dogfighting.
Just wait… it’ll knock your socks off!
83

84
Lesson 8: Padlock View
Ok, here you are in your eighth and final lesson. Don’t think this is the least important,
though. Although you don’t absolutely need the Padlock View for air-to-air combat, once
you’ve tried it, you’ll never go back to dogfighting in any other view. Yes, it’s that good.
This lesson will cover all about how to use the Padlock View, its four windows, where to look
and when. It’ll also cover the best (and worst) times to use this view as well as a brief
description of how to use the Padlock View for landing. Go ahead and hit Takeoff to begin,
and then pause the game.
What is the Padlock View?
Some of you are probably wondering where the term “padlock” came from. It’s an old fighter
jock term for “keeping your eyes glued to the target.” This view is designed so that you’ll
always have the enemy in your sights.
F A L C O N 3 . 0
Picture yourself in the cockpit of an F-16. Its bubble canopy and reclined cockpit seat give
you the ability to swivel your head almost completely around and allow you to see 360°
around you. That’s what the Padlock View simulates: the sense of complete vision in
combat. This brings me to the three rules of air combat. (Thanks to Hollywood, Club,
Dooley and the rest of the guys at Fightertown, USA!)

S E C T I O N V I : A I R C O M B A T S C H O O L
The golden rules
You need to remember three things in air combat. Even if you forget any of your other
training, you must not forget:
1. Lose sight, lose the fight.
2. Speed is life.
3. Always look good.
All three of these can be directly related to the Padlock View. I’ll go into these rules now.
1. Lose sight, lose the fight.
This axiom is, by far, the most important of the three. In air combat, you need to keep your
eyes glued to the target, or you’re history. For example, let’s put you in a head-on, one-vs.one dogfight. If you were looking through the Front View, when the enemy plane closed and
then shot by, you’d lose him. You could take a guess as to which way he turned and try to
compensate, but with your limited field of view, you could never be sure and might not hear
from him again…until he shoots a missile up your tailpipe.
With the Padlock View, the only time your enemy may disappear from view is when he flies
beneath your field of view. Even then, you’ll only lose him for a matter of seconds until you
padlock on him again. In a dogfight, your attention should be focused only on the enemy
plane. Everything else — the ground, sky, birds, whatever — is secondary. You’ll tend to
rely heavily on your peripheral vision to view all of your displays while keeping your eyes
focused on the enemy.
85
2. Speed is life.
The worst situation happens when you’re in a heated one-vs.-one encounter, following the
bandit into the vertical, and you stall out due to lack of airspeed. While you’re dropping like
a rock, he’ll be on your rear so fast, it’ll make your head swim. Always keep a close eye on
your airspeed. Before engaging in a dogfight, you want your airspeed to be at least 400–450
knots. In the Padlock View, you can see your airspeed in the upper left-hand window.
When you go into the vertical (climb rapidly), you bleed off airspeed. In order to maintain
a sufficient dogfighting speed, you’ll need to keep your hands near the throttle and probably
the afterburner switch. If you’re chasing a bandit and start to lose airspeed, kick in some
more RPMs or hit that AB switch to keep your airspeed somewhere between 400–450 knots.
Anything more than 450, and you’re a human rocket. You’ll overshoot enemy aircraft, giving
them a perfect opportunity to take you down. Speeds less than 400 are fine for tight, highG turns, but when you start dropping toward 300 or 200 knots, you won’t have enough
energy if your bandit heads skyward.
3. Always look good.
A fighter pilot is only as good as his last run. Mistakes are rarely forgotten and usually end
up becoming your moniker. You need to keep your cool, have a steady hand on the stick,
not waste your weapons and bring your bird back in one piece. You’ll never get marks for
oversteering or plowing into the ground by accident.
In the Padlock View, you can tell your angle of climb or dive, what type of aircraft you’re
locked onto your relative position to the horizon and your altitude. When flying, check these
out constantly to make sure you’re on the right track and not skimming the trees.

86
Components of the Padlock View
Unpause the game now and press 8 (or * on the numeric keypad) to go to Padlock View.
Then pause the simulation again and continue reading.
Padlock View has four main windows, three small ones at the top and a main lower one. Each
one of these is essential to use the Padlock View effectively.
F A L C O N 3 . 0
Padlock Status
Window
Main Padlock
Widow
360°
Window
Target Locator
Window
The upper left-hand corner window is called the Padlock Status Window. It displays vital
information about the current target and its range as well as your present airspeed, altitude
and G load.
The upper center window is the 360° Window. It shows you where the Main Padlock
window is in relation to your canopy. A tiny representation of the HUD is located in the
center of the 360° Window, while the rear seat is split on the right and left sides of the
window.
The upper right-hand corner window is the Target Locator Window. This has two major
functions: a target locator line to find enemy planes and an artificial horizon to determine
relative position to the earth.
The lower window is the Main Padlock Window. This is where your eyes are looking. If an
enemy plane or one of your wingmen is within range, your eyes will lock on that target and

S E C T I O N V I : A I R C O M B A T S C H O O L
follow it wherever it goes. The target will stay roughly in the center of the window as long
as it doesn’t fly under your aircraft. If it flies underneath your bird, you’ll lose sight for a
moment but acquire your target again after it reappears in view.
Let’s go over each of these in detail and I’ll explain how they work together.
Padlock Status Window
This window is your information on the world. It’s mostly used for checking out stuff about
your plane and your enemy.
Target: This is the type of aircraft you’re currently targeting on. When there’s no target
within range, it’ll display the word NONE. If you aren’t in visual range of your target, this
line will display the word UNKNOWN. Otherwise, it’ll give you the name of the plane you’re
looking at.
NM: This number is the range (in tenths of nautical miles) to the targeted aircraft.
AGL: This shows the current altitude above terrain of your aircraft. The Alt line is the most
important line in this window since it’s fairly easy to lose track of your altitude when you’re
dogfighting and your HUD isn’t always in view.
KTAS: This is your current true airspeed (in knots).
Gs: This shows the number of Gs you’re pulling.
360° Window
The 360° Window shows your viewing range in the horizontal axis only. Your HUD is in the
lower center of the window, while the back of the seat (the Rear View) is split on either side.
The effect is as if you took a panoramic picture of the landscape. The Main Padlock Window
viewing area is represented by a red area known as the Targeting Rectangle. If there is a
targeted plane in sight, it will appear in this rectangle as a “+” sign.
87
Targeting Rectangle
HUD
Rear Seat
Use the 360° Window to determine the direction of your targeted aircraft. With the Padlock
View, you want to get the red rectangle directly over the small HUD in the center of the
window so you can fire on the enemy target.

88
Target Locator Window
The Target Locator Window has two main purposes: to determine the direction of the
targeted aircraft and to show your aircraft’s orientation as compared to the horizon. Imagine
this as a miniature version of the Front View. The tiny HUD in the center of this window will
display a red Target Locator Line that shows the direction of your targeted aircraft. It also
has a green bar that shows your relative position to the horizon.
In combat, you want to pull your aircraft toward the point of the Target Locator Line. If the
targeted aircraft is behind your F-16, the red line won’t be there, but the word “REAR” will
appear above the HUD. In addition, if your speed brakes are engaged, the word “BRK” will
appear. If your afterburner is on, the word “AB” will appear.
Main Padlock Window
The Main Padlock Window is where your eyes are currently looking. Your vision will be
“padlocked” on the targeted plane, regardless of where he goes. If he goes underneath your
aircraft, you will lose sight of him for a moment, but when he reappears, you will regain
“tally” (sight). In combat, you’ll probably only look at this view once you have maneuvered
your opponent directly in front of your aircraft.
The plane you’re targeting will be highlighted by a small red box. If your radar is locked onto
the target and the enemy is within the front quarter of your F-16, the red box will turn to
green. When this box turns green and your Aiming Reticle begins to flash, launch your
missile.
Using the Padlock View
Now that you know the features of the four windows, let’s put that knowledge to work.
F A L C O N 3 . 0
No enemies in sight
Since you’re flying straight and level, you’ll notice your HUD in the Main Padlock Window
is motionless and in the bottom center of the window. The Targeting Rectangle in the 360°
Window will remain in the lower center of that window, while the Target Locator Window
will have the same orientation as the Main Window.
Unpause the game, switch to your AIM-9M, and then go ahead and make a gentle bank to
the left. Notice how the Main Window and the Target Locator Window move in unison?
Since there isn’t a target in sight, these two windows will act as one. This, however, will
change radically in combat. Fly around a bit and try to get a feel for how the windows work
in relation to your stick movements. When you’re not in combat, it’s fairly simple to operate.
After you feel comfortable with flying around in this view with no enemies, engage the
autopilot. After a bit, the autopilot will fly due north and your view will suddenly be tracking
an enemy MiG-23. When you see the focus of your Padlock View windows shift to this enemy
plane, pause and then continue reading.

S E C T I O N V I : A I R C O M B A T S C H O O L
First engagement — single bandit
Right now, you’re padlocking on an computer-controlled MiG-23 in the main window. If you
look to the 360° Window, you’ll see him just to the right of the miniature HUD, while the
Target Locator Window will have the Locator Line pointing to the right.
89
Notice that the HUD in your Main Window shifted off to the left of you. This means that the
front of the aircraft is to your left, while your eye position is focused just off the right side
on the enemy plane. Unpause the game now and try banking to the right. You’ll also notice
that when you bank to the right, the horizon in your Main Window will move upward.
As with any A-A engagement, since you want to get behind the bandit, your best bet in this
situation is to pull in the direction the Locator Line is pointing. Keep banking right and
pulling in the direction of the Locator Line. You’ll notice that the Targeting Rectangle
beginning to move towards your HUD. Continue pulling along the Locator Line until the
Targeting Rectangle is over the miniature HUD. At this time, your HUD will appear in the
Main Window.
Try to get the MiG within your reticle and wait for the red box to turn green. Then, when
the Aiming Reticle flashes and you’re within four miles, launch that AIM-9M. Keep aiming
at him until you see the missile hit. See, no problem! Pause the game again and keep reading.

90
Second engagement — multiple bandits
Ok, now that you’ve had your taste of action using the Padlock View, we’re going to throw
a twist in. Next, we’re going to give you a MiG-23 and a MiG-27 to deal with. They’ll be
coming at your from either side in a head-on engagement so you’ll have to decide which one
to engage first.
When to use the Padlock View
Anyway, unpause the game, switch to Front View and turn on your autopilot. This’ll turn
your bird north for a while, so you’ll be waiting a bit. Once you see some bogeys on your
Threat Indicator, switch back to Padlock View, pause the game again and read on.
Generally, when you’re on a mission and not in A-A combat yet, use your Front View. You
don’t want to switch to your Padlock View until you’re sure that there are some enemies in
visual range or you gain tally on them.
Changing targets in a multiple-bogey engagement
You can change the target you’re viewing in the Padlock View by pressing the T key. This
will switch to the next nearest target in your viewing range. If you want to rescan the area
for the greatest threat to you and your F-16, hit the 8 key. When you’re engaged with
multiple threats, you’ll want to switch back to the Front View after you down each plane to
see what the greatest threat is. Then you should return to the Padlock View for combat.
Prepare for combat!
Here we go! Generally, you don’t want to take part in a one-vs.-many dogfight, but for the
purposes of this lesson, I just want to let you know of the possibilities.
Anyway, now that you’re in Padlock View, choose one of the two enemies and start making
your turn toward him. Keep using the fundamentals I talked about before: follow your
Locator Line and draw the Targeting Rectangle in so that your HUD appears in the Main
Padlock Window. Another thing to remember about one-vs.-many dogfights is that you want
to dispatch enemy planes as quickly as possible. So, when you draw the first bandit into your
sights, launch a couple of missiles at him and then keep your eyes glued for the next bandit.
Not all A-A missiles will destroy an enemy in one hit; it may take multiple missiles to down
some aircraft. If you don’t obliterate him with your missiles but see him going down in
flames, switch to the second bandit right away by using the T key. The Padlock View will
follow your enemy down into the dirt unless you switch targets.
Odds are that if you didn’t pay attention to the second bandit, he’ll probably be on your six.
Lower your airspeed to around 400 kts and make some high-G horizontal maneuvers. Jink
him off your tail and try to draw him to the front of your aircraft. After you get him there,
increase airspeed and move into firing position. Once you’ve tagged him, switch to the Front
View to check out your Threat Indicator. It’s good to get in the habit of switching to the Front
View to scan your REO and Threat Indicator for approaching bogeys.
F A L C O N 3 . 0

S E C T I O N V I : A I R C O M B A T S C H O O L
In conclusion
The Padlock View is a useful but tricky view. Because it takes a lot of practice to master, don’t
be discouraged if you don’t get it all at once. Take it slow. Keep practicing this lesson until
you get the hang of it. If you find that you still don’t understand, you might take a look at the
description of Padlock View in Section IX: Flight.
Lesson 8 review
In this lesson, you learned about the golden rules and how they apply to air combat:
j Lose sight, lose the fight
j Speed is life
j Always look good
You also learned about the four windows in the Padlock View:
j Padlock Status Window
j 360° Window
j Target Locator Window
j Main Padlock Window
Finally, you were instructed about the Padlock View in the following situations:
j No bandits in sight
j Single bandit engagement
j Multiple bandit engagement
Congratulations! You’ve completed the last of the eight lessons we’re giving you. Before you
can earn your wings, however, you need to complete the “final exam.”
91

92
Review 2: A-A/A-G engagement
Ok, here you go. This is the final! This review is going to use all your skills and knowledge
to complete, so if you aren’t sure about anything I’ve talked about, go back and read over
those lessons.
Your final is going to cover the works: takeoff, following waypoints without the autopilot,
destroying a nuclear power plant, the return trip to your home airfield and landing. Along
the way, you may encounter a number of aircraft, both friendly and enemy, so be alert to
their presence. Good luck.
Before you start
One thing about this final, don’t be using your autopilot during this test. I’ll know if you’ve
been relying on it so don’t try to pull a fast one.
Takeoff
Here you are in your familiar cockpit on the runway. Go ahead, take off and bring ’er to
10,000 feet. When you reach 10,000 feet, check out your Waypoint Caret to find the direction
to the next waypoint.
Stay in the Front View for now and switch to your AIM-9Ms. If, at any time along your route,
you happen to see anything on your Threat Indicator, switch to the Padlock View when you
get within visual range and use your IFF check to see if they’re friendly or enemy.
Waypoint one
You’ll be heading north right after your first waypoint so keep an eye on your Waypoint
Indicator to see how far it is to your target area at waypoint two. When you get within 10 miles
of the second waypoint, change to the Front View, switch to your Mk84 bombs and prepare
for your bomb run.
F A L C O N 3 . 0
Waypoint two — target area
When you get within two miles of your target, you should be able to see the twin towers of
the nuclear facility. Point the death dot on the base of the first tower and press z to
designate the target. Level out at about 2,000 feet and fly straight over the tower.
After the bomb is released, take a look out your Rear View and see if you got the target. If
so, turn around again and do exactly the same thing to the other tower. Remember, since
you’ve only got two pairs of Mk84s, there isn’t any margin for error. In a combat situation,
you’re never going to be hanging around a hostile area to see if you hit your target — that’s
a sure way to be a trophy in the landscape.
When you’ve taken your shots at both of the targets, change back to your AIM-9Ms and head
for the third waypoint.

S E C T I O N V I : A I R C O M B A T S C H O O L
Waypoint three
When you hit the third waypoint, you’ll be heading south for your home base. It’s a long way,
but don’t become complacent simply because you nailed your target. Returning home is half
the trip.
Waypoint four — landing
As soon as you get within 10 miles of your airbase, start your landing approach. After you’ve
landed, engage the wheel brakes and select “End Mission.” Now check out how you did in
the Debriefing screen.
Debriefing
Here, you’ll find out if your mission was a success or failure. You’ll also see if you bagged
any bandits or destroyed any friendly aircraft. If you got both the towers, congratulations
again. You can now call yourself a pilot. If you missed the targets or were shot down, well,
go ahead and try again. Keep trying until you complete this mission. If you’re having trouble
with a certain aspect of this mission, you might want to review some of the previous lessons.
Well, it’s been fun. I’d like to extend my thanks and wish you luck in the future. Remember,
if you ever need some brushing up on your skills, I’ll always be here at Nellis. Take care, and
check six!
93

94
F A L C O N 3 . 0

SECTION
S E C T I O N V I I : R E D F L A G
VII
RED FLAG
95

96
Red Flag introduction
Red Flag is an air combat weapons training school. The actual Red Flag is an annual exercise
held at Nellis Air Force Base in southern Nevada. Pilots from bases around the world visit
Nellis AFB to pit their skills against the resident Aggressor squadrons. The Red Team,
made up of highly experienced pilots, simulates the tactics used by air forces hostile to the
United States against the visiting Blue Team pilots in a mock mini-war. Our version of Red
Flag is designed primarily as a training center and mission editor. We’ve already created a
number of training missions that you can fly, which cover many aspects of your F-16 from
basic flying to dogfighting and bombing skills. These training missions are discussed in
depth in Section VI: Air Combat School. In addition, we’ve also given you the ability in
Red Flag to create your own missions.
Red Flag training can be used to improve the “skills” of pilots in your squadron. If they are
successful in certain aspects of their mission, the relevant ability scores (i.e., bombing or
dogfighting) will increase. If they fail or are “shot down,” their skill level in these areas may
decrease. Red Flag is not a lethal exercise — the only way you can be killed here is by
colliding with the ground.
This section of the manual deals with how to load and fly our pregenerated missions as well
as how to create your own missions from scratch.
How to get here
Red Flag can be entered from the War Room once you have selected a squadron. Simply
move the pointer over the Red Flag monitor and either click a mouse button or press e
on the keyboard. If nothing happens, be sure that a squadron patch is displayed in the far
right monitor in the War Room. If the monitor says SQUAD, click it to select a squadron.
F A L C O N 3 . 0
Red Flag Control screen
 Loading...