


©
1998 Infogrames United Kingdom Limited. Ocean is a registered trademark of Infogrames
United Kingdom Limited.
©
1998 Digital Image Design Limited. All rights reserved.

Contents
Please Read First ..........................................................
Getting Started
Game Installation ....................................................
Starting Total Air War .............................................
Quick Start & Using the Interface ........................
The Main Interface .................................................
Total Air War – Overview
Simulation Overview ...............................................
Login ..........................................................................
Campaign Scenarios ..............................................
War Room .................................................................
AWACS (Airborne Warning And Control
Systems) ....................................................................
Navigating around Total Air War ..........................
F-22 Missions ...........................................................
Mission Planner ......................................................
Enhanced Multiplayer ............................................
Custom Combat Generator ....................................
ACMI (Air Combat Maneuvers
Instrumentation) ......................................................
Player Views ............................................................
Smart Views .............................................................
Training .....................................................................
Online Help ...............................................................
Campaign
Introduction ..............................................................
Five Rings Process .................................................
Total Air War Campaign .........................................
Communications Network/
Allies and Adversaries ...........................................
Initiating a Campaign
Login ..........................................................................
Campaign Selection ................................................
War Room .................................................................
War Room Overlays ................................................
Scramble!
Introduction ..............................................................
Player Missions
Introduction .............................................................
Mission Information ...............................................
Ranking .....................................................................
AWACS– Campaign
Introduction .............................................................
Tactical Advantage ................................................
C4 Network ..............................................................
Dropping into an F-22 ............................................
Mission Planner
Introduction .............................................................
Target Area .............................................................
Assign Flights ..........................................................
Assign Targets ........................................................
Weapons ..................................................................
Waypoint .................................................................
Attack Pattern ........................................................
Custom Combat
Introduction .............................................................
Scenarios
Introduction .............................................................
Operation Highland ................................................
Operation Port of Call ............................................
5
9
10
12
13
13
15
15
16
16
17
18
20
20
21
22
22
22
23
24
24
25
25
26
29
30
30
32
35
37
38
38
39
40
40
40
41
42
43
44
45
46
48
49
50
52
55
56
“There’s no fighting in the War Room”
President Merkin Muffley, Doctor Strangelove, 1964.

7
Contents
6
Contents
Operation Strike Force ..........................................
Operation Outcast ..................................................
Operation Flame Out ..............................................
Operation Choke Point ..........................................
Operation Thin Line ................................................
Operation Sea Control ...........................................
Operation Sea Breeze ...........................................
Operation Urgent Shield .......................................
The F-22
Introduction ............................................................
Avionics
Head Up Displays ......................................
Indicated Targets .......................................
Multi-Function Displays............................
Avionics Audio Cues .................................
The Autopilot ..............................................
Basic Flight
Engine Start ................................................
Taxiing The F-22 .........................................
Take Off ........................................................
Navigation ...................................................
Preparing to Land ......................................
Landing .......................................................
Final Approach ..........................................
Air Refueling ..............................................
Re-Arming & Refueling ............................
Thrust Vectored Maneuvers ...................
Air-to-Air Combat ..................................................
Detection ....................................................
BVR (Beyond Visual Range) Combat .....
Closing ........................................................
Maneuvering .............................................
Disengagement .........................................
Air-to-Ground Combat ........................................
Smart Guided Air-to-Ground Weapons .
Smart Gliding Bombs ...............................
Unguided Rockets ....................................
Freefall Retarded and Cluster Bombs ...
Maneuvers .............................................................
Wingmen Commands ...........................................
In Game Speech ...................................................
Radio Frequencies ................................................
ACMI (Air Combat Maneuvers
Instrumentation)
Introduction ...........................................................
ACMI Modes .........................................................
ACMI Interface......................................................
ACMI Display Controls .........................................
The Main Viewing Window .................................
ACMI Video Controls ............................................
Using ACMI ............................................................
Player Views
Introduction ...........................................................
Using the Views ....................................................
Padlock Views .......................................................
Views Keys .............................................................
Extended Keyboard Cockpit Views ....................
Smart Views
Introduction ...........................................................
The Smart Views Interface .................................
Using Smart Views ...............................................
Smart Views Keys ................................................
Training
Introduction ............................................................
The Training Interface ..........................................
Features ..................................................................
Multiplayer
Introduction ...........................................................
The Multiplayer Screen .......................................
Error Messages ....................................................
The Create Game Screen ....................................
The Custom Combat Screen ...............................
The Join Game Screen ........................................
The Multiplayer Options Screen ........................
Directplay Multiplay Options ..............................
Multiplayer Internet Gaming ...............................
AWACS (Airborne Warning And Control
Systems)
Introduction ...........................................................
The AWACSCommand Interface .......................
The Left Panel .......................................................
The 3D Window ....................................................
The AWACS View Information Window ...........
The Right Panel .....................................................
Viewing Flights and Objects Using the Map ...
Command Generation With the Mouse ............
Commands from Allied to Allied Flights............
Commands from Allied to Neutral Flights ........
Commands from Allied to Enemy Flights ..........
Commands from Allied to Unknown
Flights .....................................................................
The Message Window ........................................
Online Help
Introduction ...........................................................
The Online Help Interface ...................................
Airfields .........................................................................
Recognition ..................................................................
Lockheed F-22 ..................................................................
Sukhoi Su-35 ...................................................................
Eurofighter EF 2000 .........................................................
Mikoyan MiG-29M .........................................................
Dassault Rafale ...............................................................
Mikoyan MiG-21 Upgrades ........................................
Boeing E-3 Sentry ..........................................................
Weapon Systems
A General Introduction to Modern Air
Combat ....................................................................
Fighter Aircraft
Northrop Grumman F-14D ...........................................
McDonnell Douglas F-15C ...........................................
Lockheed Martin F-16 .................................................
McDonnell Douglas F/A-18E .......................................
Sukhoi Su-27 .............................................................
Strike Attack Aircraft
Lockheed Martin F-117 ...............................................
Northrop Grumman B-2 ...............................................
McDonnell Douglas F-15E ...........................................
Fairchild A-10A Thunderbolt II ...............................
Panavia Tornado ......................................................
BAe/McDonnell Douglas Harrier .................................
Dassualt Mirage-2000N ...........................................
Mikoyan MiG-27 .......................................................
Sukhoi Su-25TM .......................................................
Sukhoi Su-30MK .......................................................
Sukhoi Su-34 .............................................................
Reconnaissance Aircraft
Lockheed Martin U-2S ................................................
Lockheed Martin EC-130E ..........................................
57
58
59
60
61
62
63
64
65
70
78
79
80
90
94
95
96
98
99
101
104
106
112
113
114
114
114
119
119
121
122
122
126
129
129
132
138
139
139
143
143
144
144
145
146
147
149
149
149
150
154
155
156
156
156
157
157
158
159
159
160
161
162
163
164
164
166
167
168
168
170
170
170
170
173
174
174
175
175
175
179
179
181
196
201
221
229
237
245
253
263
271
289
289
290
290
291
291
292
292
293
293
294
294
295
295
296
296
297
297

8
Contents
9
Copyright Notice
The computer program and its associated
documentation and materials are protected
by National and International Copyright
Laws. Storage of the computer program and
its associated documentation and materials
in a retrieval system, reproduction, translation, copying, hiring, lending, broadcasting
and public performance are prohibited without the express written permission of
Infogrames. Copyright 1998 Digital Image
Design Limited. All rights reserved.
Infogrames
82-84, rue du 1er Mars 1943 - 69628
Villeurbanne Cedex, France
http://www.infogrames.com
Developer: Digital Image Design Ltd.,
Tannery Court, Tanners Lane,
Warrington, Cheshire. WA2 7NR
Data Validity
All data for TAW have been secured from
public sources. DID stress that all simulated
elements are our interpretation of the facts,
and are intended for entertainment purposes only. Because the F-22 Raptor is still in
development, some of the systems represented in the game may not be associated
with the real plane. Any trade names or
trade marks are the exclusive property of
the respective manufacturers.
Caution
The CD-ROM that holds TAW can be damaged by mishandling. We recommend that
even if you intend to run TAW directly from
CD-ROM, you perform the full installation to
hard disk once and make a back-up copy
using back-up software.
EPILEPSY WARNING
A very small percentage of individuals may
experience epileptic seizures when exposed
to certain light patterns or flashing lights.
Exposure to certain light patterns of backgrounds on a television screen or while
playing computer games may induce an
epileptic seizure in these individuals. Certain
conditions may induce undetected epileptic
symptoms in persons who have no history of
prior seizures of epilepsy. If you, or anyone
in your family, has an epileptic condition,
consult your doctor prior to playing. If you
experience any of the following symptoms
while playing a computer game: dizziness,
altered vision, eye or muscle twitches, loss
of awareness, disorientation, any involuntary movement, or convulsions, IMMEDIATELY discontinue use and consult your
doctor before resuming play.
Pack Contents
Accompanying the manual inside this box
you will find one CD-ROM, a guarantee card
and a keyboard layout diagram. Please
remember to return your guarantee card,
and answer the questions. This gives us
clues for developing the products you want
in the future.
Queries
If you should find either the program or the
documentation unsatisfactory in any way,
don’t hesitate to drop us a line detailing in
full the reasons for your dissatisfaction. This
will help us to avoid repeating any similar
problems in the future. Opinions and complaints should be sent to:
The Project Director, TAW,
Digital Image Design Ltd.,
Tannery Court, Tanners Lane,
Warrington, Cheshire.
WA2 7NR
Please Read First
Reconnaissance Aircraft (continued)
Mikoyan
MiG-25R .....................................................
Myasishchev Mya-17 ................................................
Teledyne Ryan Globe Hawk (Tier II+) ......................
Lockheed Martin/Boeing Darkstar (Tier III -) ............
SEAD Aircraft
McDonnell Douglas EF-18 ...........................................
AWACS Aircraft
Northrop Grumman/Boeing E-8 ....................................
Beriev/Ilyushin A-50 ...................................................
Helicopters
Boeing/Sikorsky RAH-66 ............................................
McDonnell Douglas AH-64 .........................................
Sikorsky UH-60 .........................................................
Boeing Helicopters CH-47 ..........................................
Sikorsky CH-53 .........................................................
Mil Mi-28 .................................................................
Mil Mi-26 .................................................................
Mil Mi-24 .................................................................
Kamov Ka-50 ............................................................
Transport Aircraft
McDonnell Douglas C-17 ............................................
Lockheed Martin C-130J ............................................
Lockheed Martin C-5 ..................................................
Bell/Boeing V-22 ........................................................
Ilyushin Il-76MF ........................................................
Civil Aircraft
Boeing 747 ................................................................
Boeing 767 ................................................................
Learjet 55 ..................................................................
Tanker Aircraft
Boeing KC-135 ..........................................................
Ilyushin Il-78 ..............................................................
Glossary ..........................................................................
Index ................................................................................
Bibliography .................................................................
Credits .............................................................................
About Digital Image Design Ltd ............................
298
298
299
299
300
300
301
301
302
302
303
303
304
304
305
305
306
306
307
307
308
308
309
309
310
310
311
317
322
324
326
11
TAW will start to install.. If you are unhappy
with your selections and you want to change
them then keep pressing the ‘Back’ button
until you reach the option you wish to
change.
8. The set-up program will now copy the
TAW files on to the hard disk of your computer. The computer's progress can be seen
on a blue bar in the center of the screen.
When it reaches the right hand side, the file
copying has finished.
9. The set-up program will now ask what
controller type you want to use to play TAW.
DID recommends that you play the game
with a joystick to experience TAW at its best.
If you do not have a joystick then you can
control your aircraft using the keyboard.
10. The set-up program will then ask for
sound options you want while playing the
game. There are three options:
• Sound Effects
• Music
• Speech
11. You will be asked if you wish to look at
the Readme file. The readme file contains
necessary last minute alterations to the
manual and other useful information. We
recommend you browse through it before
playing the game.
12. You have now installed Total Air War.
Before you can play, you will have to reset
windows to ensure it operates correctly, so
click on the ‘Finish’ button. Your machine will
then restart. To run TAW follow the steps in
the next section.
Starting Total Air War
To start the game, press the Windows ‘Start’
button and from each subsequent menu,
select; Programs, followed by DID, followed
by Total Air War and finally Total Air War.
Getting Started
10
To install and run Total Air War (TAW), follow the steps below. If you have problems
with the installation, or subsequent use of
this product, please contact us on one of the
following telephone/email numbers;
Telephone Support
Game Installation
The TAW set-up program will run automatically on inserting the game CD ROM disk into
the CD ROM drive of your computer. If TAW
is already installed on to your computer then
you will be asked if you want to run the program, alter the game configuration or reinstall the game.
In order to play TAW you must already have
DirectX 5.2 installed on your computer. If
required, the TAW set-up program will install
DirectX 5.2 automatically .
Installation Steps
1. Place the ‘Total Air War’ CD-ROM in the
drive of your computer. The set-up program
will run automatically.
2. After clicking ‘Next’ on the copyright window you will be asked if you want to install
DirectX 5.2. It is recommended that you
install this as TAW will not run without
DirectX 5.2 (or above).
3. You will be asked what kind of installation
you would like for TAW. There are three
types:
• Typical (the default setting)
• Compact
• Custom
The ‘Typical’ option will copy all data files on
to your hard disk. This option requires the
most hard disk space but offers the fastest
loading times for the installed simulation.
The ‘Compact’ option copies only the files
required to run the game. If you use this
option you must have the TAW CD-ROM disk
in your computer's CD-ROM drive when you
play the game. This installation type has
slower loading times than the ‘Typical’
option, but takes a lot less hard disk space.
The ‘Custom’ option is for advanced users,
and allows you to specify what files are
copied on to the hard disk.
4. Next, you have the option of installing
either the Direct3D or Glide (3Dfx Voodoo)
executable. If you have any doubts about
your graphic card hardware, select the
default option, Direct3D.
5. The set-up program installs TAW to
‘\Program Files\DID\Total Air War’ by
default. To change this, select a new location by clicking on the browse button.
6. The set-up program will then ask which
folder in the start menu you wish to place
the program shortcut. It is recommended
that novice users select the default setting
by clicking on the ‘Next’ button.
7. You will now be shown the options on
screen that you have just selected. If you are
happy with your choice then click ‘Next’ and
Getting Started
Getting Started
12
Getting Started
13
Configuration
If you wish to re-configure the game after
installation place the game CD-ROM in to
the CD-ROM drive and select ‘Change Setup
of Installed Game’. Click the ‘Next’ button
and follow the on screen prompts.
Changes to the Published
Manual
Amendments to this manual and information
about specific hardware support can be
found in the readme.txt file.
To Uninstall Total Air War
To uninstall the game, press the Windows
‘Start’ button and from each subsequent
menu, select; Programs, followed by DID,
followed by Total Air War, and finally,
Unintstall Total Air War.
Quick Start and Using the
Interface
Once the game is installed, choose Total Air
War from the start menu, or if you have created an icon, double click on the TAW icon
on your computer desktop to start the game.
Getting Started
Login Screen
You will be presented with the Login Screen
first, where you must enter your name and
preferred call sign. Once you have completed the login process, TAW will load and take
to straight to the main interface.
The Main Interface
From the Main Interface, you can run the following sections of the game:
Campaign
Choose one of ten dynamic scenarios
for the new TAW campaign.
Training
Learn the tricks of the trade in realistic training missions.
Custom Combat
Hand-edit intense head-to-head combat
missions for instant action.
Multiplayer
Link your computer and fly with your friends
in co-operative and head-to-head missions.
ACMI
The ultimate debrief. Replay every intimate
detail of your mission in the ACMI (Air
Combat Maneuvers Instrumentation).
Options
Options contains a selection of user configurable options, including graphics and
sound complexity.
Quit
Select Quit to leave the game and return to
your desktop.
Please refer to subsequent sections of this
manual and the Online Help for information
about flying the F-22, the dynamic campaign,
AWACS and the other game components
that constitute Total Air War.
Strap on a Jet...
If this is your first mission, select one of the
Free Flight Training missions and once within the cockpit, press SHIFT S until you are
airborne. Welcome to the F-22 Air
Dominance Fighter in Total Air War.
124
Getting Started
15
Total Air War – Overview
Welcome to DID’s Total Air W ar (TAW). TAW
is an extremely sophisticated aerial campaign and flight simulation program expertly integrated into one very compelling
game. It is the next step in Digital Image
Design Ltd’s proud tradition of award winning military flight simulation products.
TAW is as its name suggests – a total, integrated air campaign based on plausible (but
fictional) international conflicts in the Red
Sea theater. It is a fight for aerial supremacy
that will test your understanding of the chief
tenets of modern strategic air power planning and execution. Don’t worry though,
there is a lot of interesting theory and expert
advice contained here to help get your campaign started off in the right direction.
In TAW, your real-time campaign will run
continuously until the conflict has reached a
final resolution. This conclusion will be
based on several real-world variables being
monitored by the campaign engine. Perhaps
it might be that the allied losses have been
too high, or that enemy forces have failed to
realize their campaign objectives within
their projected time frame, just to name a
few. Any one of these or many other realworld factors will influence and ultimately
force the winning or losing decision model.
All aircraft missions within the campaigns
are created dynamicallyin response to highlevel scenario decision-making processes
made possible by the next generation of
campaign artificial intelligence. These missions will vary in complexity and reflect the
current strategic objectives, each of which
will adhere to current USAF strategic doc-
trine. Thus the campaign you embark on will
be non-linear in nature which, as no mis-
sions are scripted, ensures that no scenario
will ever play the same way twice. Your control of the campaign will be accomplished in
one of two direct action roles, one as a U.S.
Forces Battlespace Commander aboard the
AWACS airborne command and control platform; and the other as a U.S. Air Force pilot,
flying the advanced F-22 Air Dominance
Fighter aircraft. Both roles will test your ability to focus on achieving your strategic
objectives through a balanced use of proper
force and sound tactics.
This section will introduce you to TAW and
provide you with a brief glimpse at some of
the fun and challenges that await you!
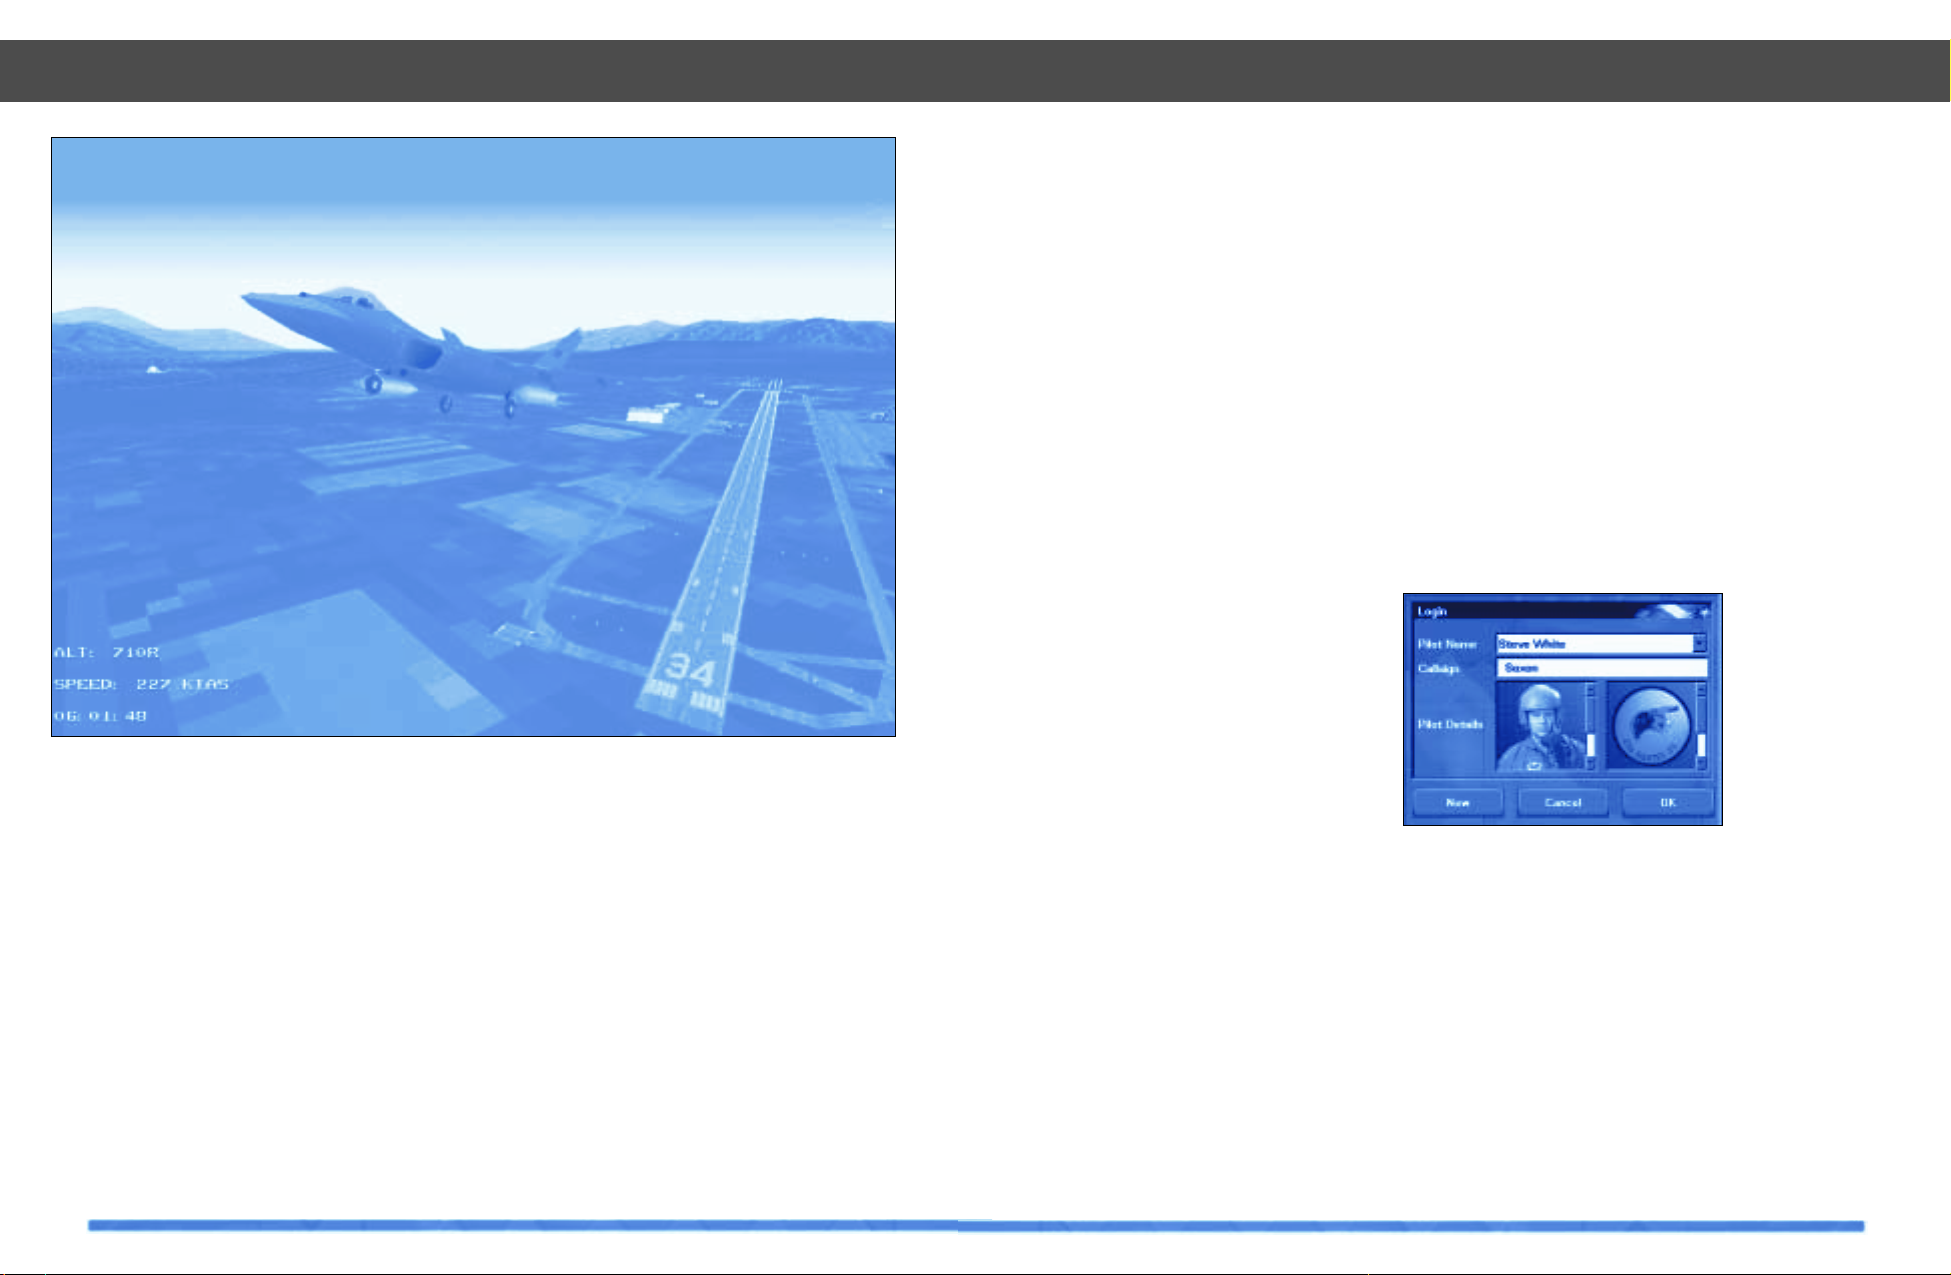
Login
TAW opens with the Login screen from
which you enter your name and callsign. The
dialogue box also displays your Squadron
patch and pilot photograph. You can customize the Login screen by adding your own
patch insignia and pilot photograph. A scoring and award system enables you to track
your progress in each campaign and watch
as your “simulated” U.S. Air Force career
progresses.
Overview
Welcome to Total Air War
17
Total Air War – Overview
16
Total Air War – Overview
AWACS
First introduced in F-22 Air Dominance
Fighter the AWACS plays a pivotal role in
directing your airborne campaign strategy in
TAW. Networked with the ground-based
EWR network, control from the AWACS
makes it possible to detect and identify
enemy airborne forces as soon as their
intent can be classified as hostile. The role
of the AWACS commander is to bear full
responsibility for maintaining the integrity of
all allied airspace. With the simple
drag-and-drop control interface, vector
friendly aircraft assets to intercept in-bound
bandit aircraft, identify unknown airborne
targets and clear attack routes deep into
enemy territory for allied strike flights. The
real-time, constant generation of allied and
enemy flights by the TAW campaign engine
ensures that your role as the AWACS commander can at times be a complex and
demanding task.
Campaign Scenarios
The Campaign scenarios are the heart of
TAW. They are comprised of ten separate
and distinct situations involving the nations
in the Red Sea theater. These scenarios vary
in complexity and duration starting with border disputes and progressing in scope and
complexity to multi-national regional conflicts. Accurate modeling of air, ground and
sea forces, based upon predictions of the
balance of power in the early decades of the
next millennium, means that you can fly
alongside many different aircraft in many
different national markings. These can
include such diverse groups as Yemenis
Su-35s, Egyptian Rafales, or maybe even
British EF-2000s!
War Room
The War Room is your active command
headquarters screen for playing out the
selected campaign scenario. From the War
Room, you can monitor your campaign as it
unfolds in real-time. Allied aircraft missions
will appear and move as they carry out their
orders, such as; patrolling friendly borders
or flying offensive missions to strike deep
behind enemy lines. Enemy and neutral
forces are also visible from the War Room.
However, without the assistance of the
AWACS in conjunction with ground-based
EWR sites, the enemy’s intent may be difficult to determine. In the War Room you can
watch as targets within the theatre get
engaged by opposing forces.
The War Room uses information display filters to assist you in understanding the current status of your campaign by displaying
target damage information on the map. This
will help you determine any targets relative
strategic importance as the campaign progresses. The status of your Allied offensive
can be determined by looking at the graphic
display of gains and losses from within the
War Room. The information on these graphs
is updated every hour, as intelligence feedback is tabulated. From your position in the
War Room, understanding and use of current US Air Force doctrine will play a key
role in determining a winning strategy. Take
command as key elements of enemy infrastructure are rendered in-operative and
enemy aircraft and C4 nodes are targeted.
Successful players will see the end result of
air supremacy being achieved.
Ten dynamic campaigns
Operational center - the War Room
The heart of the C4
network
The E-3 Sentry, airborne command and control
19
Total Air War – Overview
18
Total Air War – Overview
Custom Combat
F-22 TAW Demo
Help
Quit
Debrief
Debrief
F-22
F-22
Debrief
Debrief
F-22
F-22
F-22
Debrief
Login
Main Menu
Training
Campaign
War Room
Mission Planner
Fly Mission
Campaign Selection
ACMI
Options
Credits
Multiplayer
Logon
Create Game
AWACS
Debrief
F-22
AWACS
Navigating around Total Air War
21
variable within the campaign engine generated ATO mission. You have the ability to
choose a different target if you don’t wish to
attack the one assigned to you by the AI.
Realize that not taking out your campaign
assigned target could have serious and farreaching implications on the outcome of the
real-time war which is going on around you.
The pre-planned waypoint route can be
changed to avoid SAM and EWR sites as you
see necessary for mission accomplishment.
The altitude at each waypoint can also be
changed to better integrate other supporting
missions, such as your strike flight which
will need to go in low to take full advantage
of the support of high altitude wild weasel
and escort flights.
It is also possible to add and delete flights of
aircraft from your mission while using the
mission editor. You can choose to fly with
extra fighter escort flights or if your prefer
more of a challenge, you can opt to fly without any other support aircraft. The Mission
Planner lets you arm your aircraft with a
range of suitable weapons packages based
on the flights mission role. These weapon
loadouts reflect the best-choice option for
that respective weapons platform. For the
F-22 you have the option to select individual
weapons for each pylon of your available
wing and fuselage pylons.
All of these mission planning tools use an
intuitive point-and-click interface.
Additionally you also have the option to use
the automatic Mission Planner feature to
automatically generate mission components, reducing your planning workload if
you so desire. All of these advanced features are now available to you as part of the
TAW Mission Planner, which is one of the
most comprehensive planning tools currently available.
Enhanced Multiplayer
TAW Multiplayer introduces a number of
new game-play features including a new
range of co-operative multi-player missions.
Multiplayer also supports the CustomCombat Generator, allowing the game server
to design specific head-to-head or co-operative missions.
Total Air War – Overview
20
Total Air War – Overview
F-22 Missions
The player wanting to take part in the campaign as an F-22 pilot now has three methods of getting into cockpit. The campaign
engine will launch scramble missions as
necessary to intercept enemy aircraft as
they penetrate allied airspace. If you opt to
fly a scramble mission, you will be launched
directly into the cockpit of a ground alert
F-22, waiting on the runway of an allied airbase ready to intercept inbound enemy aircraft. While commanding the AWACS, you
can double-click the mouse on any allied
F-22 and immediately assume control as the
pilot in command of that aircraft. You can
also choose to fly an F-22 mission from a
current list of Air Tasking Orders (ATO) displayed in the Mission Selection Screen
F-22 Mission Selection
At any time during the campaign, you can fly
an allied F-22 mission off of the latest ATO
from within the War Room. The “Fly” request
will search the ATO and then display all
Allied F-22 and AWACS missions currently
ready for departure and will present them in
the Mission Selection interface. You will
note that all airbases will not have the same
type of mission available for you to fly. The
forward area bases, which often come
under attack from enemy forces, will be limited to CAP and defensive type missions. The
airbases further away from the front, deeper
into allied territory should usually be safer
from hostile attack. These bases will be providing more of the offensive type of missions. Airbases furthest from the front line
will house the E-3 and E-8 aircraft along with
any other High-Value Asset (HVA) and
experimental aircraft which are best hidden
from the opposing forces eyes. By selecting
a cross-section of missions from the ATO,
each of these airbases will have missions to
fly. If your rank allows, you can choose to fly
any one of a diverse range of missions, acting in a number of different tactical roles.
Unlike F-22 Air Dominance Fighter, none of
these air missions are scripted which again
ensures that no two missions will ever be
the same.
Mission Planner
TAW brings you one of the most thorough,
yet intuitive mission planning suites ever
released for a flight simulation. Once you
have selected an F-22 ATO mission from the
Mission Selection interface you can choose
to edit the mission with the Mission Planner.
The Mission Planner enables you to edit
almost every aspect of the selected mission’s parameters including your target
choice, supporting aircraft types and
weapon selection.
The Mission Planner is powerful enough to
allow you to edit and fine-tune almost every
Route planning in the Mission Planner
A full arsenal of weapons is at your disposal
‘On the fly’ mission generation
23
Total Air War – Overview
22
Custom Combat Generator
The Custom Combat Generator allows players to easily create a quick Air-to-Air or Airto-Ground combat sortie. Getting into the
cockpit of your F-22 is only one click away
after you have decided the parameters for
your fight. Take on a flight of deadly Su-35s,
or MiG-29Ms with GUNS only! Custom
Combat lets you experiment and find out for
yourself how it feels to fight other airborne
hardware 1-on-1 or 2-on-2, etc… the choice
is yours to make.
(ACMI) Air Combat Maneuvering
Instrumentation
The USAF operates several training establishments where data on aircraft and
weapons positions are transmitted from
fighters practicing combat, and relayed to
ground stations where they are recorded.
When the pilots land and gather for debriefing, the data are replayed in a simple 3D
graphical form, enabling student pilots to
learn from their mistakes. The dogfighting
action can be slowed down, speeded up or
frozen, to reveal every move down to the
smallest detail. After much demand from our
customers, we have included an ACMI facility for the player to record combat maneuvers and compare them as an aid to learning
about modern air combat. Like the real thing,
our ACMI collects data from the player’s aircraft and allows a graphical portrayal of that
data to be replayed afterwards.
Player Views
A variety of player views can be selected
both within the virtual F-22 cockpit, outside
the aircraft and views of the F-22 instruments. Padlock views provide a more realistic view of the world and can be locked to a
desired view, or object.
Total Air War – Overview
Smart Views
In a simulation, internal, external and God’seye views allow the user to see several different aspects of an object or the world; in
TAW there is plenty to look at, with hundreds
of vehicles moving simultaneously, plus sites
of antiquity and other tourist attractions. In
real military simulation, this function is
called a ‘Stealth View’. In our simulation we
call the feature ‘Smart Views’. This technology places virtual cameras on any aircraft or
ground object and links them together in a
way that is both informative about the subject and entertaining. It is like watching a
movie, except that you direct the action.
For additional details, see the Smart Views
chapter of this manual and the Online Help.
In addition, see the supplied Key Card for
keyboard combinations necessary to operate all the views.
Fine tune your own instant action missions
Record your combat and analyze your skill in ACMI - a simulation of a
real-world training aid used by the military
There is plenty of action in Total Air War. Smart Views let you see it all.
24
Training
The Training section of TAW adheres closely to real military practice and tactics and is
intended foremost as a training area in
which the new user can build up his knowledge and skill before going to war in
Campaign. For variety, the Training missions
are written so that each contains more than
the aircraft and targets necessary to learn
the specific lesson.
Online Help
The Online Help is a specially prepared
interactive manual, accessible from within
the Main Interface under the Help button.
The Online Help enhances the contents of
the manual by making it interactive. For
additional details, see the Main Interface
of Total Air War (Help button) and the Online
Help chapter of this manual.
Total Air War – Overview
Easy access to help, when you need it
Your route to greater flying skills
25
Campaign
Introduction
Total Air War (TAW) uses a new campaign
engine to faithfully replicate the look and
feel of 21st century warfare. Extensive
research into military planning and doctrine
as well as consultation with experts in joint
and coalition warfare from the United
States, Britain, France, Sweden, Saudi
Arabia, Russia, and several Pacific Rim
nations, have resulted in a highly interactive, non-linear campaign engine that
promises non-stop, exciting, and very realistic game play, every time you strap on a
jet, walk into the War Room, or fly a sortie
as an Airborne Warning & Control System
(AWACS) commander. You, as a player, are
taking part in a fully interactive, ongoing,
dynamic air campaign that lasts anywhere
from several hours to several days. Your
inputs will effect the outcome of the campaign. Depending on how well you fly the
F-22 and battle manage from the War Room
and AWACS, your actions, in large measure,
determine whether your side wins or loses
the campaign.
The artificial intelligence (AI) portion of the
campaign engine uses a strategic assessment process and methodology first adopted
by U.S. and coalition forces in the Gulf War.
Known as the “Five Rings” strategic assessment and campaign building process, each
adversary is examined, targeted, and struck
using a campaign template that identifies
“centers of gravity,” and the most cost
effective way to force an enemy to yield to
your will. Your adversary will be doing the
same thing to you. He will react to your
moves and send forces to destroy you and
your ability to fight. From the war room you
can use your intelligence assets to try and
get an idea of what it is the enemy is going
after and what kind of operations tempo he
is trying to sustain in order to defeat you.
Pay close attention to this. If the enemy is
able to maintain high sortie rates against
you in offensive operations, you may have to
shift your effort to more defensive sorties in
order to dull the effect of his campaign.
Generally, it is always better to maintain a
high rate of offensive sorties. Although
defeat can be avoided through good
defense, no war is ever won by it.
Five Rings Process
The Five Rings process is derived from the
1990-1991 work of USAF Colonel John A.
Warden III and his followers during the build
up and execution of the Gulf War. Col.
Warden convinced Gulf War commander,
Gen. Norman A. Schwarzkopf, of the need to
adopt a radically different strategy and
warfighting template for his battle with Iraq.
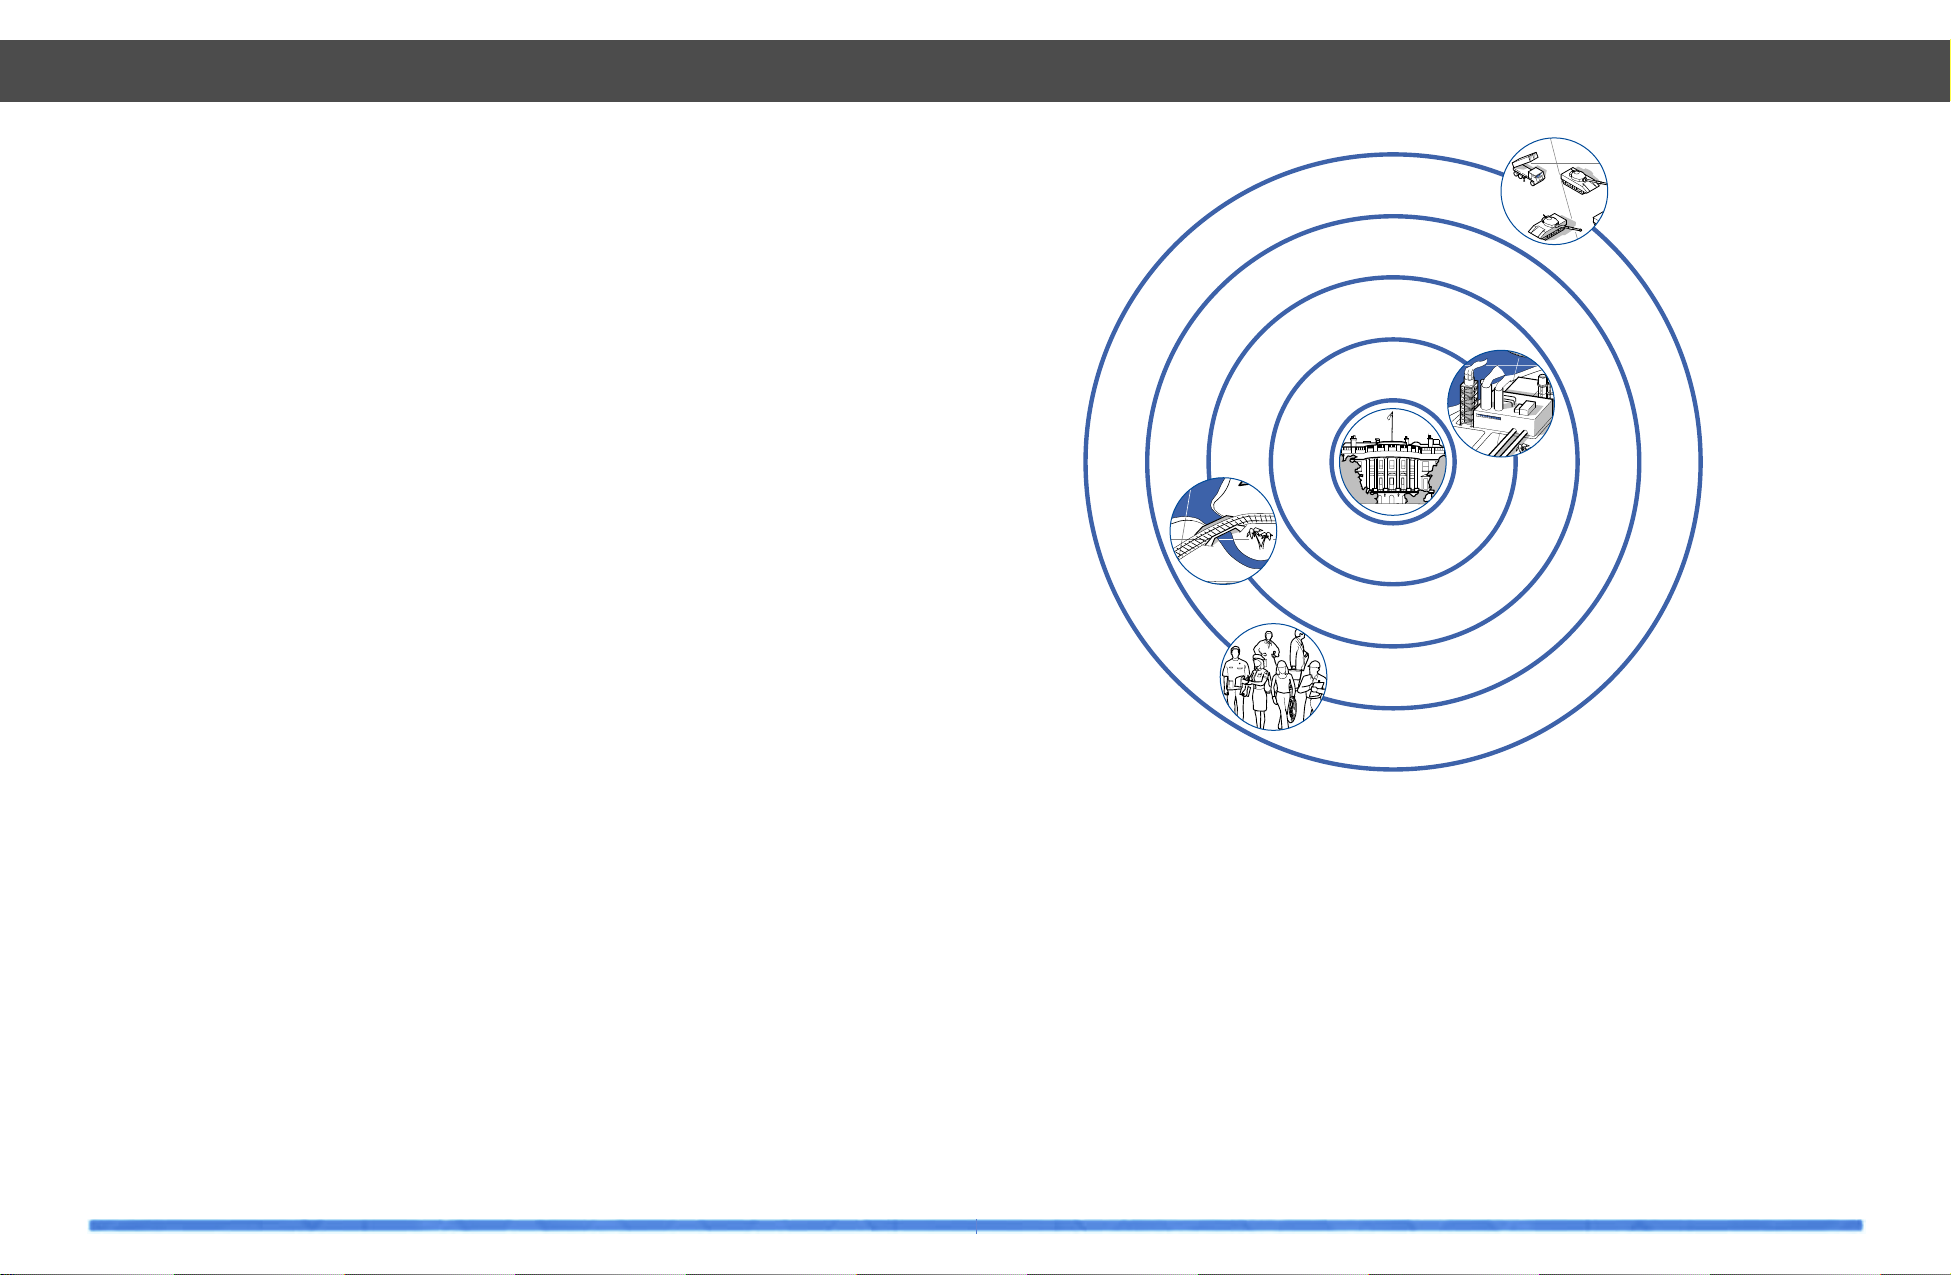
Warden’s basic premise was that all nation
states consist of five concentric rings –or
centers of gravity—the innermost ring being
leadership, then key production, infrastructure, population, and—finally—fielded military forces. Prior to the ascendancy of air
power, the only way to subdue a nation state
was first to engage and then destroy the
opponent’s fielded military forces. Until that
“One cannot doubt that flying…must in the future exercise a potent influence, not
only in the habits of men, but upon the military destinies of states.” Winston Churchill
Campaign
27
Campaign
26
was accomplished, the other centers of
gravity (i.e. all other areas vital to the survival, continued functioning, and will of the
nation state) would be impossible to reach.
With air power, this is no longer the case. All
aspects of a nation state are vulnerable to
attack and destruction by air power from the
onset of hostilities. Having said that, Warden
and others believe that leadership is the real
key to success or failure in war. When an
enemy’s leaders decide they had enough,
they sue for peace—or someone takes
power away from them. For that reason,
every action in war should be geared
to affecting the enemy’s leadership directly
or indirectly.
“A useful analogy that helps make the five
rings process readily understandable is that
of the human body compared to the modern
nation state. As the president (or dictator) is
to the nation state, so is the brain to the
body. These are leadership centers of gravity. Key production centers of gravity, that is
oil, gas, water, and electrical plants correlate to the human body’s lungs, stomach,
and circulatory system. All are energy conversion devices. Infrastructure in the nation
state refers to the road, bridges, rail, and
airways that link the country together. The
human body analogy to this is muscle and
bone. The nation state’s people – the men,
women and children that populate a nation
state - correlate to the myriad of cells that
make up the human body (population). The
outermost ring of the nation state - fielded
forces, the armies, navies, air forces, and
police that protect and defend the state relate directly to the human body’s leukocytes that seek, attack, and destroy any
threat to the body. An accompanying chart
shows the five rings and relates then directly to nation state centers of gravity (CoG’s) in
an artists rendition. Note how the CoG’s
have multiple targets in each category, if you
stop and think about it, this war-fighting principle embodied in TAW and the current doctrine of many modern air forces is nothing
more that a logical extension of what most of
us do when faced with a physical confrontation. Our first instinct is to avoid harm to ourselves and those around us we care about.
The second instinct, if confrontation is
unavoidable, is to convince our opponent to
do what we want him to do at the lowest
possible cost in physical injury and embarrassment to ourselves. If this can’t be done,
we use whatever force is necessary to convince our opponent to do what we want him
to. The point is, regardless of whether we
are punching our opponent in the nose,
arms, or legs, our entire focus is on getting
his leadership functions to do what we want.
This then, is the essence of what you are trying to do in TAW.”
Total Air War Campaign
Total Air War has adapted the Five Rings
Process to allow for superb game play.
Political targets (PIT) include multi-storied
structures that house the government elite
as well as temples and traditional government buildings. Key production (also known
in some circles as “organic essentials” or
“POL”) targets include oil, gas, water, and
electrical complexes, as well as power generating dams. Infrastructure targets (INF)
are the roads, bridges, pipelines, railroads,
and airports that crisscross the opposing
countries. Industrial targets (IND) are the
factories that turn out the war materials
needed by the fielded forces to re-supply
and fight. Command, control, communications and computing (C4) targets are the networks and nodes that send orders to the
fielded forces and information back to the
Campaign
leadership. An integral part of the C4 nets
are the radar and sensors that provide
forces and leadership with “eyes and ears.”
Naval (NAV), Army (ARMY), and Air Force
(AF) targets are also included in the TAW
database.
Depending on the campaign you have chosen and the number of adversaries and
allies in the conflict, chipping away at one or
two of the five “rings” may be sufficient to
achieve battlefield success. For example,
attacking only infrastructure (roads, bridges,
railroads, and airports) and key production
(oil, gas, electricity, and water) targets may
shut an opponent down and cause him to
sue for peace. However, in large scale conflicts with competent adversaries, it is often
necessary to create a parallel attack on the
entire system to cause its collapse and surrender. An analogy might be useful here to
understand what is meant by “parallel
attack.” Assume you and several of your
friends are forced to fight a large bear with
only spears for weapons. If each of you
makes an independent attack on the bear it
is likely you may wound him but only at great
risk to yourself and with little chance of
killing the bear. However, if all of you rush
the bear at the same time, even if some of
Colonel J. A. Warden III’s Five Ring Process
s
e
c
r
o
F
d
e
d
l
e
i
F
.
5
.
4
n
o
i
t
a
l
u
p
o
P
r
f
n
I
.
3
e
r
u
t
c
u
r
t
s
a
d
o
r
P
y
e
K
.
2
L
.
1
o
i
n
t
c
u
r
s
e
h
d
i
p
a
e

28
Campaign
29
you miss, it is likely that the bear will collapse from his
simultaneously inflicted wounds (none of which done
independently would kill him) and lead to his immediate
demise. This is parallel attack.
Prior to the creation of precision weapons, it was almost
impossible to do parallel attacks. In World War II, it took
almost 1000 B-17s to have a 90% probability of kill on a
target that was as big as a soccer field. That meant
exposing 10,000 airmen to danger and possible death for
a single target kill. Consequently, raids were flown
against target complexes in large areas or cities, one
target at a time. The enemy learned from each attack and
was able to divert resources from locations that weren’t
hit to repair the ones that were. Each successive raid
became more difficult and costly. The war dragged on for
many months and years at
great cost in blood and treasure to both sides. Things
changed dramatically with the advent of precision
weapons. Less than fifty years after WWII, one
F-117 carrying two, 2000 lb. bombs could accurately hit
twice as many targets as those 1000 B-17s. As a result, in
the first 24 hours of the Gulf War, more than 2000 targets
across Iraq were put under attack at the same time. Iraq,
like the bear in our analogy, simply went into shock and
could not recover from this parallel attack. This is the
effect of a modern air campaign on a nation state. Your
challenge, as a player, is to inflict the same level of loss
and confusion on your enemies.
It won’t be easy. TAW’s strategic game engine expects a
certain percentage of enemy losses before it
decides individual campaign objectives have
been met. For example, the game engine may
Campaign
call for a 40% level of destruction on enemy infrastructure before it gives you the nod in that portion of the fight.
To make matters even more challenging, the game
engine demands you reach these objectives within a
certain time frame. This reflects any modern commander’s concern about world opinion and the political support he may or may not receive from his civilian leaders.
Time is not your friend in this game. Like Schwarzkopf in
the Gulf War, you need to worry about your government
deciding the effort is not worth the cost, and sending you
and your forces home before the job is done. It is political reality, and you have to deal with it!
Communications Network/Allies and Adversaries
TAW heralds the development of the second phase of the
C4 network developed for F-22 ADF. In TAW, early warning radar (EWR) sites detect inbound enemy aircraft and
uplink data to the airborne AWACS aircraft. Airbases
augment this data flow further. Targeting a nation’s C4
network will significantly affect their ability to wage war.
A player must use his own system sensors to pay close
attention to his borders.
The dynamic campaign engine may very well cause
nations both in and out of the theater to be drawn into the
conflict. Neutral nations whose territories have been
overflown by careless combat patrols or bomber raids
may decide to ally with a nation hostile to your own.
Border skirmishes can quickly escalate and UN forces
may be called in to defuse the situation. You can win the
battle and lose the war by not managing where and how
your forces engage the enemy!
Applying Col. Warden’s Five Ring model in the target rich, Total Air War environment
1
1
1
1
1
2
2
2
2
2
2
2
3
3
3
3
3
3
4
5
5
5
1. Leadership 2. Key Production 3. Infrastructure 4. Population 5. Fielded Forces

31
ing, as TAW will do this automatically for you
when you leave War Room and return to the
main interface. The program will also automatically save your scenario for you once
every hour of game time.
The Campaign Information window displays
the specific information associated with
each campaign. This information is displayed when the desired campaign is
highlighted in the Campaign Selection
window. Option buttons within the Campaign
Information window include:
Map – displays campaign scenario “big picture” with color coded alliance markings.
Green is allied, Red is enemy, and Blue is
neutral. Note that these alliances are only
accurate at the start of a campaign and may
not represent the current conditions from a
saved campaign.
Briefing – text information that outlines the
current campaign scenario.
Pilot Log – displays your current pilot
information, current ratings and score. This
log is only updated on completion of a campaign, it will not update when a campaign is
still active.
Campaign Log – shows information about all
of your campaign successes, failures and
ratings.
For detailed information about each scenario, please refer to the Scenarios section,
found later in this manual.
Initiating a Campaign
30
Login
When you first start TAW, you are prompted
to enter your Pilot Name and Callsign. You
can also choose a pilot photograph and
squadron patch. These will appear in your
pilot records throughout your pilot’s TAW
career. You have the option of adding your
own patch and photograph to the Login
screen in place of those included with TAW.
To add a user generated patch or pilot photo
to TAW, both types of picture file must be in
the .pcx file format, and be 96 X 96 pixels and
256 colors. If the file is a pilot picture, then
place the .pcx file into the directory folder
marked /Pilots (within the TAW directory,
wherever you installed it). If it is a squadron
patch picture, then place the file into the
directory folder marked /insignia.
Campaign Selection
To begin a campaign in TAW, select the
CAMPAIGN button on the main interface
screen after you have confirmed your Login
identity. This will take you to the Campaign
Selection screen. From here you can choose
to start or continue any of the ten available
campaigns.
There are ten campaign scenarios in DID’s
T otal Air W ar. They are listed on the left hand
side of the Campaign Selection interface
screen. You can scroll through the list and
select on one campaign at a time. When a
campaign is highlighted, the appropriate
briefing will be displayed in Campaign
Information window. If you are just starting
you will not have enough experience to play
every campaign scenario available. The
advanced campaigns are reserved for players with more experience points because
they are extremely challenging. Take your
time and be patient, your effort spent in winning the less complicated campaigns will be
rewarded with access to those more challenging campaign scenarios!
If you have already started a campaign and
just wish to continue from where you left off,
click on the appropriate scenario (it should
have the word “ACTIVE” stamped across it)
and then select the Continue button below
the Scenario Selection window to resume
play. When you select a campaign that you
have begun but not yet completed, TAW will
display two statistical summaries of your
performance to date in that campaign scenario. One graph is your score graph and the
other graph is your damage graph. However,
should you wish to play the campaign again
from the start, select New to launch the scenario afresh. You do not have to save your
campaigns whenever you are finished play-
Initiating a Campaign
Login Login
Campaign
Scenario
Selection
Personalize your campaign in the Login window
Select from ten truly dynamic campaigns
Initiating a Campaign
Introduction
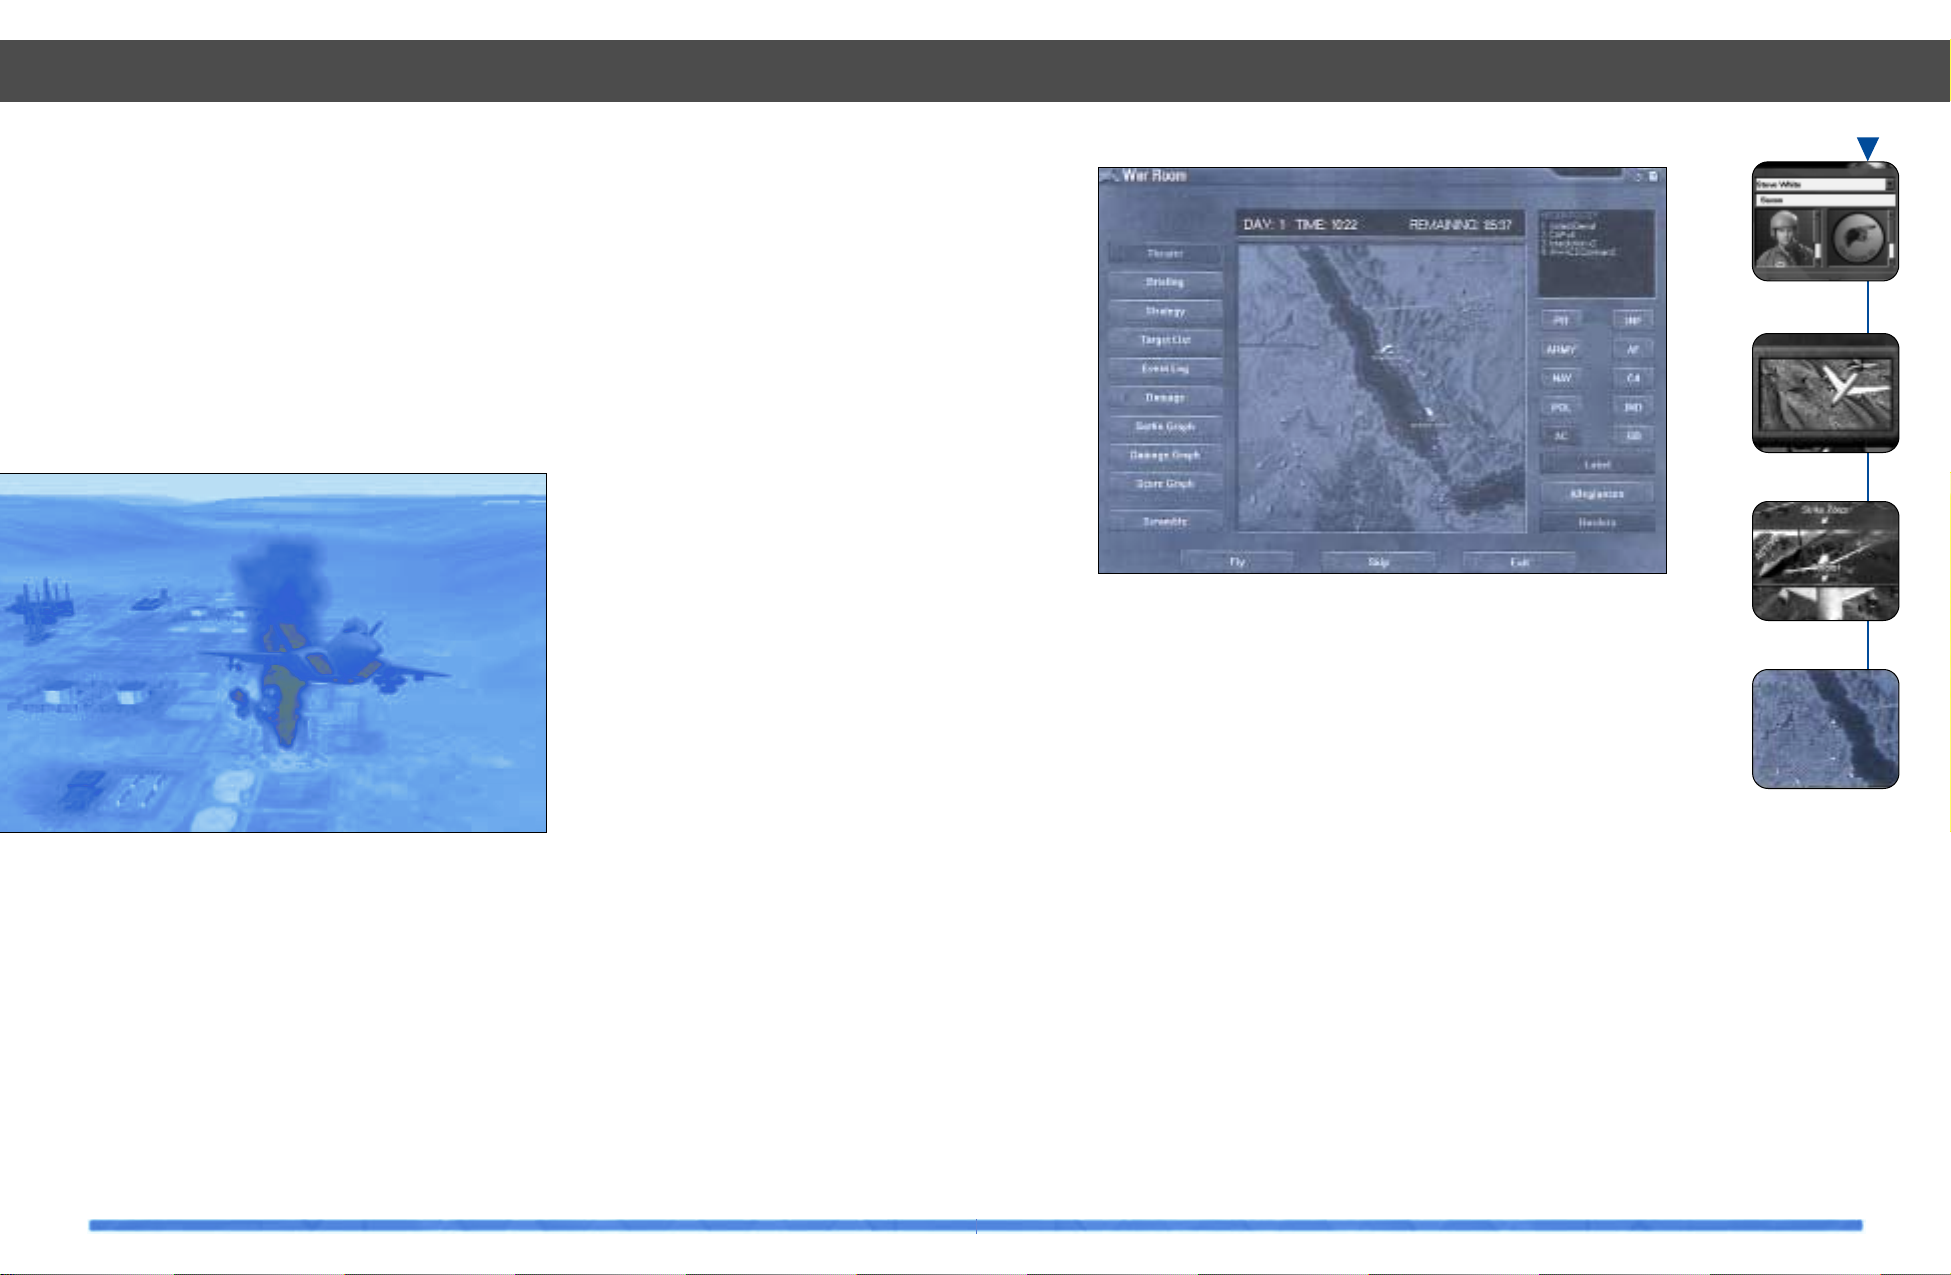
The War Room is the high-level strategic
hub of Total Air War’s campaign. From the
War Room you can access The AWACS
command station, the F-22 cockpit, or just
watch the air battle unfold before you. The
War Room also provides access to the information you need to build yourself the “big
picture” as you implement your strategy.
The War Room is composed of five sections;
the War Room display, the Mission Roster,
the War Room Mode buttons, the Target
Class selection buttons, and the War Room
control buttons. Each of these sections will
be discussed here to introduce you with
their location and operation.
War Room Display
The War Room display is the large window
located in the center of the screen. It is
capable of depicting the current situation or
user selectable campaign information. The
bar across the top of the display is your campaign timer. It tracks current day (numerically from the start of hostilities), current game
time (twenty four hour clock) and provides
you with a count down timer until the campaign must be completed. By default, it displays the theater map.
Mission Roster
The mission roster is the small display window located in the upper right-hand side of
the War Room screen. The roster displays
the current campaign missions that you can
choose to fly from the War Room if you press
the “Fly” button at the bottom of the screen.
The roster includes both AWACS and F-22
missions. Please note that these missions do
not include the scramble missions, which
are activated by pressing the “Scramble”
button.
War Room Mode Buttons
The War Room display is capable of performing many different functions to aid you
in assessing the current status of your campaign. What information appears in the main
window is determined by selecting the
desired Mode button. The Mode buttons are
located from top to bottom on the left hand
side of the War Room interface screen. The
available Mode buttons are:
Theater: The default mode, this mode displays a map and available target data for all
allied, enemy and neutral air and land forces
which the player has selected.
Briefing: Will scroll through the current scenario briefing information. To stop scrolling
33
the page simply place the mouse pointer
over the display and click on the left mouse
button, to continue the scroll, click again.
Strategy: Displays an up to date indicator of
the current allied strategy and how it is progressing alongside, if the data is available,
an indication of which strategy intelligence
suggests the enemy is pursuing.
Target List: Displays the current strategic
target list built by your war planners. The
targets are displayed in order of strategic
value, from highest to lowest. There is also a
column for current percent damage and a
column that shows the number of inbound
strike aircraft assigned to destroy the target.
To view a target location on the map,
highlight the required target and hold
down the left mouse button, to cancel
release the button.
Event Log: The event log is an asset status
list describing what is currently going on
within the campaign.
Damage: The damage map mode display
depicts the current status of the selected
target classes (selected from the right hand
side of the map display) within the theater.
Selecting the Allied or Enemy losses button
below the target classes will highlight the
areas where the aircraft losses are occurring. A brighter color (red for enemy, green
for friendly) indicates a region where higher
losses have occurred. You can also view the
damage status of any target class in theater
by selecting the desired target class button
on the right side of the War Room screen.
With a class button highlighted, all targets of
that class will display on the campaign map.
A green dot indicates that no damage has
been sustained, orange some damage and
red that the target has been destroyed.
War Room
32
War Room
Campaign
Login
Scenario
Selection
War Room
Watch the battle unfold in the War Room
War Room

35
Target Class Selection Buttons
The information displayed in the War Room
is filtered by the array of filter buttons on the
right-hand side of the War Room screen.
Each of these buttons represents one of the
following ten target classifications:
AC (aircraft)
ARMY (army targets)
NAV (naval targets)
POL (petrol, oil and lubricants type targets)
PIT (political targets)
GB (ground based vehicles and SAMs)
AF (air force targets)
C4 (command, control, communications and
computing)
IND (industrial targets)
INF (infrastructure targets)
Selecting any of these filters allows you to
view information about that class of target
on the War Room Map display. For example,
when viewing targets in Map mode, selecting only NAV will limit the display to solely
Naval type targets. If you select GB, AF or
C4, not only are the appropriate targets displayed but also the effective range of any
radar at that target. If the filter button highlighted corresponds with the current campaign strategy, the top twenty targets of that
class will be numbered in the map display.
Hint
The War Room remembers your filter preferences for each of the different War Room
modes. For example, you may prefer to display only aircraft and ground based vehicles
while using the map mode. But while in the
damage mode you prefer to display just the
infrastructure targets. As you jump between
each of these two modes, the filter buttons
will automatically reset themselves to their
last position.
War Room Control Buttons
At the bottom of the War Room screen are
the War Room Control buttons. There are
three buttons labeled; Fly, Skip and Exit.
Fly: Pressing this button will take you to the
mission selection screen where you can
choose to fly any of the available F-22 missions or take control of the AWACS.
Skip: This button advances game time at a
much faster rate.
Exit: The Exit button will exit the current
campaign, save it and return you to the campaign selection screen.
War Room Overlays
In a number of War Room modes (in particular the Map and Damage modes) you can
overlay additional information on top of the
War Room map. For example, you can label
allied and enemy flights and draw national
borders on top of the map. You can also
depict current international Allegiances,
color coded by present orientation, Blue for
neutral, Red for enemy and Green for forces
that are friendly.
Hint
The amount of information you can overlay
on flights depends on your knowledge of
enemy movements. If your C4 network has
detected and identifies an enemy flight, this
will be reflected in the War Room. Allied
missions and aircraft types are labeled.
War Room
34
Sortie Graph: This graph indicates the num-
ber of sorties (one sortie equals a single aircraft taking off completing its mission and
landing again) flown versus time during your
campaign. In general you want to see friendly sorties above enemy sorties, this usually
has a direct translation into higher operational tempo.
Damage Graph: This graph allows you see
the damage sustained during the campaign
for both allies (shown in green) and enemies
(red). Use the target class buttons to the
right of the display to view each category.
Overall success for currently assigned target strategy for the campaign can be deter-
mined by looking to see if either of your performance lines intersect the required damage line on or before that same performance
line reaches the time limit line. Highlight the
Label button to the right of the display and a
key will display at the foot of the damage
graph, red indicates your performance
whilst in an AWACS and blue whilst flying an
F-22. A block will then display across the top
of the graph to indicate which point of presence you have been using most during the
campaign.
Score Graph: This graph shows your game
score and thus indicates how well you performed your roles (F-22 pilot and AWACS
commander) while playing the selected
campaign scenario.
Scramble: Pressing the button turns it off
and on, when set to on, “Scramble” will present the player with front line based F-22
intercept missions. You also have the option
to turn the scramble missions down as they
are presented to you.
War Room
37
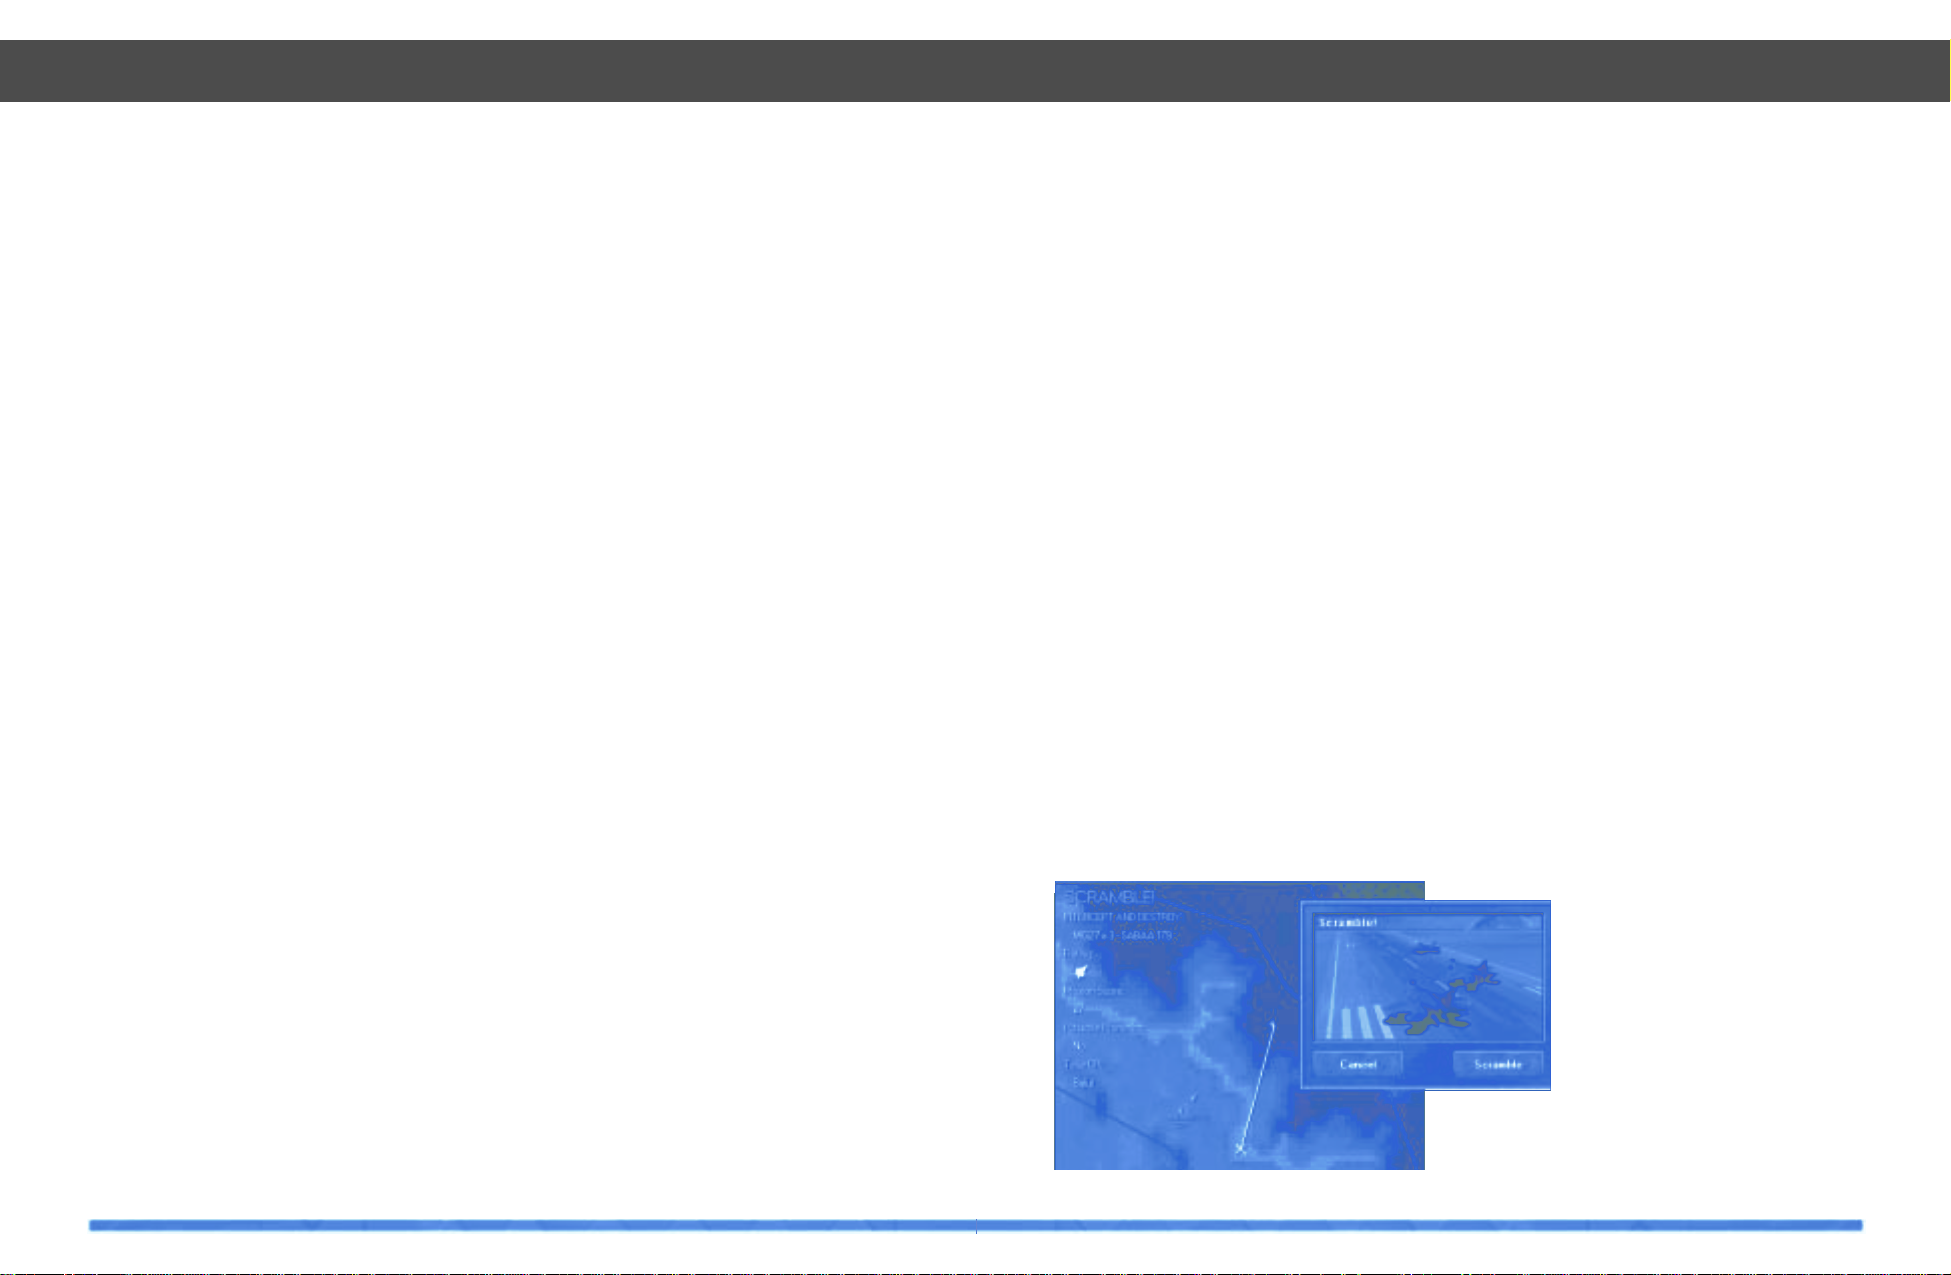
Introduction
On the left hand side of the War Room
screen is the Scramble button. If this button
is selected TAW will prompt you if a scramble mission comes up. A scramble mission
is generated whenever an in-bound enemy
flight is detected by an allied airbase. If you
accept the scramble mission you will be
given the opportunity to fly from the airbase
and intercept the incoming bandits!
Scramble!
Airbases are constantly monitoring their airspace for enemy aircraft. Occasionally
enemy flights will evade the CAP and SAM
defenses and make their way into allied territory. When this occurs and when they are
detected by an allied airbase’s EWR, that
airbase scrambles a pair of fighter aircraft to
intercept. If you have chosen to accept the
Scramble mission by pressing the Scramble
button in the War Room, then when a
scramble situation occurs the pop-up
Scramble! window will appear in the War
Room Interface.
In map mode, the War Room map will zoom
to the airbase requesting the Scramble mission and highlight the inbound enemy flight.
The complexity of the Scramble mission will
depend on your pilot’s ranking; new pilots
will only be asked to intercept a single aircraft, but more experienced pilots may face
up to three or four flights of aircraft!
If you Decline the Scramble mission then
you will continue with your duties in the War
Room. However, if you chose to accept the
call to Scramble then you will be dropped
into the cockpit of a fuelled and armed F-22
waiting at the end of the runway ready for
take-off. Good luck!
Hint
Successful Scramble missions are one of
the quickest ways to accelerate your way
through the ranks. So if you want to improve
the range of Player Missions you can fly,
spend some time honing your fighter pilot
skills by flying more Scramble missions.
Scramble!
36
War Room Graphs
The War Room graphs show both allied and
enemy damage levels. Use the filter buttons
to control which graphs are drawn into the
main window. The graphs can be used to
gauge player performance during the campaign. A steeply inclined line indicates the
player is doing a good job of executing the
campaign strategy and causing enemy systems to collapse and cease functioning. On
the other hand, if the line shows only a moderate incline, this indicates that the player is
not achieving the campaign objectives
quickly enough, and could result in a stalemate or failure. A flat line is cause for serious alarm! You are losing the war!
War Room Damage
By default, the War Room shows you a realtime display of all armed forces in theater. If
you switch the War Room into Damage
Mode, you can get an indication of the distribution and level of damage throughout
theater. Using the filter buttons, select which
target class you would like to examine and
each of the appropriate targets will appear
in the main map window. A small indicator of
the current damage level of each target
appears adjacent to that target’s icon. Allied
and enemy aircraft losses are displayed by
coloring areas of the theater where losses
have occurred. The more dense the color,
the greater then number of kills that have
occurred in that area. You should anticipate
to see these high-loss areas clustered
around the borders between allied and
enemy nations.
Hint
Knowledge of which areas are the most
dangerous and are suffering the greatest
losses is particularly useful to the AWACS
commander. Re-direct strike flights to avoid
the “hot-spots” where enemy defenses are
proving most successful.
Advancing Time
The TAW scenarios vary in duration and
some, if you play them in real-time, will have
you living in front of your computer for
almost two weeks! We appreciate that you
might not want to wait that long to determine
the outcome of all your hard work so we’ve
included a Skip option which accelerates
the rate at which the campaign progresses.
If Skip is selected and you decide to enter
either the AWACS or the F-22, then accelerated time will stop and progress will revert
to real-time.
Points of Presence
The high-level strategic War Room is somewhat removed from the front-line where the
air battle is being fought. Since there is nothing proactive to be done while in the War
Room you will need to fly either an AWACS
or an F-22 mission if you wish to affect the
campaign. If you wish to leave the War
Room and take the fight to the enemy, there
are three routes for you to follow. (Please
refer to illustration on page 41)
1. You can choose to fly a scramble mission
and drop into the cockpit of an allied F-22
ready to engage in-bound bogies!
2. You can opt instead to fly one of the F-22
missions listed on an allied airbase roster
and edit your mission with the TAW Mission
Planner.
3. Or instead you can take on the role of the
AWACS commander and direct the air war
as it unfolds on your radar scopes!
War Room
Scramble! Scramble! Scramble!
Scramble!
39
Map option, you can view the waypoint
route overlaid on top of enemy SAM and
EWR radar threat distances. Where appropriate, pressing the Target View will show
you a real-time image of your objective.
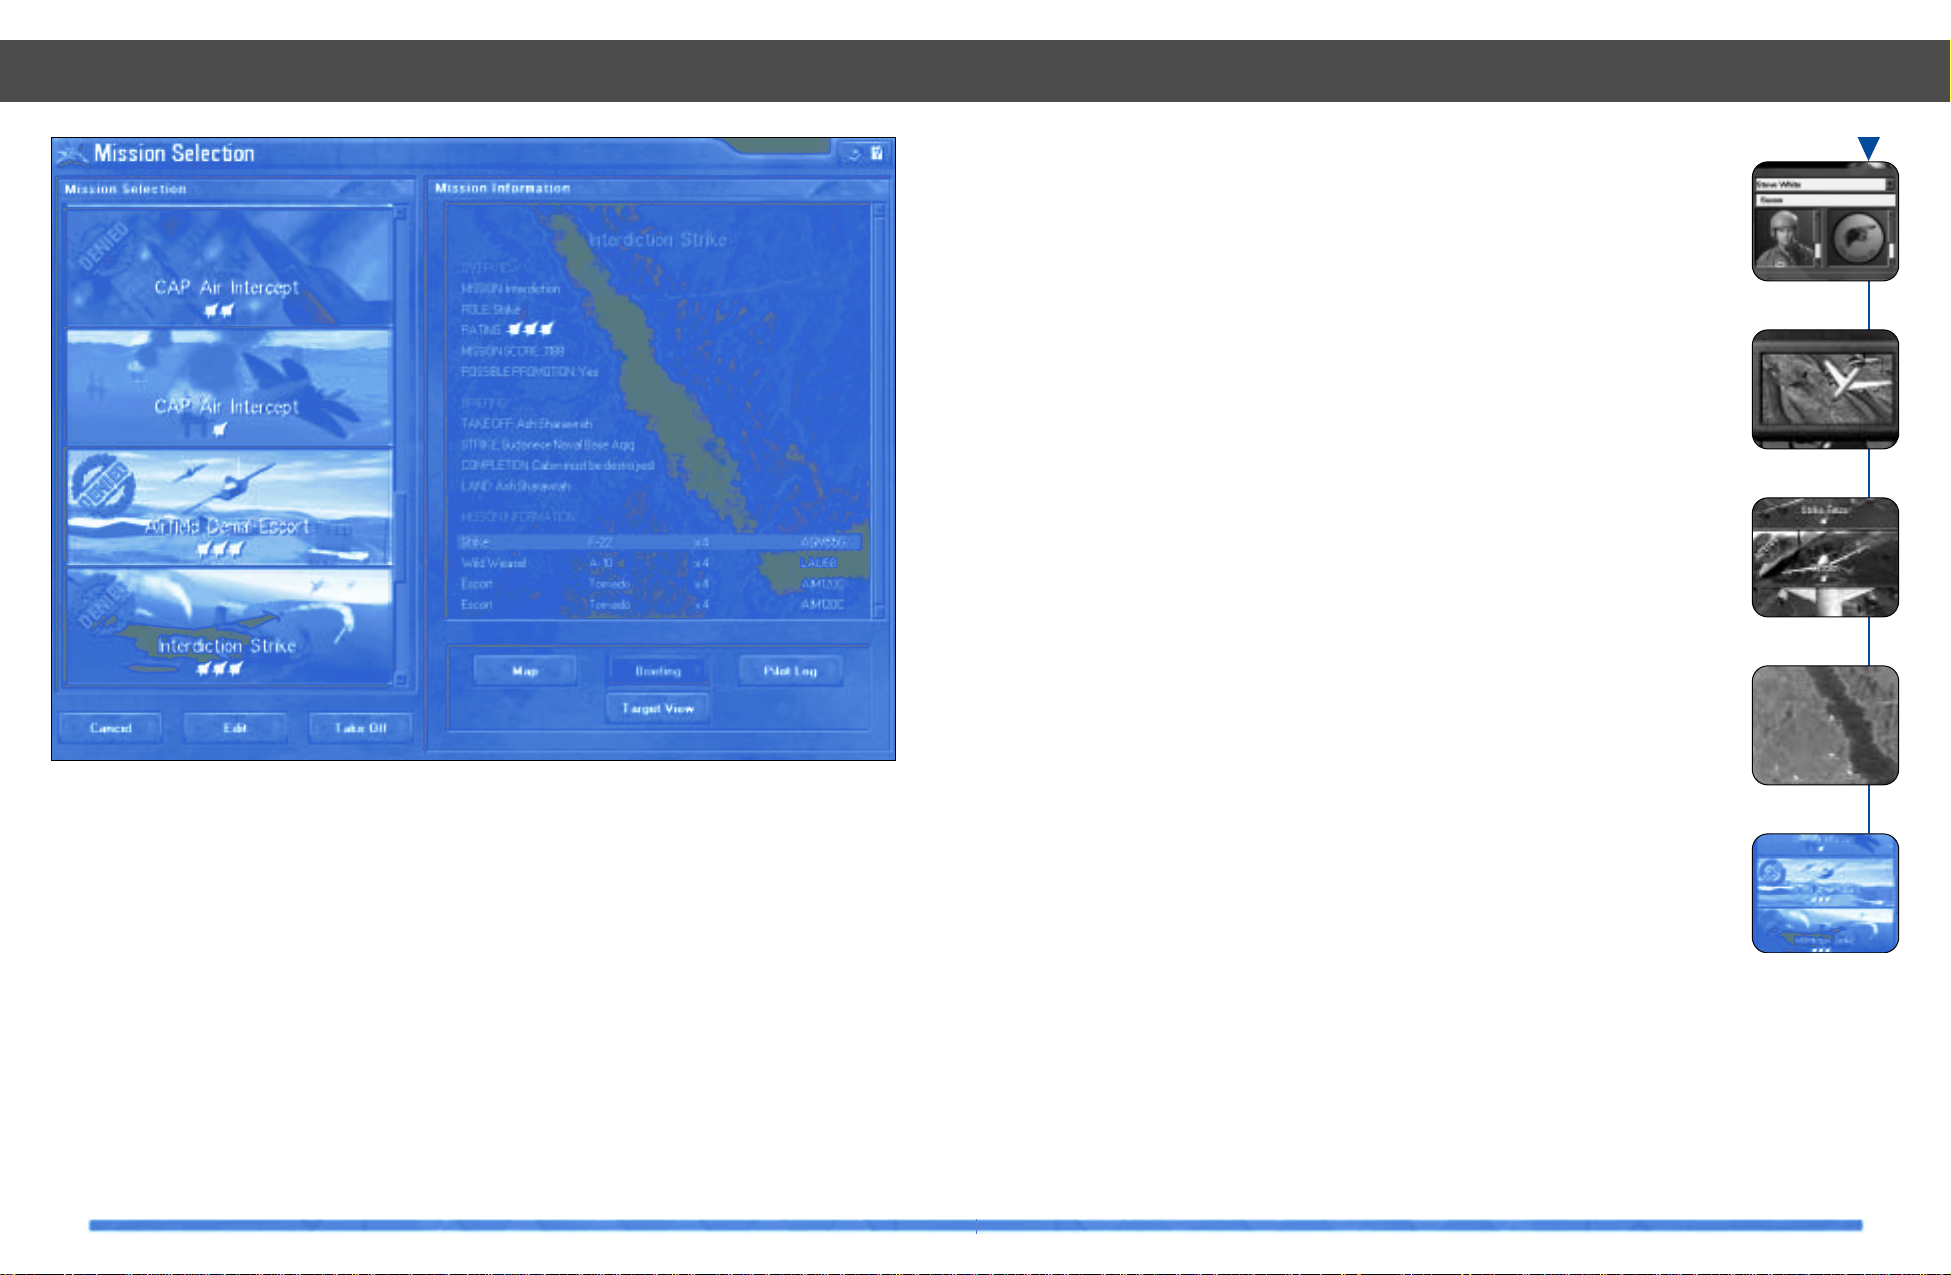
Ranking
Each mission is scored according to its complexity: Single F-22 missions such as escort
missions will be flown far from the frontline;
three F-22 missions such as interdiction missions will have you hopping over the border
into enemy territory; and five F-22 missions
such as an AWACS-kill, will see you operating deep into enemy territory without any
friendly assistance.
While your rank is low, you will be denied
access to many of the missions listed in the
Mission Selection window. However, the
more time you spend in the F-22 and the
AWACS, and the more Scramble missions
you complete, will improve your rank and
grant you greater access to more missions.
Hint
Mission scoring in Total Air War is a complex process that rewards you if you keep
both your plane and pilot (i.e. you) in one
piece! It is better to limp your damaged F-22
back into allied territory than to eject behind
enemy lines. Think carefully before you are
tempted to destroy “just one more bandit”
after completing your mission objective – if
the gamble fails, your progress through the
ranks will suffer accordingly.
Player Missions
38
Player Missions
Introduction
Selecting Fly from the War Room window
will launch you into the Player Mission
Selection window. On the left hand side of
the interface are listed all available F-22
and AWACS missions currently listed on
rosters in allied airbases within theater. As
each mission is selected, the waypoint and
target information is displayed in the window adjacent the mission list.
Once you have selected an appropriate mission, if it is an F-22 mission you can either
accept the mission as is and Take Off immediately, or Edit the campaign generated mission with the Mission Planner. If it is an
AWACS mission you can accept and jump
directly to the AWACS.
Mission Information
As you select each mission from the list, a
briefing describing the mission, its objectives and the aircraft that are currently
assigned to your flight, is displayed in the
Mission Information window. Selecting the
Login
Campaign
Scenario
Selection
War Room
Player Mission
Check the roster for deep strike missions
Player Missions
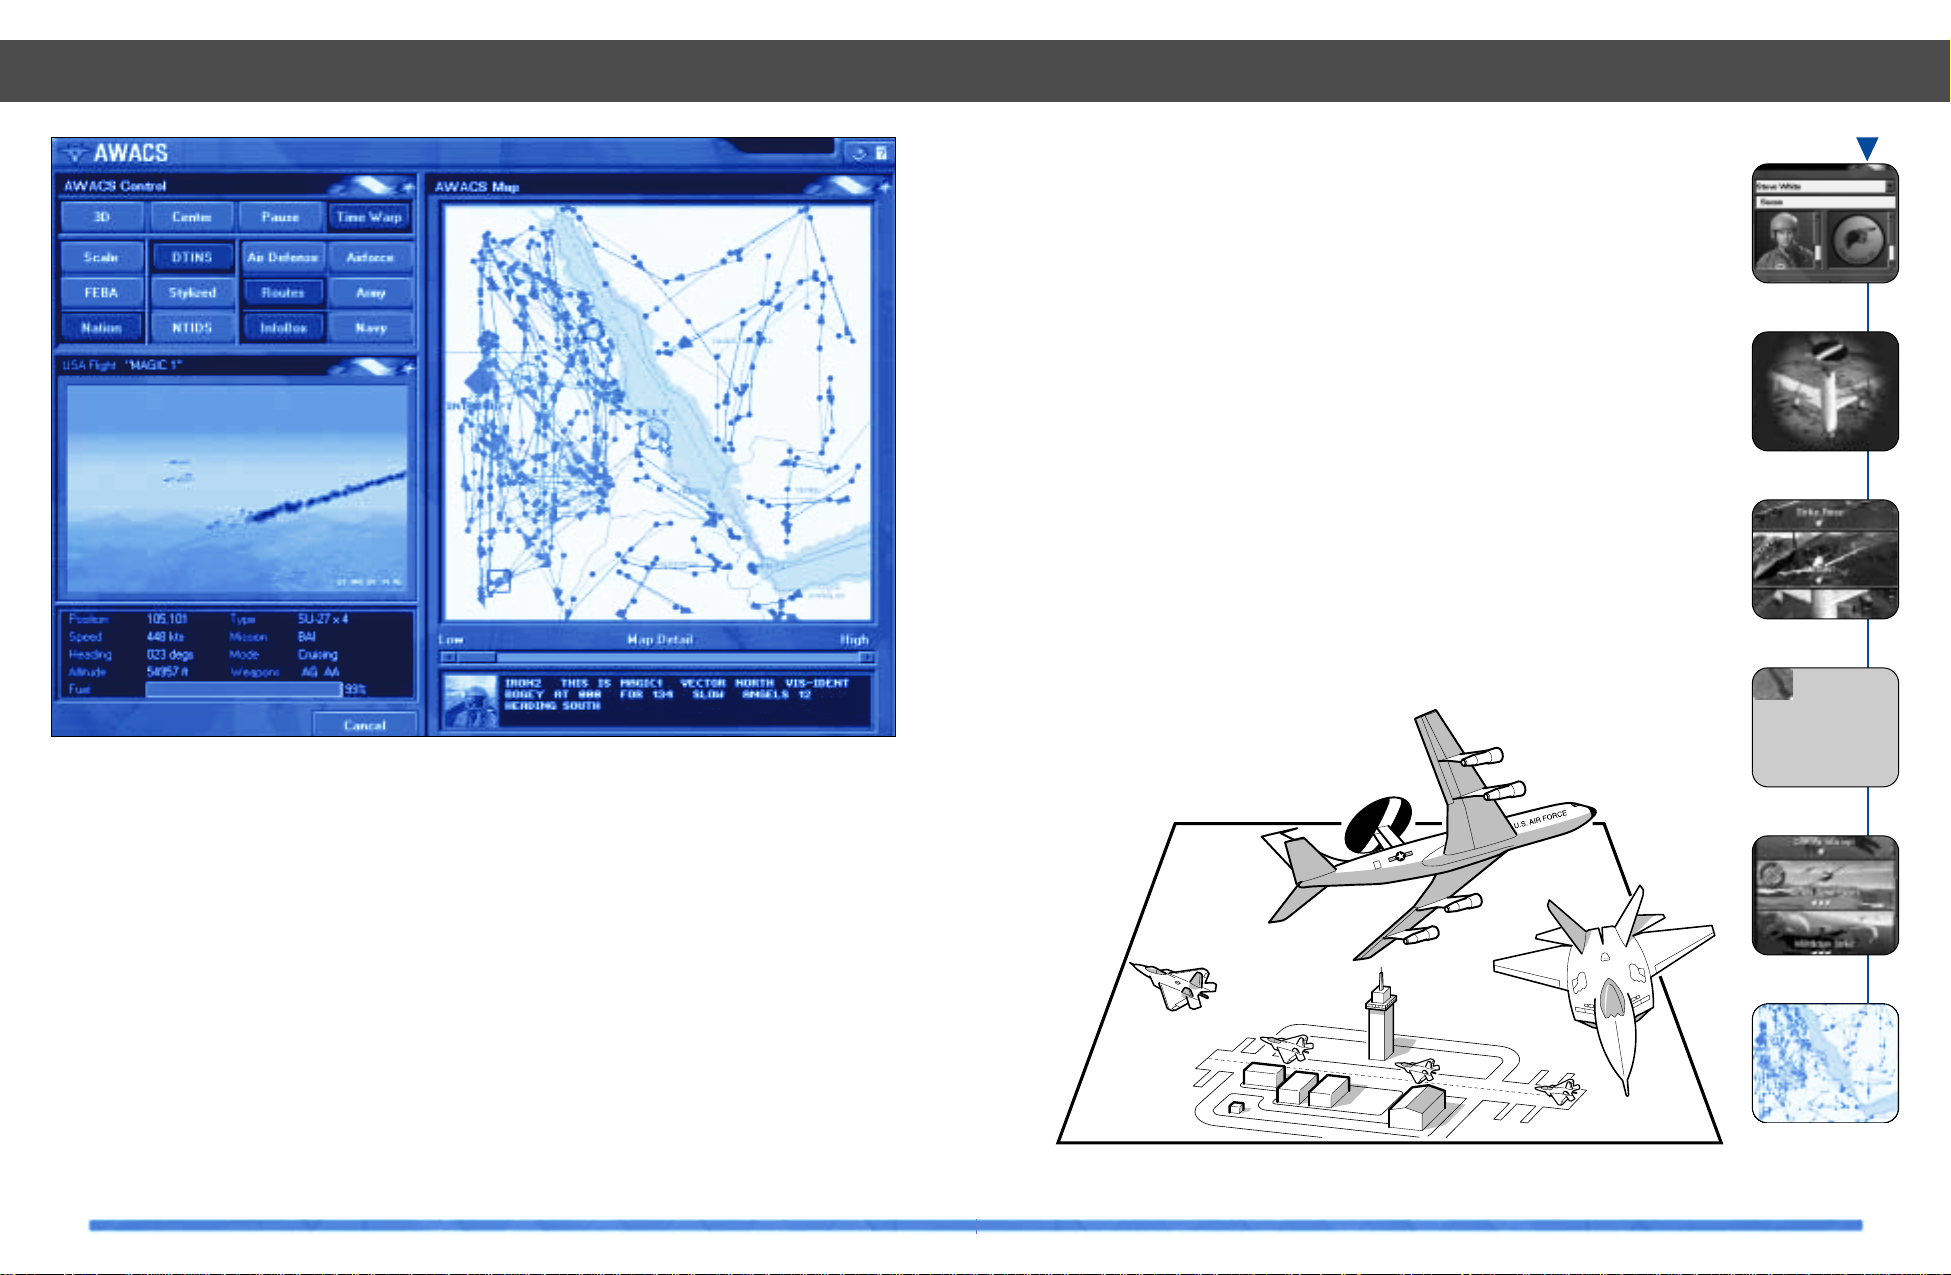
41
from their remote sensors. This means that
you should be able to identify aircraft and
get a much clearer picture of the air war at
much longer ranges. This will permit you the
valuable time needed to re-direct intercept
flights to get the job done.
Hint
Seize the tactical advantage: the AWACS is
a very valuable asset and you can be sure
that your enemies will throw everything at it
in order to drop it from the sky. If your EWR
and C4 network are in place, keep the
AWACS from straying too close to the frontline where it risks being shot down.
However, if your communications channels
have been degraded or possibly even
destroyed, you’ll have to let the AWACS fly
forward in order to see the developing air
battle. You must realize that moving your
AWACS forward is quite a gamble!
Dropping into an F-22
At any time during your AWACS session, you
can leave the AWACS and drop into an allied
F-22 by double-clicking the mouse on the
F-22 icon. Immediately you will assume control of the F-22 and hand the AWACS to the
computer controlled AI. If your F-22 aircraft
gets destroyed or you eject, you will be
thrown back into the AWACS again.
Conversely, if the last Allied AWACS lands,
or is destroyed, whilst you are piloting an
F-22, you must remain inside that aircraft.
Hint
Avoid the temptation to risk your F-22 aircraft by flying gung-ho into every dogfight!
The F-22 is the most advanced fighting
machine in theater so its loss will be to the
detriment of the allied forces.
AWACS – Campaign
40
Introduction
If there is an allied AWACS airborne, you
can take on the role of AWACS commander.
The AWACS provides the command and
control platform vital for controlling all airborne allied aircraft in theater. In TAW, it’s
role is vital as it receives updates from the
allied EWR network and J-STARS aircraft.
Using information available through War
Room intelligence, you can use the AWACS
to coordinate all your allied aircraft and
hasten the arrival of allied victory.
Tactical Advantage
Using the drag-and-drop command interface, vector allied flights to intercept inbound enemy aircraft. With your knowledge
of where the most kills and losses are occurring you can move your CAP flights into more
strategically important positions. Re-position your refuelers to top-off strike flights
before they leave the safety of friendly airspace.
C4 Network
As long as your EWR network is in place, the
AWACS will receive additional information
AWACS – Campaign
Login
Campaign
Scenario
Selection
War Room
Player Mission
AWACS
AWACS - A Bird’s eye view of the Allied offensive
Total Air War, multiple point of presence warfare
AWACS – Campaign
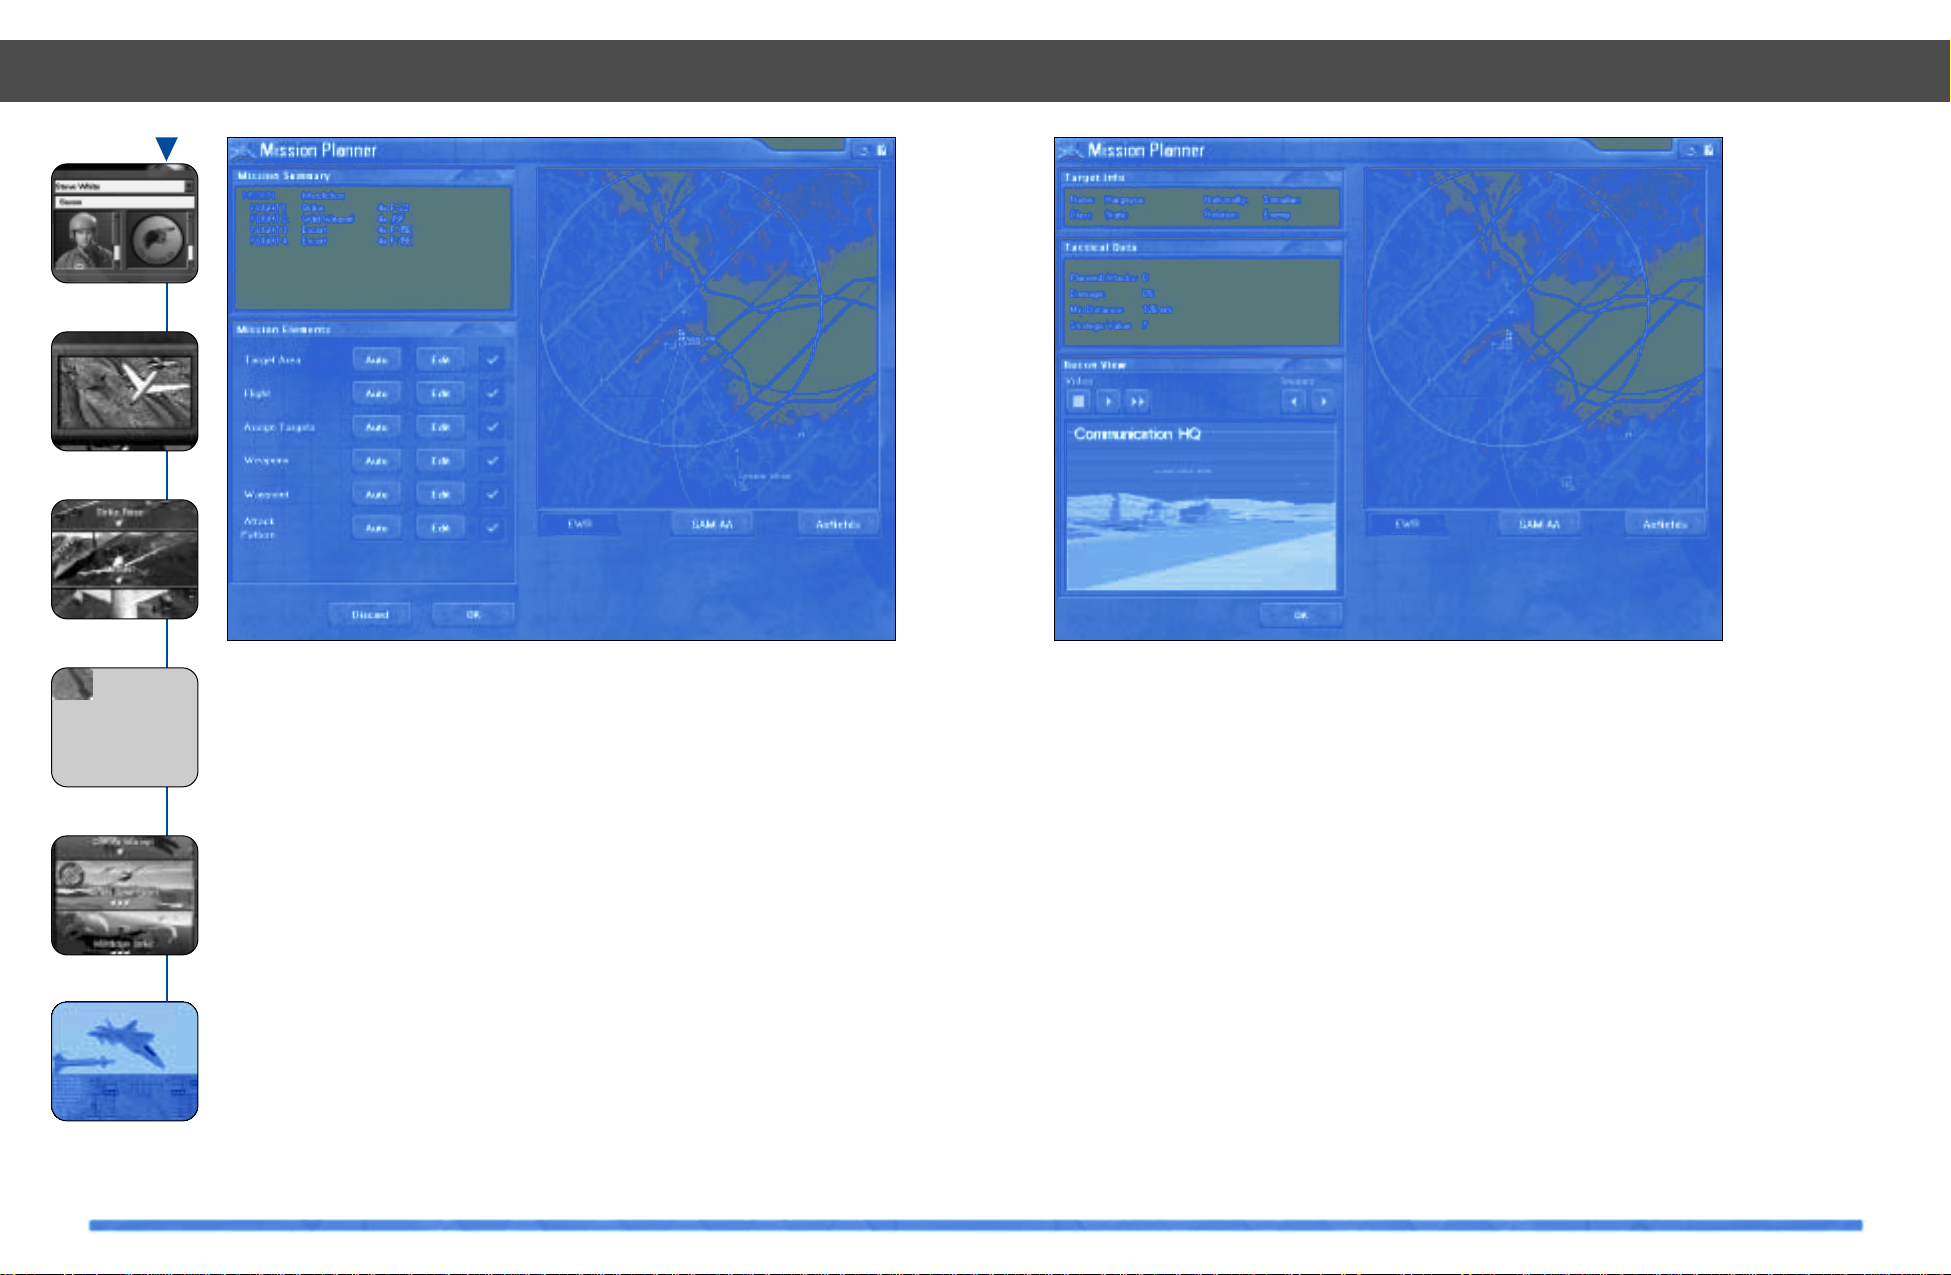
42
Mission Planner
43
Introduction
The Mission Planner is launched by selecting Edit from the Mission selection screen
when an F-22 Mission is highlighted. Once
invoked, the main Mission Planner interface lists six planning aspects of the missions that the player can edit: the target
area; the mission make-up; the targets each
strike aircraft will attack; the weapons
each flight will carry; the route flown
by each flight; and the attack pattern over
the target.
Whether each of these components is available to the player is determined by the type
of mission being edited. For example, there
is no need to assign individual strike targets
to a flight tasked to CAP and as such, this
option will be grayed out when editing a CAP
mission in the Mission Planner.
When each component of the mission planner is completed, a green check mark will
appear alongside the appropriate button in
the main Mission Planner interface. When
there is a red cross, that component is
incomplete and needs to be either custom
edited or you must press the auto button to
have the mission planner complete the
planning for you. If there are any incomplete
elements of the mission when the player
attempts to accept the mission, a pop-up
warning message will appear. All aspects of
mission planning must be addressed in
order to exit the mission planner and fly
the mission.
Mission Planner
Hand edit your mission with the comprehensive mission planner
Login
Campaign
Scenario
Selection
War Room
Player Mission
Mission Planner
A summary of the mission make-up appears
in the top-left of the screen in the Mission
Summary while the accompanying map
illustrates the position of SAM and EWR
threats, the mission waypoint route and,
when appropriate, targets. To zoom in on the
map, press the SHIFT key while clicking and
holding the left mouse button, dragging open
a box over the area of interest. To zoom out,
press the SHIFT key while pressing the right
mouse button. To re-center the map, hold
down the SHIFT key and left click the mouse
cursor where you desire the map to be recentered.
Hint
If you do not wish to edit any element of the
mission, pressing Auto will make the
Mission Planner AI complete that component for you. Also, at any time during the
mission planning, exit the process and
select Discard to return to the Player
Mission selection screen.
Target Area
The T arget Area selection screen allows you
to view Intelligence pictures of your current
target. It also allows you to select a different
target for the current mission if you so
desire. By default the mission planner is set
to attack the Campaign generated target.
However, should you want, you can refuse
the Campaign target and select an alternate
target. Each numbered target is a high value
target, selected from the Allied “kill list”.
Selecting and destroying a numbered taget
will hasten the onset of victory. It is important to check the Strategic Value of the current target in the Tactical Data display to
ensure that the target you selected is still
Choose and observe your targets in the target selection area
Mission Planner
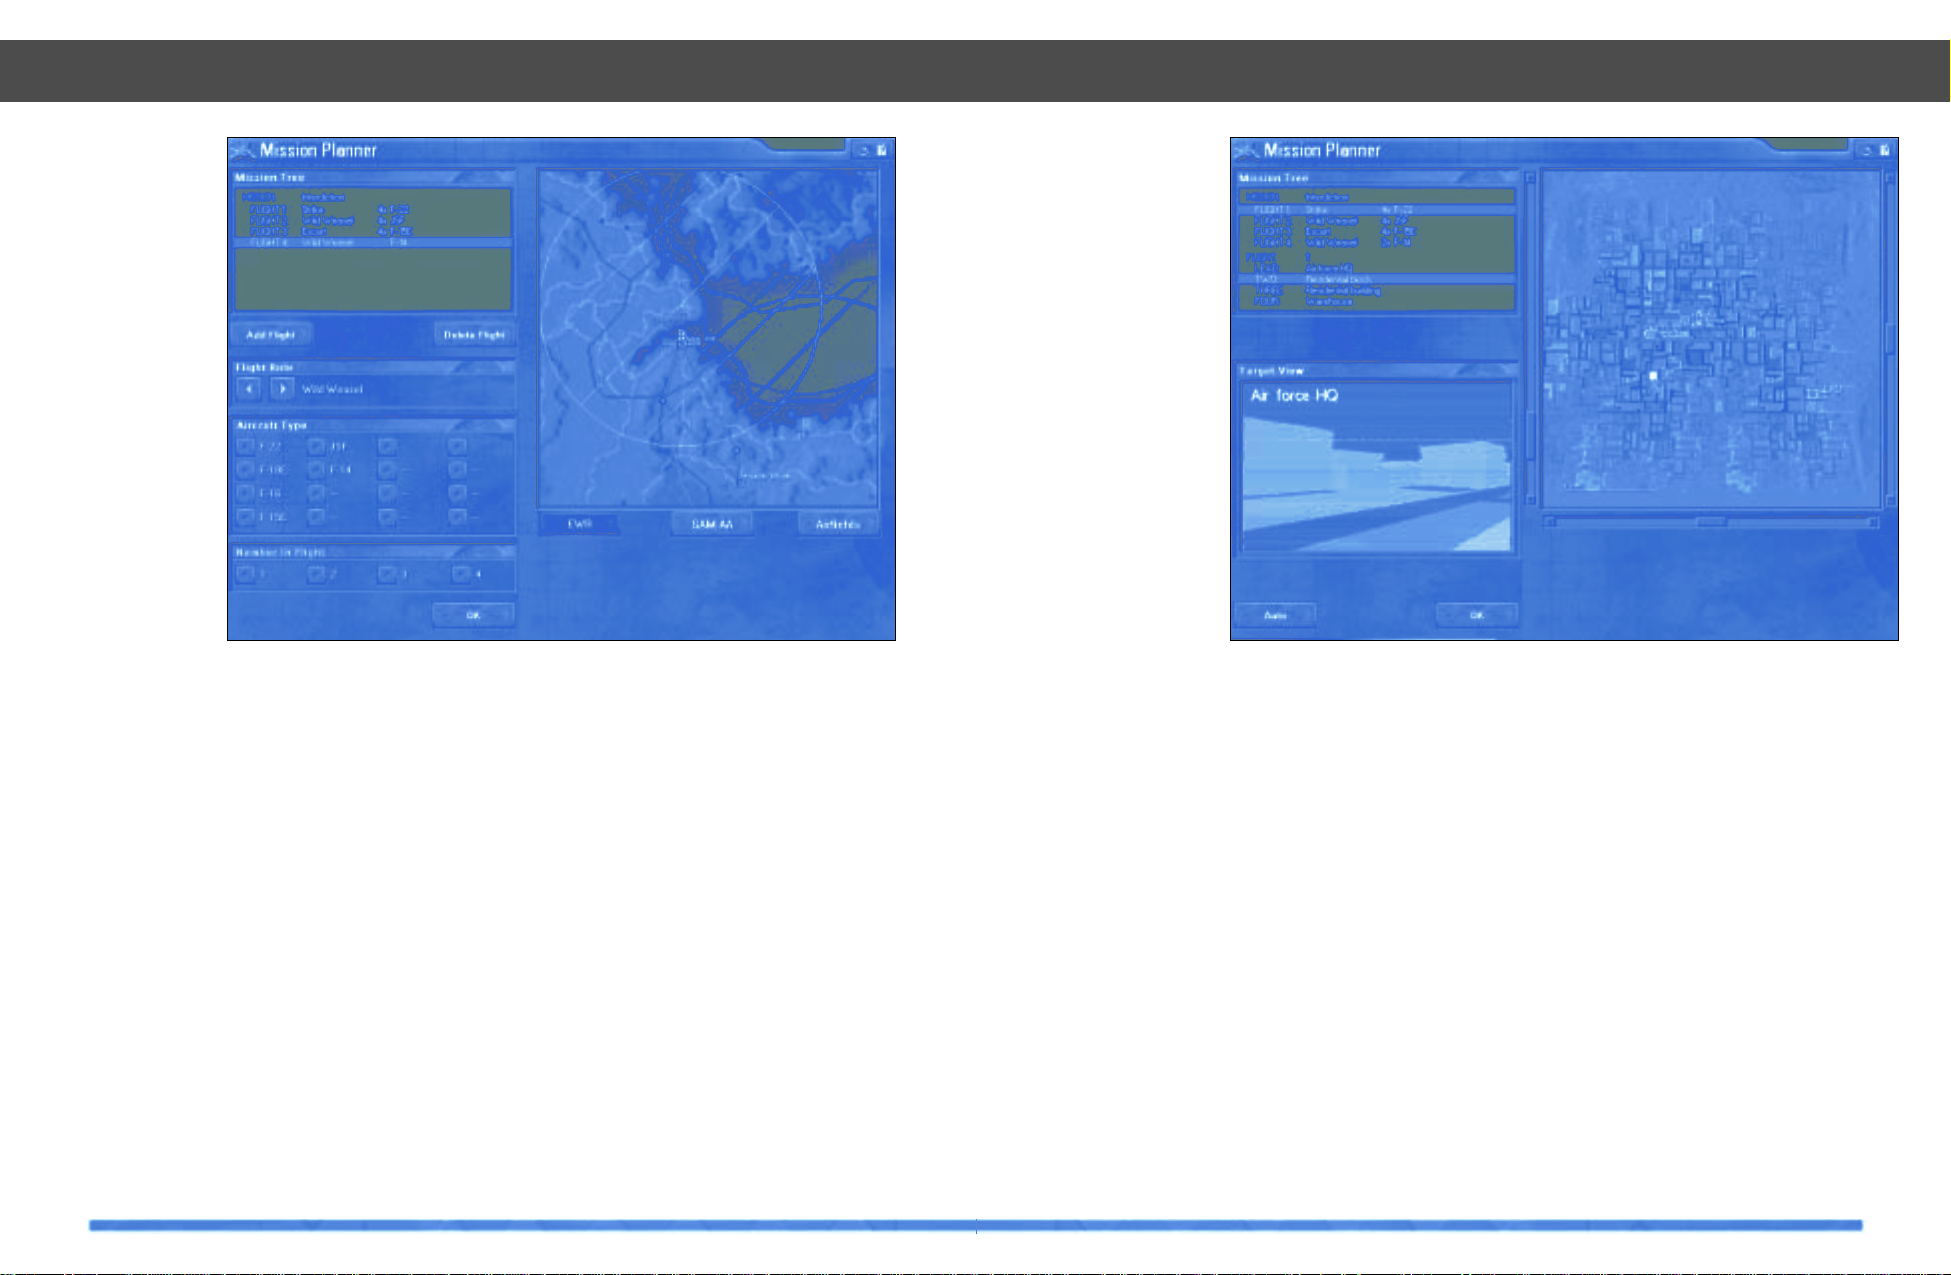
45
valid under the current Campaign strategy. If
allied intelligence is up to date, still imagery
and live images from tactical recon sources
of the target can be viewed in the Recon
window.
Hint
The ability to select a different target than
that assigned by the Campaign engine is a
powerful feature of the Mission Planner.
However, use it with caution because if you
elect to strike a different target, you could
be jeopardizing the outcome of the
Campaign by not attacking a key component
of the enemy force structure. Don’t forget,
the mission score will be recalculated if you
elect to strike a different target.
Assign Flights
When the Campaign generates a mission, it
checks to see which allied aircraft are available, and in what numbers, at the current
airbase. It then matches suitable aircraft to
the roles required in order for the mission to
be carried out. Three flights are required to
execute an interdiction mission: a strike
flight, an escort flight and a wild weasel
flight. If resources allow, a second escort or
strike flight might be desirable.
If the player wishes to edit the flights
assigned to the mission, select a flight in the
Mission Summary and click Delete before
adding a new one. Select which role you
wish the flight to take and then select from
the array of appropriate allied aircraft. Up to
four aircraft can constitute a flight, however
select EWR or SAM AA to keep an eye on
the radar umbrella in the map window as the
RCS of the mission varies. It is important to
remember that a hand-edited mission must
Mission Planner
44
Mission Planner
Assign Flights, select aircraft from available resources
contain at least one
flight of F-22 aircraft, and that
flight’s role must be
the role determined
for the player in that
mission.
Hint
Each aircraft has a
unique radar cross
section (RCS). This
determines how visible it is to both
allied and enemy
radar. RCS increases as weapons are
added externally to
an aircraft. This
should be kept in
mind when editing
the composition of
a flight for a mission. It is advantageous to select stealthy
aircraft with internal weapons stores such
as the JSF. However, if you choose to add
external weapons and fuel tanks or add
other flights which are not as stealthy, you
risk increasing RCS to the point where the
mission has a reduced chance of success.
Assign Targets
When flying strike missions, the Mission
Planner allows you to assign different static
targets to different wingmen in each strike
flight. First select the appropriate strike flight
from the Mission Summary window and
then, using the mouse cursor to highlight
each target, assign the highlighted target to
the next aircraft in the current strike flight.
Once again, the selected target is displayed
in the Target View window if allied recon is
operational and up to date.
Hint
Target selection is an important task and
care should be taken in assigning targets to
strike flights. Some targets have a higher
strategic value than others, for example,
destroying an airfield’s control tower has a
much greater affect on the operation of the
enemy airbase than destroying an empty
hanger. If you are not sure how to best
assign targets, selecting Auto will make the
Mission Planner AI automatically assign targets. Also, bear in mind that collateral damage can destroy targets that are closely
packed together, so don’t task your wingmen to strike targets near your own when a
well placed cluster bomb will do the whole
job alone.
Direct your wingmen to their targets
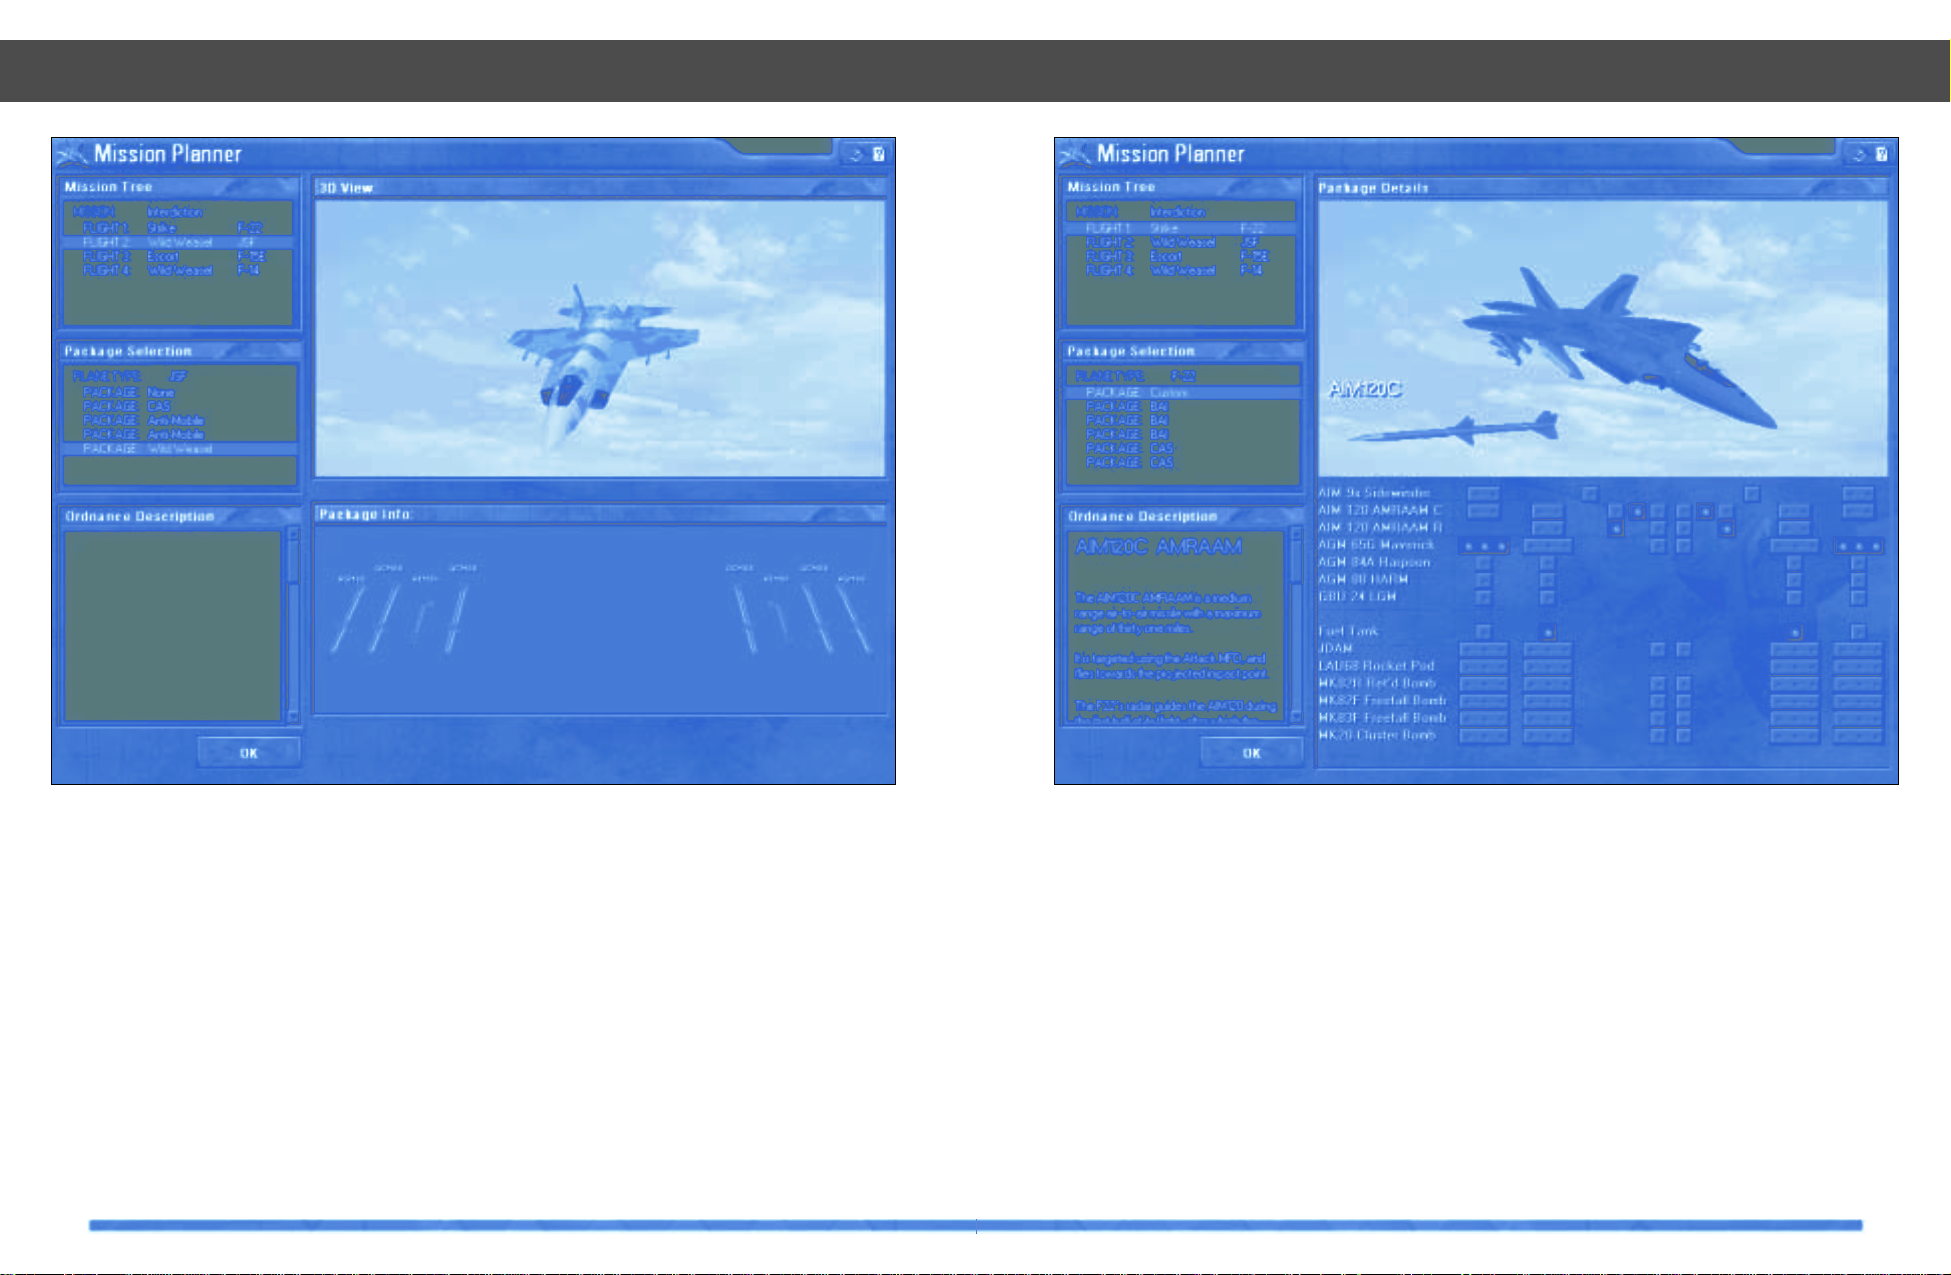
47
Weapons
The Weapons selection screen allows you
to arm your own F-22 flight and those flights
accompanying you on your mission. Select
the appropriate flight from the Mission
Summary and the aircraft will appear in the
3D View window. For anything other than the
F-22, a selection of suitable weapon loadouts are displayed in the aircraft Package
Selection window.
These contain a selection of weapons chosen for their suitability for the current mission type. Each weapons package is
displayed below the aircraft in the Package
Info window and also in position on the
appropriate pylons in the 3D window.
Hint
When selecting an appropriate package,
you must remember the effect that carrying
external weapons and fuel tanks will have
on the flight’s average RCS.
Selecting the weapons for the F-22 provides
you with a lot more choice. Although you
can choose from a number of pre-determined packages appropriate to the aircraft’s
current role, it is also possible to select indi-
Mission Planner
46
Mission Planner
Choose your weapons...
vidual weapons for each pylon. Weapons
are selected by clicking the mouse cursor
over the appropriate set of buttons in the
weapons load-out interface below the F-22
in the 3D View window. Not all weapons are
available in all pylon positions.
Hint
Customize your weapon selection to reflect
those weapons you are most familiar with: if
laser guided bombing is your forte, then opt
for GBU-24; if you prefer to fly directly at the
target with rockets blazing, then you should
sling a LAU-68 rocket pod under each wing!
Once again, don’t forget that all important
RCS when determining your loadout or you
will lose the advantage of stealth as you
head into combat and find it difficult to
evade enemy forces with your increased
drag and reduced maneuverability.
Taking the role of an Armaments Officer

49
Waypoint
When a mission is created, the Mission
Planner AI attempts to find the most effective waypoint route for each of the flights in
the mission. It takes into consideration terrain features (such as valleys), the position
of EWR and SAM sites, current international
borders and international allegiances, and
the range of the aircraft in each flight.
Although you can choose to accept the AI
generated route, you can also Customize the
waypoint route for yourself with the
Waypoint Editor component of the Mission
Planner.
The current waypoint is plotted in the map
window. You can move the position of each
waypoint by clicking the mouse on a waypoint number and dragging it to a new position. Clicking on the small yellow crosses
mid-way along each leg of the waypoint
route introduces a new waypoint between
the numbered waypoint which comprise the
leg. This too can then be moved into a new
position. Waypoints can be removed by
right-clicking the mouse on the appropriate
waypoint number.
Automatic waypoint route generation is possible by clicking the Replot Route button in
the Route Priority window. Dragging the slider bar between shorter and safer will vary
the degree to which the Mission Planning AI
priorities avoiding enemy forces and minimising mission duration.
The Profile window at the bottom of the
Mission Planner interface illustrates a side
view of the current route. It is possible to set
the altitude at which flights pass each waypoint. Clicking with the left mouse button on
a waypoint will allow you to adjust the altitude. The assigned altitude can be
increased by dragging it higher or
decreased by dragging it lower, as appropriate. If you click with the right mouse button,
the whole waypoint route can be dragged to
a different altitude.
Hint
If resources allow, a well structured
Interdiction Mission should include an
escort flight, wild-weasel flight and a strike
flight. Each of these should arrive at the target at a different altitude: the strike flight
low to avoid detection, the escort flight
should stay high to provide cover for the
strike flight and the wild-weasel higher still
so it can light-up and destroy any SAM
defences it encounters well before they
threaten the strike flight.
Mission Planner
48
Mission Planner
Use the Waypoint Editor to weave your way through EWR
Attack Pattern
With the waypoint route complete, the final
component of the mission to be edited is the
attack pattern flown by each aircraft over
the target. The Attack Pattern editor allows
you to manipulate the actual flight path of
each attack pattern through the target area.
For example, wild-weasel flights might want
to fly a criss-cross pattern searching for
SAM and AAA. By clicking the mouse on one
of the legs of the pattern, it can be repositioned to provide better cover from hostile
ground attack.
Attack patterns flown by strike flights vary
according to the weapon they are using:
guided-weapons are delivered by flying a
dog-leg strike pattern while free-fall
weapons must be dropped by over-flying the
target.
Once again, select Auto to force the Mission
Planner AI to complete the process for you.
Hint
Your approach angle to the target can be
changed by altering the IP waypoint in the
waypoint editor. Avoid overflying towns,
cities, bases and other built-up areas.
SAMs and AAA are more likely to be positioned in these locations.
Summary
Now the mission planning is complete,
select OK to jump into the cockpit of your
F-22 and embark upon your hand-editted
mission. Selecting Discard will return you to
the Mission Selection screen and reset the
mission to its original settings.
Dodge the AAA as you strike your target

51
Custom Combat
50
Custom Combat
Introduction
TAW has a new module called Custom
Combat. This module allows you to set up a
Basic Fighter Maneuvers (BFM) engagement with any of the aircraft and vehicles
available in TAW. It can also be played multiplayer to let you and your wingmen fly in a
dogfight of your choosing. Select the
Custom Combat tab from the main menu to
launch the TAW custom combat editor.
Set the Scene
Using the Custom Combat editor, you can
control what your BFM mission will be like.
These options can be selected in any order
you desire. The environmental conditions
available allow you to choose the time and
location of your mission. From the Global
Options section of the interface select your
desired Location (Desert, Hills, or Sea) and
Time of Day (Midday, Dusk, or Night).
Using the Advantage selection buttons you
can opt to give your flight the benefit of
starting the engagement in a good position behind the enemy. If you desire, you can
choose that no side should have the advantage at the start and this will result in you
confronting your foe head on. You can also
give the advantage to the enemy, which will
place them behind your flight. Keep in mind
that these settings only apply to the start and
after the mission begins it is up to and your
wingmen to determine the final outcome of
the fight!
Custom Combat
Hand edit instant combat action in Custom Combat
Choose your adversaries in Custom Combat
Login
Custom Combat
Custom Combat
Add Enemy Forces
A summary of your current mission can be
viewed in the Formation Selection window.
In this window you will see the results of any
Insert or Delete actions you have performed.
All aircraft and vehicles that are currently in
your mission will be displayed here.
To add an aircraft, select the Air button from
the Mission Information section of the interface. With Air selected, all available aircraft
will be listed in the scrolling window labeled
Mobile Type. Use the scroll bar to view your
choices and make your selection by clicking
on the aircraft’s name. With any of the available vehicles selected (Air, Land or Sea), its
3D image will appear in the viewing window
next to the scroll list. The 3D image can be
re-oriented by using the left mouse button,
the 3D image can be re-sized by using the
right mouse button. After a suitable aircraft
type has been selected, determine how
many you want in the flight, and then the
type of weapons you desire the enemy aircraft to have.
You can add any amount of enemies up to a
maximum of nine flights (aircraft) or groups
of ground-based vehicles, SAM, AAA and
ships to your mission. Note that if you accidentally add a land-based vehicle to a seabased mission, (or visa-versa) a pop-up
warning window will alert you to the fact
that the mismatched enemy equipment will
not appear.
Take-off
Once you are satisfied with your mission,
accept it and you will be propelled into the
cockpit ready to fight against your chosen
adversaries. On completion of the mission,
you will be debriefed on your performance
before returning to the Custom Combat
screen once again. You can Replay the mission as is or make minor modifications and
fly the mission over again.

53
haven’t fostered ill will towards each other.
Outright hostilities had not developed in the
past because of the lack of either a credible
military force or the capital required to support it. As a nation in the Red Sea area, you
were either a “have” or a “have not” in the
national forces department. But all of that
was soon to change.
Current Situation
New fortunes, created by the discovery of
precious metals and oil reserves within the
Red Sea operations area have lead to
regional unrest. International power struggles for the control of these precious natural resources now bolster nationalism and
strengthen each countries desire to fight.
With the new regional income, formerly poor
countries now can afford to train and equip
national military forces. All armed forces
within the region are ready and willing to
test their newly purchased hardware. It is a
very dangerous time.
Rapid Economic Growth
While on an international antiquities excavation in southern Sudan, a professor and
his archaeological team discovered unexpected oil reserves within that region. The
oil deposits extended from within southern
Sudan well into northern Ethiopia. Sudan
and Ethiopia exploited the oil reserves and
grew rich, becoming members of OPEC. The
excitement over the discovery of new oil
fields gave rise to new searches throughout
the area for other oil reserves.
Another series of large oil deposits were
found in the coastal region of Eritrea,
Djibouti and Somalia. Although not quite as
expansive as the fields discovered in Sudan,
it was sufficient to provide these three
nations with a 11% control over the world’s
petroleum market.
As the oil reserves along the Somali coast
were being mapped out, researchers stumbled upon new gold deposits. As the initial
gold strikes were quickly exploited, more
were found. There were some days when
the coastal nations ceased to function
because almost every citizen was out
with a pickax and shovel, looking for their
share of the fortune. The nations of Somalia,
Djibouti and Eritrea became wealthy practically overnight.
New Force Structures
Once the nations in the area possessed sufficient economic means, they quickly began
to build their national forces. A massive new
arms market developed in response to this
demand. Foreign consultants were hired to
advise the nations on hardware purchases.
The result was a quite diverse range of
equipment in use for each country, in some
cases Russian built systems being used right
along side western built systems.
Infrastructure
To support the new military, the old infrastructure which had supported the former
way of life had to be updated. Airfields had
to be modernized to allow strategic and tactical aircraft operations. A large anti-aircraft
network had to be established to provide
warning and protection from invading hostile aircraft. National landmarks and governmental assets had to be protected from
attack and reinforced to help repel any air
Scenarios
52
Introduction
The Campaign scenarios available in TAW
are very diverse in nature. They range from
border conflicts to multi-national regional
war. The TAW campaign engine has the
ability to introduce and dissolve new international alliances – during gameplay. Thus
the allied and enemy balance of power has
the ability to change, literally overnight.
Once you think that you have successfully
attained air superiority – the picture may
change, sometimes for the worse!
Regional Background
The Red Sea theater is composed of the
countries within the geographic region surrounding the Red Sea and the Gulf of Aden.
The countries located in the region are
Egypt, Sudan, Eritrea, Ethiopia, Djibouti,
Somalia, Yemen, and Saudi Arabia. The
other nations with interests in the area
include the U.S.A., Great Britain, China,
France, and Russia.
Pre-1999 History
In the mid-1990s, most of the military might in
the Red Sea region was found in only three
countries; Yemen, Saudi Arabia and Egypt.
All of the other nations, dealing with constant internal pressures and sporadic social
unrest could ill afford any concentrated
efforts at modern militarization. So the rest
of the area’s nations would bide their time
and wait for their opportunity to field a
national army that could stand against the
might of any one of the “big three.” Although
there weren’t any formal declarations of war
within the region, there were also no real
alliances. Each nation was kept busy dealing
with internal problems of various sorts, so
much so that any external issues were usually left unresolved. Border disputes erupted
from time to time and were usually settled as
a result of some form of military stalemate
with each side claiming to be the victor.
Cultural Differences
Another factor within the region stemmed
from the major cultural and religious differences between the peoples of the Red Sea
area nations. The population in the southwestern part of the region was largely
agrarian. Trading mostly foodstuffs and
other essentials for survival, farming groups
clustered into tribes and lay claim to several
hundred acres of land. When arguments
arose between neighboring tribes, the result
was often bloodshed, as tribal land holdings
sometimes crossed international borders.
Cities and towns within the region were
often defined by the religious beliefs of the
residents. Rarely, were there populations of
mixed beliefs. Only the largest trading and
commerce centers could tolerate such religious diversity. Religious beliefs also played
a major role in state and national rule, often
affecting the decision making and negotiating thought processes of the country.
Tensions
With all of the diverse people and religious
beliefs within the area, tension was an
everyday side effect. Although no formal
declarations of war had occured in the
recent past, that did not mean that nations
Scenarios
Scenarios
Scenario 1:
OPERATION HIGHLAND
Background
Sudan is a country divided by religion.In the north,controlling the government and the air force are the followers of Islam.In
the
southern Sudanese highlands there is a loose conglomeration of Christians and Animists.Following Sudan’s rise in power this
stratification further increased national tensions.The Sudanese government then decided to end all the strife and began trying
to
irradicate the “Christian scourge.” A mass exodus of people ensued, with several thousand people fleeing into Ethiopia and Eritre
a.
The United Nations was quick to condemn Sudan’s actions,but the Arab state continued its religious “cleansing.” Eritrea and
Ethiopia finally issued Sudan an ultimatum,stop the violence or face the consequences.
The United States, in the name of humanitarian causes,aligned with Ethiopia and Eritrea to help compel Sudan to end it’s
Christian persecution. Forces on both sides of the battle line began preparing for the upcoming conflict.In a rapid move,surpris
-
ing the United States state department,Sudan declared war on its southern and eastern neighbors and their allies; Ethiopia,
Eritrea and the U.S.
Force List
Enemy Nations:
Sudan.
Friendly Nations:
USA,Ethiopia, Eritrea.
Objectives
OPERATION HIGHLAND is a response to a war declaration by Sudan. Your objectives are to reduce Sudan’s capability to conduct
an extended war campaign against Ethiopia and Eritrea.You must begin by degrading the Sudanese Command and Control (C4)
system.After destroying the early warning and GCI networks,you must then reduce their air-to-air and air-to-ground capability b
y
targeting Sudanese Air Force units.
Possible Alternatives
If you are successful in reducing their Air Force’s strength,then you might be called upon to attack their land forces and try
to
prevent Sudanese land forces from crossing the southeastern border and attacking friendly ground forces.
Enem
y Interests
Intelligence reports that Sudan has boasted about the strength of their Air Force in the international community.They will most
likely attempt to prove this as they enter into a conflict.Other reports
indicate that Sudan will probably try to attack Ethiopian and Eritrean resource producing
infrastructure nodes.Be wary of this and be committed to protecting against any air attacks on
friendly centers of industry. If provoked by a sense that they might be losing the war, Sudan may resort to attacking targets tha
t
may have more of an impact on Ethiopian and Eritrean public opinion,such as churches,schools and universities,and government
meeting places.
55
Scenarios
54
strikes that might get through. Across all of
the Red Sea theater area, nations prepared
themselves for any outbreak of hostilities.
General Hints for Scenario Gameplay
TAW utilizes a dynamic campaign engine to
create the situation that the player must
react to. As such, hints to help you improve
your score will be more generic in nature
than with simulations which rely on scripted
missions. Since conditions can vary dramatically, even when playing the same scenario
a second time, it is wise to look for clues
as to “how” the enemy fights, rather than
memorizing what you see the enemy do the
first time through. The next time it will be
very different.
Intelligence Reports
As in the real world, intelligence reporting is
part science and part art. Some of the
reports you receive will be accurate and
some will not. Use intelligence reports as a
first estimate as to the enemies actual intentions and then try to confirm the enemies
actions by paying attention to what the
enemy is destroying. Also be aware that the
enemy, like you, can change their classes
of targets in response to the current
status of the conflict. Just like in actual war,
“stuff changes!”
Alliance Changes
You will discover that during gameplay international alliances can and will change. Be
cautious of this and be prepared to “flex”
and begin your fight all over again. When
alliances change, air assets and C4 nodes
will change to reflect the new situation.
Front line bases will now be home to fighter
and strike aircraft, whereas the more remote
bases will now have the high value assets
and other important strategic aircraft located there.
Scenarios

57
Scenario 3:
OPERATION STRIKE FORCE
Background
Somalia’s current ruling party has spent considerable effort in trying to develop nuclear weapons
technology with the aid of China.To date, none of the work has paid off but a plant that was theorized to be capable of manufact
ur-
ing weapon’s grade plutonium was discovered by Ethiopian spies.In a quick, precision air strike,Djibouti and French aircraft lev
-
eled the research buildings to the ground.Incensed by this act of “outright aggression”against them, Somalia moved their weapon
research to multiple,remote,clandestine locations.The Somali leadership vowed to continue research and to repay the aggressors
for their unwarranted intervention.
The world watched as the nuclear research standoff continued.Djibouti and France both decided that the only course of action
left was to strike all suspected research facilities in an attempt to put an end to Somalia’s quest to become a nuclear power.
Force List
Enemy Nations: Somalia,China.
Friendly Nations: Djibouti,France,USA.
Objectives
You will be tasked with destroying the suspected industry sites that might be part of the Somali nuclear weapons research effor
t.
Do your best to get your strike aircraft through to their targets.If the
intelligence community still believes that a threat of nuclear research capability exists after disabling the industrial sites
you may
be called upon to hit other classes of targets.
Possible Alternatives
To enhance the chances of your strike aircraft getting their missions completed you may consider
using dedicated SEAD missions along with your air-to-ground sorties. Some of your targets will be heavily defended.
Enemy Interests
The enemy will do everything they can to resist your efforts to invade their airspace and bomb their factories.SAM crews and C4
nodes will be watching closely for any suspect activity. Strike aircraft should expect to meet with a well coordinated resistanc
e.
Scenarios
56
Scenario 2
:
OPERATION PORT OF CALL
Background
Yemen has always exercised control over the southern portion of the Red Sea.But as Eritrea has grown into a regional power,they
have begun to compete directly with Yemen’s authority. In order to secure a higher throughput of oil to the world,Eritrea began
to
make their own rules with respect to the south Red Sea straits.Yemen protested and some heated exchanges occurred between the
two countries at the UN negotiating table. Finally it was Eritrea which broke from the truce talks, labeling Yemen as being total
ly
unreasonable.After a two-week cooling period the talks began again. Once more the
negotiations stopped,this time with Yemen leaving the table vowing to never return.They also added that any problems they might
have in the future with Eritrea would be settled by force.
Russia,eager to gain regional support and much needed petroleum supplies aligned with Yemen and the two countries signed a
joint force agreement.Yemen,now thinking that Eritrea would be foolish to engage a superpower,began actively enforcing their
naval regulations in the southern Red Sea.The U.S. was caught off guard by the force treaty and began to align itself with Eritr
ea.
In a bold move,Eritrea openly defied Yemen’s authority and sailed a large oil convoy through Yemen territorial waters.Yemen was
outraged,and the next time the Eritreans tried such a stunt,they would be punished.As the next large convey left port in Eritre
a,
the Yemen Air Force struck.They destroyed three Eritrean
warships and five super tankers. Eritrea declared war on Yemen in response to their senseless
disregard of Eritrean sovereignty.
Force List
Enemy Nations: Yemen, Russia.
Friendly Nations: Eritrea, USA.
Objectives
The key to the Yemen armed forces is their Command and Control structure,so your first task will be to attack C4 targets.After
degrading the ability of the Yemen Air Force to see and react to you, go directly after their air-to-air and air-to-ground asset
s. By
destroying Yemenis and Russian aircraft you will reduce their potential for any further devastating attacks on Eritrea.
Possible Alternatives
If Yemen refuses to capitulate you may have to reduce their potential for sustaining a prolonged
conflict by destroying key nodes within Yemen’s infrastructure.
Enemy Interests
Initially,Yemen’s most likely course of action will be to continue in their effort to remove Eritrea’s naval presence from the
south-
ern Red Sea area. Protection around key port facilities have been
reinforced in anticipation of this,but in the short time since hostilities began not enough has been done.Friendly forces are r
ely-
ing on defensive air-to-air missions to keep the enemies strike aircraft
at bay.
Scenarios

59
Scenario 5:
OPERATION FLAME OUT
Background
Djibouti and Eritrea share a large oil deposit that spans the border between the two countries.Rather than sharing the resource
,
each country laid claim to total ownership of the oil. A heated debate ensued as each country fought viciously to gain the selli
ng
rights to the oil.The UN intervened and was finally able to get both nations to agree to a “settling period” of twelve months.Th
is
settling period was a set amount of time that neither country could take advantage of the oil resources,while the field was
researched and documented.It was also hoped that during this settling period,both nations would
be able to develop a mutually satisfactory accord on the joint exploitation of the disputed oil resources.
Two weeks into the “settling period”Eritrean commandos conducted a raid on southern Djibouti.They succeeded in destroying a
major petroleum production plant and storage facility in eastern Djibouti.This act of terrorism re-focused the world’s attentio
n on
the region.As a result the USA
discovered,through the use of satellite imagery,Eritrea’s ulterior motive.
Eritrea is currently massing infantry, armor and artillery units in what is theorized to be a pending invasion of Djibouti.
Intelligence also reports the presence of Russian units in the buildup.Although there is no movement visible as of yet, rumors a
re
that Ethiopia has issued a nationwide force
mobilization order.
Force List
Enem
y Nations:
Eritrea,Russia.
Friendly Nations: Djibouti,USA.
Objectives
If Eritrea has enough time to assemble and mass it’s ground forces,Djibouti will be quickly overrun.The allied planners are tas
k-
ing you to destroy Eritrea’s petroleum manufacturing and storage facilities in an effort to immobilize the enemy ground force’s
vehicles before they can attack.
Possible Alternatives
You may also be required to directly target ground units themselves in an effort to ebb Eritrea’s impending invasion south.
Enemy Interests
The enemy will protect their ground units and fuel reserves from your attack.They will probably also try to launch an anti-air
offensive in an attempt to gain local air superiority.With control of the air, the enemy will be free to move their ground force
s at
will.
Scenarios
58
Scenario 4:
OPERATION OUTCAST
Background
Saudi Arabia had long been one of the wealthiest nations in the Red Sea operations area.Almost all of Saudi’s riches are the re
sult
of the country’s control over the world’s oil market.When Sudan entered OPEC and began to sell their oil to other countries,
expectedly, Saudi lost a small portion of their
consumer base.Initially the impact was negligible but in an attempt to fund a rapidly growing arms race,Sudan began “dumping”
their oil into the world market at ridiculously low prices.Saudi Arabia tried to bargain with Sudan through OPEC mediation
groups,but Sudan was still secretly using their oil to procure military hardware.
In desperation Saudi Arabia expelled Sudan from OPEC and attempted to impose economic sanctions on their former Northeast
African ally. In agreement with Saudi Arabia, the United States and the United Kingdom also entered into economic sanctions
against Sudan. But Egypt and France were quick to come to Sudan’s aid,agreeing that Saudi Arabia had acted without the full concurrence of OPEC.Sudan demanded to be let back into OPEC and to be permitted to sell their oil on the international
market.Saudi Arabia refused to re-admit Sudan to OPEC and denied their request for access to the world’s oil market.Sudan,
angry over the loss of revenue and the impact of the recent economic
sanctions decided to settle their dispute with Saudi Arabia through the use of force. Sudan’s foreign minister proclaimed,“If th
ey
won’t listen to the pleas of an Arab brother,then let them hear the
deafening thunder of our military might!”
Force List
Enem
y Nations:
Sudan,France.
Friendly Nations: USA,United Kingdom,Saudi Arabia.
Objectives
Initial intelligence estimates of Sudan’s offensive capabilities indicate that they are well trained and quite able to inflict
extensive
damage on Saudi Arabia.Sudan is also receiving support from France in the way of aircraft,weapons military advisors and air-
crews.Your first priority will be to attack their combined air force assets and attempt to reduce their offensive air power.Fro
m
there you can expect to target C4 as you try to “roll back”Sudan’s air defenses.
Possible Alternatives
After degrading Sudan’s air defenses the Saudi War Council has determined that the allied aircraft will then go after Sudan’s p
etro-
leum industry, in an attempt to reduce their oil output,thus trying to
curtail the influx of additional arms and military hardware.You should also be careful of Sudan’s strong ties with other Arab
nations in the region.Secret alliances may end up having an effect on your war plans.
Enemy Interests
Sudan will mount a solid defense to your attacks,and they will probably try to target your airborne resources as best they can.
Their only option at winning is to destroy your air force and make any
victory you might attain a costly one.
Scenarios

61
Scenario 7:
OPERATION THIN LINE
Background
During the past seven months an anti-Christian terrorist group has been active in the urban coastal cities in Eritrea, Djibouti
and
Somalia.The latest bombing claimed the lives of 178 Christian
parishioners.Elusive and highly intelligent,the terrorist group has evaded all attempts at capture.A break in the case occurred
when a trivial lead turned up some disturbing information.The group was apparently being sponsored by right wing,Islamic fundamentalists in Yemen.When the information was divulged to the world’s media, Yemen quickly disavowed any knowledge of such
a group.Activities associated with the terrorist group subsided for a while in the wake of the news.
Just before the terrorist group’s next attack,information about the operation was leaked to
authorities.The mission was foiled and the Djibouti authorities arrested 11 Yemenis army commandos.Yemen immediately
demanded they be set free.Djibouti officials ignored the demands and proceeded to try them as criminals.As the prisoners were
being transferred from the holding facility to the
infirmary for medical checks,another Yemenis commando team rescued the captives,killing all the guards and police officers in
the process.Yemen issued a statement defending their actions and vowed to continue such anti-Christian operations as long as
necessary to rid the region of any influence of such “infidels.” Eritrea, Djibouti and Somalia formed an alliance and demanded th
e
Yemenis criminals be brought to justice,if not first by internal means, then possibly by external military pressure.Yemen’s lack
of
response prompted the Christian alliance to declare war and enact their own brand
of justice.
Force List
Enem
y Nations:
Yemen.
Friendly Nations:Djibouti,Eritrea,Somalia,USA.
Objectives
You must first attack and destroy enemy air force assets.After reducing the effectiveness of their air power,attack key politic
al
targets in a statement of power.
Possible Alternatives
Be prepared to attack targets that will reduce the enemy’s ability to engage in an extended conflict.
Enemy Interests
At this point,nothing is known about the enemy’s intentions.
Scenarios
60
Scenario 6:
OPERATION CHOKE POINT
Background
As a result of the large oil field discoveries,Sudan’s petroleum output increased to rival that of Arab coalition partner,Saudi
Arabia.Both countries relied heavily on Red Sea shipping lanes to move their oil products to their consumer nations.When Eritre
a
began to produce oil,they also used the southern Red Sea for shipping throughput.With all this traffic in the water, the number
of
shipping accidents began to rise.It was obvious that someone had to get control of the situation and regulate the shipping traf
fic.
Eritrea and Yemen signed a trade waters agreement in which those two countries would provide regulation and control of ship
passage through the southern Red Sea into the Gulf of Aden.Once Yemen and Eritrea seized control, the price of safe passage dra-
matically increased. Sudan and Saudi Arabia protested the toll fees. The argument hit fever pitch when Eritrea and Yemen decided
to limit the number of Sudanese and Saudi tankers passing through the straits.This action had a severe impact on Sudanese and
Saudi oil deliveries. As the situation now stood, Eritrea and Yemen had almost
complete control over south Red Sea oil distribution.
Ethiopia,in an attempt to further its own causes,aligned with Eritrea and Yemen and was able to use south Red Sea shipping
lanes at will. China, one of the largest consumers of the Red Sea oil
products aligned itself with Eritrea and Yemen to avoid loosing its precious oil supply. Ethiopia,Eritrea and Yemen surpassed
Saudi and Sudan in oil distribution revenues.
Sudan was in a difficult position.They were hurt the most by the developments in the south Red Sea. Saudi Arabia,because of
their close ties with Egypt,was able to use the Suez Canal (although at
considerable cost) to get it’s oil shipments out.Sudan did not have the luxury of using the Suez Canal because of a long standi
ng
border dispute with Egypt.Their only option was to use the Red Sea.
While Eritrea,Ethiopia and Yemen asserted control over the shipping lanes, they also began building the strength of their armies
.
Nationwide military conscription was instituted to start filling the ranks. Foreign advisors and personnel were brought in from
China to assist in reorganization and training of army units.The extra capital brought in by the increased oil sales was direct
ly
used to amass military hardware.It certainly seemed as if Yemen, Eritrea and Ethiopia were preparing to declare themselves the
“newest” regional powers.
As a final step to gain control over the oil distribution,Yemen and Eritrea closed the south Red Sea to all Sudanese and Saudi
Arabian oil tankers.Sudan’s rebuttal came in the form of a war declaration on Yemen,Eritrea and Ethiopia.Saudi Arabia,entered
a non-binding use of force agreement along with Sudan against the antagonistic nations that had closed the southern shipping
lanes.The final line had been crossed.
Force List
Enem
y Nations:
Yemen,Eritrea,Ethiopia, China.
Friendly Nations:USA, France, United Kingdom,Saudi Arabia,Sudan.
Objectives
Your first targets will consist of ground based military units in an attempt to minimize the chances of an enemy ground offensi
ve.
Any subsequent target lists will be linked to the main objective of
precluding any coherent ground based attacks by destroying key industrial,infrastructure, or fuel
producing targets.
Possible Alternatives
As the enemies military buildup continues you may have to destroy other classes of targets in an attempt to reduce any military
advantage the enemy might have.
Enemy Interests
The enemy will probably attempt to reduce the effectiveness of our C4 system and degrade the ability of our AWACS aircraft to
perform its mission.
Scenarios

63
Scenario 9:
OPERATION SEA BREEZE
Background
A small coastal town in Somalia reported that several hundred residents became violently ill just after 10 O’clock in the morni
ng.
As medical help arrived,the condition of the affected townspeople worsened. By nightfall over half of the town’s population had
died,and what was left was in critical condition. Doctors speculated that the symptoms were that of a nerve agent, although no
reagent was found at the site of the carnage.Two weeks later a similar incident occurred in southern Djibouti,again there was n
o
evidence left of what had actually caused the sicknesses and the deaths.
Over the next week, there were several incidents of adrift fishing vessels being found,on which the crew was dead and or missing.Autopsy reports confirmed that the fishing crews had perished in the same manner as the residents of the two small towns. A
young surgeon in Djibouti determined to find the cause of the catastrophes plotted the last known position of the boats on a ma
p.
He made a
startling observation.In both cases, the fishing crews had been well offshore the affected towns and in both cases the fishing
crews had perished before the towns were even affected. He drew a line from the towns through the area of the fishing vessels
until the line hit land.Both of the lines met in a coastal area of Yemen known for it’s secret military research facilities.As
a final
check,the young doctor found the weather records for the wind speed and direction on the days of the attacks and it all matched
up perfectly.Yemen had to have been conducting chemical or biological weapons testing and have also been using the surrounding
nations as test subjects.
Yemen vehemently denied all accusations while they quickly dismantled the research facility. Intelligence reports seemed to indi
-
cate that the research was still being conducted,although no one except the Yemenis knew where.
Force List
Enem
y Nations:
Yemen.
Friendly Nations:USA, Djibouti, Somalia.
Objectives
Take out all industrial research sites in Yemen in an attempt to curtail their chemical and biological weapon research.Intellig
ence
has indicated that these facilities may now be located within government buildings.
Possible Alternatives
None at this time.
Enemy Interests
The enemy will most likely continue to strike at you while you are trying to locate and stop the weapons research.
Scenarios
62
Scenario 8:
OPERATION SEA CONTROL
Background
Djibouti is holding their first three-party presidential election.The front runner is a staunch
right-wing conservative named Igman Bushir. The next closest candidate still represents a conservative platform,but not as radical as Bushir’s.Because of his Christian beliefs,the popular candidate is not well liked in the Arab world.Although not Anti-Ar
ab,
Bushir has made it clear that Yemen has too much control in the Red Sea and that power over commercial shipping should be
shared with Djibouti.
After the presidential election votes are tallied,Bushir wins. At his inauguration,Bushir is shot. His wound proves fatal and con
-
trol of the nation passes to the vice president.The gunman is arrested and turns out to be a radical Yemenis student,studying i
n
Djibouti.The new president has the assassin publicly executed,and in his follow up address to the nation,declares a state of wa
r
with Y emen.
Force List
Enem
y Nations:
Yemen,Russia.
Friendly Nations: Djibouti,China, United Kingdom,USA.
Objectives
Your first attacks will be against political targets in Yemen as a response to the continued support Yemen has provided to anti
-
Arab sympathizers in the region.
Possible Alternatives
Other important centers of gravity in Yemen include their air force and C4 system.Be warned that, in this part of the world ther
e
is always the possibility of hidden force agreements between countries.Try not to offend neighboring nations and cultures or yo
u
run the risk that they might also become embroiled in the conflict.
Enemy Interests
The enemy will use their powerful air force to try to stop you.They may also try to attack your military hardware manufacturing
facilities,which they have interpreted as one of your weaknesses.
Scenarios

64
Scenario 10:
OPERATION URGENT SHIELD
Background
Northern Ethiopia is home to several nomadic tribes which have maintained a “loose ownership” of their hunting and farming
grounds on which they live.When oil reserves were discovered in the area,the government annexed the land,but let the tribes
continue their way of life on the government owned property. As oil rigs and petroleum company workers arrived and setup living
areas the land area used by the tribes began to shrink. This action caused a lot of pressure between the two groups. The tribes
desired to have their land holdings back and the oil company,on the other side,wanted to rapidly exploit the oil rich ground. Mi
nor
skirmishes occurred as the two sides struggled for control of the land.The oil company took their problem back to the government. Motivated by oil money, the
government dispatched the army to get control of the situation.The government troops moved in and began to systematically
“exterminate”the tribe members.
Word of the massacre spread quickly throughout the tribes and a mass exodus to Eritrea ensued. Overwhelmed by the number of
Ethiopian refugees,Eritrea with UN support,setup several
humanitarian aid camps around major ports to help house the homeless tribes people until other accommodations could be procured. Ethiopia was angered that Eritrea and the UN had intervened in what was thought to be strictly an issue of “national con-
cern.” In response to Ethiopia’s threats,Eritrea closed down all Ethiopian oil shipping.China, who was heavily reliant on Ethiopi
a’s
oil,
condemned Eritrea’s shipping embargo against Ethiopia.The Chinese agreed that the refugee situation was a matter of internal
unrest that Ethiopia should be left to resolve by itself.A UN delegation,
headed by the US and Russia sided with Eritrea. Angered by the loss of revenue over the suspension in shipping privileges,
Ethiopia conducted surprise air strikes against Eritrea. Once again the region was embroiled in war.
Force List
Enem
y Forces:
Ethiopia,China.
Friendly Forces: Eritrea,USA, Russia.
Objectives
Your objective is to defend Eritrea by attempting to reduce the Ethiopia’s air power.In concert with your primary objective you
must target C4 nodes in an attempt to “blind” the enemy.
Possible Alternatives
None at this time.
Enemy Interests
It is postulated that the Ethiopian decision makers will want to destroy friendly shipping capabilities in response Eritrea’s s
hip-
ping embargo.Not much is currently known about what the Ethiopians and their allies are doing.
Scenarios
65
Introduction
The Lockheed F-22 Raptor is a fighter
uniquely optimized for the air superiority
role. It represents a quantum leap in capability over its predecessor, the McDonnell
Douglas F-15 Eagle. Key to this role is the
ability to see and shoot before an enemy is
aware of any threat, so reducing combat
losses - what Lockheed-Martin refers to as
‘first-look, first kill’ capability. The F-22
uses stealth technology to remain undetected for longer, shares data between command aircraft and fighters and merges
onboard and off-board sensor information
into one coherent display. The pilot is able
to alter his stealthiness by altering emissions from active sensors and jammers,
simply by adjusting the EMCON (emission
control) level.
In a secondary strike role, stealth and smart
weapons combine to aid undetected penetration of enemy airspace, with accurate
delivery of tactically efficient weapons.
The F-22 receives target information from
active and passive sensor suites on-board
and via data link from off-board sensors on
other aircraft such as AWACS and friendly
fighters. For the first time in a fighter aircraft,
this information is fused together to build
one overall picture of any given situation,
instead of each detection system feeding its
own dedicated display. Separate displays
increase the pilots workload, while ‘sensorfusion’ techniques reduce it dramatically.
Stealth technology has helped determine
the shape of the F-22 (hence its angular
fuselage and wings), so that the aircraft’s
position is not easily given away to hostile
radar. Equal consideration has been given to
the detection systems and avionics so that
they will do little to give away the plane’s
position. A normal radar sends out a concentrated signal and detects return echoes
making it an inherently non-stealthy device.
An opponent’s radar warning receiver may
detect its signal. The F-22’s radar has been
specially designed so that its energy is distributed over a broad spectrum, making it
very hard to detect. It is known as a Low
Probability of Intercept (LPI) radar and is
controlled by the aircraft’s EMCON
(Emissions Control) setting.
To a large extent the F-22’s systems think for
themselves, sharing the workload in the
event of threat or damage. The EMCON system automatically adjusts the F-22 sensors
and defensive aids to deal with potential
threats, although manual EMCON override is
available should the need for different tactics arise.
Total Air War has been modeled on these
features, using information available about
the F-22 and the design concepts used in its
construction.
The F-22
The F-22

EMCON Steps
The EMCON steps have been based on the
real F-22, but due to military sensitivity and
game play reasons the device’s abilities
have been defined as follows:
EMCON 1
• The radar is off.
• The AMRAAM is disabled.
• The IRST is the primary on board detection
system with a range of 50 miles. It can be
used to target target and launch the
Sidewinder air-to-air missile and the
Maverick Air-to-Ground missile.
• The Radar Homing And Warning is on to a
range of 50 miles. (RHAW warns of enemy
radar activity, tracks and then classifies the
source type).
• The Missile Approach and Warning is on.
(The MAW system warns of enemy missile
launches).
• The Communications radio is prevented
from transmitting.
• The secure data link is set to receive.
EMCON 2
• The radar is on and is able to ID and track
air-to-air contacts only.
• The AMRAAM is disabled, but the missile
steering circle information is now displayed
on the Air-to-Air HUD.
• The IRST is on with a range of 50 miles. It
can be used to target and launch the
Sidewinder air-to-air missile and the
Maverick Air-to-Ground missile.
• The RHAW is active to a range of 100 miles.
(The RHAW warns of enemy radar activity,
tracks and classifies the source).
• The MAW is off. (The MAW warns of
enemy missile launches).
• The Communications radio is fully on.
• The IFDL secure data link is set to both
send and receive.
EMCON 3
• The radar is on and is able to ID, track and
target air-to-air contacts.
• The AMRAAM is now enabled.
• The IRST is on with a range of 50 miles. It
can be used to target and launch the
Sidewinder air-to-air missile and the
Maverick Air-to-Ground missile.
• The RHAW is on to a range of 150 miles.
(The RHAW warns of enemy radar activity,
tracks and classifies the source).
• The MAW is off. (The MAW warns of
enemy missile launches).
• The Communications radio is fully active.
• The IFDL secure data link is set to both
send and receive.
EMCON 4
• The radar is on and is able to ID, track and
target air-to-air contacts.
• The AMRAAM is enabled.
• The radar is also able to ID track and target
large ground mobile and ship targets.
• The IRST is on with a range of 50 miles. It
can be used to target and launch the
Sidewinder air-to-air missile and the
Maverick Air-to-Ground missile.
• The RHAW is active to a range of 200 miles.
(The RHAW warns of enemy radar activity,
tracks and classifies the source).
• The MAW is on. (The MAW warns of
enemy missile launches).
• The ability to manually launch drones and
chaff is enabled.
• The Communications radio is fully active.
• The IFDL secure data link is set to both
send and receive.
EMCON 5
• The radar is on and is able to ID, track and
target air-to-air contacts.
• The AMRAAM is enabled.
• The radar is able to ID track and target all
ground mobile and ship targets. Air-to-
67
The F-22 – Avionics
66
Avionics
Onboard systems comprise radar, IRST
(Infra Red Search and Track), RHAW (Radar
Homing And Warning), IFF (Identification
Friend or Foe), active jammers and the MAW
(Missile Approach and Warning) systems. Of
these, the radar and jammers are active
devices that could give away the aircraft's
position from the energy being sent out. The
others are passive, or listening, systems. All
aircraft systems that emit energy and could
therefore alert the enemy, such as active
sensors or radios, are controlled by the
EMCON system.
EMCON Settings
The EMCON system is there to decide how
to balance stealth against detection and
jamming capability. There are five EMCON
levels, controlled either automatically by the
aircraft computers, or manually by the pilot.
EMCON 1 is the stealthiest and EMCON 5 is
the least stealthy, allowing the most use of
radar and radio.
In its auto mode the F-22 would normally
travel in the stealthiest mode, EMCON 1.
After a potential enemy is spotted, the aircraft systems will gradually increase the
EMCON condition as the opponent gets
closer, in order to provide more data for targeting, or in the worst case, jamming. It
increases EMCON in non regular steps
based on the evaluated range of the enemies’ detection systems and weapons.
By exploiting stealth, the pilot is able to stalk
his target like a cat stalking a mouse, without the target ever being aware of danger.
With each increase in EMCON, the pilot has
more information with which to decide on a
course of action (engage or not) and with
which to target his weapons. At EMCON 3 he
will be within AMRAAM firing parameters
and have enough information for BVR
(Beyond Visual Range) missile targeting. By
the time the systems have reached EMCON
5, detection by the enemy is irrelevant
because the aircraft will be most likely be in
visual range. It should be noted that Russian
fighters like the Sukhoi Su-37 employ the
two pronged approach of using a very powerful radar to burn through any stealth
advantage, then turning its radar off and
handing over to passive IRST. The pilot is
able to manually override the avionics and
choose the EMCON condition best suited for
chosen tactics, For example, on a strike mission where surprise is everything, the pilot
may wish to remain stealthy, despite the
proximity of enemy fighters.
When using radar guided Air-to-Air missiles
(such as the AIM120 AMRAAM) you must
have an EMCON level at least 3 to launch.
These weapons can not be launched at
EMCON levels 1 and 2.
The avionics allow the classification and
display of enemy aircraft and SAM control
radar. By knowing what you are up against
and by displaying the enemy's detection and
weapons ranges, it is possible to sneak
around the danger and keep the F-22
stealthy. In other words the F-22 pilot enjoys
the rare ability to see his enemy yet not be
seen and therefore knows just how far his
enemy is able to see and strike.
EMCON level is selected in one of two ways.
Firstly, by an MFD button in the cockpit for
both manual and automatic EMCON level.
Secondly by pressing E on the keyboard and
choosing a level option; e.g. 1 for manual
EMCON 1 etc., or option 6 for auto EMCON.
NOTE: EMCON is normally set to automatic.
The F-22 – Avionics

69
This is done by pressing the relevant button
on the Systems MFD. The number of
weapons to be launched as a salvo or ripple
is set in the Systems MFD, before you
engage. One press of the trigger will start
the sequence.
Sharing targets with your wingman
Information on targets is shared through the
IFDL (Intra Flight Data Link), enabling you to
target and prioritize the weapons of your
wingman by either pressing F2 or F3 on the
keyboard. Then you simply ask your wingman to engage by pressing TAB to talk to
Wingmen, option 3 Combat, next option 1
“ENGAGE MY TARGET”. A quicker method is
to press F2 (or F3) on the keyboard and then
press M .
Infra Red Search and Track (IRST)
The IRST is a highly sensitive infrared camera that has the ability to magnify a target for
display on the Up front MFD. This allows the
pilot to visually identify targets at well
beyond visual (eyeball) range. The IRST
scans around a frontal arc and several
degrees up and down. It operates in tandem
with the radar in EMCON 2 and higher, being
cued (pointed to) the currently selected
target in the SHOOT list. The IRST will be
slaved to the pilot’s view if a padlock view is
used (F2).
In EMCON 1 the IRST becomes the primary
on-board search and track device, cued to a
potential target by its heat emissions. As
such it is a very stealthy means of acquiring
targets. Target information gained by the
IRST is pooled with all other sensor information allowing all air-to-air and Air-to-Ground
guided weapons to be cued to their targets.
For additional information please refer to
‘Shoot Lists’ and ‘Cycling Targets’ above,
together with entries on AMRAAM,
Sidewinder and Maverick missiles.
Removing HUD Clutter with the ‘J’ key
The ‘J’ key can now be used for removing
clutter from the HUD to allow you to concentrate on the target at the head of your shoot
list. The ‘de-clutter’ is a toggle on/off function and when toggled on turns off the following symbology in the air-to-ground and
air-to-air HUD modes:
• Velocity vector
• The HUD Terrain following box
• T argets that are not currently at the head of
the shoot list
• The radio frequency indicator
• The EMCON indicator
The F-22 – Avionics
68
Ground missiles requiring radar for targeting
(Harpoon) are enabled for launch.
• The IRST is active, with a range of 50 miles.
It can be used to target and launch the
Sidewinder air to air missile and the
Maverick Air-to-Ground missile.
• The RHAW is active to a range of 250 miles.
(The RHAW warns of enemy radar activity,
tracks and classifies the source.
• The MAW is fully active. (The MAW warns
of enemy missile launches). The defensive
suite of drones, ECM, chaff and flares is fully
enabled.
• The Communications radio is fully active.
• The IFDL secure data link is set to both
send and receive.
Shoot lists
Detected targets are put into a ‘Shoot List’ in
the sorted order of engagement, either automatically via a key press or manually via the
MFDs. Priority of threat is assessed from
enemy bearing, type and speed. A shoot list
for the currently selected weapon type is
built by pressing T on the keyboard.
Note: the shoot list is normally built automatically. Targets can be put into the shoot list manually
by padlocking the target using F2 or F3 on the
keyboard and then pressing S. This is particularly relevant for targeting the AIM-9X Sidewinder
and AGM-65 Maverick.
T argets can also be added manually by looking at the Situation or Attack MFDs and placing the cursor over a target and clicking.
Each new click over a marked target will add
it to the shoot list . Your weapons, when fired
will engage the targets in the same order
that you picked them.
The number of shoot list entries is directly
related to the number of weapons carried, a
separate shoot list being built for each
weapon on board. The shoot list generation
system prioritizes targets in center of HUD
higher than the other potential threats. To
prioritize something higher, place it in the
center of the HUD, and press ‘T’.
NOTE: an automatic shoot list can be added to
manually until all weapons carried have a target
and hence a position in the list. Information about
targets is displayed in the bottom left corner of
each MFD if you place the cursor over a target on
that MFD.
The shoot list can be cleared with the ‘U’
key. This is useful in situations where you
build an automatic shoot list and then need
to clear to build a manual shoot list.
Cycling targets
There are 2 methods for cycling targets:
automatic and manual. The Shoot lists are
normally set to cycle a target manually, i.e.
you will have to cycle your aim to the next
target after firing at it by pressing the C key
to cycle through the list forwards, or the X
key to cycle through the list backwards.
Automatic cycling is available as on the
real F-22, by going to the Attack MFD and
pressing the ‘Auto Cycle Targets’ button.
Each time you fire a selected weapon, the
target for your next weapon will be shifted to
the next target in the SHOOT list. This means
that you can quickly engage a number of targets in rapid succession, just by firing each
time the SHOOT cue appears. Auto target
cycling can be toggled on / off using ‘Shift C’.
When you only have one pass at the enemy,
you might want to set the selected weapon
to launch as a salvo fire, or ripple fire. In
salvo fire, all selected weapons will launch.
In ripple fire, each weapon will launch when
it has all the information it needs and is
in range.
The F-22 – Avionics

71
The F-22 – Avionics
Head Up Display
The Up Front MFD
Combined
Communications &
Warnings MFD
Defense MFD
Artificial Horizon MFD
Attack MFD
Situation MFD
Systems MFD
70
Cockpit Layout
The F-22 – Avionics
The F-22 has a full ‘glass’ cockpit
The Head Up Display
The HUD is positioned in the pilot’s line of sight and inside the front of his canopy. It is possible to cycle the HUD colors between bright red, dark green, bright green, or dark red and can be cycled through those colors by pressing the
keyboard SHIFT H keys. Information useful to the pilot is shown on the HUD in 5 selectable modes, all of which can be
selected by cycling through H on the keyboard.
Common information in all F-22 HUD modes
Indicated Air
Speed in Knots
Current EMCON
Status
Pitch Ladder Current HUD
Mode
Compass Ribbon Waypoint Carets Current Radio
Frequency
Velocity Vector Altitude in Feet Next Waypoint Engine Power Airbrake Status G Force Readout

73
The F-22 – Avionics
72
The Helmet Mounted Display
The F-22 – Avionics
The AA HUD - essential information for Air-to-Air combat
First A/C in
Shoot List Type
Target Altitude Target Range
(Nm)
Air-to-Air
HUD Mode
Air Speed
(Mach)
Enemy A/C
Tracked & First
on Shoot List
Enemy A/C
Tracked & in
Shoot List
Closing
Velocity
Target Speed Currently
Selected
Weapon Range
Bar
Target Range
& Priority
Defense MFD
(Pilot Aid)
Sensor Range
(Nautical Miles)
Situation MFD
(Pilot Aid)
Sensor Range
(Nautical Miles)
Air-to-Air Weapons HUD
The Air-to-Air weapons HUD is selected by pressing RETURN on the keyboard, or by pressing H to cycle through the
HUD modes. The Air-to-Air HUD shows all useful information for air combat.
Current HUD Mode
Pilot Aids
Pilot aids overlays the Situation and Defense displays in the bottom corners of the screen. The pilot aids default to on
in the ‘Full HUD’ view and their settings can be adjusted by pushing ‘Shift G’. The three settings are:
• Full HUD pilot aids (Default)
• Full HUD and virtual cockpit pilot aids
• Pilot aids off
Helmet mounted information
For additional information please refer to the Online help (main menu, help button).

75
The F-22 – Avionics
74
Instrument Landing System HUD
The Instrument Landing HUD is selected by pressing H to cycle through the HUD modes and displays information to
aid landing.
The F-22 – Avionics
Air-to-Ground weapons HUD
The Air-to-Ground weapons HUD is selected by pressing BACKSPACE on the keyboard, or by pressing H to cycle
through the HUD modes. The Air-to-Ground HUD shows all of the useful information for targeting mobile or static
ground targets.
The AG HUD - essential information for Air-to-Ground combat
The ILS HUD - landing made easier
Bomb Fall
Angle
Bomb Fall Line Currently
Selected
Weapon
Number of
Weapons
Available
Selected Firing
Method
Selected
Target Cycling
Current
LANTIRN
Mode
Landing Approach
Speed Warning
Instrument Landing
System HUD mode
Landing Approach
Altitude Warning
Instrument Landing
System Markers
Vertical Speed
Indicator
(Feet Per Second))
Air-to-Ground
HUD Mode
The HUD Terrain Following Box
T o allow your F-22 to fly at low level your HUD shows a rectangle at the bottom of the display. As your plane flies lower
the rectangle rises up the display. If you keep the velocity vector in or above the box then your plane is in no risk of
hitting the ground.

77
The F-22 – Avionics
76
Air Refueling HUD
The air refueling HUD is selected by pressing H to cycle through the HUD modes and displays all useful information
for in-flight refueling.
The F-22 – Avionics
Navigation HUD
The air navigation HUD is selected by pressing H to cycle through the HUD modes and displays useful information for
navigation around the world.
The Navigation HUD - find your way from A to Z
Weapons Deactivated Navigation
HUD mode
Status to Planned
Altitude
External Fuel Status Internal Fuel Status
Weapons Deactivated Refueling
HUD mode
Altitude Warning
External Fuel Status Internal Fuel Status Refueling Status
The Refueling HUD - essential for this difficult maneuver

79
The Multi Function Displays
In the F-22 cockpit their are seven MFDs. See the cockpit diagram in the Avionics description above. For additional
information please refer to the Online help (main menu, help button).
The Combined Communications and Warnings MFD
This MFD has one mode: Display text transcriptions of messages sent to you audibly, plus the currently selected communications radio frequency. Interspersed with the messages will be system malfunctions and warnings text.
The F-22 – Avionics
78
The F-22 – Avionics
Text corresponding to audio and warning messages are displayed on this MFD
Cycle Radio
Frequency
Data Text Damage Report
1. The Target is being Tracked 2. The Target is Locked and in
the Shoot List
3. The Next Target in the
Shoot List
4. Weapon Launched at
Individual Target
1. The Target is being Tracked 2. The Target is Locked and in
the Shoot List
3. The Next Target in the
Shoot List
4. Weapon Launched at
Individual Target
Indicated Targets
Targets are marked on the HUD and MFDs as shown in the accompanying diagrams:
HUD Symbology MFD Symbology MFD Color
Enemy Aircraft (Subsonic) Red
Enemy Aircraft (Supersonic) Red
Enemy Aircraft Radar Coverage Red
Friendly Aircraft Green
Unknown Aircraft Yellow
Enemy Ship Red
Friendly Ship Green
Unknown Ship Yellow
Enemy Ground Mobile Red
Friendly Ground Mobile Green
Unknown Ground Mobile Yellow
Enemy Missile Red
Friendly Missile Green
Enemy Static Target Red
Enemy SAM or Radar Site Red
(Circle shows Radar Coverage)
Wingmen Light Blue
Strike/High Value Asset (in your mission) White
Wild Weasel (in your mission) Dark Yellow
Escort (in your mission) Light Yellow
HUD Targeting Sequence
MFD Targeting Sequence
RDTSR

81
The Artificial Horizon MFD
This MFD displays the Artificial Horizon.
The F-22 – Avionics
80
The Up Front MFD
This MFD has two modes:
1. Display aircraft target images detected by the IRST when the HUD is in Air-to-Air mode.
2. Display ground target images detected by the IRST when the HUD is in Air-to-Ground mode.
You can display the artificial horizon in other MFDs such as the System MFD or LANTIRN MFD.
The F-22 – Avionics
IRST display and Warning lights
Manual ACMI
Recording
EMCON 1 EMCON 2 EMCON 3 EMCON 4 EMCON 5 Auto EMCON Cycle HUD
Mode
R1 - Radio Frequency 1
R2 - Radio Frequency 2
R3 - Radio Frequency 3
R4 - Radio Frequency 4
LI - LANTIRN Image
WI - Weapon Image
II - IRST Image
LI - Lock Image to
Selected Weapon
ZI - Zoom Image Gear Up/Down Main Bay Doors
Open/Close
Artificial horizon - useful for instrument approaches
Artificial Horizon Pitch Ladder Display Autopilot
R1 L ZI
R2 WI
R3 II
R4 LI
Avionics Audio Cues
The F-22 avionics have a female voice that
issues warnings, known affectionately to
pilots as “Bitchin’ Betty”. Betty is intended
to provide an audible cue or warning of
importance to the pilot when his mind is on
something else! However, Betty can be
turned on/off by pressing the relevant button
on the Systems MFD. Further cues and
warnings are given by assorted synthesized
sounds.
Engine Status,
Left / Right
Radar Lock Warning
Incoming Radar
Guided Missile
Incoming Infra-red
Missile
E1 E2 E3 E4 E5 EA CH
HPLA
TA
G
B

83
The Situation MFD
This MFD has two display modes:
1. Display sensor information of the overall situation.
2. Display the interactive Auto-pilot
The F-22 – Avionics
82
The Defense MFD
This MFD has two display modes:
1. Display sensor information with the addition of enemy radar and weapons ranges.
2. Display the interactive Auto-pilot
The F-22 – Avionics
Display Attack MFD
Display Enemy Radar
Range
Display Auto-pilot
Increase Sensor
Range
Decrease Sensor
Range
Display Artificial
Horizon
Defense - critical information about your enemies offensive stance
Situational awareness - the moving map underlies all detected targets
Auto EMCON Cycle EMCON
Backwards
Cycle EMCON
Forwards
Launch Decoy
Drone
Launch Chaff Launch a
String of
Six Flares
Display Attack MFD
Display Map
Display Place Names
Display Waypoints
Display Auto-pilot
Increase Sensor
Range
Decrease Sensor
Range
Display Artificial
Horizon
Auto EMCON Cycle EMCON
Backwards
Cycle EMCON
Forwards
Waypoint
Editor
Filter Own
Sensors Only
Filter Ground
Targets Only
Filter Air
Targets Only
AE E- E+
AE E- E+
CH FL
WE OS GT AT
D
ER
A
D
M
PN
WP
A
S+
S-
H
S+
S-
H
Kill Boxes in Training Missions
Kill Boxes are shown as red boxes on the ‘Situation’ and ‘Attack’ MFDs. Any ground based unit (tanks and SAMs etc.)
contained by the box are to be regarded as the enemy.
Mission Targets
Mission targets are indicated in the Defense, Situation & Attack MFDs by the letter ‘T’. (This is only available at Easy
& Medium difficulty settings).

Display Attack MFD
Display Weapons
Image
IRST Image
Display Altitude Data
Display Auto-pilot
Increase Sensor
Range
Decrease Sensor
Range
Generate Shoot List
for Selected Weapon
Display Range Data
Display Artificial
Horizon
Auto EMCON Cycle EMCON
Backwards
Cycle EMCON
Forwards
Auto Cycle
Targets
Manual Cycle
Targets
85
LANTIRN - for precision ground attacks with guided weapons
The F-22 – Avionics
84
The Attack MFD
This MFD has four modes:
1. Display sensor information with the emphasis on ranges and heights.
2. Display the LANTIRN TV image from the under fuselage ‘eyes’ for targeting laser guided weapons.
3. Display the interactive Auto-pilot
4. Display an image sent back by a camera equipped weapon, (such as a Maverick air-to-ground missile).
The F-22 – Avionics
Attack - everything you need to know to engage the target
Display
LANTIRN
Image
LANTIRN
Reset
Zoom
LANTIRN
LANTIRN
Track
LANTIRN
Mode
Display
LANTIRN
Image
LANTIRN
Reset
Zoom
LANTIRN
LANTIRN
Track
LANTIRN
Mode
AE E- E+ AC MC
AE E- E+ AC MC
L LR ZL LT LM
LLRZLLTLM
D
WI
II
AD
A
D
WI
II
AD
A
S+
S-
SL
RD
H
S+
S-
SL
RD
H

87
The Systems MFD
The F-22 – Avionics
86
The Systems MFD
This MFD has five modes:
1. Display the general systems of immediate importance to the pilot.
2. Display the fuel systems.
3. Display wingman information
4. Display systems status.
5. Display the interactive Auto-pilot
NOTE: on the systems MFD are buttons which will alter the firing of weapons, the options are: single, ripple and salvo fire.
The F-22 – Avionics
General systems (Wingman Mode) - engine fuel and weapons status at a glance
Display Attack MFD
Display Fuel Systems
Display Wingman’s
System
Display Systems
Check
Display Auto-pilot
Vocal Warnings On
Display ILS Markers
Display Artificial
Horizon
Auto EMCON Cycle EMCON
Backwards
Cycle EMCON
Forwards
Cycle Firing
Mode
Decrease
Firing Number
Increase
Firing Number
Decrease Fire
Delay
Increase Fire
Delay
Fuel systems - fuel usage at a glance
Fuel Usage Rate Total Fuel Remaining
Internal Fuel
Tank Level
Engines Auxiliary Fuel
Tank Level
AE E- E+
FM F- F+ D- D+
D
FS
WS
SC
A
VW
IL
H

89
The Systems MFD
The F-22 – Avionics
88
The Systems MFD
The F-22 – Avionics
Aircraft systems status - Check your Aircraft systems at a glance Auto-pilot - alter the Auto-pilot instructions
Generator
Weapons Bay
Fuel (Leak)
LANTIRN
Air Brake
Communications
Cannon
Nose Wheel
Steering
Air Frame
Control Surfaces
Head Up Displays
Cockpit Pressure
Auxiliary Power
Engine 1
Hydraulics
Radar
Avionics
Engine 2
Infra Red Search
& Track
Under Carriage
A breakdown of the abbreviations used in the Systems Status MFD
Green Means that the system is fully functional.
Yellow The system is damaged but still operable.
Red That the system is badly damaged.
Flashing Yellow The system is on fire.
Waypoint Follow Mode Heading Follow Mode Track Target Mode Speed Mode
Take Off
Mode
Landing Mode
Air Refuel
Mode
Enable Auto-pilot

91
The F-22 – Avionics
90
The F-22 – Avionics
The Auto-pilot
The Auto-pilot is capable of controlling the
F-22 throughout all the phases of a mission.
It will taxi the aircraft to the runway and
automatically takeoff, follow a waypoint
route and a predetermined heading, track
targets, maintain a constant speed, aid airto-air refueling and assist in landing and
taxiing back to a parking apron. Engage or
disengage at any time in flight, or on the
ground.
When used for take off, you must have been
given permission to taxi and replied by
pressing Y on the keyboard. The auto-pilot
must be in take-off mode.
For landing you must have sought and been
granted permission to land and replied by
pressing Y on the keyboard. The auto-pilot
must be in landing mode.
To refuel with the auto-pilot you must have
sought permission to refuel and replied Y on
the keyboard to the ‘AFFIRM WEAPONS
AND NOSE COLD’ message.
Select refuel on the auto-pilot, noting that
the HUD should now be in refuel mode and
form behind and to the left of the tanker.
When the refueler gives you CLEARED PRE-
CONTACT permission, engage the auto-pilot
by pressing A on the keyboard.
The Auto-pilot is available on any one of the
main MFDs and has the following modes:
• Follow waypoint route
• Follow heading
• Follow first target in shoot list
• Follow a set speed
• Take off mode
• Landing mode
• Refueling mode
Follow waypoint - one of the auto-pilots many useful functions
Follow heading - when you need to wander off-route
Follow target - attack maneuvering under computer control
Waypoint Type
Select Next/Previous
Waypoint
Distance to Waypoint
Time on Target
Time on Waypoint
Waypoint Type
Change Waypoint
Set Auto-pilot
Heading to Current
Aircraft Heading
Change Auto-pilot
Heading
Change Auto-pilot
Altitude
Set Auto-pilot
Altitude to Current
Aircraft Altitude
Change Auto-pilot
Speed
Set Auto-pilot Speed
to Current Aircraft
Speed
Set Auto-pilot Speed
to the Current Aircraft
Speed
Change Auto-pilot
Speed
Distance to the Next
Waypoint
Time on Target
Time on Waypoint
Waypoint Number
Auto-pilot Heading
Auto-pilot Altitude
Auto-pilot Speed
Waypoint Altitude
Waypoint Heading
Auto-pilot Speed
Waypoint Altitude
Waypoint Heading
Time Due on
Waypoint
Waypoint Number
Waypoint Altitude
Time Due on
Waypoint

93
Follow speed - adjust to arrive at targets on time
Take-off mode - when you have better things to do
The F-22 – Avionics
92
The F-22 – Avionics
Landing mode - automated, like modern civil aircraft
Refueling mode - reduce risk in this tricky maneuver
Waypoint Altitude
Waypoint Heading
Time Due on
Waypoint
Waypoint Distance
Time on Target
Time Due on
Waypoint
Distance to Waypoint
Time on Target
Time on Waypoint
Waypoint Altitude
Waypoint Heading
Waypoint Time

95
Flight Training
Training is essential if you are to understand
the avionics and their application to real
missions. In the Training section of Total Air
War are missions which should be viewed
initially as training.
Engine start
For those in a hurry, start the engines direct-
ly by pressing the [ (left engine) and ] (right
engine) symbols on the keyboard. All aircraft
systems will power up automatically.
When you start a new mission on the ground
you will find the F-22 Auxiliary Power Unit
running and all systems ready for start. The
tower will call you for a communications
check, “COMMS CHECK, GO TO NOISECON
5”. Set your F-22 to (manual) EMCON 5, by
pressing E on the keyboard and then option
5, or by pressing the relevant button on the
Up Front MFD panel.
NOTE: the engines will be off and the brakes will
be on. The radio frequency will already be set to
PUSH 1 for communication with the tower. To
select the radio frequency PUSH 1 by pressing 1
on the normal keyboard numbers. To change
radio frequencies at any time press the number
of the frequency required: 1, 2, 3, 4, from the normal keyboard numbers.
Go to the Systems MFD by pressing 0 on
your extended keypad. The MFD will already
be displaying the start up screen, press the
indicated red start button, when it is green
all systems are live and the engines have
been started.
For take off select either the ILS, or NAV
HUD mode by pressing the H key repeatedly
until those HUD modes are displayed.
The canopy will close automatically when
you exceed 5 knots and can be closed /
opened below that speed by pressing I on
the keyboard.
The F-22 – Basic Flight
94
The F-22 – Basic Flight
Ready for take-off
Taxiing the F-22
The easy way, go to the Systems MFD by
pressing 0 on the extended keyboard, press
the relevant MFD button to select the Autopilot mode on that MFD and then select T ake
off on the Auto-pilot list of buttons, then
engage the Auto-pilot by pressing A on the
keyboard. The auto-pilot will now complete
all taxiing and take off.
Once your take off time has passed the
tower will determine a safe time slot for you
to begin taxiing. If there is no safe slot, then
permission will be delayed. When the tower
clears you to taxi, you can move from your
parked position. If permission to taxi has not
been granted after the communication’s
check, request your take-off time by picking
option 2 Airfield and then choosing option 1,
“SAY MY take-off” from the menu on the top
left of your Helmet Mounted Display. The
tower will respond with your take-off time.
T ake the brakes off by pressing B on the keypad and increase engine power by repeatedly pressing the extended keyboard +
symbol, (or pushing forwards on your throttle). Power will have to be increased to 55%
to get the F-22 moving and shortly after
throttled back to 53% to maintain a taxi
speed of 20 knots. When cornering slow
down to around 10 knots.
NOTE: exceeding this taxi speed may result in
you crashing before you are even off the ground!
The aircraft can be steered on the ground by
use of the <, (to the left) and >, (to the right)
symbol keys, or by the appropriate use of
your rudder pedals. The toe brakes can be
actuated to slow one side of the aircraft by
pressing SHIFT <, or SHIFT>.
From a standing start, push throttles to 100%

97
Unsure where to taxi? then use the way
point direction caret (an inverted arrow on
the HUD compass ribbon), please see
Navigation. The way point direction caret is
useful for getting around the airfield. When
you arrive at the runway hold area, (the area
of taxi way just before the runway), stop by
applying the brakes, B on the keyboard and
throttle the engines back to ground idle
(50%). You will let the tower know you are at
the hold automatically, place your F-22 nose
just short of the runway edge. Permission to
proceed onto the runway “LINE UP”, will be
given when the runway is clear of other traffic. When you have got the F-22 lined up
pointing straight down the runway, then
stop.
Remember, do not assume it is always clear,
keep a good look out around you. When you
are lined up on the runway stop you will
automatically declare your readiness to
take-off.
Take Off
For those in a hurry, ignore any permissions
take the brakes off, increase the throttle to
full and pull the F-22 nose off the deck at a
speed of 180 knots by pressing the DOWN
CURSOR key gently, (or by pulling back on
your joystick).
For those in a big hurry, use the DID time
skip by pressing SHIFT S to move from your
parked position, until you find yourself on the
runway. Or press SHIFT S one more time to
put you in the air. Refer to take-off permission below.
NOTE: at any time in flight, or on the ground you
can stop the action by pressing P to pause the
game, (press again to resume).
The easy way, go to the Systems MFD by
pressing 0 on the extended keyboard, press
the relevant MFD button to select the Autopilot mode on that MFD and then select takeoff on the Auto-pilot list of buttons, then
switch on the Auto-pilot by pressing A on the
keyboard.
NOTE: so long as your engines are running, when
you select take-off, the Auto-pilot will taxi the
aircraft to the runway and take-off.
The tower will give you final take-off permission “YOU ARE CLEARED TO TAKE-OFF”,
Note the altitude you are to climb to and the
bearing for airfield departure.
Throttle your engines up to full military
power, an indicated 100% on your HUD (the
throttles can be snapped to military power
by pressing SHIFT + on the keyboard), immediately on reaching that value take the
brakes off. When you reach 180 knots pull
the nose up by pressing the DOWN CURSOR
The F-22 – Basic Flight
96
The F-22 – Basic Flight
Take off speed
key gently, (or by pulling back on your joystick). Shortly after leaving the ground bring
the gear up by pressing G on the keyboard,
keep the aircraft straight, (no rolling) and in
a steady 15 degree climb. Climb to the altitude indicated by the tower and steer the
aircraft onto the pre-planned route by referring to Navigation.
The tower will contact you once more
“PUSH 2 FOR MAGIC, GOOD DAY”, contact
the AWACS on radio frequency PUSH 2
(open channel) by pressing 2 on the keyboard, or PUSH VICTOR 3 by pressing 3 on
the keyboard and picking option 2 AWACS,
then choosing option 7 “FLIGHT IS AVAIL-
ABLE”, if you intend to fly away from the airfield.
NOTE: from the menu choices now placed in
AWACS on your Helmet Mounted Display you will
have a choice of requests and reports for the
AWACS who will handle all aspects of your flight
until you need to contact the tower for landing. If
you do not inform the AWACS of your flight you
may be interrogated for identification. Please see
The AWACS chapter for more information.
NOTE: once you get airborne, turn the aircraft
slowly left or right by use of the rudder, press
symbol <, >. Or bank for example left and turn by
slowly pressing the LEFT CURSOR key, (or pushing the joystick to the left gently.
A much sharper turn can then be executed by
pulling the nose up with the DOWN CURSOR key,
(or pulling back with the joystick).
A steep departure from the airfield

99
Navigation
The way point direction carets, will enable
you to follow a planned route by looking at
the compass ribbon at the top of the HUD.
The figure in the center of the box is the
compass heading you are currently on. The
inverted arrow below the compass ribbon
shows where you must steer the box in
order to line up with the first way point on
your route.
The triple vertical line symbol above the
compass ribbon shows where you must
steer in order to intersect the line between
the last way point and the next.
NOTE: these navigation symbols are displayed in
all HUD modes. The symbols will also indicate a
direction to follow for the right taxi way to reach
the correct end of the runway as indicated by the
tower.
The navigation HUD can be selected by
pressing the H key repeatedly until NAV HUD
appears. The NAV HUD will tell you if you are
high / low, or early / late on your intended
route and so will help you to judge what you
should do in order to follow your mission
correctly.
Please see the Navigation HUD illustration
in Head Up Display.
The F-22 – Basic Flight
98
The F-22 – Basic Flight
Navigation - half the battle is getting there in one piece
Preparing to Land
For landing you must have sought and been
granted permission to land. The auto-pilot, if
used must be in landing mode.
For those in a hurry, use the DID time skip by
pressing SHIFT S until you find yourself in a
parking position.
For those in a desperate hurry, press SHIFT
Q and finish the game!
The easy way, you must be within 15 miles of
the airfield and gain permission to land by
selecting radio frequency PUSH 1, select it
by pressing 1 on the keyboard. Request permission to approach from the tower by picking option 2 Airfield and then choosing either
option 3, “DIRECT APPROACH” (or option 5
“CIRCUIT APPROACH” from the menu on the
top left of your Helmet Mounted Display. Go
to the Systems MFD by pressing 0 on the
extended keyboard, press the relevant MFD
button to select the Auto-pilot mode on that
MFD and then select landing on the Autopilot list of buttons, then engage the Autopilot by pressing A on the keyboard.
NOTE: the Auto-pilot will land the F-22 and taxi it
back to a parking slot, all necessary messages
and steps will be handled automatically. You will
only be responsible for engine shut down once
parked.
Heading for home!

101
When you need to return to an airfield it will
be for one of four reasons:
1. You are following your pre-planned route.
2. You have requested a vector for recovery
at your mission start base.
3. You have requested a divert airfield from
the AWACS.
4. You intend to land at an airfield of your
choice.
NOTE: at 15 miles from the base you will be able
to see the landing light pattern and the ILS hoops
on your ILS HUD only if you are within a few
degrees of the glide slope at the end of the runway. Only the runway to be used will display
open ILS hoops.
Pre planned landing
As you get to 15 miles of your destination airfield on your way point route select the ILS
HUD mode and radio frequency PUSH 1 by
pressing 1 on the keyboard. Request permission for recovery from the tower by picking
option 2 Airfield, then choosing either of
options 3 (“DIRECT APPROACH”), 4
(“TEARDROP APPROACH”) or 5 (“CIRCUIT
APPROACH”) from the menu on the top left
of your Helmet Mounted Display, then refer
to Landing below.
Vector for Recovery
In order to assist with navigation to your
destination airfield, select radio frequency
PUSH 1 and the ILS HUD mode, then request
a vector for recovery from the tower by picking option 2 Airfield, then choosing option 2,
“VECTOR FOR RECOVERY” from the menu
on the top left of your Helmet Mounted
Display. You will be given a direction to the
airfield.
Requesting a divert airfield
To request a divert airfield from the AWACS
who is controlling your flight first ensure you
are in radio frequency PUSH 2, or PUSH VICTOR 3 by pressing 2 or 3 on your keyboard.
From the menu on the top left of your Helmet
Mounted Display, pick option 2 AWACS,
then choose option 1 “REQUEST DIVERT
AIRBASE”. The AWACS will name the nearest available airfield, give you a direction to
it and its range from you. Then refer to
‘Land’ at an airfield of choice.
NOTE: requesting any information from the
AWACS when an AWACS is not present, will
obviously meet with silence!
Land at an airfield of choice
When you are within 15 miles of any airfield
you can land there by selecting the ILS HUD
mode and radio frequency PUSH 1, then
request permission for approach from the
tower by picking option 2 Airfield, followed
by either of options 3 (“DIRECT
APPROACH”), 4 (“TEARDROP APPROACH”)
or 5 (“CIRCUIT APPROACH”) from the menu
on the top left of your Helmet Mounted
Display, then refer to Landing below.
The F-22 – Basic Flight
100
The F-22 – Basic Flight
Landing
The ILS HUD is necessary for landing information and can be selected by pressing the
H key repeatedly until the ILS HUD appears.
This HUD mode indicates a series of glide
slope markers visible rising from the end of
the runway, these indicate the correct path
to follow for touchdown. The ILS markers
can be turned on / off while in the ILS HUD
mode by pressing the appropriate button on
the Systems MFD.
For additional information please see the
Instrument Landing System HUD illustration
in Head Up Display and the Systems MFD
illustration in Multi Function Displays.
NOTE: to talk to the tower and hear instructions
you will need to be on radio frequency PUSH 1,
select it by pressing 1 on the normal keyboard
numbers. The way point and way point path
markers mentioned in Navigation are of great use
in all kinds of approaches to indicate where you
should fly to next.
Your airfield approach will be one of the following:
• Circuit approach
• Teardrop approach
• Direct approach
The normal approach is Circuit which the
tower will advise you of with the message:
“JOIN THE LEFT CIRCUIT, FOR RECOVERY
ON RUNWAY”, plus the runways number,
Gear down for finals

103
when you are within 15 miles of the runway.
If you specifically request a teardrop, or
straight in approach you will receive clearance for that kind of approach, or you may
be refused due to traffic considerations.
NOTE: you can acknowledge the towers orders
by pressing Y on the keyboard.
Circuit approach
This is the normal fighter approach to a military airfield. It is performed by making an
approach directly for the runway to be landed on and descending to an altitude of 3,000
feet by the time you are directly over the
runway. You must fly down the length of the
runway maintaining that altitude and follow
the left hand circuit. The circuit will be indicated on your Situation MFD as an extension
of your way point route and will further be
indicated by way point direction carets.
Please see Navigation for more details.
The circuit is approximately 2.5 miles across
and 3 miles along the runway side. Turn left
onto leg 2 and at the next indicated turn onto
leg 3 which is the back leg, descending to
1,500 feet. Lower your undercarriage by
pressing G on the keyboard. Continue to the
next turn and onto leg 4, here you should be
able to see the ILS hoops as you are about to
intercept the glide path. Turn onto leg 5 for
final approach, notify the tower by selecting
radio frequency PUSH 1 and notify the tower
that you are on finals by picking option 2
Airfield. Then choose option 6 ‘FINALS‘ from
the airfield menu, then descend on the glide
slope. The tower will respond by saying
‘CLEAR TO LAND’ if the runway is clear or
‘LANDING NEGATIVE, GO AROUND ’ if anoth-
er flight is taking off or is ahead of you on the
The F-22 – Basic Flight
102
The F-22 – Basic Flight
Teardrop approaches for airfields under threat
Instrument Landing System.
For additional information please refer to
Final approach below.
Teardrop approach
The Teardrop approach is used specifically
at front line airfields that might come under
attack at short notice and is essentially a
much shorter and tighter version of the
Circuit approach. Teardrop approach is a
dynamic maneuver which rapidly reduces a
high approach speed and altitude by pulling
a high G spiraling turn to quickly land and
reduces the risk of attack by enemy surface
to air missiles, if the airbase is close to
enemy forces.
To request a Teardrop approach you should
already be in radio frequency PUSH 1, pick
option 2 Airfield, then choose option 4,
“TEARDROP APPROACH” while you are
within 15 miles of the runway. Approach the
glide slope approximately half way along its
length as indicated on the ILS HUD by the
ILS hoops. As you intercept the glide slope
you need to be at 1500 feet, notify the tower
by selecting radio frequency PUSH 1, pick
option 2 Airfield, then choose option 6
‘FINALS’ from the airfield menu, spiral
sharply round 360 degrees so that you lose
height rapidly to approximately 500 feet and
pointing towards the runway.
For additional information please refer to
Final approach below.
Direct approach
The traditional straight in approach to the
runway. To request a Direct approach you
Direct landing approach with no circuits

105
should already be in radio frequency PUSH
1, pick option 2 Airfield, then choose option 3
“DIRECT APPROACH” from the menu on the
top left of your Helmet Mounted Display
while you are within 15 miles of the runway.
When permission is granted work your F-22
around to the correct runway so that you
can make the most direct approach and see
the runway lighting and ILS hoops as soon
as possible. As you intercept the glide slope
notify the tower by selecting radio frequency PUSH 1, pick option 2 Airfield, then
choose option 6 ‘FINALS’ from the airfield
menu.
Final Approach
The Glide Slope
The glide slope is indicated by the ILS markers projecting out of the end of the runway.
You must intercept the glide slope allowing
yourself enough room to line up with the runway.
Steadily reduce your airfield approach
speed to 230 knots by repeatedly pressing
the extended keyboard - key, (or by pulling
back on your throttle) by the time you have
intercepted the glide path, your glide slope
speed should be 170 knots, power setting
57%. You must get the F-22 pointed straight
down the approach and runway and level
the wings. It may help to deploy the airbrakes by pressing B on the keyboard. If
your undercarriage is not already down,
lower it by pressing G on your keyboard.
While on your final approach it is important
to notify the tower by selecting radio frequency PUSH 1, pick option 2 Airfield, then
choose option 6 “FINALS” from the airfield
menu. This action will allow the tower to free
up the runway once you have landed and
will give them a final chance to grant permission or direct you to go around the circuit
once more.
Keep the velocity vector in the HUD just
beyond the touchdown 3, 2, 1 markers on the
runway, when your altitude is 50 feet, pull
the nose up slightly so that the velocity vector is approximately half way down the runway. Reducing the power to 55% (flight idle),
at this point may help your touchdown.
NOTE: on touch down the wheel brakes will be
applied already if you have deployed the airbrakes, to take the brakes off press the B key on
the keyboard. You will get the shortest possible
landing if you leave the brakes on.
The F-22 – Basic Flight
104
The F-22 – Basic Flight
NOTE: the F-22 is not equipped with a braking
chute, or thrust reversing.
Once you have achieved taxiing speed of 20
knots or less, the tower will notify you where
to park your F-22. You will be able to find
your way back to your allotted parking
space by use of direction carets at the top of
all HUD displays.
For additional information please see
Navigation above.
NOTE: once back on the runway, the F-22 will be
rearmed / refueled automatically
Permission to land is refused!
When the airfield is busy , or out of action
you may be given other instructions. If the
airfield is out of action, you will be told that
the “THE AIRBASE IS BLACK, DIVERT TO...”,
plus the divert airfield name. Your way point
route will be automatically extended to the
new airfield, as portrayed on the Situation
MFD.
At a busy airfield you may be directed to turn
to a new heading, or to “JOIN THE STACK”
at an indicated altitude. The Stack is a circuit for aircraft to orbit within, where the air-
craft start at the top and spiral slowly down
until they are given permission to land, the
position will be the same as the landing circuit in this game, the rotation is left hand
(anti-clockwise seen from above) like the
landing circuit.
When the player is on final approach, (i.e. on
the glide slope) final permission may be
refused with the message: “LANDING NEG-
ATIVE, GO AROUND”. In this case you must
follow the landing circuit at 1,500 feet altitude one more time and attempt a landing
when you are on leg 5, descending on the
glide slope as in Direct Approach.
Landing at Friendly airfields to rearm
and refuel
You can land at friendly airfields to rearm
and refuel your plane. Land as normal on the
runway, bring your plane to a halt and you
will be rearmed and refueled.
Emergency Landings
If your aircraft has damaged under carriage
you may have to perform an emergency
‘belly’ landing. For safety reasons we recommend jettisoning all stores before attempting
a belly landing.
No brake-chute! Air-brake rudders and wheel brakes slow you down
Touchdown! Note the ILS markers and the position of the velocity vector

107
Air Refueling
The United States Air Force is alone in using
the flying boom method of aerial refueling,
as opposed to the basket method favored by
all other air forces. When an aerial refueling
has been planned into your route, the refueling point will be marked on your Situation
MFD and the patrol route of the tanker you
must refuel from will also be visible.
The Refueling HUD can be selected by
pressing the H key repeatedly until the REF
HUD appears. The Refuel HUD indicates
information vital for refueling correctly.
Please see the Refueling HUD illustration in
Head Up Display.
NOTE: your tanker will display white anti collision strobe lights at the tip of its fin and underneath the center fuselage, plus flashing red /
white beacon lights above and below the fuselage. You should acknowledge the refuelers messages by pressing Y on the keyboard.
The easy way, refer to ‘vector to the nearest
refueling aircraft’ below. You must approach
the tanker at an altitude 10,000 feet above
the tanker. When you are within 15 miles of
the tanker change your radio frequency to
PUSH VICTOR 4 by pressing 4 on the keyboard, then you must request permission to
refuel from the tanker by picking option 2
Refueler and then choosing option 2 “REFU-
EL PERMISSION” from the menu on the top
left of your Helmet Mounted Display.
The tanker will tell you to “SKIP IT” if refueling is not currently possible, or will give
you permission by replying “AFFIRMATIVE,
WEAPONS AND NOSE COLD”. You must
reply by pressing Yon the keyboard, in order
for the auto-pilot to work. Ensure that your
radar output is reduced by going to manual
EMCON 2.
When the refueler says “CLEARED, PRE
CONTACT”, you can engage the auto-pilot.
Go to the Systems MFD by pressing 0 on the
extended keyboard, press the relevant MFD
button to select Auto-pilot mode on that
MFD and then select refueling on the Autopilot list of buttons, then engage the Autopilot by pressing A on the keyboard.
The auto-pilot will handle the refueling from
now on and will switch off automatically
once the refuel boom is connected.
Please refer to ‘refueling is complete’.
Manual refueling, should you need to refuel
when no refueling has been scheduled, you
can request a vector to the nearest refueling
aircraft by selecting radio frequency PUSH 2
or PUSH VICTOR 3, (2 or 3 on your keyboard),
pick option 2 AWACS and then choose
option 2 “VECTOR TO TANKER” from the
menu on the top left of your Helmet Mounted
Display. You will be given the necessary vector and told to contact the indicated tanker
on radio frequency PUSH VICTOR 4, (4 on
your keyboard).
The F-22 – Refueling
106
The F-22 – Refueling
You must approach the tanker at an altitude
10,000 feet above the tanker. When you are
within 15 miles of the tanker change your
radio frequency to PUSH VICTOR 4 by pressing 4 on the keyboard, then you must request
permission to refuel from the tanker by picking option 2 Refueler and then choosing
option 2 “REFUEL PERMISSION” from the
menu on the top left of your Helmet Mounted
Display.
The tanker will tell you to “SKIP IT” if refueling is not currently possible, or will give you
permission by replying “AFFIRMATIVE,
WEAPONS AND NOSE COLD”. Reply by
pressing Y on the keyboard. You must ensure
that your radar output is reduced by going to
manual EMCON 2. (Or manual EMCON 1, if
your mission requires stealth). Close the
refueler to approximately one quarter of a
mile and slightly below his altitude.
NOTE: if you are in manual EMCON 1 you will be
able to do a stealthy refuel. The refueler will not
speak to you if you are in EMCON 1 you must use
your judgement and the Receiver Director Lights
for position information. When the boom is connected a wired voice link will be made enabling
you to hear the boom operator’s “CONTACT” and
“DISCONNECT” messages.
The gas station in the sky
On the way to a top-up. All major credit cards
accepted

109
The F-22 – Refueling
108
The F-22 – Refueling
Air-to-Air Refueling
1. The fighter has a vector to the tanker
aircraft
2. The fighter requests permission to refuel from
the tanker. Once permission is granted the
approach is made from above the
tanker’s altitude
3. The fighter approaches the tanker, from a
position one quarter mile astern to the
pre-contact position
4. The fighter is in the pre-contact position, at
the correct height and 50’ astern. The refueler
will grant permission to move forward to the
contact position.
5. The fighter is in the contact position. The
refueling boom will be ‘flown’ into the
fighter by the refual boom operator.
7. The boom is
disconnected and the
fighter backs away
before peeling off
below the tanker.
6. The boom has made contact and fuel flows.
The Refueling Boom
The refueling boom is telescopic and has
colored bands marking how far it is extended.
Too compressed, marked by a wide yellow band.
The ‘green zone’.
Optimum position marked by a narrow yellow
band.
Too extended, marked by a wide yellow band.
The Receiver Director Lights
D Too High
Correct Height
U Too Low
1.
2.
3.
4.
5.
6.
7.
F Move Forward
Correct Fore/Aft Position
A Move Aft
=
=

111
The F-22 – Refueling
110
When you are in the correct position the
refueler will give the message “STABILIZE”.
You must now hold station with the refueler,
he will fly the refueling boom into the receptacle on the upper fuselage of your F-22.
When the boom makes contact he will give
the message “CONTACT”, you will automatically acknowledge the boom operator by
saying “AFFIRM”.
The Receiver Director Lights will now be
controlled by the boom position and will help
you to maintain your position within the
bounds of permissible movement of the refueling boom. The extending part of the boom
has a series of colored bands on it, when the
narrow yellow stripe of the extending part of
the boom is against the lowering part of the
boom you are in the right forward / aft location of the contact position.
Refueling is complete
When your refueling is complete the refueler will give you the message “DISCONNECT
AND PUSH 2”, he will then disconnect the
boom from your aircraft, you must break the
connection by throttling back your engines
slightly, by pressing the - key on the keyboard. If you are refueling on your own you
are now clear to recommence your mission.
As the boom moves clear, slowly back your
F-22 away. It is customary to leave the refueler after first backing well clear by reducing altitude and pulling away towards the
right before returning to your mission heading 5,000 feet below the refueler so as to
reduce possible collisions with other aircraft
waiting to refuel.
If you are refueling with your wingman, after
backing slowly away you must wait for your
wingman by swinging out to trail the starboard (right) wing tip of the refueler.
The F-22 – Refueling
Work your F-22 in behind the refueler,
approximately twenty feet below his altitude. When you are within 100 feet behind,
the refueler will give the message
“CLEARED, PRE CONTACT”, which means
you must go to the pre-contact position fifty
feet behind the tanker refuel position.
When you are at the pre-contact position
the refueler will give you the message
“CLEARED CONTACT”. This means that you
are at the right level below the refueler and
fifty feet behind the tanker refuel position.
The tanker will turn off his lower strobe light
and both upper and lower beacons will flash
red only, to indicate he is now ‘engaged’. You
must now go slowly forward to the contact
position. To help you achieve this the refueler displays two patterns of lights called the
Receiver Director lights under its forward
fuselage.
From your position the lights on the left indicate if you are high or low of the contact
position, Up and Down letter cues will also
display at the apparent top or bottom of the
left director lights. The right hand lights indicate the your current forward / aft location
of the contact position. Forward and Aft letter cues also display at the apparent top or
bottom of the right director lights.
Aim to arrive in the pre-contact position
Gentle use of the throttle and stick is required
The receiver director lights
About to receive the boom
When you refuel, so do your buddies
The boom connects behind you

113
Thrust Vectored Maneuvers
The F-22 enjoys the extra maneuverability of
thrust vectored engines which apart from
giving quicker responses for dogfighting,
will also allow very high angles of attack,
(nose up angle, towards the direction of
flight). This type of control is of particular
relevance at speeds where aerodynamic
lift and influence are low. The F-22, Sukhoi
Su-37 and Mikoyan MiG-35 are all able to
use thrust vectoring to aim the fighter
towards an enemy briefly while flying in
another direction.
Within the T otal Air W ar sim, the F-22 has not
been modeled with thrust vectoring
engaged all the time as in the real F-22. To
help you get to grips with it DID has opted to
allow the user the ability to pick when he
wants thrust vectoring by pressing and holding the KEY ABOVE TAB, to disengage simply
let go of the key. By not having thrust vectoring engaged permanently the user will be
able to make greater use of both the expanded and normal flight envelope.
The F-22 flight control systems prevents the
pilot from overloading the aircraft. The
effect of thrust vectoring is reduced with
increasing speed and will be only really be
noticeable below 400 knots airspeed.
For additional information please refer to the
Training section of Total Air War and the
Online help (main menu, help button), for
more information on thrust vectored flight,
how to use it, and of course try it out in one
of your early missions.
The F-22 – Thrust Vectoring
112
Once the refueling is complete you must follow the refueler’s request and change your
radio frequency to PUSH 2, or PUSH VICTOR
3, by pressing 2, or 3 on the keyboard. contact the AWACS and let them know that you
are now available again by choosing option
2 AWACS and then option 7 “FLIGHT IS
AVAILABLE”.
Rearming and Refueling
When you land on the runway the F-22 will
automatically be rearmed / refueled with
the loadout that was originally present.
The F-22 – Refueling
It’s not only the Russians who pull high-alpha stunts like these!

115
The F-22 – Air-to-Air Combat
114
The F-22 – Air-to-Air Combat
Achieving an attacking position undetected
and then launching a surprise attack while
being vigilant of enemy surprises is of great
importance.Please refer to the Introduction
of this F-22 aircraft chapter to see how the
F-22 has been designed to be particularly
suited to the BVR air combat role.
The United States Air Force uses a tactic
called the ‘Grinder’, a technique that maximizes the chances of success in attacking
an opposing force, especially if that force is
superior in numbers.
Please refer to Air to Air Combat Tactics
below.
Please refer to the Training section of Total
Air War, the Weapons Training BVR
AMRAAM mission teaches you about detection of targets, and engaging those targets
in BVR combat.
The AIM-120 AMRAAM
The AIM-120R AMRAAM is a long range
radar guided ram jet powered version of the
standard AMRAAM missile. It has a best
range of 44 miles and uses its ramjet power
to close a target very rapidly, thereby reducing the chances of a target maneuvering out
of its way.
The AIM-120C AMRAAM has a best range
of 31 miles and is powered by a slower flying
rocket motor.
To launch an AMRAAM you must have the
Air-to-Air HUD selected by pressing RETURN
on the keyboard, this will also select air to
air weapons. Keep pressing RETURN until
the HUD weapon indicator shows you have
selected the AMRAAM of your choice. Both
versions of the AMRAAM missile are cued
to their target by the F-22’s avionics. On the
way to the target the missiles own radar
takes over and acquire the target, making
the AMRAAM a `fire and forget missile’.
AMRAAMs can be cued by radar, IRST, or off
board information.
NOTE: if the user launches an AMRAAM at manual EMCON 1 no radar cuing will be possible.
If an AWACS, or another F-22 (data sharing),
is not present then no cuing from off board
sensors is possible.
A target is often able to cover a lot of sky
between missile launch and half distance. It
is therefore possible that the missile may
arrive at half the distance, and not be able to
find the target in the position that the F-22
predicted! especially if the target realizes it
is under attack and maneuvers hard. The
F-22 pilot can sometimes ensure a higher
probability of a kill against a target that he
Weapons Training
In the Training section of Total Air War are a
series of missions which should be viewed
as training missions. The Missions are written so that each contains more than the aircraft, and targets necessary to learn the
specific lesson.
Difficulty Levels
The difficulty of the game can be set in the
game options screen. The three difficulty
options determine the accuracy of weapons
fired against your aircraft, the accuracy of
your guided weapons and the amount of
damage taken by your F-22 when hit. For
additional details, please refer to the
Training section of Total Air War, and the
Online help (main menu, help button), for
more information on weapons, and how to
use them.
Air-to-Air Combat
Air-to-air combat is made up of five stages:
1. Detection
2. Beyond Visual Range Combat
3. Closing
4. Maneuvering or Dogfight
5. Disengagement
Detection
In detection it is often the case that he who
sees first wins, by electronic or visual
means. As you will have seen from the
Avionics section the F-22 is able to get information about potential enemies from great
ranges, and can operate completely stealth-
ily while receiving data from an AWACS or
another F-22.
Missile range
Missiles in general will have a greater range
when launched at a higher altitude, or a
higher flight speed.For the purposes of this
manual a benchmark ‘best range’ has been
quoted, which represents an optimum
launch range. In some circumstances this
may not be achieved, or may be exceeded,
depending on the individual circumstances.
NOTE: weapon performance has in some cases
been altered to benefit game playability.
BVR combat
From combat experience many fighter pilots
will be able to tell you that four out of five
victories are achieved in BVR combat.
Beyond Visual Range combat - made easy
continued on page 118
Cued for the kill. Four enemy aircraft in AWACS
Cued for the kill. The same four enemy aircraft in
the F-22 cockpit

The F-22 is designed to detect the enemy first, by use of its stealth and avionics design.
AMRAAMs can be launched while the enemy aircraft is still unaware that it is under attack. These abilities make the
F-22 ideal for suprise attacks or use of the ‘Grinder’.
Once in a dogfight, thrust vectoring and an advanced helmet display give the F-22 pilot the ‘edge’.
The Five Phases of Air-to-Air Combat
1. Detection
It is essential to locate the enemy first and
maneuver to a firing position.
4. Manuevering
The glamorous dogfight is dangerous and
responsible for one in five victories.
5. Disengagement
Short of fuel, weapons, or the odds have become
too great, time for ‘bugging out’.
2. Beyond Visual Range
Four out of five Air-to-Air victories are achieved
in BVR combat.
3. Closing
When the odds are favorable, closing with the
enemy for a short range missile shot or
cannon pass.
1.
2.
3.
4.
5.
117
The F-22 – Air-to-Air Combat
116
The F-22 – Air-to-Air Combat

119
Closing
As the range continues to reduce you may
not have destroyed all the targets, or be out
of AMRAAMs, your next task will be to
rapidly close the distance between you
while setting up your ideal Sidewinder firing
solution.
Maneuvering
Maneuvering, or dog fighting has long been
the most glamorous part of air combat but is
in fact responsible for only one fifth of all air
combat victories. This part of combat is
highly dangerous with a high loss rate, like
BVR combat he who can fire his short range
missiles will usually gain the advantage, but
if you fail to hit the target in the opening part
of the dogfight, the victory will go to the most
experienced pilot making best use of the
most maneuverable fighter.
Please refer to the Training section of Total
Air War, the Weapons Training DOGFIGHT
SIDEWINDER mission continues on from the
BVR mission, and teaches you to first close
and then engage the enemy with firstly the
Sidewinder missile, and then your gun in
dogfighting combat.
The AIM-9x Sidewinder
The AIM-9x Sidewinder is a short range,
thrust vectoring, Infra Red, (heat) guided
missile with at best a range of 10 miles. As
the missile is only cued in the direction of
the target, and once launched relies on it IR.
seeker, it is truly a fire and forget weapon.
To launch a Sidewinder you must have the
Air to Air HUD selected by pressing RETURN
on the keyboard. This will also select air to
The F-22 – Air-to-Air Combat
118
suspects may maneuver by keeping his nose
pointed towards the target.
Potential targets must be entered into the
Shoot list, (one Shoot list is made for each
kind of weapon).
Please refer to Shoot lists, in the Avionics
section.
The targets will be marked in the HUD,
Attack, Situation, and Defense MFDs. The
first to be fired at is marked in a special way,
please see the Head Up Display, and Multi
Function Display sections and refer to the
Target Marking diagrams in each of those
sections.
NOTE: both the HUD and Attack MFDs display
data on missile range.
Please refer to the Head Up Display, and
Multi Function Display sections.
On the Air to Air HUD, and on the Attack display you will find the missile steering circle
and steering dot.
The missile steering circle reflects the probability of kill, (also expressed on the HUD as
a 00% pk value), i.e. the bigger the circle is
portrayed the greater the chances of killing
the target if the missile is launched at that
moment.
The missile steering dot indicates where you
ought to be aiming your nose in order to
close the target.
The word “SHOOT” will appear on the HUD,
and Attack displays if the AMRAAM is within range (parameters) of the target.
Pressing the SPACE bar will launch an external weapon, or open the main bay doors
briefly and launch an internally carried
weapon.
The F-22 – Air-to-Air Combat
AMRAAM away. Note the HUD symbology
AIM-9X is an extremely effective, off-boresite
missile
One versus many is now a fight loaded to the
F-22’s advantage
continued from page 115

121
selected the gun. Place the gun pipper over
the target by maneuvering your F-22.
The word “SHOOT” will appear on the HUD,
and Attack displays if you are within gun
range of the target. Immediately that the target is in the pipper and the shoot cue is lit,
fire your gun by pressing the SPACEBAR,
and holding it down so long as you wish to
fire.
NOTE: that you only have a limited number of cannon rounds, so do not spray bullets all over the
place!
Cannon Snake
When using the Air-to-Air cannon, the path
of the shells is shown as a moving ‘snake’ on
the HUD. At the end of the ‘snake’ is a circle.
If the circle is over the targeting box of the
enemy aircraft then your bullets have a high
probability of hitting.
Disengagement
Modern fighters are often short of fuel when
it comes to finally doing some fighting. This
combined with an inevitable short supply of
weapons makes for a quick fight. When the
time comes to break off the engagement
your main task is firstly to preserve your own
life and secondly return a very valuable aircraft home.
For additional information, please refer to
the Training section of Total Air War, the
Weapons Training DOGFIGHT SIDEWINDER
mission. When you have run out of weapons
and before your fuel gets too low, you must
break off the mission in a clear cut way that
avoids the danger of further enemy action.
The F-22 – Air-to-Air Combat
120
air weapons. Keep pressing RETURN until
the HUD weapon indicator shows you have
selected the Sidewinder.
The Sidewinder is cued to its target by the
F-22’s IRST primarily, or by cuing with the
helmet mounted sight. It can also acquire a
target by being put into the airstream and
pointed in the general direction of the target, by pointing the F-22 at it!
The Sidewinder can have targets designated in the same way as the AMRAAM, i.e.
automatic or MFD manual entry in a shoot
list. Potential targets must be entered into
the shoot list, (one Shoot list is made for
each kind of weapon).
Please refer to Shoot lists, in the Avionics
section.
The targets will be marked in the HUD,
Attack, Situation, and Defense MFDs, the
first to be fired at is marked in a special way.
Please see the Head Up Display, and Multi
Function Display sections and refer to the
Target Marking diagrams in each of those
sections.
Manual SHOOT list entries can also be made
for the Sidewinder by visual designation.
This is done by padlocking a target with the
F2 key on the keyboard, then adding that target to the currently selected missile
(Sidewinder) shoot list by pressing the S key
on the keyboard.
NOTE: you can add a padlocked target to
your wingman’s shoot list by pressing M on
the keyboard.
When the weapon is in range (parameters)
the shoot cue will appear in the HUD and
Attack MFD. Pressing the SPACE bar once
will launch an externally carried weapon,
(NOTE it must first acquire the target as
below). If the missile is carried in a dedicated bay one press will put a Sidewinder out of
its bay, to ‘sniff the air’; when it has acquired
its target the growling tone you can hear will
have risen to a much higher pitch, and the
word “SHOOT” will appear on the HUD. The
Attack display will show if the Sidewinder is
within range of the target. Pressing the
SPACEBAR again will fire the missile.
The F-22 gun
The F-22 gun is the M61A2 20 mm rotating 6
barrel Gatling gun, which has an ammunition
drum containing 1750 rounds.
To fire the gun you must have the Air-to-Air
HUD selected by pressing RETURN on the
keyboard, this will also select air-to-air
weapons. Keep pressing RETURN until the
HUD weapon indicator shows you have
The F-22 – Air-to-Air Combat
Short-range kill with the advanced Sidewinder
Guns, guns, guns! Get the enemy in your sight
and fire
If you can‘t win, survive to fight another day

123
Target Marking diagrams in each of those
sections.
Manual Shoot list entries can also be made
for the Maverick by visual designation. This
is done by padlocking a target with the F2
key on the keyboard, then adding that target
to the currently selected missile (Maverick)
shoot list by pressing the S key on the keyboard.
NOTE: you can add a padlocked target to your
wingman’s Shoot list by pressing M on the keyboard.
Typically a target to be attacked using
Maverick will be attacked at maximum
range from medium altitude, or more likely
the aircraft will approach the area known to
contain targets at low altitude and will pop
up when in range for ‘a good look,’ launching
weapons in a medium dive, before dropping
to the deck and turning away sharply.
When the weapon is in range (parameters)
the shoot cue will appear in the HUD and
Attack MFD. Pressing the SPACE bar once
will normally launch the weapon.
Salvo or ripple drops can be initiated on
pressing the SPACE bar if the relevant Salvo,
or Ripple buttons have been previously
selected on the Systems MFD.
NOTE: that the number of bombs to be released as
part of the salvo, or ripple can also be set on the
Systems MFD surround.
The image that the Maverick is homing on to
is displayed on the Attack MFD by pressing
the appropriate button on the Up front MFD
surround.
When a number of weapons are in flight you
will be able to see the image sent by the oldest launched, (and still in flight), by pressing
the appropriate button on the Up front MFD
surround.
NOTE: the weapon can also be seen by pressing
F8 on the keyboard.
The F-22 – Air-to-Ground Combat
122
Air-to-Ground Combat
The F-22 has a secondary air-to-ground role,
particularly in the delivery of smart weapons
like the JDAM and the growing generation
of cruise sub-munitions dispensers, like the
European Apache and US JSOW.
Though it is unlikely that the F-22 would ever
be employed to deliver ‘Iron bombs’, it has
four wing hard points with a rating of 5,000lb
and designed initially to carry one 600 gal.
drop tank and two air-to-air missiles each.
This means that the F-22 has the capacity to
carry a huge amount of ordinance.
It should be remembered that the F-22’s predecessor, the F-15 was designed with the
immortal words “not a pound for air to
ground,” and yet the F-15E developed from
that air superiority fighter is probably the
most capable all weather strike aircraft possessed by any air force in the world today.
For the purposes of game play DID has given
the player the option of using many weapons
that the real F-22 is unlikely to carry.
Bombs and missiles have a realistic blast
radius. Bombs damage ground vehicles and
planes in close proximity, not just those hit
(don’t drop a bomb too low now!).
The air to ground weapons fall into five main
types:
• Smart self guided missiles
• Sub munitions dispensers
• Smart gliding bombs
• Unguided rockets
• Freefall and Retarded bombs
Smart, Guided, Air-to-Ground
Missiles
The AGM-65G Maverick
The AGM65G Maverick, is an IIR guided
medium range weapon with a best range of
15 miles. It is mainly used for destroying
mobile ground targets, but can also be used
against bridges, field HQs and even against
small ships and helicopters!
The on board LANTIRN system provides the
data for display on the HUD, the Helmet
Mounted Display and MFDs. LANTIRN is
used further to provide a TV image in the
Attack MFD. Once a target has been marked
the missile on launch will find its own way
there.
To launch a Maverick you must have the Air
to Ground HUD selected by pressing the
BACKSPACE key on the keyboard. This will
also select air to ground weapons. Keep
pressing BACKSPACE until the HUD weapon
indicator shows you have selected the
Maverick. The Maverick is cued to its target
by the F-22’s IRST primarily, or by data available to the avionics.
The Maverick can have targets designated
in the same way as an AMRAAM, i.e. automatic or MFD manual entry in a SHOOT list.
Potential targets must be entered into the
SHOOT list. One Shoot list is made for each
kind of weapon.
Please refer to Shoot lists, in the Avionics
section.
The targets will be marked in the HUD,
Attack, Situation and Defense MFDs, the
first to be fired at is marked in a special way.
Please see the Head Up Display and Multi
Function Display sections and refer to the
The F-22 – Air-to-Ground Combat
A Maverick on its way to a kill

125
The AGM-88 HARM
One of the greatest threats to modern aircraft is the ever increasing number of SAMs.
Even a poor nation can purchase significant
numbers of lightweight but effective
weapons. To counter this the F-22 uses
stealth technology and can carry anti-radar
missiles.
The AGM-88 HARM, homes onto the emissions from an air defense radar and is used
principally to knock out SAMs. It has a best
range of 15 miles. When a radar starts up
and has been detected by the F-22, AWACS,
or JSTAR aircraft, it becomes marked. Once
launched the weapon homes onto the radar
emissions.
To launch a HARM you must have the
Air-to- Ground HUD selected by pressing the
BACKSPACE key on the keyboard, this will
also select air to ground weapons. Keep
pressing BACKSPACE until the HUD weapon
indicator shows you have selected the
HARM. The HARM is cued to its target by the
F-22’s sensors.
The HARM can have targets designated in
the same way as an AMRAAM, i.e. automatically or by MFD manual entry in a Shoot list.
Potential targets must be entered into the
Shoot list. One Shoot list is made for each
kind of weapon. Please refer to Shoot lists,
in the Avionics section.
The targets will be marked in the HUD and
Defense MFD by a pentagon. The first to be
fired at is marked in a special way.
Please see the Head Up Display and Multi
Function Display sections and refer to the
Target Marking diagrams in each of those
sections.
NOTE: any ground target that has a radar signature, (ships, Early Warning radar and SAMs) can
be fired at with the HARM.
Manual shoot list entries can also be made
for the HARM by visual designation.
This is done by padlocking a target with the
F2 key on the keyboard, then adding that target to the currently selected missile (HARM)
shoot list by pressing the S key on the keyboard.
NOTE: you can add a padlocked target to your
wingman’s shoot list by pressing M on the keyboard.
Aircraft flying the SEAD (Suppression of
Enemy Air Defense) role normally fly at
medium to high altitude and will fly above
and behind any aircraft that they are providing cover for. Any target will be attacked as
soon as data is available and in range, being
launched in level flight, or a shallow dive.
When the weapon is in range (parameters)
the shoot cue will appear in the HUD and
The F-22 – Air-to-Ground Combat
124
The AGM-84A Harpoon
The AGM-84A Harpoon, is an active radar
guided long range weapon with a best range
of 74 miles. It is a dedicated anti-ship
weapon. Once a target has been marked the
launched missile will find the ship and attack
it at low altitude.
To launch a Harpoon you must have the Air
to Ground HUD selected by pressing the
BACKSPACE key on the keyboard. This will
also select air-to-ground weapons. Keep
pressing BACKSPACE until the HUD weapon
indicator shows you have selected the
Harpoon. The Harpoon is cued to its target
by the sensors.
The Harpoon can have targets designated in
the same way as an AMRAAM, i.e. automatic or MFD manual entry in a shoot list.
Potential targets must be entered into the
shoot list. One Shoot list is made for each
kind of weapon.
Please refer to Shoot lists, in the Avionics
section.
The targets will be marked in the HUD,
Attack, Situation and Defense MFDs. The
first to be fired at is marked in a special way.
Please see the Head Up Display and Multi
Function Display sections and refer to the
Target Marking diagrams in each of those
sections above.
Typically, the target to be attacked using
Harpoon will be attacked at maximum range
from low to medium altitude in level flight.
When the weapon is in range (parameters)
the shoot cue will appear in the HUD and
Attack MFD. Pressing the SPACE bar once
will launch the externally carried weapon.
The F-22 – Air-to-Ground Combat
Harpoon attacks against heavily defended ships are always high-risk
Killing SAMs is an essential part of protecting conventional strike packages

127
The GBU-24 Laser Guided Bomb
The GBU-24, is a Freefall bomb which has
been modified with extending wings at the
tail and a seeker on the nose which looks for
laser light reflected off a target. The target is
‘marked’ by a laser carried by the launch aircraft, or another accompanying aircraft. Like
the JDAM it must be launched from within a
certain altitude / speed envelope. The LANTIRN TV system is used to find the target,
aim and lock the laser.
To drop a GBU-24 you must have the
Air-to -Ground HUD selected by pressing the
BACKSPACE key on the keyboard. this will
also select air-to-ground weapons. Keep
pressing BACKSPACE until the HUD weapon
indicator shows you have selected the
GBU-24.
When you are at least 10 miles off the target,
go to the Attack MFD (preferably while the
Auto-pilot flies the F-22), by pressing 3 on the
extended keyboard. The view through the
LANTIRN camera is now selected by pressing the LANTIRN IMAGE button on the MFD
surround. The camera will be pointing forwards in the direction of flight, as it is in
slave mode normally. To move the LANTIRN
camera press CHANGE LANTIRN MODE on
the MFD surround. The camera can be
moved by pressing the right SHIFT and the
CURSOR keys in the desired direction.
Once you have found the general target
area, the camera can be zoomed by pressing the TOGGLE ZOOM button on the MFD
surround. Adjust the camera so that the
cross hairs lie over the desired target, or
point on the ground. Press LANTIRN TRACK
on the MFD surround and this will track the
target point on the ground, putting a lock box
over that target point. The laser is now firing
at that target and the camera will attempt to
maintain lock while the aircraft maneuvers
within certain limits.
The F-22 – Air-to-Ground Combat
126
Attack MFD. Pressing the SPACE bar once
will launch the weapon.
Smart Gliding Bombs
The JDAM
The JDAM, is a Freefall bomb modified by
having a special tail cone containing GPS
guidance. The bomb has its target pre-programmed at the mission planning stage, so
long as the launch aircraft releases the
bomb within the parameters indicated on the
HUD and Attack MFDs the bomb will hit
regardless of weather, daylight, launch altitude, or attitude!
To drop a JDAM you must have the
Air-to-Ground HUD selected by pressing the
BACKSPACE key on the keyboard, this will
also select air to ground weapons. Keep
pressing BACKSPACE until the HUD weapon
indicator shows you have selected the
JDAM.
The JDAM guides itself to the target but
must be dropped within a cone that will
allow sufficient speed and height for it to
reach its target. This is worked out automatically by the avionics. The area that the
JDAM can possibly reach at the aircraft’s
current speed, altitude and attitude is
marked by an ellipse on the Attack MFD. So
long as the target is within the ellipse, the
bomb, when released, will hit the target.
The target is marked on the HUD. When the
target is within the bombs parameters, the
shoot cue will be displayed on both the HUD
and the Attack MFD. Generally when you are
using the HUD, you will need to be higher
than 500 feet, 1 mile from the target for a low
altitude release. Or higher than 10,000 feet
10 miles from the target for a high altitude
release before the shoot cue should come
on. Because of the great flexibility of the
JDAM delivery there is no typical release
suggestion. The greater the height and
speed, then the greater the stand off range.
When the weapon is in range the shoot cue
will appear in the HUD and Attack MFD.
Pressing the SPACE bar once will open the
main bay doors briefly and release one
weapon, if the weapon is carried internally,
or will release an externally carried weapon.
However salvo, or ripple drops can be initiated on pressing the SPACE bar if the relevant Salvo, or Ripple buttons have been
previously selected on the Systems MFD.
Note: that the number of bombs to be released as
part of the salvo, or ripple can also be set on the
Systems MFD.
The F-22 – Air-to-Ground Combat
JDAM away. Note the marked target within the HUD
Here, ground targets are designated ready for weapons firing

129
Unguided Rockets
The LAU-68 rocket
Unguided rockets have been used against
ground targets since World War Two. Each
rocket packs a big punch and can be fired
singly, or as rippled groups, making them
much more destructive in a strafe type
attack than using the gun.
To fire the LAU-68 rocketyou must have the
Air-to-Ground HUD selected by pressing the
BACKSPACE key on the keyboard. This will
also select air to ground weapons. Keep
pressing BACKSPACE until the HUD weapon
indicator shows you have selected the
LAU-68. Place the rocket pipper over the target by maneuvering your F-22.
When you are aiming at a fast moving
ground target, provide a little lead to your
target by aiming slightly ahead of it. The
unguided rocket attack is best made in a
shallow to steep dive from 10,000 feet or
lower.
The word “SHOOT” will appear on the HUD
and Attack displays if you are within rocket
range of the target. Immediately that the target is in the pipper and the shoot cue is lit,
fire your rockets by pressing the SPACEBAR
or trigger, once for single rounds, or more if
the relevant Salvo, or Ripple buttons have
been previously selected on the Systems
MFD surround.
Freefall, Retarded and Cluster
bombs
There are three main techniques to be used
to deliver a Freefall bomb:
• From a shallow dive, usually below
20,000 feet and above 2,000 feet.
• Toss bomb (where the aircraft pulls up
and releases the bomb, imparting a ballistic
trajectory and greater range to the bomb),
the maneuver is usually carried out up to
altitudes of 20,000 feet.
• Level flight and release, from any altitude down to 1,000 feet.
The Freefall (iron) bomb is similar in design
to the millions that were dropped during the
Second World War.
Retarded bombs are designed to be dropped
in very low level attacks where the extra
drag created by their retarding mechanism
literally pulls them clear of the bombing aircraft, saving it from blast effects.
The Cluster bomb is delivered in a shallow
dive, or from level flight at altitudes below
10,000 and above 1,000 feet. Shortly after
release the bomb breaks into multiple
bomblets which scatter over a wide area.
All three types of bombs, regardless of delivery method, are targeted in the same way. To
drop a Freefall, Retarded, or Cluster bomb
you must have the Air-to-Ground HUD
selected by pressing the BACKSPACE key
on the keyboard, this will also select air to
ground weapons. Keep pressing BACKSPACE until the HUD weapon indicator
shows you have selected the MK82F /
MK82R, MK83F, or the MK20 respectively.
A bomb fall line will be displayed on the HUD
and a mission planned target will be marked
The F-22 – Maneuvers
128
Once the target has been locked in this way,
the shoot cue will be displayed on both the
HUD and the Attack MFD, when the bomb,
(or bombs) are in firing parameters and can
be dropped, at the same time an indicator
caret will have progressed up the right edge
of the Attack MFD to the uppermost line, this
is a good indication of progress and range to
release.
NOTE: the LANTIRN RESET button will return the
camera to slaved straight ahead mode, as will the
CHANGE LANTIRN MODE button.
The GBU series of bombs can be dropped
day or night, but bad visibility will hamper
both the camera and the laser designator.
The bomb is best dropped from medium to
high altitudes (10,000 to 40,000 feet) in level
flight, or in a shallow dive. When the shoot
cue appears in the HUD and Attack MFD,
pressing the SPACE bar once will normally
drop one externally carried weapon.
However salvo, or ripple drops can be initiated on pressing the SPACE bar if the relevant Salvo, or Ripple buttons have been
previously selected on the Systems MFD
surround.
NOTE: The number of bombs to be released as
part of the salvo, or ripple can also be set on the
Systems MFD surround.
The F-22 – Air-to-Ground Combat
Unguided rockets - dramatic and effective (see following page)

131
Air-to-Air Combat Tactics
In the Training section of Total Air War are a
series of missions which should be viewed
initially as training missions. The Missions
are written so that each contains more than
the aircraft and targets necessary to learn
the specific lesson.
Using EMCON
Either the pilot (in manual EMCON), or the
F-22 avionics (in auto EMCON) can decide
which of 5 EMCON states to be in.
EMCON1 is the stealthiest and EMCON5 is
the least stealthy, allowing the most use of
radar and radio. The EMCON system is there
to decide how stealthy the F-22 should be, In
its auto mode the F-22 would normally travel
in EMCON1. When a potential enemy is spotted by the aircraft systems it will gradually
increase the EMCON condition as the opponent gets closer in non regular steps, based
on the range of the F-22 and the potential
enemy’s detection systems and weapons.
Please refer to EMCON in the preceding
Avionics section.
Using the IRST
The IRST is a highly sensitive Infrared camera that has the ability to zoom onto a distant
target magnifying the image for display on
the Up front MFD. This allows the pilot to
visually identify targets at well beyond visual (eyeball) range.
In EMCON 1 the IRST becomes the primary
on board search and track device and can
also be cued to a potential target by avionics
received emissions. As such it is a very
stealthy means of acquiring targets.
Target information gained by the IRST is
pooled with all other sensor information
allowing all air to air and air to ground guided weapons to be cued to their targets.
Please refer to IRST in Avionics.
The F-22 – Maneuvers
130
by a cross. The CCIP (Continuously
Computed Impact Point) marked by a small
caret will progress up the bomb fall line as
you near the target. Immediately that the
caret lies over the target the bombs must be
immediately released by pressing the SPACE
bar. Once will normally release a single
externally carried weapon at a time.
However salvo or ripple drops can be initiated on pressing the SPACE bar if the relevant
Salvo, or Ripple buttons have been previously selected on the Systems MFD surround.
The F-22 – Air-to-Ground Combat
When the CCIP crosses the target, release the bomb

133
Drag Left
Dragging left or right is a tactic where one fighter of a pair becomes the bait for enemy aircraft and flies to the left or
right. Once the opposing aircraft have followed the bait, the other fighter of the pair swings in behind them and launches an attack.
In some BVR situations the lure can first go one way and then be switched to the other direction. The tactic has been
described best as: “Hold them by the nose and then kick them in the pants!”
“Hold them by the nose and then kick them in the pants!”
The F-22 – Maneuvers
132
Eyeball and Shooter
The eyeball shooter method of attack is used when a visual confirmation of a hostile aircraft is needed, which may
occur when the nations involved are not at war but may be involved in a military stand off, or show of force. Typically
your fighters would be involved in a head on approach to intruding aircraft. They will have been alerted to the presence of these aircraft by one sensor source or another and will attempt to offset their flight paths by several miles
allowing them to close the unknown contacts from a front quarter. Your two fighters will be separated by over a mile,
the lead will be able to visually ID the bogeys as bandits, while the number two is ready to fire immediately on command at the trailing contacts. Only the lead fighter will come within the unidentified contacts visual range and will turn
to engage the enemy lead immediately if he has given the command for his wingman to launch. This tactic will hopefully quickly turn a 2 on 4 attack into a 2 on 1.
The number two gets ready to fire while the lead ‘eyeballs’ the targets
The F-22 – Maneuvers

135
Sandwich Left (Bracket Left)
Still the oldest trick in the book for a pair of fighters. When one aircraft is attacked from his rear quarter he turns to
the opposite side to which his wingman is on, thereby drawing the attacker further while his wingman swings neatly
in behind ready to dispatch the attacker with a heat seeking Sidewinder once the first fighter breaks out of the danger area.
Sandwich of death
The F-22 – Maneuvers
134
Offensive Split
A pair of fighters can carry out this tactic while in a combat spread. One fighter draws the attention of the enemy while
the other (hopefully unobserved) sneaks around the back.
It could be a follow on to the Eyeball and Shooter method: when the lead gains visual contact and gives the order for
his wingman to fire, the lead is observed by the enemy who will certainly turn towards him. The wingman who is the
shooter goes low and undetected turns hard in a climbing turn behind the enemy.
Before he knows it, the enemy is in a tight spot
The F-22 – Maneuvers

137
The Grinder
The United States Air Force uses a tactic called the `Grinder’, a technique that involves a flight of fighters maneuvering to launch a salvo of long range missiles against an opposing force and then rapidly spiraling to a lower altitude
and either escaping, or regrouping. This technique maximizes their chance of success and reduces the risk of losses. The maneuver can be repeated over until all the opposing force is destroyed. Please refer to BVR combat in the
Air to Air Combat section.
A barrage of missiles will make any enemy think twice
The F-22 – Maneuvers
136
Defensive Split
This a maneuver to either foil or deal effectively with an attack from behind by an equal number of fighters. One of the
attacked pair will go high and attempt to loop behind the attackers, drawing their attention as a potential victim as he
will lose energy faster than his wingman who has gone low by rolling over and pulling a rapid dive. The wingman loops
up to deal with the attackers rejoining the fight that the first fighter is now drawing down to meet his wingman.
One goes high, the other goes low. Luck and skill leads to survival
The F-22 – Maneuvers

139
In Game Speech
The F-22 has 4 preset radio frequencies for
communication with other aircraft and the
ground. You can communicate with your
Wingmen on all 4 frequencies, each frequency also enables you to talk to one other
group as outlined below:
NOTE: whenever you can talk to a group on a specific radio frequency you will be able to hear
what that group is saying to you. Quick access to
wingmen commands can be gained by pressing
TAB on the keyboard.
Please see Wingmen Commands above. For
additional information, please refer to the
Training section of Total Air War. Look at the
Key Card, In Flight Communications. In addition please go to the Avionics section for
reference to ‘Bitchin Betty’.
A full list of all player selectable phrases
appears below.
Radio Frequencies
Frequency PUSH 1
Frequency PUSH 1 is for talking to the airfield tower and local airfield air traffic control. T o select press 1 on the keyboard, or the
relevant button on the up front MFD panel.
Frequency PUSH 2
Frequency PUSH 2 is an open channel for
aircraft allowing you to broadcast messages, warnings and orders and also
enables you to talk specifically to the
AWACS. as this channel is open you will be
able to hear radio traffic between other aircraft. To select press 2 on the keyboard, or
the relevant button on the up front MFD
panel.
Frequency PUSH 3
Frequency PUSH VICTOR 3 is also for talking
to the AWACS but is a closed channel for
talk between you and the AWACS handling
your flight. To select press 3 on the keyboard, or the relevant button on the up front
MFD panel.
Frequency PUSH 4
Frequency PUSH VICTOR 4 allows you to talk
to an air refueling aircraft. To select press 4
on the keyboard, or the relevant button on
the up front MFD panel.
NOTE: When starting a new mission the radio frequency will be set to PUSH 1.
Talking to other groups
Care has been taken to present the ‘enthusiastic user’ with speech relevant to each situation, this will be particularly apparent
when seeking instructions to take-off, or
refuel. For the less experienced user, do not
let the depth of speech get to you! Try pausing the game while you make a selection.
The F-22 – Communications
138
Stealth Attack
Stealth is a huge asset to have if your mission involves a sneak attack. It can be especially useful if your government wishes to
take out certain undesirables while maintaining a plausible denial!
ECM, Chaff and Flares
ECM, Chaff and Flares all have the job of
preventing or confusing an attack on you by
missiles, but achieve this objective in different ways.
Electronic Counter Measures take many
forms but basically prevent enemy radar
from seeing a clear picture of the jamming
aircraft.
Chaff is a last ditch attempt to thwart a missile attack by dumping large amounts of aluminum strips which temporarily blinds the
radar of a missile, fighter, or ground station.
Flares are also a last ditch attempt to foil a
missile attack, but being a high intensity
heat source are aimed at heat seeking missiles and blinding IRST sensors.
Wingmen Commands
Press TAB on the keyboard, this will present
a menu on the top left of your Helmet
Mounted Display. Selecting one of these
(with the exceptions of options 1 and 9,
which are context sensitive), will lead into a
further set of options.
Formations
Under option 2, FORMATION, is a list of formations to apply to your flight. Some of these
formations can be close (wingtip to wingtip),
while others are combat spread formations
with a large horizontal separation between
individual aircraft.
Card
Card is the most useful formation for a four
aircraft flight, providing mutual cross cover.
The four aircraft are horizontally spaced at
the four corners of a playing card shape.
Deuce
Deuce is specifically a formation for two aircraft on a SEAD mission. The first aircraft is
usually the bait, while the second flying
above and behind watches for any radar
that tries to track the first and launches a
HARM at the radar source.
Sweep
Sweep is a line abreast formation used for
fighter sweeps and by all aircraft to cross an
obstacle such as a coastline. All aircraft in
the formation will cross at the same time
dividing potential ground fire between them
and thereby reducing the risk to individual
aircraft.
Strike
Strike is a line astern formation used to
launch, or drop weapons on a ground target.
Separation must be adequate to prevent aircraft flying into the explosions created by
the aircraft ahead.
Fingertips
Fingertips can apply to two or four aircraft.
The aircraft form one half of an arrow, forming up on the leader.
Vic
Vic is the V formation loved by airshow
spectators the world over and included here
for fun!
For additional information, please refer to
the Training section of Total Air War. Look at
the Key Card and In Game Speech below.
The F-22 – Maneuvers
continued on page 142

FRQ 3
1 Wingmen
2 AWACS
141
The F-22 – Communications
140
The F-22 – Communications
As real as it gets. Accurate speech simulation, easily accessed via a menu
F-22 Speech
FRQ 2
1 Wingmen
2 AWACS
3 Broadcast
4 Help
FRQ 1
1 Wingmen
2 Airfield
Wingmen
1 Engage
2 Formation
3 Combat
4 Maneuver
5 Abort
Mission
6 Radio
7 Disengage
FRQ 4
1 Wingmen
2 Refueler
1 Say My Take-off Time
2 Vector For Recovery
3 Direct Approach
4 Teardrop Approach
5 Circuit Approach
6 Finals
1 Engage My Target
2 Engage Bandit
3 Engage Hostile
4 Engage Threat
5 Drag Left
6 Drag Right
7 Bracket Left
8 Bracket Right
9 Complete
1 Change to Radio Frequency 1
2 Change to Radio Frequency 2
3 Change to Radio Frequency 3
4 Change to Radio Frequency 4
5 Say Again
1 Break Left
2 Break Right
3 Break High
4 Break Low
1 Card
2 Deuce
3 Sweep
4 Strike
5 Fingertips
6 Vic
1 Request Divert Airbase
2 Where is the Tanker
3 Clearence to Base
1 Leave the Area
2 Leave, or be Shot Down
1 Bandits Hot
2 Threat Hot
1 Where is the Tanker
2 Refuel Permission

142
The F-22 – Communications
When you wish to talk to your Wingmen
Remember that this can be done in any radio
frequency by picking option 1 Wingmen and
choosing the relevant option. Or press TAB
on the keyboard, this will present a menu on
the top left of your Helmet Mounted Display
Selecting one of these (with the exceptions
of options 1 and 7). Once key phrases are
learned you will be able to short cut them as
in this example, to give the order “ENGAGE
MY TARGET”, press TAB, 3, 1.
When you wish to talk to the airfield both
before, or during flight ,first select radio frequency PUSH 1, pick option 2 Airfield and
choose what you wish to say from the
options presented on the top left of your
Helmet Mounted Display.
Remember that any replies from the airfield
can only be heard on this frequency!
When you wish to talk to the AWACS, first
select radio frequency PUSH VICTOR 3, (or
PUSH 2), pick option 2 AWACS and choose
what you wish to say from the options presented on the top left of your Helmet
Mounted Display.
Remember that any replies from the AWACS
can only be heard on this frequency!
When you wish to talk to the refueler, first
select radio frequency PUSH VICTOR 4, pick
option 2 Refueler and choose what you wish
to say from the options presented on the top
left of your Helmet Mounted Display.
continued from page 139
143
Introduction
ACMI is a highly cost effective tool for training pilots. It features an under-wing data
pod which relays the aircraft‘s position in
3D space to a ground station, and calculates the path of virtual weapons once a
lock has been obtained and the trigger
pulled. Instructors on the ground assess
which students have scored kills, and call
the defeated pilots out of the fight. Later, in
the debriefing room, a 3D reconstruction of
combat is replayed from the collected data
using simple, graphical representations of
aircraft, weapons and the landscape.
Mistakes are easily pointed out, and the
lessons learned.
In TAW, ACMI is one of the best tools for
learning the skills of modern air combat. For
customers of DID products, ACMI has
always been one of the most requested features, which is why TAW has probably the
best system of its kind. Now the player is
able to record, analyze and compare performance in combat.
Like the real ACMI, data is collected from
the player‘s aircraft, allowing a graphical
portrayal to be replayed afterwards.
In some cases the ACMI data from a previous flight is the ideal way to brief new pilots.
ACMI Modes
The ACMI system can run in one of four
modes, each mode has a different screen
layout:
In-Cockpit Recorder Mode
SHIFT R starts a recording, and red onscreen text warns you that a recording is
being made. Pressing SHIFT R again stops
the recording. When the mission is over, go
to the ACMI Debrief Screen to view the
ACMI recording and save it for future use.
The system has been designed so that each
minute of ACMI data takes only a few kilobytes of space on your hard disk, making
ACMI files ideal for sending over the
Internet.
ACMI
ACMI (Air Combat Maneuvers
Instrumentation)
Login
ACMI
ACMI Screen
ACMI in Action

145
Object ID
Identifies objects by overlaying a text
description at the head of each object trail.
Next Plane
Moves the view focus to the next plane in
the recording.
Last Plane
Moves the view focus to the previous plane
in the recording.
ACMI View Controls
The viewer contains the main viewer
screen, the viewer controls, and the video
controls. The selectable views are:
Cockpit
Puts you in the cockpit of the currently
focused aircraft, which means you have a
pilot's eye view of the recording.
Spin
Continuously spins around the currently
focused aircraft.
Satellite
A top down view of the currently focused
aircraft.
Free
A user moveable camera. Hold down the left
mouse button in the view area, and then
drag the mouse around to move the camera
around the currently focused aircraft.
Track
Places the camera so that it points towards
the currently focused aircraft's target.
Side Track
Places the camera at 90 degrees to the current aircraft and its target.
The Main Viewing Window
The main viewing window contains two
scroll bars, these are:
Zoom scroll bar
Located on the left of the main view, this
zooms the view distance of the current view.
This has no effect in the cockpit view.
Aircraft trail length scroll bar
Located on the right of the main view, this
scroll bar changes the trail lengths of the
objects in the view.
Changing the trail lengths can avoid clutter
or help to increase the frame rate if there
are a lot of objects in view.
ACMI
144
In-Cockpit ACMI Mode
The ACMI module is started from the cockpit
while you are flying a mission by pressing
SHIFT A. The full ACMI interface will be dis-
played, showing what is going on around
you in real time. An indicator will show
whether or not you are recording at that
time. See ‘ACMI Interface’ for a complete
description.
Debrief Player Mode
This screen is accessed at the end of a mission to view the recording you have made
during the mission, and to save that mission
data if required.
Playback Mode
This is started from the TAW Main Menu,
and is used to load and view previously
recorded missions. These can be your
recordings, or ones copied from other pilots.
ACMI Interface
The ACMI module screen contains the main
view screen, the view controls, and the
video controls. The ACMI consists of the following panels:
Recording Data
This displays information and game data
about the current recording. These are:
Game Type, Mission Type, Flight Role,
and T ake-off Base. This information is stored
when the player starts the recording.
3D View/Recording Log
If the ACMI is started while flying a mission,
this panel will display a scaled-down 3D
game view.
All key presses, and joystick movements will
work within this view, which means that you
continue flying your mission while in the
ACMI.
If the ACMI is in a playback mode, this area
will contain a scrolling message log. The log
shows colour coded text details about what
happened in the recording, such as plane
hits and deaths. User recorded messages
are also displayed here.
ACMI Display Controls
This area contains the following buttons:
Targets
Shows who is targeting whom by drawing a
moving dotted line between an aircraft and
its target. The line colour is that of the targeting plane, and the line moves towards its
target.
Height
Draws a gray line from each plane down to
the ground, which gives a better indication
of how high each plane is flying.
Weapon ID
Identifies weapons by overlaying a text
description at the head of the weapon trails.
ACMI

147
Using ACMI
One of the biggest problems of air combat is
getting an understanding of the complex
spatial relationships that occur in a dogfight.
ACMI offers a whole new way to view the
action, and obtain a better understanding of
how different maneuvers and weapons
should be employed.
It is possible to initiate an ACMI recording
during flight and view it afterwards. Or it is
possible to enter the ACMI interface while
you are flying, for real-time analysis of actual flight through an abstraction in simple
graphics.
During a mission you can start and stop a
recording by pressing SHIFT R. This will tog-
gle the recording on and off. If the ACMI is
recording you will see a red ‘REC’ symbol on
the bottom right corner of your screen.
Alternatively, during a mission, it is possible
to start the ACMI screen by pressing SHIFT
A on the keyboard. In this case you will be
able to watch what is happening in real time.
Pressing SHIFT A again, or clicking on Exit
within the ACMI window, will take you out of
ACMI again.
When an aircraft is hit, you will see a small
star shaped graphic that represents an
explosion. Weapons tracks are shown as
dotted lines, and aircraft or weapons identification is made easy by labels on screen. A
colored line will also reveal who is tracking
ACMI
146
ACMI Video Controls
Below the main view area are the video controls. From left to right these are:
Rewind to Start
Takes you back to the start of the currently
loaded recording.
Stop
Stops, or pauses the recording or playback
of ACMI.
Play / Record
In playback mode there is a playback button,
e.g. for use during debrief. In record mode
there is a record button, e.g. for use during a
mission.
Fast Forward
Speeds the recording forward at four times
normal speed.
Timer
Next to the video controls is a timer, which
shows the current play or record time in
seconds.
‘FULL‘ button
When the ACMI is in one of the playback
modes, a 'FULL' button will appear that lets
you expand the view area to full screen
mode.
‘SMALL‘ button
Pressing the ‘SMALL’ button after using the
‘FULL’ button will take you back to a smaller
window.
ACMI
ACMI Smaller WindowFull Screen Mode

during a multiplay mission, any messages
sent by you will be recorded in the 3D View /
Recording Log. A typed message can be
sent to everyone by pressing 5 on the keyboard, and then typing your message, ending it with one press of the RETURN key.
Similarly a typed message can be sent to
your team members by pressing 6 on the
keyboard, type your message, and then
press the RETURN key.
You can index an event of importance by
sending a message to everyone as above,
type an index message while making a
recording in flight. For example “sensor contact made” will give you a suitable event
index within a recording of BVR combat.
148
ACMI
149
Introduction
In TAW there is a very wide choice of player views. Each view has its own merits, and
choice depends very much on the player’s
preference. For example, looped fly-by is an
excellent way to enjoy aerobatic maneuvers from an external view -especially
when using thrust vectoring. Padlock view
adds a realistic head movement to the
cockpit view, enhancing the feeling of
flight. Some players, on the other hand, prefer the straightforward HUD only view, with
its uncluttered display.
See the supplied Key Card for keyboard
combinations necessary to operate the different views.
Using the Views
Finding your favorite combination of views
takes practice and experimentation. Once
you have found the best combination, programming the views onto a programmable
joystick will make life easier.
Padlock Views
In TAW there are a number of padlock views.
A padlock view is an internal tracking view
that simulates the pilot looking around the
cockpit towards a given object. For example, the F2 view is a current target
padlock, which means that the pilot's head
will turn to keep that object in view. The padlock views cannot be used to padlock planes
outside visual range.
Padlock views are more realistic than external views, and more flexible than the normal
forward-looking view. However they may be
confusing to start with; practice helps a lot.
Padlock views are on F2, F3, and F4, these
work as follows:
F2 - Current weapon target padlock.
This view will padlock to the currently
locked target. This is obviously useful for lining up missile shots etc. When the HUD is in
ILS mode the F2 key will padlock to the runway you have been instructed to land on.
Pushing F2 again will show an external view
of your plane with the runway behind. You
will be unable to use this view if you are out
of range of the landing strip or if no runway
has been allocated to you.
F3 - Current threat padlock.
This view will padlock to any missile that has
been fired at you. If there are no missiles,
the view will padlock to the closest plane
that is targeting you.
Player Views
Player Views
Realistic head movement while tracking targets
in the wide-angle padlock view

151
SHIFT F1
Check your six.
F2
Current weapon target padlock. Toggles
between internal view, and external view.
SHIFT F2
External target to player.
F3
Toggle threat padlock between internal
view, and external view.
SHIFT F3
External view threat to player.
F4
Toggle View Padlock between internal view,
and external view.
Player Views
150
F4 - View padlock
This gives you the flexibility to padlock to
any object within the local area, e.g. planes,
ground vehicles and buildings. It is independent of weapons, and is equivalent to scanning with your eyes. However, if you ‘View
Padlock’ onto a potential target, press ‘S’ to
put a weapons lock on that target.
There are a number of keys that control the
View Padlock.
F11 - View Padlock filter
Cycles around Air, Ground and Static
objects: Air being aircraft, Ground being
ground vehicles, and Static meaning buildings and structures.
To change the current View Padlock object
you use the following keys:
Z
View next object in flight or group.
\
View previous object in flight or group.
Shift Z
Skip view to next flight or group.
Shift \
Skip view to previous flight or group.
The keys above will work for static objects,
but you will need to be much closer to see
them.
When you have a View Padlock you can use
F4, Shift F4, F9, Shift F9, F10 and Shift F10 to
view that object in different ways (See the
Views Keys section below). If you have a
View Padlock on an object there are two
other useful functions you can perform. The
first is to add that object to your shoot list by
pressing S on the keyboard. The second is to
add the current padlock object to your wingman’s shoot list by pressing M on the keyboard, this is very useful if you are out of
weapons and still want to designate targets.
NOTE: The View Padlock filter and object are
automatically set to the ‘objects’ view using F2.
Views Keys
The ‘F’ keys from F1, to F11 provide a range
of views around the F-22, and other mobiles
in the world; many of these keys will padlock
a mobile, cycle between related views and
can be modified by pressing SHIFT on your
keyboard.
F1
Toggle virtual cockpit on / off.
Player Views

153
F8
Cycle missile view / pylon view.
F9
View Padlock selected moveable external
view.
SHIFT F9
View Padlock selected fixed external view.
F10
View Padlock selected flyby.
SHIFT F10
View Padlock selected looped flyby.
F11
View Padlock browse filters Air, Ground
Mobile target, or Ground Static targets.
Player Views
152
SHIFT F4
External View Padlock object to player.
F5
Toggle, padlock to wingman, external view,
player to wingman.
SHIFT F5
External view , Wingman to Player.
F6
Player fly-by.
SHIFT F6
Looped player fly-by.
F7
Player moveable external view, (you can use
SHIFT and CURSOR keys to alter your viewing position).
Player Views

155
Smart Views
154
The Wide Angle Camera
The internal views selected on the F1, F2, F3,
and F4 keys can be individually modified
from normal narrow angle cameras to wide
angle cameras by pressing K on the keyboard while in each view.
Extended Keyboard Cockpit
Views
The extended keyboard numbers each provide a particular view of your MFDs.
NUM 0 View Systems MFD.
NUM 1 View Defense MFD.
NUM 2 View Situation MFD.
NUM 3 View Attack MFD.
NUM 4 View combined Communications
and warnings MFD.
NUM 5 View Up Front MFD and Panel.
NUM 6 View Artificial Horizon MFD.
NUM 8 Return to normal F1 view of HUD.
Player Views
Introduction
Total Air W ar, like its predecessor EF2000, is
packed with action. To let you appreciate
the enormous attention to detail, we developed Smart Views, a special set of camera
views which open up the world for all to
see. Special filters allow you to select the
type of action or objects that you view.
Smart Views behaves like a virtual movie
director, selecting the most interesting
action and camera views and displaying
them automatically.
For additional details, see the supplied Key
Card for keyboard combinations necessary
to operate the Smart Views.
More amazing scenes from Total Air War,
courtesy of Smart Views
Smart Views
Normal View Wide Angle View

156
Smart Views
The Smart Views Interface
When you press the F12 key, Smart Views
mode will start and the interface will be displayed over the camera view briefly. The display is split into upper and lower panels,
each containing several filters that can be
changed. The F10 key will cycle through the
types of object filter in the upper panel,
while the F11 key will cycle through the allegiance filters in the lower panel.
In Smart Views mode the F9 key will lock
your camera to whatever object you were
viewing, through smart views at the time you
press it.
Using Smart Views
The Smart Views cameras allow you to
watch a mission separately from whatever
role you were supposed to be playing. The
cameras will move between views of interest according to the filters you have set and
allow you to see the ‘movie’ of your mission
in real time.
Smart Views Keys
The following keys control the Smart views
system:
F12
Smart view menu system. A screen overlay
will be shown for a few seconds.
F9
After pressing F12 toggle hold/unhold on
current object.
F10
Choose object.
F11
Choose allegiance.
Z
View next object.
\
View previous object.
Shift Z
View next groups or flight.
Shift \
View previous group or flight.
NOTE: It is advisable to engage your autopilot
when using smart views during a mission. If you
are killed, the Smart Views cameras will engage
and continue showing the mission until it is
‘timed out’.
The Smart Views Interface
157
Introduction
TAW is based on the same simulation software that DID sell to military customers for
real training applications. In the Training
section, you will find a host of missions
designed to familiarize you with the
F-22 and AWACS aircraft, helping you to
become proficient in the techniques of
modern air combat.
The Training screen contains six training
areas displayed on the top left of the interface, each containing pre-written missions.
‘Flight Training’ deals with the basics like
take-off and landing, while ‘Weapons
Training’ teaches how to target and launch
your weapons. ‘Free Flight’ is a set of missions that will take you on an anticlockwise
peacetime tour of the world, starting in the
Yemeni mountains in the South. The
‘Dogfighting Skills’ section deals with training for combat, while ‘Wingmen’ teaches
you how to make the most of your buddies.
The ‘AWACS Missions’ is an area specifically to teach use of the AWACS commander.
NOTE: from the AWACS you will be able to enter
and fly any F-22 on the AWACS display.
The Training Interface
As you select each training area, the missions within it are displayed underneath in a
scrolling window, from where you will be
able to select the individual missions by
clicking on them.
NOTE: the selected mission is highlighted in
color.
The OK button
Pressing this button on the bottom left of the
interface will start the selected mission.
The CANCEL button
Pressing this button will return you to the
Main Menu.
Game Feature Options
To access game feature options from within
the mission, press SHIFT O on the keyboard.
Information buttons
Below the Interface window on the right are
six buttons that will display information in
the window.
The Pilot Log button
Displays your campaign history and awards.
The Map button
Displays the world with your route overlaid.
The Briefing button
Gives a brief text description of the selected
mission.
Training
Practice makes perfect in the Training area
Training
Login
Training

159
Introduction
Multiplayer gaming in TAW is a great deal
of fun. There are preset head to head, team
play and co-operative missions for you to
enjoy. Plus, you can create your own cooperative missions using the Custom
Combat generator making the experience
as dynamic as your own imagination. You
will also be able to play TAW over various
Internet Multiplayer Gaming services such
as DWANGO, MPATH and Wireplay. There
is a huge online community of virtual pilots
waiting to do battle on the internet. Check
out our website for hot links to virtual
squadrons (http://www.did.com).
Note: We do not recommend using the partial
install option for TAW multiplay.
The Multiplayer Interface
The following sections describe the TAW
Multiplayer screens and what you need do
at each one in order to setup a multiplayer
game.
The Multiplayer Screen
Select a Service Provider
There should be a list of options in the
Multiplay Client box. If there is not then
DirectX may not be installed correctly. This
list may also include options for other service providers (e.g. online game companies)
that support DirectX. All players must select
the same service provider in order to connect their machines together. Please refer to
’DirectPlay Multiplay Options‘ in this section
for help in setting up each service provider.
Choose to Create or Join a Game
The TCP/IP, Serial and Modem service
providers require the user to input parameters in order to locate the game host (i.e. the
game creators machine). Please refer to
’DirectPlay Multiplay Options‘ in this section
for help in setting up each service provider.
When selecting IPX, a search for games will
take place immediately.
Choose a Game
When there are one or more games in the
‘Games In Progress’ box you can select a
game. This will either result in either ‘Open’
or ‘Closed’ being appended to the game
name. If the game is closed then the game is
not accepting any more players and you
cannot join it. If the game is ‘Open’ then a list
of current players will appear in the ‘Current
Players’ box and the selected mission
details will appear in the ‘Game Details’ box.
You can then either join the game or select
(and hence interrogate) another in the list.
Multiplayer
Multiplayer
The Multiplayer screen - chat to other pilots
Login
Multiplayer
Multiplayer
Screen
158
The Target View button
Displays information for the selected air-toground mission.
NOTE: this is only available for Weapons Trainng
and Wingmen missions.
Features
The briefing displayed to you on mission
selection will also be displayed in the map
view, use the DEL key on the number keypad. For variety and to increase the training
value, each of the missions contains objects
and activities of interest other than those
related to the basic training mission.
The skills that you as the game user learn
within the Training section are imparted to
each of your F-22 squadrons on entering the
Campaigns. Though it is not necessary to
complete this section before entering a
Campaign, it will certainly help.
Missions are measured against a pre-set
requirement for mission success and will be
displayed to you as a percentage.
Training
Practice difficult maneuvers such as air-to-air refueling

161
The Create Game Screen
In this screen you can either select one of
the preset missions or create your own mission by selecting the Custom Combat option.
There are three types of preset mission:
head-to-head where it’s every man/woman
for themselves; team play where a maximum
of four teams can battle it out; and co-operative where you work together to blow the
AI enemy to pieces.
It is important to note that when the Custom
Combat option is selected no more players
can join the game and ‘lurking’ players (i.e.
players interrogating the game) will be
removed from the game.
Multiplayer
160
Error Messages
Please refer to ‘DirectPlay Multiplay
Options’ in this section for help in setting up
each service provider.
Game closed - unable to join!
This simply means that the selected game is
not accepting any more players.
Failed to Open Service Provider.
The selected service provider is either not
installed or has a problem. Check that it is
installed correctly in the Network section of
the Windows Control Panel.
This Service Provider is not Supported.
The selected service provider is not supported by TAW.
Could not create the game - Invalid
Parameters.
A problem has occurred while creating the
game. The selected service provider may be
incorrectly installed or the parameters provided for a ‘Serial’ connection may be incorrect. There may also be a problem with the
hardware being used (e.g. serial cable, network card or modem).
Connection timed out while joining game.
Please try again.
Communication with the game host has discontinued.
Directplay error while joining game.
Please try again.
A connection could not be made with the
game host at the Directplay level.
Timed Out! Please try again.
A connection could not be made in the time
period allowed.
Connection Lost!
You have been disconnected from the game.
No more new players!
The game at the stated address is not
accepting any new players.
Please check IP address OR serial parameters and serial cable
This message means that either the IP
address is invalid if TCP/IP is selected or
that there is a problem with the serial connection.
No Games Available
There are no games at the stated destination
address. The game continuously searches
for games until the ‘cancel’ button is
pressed. If playing over the internet, wait a
while, as the game may not yet have been
setup by the game host.
Multiplayer
Choose your battleground in the Create Game screen
Login
Multiplayer
Multiplayer
Screen
Create Game

163
The Join Game Screen
Here players can chat to each other and are
able to view the mission briefings for the
missions that are selected by the game host.
Multiplayer
162
The Custom Combat Screen
Here you can build your own mission. You
can select the number and type of planes,
ships and ground based vehicles you want
to fight against. You are also able to select
the weapons package to use for each
object. Please refer to the ’Custom Combat‘
section of the manual for help on how to set
up a custom mission.
Multiplayer
Design your theater of war in the Custom Combat screen
Spine tingling tension as you prepare for battle
Login
Multiplayer
Multiplayer
Screen
Join Game
Login
Multiplayer
Multiplayer
Screen
Create Game
Custom Combat

165
parameters are wrong then an error message will be displayed.
Port
You need to know which communication
port (COM1, COM2, COM3 or COM4) that the
serial cable is plugged into. If it is not apparent by looking at the back of your computer
then the best way to find out is simply by trial
and error.
Baud Rate
It is recommended that you use the fastest
speed possible (minimum 14400 bps).
Stop Bits and Parity
Leave as default.
Flow
It is better to use RTS/DTR hardware flow
control but it largely
depends on which
cable you are using.
Modem
You must first select
a Modem from the
given list of installed
modems. If you are
joining a game then
you must also provide the phone number of the machine
you want to dial into.
Set the speed on
both machines to the
fastest speed of the
slower modem.
Make sure that both
machines have the
same maximum
speed setting.
Most of the configuration settings can be
left as default. If you have a modem that
enables you to turn off error control then this
may help overall performance.
When playing custom combat missions over
low bandwidth media it is advisable to be
prudent with the amount of movable objects
in the world as this will have a direct impact
on the performance of the game.
Multiplayer Internet Gaming
Playing TAW over Kali95.
Please find below a number of recommendations that will help improve gameplay over
Kali95.
Multiplayer
164
The Multiplayer Options Screen
This screen only appears if you select a preset mission. All players are able to select
which weapons package they want to use
and which team they want to be on.
DirectPlay Multiplay Options
This section describes the available options
in the Directplay dialog boxes that you need
to complete in order to connect to another
computer.
The following connection methods will only
work if you have them installed correctly
otherwise an error message will appear.
You can install service providers by selecting the Network (for IPX and TCP/IP) or
Modem option from the Windows Control
Panel.
IPX
Select this option for Local Area Network
(LAN) multiplay. There is no dialog box for
this service provider. If an error box appears
please check that the IPX service provider it
is installed correctly.
TCP/IP
This is the Internet standard but can also be
used for multiplay on Local Area Networks
(LANs). If you are joining a game then you
must provide either the computer name or
the IP address of the game creator. It is not
recommended that you leave the field blank
to search for games.
Serial
You must provide the following information
in order to connect to another machine. It is
important that both players choose the same
settings in the Directplay dialog box. If the
Multiplayer
Choose your wingmen and load up your weapons
Login
Multiplayer
Multiplayer
Screen
Create Game
Custom Combat

Low ping times are best! Ideally the ping
time to each player should be at most 500ms.
Turn chat mode off and ensure that all chat
windows are closed before starting the
game. Receipt of chat messages during the
game will minimize the game.
It is advisable to install a full version with
music turned off.
When selecting options within each screen,
give the game time to respond. Over zealous
mouse clicking will only make things worse!
When creating a Custom Combat mission
don’t overload the world with objects
(including missiles!).
Allow Kali to drop packets to speed up
game.
MPATH
www.mplayer.com
Wireplay
www.wireplay.com
Dwango
www.dwango.com
Another opponent bites the dust in TAW Multiplay
124
Multi-Player
167
Introduction
The E-3 Sentry AWACS aircraft is a fundamental part of the Command,
Communications and Control (C
3
) system
allowing the AWACS commander to control
the localized air war in a way favorable to
him. The AWACS looks after the flight control of all aircraft within his radar view,
identifies and prioritizes air threats, organizes and monitors Combat Air Patrols
(CAP) and flight Interceptions. Within this
game the AWACS can redirect Close Air
Support (CAS) missions based on data
received from ground commanders and the
E-8 Joint Surveillance Targeting And
Reconnaissance System (JSTARS) aircraft.
The AWACS radar is optimized against air
threats and can detect the presence of
flights at ranges of up to 250 miles depending on the altitude and radar cross-section
of the flight. Stealthy flights may remain
undetected or unidentified until they are
much closer. At the edge of the radar’s
range, a flight will appear as an unknown
contact, the type and number of planes cannot be detected at ranges greater than 200
miles. At ranges less than 200 miles the
AWACS radar will be able to produce basic
information about the type and number of
planes in the flight and will be able to identify the flight as hostile, friendly, or neutral.
Using a combination of ELINT (electronic
Intelligence), Link-16, radar and visual identification methods the AWACS can produce
detailed information such as weapons loads
on flights within ranges of 150 miles.
The radar can also see ships and to a lesser
extent ground vehicles, although to get full
ground coverage a JSTARS aircraft will
need to be available to data-link with the
AWACS. The AWACS is available in relevant
missions of the Training and Campaign sections of TAW.
AWACS
Airborne Warning And Control System
(AWACS) Command

169
Scale (Training Missions only)
Display a scale in nautical miles at the bottom of the AWACS Map Window.
Targets (Campaign only)
Display current strategic objectives.
FEBA
Display the Forward Edge of Battle Area.
Nations
Displays the colored map and nation names
in the AWACS Map Window (on by default).
DTINS
Display the DID Target Interaction
Symbology (DTINS) icons and text (on by
default).
Stylized
Toggle between Point (default) Symbology
and Stylized symbology. This button is disconnected when NTIDS are selected.
NTIDS
Toggle NATO Target Identification
Symbology (NTIDS). This button will override
your choice of Point/Stylized symbology.
Air Defense
Display Surface to Air Missile launchers
(SAMs), Early Warning Radar (EWR), Radar
and Communications sites. When the 3D
AWACS Map is selected, this displays SAM
umbrellas.
Air Force
Display all airbases and airfields (on by
default).
Routes
Display allied aircraft flight paths and waypoint routes.
Army
Display all Military bases and any known or
allied ground forces. An E-8 JSTARs aircraft
must be airborne to display detailed ground
force information.
Navy
Display all Naval bases and any known or
allied Naval forces.
Information Box
Display the flight information boxes alongside the flight currently under the mouse
cursor in the AWACS Map Window. This
AWACS
168
The AWACS Command Interface
The AWACS interface is divided into a left
and right panel containing five components:
The Control Panel; The 3D World Window;
The AWACS View Information Window; The
AWACS map Window; and The AWACS
Message Window.
The Left Panel
The Control Panel
The AWACS Command Interface consists of
sixteen buttons. These control the style and
content of information displayed in the
AWACS Map Window and allow the player
to accelerate or suspend the game.
3D
Toggle the 3D map display in the AWACS
Map Window.
Pause
Suspend the game. When Pause is selected,
the text ‘Paused’ will appear in the AWACS
3D World Window.
Center
Reset map to combat zone in AWACS training mission.
Time Warp
Increase the speed at which the game runs.
When Time Warp is selected the text “Time
Warp” will appear in the AWACS 3D World
Window.
AWACS

171
cursor above and to the left of the area
which you want to zoom into, hold the SHIFT
key and press the left mouse button and
while continuing to hold it down pull out a
zoom box encompassing the area that you
want to zoom the map to. Then while keeping the SHIFT down, release the left mouse
button to carry out the zoom.
The left mouse button can now be used to
move the zoomed map by pressing and holding SHIFT on the keyboard, move the mouse
cursor to the center of the area which you
desire to move towards and then press the
left mouse button.
T o zoom back out of the map, press SHIFT on
the keyboard and the right mouse button
while the mouse cursor is anywhere on the
map, to zoom out one stage. To zoom fully
out to the full size map, continue to hold the
right mouse button until the zoom has taken
place.
3D Map Zoom and Control
When the AWACS map is in 3D mode the
map can be controlled by use of the keyboard SHIFT key, plus the left and right
mouse buttons.
AWACS
170
information is also presented in the AWACS
View Information Window.
The AWACS 3D Window
A 3D world view of the currently selected
map object is displayed below the Control
Panel Buttons.
The AWACS View Information
Window
Below the 3D window is the AWACS View
Information Window. This will list relevant
information about the flight or object currently being viewed in the AWACS 3D window. For flights that are unknown or
out-of-range of the AWACS no information
will be available.
Cancel Button
Pressing the Exit button will return you to the
Training or Campaign menu depending on
where you started from.
The Right Panel
The AWACS Map Window
The AWACS Map Window displays the area
of the world currently within AWACS radar
range. It displays the components of the battle that the player has selected with the filters available in the AWACS Control Panel.
These can include all of the allied air, land
and sea forces. Plus all the enemy and neutral forces within range of the AWACS. The
airbases, Military and naval bases in theater
can be displayed. Additional information for
allied aircraft can be visualized, including
CAP and CAS patrol areas, flight paths and
waypoint routes. Friendly objects are displayed green, Enemy objects are displayed
red, neutral objects are displayed blue and
objects about which little is known will be
displayed orange1.
Viewing Flights and Objects using the
AWACS Map Window
Any item displayed on the map can be
viewed by simply moving the mouse cursor
over the icon in the AWACS Map Window
and clicking with the left mouse button.
These objects include aircraft flights,
ground based vehicles, ships, airbases,
army bases, ports, SAM installations and
radar sites.
If the object is part of the allied force, it will
appear clearly in the AWACS 3D World
Window. However, if the object is unknown
and the player is yet to perform reconnaissance in that region, the image in the
AWACS 3D World Window will appear distorted and noisy. If a flight is destroyed
whilst being viewed in the AWACS 3D window, the view remains focused around the
last recorded position of that flight. In order
to update this, the player must select another flight in the AWACSwindow.
Moving Around the AWACS Map
Window
2D Map Zoom and Control
When the AWACS map is in 2D mode the
map can be controlled by use of the SHIFT
key, plus the left and right mouse buttons.
Selecting Items
The left mouse button is used to select items
on the map.
Zooming the map
To zoom into the map the mouse cursor must
be on the AWACS map. Place the mouse
AWACS

173
Command Generation
Commands are generated by the following
procedure :
1.Select an allied flight by moving the mouse
over the flights until a suitable flight has
been highlighted.
In the example above an Allied CAP flight is
being chosen for a task. Notice the green
circle DTINS icon to indicate an allied flight.
2. Use the left mouse button to select that
flight for a task.
You may notice that the CAP flight is armed
with Air-to-Air weapons making it suitable
for Intercept tasks. This information can be
seen in the flight information box below the
3D window.
3. Move the mouse to either a new map
location (in the case of relocating patrol missions) or onto another flight. This action will
produce an icon and text over the new flight
describing the command that will be generated if the left mouse button is released. (For
details of commands and icons see table
below).
Here the CAP flight is being dragged to an
Enemy flight producing a red diamond.
DTINS icon to indicate that an Intercept-toKill task will be sent to the Allied flight if the
mouse is released.
4. To Send the command, release the left
mouse button over the Flight.
To Cancel the command, return the mouse
cursor to the original flight location and
release the left mouse button. The command
has been sent to the Allied CAP flight to
intercept and kill the enemy flight. The Allied
flight responds to the AWACS and sets up its
intercept vector to the enemy flight. This is
illustrated as a dashed line modifying the
current flight way-point route. The intercept
vector is the point in space where the two
flights will meet if they maintain their current
headings and speeds. The intercept vector
is updated as these change.
AWACS
172
Selecting Items
The left mouse button is used to select items
on the map.
Zooming the map
To zoom into the map place the mouse cursor on the AWACS map, hold the SHIFT key
and press the left mouse button . Moving the
Mouse forwards and backwards will alter
the zoom.
Rotating the map
To rotate the map press and hold SHIFT on
the keyboard, then hold the right mouse button down and move the mouse cursor to the
right to achieve a clockwise rotation, or
move the cursor to the left side for a counter
clockwise rotation.
Changing the map zoom focus
To change the focus of the zoom, press and
hold SHIFT on the keyboard, hold down both
of the mouse buttons and move the mouse
cursor from one side to the other, or from top
to bottom.
Commanding flights through the
AWACS Map Window
The AWACS Commander has the power to
perform a wide variety of tasks in the control
of the tactical Air War:
• Identify and prioritize air threats.
• Organize and monitor Combat Air Patrols
(CAP).
• Assign and update flight Interceptions
including visual identification, shadow and
engage-to-kill tasks.
• Vector flights to refuelers or to land.
• Assign allied flights to aid other allied
flights in distress.
• With assistance from the E-8 JSTARs aircraft, vector Close Air Support (CAS) flights
to kill mobile ground targets such as SAMs,
SCUDs and enemy tanks.
The command generation system is context
sensitive, only allowing the Commander to
send valid commands to Allied flights.
Commands that are valid but are not currently available will either produce a negative response from the command generation
system or from the flight itself.
Note: In order to make it clear which flights
are being controlled and targeted in the
AWACS Map Window, the DTINS button
must be selected.
AWACS
A successful command will produce a text
confirmation displayed in the AWACS
Message Window and if speech is activated, an audible message. The response from
the Allied Flight can be both seen and heard.
Commands from Allied Flights to
Allied Flights
The ESCORT command
As AWACS Commander, you can tell any
Allied flight armed with Air-to-Air weapons
to escort any other Allied flight. When the
escort command is available a green circle
will appear over the flight to be escorted.
The REFUEL command
If an Allied flight requests fuel, the AWACS
Commander can drag and drop that flight to
any patrolling allied refueler within range. If
the refuel command is available a semi-filled
circle will appear over the refueler.
Note: Allied flights dragged to a refueler
will be told to escort the flight unless they
have previously requested refueling, or are
low on fuel (those that are capable of midair refueling).
The LAND command
If a flight requests landing or you simply
want to force a flight to land, then as AWACS
Commander you can drag and drop the flight
to any Allied airbase. If the Land command is
available, then an inverted triangle will
appear over the airbase.
The MOVE PATROL command
The move-patrol command is only available
to flights that are in patrol mode (check the
flight information box to see what mode the
flight is in). The flights that will go into patrol
mode are CAP, CAS, AWACS, JST ARS, REFUELER and some ELINT . To move a patrol position simply drag and drop the mouse to the
new patrol position. While the patrol flight is
being dragged and dropped to its new location, a small circle with crosshairs will
appear attached to the mouse.
Commands from Allied Flights to
Neutral Flights
The SHADOW command
As AWACS Commander you can tell any
Allied flight to shadow any Neutral flight. As
Neutral flights should normally be of little
danger to our alliance, the shadow command will merely make the Allied flight follow the Neutral flight closely. If the Neutral
flight becomes aggressive or if it violates
Allied airspace, the Allied flight may then
take action to destroy it. If the shadow command is available, a blue DTINS diamondwith shadow symbol will appear over the
Neutral flight.
175
Commands from Allied Flights to
Enemy Flights
The INTERCEPT command
Any enemy flight can be intercepted by
dragging and dropping any Allied flight
armed with Air-to-Air weapons onto it. The
intercept command will force the Allied
flight to engage in combat with the enemy
flight. If the intercept command is available
a red DTINS solid diamond will appear over
the enemy flight to be intercepted.
Commands from Allied Flights to
Enemy Ground Vehicles
The Strike Command
As an AWACS commander you can task an
allied flight with suitable Air-to-Ground
weapons to strike an enemy ground vehicle.
Commands from Allied Flights to
Unknown Flights
The VIS-IDENT command
Flights that are on the extremes of the
AWACS radar’s coverage will appear on the
AWACS map display as unknown contacts.
These flights are too far away to be positively identified by the AWACS but an Allied
flight can be dragged and dropped onto
them and forced to visually identify the flight
for the AWACS. If the vis-ident command is
available an orange DTINS diamond will
appear over the unknown flight which is to
be identified.
Information Adjust Slider
Below the AWACS Map Window is the
Information Adjust Slider. Moving the slider
with your mouse cursor will alter the amount
of information displayed in the AWACS Map
Window.
The AWACS Message Window
Situated beneath the AWACS Map Window,
the AWACS Message Window displays
messages sent between the AWACS
Commander and Allied flights in Theater.
These messages can be both read and
heard.
Looking at the diagram above, ‘IRON 2’
refers to the flight call sign, ‘MAGIC 1’ refers
to the AWACS call sign, ‘VECTOR NORTH’
refers to the direction that the flight is
required to take to acquire the target. The
‘VIS-IDENT’ command instructs the flight to
visually identify the target. The remainder of
the message gives details about the target.
Clicking on the colored image will zoom the
AWACS map to the sender’s location.
AWACS & Difficulty Settings
In easy and medium difficulty targets are
highlighted with a red box and allied F-22s
are colored light green.
Mission Completion
AWACS Training missions end when the last
allied AWACS in theater is destroyed or
lands at an airbase.
AWACS
174
AWACS

177
AWACS
176
AWACS
AWACS NTID Symbology
Aircraft
Flight
Ship
Ship Group
Helicopter
SAM Site
Ground Vehicle
Ground Vehicle
Group
Air Base
Army Base
Comms Site
Port
Allied
(Green)
Enemy
(Red)
Neutral
(Blue)
Unknown
(Orange)
AWACS Stylized Symbology
Aircraft
Flight
Ship
Ship Group
Helicopter
SAM Site
Ground Vehicle
Ground Vehicle
Group
Air Base
Army Base
Comms Site
Port
Allied
(Green)
Enemy
(Red)
Neutral
(Blue)
Unknown
(Orange)

178
AWACS
AWACS Point Symbology
Aircraft
Flight
Ship
Ship Group
Helicopter
SAM Site
Ground Vehicle
Ground Vehicle
Group
Air Base
Army Base
Comms Site
Port
Allied
(Green)
Enemy
(Red)
Neutral
(Blue)
Unknown
(Orange)
179
Introduction
One of the great benefits of Windows 95 is
the refined system for providing online help.
Based on the same information as the manual, online help adds the benefits of ‘hotlinks’ to help you navigate your way through
topics, and interactive graphics that aid
understanding of the way systems work. In
addition, TAW offers instant supplementary
help in the form of ‘tool-tips’: simply
leave the mouse pointer over a button and a
small text explanation of the buttons function will appear.
Online graphical help is a handy feature
when you are learning how to use TAW for
the first time. It saves reaching for the manual each time you want to learn about a feature, but offers the benefits of interactivity.
Topics are linked together by ‘key words’,
which let you explore a subject that might be
explained throughout several different sections of the help file.
For additional details, see Online Help in the
Main Interface of TAW (Help button).
The Online Help Interface
The Total Air War Online Help uses the windows help system which has now become a
de facto standard for PC software.
Where possible, we have included graphical
elements to help increase understanding of
certain subjects, such as the avionics.
Using Online Help
When you first load TAW Online Help, you
will be presented with the ‘Contents’ listing,
represented by a series of ‘Books’.
By clicking the tabs at the top of the window
you can access an index of all the documents in the help file, and browse a fully
customizable search database with Find.
Should you decide to use the interface fullscreen and you want to access the help file
easily, try opening the help file full-screen
and then swapping between the help file
and the simulation using ALT TAB.
Index facility
This will allow you to type in a word, after
which you will be shown the document titles
that contain that word.
Find
This works in much the same way as ‘Index’
but offers more power and flexibility by
searching through entire documents.
Online Help
Online Help
Login
Help

Documents
To access a document, open an appropriate
book and select a document from inside. At
the top of the document window you will be
presented with a new set of buttons labeled
Help Topics, Back,Print, << and >>.
Help Topics - shortcut T
This will return you to the main contents list
as described above.
Back - shortcut B
Clicking ‘Back’ will return you to the previous document that you were reading.
Print - shortcut P
To make a printed copy of the current document click this button.
NOTE: you must have a printer connected for this
function to work, or alternatively Windows 95
will allow you to print to a file (see your
Windows 95 documentation for more details).
<< >> - shortcut < and >
These two buttons will allow you to move
backwards or forwards through the entire
help file in sequential order.
Online Help
180
181
Airfields
Aden Airport

183
Airfields
At Taif Airport
182
Airfields
Asyut Airport

185
Airfields
Djibouti International Airport
184
Airfields
Jeddah Old Airport

187
Airfields
Khamis Mushayt Airbase
186
Airfields
Khartoum Airport

189
Airfields
188
Airfields
King Abdul Int. Airport Jeddah / Mecca King Khalid International Airport - Riyadh

191
Airfields
190
Airfields
Luxor Airport Provincial Dispersal Airbase

193
Airfields
Large Provincial Airbase (Um Durman)
192
Airfields
Small Provincial Airbase (Sinprov)

195
Airfields
194
Airfields
Provincial Island Airbase (Barim) Riyadh Military Airbase

197
Recognition
196
Recognition
Ground Vehicles
M-1 Abrams Challenger II T-80
M-109 MLRS G-6
AMX-10RC
M-163 Vulcan Warrior BMP-3
Tanks
Self Propelled Guns
Armored Personnel Carriers
Ground Vehicles
Patriot (Missile System) Patriot (Radar System) Jernas
Chapparal Roland Crotale
SA-6 SA-11 SA-17
Anti Aircraft Systems
BMP-3BMZ BRDM-2

199
Recognition
198
Recognition
SS-23 ZSU-23-4
Ground Vehicles
Humvee Bedford Train
Fire Truck Fuel Tanker Truck
Tractor Limousine
Civilian/Supply Vehicles
Ships
Anglo Arleigh Burke Avenger
Charles De Gaul Gepard Invincible
La Fayette L CAC Nimitz
Oliver H Perry Type 23 Destroyer
Wasp

200
Recognition
Ships (Civilian)
Container Ship Dhow Oil Tanker (large)
Oil Tanker (small) Trawler Ferry
201
Air supremacy is the foundation of the US
Air Forces doctrine and mission. The service believes that its first task is to ensure
that it can control the skies in the theater of
warfare, at any time and any place it chooses. This prevents hostile aircraft from interfering with air and ground operations or
performing reconnaissance. Performed ably
since the late 1970s by the McDonnell
Douglas F-15 Eagle, this mission will pass
in the next decade over to the Lockheed
Martin F-22.
By the time the F-22 enters service in 2004, it
will have been more than 20 years since the
USAF formed an Advanced Tactical Fighter
(ATF) program office to define the F-15s
replacement. At the start of the 1980s, it was
clear that Soviet planners had set out to
meet the threat posed by new, agile US
fighters in three ways. One was the development of new, fast, agile and heavily armed
fighters: the MiG-29 and the larger, longrange Su-27. Almost more worrisome was
the continued development of improved surface-to-air missiles. It also became apparent that the Soviet Union was working on
airfield attack weapons.
The F-22
Development of the F-22
Above: Developed for air
supremacy against all
current and projected
future threats, the F-22
will be one of the
cornerstones of the
USAF’s Air Combat
Command well into the
future. Enhanced
maneuverability ,
advanced avionics and
stealthiness give the
aircraft an edge in
air-to-air combat.
Bill Sweetman
 Loading...