

Page 1
®
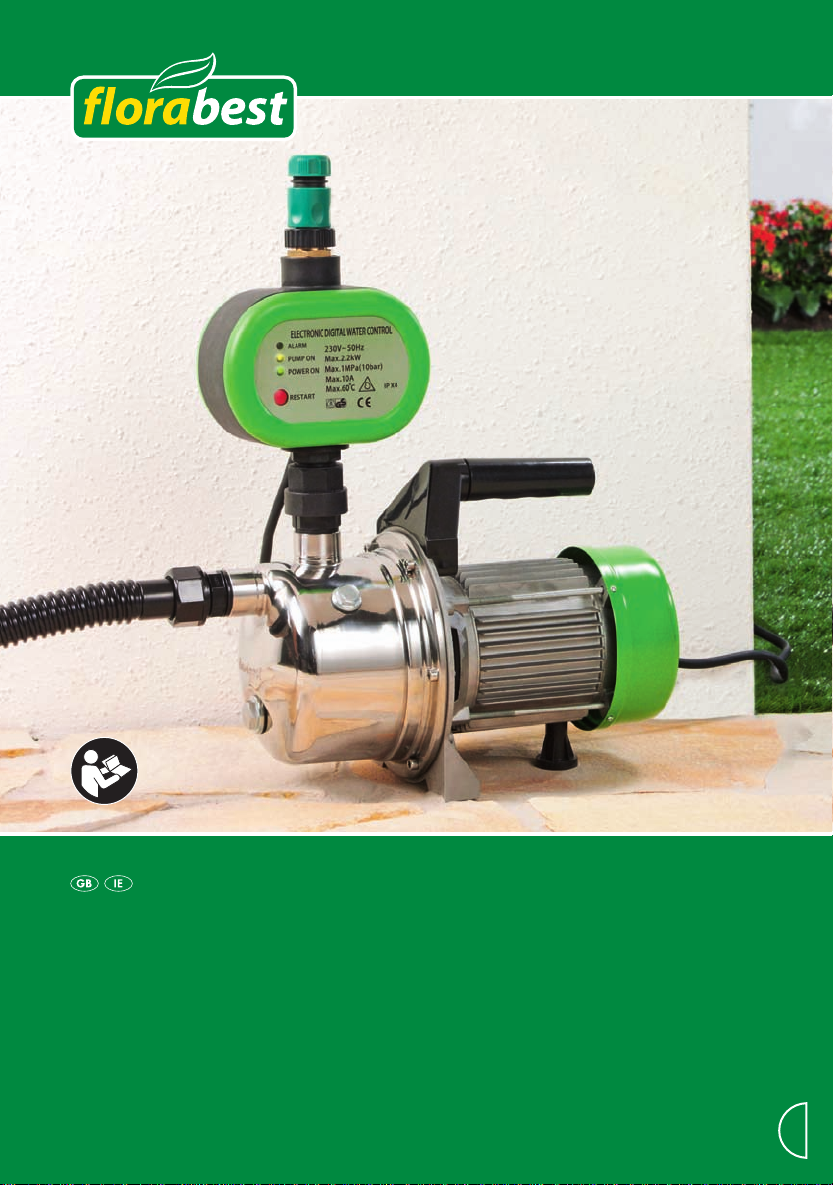
FHA 1100 A1
Domestic Water Pump
Translation of original operation manual
6
Page 2

Before reading, unfold the page containing the illustrations and familiarise yourself with all functions
of the device.
GB / IE Translation of original operation manual Page
5
Page 3

A
4
11
9
10
6
3
1
12
7
13
14
16
17
2
8
5
15
3
Page 4
B
19
18
4
Page 5
IEGB
Content
Notes on Safety ................................... 5
Symbols in the manual .................... 5
Symbols on the equipment .............. 5
General notes on safety ................... 6
Areas of Application ............................ 7
General Description ............................ 7
Functional description ...................... 7
Overview .......................................... 8
Scope of Delivery ............................. 8
Initial Operation ................................... 8
Assembly ........................................ 8
Mains Connection ............................ 8
Setting up ......................................... 8
Connecting the hoses ...................... 8
Filling the pump ............................... 9
Operational start-up ......................... 9
Starting the unit ................................ 9
Restarting the appliance .................. 9
Maintenance Instructions ..................... 9
General cleaning instructions .......... 9
Storage .......................................... 10
Waste Disposal and Environmental
Protection ........................................... 10
Guarantee Notes ................................ 10
Spare Parts Order .............................. 11
Technical Data ................................... 11
CE Declaration of Conformity .......... 13
Exploded Drawing ............................. 15
Grizzly Service-Center ...................... 17
Notes on Safety
This section deals with the general safety
regulations for working with the equipment.
Symbols in the manual
Warningsymbolswithinforma-
tionondamageandinjuryprevention.
Instruction symbols (the instruction
is explained at the place of the exclamation mark) with information on
preventing damage.
Help symbols with information on
improving tool handling.
Symbols on the equipment
Read and follow the operating in-
structions provided for the device!
Attention: Remove the plug from
the socket as soon as the power
lead is damaged or cut.
G1“
Water inlet
IN
Before initial start-up, please read
through these operating instructions carefully prior to using the
machine. Keep the instructions
safe and pass them on to any subsequent user so that the information is always available.
G1“
Electric appliances should not be
disposed of in the domestic garbage.
OUT
Water outlet
5
Page 6
GB
IE
General notes on safety
Working with the equipment:
Caution: to avoid accidents and
injuries:
• This appliance is not intended for operation by persons (including children) with
reduced physical, sensory or mental
capabilities, or lacking experience and/
or knowledge, unless they are under the
supervision of or have been instructed
on how to use the appliance by a person
responsible for their safety.
• Keep the equipment away from children
and pets. Children must be supervised
in order to ensure that they do not play
with the equipment.
• People who are unfamiliar with the
operating instructions are not permitted
to use the equipment. The operation
of the equipment is not authorised for
people under the age of 16.
• Should there be people in the water,
do not operate the equipment.
• Take appropriate measures to keep
children away from the equipment
whilst it is running.
• Dispose of the packaging material correctly.
• Do not use the equipment in the vicinity of ammable liquids or gases. Nonobservance will result in a risk of re or
explosion.
• Do not use for water containing abrasive particles such as sand. The dispensing of aggressive, abrasive (grinding effect), corrosive, combustible (e.g.
motor fuels) or explosive liquids, salt
water, cleaning agents and foodstuffs
is not permitted. Liquid temperature not
to exceed 35°C.
• Store the equipment in a dry place and
out of reach of children.
Caution! To avoid damage to the
equipment and any possible person
injury resulting from this:
• Do not work with damaged or incomplete equipment, or with equipment
that has been converted without the
approval of the manufacturer. Before
initial operation, have a specialist
check that the required electrical protection measures are in place.
• Do not carry or x the equipment by
the cable or pressure line.
• Protect the equipment from frost and
from running dry.
• Use only original accessories and do
not carry out conversion work on the
equipment.
• Please read the notes in the operating
instructions on the topic of “maintenance and cleaning”. Any measures
above and beyond these, particularly
opening the equipment, are to be carried out by an electrician. In the case
of repairs, always contact our service
centre.
Electrical safety:
Caution: to avoid accidents and in-
juries from electric shocks:
• After erection, the mains plug must be
freely accessible when the equipment
is in operation.
• Before operating your new pump, have
a specialist check:
- The earthing, the protective multiple
earthing; the residual current circuit
breaking must be compliant with the
safety regulations of the energy supply company and function without
fault,
- The protection of the electrical plug
connections from the wet.
6
Page 7

IEGB
- If there is a risk of ooding, x the
plug connections in an area that is
safe from ooding.
• Ensure that the mains voltage match-
es the specications on the rating
plate.
• The electrical installation shall be ac-
cording to national wiring rules.
• Connect the equipment only to a
socket with a residual current protection device (residual current circuit
breaker) with a rated current of not
more than 30 mA; minimum fuse 6
amperes.
• Before each use, check the equip-
ment, cable and plug for damage. Defective cables are not to be repaired,
but rather replaced by new ones.
Have any damage to your equipment
repaired by a specialist.
• If the power cable for this equipment
is damaged, it must be replaced by
the manufacturer, a customer service
agent of the same or a similarly qualied person in order to prevent hazards.
• Do not pull the plug from the socket
by the cable. Protect the cable from
heat, oil and sharp edges.
• Do not carry or x the equipment by
the cable.
• Use only extension cables that are
protected from spray water and designed for outdoor use. Always fully
unroll a cable drum before use. Check
the cable for damage.
• Before any work on the equipment,
during work breaks and in the case
of non-use, remove the plug from the
socket.
• The cross-section of mains connec-
tion lines must be no smaller than
rubber hose lines with the designation
H07RN-F. The line must be 10 m long.
Areas of Application
The home water dispenser is intended for
use in private homes and gardens. The
unit is suitable for service water supply and
the irrigation of gardens. It is solely intended for pumping clear and rain water up to
temperatures of no more than 35°C.
Any other use, not expressly authorised
in these instructions (e.g. for transporting foodstuffs, salt water, motor fuels,
chemical products or water with abrasive
materials), may cause damage to the
equipment and represent a serious risk for
the user.
The home water dispenser is not suitable
for continuous duty. Continuous operation
reduces the durability and shortens the
guarantee period.
The operator or user is responsible for accidents or damage to other people or their
property.
The manufacturer shall not be liable for
damages caused by use other than for
which the equipment is intended or by incorrect operation.
General Description
Functional description
The home water dispenser pumps water
automatically. The pump will turn on and
convey water at turn-on pressure. The turnon point is set in the factory and cannot be
adjusted by the user.
Read the sections below to learn more
about each operating element’s function.
The diagram of the most impor-
tant functional elements can be
found on the foldout side.
7
Page 8

GB
A
A
A
A
A
A
IE
Overview
1 Water outlet, automatic switch
2 Power cable, automatic switch
3 Water outlet, home water dis-
penser
4 Water inlet, home water dis-
penser
5 On/Off switch
6 Power cable, home water dis-
penser
7 Home water dispenser
8 Carrying handle
9 Water inlet, automatic switch
10 Automatic switch
11 Restart switch
12 “Power On” indicator
13 “Pump On” indicator
14 “Alarm” indicator
15 Rest
16 Thread of rest screw
17 Draining screw
Scope of Delivery
- Home water dispenser
- Automatic switch
- Rest
Initial Operation
Assembly
Mains Connection
The pump you have purchases is already
tted with an earthed plug. The pump is
intended for connection to an earthed
socket at 230 V ~ 50Hz.
Setting up
• Place the unit on a rm, horizontal,
non-ooding surface.
• Always put up the home water dispenser at a point higher than the
water surface you wish to pump water
from.
Where this is impossible, install a low
pressure-resistant shut-off implement
between the appliance and the suction hose.
• Remove the cap from the home water
dispenser’s water outlet (
the automatic switch (
home water dispenser’s water outlet
(
3).
3). Mount
10) on the
Connecting the hoses
On the suction side, attach a hose
with reow stopper and install a
prelter. On the suction side, do
not use any quick-action connection systems.
• Screw the rest (15) from the package
into the thread (16) in the bottom of
the home water dispenser (7).
• Push the carry handle (8) onto the
carry handle holder and screw these
together using the screws with washers. To do this, use the hex key.
• To permanently install the home water dispenser, screw it to the ground.
Screwing it to a xing panel will prevent the appliance from moving.
Mind not to obstruct the access to the
draining screw (17).
8
• Attach a suction hose to the home water
dispenser’s water inlet tting (
• Attach a pressure hose to the automatic
switch’s water outlet tting (
Air in the suction hose will stop the
house water dispenser from working properly.
4).
1).
Page 9

IEGB
A
A
A
B
B
A
A
A
Filling the pump
Fill up the house water dispenser every
time before you start using it. This will ensure an immediate start. Running dry will
destroy the pump.
• Use a wrench (SW17) to unscrew the
ller screw (
home water dispenser.
• Fill in water up to the mark and screw
in the ller screw (
• Mind to also ll the suction hose with
water.
19) at the back of the
19).
Operational start-up
• Check that the electrical connection is 230V ~50Hz
• Check the proper status of the
electrical plug socket and make
sure that the plug socket is sufciently fused (at least 10 A). Insert the pump plug into the plug
socket and the pump is ready
for operation.
• Make sure that moisture or water never come in contact with
the mains connection.
There is a risk of electrocution.
Starting the unit
• Connect the power cable of the auto-
matic switch (
ply.
2) to the power sup-
• The “Pump On” indicator (A13) tells
you that the pump is working.
• The “Alarm” indicator (
when the appliance turns itself off automatically.
14) lights up
Restarting the appliance
• Following automatic switch-off of the appliance, press the restart switch (
• If restarting the appliance fails several
times, ll up the pump with new water.
11).
Maintenance
Instructions
Clean and maintain your equipment regularly. This will guarantee its performance
and long durability.
Ask our service centre to carry out
any work that is not described in
these instructions. Use only original
parts.
Pull out the power plug before every
maintenance operation. There is a
risk of electrocution or of injury from
moving parts.
General cleaning instructions
In case the unit clogs up, remove the
suction and pressure hoses. Remove the
automatic switch (
wash out the obstructing particle.
10) and use water to
When you connect the appliance
to the mains, all lamps will rst of
all light up.
• Set the On/Off switch (
the unit.
• The “Power On” indicator (
light up to indicate that the unit is
ready to operate.
5) to turn on
12) will
Any measures above and beyond these,
particularly opening the equipment, are
to be carried out by an electrician. In the
case of repairs, always contact our service centre.
9
Page 10

GB
B
IE
Storage
• Keep the equipment clean, dry and out
of the reach of children.
• To keep the pump when not in use,
open the draining screw (
an SW21 wrench and carefully drain
the pump.
Waste Disposal
and Environmental
Protection
Be environmentally friendly. Return the tool,
accessories and packaging to a recycling
centre when you have nished with them.
Hand the tool in at a recycling centre. The
plastics and metal parts can be separated
and recycled. Ask your Service Center
about this.
Do not dispose of electrical appli-
ances as unsorted municipal waste,
use separate collection facilities.
Contact you local government for
information regarding the collection
systems available.If electrical appliances are disposed of in landlls
or dumps, hazardous substances
can leak into the groundwater and
get into the food chain, damaging
your health and well-being. When
replacing old appliances with new
ones, the retailer is legally obligated
to take back your old appliance for
disposals at least free of charge.
Guarantee Notes
• This appliance has a 36-month guarantee; a shorter 12-month guarantee
applies if the appliance is to be used for
commercial purposes or for replacement
appliances according to statutory regulations.
• Damage due to natural wear and tear,
overload or incorrect use is excluded
10
18) with
from the guarantee. Certain components
are subject to normal wear and tear and
are excluded from the guarantee.
In the case of pumping water contain-
ing sand or aggressive liquids or other
incorrect, non-design-appropriate use,
as well as in case of non-observance
of the operating manual, application of
force in use or inappropriate or insufcient maintenance, no guarantee claim
exists, since seals, impeller wheel, motor
or other parts are damaged by this. Also,
sewage water pumps are not suitable for
the pumping of abrasive materials (sand,
stone).
• Furthermore, the prerequisite for guarantee services is that the references
indicated in the operating instructions regarding cleaning and maintenance have
been adhered to.
• Damage, which has been caused from
material or manufacturing faults, will be
made good free of charge, by replacement delivery or repair.
This requires that the appliance is
returned to our service center undismantled and with proof of purchase and
guarantee.
• Repairs, which are not covered by the
guarantee, can be carried out for charge
by our service center. Our service center
will be glad to provide you with a cost
estimate.
We can only process devices which
have been packaged sufciently and
which have been dispatched with correct
stamping.
• Devices sent in freight collect - by
bulk freight, express or with other
special freight - are not accepted.
• If you have a justied guarantee claim,
please contact our service centre by
telephone, which will then advise you on
how the claim will be processed.
• Defective units returned to us will be disposed of for free.
Page 11

Spare Parts Order
Use the service address or fax number
supplied to order replacement parts.
Technical Data
Home water dispenser ......FHA 1100 A1
Mains connection............... 230V~, 50 Hz
Power consumption ................. 1100 Watt
Suction lift .......................................... 7 m
Max. discharge rate ................... 4.600 l/h
Max. discharge head ....................... 45 m
Max. water temperature.................. 35 °C
Hose connection ................................... 1“
Turn-on pressure .......................... 2,0 bar
Turn-off pressure .......................... 4,5 bar
Safety class ............................................ I
Degree of protection ........................ IPX4
Noise pressure
level (L
pA) ......90,8 dB(A); Kp A = 3,0 dB(A)
Noise performance level
(measured) / (L
.................... 94,4 dB(A ); K
Noise performance level
(guaranteed) ............................. 98,0 dB(A)
WA)
WA = 3,0 dB(A)
IEGB
Technical and optical changes can be carried
out in the course of further development without notice. All dimensions, references and information of this instruction manual are without
guarantee. Legal claims, which are made on
the basis of the instruction manual, cannot thus
be considered as valid.
11
Page 12

GB
IE
12
Page 13

IEGB
GB
IE
We hereby conrm that the
Home water dispenser
Design Series FHA 1100 A1
Serial number 20110100001 - 20110148676
conforms with the following applicable relevant version of the EU guidelines as of
model year 2011 :
2006/42/EC • 2004/108/EC • 2000/14/EC
In order to guarantee consistency, the following harmonised standards as well as national standards and stipulations have been applied:
EN 60335-1/A13:2008 • EN 60335-2- 41:2003+A1:2004
EN 55014-1:2006 • EN 55014-2/A1:2001 • EN 61000-3-2:2006
EN 61000-3-3:2008 • EN 62233:2008
EU declaration of conformity
We additionally conrm the following in accordance with the 2000/14/EC emissions
guideline:
Guaranteed sound power level: 98,0 dB(A)
Measured sound power level: 94,4 dB(A)
Compliance evaluation process carried out in accordance with Appendix V, 2000/14/EC
Labelled with CE identication mark in 2011
Grizzly Gartengeräte GmbH & Co. KG
Am Gewerbepark 2
D-64823 Groß-Umstadt / 24.01.2011
(Andreas Gröschl, Technical Director
and Documentation Representative)
13
Page 14

GB
IE
14
Page 15

Exploded Drawing
IEGB
informative
15
Page 16

GB
IE
16
Page 17

Grizzly Service-Center
IEGB
GB
DES UK Ltd.
Unit B7
Oxford Street Industrial Park
Vulcan Road
Bilston, West Midlands WV14 7LF
Tel: 0870 7876177
Tel from Ireland: 0044 870 787 6177
Fax: 0870 7876168
Fax from Ireland: 0044 870 787 6168
Email: grizzly@deslimited.com
2011-01-07-rev02-op
17
Page 18

IAN 61041
Grizzly Gartengeräte GmbH & Co. KG
Am Gewerbepark 2
D-64823 Groß-Umstadt
Last Information Update: 12 / 2010
Ident.-No.: 79114049122010 - 6
6
 Loading...