


3-Axis Stabilized Handheld Gimbal
for Camera
Instructions
Guilin Feiyu Technology Incorporated Company
V1.1E NUser Manual

Catalogue
www.feiyu-tech.com
1. G6 Plus Overview 1
2. Quick Start Guide 3
3. Balance the Gimbal 4
Balance Adjustment of the Pan Axis 4
Balance Adjustment of the Roll Axis 5
Balance Adjustment of the Tilt Axis 6
4. Basic Operation 7
Modes 7
Introduction of Display 7
Joystick - operation 8
Function Button - operation 8
Shutter Button - operation 8
Setting Button - operation 9
Swith Camera Modes
Setup Parameter
Horizontal Adjustment Button - operation
Trigger Button - operation
Multifunction Knob - Zooming control / Follow focus / Control 3 Axis
App - Download and Connecting
10
10
10
11
5. Advanced Operation 12
Manual Lock 12
Auto-rotation Mode 12
9
9
Connecting to Camera
Firmware Upgrade
Gimbal Initialization
13
13
14
6. Specifications 15
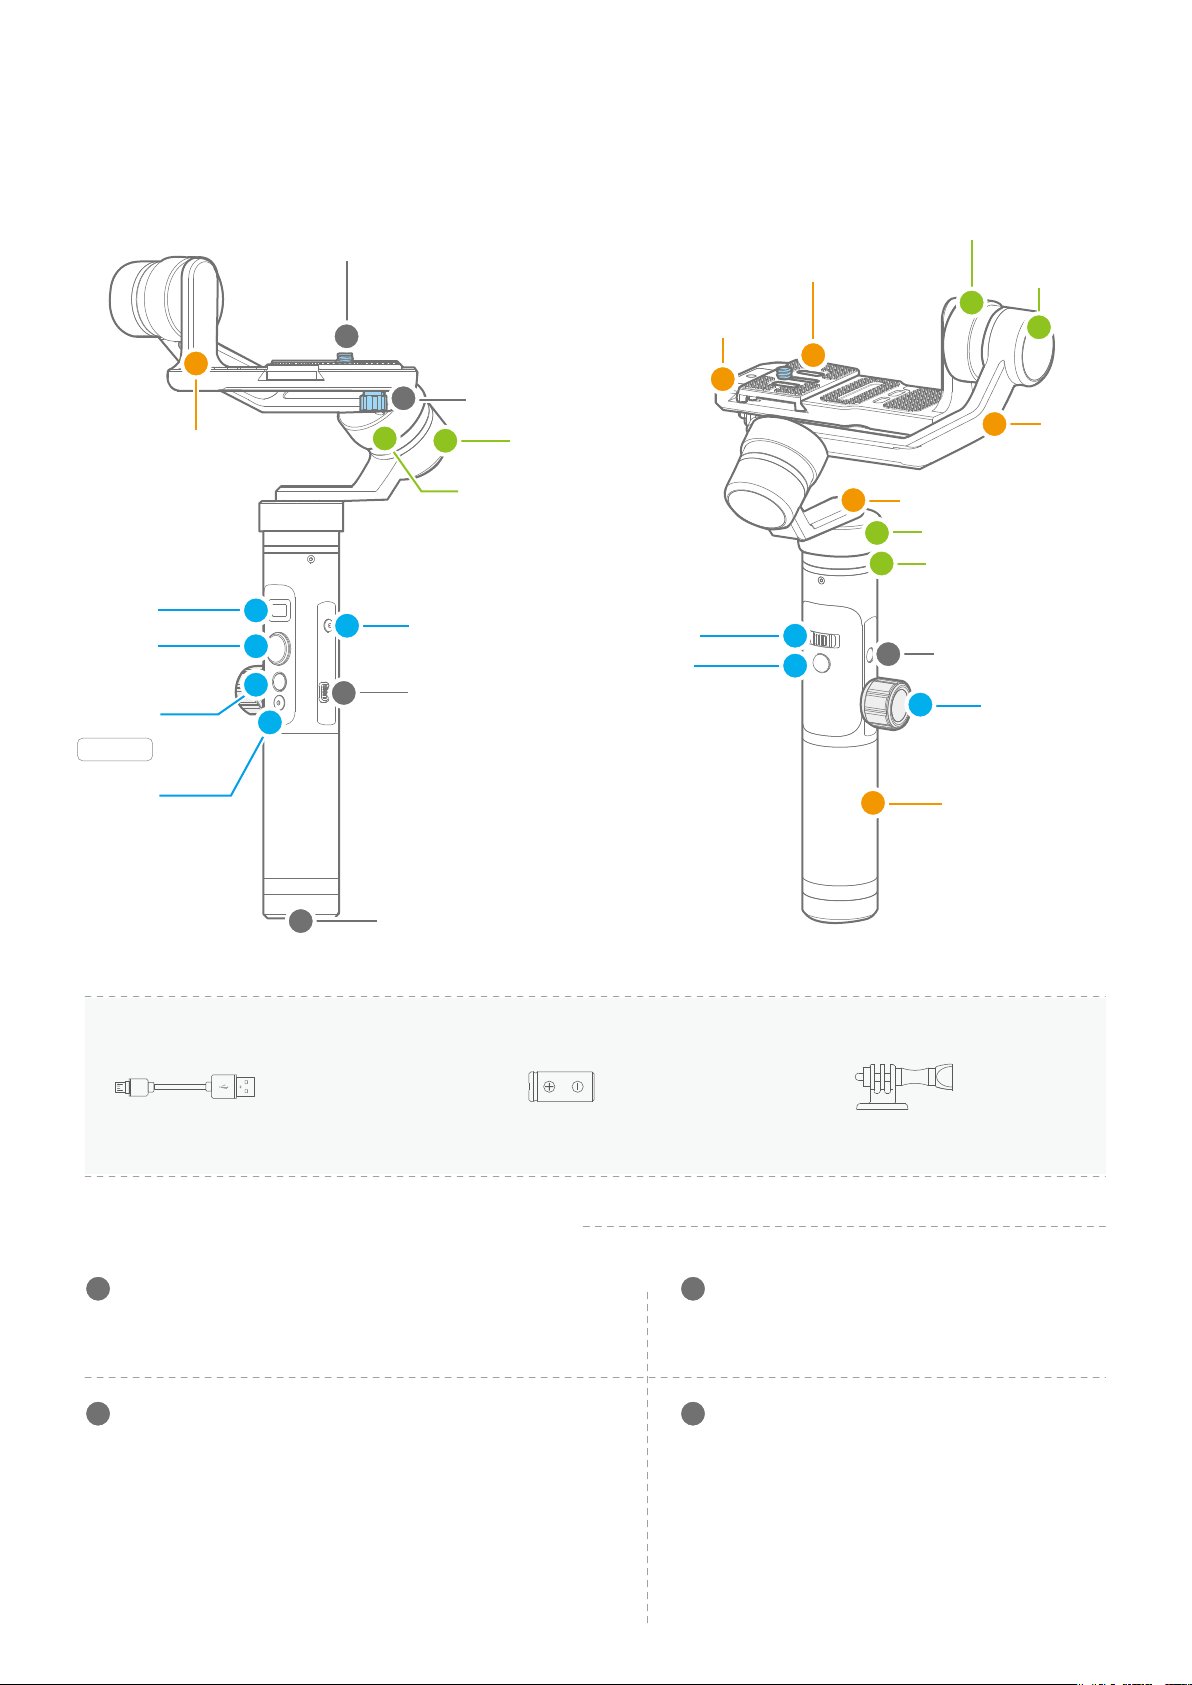
1. G6 Plus Overview
Display
Joystick
Function
Button
ON / OFF
Shutter
Button
1
Sliding Arm
Thumb Screw
1
2
3
4
Adjustment
Sliding Plate
Adapter
(Clamping plate)
1
2
4
Adapter Thumb Screw
3
Roll Axis
2
3
Roll Axis Knob Ring
Tilt Axis Knob Ring
5
Vertical Arm
6
5
Pan Axis Knob Ring
Pan Axis
2
Tilt Axis
4
1
Cross Arm
Horizontal
Adjustment
5
3
Setting Button
Micro USB Port
Button
Trigger
Button
6
7
4
1/4-20 Thread
Mount
8
Multifunction
Knob
6
Handle
4
1/4-20 Thread
Mount
Accessories
Micro USB Cable
X1
Introduction of Interface and screws
1
Thumb Screw
Used for fixing the camera or mobile phone to the adjustment
sliding plate
3
Micro USB Port
(1) Used for charging the gimbal (input 5V / 2A ), the gimbal
can be used while being charged, but it is not available for
external power supply.
26650 Li-ion Battery
X1
2
Adapter Thumb Screw
Used for fixing the adjustment sliding plate.
4
1/4-20 Thread Mount
Used for expand other accessories, such as the
tripod which built-in 1/4 inch screw,extension
rod and so on
Mount Adapter
X1
(2) Used for firmware upgrade (computer), please refer to
the firmware upgrade operation steps for details.
Please stuff up this port by the dustproof plug when it is not in use.
www.feiyu-tech.com
01
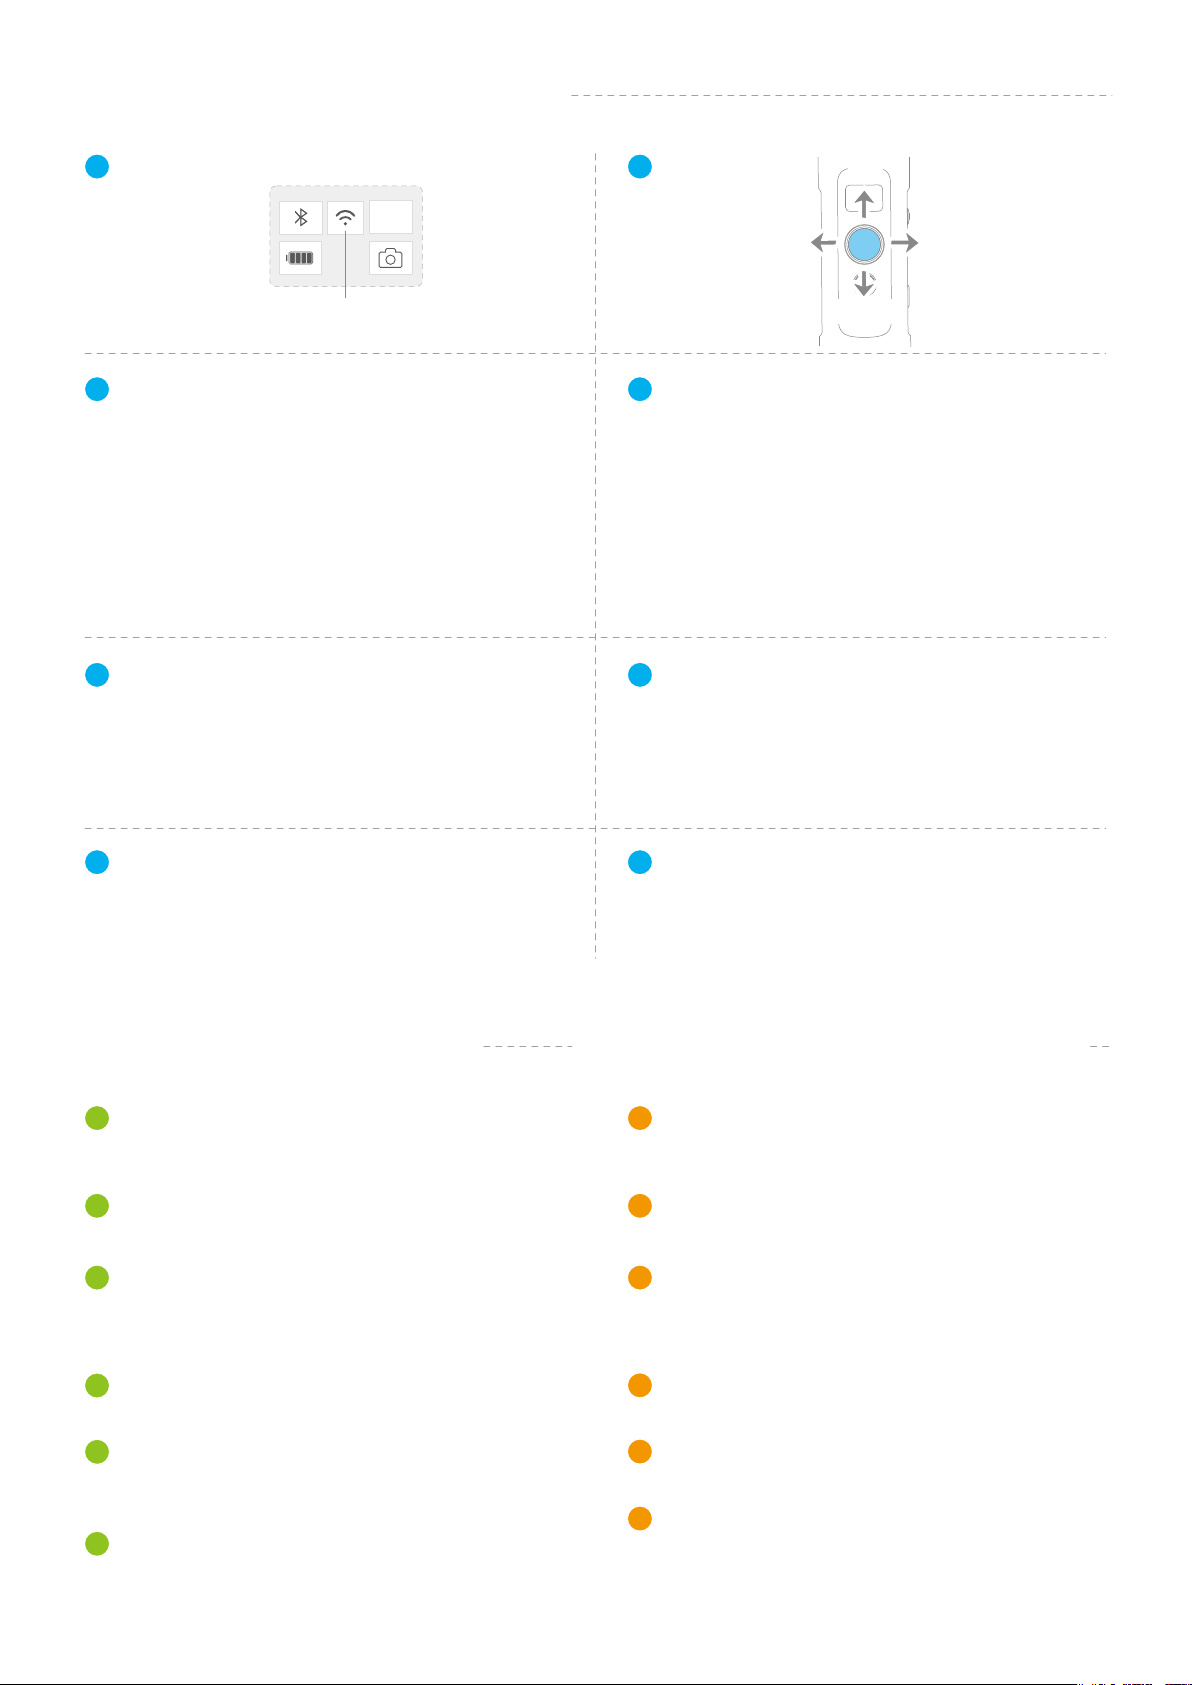
Introduction of Display and Bottons
1
Display
Bluetooth
Battery Level
3
Function Button
HF
WiFi
Refer to Page 8
Modes
Camera
Mode
Power on / Power offLong press
Panning Mode / Lock ModeSingle tap
Double tap Follow mode
Triple tap Rotate 180° in horizontal
Quadruple tap Auto-rotation Mode
Five tap Initialization
5
Setting Button
(After connecting your camera)
Swith the interface for camera parametersLong press
Single tap
Please refer to the chapter "Connecting to camera" in page 13
Swith camera modes / main interface
Refer to Page 9
2
Joystick
Up
Left Right
Down
4
Shutter Button
Refer to Page 8
After connecting the gimbal to camera via Feiyu
On App, shutter button can control the camera
for shooting.
Please refer to the chapter "Connecting to camera" in page 13
6
Horizontal Adjustment Button
You can control the horizon angle via the horizontal
adjustment button.
Refer to Page 10
7
Trigger Button
Refer to Page 10
Lock ModePress and hold
Double tap Reset
Introduction of Axis and Knob
1
Tilt Axis
Take the camera lens as the base point, and control the
camera lens to move upward or downward by tilt axis.
2
Tilt Axis Knob Ring
Used for fixing the sliding arm.
3
Roll Axis
Take the camera lens as the base point, and control
the camera lens to tilt to the left or tilt to the right by
roll axis.
4
Roll Axis Knob Ring
Used for fixing the cross arm.
8
Multifunction Knob
(1) Achieve the control to the focal length of camera,
such as follow focus, zoom.
(2) Achieve the control to the angle of three axes of
the gimbal
Refer to Page 10
Introduction of Other Components
1
Sliding Arm
Used for adjusting the up and down centre-of-gravity
position of tilt axis.
2
Adapter (Clamping plate)
Used for fixing the camera.
3
Adjustment Sliding Plate
Used for adjusting the front and back position of camera
so as to adjust the front and back centre-of-gravity .
position of tilt axis
4
Cross Arm
Used for adjusting the centre-of-gravity position of roll axis.
5
Pan Axis
Take the camera lens as the base point, and control
the camera lens to turn left or turn right by pan axis.
6
Pan Axis Knob Ring
Used for fixing the vertical arm.
5
Vertical Arm
Used for adjusting the centre-of-gravity position of pan axis.
6
Handle
Used for holding the gimbal by one hand.
www.feiyu-tech.com
02
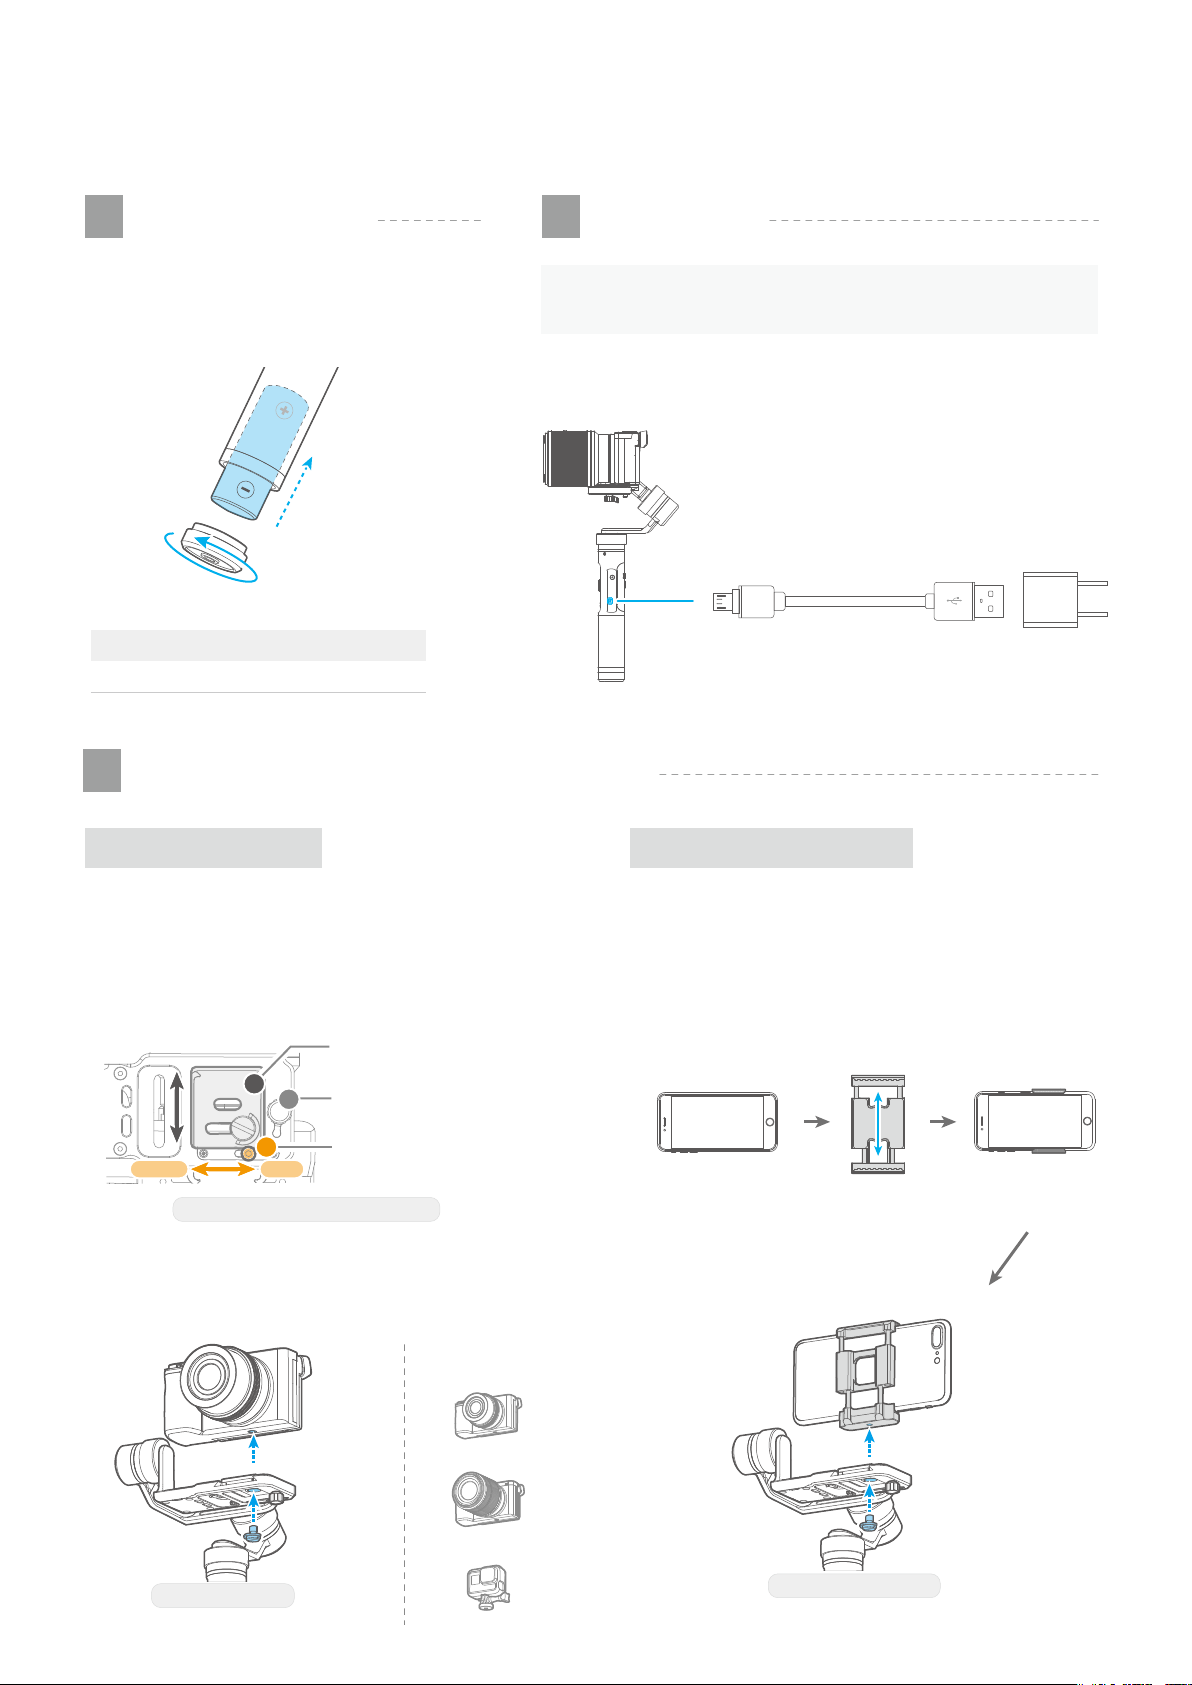
2. Quick Start Guide
1
Install Battery
Remove the bottom cap, insert a 26650
battery and then tighten the cap.
Type 26650
5000mAhBattery Capacity
3
Put the Camera / Smartphone on
2
Charging
Please fully charge the battery before power on
TIP
the gimbal for the first time.
Charging with Micro USB cable as shown below.
Micro Port USB Port
Micro USB
Cable
(Equipped by user)
Output: 5V / 2A
Put the Camera on Put the Smartphone on
Correctly place the camera on the adjustment sliding
plate, and tighten it with thumb screw in the middle
sliding chute.
You can also take down the adjustment sliding plate from
the adapter, install it to the bottom of the camera, and then
install to the adapter.
Take
Down
3
1
Unscrew
2
LockUnlock
Bottom of the Adapter (Clamping plate)
If the camera doesn't have the 1/4-20 screw hole, please
put the camera on mount adapter,which has 1/4-20 screw
hole, and then mount it following above steps.
Unlock
Adjustment
Sliding Plate
Thumb Screw
Safety lock
Compatible
for Reference
Correctly place the smartphone on the smartphone
adapter(Optional accessory), and tighten it with
thumb screw in the middle sliding chute.
Available mobile phone width: 57~84mm
Smartpnone Place in the
(Optional Accessory)
Smartphone
Adapter
smartphone adapter
Camera Installation
Pocket Camera
ILDC
GoPro Sports Camera
Smartphone installation
www.feiyu-tech.com
03
4
Vertical Arm
Pan Axis Knob Ring
Loosen
Move
Balance the Gimbal
5
Power on / off
NOTE
Unbalanced center of gravity can lead to a
decrease in stability, even the camera cannot be
balanced.
Power on the gimbal after the center of
gravity of 3 axis is balanced.
Please refer to the follow chapter "Balance
the Gimbal" for operation
NOTE
(1) Please mount the camera or smartphone before
powering on the gimbal.
(2) When the battery is low, please charge the gimbal.
(3) When not in use, turn off the gimbal and then remove
the battery.
Power on / off
Long press the function button, the display will
show and release it when you hear the
beep tone.
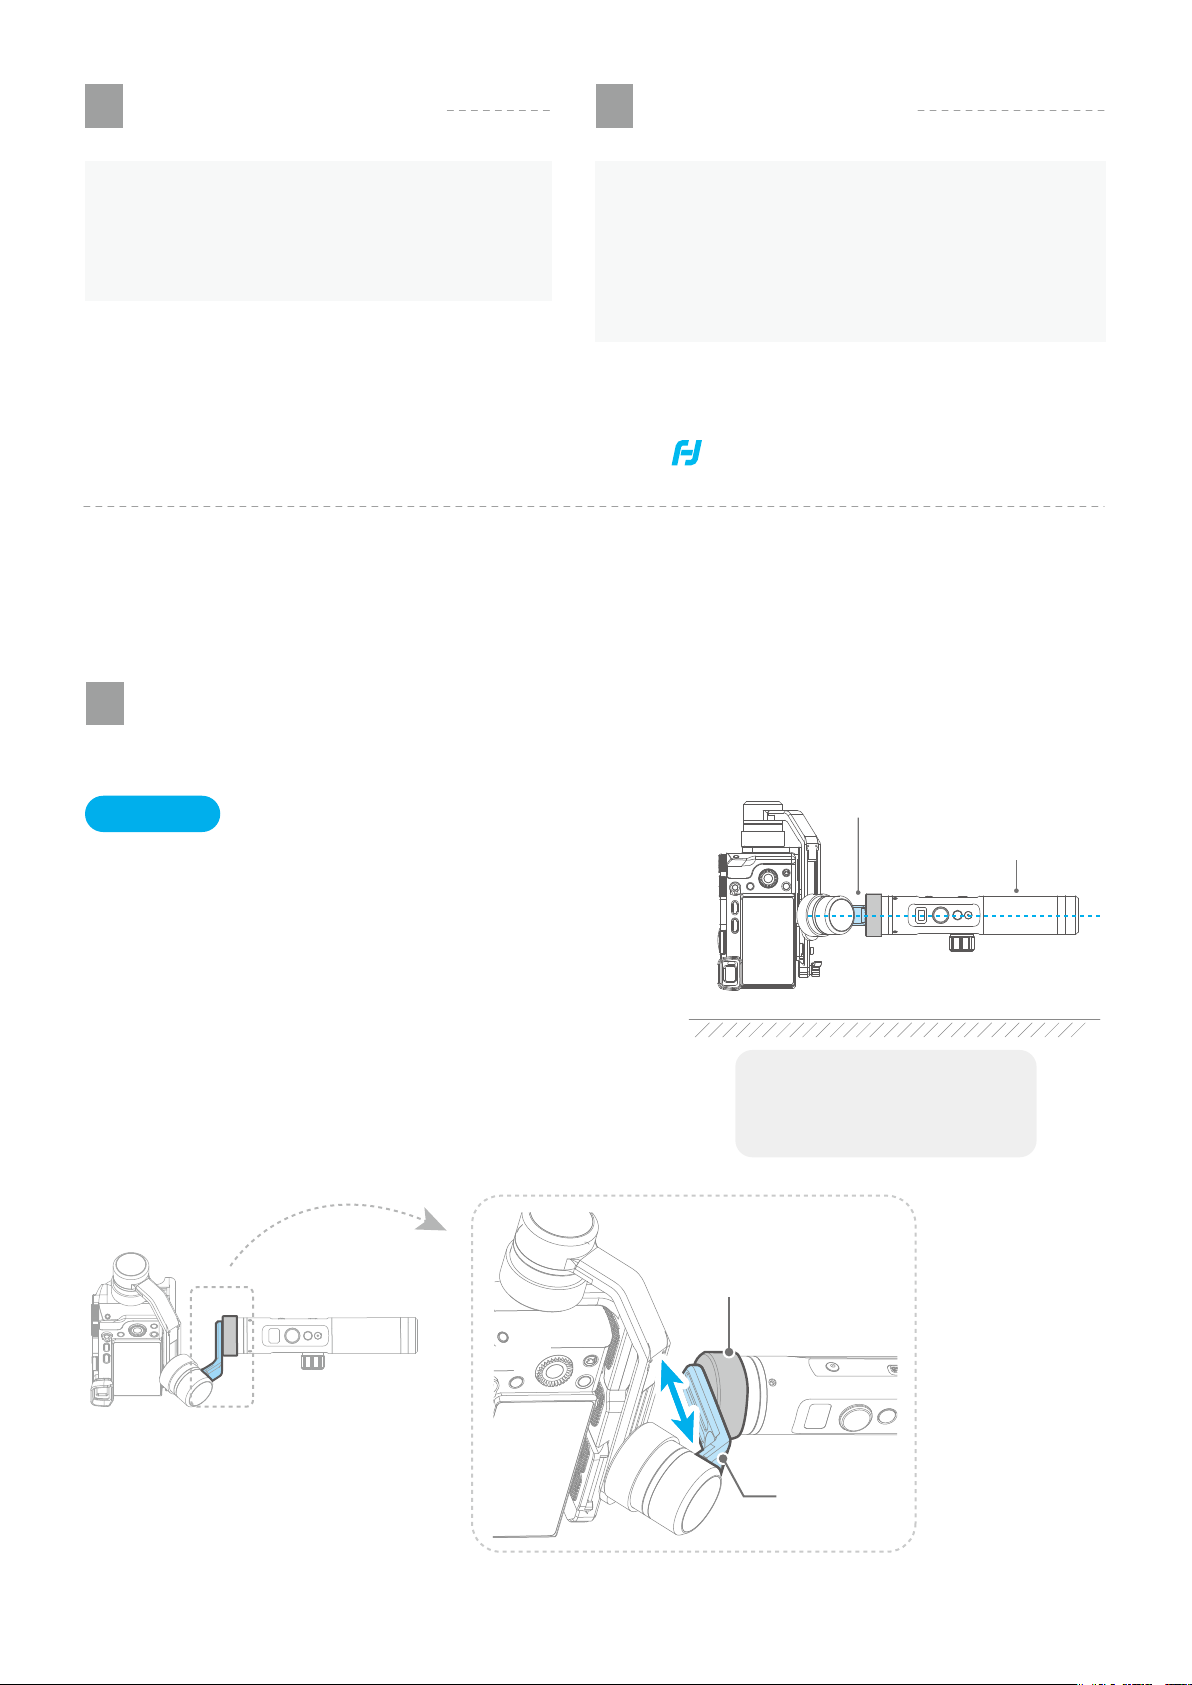
3. Balance the Gimbal
1
Balance Adjustment of the Pan Axis
* After adjustment, be sure to tighten the pan axis knob ring
( Before power on )
Steps
(1) Hold the handle of gimbal, keep the handle parallel
to the level ground.
(2) Loosen the pan axis knob ring
(Slightly loose until the vertical arm can be moved)
(3) Move and adjust the position of vertical arm,
until the vertical arm is parallel to the level ground
(4) Tighten the pan axis knob ring
Vertical Arm
Handle
Level Ground
After adjustment
Vertical arm is parallel
to the level ground
Move and adjust the position
of vertical arm
www.feiyu-tech.com
04

2
Cross Arm
Roll axis knob ring
Loosen
Move
Cross Arm
Roll axis knob ring
Loosen
Move
Balance Adjustment of the Roll Axis
* After adjustment, be sure to tighten the roll axis knob ring
Steps
(1) Stand the gimbal on level ground.
(2) Loosen the roll axis knob ring
(Slightly loose until the roll arm can be moved)
(3) Move and adjust the position of roll arm, until the
camera is parallel to the level ground.
( Refer to lever principle )
(4) Tighten the roll axis knob ring
Level Ground
After adjustment
Camera is parallel
to the level ground
www.feiyu-tech.com
05

3
Balance Adjustment of the Tilt Axis
Step 1
(1) Stand the gimbal on level ground.
(2) Loosen the tilt axis knob ring
(Slightly loose until the sliding arm can be moved)
(3) Move the sliding arm to the lowest position.
Loosen
Tilt axis knob ring
Move the sliding arm
to the lowest position
Step 2
(1) Loosen the thumb screw on the bottom of the adapter(Clamping plate)
(Slightly loose until the adjustment sliding plate can be moved)
(2) Move and adjust the position of adjustment sliding plate,
until the camera lens is parallel to the level
(3) Tighten the thumb screw
* After adjustment, be sure to tighten the thumb screw
Loosen
Thumb
Screw
Move
Adjustment
sliding plate
Level Ground
After adjustment
Camera lens is parallel
to the level ground
Step 3
* After adjustment, be sure to tighten the tilt axis
knob ring
(1) At any pitching angle, give an angle to the camera
at random.
(2) Slightly adjust the position of sliding arm, until it
keeps still without shaking
(3) Tighten the tilt axis knob ring
Level Ground
After adjustment
At any pitching angle, it can keep still
without shaking
www.feiyu-tech.com
06

4. Basic Operation
Modes
Panning Mode(Default mode)
The roll and tilt direction are fixed, and the camera moves according to the left-right movements of the
user's hand.
Follow Mode
The roll direction is fixed, and the camera moves according to the left-right movements, up-down
movements of the user's hand.
Lock Mode
The orientation of the camera is fixed.
Reset
Return to panning mode, three axises return to default position.
Panning Mode
Default
Introduction of Display
Display icon Mode / Status
HF
AF
LK
SET WIFI VIA APP
Panning Mode
Follow Mode
Lock Mode
Bluetooth is connected
Bluetooth is not connected
Prompt for users to open the App
settings in order to connect via WiFi
Follow Mode
Display icon Mode / Status
Battery Level
Camera photo shooting
Camera video shooting
WiFi is connected
WiFi is not connected
Camera is not
connected
Lock Mode
Please refer to the chapter
"Connecting to camera" in
page 13
www.feiyu-tech.com
07

Joystick - operation
Move to left
Upward
(1) Camera lens upward
(2) Select the option above
Up
Move to right
(1) Camera lens move to left
(2) Select the option on the left
(3) Cancel
Left Right
Down
(1) Camera lens move to right
(2) Select the option on the right
(3) Confirm
Downward
(1) Camera lens downward
(2) Select the option below
Function Button - operation
Note: The firmware upgrade may occur manual operation function and the actual product features do not match.
Please find the latest manual on the official website.
Single tap
Panning Mode /
Lock Mode
Single tap to switch between panning mode
and lock mode
Joystick
Double tap Follow mode
Triple tap
Quadruple tap Auto-rotation Mode
Five tap Initialization
Rotate 180° in
horizontal
Under all follow, single tap to switch to locking
mode
Single tap to switch between panning mode
and lock mode
Enter auto-rotation mode
Please refer to the chapter "Auto-rotation Mode" in page 12
Enter initialization
Please refer to the chapter "Gimbal Initialization" in page 14
Shutter Button - operation
After connecting the gimbal to camera/smartphone via Feiyu On/ Vicool
App, single tap it to control the recording of the camera / smartphone.
Single tap Shooting / Start shooting / Stop shooting
On the main interface of
the gimbal display
Function
Button
Shutter
Button
Please refer to the chapter "Connecting to camera" in page 13
www.feiyu-tech.com
08

Setting Button - operation
After connecting the gimbal to camera via Feiyu On App, the setting button can switch the camera modes.
Using the setting button and joystick to setup parameters.
Please refer to the chapter "Connecting to camera" in page 13
Swith Camera Modes
Main interface of
the display screen
HF
Support Cameras for Reference:
Sony RX0 / GoPro HERO series sports cameras / Panasonic LX10 / Panasonic GH4
Setting Button
Single
tap
Swith camera modes
Camera photo shooting
Camera video shooting
Setting
Button
Setup Parameter
Main interface of
the display screen
HF
WB
Setting
AWB Auto white balance
Daylight
Shade
Cloudy
Tungsten
Setting Button
Long press
Single
tap
ISO
Setting
auto
100
125
200
400
800
1600
3200
6400
12800
Interface for camera
parameters
ISOWB
兆像素White
Balance
兆像素Light
Sensitivity
Left Right
Setting Parameters:
Joystick Explanation
Move to right To the right option / Confirm
Move to left To the left option / Cancel
Setting
Button
Joystick
Using the joystick
to set up parameters
Up
Down
Move to up / down Modify Parameters
www.feiyu-tech.com
09

Horizontal Adjustment Button - operation
Horizontal
Adjustment
Button
Trigger Button - operation
You can control the horizon angle via the
horizontal adjustment button.
The control angle is -30° ~ +30°
In the panning mode or follow mode, press and hold
Press and hold Quickly follow
Double tap Reset
Multifunction Knob -
the trigger button to enter quickly follow, release it
to return previous mode
Return to panning mode, tilt,roll and pan axis return
to initial level
Zooming control / Follow focus /
Control 3 Axis
Single tap Switch adjustment option
Rotate Adjust by rotating
Long press Select the device you want to control
Default
Control
Control
Camera
Camera
Switch adjustment option
Single tap
Multifunction
Knob
Single tap /
Long press
Rotate
Display
*
Default
*
Zoom Zooming control
Follow Focus
Explanation
Follow focus
Trigger Button
Camera supports
zooming control
Camera supports
follow focus
Long press the
multifunction knob
Control
Control
Gimbal
Gimbal
Single tap
Switch adjustment option
* After connecting your camera
Please refer to the chapter "Connecting to camera" in page 13
Display
Pan Control
Roll Control
Tilt Control
Explanation
Control the pan axis rotation
Control the roll axis rotation
Control the tilt axis rotation
www.feiyu-tech.com
10

App - Download and Connecting
* Requires iOS 9.0 or later, Android 5.0 or later
Using the Feiyu ON App when you
mount your camera on the gimbal
iOS Version Android Version iOS Version Android Version
Or search and download the "Feiyu ON" / "Vicool" App on the following application platform:
App Store
Google play
Using the Vicool App when you mount
your smartphone on the gimbal
Connecting App
Turn on the Bluetooth and run the App on smartphone, follow on the instructions to connect smartphone to
gimbal via bluetooth. Take the Feiyu ON app connecting for example.
1 2 3
www.feiyu-tech.com
11

5. Advanced Operation
Manual Lock
Camera can be manually positioned while in panning mode ,
follow mode or lock mode. Both the pan axis and tilt axis can
be manually set up.
Manually move camera to desired position,and hold for half a
second. New tilt and/or pan positions are automatically saved.
Take the tilt axis setting for example:
Auto-rotation Mode
The G6 Plus gimbal can easily create constant speed movements in the auto-rotation mode.
This mode can be used for recording both regular video and motion timelapse photography.
For better performance, attach gimbal to the FeiyuTech tripod, or other tripod, to keep it completely still.
Set rotation speed in Feiyu ON App
Both the pan and tilt directions can be rotated.
Connect to the Feiyu ON App and select desired speed from the auto-rotation mode rate option in the settings menu.
G6 Plus
9s/ turn
18s/ turn
24s/ turn
30s/ turn
min/ turn
1
2
min/ turn
( 1 ) Enter auto-rotation mode
Enter auto-rotation mode by quadruple tapping the function
button.
Quadruple tap
function button
Rotation Speed
4
min/ turn
8
min/ turn
15
min/ turn
30
min/ turn
1h/ turn
(Default)
4h/ turn
( 2 ) Set rotation start position
Record the first position (rotation start position) by manually moving
camera to desired position. Hold in position for half a second. Single
tap the function button to record rotation start position.
Tilt
Pan
Single tap
function button
8h/ turn
( 3 ) Set rotation end position ( 4 ) Start auto rotation movements
Record the second position (rotation end position) by manually
moving camera to desired position. Hold in position for half a second.
Single tap the function button to record rotation end position.
The gimbal automatically restores to the start position, while the
tilt axis and pan axis start rotating at a constant speed according
to pre-set speed to end position, repeat step (2) (3) to start again.
Exit
Tilt
Pan
Single tap
function button
Double tap
Trigger button Exit the auto-rotation mode and reset
www.feiyu-tech.com
12

Connecting to Camera
G6 Plus gimbal can connect to the camera by Feiyu ON App.
Operations available after connecting to the camera:
Button Operation Function
Setting Button Single tap
Shutter Button
Single tap
Single tap in the main interface of the gimbal display can switch to the camera
modes
On the main interface of the gimbal display, single tap for photo shooting /
start shooting / stop shooting
Steps of connecting to camera:
(1) Turn on your sports camera's WiFi (2.4GHz)
(2) Successively select "Settings" -- "Parameters Settings" --"WiFi Settings" on Feiyu ON App
(3) Select camera model
(4) Select your camera connection name and enter the correct connection password of your camera
(5) Waiting for connecting
(6) Connect successfully
If icon appears on the display screen, it means the gimbal failed to connect to the camera, try to
restart gimbal or camera, or reconnect according to above steps.
If the WiFi is not connected for a long time, please restart the camera's WiFi.
Firmware Upgrade
Connect the gimbal to the Feiyu ON App, to upgrade the firmware through the App.
Settings Updata
Query Update
Your Gimbal version is ***,
The latest version is ***,
do you want to upgrade?
Feiyu ON
Later Download
www.feiyu-tech.com
13

Gimbal Initialization
You can initialize your gimbal when:
(1) When camera is not level
(2) If not used for a long period of time
(3) In case of extreme temperature variations
Adjusting Steps
Initing
Display
Five tap
Tap the function button for 5 consecutive times
1
and hear the "beep" sound, and the motor will
stop working and "Initing" shows up.
Display
InitingSuccess
Single tap
Place the gimbal on the table unmoved, and the
2
gimbal automatically detect whether or not it is
placed on a static flat surface, and then its
initializing will start automatically showing "Initing"
on the display, and "Success" will be displayed after
the initializing has been successfully completed.
After the initialization is done, single tap the function
3
button to wake up and return to the main interface.
NOTE:
If the initialization is not successful for a long
time, long press the function button to turn
off the gimbal,restart it and then initialize.
www.feiyu-tech.com
14

6. Specifications
294mm
108mm
156mm
Specifications
Product Name G6 Plus 3-Axis Stabilized Handheld Gimbal for Camera
Max. Tilting Range 260°
Max. Rolling Range
Max. Panning Range 360°
Tilting Speed 2°/s ~ 75°/s
Panning Speed 3°/s ~ 150°/s
Operation Time 9 Hours
Weight 663g ( Not including the battery, camera, camera lens, etc. )
Payload 800g
Compatible Cameras
for Reference
320°
( In center of gravity balanced state )
Sony RX100 / Sony a6300 (16-50 or 28-70mm) / Sony a6500 (16-50 or
28-70mm) / Canon M10 (15-45mm) / Canon G3X , ect.
Sony RX0 / GoPro HERO series sports cameras
Fit for smartphone with smartphone adapter(Optional accessory)
www.feiyu-tech.com
15

Guilin Feiyu Technology Incorporated Company
+86(0)773 2320865
Due to software and hardware improvements, your actual product might differ from the descriptions
and pictures in this user manual. You can get the latest user manual from the official website.
For more information, please visit our official website
D I S C L A I M E R
Prohibit any user for any illegal purpose. Users will be responsible for all behaviors of purchase and use products.
The Company assumes no liability for any risks related to or resulting from the debug and use of this product (including the direct,
indirect or third-party losses).
For any unknown sources of using, we will not be at any services.
The updating and changes of product firmware and program may cause changes in function descriptions in this user manual,
please read the instructions carefully before upgrading the firmware and use the corresponding user manual.
You can get the latest user manual from the official website: www.feiyu-tech.com
FeiyuTech reserves the right to amend this manual and the terms and conditions of use the gimbal at any time.
 Loading...