


User Manual
Publish in October 2016
3-Axis Stabilized Handheld Camera
GuiLin FeiYu Technology Incorporated Company

CONTENTS
EN
I Product Overview
II How to use Summon+
1. Function introduction of buttons and ports
2. Camera menu introduction
3. Introduction of photographing and shooting
4. Introduction of operating mode
5. LED indicator instructions
6. Reverse shooting
7. Firmware upgrade
8. Charging mode
9. Initialization
10. Operating example
III Product Parameters
1
2
2
3
6
6
7
7
7
8
8
8
10
Product Overview
I Product Overview
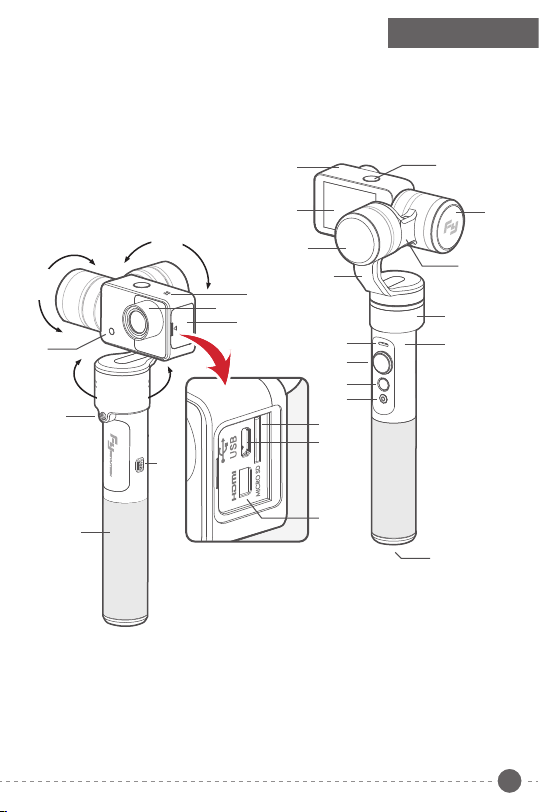
Summon+ is a controllable all-in-one camera with 3-axis stabilization function. It has simple and
elegant structure and is easy to operate, the photographing and shooting are controllable so as
to take stable HD videos and pictures. It has realized some functions including fixed point
shooting, following shooting and time-lapse photography.
[7]
[8]
Tilting
310°
[3]
[9]
Rolling
310°
[1]
Panning
360°
[4]
[5]
[6]
[1] Camera lens
[2] Dust cover
[3] Fill flash
[4] 1/4 inch screw hole
[5] USB port
[6] Hand shank
[7] Camera
[8] Photo / Video
switchover button
[9] Camera back screen
[10] Tilting axis
[11] Rolling axis
[11]
[20]
[2]
[13]
[16]
[17]
[18]
[19]
[21]
[22]
[23]
[12] Cross arm
[13] Erecting arm
[14] Panning axis
[15] Control connecting base
[16] Indicator
[17] Joystick
[18] Function button
[19] Shutter
[20] Microphone
[21] Micro SD port( Excluding card)
[22] SD reading port
[23] HDMI interface
[10]
[12]
[14]
[15]
[4]
1
1
How to use Summon+
II How to use Summon+
1
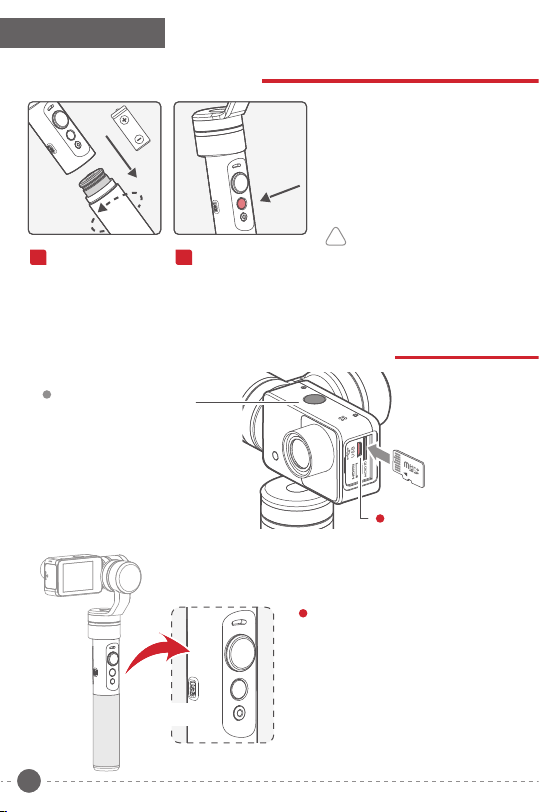
Install battery
Remove the hand
shank and insert one
22650 battery into it.
2
Power on / off
The function button can
control power on or
power off.
Power on:
Long press the function button until
the green light up, then release it to
turn on the gimbal.
Power off:
Long press the function button until
the red light always on, then release
it to turn off the gimbal.
!
If the battery power is too low,
the screen shall turn off automatically,
please long press the function button
for 3 seconds so as to make sure the
unit completely powers off.
Then you can recharge or replace
the battery.
1. Function introduction of buttons and ports
Photo / Video
switchover button
Single tap this button to switch
below Photo mode and
Video mode.
Long press this button to open
WiFi function, and long press
again to turn off WiFi function.
The default is Video mode.
USB port
Connect with USB data cable by this
port to upgrade firmware or charge
the battery.
Please refer to “Firmware upgrade”
USB port
2
for the operation of firmware upgrade.
Please refer to “Charging mode” for
the charging mode.
* Class10 high-speed micro
SD card is recommended
Micro SD card *
(Equipped by users)
SD reading port
Connect to a computer
with USB data cable so
as to read the video and
picture files in a SD card.
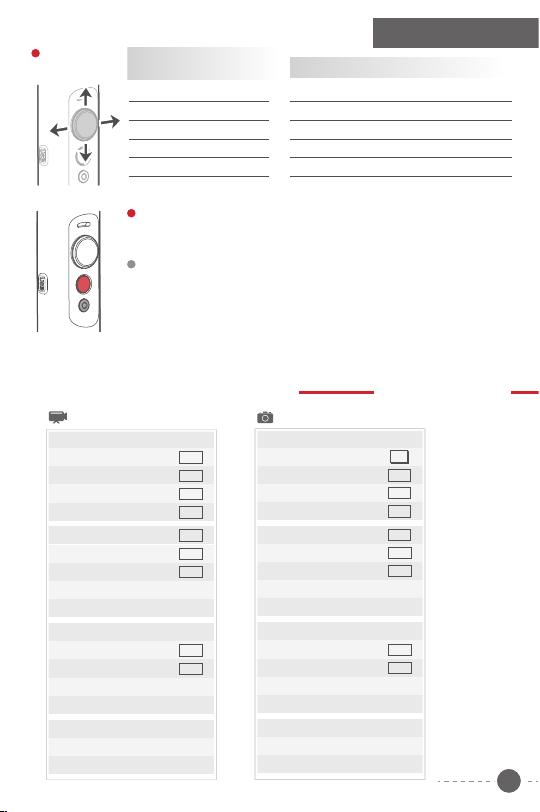
Joystick
How to use Summon+
Control the orientation
of camera lens
Joystick Camera lens
Up
Down
Left
Right
Switch working mode or access camera menu.
Please refer to “Introduction of camera menu” and “Introduction of working mode”
Down
Up
Left
Right
Function button
Control camera menu *
Joystick Camera menu
Up
Upward selection
Down
Downward selection
Left
Return to the previous menu / Exit
Right
Access the next menu / Confirm
Triple tap function button to access camera menu,
*
the joystick can set the camera menu at this moment.
Shutter
Single tap this button to start or stop photographing or recording.
In Photo mode, single tap this button to take a picture.
In Video mode, single tap this button to start recording, and press again to stop recording.
Double tap this button to turn on the fill flash, and double tap again to turn off the fill flash.
The video files are named as MOV_xxxxx.mov, for example, "MOV_00001.mov"
The picture files are named as IMG_xxxxx.jpgv, for example, "IMG_00001.jpg"
2. Camera menu introduction
Menu display in Video mode
Media Playback
Movie Size
Field Of View
Distortion Correct
Slow Motion
White Balance
Timelapse
Timelapse Duration
Level Speed
Vertical Speed
Follow Setting
Invert Mode
Date Stamp
Date & Time
Language
System
Wi-Fi-Password
Format
1080
H
ON
OFF
AUTO
OFF
OFF
OFF
OFF
EN
Triple tap function button
to access camera menu
Menu display in Photo mode
Media Playback
Resolution
Field Of View
Distortion Correct
Scheduled picture
Photo Burst
Timelapse
Timelapse Duration
Level Speed
Vertical Speed
Follow Setting
Invert Mode
Date Stamp
Date & Time
Language
System
Wi-Fi-Password
Format
16M
H
ON
OFF
OFF
OFF
OFF
OFF
OFF
EN
3

How to use Summon+
Menu introduction
Media
Playback
Under the "VIDEO" or "JPG" option, click the " Photo / Video switchover button"
enter the delete menu, you can choose to delete a single file or delete all files.
Movie Size Only display in Video mode. You can choose from below video sizes:
Resolution Only display in Photo mode. You can choose from below :
Play back recorded videos VIDEO JPG Check the pictures
Joystick VIDEO JPG
Up
Down
To the left
To the right
1080P (60fps) / 1080P (30fps) / 720P (120fps) / 720P (60fps) / VGA (240fps) /
4K (25fps) / 4K (15fps) / 2.7K (30fps) / 1440P (30fps)
Factory default setting is 1080P (60fps)
Tips: non-high-speed micro SD card is not available for 4K format shooting.
16M (4508*3456) / 12M (4000*3000) / 8M (3264*2448) / 5M (2592*1944)
Factory default setting is 16M (4508*3456)
Check the previous video
Check the next video
Return to menu
Play videos
Check the previous picture
Check the next picture
Return to menu
Check picture information
Only display in Video mode
Only display in Photo mode
Field Of View You can choose from Wide, Medium and Narrow grades.
Distortion
Correct
Slow Motion
White
Balance
Scheduled
picture
2S
Double
Off
The factory default setting is Wide.
Repair the distortion caused by camera lens to avoid the barrel shape distortion of
pictures. Factory default setting is“On”.
Open the slow motion function. Only display in Video mode except 4K video
sizes. Factory default setting is “Off”.
Tap to adjust the white balance. Only display in Video mode. Can be set to be
Auto / Daylight / Cloudy / Fluor H / Tungsten, the boot-up default is “Auto”.
Only display in Photo mode. Factory default setting is “Off”.
You can choose from below:
Take a picture after 2 seconds
Take the first picture after 10 seconds and take the second picture after 2 seconds
Don’t use this function
10S
Take a picture after 10 seconds
4

How to use Summon+
Photo
Burst
Timelapse
Only display in Photo mode. 3 / 5 / 10 pictures are settable for continuous shooting,
factory default setting is Off.
Press Shutter botton for continuous shooting after setting.
Open the timelapse function and set the internal time for shooting two adjacent photos.
You can choose from 3 sec / 5 sec / 10 sec / 30 sec /1 min / Off.
Factory default setting is Off.
Timelapse Duration Set the shooting time of time-lapse photography.
Level Speed
Open the panning axis rotation function and set the panning axis rotation speed for
time-lapse photography.
The settable numerical range is -20 ← 0 → +20(“+”stands for clockwise rotation,“ -”stands for
anticlockwise rotation),the bigger the number the faster the rotation speed, the maximum rotation speed
is 360°/ 6 min, and the minimum is 360°/ 120 min.
If the number increases by 1, the time needs for rotating 360° shall decrease by 6 minutes.
If the number decreases by 1, the time needs for rotating 360° shall increase by 6 minutes.
The time needs for rotating 360° between two numbers is as following table (“min” stands for minutes)
There is no rotation when the number is set as 0.
1
2 3 4 5 6 7 8 9 10 11 12 13 14 15 16 17 18 19 20
Number
120
114
108
Time
Vertical
Speed
min
102
min
min
min96min90min84min78min72min60min66min54min48min42min36min30min24min18min12min6min
Turn on the tilting axis rotation function to set the tilting axis rotation speed for time-lapse
photography. Please refer to“Level Speed setting”.
Follow Setting You can set the follow speed and follow dead zone of panning axis.
Invert
Invert the screen display after opening.
Can be used for inversion shooting. Factory default setting is “Off”.
Mode
Date
The shooting date and time shall be displayed on the picture after this function
is opened. Settable options: Off / Date / Date & Time. Factory default setting is Off.
Stamp
Date & Time Can set the current date, time and format. Turn the joystick to the right to successively
Language Set the menu to be in English / Simplified Chinese / Traditional Chinese / German /
System
select the date and time format desired to be modified, turn the joystick up to increase
the numerical value while turn it down to decrease the numerical value.
After setting all items, turn the joystick to the right to save the settings and return to the
previous menu.
French / Spanish / Portuguese. The factory default setting is English.
Restore to the factory settingsFactory Reset
System Info
Check information related to the system
Check the capacity and free space of SD card Card Info
WIFI-Password
Set WiFi password.
Format Format SD card.
5

How to use Summon+
3. Introduction of photographing
and shooting
Photographing
Switch to Photo mode by “Photo / Video switchover button”.
Single tap “Shutter”button to photograph.
Special modes: Photo Burst / Scheduled picture
Shooting
Switch to Video mode by “ Photo / Video switchover button”.
Single tap “Shutter” button to start recording and press this
button again to stop recording.
Special mode: Slow Motion / Panorama shooting
Timelapse
Automatically take a picture in the set time interval, panning axis moves by the set
horizontal speed (or tilting axis moves by the set vertical speed), and automatically
compose a video after shooting.
Panorama Shooting
In video mode, triple tap the "Shutter" button to start panorama shooting, heading axis will
automatically rotate shooting. Shooting range: 360 ° Recording Time: 8s
( Please refer to “Actual Operations” for detailed operations )
Photo / Video
switchover button
Shutter
4. Introduction of operating mode
Working mode
Panning mode
The camera is allowed to pan left or right.
Vertical tilts or rolls are disabled.
Panning and Tilting mode
The camera is allowed to pan left or right
and tilt up and down. Rolls are disabled.
Lock mode
The camera stays in its current orientation.
All panning, tilting and rolls are disabled.
Operation instructions of function button
Operation
Single tap
Double tap
Triple tap
Quadruple tap Reset
Long press
for 1 second
Function Explanation
Panning Mode / Lock Mode
Panning and Tilting Mode
Access camera menu
Standby
6
Other functions
Reset
Reset the tilting axis to initial
orientation and initial mode.
Standby
In standby mode, keep in power-up
state, the motor stops working, the
indicator light flashes for three times,
and single tap again to wake it up.
Single tap to switch between panning mode and
lock mode
Under panning and tilting mode, single tap to switch
to lock mode
Control camera menu by the joystick
(
Please refer to
Reset the tilting axis to initial orientation and initial
mode
Single tap again to wake it up, or triple tap to
initialize (
“Joystick” )
Please refer to
“Initialization”)
5. LED indicator instructions
Color Flashes
Blue
Single
Blue
Double
Blue
Triple Standby
Always on
Blue Initialization failure / Malfunction
Quickly
Mode / Status
Panning mode
Panning and Tilting mode
Lock mode / InitializingBlue
6. Inversion shooting
Turn the hand shank to the upward side
of camera to realize the inversion for
shooting in the scenes with low angle.
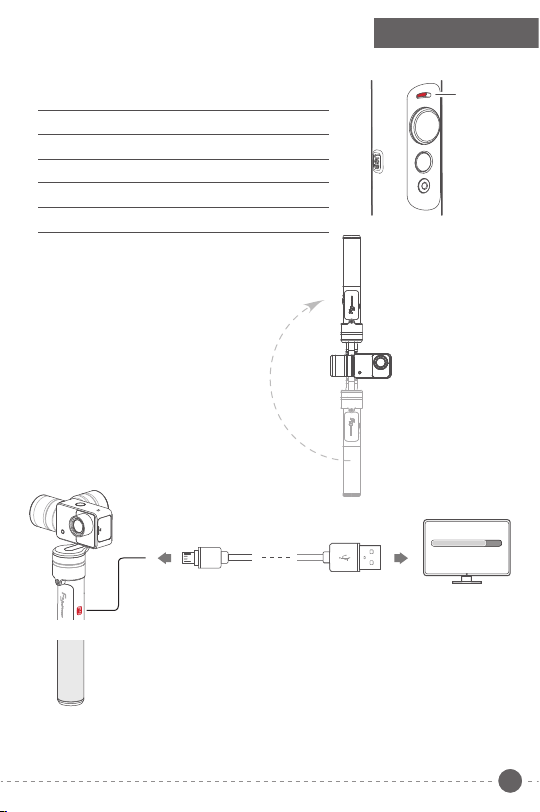
7. Firmware upgrade
Micro port
USB data cable
USB port
Upgrade steps
(1) Please visit the official website www.feiyu-tech.com to download the
relevant programs for upgrading, including USB drive program, firmware
upgrade software and product firmware, and install the relevant software,
decompress the firmware files for standby application.
Connect the USB cable with micro port as the above picture.
(2)
Please upgrade the relevant firmware according to the operation
(3)
instructions of firmware upgrade software.
How to use Summon+
Indicator
Upgrade........
PC
7

How to use Summon+
8. Charging
Micro port
USB data cable
After power off, connect the USB data cable to USB port, and connect
USB port
with 5V USB power adapter by USB cable (equipped by user).
Or take out the battery, and use the corresponding charger to charge
the battery (equipped by user).
The red indicator light is on during charging, and green light is on after
the battery is fully charged.
9. Gimbal Horizontal Angle Adjustment
The horizontal angle needs to be adjusted whenever the following situations happen to the gimbal
(1) There is small angular deviation between tilting angle and horizontal line after boot-up.
(2) There is small angular deviation between rolling angle and horizontal line.
(3) Under lock mode, panning angle drifts.
5V USB power adapter
(Equipped by user )
( Initialize the gimbal )
Adjusting steps:
In boot-up state, long press the Function Button until the red light
(1)
flashes quickly to enter standby status, the blue light will flash 3
times periodically.
Lay the gimbal on a static flat surface and triple
(2)
tap the Function Button. Initialization is successful
when the blue light changes from constant on to
flashing 3 times periodically.
When the initialization failed, the LED indicator will flash quickly, repeat step (2) to reinitialize.
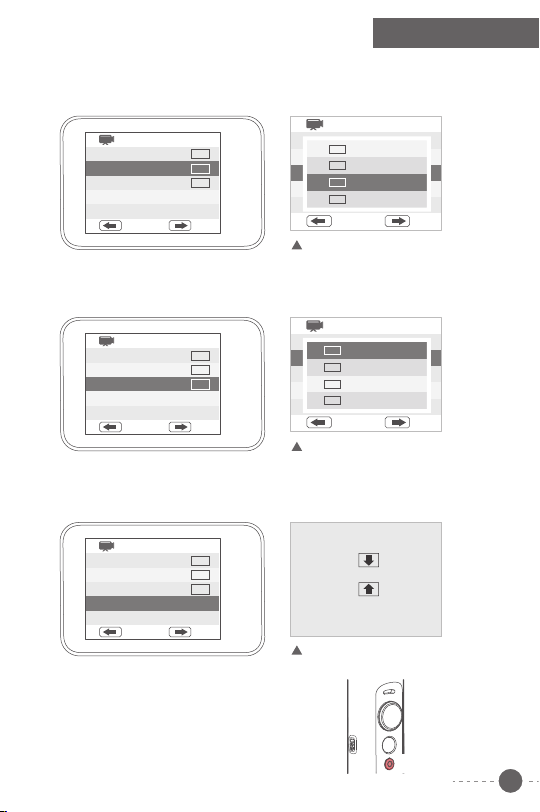
10. Operating example
Take time-lapse photography as an example:
(1) Install the battery, long press the function
button for 0.5 second to power on.
(2) Triple tap function button to access the
menu.
Return to the
previous menu
or exit
Place Still
Turn up to select
Turn down to select
Turn down to select
Access to the
next menu
or confirm
Function
button
8
Introduction of the joystick
under menu mode
How to use Summon+
(3) To select “Timelapse”, turn the joystick to the right to access this interface, you can set the
interval time of continuous pictures taken by time-lapse photography.
For example, you can set it as 5 seconds. Turn the joystick to the right to save, and return to
the previous menu.
白平衡
OFF
White Balance
Timelapse
Timelapse Duration
Level Speed
Vertical Speed
Back
(4) To select “Timelapse Duration”, turn the joystick to the right to access this interface,
you can select from unlimited / 5 / 10 / 15 / 20 / 30 / 60 minutes. The default is “unlimited”,
i.e. no limit to the shooting time. Turn the joystick to the right to save, and return to the
previous menu.
White Balance
Timelapse
Timelapse Duration
Level Speed
Vertical Speed
Back Enter
(5) To select “Level Speed”, turn the joystick to the right to access this interface, set
the speed of panning movement, take “+15” as an example (“+” is for clockwise
rotation, “-” is for anticlockwise rotation). Turn the joystick to the right to save, and
return to the previous menu.
AUTO
OFF
OFF
Enter
AUTO
5
SEC
OFF
Off
持续时间
3
SEC
3sec
缩时录影
5
SEC
5sec
水平速度
10
SEC
10sec
垂直速度
Back
Enter
After enter“Timelapse”
白平衡
OFF
Unlimited
持续时间
5
MIN
5Min
缩时录影
0
1
MIN
10Min
水平速度
5
1
MIN
15Min
垂直速度
Back
Enter
After enter“Timelapse Duration”
White Balance
Timelapse
Timelapse Duration
Level Speed
Vertical Speed
Back Enter
(6) Single tap the Shutter after setting, panning axis
shall rotate according to the set speed and take a
picture for every 5 seconds. The pictures shall
automatically generate videos after shooting.
Single tap the Shutter button to end the
shooting in advance, the pictures shall automatically
generate videos after shooting and can be previewed
in “Media Playback”
AUTO
SEC5
OFF
level: 000
After enter“Level Speed”
Shutter
9

III Product Parameters
97 mm 81 mm
Weight:
350g
(Not including battery)
232 mm
143 mm
Tilting angle range 310°
Rolling angle range 310°
Panning angle range 360°
Graph sensor 16 mega pixels
Lens specification 1 / 2.3”
Display screen 2.0 inch / 4:3, Resolution: 320x240
ISO 50~3200 , Automatic
Video resolution
Photograph resolution
Video format MOV
Picture format JPG
Working environment Temperature: -10~+50℃ Humidity: 30%~80%
Storage environment Temperature: -10~+150℃ Humidity: 30%~90%
Memory card
WIFI
4K@25FPS / 4K@15FPS / 2.7K@30FPS / 2.7K@15FPS /
1920x1440P@30FPS / 1080P@60FPS / 720P@120FPS / VGA@240FPS
16M (4608*3456) / 12M (4000*3000) / 8M (3264*2448) /
5M(2592*1944)
Maximum support 64GB
Support transfer rate of Class 10 Micro SD card
High-performance and low power consumption SDIO WiFi
2.4G, 802.11b/g/n
Farthest distance is 10 meters in open and clear environment
Maximum control speed ±120°/s
Battery model 22650
Working voltage 3.7V ~ 4.2V
Lens field angle 95°
Aperture Size f 2.8
10

Package List
Name
Summon+
USB cable (micro port, 50cm)
Lens filter cap
Quantity
1
1
1
1
Name Quantity
Portable bag 1
User manual22650 rechargeable battery
Warranty card
1
1
DISCLAIMER
Prohibit any user for any illegal purpose. Users will be responsible for all behaviors of purchase and
use products.
The Company assumes no liability for any risks related to or resulting from the debug and use of this
product (including the direct, indirect or third-party losses).
For any unknown sources of using, we will not be at any services.
The updating and changes of product firmware and program may cause changes in function
descriptions in this user manual, please read the instructions carefully before upgrading the firmware
and use the corresponding user manual.
You can get the latest user manual from the official website: www.feiyu-tech.com
Feiyu Tech reserves the right to amend this manual and the terms and conditions of use the product
at any time.
Attention
Please correctly assemble the product in accordance with the installation diagram.
Please upgrade the firmware and program with the standard data cable.
Please make sure the product is powered off when not in use.

Create More Possibilities
For more information, please visit our official website
www.feiyu-tech.com
Support Email: service@feiyu-tech.com
www.feiyu-tech.com
 Loading...