


3-Axis Stabilized Handheld Gimbal for Camera
Instructions
EN V 1.1

Catalogue
1. Overview 1
2. Start to Use 3
3. Gimbal Balance 5
www.feiyu-tech.cn
Balance Adjustment of the Tilt Axis
Balance Adjustment of the Roll Axis 6
Balance Adjustment of the Pan Axis
4. Function & Operation 8
Working mode 8
Touch Screen 9
Joystick 9
Function Button Operation 10
Shutter Button Operation 10
Power Button Operation
Camera Mode Button Operation
Trigger Button Operation
Multifunction Knob Operation -
Control the current axial rotation / follow focus and zoom
10
10
11
11
5
7
Download and connect App 12
5. Advanced Operation 12
Manual Lock 12
Timelapse mode 13
Inception mode 14
Portrait mode 14
Motor setup
Firmware Upgrade
How to connect Camera
Gimbal Initialization
Accessories Introduction
14
15
15
19
19
6. Specifications 20
Compatible Cameras for Reference 21
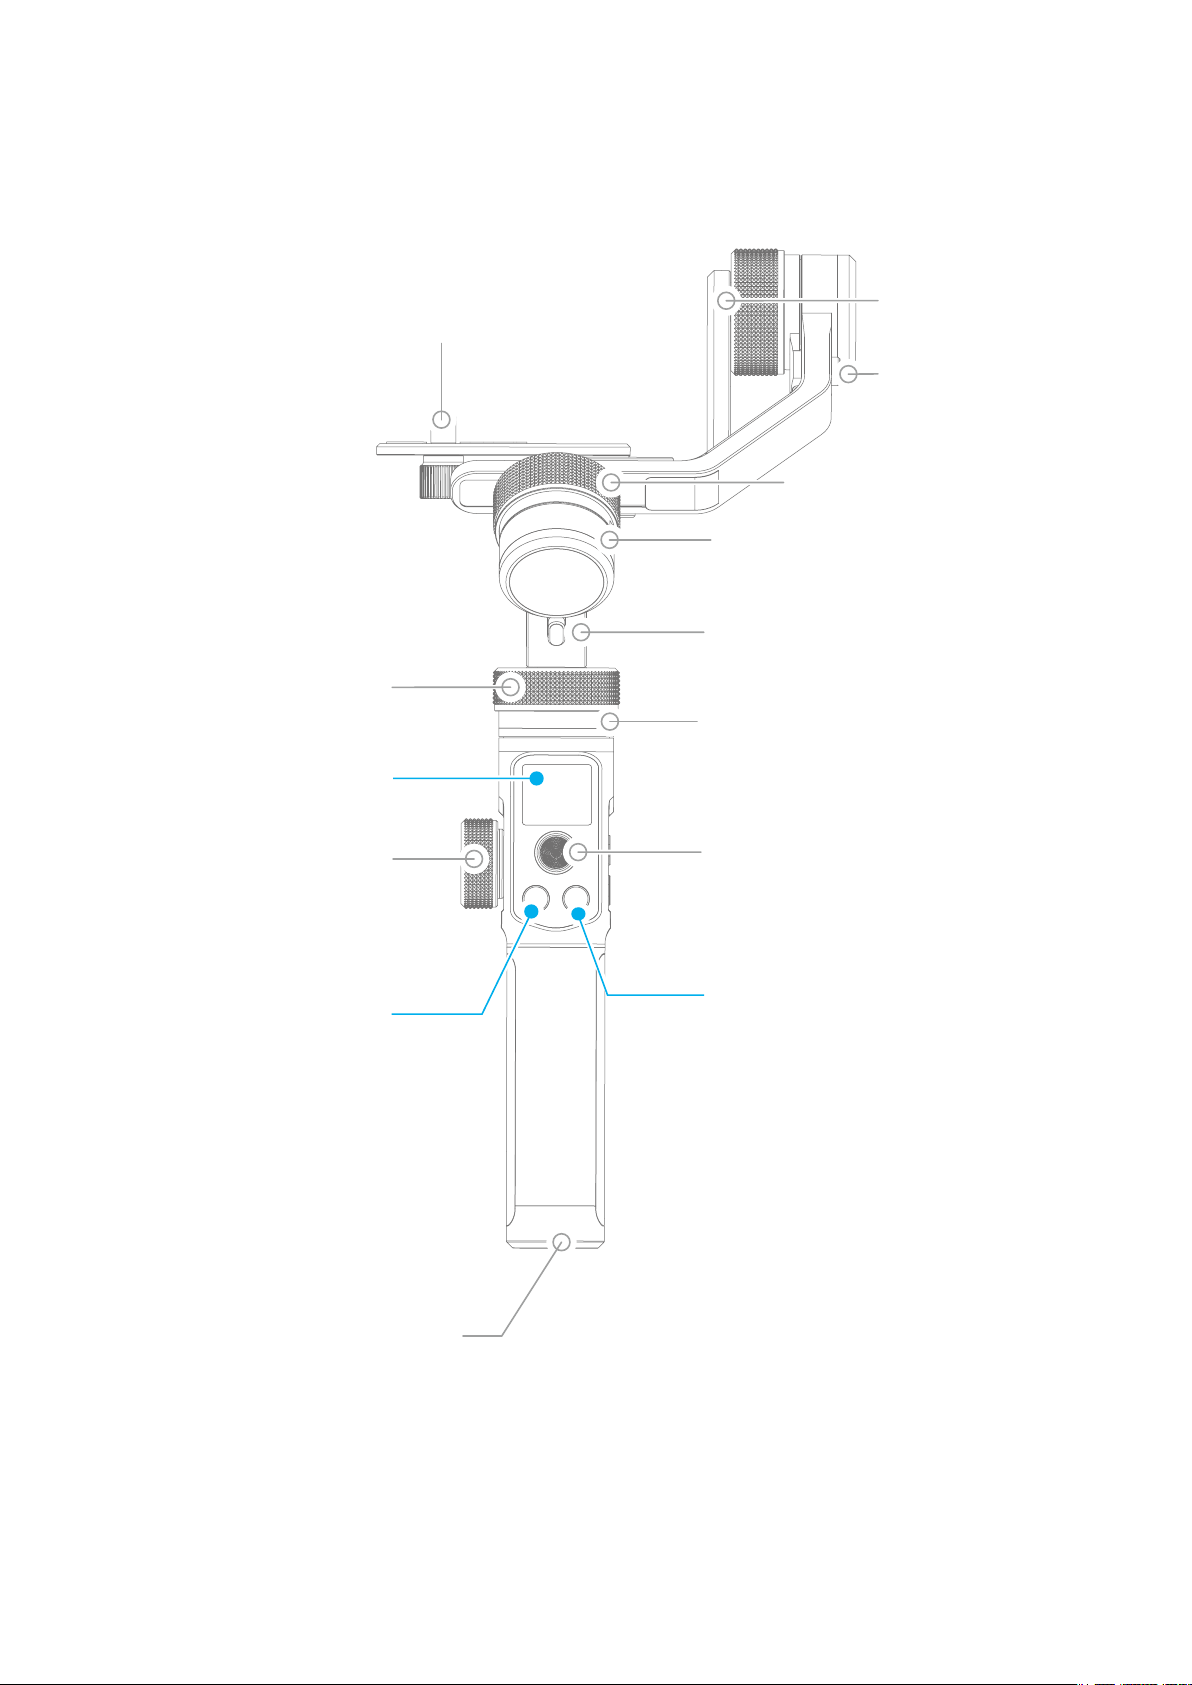
1. Catalogue
Pan Axis Knob Ring
Sliding Arm
Thumb Screw
Tilt Axis
Position Lock
Roll Axis Knob Ring
Roll Axis
Roll Axis Position Lock
Display
Multifunction Knob
Shutter Button
Pan Axis
Joystick
Function Button
1/4-20 inch
Thread Hole
www.feiyu-tech.cn
01
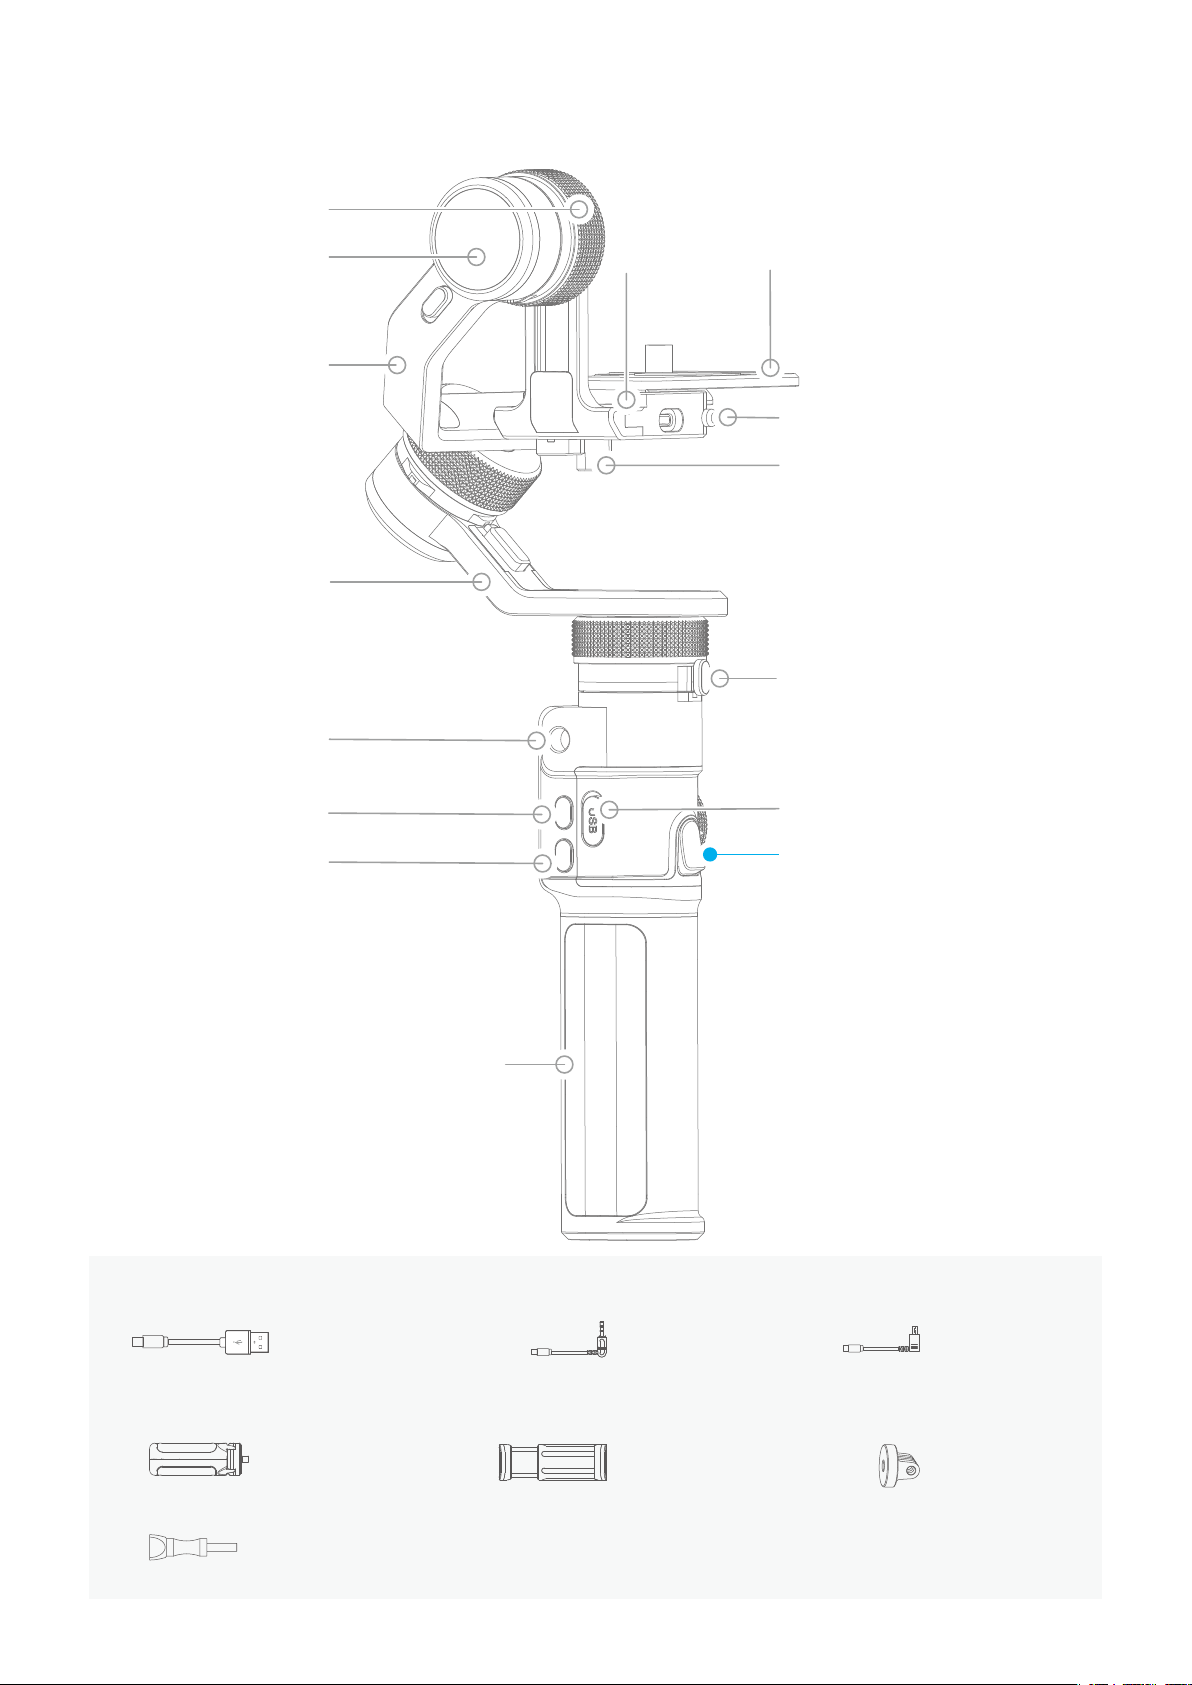
Tilt Axis
Knob Ring
Tilt Axis
Cross Arm
Vertical Arm
Fixed
Plate
Quick
Release
Plate
Anti-drop Column
Safety Lock
Pan Axis
1/4-20 inch
Thread Hole
Power Button
Camera
Mode Button
Accessories
Position Lock
Type C Port
Trigger Button
Handle
USB 2.0 to TypeC
X1
Tripod
X1
Long Thumb Screw
X1
Panasonic
Shutter Cable
X1
Smartphone holder
X1
Sony Shutter Cable
X1
Gopro adapter
(1/4 Thumb Screw)
X1
www.feiyu-tech.cn
02
2. Start to Use
1
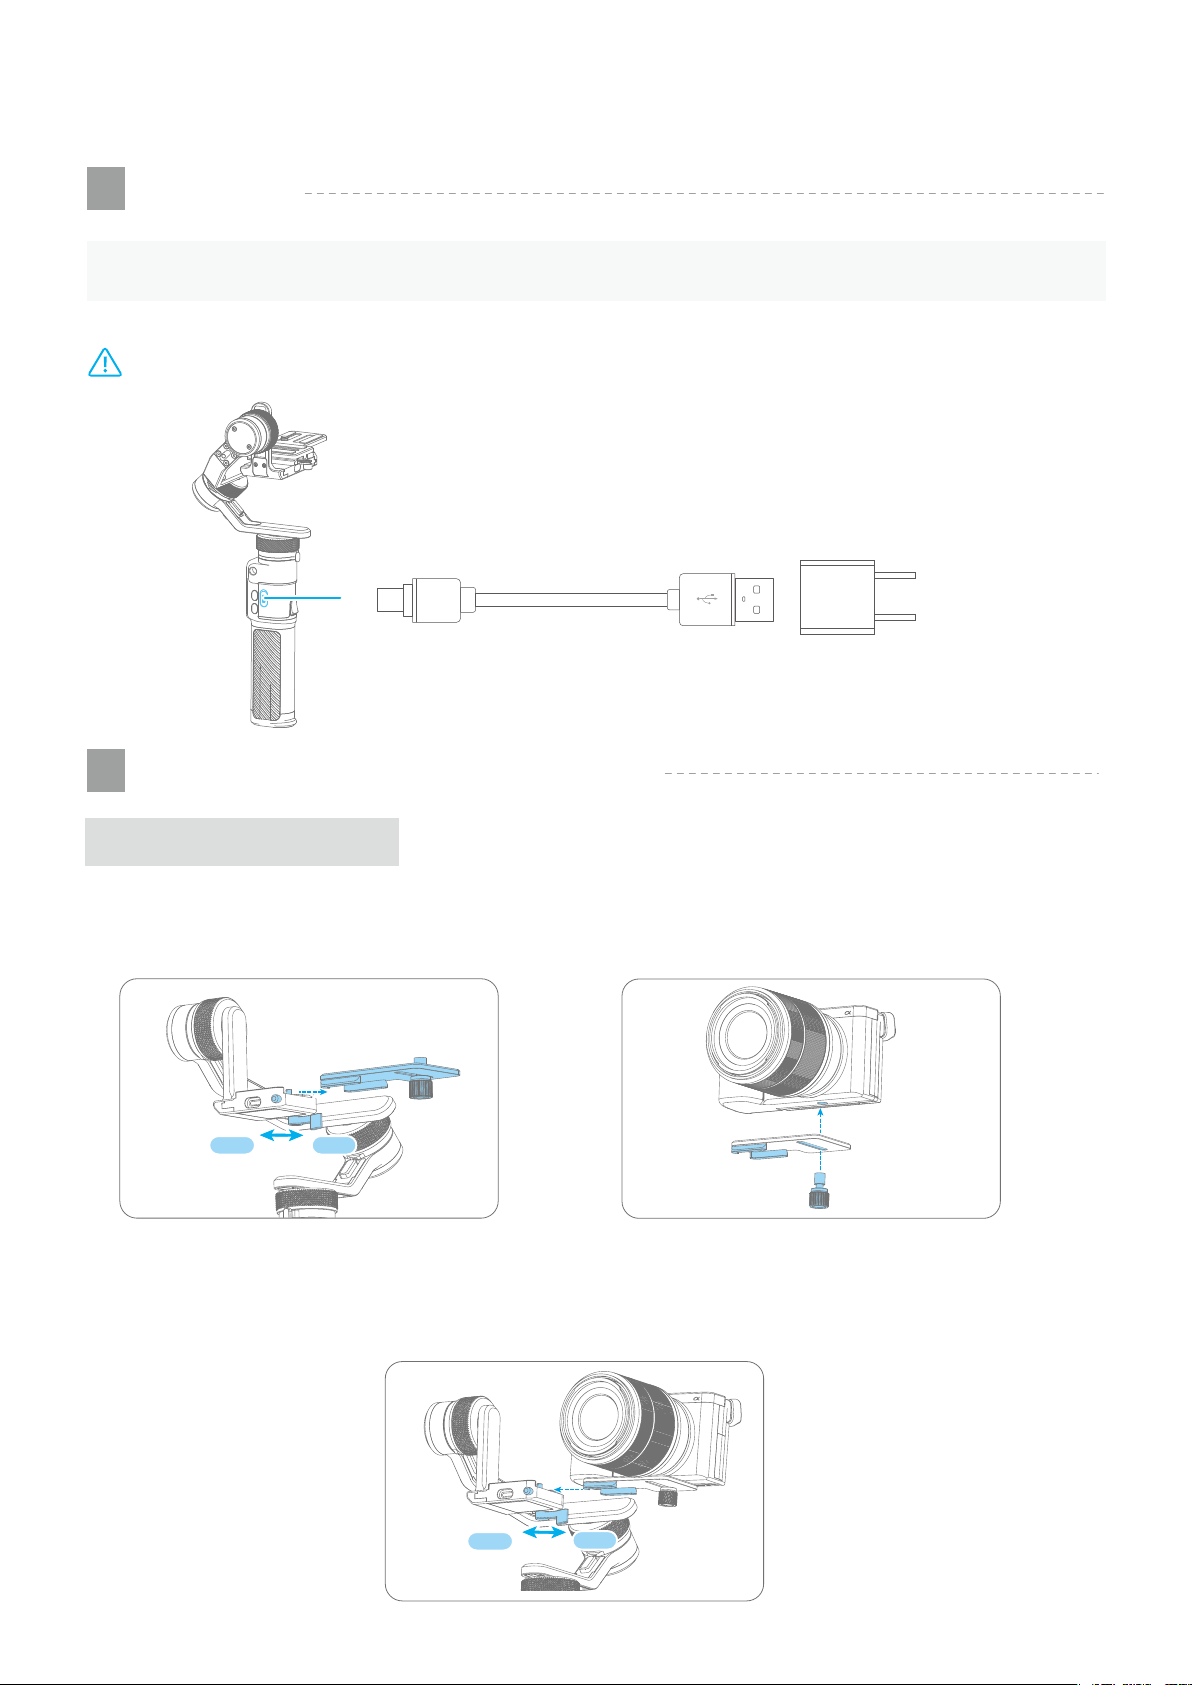
Charging
TIPS
Charging with Type C USB cable, as the figure below shows:
Note: DO NOT charge the gimbal via the Type C port on the fixed plate. Otherwise, the circuit board may
be burnt.
2
Please fully charge the battery before powering on the gimbal at the first time.
Type C port USB port
Type C USB
Cable
(Equipped by user)
Camera/SmartPhone Installation
Output: 5V / 2A
Camera Installation
Unlock the safety lock, press and hold the anti-drop column to take out quick release plate as
the figure 1 shows, tighten the thumb screw to fix the quick release plate on the bottom of the
camera as the figure 2 shows.
LockUnlock
Figure 1
Figure 2
Press and hold the anti-drop column , insert the camera in the fixed plate , and lock the safety
lock as the figure 3 shows.
If the camera doesn't have the 1/4-20 inch screw hole, please put the camera on mount adapter, which
has 1/4-20 inch screw hole, and then mount it in follow the steps above.
Unlock
Lock
Figure 3
www.feiyu-tech.cn
03

*Pull the safety lock to left to unlock, and pull it to right to lock it when the safety lock is
locking as the figure 4.
Pull the safety lock to left to lock it, and pull it to right to unlock when the safety lock is
unlocked as the figure 5.
Lock
Unlock
Locking
Lock Unlock
Figure 4
Unlocked
Figure 5
Smartphone Installation
Mount smartphone into the smartphone holder, and tighten the thumb screw to fix the
smartphone holder on the quick release plate.
The width of smartphone should be 54-88mm.
Smartphone Mount into the
Smartphone
holder
smartphone holder
Unlock
Lock
3
Power on/off
TIPS
(1) Please mount the camera or smartphone before powering on the gimbal.
(2) When the battery is low, please charge the gimbal.
(3) When not in use, please power off the gimbal.
Power on/off:
Long press and release the power button when the display shows on screen and hear
the tone.
*Gimbal will vibrate slightly for a few seconds after power on it to adapt the camera weight.
www.feiyu-tech.cn
04
4
Position Lock
Each of the three rotating axis has one position lock, take the pan axis lock for example.
Unlock
Lock
3 Axis position lock
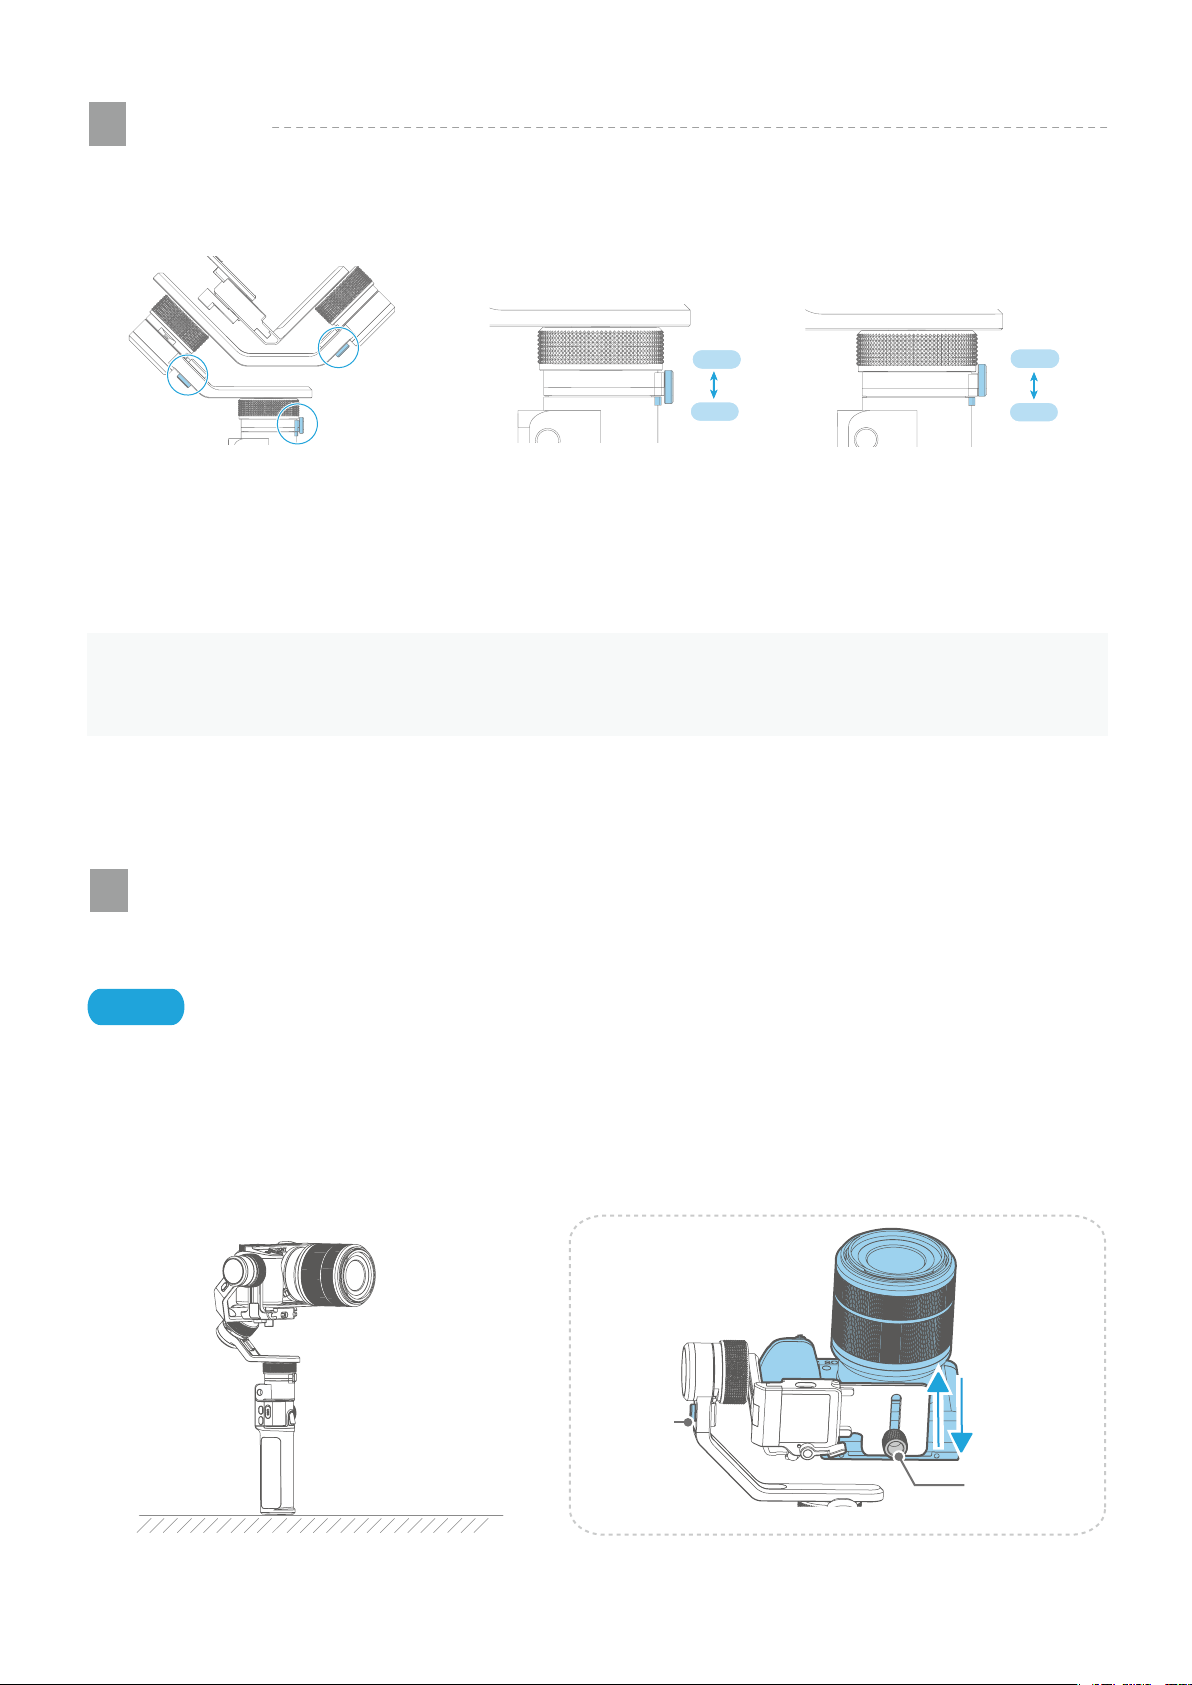
3. Gimbal Balance
TIPS
If the gimbal is not well balanced, it will decrease the performance of stabilization or even cannot balance
the camera.
*Before balancing the gimbal, please lock the gimbal at the balanced lock status, and unlock
the position lock in stages for convenient balancing.
1
Balance Adjustment of the Tilt Axis
Lock status Unlock status
( Before powering on )
Unlock
Lock
Power on the gimbal after balanced it.
Steps
(1) Let the gimbal stand on a horizontal plane, unlock the tilt axis position lock.
(2) Loosen the Thumb screw on the camera bottom, slide the sliding arm to balance the camera
until the camera is parallel with the horizontal plane, tighten the Thumb Screw.
(Loosen the Thumb screw a little to let the camera can be moved)
move
Unlock
Camera
Loosen
Horizontal Plane
Thumb
Screw
www.feiyu-tech.cn
05
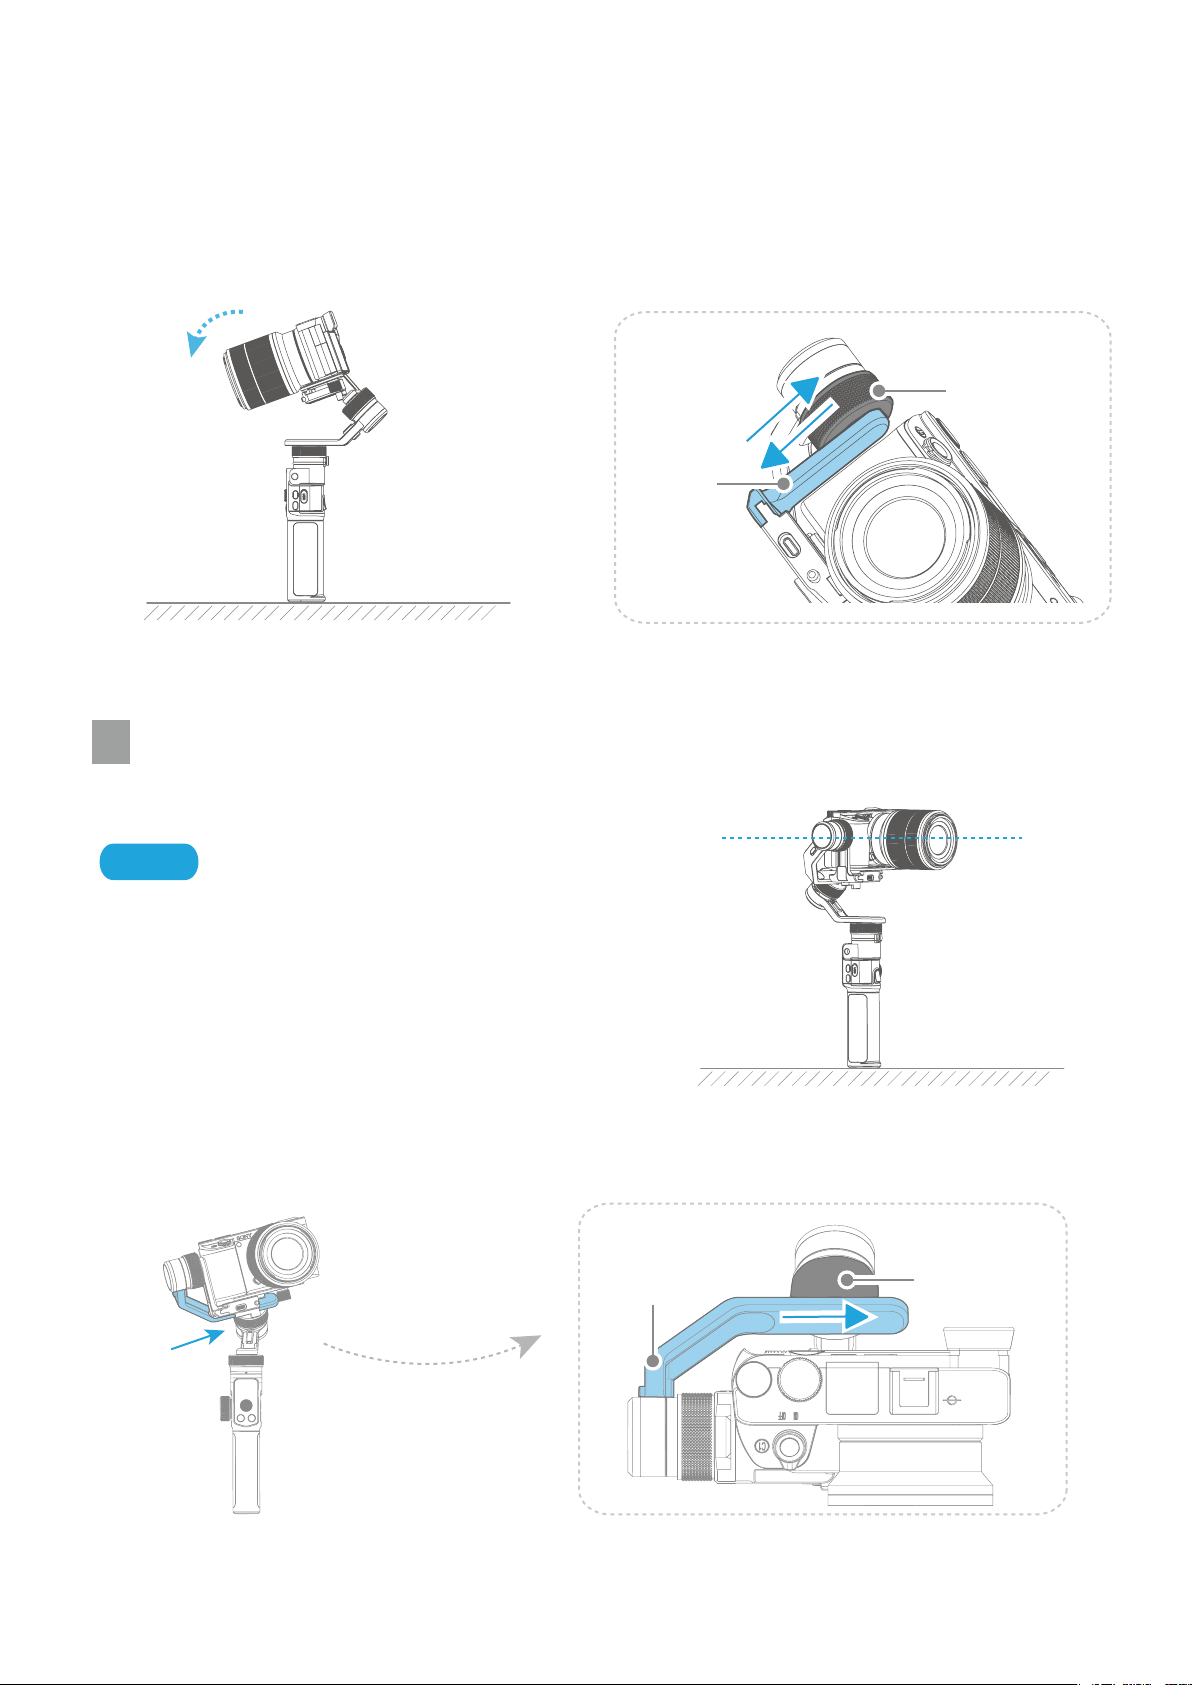
(3) Loosen the tilt axis knob ring, rotate the tilt axis to any angle, and slide the sliding arm slightly,
until the camera can stay stable. Then tighten the tilt axis knob ring to finish the balance.
(If the camera cannot be parallel with the horizontal plane after balancing, repeat the steps
above until it is parallel.)
* Please tighten the tilt axis knob ring after balanced the tilt axis.
Loosen
Tilt Axis Knob
Ring
move
Sliding Arm
Horizontal Plane
2
Balance Adjustment of the Roll Axis
* Please tighten the roll axis knob ring after balanced
the roll axis.
Steps
(1) Unlock the roll axis position lock, put gimbal on a
horizontal plane.
(2) Loosen the roll axis knob ring, slide the cross arm
to balance the camera. Then tighten the roll axis
knob ring, and tilt the camera to left or right, if the
camera can stay stable means balanced.
(Loosen the roll axis knob ring a little to let the cross
arm can be moved)
move
Cross Arm
Horizontal Plane
Loosen
Roll Axis Knob
Ring
www.feiyu-tech.cn
06

(3) If the camera cannot be parallel with the
horizontal plane after balancing, please
unlock the safety lock, and slide the quick
release plate until the camera is parallel with
the horizontal plane, then lock the safety lock.
* Please lock the safety lock after balanced
the roll axis.
move
Cross Arm
Unlock
Loosen
Roll Axis Knob
Ring
move
Quick Release
Plate
Lock
3
Balance Adjustment of the Pan Axis
* Please tighten the pan axis knob ring after balanced the pan axis.
Steps
(1) Unlock the pan axis position lock, hold the
gimbal horizontally, make the handle is parallel
with the horizontal plane.
(2) Loosen the pan axis knob ring, slide the
vertical arm to balance the camera. Then tighten
the pan axis knob ring, and rotate the pan axis to
any angles, if the camera can stay stable means
balanced.
Horizontal Plane
Vertical Armmove
Loosen
Pan Axis Knob
Ring
www.feiyu-tech.cn
07
4. Function & Operation
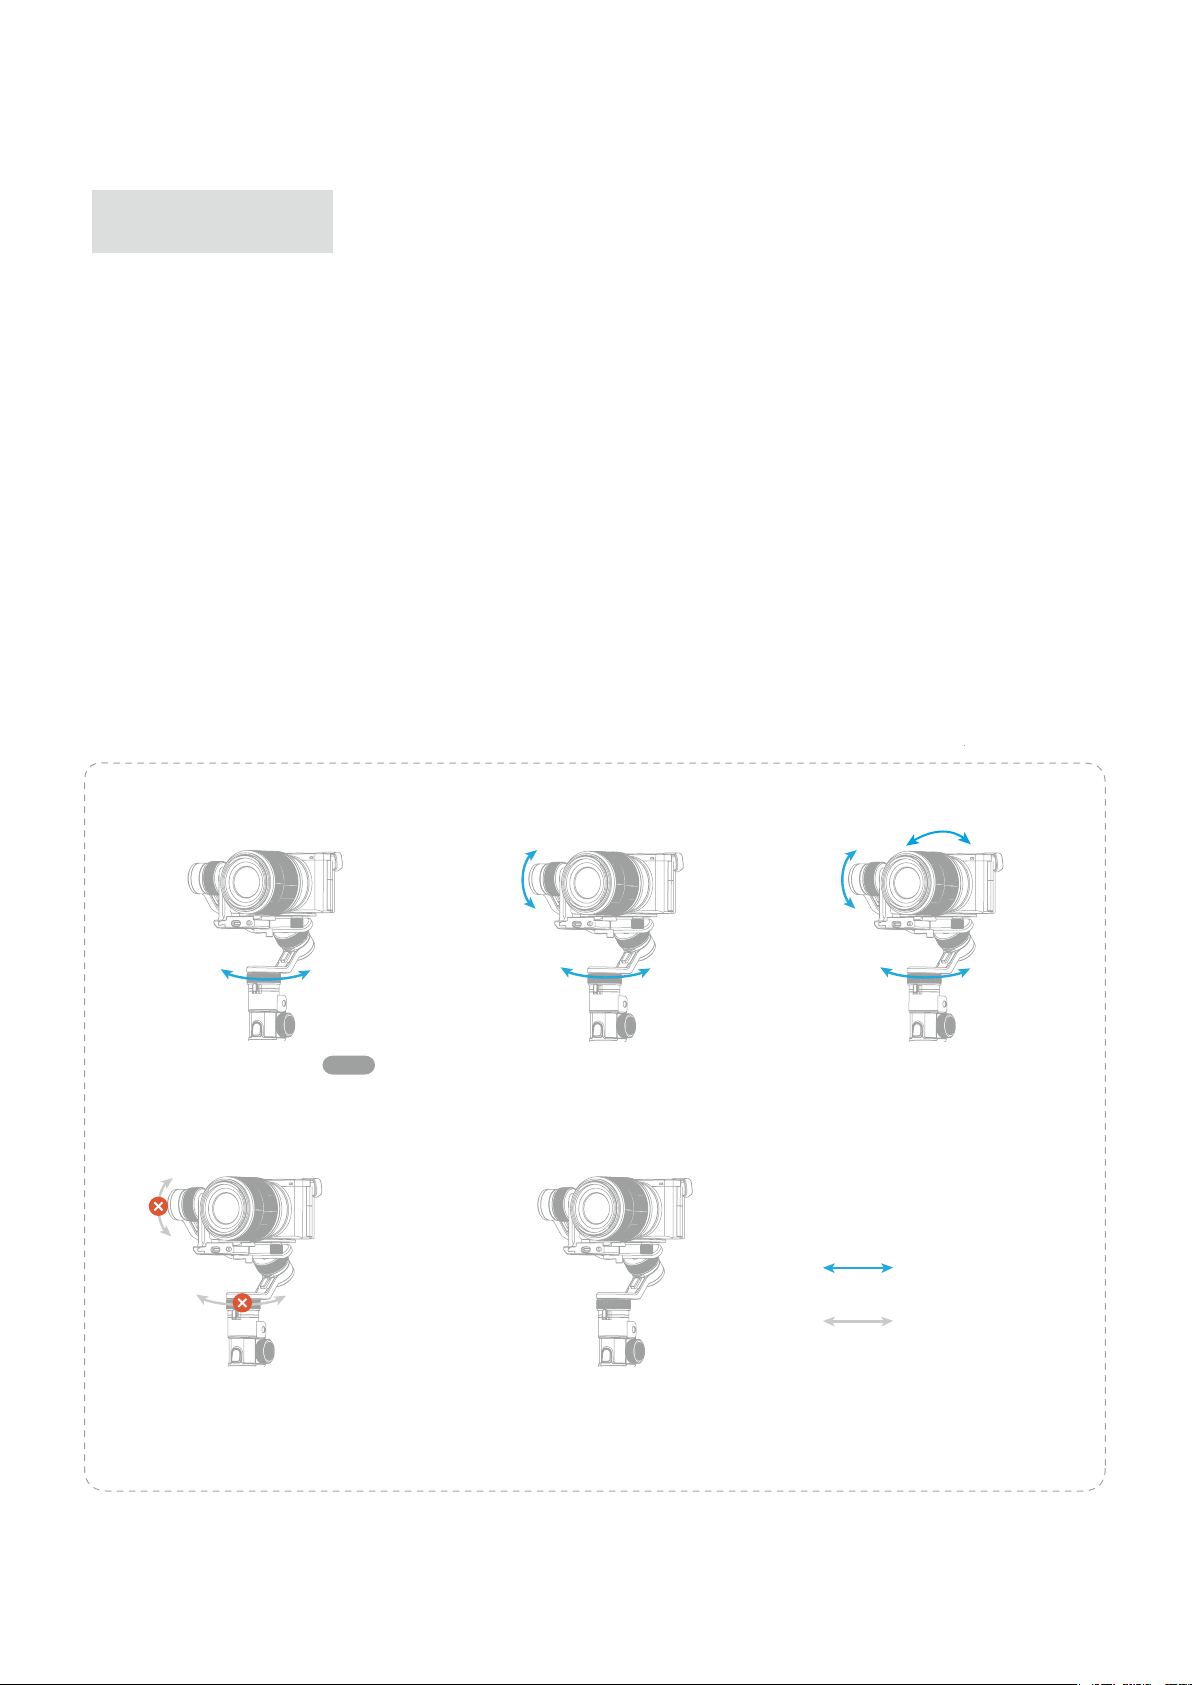
Working mode
Pan Mode (Default mode)
The roll and tilt direction are fixed, and the lens moves according to the left-right movements
of the user's hand.
Follow Mode
The roll direction is fixed, and the lens moves according to the left-right movements, up-down
movements of the user's hand.
All Follow Mode
The lens moves according to the user's hand.
Lock Mode
The orientation of the lens is fixed.
Reset
Return to pan mode, three axis return to default position.
Pan Mode
Default
Follow Mode
All Follow Mode
Follow and rotate
Lock Mode Reset
Lock the position
www.feiyu-tech.cn
08
Touch Screen
Display icon Mode / Status
HF
AF
TF
Pan Mode
All Follow Mode
Follow Mode
Lock ModeLK
Bluetooth is connected
Bluetooth is not connected
WiFi is connected
WiFi is not connected
Timelapse mode
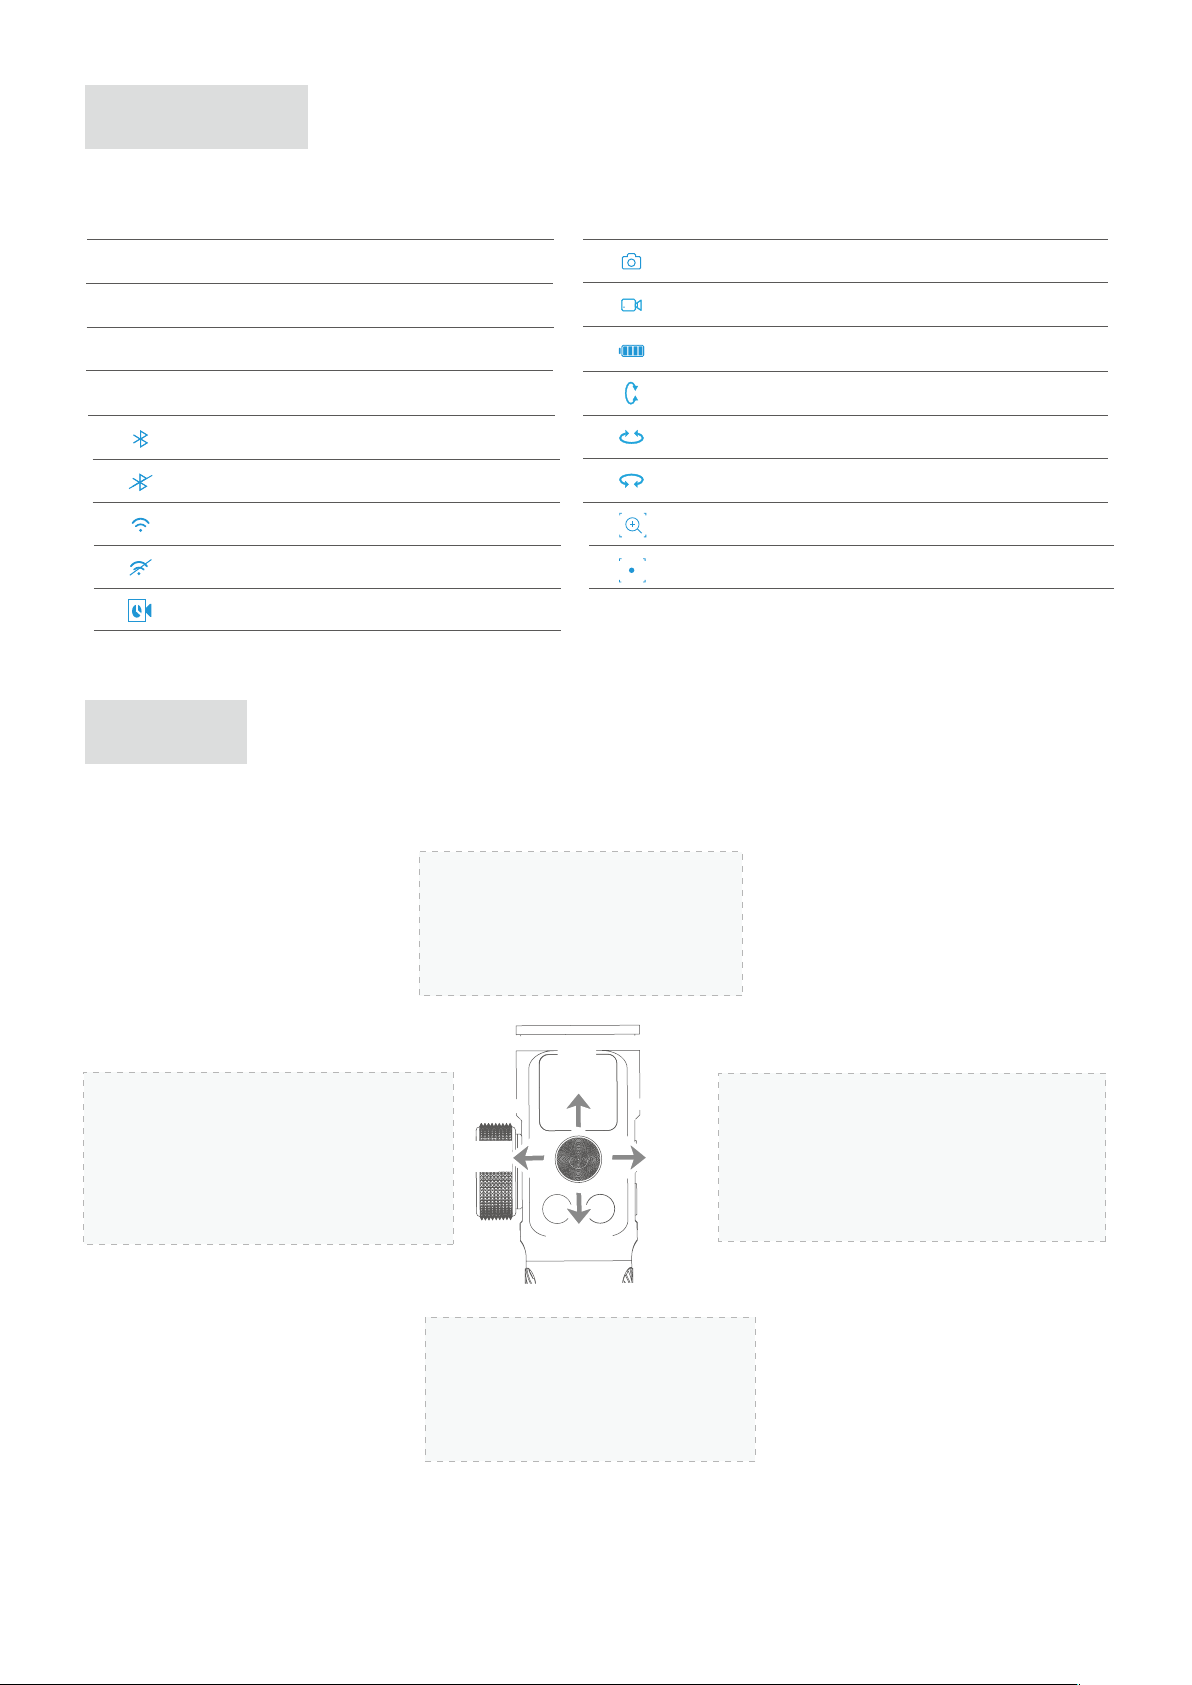
Joystick
Display icon Mode / Status
Photo mode
Video mode
Battery Level
Tilt axis enabled
Pan axis enabled
Roll axis enabled
Zoom
Follow focus
Move to left
(1) Camera lens move to left
(2) Select the option on the left
(3) Cancel
Upward
(1) Camera lens upward
(2) Select the option above
up
left
right
down
Downward
(1) Camera lens downward
(2) Select the option below
Move to right
(1) Camera lens move to right
(2) Select the option on the right
(3) Confirm
www.feiyu-tech.cn
09

Function Button Operation
After connecting to Feiyu ON APP, users can customize the function button
operations of lock/pan/follow/all follow mode.
Single tap Pan/Lock mode
Double tap Follow mode
Triple tap
All Follow Mode
Default
Default
Default
Single tap in pan mode to switch to
lock mode. Single tap in lock mode
to switch to pan mode.
Single tap in follow mode to switch
to pan mode.
Shutter Button
Users can control camera to shoot through shutter button after connecting
gimbal with camera/smartphone via Feiyu ON App or cable.
Press half way
Single tap Photo/video
TIPS: Due to software and hardware improvements, your actual product
might differ from the descriptions and pictures in this user manual. You
can get the latest user manual from the official website.
Focus
In photo/video mode
Function
Button
Shutter
Button
Power Button Operation
Single tap
Long press
swipe from page to page
Power on/off
Single tap to cyclic switch
among 3 pages
Camera Mode Button Operation
Single tap Switch camera mode
Triple tap
Switch front and rear camera
Users can switch front and rear
camera while using Feiyu ON to
shoot after connecting it.
Power
Button
Camera
Mode
Button
www.feiyu-tech.cn
10

Trigger Button Operation
Users can customize the trigger button operations of lock/fast follow/
follow mode via Feiyu ON APP.
Press and hold Fast follow
Double tap
Reset
Default
Press and hold trigger button in pan/
follow mode to enter fast follow mode,
release it to return to previous mode.
Return to pan mode, three axis return to
default position.
Trigger
Button
Triple tap Selfie mode (Pan axis rotate 180° to shoot)
Multifunction Knob Operation Control the current axial rotation / follow focus and zoom
Default to control tilt axis just after powering on the gimbal.
Multifunction
Knob
Single tap
/long press
Single tap
Single tap
Long press
Switch between follow
focus/zoom
Switch among tilt/
roll/pan control
Switch among follow focus/zoom/
current axial rotation
In controlling follow focus
/zoom state
In controlling 3 axis
rotation state.
Rotate
Default
Control
camera
Long press the
multifunction knob
Control
gimbal
Single tap the
Multifunction Knob
Switch among c
ontrollable options
Single tap the
Multifunction Knob
Switch among c
ontrollable options
Display icon
Zoom Zooming control
Follow Focus
* After connecting your camera
See P15 for how to connect camera
Display icon
Pan Control
Roll Control
Tilt Control
Default
*
*
Function description
Follow focus
Function description
Control the pan a
xis rotation
Control the roll axis
rotation
Control the tilt axis
rotation
Rotate to control follow focus, need
camera support to follow focus
Rotate to control zooming,
need camera supporting
Rotate to control pan angle
Rotate to control roll angle
Rotate to control tilt angle
www.feiyu-tech.cn
11

Download and connect App
Feiyu ON
Photo/Video
Slow motion Filter
Video editing
Timer
photography
Face trackingObject tracking
Landscape and
portrait switching
Light tracking
photography
Beauty
Firmware
upgrade
Track time-lapseZooming
Ultra-wide angle
panorama
Overlapping
images
......
Please download Feiyu ON at your smartphone
app store or scan the QR code below.
* Requires iOS 9.0 or later, Android 6.0 or later.
iOS Version Android Version
Connect the App
(1) Turn on the gimbal
(2)Turn on bluetooth and open App, and login (register first if not), then follow prompts to
connect with G6Max. Once the connection is successful, G6Max can be controlled on the App,
including remote direction, switching mode, setting parameters and etc.
5. Advanced Operation
Manual Lock
Manually move camera to desired position, and hold for
half a second to save the new position.
Users can manual lock the tilt axis in pan/follow/lock mode.
Manually move pan axis to desired position, and hold for
half a second. New tilt position are automatically saved.
www.feiyu-tech.cn
12
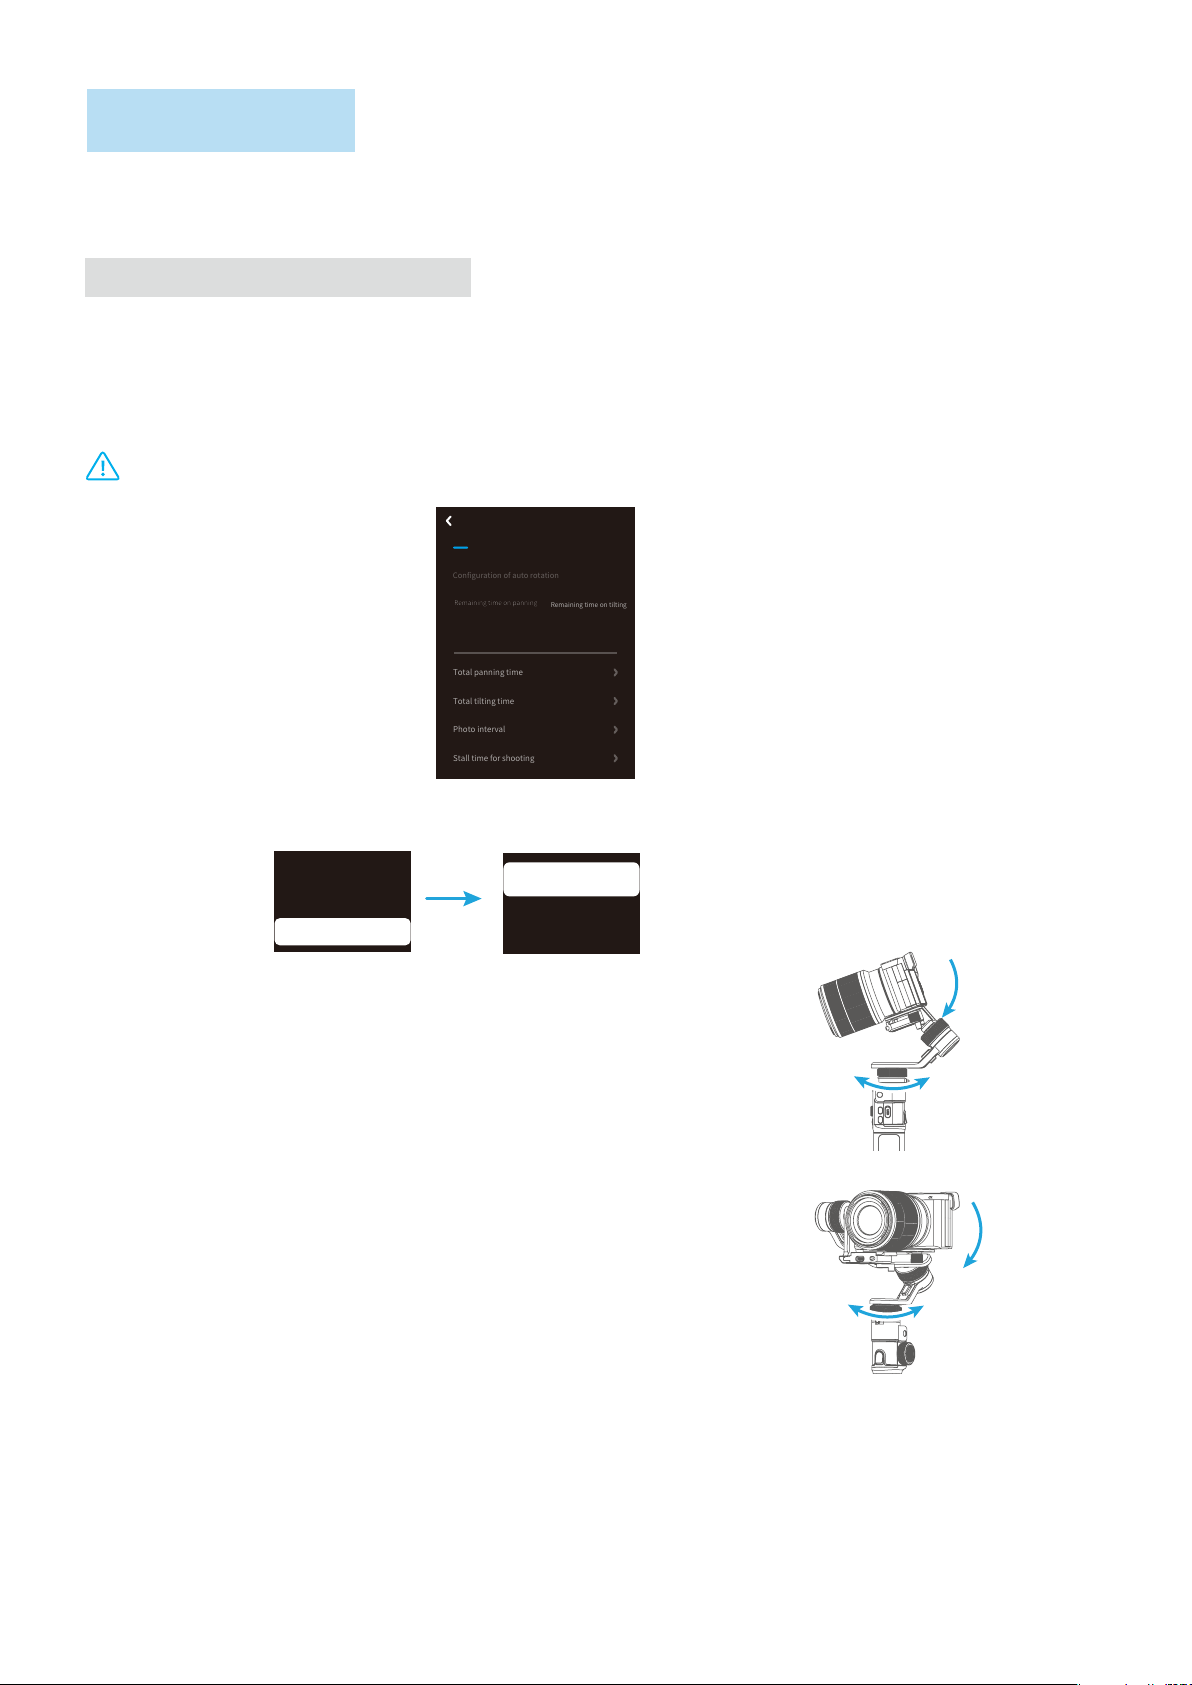
Timelapse mode
Remaining time on tilting
Total tilting time
Photo interval
Stall time for shooting
Remaining time on panning
Total panning time
It is convenient to make gimbal move at a constant speed through timelapse mode. It can be
used to record normal video or timelapse photography.
Set time parameters on Feiyu ON App
Enter the Feiyu ON App to set the timelapse mode parameters.
Enter the parameter setting interface to select the timelapse mode for setting. The time
setting for panning and tilting rotation time must less than 8 hours, and the maximum setting
time for shooting interval is 59 seconds , while the maximum waiting time for shooting is 58
seconds.
Note: The photographing interval setting must be longer than the photographing stop time and
less than the panning rotation time or the tilting rotation time.
Timelapse
Configuration of auto rotation
00:00:00 00:00:00
Save
00:00:00
00:00:00
5
5
( 1 ) Choose the timelapse mode on the screen to enter it.
Inception
Set Route
Portrait
Timelapse
Last Setup
( 2 ) Set rotation start position
Rotate the pan or tilt axis to a start position, hold on for 0.5
seconds, and move the joystick to right to confirm.
( 3 ) Set rotation end position
Rotate the pan or tilt axis to an end position, hold on for 0.5
seconds, and move the joystick to right to confirm.
Pan
Tilt
Pan
Tilt
( 4 ) Start auto rotation movements
Gimbal returns the start position after setting, and then tilt and pan axis will start to rotate
uniformly according to the parameter that has been set.
Repeat the step (2)(3) to start again.
( 5 ) Exit
Double tap the function button to exit the timelapse mode Exit and reset
www.feiyu-tech.cn
13

Inception mode
Single tap Inception Mode on screen, the camera lens will rotate to upward. Holding the gimbal
horizontally, and set rotation direction/speed, rotates one circle or continuous rotating. The
camera will automatically rotate 360 degree to take inception footage with pre-set speed and
direction after setup.
Inception
Portrait
Timelapse
Portrait mode
Hold the gimbal horizontally, select “portrait” on screen to enter portrait shooting.
Turn Right
Turn Left
Continue R
Continue L
Set Speed
Inception
Portrait
Timelapse
Motor setup
Motor Setup
Konb Setup
Cam Setup
Tilt motor
Pan motor
Roll motor
Adaption
www.feiyu-tech.cn
14

Firmware Upgrade
Upgrade the firmware through the Feiyu ON App.
Firmware Upgrade
(1) Click the icon
(2) Select upgrade type.
(3) Follow the prompts to upgrade the firmware.
Upgrade type introductions:
Gimbal update: Repair / update or newly add gimbal
control / function / parameter and etc.
Keyboard update: Repair / update or newly add button/touch
screen/interaction functions, update more compatibility cameras
which can be controlled through WIFI, repair few bugs about
camera control through WIFI, and etc.
Bluetooth firmware update: Repair / update or newly add
Bluetooth functions, update more compatibility cameras, and etc.
How to connect Camera
Latest version:***
Current version:***
Please read the following notices CAREFULLY:
1. Please KEEP your phone screen ON during upgrade
progress.
2. Do NOT leave current App page.
3. The motors will be pow off during upgrade
progress, this is normal case.
4. In case of upgrade failure, the gimbal might be
unfunctionable, please reboot your gimbal and
restart App on your phone, and then perform
upgrade agian util successful upgrade.
5. If upgrade success, please forget/unpaired the
gimbal with your phone in phone settings page,
and reconnect again.
I Known
Start updating
Steps:
Method 1
Connecting the Type C on the gimbal with the camera USB port through shutter cable.
Type C Port
Method 2
(1) Turn on your camera's WiFi (choose 2.4GHz for gopro)
(2) Select the camera connection icon in Feiyu ON's virtual joystick interface .
(3) Choose your camera brand and model.
(4) Choose your camera’s WIFI name, and enter the password.
(5) Wait to connect.
(6) Connection succeed.
If you fail to connect camera, you can try to reboot the gimbal or camera, or follow the steps
above to connect again.
If you cannot connect camera’s WIFI for a long time, please try to turn on WIFI again.
www.feiyu-tech.cn
15
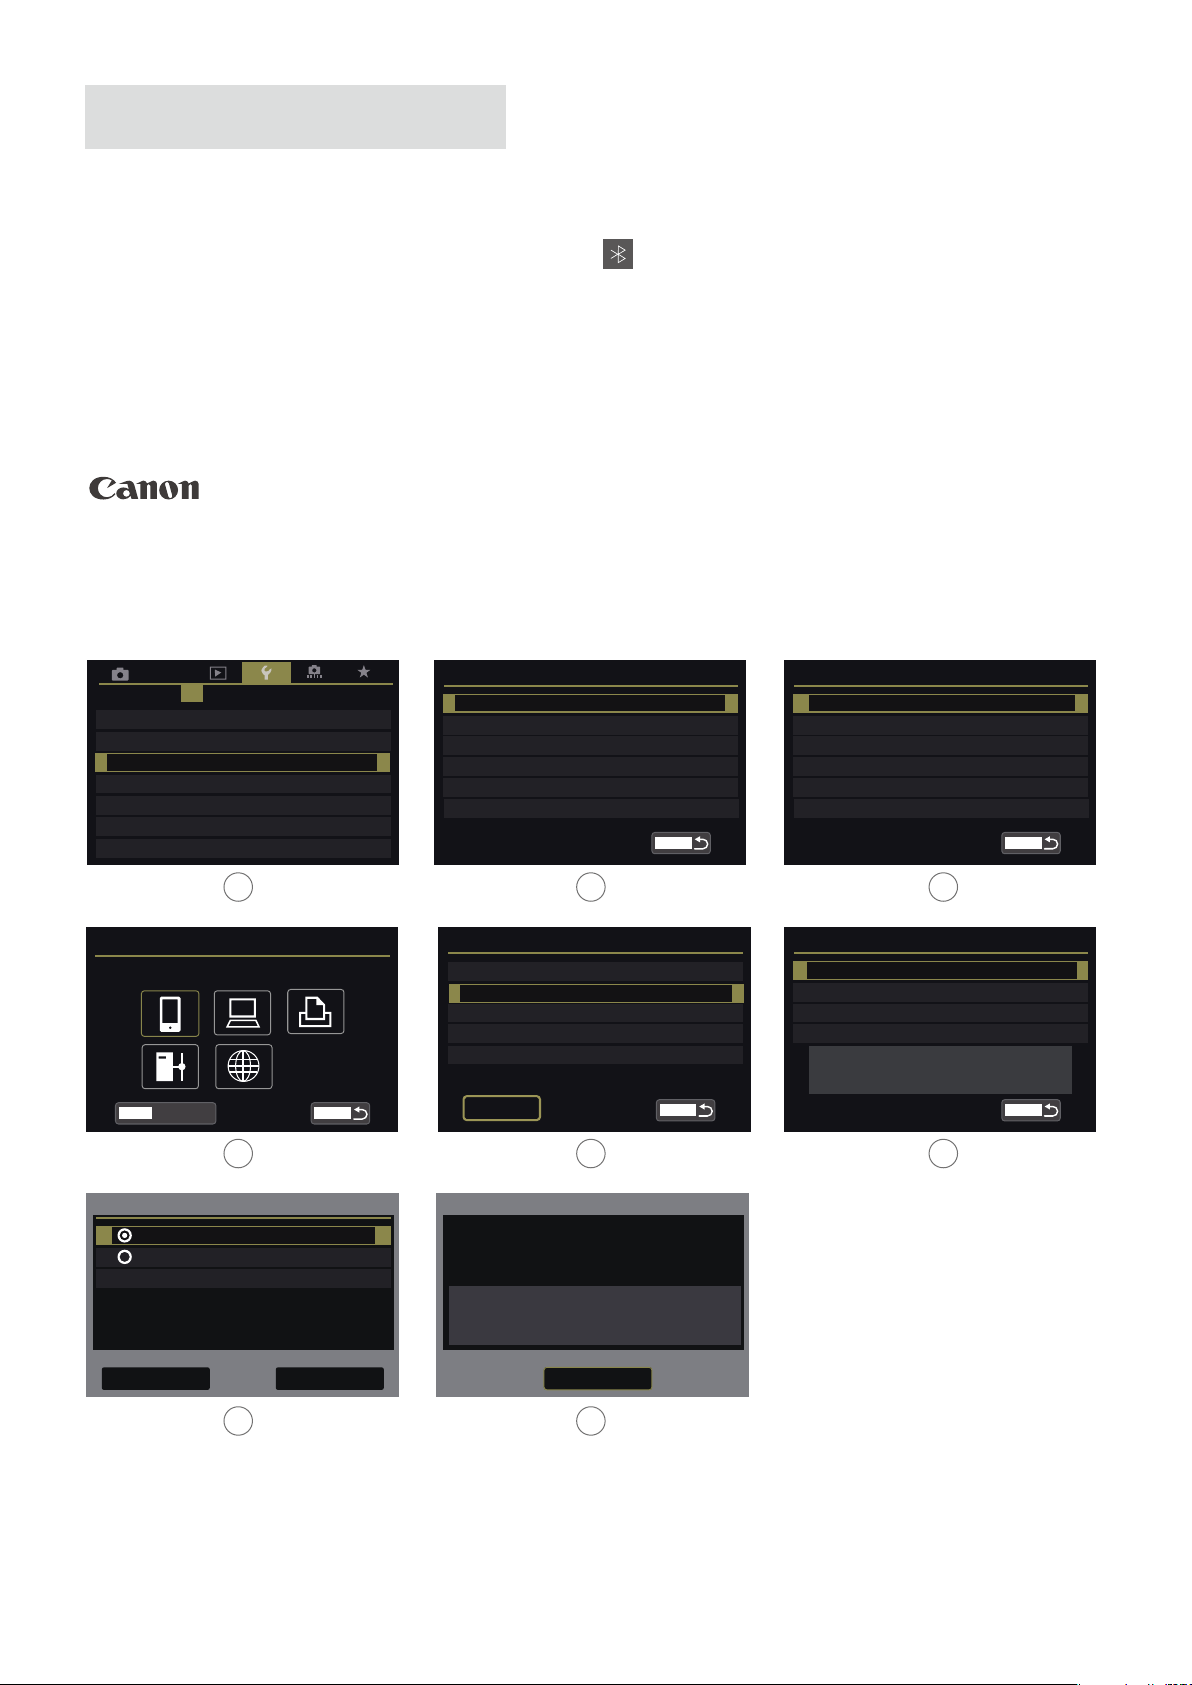
Connect Camera with Wi-Fi
(1) Power on the gimbal.
(2)
Turn on Bluetooth and Feiyu ON App, APP automatically connects to gimbal with the strongest signal of Bluetooth. The Bluetooth icon on display will be lighted after successfully
connected.
(3)
How to Obtain camera’s Wi-Fi name and password.
Steps for different brand cameras:
Tap "MENU" button , finding "communication setting" , find "Built-in wireless setting" - "Wi/Fi
function" - "connect to smart phone" - "review/change setting" - "change set" -"easy connection", click "OK" get Wi-Fi name and password.
AF
1 2 3 54
HDMI frame rate AUTO
GPS settings
Communication settings
1 2 3
Wi-Fi function
Connect to smartphone
View info
MENUINFO.
4 5 6
Connection method
Easy connection
Select a network
Connect the camera directly to
the device
SET UP4
Communication settings
Built-in wireless settings
FTP transfer settings
MENU
Connect to smartphone
SET1Choose set
Review/change settings
Delete settings
Connect
Waiting to connect
Connect device to camera using
network settings below and then
start Cannon app/software
SSID
Encryption key
将相机直接连接到
xxxxxx-xxx_Canonxx
设备
MENU
12345678
Built-in wireless settings
Wi-Fi/NFC Enable
Wi-Fi function
Send images to smartphone
Nickname
Clear settings
Review/change settings
Change set.
Change settings name
Viewable imgs
Confirm set.
Viewable imgs
E0S5D4
All images
MENU
MENU
Cancel
OK
Cancel
7 8
www.feiyu-tech.cn
16

Camera :SONY a6300,A7S II, A7 etc.
Gain Wi-Fi name and password at "smart remote embedded" in the Application list.
Smart Remote Embedded
Operate smartphone to connect to
this divice via Wi-Fi
SSID: XXXXXX-XXXX:XXXX-XXXX
Password: 12345678
Device Name: ILCE-XXXX
Application List
Introduction
Application
1
MENU
PlayMemories
Camera Apps
Application
Management
Select
Smart Remote
Embedded
Enter
MENU
1 2 3
Latest Camera :Sony a6400,A7R III
Tap MENU button, find "smart cellphone control" connecting with password.
1 2
Send to Smartphone Fun
Send to Computer
View on TV
Ctrl w/ Smartphone
Airplane Mode
Wi-Fi Settings
Network1 1/2 .
1 2 3
Ctrl w/ Smartphone
1
Ctrl w/ Smartphone
Connection
Off
MENU
?
Always be connected
On
On
MENU
?
Connection Information
Operate smartphone to connect to
this device via Wi-Fi.
SSID:XXXXXX-XXXX:ILCE-6400
Password: 12345678
Device Name: ILCE-6400
Connect via QR Code
Wi-Fi
MENU
Exit App.
Wi-Fi
MENU
Select "setup" under "Wi-Fi", find "Wi-Fi function" - "New/Connection" - "remote shooting
& view" obtain Wi-Fi name and password.
Setup
Clock Set
World Time
c
Travel Date
Wi-Fi
Beep
1 2
Select a function
Remote Shooting & View
Playback on TV
Send Images While Recording
Send Images Stored in the Camera
4 5
1/6
Wi-Fi
Wi-Fi Fuction
Wi-Fi Setup
Please set on your smartphone
Please scan the QR code using "Image App",
or enter the password into Wi-Fi settings
SSID:GH4-35E9A7MJT
Password: afcc2de35e9a7
DISP.Change method
QR Cord
Wi-Fi
New Connection
Select a destination from History
Select a destination from Favorite
3
www.feiyu-tech.cn
17

(4) Switch on Feiyu ON App , select the camera connection icon in the virtual
joystick interface, select corresponding camera brand and camera you used, choose
right camera Wi-Fi name and input password.
Remote Control
FY_G6Max_xx
Connect Camera
Waiting for 5~10 seconds, After the connection is successful, the camera interface will display corresponding
tips and changes.(Canon camera is needed to tap "confirm"), And automatically return to the main shooting
interface, the camera icon on gimbal's touching
screen light up at same time, connection is done. You
can exit APP after connected.
Connect camera Wi-Fi again
After the first successful connection to the camera Wi-Fi, gimal will remember the camera's Wi-Fi and password. To connect the previous camera again, simply open the camera's Wi-Fi connection interface and the gimbal will automatically establish the connection. When the camera icon of the gimbal on touch screen lights up, the camera can
be controlled.
Fail to connect Camera
In the APP interface, selected wrong camera Wi-Fi name, the Wi-Fi password input error
(not distinguishing between upper and lower case letters), and the gimbal Wi-Fi is occupied, which may fail to connect and control the camera.
Please confirm the Wi-Fi name and password are entered correctly. If the connection is
failed again, it is recommended to disconnect the Wi-Fi connection and reconnect again.
www.feiyu-tech.cn
18

Gimbal Initialization
You can initialize your gimbal when
(1) When camera is not balance.
(2) If not use for a long period of time.
(3) In case of extreme temperature variations.
STEPS
(1) Select Calibration on the display by joystick to enter the gimbal initialization.
Motor Setup
Initialize
Konb Setup
Cam Setup
(2) Place the gimbal on the table, and the gimbal automatically initializes. If the touch screen
prompts that the calibration is successful, the initialization ends, otherwise the initialization fails.
(3) After the initialization is successful, single tap the function button to wake up and return to last page.
Note: If the initialization is not successful for a long time, please single tap function button to wake
up and initialize again.
Language
Horizontal Plane
Accessories Introduction
Tripod
www.feiyu-tech.cn
19

6. Specifications
143.6mm
114.03mm
299.41mm
Specifications
Max. Tilt Range 280°
Max. Roll Range
Max. Pan Range 360°
Theoretical Battery Life 9 Hours
Net weight 665g ( not including camera、lens and other accessories )
Payload Capability 1200g
Compatible Cameras
for Reference
330°
(After balancing )
Sony RX100 / Sony a6300 (16-50 or 28-70mm) / Sony a6500
(16-50 or 28-70mm) / Canon M50, ect.
Sony RX0 / GoPro HERO series sports cameras
Fit for smartphone with smartphone adapter(Optional accessory)
www.feiyu-tech.cn
20

Compatible Cameras for Reference
Brand
Canon
Model
Canon EOS M50
Canon EOS RP
Canon G7X MarkIII
Canon 200D
Sony RX0
Sony RX100Ⅳ
Sony RX100 V
Sony RX100 VI
Sony a6300+16-50
Sony a6500+28-70
Sony
Sony a6000
Sony a5100
sony AS50
SONY X3000
sony QX1
sony RX1RⅡ
Sony a6400+24-70
Sony DSC-HX90
SonyDSC-WX500
Sony RX100M5A
Sony HDR-AS50R
Sony FDR-X3000R
Sony SJ cam
Sony RICCA
www.feiyu-tech.cn
21

Brand
Model
Sony α7sII/7SM2
Sony
Panasonic
Sony α7RII
Sony α9
Panasonic DC-GF9KGK
Panasonic ZS70
Panasonic ZS220
Panasonic GX9K+12-32
Panasonic GF10K+12-32
Panasonic DMC-ZS110
Panasonic GH3
Panasonic GH4
Panasonic GF9X
SJcam
RICCA
GoPro
YI
Panasonic LX10
Panasonic LX100
Panasonic DMC-GX85
SJcam SJ6 LEGEND
RICCA
gopro 5/6/7
YI 4K
*Tips: The camera needs to be close to the tilting motor.
www.feiyu-tech.cn
22

Disclaimer
Thanks for using Feiyu Gimbal. The information in this document affects your safety and your legal rights and responsibilities. Read the entire document carefully to ensure proper configuration before use, Failure to read and follow
instructions and warnings in this document may result in serious injury to yourself or others, or damage to your products or damage to other objects in the vicinity.
By using this product, you hereby signify that you have read this disclaimer and warning carefully and that you understand and agree to abide by the terms and conditions herein. You agree that you are solely responsible for your own
conduct while using this product, and for any consequences thereof. You agree to use this product only for purposes
that are proper and in accordance with all applicable laws, rules, and regulations, and all terms, precautions, practices,
policies and guideline FeiyuTech has made and may make available. FeiyuTech accepts no liability for damage, injury
or any legal responsibility incurred directly or indirectly from the use of product.
FeiyuTech will not provide any service for any product obtained from abnormal channels.
Notice
1.
Make sure motor spinning is not blocked by external force when gimbal is power on.
2.
Gimbal DO NOT contact water or other liquid if the gimbal is not mark waterproof or splash-proof. Waterproof and
splash-proof product DO NOT contact sea water or other corrosive liquid.
3.
DO NOT disassembly the gimbal except is detachable available. It need send to FeiyuTech after-sales or authorized
service center to fix it if you accidently disassembly and cause abnormal work. The relevant costs are borne by user.
4.
Prolonged continuous operation may cause the motor surface temperature to rise, please operate carefully.
Storage and Maintenance
Keep the gimbal and battery out of the reach of children and pets.
1.
2.
DO NOT leave the gimbal and battery near heat sources such as a furnace or heater. DO NOT leave the gimbal and
battery inside of a vehicle on hot days.
3.
Please storage the battery in dry environment.
4.
DO NOT overcharge or overuse the battery, otherwise it will cause damage to the battery core.
5. Never use the gimbal and battery when the temperature is too high or too low.
Official Social Media
Website Facebook Youtube Twitter Instagram
Facebook: www.facebook.com/feiyutech
YouTube Channel: www.youtube.com/c/Feiyu-tech
Twitter: www.twitter.com/feiyutech
Instagram: www.instagram.com/FeiyuTech
YouTube Channel: www.youtube.com/c/Feiyu-tech
Online Store: store.feiyu-tech.com

Guilin Feiyu Technology Incorporated Company
For more information, please visit our official website
E-mail: service@feiyu-tech.com Tel: +86 773 2320865
Due to software and hardware improvements, your actual product might differ from the descriptions
and pictures in this user manual. You can get the latest user manual from the official website.
www.feiyu-tech.com
 Loading...