


3-Axis Stabilized Handheld Gimbal for Camera
Instructions
Guilin Feiyu Technology Incorporated Company
V2.0E NUser Manual

Catalogue
1.Product Overview
2.Installation
2.1Battery Charging
2.2Battery Installation
2.3Camera Installation
3.Gimbal Balancing
3.1Balance Adjustment of the Tilting Axis
3.2Balance Adjustment of the Rolling Axis
3.3Balance Adjustment of the Panning Axis
4.AK2000 Function / Operation
4.1Handle - Function / Operation
1
2
2
2
3
4
4
6
7
8
8
4.2Function
5.App - Download and Connecting
5.1Download and Install Feiyu ON App
5.2Connecting App
6.Advanced Operation
6.1Gimbal Initialization
6.2Firmware Upgrade
7.Parameters
8.Compatible Cameras for Reference
13
16
16
16
17
17
18
19
20
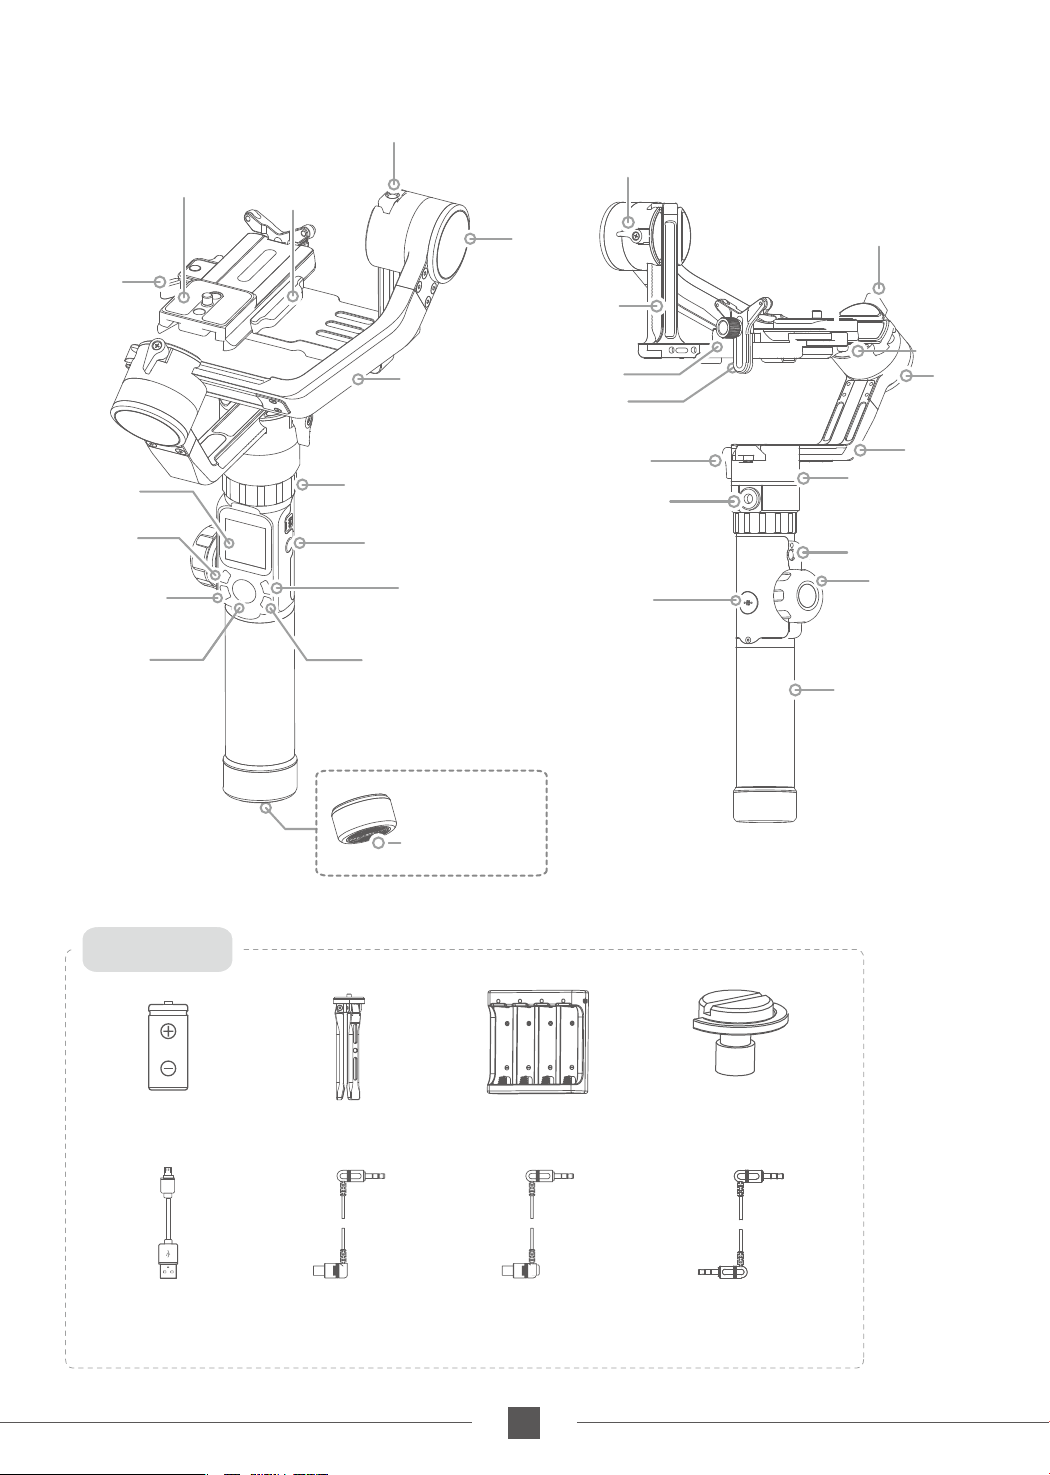
1.Product Overview
1/4 Inch Thread Hole
Quick Release Plate
Safety
Lock
Touch Screen
Mode Button
Capturing Button
Fixed Plate
Cross Arm
Retaining Ring
Function Button
Power Button
Recording ButtonJoystick
Tilt Lock Screw
Tilt Axis
Sliding Arm
Screw
Lens Support Frame
Pan Lock Screw
1/4 Inch Thread Hole
Shortcut
Button
Roll Lock Screw
anti-column
Roll Axis
Vertical Arm
Pan Axis Knob Ring
1/4 Inch Thread Hole
Multifunction
Knob
Handle
Accessories
18650 Li-ion Battery
X4
Micro USB Cable
X1
Tripod
X1
Sony Control Cable
(3.5 audio to multi)
X1
1/4 Inch Thread Hole
Charger
Canon Control Cable
(RS-80N3)
Thumb Screw
X1
X1
(Short)
X1
Panasonic Control Cable
(Shift audio 3.5 to 2.5)
X1
1
www.feiyu-tech.com
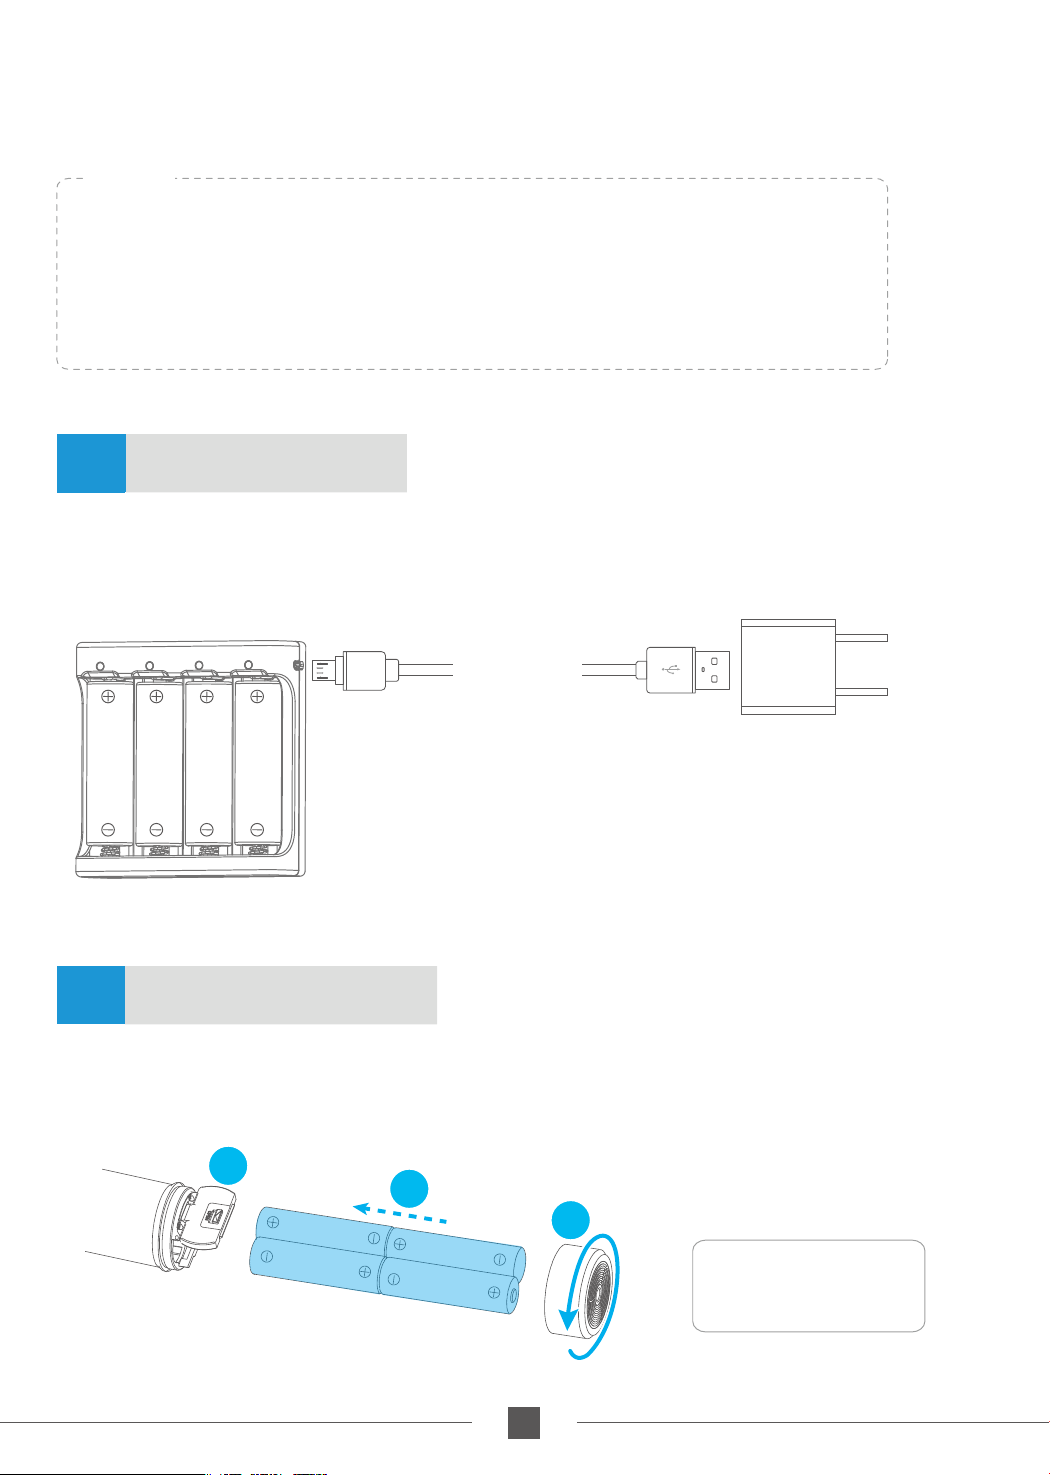
2.Installation
TIPS
(1) Please mount the camera before powering on the gimbal.
(2) When the battery is low, please charge the gimbal.
(3) When not in use, turn off the gimbal and then remove the batteries.
Battery Charging2.1
Please fully charge the batteries before powering on the gimbal for the first time.
Charge the batteries with the charger.
Micro USB
Cable
(not included)
5V / 3A
2.2
Remove the tail cap, open the batteries compartment, and install the batteries correctly.
Battery Installation
2
3
1
Battery Model:
18650 Li-ion Battery
2
www.feiyu-tech.com
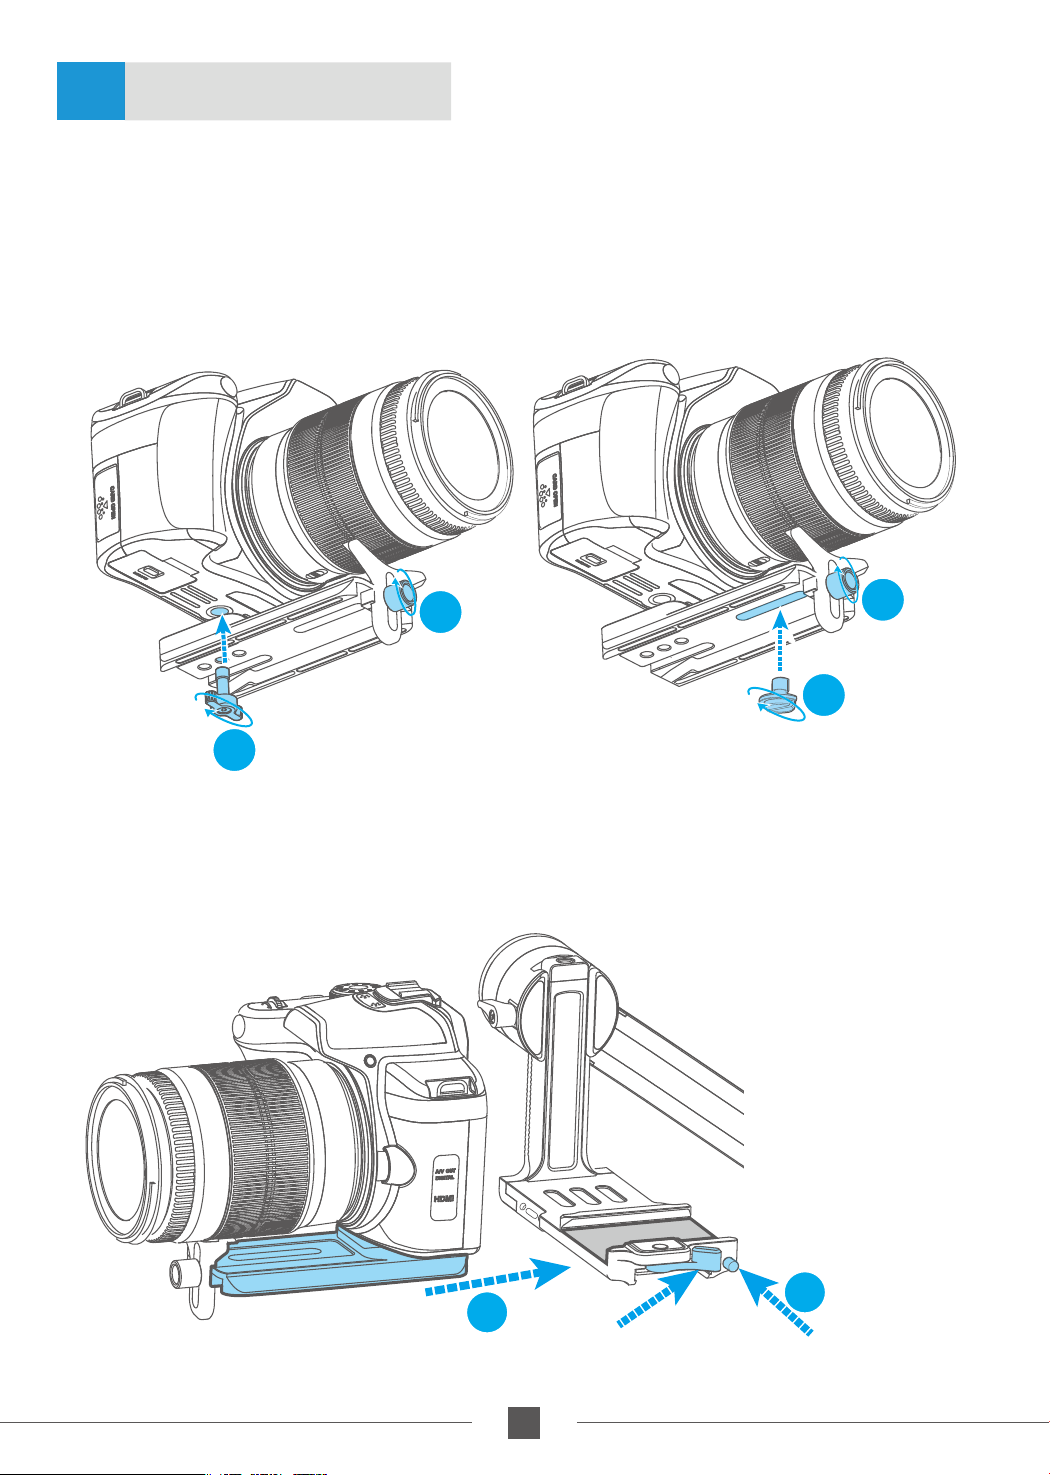
2.3
1. Lock the lens support frame with the screw to the quick release plate;
2. Use the thumb screw to lock the camera from the bottom slot of the quick release
plate, and slightly adjust the lens support frame after locking the camera;
(Select the long/short thumb screw according to the position of the camera to be
mounted on the quick release plate)
Camera Installation
1
1
2
Thumb Screw
2
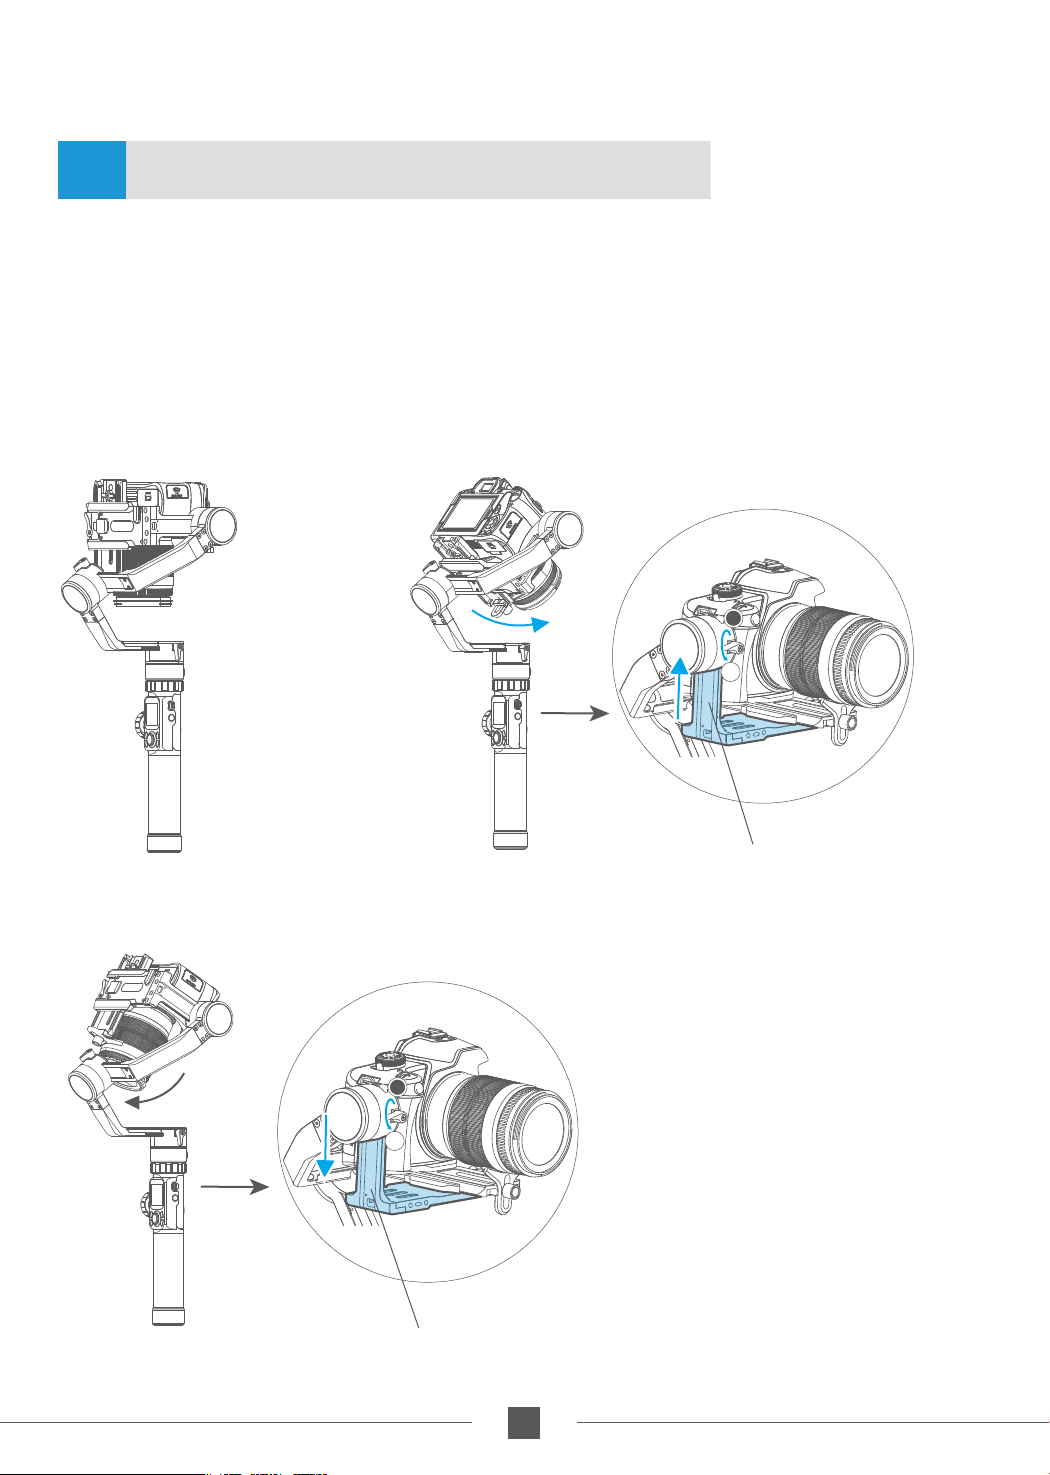
3. Press and hold the anti-column;
4. Place the quick release plate on the fixed plate, loosen the anti-column and tighten
the safety lock.
(Long)
Thumb Screw
(Short)
4
Safety Lock
3
3
Anti-column
www.feiyu-tech.com
3.Gimbal Balancing
3.1
Balance Adjustment of the Tilting Axis
Adjust the center of gravity of the camera in two steps to the axis of rotation of the tilting
axis.
Adjust the center of gravity position of the tilting axis up and down: point the camera
(1)
lens down, adjust cross arm to maintain the level, as shown in figure ①, let go and
observe the state of rotation. Adjust the balance via adjust the sliding arm up and
down (refer to figure ② ③).
* After adjustment, be sure to tighten the lock screw.
T
L
Normal
①
T=Tight
L=Loose
Camera forward Slide up to adjust
②
T
L
T=Tight
L=Loose
Silde down to adjustCamera backward
③
44
www.feiyu-tech.com
www.feiyu-tech.com
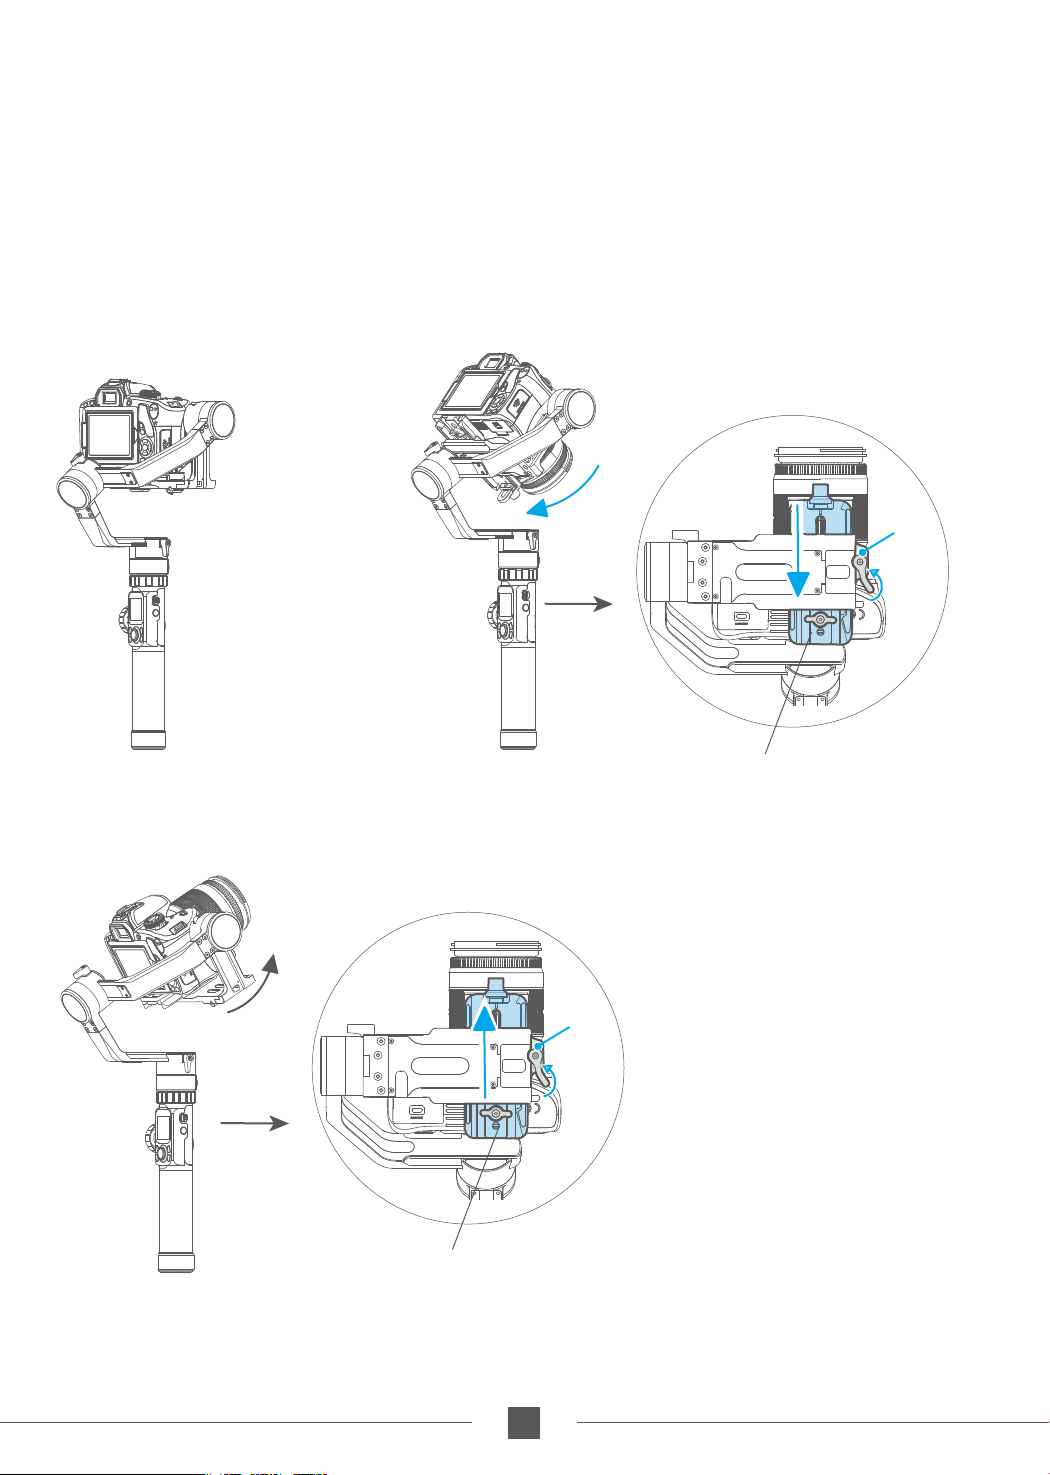
Adjust the center of gravity position of the tilting axis forward and backward: point
(2)
the camera lens horizontal forward, adjust cross arm to maintain the level as shown
in figure ①,let go and observe the state of rotation.
Loosen the safety lock on the right side of the camera, and adjust the balance by
sliding up and down the quick release plate on the bottom of the camera (refer to
Figure ② ③).
*Be sure to fasten the safety lock after adjustment.
Safety
Lock
Balanced
①
Camera backward
Camera forward
Safety
Lock
Slide the adjustment
skateboard up to adjust
③
Slide the adjustment
skateboard down to adjust
②
5
www.feiyu-tech.com
Balance Adjustment of the Rolling Axis3.2
When the balance adjustment of tilting axis completed, the balance of the rolling axis
can be adjusted:keep the gimbal socket connector vertical to the ground with the hand
-held control handle as shown in figure ①, leave the gimbal powered off and observe the
balance. Loosen the lock screw and slide the cross arm left and right to adjust the roll
(refer to figure ② ③).
* After adjustment, be sure to tighten the lock screw.
T=Tight
L=Loose
T
L
Balanced
①
Camera leftward
Camera rightward
T=Tight
L=Loose
T
L
Slide the cross
arm right to adjust
Slide the cross
arm left to adjust
②
③
46
www.feiyu-tech.com

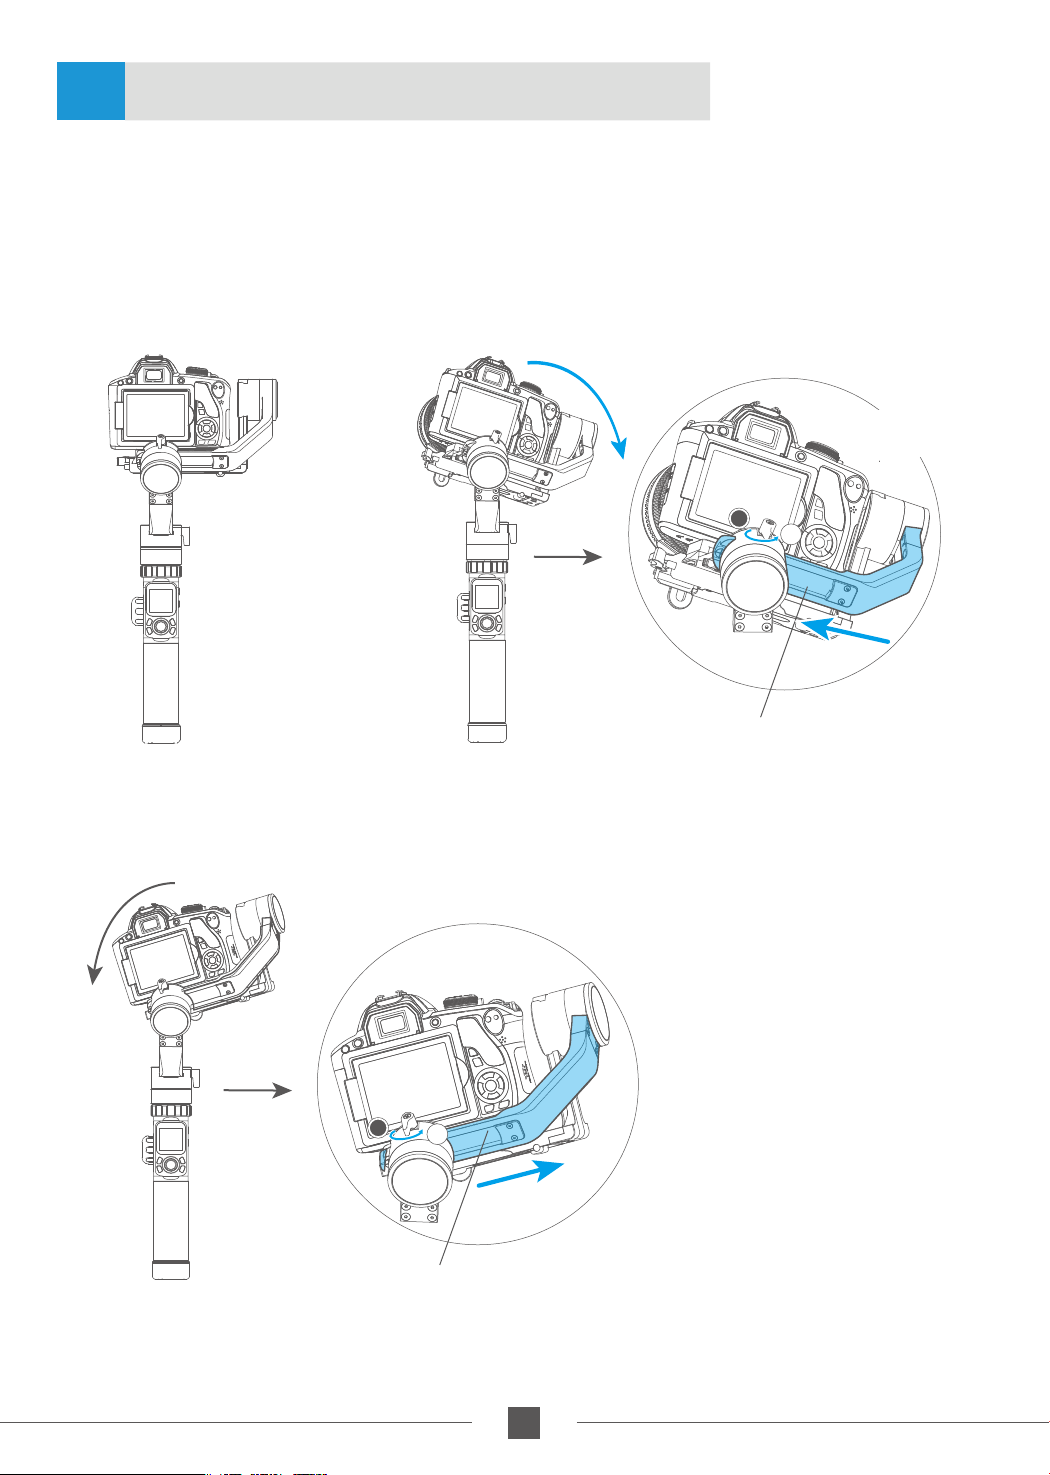
Balance Adjustment of the Panning Axis3.3
When the balance adjustment of tilting axis and rolling axis is completed, the balance
of the panning axis can be adjusted. Keep the gimbal socket connector in the horizontal
position,adjust hand-held panning axis as shown in figure ①,let go and observe the state
of rotation.
Loosen the lock screw on the panning and slide the vertical arm forward and backward
to adjust (refer to figure ② ③).
* After adjustment, be sure to tighten the lock screw.
Horizontal ground
①
T=Tight
L=Loose
T
Slide the vertical arm
backward to adjust
The lens is down The lens is up
T=Tight
L=Loose
T
L
L
Slide the vertical arm
forward to adjust
②
③
7
www.feiyu-tech.com

4.AK2000 Function / Operation
Handle - Function / Operation4.1
1.Touch Screen
* Click the option to switch or select the function mode, and slide the screen to the left or right to switch
the page.
Single tap the power button in the panning follow mode to enter the panning follow
mode and rolling follow (rolling follow angle ≤ 60°).
Single tap the power button in the follow mode to enter the follow mode and rolling
follow (rolling follow angle ≤ 60°).
Single tap the power button in the lock mode to enter the lock mode and rolling follow
(rolling follow angle ≤ 60°).
Long press or lock functions of multifunction knob, single press the
multifunction knob / or to restore the functions
Screen interface
Display icon
I S O
AUTO
2.3
2.0
1.7
1.3
Mode / Status
WiFi is connected
WiFi is not connect
Bluetooth is connected
Bluetooth is not connect
Battery Level
Camera mode
Camera is not connect
Zoom status
80
100
125
AWB
K
Payload
Setting
Rotation
Time
Scroll
Setting
Display icon Mode / Status
HF
TF Follow Mode
AF
LK
HF-R
TF-R
LK-R
Panning Mode
All follow mode
Lock Mode
Panning Mode + Rolling follow
Follow Mode + Rolling follow
Lock Mode + Rolling follow
Tilt Axis
Capture
Mode
Auto
Rotation
Settings
Follow focus status
Roll Axis
Pan Axis
8
www.feiyu-tech.com

Screen Interface
The load setting is performed according to the camera.
Payload
Capture
Setting
Mode
Auto
Rotation
Rotation
Time
Scroll
Settings
Setting
Select the corresponding scene mode according to the shooting scene.
Payload
Capture
Setting
Mode
Auto
Rotation
Rotation
Time
Scroll
Settings
Setting
The maximum time setting of PAN and TILT is less than 8 hours, and the maximum time setting of INVL
and DWELL is 59 seconds.
Please refer to the chapter "Auto-rotation Mode" in page 14
Payload
Capture
Setting
Mode
Auto
Rotation
Rotation
Time
Scroll
Settings
Setting
Click on the
touch-screen
Slide the touchscreen interface
to the right
Click on the
touch-screen
Slide the touchscreen interface
to the right
*
PAN/TILT>INVL>DWELL
Click on the
touch-screen
Slide the touchscreen interface
to the right
0-300 g
300-600 g
600-1000g
1000-1500g
Default
Smooth
Action
P A N
00:00:00
T I L T
00:00:00
I N V L
00:00:00
DWELL
00:00:00
Slide the touch-
1500-2500g
screen interface
up and down
Auto-adapt
Pull the fourdirectional joystick
up anddown to increase
and decrease the time
Touch the screen
to select and
change the options
>2500g
Custom 1
P A N
T I L T
I N V L
DWELL
Custom 2
Custom 3
07:59:59
07:59:59
00:00:59
00:00:58
Enter auto-rotation mode
Payload
Setting
Rotation
Time
Scroll
Setting
Capture
Mode
Auto
Rotation
Settings
Click on the
touch-screen
Slide the touchscreen interface
to the right
procedure 1
Initial
point
setting
ESCO K
The higher the sensitivity setting, the faster the response of control PTZ/camera
Payload
Setting
Rotation
Time
Scroll
Setting
Capture
Mode
Auto
Rotation
Settings
Click on the
touch-screen
Slide the touchscreen interface
to the right
Sensitivity
Camera ctrl
Pull the fourdirectional
joystick up
and down or
left and right
to select options
Gimbal
Camera
Sensitivity
Settings
Payload
Setting
Rotation
Time
Scroll
Setting
Capture
Mode
Auto
Rotation
Settings
Click on the
touch-screen
Slide the touchscreen interface
to the right
Calibration
Language
WL W/T&F/F
AKFI
AKFII
Camera ctrl
9
www.feiyu-tech.com

2.Mode Button
Note: The firmware upgrade may occur manual operation function and the actual product features do not match.
Please find the latest manual on the official website.
Single click
Double click
Triple click
Panning Mode /
Lock Mode
Follow mode
All follow mode
3.Power Button
Long time
press
Single tap
Triple tap
Power on /
Power off
Rolling follow mode
Rotate 180° in
horizontal
Single tap to switch between panning
mode and lock mode
Under follow mode, single tap to switch to
panning mode
Enter all follow mode
Long time press the power button, and
release it when the display show
Angle limit 60 °
The roll and tilt direction are fixed, the
pan direction rotate 180 °
Mode Button
Power
Button
4.Capturing Button
Manual
capturing
Self-timer
Single click the camera button to focus and single tap again within 3 seconds to take photos. When
there is no operation within 3 seconds after clicking for focus, the focus state shall be cleared.
* Need to connect to the camera shutter cable or connect to the camera WiFi.
Press and hold the camera button, the gimbal will make a “beep” sound and enter the automatic
continuous shooting mode; it shoots once for every 5 seconds by default. Single tap the camera
button to exit the automatic continuous shooting mode (you can enter the Feiyu On App to set the
continuous shooting interval).
* Need to connect to the camera shutter cable.
Capturing Button
10
www.feiyu-tech.com

5.Recording Button
* Need to connect to the shutter release cable or the camera WiFi
(for Camera with WiFi function).
Single tap
Start shooting / Stop shooting
6.Shortcut button
Long time
press
Double tap Reset
Fast follow mode
7.Joystick
Video
Button
Long time press the shortcut button,
enter the fast follow mode.
Double tap the shortcut button,
return to panning mode, tilt,roll
and pan axis return to initial level.
shortcut button
Move to left
(1) Camera lens move to left
(2) Select the option on the left
Upward
(1) Camera lens upward
(2) Select the option above
Move to right
(1) Camera lens move to right
(2) Select the option on the right
Joystick
Downward
(1) Camera lens downward
(2) Select the option below
11
www.feiyu-tech.com

8.Function Button
Single tap
On other interfaces, single tap the function button to return
to the main interface.
Single tap the function key on the main interface to enter the
locked/unlocked state.
Return / Lock / Unlock
9. Multifunction Knob
Rotate
Long time
press
Single tap Switch adjustment option
Control the current axial rotation /
follow focus and zoom
Switch between the follow focus &
zoom options and the axial options
Single tap /
Long time press
Display
Function Button
Rotate
Multifunction Knob
Introduction
Control Follow
Control Follow
focus or Zoom
focus or Zoom
Long time press the
multifunction knob
Control the
Control the
axis direction
axis direction
Single tap
Switch adjustment option
Single tap
Switch adjustment option
Default
* After connecting your camera
Please refer to the chapter "Connecting to camera" in page 16
Display
Default
Zooming control
Follow focus
Introduction
Control the tilt axis rotation
Control the roll axis rotation
Control the pan axis rotation
Camera supports
zooming control
Camera supports
follow focus
12
www.feiyu-tech.com

Function4.2
Modes
Panning Mode(Default mode)
The roll and tilt direction are fixed, and the camera moves according to the left-right movements
of the user's hand.
Follow Mode
The roll direction is fixed, and the camera moves according to the left-right movements, updown movements of the user's hand.
Rolling Follow Mode
The pan and tilt direction are fixed, and the camera moves according to the left-right
movements of the user's hand.
All Follow Mode
The camera moves according to the user's hand.
Lock Mode
The orientation of the camera is fixed.
Reset
Return to panning mode, three axises return to default position.
Manual Lock
Manually move camera to desired position,and hold for half a second. New tilt and/or
pan positions are automatically saved.
(Camera can be manually positioned while in panning mode ,follow mode or lock mode.)
Take the tilt axis setting for example:
13
www.feiyu-tech.com

Auto-rotation Mode
Auto-rotation Mode Parameter Setting
Method 1. Enter the Feiyu ON App to set the auto-rotation mode parameters.
Enter the parameter setting interface to select the auto-rotation mode for setting. The maximum
time setting for panning and tilting rotation time is less than 8 hours, and the maximum setting
time for photographing stop time and photographing interval is 59 seconds.
(Note: The photographing interval setting must be greater than the photographing stop time and
less than the panning rotation time or the tilting rotation time.)
Method 2. Set the auto-rotation mode parameters by entering the rotation time
interface through the display screen.
Adjust and control the options via the touch screen or by pulling the four-directional joystick up
and down or left and right
P A N
T I L T
I N V L
DWELL
00:00:00
00:00:00
00:00:00
00:00:00
Minimum time
setting
0 0 : 0 0 : 0 0
0 0 : 0 0 : 0 0
0 0 : 0 0 : 0 0
0 0 : 0 0 : 0 0
Maximum time
setting
0 7 : 59 : 59
0 7 : 59 : 59
0 0 : 0 0 : 5 9
0 0 : 0 0 : 5 8
Payload
Capture
Setting
Mode
Auto
Rotation
Rotation
Time
Scroll
Settings
Setting
Display icon Mode / Status
PAN( T1 )
TILT ( T2)
INVL( t )
DWELL( P )
* T1/T2>t>P
PAN: Time required for the panning axis to rotate from the start point to the end point.
Panning axis rotation time period
Tilting axis rotation time period
Photographing interval
Photographing waiting time
TILT : Time required for the tilting axis to rotate from the start point to the end point.
INVL: The time between the end of the previous shooting and the end of the next shooting.
DWELL: Gimbal stop time after issuing a photographing command.
14
www.feiyu-tech.com

Auto- rotation mode setting
(1) Select auto-rotation to enter the auto-rotation
mode on the display interface.
Payload
Setting
Rotation
Time
Scroll
Setting
Capture
Mode
Auto
Rotation
Settings
procedure 1
Initial
point
setting
ESCO K
(3) Set rotation end position
Rotate the panning axis or tilting axis to the end
position and stay for half a second, and click OK
option on the screen again to record the end
position.
(2) Set rotation start position
Rotate the panning axis or tilting axis to the start
position and stay for half a second, and click OK
option on the screen to record the start position.
Tilt Axis
Pan Axis
(4) Start auto rotation movements
The gimbal automatically returns to the start
position, the tilting axis and panning axis start
to rotate to the end position according to the
set parameters, and the gimbal automatically
resets after completion.
Tilt Axis
Pan Axis
Exit
Double tap
Shortcut button or click the
ESC option on the screen
Exit the auto-rotation mode and reset
15
www.feiyu-tech.com

5.App - Download and Connecting
5.1
* Requires iOS 9.0 or later, Android 5.0 or later
5.2
Download and Install Feiyu ON App
iOS Version Android Version
Connecting App
1. Turn on the mobile phone Bluetooth and start the gimbal;
2. Open the App, and connect to AK2000 according to the App prompts. After the
connection is successful, you can control AK2000 on the App.
1316
www.feiyu-tech.com

6.Advanced Operation
6.1
Gimbal Initialization6.1
You can initialize your gimbal when:
(1) When camera is not balance.
(2) If not use for a long period of time.
(3) In case of extreme temperature variations.
(1) Select system settings on the display screen to enter the gimbal calibration.
(2) Place the gimbal on the table, and the gimbal automatically initializes. If the display
screen prompts that the calibration is successful, the initialization ends, otherwise the
initialization fails.
(3) After the initialization is successful, slide the display screen interface to the left/right
or click the “ESC” key on the screen to wake up.
1317
www.feiyu-tech.com

Firmware Upgrade6.2
Connect the gimbal to the Feiyu ON App, to upgrade the firmware through the App.
Settings Update
Query Update
Your Gimbal version is ***,
The latest version is ***,
do you want to upgrade?
Feiyu ON
Later Download
14141418
www.feiyu-tech.com

7.Specifications
40mm
56mm
182.5mm
211.7mm
128mm
424.5mm
258.8mm
Max. Tilting Range 360°
Max. Rolling Range
360°
Max. Panning Range 360°
Tilting Speed 2°/s ~ 75°/s
Panning Speed
3°/s ~ 150°/s
Operation Time 12 Hours
Weight About 1252g (not including the batteries)
Payload 2800g
( In center of gravity balanced state )
14141419
www.feiyu-tech.com

8.Compatible Cameras for Reference
Brand
Canon
Model
Canon5DMarkIV
Canon5DMarkIII
Canon6DMarkII
Can be equipped with a lens
CanonEF 100mm f/2.8L IS USM +Camera hood
CanonEF 135mm f/2L USM+Camera hood
CanonEF 85mm f/1.2 L II USM+Camera hood
CanonEF 50mm f/1.2L USM+Camera hood
CanonEF 35mm f/2 IS USM+Camera hood
CanonEF 85mm f/1.2 L II USM+Camera hood
CanonEF 24-105mm f/4L IS USM
CanonEF 85mm f/1.2 L II USM+Camera hood
CanonEF 16-35mm f/2.8L II USM
CanonEF 24-105mm f/4L IS USM
CanonEF 50mm f/1.2L USM+Camera hood
Nikon
Sony
Nikon D500
NikonD7500
Sony α9
Sony α7R2
NikonAF-S 105mm f/2.8G IF-ED VR
NikonNikkor 18-140mm f/3.5-5.6G ED VR
NikonNikkor 18-140mm f/3.5-5.6G ED VR
NikonAF-S 105mm f/2.8G IF-ED VR
Sony E 50mm F1.8
Sony E PZ 18-105mm F4 OSS
Sony FE 85mm F1.8
Sony FE 35mm F1.4
sony FE 24-240mm F3.5-6.3
SonyVario-Sonnar T* 24-70mm f/2.8 ZA SSM
14141420
www.feiyu-tech.com

Brand
Model
Can be equipped with a lens
Sony E 50mm F1.8
Sony E PZ 18-105mm F4 OSS
Sony FE 85mm F1.8
Sony
Panasonic
Sony α7R3
Sony A6500
GH5s
GH4 OLYMPUS M.ZUIKO DIGITAL ED 12mm f/2.0
Sony FE 35mm F1.4
sony FE 24-240mm F3.5-6.3
Sony FE 24-105mm f/4 G OSS
Sony FE 12-24mm f/4.0 G
SonyFE 28-70mm f/3.5-5.6 OSS
25mm f/1.4
35-100mm f2.8
14141421
www.feiyu-tech.com

Guilin Feiyu Technology Incorporated Company
+86(0)773 2320865
Due to software and hardware improvements, your actual product might differ from the descriptions
and pictures in this user manual. You can get the latest user manual from the official website.
For more information, please visit our official website
D I S C L A I M E R
Prohibit any user for any illegal purpose. Users will be responsible for all behaviors of purchase and use products.
The Company assumes no liability for any risks related to or resulting from the debug and use of this product (including the direct,
indirect or third-party losses).
For any unknown sources of using, we will not be at any services.
The updating and changes of product firmware and program may cause changes in function descriptions in this user manual,
please read the instructions carefully before upgrading the firmware and use the corresponding user manual.
You can get the latest user manual from the official website: www.feiyu-tech.com
FeiyuTech reserves the right to amend this manual and the terms and conditions of use the gimbal at any time.
 Loading...