


Guilin Feiyu Electronic Technology Co., Ltd
Feiyu Tech
FY-DoS for multi-rotors control manual
Installation & Operation Multi-rotor firmware above V2.10
Dear Customer:
Thank you for choosing DoS as your autopilot system. Please read this manual
carefully before using the system to ensure proper use and operation.
The installation and use of this device require some skill and knowledge in flying
remote controlled airplane model.
If you are a complete beginner and have never flown one before, we do not
recommend you install this device on your own.
Please find assistance from an experienced RC pilot who may provide you with the
basic knowledge required to use this device successfully.
If you are already an experienced flyer, you will find the DoS installation to be easy
and logical. Just follow this manual and you won’t go wrong.
If you need any technical support you can send e-mail directly to: service@feiyu-tech.com
DoS module
DoS is an Attitude Flight Stabilization System (AFSS) and autopilot system.Now can
be used for automated stabilization of fixed wing aircrafts,and after upgrade firmware can
be used for other aircraft and equipment control (For more details of DoS,please refer to
the latest firmware and the instructions).
DoS has integrated three-axis gyro ,three-axis accelerometer,three axis magnetometer
and barometric pressure sensor. DoS can accurately measure flight attitude, the earth
azimuth and through the barometer to measure relative altitude. This manual mainly
introduces DoS firmware for Multi-rotor flight system.
The firmware for Multi-rotor flight system above V2.10 can realize the following
functions:( We will continue updating new firmware to improve performance and update
functions, please pay attention to the latest news FeiYu official website (www.feiyudz.cn)
posted.)
Attitude Stabilized Mode
Dos can auto stabilize the aircraft flight attitude in this mode, pitch and roll stick
center position for 0 °attitude,its endpoint is 45 ° , pitch and roll stick can linear control the
flight attitude, maximum angular velocity is 150 ° / s. Yaw stick in the center position will
lock current course , its endpoint corresponding maximum rotation rate 135 ° per second,
yaw stick can linear control the aircraft rotation rate. Throttle stick direct control aircraft
climb and decline, climbing and declining rate is directly related to the throttle.
Hovering Mode
The GPS Module must be connected to the DoS with at least 5 GPS satellites
detected.In this Mode, pitch, roll, yaw control method is the same as Attitude Stabilized
Mode.DOS can auto control flight altitude.Climbing and descending rate is directly related
to the throttle, when the throttle stick is in the center position,DOS auto locks the altitude,
in maximum means climb rate is 3 m/s, in minimum means decline rate is 1.5 m/s.Throttle
stick can linear control the aircraft climb and decline rate.Pitch, roll sticks released will
lock the position when GPS signal is adequate,non-released will equivalent of Attitude
Stabilized Mode.
Guilin Feiyu Electronic Technology Co., Ltd http://www.feiyudz.cn E-mail: service@feiyu-tech.com Page 1

Guilin Feiyu Electronic Technology Co., Ltd
Auto Return To Launch Mode(RTH)
The GPS Module must be connected to the DoS with at least 5 GPS satellites
detected.In this Mode, pitch, roll, yaw and altitude control method is the same as Hovering
Mode. Pitch, roll sticks released will automatically fly the aircraft back to the take-off
point, Maximum return to home point speed: 5.5m/s.
Camera Gimbal Stabilization
DoS multi-rotor firmware,when is used to control the aircraft under 6 axis, can
simultaneously control two axis Camera Gimbal Stabilization
DoS can connect with the Hornet-OSD and the Data Radio
DoS has one UART interface for connecting the FY-data radio and the OSD module.
It can realize the following function by combing them.
First Person View (FPV): Can be connected to the Hornet - OSD, the flight data
overlay to video output,and through the vodeo transmission system to send back, let you
enjoy the fun of FPV. And it will be easier to operate FPV with the functions of automatic
balance, Hovering and Auto Return To Launch.
Real time telemetry-real time monitor: Real time telemetry-real time monitor the
flying state, using the Data Radio to lengthen the remote control distance.
For more information, please refer to the FY-OSD and FY Data Radio manual.
1. DoS standard configuration:
Standard configuration
●DoS control module *1;
●RC receiver connecting wires * 1;
●USB cable *1;
●Velcro double sided tape * 2;
Optional accessory
●DoS vibration absorbing mount *1;
●GPS module *1;
●Hornet OSD module;
●Data Radio;
●Remote Adaptor;
2. Technical Specification:
DoS module
Input voltage : 4.0 ~ 6.0 Volt;
Current : 50mA (5V);
Size : 47 x 30 x 11 mm;
Weight (excluding wires) : 25g;
Temperature range : -25 ° C ~ +70 ° C;
Control frequency :400HZ ;
Maximum rate of rotation : ≤ 2000 °/s.
Guilin Feiyu Electronic Technology Co., Ltd http://www.feiyudz.cn E-mail: service@feiyu-tech.com Page 2
Guilin Feiyu Electronic Technology Co., Ltd
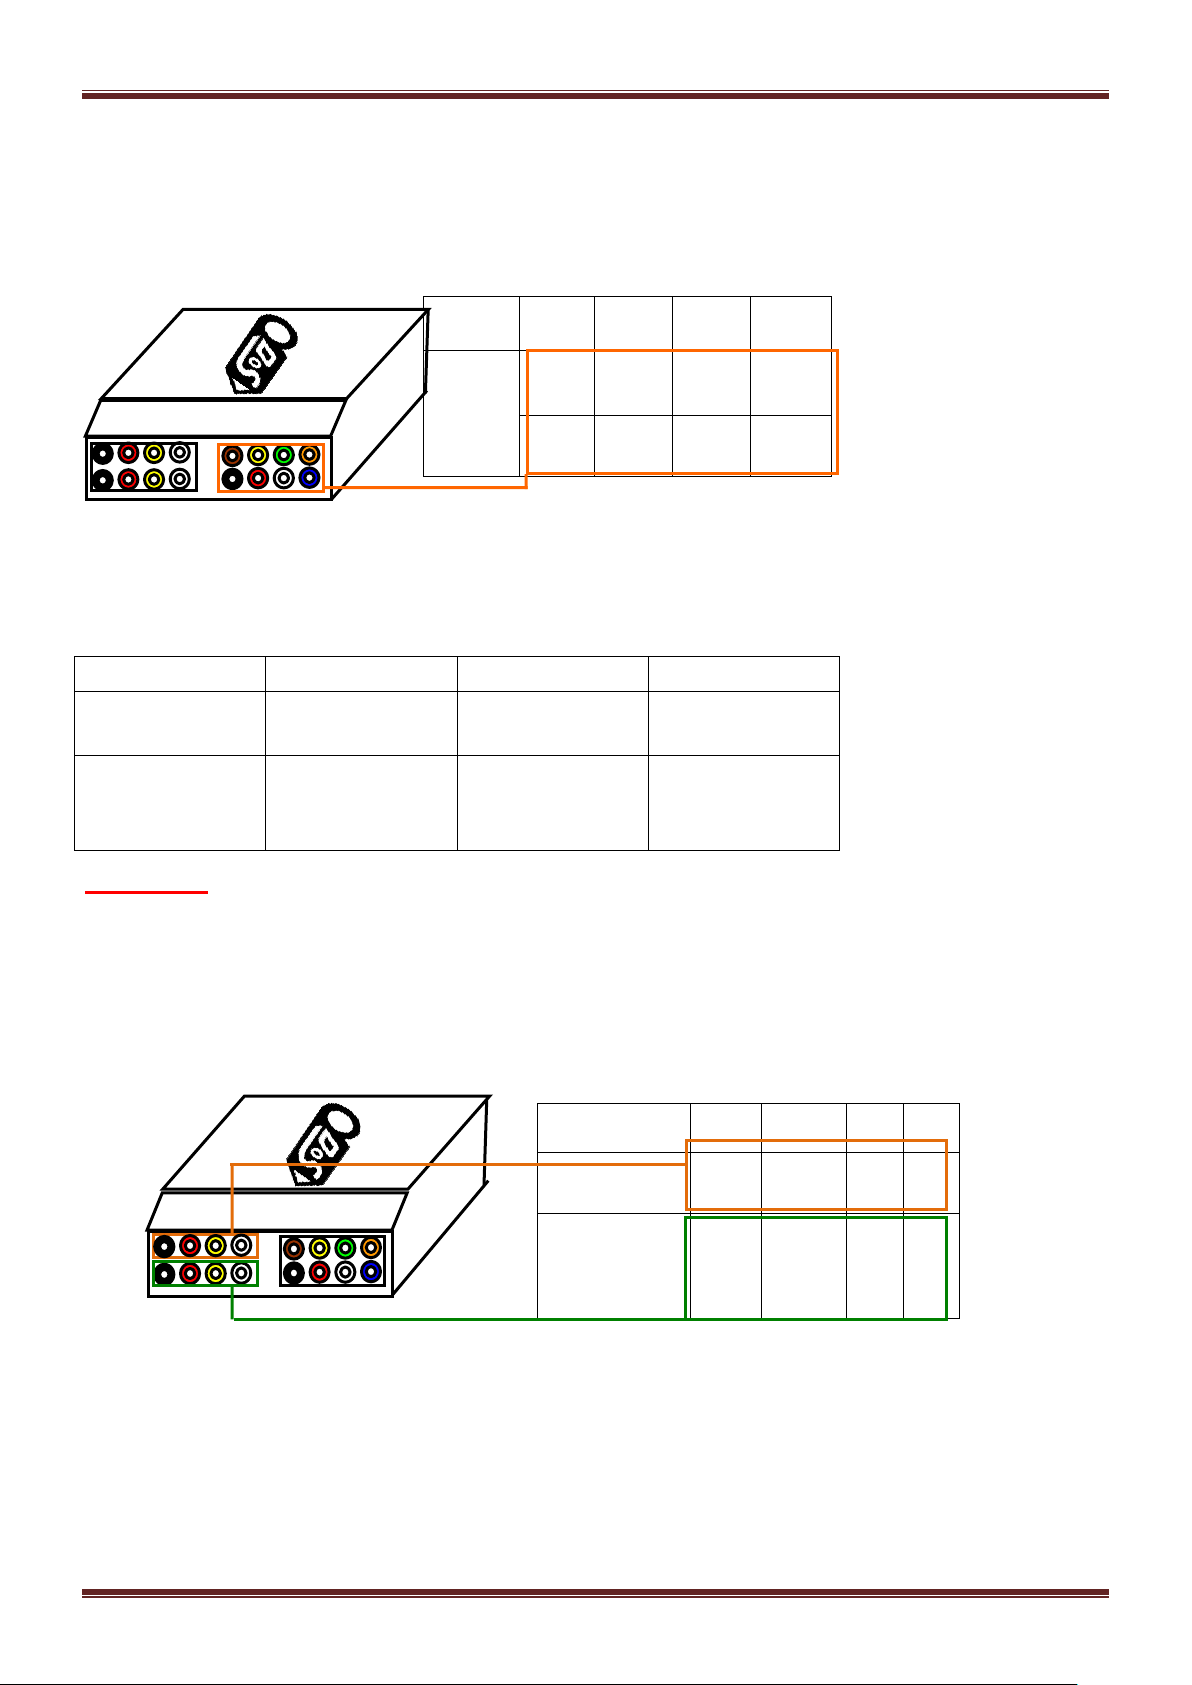
No.
1 2 3
4
RC
receiver
interface
SW1
RUD
Servo
THR
Servo
ELE
Servo
GND
Power
+5V
AIL
Servo
SW2
position
1 2 3
servo signal
output
900~1200US
1200~1800US
1800~2100US
function
stabilized
mode
Hovering
Mode
Auto Return
To Launch
Mode
No. 1 2 3 4
GPS interface
GND
Power
+5V
TX0 RX
0
Data radio
interface/para
meter setting
interface
GND
Power
+5V
TX1 RX
1
3. Interface specifications:
Remote receiver input interface
SW1 default setting state
Attention: SW1 can be used to switch DoS flight modes by any 3-position switch.SW2 is
unnecessary in firmware V2.1.
GPS and UART interface
GPS module interface
The GPS pin interface consist of: GND, +5V , RX0. The characteristics are:
Baud rate: 38400
Data bits: 8
Stop Bits: 1
Parity: None
Interface Features: TTL level
Guilin Feiyu Electronic Technology Co., Ltd http://www.feiyudz.cn E-mail: service@feiyu-tech.com Page 3
Guilin Feiyu Electronic Technology Co., Ltd
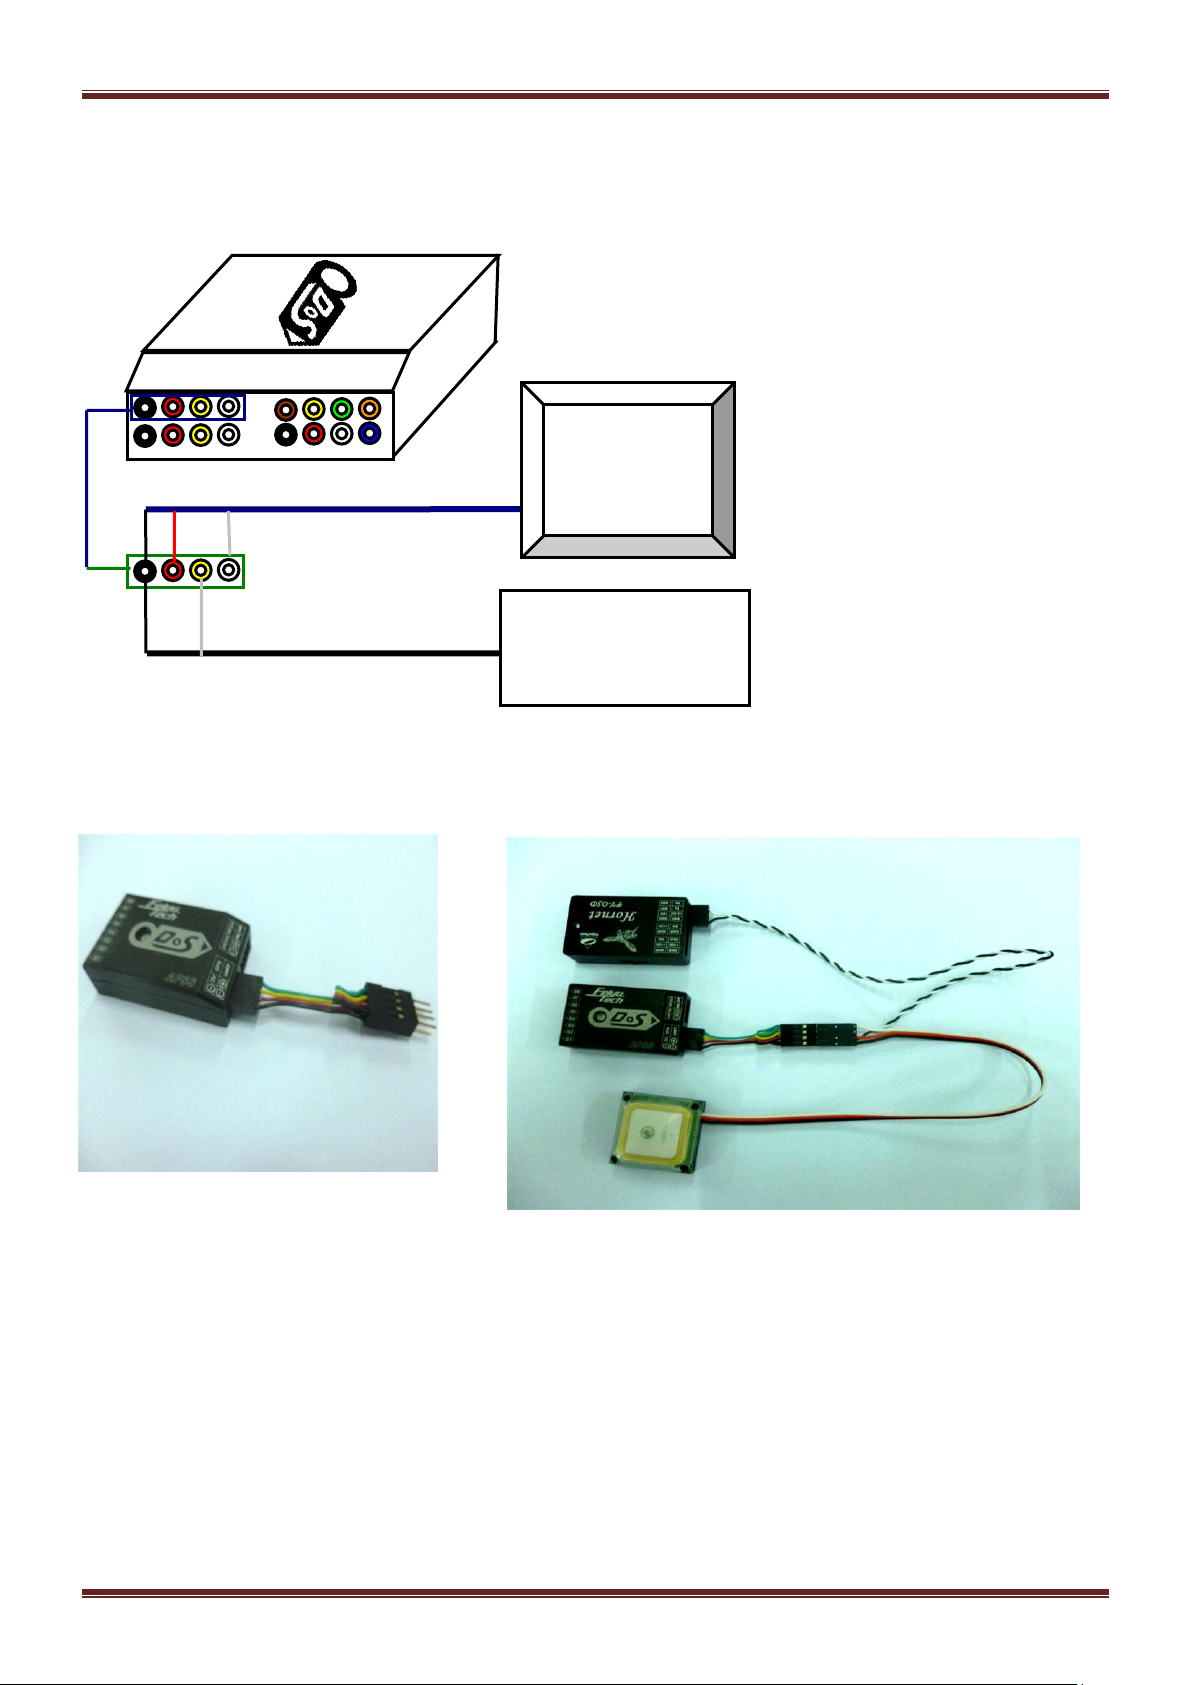
GPS module
Hornet OSD module
(V1.16)
OSD data line
This port is use for GPS Receiver. The GPS data protocol is standard NEMA0183.
Hornet - OSD (V1.6) and DoS connection graph:
You need a 4p Y line, the Hornet - OSD data line and GPS module connected to the
DoS’s GPS interface. Connection diagram is as follows:
Physical connection diagram:
Put the 4P Y line inserted into DoS’s GPS port
Data Radio interface
The UART pin interfaces consist of: GND, power 5V , TX1, RX1.
The characteristics as follows:
Baud Rate: 19200
Data bits: 8
Stop Bits: 1
Parity: None
Interface Features: TTL level
This pin interfaces connects to the Data Radio, PC computer serial port or OSD module.
You can set DoS control parameters and upgrade DoS firmware through this interface. For
the firmware upgrade,please refer to the firmware update operation manul.
Guilin Feiyu Electronic Technology Co., Ltd http://www.feiyudz.cn E-mail: service@feiyu-tech.com Page 4
Guilin Feiyu Electronic Technology Co., Ltd
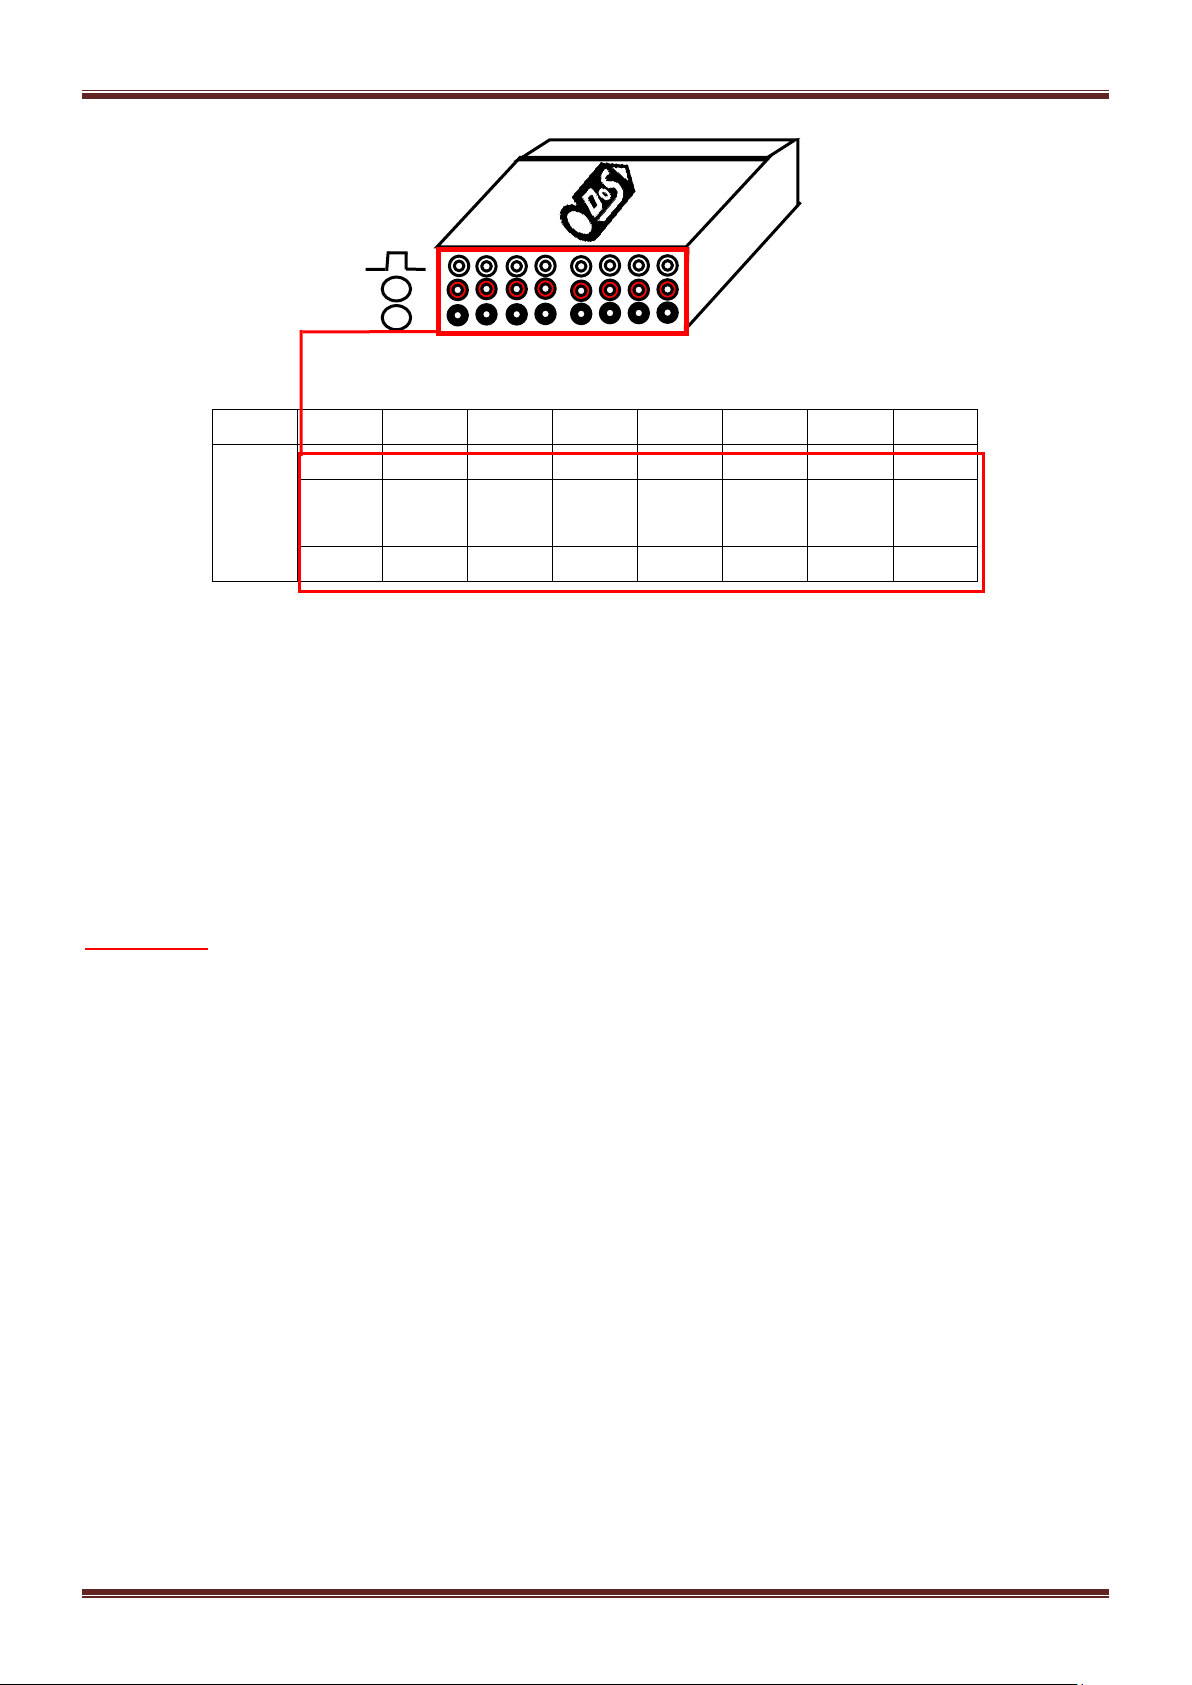
No.
S8
S7
S6
S5
S4
S3
S2
S1
Servo
Output
Interfa
ce
M8
M7
M6
M5
M4
M3
M2
M1
Power
+5V
Power
+5V
Power
+5V
Power
+5V
Power
+5V
Power
+5V
Power
+5V
Power
+5V
GND
GND
GND
GND
GND
GND
GND
GND
S2
S1
S3
S4
S5
S6
S7
S8
-
+
ESC output interface
DoS’s S1 ~ S8 ports are connected separately to ESC M1 ~ M8.
Typically 1020us is lower limit, 1520us is neutral and 2020us is upper limit, frequency is
400Hz.
4. Camera Gimbal Stabilization
DoS multi-rotor firmware,when is used to control the aircraft under 6 axis, can
simultaneously control two axis Camera Gimbal Stabilization.S7 port is connected Camera
Gimbal’s roll servo,S8 port is connected Camera Gimbal’s pitch servo.
Attention:
(1) You must use 400Hz high-speed servos for Camera Gimbal, if you use normal
servos for a long time, will cause the Camera Gimbal servos overheat.
(2) If you use DoS to control Octocopter aircraft,S7 and S8 ports will not output
Camera Gimbal control signal any more.
5. Power Supply:
●DoS input voltage is 4.0 ~ 6.0 V, you can use a stabilized voltage supply ,or directly use
ESC’s +5 V power supply, most of the ESC power supply can meet the requirements;
●DoS and the RC receiver use the same power supply via the RC receiver connection
wiring.
●VERY IMPORTANT: Only one BEC power source should be used. If all four ESCs
have internal BEC, choose only one to supply power. Disconnect the red wire (positive)
of the other ESCs,but reserve the GND and Signal wirings.
Guilin Feiyu Electronic Technology Co., Ltd http://www.feiyudz.cn E-mail: service@feiyu-tech.com Page 5

Guilin Feiyu Electronic Technology Co., Ltd
NO.
operating mode
LED
GPS location
fixed
(normal)
GPS location fixed
(good)
GPS location fixed
(very good)
1
stabilized mode
Single flash
Single flash
Double flash
Triple flash
2
Hovering Mode
Double flash
Single flash
Double flash
Triple flash
3
Auto Return To
Launch Mode
Triple
flash
Single flash
Double flash
Triple flash
4
Gyro needs Reset
or is moving
Red light
continuous flash
5
During the gyro
reset
Flash
white light for
almost one second
6
too much
vibration
red light stay on
solid
6. Indicator light instruction:
Attention:
Vibration LED takes precedence over GPS positioning LED,you must make sure that
the gyro is not need to initialize (Red light continuous flashing), only in that you will
know the GPS positioning success or not.
7. Vibration damping installation:
Damping installation: Good damping installation is the basis of DoS can do normal work,
also can decide whether DoS to maximize play flight performance or not, and make sure
you have a great flight. Otherwise may cause serious flight accidents, for example: flight
jitter, flight attitude gradually deviation and tilt from the balance position, and Hovering
mode unable to keep the flight altitude and position. You can use your own DIY shock
absorbing devices to do the shock absorbing, but we recommend using suspending
damping installation, especially use DoS vibration absorbing mount which product by
FeiYu Tech,it can meet the requirements of most of the conditions, and in addition you
need to try to reduce the vibration of the motors and oars.
Installtion position:Each modules install to a suitable position is conducive to further
enhance the performance of Hovering mode. DoS module installation position should be
as far as possible to close to the center of the aircraft, the aim is to reduce the disturbance
to the internal IMU position sensoring when the aircraft tilt or rotate. In addition also you
have to consider a very important factor, that is as far as possible to reduce the interference
to the DoS internal magnetic sensor which caused by installation position. There will be
caused interference to magnetic sensor,such as surroundings have strong current, motor
rotation, battery, etc. We need to do is to give full consideration of these two factors,
compromise to select a suitable position for install it. GPS module should be placed as far
as possible to the center position,that can reduce the interference to GPS data when it level
rotating. Also you can put the GPS module to a high place use a stent, the practice shows
that can effectively reduce the interference to GPS signals which caused by other devices,
Guilin Feiyu Electronic Technology Co., Ltd http://www.feiyudz.cn E-mail: service@feiyu-tech.com Page 6

Guilin Feiyu Electronic Technology Co., Ltd
and improve the positioning performance of GPS module.
We recommed using suspending damping installation, especially use DoS vibration
absorbing mount which product by FeiYu Tech.(You can find purchase method from FeiYu
official website: www.feiyudz.cn )
Installation process as follows:(You need a allen driver)
1.Use screws to install the four support columns on the baseboard;
2.Stick the solid foam pads (dampers) to the cover board four interior Angle position;
Guilin Feiyu Electronic Technology Co., Ltd http://www.feiyudz.cn E-mail: service@feiyu-tech.com Page 7

Guilin Feiyu Electronic Technology Co., Ltd
3.Stick the cover board to the DoS upper surface (LOGO character surface); you can
appropriately increase DOS module weight to improve the damping effect, you can stick
copper sheet or other sheet metal which cannot be magnetized on the bottom of the DOS
(Otherwise the magnetized sheet metal will disturb the internal magnetic field sensors).
4.Use screws to fix the cover board to the four support columns;
5.Stick the circular ring foam pads (dampers) to the four rounded corners on the baseboard
vibration absorbing mount.Then fix it as far as possible to the position of barycentre on
aircraft
Guilin Feiyu Electronic Technology Co., Ltd http://www.feiyudz.cn E-mail: service@feiyu-tech.com Page 8

Guilin Feiyu Electronic Technology Co., Ltd
Wire color
Receive channel
White
(bundled with red
& black)
aileron
Channel
1
orange
elevator
Channel
2
green
throttle
Channel
3
yellow
rudder
Channel
4
brown
SW 1
Any free channel
controlled by
A 3-way switch or dial
knob
Channel
5
blue
SW 2(not used)
Any free channel
controlled by
A 3-way switch or dial knob
Channel
6
8. RC receiver connection:
RC receiver and DoS connection wires is included in the DoS product. Attention: the
wires is arranged by the colors.
a) DoS requires a minimum of 6-channel RC receiver.
b) 4 Receiver channels are used for aileron (channel 1), elevator (channel 2) ,throttle
(channel 3) and rudder (channel 4) signal output. Connect these 4 receiver output
signals to the DoS with the supplied wires (pay attention to the color of each channel ).
c) a free Receiver channels are required to control the DoS Flight Modes (a 3-position
switch ,”SW1”).
d)the other 3-position switch(SW2) is not used in firmware V2.0,so you do not need to
connect.
Attention:RC mode Setting of your controller has to be fixed wing model, and every
channels’ maximum and minimum value to be the default value (100%), all the sticks trim
to 0, also cancel all the curve set .
9. Motor start-up instruction:
Start Motor:When using multi-rotor firmware, pushing throttle stick before takeoff will
Guilin Feiyu Electronic Technology Co., Ltd http://www.feiyudz.cn E-mail: service@feiyu-tech.com Page 9

Guilin Feiyu Electronic Technology Co., Ltd
not start motors. You have to execute Combination Stick Commands (CSC) in stabilized
mode(Can not in Hovering mode or Auto Return To Launch Mode(RTH)) to start motors.
Meet the following conditions:
Put Throttle stick to the lowest position
Put Aileron stick to any endpoint position
Put Elevator stick to any endpoint position
Put Rudder stick to any endpoint position
Combination Stick Commands only need to execute for the first time power on and
take off , the purpose is to prevent motor from wrong start, after execute Combination
Stick Commands the motor will run at Idle Speed, now the throttle stick is at minimum
position, at this time if you want to stop the motor running, you need to push throttle stick
to idle speed above, and then put it to the minimum position, idle speed value default is
1170 us, the throttle stick below 20%. Take off again you do’t need to the execute
Combination Stick Commands when you (If you do not have power off and power on).
10. Gyroscope Reset:
The Red LED flashes continuously even when the DoS remains stationary,that means
you need to do the Gyro reset.The Gyro reset must be done before the Combination Stick
Commands,after execute Combination Stick Commands you can not do the Gyro reset.
Initialization / Reset Process:
1.Power on DOS and keep stationary.
2.Switch to stabilized mode.
3.On SW1,switch stabilized mode to hovering mode 6 times, time interval has to be less
than 3 seconds as follows:
stabilized mode→hovering mode →stabilized mode →hovering mode →stabilized
mode→hovering mode →stabilized mode →hovering mode →stabilized mode →hovering
mode →stabilized mode →hovering mode.
4,DoS indicator will turn white about one second.
5,After white LED turns off, the re-setting / initialization is completed.
11. Calibrate the Compass
Ferromagnetic substances placed on aircraft or around its working environment will
affect the reading of earth magnetic for digital compass, it also reduces the accuracy of the
aircraft control, or even reads incorrect heading. Calibration will eliminate such influences,
and ensure DoS system performs well in a non-ideal magnetic environment.
Please do the calibrate if the following circumstances occur:
(1)The first time you install DoS on your aircraft.
(2)When the aircraft mechanical setup is changed
(3) If the DoS module is re-positioned.
(4) If electronic devices are added/removed/ re-positioned (Main Controller, servos,
batteries, etc).
Guilin Feiyu Electronic Technology Co., Ltd http://www.feiyudz.cn E-mail: service@feiyu-tech.com Page 10

Guilin Feiyu Electronic Technology Co., Ltd
(5) When the mechanical structure of the aircraft is changed.
(6) If the flight direction appears to be shifting (meaning the aircraft doesn’t “fly
straight”).
Calibration procedure:
Please power on, and level holding the frame to do the rotate clockwise (or
counterclockwise) 8-10 circles (rotational speed less than 60 degrees per second), after
complete the calibration, On SW1,switch stabilized mode to hovering mode 6 times, time
interval has to be less than 3 seconds,use the “Gyroscope Reset” procedure to save the
compass calibration parameters.
Pre-flight test:The following steps is very important, please make sure to check them
each time before take off, otherwise you may not have a normal flight.
1. Check the installation of the equipments and damping devices is normal or not, check
the motors and oars are solid and reliable install or not.
2. Power on, do not to do the combination Stick Commands (CSC) in stabilized mode to
start the motors yet, observe the DoS indicator first, if the red LED continues to flash,
that means the gyroscope needs to initialization, you must to initialize the gyroscope
(Please refer to the “Gyroscope Reset”).
3. Observe the DoS indicator if there is a green light flash, that means the GPS has been
positioning success and have record the home point, satisfies the requirement of flight,
but after that you can wait over 30 seconds to let the GPS positioning is more stable
and accurate.
12. Other considerations
(1) Please as far as possible to maintain the current altitude when switch Attitude
Stabilized Mode to Hovering Mode. In Hovering Mode, DoS can automatic control flight
altitude.Climbing and descending rate is directly related to the throttle, when the throttle
stick is in the center position,DOS automatic locks the altitude, in maximum means climb
rate is 3 m/s, in minimum means decline rate is 1.5 m/s.Throttle stick can linear control the
aircraft climb and decline rate.
There are two very important points:
1) To prevent the altitude sudden change caused by the throttle, you have to put throttle
stick back to balance flight position, when switch off hovering mode.
2)After connect the GPS module,please do not take off yet.You should wait the GPS
positioning LED shows the GPS positionning is in a good condition(Green light double
flash each loop or triple flash each loop).
(2)
1)When flight 0.8 meters above to the ground will have a good control effect, if you
descending to the ground in hovering mode may caused the aircraft altitude volatility.
2)You can not completely shut down the throttle in Hovering Mode or Auto Return to
Launch Mode, In order to ompletely shut down the throttle you need to switch to altitude
stabilized mode.
3)Without the GPS module,swith to Hovering Mode or Auto Return to Launch Mode will
automatic into Fixed Altitude Flight Mode.
(3) In hover mode, you can change the aircraft position by RC sitcks, when release the RC
Guilin Feiyu Electronic Technology Co., Ltd http://www.feiyudz.cn E-mail: service@feiyu-tech.com Page 11

Guilin Feiyu Electronic Technology Co., Ltd
USB Cable
sticks, the aircraft will hover to a new position.
13. DoS Setting Software and installation and debugging instructions:
connection mode:
First need install USB-TTL device driver, you can download it form our website:
www.feiyudz.cn
Software Interface Description:( Parameter in the following picture is default parameter)
Guilin Feiyu Electronic Technology Co., Ltd http://www.feiyudz.cn E-mail: service@feiyu-tech.com Page 12

Guilin Feiyu Electronic Technology Co., Ltd
Install Setting:
DoS supports four install directions. The LOGO must be installed facing up.
DoS has an arrow printed on the topface. Normally orientate the arrow towards the head of
the craft.
If adjust the installation direction, you have to set it via the setting software, otherwise will
cause the aircraft abnormal condition.
Motor Mixer
The following pictures display the rotation direction and serial number of each motor,
each ESC should be connected to the DoS S1 - S8 interface. Pay attention that once you
choosed the control type, the corresponding position motor rotate direction have to be
completely the same as the picture. (If the motor rotate direction is not correct then
exchange any two of the three connect wires between ESC and motor to change the motor
rotate direction.)
DoS support the following types of multi-rotors:
Quadcopter + Quadcopter X
Guilin Feiyu Electronic Technology Co., Ltd http://www.feiyudz.cn E-mail: service@feiyu-tech.com Page 13

Guilin Feiyu Electronic Technology Co., Ltd
Hexacopter + Hexacopter X Y6
Octocopter + Octocopter X
Control parameters adjustment
RC Sensitivity
RC Sensitivity determine the reaction speed of attitude from command stick, the
bigger the value the quicker the reaction. Increase it for sharper and quicker leveling
action after command stick released. Unstable shaking flying and the control feeling will
be stiffness and rigid if the value is too high; and sluggish leveling action and slow braking
if too small.
Control Gain
Control gain use for stabilizing the flight attitude. To the gains of Pitch and Roll, if
you release the Pitch or Roll stick after command stick, multi-rotor should be back to
hovering state.
Guilin Feiyu Electronic Technology Co., Ltd http://www.feiyudz.cn E-mail: service@feiyu-tech.com Page 14

Guilin Feiyu Electronic Technology Co., Ltd
Control P: If the reaction of multi-rotor in this procedure is too soft (large delay),
please increase the basic gain slowly (10%-15% each time)until vibration emerges
after you release the stick. Then decrease the gain a little until vibration just disappears.
Now the gain is perfect.
Control I: This value generally do not need to adjust
Course control gain adjustment
The way of tuning the Yaw gain is the same as the way of adjusting the Tail Gyro. If
you want fast stick reaction speed, increase the gain, otherwise decrease the gain. However,
the spin of multi-rotor is produced by the counter torque force, and the magnitude of
which is limited. Therefore, large gain will not produce tail vibration like helicopter, but
severe reaction at the start or stop of motors, which will affect the stabilization of the other
directions.
Vertical control Gain
Vertical control Gain is used for hovering Mode.
Control P: You use two methods to judge if the Vertical gain is good enough: 1) The
multi-rotor can lock the altitude when the throttle stick is at center position; 2) The
change of altitude is small during the flight along a route. You can increase the gain
slowly (10% each time) until the vibration emerges along the vertical direction or the
reaction of throttle stick is too sensitive, then decrease 20% of the gain. Now it is a
suitable Vertical gain.
Control I: This value generally do not need to adjust.
Navigation control Gain
Navigation control Gain is the control parameters use for control hovering point.
Control P: please increase the basic gain slowly (2-3 each time)until the vibration
emerges in the hovering point. Then decrease the gain a little until vibration just
disappears. Now the gain is perfect.
Control I: This value generally do not need to adjust.
Camera Gimbal Stabilization adjust instructions
Attention:Please do not adjust the Camera Gimbal Stabilization untill you have finished
the multi-rotor aircraft adjust.
Please according to following steps to adjust Camera Gimbal Stabilization :
(1)Gimbal Reverse
1)Shaking the Camera Gimbal on roll direction , if DoS not give the corresponding
reverse correction, please choose Roll reverse.
2) Shaking the Camera Gimbal on pitch direction , if DoS not give the corresponding
reverse correction, please choose pitch reverse.
Guilin Feiyu Electronic Technology Co., Ltd http://www.feiyudz.cn E-mail: service@feiyu-tech.com Page 15

Guilin Feiyu Electronic Technology Co., Ltd
(2)Gimbal Gain
The default Gimbal Gain:Roll 50,Pitch 50.
Under the condition of servo no rotation, you should control the camera gimbal with
RC stick. If the servo shaking when the stick in the neutral position, that’s indicates the
sensitivity is too big. As a result, you should slowly decrease(10% -20% each time)
corresponding direction Gimbal Gain, until the shaking situation disappear.If the camera
gimbal go back to Neutral is too soft, As a result, you should slowly increase(10% -20%
each time) corresponding direction Gimbal Gain
(3)Gimbal Neutral
The default Gimbal Neutral is 1520.
Power on and put the camera gimbal into level position,observe the servos position.If
the servos is not in the Neutral value,please through adjust the to corresponding servos
Gimbal Neutral to make them into Neutral value position.
Adjusting method:According to corresponding servo reaction, appropriate increase or
decrease corresponding servo Gimbal Neutral.
——END——
Note: We reserve the right to change this manual at any time! And the newest edition
will be shown on our website www.feiyudz.cn.
Guilin Feiyu Electronic Technology Co., Ltd http://www.feiyudz.cn E-mail: service@feiyu-tech.com Page 16
 Loading...