


F-H3300BR
Emerson F-H3300BR, F-GN1100C, F-HC1100C, F-HC1100BR, F-HC3300BR Installation Manual
...
Installation Manual
English
Manual de instalación
Español
Manuel d’installation
Français
Installationshandbuch
Deutsch
Installatiehandleiding
Nederlands
Manual de Instalação
Português
Руководство по установке
Русский
Installationsvejledning
Dansk
Manuale di installazione
Italiano
Instrukcja instalacji
Polski
설치 매뉴얼
한국
2
8
14
20
26
32
38
44
50
56
62
68
F-HC3300C
F-HC3300BR
F-H3300C
F-H3300BR
F-HC1100C
F-HC1100BR
F-GN1100C
F-GN1100BR
SWT-FLTR-1,
-2, -3, -4
SWT-3, -7
steaming
hot water
tap
fi ltered 98°C
water on tap
安装手册
中文
74
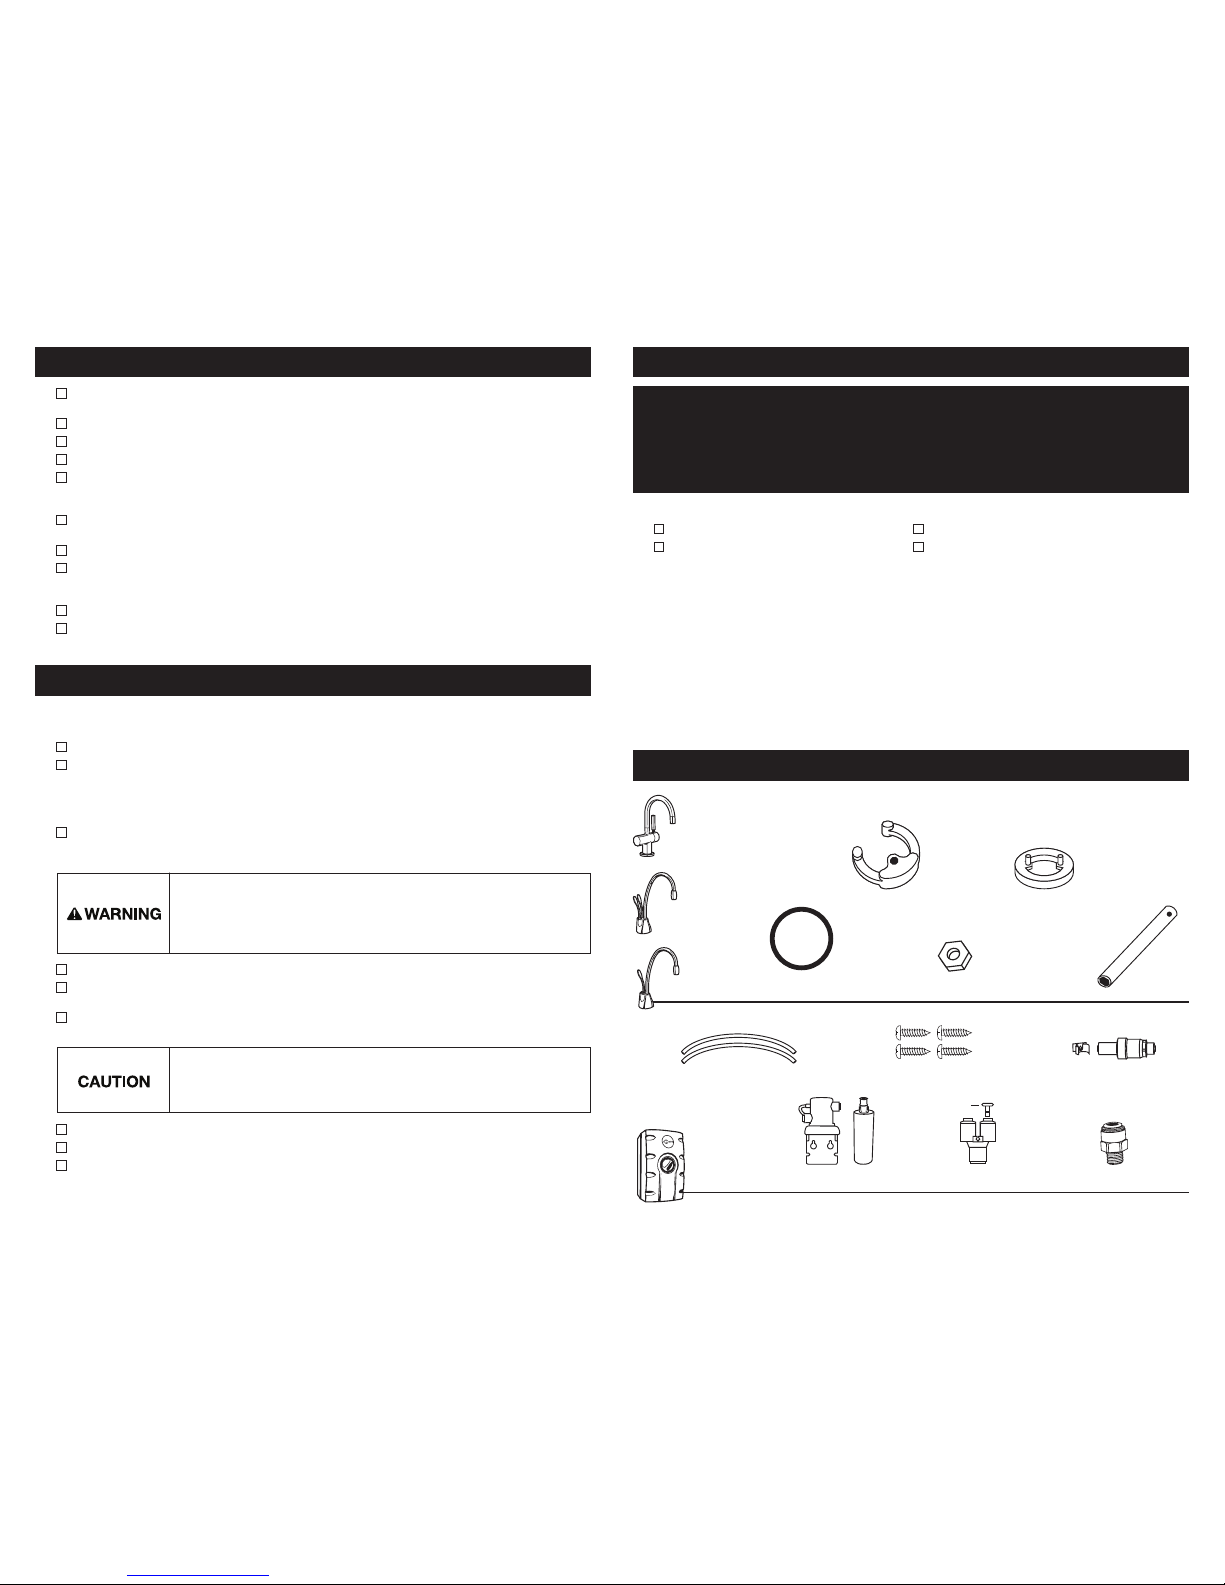
IN THIS PACKAGE
Filter Head & Cartridge
(SWT-FLTR only)
9.5mm White Tubes (2)
HC1100-1, -3
GN1100-1, -3
John Guest Fitting
(Australia only)
19mm Screws (4)
Y-Quick Connector
H3300-1, -3,
HC3300-1, -3
Semicircular
Mounting Plate
Rubber O-Ring
Hex Nut Hex Tool
Brass Seat
(HC3300, H3300)
SWT-FLTR-1, -3
SWT-3
Back Flow Protection Valve
(Australia/New Zealand only)
Plug (1)
■ For your satisfaction and safety, read all instructions, cautions and warnings before installing or using this
steaming hot water tap.
■ Make sure that all electrical wiring and connections conform to local codes.
■ A standard, earth (grounded) electrical outlet is required under the sink for the tap’s electrical power.
■ The wall outlet powering your tap must have electrical power supplied to it continuously.
■ This outlet must be fused and should not be controlled by the same wall switch that operates the food waste
disposer. Fuse/circuit breaker required is 10 amp for 230 volt (10 amp for 220-240 volt UK) and 15 amp for
120 v olt.
■ To ensure proper operation, this unit is not intended to be flushed with chlorine. If you suspect elevated levels
of chlorine in your water, it is recommended to use our water filtration system.
■ In Australia, all plumbing and electrical work must be completed by a qualified tradesperson.
■ To prevent damage or unit not operating properly, the water pressure must be between 172 kPa - 862 kPa
(1.7 bar - 8.6 bar; 25 psi - 125 psi) . Ambient (room) temperature between 10ºC and 38ºC. In Australia, an
Australian water mark approved 350 kPa set pressure limiting valve and dual check valve must be used.
■ Moving parts inside the tank causing a rattling noise is normal.
■ If the supply cord is damaged, it must be replaced by the manufacturer, its service agent or similarly qualified
persons in order to avoid a hazard.
WHAT YOU SHOULD KNOW BEFORE YOU BEGIN
ADDITIONAL CONSIDERATIONS
Equipment You May Need:
Equipment Required:
■ Drill
■ Compression fitting, T-fit ti ng
or saddle valve
■ Adjustable spanner
■ Anchors for plasterboard
■ Hole saw
■ Basin nut wrench
■ Hole punch
If you intend to use the sprayer hole in the sink for the hot water tap, you may need a 3.18mm plug or a 6.35mm
cap (not supplied) for the sink spray hose line. Se e Step 1B. If you need to cut a mounting hole in the stainless
steel sink, you may need a hole punch or a 35mm - 38mm hole saw made for cutting stainless steel.
What if you don’t have a sprayer hole or don’t want to use it?
Many householders replace the soap dispenser in their sink with a steaming hot water tap. If drilling a hole into a
stainless steel sink or worktop, you can cut a mounting hole for the tap with a hole saw for stainless steel, or you
can use a hole punch.
Hole size requirements: – HC1100, HC3300 and H3300, a 35mm - 38mm hole is required.
– GN1100, hole requirement is 32mm - 38mm.
Consult a professional before drilling into a surface other than stainless steel.
WHAT YOU NEED TO GET STARTED
■ Phillips and flat blade screwdrivers
■ Pencil
■ Tape Measure
■ Spirit level
In Australia and New Zealand, the installation must conform to AS3500.4.1 or AS/NZ S 3500.4.2 (Clause 9.b).
Important: Always arrange the power cord so that it cannot come in contact with hot surfaces.
■ Use this water heater only for its intended use as described in this manual.
■ This appliance is not intended for use by persons (including children) with reduced physical, sensor y or mental
capabilities, or lack of experience and knowledge, unless they have been given supervision or instruction
concerning use of appliance by a person responsible for their safety. Children should be supervised to ensure
that they do not play with hot water tap. To reduce the risk of injury, close supervision is required when an
appliance is used near children.
■ Do not operate this product if it has been or appears to be damaged in any manner or after the product
malfunctions, or is dropped. Return the complete product immediately to your retail dealer for inspection, and
if necessar y, adjustment or repair.
■ Do not disconnect the product from the power supply by pulling on the cord.
■ Do not use the product for other than its intended use as described in these instructions. The use of accessory
attachments other than those recommended by the manufacturer may cause safety hazards.
■ The recommended connection may be made to an existing cold water line with a branch terminating with a
shutoff valve, a pressure relief and dual check non-return valve sited adjacent to the product.
■ The filter is attached to cold water only.
■ Systems certified for cyst reduction may be used on disinfected water that may contain filterable cysts.
■ The filter is made in the USA.
Electric Shock Hazard: To reduce the risk of electric shock, do not immerse or expose
the product, flexible cord or plug to rain, moisture or any liquid or when standing in
or on damp or wet surfaces. If any electrical product falls into water, UNPLUG it
immediately. DO NOT RE ACH INTO THE WATER. Important: Prior to reconnecting to
the power supply, the product should be inspected by a qualified technician.
Property Damage: The flexible vent and outlet tubes must be correctly
connected to the tap supplied by the manufacturer. They must not be obstructed
or connected to a normal type tap or any other type. Important: Do not allow the
unit to continuously boil.
2

Property Damage: Do not pinch or b reak copper tubing.
Do not distor t the last 25mm of tub ing.
HC110 0/G N1100
■ Unpack hot water tap components.
■ On a firm, flat surfa ce, carefully
straighten the copper tubing.
A
These instructions are separated
into main sections, indicated by
numbers, and subsections,
indicated by capital letters. The
manual is set-up this way to
allow you to take a break at any
point after completing a section
or subsection without affecting
the installation process.
Provides a step-by-step narrative describing the installation step, with tick boxes that can be marked as you
progress through the installation.
Contains simple illustrations that provide visual instruction to support the narrative.
CAUTIONS and WARNINGS that will require your attention during the step.
1
2
3
1
2
3
HOW TO USE THIS INSTRUCTION MANUAL
OVERVIEW OF A COMPLETED SET-UP
B
PREPARATION
START HERE
PROPER INSTALLATION SHOULD TAKE ABOUT 2-4 HOURS
■ Identify locations for the tap, tank and
filter (if applicable).
■ Check to make sure there is proper
clearance (see chart at left) for tap
handles to be fully opened.
■ Check to make sure counter is not too
thick (see chart at left).
■ Make sure there is an earth (grounded)
electrical outlet under the sink.
■ Tur n off water supply.
■ If using the sink sprayer hose hole,
remove nut that connects sprayer hose
at bottom of tap.
■ Using adjustable spanner, remove nut
connecting sprayer washer flange in
sprayer hole.
■ Close hose opening with either a plug
or a cap (not supplied).
1
The wall out let for the tap must have power
supplied to it continuously and must be fused.
It should not be controlled by the same wall
switch that operates the food waste disposer.
If you have to dr ill through sink or
worktop, you may need to rent or
purchase the appropriate tools.
Require d minimum from cent re of hole to wall
Maximum counter thickness is 76mm.
A
3
A potentially hazardous situation, which, if not avoided, could result in death or serious injury.
Caution, used with the safety alert symbol, indicates a hazardous situation which, if not
avoided, could result in minor or moderate injury.
Caution, without the safety alert symbol, is used to address practices not related to
personal injury.
Property Damage: Do not pinch or break copper tubing.
Do not distort the last 25mm of tubing.
HC1100 /GN1100
■ Unpack hot water tap components.
■ On a firm, flat surface, carefully
straighten the copper tubing.
■ Ensure that the black O-ring is properly
seated in the base of the tap head (the
groove on the underside of the tap).
A
INSTALLING THE TAP - HC1100 / G N110 0
2
HC1100 /GN1100
■ Feed tubes down through the hole
in the sink or countertop until the base
is at rest.
■ From under the sink, place the
semi-circular mounting plate and hex
nut onto the threaded stud. Ensure tap
head is at desired angle.
■ Insert screwdriver into hole on side of
hex tool (creating a “T”), and use tool
to tighten nut and secure tap.
B
An assistant may be needed to hold
the tap in place while securing.
HC3300 ............. 64mm
H3300 ............... 64mm
HC 1100 ............. 67mm
GN 1100 ............. 83mm
 Loading...