


Thank you for purchasing Mitsubishi Multi Entertainment System (MMES). |
|
• Please read this owner’s manual thoroughly before operating MMES. |
|
• After reading this manual, be sure to keep it handy for future reference. |
|
Contents |
|
Audio ................................................................................................................................................... |
3 |
Playable Discs ....................................................................................................................................................................................... |
4 |
DVD Video Features .............................................................................................................................................................................. |
4 |
1. PRECAUTIONS .................................................................................................................................................................................... |
6 |
Operation Panel/Generalities ................................................................................................................................................................ |
6 |
Cleaning ................................................................................................................................................................................................ |
7 |
About the Registered Marks, etc. .......................................................................................................................................................... |
7 |
2. CONTROLS .......................................................................................................................................................................................... |
8 |
Functions of Buttons.............................................................................................................................................................................. |
8 |
Outline of Button and Touchkey Operation ............................................................................................................................................ |
9 |
3. BASIC OPERATIONS ......................................................................................................................................................................... |
13 |
Turning the Power On/Off .................................................................................................................................................................... |
13 |
Opening the Operation Panel and Adjusting the Angle ....................................................................................................................... |
13 |
Switching the Operation Mode ............................................................................................................................................................ |
14 |
Turning the Audio Off........................................................................................................................................................................... |
14 |
Switching between day and night modes ............................................................................................................................................ |
14 |
Turning the Monitor Display Off ........................................................................................................................................................... |
14 |
Displaying the Clock Screen................................................................................................................................................................ |
14 |
Adjusting the Volume ........................................................................................................................................................................... |
15 |
Setting/Ejecting a Disc ........................................................................................................................................................................ |
15 |
Inserting/Removing an SD Memory Card ........................................................................................................................................... |
16 |
Connecting/Disconnecting a USB Media Device................................................................................................................................. |
17 |
Selecting a Media Source ................................................................................................................................................................... |
18 |
Steering Remote Control Operations .................................................................................................................................................. |
19 |
1

Contents
4. SOURCE OPERATIONS..................................................................................................................................................................... |
20 |
Radio Operations ................................................................................................................................................................................ |
20 |
Audio CD Operations........................................................................................................................................................................... |
23 |
MP3/WMA/AAC Operations ................................................................................................................................................................ |
24 |
DVD Video Operations......................................................................................................................................................................... |
26 |
5. SOURCE OPERATIONS (ACCESSORIES) ....................................................................................................................................... |
32 |
SD Memory Card Operations .............................................................................................................................................................. |
32 |
USB Memory Operations .................................................................................................................................................................... |
33 |
iPod® Operations ................................................................................................................................................................................. |
34 |
Bluetooth Audio Operations................................................................................................................................................................. |
36 |
Telephone Operations ......................................................................................................................................................................... |
37 |
6. SYSTEM SETTINGS........................................................................................................................................................................... |
40 |
Audio Settings ..................................................................................................................................................................................... |
40 |
Display Adjustment.............................................................................................................................................................................. |
41 |
Volume and Beeps Settings ................................................................................................................................................................ |
42 |
Selecting a Language.......................................................................................................................................................................... |
42 |
Bluetooth Settings ............................................................................................................................................................................... |
42 |
Setting the Clock ................................................................................................................................................................................. |
43 |
Other Settings ..................................................................................................................................................................................... |
43 |
7. TROUBLESHOOTING ........................................................................................................................................................................ |
44 |
2

Audio
3

Playable Discs
This DVD player can play the following discs:
Playable discs
|
|
|
|
|
|
|
|
|
|
|
|
|
|
|
|
|
|
|
|
|
|
|
|
|
|
|
|
|
|
|
|
|
|
|
|
|
|
|
|
|
|
|
|
|
|
|
|
|
|
|
|
|
|
|
DVD video discs Audio CDs |
CD TEXT |
|||||||||
In addition, the DVD player can play CD-R/RW, DVD-R/RW, and DVD+R/RW discs on which the following media files have been recorded:
Playable media files
MP3/WMA/AAC
For detailed information, see the sections entitled “MP3/WMA/AAC Operations” (page 24).
About CD Extra discs
A CD Extra disc is a disc in which a total of two sessions have been recorded. The first session is Audio session and the second session is Data session.
Your personally-created CDs with more than second data sessions recorded cannot be played on this DVD player.
Note:
•When you play a CD Extra disc, only the first session will be recognized.
About playing a CD-R/RW disc
This player can play CD-R/RW discs previously recorded in Audio CD format or format with MP3/WMA/AAC files.
About playing a DVD-R/RW or DVD+R/RW disc
This player can play DVD-R/RW and DVD+R/ RW discs previously recorded in DVD video format or format with MP3/WMA/AAC files.
Discs that cannot be played back
This player cannot play DVD Audio, DVD-RAM, Video CDs, Photo CDs, etc.
Note:
•It may not be possible to play back discs recorded on some CD/DVD drive units. (Cause: disc characteristics, cracks, dust/dirt, dust/dirt on player’s lens, etc.)
•If a CD-R/RW, DVD-R/RW, or DVD+R/RW disc that has not been finalized is played, it will take a long time to start playing. Also, it may not
be possible to play depending on its recording conditions.
•You cannot play Super Audio CDs. Playback of the CD player is not supported even if it is a hybrid disc.
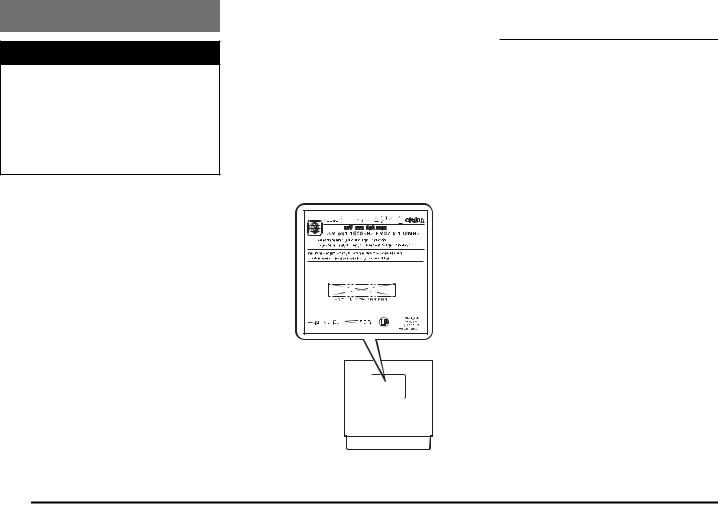
Note on region numbers of DVD video discs
The DVD video system assigns a region number to DVD players and DVD discs by sales area.
The DVD video region number playable in this system is marked on the disc jacket as shown below.
ALL 2
DVD Video Features
This unit provides the following functions in addition to the high image quality and sound quality of DVD video.
Note:
•The functions described in this section differ depending on the DVD video disc. Refer to the instructions provided with the DVD video.
•Some disc functions may operate differently from described in this manual.
4
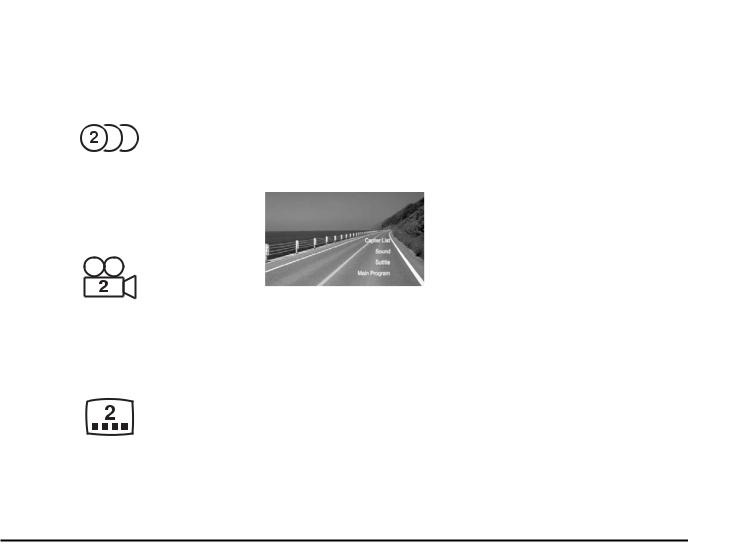
Multi-sound function
DVD video can store up to 8 languages for one film; select the language of your preference.
•The languages stored on the disc are indicated by the icon shown below.
Multi-angle function
A DVD video that is filmed from multiple angles allows you to select the angle of choice.
•The number of recorded angles is indicated by the icon shown below.
Subpicture (subtitles) function
A DVD video can record subtitles for up to 32 languages and you can select the language of the subtitles you wish to see.
•The number of recorded subtitle languages is indicated by the icon shown below.
Multi-story function
When a DVD video contains more than one story for a film, you can select the story you wish to enjoy. The operation procedures vary with the disc; observe the instructions for selecting a story provided during playback.
DVD menu
DVD Menus can be called up during DVD video playback to perform menu setting.
• Example showing DVD menu
5
1. PRECAUTIONS
 WARNING
For your safety, the driver should not watch the DVD video/movie data or operate the controls while driving. Please note that watching and operating the DVD video/movie data while driving are prohibited by law in some countries. Also, while driving, keep the volume to a level at which external sounds can be heard.
1.When the inside of the car is very cold and the player is used soon after switching on the heater, moisture may form on the disc (DVD/CD) or the optical parts of the player and proper playback may not be possible. If moisture forms on the disc (DVD/CD), wipe it off with a soft cloth. If moisture forms on the optical parts of the player,
do not use the player for about one hour. The condensation will disappear naturally allowing normal operation.
2.Driving on extremely bumpy roads which cause severe vibration may cause the sound to skip.
3.This unit uses a precision mechanism. Even in the event that trouble arises, never open the case, disassemble the unit, or lubricate the rotating parts.
4.The on-screen display in some operations is not available in Thai.
Thai on-screen display is available:
Navigation screens, Hands Free Phonebook/Call Log/SNS
Thai on-screen display is not available:
Audio operation screens, Titles of CD/USB/ iPod modes, Bluetooth application screens. Subpicture (subtitles) in Thai of DVD can be displayed if available.
INFORMATION FOR USERS:
CHANGES OR MODIFICATIONS TO THIS PRODUCT NOT APPROVED BY THE MANUFACTURER WILL VOID THE WARRANTY.
Operation Panel/
Generalities
For a longer service life, be sure to read the following cautions.
•The operation panel will operate properly in a temperature range of 0 to 60°C.
•Do not allow any liquids on the set from drinks, umbrellas, etc. Doing so may damage the internal circuitry.
•Do not disassemble or modify the set in any way. Doing so may result in damage.
•Do not draw the operation panel out and use it as a tray. Also, subjecting the operation panel to shocks may result in breakage, deformation, or other damage.
•Do not let cigarettes burn the display. Doing so may damage or deform the cabinet.
•If a problem should occur, have the set inspected at your store of purchase.
•Do not insert objects or poke in the space between the operation panel and the main unit when the panel is tilted.
•Do not place anything on the display when the panel is tilted.
•In extremely cold weather, the display movement may slow down and the display may darken, but this is not a malfunction. The display will work normally when the temperature increases.
•Small black and shiny spots inside the operation panel are normal for LCD products.
•The operation panel may stop temporarily when it opens or closes, when the engine stops or when it is cold.
•The touchkeys on the display operate when slightly touched. Do not press the touchkey screen with much force.
6

•Do not push the case surrounding the touchkey panel with much force. This may cause malfunctioning of the touchkeys.
Cleaning
•Cleaning the cabinet
Use a soft and dry cloth and gently wipe off the dirt. For tough dirt, apply some neutral detergent diluted in water to a soft cloth, wipe off the dirt gently, then wipe again with a dry cloth.
Do not use benzene, thinner, car cleaner, etc., as these substances may damage the cabinet or cause the paint to peel. Also, leaving rubber or plastic products in contact with the cabinet for long periods of time may cause stains.
 CAUTION
Do not use benzene, thinner, car cleaner, polishing spray, etc., as these substances may cause a fire.
•Cleaning the operation panel
The operation panel tends to collect dust, so wipe it off occasionally with a soft cloth. The surface is easily scratched, so do not rub it with hard objects.
About the Registered Marks, etc.
•This product incorporates copy protection technology that is protected by U.S. and other intellectual property rights. The use of Rovi Corporation’s copy protection technology in the product must be authorized by Rovi Corporation. Reverse engineering or disassembly is prohibited. Use of this product by the customer is
restricted to play program materials to which the Rovi copyright protection process has been applied.
•Manufactured under license from Dolby Laboratories.
“Dolby” and the double-D symbol are trademarks of Dolby Laboratories.
•The Bluetooth word mark and logos are owned by the Bluetooth SIG, Inc. and any use of such marks by Clarion Co., Ltd. is under license. Other trademarks and trade names are those of their respective owners.
•“Made for iPod,” and “Made for iPhone” mean that an electronic accessory has been designed to connect specifically to iPod, or iPhone, respectively, and has been certified by the developer to meet Apple performance standards.
Apple is not responsible for the operation of this device or its compliance with safety and regulatory standards.
Please note that the use of this accessory with iPod or iPhone may affect wireless performance.
iPhone and iPod are trademarks of Apple Inc., registered in the U.S. and other countries.
•BBE MP (Minimized Polynomial Non-Linear Saturation) Process improves digitally compressed sound, such as MP3, by restoring and enhancing the harmonics lost through compression. BBE MP works by regenerating harmonics from the source material, effectively recovering warmth, details and nuance.
•Manufactured under license from BBE Sound, Inc.
•Licensed by BBE Sound, Inc. under one or more of the following US patents: 5510752, 5736897. BBE and BBE symbol are registered trademarks of BBE Sound, Inc.
Unit operation Temperature 0°C-+60°C
7
This device complies with Part 15 of the FCC Rules and with RSS-210 of Industry Canada. Operation is subject to the following two conditions: (1) This device may not cause harmful interference, and (2) this device must accept any interference received, including interference that may cause undesired operation.
Le présent appareil est conforme aux CNR d'Industrie Canada applicables aux appareils radio exempts de licence. L'exploitation est autorisée aux deux conditions suivantes : (1) l'appareil ne doit pas produire de brouillage, et
(2) l'utilisateur de l'appareil doit accepter tout brouillage radioélectrique subi, même si le brouillage est susceptible d'en compromettre le fonctionnement.
NOTE: The manufacturer is not responsible for any radio or TV interference caused by unauthorized modifications to this equipment. Such modifications could void the user's authority to operate the equipment.
NOTE: This equipment has been tested and found to comply with the limits for a Class B digital device, pursuant to part 15 of the FCC Rules. These limits are designed to provide reasonable protection against harmful interference in
a residential installation. This equipment generates uses and can radiate radio frequency energy and, if not installed and used in accordance with the instructions, may cause harmful interference to radio communications.
However, there is no guarantee that interference will not occur in a particular installation. If this equipment does cause harmful interference to radio or television reception, which can be determined by turning the equipment off and on, the user is encouraged to try to correct the interference by one or more of the following measures:
-Reorient or relocate the receiving antenna.
-Increase the separation between the equipment and receiver.
-Connect the equipment into an outlet on a circuit different from that to which the receiver is connected.
-Consult the dealer or an experienced radio/TV technician for help
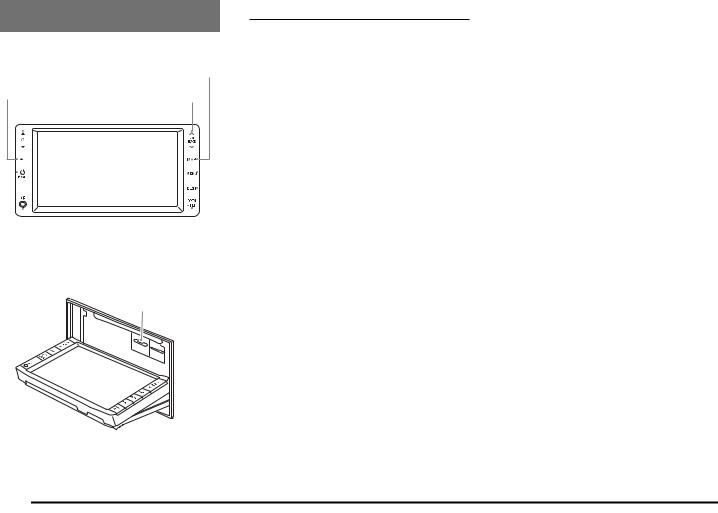
2. CONTROLS
• Operation Panel
[MAP] button
[AV] button [ ], [ ](Tune/Track) buttons
[{], [}] (Volume) buttons
|
|
|
|
|
|
|
|
|
|
|
|
|
|
|
|
|
|
|
|
|
|
|
|
|
|
|
|
|
|
|
|
|
|
|
|
|
|
|
|
|
|
|
|
|
|
|
|
|
|
|
|
|
|
|
|
|
|
|
|
|
|
|
|
|
|
|
|
|
|
|
|
|
|
|
|
|
|
|
|
|
|
|
|
|
|
|
|
|
|
|
|
|
|
|
|
|
|
|
|
|
|
|
|
|
|
|
|
|
|
|
|
|
|
|
|
|
|
|
|
|
|
|
|
|
|
|
|
Microphone |
[OPEN/nTILT] button |
|
|
||||||||
[ |
|
POWER] button |
[DEST] button |
|
|
||||||||
|
|
||||||||||||
|
|
|
|
|
|
|
|
|
|
|
|
|
|
[MENU] button • With the operation panel open
SD memory card slot
Functions of Buttons
Note:
•Be sure to read this section while referring to the front diagram.
[{], [}] (Volume) buttons
•Use these buttons to increase/decrease the volume.
[AV] button
•Press this button to display/hide the Source screen to switch the source mode.
[POWER] button
•Use this button to turn on/off the audio features of this unit.
[ ], [ ] (Tune/Track) buttons
•In Tuner mode, press these buttons to seek up/down by 1 step. Press and hold these buttons to seek a station automatically.
•In Audio CD, MP3/WMA/AAC, USB, iPod, and Bluetooth Audio modes, use these buttons to select a track to be played.
•In Audio CD, MP3/WMA/AAC, USB, iPod, and Bluetooth Audio modes, pressing and holding a button during playback performs the fast-forward/fast-backward operation.
[MAP] button
•Press this button to display the Map screen of the current location in any mode.
•When the destination is set, keep pressing this button for more than 1.5 seconds to check the current guidance message.
[MENU] button
•Press this button to display the Main Menu screen in any mode.
[DEST] button
•Press this button to display the Destination Menu screen in any mode.
•Keep pressing this button for more than
1.5 seconds to display the Go Home screen in any mode.
[OPEN/nTILT] button
•Use this button to open/close the operation panel.
SD memory card slot
•Insert an SD memory card with music files into the unit to play them.
Microphone
•The built-in microphone is for a Bluetooth telephone.
Note:
•Do not put a pointed object into the hole of the microphone. This may damage the microphone.
8
Outline of Button and
Touchkey Operation
Turning the power on
Note:
•Start the engine before using this unit.
•Be careful about using this unit for a long time without running the engine. If you drain the car’s battery too far, you may not be able to start the engine and this can reduce the service life of the battery.
System check
The format utilized on this unit is provided with a system check function. When the system check function is performed under the following conditions, the power is automatically turned off. Once turn off the engine switch, then restart the engine again.
•When power is first turned on after initial installation.
•When an external device is connected or disconnected.
Note:
*1 These images indicate the buttons to press or keys to touch.
Engine ON position


 *1
*1
You can change the media sources.
9
Tuner mode operation
(Source screen)
Preset ch.
Switches the radio band.
•Select desired station after selecting radio band.
 Manual tuning
10
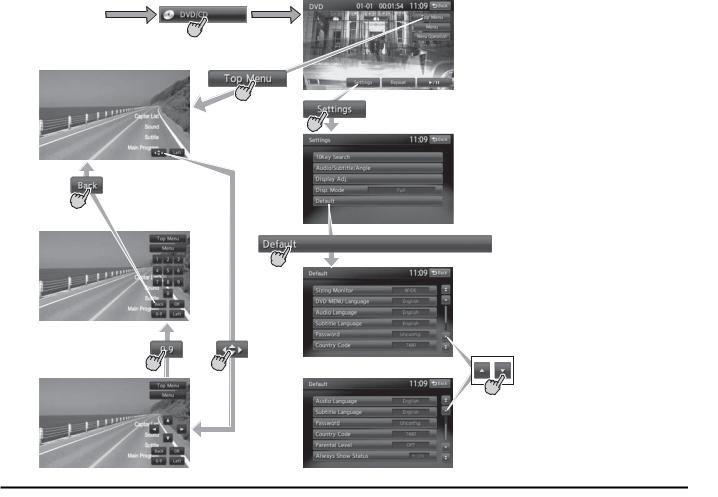
DVD Video mode operation
(DVD Video mode screen)
(Source screen)
(DVD top menu)
(Settings screen)
(Default screen)
11

Adjusting the General settings
(Audio screen) (Phone screen)
(Display Adj. screen) |
(Main menu screen) |
(Bluetooth screen) |
|
(Volume and Beeps screen) |
(Clock screen) |
(Select Language screen) |
(Others screen) |
12
3. BASIC OPERATIONS
Note:
•Be sure to read this chapter while referring to “2. Controls” (page 8).
Turning the Power On/Off
Note:
•Start the engine before using this unit.
•Be careful about using this unit for a long time without running the engine. If you drain the car’s battery too far, you may not be able to start the engine and this can reduce the service life of the battery.
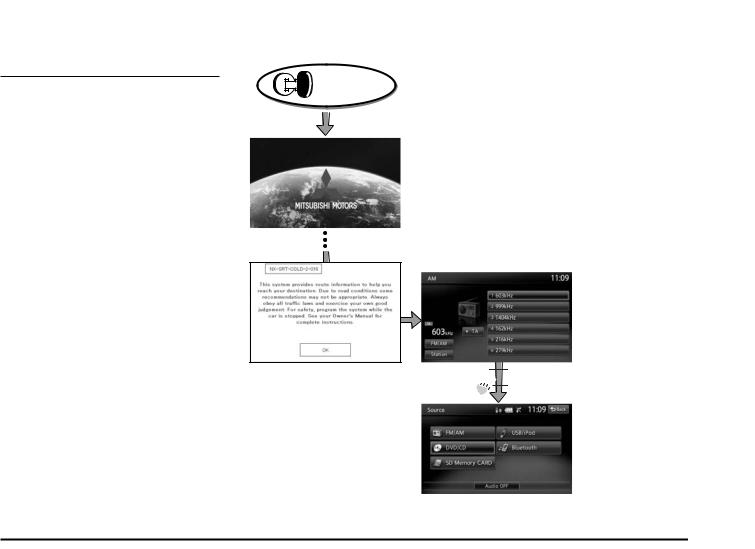
q Turning the power on
1.Start the engine. The power is automatically turned on and the startup screen is displayed.
Engine ON position
Note:
•The power is turned on even when the ignition switch is set to the ACC ON position.
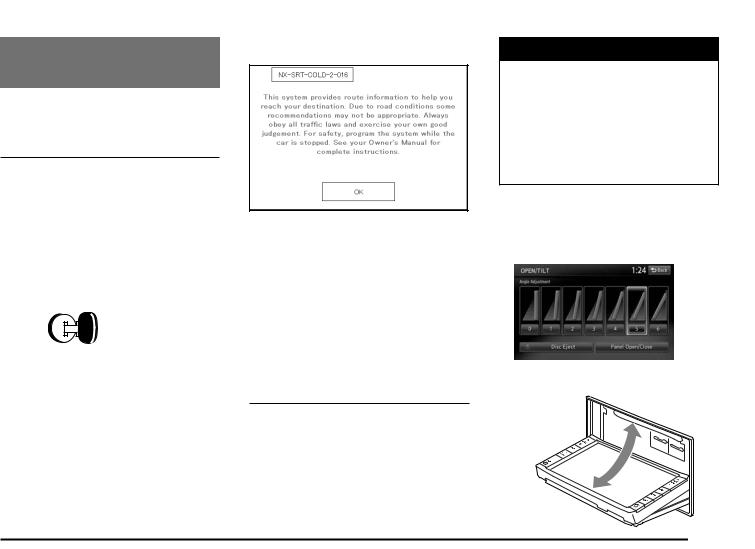
When the following caution screen is displayed
Touch the [OK] key. The system resumes from its status when the power was turned off.
The navigation system does not operate until the [OK] key is touched.
•The Audio features are available even if the [OK] key is not touched.
q Turning the power off
1. Turn the ignition switch to the OFF position.
Opening the Operation
Panel and Adjusting the
Angle
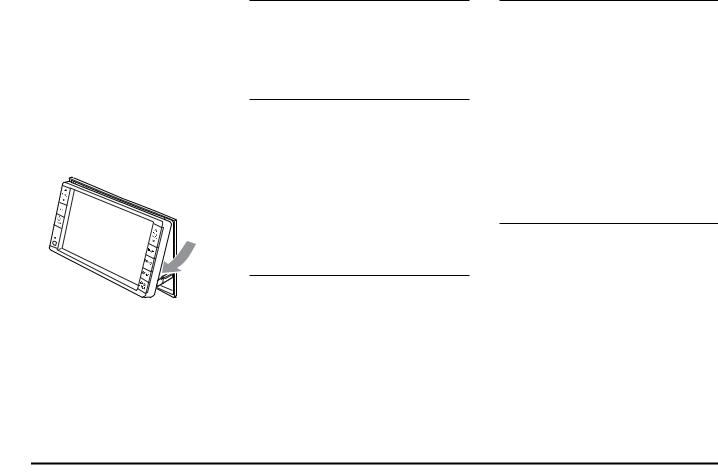
The operation panel can be opened/closed to insert/eject a disc or memory card. The angle of the operation panel can be adjusted to suit the mounting angle of the unit or light coming into the car.
 WARNING
•To prevent the battery from going dead, operate this unit with the engine running if possible.
•When the operation panel is operating, be careful not to get your hand or finger caught between the panel and main unit or the instrument panel of the car.
•Do not move the operation panel by hand.
Opening/closing the operation panel
1.Press the [OPEN/nTILT] button to display the OPEN/TILT screen:
2.Touch the [Panel Open/Close] key. The operation panel opens.
13
3.Touch the [Panel Open/Close] key when the operation panel is open.
The operation panel closes.
Adjusting the angle of the operation panel
The angle of the operation panel can be adjusted in the range of 0° to 30°.
1.Press the [OPEN/nTILT] button to display the OPEN/TILT screen.
2.Select the angle from [0] to [6] in Angle Adjustment.
The selected angle is stored in memory. Once you select the angle of the operation panel, the operation panel returns to the selected angle even after it is opened/ closed.
3.Touch the [Back] key to return to the previous screen.
Returning the operation panel to the original angle
1.Press the [OPEN/nTILT] button to display the OPEN/TILT screen.
2.Touch the [0] key in Angle Adjustment. The operation panel moves and stops at 0°.
Switching the Operation
Mode
To switch to the Source menu screen from the Navigation screen, press the [AV] button twice. To switch to the Navigation screen from the Source menu screen, press the [MAP] button.
Turning the Audio Off
You can turn off all of the Audio features.
1.Press the [AV] button (once or twice) until the Source menu screen is displayed.
2.Touch the [Audio OFF] key.
Turning the Audio features on
1.Press the [AV] button (once or twice) until the Source menu screen is displayed.
2.Touch one of the source keys.
Switching between day and night modes
You can switch the screen brightness setting between day and night modes.
1.Press the [MENU] button and touch the [Day/Night] key.
The display dims or brightens.
Turning the Monitor
Display Off
You can turn off the monitor display, and change it to a black screen.
1.Press the [MENU] button and touch the [Display] key to display the Display screen.
2.Touch the [Screen Display OFF] key. The monitor display turns off.
Turning the monitor display on
1.Touch the monitor display.
•You can also turn on the monitor display by pressing the [AV], [MAP], [MENU], [DEST], or [OPEN/nTILT] button, or any button on the steering remote control.
Displaying the Clock
Screen
You can change the screen to display only the digital clock on a dark background.
1.Press the [MENU] button and touch the [Display] key to display the Display screen.
2.Touch the [Clock Screen Display] key. The Clock screen is displayed.
To return to the current mode screen, touch the monitor screen or press the [AV] button.
Note:
•The Clock screen cannot be displayed while in Tel mode.
14
 Loading...