


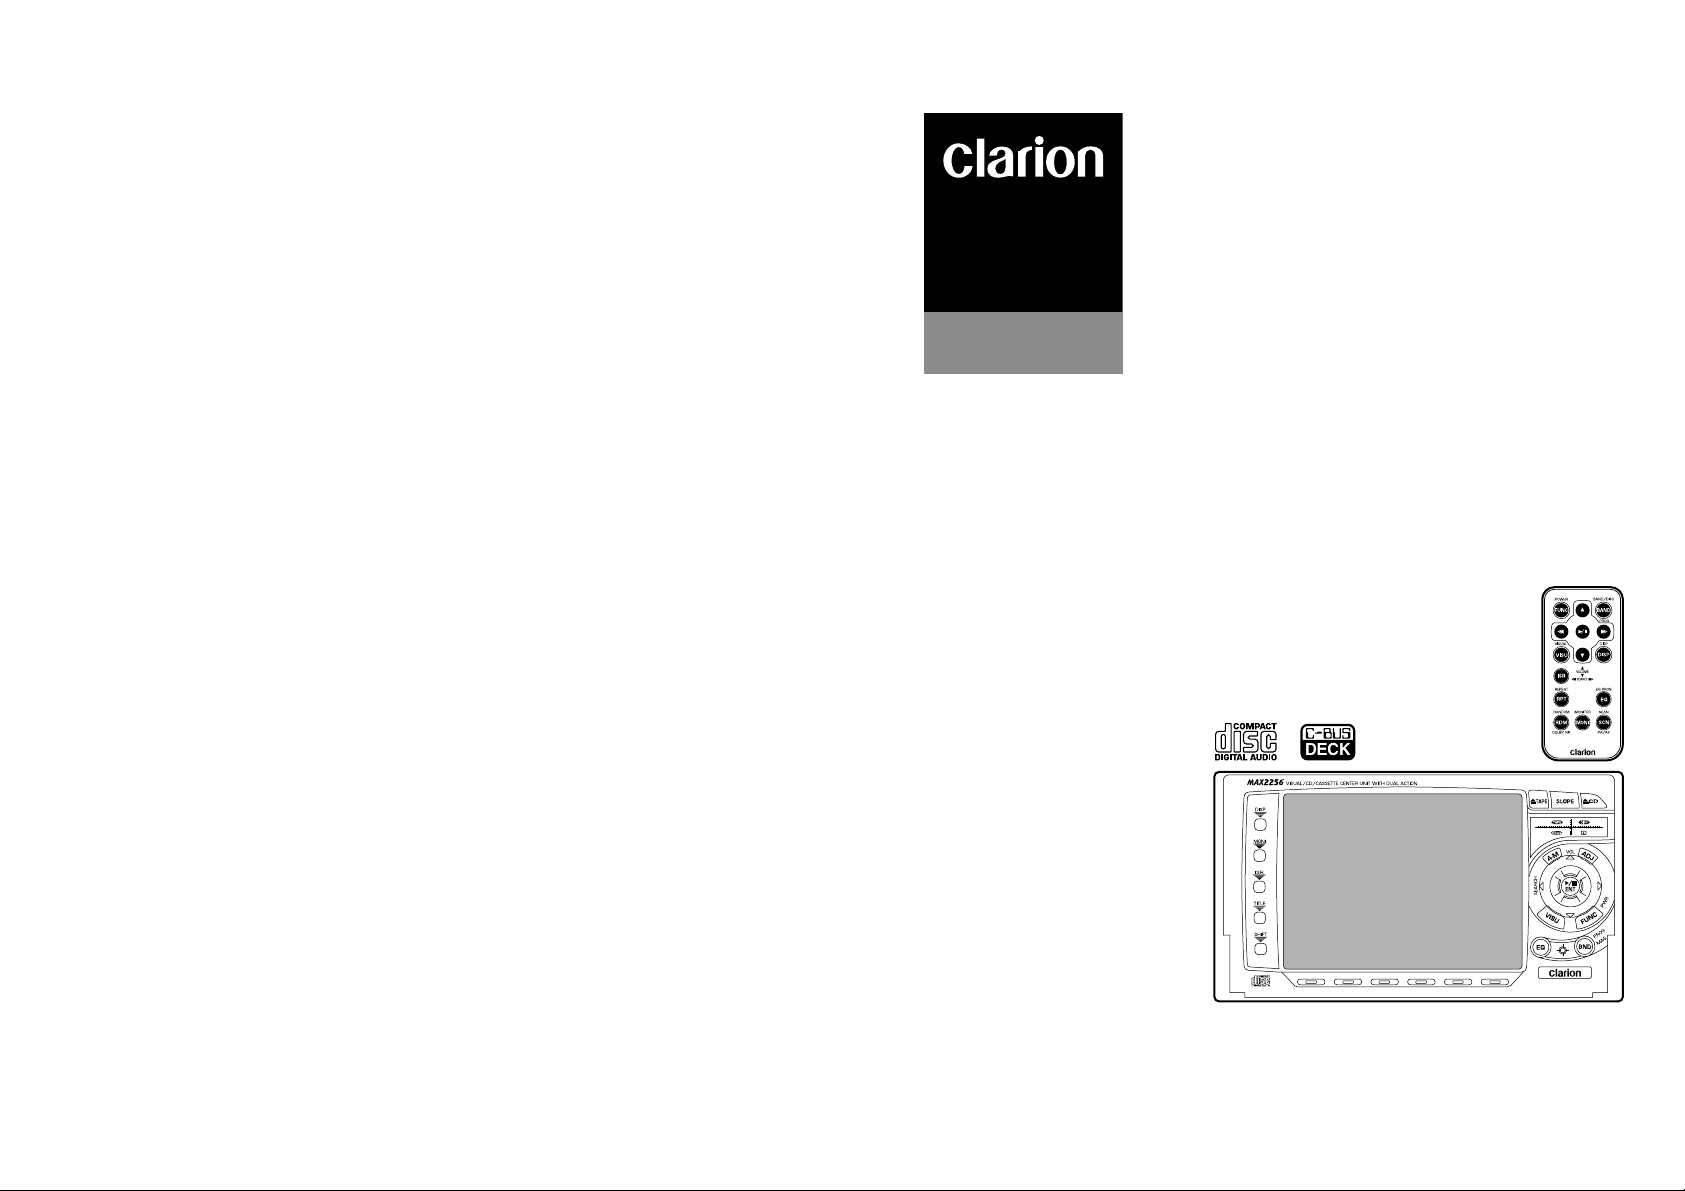
MAX2256
Clarion Co., Ltd.
Printed in Japan / Imprimé au Japon / Impreso en Japón
1996/8 (S.K) QZ-2501B 280-6734-00
VISUAL/CD/CASSETTE CENTER UNIT WITH DUAL ACTION
CENTRE VISUEL/CD/CASSETTE À DOUBLE ACTION
UNIDAD CENTRAL VISUAL/DISCOS COMPACTOS/CASETES
CON ACCIÓN DOBLE
MAX2256
Owner’s Guide & Installation
Mode d’emploi et guide d’installation
Guía del usuario y de instalación
Thank you for purchasing the Clarion MAX2256.
Nous vous remercions d’avoir acheté le Clarion MAX2256.
Muchas gracias por la adquisición del MAX2256 Clarion.
*
Please read this Owner’s Guide & Installation
in its entirety before proceeding with wire connection and installation.
*
After reading this manual, be sure to keep it in
a handy place (e.g., glove compartment).
If you sell the motor vehicle, please leave the
manual in it so that the new owner can use it.
*
Read the contents of the enclosed warranty
card and keep it with this manual.
*
The section “CD Changer Mode Operations” of
this Owner’s Guide provides the operation procedure of a CD changer which is connected to
MAX2256 by C-BUS cable. (If you buy the CD
changer only, it is accompanied only by its
owner’s guide. The operation guide of the CD
changer is included in this Owner’s Guide.)
*
Veuillez lire entièrement le mode d’emploi et le
guide d’installation avant de procéder aux connexions et à l’installation.
*
Après avoir lu ce mode d’emploi, prenez soin
de le conserver dans un endroit pratique (par
ex: la boîte à gants).
Si vous vendez votre véhicule à moteur, laissez-y le manuel de façon que le nouveau propriétaire puisse l’utiliser.
*
Lisez le contenu de la carte de garantie comprise et conservez-la avec ce manuel.
*
La section “Fonctionnement du mode changeur
de CD” de ce mode d’emploi explique le fonctionnement d’un changeur CD connecté au
MAX2256 par un câble C-BUS. (Si vous achetez
le changeur de CD indépendamment, il est seulement accompagné de son propre mode d’emploi. Le guide de fonctionnement du changeur
CD et compris dans ce mode d’emploi.)
■ Contents
English
1. PRECAUTIONS.........................................4
2. CONTROLS...............................................5
3. FEATURES................................................6
4. HANDLING COMPACT DISCS.................7
5. BUTTON TERMINOLOGY........................8
First Finger Control Operation...................8
6. REMOTE CONTROL.................................9
Inserting the Battery ..................................9
Functions of Remote Control Unit Buttons
....9
7. MODE DISPLAY ......................................10
8. CAUTIONS ON HANDLING....................12
Cleaning...................................................13
9. OPERATION............................................14
Basic Operations......................................14
Radio Mode Operations ...........................17
Tape Mode Operations.............................19
CD Mode Operations...............................21
CD Changer Mode Operations................23
Operating the Equalizer...........................25
Rear Vision Camera.................................26
Other Functions .......................................28
10. FM RECEPTION......................................31
11. TROUBLESHOOTING.............................32
12. ERROR DISPLAYS .................................33
13. SPECIFICATIONS...................................34
• Installation/Wire Connection Guide.....35
■ Table des matières
Français
1. PRÉCAUTIONS.......................................44
2. COMMANDES...........................................5
3. CARACTÉRISTIQUES..............................6
4.
MANIPULATION DES DISQUES COMPACTS
......45
5. NOMENCLATURE DES TOUCHES........46
Fonctionnement de la commande d’index
..46
6. TÉLÉCOMMANDE ..................................47
Mise en place de la pile...........................47
Fonctions des touches de la télécommande
...47
7. AFFICHAGE DE MODE..........................48
8. PRÉCAUTIONS DE MANIPULATION.....50
Nettoyage.................................................51
9. FONCTIONNEMENT...............................52
Opérations de base .................................52
Fonctionnement du mode radio...............55
Fonctionnement du mode lecteur de cassette
....58
Fonctionnement du mode lecteur CD ......60
Fonctionnement du mode changeur de CD
....62
Fonctionnement de l’égaliseur.................64
Caméra à vision arrière ...........................65
Autres fonctions.......................................67
10. RÉCEPTION FM......................................70
11. DÉPISTAGE DES PANNES.....................71
12. MESSAGES D’ERREUR.........................72
13. SPÉCIFICATIONS...................................73
• Manuel d’installation et de connexion...75
1. No abra la caja. En el interior no existe ninguna pieza que pueda reparar el usuario.
Si cae algo dentro de la unidad durante la
instalación, consulte a su proveedor o a un
centro de reparaciones autorizado por
CLARION.
2. Para limpiar la caja, utilice un paño suave y
seco. No utilice nunca paños duros, diluidor
de pintura, bencina, alcohol, etc. Si la
suciedad es difícil de limpiar, humedezca ligeramente un paño suave en agua fría o cáli-
da y frote suavemente la parte sucia.
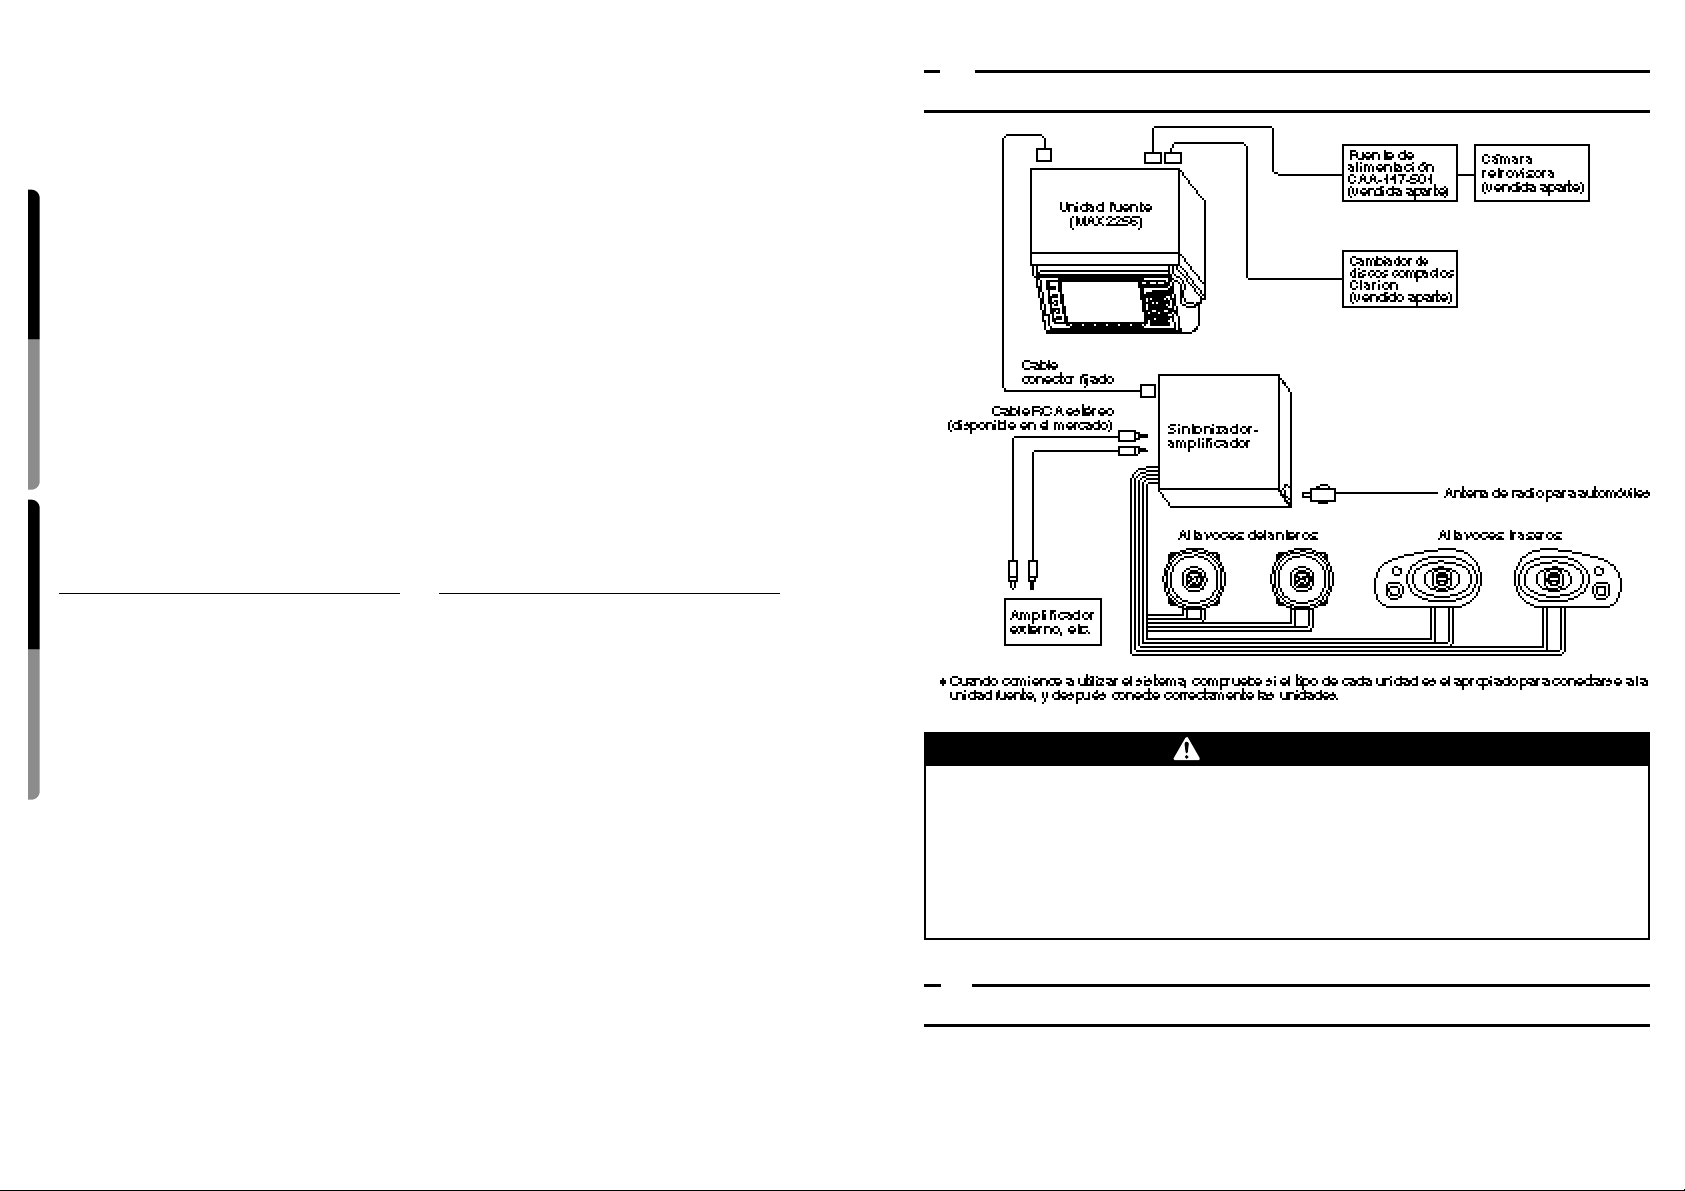
7.
EJEMPLOS DE SISTEMAS
8.
PRECAUCIONES GENERALES
Este producto deberá instalar y utilizarse solamente de acuerdo con estas instrucciones. NO
CONECTE UN SINTONIZADOR DE TELEVISIÓN A ESTE PRODUCTO NO LO ALTERE DE
NINGUNA OTRA FORMA PARA RECIBIR SEÑALES DE TELEVISIÓN NI PARA REPRODUCIR
VIDEOCINTAS NI JUEGOS DE VÍDEO. Cualquier alteración de este producto que le permita
utilizarlo de formas que no sean las indicadas en este manual podría distraer al conductor y
resultar en un accidente del que sería responsable el instalador. CLARION NO SE HARÁ
RESPONSABLE DE NINGÚN ACCIDENTE PRODUCIDO POR NO HABER INSTALADO EL
PRODUCTO COMO SE INDICA EN ESTAS INSTRUCCIONES.
ADVERTENCIA
3 4
English
Owner’s Guide
Español
Guía del usuario
USE OF CONTROLS, ADJUSTMENTS, OR PERFORMANCE OF PROCEDURES OTHER
THAN THOSE SPECIFIED HEREIN, MA Y RESULT IN HAZARDOUS RADIATION EXPOSURE.
THE COMP ACT DISC PLAYER SHOULD NO T BE ADJUSTED OR REPAIRED BY ANYONE
EXCEPT PROPERLY QUALIFIED SERVICE PERSONNEL.
1. This set is exclusively for use in motor
vehicles with a 12V power supply, negative ground.
2. Do not operate the set in ways other than
those described in this owner’s guide. In
addition, the LCD panel’s opening/ closing
mechanism is delicate, so do not operate
or use it with excessive force.
3. When the inside of the motor vehicle is
very cold and the player is used soon after
switching on the heater, moisture may
form on the disc or the optical parts of the
player and proper playback may not be
possible. If moisture forms on the disc,
wipe it off with a soft cloth. If moisture
forms on the optical parts of the player, do
not use the player for about one hour and
the condensation will disappear naturally
to allow normal operation.
4. Driving on extremely bumpy roads which
cause severe vibration may cause the
sound to skip.
5. This unit uses a precision mechanism.
Even in the event that trouble arises,
never open the case, disassemble the
unit, or lubricate the rotating parts.
This equipment has been tested and found to
comply with the limits for a Class B digital
device, pursuant to Part 15 of the FCC Rules.
These limits are designed to provide reasonable protection against harmful interference
in a residential installation. This equipment
generates, uses, and can radiate radio frequency energy and, if not installed and used
in accordance with the instructions, may
cause harmful interference to radio communications. However, there is no guarantee that
interference will not occur in a particular
installation. If this equipment does cause
harmful interference to radio or television
reception, which can be determined by turning the equipment off and on, the user is
encouraged to consult the dealer or an experienced radio/TV technician for help.
1. PRECAUTIONS
CHANGES OR MODIFICATIONS TO THIS PRODUCT WILL VOID THE WARRANTY AND
WILL VIOLATE FCC APPROVAL.
INFORMATION FOR USERS:
CAUTION
Be sure to spread and read the next page.
Veuillez déployer et vous référer à la page suivante.
Cerciórese de desplegar y de leer la página siguiente.
*
Antes de pasar a la conexión de los cables y a
la instalación, lea detenidamente esta guía del
usuario y de instalación.
*
Después de haber leído este manual, guárdelo a mano (p. ej., en la guantera).
Cuando venda su automóvil, deje en él el
manual de instrucciones a fin de que pueda
utilizarlo el nuevo usuario.
*
Lea el contenido de la tarjeta de garantía
adjunta, y guárdela con este manual.
*
En la sección “Operaciones en el modo de
cambiador de discos compactos” se indica el
procedimiento de operación de un cambiador
de discos compactos conectado al MAX2256
mediante el cable C-BUS. (Si usted adquiere
solamente el cambiador de discos compactos,
sólo se suministrará con su guía del usuario.
La guía de operación del cambiador de discos
compactos se incluye en esta guía del usuario.)
■ Índice
Español
1. PRECAUCIONES....................................84
2. CONTROLES.............................................5
3. CARACTERÍSTICAS.................................6
4.
MANEJO DE LOS DISCOS COMPACTOS
...85
5.
NOMENCLATURA DE LOS BOTONES
...86
Operación de control con el índice..........86
6. CONTROLADOR REMOTO ....................87
Colocación de la pila................................87
Funciones de los botones del controlador remoto
...87
7. VISUALIZACIÓN DE MODOS.................88
8. PRECAUCIONES DE MANEJO..............90
Limpieza...................................................91
9. OPERACIÓN ...........................................92
Operaciones básicas ...............................92
Operaciones en el modo de radio ...........95
Operaciones en el modo de reproductor de casetes
...98
Operaciones en el modo de reproductor de discos compactos
.100
Operaciones en el modo de cambiador de discos compactos
.102
Operación del ecualizador.....................104
Cámara retrovisora................................105
Otras funciones......................................107
10. RECEPCIÓN DE FM .............................110
11. SOLUCIÓN DE PROBLEMAS ..............111
12. INDICACIONES DE ERROR.................112
13. ESPECIFICACIONES............................113
•
Guía de instalación/conexión de cables
..115
12V NEG. GND. 530–1710kHz/ 87.9–107.9MHz
THIS DEVICE COMPLIES WITH PART 15 OF THE FCC RULES.
OPERATION IS SUBJECT TO THE FOLLOWING TWO CONDITIONS: (1)
THIS DEVICE MAY NOT CAUSE HARMFUL INTERFERENCE, AND (2)
THIS DEVICE MUST ACCEPT ANY INTERFERENCE RECEIVED,
INCLUDING INTERFERENCE THAT MAY CAUSE UNDESIRED OPERATION.
THIS PRODUCTION COMPLIES WITH DHHS RULES 21 CFR SUBCHAPTER J APPLICABLE AT DATE OF MANUFACTURE.
CLARION CO., LTD.
50 KAMITODA, TODA-SHI, SAITAMA-KEN, JAPAN.
Dolby noise reduction manufactured under license from Dolby Laboratories
Licensing Corporation.
“DOLBY” and the double-D symbol are trademarks of Dolby Laboratories
Licensing Corporation.
MODEL
QZ-2501B
MANUFACTURED:
SERIAL No.
286-8634-00
MADE IN JAPAN
SOURCE UNIT
APPAREIL PILOTE
UNIDAD FUENTE
THIS PRODUCT IS NOT INTENDED FOR VIEWING TELEVISION BROADCASTS OR VIDEO
TAPES OR FOR PLAYING VIDEO GAMES. Such uses of this product may distract the
driver or interfere with the driver’s safe operation of the motor vehicle and may violate
state law. CLARION DISCLAIMS ANY LIABILITY FOR ANY BODILY INJURY, INCLUDING
FATALITIES, OR PROPERTY DAMAGE THAT MAY RESULT FROM ANY SUCH UNINTENDED
USES OR FROM ANY IMPROPER USE OF THIS PRODUCT.
WARNING

English
Owner’s Guide
Français
Mode d’emploi
Español
Guía del usuario
5 6
■ Dual Action Panel – Fully-automatic movement of the operation panel
■ Single Package All Source Unit (Amplifier/Tuner/Cassette Dec k/CD Dec k,
7-Band Graphic Equalizer)
■ Various Character Panels
■ 100-Station Title Memory Function (CD title, AM/FM stations)
■ Twin Source (CD/CASSETTE) Mechanism
■ 7-Band Spectrum Analyzer/Equalizer
■ Environment Setting (CONFIGURATION) Function (Turns on and off the
illumination and background colors)
■ The CD Changer can store and play up to 18 CDs.
■ RCA Gold-plated LINE OUT
■ Remote Controller – Multi-function remote controller provided
3. FEATURES2.
CONTROLS / COMMANDES / CONTROLES
Note: Be sure to spread this page and refer to the front diagrams when you read each chapter.
Remarque:Veuillez déploy er cette page et v ous référez à ses schémas de la f ace a v ant quand
vous lisez chaque chapitre.
Nota: Cuando lea los capítulos, despliegue esta página para ver los diagramas de la parte frontal.
■
Panneau à double action – Mouvement entièrement automatique du panneau de commande
■ Appareil incorporant toutes les sources en un seul bloc (amplificateur/
tuner/lecteur de cassette/lecteur CD/égaliseur graphique à 7 plages)
■ Différents panneaux de caractères
■
Fonction de mémoire de titre pour 100 stations (titre de CD, stations AM/FM)
■ Mécanisme de source jumelée (CD/CASSETTE)
■ Égaliseur/analyseur de spectre à 7 plages
■ Fonction de réglage d’environnement (CONFIGURATION) (allume et éteint
l’éclairage et les couleurs du fond)
■ Le changeur CD peut mémoriser et lire jusqu’à 18 CD.
■ Prises LINE OUT RCA plaquées or
■ Télécommande – Télécommande multi-fonctions fournie
3. CARACTÉRISTIQUES
■
Panel de acción doble – Movimiento completamente automático del panel de operación
■
Unidad fuente completa en un solo paquete (amplificador/sintonizador/reproductor
de casetes/reproductor de discos compactos/ecualizador gráfico de 7 bandas)
■
Varios paneles de caracteres
■
Función de memoria de títulos de 100 emisoras (títulos de discos compactos y de
emisoras de AM/FM)
■
Mecanismo de fuente doble (CD/CASSETTE)
■
Analizador de espectro/ecualizador de 7 bandas
■
Función de ajuste ambiental (CONFIGURATION) (Activa y desactiva la iluminación y
los colores de fondo.)
■
Cambiador de discos compactos que puede almacenar y reproducir hasta 18 discos
compactos.
■
Tomas LINE OUT tipo RCA doradas
■
Controlador remoto – Controlador remoto multifuncional suministrado
3. CARACTERÍSTICAS
1
1
5
3
2
6
7
4
2 3
4
5
6
7
8
9
8
9
1916 1817
13
13
14
14
15
15
12
12
10
10
11
11
SOURCE UNIT / APPAREIL PILOTE / UNIDAD FUENTE
Opened Operation Panel
Panneau de commande ouvert
Panel de operación abierto
21
31
22
20
30
23
24
25
26
28 29
27
REMOTE CONTROL UNIT
TÉLÉCOMMANDE
CONTROLADOR REMOTO
Signal transmitter
Emetteur de
signaux infrarouges
Transmisor de señal
English
Owner’s Guide
Français
Mode d’emploi
Español
Guía del usuario
7
English
Owner’s Guide
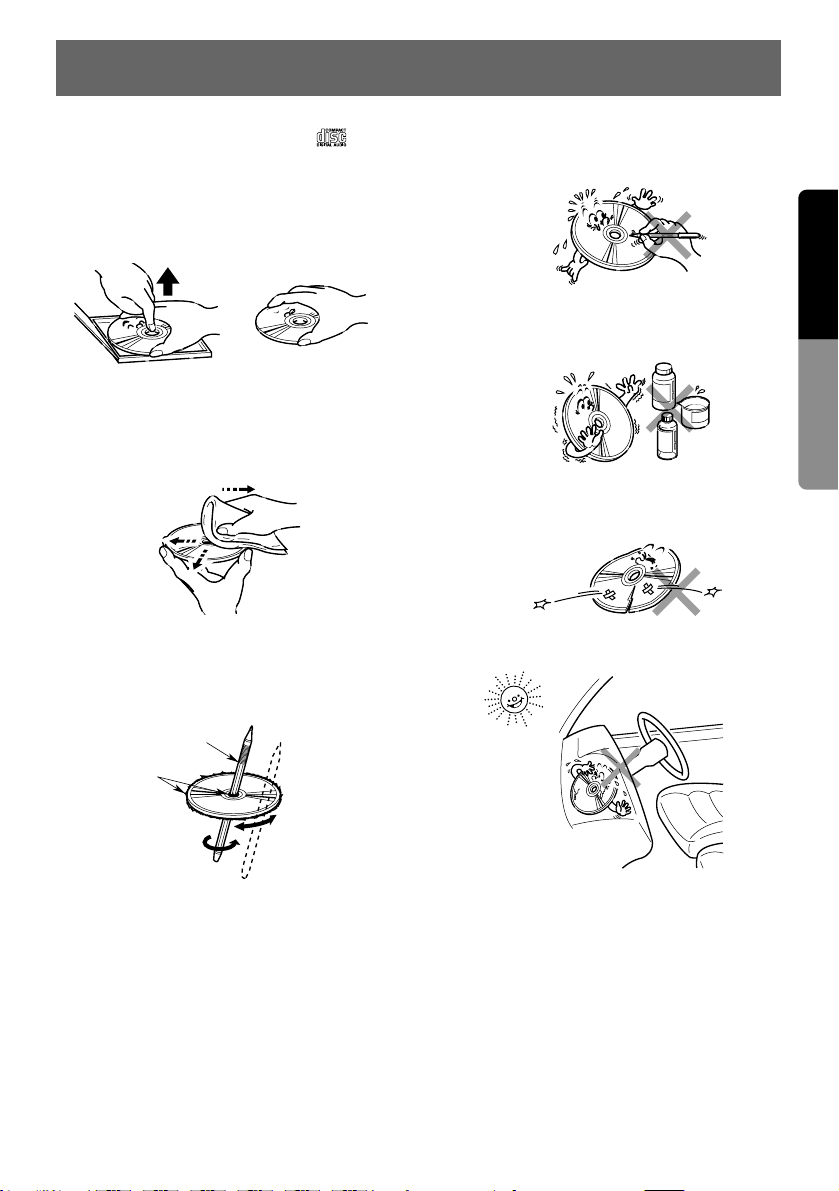
This unit has been designed specifically for playback of compact discs bearing the mark.
No other discs can be played.
To remove the compact disc from its storage
case, press down on the center of the case and
lift the disc out, holding it carefully by the edges.
Always handle the compact disc by the edges.
Never touch the surface.
To remove fingermarks and dust, use a soft
cloth, and wipe in a straight line from the center
of the compact disc to the circumference.
New discs may have some roughness around
the edges. The unit may not work or the sound
may skip if such discs are used. Use a ball-point
pen, etc. to remove roughness from the edge of
the disc.
Note on Compact Discs
Never stick labels on the surface of the compact
disc or mark the surface with a pencil or pen.
Do not use any solvents such as commercially
available cleaners, anti-static spray, or thinner to
clean compact discs.
Do not use compact discs that have large
scratches, are misshapen, or cracked, etc. Use
of such discs will cause misoperation or damage.
Do not expose compact discs to direct sunlight
or any heat source.
No
No
No
No
Ball-point pen
Roughness
Proper way to hold
the compact disc
Z
Z
Z
Removing the disc
4. HANDLING COMPACT DISCS
Note:
Do not use commercially available CD protection sheets or discs equipped with stabilizers, etc. These
may get caught in the internal mechanism and damage the disc.
8
English
Owner’s Guide
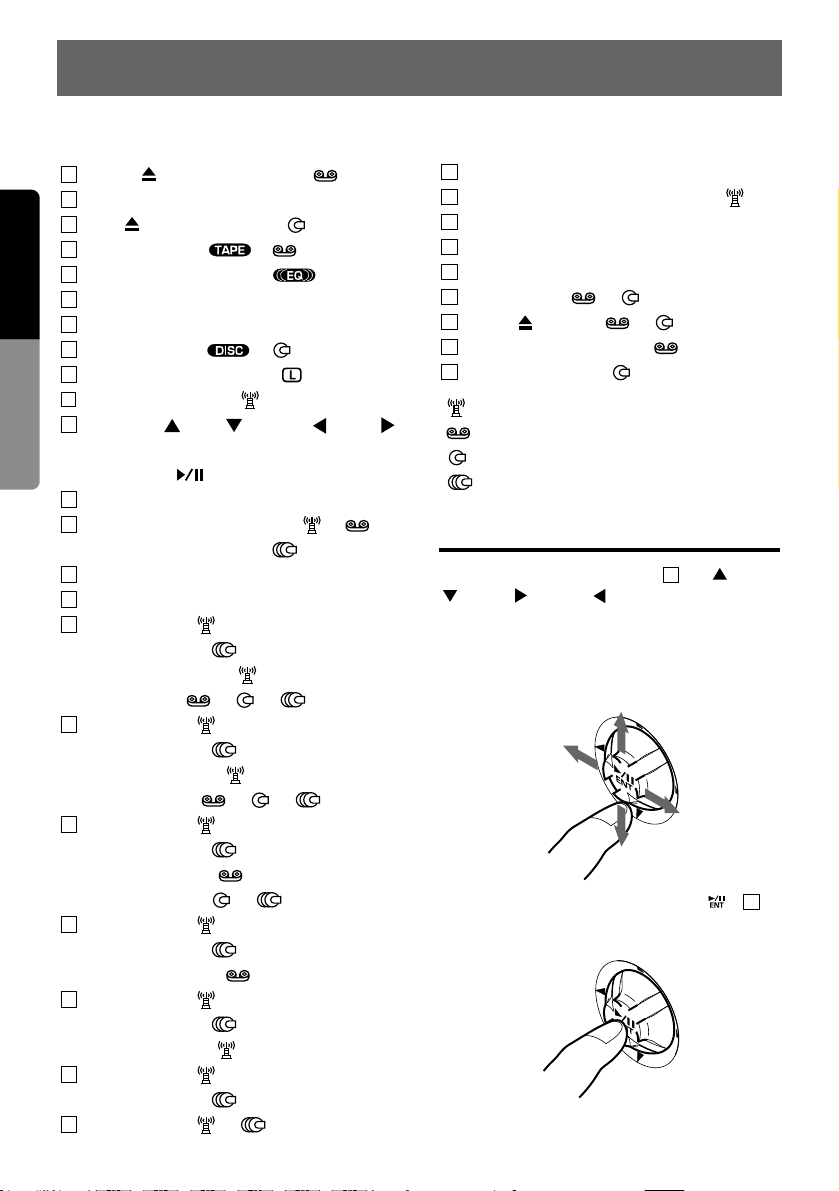
5. BUTTON TERMINOLOGY
Note: Be sure to read this chapter referring to the front diagrams of chapter “2. CONTROLS” on page
5 (spread).
TAPE ( : Tape Eject) Button [ ]
SLOPE Button
CD ( : CD Eject) Button [ ]
TAPE Indicator ( ) [ ]
EQ (Equalizer) Indicator ( )
A-M (Audio Mode) Button
VISU (Visual) Button
DISC Indicator ( ) [ ]
L (Monitor Lock) Indicator ( )
ADJ (Adjust) Button [ ]
Up/Down ( (Up)/ (Down), (Left)/
(Right)) Buttons
ENT (Enter ) Button
FUNC (Power/Function) Button
BND (Band/Program) Button [ ], [ ]
MAG (Magazine) Button [ ]
Receiver for remote control unit
EQ (Equalizer) Button
Preset Button [ ]
Disc No. Button [ ]
Preset Scan Button [ ]
Scan Button [ ], [ ], [ ]
Preset Button [ ]
Disc No. Button [ ]
Auto Store Button [ ]
Repeat Button [ ], [ ], [ ]
Preset Button [ ]
Disc No. Button [ ]
Dolby NR Button [ ]
Random Button [ ], [ ]
Preset Button [ ]
Disc No. Button [ ]
Blank Skip Button [ ]
Preset Button [ ]
Disc No. Button [ ]
Monaural Button [ ]
Preset Button [ ]
Disc No. Button [ ]
SHIFT Button [ ], [ ]
TITLE Button
ISR (Instant Station Recall) Button [ ]
MONI (Monitor) Button
DISP (Display) Button
Display
Close Button [ ], [ ]
Eject ( ) Button [ ], [ ]
Cassette Insertion Slot []
CD Insertion Slot []
[ ] : In Radio Mode
[ ] : In Tape Mode
[ ] : In CD Mode
[ ] : In CD Changer Mode
First Finger Control Operation
By sliding the Up/Down button up , down
, right , or left , you can select various
items and make settings. This function is called
the First Finger Control Operation. With this
function, you can select a menu or track, control
the volume, or change a frequency according to
the operation mode.
Press the center of the ENT button ( ) to
execute a selected menu, play/pause, or mute
on/off.
11
11
31
30
29
28
27
26
25
24
23
22
21
20
19
18
17
16
15
14
13
12
11
10
9
8
7
6
5
4
3
2
1
9
English
Owner’s Guide
Functions of Remote Control Unit Buttons
6. REMOTE CONTROL
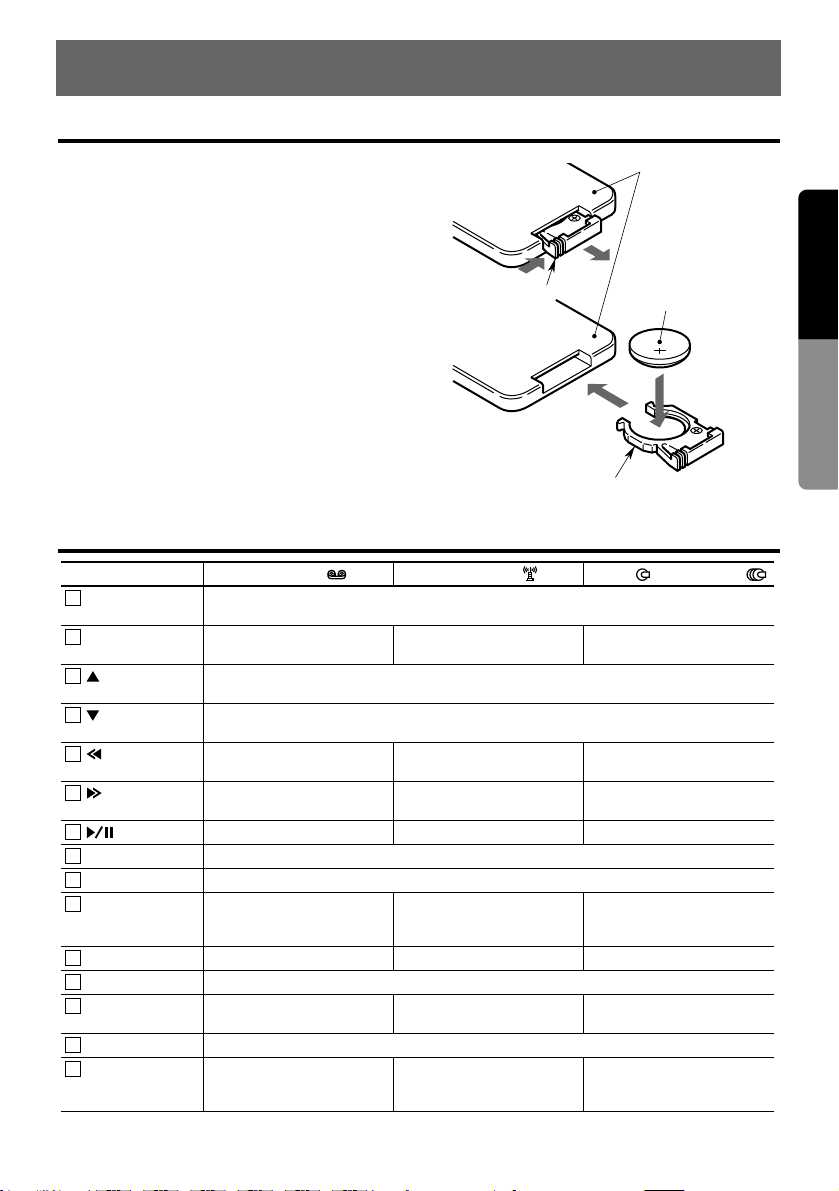
Inserting the Battery
1) Turn the remote control unit upside down,
push the lock in the direction of the arrow,
and pull out the battery holder.
2) Insert the enclosed battery (CR2025) with
the “+” side facing up.
3) Push the battery holder back in securely until
a click is heard.
Notes:
Using batteries improperly can cause them to
explode. Take note of the following points:
•
When replacing the battery, be sure to set the new
battery with the “+” side facing up.
•
Do not short-circuit, disassemble or heat batteries.
•
Do not dispose of batteries in flames.
•
Dispose of spent batteries in the proper place.
C
R
2
0
2
5
1)
3)
2)
Remote Control Unit
Enclosed battery
(CR2025)
Battery holder
Lock
Rear side
Button Tape Mode [ ] Radio Mode [ ]
CD Mode [ ]/CD Changer Mode [ ]
FUNC (POWER) Turns power on, switches between tape, radio, and CD, and turns power off when pressed
for 1 second or longer.
BAND (BAND/
DISC/PROG)
Switches playback direction
and cancels scan play.
Switches reception band. Switches the disc (only in CD
changer mode).
(VOLUME UP)
Turns volume up.
(VOLUME DOWN)
Turns volume down.
(SEARCH DOWN)
REW, APC-REW Preset channel down Search down
(SEARCH UP)
FF, APC-FF Preset channel up Search up
Play/Pause Switches mute on and off. Play/Pause
VISU (VISUAL) Switches the display to monitor.
DISP Displays and switches the spectrum analyzer patterns.
ISR Calls ISR. Calls ISR and stores a chan-
nel when pressed for about 2
seconds.
Calls ISR.
RPT (REPEAT) Repeat None Repeat
EQ (EQ PROG) Calls the EQ USER display.
RDM (RANDOM/
DOLBY NR)
Switches Dolby NR mode on
and off.
None Random
MONI (MONITOR) Switches the monitor on and off.
SCN
(SCAN PS/AS)
Scan Preset scan, stores a station
when pressed for about 2
seconds.
Scan
1
2
3
4
5
6
7
8
9
10
11
12
13
14
15
Note:
Functions of the source unit and the remote control unit differ slightly.
10
English
Owner’s Guide
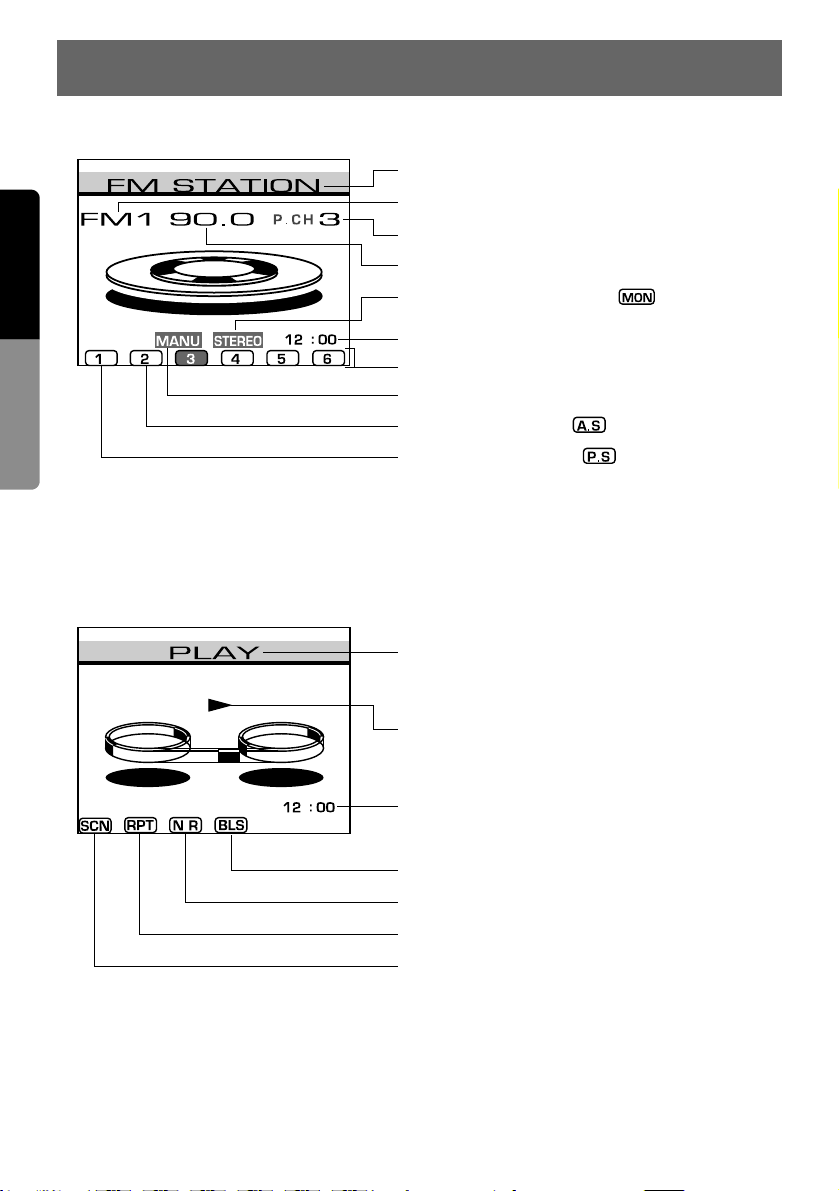
7. MODE DISPLAY
<Radio Mode>
<Tape Mode>
Station title
Preset channel
Frequency
Stereo/Monaural indication ( )
Current time
Preset Nos.
Manual indication
Preset scan indication ( )
Auto store indication ( )
Band
Playback direction
Tape status
PLAY, FF, REW, APC-FF, APC-REW,
PAUSE, EJECT, NO CASSETTE
Current time
Blank skip ON/OFF indication
Dolby NR ON/OFF indication
Repeat ON/OFF indication
Scan ON/OFF indication
11
English
Owner’s Guide
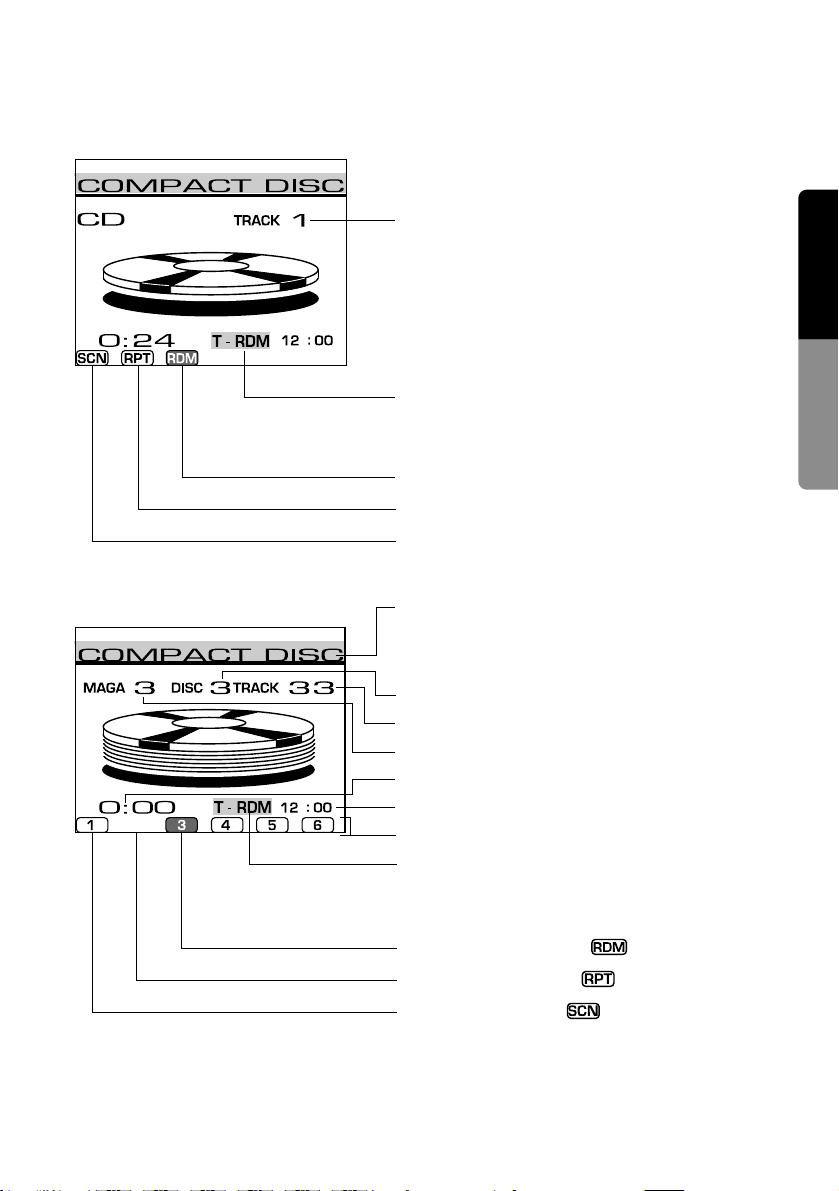
CD title
<CD Mode>
<CD Changer Mode>
Track No.
Display about track
Track random: “T-RDM”
Track repeat : “T-RPT”
Track scan : “T-SCN”
Random play indication
Repeat play indication
Scan play indication
Scan play indication ( )
Repeat play indication ( )
Random play indication ( )
Display about track
Track random: “T-RDM”
Track repeat : “T-RPT”
Track scan : “T-SCN”
Stored disc Nos.
Current time
Playback time counter
Magazine No.
Track No.
Disc No.
When a CD magazine is not loaded in the CD changer,
“NO MAGAZINE” is displayed and “DISC CHECK” is
displayed after that until the playback starts.
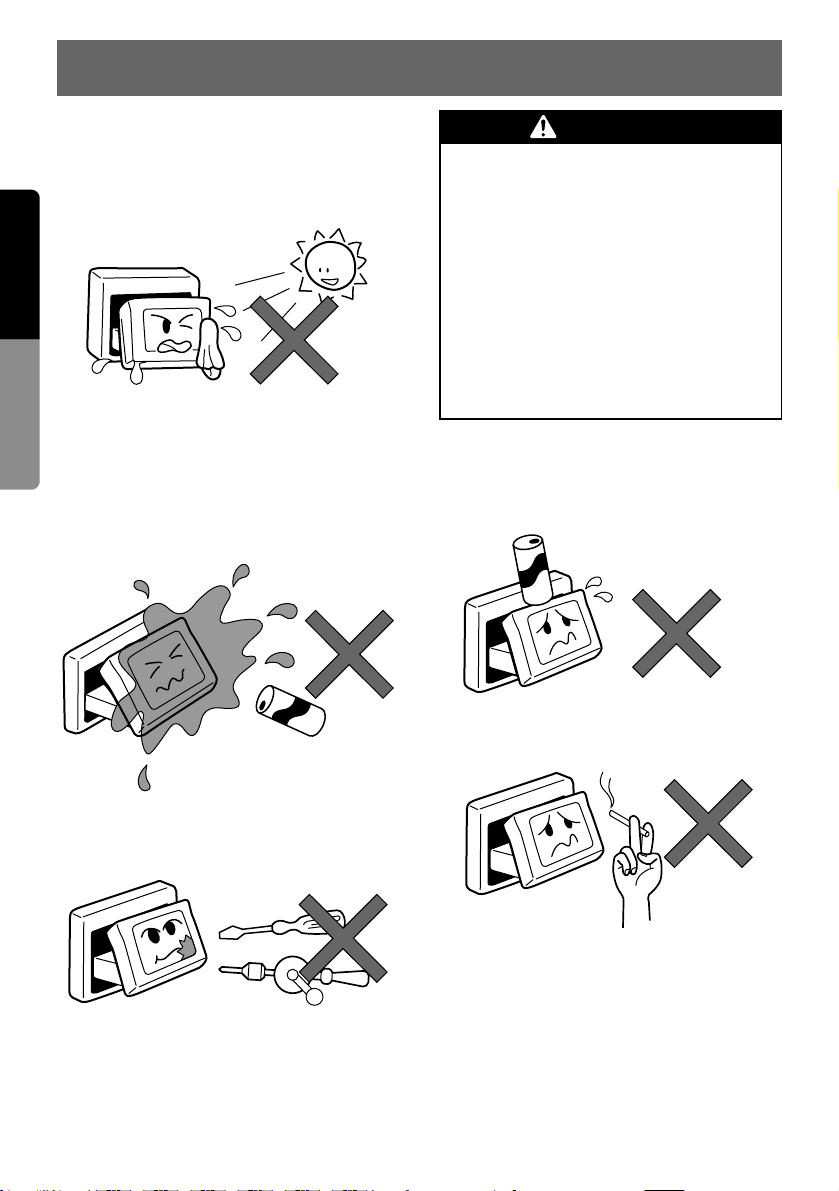
For a longer service life, be sure to read the following cautions.
•
Be sure to store the LCD panel inside the
source unit when parking the car outdoors for
long periods of time.
The LCD panel will operate properly in a temperature range of 32°F (0°C) to 140°F
(60°C).
•
Don’t allow any liquids on the set from drinks,
umbrellas etc. Doing so may damage the
internal circuitry.
•
Do not disassemble or modify the set in any
way. Doing so may result in damage.
•
Do not draw the LCD panel out and use it as
a tray. Also, subjecting the LCD panel to
shocks may result in breakage, deformation
or other damage.
•
Do not let cigarettes burn the LCD panel.
Doing so may damage or deform the cabinet.
•
If a problem should occur, have the set
inspected at your store of purchase.
•
Do not insert objects or poke in the space
between the LCD panel and the source unit
when the panel is tilted.
•
Do not place anything on the LCD panel
when the LCD panel is tilted.
No
No
No
No
No
12
English
Owner’s Guide
8. CAUTIONS ON HANDLING
THIS PRODUCT IS NOT INTENDED FOR
VIEWING TELEVISION BROADCASTS OR
VIDEO TAPES OR FOR PLAYING VIDEO
GAMES. Such uses of this product may
distract the driver or interfere with the driver’s safe operation of the motor vehicle
and may violate state law. CLARION DISCLAIMS ANY LIABILITY FOR ANY BODILY
INJURY, INCLUDING FATALITIES, OR
PROPERTY DAMAGE THAT MAY RESULT
FROM ANY SUCH UNINTENDED USES OR
FROM ANY IMPROPER USE OF THIS
PRODUCT.
WARNING
 Loading...