


Ownerʼs manual Mode d'emploi
Manual de instrucciones
Bluetooth® SD/MP3 RECEIVER
RÉCEPTEUR Bluetooth® SD/MP3
RECEPTOR Bluetooth® SD/MP3

English
CLARION PRODUCT REGISTRATION INFORMATION
For USA and Canada only
Dear Customer:
Congratulations on your purchase of a Clarion mobile electronic products. We are confident that youʼll enjoy your Clarion experience.
There are many benefits to registering your product. We invite you to visit our website at www.clarion.com to register your Clarion product.
We have made product registration simple with our easy to use website. The registration form is short and easy to complete. Once youʼre registered, we can keep you informed of important product information.
Register at www.clarion.com - itʼs easy to keep your Clarion product up to date.
Contents |
|
|
1. |
FEATURES ........................................................................................................................... |
2 |
2. |
PRECAUTIONS .................................................................................................................... |
3 |
3. |
HANDLING MEMORY CARD ............................................................................................... |
4 |
4. |
CONTROLS .......................................................................................................................... |
5 |
|
MAIN UNIT ............................................................................................................................ |
5 |
5. |
NOMENCLATURE ................................................................................................................ |
6 |
|
Names of the Buttons and Their Functions ........................................................................... |
6 |
|
Display Items ......................................................................................................................... |
7 |
|
LCD Screen ........................................................................................................................... |
7 |
6. |
DCP (Detachable Control Panel) ........................................................................................ |
8 |
7. |
OPERATIONS ....................................................................................................................... |
9 |
|
Basic Operations ................................................................................................................... |
9 |
|
Radio Operations ................................................................................................................ |
10 |
|
MP3 Operations .................................................................................................................. |
12 |
|
Introduction to Bluetooth® Wireless Technology................................................................... |
19 |
|
Handsfree Operations ......................................................................................................... |
22 |
|
Audio Streaming Operations ............................................................................................... |
25 |
|
Common Operations ........................................................................................................... |
26 |
|
Compatible Devices ............................................................................................................ |
31 |
8. |
ADDITIONAL INFORMATION ............................................................................................ |
32 |
9. |
TROUBLESHOOTING ........................................................................................................ |
34 |
10. |
ERROR DISPLAYS ............................................................................................................ |
37 |
11. |
SPECIFICATIONS .............................................................................................................. |
38 |
1. FEATURES
 Built in Bluetooth® Handsfree (HFP) and audio streaming (A2DP & AVRCP).
 MP3 playback via SD card slot.
  728-variable color illuminated design.
2FB275BT / FB275BTB
2. PRECAUTIONS
This equipment has been tested and found to comply with the limits for a Class B digital device, pursuant to Part 15 of the FCC Rules.
These limits are designed to provide reasonable protection against harmful interference in a residential installation.
This equipment generates, uses, and can radiate radio frequency energy and, if not installed and used in accordance with the instructions, may cause harmful interference to radio communications. However, there is no guarantee that interference will not occur in a particular installation.
If this equipment does cause harmful interference to radio or television reception, which can be determined by turning the equipment off and on, the user is encouraged to consult the dealer or an experienced radio/TV technician for help.
! CAUTION
USE OF CONTROLS, ADJUSTMENTS, OR PERFORMANCE OF PROCEDURES OTHER THAN THOSE SPECIFIED HEREIN, MAY RESULT IN HAZARDOUS RADIATION EXPOSURE.
THECOMPACTDISCPLAYERSHOULDNOT BE ADJUSTED OR REPAIRED BY ANYONE EXCEPT PROPERLY QUALIFIED SERVICE PERSONNEL.
INFORMATION FOR USERS:
CHANGES OR MODIFICATIONS TO THIS PRODUCT NOTAPPROVED BYTHE MANUFACTURER WILL VOID THE WARRANTY AND WILL VIOLATE FCC APPROVAL.
English
Warning:
Changes or modifications to this equipment not expressly approved by the party responsible for compliance could void the userʼs authority to operate the equipment.
Operation is subject to the following two conditions:
(1) This device may not cause interference, and
(2) This device must accept any interference, including interference that may cause undesired operation of the device.
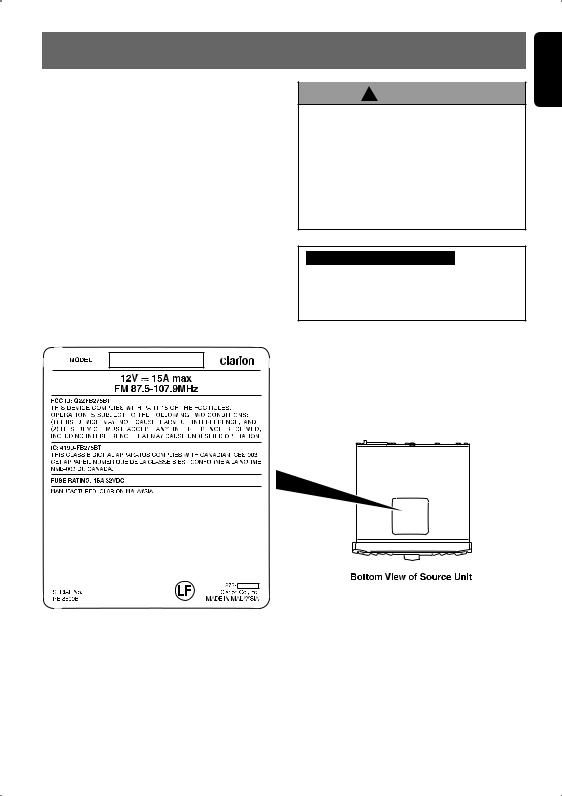
SD Logo is a trademark.
The Bluetooth® word mark and logos are owned by the Bluetooth® SIG, Inc. and any use of such marks by Clarion Co.,Ltd. is under license. Other trademarks and trade names are those of their respective owners.
FB275BT / FB275BTB |
3 |
English
3. HANDLING MEMORY CARD
SD/MMC Memory Card
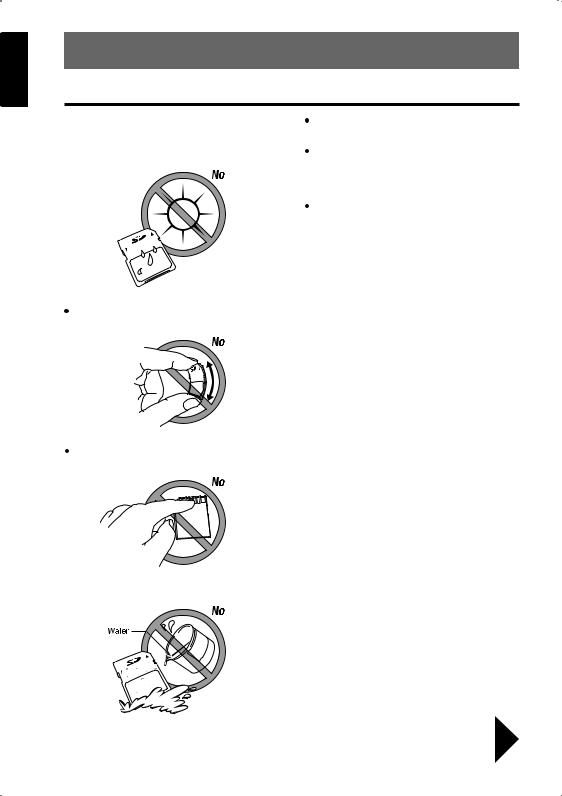
 Do not leave the card in vehicle where there is high temperature or direct sunlight or where electromagnetic waves or electrostatic are easily generated.
When the card is being read, do not remove the card.
After eject operation, always remove the memory card from the slot; otherwise, the flip down panel may not be closed properly.
After usage, store the supplied memory card in the enclosed case.
Do not bend or drop the card. The card or the recorded content may be damaged.
Do not touch the terminals on the back of the card with your fingers.
 Do not allow dirt, dust or water to enter it.
|
Be sure to unfold and read the next page. |
|
Veuillez déployer et vous référer à la page suivante. |
4 |
Cerciórese de desplegar y de leer la página siguiente. |
FB275BT / FB275BTB |
English |
4. CONTROLS / COMMANDES / |
|
CONTROLES |
||
|
||
Français |
MAIN UNIT / APPAREIL PRINCIPAL / UNIDAD PRINCIPAL |
|
|
||
Español |
|
English
With the FLIP DOWN PANEL opened / Ouvrez le PANNEAU RABATTABLE / Apertura del PANEL ABATIBLE
FENTE DE CARTE MÉMOIRE SD/MMC
RANURA PARA TARJETA DE MEMORIA SD/MMC
Note: Be sure to unfold this page and refer to the front diagrams as you read each chapter.
Remarque:Veuillez déplier cette page et vous référer aux schémas quand vous lisez chaque chapitre.
Nota: Cuando lea los capítulos, despliegue esta página y consulte los diagramas.
5FB275BT / FB275BTB

Display Items
English
Some of the modes will change the whole display such as volume, Adjustment mode and file navigation.
LCD Screen
In extreme cold, the screen movement may slow down and the screen may darken, but this is normal. The screen will recover when it returns to normal temperature.
Please take note that reflection of the screen cover may increase due to direct sunlight exposure, thus this might decrease the visibility of the LCD screen.
FB275BT / FB275BTB |
7 |
English
5. NOMENCLATURE
Notes:
Be sure to read this chapter referring to the front diagrams of chapter “4. CONTROLS” on page 5.  SD is the abbreviation of Secure Digital Card while MMC is the abbreviation of Multimedia card.
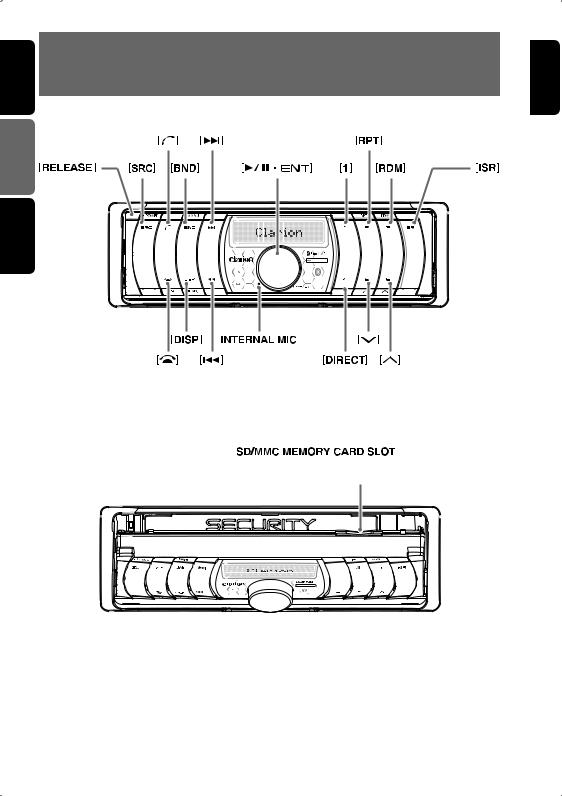
Names of the Buttons and Their Functions
SD/MMC MEMORY CARD SLOT
 SD/MMC memory card insertion slot.
[RELEASE] button
 Deeply push in the button to unlock the flip down panel.
[ |
knob |
|
Adjustthevolumebyturningtheknobclockwise |
|
or counterclockwise. |
|
Press and hold the knob for 1.5 seconds or |
|
longer to perform auto store in the Radio |
|
mode. |
|
Play or pause a track while in the SD/BT Audio |
|
mode. |
|
Press and hold the knob for 1.5 seconds or |
|
longer to perform manual navigation in the SD |
|
mode. |
|
Perform next level adjustment or selection in |
|
the Adjustment mode. |
|
Perform various settings. |
INTERNAL MIC
 Built-in internal microphone.
[SRC] button
 Press the button to turn on the power.
Press and hold the button for 1.5 seconds or longer to turn off the power.
Switch the Operation mode among the Radio mode, SD mode, BT Audio mode and AUX mode.
button
 Accept an incoming call or make outgoing call.
[] button
 Reject an incoming call or end a call. Cancel current operation.
[BND] button
 Switch the band while in the Radio mode.
Press and hold the button for 1.5 seconds or longer to toggle seek/manual tuning.
Play the first track in current folder while in the SD mode.
Press and hold the button for 1.5 seconds or longer to play the first track in the memory card.
6FB275BT / FB275BTB
[DISP] button
During SD mode, switch the display indication in the following order:
Track Name |
Folder Name Title Tag |
Album Tag |
Artist Tag Track Name... |
Press and hold the button for 1.5 seconds or longer to enter the Adjustment mode.
buttons
Seek a station while in the Radio mode or select a track when listening to a SD/BT Audio mode.
These buttons are also being used to make various settings.
[1] button
 Restart current track in the SD mode.
[RPT] button
Perform track repeat play while in the SD mode.
Press and hold the button for 1.5 seconds or longer to perform folder repeat play while in the SD mode.
[RDM] button
Perform track random play while in the SD mode.
Press the button to toggle track random/folder random/card random/random off while in the SD mode.
 Press and hold the button for 1.5 seconds or longer to perform quick random folder play.
buttons
 Select the folder in the SD mode.
[DIRECT] buttons
Store a station into memory or recall it directly while in the Radio mode.
Store a telephone number into memory or recall it directly while in the Telephone mode.
[ISR] button
 Recall ISR radio station in memory.
Press and hold for 1.5 seconds or longer: Store current station into ISR memory (Radio mode only).
English
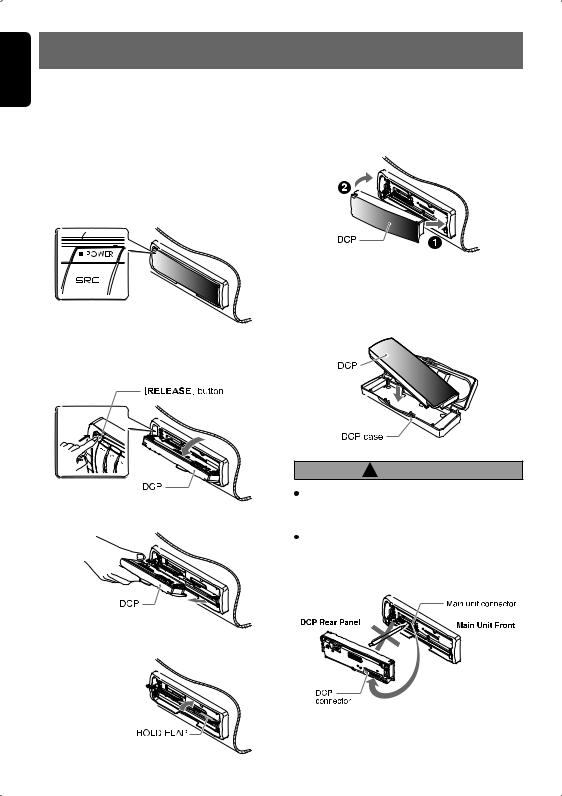
6. DCP (Detachable Control Panel)
The control panel can be detached to prevent theft. When detaching the control panel, store it in the DCP (Detachable Control Panel) case to prevent scratches.
We recommend taking the DCP with you when leaving the car.
Removing the DCP
1.Press the [SRC] button for 1.5 seconds or longer to switch off the power.
2.Press in the [RELEASE] button.
The flip down panel can only be opened up to 65˚, please do not forcibly push to open further.
3. Pull the DCP toward you and remove it.
4. Close the HOLD FLAP.
Attaching the DCP
1.Insert the right side of the DCP into the main unit.
2.Insert the left side of the DCP to attach into the main unit.
Storing the DCP in the DCP case
Hold the DCP, in the orientation as shown in the figure below, and put it into the supplied DCPcase. (Ensure the DCP is in the correct orientation.)
! CAUTION
The DCP can easily be damaged by shock. After removing it, be careful not to drop it or subject it to strong shocks.
The connector connecting the main unit and the DCP is an extremely important part. Be careful not to damage it by pressing on it with fingernails, pens, screwdrivers, etc.
Note:
 If the DCP is dirty, wipe off the dirt with a soft, dry cloth only.
8FB275BT / FB275BTB
7. OPERATIONS
Note: Be sure to read this chapter referring to the
Basic Operations front diagrams of chapter “4. CONTROLS” on page 5.
! CAUTION
Be sure to lower the volume before switching off the unit power or the ignition key. The unit remembers its last volume setting. If you switch the power off with the volume up, when you switch the power back on, the sudden loud volume may hurt your hearing and damage the unit.
Turning on/off the power
1.Press the [SRC] button.
2.The illumination and display on the unit light up. The unit automatically remembers its last Operation mode and will automatically switch to display that mode.
3.Press and hold the [SRC] button for 1.5 seconds or longer to turn off the power for the unit.
A welcome animation will be displayed at the first time. This animation can be turned on or off in the Adjustment mode.
Notes:
Be careful about using this unit for a long time without running the engine. If you drain the carʼs battery too much, you may not be able to start the engine and this can reduce the service life of the battery.
 The unit will automatically prevent from being turned on the power for a few seconds after power off for internal protection purposes.
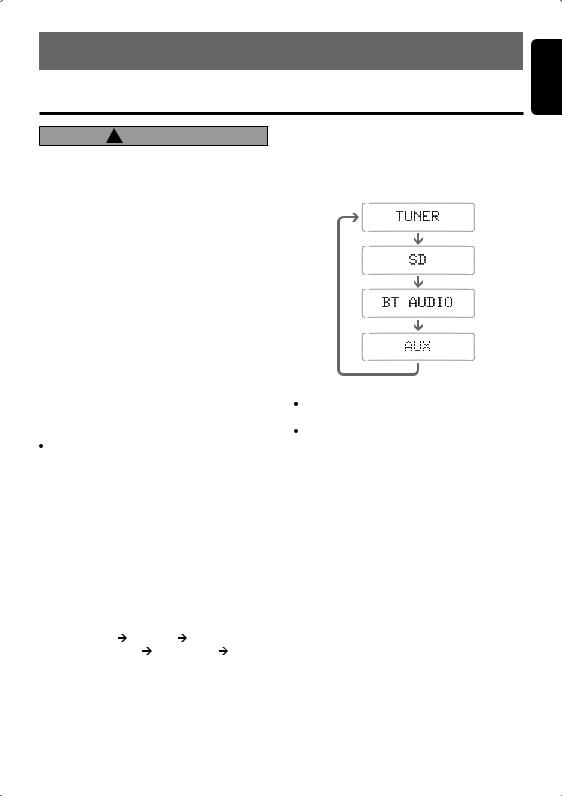
Selecting a mode
1.Press the [SRC] button to change the Operation mode.
2.Each time you press the [SRC] button, the Operation mode changes in the following order:
Radio mode SD mode
(BT Audio mode AUX mode) Radio mode...
AUX mode is only available if AUX is enabled in ADJ mode while BT Audio mode will only be available if there is A2DP connection.
And the following title will be displayed for a moment each time the mode changes.
Notes:
There will be screen wipe transition in between if animation is enabled in Adjustment mode.
If the SD mode is selected when no SD memory card is inserted, the display shows “NO CARD”.
Switching the display
Press the [DISP] button to select the desired display.
When the [DISP] button is pressed at the first time, the current display type will be displayed. Further pressing the [DISP] button will switch the display in the following order:
 SD mode
“TRACK” “FOLDER”
 “TITLE”
 “ALBUM”
  “ARTIST”
 “TRACK” ...
Once selected, the preferred display becomes the display default. When a function adjustment such as volume is made, the screen will momentarily switch to that functionʼs display, then revert back to the preferred display several seconds after the adjustment.
English
FB275BT / FB275BTB |
9 |

English |
Basic Operations |
|
Adjusting the volume |
|
|
|
|
|
|
Turning the |
knob clockwise in- |
|
creases the volume; turning it counterclockwise |
|
|
decreases the volume. |
|
“VOLUME 0” to “VOLUME 33” will be displayed depends on the volume level.
Factory default setting for volume is “VOLUME 13”.
AUX function
This system has AUX RCA input in the rear panel where you can listen to sounds and music from external devices connected to this unit.
1.Connect the external music player to the AUX RCA input.
2.Enable the AUX function in Adjustment mode. Please refer “Setting AUX function” on page 27 for more details.
3.Press the [SRC] button to select theAUX mode to activate the AUX function.
Note:
 Volume can be adjusted through the unit.
Please refer chapter “Common Operations” on page 26 for more operation controls.
Radio Operations
Listening to the radio
1.Press the [SRC] button and select the Radio mode, then the radio will be on.
2.To select a preset band, press the [BND] but-
ton, then select one of the preset bands such as FM1, FM2 or FM3. Every time the [BND] button is pressed, the display will change as:
FM1 FM2 FM3 |
FM1... |
3. Press the |
button to tune in the |
desired station. |
|
Initial frequency display is “87.50MHz”.
Seek tuning
There are 2 types of seek tuning: DX SEEK and LOCAL SEEK.
DX SEEK can automatically tune in to receivable broadcast stations; LOCAL SEEK can tune in to only broadcast stations with a good reception sensitivity.
1.Press the [BND] button and select the desired FM band.
Press and hold the [BND] button for 1.5 seconds or longer to switch to Auto Seek mode. Make sure “SEEK TUNE” is displayed briefly.
2. Press the |
, |
button to start automatic |
station tuning. |
|
|
When the |
] button is pressed, search |
|
will be performing in the direction of higher fre- |
||
quencies. When the |
button is pressed, |
|
search will be performed in the direction of |
||
lower frequencies. |
|
|
DX SEEK |
|
|
When the |
button is pressed, search will be |
|
performing in the direction of higher frequencies. When the button is pressed, search will be performed in the direction of lower frequencies.
When seek tuning starts, “DX” appears in the display.
10 FB275BT / FB275BTB
Radio Operations
LOCAL SEEK |
Auto store |
|
If the button is pressed and held in position for |
Auto store is a function for storing up to 6 stron- |
|
1.5 seconds or longer, local seek tuning will be |
gest stations that are automatically tuned in |
|
enabled. Broadcast stations with good reception |
sequentially. If 6 receivable stations cannot be |
|
sensitivity are selected. |
received, a previously stored station remains un- |
|
When local seeking starts, “LO” appears in the |
overwritten at the memory position. |
|
display. |
1. Push and hold the |
knob for |
|
||
Manual tuning |
1.5 seconds or longer. The stations with good |
|
reception are stored automatically to the preset |
||
There are 2 ways available: Quick tuning and |
channels. |
|
step tuning. |
Notes: |
|
When you are in the step Tuning mode, the fre- |
The stations are stored in FM3 even if FM1 or FM2 |
|
quency changes one step at a time. In the Quick |
was chosen for storing stations. |
|
Tuning mode, you can quickly tune the desired |
The auto store procedure may take up to 40 sec- |
|
frequency. |
onds to complete. |
|
1. Press the [BND] button and select the desired |
Recalling a preset station |
|
FM band. |
|
|
Press and hold the [BND] button for 1.5 seconds |
A total of 18 preset positions (6-FM1, 6-FM2, 6- |
|
or longer to switch to Manual Seek mode. Make |
FM3) exists to store individual radio stations in |
|
sure “MANUAL TUNE” is displayed briefly. |
memory. Pressing the corresponding [DIRECT] |
|
2. Tune into a station. |
button recalls the stored radio frequency auto- |
|
matically. |
||
|
Quick tuning
Press and hold the |
button for 1.5 sec- |
onds or longer to begin station tuning. |
|
Step tuning |
|
Press the |
button to perform manual |
tuning. |
|
1.Press the [BND] button and select the desired FM band.
2.Press the corresponding [DIRECT] button to recall the stored station.
Press and hold one of the [DIRECT] buttons for 1.5 seconds or longer to store that station into preset memory.
Preset memory function |
Note: |
|
If there is no preset channel stored, “- -EMPTY- -” is |
||
Preset memory function can store up to 18 sta- |
||
displayed briefly and reverts to previous frequency |
||
tions: |
display. |
|
Six stations for each of FM1, FM2, and FM3. |
|
Factory default setting is empty for all channels.
Manual memory function
1.Press the [BND] button, to select a band you want to store in the memory.
2. Press the |
, |
button to tune into a |
desired station. |
|
|
Instant station recall (ISR)
Instant station recall is a special radio preset that instantly accesses a favorite radio station at a touch of a button. The ISR function even operates with the unit in other modes.
3.Press and hold one of the [DIRECT] buttons for 1.5 seconds or longer to store the current station into preset memory and “SAVED” will be displayed briefly.
English
FB275BT / FB275BTB 11

English
Radio Operations
ISR memory
1.Select the station that you wish to store in ISR memory during Tuner mode.
2.Press and hold the [ISR] button for 1.5 seconds or longer to store the current station into memory and “SAVED” will be displayed briefly.
Recalling a station with ISR
In any mode, press the [ISR] button to turn on the radio function and tune the selected radio station. “
 ” appears in the display and the indicator lit on. Press the [ISR] button again to return to the previous mode.
Notes:
ISR mode cannot be accessed during Adjustment/ Manual Navigation/Telephone mode.
If there is no station stored in ISR, “- -EMPTY- -” is displayed briefly and reverts to previous mode
display. “ISR” indicator will not be lit on.
MP3 Operations
What is SD/MMC card?
The MultiMediaCard (MMC) and Secure Digital (SD) are flash memory (non-volatile) card format that are used to store large capacity of data in a compact and slim size of media. SD memory cards are based on the older MultiMediaCard (MMC) format with additional features such as write protection switch.
Memory card that can be played are limited to those recognized as SD or MMC; operation is not guaranteed with all SD memory card from all manufacturers. For SD/MMC memory card compatibility, please consult your nearest Clarion dealer for more information.
To prevent the accidental loss of data, always back up important data to your computer.
Audio files playable on this unit are limited to MP3 files. AAC, WMA or other audio formats are not supported.
This unit doesnʼt support SDHC (Secure Digital High Capacity) and SDIO (input/output) cards.
This unit supports SD memory card up to 2GB based on SD Association standard.
What is MP3?
MP3 is an audio compression method and classified into audio layer 3 of MPEG standards. This audio compression method has penetrated into PC users and become a standard format. This MP3 features the original audio data compression to about 12 percent of its initial size with a high quality sound. This means that several music CDs can be recorded on a SD card to allow a long listening time .
Depends on the SD card storage capacity.
12 FB275BT / FB275BTB
 Loading...