


M275
MARINE CD/MP3/WMA RECEIVER
RADIO CD/MP3/WMA MARIN
LETTORE CD/MP3/WMA PER USO MARINO
RECEPTOR MARINE CD/MP3/WMA
Ownerʼs manual
Mode dʼemploi
Istruzioni per lʼuso
Manual de instrucciones
1. FEATURES
Auxiliary Audio Input
CD-R, CD-RW, WMA, & MP3 Compatible
Rotary Volume Control & HD Display
1. FEATURES ..............................................................................................................................2
2. CONTROLS
.............................................................................................................................3
MAIN UNIT ................................................................................................................................3
3. NOMENCLATURE
...................................................................................................................4
Names of the Buttons and Their Functions ..............................................................................4
Display Items ............................................................................................................................5
LCD Screen ..............................................................................................................................5
4. PRECAUTIONS .......................................................................................................................6
5. HANDLING COMPACT DISCS ................................................................................................
7
6. DCP
(
Detachable Control Panel
)
...........................................................................................8
7. OPERATIONS
..........................................................................................................................9
Basic Operations ......................................................................................................................9
Radio Mode Operations .......................................................................................................... 12
CD/MP3/WMA Mode Operations ............................................................................................ 14
8. OTHER OPERATIONS
..........................................................................................................20
9. TROUBLESHOOTING
...........................................................................................................22
10. ERROR DISPLAYS
...............................................................................................................23
11. SPECIFICATIONS
.................................................................................................................24
Contents
2
M275
CLARION PRODUCT REGISTRATION INFORMATION
For USA and Canada only
Dear Customer:
Congratulations on your purchase of a Clarion mobile electronic products. We are confident that
youʼll enjoy your Clarion experience.
There are many benefits to registering your product. We invite you to visit our website at www.
clarion.com to register your Clarion product.
We have made product registration simple with our easy to use website. The registration form
is short and easy to complete. Once youʼre registered, we can keep you informed of important
product information.
Register at www.clarion.com - itʼs easy to keep your Clarion product up to date.
www.clarion.com
Be sure to unfold and read the next page.
Veuillez déplier et vous référer à la page suivante.
Assicurarsi di aprire e leggere la pagina successiva.
Cerciórese de desplegar y de leer la página siguiente.
M275
3
English
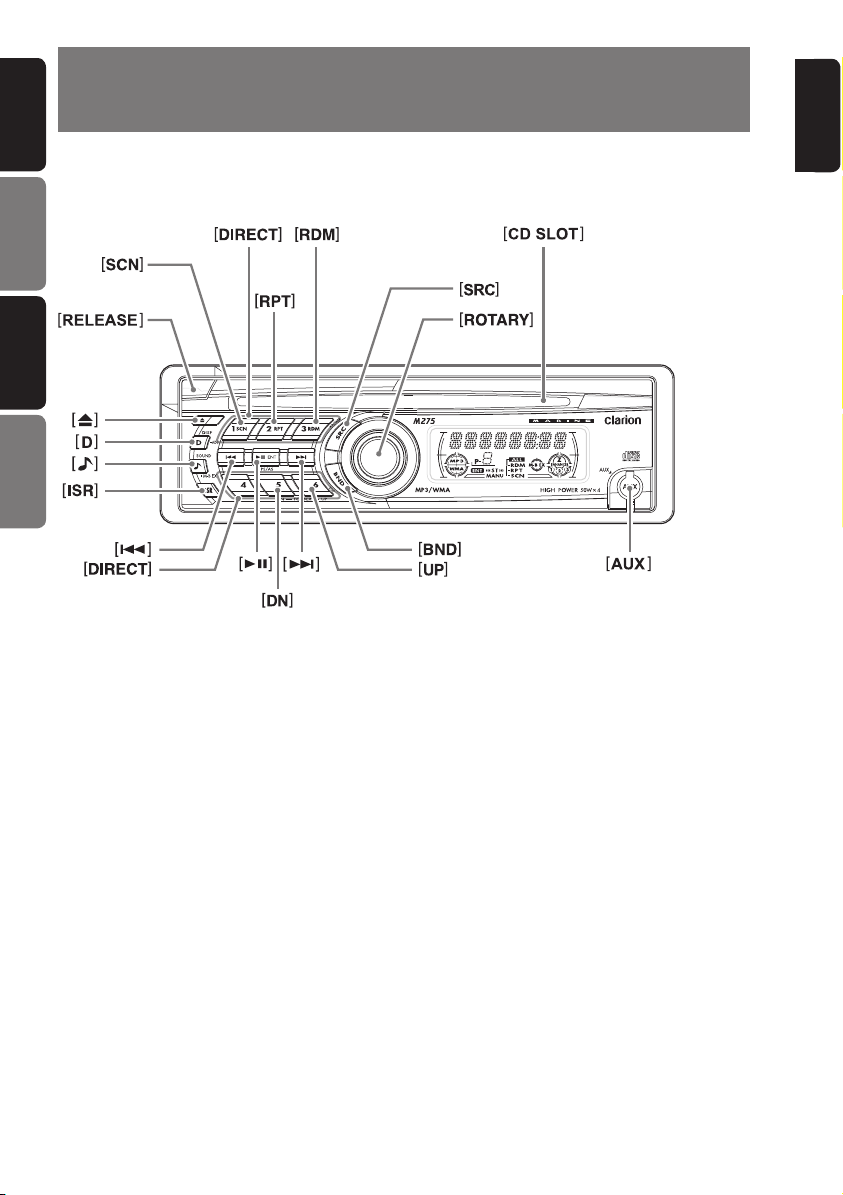
2.
MAIN UNIT / APPAREIL PRINCIPAL /
APPARECCHIO PRINCIPALE / UNIDAD PRINCIPAL
CONTROLS / LES COMMANDES /
CONTROLLI / CONTROLES
English Français Italiano Español
Note: Be sure to unfold this page and refer to the front diagrams as you read each chapter.
Remarque: Veuillez déplier cette page et vous référer aux schémas quand vous lisez chaque chapitre.
Nota: Assicurarsi di aprire questa pagina e fare riferimento a questi diagrammi quando si legge ciascun capitolo.
Nota: Cuando lea los capítulos, despliegue esta página y consulte los diagramas.
6
English
M275
4. PRECAUTIONS
1. When it is very cold in the boat and the unit is
used soon after switching on the heater, the
disc and the optical components may become
fogged and not operate properly. Wipe fogged
discs with a soft cloth. Fogged optical compo-
nents will naturally return to normal when the
unit is left for about one hour after which it will
operate normally.
2. When the boat is underway in rough water the
sound may skip as a result of intense vibra-
tions and shock.
3. This unit uses a precision mechanism. Even in
the event that trouble arises, never open the
case, disassemble the unit, or lubricate the
rotating parts.
USE OF CONTROLS, ADJUSTMENTS,
OR PERFORMANCE OF PROCEDURES
OTHER THAN THOSE SPECIFIED HEREIN,
MAY RESULT IN HAZARDOUS RADIATION
EXPOSURE.
THE COMPACT DISC PLAYER SHOULD NOT
BE ADJUSTED OR REPAIRED BY ANYONE
EXCEPT PROPERLY QUALIFIED SERVICE
PERSONNEL.
CHANGES OR MODIFICATIONS TO THIS
PRODUCT NOT APPROVED BY THE MANU-
FACTURER WILL VOID THE WARRANTY
AND WILL VIOLATE FCC APPROVAL.
INFORMATION FOR USERS:
CAUTION
!
This equipment has been tested and found to
comply with the limits for a Class B digital device,
pursuant to Part 15 of the FCC Rules.
These limits are designed to provide reasonable
protection against harmful interference in a resi-
dential installation.
This equipment generates, uses, and can radiate
radio frequency energy and, if not installed and
used in accordance with the instructions, may
cause harmful interference to radio communica
-
tions. However, there is no guarantee that inter-
ference will not occur in a particular installation.
If this equipment does cause harmful interfer-
ence to radio or television reception, which can
be determined by turning the equipment off and
on, the user is encouraged to consult the dealer
or an experienced radio/TV technician for help.

7
English
M275
This unit h as be en desi gned sp ecifi cally f or
playback of compact discs bearing the
mark. No other discs can be played.
To remove the compact disc from its storage
case, press down on the center of the case and
lift the disc out, holding it carefully by the edges.
Note:
Do not use commercially available CD protection sheets or discs equipped with stabilizers, etc. These may
get caught in the internal mechanism and damage the disc.
Never stick labels on the surface of the compact
disc or mark the surface with a pencil or pen.
Always handle the compact disc by the edges.
Never touch the surface.
To remove fingermarks and dust, use a soft cloth,
and wipe in a straight line from the center of the
compact disc to the circumference.
New discs may have some roughness around
the edges. The unit may not work or the sound
may skip if such discs are used. Use a ball-point
pen, etc. to remove roughness from the edge of
the disc.
Do not use any solvents such as commercially
available cleaners, anti-static spray, or thinner to
clean compact discs.
Do not use compact discs that have large scratch
-
es, are misshapen, or cracked, etc. Use of such
discs will cause misoperation or damage.
Do not expose compact discs to direct sunlight or
any heat source.
Note on compact discs
5. HANDLING COMPACT DISCS

[
DIRECT
]
buttons
Store a station into memory or recall it directly
while in the Radio mode.
[
]
button
Perform preset scan while in the Radio mode.
Press and hold the button for 2 seconds or
longer to perform auto store.
Play or pause a track while in the CD/MP3/WMA
mode.
Perform second level adjustment or selection.
[
UP
]
,
[
DN
]
buttons
Select the folder
(
MP3/WMA disc only
)
.
[
RDM
]
button
Perform random play while in the CD/MP3/WMA
mode.
Press and hold the button for 1 second or
longer to perform all random play while in the
MP3/WMA mode.
4
M275
3. NOMENCLATURE
[
RELEASE
]
button
Press the
[
RELEASE
]
button to unlock the
detachable panel.
English
Note:
Be sure to read this chapter referring to the front diagrams of chapter “
2. CONTROLS” on page 3
(
unfold
)
.
Names of the Buttons and Their Functions
[ ]
button
Eject a CD when it is loaded in the unit.
[
D
]
button
During Radio mode, switch the display indication
in the following order:
Main Display Clock Display Main Display...
During CD/AUX mode, switch the display
indication
(
Main Display, Clock Display
)
.
During MP3/WMA mode, switch the display
indication in the following order:
Track No./Play Time Folder No./Play Time
Track Name Folder Name Title Tag
Album Tag Artist Tag Clock Display
Track No./Play Time...
Press and hold the button for 1 second or longer
to enter the Adjustment mode.
[ ]
button
Use the button to enter to the Sound mode.
(
Z-Enhancer, Bass, Treble, Balance, Fader
)
.
Press and hold for 1 second or longer to turn
on or off the M-B EX mode.
[
ISR
]
button
Recall ISR radio station in memory.
Press and hold for 2 seconds or longer: Store
current station into ISR memory
(
Radio mode
only
)
.
[
SCN
]
button
Perform scan play for 10 seconds of each track
while in the CD/MP3/WMA mode.
Press and hold the button for 1 second or longer
to perform all scan play while in the MP3/WMA
mode.
[
RPT
]
button
Repeat play while in the CD/MP3/WMA mode.
Press and hold the button for 1 second or longer
to perform all repeat play while in the MP3/WMA
mode.
[
]
,
[
]
buttons
Seek a station while in the Radio mode or select
a track when listening to a CD. These buttons
are used to make various settings.
Press and hold the button for 1 second or longer
to enter the fast-forward or fast-backward in
CD/MP3/WMA mode.
[
SRC
]
button
Press the button to turn on the power.
Press and hold the button for 1 second or longer
to turn off the power.
Switch the Operation mode among the Radio
mode, CD/MP3/WMA mode and AUX mode.
[
BND
]
button
Switch the band, or seek tuning or manual
tuning while in the Radio mode.
Play the first track while in the CD/MP3/WMA
mode.
Press and hold the button for 1 second or
longer to select CD-DA or MP3/WMA on a Multi-
session disc.
[
ROTARY
]
knob
Adjust the volume by turning the knob clockwise
or counterclockwise.
Use the knob to perform various settings.
8
English
M275
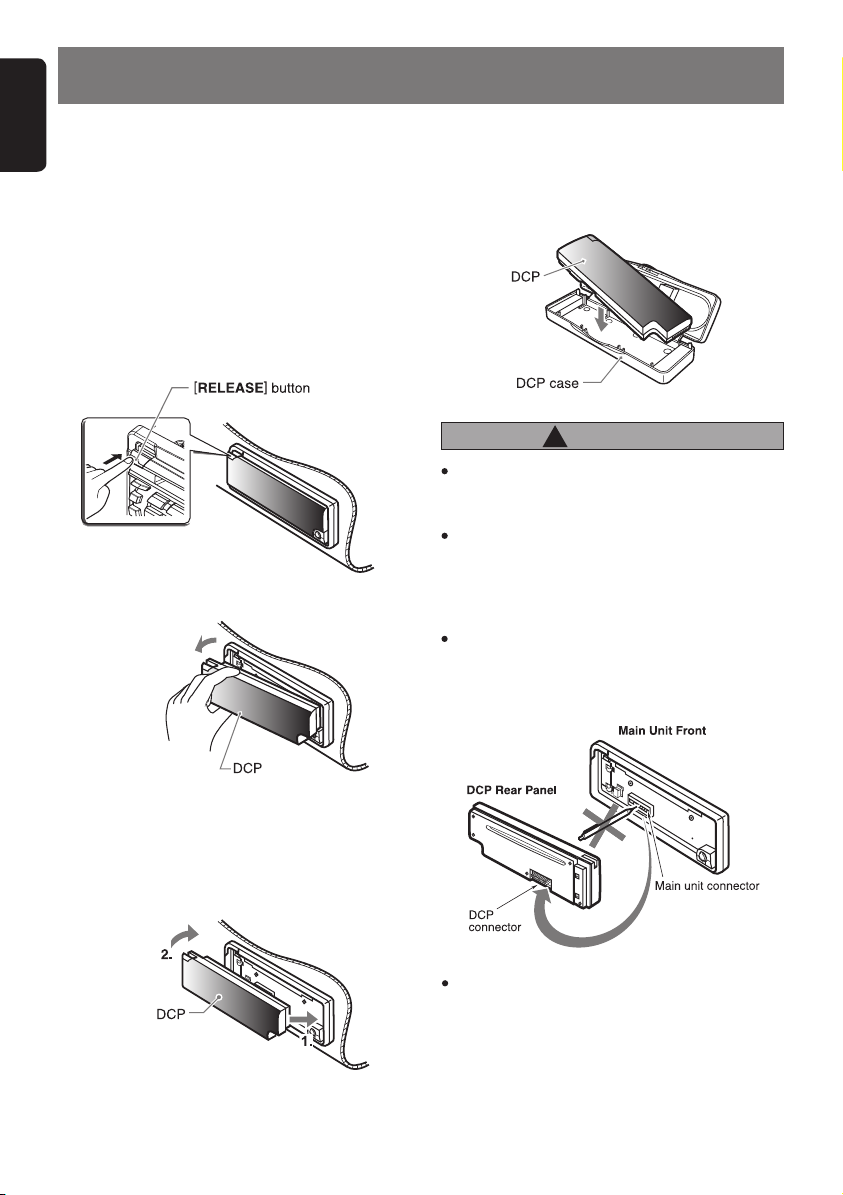
The control panel can be detached to prevent
theft. When detaching the control panel, store it
in the DCP
(
Detachable Control Panel
)
case to
prevent scratches.
We recommend taking the DCP with you when
leaving the boat.
2. Press in the
[
RELEASE
]
button.
3. Remove the DCP.
Attaching the DCP
1. Insert the right side of the DCP into the main
unit.
2. Insert the left side of the DCP to attach into the
main unit.
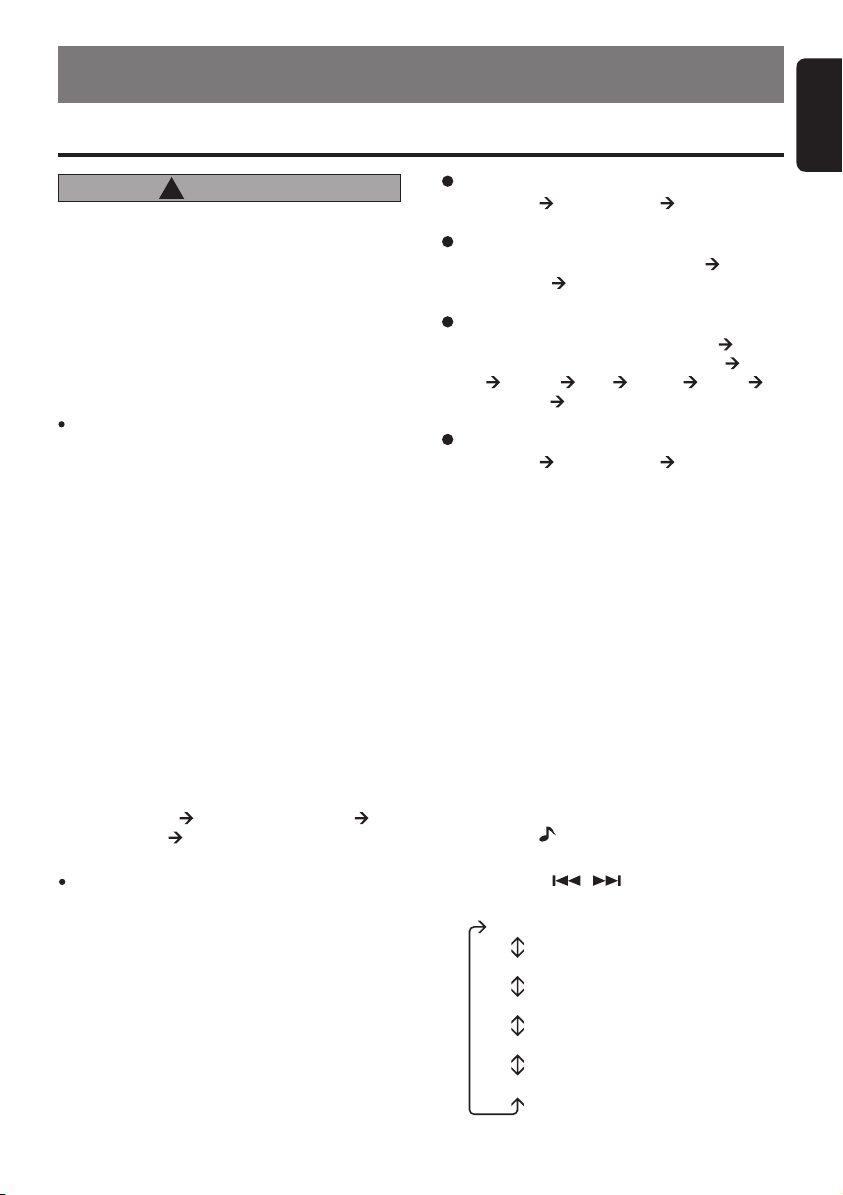
The DCP can easily be damaged by impact.
After removing it, be careful not to drop it
or subject it to strong shocks.
When the Release button is pressed and the
DCP is unlocked, the intense vibration and
stock may cause it to fall. To prevent dam-
age to the DCP, always store it in its case
after detaching it.
(
See figure above.
)
The connector connecting the main unit and
the DCP is an extremely important part. Be
careful not to damage it by pressing on it
with fingernails, pens, screwdrivers, etc.
CAUTION
!
Removing the DCP
1. Press the
[
SRC
]
button for 1 second or longer
to switch off the power.
∗ The DCP is unlocked
Note:
If the DCP is dirty, wipe off the dirt with a soft, dry
cloth only.
Storing the DCP in the DCP case
Hold the DCP, in the orientation as shown in the
figure below, and put it into the supplied DCP
case.
(
Ensure the DCP is in the correct orienta
-
tion.
)
6. DCP
(
Detachable Control Panel
)
9
English
M275
Radio mode
Main Display Clock Display Main Display...
Note: Be sure to read this chapter referring to the front diagrams of
chapter “2. CONTROLS” on page 3
(
unfold
)
.
7. OPERATIONS
CAUTION
!
Basic Operations
Be sure to lower the volume before switch-
ing off the unit power or the ignition key. The
unit remembers its last volume setting. If
you switch the power off with the volume up,
when you switch the power back on, the sud-
den loud volume may hurt your hearing and
damage the unit.
Turning on/off the power
Note:
Be careful about using this unit for a long time
without running the engine. If you drain the boatʼs
battery too much, you may not be able to start the
engine and this can reduce the service life of the
battery.
1. Press the
[
SRC
]
button.
2. The illumination and display on the unit light
up. The unit automatically remembers its last
Operation mode and will automatically switch
to display that mode.
3. Press and hold the
[
SRC
]
button for 1 second
or longer to turn off the power for the unit.
Selecting a mode
1. Press the
[
SRC
]
button to change the Opera
-
tion mode.
2. Each time you press the
[
SRC
]
button, the Op
-
eration mode changes in the following order:
Radio mode CD/MP3/WMA mode
AUX mode Radio mode...
Note:
If the CD mode is selected when no disc is inserted,
the display shows “NO DISC”.
Switching the display
Press the
[
D
]
button to select the desired display.
Each time you press the
[
D
]
button, the display
switches in the following order:
AUX mode
Main Display Clock Display Main Display...
∗ Once selected, the preferred display becomes the
display default. When a function adjustment such
as volume is made, the screen will momentarily
switch to that functionʼs display, then revert back
to the preferred display several seconds after the
adjustment.
Adjusting the volume
Turning the
[
ROTARY
]
knob clockwise increases
the volume; turning it counterclockwise decreas
-
es the volume. “VOL XX” will be displayed where
“XX” is the volume level from 0
(
minimum
)
to 33
(
maximum
)
.
∗ The factory default setting for volume is “VOL
13”.
CD mode
Main Display
(
Track No., Play Time
)
Clock Display Main Display...
MP3/WMA mode
Main-1 Display
(
Track No., Play Time
)
Main-2 Display
(
Folder No., Play Time
)
Track Folder Title Album Artist
Clock Display Main-1 Display...
Sound mode adjustments
1. Press the
[ ]
button to enter the Sound Adjust-
ment mode.
2. Press the
[
,
]
button to select the
“item name”.
“Z-EHCR”
“BASS”
“TREBLE”
“BALANCE”
“FADER ”
 Loading...