


CZ302E

English
CAUTIONS:
This appliance contains a laser system and is classified as a “CLASS 1 LASER
PRODUCT“. To use this model properly, read this Owner’s Manual carefully and keep this manual for your future reference. In case of any trouble with this player, please contact your nearest “AUTHORIZED service station”. To prevent direct exposure to the laser beam, do not try to open the enclosure.
OBS!
Apparaten innehåller laserkomponenten som avger laserstrålning överstigande gränsen för laserklass 1.
VAROITUS
Suojakoteloa si saa avata. Laite sisältää laserdiodin, joka lähettää näkymätöntä silmille vaarallista lasersäteilyä.
!CAUTION
USE OF CONTROLS OR ADJUSTMENTS OR PERFORMANCE OF PROCEDURES OTHER THAN THOSE SPECIFIED IN THE OWNER’S MANUAL MAY RESULT IN HAZARDOUS RADIATION EXPOSURE.
ADVARSEL.
Denne mærking er anbragt udvendigt på apparatet og indikerer, at apparatet arbejder med laserstråler af klasse 1, hvilket betyder, at der anvendes laserstråler af svageste klasse, og at man ikke på apparatets yderside kan blive udsat for utilladelig kraftig stråling.
APPARATET BØR KUN ÅBNES AF FAGFOLK MED SÆRLIGT KENDSKAB TIL APPARATER MED LASERSTRÅLER! Indvendigt i apparatet er anbragt den her gengivne advarselsmækning, som advarer imod at foretage sådanne indgreb i apparatet, at man kan komme til at udsaætte sig for laserstråling.
|
CZ302E |
||
MW 531-1602kHz |
|
||
FM |
87.5-108MHz |
03 2220 |
|
LW |
153-279kHz |
||
|
|||
This product includes technology owned by Microsoft Corporation and cannot be used or distributed without a license from MSLGP.
QDID NO.: B017789
|
CHINA |
TX-1105E-A |
PN:127070009680 |
Contents
Thank you for purchasing this Clarion product.
•Please fully read this owner’s manual before operating this equipment.
•Check the contents of the enclosed warranty card and store it in a safe place with this manual.
Contents......................................................................................................................... |
1 |
1. FEATURES........................................................................................................................ |
2 |
Expanding Systems........................................................................................................ |
2 |
2. PRECAUTIONS................................................................................................................. |
2 |
About the Registered Marks,etc..................................................................................... |
2 |
Front Panel / Generalities............................................................................................... |
2 |
USB Port......................................................................................................................... |
2 |
Remove the DCP............................................................................................................ |
3 |
Attach the DCP............................................................................................................... |
3 |
Storing the DCP in the DCP Case.................................................................................. |
3 |
3. CONTROLS....................................................................................................................... |
3 |
Operational Panel........................................................................................................... |
3 |
Names of Buttons........................................................................................................... |
3 |
4. CAUTIONS ON HANDLING.............................................................................................. |
4 |
Handling Discs................................................................................................................ |
4 |
5. OPERATIONS................................................................................................................... |
4 |
System Setup................................................................................................................. |
5 |
Audio Setup.................................................................................................................... |
5 |
Radio Operations............................................................................................................ |
5 |
Radio Data System Operations...................................................................................... |
6 |
CD/MP3/WMA Operations.............................................................................................. |
6 |
USB Operations.............................................................................................................. |
8 |
iPod & iPhone Operations.............................................................................................. |
8 |
Bluetooth Operations...................................................................................................... |
9 |
AUX Operations.............................................................................................................. |
9 |
6. TROUBLE SHOOTING.................................................................................................... |
10 |
7. ERROR DISPLAYS......................................................................................................... |
10 |
8. SPECIFICATIONS........................................................................................................... |
11 |
9. INSTALLATION / WIRE CONNECTION GUIDE............................................................. |
11 |
1 CZ302E

1. FEATURES
Built-in Parrot Bluetooth® Handsfree (HFP) and Audio Streaming (A2DP & AVRCP) Compatible with iPod® / iPhone® via USB
4ch RCA Output with HPF/LPF and BEAT-EQ with 3 Band Parametric Equalizer
Expanding Systems
Expanding audio features
iPod/iPhone |
USB Memory |
|
(Connect via CCA-748) |
||
(Connect via CCA-755) |
||
|
||
|
Portable Player |
|
|
(Connect via AUX IN Jack) |
Bluetooth cellular phone
Note:
• The items listed outside of the frames are the commercial products generally sold.
• CCA-748 and CCA-755: Sold by separately.
2. PRECAUTIONS
WARNING
For your safety, the driver should not operate the controls while driving.
Also, while driving, keep the volume to a level at which external sounds can be heard.
1.When the interior of the car is very cold and the player is used soon after switching on the heater, moisture may form on the disc or the optical parts of the player and proper playback may not be possible. If moisture forms on the disc, wipe it off with a soft cloth. If moisture forms on the optical parts of the player, do not use the player for about one hour. The condensation will disappear naturally allowing normal operation.
2.Driving on extremely bumpy or rough roads can cause the disc to skip during playback.
3.This unit uses precision parts and components for its operation. In the event that trouble arises, never open the case,disassemble the unit, or lubricate the rotating parts. Contact your Clarion dealer or service center.
About the Registered
Marks,etc.
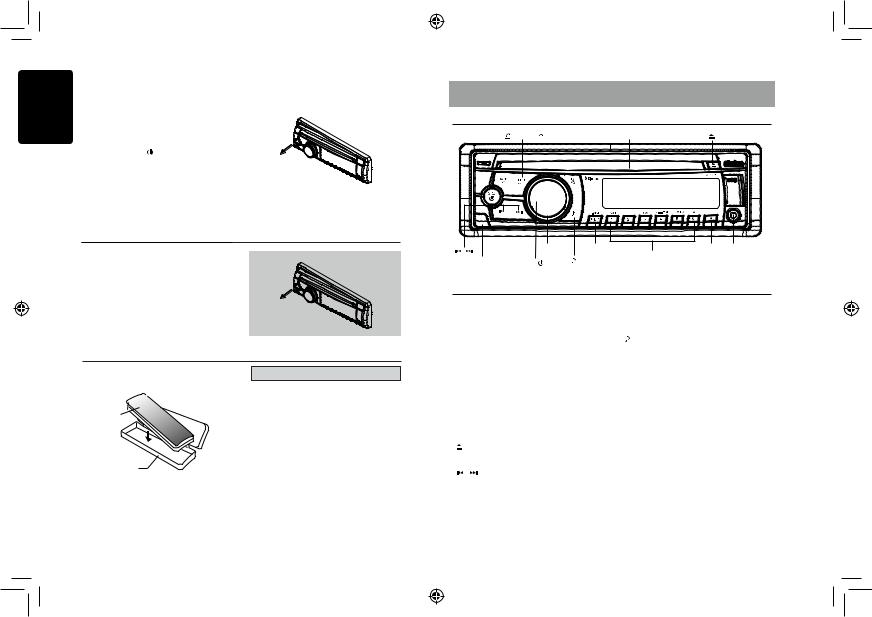
Front Panel / Generalities
For a longer service life, be sure to read the following cautions.
• Do not allow any liquids on the unit from drinks, umbrellas, etc. Doing so may damage the internal circuitry.
• Do not disassemble or modify the unit in any way. Doing so may result in damage.
• Do not let cigarettes burn the display. Doing so may damage or deform the body.
• If a problem should occur, have the unit inspected at your store of purchase.
Cleaning the body
•Use a soft, dry cloth and gently wipe off the any dirt or dust.
•For tough dirt, apply some neutral detergent diluted in water to a soft cloth, wipe off the dirt gently, then wipe again with a dry cloth.
•Do not use benzene, thinner, car cleaner, etc., as these substances may damage the body or cause the paint to peel. Also, leaving rubber or plastic products in contact with the body for long periods of time may cause stains.
1.“Made for iPod,” and “Made for iPhone” mean that an electronic accessory has been designed to connect specifically to iPod, or iPhone, respectively, and has been certified by the developer to meet Apple performance standards.
Apple is not responsible for the operation of this device or its compliance with safety and regulatory standards. Please note that the use of this accessory with iPod or iPhone may affect wireless performance.
iPhone and iPod are trademarks of Apple Inc., registered in the U.S. and other countries.
2.The Bluetooth word mark and logos are owned by the Bluetooth SIG, Inc. and any use of such marks by Clarion Co.,Ltd. is under license.
Other trademarks and trade names are those of their respective owners.
USB Port
•The USB memory stick may stick out when inserted,so it may cause danger during driving. When connect USB memory stick to the main unit, please use a USB extension cable(CCA-755).
•The USB memory sticks must be recognized as “USB mass storage class“ to work properly. Some models may not operate correctly.
When the memorized data is lost or damaged by any chance, Clarion shall not be liable for any damage.
When using an USB memory stick, we recommend that you backup your data stored on it before using a personal computer etc.
•Data files may be broken when using USB memory sticks in the following situation: When disconnecting the USB memory stick or turning the power off during reading data. When affected static electricity or electric noise.
Connect/disconnect the USB memory stick when it is not accessed.
•Connecting with the computer is not covered.
English
CZ302E 2
English |
Remove the DCP |
|
|
||
|
|
|
|
|
|
The control panel can be detached to prevent |
|
|
|||
|
theft. When detaching the control panel, keep |
|
|
||
|
it in the safety place and prevent scratches. |
|
|
||
|
We recommend taking the DCP |
|
|
||
|
(DETACHABLE CONTROL PANEL) with you |
|
|
||
|
when leaving the car. |
|
|
||
|
1. |
Press the [SRC / ] button (1 sec.) to turn |
|
|
|
|
|
|
off the power. |
|
|
|
2. |
Deeply push in [OPEN] button to unlock |
|
|
|
|
|
|
the DCP. |
|
|
|
3. |
Hold the side popped out, remove the |
|
|
|
|
|
|
DCP. |
|
|
Attach the DCP
1.Hold the DCP and ensure that the panel faces towards you. Set the right side of the DCP into the DCP bracket.
2.Press the left side of the DCP until it locks.
Storing the DCP in the DCP Case
Hold the DCP, as shown in the figure below, and put it into the supplied DCP case.
DCP
DCP case
Note:
If the DCP is dirty, wipe off the dirt with a soft, dry cloth only.
 CAUTION
•The DCP can easily be damaged by shocks. After removing it, be carefully not to drop it or subject it to strong shocks.
•Once the [OPEN] button is pressed and DCP is unlocked, car vibrations can cause the DCP to fall.
•The connector for the main unit and DCP is extremely important. Be careful not to damage it by pressing on it with fingernails, screwdrivers, etc.
3 CZ302E
3. CONTROLS
Operational Panel
[MIC] [BAND / ] [MENU / ] |
[PS/AS] |
[ Disc Slot ] |
[ ] [ USB connetor ] |
|||||||
|
|
|
|
|
|
|
|
|
|
|
|
|
|
|
|
|
|
|
|
|
|
|
|
|
|
|
|
|
|
|
|
|
[ |
, |
] |
|
[VOLUME] |
[ DISP ] |
[TA] |
AUX Jack |
|
|
|
|
|
[1~6] |
|
|||
|
|
[OPEN] |
[ SRC / |
] |
[ |
] |
|
|
|
|
|
|
|||||
|
|
|
|
|
|
|
||
Names of Buttons
[SRC / ] Button
• Power/Toggle the audio source
[BAND / ] Button
•RADIO mode:Select tuner band
•BT mode: Dial/Answer / Transfer call / Redial (long press)
[MENU / ] Button
•MP3/WMA mode: Search function
•CD mode: No function
•RADIO mode: PTY select
•BT mode: Terminate call
•AUX mode: No function
•iPod mode: iPod menu
•USB mode: Search function
[ ] Button
• Press to eject disc.
[ , ] Buttons
•Previous / next track
•Search (long press)
[OPEN] Button
• Unlock the front panel.
[PS / AS] Button
•Scan play / Preset scan
•Auto memory store (long press)
[ |
] Button |
• |
Sound effect setting |
[VOLUME] Knob
• Adjust volume level / Confirm (press)
[TA] Button
• Traffic announcement
[1–6] Buttons
•[1] Button: Scan play / Preset station 1.
•[2] Button: Repeat play / Preset station 2.
•[3] Button: Random play / Preset station 3.
•[4] Button: Play / Pause / Top play (long press) / Preset station 4.
•[5] Button: Previous folder / Preset station
5.10 tracks down (long press)
•[6] Button: Next folder/Preset station 6.
10tracks up (long press)
[ DISP ] Button
•Display switch
•System setup (long press)
[ MIC ] Hole
• Internal microphone

4. CAUTIONS ON HANDLING
Handling Discs
Handling
•New discs may have some roughness around the edges. If such discs are used, the player may not work or the sound may skip. Use a pen or similar tool to remove any roughness from the edge of the disc.
Ball-point pen
Roughness
•Never stick labels on the surface of the disc or mark the surface with a pencil or pen.
•Never play a disc with any cellophane tape or other glue on it or with peeling off marks. If you try to play such a disc, you may not be able to get it back out of the player or it may damage the player.
•Do not use discs that have large scratches, are misshapen, cracked, etc. Use of such discs may cause misoperation or damage.
•To remove a disc from its storage case, press down on the center of the case and lift the disc out, holding it carefully by the edges.
•Do not use commercially available disc protection sheets or discs equipped with stabilizers, etc. These may damage the disc or cause breakdown of the internal mechanism.
Cleaning
•To remove fingermarks and dust, use a soft cloth and wipe in a straight line from the center of the disc to the outer edge.
•Do not use any solvents, such as commercially available cleaners, antistatic spray, or thinner to clean discs.
•After using special disc cleaner, let the disc dry off well before playing it.
On Discs
•Never turn off the power and remove the unit from the car with a disc loaded.
 CAUTION
For your safety, the driver should not insert or eject a disc while driving.
Storage
•Do not expose discs to direct sunlight or any heat source.
•Do not expose discs to excess humidity or dust.
•Do not expose discs to direct heat from heaters.
5. OPERATIONS
Basic Operations
Note:
•Refer to the diagrams in “3. CONTROLS” when reading this chapter.
 CAUTION
When the unit is turned on, starting and stopping the engine with its volume raised to the maximum level may harm your hearing.
Be careful about adjusting the volume.
Power on / off
Notes:
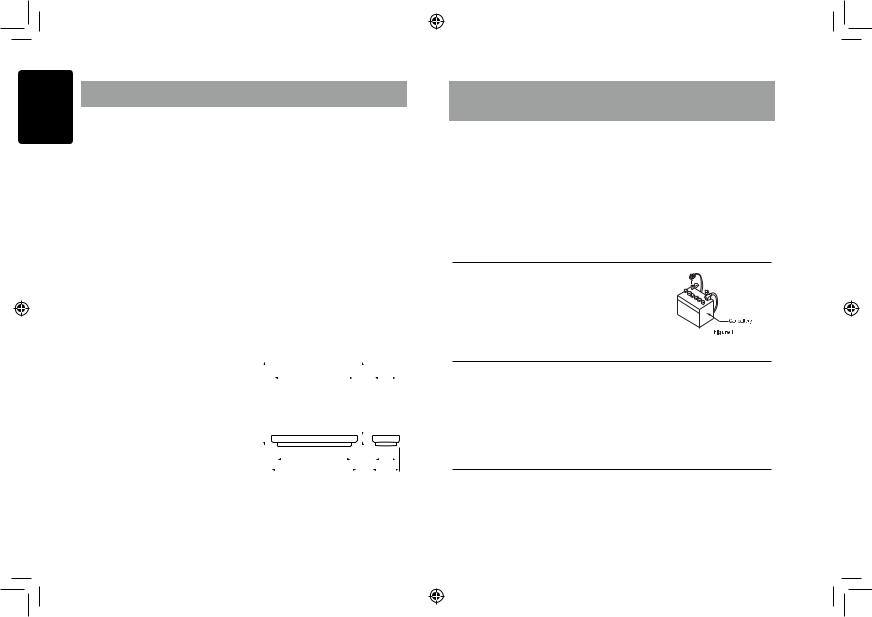
•Start the engine before using this unit.
•Be careful about using this unit for a long time without running the engine. If you drain the car’s battery too far, you may not be able to start the engine and this can reduce the service life of the battery.
1.Start the engine. The power button / knob illumination on the unit will light up.
Engine ON position
2.Press the [SRC /  ] button on the front panel to turn on the power under standby mode. The unit goes back to the last status after power on.
3.Press and hold the [SRC /  ] button on the front panel to turn off the power.
CT (Clock Time) display
•The displayed clock data is based on the CT (clock time) data in the RDS signal.
Volume adjustment
Turn the [VOLUME] knob on the front panel. The adjustable range of volume is 0 to 40.
 CAUTION
While driving, keep the volume level at which external sounds can still be heard.
Playing source selection
Press [SRC /  ] button on the front panel repeatedly to choose desired playing source.
Notes:
•Playing source selection means selecting which mode, such as DISC mode, RADIO mode, AUX mode and BT mode.
Display system time
Press the [ DISP ] button on the front panel to switch the display information from clock, station information (RADIO mode), or track information (CD mode).
RESET
If you have below problems, pls press [RESET] button.
•Unit can not power on
•Nothing happens when buttons are pressed
•Display is not accurate
Note:
*When the [RESET] button is pressed,preset radio stations, audio setting,etc. stored in memory are kept.
RESET
English
CZ302E 4

English
5
System Setup
In any mode, press and hold [ DISP ] button to enter system setup. Press [ ] or [ ] button to select options, rotate the [VOLUME] knob to adjust.
AF: ON/OFF (RADIO mode)
Rotate the [VOLUME] knob to choose AF on or off.
REG: ON/OFF (RADIO mode)
Rotate the [VOLUME] knob to choose REG on or off.
DX/LO (RADIO mode)
Rotate the [VOLUME] knob to choose radio local or distant at radio mode.
•LO: Only stations with strong signal can be received.
•DX: Stations with strong and weak signals can be received.
AUX SENS (AUX mode)
Rotate the [VOLUME] knob to choose AUX Input sensitivity LOW, MID or HIGH at AUX mode.
SELECT (BT mode)
This ”SELECT” menu is intended to automatically paired by selecting a mobile phone was stored.
This unit can store three mobile phones. The mobile phone will be stored in paired order to the unit. The mobile phone can be stored up to three. The fourth mobile phone can not be stored. If you want to store a fourth mobile phone, please delete unwanted mobile phone from ”DELETE” menu.
1.Rotate the [VOLUME] knob to choose the pair mobile phone name from the pairing list.
2.Press and hold the [VOLUME] knob to confirm.
DELETE (BT mode)
1.Rotate the [VOLUME] knob to choose the paired mobile phone name from the pairing list.
2.Press and hold the [VOLUME] knob to confirm.
DISCON (BT mode)
Disconnect currently connected mobile phone.
1.Rotate the [VOLUME] knob, mobile phone displays are currently connected.
2.Press and hold the [VOLUME] knob to disconnect.
CZ302E
MIC SEL (BT mode)
Rotate the [VOLUME] knob to choose Microphone EXTERNAL or INTERNAL.
MIC GAIN (BT mode)
Rotate the [VOLUME] knob to choose Mic gain: -5,-4,-3,-2,-1,0,1, 2, 3, 4, 5.
You can change the gain of MIC when a telephone partner cannot hear your voice.
You can listen to your telephone calls from the speakers connected to this unit.
*When listening to your calls on your car speakers, you can adjust the volume by turning the [VOLUME] knob.
TONE SEL (BT mode)
You can get mobile phone ring tone from the speaker.
Rotate the [VOLUME] knob to choose AUTO or INTERNAL.
• AUTO:
Mobile phone ring tone from the speaker.
• INTERNAL:
The unit original ring tone from the speaker.
AUTO ANS (BT mode)
To answer incoming calls automatically.
Rotate the [VOLUME] knob to choose AUTO ANS ON or OFF.
AUTO CON: ON/OFF (BT mode)
Automatically connects the mobile phone was last connected.
Rotate the [VOLUME] knob to choose AUTO CON ON or OFF.
PIN CODE
Rotate and press the [VOLUME] knob to choose a 4-digit password. Press the [VOLUME] knob more than 1 seconds to confirm.
The PIN CODE default setting is “ 0000 “.
SCRN SVR: ON/OFF
Rotate the [VOLUME] knob to choose SCRN SVR (screen saver) ON or OFF.
SCROLL: ON/OFF
For track information that is longer than the display panel:
When SCROLL is ON, the LCD will display ID3 TAG information cyclely, e.g: TRACK- >FOLDER->FILE->ALBUM->TITLE->ARTIST- >TRACK->...
System Setup
When SCROLL is OFF, the LCD will display one of the ID3 TAG information, the default is TRACK, but user can adjust it to other ID3 TAG information by press [ DISP ] button.
S-CTRL (IPOD mode) : ON/OFF
Rotate the [VOLUME] knob to choose S-CTRL (Simple Control) ON or OFF.
*Refer to P8.
DIMMER: ON/OFF
Rotate the [VOLUME] knob to choose dimmer ON or OFF.
•ON: LCD dimmer is active when small light of vehicle is turned ON.
•OFF: LCD always maximum brightness regardless of the vehicle small light.
REAR/S-W
Rotate the [VOLUME] knob to choose REAR or SUB-WOOFER.
SW PHASE
Rotate the [VOLUME] knob to choose SUBWOOFER phase REVERSE or NORMAL.
TEL-SW
Rotate the [VOLUME] knob to choose MUTE, ON or OFF.
• MUTE:
The sound from this unit is muted during telephone calls.
• OFF:
This unit continues normal operation even when the cellular phone is used.
• ON:
You can listen to your telephone calls from the speakers connected to this unit. *When listening to your calls on your car speakers, you can adjust the volume by turning the [VOLUME] knob.
BEEP: ON/OFF
Rotate the [VOLUME] knob to choose button beep sound ON or OFF.
RESET
1.Press and hold the [VOLUME] knob to reset.
2.Settings will be set to the default value.
3.The unit will be turned off automatically.
Note:
• When the [RESET] is selected and you press and hold the [VOLUME] knob, radio station frequencies, titles, and other data stored in memory are cleared.
Audio Setup
Press the [ ] button to enter sound effect setting mode. First press shows current EQ. Rotate the [VOLUME] knob to changes BEAT EQ in this order:
OFF -> B-BOOST -> IMPACT -> EXCITE -> CUSTOM
Rotate the [VOLUME] knob to changes CUSTOM, and press the [VOLUME] knob,
the press [ |
] or [ |
] button to select it |
including: BAS-G -> BAS-F -> BAS-Q -> MID-G -> MID-F -> MID-Q -> TRE-G -> TRE-F, rotate the [VOLUME] knob to select a value. BAS-G / MID-G / TRE-G: (-7)- (+7)
BAS-F: 50/100/200
BAS-Q: 0.7/1/1.4/2
MID-F: 500/1K/2K
MID-Q: 0.7/1/1.4/2
TRE-F: 5k/10k/15k
TRE-Q 0.7/1.0/1.4/2.0
Press the [ ] button, then press [ |
] or |
|
[ |
] button to select USER preset |
|
including:
BALANCE -> FADER -> M-B EX -> LPF(low pass filter) -> S-W VOL (Subwoofer Volume),rotate the [VOLUME] knob to select a value.
BALANCE:LEFT 1-7->CENTER->RIGHT 1-7 FADER:FRONT 1-7->CENTER->REAR 1-7 M-BEX: ON/OFF
LPF: THROUGH/60/90/120
HPF:THROUGH/60/90/120 SUBW VOL: (-6)-(+6)
Radio Operations
Select tuner as playing source |
Selecting the radio band |
Press [SRC / ] button once or more to enter |
Press the [BAND / ] button on the panel |
RADIO mode. |
to select one radio band among FM1, FM2, |
|
FM3, MW and LW. |

Radio Operations
Manual tuning
During manual tuning, the frequency will be changed in steps.
Press the [ ] or [ ] button on the panel to select a higher / lower station.
Auto tuning
Press and hold the [ ] or [
 ] button on the panel to seek a higher / lower station.
To stop searching, repeat the operation above or press other buttons having radio functions.
Note:
When a station is received, searching stops and the station is played.
Preset scan
Preset scan receives the stations stored in preset memory in order. This function is useful when searching for a desired station in memory.
1.Press the [PS/AS] button.
2.When a desired station is tuned in, press the [PS/AS] button again to continue receiving that station.
Note:
•Be careful not to press and hold the [PS/ AS] button for 1 second or longer, otherwise the auto store function is engaged and the unit starts storing stations.
Auto store
Only stations with sufficient signal strength will be detected and stored in the memory.
Press and hold the [PS/AS] button (1 sec.) to
start automatic station search.
To stop auto store, press other buttons having radio functions.
Notes:
1.After auto store, the previous stored stations will be overwritten.
2.The unit has 5 bands, such as FM1, FM2, FM3, MW and LW. FM3, MW and LW can store by AS function. Each bands can store 6 stations, CZ302E can store 30 stations in total.
Manual store
When one expected radio station has been detected, press and hold number button 1-6 to store it in the memory.
Recall the stored stations
Press one numeric button among 1 to 6 on the panel to select the corresponding stored station.
Local seeking
When LOCAL seeking is ON, only those radio stations with strong radio signal could be received.
Select LOCAL function, press and hold the [ DISP ] button on the front panel, then press [ ] button repeatedly until LO or DX displays on the screen, and rotate the [volume] knob to select Local or Distant mode.
Note:
The number of radio stations that can be received will decrease after the local seeking mode is ON.
Radio Data System Operations
Radio Data System
This unit has a built-in “Radio Data System” decoder system that supports broadcast stations transmitting “Radio Data System” data. When using the “Radio Data System” function, always set the radio to FM mode.
AF function
The AF function switches to a different frequency on the same network in order to maintain optimum reception.
* The factory default setting is “ ON ”.
1.Set to system setup by long pressing [ DISP ] button.
2. |
Press the [ |
] or [ |
] button to select |
|
“AF”. |
|
|
3. |
Rotate the knob to select “ ON ” or “ OFF ”. |
||
• ON:
“AF” indicator appears in the display and AF function turns on.
• OFF:
“AF” indicator disappears in the display and AF function turns off.
REG (Regional programme) function
When the REG function is ON, the optimum regional station can be received. When this
Radio Data System Operations |
|
English |
|
function is OFF, if the regional station area |
this means that the “Radio Data System” |
||
switches as you drive, a regional station for |
broadcast station being received has traffic |
|
|
that region is received. |
announcement programmes. |
|
|
* The factory default setting is “ON”. |
Setting the TA standby mode |
|
|
Notes: |
|
|
|
• This function is disabled when a national |
If you press the [TA] button, “TA” lights in |
|
|
the display and the unit is set into the TA |
|
||
station such as BBC R2 is being received. |
|
||
standby mode until a traffic announcement |
|
||
• The REG function ON/OFF setting is valid |
|
||
is broadcast. When a traffic announcement |
|
||
when the AF function is ON. |
|
||
broadcast starts, “TRAF INF” appears in the |
|
||
1. Set to system setup by long pressing |
|
||
display. If you press the [TA] button while |
|
||
[ DISP ] button. |
|
||
a traffic announcement broadcast is being |
|
||
2. Press the [ |
] or [ ] button to select |
|
|
received, the traffic announcement broadcast |
|
||
“REG”. |
|
|
|
[VOLUME] knob to select |
reception is cancelled and the unit goes into |
|
|
3. Rotate the |
|
||
the TA standby mode. |
|
||
“ ON” or “ OFF”. |
|
||
|
|
||
|
|
Cancelling the TA standby mode |
|
Manually tuning a regional station |
As “TA” appears in the display, press the |
|
|
in the same network |
[TA] button. The “TA” in the display goes off |
|
|
and the TA standby mode is cancelled. |
|
||
This function is valid when the AF function is |
PTY (Programme Type) |
|
|
ON and the REG function is OFF. |
|
||
Note: |
|
This function enables you to listen to a |
|
This function can be used when a regional |
broadcast of the selected programme type |
|
|
broadcast of the same network is received. |
even if the unit is on a function mode other |
|
|
TA (Traffic Announcement) |
than radio. |
|
|
* Some countries do not yet have PTY |
|
||
In the TA standby mode, when a traffic |
broadcast. |
|
|
announcement broadcast starts, the traffic |
* In the TA standby mode, a TP station has |
|
|
announcement broadcast is received as top |
priority over a PTY broadcast station. |
|
|
priority regardless of the function mode so you |
Selecting PTY |
|
|
can listen to it. Traffic programme (TP) |
|
||
automatic tuning is also available. |
Press [MENU / ] button, then rotate the |
|
|
* This function can only be used when “TP” |
[VOLUME] knob to select PTY type, press |
|
|
appears in the display. When “TP” appears, |
the [VOLUME] knob, the unit begin |
|
|
searching.
CD/MP3/WMA Operations
This unit can playback MP3/WMA files
Notes:
•If you play a WMA file with active DRM (Digital Rights Management), there will be no audio. (The WMA indicator blinks).
To disable DRM
(Digital Rights Management)
When using Windows Media Player 9/10/11, click on Tool -> Options -> Copy Music tab,
then under Copy Settings, unclick the check box for copy protected music Music. Then, reconstruct files.
Personally constructed WMA files are used at your own responsibility.
Precautions when creating MP3/
WMA file
Usable sampling rates and bit rates
1. MP3: Sampling rate 8 kHz-48 kHz, Bit rate 8 kbps-320 kbps / VBR
2. WMA: Bit rate 8 kbps-320 kbps
CZ302E 6

English
CD/MP3/WMA Operations
Precautions when creating MP3/
WMA file
Usable sampling rates and bit rates
1.MP3: Sampling rate 8 kHz-48 kHz, Bit rate 8 kbps-320 kbps / VBR
2.WMA: Bit rate 8 kbps-320 kbps
File extensions
1.Always add a file extension “.MP3”, “.WMA” to MP3, WMA file by using single byte letters. If you add a file extension other than specified or forget to add the file extension, the file cannot be played.
2.Files without MP3/WMA data will not play. The files will be played soundlessly if you attempt to play files without MP3/WMA data.
* When VBR files are played, the play time
display may differ the play location.
*When MP3/WMA files are played, a little no sound part is caused between tunes.
This unit can play back MP3/WMA files
Notes:
•If you play a WMA file with active DRM (Digital Rights Management), no audio is output (The WMA indicator blinks).
To disable DRM
(Digital Rights Management)
When using Windows Media Player 9/10/11, click on Tool -> Options -> Copy Music tab, then under Copy Settings, unclick the Check box for Copy Protect Music. Then, reconstruct files.
Personally constructed WMA files are used at your own responsibility.
Precautions when creating MP3/
WMA file
Usable sampling rates and bit rates
1.MP3: Sampling rate 8 kHz-48 kHz, Bit rate 8 kbps-320 kbps / VBR
2.WMA: Bit rate 8 kbps-320 kbps
File extensions
1.Always add a file extension “.MP3”, “.WMA” to MP3, WMA file by using single byte letters. If you add a file extension other
than specified or forget to add the file extension, the file cannot be played.
2.Files without MP3/WMA data will not play. The files will be played soundlessly if you attempt to play files without MP3/WMA data.
*When VBR files are played, the play time display may differ the play location.
*When MP3/WMA files are played, a little no sound part is caused between tunes.
Logical format (File system)
1.When writing MP3/WMA file on a CD-R disc or CD-RW disc, please select “ISO9660 level 1, 2 or Joliet” or Apple ISO as the writing software format. Normal play may not be possible if the disc is recorded on another format.
2.The folder name and file name can be displayed as the title during MP3/WMA play but the title must be within 32 single byte alphabetical letters and numerals (including an extension).
3.Do not affix a name to a file inside a folder having the same name.
Folder structure
A disc with a folder having more than 8 hierarchical levels will be impossible.
Number of files or folders
1.Up to 999 files can be recognized per folder.
Up to 3000 files can be played.
2.Tracks are played in the order that they were recorded onto a disc. (Tracks may not always be played in the order displayed on the PC.)
3.Some noise may occur depending on the type of encoder software used while recording.
Eject function
Just pressing the [ ] button, ejects the disc even if the power to the unit was not turned on.
Notes:
•If you force a CD into before auto reloading, this can damage the CD.
•If a CD (12 cm) is left ejected for 15 seconds, the CD is automatically reloaded (Auto reload).
CD/MP3/WMA Operations
Listening to a disc already loaded in the unit
Press the [SRC /  ] button to select the CD/ MP3/WMA mode.
When the unit enters the CD/MP3/WMA mode, play starts automatically.
Loading a CD
Insert a CD into the center of the CD SLOT with facing up. The CD plays automatically after loading.
Notes:
•Never insert foreign objects into the CD SLOT.
•If the CD is not inserted easily, there may be another CD in the mechanism or the unit may
require service.
•Discs without the  or TEXT mark and CDROMs cannot be played by this unit.
•Some CD-R/CD-RW disc may not be usable.
Pausing play
1.Press the [ 4 ] button to pause play. “PAUSE” appears in the display.
2.To resume CD play, press the [ 4 ] button again.
Displaying CD titles
This unit can display title data for MP3/WMA disc.
When SCROLL is OFF, each time you press the [ DISP ] button to change the title display.
MP3/WMA disc
Track -> Folder -> File title -> Album -> Title -> Artist -> Track ...
Notes:
•If MP3/WMA disc has no ID3 TAG, “NO TITLE” appears in the display.
•Only ASCII characters can be displayed in Tags.
Selecting a track
Track-up
1.Press the [ ] button to move ahead to the beginning of the next track.
2.Each time you press the [ ] button, the track advances ahead to the beginning of the next track.
3.For MP3/WMA disc, press and hold the [ 6 ] button (1 sec.) to move ahead to +10 tracks.
Track-down
1.Press the [ ] button to move back to the beginning of the current track.
2.Press the [ ] button twice to move back to the beginning of the previous track.
3.For MP3/WMA disc, press and hold the [ 5 ] button (1 sec.) to move back to -10 tracks.
Fast-forward/Fast-reverse
Fast-forward |
|
Press and hold the [ |
] button . |
Fast-reverse |
|
Press and hold the [ |
] button . |
*For MP3/WMA discs, it takes some time until the start of searching and between tracks. In addition, some errors may occur in the play time.
Folder Select
This function allows you to select a folder containing MP3/WMA files and start playing from the first track in the folder.
1.Press the [ 5 ] or [ 6 ] button.
Press the [ 6 ] button to move the next folder. Press the [ 5 ] button to move the previous folder.
2.To select a track, press the [ ] or [
 ] button.
Search Function
1.Press the [MENU / ] button to enter fold sch mode. Press the [VOLUME] button to enter the folder list search mode.
2.Turn the [VOLUME] knob to select a folder.
3.Press the [VOLUME] button to enter the file list search mode. And then the track list appears in the display.
4.Turn the [VOLUME] knob to select a track.
5.Press the [VOLUME] knob to play.
*When play back MP3 / WMA file, this function is performed in the current folder.
7CZ302E

CD/MP3/WMA Operations
Top function
The top function resets the CD player to the first track of the disc. Press and hold the [ 4 ] button (1 sec.) to play the first track (track No.
1) on the disc.
*In case of MP3/WMA, the first track of the current folder will be played.
Other various play functions
Scan play
This function allows you to locate and play the first 10 seconds of all the tracks recorded on a disc.
Press the [ 1 ] button to perform scan play.
Repeat play
This function allows you to play the current track repeatedly or play a track currently being played in the MP3/WMA folder repeatedly.
CD:
1.Press the [ 2 ] button once or more until “RPT ON” appears on the LCD to perform repeat play.
2.Press [ 2 ] button again to cancel repeat playback, “RPT OFF” appears on the
LCD.
MP3/WMA:
1. Press the [ 2 ] button once or more until “TRACK RPT” appears on the display to perform repeat play, and “RPT” segment lights on.
2. For MP3/WMA files, press [ 2 ] button repeatedly until “FOLD RPT” appears on the display for folder repeat play.
3. Press [ 2 ] button repeatedly until “RPT OFF” appears on the display to cancel repeat playback, and “RPT” segment goes off.
Random play
This function allows you to play all tracks recorded on a disc in a random order. Press the [ 3 ] button to perform random play.
Random function activates when jumping to another track.
USB Operations
1.Push the cap of the USB connector to the right. Insert a USB cable (CCA-755) into the
USB connector. Insert a USB device into |
|
the USB cable. |
|
When connecting a USB device, the unit will |
|
read the files automatically. |
|
2. To remove the USB device, you should first |
|
select another source or turn off the power, |
|
in order to avoid damaging the USB device. |
CCA-755 |
Then take off the USB device. Push the cap |
to the left.
3. Operation is same as MP3/WMA operation.
iPod & iPhone Operations
Connect
Connect an iPod or iPhone to the USB connector via CCA-748 cable.
When connecting a device, the unit will read the files automatically. The track information display on the screen once playback start.
MENU
In the S-CTRL OFF mode, press [MENU /  ] button,rotate the [VOLUME] knob select “MUSIC” or “VIDEO”. Select “MUSIC”, press the [VOLUME] knob, then rotate the [VOLUME] knob to show PLAY LISTS / ARTISTS / ALBUMS
iPod & iPhone Operations
/ GENRES / SONGS / COMPOSERS, press and rotate the [VOLUME] knob to select a desired option, then press the [VOLUME] knob to confirm.
Select “VIDEO”, press the [VOLUME] knob, then rotate the [VOLUME] knob to show MOVIES / MUSIC VIDEOS / TV SHOWS/ VIDEO PODCASTS / RENTALS, press and rotate the [VOLUME] knob to select a desired option, then press the [VOLUME] knob to confirm
NOTE:
•VIDEO MENU item is different by the model of connected iPod and language setting.
Repeat play
This function allows you to play the current track repeatedly or play all tracks in your iPod/ iPhone repeatedly.
1.Press the [ 2 ] button once or more until “RPT ON” appears on the LCD to perform repeat play.
2.Press [ 2 ] button repeatedly until “RPT OFF” appears on the LCD to cancel repeat playback.
Random play
This function allows you to play all tracks recorded on a disc in a random order.
1.Press [ 3 ] button repeatedly until “ALBUM RDM” appears on the LCD for album random play.
2.Press the [ 3 ] button once or more until “SONG RDM” appears on the LCD to perform random play.
3.Press [ 3 ] button repeatedly until “RDM OFF” appears on the LCD to cancel random playback.
Setting iPod simple control mode
Use this function if you wish to operate through your iPod connected to this unit via the USB cable.
* The factory default setting is “ OFF “.
1.Press and hold [DISP] button to enter system setup.
2.Press [ ] or [
 ] button to select
“S-CTRL“.
3.Rotate the [VOLUME] knob to select
“ON “ or “ OFF “ .
•ON: Operations are made through your iPod.
•OFF: Operations cannot be made through your iPod.
to monitor
CCA-748
Notes:
•When performing iPod operations using simple control mode, make the operations slowly. If repetitive operations are performed too quickly, unforeseen errors may occur.
•When performing iPod operations using simple control mode, please do not operate the iPod and the unit at the same time, otherwise there may be unexpected event happened.
•Some iPod models do not support this function. Consult your nearest Clarion dealer or website to confirm which models do not support this function.
iPod menu alphabet search
This function searches the subfolders for desired alphabetical letters.
1.Press the [MENU /  ] button to select the iPod menu mode.
2.Press the [VOLUME] knob to switch between categories.
MUSIC: PLAYLIST, ARTISTS, ALBUMS, GENRES, SONGS, COMPOSERS VIDEO: MOVIES, MUSIC VIDEOS, TV SHOWS VIDEO PODCASTS, RENTALS
3.Press the [VOLUME] knob. (The contents of the category are displayed.)
4.Press and hold the [ DISP ] button (1 sec.).
5.Rotate the [VOLUME] knob to select the desired letter to search.
6.Press the [DISP] button again to next perform search.
7.Press the [ VOLUME ] knob to confirm.
CZ302E
English
8

English
9
Bluetooth Operations
The Bluetooth allows you to utilize your car’s built-in audio system for wireless mobile phone or music handsfree communication. Some Bluetooth mobile phones have the audio features, and some portable audio players support Bluetooth feature. This system can play audio data stored in a Bluetooth audio device. The car stereo with Bluetooth will be able to retrieve phonebook contacts, received call, dialed call, missed call, incoming calls, outgoing call and listen to music.
Note:
•Do not leave the microphone of Bluetooth handsfree in the places with wind passing such as air outlet of the air conditioner, etc. This may cause a malfunction.
•If leave it in the places subjected to direct sun, high temperature can cause distortion, discoloration which may result in a malfunction.
•This system will not operate or may operate improperly with some Bluetooth audio players.
•Clarion cannot guarantee the compatibility of all mobile phones together with unit.
•Audio playback will be set to the same volume level as set during telephone call. This might cause problems, if extreme volume level is set during telephone call.
Handsfree Operations
Pairing
1.Turn on Bluetooth function of your mobile phone.
2.Enter mobile phone’s Bluetooth setup menu.
3.Search for new Bluetooth devices.
4.Select CZ302E from the pairing list on the mobile phone.
5.Enter “0000” as the password (The password default setting is “ 0000 ”).
6.After pairing successfully, the unit will enter Bluetooth mode automatically, and “CONNECTED” will appear on the LCD.
7.The unit can connect three units.
Making a call
Operation from Bluetooth menu
Press the [SRC /  ] button to switch the source to “BLUETOOTH”. Press [MENU /
 ] button to select a way to make outgoing call:
• Dial Number
1. Press the [MENU / ] button.
CZ302E
2.Rotate the [VOLUME] knob on the front panel to switch: , “DIAL NUM”.
3.Press the [VOLUME] knob to confirm the selection.
4.Rotate the [VOLUME] knob to select a number, press the knob to confirm and ready to input the next digit. Repeat the above until all numbers inputted.
5.Press the [VOLUME] knob to dial.
6.Press [MENU / ] to terminate call.
• Dialled/Missed/ Received
You can search any Dialled/Missed/Received /User pbk.
1.Rotate the [VOLUME] knob to select “DIALLED”, “MISSED” , “RECEIVED”.
2.Press the [VOLUME] knob to enter the selected call history.
3.Rotate the [VOLUME] knob to scroll the contacts.
4.When the contact name or mobile phone No. is displayed, press the [VOLUME] knob to call the mobile phone No. of that contact.
*Press the [MENU / ] button to end the call.
• Call from Phonebook
User can search the contact name in the phonebook and make call.
1.Rotate the [VOLUME] knob to select “USER PBK” .
2.Press the [VOLUME] knob to enter the selected phonebook.
3.Rotate the [VOLUME] knob to scroll the contacts.
4.The phone number and the name to scrool display.When the contact name is displayed, press the [VOLUME] knob to call the mobile phone No. of that contact.
*Press the [MENU / ] button to end the call.
Note:
•Some mobile phones may not be able to transfer data of Phonebook.
•After RESET, please wait few minutes until data transferred following to the Bluetooth mode selection. During that, “PBK UPDATE” is on the display.
•Redial
You can call last dialed number. Press and hold the [BAND /  ] button
(1sec).
Bluetooth Operations
• Transfer Call
You can switch Handsfree call and mobile phone call.
Press the [BAND / ] button during call.
• Answering a call
You can answer an incoming call by pressing the [BAND /  ] button.
*Press the [MENU / ] button to reject an incoming call.
Audio Streaming Operations What is audio streaming?
Audio streaming is a technique for transferring audio data such that it can be processed as a steady and continuous stream. Users can stream music from their external audio player to their car stereo wirelessly and listen to the tracks through the car’s speakers. Please consult your nearest Clarion dealer for more information on the product of wireless audio streaming transmitter offered.
 CAUTION
Please avoid operating your connected mobile phone while audio streaming as this may cause noise or sound choppy on the song playback.
Audio streaming may or may not resume after telephone interrupt as this is dependent on mobile phone.
System will always return to Radio mode if audio streaming is disconnected.
Note:
Be sure to read the chapter “Pairing before proceeding.
Play / Pause a track
1.Push the [ 4 ] button to pause audio playback.
2.To resume audio playback, push the [ 4 ] knob again.
Selecting a track
Track-up
1.Press the [ ] button to move to the beginning of the next track.
2.Each time the [ ] button is pressed,
playback proceeds to another track in the advancing direction.
Track-down
1.Press the [ ] button to move to the beginning of the previous track.
2.Each time the [ ] button is pressed, playback proceeds to previous track in the reverse direction.
Note:
Playing order will depend on Bluetoothaudio player. When [ ] button is pressed, some A2DP devices will restart the current track depends on the duration of playback. During music streaming playback, “A2DP
and HFP” will be shown on the display. When A2DP device is disconnected,
“ DISCONNECT” will be shown on the display and return to previously selected audio source. Some Bluetoothaudio players may not have play / pause synchronized with this unit. Please make sure both device and main unit are in the same play / pause status in BT MUSIC mode.
ID3 display
SCROLL: ON/OFF
During music streaming playback, for music information that is longer than the display panel:
When SCROLL is ON, the LCD will display ID3 TAG information cyclely, e.g: TRACK- >ALBUM->TITLE->ARTIST->TRACK->...
When SCROLL is OFF, the LCD will display one of the ID3 TAG information, the default is TRACK, but user can adjust it to other ID3 TAG information by press [ DISP ] button.
AUX Operations
Press [SRC /  ] button on the panel to select “AUX”.
AUX is just for audio content with 3.5mm Jack connector plugged into audio-in socket on the front panel.
AUX Input sensitivity setting
1.Press and hold the [ DISP ] button (1 sec.).
2.Turn the [VOLUME] knob to select “AUX SENS”.
3.If the output level of connected external audio player is “HIGH”, rotate [VOLUME] knob and choose “LOW”. And if the output level is “LOW”, choose “HIGH”.
6. TROUBLE SHOOTING
GENERAL
Problem |
Cause |
Measure |
|
Unit can not |
Unit fuse blown. |
Replace with new fuse of correct rating. |
|
power on. |
Car battery fuse blown. |
Replace with new fuse of correct rating. |
|
|
|||
|
|
Turn off the power and remove the DCP. |
|
Unit can not |
|
Press the [RESET] button with a thin rod. |
|
power on. |
|
Note: |
|
Nothing happens |
The microprocessor has |
||
when buttons are |
When the [RESET] button is pressed, turn off |
||
pressed. |
malfunctioned due to noise, etc. |
the ACC power.* |
|
Display is not |
|
*When the [RESET] button is pressed, |
|
accurate. |
|
preset radio stations, titles, etc. stored in |
|
|
|
memory are kept. |
|
|
Improper audio output connection. |
Check wiring and correct. |
|
|
Volume set too low. |
Increase volume level. |
|
No/low audio |
Speakers damaged. |
Replace speakers. |
|
output. |
Heavily biased volume balance. |
Adjust the channel balance to center position. |
|
|
|||
|
Speaker wiring is in contact with |
Insulate all speaker wiring connections. |
|
|
metal part of car. |
||
|
|
||
|
Non-standard disc used. |
Use a standard disc. |
|
Poor sound quality |
Speaker power rating does not |
Replace speakers. |
|
match unit. |
|||
|
|||
or distortion. |
|
|
|
Wrong connections. |
Check wiring and correct. |
||
|
|||
|
Speaker is shorted. |
Check wiring and correct. |
|
Tel-Mute |
MUTE wire is grounded. |
Check the MUTE wiring and correct. |
|
malfunction |
|||
|
|
||
Unit resets itself |
Incorrect connection between ACC |
Check wiring and correct. |
|
when engine is off. |
and Battery. |
|
DISC Player
Problem |
Cause |
Measure |
|
Disc cannot be |
Another disc is already loaded. |
Eject the disc before loading the new one. |
|
There is an object installed inside |
|
||
loaded. |
Remove the object inside the unit. |
||
the unit. |
|||
|
|
||
Sound skips or is |
Compact disc is dirty. |
Clean the compact disc with a soft cloth. |
|
Compact disc is heavily scratched |
Replace with a compact disc with no |
||
noisy. |
|||
or warped. |
scratches. |
||
|
|||
Sound is bad when |
Condensation may form on the internal |
|
|
power is first turned |
lens when the car is parked in a |
Let dry for about 1 hour with power on. |
|
on. |
humid place. |
|
USB Devices |
|
|
English |
|
|
|
|
Problem |
Cause |
Measure |
|
USB device cannot |
The USB device has been |
Reversing the connection direction of the USB |
|
inserted with wrong direction. |
device, try it again. |
|
|
be inserted. |
The USB connector is broken. |
Replace with a new USB device. |
|
|
|
||
|
|
|
|
USB device is not |
The USB device is damaged. |
Disconnect the USB device and reconnect. If the |
|
Connectors are loose. |
device is still not recognized, try replacing with a |
|
|
recognized. |
|
||
different USB device. |
|
||
|
|
|
|
No sound heard with |
No MP3/WMA file is stored in the |
|
|
the display “No File” |
USB device. |
Store these files properly in the USB device. |
|
shown. |
|
|
|
Sound skips or is |
MP3/WMA files are not encoded |
Use MP3/WMA files encoded properly. |
|
noisy. |
properly. |
|
|
Bluetooth |
|
|
|
|
|
|
|
Problem |
Cause |
Measure |
|
Cannot pair the |
The device does not support the |
Use another device to connect. |
|
Bluetooth enabled |
profiles required for the system. |
|
|
device with the car |
The Bluetooth function of the |
Refer to the user manual of the device for how to |
|
audio system. |
device is not enabled. |
enable the function. |
|
The audio quality |
The internal microphone gain is |
Adjust the gain of the internal microphone in |
|
not set correctly. |
System Setup. |
|
|
is poor after |
|
Adjust the gain and position of the external |
|
connection with a |
The external microphone is |
|
|
microphone. |
|
||
Bluetooth-enabled |
not set correctly nor properly |
|
|
For example, stick the microphone onto the |
|
||
device. |
positioned. |
|
|
|
|
dashboard so it is close to the driver. |
|
7. ERROR DISPLAYS
If an error occurs, one of the following displays is displayed.
Take the measures described below to solve the problem.
Display |
Cause |
Measure |
|
|
Disc is inserted incorrectly. |
Eject the disc then reload it properly. |
|
ERROR 3 |
|
|
|
The disc format is not supported. |
Try another disc. |
||
|
|||
|
|
|
|
ERROR 5 |
This is a failure of deck’s mechanism. |
Consult your store of purchase. |
If an error display other than the ones described above appears, press the [Reset] button. If the problem persists, turn off the power and consult your store of purchase.
*When the [RESET] button is pressed, preset radio stations, titles, etc. stored in memory are kept.
CZ302E 10
English
8. SPECIFICATIONS
FM Tuner
Frequency range: 87.5-108.0MHz
Usable sensitivity: 8dBf
Frequency response: 30Hz-15kHz
Stereo separation: 30dB(1kHz)
Signal/noise ratio: >55dB
AVRCP (AV Remote Control Profile)
Send/Receive Sensitivity: Class 2
Audio Amplifier
Maximum power output: 180W (45W x 4)
Speaker impedance: 4 (4 to 8
 allowable)
MW Tuner
Frequency range: 5311602kHz
Usable sensitivity (S/N=20dB): 30dBμ
LW Tuner
Frequency range: 153-279kHz
Usable sensitivity (S/N=20dB): 34dBμ
CD Player
System: Disc digital audio system Frequency response: 20Hz-20kHz Signal/noise ratio: >94dB
Total harmonic distortion: Less than 0.1% (1kHz) Channel separation: >60dB
MP3/WMA mode
MP3 sampling rate: 8 kHz to 48 kHz
MP3 bit rate: 8 kbps to 320 kbps / VBR
WMA bit rate: 8 kbps to 320 kbps
Logical format: ISO9660 level 1,2
Joliet file system
USB
Specification: USB 1.0/2.0
Playable audio format:
MP3(.mp3): MPEG 1/2/Audio Layer-3
WMA(.wma): Ver 7/8/9.1/9.2
Bluetooth
Specification: Bluetooth Ver. 2.0+EDR Profile: HFP (Hands-free Profile)
PBAP(Phone Book Access Profile) A2DP (Advanced Audio Distribution
Profile)
11 CZ302E
Input
Audio input sensitivity:
High: 320mV (at 1V output) Mid: 650mV (at 1V output) Low: 1.3V (at 1V output)
(input impedance 10 k or greater) Aux-in level: ≤2V
General
Power supply voltage:
14.4VDC (10.8 to 15.6V allowable), negative ground
Pre-Amp output voltage:
2.0V (CD play mode: 1kHz, 0dB, 10k load) Fuse: 15A
Dimensions of the Main Unit:
188mm Width × 58mm Height × 190mm Depth Weight of the Main Unit: 1.35kg
|
|
|
|
|
|
178mm |
|
|
|
|
50mm |
190mm |
|
|
|
163mm |
|
|
|||||
|
|
|
|
|
|
|
|
|
|
|
|
|
|
|
|
|
|
|
|
|
|
|
|
|
|
|
|
|
|
|
|
|
|
|
|
|
|
|
|
|
|
170mm |
|
mm |
46mm |
||
|
|
|
|
|
|
188mm |
|
14 |
|
58mm |
|
|
|
|
|
|
|
|
|
|
|
||
Notes:
•Specifications and design are subject to change without notice for further improvement.
9.INSTALLATION / WIRE CONNECTION GUIDE
CONTENTS |
|
|
1) |
Before Starting....................................................................... |
11 |
2) |
Package Contents.................................................................. |
11 |
3) |
General Cautions................................................................... |
11 |
4) |
Cautions on Installation.......................................................... |
12 |
5) |
Installing the Source Unit....................................................... |
12 |
6) |
Removing the Source Unit..................................................... |
13 |
7) |
Wiring and Connections......................................................... |
13 |
8) |
Connecting the accessories................................................... |
14 |
1) Before Starting
1. This set is exclusively for use in cars with a negative ground 12 V power supply.
2. Read these instructions carefully.
3. Be sure to disconnect the battery terminal before starting. This is to prevent short circuits during installation. (Figure 1)
2) Package Contents
Source unit........................................... |
1 |
L-key.................................................... |
2 |
Front panel........................................... |
1 |
Wire connector..................................... |
1 |
Trim ring............................................... |
1 |
DCP case............................................. |
1 |
Mounting bracket.................................. |
1 |
Owner’s manual................................... |
1 |
Special screw (M4×42)........................ |
1 |
Warranty card....................................... |
1 |
Rubber cap........................................... |
1 |
Special screw (Front panel lock).......... |
1 |
Screws M5x6 mm................................. |
4 |
|
|
3) General Cautions
1. Do not open the case. There are no |
2. Use a soft, dry cloth to clean the case. |
user serviceable parts inside. If you |
Never use a rough cloth, thinner, |
drop anything into the unit during |
benzine, or alcohol etc. For tough dirt, |
installation, consult your dealer or an |
apply a little cold or warm water to a |
authorized Clarion service center. |
soft cloth and wipe off the dirt gently. |

4) Cautions on Installation
1. |
Prepare all articles necessary for |
your car dealer beforehand. |
|
installing the source unit before |
4. Use the enclosed screws for |
|
starting. |
installation. |
2. |
Install the unit within 30° of the |
Using other screws can cause |
|
horizontal plane. (Figure 2) |
damage. |
3.If you have to do any work on the car |
(Figure 3) |
|
|
body, such as drilling holes, consult |
|
5) Installing the Source Unit
1.Place the mounting bracket into the instrument panel, use a screwdriver to bend each stopper of the mounting bracket inward, then secure the stopper.
2.Wire as shown in Section 7) .
3.Insert the source unit into the mounting bracket until it locks.
4.Take care of the top and bottom of the trim ring and mount it so that all the hooks are locked.
Notes:
1.Some car models require special mounting kits for proper installation. Consult your Clarion dealer for details.
2.Fasten the front stopper securely to prevent the source unit from coming loose.
• Console opening dimensions
|
|
|
|
|
|
|
|
|
|
|
|
(182 mm) |
|
|
|
||
|
|
|
|
|
|
|
|
|
|
|
|
|
|
|
|
|
|
|
|
|
Hole |
|
mm |
|
||
|
|
|
|
53 |
|
|||
|
|
|
|
|
|
|
|
|
|
|
|
|
|
|
|
|
|
|
|
|
|
|
|
|
|
|
Notes of installation
1.Before installation, please make sure proper connections are conducted and the unit operates normally. Improper connection may result in damage to the unit.
2.Use only accessories designed and manufactured for this unit and other unauthorized accessories may result in damage to the unit.
3.Before installation, please fasten all power cables.
4.DO NOT install the unit in the place where close to hot area to prevent damage to electrical components such as the laser head.
5.Install the unit horizontally. Installing the unit more than 30 degree vertically may result in worse performance.
6.To prevent electric spark, connect the positive pole first and then the negative pole.
7.DO NOT block the cooling fan exit to ensure sufficient heating dissipation of this
unit, or it may result in damage to this unit.
Unit Installation
Method A
1.Insert mounting bracket into dash board, choose appropriate mounting tab according to the gap width, bending the mounting tab outwards with a screwdriver to fix the mounting bracket in place.
2.Screw in 1 piece of M4×42 to the hole of the unit back and put on a rubber cap over the screw. (see picture below)
3.Slide the unit into the bracket until you hear a click sound.
English
Screwdriver
Rubber cap
Special Screw (M4x42)
CZ302E 12

English |
Method B |
6) Removing the Source Unit |
|
right part. |
|
|
|
|
|
|
M5x6 |
Dashboard
Mounting Frame
1.Insert this unit directly to the opening of the dashboard.
2.Place M5×6 cylindrical screw through the holes of the mounting frame located inside the opening to holes of the unit and fasten the screws to left & right.
Trim Ring Installation
Attach the trim ring around the front panel.
Disassemble trim ring
1. Push the trim ring to right and pull out the

 Top
Top
Bottom
2.Push the trim ring to left and pull out the left part.
Disassemble the unit
1.Switch off the power.
2.Remove the panel.
3.Remove the trim ring.
4.Insert the removal keys straight back until they lock, then pull the unit out.
5.Disconnect all the wires.
7) Wiring and Connections
Black |
White |
Rear audio output (Left)/ |
||||
|
Rear SUB |
|
|
|
|
Subwoofer output 1 |
|
|
|
||||
|
/ Left 1 OUT |
|
|
|
|
|
|
|
|
|
|
|
|
Black |
Black |
|
External microphone |
MIC |
|
(RCB-199:Sold by separately) |
||
|
||
Steering wheel Black |
Black |
|
control terminal |
SWC |
Antenna
(Black)
Black |
Red |
Rear audio output (Right)/ |
|
Rear SUB |
|
||
|
Subwoofer output 2 |
||
/ Right 2 OUT |
|
|
|
Gray |
White |
Left |
Front audio |
|
|
||
|
Red |
Right |
output terminal |
|
|
|
|
4 Channel Amplifier
C
|
|
|
|
|
|
8 |
B |
A |
||
|
|
|
|
5 6 7 |
|
1 |
2 |
|||
|
2 |
3 |
4 |
13 |
14 15 |
16 |
3 |
4 |
1 |
2 |
1 |
|
11 12 |
|
|
5 |
6 |
3 |
4 |
||
9 |
10 |
|
|
|
|
|
7 8 |
5 |
6 |
|
|
|
|
|
|
|
|
|
|
7 |
8 |
Refer to next page
Refer to next page.
13 CZ302E

|
|
A |
|
|
|
1 |
|
|
Rear right - |
3 |
|
16 |
5 |
||
14 |
Front right - |
7 |
|
12 |
Front left + |
2 |
|
10 |
Rear left + |
||
8 |
|
4 |
|
6 |
AMP Remote |
6 |
|
4 |
8 |
||
ACC + |
|||
2 |
|
||
Ground |
|
||
|
|
||
C |
|
|
15 |
Rear right + |
B |
|
1 |
|||
13 |
Front right + |
||
3 |
|||
11 |
Front left - |
5 |
|
9 |
Rear left - |
7 |
|
7 |
|||
Illumination |
|
||
5 |
2 |
||
Phone Mute |
|||
3 |
|
4 |
|
1 |
Battery + |
6 |
|
|
|
8 |
|
|
Phone Mute(+) / Brown |
Rear right (+) / Purple |
|
|
|
Rear right (-) / Purple with black stripe |
|
|
|
Front right (+) / Grey |
|
|
Battery 12V(+) / Yellow |
Front right (-) / Grey with black stripe |
|
|
Remote On / Blue with white stripe |
Front left (+) / White |
|
|
Illumination / Orange with white stripe |
Front left (-) / White with black stripe |
|
|
ACC+ / Red |
Rear left (+) / Green |
|
|
Ground / Black |
Rear left (-) / Green with black stripe |
|
|
Yellow |
Yellow |
|
|
Red |
Red |
For VW and Audi: Change wiring like above.
8) Connecting the accessories
•Connecting to the external amplifier
External amplifiers can be connected to the 4 channel RCA output connections. Ensure that the connectors are not grounded or shorted to prevent damage to the unit.
English
CZ302E 14

Français
Table des matières
Nous vous remercions de votre achat de ce produit Clarion.
•Lisez ce mode d’emploi dans son intégralité avant d’utiliser cet appareil.
•Vérifiez le contenu de la carte de garantie ci-jointe et conservez-la en lieu sûr avec ce mode d’emploi.
1. CARACTÉRISTIQUES............................................................................................................ |
15 |
2. PRÉCAUTIONS....................................................................................................................... |
16 |
About the Registered Marks, etc.......................................................................................... |
16 |
Façade/Généralités.............................................................................................................. |
16 |
Port USB............................................................................................................................... |
16 |
Retirer le DCP....................................................................................................................... |
17 |
Fixer le DCP en place........................................................................................................... |
17 |
Rangement du DCP dans son boîtier................................................................................... |
17 |
3. COMMANDES......................................................................................................................... |
17 |
4. PRÉCAUTIONS DE MANIPULATION.................................................................................... |
18 |
Manipulation des disques..................................................................................................... |
18 |
5. FONCTIONNEMENT............................................................................................................... |
18 |
Opérations de base.............................................................................................................. |
18 |
Configuration du système..................................................................................................... |
19 |
Configuration audio............................................................................................................... |
19 |
Fonctionnement de la radio.................................................................................................. |
19 |
Fonctionnement RDS........................................................................................................... |
20 |
Fonctionnement CD/MP3/WMA............................................................................................ |
21 |
Fonctionnement USB............................................................................................................ |
22 |
Fonctionnement iPod & iPhone............................................................................................ |
22 |
Fonctionnement Bluetooth.................................................................................................... |
23 |
Fonctionnement AUX............................................................................................................ |
24 |
6. GUIDE DE DÉPANNAGE........................................................................................................ |
25 |
7. AFFICHAGE DES ERREURS................................................................................................. |
25 |
8. CARACTÉRISTIQUES TECHNIQUES.................................................................................... |
26 |
9 INSTALLATION/GUIDE DE RACCORDEMENT DES CÂBLES............................................. |
26 |
1. CARACTÉRISTIQUES
 Fonction mains libres (HFP) Parrot Bluetooth® intégrée et streaming audio (A2DP & AVRCP)
 Compatible avec iPod®/iPhone® via USB
 Sortie RCA 4 canaux avec filtres HPF/LPF et BEAT-EQ avec égalisation paramétrique 3 bandes
Systèmes extensibles
Amélioration des caractéristiques audio
Amplificateur à 4 canaux
iPod/iPhone
(À raccorder par le CCA-748)
Téléphone portable
Bluetooth®
Clé USB
(À raccorder par le CCA-755)
Lecteur portable
(À raccorder à la prise d’entrée AUX IN)
Remarque :
•Les éléments en dehors des cadres correspondent aux produits en vente habituellement dans le commerce.
•CCA-748etCCA-755:vendusséparément.
15 CZ302E

2. PRÉCAUTIONS
 AVERTISSEMENT
Par mesure de sécurité, le conducteur ne doit pas utiliser les commandes pendant qu’il conduit. Par ailleurs, en roulant, maintenez le volume à un niveau permettant d’entendre les sons extérieurs.
1.Lorsque l’intérieur de la voiture est très froid et que le lecteur est utilisé aussitôt après avoir allumé le chauffage, de la condensation peut se former sur le disque ou les composants optiques du lecteur, ce qui risque d’affecter la lecture. Si de la condensation se forme sur le disque, essuyez-le avec un chiffon doux. Si de la
condensation se forme sur les composants optiques du lecteur, cessez d’utiliser le lecteur pendant une heure environ. La condensation disparaîtra naturellement et le fonctionnement normal sera rétabli.
2.Conduire sur des routes très cahoteuses ou difficiles peut être à l’origine d’un son saccadé.
3.Des pièces et des composants de grande précision entrent dans le fonctionnement de cet appareil. En cas de problème, n’ouvrez jamais le boîtier, ni ne démontez l’appareil, ni ne lubrifiez les pièces en mouvement. Adressez-vous à votre revendeur ou à un SAV Clarion.
About the Registered Marks, etc.
1.“Made for iPod,” and “Made for iPhone” mean that an electronic accessory has been designed to connect specifically to iPod, or iPhone, respectively, and has been certified by the developer to meet Apple performance standards.
Apple is not responsible for the operation of this device or its compliance with safety and regulatory standards. Please note that the use of this accessory with iPod or iPhone may affect wireless performance.
iPhone and iPod are trademarks of Apple Inc., registered in the U.S. and other countries.
2.The Bluetooth word mark and logos are owned by the Bluetooth SIG, Inc. and any use of such marks by Clarion Co.,Ltd. is under license.
Other trademarks and trade names are those of their respective owners.
Façade/Généralités
Lisez attentivement les précautions suivantes pour obtenir une durée de service plus longue.
•Ne laissez pas de liquides (boissons, parapluies, etc.) pénétrer dans l’appareil sous peine d’endommager le circuit interne.
•Ne démontez ni ne modifiez l’appareil de quelque façon que ce soit sous peine de provoquer des dégâts.
•Ne laissez pas de cigarettes brûler l’affichage sous peine d’abîmer ou déformer le boîtier.
•En cas de problème, confiez l’appareil au magasin d’achat pour inspection.
Nettoyage du boîtier
•Utilisez un chiffon doux et sec, et essuyez délicatement la saleté ou la poussière.
•Pour les saletés tenaces, appliquez un détergent neutre dilué dans l’eau sur un chiffon doux et frottez délicatement, puis essuyez avec un chiffon sec.
•N’utilisez pas de benzène, diluant, nettoyant pour voiture, etc., car ces substances peuvent abîmer le boîtier ou décoller la peinture. En outre, des tâches peuvent apparaître si vous laissez des produits en caoutchouc ou en plastique en contact prolongé avec le boîtier.
Port USB
•La clé USB peut dépasser une fois insérée, ce qui présente un
danger pendant la conduite. Lors du raccordement d’une clé USB à l’appareil principal, utilisez un câble de rallonge USB (CCA-755).
•Les clés USB doivent être reconnues comme faisant partie de la « classe de stockage de masse USB » pour fonctionner correctement. Certains modèles peuvent ne pas fonctionner correctement.
Clarion ne saurait être tenu responsable de toute perte ou d’un dommage quelconque des données sauvegardées.
Il est recommandé de faire au préalable une copie de sauvegarde des données contenues sur la clé USB au moyen d’un ordinateur personnel ou autre lors de l’utilisation d’une clé USB.
•Les fichiers de données peuvent être endommagés si vous utilisez la clé USB dans les situations suivantes : Lors du débranchement de la clé USB ou de la mise hors tension de l’appareil pendant la lecture des données.
En présence d’électricité statique ou de bruit électrique.
Insérez/retirez la clé de mémoire USB en dehors de l’accès à son contenu.
•La connexion à un ordinateur n’est pas garantie.
Français
CZ302E 16

Retirer le DCP
|
Le panneau de commande peut être retiré |
|
|
|
|
|
pour prévenir le vol. Une fois le panneau de |
|
Français |
commande retiré, rangez-le dans le boîtier |
|
pour DCP (DETACHABLE CONTROL |
|
|
|
|
|
|
PANEL, PANNEAU DE COMMANDE |
|
|
AMOVIBLE) pour le protéger des |
|
|
égratignures. |
|
|
Nous vous recommandons d’emporter le |
|
|
DCP avec vous lorsque vous quittez le |
|
|
véhicule. |
|
|
|
|
|
1. Appuyez sur la touche [SRC / ] (pendant |
|
|
1 seconde) pour éteindre l’appareil. |
|
|
2. Enfoncez la touche [OPEN ] pour |
|
|
déverrouiller le DCP. |
|
3. Tenez la partie sortie et retirez le DCP.
Fixer le DCP en place
1. Tenez le DCP en veillant à ce que la façade soit tournée vers vous. Insérez le côté droit du DCP dans le support du DCP.
2. Appuyez sur le côté gauche du DCP jusqu’à ce qu’il se verrouille en place.
Rangement du DCP dans son boîtier
Tenez le DCP comme indiqué sur l’illustration ci-dessous, puis rangez-le dans le boîtier pour DCP fourni.
DCP
Boîtier pour DCP
Remarque :
Si le DCP est sale, essuyez la saleté en utilisant uniquement un chiffon doux et sec.
17 CZ302E
 PRÉCAUTION
•Le DCP est très sensible aux chocs. Une fois retiré, veillez à ne pas le lâcher ou le heurter violemment.
•Une fois la touche [OPEN] enfoncée et le DCP déverrouillé, les vibrations de la voiture peuvent le faire tomber.
•Le connecteur pour l’appareil principal et le DCP est extrêmement important. Assurez-vous de ne pas l’endommager en appuyant dessus avec les ongles, un tournevis, etc.
3. COMMANDES
Panneau de commande
[MIC] [BAND / ] [MENU / ] |
[PS/AS] |
[ Fente de disque ] |
[ ] [ Connecteur USB ] |
|||||||
|
|
|
|
|
|
|
|
|
|
|
|
|
|
|
|
|
|
|
|
|
|
|
|
|
|
|
|
|
|
|
|
|
[ |
, |
] |
|
[VOLUME] |
[ DISP ] |
[TA] |
Prise AUX |
|
|
|
|
|
[1~6] |
|
|||
|
|
[OPEN] |
[ SRC / |
] |
[ |
] |
|
|
|
|
|
|
|||||
|
|
|
|
|
|
|
||
Noms des touches
Touche [SRC /  ]
]
•Mise sous tension/Changement de source audio
Touche [BAND /  ]
]
•Mode RADIO – Pour sélectionner la bande radio
•Mode BT – Composer/répondre/Transfert d’appel / Bis (appui long)
Touche [MENU /  ]
]
•Mode MP3/WMA – Fonction de recherche.
•Mode BT – Mettre fin à l’appel.
•Mode CD – Inopérant.
•Mode RADIO – Sélection PTY.
•Mode AUX – Inopérant.
•Mode USB – Fonction de recherche
•Mode iPod – Menu iPod
Touche [ ]
•Appuyez sur cette touche pour éjecter le disque.
Touches [  ,
,  ]
]
•Plage précédente/suivante
•Recherche (pression longue)
Touche [OPEN]
• Pour déverrouiller la façade.
Touche [PS / AS]
•Lecture par balayage/Balayage des stations préréglées
•Mémorisation automatique (pression longue)
Touche [  ]
]
• Réglage des effets sonores
Bouton [VOLUME]
•Pour ajuster le niveau sonore/Confirmer (appuyer)
Touche [TA]
• Annonce du trafic routier
Touches [1-6]
•Touche [1] : Lecture par balayage/Station préréglée 1.
•Touche [2] : Lecture répétée/Station préréglée 2.
•Touche [3] : Lecture aléatoire/Station préréglée 3.
•Touche [4] : Lecture/Pause/Lecture de la première plage (pression longue)/Station préréglée 4.
•Touche [5] : Dossier précédent/Station
préréglée 5.10 plages vers le bas (pression longue)
• Touche [6] : D o s s i e r s u i v a n t / S t a t i o n p r é r é g l é e 6 . 10 plages vers le haut (pression longue)
Touche [DISP]
•Changement d’affichage
•Configuration du système (pression longue)
Orifice [ MIC ]
• Micro interne
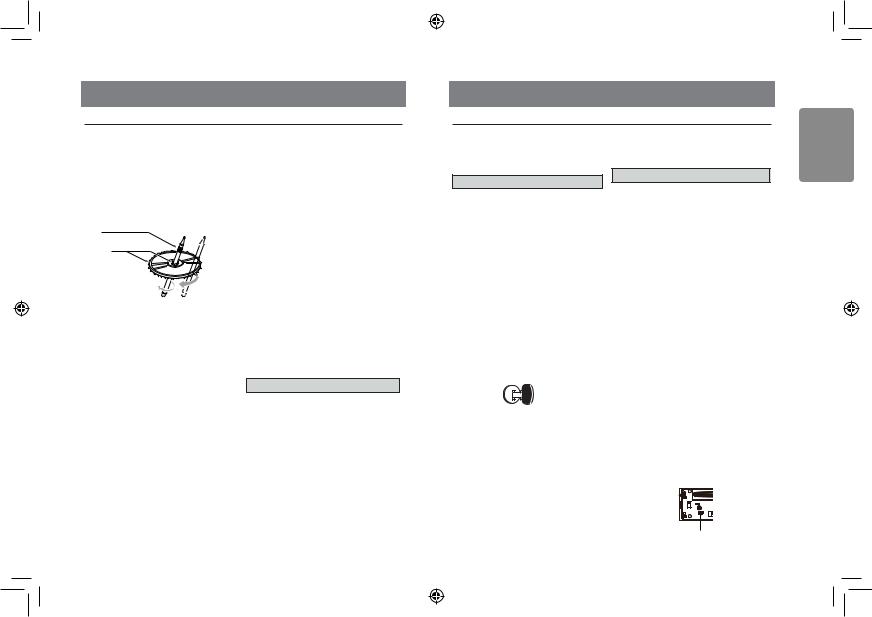
4. PRÉCAUTIONS DE MANIPULATION
Manipulation des disques
Manipulation
•Les disques neufs peuvent présenter des aspérités sur les bords. L’utilisation de tels disques peut entraîner un mauvais fonctionnement du lecteur ou un son
saccadé. Utilisez un stylo à bille ou un objet semblable pour retirer toute aspérité du bord du disque.
Stylo à bille
Aspérité
•Ne collez jamais d’étiquettes sur la surface d’un disque et n’écrivez rien dessus avec un stylo ou au crayon.
•Ne lisez jamais de disque avec du ruban cellophane ou de la colle sur sa surface ou présentant des traces de décollement.
Vous risqueriez de ne plus pouvoir le retirer de lecteur ou d’abîmer ce dernier.
•N’utilisez pas de disques rayés, déformés, fissurés ou autre sous peine de provoquer un mauvais fonctionnement ou des dégâts.
•Pour sortir un disque de son boîtier de rangement, appuyez au centre du
boîtier et soulevez le disque en le tenant délicatement par les bords.
•N’utilisez pas de feuillets de protection pour disque en vente dans le commerce ni de disques pourvus de stabilisateurs, etc., sous peine d’abîmer le disque ou de provoquer une panne du mécanisme interne.
Rangement
•Ne placez pas les disques en plein soleil ou à proximité d’une source de chaleur.
•N’exposez pas les disques à une humidité ou de la poussière excessive.
•N’exposez pas les disques à la chaleur directe d’un chauffage.
Nettoyage
•Pour retirer les traces de doigt et la poussière, utilisez un chiffon doux et essuyez en ligne droite depuis le centre du disque jusqu’au bord.
•N’utilisez pas de solvants, comme les nettoyants en vente dans le commerce, les sprays antistatiques ou les diluants pour nettoyer les disques.
•Après utilisation d’un nettoyant spécial pour disque, laissez le disque bien sécher avant de l’utiliser.
À propos des disques
•N’éteignez jamais l’appareil, ni ne le retirez de la voiture avec un disque chargé.

 PRÉCAUTION
Par mesure de sécurité, le conducteur ne doit pas insérer ou éjecter un disque alors qu’il conduit.
5. FONCTIONNEMENT
Opérations de base
Remarque :
•Reportez-vous aux schémas dans « 3. COMMANDES » lorsque vous lisez ce chapitre.

 PRÉCAUTION
Lorsque l’appareil est sous tension, allumer et éteindre le moteur avec son volume au maximum peut entraîner une perte auditive.
Prenez soin de ne pas régler le volume trop fort.
Mise sous/hors tension
Remarques :
•Démarrez le moteur avant d’utiliser cet appareil.
•Prenez garde de ne pas utiliser l’appareil
pendant une période prolongée sans démarrer le moteur. Si vous videz la batterie de la voiture, vous ne serez plus en mesure de démarrer le moteur et ceci risque de diminuer la durée de vie de la batterie.
1.Démarrez le moteur. Le voyant de la touche/bouton d’alimentation sur l’appareil s’allume.
Position du moteur ON
2.Appuyez sur la touche [SRC / ] de la façade pour mettre l’appareil sous tension depuis le mode de veille. L’appareil revient au dernier statut après la mise sous tension.
3.Maintenez enfoncée la touche [SRC / ] de la façade pour mettre l’appareil hors tension.
Affichage CT (horloge)
•Les données d’horloge affichées se basent sur les données CT (horloge) du signal RDS.
Réglage du volume
Tournez le bouton [VOLUME] sur la façade. La plage de volume réglable est de 0 à 40.

 PRÉCAUTION
En roulant, maintenez le volume à un niveau permettant de toujours entendre les sons extérieurs.
Sélection de la source de lecture
Appuyez à plusieurs reprises sur la touche [SRC /  ] de la façade pour sélectionner la source de lecture de votre choix.
Remarques :
•La sélection de la source de lecture permet de sélectionner un mode, par exemple, mode
DISC, mode RADIO et mode AUX.
Affichage de l’heure du système
Appuyez sur la touche [DISP] de la façade pour faire basculer les informations d’affichage entre les informations RDS, l’heure du système et la source de lecture.
RÉINITIALISATION
Si vous rencontrez l’un des problèmes ci-dessous, veuillez appuyer sur le bouton [RESET].
•L’appareil ne s’allume pas
•Rien ne se produit lorsque j’appuie sur les touches
•L’affichage est imprécis
Remarque :
*Lorsque vous appuyez sur le bouton [RESET], les fréquences de station radio, les réglages audio et les autres données mémorisées sont conservées.
RESET
Français
 |
CZ302E |
18 |
|

Français
19
Configuration du système
Dans n’importe quel mode, maintenez enfoncée la touche [ D I S P ] pour accéder à la configuration du système.
Appuyez sur la touche [ |
|
] ou |
|
|
|||
[ |
] pour sélectionner les options et |
||
tournez le bouton [VOLUME] pour procéder au réglage.
AF : ON/OFF
Tournez le bouton [VOLUME] pour activer ou désactiver AF.
REG : ON/OFF
Tournez le bouton [VOLUME] pour activer ou désactiver REG.
DX/LO (Mode RADIO)
Tournez le bouton [V O L U M E ] pour sélectionner local (LO) ou distant (DX) comme mode RADIO.
•LO : seules les stations dont le signal est puissant peuvent être captées.
•DX : les stations ayant des signaux puissants et faibles peuvent être captées.
AUX SENS (Mode AUX)
Tournez le bouton [V O L U M E ] pour sélectionner la sensibilité de l’entrée AUX entre LOW, MID ou HIGH en mode AUX.
SELECT (Mode BT)
Ce menu « SELECT(SÉLECTIONNER) » est destiné à l’appariement automatique en sélectionnant un téléphone portable enregistré.
Cet appareil peut enregistrer trois téléphones portables. Les téléphones portables seront enregistrés dans leur ordre d’appariement sur l’appareil. Il est possible d’enregistrer jusqu’à trois téléphones portables. Vous ne pourrez pas enregistrer un quatrième téléphone portable. Pour enregistrer un quatrième téléphone portable, il est nécessaire de supprimer un téléphone portable non utilisé depuis le menu « DELETE(SUPPRIMER) ».
DELETE (Mode BT)
1.Tournez le bouton [VOLUME] pour choisir le nom du téléphone portable apparié dans la liste d’appariement.
2.Maintenez enfoncé le bouton [VOLUME] pour confirmer.
DISCON (BT mode)
Déconnectez le téléphone portable actuellement connecté.
CZ302E
1.Tournez le bouton [VOLUME], les téléphones actuellement connectés s’affichent.
2.Maintenez enfoncé le bouton [VOLUME] pour déconnecter.
MIC SEL (Mode BT)
Tournez le bouton [VOLUME] pour choisir EXTERNAL ou INTERNAL pour le micro.
MIC GAIN (Mode BT)
Tournez le bouton [VOLUME] pour choisir legain du micro : -5,-4,-3,-2,-1,0,1, 2, 3, 4, 5. Vous pouvez modifier le gain de MIC si votre correspondant ne peut pas vous entendre.
TONE SEL (BT mode)
Vous pouvez obtenir une sonnerie de téléphone portable depuis l’enceinte. Tournez le bouton [VOLUME] pour choisir AUTO ou INTERNE.
• AUTO :
Sonnerie de téléphone portable depuis l’enceinte.
• INTERNE :
Sonnerie originale de l’appareil depuis l’enceinte.
AUTO ANS (Mode BT)
Pour répondre automatiquement aux appels entrants.
Tournez le bouton [VOLUME] pour activer (ON) ou désactiver (OFF) AUTO ANS.
AUTO CON : ON/OFF (Mode BT)
Tournez le bouton [VOLUME] pour activer (ON) ou désactiver (OFF) AUTO CON.
PIN CODE
Tournez le bouton [VOLUME] et appuyez dessus pour choisir un mot de passe à 4 chiffres. Appuyez pendant plus d’une seconde sur le bouton pour confirmer.
SCRN SVR : ON/OFF
Tournez le bouton [VOLUME] pour activer ou désactiver SCRN SV (économiseur d’écran).
SCROLL : ON/OFF
Pour les informations sur les plages plus longues que le panneau d’affichage :
Avec SCROLL réglé sur ON, l’écran LCD fera défiler les informations ID3 TAG sur l’affichage, par ex. :
TRACK(Plage)->FOLDER(Dossier)- >FILE(Fichier)->ALBUM->TITLE(Titre)- >ARTIST(Artiste)->TRACK(Plage)->...
Configuration du système
Avec SCROLL réglé sur OFF, l’écran LCD affiche une des informations ID3 TAG, le réglage par défaut est TRACK, mais l’utilisateur peut l’ajuster pour une autre information ID3 TAG en appuyant sur la touche [DISP].
S-CTRL (Mode IPOD) : ON/OFF
Tournez le bouton [VOLUME] pour activer ou désactiver S-CTRL (contrôle simple).
* Voir page 23.
REAR/S-W
Tournez le bouton [VOLUME] pour sélectionner REAR ou S-WOOFER (SUB-WOOFER).
SW PHASE
Tournez le bouton [VOLUME] pour régler la phase du SUB-WOOFER(caisson des graves) sur REVERSE ou NORMAL.
TEL-SW
Tournez le bouton [VOLUME] pour sélectionner MUTE, ON ou OFF.
• MUTE :
Le son depuis cet appareil est coupé pendant les appels téléphoniques.
• OFF :
Cet appareil continue de fonctionner normalement même lorsque le téléphone portable est utilisé.
• ON :
Vous pouvez écouter les appels de votre téléphone depuis les enceintes raccordées à l’appareil.
*Lorsque vous écoutez vos appels depuis les enceintes de votre voiture, vous pouvez ajuster le volume en tournant le bouton [VOLUME].
DIMMER : ON/OFF
Tournez le bouton [VOLUME] pour activer ou désactiver DIMMER.
•ON : L’atténuateur d’écran LCD est activé lorsque le plafonnier de la voiture est allumé.
•OFF : La luminosité de l’écran LCD est toujours maximale indépendamment du plafonnier de la voiture.
BEEP : ON/OFF
Tournez le bouton [VOLUME] pour activer ou désactiver le bip des touches.
RESET (Réinitialiser tous les)
1.Sélectionnez « RESET ».
2.Maintenez enfoncé le bouton [VOLUME] pour réinitialiser.
3.Les réglages sont ramenés à leurs valeurs par défaut.
4.L’appareil s’éteint automatiquement.
Remarque :
Si vous sélectionnez « RESET » et maintenez enfoncé le bouton [VOLUME], les fréquences des stations radio, les titres et les autres données mémorisées sont effacés.
Configuration audio
Appuyez sur la touche [ ] |
pour accéder |
MID-F : 500/1 K/2 K |
|
|
||||||
au mode de réglage des effets sonores. La |
MID-Q : 0.7/1/1.4/2 |
|
|
|||||||
première pression sur la touche affiche l’EQ |
TRE-F : 5 k/10 k/15 k |
|
|
|||||||
actuel. Tournez le bouton [VOLUME] pour |
TRE-Q 0,7/1,0/1,4/2,0 |
|
|
|||||||
modifier BEAT EQ dans l’ordre suivant : |
|
|
Appuyez sur la touche [ ], puis sur la |
|||||||
OFF -> B-BOOST -> IMPACT -> EXCITE -> |
touche [ |
|
] ou [ |
|
] pour sélectionner le |
|||||
CUSTOM |
|
|
|
préréglage USER comprenant : |
||||||
Tournez le bouton [VOLUME] pour changer |
BALANCE -> FADER -> M-B EX -> LPF |
|||||||||
CUSTOM et appuyez sur le bouton [VOLUME], |
(filtre passe-bas) -> S-W VOL (volume du |
|||||||||
puis appuyez sur la touche [ |
|
|
] ou [ |
|
] |
subwoofer), tournez le bouton [VOLUME] |
||||
|
|
|||||||||
pour sélectionner entre : BAS-G -> BAS-F -> |
pour sélectionner une valeur. |
|||||||||
BAS-Q -> MID-G -> MID-F -> MID-Q -> TRE-G |
BALANCE : LEFT 1-7->CENTER->RIGHT |
|||||||||
-> TRE-F, tournez le bouton [VOLUME] pour |
1-7 |
|
|
|
|
|||||
sélectionner une valeur. |
|
|
|
FADER : FRONT 1-7->CENTER->REA 1-7 |
||||||
BAS-G/MID-G/TRE-G : (-7)- (+7) |
|
|
|
M-BEX : ON/OFF |
|
|
||||
BAS-F : 50/100/200 |
|
|
|
LPF : 60/90/120 |
|
|
||||
BAS-Q : 0.7/1/1.4/2 |
|
|
|
HPF : 60/90/120 |
|
|
||||
|
|
|
|
|
|
SUBW VOL : (-6)-(+6) |
|
|
||
Fonctionnement de la radio
Sélectionner le tuner comme source de lecture
Appuyer sur la touche [SRC / ] à une ou plusieurs reprises pour accéder au mode
RADIO.
Sélectionner une bande radio
Appuyez sur la touche [BAND / ] de la façade pour sélectionner une bande radio parmi FM1, FM2, FM3, MW et LW.
Accord manuel
Pendant l’accord manuel, la fréquence change par paliers.
Appuyez sur les touches [ ]/[
]/[
 ] de la façade pour rechercher une station supérieure/ inférieure.
Accord automatique
Maintenez enfoncées les touches [ ]/[
]/[
 ] de la façade pour trouver une station supérieure/inférieure.
Pour arrêter la recherche, répétez l’opération ci-dessus ou appuyez sur d’autres touches ayant des fonctions radio.
Remarque :
La recherche s’arrête lorsqu’une station est captée et celle-ci est lue.
Balayage des stations préréglées
Cette fonction capte l’une après l’autre les stations placées dans la mémoire de préréglage. Cette fonction est pratique pour retrouver une station donnée déjà mémorisée.
1.Appuyez sur la touche [PS/AS].
2.Quand la station souhaitée est accordée, appuyez à nouveau sur la touche [PS/AS] pour continuer à capter cette station.
Remarque :
Veillez à ne pas maintenir enfoncée la touche [PS/AS] pendant plus de 1 seconde sous peine d’activer la fonction de mémorisation automatique et de lancer la mémorisation des stations sur l’appareil.
Mémorisation automatique
Seules les stations dont la puissance de signal est suffisante sont détectées et mises en mémoire.
Maintenez enfoncée la touche [PS/AS] (pendant 1 seconde) pour lancer la recherche automatique de stations.
Pour arrêter la mémorisation automatique, appuyez sur d’autres touches ayant des fonctions radio.
Remarques :
1.Après la mémorisation automatique, les stations précédemment mémorisées seront écrasées.
2.L’appareil comprend 5 bandes, FM1, FM2, FM3, MW et LW. FM3, MW et LW peuvent mémoriser par la fonction AS. Chaque bande peut mémoriser 6 stations et le CZ302E peut mémoriser 30 stations en tout.
Mémorisation manuelle
Lorsqu’une station radio attendue est détectée, maintenez enfoncée une des touches numériques 1 à 6 pour la mémoriser.
Rappeler les stations mémorisées
Appuyez sur l’une des touches numériques 1 à 6 de la façade pour sélectionner la station mémorisée correspondante.
Recherche locale
Lorsque la fonction de recherche LOCAL est sur ON, seules les stations radios ayant un signal radio puissant peuvent être captées. Pour sélectionner la fonction LOCAL, maintenez enfoncée la touche [DISP] de la façade, puis appuyez à plusieurs reprises sur la touche [
 ] jusqu’à ce que LO ou DX s’affiche à l’écran et tournez le bouton [VOLUME] pour sélectionner le mode Local ou Distant.
Remarque :
Le nombre de stations radio pouvant être captées diminue une fois le mode de recherche
locale sur ON.
Fonctionnement RDS
Système de transmission de données radio (RDS, Radio Data System)
Cet appareil est pourvu d’un décodeur intégré RDS acceptant les stations émettant des données RDS.
Pour pouvoir utiliser la fonction RDS, réglez la radio sur le mode FM.
Fonction AF
La fonction AF permet de changer de fréquences sur le même réseau afin de garantir une réception optimale continue.
* Le réglage par défaut est ON.
1.Sélectionnez la configuration du système en appuyant longuement sur la touche [DISP].
2.Appuyez sur la touche [  ] ou [
 ] pour sélectionner « AF ».
3.Tournez le bouton [VOLUME ] pour
sélectionner ON ou OFF.
• AF ON :
L'indicateur « AF » apparaît sur l’affichage et la fonction AF est activée.
• AF OFF :
L'indicateur « AF » disparaît de l’affichage et la fonction AF est désactivée.
Fonction REG (Programme régional)
Avec la fonction REG activée, la station régionale la plus claire peut être captée. Lorsque cette fonction est désactivée, si la zone de la station régionale change pendant que vous conduisez, une autre station régionale pour la nouvelle région est captée.
* Le réglage par défaut est ON.
Remarques :
•Cette fonction est désactivée lorsqu’une station nationale, la BBC R2 par exemple, est captée.
•Le réglage ON/OFF de la fonction REG est
disponible lorsque la fonction AF est activée.
1.Sélectionnez la configuration du système en appuyant longuement sur la touche [DISP].
2.Appuyez sur la touche [  ] ou [
 ] pour sélectionner « REG ».
3.Tournez le bouton [VOLUME] pour sélectionner ON ou OFF.
Recherche manuelle d’une station régionale sur le même réseau
Cette fonction est disponible avec la fonction AF activée et la fonction REG désactivée.
Remarque :
•Cette fonction peut être utilisée lorsqu’une émission régionale sur le même réseau est captée.
Annonce du trafic routier (TA,
Trafic Announcement)
En mode de veille TA, lorsqu’une émission d’annonce du trafic routier commence, celle-ci est captée en priorité quelque soit le mode de fonction afin de vous permettre de l’écouter. La recherche automatique du programme de trafic routier (TP) est également disponible.
*Cette fonction ne peut être utilisée que si
«TP » apparaît sur l’affichage. Lorsque
«TP » apparaît, cela signifie que la station RDS captée comporte des programmes d’annonce du trafic routier.
Réglage du mode de veille TA
Si vous appuyez sur la touche [TA], « TA » s’allume sur l’affichage et l’appareil entre en mode de veille TA jusqu’à ce qu’une annonce de trafic routier soit diffusée. Lorsqu’une émission d’annonce du trafic routier commence, « TRAF INFO » apparaît sur l’affichage. Si vous appuyez sur la touche [TA] alors qu’une émission d’annonce du trafic routier est captée, la réception est annulée et l’appareil entre en mode de veille TA.
Annulation du mode de veille TA
Appuyez sur la touche [TA] pendant que « TA » s’allume sur l’affichage. « TA » s’éteint sur l’affichage et le mode de veille TA est annulé.
Français
CZ302E 20

Français
21
Fonctionnement RDS
Type de programme (PTY, Programme Type)
Cette fonction vous permet d’écouter une émission du type de programme sélectionné même si l’appareil est sur un mode de fonction autre que radio.
*Certains pays ne proposent pas encore d’émissions PTY.
*En mode de veille TA, une station TP a priorité sur une station PTY.
Sélection PTY
Appuyez sur la touche [MENU /  ], puis tournez le bouton [VOLUME] pour sélectionner le type PTY et appuyez sur le bouton [VOLUME] pour lancer la recherche.
Fonctionnement CD/MP3/WMA
Cet appareil peut lire les fichiers MP3/WMA
Remarques :
•Si vous lisez un fichier WMA avec DRM (Digital Rights Management = Gestion des Droits Numériques) actif, il n’y aura pas de son.
DRM (Digital Rights Management = Gestion des Droits Numériques)
Si vous utilisez Windows Media Player 9/10/11, cliquez sur Tool -> Options -> l’onglet Rip Music, puis sous les réglages Rip, décochez la case pour copy protect music. Ensuite, reconstruisez les fichiers.
Vous utilisez sous votre propre responsabilité les fichiers WMA construits personnellement.
Précautions relatives à la création de fichiers MP3/WMA
Taux d’échantillonnage et débits binaires utilisables
1.MP3 : Taux d’échantillonnage 8 kHz à 48 kHz, Débit binaire 8 kb/s à 320 kb/s/VBR
2.WMA : Débit binaire 8 kb/s à 320 kb/s
Extensions de fichier
1.Ajoutez toujours une extension de fichier « .MP3 », « .WMA » à un fichier MP3, WMA en utilisant des lettres à 1 octet. La lecture du fichier ne sera pas possible si vous ajoutez une extension autre que celle qui est spécifiée ou si vous oubliez d’en ajouter une.
CZ302E
2.Les fichiers sans données MP3/WMA ne seront pas lus. Les fichiers seront lus sans qu’aucun son ne soit émis si vous tentez de lire des fichiers ne comportant pas de données MP3/WMA.
* À la lecture de fichiers VBR, il se peut que l’affichage la durée de lecture soit différente de l’endroit de lecture.
* À la lecture de fichiers MP3/WMA, une petite section sans son est produite entre les morceaux.
Format logique (Système de fichier)
1.Pour enregistrer un fichier MP3/WMA sur un disque CD-R ou CD-RW, sélectionnez « ISO9660 level 1, 2 ou joliet » ou apple ISO comme format du logiciel d’écriture. La lecture normale risque d’être impossible si le disque est enregistré dans un autre format.
2.Vous pouvez afficher le nom de dossier et le nom de fichier comme titre pendant la lecture MP3/WMA, mais le titre ne doit pas dépasser 32 caractères alphanumériques d’un seul octet (extension comprise).
3.N’attribuez pas de nom à un fichier dans un dossier, portant déjà le même nom.
Structure de dossier
Il est impossible d’avoir un disque avec un dossier, renfermant plus de 8 niveaux hiérarchiques.
Fonctionnement CD/MP3/WMA
Nombre de fichiers ou de dossiers
1.Un maximum de 999 fichiers peut être reconnu par dossier.
Un maximum de 3000 fichiers peut être lu.
2.Les plages sont lues dans l’ordre de leur enregistrement sur un disque (il se peut que les plages ne soient pas toujours lues dans l’ordre affiché sur l’ordinateur).
3.Il se peut que certains bruits soient produits selon le type de logiciel de codage utilisé pour l’enregistrement.
Fonction d’éjection
Il suffit d’appuyer sur la touche [ ] pour éjecter le disque.
Remarques :
•Forcer un CD à l’intérieur de l’appareil avant sa recharge automatique risque de l’endommager.
•Si un CD (12 cm) est laissé éjecté pendant plus de 15 secondes, il sera automatiquement réinséré (Recharge automatique).
Écoute d’un disque déjà chargé
Appuyez sur la touche [SRC /  ] pour sélectionner le mode CD/MP3/WMA. Lorsque l’appareil passe en mode CD/MP3/ WMA, la lecture commence automatiquement.
Chargement d’un CD
Placez un CD au centre de la fente de CD avec l’étiquette tournée vers le haut. Le CD est lu automatiquement une fois chargé.
Remarques :
•N’insérez jamais d’objets étrangers dans la fente de CD.
•Si le CD ne rentre pas facilement, il se peut qu’un autre CD se trouve déjà dans la fente ou que l’appareil ait besoin d’être réparé.
•Des disques sans le label  ou
ou  et
et
TEXT
les CD-ROM ne peuvent pas être lus sur cet appareil.
•Il se peut que certains disques CD-R/CD- RW ne soient pas utilisables.
Pause de la lecture
1.Appuyez sur la touche [ 4 ] pour suspendre la lecture.
Le voyant « PAUSE » apparaît sur l’affichage.
2.Pour reprendre la lecture du CD, appuyez à nouveau sur la touche [ 4 ].
Affichage des titres de CD
Cet appareil permet d’afficher les données de titre des disques MP3/WMA.
Avec SCROLL réglé sur OFF, à chaque pression sur la touche [DISP], l’affichage du titre change.
Disque MP3/WMA
TRACK(Plage) -> FOLDER(Dossier)
-> FILE(Fichier) -> ALBUM(Album)
-> TITLE(Titre) -> ARTIST(Artiste) ->
TRACK(Plage) -> ...
Remarques :
•Si le disque MP3/WMA n’a pas de ID3 TAG, le message “ NO TITLE “(NO Titre) apparaît sur l’affichage.
•Seuls les caractères ASCII peuvent être affichés en Tags.
Sélection d’une plage
Avance de plage |
|
|
|
|
|
1. |
Appuyez sur la touche [ |
|
] pour avancer |
||
|
|||||
|
au début de la plage suivante. |
|
|
||
2. |
À chaque pression sur la touche [ |
|
], |
||
|
|||||
|
la lecture avance au début de la plage |
||||
|
suivante. |
|
|
|
|
3.Pour les disques MP3/WMA, maintenez enfoncée la touche [ 6 ] (pendant 1 seconde) pour avancer à +10 plages.
Recul de plage |
|
|
|||
1. |
Appuyez sur la touche [ |
|
] pour reculer |
||
|
|||||
|
au début de la plage actuelle. |
||||
2. |
Appuyez à deux reprises sur la touche |
||||
|
[ |
|
] pour reculer au début de la plage |
||
|
|
||||
précédente.
3.Pour les disques MP3/WMA, maintenez enfoncée la touche [ 5 ] (pendant 1 seconde) pour reculer à -10 plages.

Fonctionnement CD/MP3/WMA
Avance rapide/Retour rapide
Avance rapide |
|
Maintenez enfoncée la touche [ |
]. |
Retour rapide
Maintenez enfoncée la touche [ 
 ].
].
* Pour les disques MP3/WMA, un certain temps est nécessaire avant le début de la recherche et entre les plages. Par ailleurs, la durée de lecture peut comporter une erreur.
Sélection de dossiers
Cette fonction vous permet de sélectionner un dossier renfermant des fichiers MP3/WMA et de commencer la lecture à partir de la première plage du dossier.
1.Appuyez sur la touche [ 5 ] ou [ 6 ]. Appuyez sur la touche [6] pour passer au dossier suivant. Appuyez sur la touche [5] pour passer au dossier précédent.
2.Pour sélectionner une plage, appuyez sur la touche [ 
 ] ou [
 ].
].
Fonction de recherche
1.Appuyez sur la touche [MENU /  ] pour accéder au mode FOLD SCH. Appuyez sur le bouton [VOLUME] pour accéder au mode de recherche de listes de dossiers.
2.Tournez le bouton [ V O L U M E ] pour sélectionner un dossier.
3.Appuyez sur le bouton [VOLUME] pour accéder au mode de recherche de listes de fichiers. La liste de plages apparaît alors sur l’affichage.
4.Tournez le bouton [VOLUME] pour sélectionner une plage.
5.Appuyez sur le bouton [VOLUME] pour lancer la lecture.
*Lors de la lecture de fichiers MP3/WMA, cette fonction est exécutée dans le dossier actuel.
Fonction de lecture de la première plage (Top)
Cette fonction ramène le lecteur CD à la première plage du disque. Maintenez enfoncée la touche [4 ] (pendant 1 seconde) pour lire la première plage (Plage N°1) du disque.
*Dans le cas des dossiers MP3/WMA, la première plage du dossier actuel est lue.
Autres fonctions diverses de lecture
Lecture par balayage
Cette fonction vous permet de localiser et de lire les 10 premières secondes de toutes les plages enregistrées sur un disque.
Appuyez sur la touche [ 1 ] pour effectuer une lecture par balayage.
Lecture répétée
Cette fonction vous permet de lire la plage actuelle en boucle ou de lire une plage en cours de lecture dans le dossier MP3/WMA en boucle.
CD :
1.Appuyez sur la touche [ 2 ] à une ou plusieurs reprises jusqu’à ce que « RPT ON » apparaisse sur l’écran LCD pour procéder à la lecture répétée.
2.Appuyez à plusieurs reprises sur la touche [ 2 ] jusqu’à ce que « RPT OFF » apparaisse sur l’écran LCD pour annuler la lecture répétée.
MP3/WMA :
1.Appuyez sur la touche [ 2 ] à une ou plusieurs reprises jusqu’à ce que
«TRACK RPT » apparaisse sur l’affichage pour procéder à la lecture répétée et que le segment « RPT » s’allume.
2.Pour les fichiers MP3/WMA, appuyez à plusieurs reprises sur la touche [ 2 ] jusqu’à ce que « FOLDER RPT » apparaisse sur l’affichage pour la lecture répétée d’un dossier.
3.Appuyez à plusieurs reprises sur la touche [ 2 ] jusqu’à ce que « RPT OFF » apparaisse sur l’affichage pour annuler la lecture répétée et que le segment
«RPT » s'éteigne.
Lecture aléatoire
Cette fonction vous permet de lire toutes les plages enregistrées sur un disque dans un ordre aléatoire.
Appuyez sur la touche [ 3 ] pour effectuer une lecture aléatoire.
Fonctionnement USB
1.Ouvrez le couvercle du connecteur USB à droite. Insérez un câble USB (CCA-755) dans le connecteur USB. Raccordez un périphérique USB au câble USB.
Lors du raccordement d’un périphérique USB, l’appareil lit automatiquement les fichiers.
2.Pour retirer le périphérique USB, il est
recommandé de sélectionner d’abord une |
|
autre source ou d’éteindre l’appareil afin |
|
d’éviter de l’endommager. Ensuite, retirez |
CCA-755 |
le périphérique USB. Fermez le couvercle à |
|
gauche. |
|
3.L’opération est identique à celle pour MP3/ WMA.
Fonctionnement iPod & iPhone
Raccordement
Raccordez un iPod ou iPhone au connecteur USB via le câble CCA-748.
Lors du raccordement d’un périphérique, l’appareil lit automatiquement les fichiers. Les informations sur la plage s’affichent à l’écran une fois la lecture lancée.
MENU
En mode S-CTRL OFF, appuyez sur la touche [MENU /  ], tournez le bouton [VOLUME] pour sélectionner « MUSIC » ou « VIDEO ».
Sélectionnez « MUSIC », appuyez sur le bouton [VOLUME], puis tournez le bouton [VOLUME] pour afficher PLAY LISTS / ARTISTS / ALBUMS / GENRES / SONGS / COMPOSERS. Enfoncez et tournez le bouton [VOLUME] pour sélectionner l’option de votre choix, puis appuyez sur le bouton [VOLUME] pour confirmer.
Sélectionnez « VIDEO », appuyez sur le bouton [VOLUME], puis tournez le bouton [VOLUME] pour afficher MOVIES / MUSIC VIDEO / TV SHOWS / VIDEO PODCASTS / RENTALS. Enfoncez et tournez le bouton [VOLUME] pour sélectionner l’option de votre choix, puis appuyez sur le bouton [VOLUME] pour confirmer.
vers le moniteur
CCA-748
REMARQUE :
La rubrique VIDEO MENU est différente selon le modèle d’iPod raccordé et le réglage de langue.
Lecture répétée
Cette fonction vous permet de lire en boucle la plage actuelle ou de lire en boucle toutes les plages de votre iPod/iPhone.
1.Appuyez sur la touche [ 2 ] à une ou plusieurs reprises jusqu’à ce que « RPT ON » apparaisse sur l’écran LCD pour procéder à la lecture répétée.
Français
CZ302E 22

Français
Fonctionnement iPod & iPhone
2.Appuyez à plusieurs reprises sur la touche [ 2 ] jusqu’à ce que « RPT OFF » apparaisse sur l’écran LCD pour annuler la lecture répétée.
Lecture aléatoire
Cette fonction vous permet de lire toutes les plages enregistrées sur un disque dans un ordre aléatoire.
1.Appuyez sur la touche [ 3 ] à plusieurs reprises jusqu’à ce que « ALBUM RDM » apparaisse sur l’écran LCD pour la lecture aléatoire de l’album.
2.Appuyez sur la touche [ 3 ] à une ou plusieurs reprises jusqu’à ce que « SONG RDM » apparaisse sur l’écran LCD pour procéder à la lecture aléatoire.
3. A p p u y e z à p l u s i e u r s r e p r i s e s s u r l a t o u c h e [ 3 ] jusqu’à ce que « RDM OFF » apparaisse sur l’écran LCD pour annuler la lecture aléatoire.
Réglage du mode de contrôle simple iPod
Utilisez cette fonction pour commander depuis votre iPod raccordé à cet appareil par le câble USB.
* Le réglage par défaut est « OFF ».
1.Maintenez enfoncée la touche
[ DISP ] pour accéder à la configuration du système.
2.Appuyez sur la touche [  ] ou [
 ]pour sélectionner « S-CTRL ».
3.Tournez le bouton [VOLUME] pour sélectionner « ON » ou « OFF ».
•ON : Les opérations s’effectuent sur l’iPod.
•OFF : Les opérations ne peuvent pas être effectuées sur l’iPod.
Remarques :
•Lorsque vous effectuez des opérations sur l’iPod en mode de contrôle simple, effectuezles lentement. Si des opérations répétitives sont effectuées trop rapidement, des erreurs imprévisibles risquent de se produire.
•Lorsque vous effectuez des opérations sur l’iPod à l’aide du mode de contrôle simple, veuillez ne pas utiliser l’iPod et l’appareil simultanément pour éviter de causer un problème de fonctionnement.
•Certains modèles d’iPod ne prennent pas en charge cette fonction. Consultez votre revendeur Clarion ou notre site Web pour confirmer les modèles acceptant cette fonction.
Recherche alphabétique dans le menu de l’iPod
Cette fonction effectue une recherche dans les sous-dossiers pour trouver les lettres souhaitées.
1.Appuyez sur la touche [MENU /  ] pour sélectionner le mode de menu de l’iPod.
2.Appuyez sur le bouton [VOLUME] pour alterner entre les catégories.
MUSIC : PLAYLIST, ARTISTS, ALBUMS, GENRES, SONGS, COMPOSERS VIDEO : MOVIES, MUSIC VIDEOS, TV SHOWS, VIDEO PODCASTS, RENTALS
3.Appuyez sur le bouton [VOLUME]. (Le contenu de la catégorie s’affiche.)
4.Maintenez enfoncée la touche [ DISP ] (pendant 1 seconde).
5.Tournez le bouton [VOLUME] pour sélectionner la lettre que vous souhaitez trouver.
6.Appuyez à nouveau sur la touche
[ DISP ] pour procéder à la recherche suivante.
7.Appuyez sur le bouton [VOLUME] pour confirmer.
Fonctionnement Bluetooth
La fonction Bluetooth vous permet de vous servir du système audio intégré de votre voiture afin d’établir une communication mains libres pour l’utilisation de votre téléphone portable ou l’écoute musicale. Certains téléphones portables Bluetooth disposent de fonctions audio et certains lecteurs audio portables sont compatibles avec la fonction Bluetooth. Ce système peut lire les données audio mémorisées sur un périphérique audio Bluetooth. Un autoradio avec Bluetooth permet de gérer les contacts du répertoire téléphonique, les appels reçus, les numéros composés, les appels manqués, les appels entrants, les appels sortants et l’écoute musicale.
Remarque :
•Ne laissez pas le microphone mains libres Bluetooth dans des endroits de libre circulation d’air comme une sortie d’air de climatiseur, etc., sous peine de provoquer un dysfonctionnement.
•Si vous l’exposez à des températures élevées ou aux rayons directs du soleil, il peut être déformé ou décoloré, ce qui présente un risque de dysfonctionnement.
•Ce système ne fonctionnera pas ou pourrait fonctionner de façon inadéquate avec certains lecteurs audio Bluetooth.
•Clarion ne peut garantir la compatibilité de tous les téléphones portables avec cet appareil.
•La lecture audio sera réglée au même volume que pour les appels téléphoniques. Ce qui peut présenter un problème si un volume sonore extrême est réglé au cours d’un appel téléphonique.
Fonctionnement mains libres Appariement
1.Activez la fonction Bluetooth de votre téléphone portable.
2.Accédez au menu de configuration Bluetooth de votre téléphone portable.
3.Recherchez de nouveaux périphériques Bluetooth.
4.Sélectionnez le CZ302E dans la liste d’appariement du téléphone portable.
5.Tapez « 0000 » pour mot de passe.
6.Une fois l’appariement réussi, l’appareil entre automatiquement en mode Bluetooth et « CONNECTÉ » apparaît
sur l’écran LCD.
Faire un appel
Opérations depuis le menu Bluetooth
Appuyez sur la touche [SRC /  ] pour commuter la source sur « BLUETOOTH ». Appuyez sur la touche [MENU /
  ] pour sélectionner une méthode pour effectuer un appel sortant :
• Composer le numéro
1.Appuyez sur la touche [MENU / ] .
] .
2.Tournez le bouton [VOLUME] sur la façade pour sélectionner « DIAL NUM ».
3.Appuyez sur le buuton [VOLUME] pour saisir le numéro composé sélectionné.
4.Tournez le bouton [VOLUME] pour sélectionner un numéro, appuyez sur le bouton pour confirmer et préparer à la saisie du chiffre suivant. Répétez la procédure ci-dessus jusqu’à ce que tous les chiffres soient saisis.
5.Appuyez sur la buuton [VOLUME] pour composer.
6.Appuyez sur [MENU /  ] pour mettre fin à l’appel.
• Historique des appels composés/ manqués/reçus
Vous pouvez faire une recherche dans l’historique des appels composés/ manqués/reçus.
1. Tournez le bouton pour sélectionner « D I A L L E D », « M I S S E D » ou
« RECEIVED ».
2.Appuyez sur le buuton [VOLUME] pour accéder à l’historique de l’appel sélectionné.
3.Tournez le bouton [VOLUME] pour faire défiler les contacts.
23 CZ302E

Fonctionnement Bluetooth
4. Lorsque le nom du contact ou le N° du téléphone portable s’affiche, appuyez sur la bouton [VOLUME] pour appeler le N° du téléphone portable de ce contact.
*Appuyez sur la touche [MENU /  ] pour mettre fin à l’appel.
•Faire un appel à partir du répertoire téléphonique
Vous pouvez rechercher le nom d’un contact dans le répertoire téléphonique pour faire un appel.
1. Tournez le bouton pour sélectionner
”USER PBK”
2. Appuyez sur le bouton [VOLUME] pour accéder au répertoire téléphonique sélectionné.
3. Tournez le bouton [VOLUME] pour faire défiler les contacts.
4. Lorsque le nom du contact s’affiche, appuyez sur la bouton [VOLUME] pour appeler le N° du téléphone portable de ce contact.
*Appuyez sur la touche [MENU /  ] pour mettre fin à l’appel.
Remarque :
•Certains téléphones portables peuvent
ne pas être capables de transférer les données du répertoire téléphonique.
•Après RESET, veuillez patienter quelques
minutes jusqu’à ce que les données soient transférées suivant la sélection du mode Bluetooth. Pendant ce temps,
«PBK UPDATE » s’affiche.
•Redial (Bis)
Vous pouvez appeler le dernier numéro composé.
Appuyez et maintenez la touche [BAND /  ] bouton (1sec).
• Transfer Call (Appel de transfert)
Vous pouvez passer des appels mains libres et le téléphone mobile.
Appuyez sur le [BAND /  ] Pendant bouton d’appel.
• Prendre un appel
Vous pouvez répondre à un appel entrant en appuyant sur la touche [BAND /  ] .
] .
* Appuyez sur la touche [MENU / ] pour rejeter un appel entrant.
Fonctionnement du streaming audio
Qu’est-ce que le streaming audio ?
Le streaming audio est une technique permettant de transférer des données audio de sorte qu’elles puissent être traitées sous la forme d’un flux stable et continu. Les utilisateurs peuvent transmettre en continu et sans fil de la musique depuis leur lecteur audio externe vers leur autoradio, et écouter les plages via les enceintes de leur voiture. Veuillez vous adresser au revendeur Clarion le plus proche pour de plus amples informations sur les émetteurs sans fil de streaming audio disponibles.
 PRÉCAUTION
Évitez d’utiliser le téléphone portable raccordé pendant le streaming audio sous peine de provoquer des bruits ou un son saccadé pendant le lecture de la chanson.
Le streaming audio peut reprendre ou pas après une interruption téléphonique en fonction du téléphone portable raccordé.
Le système reviendra toujours au mode Radio si le streaming audio est interrompu.
Remarque :
Veillez à lire le chapitre « Appariement » avant de continuer.
Lire/Suspendre une plage
1.Enfoncez la touche [ 4 ] pour suspendre la lecture audio.
2.Pour reprendre la lecture audio, enfoncez à nouveau le bouton [ 4 ] .
Fonctionnement Bluetooth
Sélection d’une plage
Avance de plage
1.Appuyez sur la touche [ 
 ] pour avancer au début de la plage suivante.
2.À chaque pression sur la touche [ 
 ], la lecture passe à une autre plage dans le sens avant.
Recul de plage
1.Appuyez sur la touche [ 
 ] pour reculer au début de la plage précédente.
2.À chaque pression sur la touche [ 
 ], la lecture passe à la plage
précédente dans le sens arrière.
Remarque :
L’ordre de lecture dépend du lecteur audio Bluetooth. À la pression sur la touche
[ 
 ] , certains périphériques A2DP redémarrent la plage actuelle selon la durée de la lecture.Pendant la lecture en streaming de la musique, « A2DP la HFP » apparaît sur l’affichage. Lorsque le périphérique AD2P est débranché, « DISCONNECT » apparaît sur l’affichage et l’appareil revient à la source audio précédemment sélectionnée. Certains
lecteurs audio Bluetooth peuvent ne pas être en mesure de synchroniser la lecture/pause avec cet appareil. Assurez-vous que le périphérique et l’appareil principal sont dans le même statut de lecture/pause en mode
BT MUSIC.
Display ID3 TAG
Pour les informations sur les plages plus longues que le panneau d’affichage :
Avec SCROLL réglé sur ON, l’écran LCD fera défiler les informations ID3 TAG sur l’affichage, par ex. :
TRACK(Plage) - > FOLDER(Dossier) ->FILE(Fichier)->ALBUM->TITLE(Titre)- >ARTIST(Artiste)->TRACK(Plage)->...
Avec SCROLL réglé sur OFF, l’écran LCD affiche une des informations ID3 TAG, le réglage par défaut est TRACK, mais l’utilisateur peut l’ajuster pour une autre information ID3 TAG en appuyant sur la touche [DISP].
Fonctionnement AUX
Appuyez sur la touche [SRC /  ] de la façade pour sélectionner « AUX ».
AUX ne sert que pour les contenus audio lorsque le connecteur Jack 3,5 mm est branché dans la prise d’entrée audio sur la façade.
Réglage de la sensibilité de l
’entrée AUX
1.Maintenez enfoncée la touche [DISP] (pendant 1 seconde).
2.Tourner le bouton [VOLUME ] pour sélectionner « AUX SENS ».
3.Si le niveau de sortie du lecteur audio externe connecté est réglé sur ”HIGH” (Élevé), tournez le bouton [VOLUME] et sélectionnez ”LOW”(Faible),. Au contraire, si le niveau de sortie est réglé sur ”LOW”(Faible), sélectionnez ”HIGH”(Élevé).
Français
CZ302E 24

Français
6. GUIDE DE DÉPANNAGE
GÉNÉRALITÉS
Anomalie |
Cause |
Solution |
|
L’appareilne |
Unfusibledel’appareila |
Remplacez-leparunfusibleneufde |
|
sauté. |
calibrecorrect. |
||
s’allumepas. |
Unfusibledelabatteriede |
Remplacez-leparunfusibleneufde |
|
|
voitureasauté. |
calibrecorrect. |
|
|
|
Éteignezl’appareiletretirezleDCP. |
|
L’appareilne |
|
Enfoncez le bouton [RESET] avec une |
|
|
tige fine. |
||
s’allumepas. |
|
Remarque : |
|
Rien ne se produit |
Lemicroprocesseur |
||
lorsque j’appuie sur |
fonctionnemalenraisonde |
Lorsque le bouton [RESET] est enfoncé, |
|
les touches. |
bruit,etc. |
coupez l’alimentation de l’accumulateur.* |
|
L’affichage est |
|
* Lorsque vous appuyez sur le bouton |
|
imprécis. |
|
[RESET], les fréquences de station radio, |
|
|
les réglages audio et les autres données |
||
|
|
mémorisées sont conservées. |
|
|
Laconnexiondelasortie |
Vérifiezlecâblageetrectifiez-le. |
|
|
audioestincorrecte. |
||
|
|
||
|
Levolumeesttropbas. |
Augmentezleniveausonore. |
|
Pasdesortiedu |
Lesenceintessontabîmées. |
Remplacezlesenceintes. |
|
sonoufaiblesortie |
L’équilibreduvolumeest |
Réglezl’équilibredescanauxsurla |
|
duson. |
fortementdécalé. |
positioncentrale. |
|
|
Lecâblagedesenceintes |
Isoleztouteslesconnexionsdecâblage |
|
|
estencontactavecune |
||
|
piècemétalliquedela |
desenceintes. |
|
|
voiture. |
|
|
|
Undisquenonstandard |
Utilisezundisquestandard. |
|
|
estutilisé. |
||
|
|
||
Qualitéaudio |
Lapuissancenominaledes |
Remplacezlesenceintes. |
|
enceintesnecorrespond |
|||
médiocreou |
pasàcelledel’appareil. |
|
|
distorsion. |
|
|
|
Raccordementserronés. |
Vérifiezlecâblageetrectifiez-le. |
||
|
|||
|
L’enceinteestcourt- |
Vérifiezlecâblageetrectifiez-le. |
|
|
circuitée. |
||
|
|
||
Dysfonctionnement |
LecâbleMUTEestmisà |
VérifiezlecâblageMUTEetrectifiez-le. |
|
delafonctionTEL- |
laterre. |
||
MUTE. |
|
|
|
L’appareilse |
Connexionincorrecteentre |
|
|
réinitialisetoutseul |
Vérifiezlecâblageetrectifiez-le. |
||
lorsquelemoteur |
l’accumulateuretlabatterie. |
||
estarrêté. |
|
|
Lecteur de disque
Anomalie |
Cause |
Solution |
|
Impossible de |
Un autre disque est déjà |
Éjectez le disque avant de charger un autre |
|
chargé. |
disque. |
||
charger un |
|||
Un objet est inséré à |
|
||
disque. |
Retirez l’objet à l’intérieur de l’appareil. |
||
l’intérieur de l’appareil. |
|||
|
|
||
Le son est |
Le disque compact est sale. |
Essuyez le disque compact avec un chiffon doux. |
|
saccadé ou |
Le disque compact est très |
Remplacez-le par un disque compact sans |
|
brouillé. |
éraflé ou tordu. |
éraflures. |
|
Le son est |
De la condensation peut se |
|
|
mauvais lors de |
former sur la lentille interne |
Laissez l’appareil sécher sous tension pendant |
|
la première mise |
lorsque la voiture est garée |
environ 1 heure. |
|
sous tension. |
dans un endroit humide. |
|
Périphériques USB
Anomalie |
Cause |
Solution |
|
Impossible d’insérer |
Le périphérique USB a été |
Raccordez le périphérique USB dans le sens |
|
inséré dans le mauvais sens. |
opposé, puis essayez de nouveau. |
||
le périphérique |
|
|
|
Le connecteur du |
|
||
USB. |
Remplacez le périphérique USB par un neuf. |
||
périphérique USB est cassé. |
|||
Le périphérique |
Le périphérique USB est |
Débranchez le périphérique USB, puis |
|
endommagé. |
rebranchez-le. Si le périphérique n’est toujours |
||
USB n’est pas |
|||
Les connecteurs sont |
pas reconnu, essayez de le remplacer par un |
||
reconnu. |
|||
desserrés. |
périphérique USB différent. |
||
|
|||
Aucun son n’est |
Aucun fichier MP3/WMA |
Stockez correctement ces fichiers sur le |
|
émis avec « No |
n’est compris sur le |
||
périphérique USB. |
|||
File » affiché. |
périphérique USB. |
||
|
|||
Le son est saccadé |
Les fichiers MP3/WMA sont |
Utilisez des fichiers MP3/WMA correctement |
|
ou brouillé. |
mal codés. |
codés. |
Bluetooth
Anomalie |
Cause |
Solution |
|
Impossible |
Le périphérique ne prend pas en |
Utilisez un autre périphérique pour le |
|
d’apparier le |
charge les profils requis par le |
raccordement. |
|
périphérique |
système. |
||
|
|||
compatible Bluetooth |
La fonction Bluetooth du |
Consultez le mode d’emploi du périphérique pour |
|
avec le système |
périphérique n’est pas activée. |
savoir comment activer la fonction. |
|
autoradio. |
|||
|
|
||
La qualité audio |
Le gain pour le microphone interne |
Ajuster le gain du microphone interne dans le menu |
|
est médiocre après |
n’est pas ajusté correctement. |
de configuration du système. |
|
connexion avec |
|
|
|
un périphérique |
Le microphone externe n’est |
Ajuster le gain et l’emplacement du |
|
compatible |
pas configuré et/ou positionné |
microphoneexterne. Example: fixer le microphone |
|
Bluetooth. |
correctement. |
plus près du conducteur. |
|
|
|
|
25 CZ302E

7. AFFICHAGE DES ERREURS
En cas d’erreur, l’un des affichages suivants apparaît.
Prenez les mesures décrites ci-dessous pour résoudre le problème.
Affichage |
Cause |
Solution |
|
|
Le disque est mal inséré. |
Éjectez le disque, puis rechargez-le |
|
|
correctement. |
||
ERROR 3 |
|
||
Le format du disque n’est pas pris |
Essayez avec un autre disque. |
||
|
|||
|
en charge. |
|
|
ERROR 5 |
Il s’agit d’une défaillance du |
Adressez-vous au magasin d’achat. |
|
|
mécanisme de la platine. |
|
Si un affichage d’erreur différent de ceux décrits ci-dessus apparaît, appuyez sur le bouton [RESET]. Si le problème persiste, éteignez l’appareil et adressez-vous au magasin d’achat.
*Lorsque vous appuyez sur le bouton [RESET], les fréquences de station radio, les réglages audio et les autres données mémorisées sont conservées.
8. CARACTÉRISTIQUES TECHNIQUES
Tuner FM
Bande de fréquences : 87,5 à 108,0 MHz Sensibilité utilisable : 8 dBf
Réponse en fréquence : 30 Hz à 15 kHz Séparation stéréo : 30 dB (1 kHz) Rapport signal/bruit : >55 dB
Tuner MW
Bande de fréquences : 531 à 1 602 kHz Sensibilité utilisable (S/B=20 dB) : 30 dBμ
Tuner LW
Bande de fréquences : 153 à 279 kHz Sensibilité utilisable (S/B=20 dB) : 34 dBμ
Lecteur CD
Système : Système audio numérique à disque Réponse en fréquence : 20 Hz à 20 kHz Rapport signal/bruit : >94 dB
Taux d’harmoniques : inférieur à 0,1 % (1 kHz) Séparation des voies : >60 dB
Mode MP3/WMA
Taux d’échantillonnage MP3 : 8 kHz à 48 kHz Débit binaire MP3 : 8 kb/s à 320 kb/s/VBR Débit binaire WMA : 8 kb/s à 320 kb/s Format logique : ISO9660 niveau 1,2
Système de fichier Joliet
Entrée
Sensibilité de l’entrée audio :
Élevée : 320mV (pour sortie de 1V) Moyenne : 650mV (pour sortie de 1V) Faible : 1,3V (pour sortie de 1V) (impédance d’entrée 10 k ou supérieure)
Niveau entrée AUX : ≤2V
Généralités
Tension d’alimentation :
14,4 VCC (10,8 à 15,6 V admissibles), prise de masse négative
Tension de sortie du préampli :
2,0 V (mode de lecture CD : 1 kHz, 0 dB, charge de 10 k )
Fusible : 15 A
Dimensions de l’appareil principal :
188 mm de largeur × 58 mm de hauteur × 190 mm de profondeur
Poids de l’appareil principal : 1,35 kg
Français
USB
Caractéristiques techniques : USB 1.0/2.0 Format audio lisible :
MP3 (.mp3) : MPEG 1/2/Audio Layer-3 WMA (.wma) : Ver 7/8/9.1/9.2
Amplificateur audio
Puissance de sortie maximale : 180 W (45 W x 4)
Impédance des enceintes : 4 (4 à 8 admissibles)
Remarques :
•Les caractéristiques et la conception sont sujettes à modification sans préavis pour des améliorations futures.
CZ302E 26

Français
9 INSTALLATION/GUIDE DE RACCORDEMENT DES CÂBLES
TABLE DES MATIÈRES |
|
|
1) |
Pour commencer.................................................................... |
27 |
2) |
Contenu de l’emballage......................................................... |
27 |
3) |
Précautions générales........................................................... |
27 |
4) |
Précautions d’installation....................................................... |
27 |
5) |
Installation de l’appareil principal........................................... |
27 |
6) |
Retrait de l’appareil principal.................................................. |
28 |
7) |
Câblage et connexions.......................................................... |
29 |
8) |
Connexion des accessoires................................................... |
29 |
1) Pour commencer |
|
|
1.Cet appareil est conçu exclusivement pour être utilisé dans une voiture à alimentation de 12 V avec prise de masse négative.
2.Lisez attentivement les instructions.
3.Veillez à débrancher la « borne » de la batterie avant de commencer. Ceci afin d’empêcher les courts-circuits pendant l’installation. (Figure 1)
2) Contenu de l’emballage
Batterie de voiture
Figure 1
Appareil principal.................................. |
1 |
Façade................................................. |
1 |
Anneau de finition................................ |
1 |
Applique de montage........................... |
1 |
Vis spéciale (M4×42)........................... |
1 |
Vis M5x6 mm....................................... |
4 |
Capuchon en caoutchouc.................... |
1 |
3) Précautions générales
Clé en L................................................ |
2 |
Serre-fils............................................... |
1 |
Boîtier pour DCP.................................. |
1 |
Manuel de l’utilisateur.......................... |
1 |
Carte de garantie................................. |
1 |
Vis spéciale (Verrouillage de la |
|
façade)................................................. |
1 |
1.N’ouvrez pas le boîtier. Vous ne trouverez aucune pièce réparable par l’utilisateur à l’intérieur. Si vous faites tomber quelque chose dans l’appareil pendant l’installation, adressez-vous au revendeur ou à un SAV agréé Clarion.
2.Utilisez un chiffon doux et sec pour nettoyer le boîtier. N’utilisez jamais un chiffon rêche, du diluant, du benzène, de l’alcool. Pour des saletés tenaces, appliquez un peu d’eau chaude ou froide sur un chiffon doux et essuyez délicatement la saleté.
4) Précautions d’installation
1.Préparez tous les éléments nécessaires à l’installation de l’appareil principal avant de commencer.
2.Installez l’appareil à 30° du plan horizontal. (Figure 2)
3.Si vous devez procéder à des travaux sur la carrosserie de la voiture (percer
Max 30°
Figure 2
des trous par exemple), adressezvous à votre concessionnaire auto au préalable.
4.Utilisez les vis fournies pour l’installation.
L’utilisation d’autres vis pourrait provoquer des dégâts. (Figure 3)
Châssis Châssis


 Dégât
Dégât
Max. 6 mm (Vis M5)
Figure 3
5) Installation de l’appareil principal
1.Placez l’applique de montage dans le tableau de bord, utilisez un tournevis pour pousser chaque butée de l’applique de montage vers l’intérieur, puis fixez la butée.
2.Procédez au câblage comme indiqué à la section 7.
3.Insérez l’appareil principal dans l’applique de montage jusqu’à ce qu’il se verrouille en place.
4.Prenez soin du haut et du bas de l’anneau de finition et installez-le de sorte que tous les crochets soient verrouillés.
Remarques :
1.Certains modèles de voiture nécessitent des kits de montage spéciaux pour une installation correcte.
Adressez-vous à votre revendeur Clarion pour en savoir plus.
2.Serrez solidement la butée avant pour empêcher l’appareil principal de lâcher.
• Dimensions de l’ouverture de la console
|
|
|
|
|
|
|
|
|
|
|
|
|
(182 mm) |
|
|
|
|
||
|
|
|
|
|
|
|
|
|
|
|
|
|
|
|
|
|
|
|
|
|
|
|
Orifice |
|
mm |
|
|||
|
|
|
|
53 |
|
||||
|
|
|
|
|
|
|
|
||
|
|
|
|
|
|
|
|
|
|
27 CZ302E

Remarques sur l’installation
1.Avant l’installation, assurez-vous que les branchements ont été effectués correctement et que l’appareil fonctionne normalement. Une connexion incorrecte peut endommager l’appareil.
2.N’utilisez que des accessoires conçus et fabriqués pour cet appareil, car d’autres accessoires non autorisés pourraient endommager l’appareil.
3.Avant l’installation, serrez tous les câbles d’alimentation.
4.N’installez PAS l’appareil dans un endroit chaud afin d’éviter d’infliger des dégâts aux composants électriques, comme la tête du laser.
5.Installez l’appareil horizontalement. L’installation de l’appareil à plus de
30 degrés à la verticale peut être à l’origine de performances médiocres.
6.Afin d’empêcher des étincelles électriques, connectez le pôle positif en premier, suivi du pôle négatif.
7.NE bloquez PAS la sortie du ventilateur de refroidissement sous peine d’endommager l’appareil et afin de garantir une dissipation suffisante de la chaleur.
Installation de l’appareil
Méthode A
1.Insérez l’applique de montage dans le tableau de bord, sélectionnez la languette de montage adéquate en fonction de l’écart, pliez la languette de montage vers l’extérieur au moyen d’un tournevis pour fixer l’applique de montage en place.
2.Vissez une vis M4x42 dans l’orifice au dos de l’appareil et placez un capuchon en caoutchouc sur la vis. (voir photo cidessous)
3.Faites glisser l’appareil dans l’applique jusqu’au déclic.
Tournevis
Tableau de bord
Gaine de caoutchouc
Vis spéciale
Applique de montage
Méthode B
M5x6
Tableau de bord
Plaque de montage
1.Insérez cet appareil directement dans l’ouverture du tableau de bord.
2.Insérez une vis cylindrique M5x6 par les orifices de la plaque de montage située à l’intérieur de l’ouverture dans les orifices de l’appareil et serrez les vis vers la gauche et la droite.
Installation de l’anneau de finition
Fixez l’anneau de finition autour de la façade. Prenez soin du haut et du bas de l’anneau de finition et installez-le de sorte que tous les crochets soient verrouillés.

 Haut
Haut
Bas
6) Retrait de l’appareil principal
Désinstallation de l’anneau de finition
1.Poussez l’anneau de finition vers la droite et tirez sur la section droite.
2.Poussez l’anneau de finition vers la gauche et tirez sur la section gauche.
Démontage de l’appareil
1.Éteignez l’appareil.
2.Retirez la façade.
3.Retirez l’anneau de finition.
4.Insérez les clés d’extraction tout droit jusqu’à ce qu’elles se verrouillent en place, puis dégagez l’appareil.
5.Déconnectez tous les câbles.
Français
CZ302E 28

7) Câblage et connexions
Français
Noir
/ Left Rear
1 OUT SUB
Noir
/ Right Rear
2 OUT SUB
Blanc
Rouge
Sortie audio arrière (Gauche)/ Sortie du subwoofer 1
Sortie audio arrière (Droite) / Sortie du subwoofer 2
Noir |
Noir |
|
|
|
Micro externe |
MIC |
|
Blanc |
|
(RCB-199 : vendu |
Gris |
|
||
|
Gauche |
Borne de sortie |
||
séparément) |
|
|
||
|
|
Droit |
audio avant |
|
|
|
|
||
|
|
|
Rouge |
|
Noir |
Noir |
|
|
|
Borne de commande |
SWC |
|
|
|
|
|
|
|
|
du volant |
|
|
|
|
|
|
|
Amplificateur à 4 voies |
|
Antenne
(Noir)
C
|
|
|
|
|
|
|
8 |
|
|
|
|
|
|
|
|
5 |
6 7 |
|
B |
|
|
||
|
|
|
4 |
|
|
16 |
1 |
|
A |
||
|
2 |
3 |
|
|
15 |
2 |
|||||
1 |
|
12 |
13 14 |
|
|
3 |
4 |
1 |
2 |
||
|
10 |
11 |
|
|
|
|
|
5 |
6 |
3 |
4 |
9 |
|
|
|
|
|
|
|
7 |
8 |
5 |
6 |
|
|
|
|
|
|
|
|
|
|
7 |
8 |
Reportez-vous à la page suivante
|
|
A |
|
|
|
1 |
|
|
|
3 |
|
16 |
Arrière droite - |
5 |
|
|
|||
14 |
Avant droite - |
7 |
|
|
|||
12 |
Avant gauche + |
2 |
|
10 |
Arrière gauche + |
||
8 |
|
4 |
|
6 |
|
6 |
|
4 |
|
8 |
|
2 |
|
|
|
C |
|
|
|
15 |
|
B |
|
|
1 |
||
13 |
|
||
|
3 |
||
11 |
|
||
|
5 |
||
9 |
|
||
|
7 |
||
7 |
|
||
Éclairage |
|
||
5 |
Mise en sourdine du |
2 |
|
3 |
téléphone |
4 |
|
|
|||
1 |
Batterie + |
6 |
|
|
FUSE15A |
8 |
|
Emplacement |
Fonction |
||
Connecteur A |
Connecteur B |
||
|
|||
|
Mise en sourdine du téléphone/Brun |
Arrière droite +/Violet |
|
|
|
Arrière droite (-)/Violet avec bande blanche |
|
|
|
Avant droit (+)/Gris |
|
|
Batterie 12V(+)/Jaune |
Avant droite (-)/Gris avec bande blanche |
|
Télécommande activée/Bleu avec bande blanche |
Avant gauche (+)/Blanc |
||
|
Éclairage/Orange avec bande blanche |
Avant gauche(-)/Blanc avec bande noire |
|
|
ACC+/Rouge |
Arrière gauche(+)/Vert |
|
|
Terre/Noir |
Arrière gauche(-)/Vert avec bande noire |
|
|
Jaune |
Jaune |
|
|
Rouge |
Rouge |
|
Pour VW et Audi : modifiez le câblage comme ci-dessus.
8) Connexion des accessoires
•Connexion à l’amplificateur externe
Il est possible de connecter des amplificateurs externes aux connexions de sorties RCA à 4 voies. Assurez-vous que les connecteurs ne sont pas mis à la terre ou court-circuités afin d’éviter d’endommager l’appareil.
29 CZ302E
 Loading...