


 Loading...
Owner’s manual
Mode d’emploi
Manual de instrucciones
DB265MP
CD/MP3 RECEIVER RÉCEPTEUR CD/MP3
RECEPTOR CON REPRODUCTOR DE DISCOS CD/MP3

Thank you for purchasing this Clarion product.
Please read this owner’s manual in its entirety before operating this equipment.
After reading this manual, be sure to keep it in a handy place (e.g., glove compartment).
Check the contents of the enclosed warranty card and keep it carefully with this manual.
English
Contents |
|
|
1. |
FEATURES .................................................................................................................................. |
2 |
2. |
CONTROLS ................................................................................................................................ |
3 |
|
SOURCE UNIT ............................................................................................................................ |
3 |
|
DISPLAY ...................................................................................................................................... |
3 |
3. |
BUTTON TERMINOLOGY .......................................................................................................... |
4 |
|
Names of the Buttons and their Functions .................................................................................. |
4 |
4. |
PRECAUTIONS .......................................................................................................................... |
5 |
5. |
HANDLING COMPACT DISCS ................................................................................................... |
6 |
|
LCD Screen ................................................................................................................................. |
6 |
6. |
DCP (Detachable Control Panel) .............................................................................................. |
7 |
7. |
REMOTE CONTROL ................................................................................................................... |
8 |
|
Inserting the Battery .................................................................................................................... |
8 |
|
Functions of Remote Control Unit Buttons .................................................................................. |
9 |
8. |
OPERATIONS ........................................................................................................................... |
10 |
|
Basic Operations ....................................................................................................................... |
10 |
|
Radio Mode Operations ............................................................................................................. |
12 |
|
CD Mode Operations ................................................................................................................. |
13 |
|
MP3 Mode Operations ............................................................................................................... |
14 |
9. |
TROUBLESHOOTING .............................................................................................................. |
17 |
10. |
ERROR DISPLAYS ................................................................................................................... |
17 |
11. |
SPECIFICATIONS ..................................................................................................................... |
18 |
1.FEATURES
•High contrast blue negative display (13 x 8 Digits) with screen saver
•MP3 compatible with ID3-TAG display
•“Z-ENHANCER” sound customization & “MAGNA BASS EX” dynamic bass enhancement
Be sure to unfold and read the next page.
Veuillez déplier et vous référer à la page suivante.
Cerciórese de desplegar y de leer la página siguiente.
2 DB265MP

|
|
|
|
|
|
|
|
English |
2. CONTROLS / LES COMMANDES / CONTROLES |
|
|
||||
Note: Be sure to unfold this page and refer to the front diagrams as you read each chapter. |
|
|
|
|
|
|
|
|
|
|
|
|
|
|
|
|
Remarque: Veuillez déplier cette page et vous référer aux schémas quand vous lisez chaque chapitre. |
|
|
|
|||
çFran |
Nota: Cuando lea los capítulos, despliegue esta página y consulte los diagramas. |
|
|
|
|
|
|
SOURCE UNIT / APPAREIL PILOTE / UNIDAD FUENTE |
|
|
|
||||
|
|
|
|
||||
|
[ROTARY] |
[ |
|
] |
[DIRECT] |
|
|
ais |
[CD SLOT] |
|
|
|
|
|
|
[RELEASE] |
[Z] |
[ISR] |
|
|
|||
|
|
||||||
|
|
|
|||||
olñEspa |
] |
[ |
[RPT] |
|
|||
|
|
||
|
[A-M] |
[RDM] |
|
|
[SCN] |
||
|
|
|
|
|
] |
[ |
[UP] |
[ |
|
] |
[BND] |
[DN] |
|
[SENSOR] |
[T] |
||
|
|
|
||
[SRC] |
[D] |
|||
|
|
|||
DISPLAY / AFFICHEUR / VISUALIZADOR
Operation status indication Frequency, Clock, etc. are displays Indication d’état de fonctionnement
Fréquence, horloge, etc. sont affichées Indicación del estado de operación
La frecuencia, la hora, etc. son visualizaciones
Preset channel indication (1 to 6) Indication de canal préréglé (1 à 6) Indicación de canal memorizado (1 a 6)
M-B EX (MAGNA BASS EX) indication
Indication de M-B EX (MAGNA BASS EX) Indicación de M-B EX (MAGNA BASS EX)
MP3 indication
Indication de MP3
|
Indicación MP3 |
Stereo indication |
MUTE indication |
Indication stéréo |
Indication MUTE (Silence) |
Indicación de estéreo |
Indicación de MUTE |
Manual indication |
Z-Enhancer indication |
Indication de fonctionnement manuel |
Indication du renforceur-Z |
Indicación de manual |
Indicación de reforzador Z |
Folder indication |
Random indication |
Indication de dossier |
Indication de lecture aléatoire |
Indicación de carpeta |
Indicación de reproducción aleatoria |
Scan indication |
Repeat indication |
Indication de balayage |
Indication de répétition |
Indicación de exploración |
Indicación de reproducción repetida |
English
3. BUTTON TERMINOLOGY
Note:
• Be sure to read this chapter referring to the front diagrams of chapter “2. CONTROLS” on page 3 (unfold).
Names of the Buttons and their Functions
[RELEASE] button
•Press the [RELEASE] button to unlock the
DCP.
[ROTARY] knob
•Adjust the volume by turning the knob clockwise or counterclockwise.
•Use the knob to perform various settings.
[CD SLOT]
• CD insertion slot.
[Z] button
•Use the button to select one of the three types of sound characteristics already stored in memory. (Z-Enhancer)
[Q] button
• Ejects a CD when it is loaded into the unit.
[DIRECT] button
•Stores a station into memory or recall it directly while in the radio mode.
[ISR] button
•Recalls ISR radio station in memory.
•Press and hold for 2 seconds or longer:
Stores current station into ISR memory (radio mode only).
[RPT] button
• Plays repeatedly while in the CD/MP3 mode.
[RDM] button
•Performs random play while in the CD/MP3 mode.
[SCN] button
•Performs scan play for 10 seconds for each track while in the CD/MP3 mode.
[UP], [DN] button
•Play first track of next or previous folder which contain MP3 files.
Key function only available after MP3 indicator turned on.
[T] button
•Switches MP3 TITLE display.
•Press and hold for 1 second to scroll display data.
[D] button
•Switch the display indication (Main display, clock display).
MP3 FUNCTION-DISPLAY SELECTION
•Display changes in the following order: Track
No. / Play time Folder No. / Track No.
Title Display Clock Display Track No. / Play time...
•Long press to enter adjustment mode.
[BND] button
•Switches the band, or seek tuning or manual tuning while in the radio mode.
•Plays a first track while in the CD/MP3 mode.
•Press and hold the button to select between
CD-DA playback and MP3 playback in multisession CD.
[SENSOR] button
•Receiver for remote control unit.
•Operating range: 30° in all directions.
[SRC] button
•Press the button to turn on the power.
Press and hold the button for 1 second or longer to turn off the power.
•Switches the operation mode between radio and CD/MP3 mode.
[
 ] button
•Plays or pauses a CD while in the CD/MP3 mode.
•To enter various setting.
•Performs preset scan while in the radio mode. When the button is pressed and held, auto store is performed.
[A-M] button
•Press and hold the button for 1 second or longer to switch the MAGNA BASS EX on/off.
•Use the button to switch to the audio mode (bass/treble, balance/fader).
[å], [∂] buttons
•Selects a station while in the radio mode or selects a track when listening to a CD/MP3.
•Press and hold the button for 1 second or longer to switches the fast-forward/fast- backward.
3 |
DB265MP |
4 |
DB265MP |

4.PRECAUTIONS
1.When the inside of the car is very cold and the player is used soon after switching on the heater moisture may form on the disc or the optical parts of the player and proper playback may not be possible. If moisture forms on the disc, wipe it off with a soft cloth. If moisture forms on the optical parts of the player, do not use the player for about one hour. The condensation will disappear naturally allowing normal operation.
2.Driving on extremely bumpy roads which cause severe vibration may cause the sound to skip.
3.This unit uses a precision mechanism. Even in the event that trouble arises, never open the case, disassemble the unit, or lubricate the rotating parts.
English
This equipment has been tested and found to comply with the limits for a Class B digital device, pursuant to Part 15 of the FCC Rules.
These limits are designed to provide reasonable protection against harmful interference in a residential installation.
This equipment generates, uses, and can radiate radio frequency energy and, if not installed and used in accordance with the instructions, may cause harmful interference to radio communications. However, there is no guarantee that interference will not occur in a particular installation.
If this equipment does cause harmful interference to radio reception, which can be determined by turning the equipment off and on, the user is encouraged to consult the dealer or an experienced radio technician for help.
 CAUTION
USE OF CONTROLS, ADJUSTMENTS, OR PERFORMANCE OF PROCEDURES OTHER THAN THOSE SPECIFIED HEREIN, MAY RESULT IN HAZARDOUS RADIATION EXPOSURE.
THE COMPACT DISC PLAYER SHOULD NOT BE ADJUSTED OR REPAIRED BY ANYONE EXCEPT PROPERLY QUALIFIED SERVICE PERSONNEL.
CHANGES OR MODIFICATIONS NOT EXPRESSLY APPROVED BY THE MANUFACTURER FOR COMPLIANCE COULD VOID THE USER’S AUTHORITY TO OPERATE THE EQUIPMENT.
INFORMATION FOR USERS:.
CHANGES OR MODIFICATIONS TO THIS PRODUCT NOT APPROVED BY THE MANUFACTURER WILL VOID THE WARRANTY AND WILL VIOLATE FCC APPROVAL.
Bottom View of Source Unit
DB265MP 5

English
5. HANDLING COMPACT DISCS
Use only compact discs bearing the
 mark.
mark.
Do not play heart-shaped, octagonal, or other specially shaped compact discs.
Some CDs recorded in CD-R/CD-RW mode may not be usable.
Handling
•Compared to ordinary music CDs, CD-R and CD-RW discs are both easily affected by high temperature and humidity and some of CD-R and CD-RW discs may not be played.
Therefore, do not leave them for a long time in the car.
•New discs may have some roughness around the edges. If such discs are used, the player may not work or the sound may skip. Use a ball-point pen or the like to remove any roughness from the edge of the disc.
Ball-point pen
Roughness
•Never stick labels on the surface of the compact disc or mark the surface with a pencil or pen.
•Never play a compact disc with any cellophane tape or other glue on it or with peeling off marks. If you try to play such a compact disc, you may not be able to get it back out of the CD player or it may damage the CD player.
•Do not use compact discs that have large scratches, are misshapen, cracked, etc. Use of such discs may cause misoperation or damage.
•To remove a compact disc from its storage case, press down on the center of the case and lift the disc out, holding it carefully by the edges.
•Do not use commercially available CD protection sheets or discs equipped with stabilizers, etc. These may damage the disc or cause breakdown of the internal mechanism.
Storage
•Do not expose compact discs to direct sunlight or any heat source.
•Do not expose compact discs to excess humidity or dust.
•Do not expose compact discs to direct heat from heaters.
Cleaning
•To remove fingermarks and dust, use a soft cloth and wipe in a straight line from the center of the compact disc to the circumference.
•Do not use any solvents, such as commercially available cleaners, anti-static spray, or thinner to clean compact discs.
•After using special compact disc cleaner, let the compact disc dry off well before playing it.
LCD Screen
In extreme cold, the screen movement may slow down and the screen may darken, but this is normal.
The screen will recover when it returns to normal temperature.
6 DB265MP
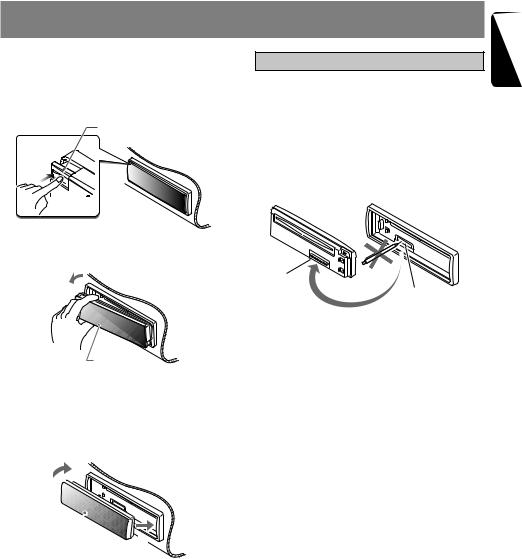
6. DCP (Detachable Control Panel)
Removing the DCP
1.Press the [SRC] button for 1 second or longer to switch off the power.
2.Press in the [RELEASE] button.
[RELEASE] button
The DCP is unlocked
3.Remove the DCP.
DCP
 CAUTION
•The DCP can easily be damaged by shocks. After removing it, be careful not to drop it or subject it to strong shocks.
•The connector connecting the main unit and the DCP is an extremely important part. Be careful not to damage it by pressing on it with fingernails, pens, screwdrivers, etc.
DCP Rear Panel |
Main Unit Front |
DCP connector
Main unit connector
Note:
•If the DCP is dirty, wipe off the dirt with a soft, dry cloth only.
Attaching the DCP
1.Insert the right side of the DCP into the main unit.
2.Insert the left side of the DCP into the main unit.
2.

DCP
1.
English
DB265MP 7
Loading...