


Owner's manual & Installation manual Mode d'emploi et manuel d'installation Manual de instrucciones y de instalación
CZ505
Bluetooth® CD/USB/MP3/WMA RECEIVER
RÉCEPTEUR Bluetooth® CD/USB/MP3/WMA
RECEPTOR Bluetooth® CD/USB/MP3/WMA

English
2 |
CZ505 |
Contents
Thank you for purchasing this Clarion product.
•Please fully read this owner’s manual before operating this equipment.
•Check the contents of the enclosed warranty card and store it in a safe place with this manual.
1. FEATURES ....................................................................................................................... |
3 |
2. PRECAUTIONS ................................................................................................................ |
3 |
Front Panel / Generalities .............................................................................................. |
4 |
USB Port ........................................................................................................................ |
4 |
Remove the DCP ........................................................................................................... |
5 |
Attach the DCP .............................................................................................................. |
5 |
3. CONTROLS ...................................................................................................................... |
5 |
Operational Panel .......................................................................................................... |
5 |
Names of Buttons........................................................................................................... |
5 |
Notes for use of Remote Control.................................................................................... |
6 |
Remote Control (RCX001) ............................................................................................. |
6 |
4. CAUTIONS ON HANDLING ............................................................................................. |
7 |
Handling Discs ............................................................................................................... |
7 |
5. OPERATIONS................................................................................................................... |
7 |
Basic Operations............................................................................................................ |
7 |
System Setup................................................................................................................. |
8 |
Audio Setup.................................................................................................................... |
9 |
Radio Operations ........................................................................................................... |
9 |
HD Radio Operations ................................................................................................... |
10 |
SiriusXM Satellite Radio Operations ............................................................................ |
10 |
CD/MP3/WMA Operations ........................................................................................... |
12 |
USB Operations ........................................................................................................... |
13 |
iPod & iPhone Operations............................................................................................ |
13 |
Bluetooth Operations ................................................................................................... |
14 |
AUX Operations ........................................................................................................... |
15 |
6. TROUBLE SHOOTING................................................................................................... |
16 |
7. ERROR DISPLAYS......................................................................................................... |
17 |
8. SPECIFICATIONS .......................................................................................................... |
17 |
9. INSTALLATION / WIRE CONNECTION GUIDE ............................................................ |
18 |
1. FEATURES
 SiriusXM-Ready™ and HD Radio™ Receiver with iTunes® Tagging
 Built-in Bluetooth® Handsfree (HFP) and Audio Streaming (A2DP with aptX ® & AVRCP)
  728 Variable Color Illumination Control
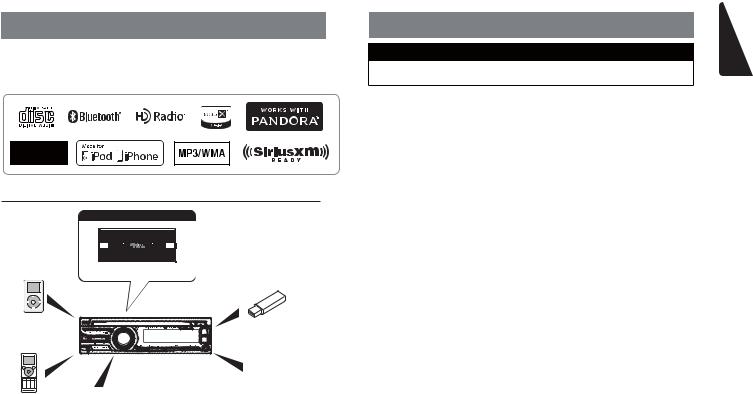
Expanding Systems
Expanding audio features
6 Channel Amplifier
iPod/iPhone |
USB Memory |
|
(Connect via |
||
(Connect via CCA-755) |
||
Accessory cable for |
||
|
||
iPod/iPhone) |
|
|
|
Portable Player |
|
|
(Connect via AUX IN Jack) |
|
|
SiriusXM-Connect™ |
|
Bluetooth® |
Vehicle Tuner |
|
cellular phone |
|
Note:
•The items listed only show connectivity options and are not included with the unit.
•CCA-755: Sold separately.
•Optional CCA-750 (iPod cable) also available, but CZ505 doesn't have iPod Video function, so even if connect to the Monitor, CZ505 doesn't playback the video.
2. PRECAUTIONS
 WARNING
For your safety, the driver should not operate the controls while driving.
Also, while driving, keep the volume to a level at which external sounds can be heard.
1.When the interior of the car is extremely cold and the player is used soon after switching on the heater, moisture may form on the disc or the optical parts of the player and proper playback may not be possible. If moisture forms on the disc, wipe it off with a soft cloth. If moisture forms on the optical parts of the player, do not use the player for about one hour. The condensation will disappear naturally allowing normal operation.
2.Driving on extremely bumpy surface can cause the disc to skip during playback.
3.This unit uses precision parts and components for its operation. In the event that trouble arises, never open the case, disassemble the unit, or lubricate the rotating parts. Contact your Clarion dealer or service center.
4.FCC STATEMENT
4.1.This device complies with Part 15 of the FCC Rules. Operation is subject to the following two conditions:
(1)This device may not cause harmful interference.
(2)This device must accept any interference received, including interference that may cause undesired operation.
4.2.Changes or modifications not expressly approved by the party responsible for compliance could void the user’s authority to operate the equipment.
NOTE:
This equipment has been tested and found to comply with the limits for a Class B digital device, pursuant to Part 15 of the FCC Rules. These limits are designed to provide reasonable protection against harmful
interference in a residential installation. This equipment generates uses and can radiate radio frequency energy and, if not installed and used in accordance with the instructions, may cause harmful interference to radio communications. However, there is no guarantee that interference will not occur in a particular installation. If this equipment does cause harmful interference to radio or television reception, which can be determined by turning the equipment off and on, the user is encouraged to try to correct the interference by one or more of the following measures:
•Reorient or relocate the receiving antenna.
•Increase the separation between the equipment and receiver.
•Connect the equipment into an outlet on a circuit different from that to which the receiver is connected.
•Consult the dealer or an experienced radio/TV technician for help.
FCC Radiation Exposure Statement
This equipment complies with FCC radiation exposure limits set forth for an uncontrolled environment. This equipment should be installed and operated with minimum distance 20cm between the radiator & your body
5.“Made for iPod” and “Made for iPhone” mean that an electronic accessory has been designed to connect specifically to iPod or iPhone, respectively, and has been certified by the developer to meet Apple performance standards.
Apple is not responsible for the operation of this device or its compliance with safety and regulatory standards.
English
CZ505 3

English
Please note that the use of this accessory with iPod or iPhone may affect wireless performance.
iPhone, iPod and iTunes are trademarks of Apple Inc., registered in the U.S. and other countries.
6.Pandora, the Pandora logo, and the Pandora trade dress are trademarks or registered trademarks of Pandora Media, Inc. used with permission.
Pandora is currently only available in the United States, Australia and New Zealand. If you have any issues with the Pandora application on your mobile phone, please direct them to pandora-support@pandora. com.
7.The Bluetooth word mark and logos are registered trademarks owned by the Bluetooth SIG, Inc. and any use of such marks by Clarion Co., Ltd is under license. Other trademarks and trade names are those of their respective owners.
8.Sirius, XM and all related marks and logos are trademarks of Sirius XM Radio Inc. All rights reserved.
9.HD Radio Technology manufactured under license from iBiquity Digital Corporation. U.S. and Foreign Patents. HD Radio™ and the HD, HD Radio, and “Arc” logos are proprietary trademarks of iBiquity Digital Corp.
10.The aptX® mark and the aptX logo are trade marks of CSR plc or one of its group companies and may be registered in one or more jurisdictions.
11.- English:
This device complies with Industry
C a n a d a l i c e n c e - e x e m p t R S S standard(s). Operation is subject to the following two conditions: (1) this device may not cause interference, and (2) this device must accept any interference, including interference that may cause undesired operation of the device.
- French:
Le présent appareil est conforme aux CNR d’Industrie Canada applicables aux appareils radio exempts de licence. L’exploitation est autorisée aux deux conditions suivantes : (1) l’appareil ne doit pas produire de brouillage, et (2) l’utilisateur de l’appareil doit accepter tout brouillage radioélectrique subi, même si le brouillage est susceptible d’en compromettre le fonctionnement.
Cleaning the body
•Use a soft, dry cloth and gently wipe off any dirt or dust.
•For tough dirt, apply some neutral detergent diluted in water to a soft cloth, wipe off the dirt gently, then wipe again with a dry cloth.
•Do not use benzene, thinner, car cleaner, etc., as these substances may damage the body or cause the paint to peel. Also, leaving rubber or plastic products in contact with the body for long periods of time may cause stains.
INFORMATION FOR USERS:
Changes or modifications to this product unapproved by the manufacturer will void the warranty and will violate FCC approval.
Front Panel / Generalities
For a longer service life, be sure to read the following cautions.
•Do not allow any liquids on the unit from drinks, umbrellas, etc. Doing so may damage the internal circuitry.
•Do not disassemble or modify the unit in any way. Doing so may result in damage.
•Do not let cigarettes burn the display. Doing so may damage or deform the body.
•If a problem should occur, have the unit inspected at your store of purchase.
•The remote control unit may not work if the remote control sensor is exposed to direct sunlight.
USB Port
•The USB memory stick may stick out when inserted, so it may cause danger during driving. When connect USB memory stick to the source unit, please use the USB extension cable(CCA-755).
• T h e U S B m e m o r y s t i c k s m u s t b e recognized as “USB mass storage class” to work properly. Some models may not operate correctly.
When the memorized data is lost or damaged by any chance, Clarion shall not be liable for any damage.
When using the USB memory stick, we recommend that you backup your data stored on it before using a personal computer etc.
•Data files may be broken when using USB memory sticks in the following situation: When disconnecting the USB memory stick or turning the power off while reading data.
When affected by static electricity or electric noise.
Connect/disconnect the USB memory stick when it is not accessed.
•Connecting with the computer is not available.
4 CZ505
Remove the DCP
The control panel can be detached to prevent theft. When detaching the control panel, keep it in the safety place and prevent scratches.
W e r e c o m m e n d t a k i n g t h e D C P (DETACHABLE CONTROL PANEL) with you when leaving the car.
1. Press the [ / SRC] button (1 sec.) to turn off the power.
2.Deeply push into [OPEN] button to unlock the DCP.
3.Hold the side popped out, remove the DCP.
Attach the DCP
1.Hold the DCP and ensure that the panel faces towards you. Set the right side of the DCP into the DCP bracket.
2.Press the left side of the DCP until it locks.
 CAUTION
•The DCP can easily be damaged by shocks. After removing it, be careful not to drop it or subject it to strong shocks.
•Once the [OPEN] button is pressed and DCP is unlocked, car vibrations can cause the DCP to fall.
•The connector for the main unit and DCP is extremely important. Be careful not to damage it by pressing on it with fingernails, screwdrivers, etc.
Note:
If the DCP is dirty, wipe off the dirt with a soft, dry cloth only.
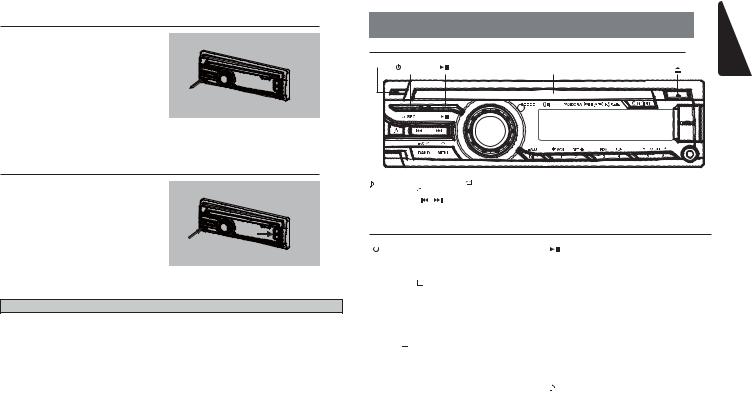
3. CONTROLS
Operational Panel
[MIC] |
|
|
[ / SRC ] [ ] |
Disc Slot |
[ ] |
|
|
|
|
|
|
|
|
|
|
|
|
|
|
|
|
|
|
|
|
|
|
|
|
|
|
|
|
|
|
|
|
|
|
|
|
|
|
|
|
|
|
|
|
|
|
|
|
|
|
|
|
|
|
|
|
|
|
|
|
|
|
|
|
|
|
[BAND / |
[MENU / ] |
|
|
[DISP] |
|
|
|
|
|||
|
|
|
|
|
|
|
||||||
|
AS / |
] |
|
|
[VOLUME] |
|
|
|
|
|
|
|
|
|
[ 1~6 ] |
|
|
||||||||
[OPEN] |
[ / |
] |
|
|
|
|
|
|||||
|
|
|
|
|
|
|
|
|
||||
Names of Buttons
[  / SRC ] Button
•Toggle the audio source
•Power on / Power off (long press)
[ BAND / AS /  ] Button
•RADIO mode – Select tuner band / Auto memory store (long press)
•BT mode – Dial / Answer / Transfer call / Redial
•SiriusXM mode – Select tuner band / Select category (long press)
[ MENU / ] Button
•MP3/WMA mode – Search function
•CD mode – No function
•RADIO mode – No function
•AUX mode – No function
•USB mode – Search function
•iPod mode – iPod menu
•Pandora mode – Station select
•BT mode – Terminate call
•SiriusXM mode – Direct select
[ ] Button
• Press to eject disc
[ |
] Button |
•Play / Pause
•SiriusXM mode– Channel scan (in current category) / Preset scan (long press)
[  /
/
 ] Buttons
•RADIO mode – Manual tuning / Auto search (long press)
•MP3/WMA/CD/USB/iPod mode
–Previous / next track
–Fast Forward / Fast Backward (long press)
•Pandora mode – Skip track ( )
)
[OPEN] Button
• Unlock the front panel
[ |
] Button |
• |
Sound effect setting |
[VOLUME] Knob
•Adjust volume level / Confirm (press)
•Pandora mode – Bookmark track
•SiriusXM/HD Radio mode – iTunes tagging (long press)
English
CZ505 5

English |
Names of Buttons |
|
|
||
[1~6] Buttons |
/ Preset station memory 1 |
|
(long press) |
||
|
|
• |
[6] Button: Next folder / Preset station |
||
|
• |
[1] Button: |
Scan play / Preset station 1 |
|
6 / Preset station memory 6 |
|
|
|
(long press) / Pandora mode - |
|
10 tracks up (long press) |
|
|
|
Thumbs down |
|
/ Pandora mode – Next |
|
• |
[2] Button: |
Repeat play / Preset station |
|
Station |
|
|
|
2 / Preset station memory 2 |
|
|
|
|
|
(long press) / Pandora mode - |
[DISP] Button |
|
|
|
|
Thumbs up |
• Display change |
|
|
• |
[3] Button: |
Random play / Preset station 3 |
• |
System setup (long press) |
|
|
|
/ Preset station memory 3 (long |
|
|
|
|
|
press) / Pandora mode - Create |
[ MIC ] Hole |
|
|
|
|
new station by Artist / by Track |
• |
Internal microphone |
|
|
|
(long press) |
|
|
|
• |
[4] Button: |
Top play / Preset station 4 / |
|
|
|
|
|
Preset station memory 4 (long |
|
|
|
|
|
press) |
|
|
|
• |
[5] Button: |
Previous folder / Preset station |
|
|
|
|
|
5 / Preset station memory 5 |
|
|
|
|
|
(long press) / Pandora mode – |
|
|
Previous station
10 tracks down (long press)
Notes for use of Remote Control
1.Aim the remote control at the remote sensor on the unit.
2.Remove the battery from the remote control or insert a battery insulator if the battery has not been used for a month or longer.
3.DO NOT store the remote control under direct sunlight or in high temperature environment, or it may not function properly.
4.Use “button shaped” lithium battery “CR2025” (3V) only.
5.DO NOT subject battery to recharge, disassemble, heat or dispose in fire or water.
6.Insert the battery in proper direction according to the (+) and (-) polarities.
7.Store the battery in a place where children cannot reach to avoid the risk of accident.
Inserting the Battery
1.Slide remote control unit’s rear cover in the direction shown.
2.Insert battery (CR2025) into insertion guides with printed side (+) up.
3.Press battery into compartment as shown.
4.Replace and slide cover until it clicks into place.
Insertion guide
Remote Control (RCX001)
[SRC /  ] Button
•Toggle the audio source
•Power on / Power off (long press)
[ |
, |
] Buttons |
•Preset station up / down
•Previous / next track
•Search (long press)
•Pandora mode – Skip track ( )
)
[SCN / PS / AS] Button
•Scan play / Preset scan
•Auto store (long press)
•Pandora mode – Thumbs down
•SiriusXM mode– Channel scan (in current category) / Preset scan (long press)
[BAND / TOP] Button
•CD/MP3/WMA/USB mode – Top play
•RADIO mode – Select tuner band
•Pandora mode – Next station
•SiriusXM mode – Select tuner band / Select category (long press)
[ , ] Buttons
• Volume up / down
[ |
|
|
|
] Button |
|
|
• Play / Pause
[ISR] Button
• SiriusXM/HD Radio mode - iTunes tagging
[DISP] Button
• Display change
[RDM] Button
•Random play
•Pandora mode – Bookmark track
[RPT] Button
•Repeat play
•Pandora mode – Thumbs up
[MUTE] Button
• Mute the volume
[SRC /  ]
]
[  ,
, 
 ]
]
[MUTE]
[SCN / PS / AS]
[BAND / TOP]
[ ,
, ]
]
 [
[ ]
]
[ISR]
[DISP]
[RDM]
[RPT]
6 CZ505

4. CAUTIONS ON HANDLING
Handling Discs
Handling
•New discs may have some roughness around the edges. If such discs are used, the player may not work or the sound may skip. Use a ball-point pen or the like to remove any roughness from the edge of the disc.
Ball-point pen
Roughness
Storage
•Do not expose discs to direct sunlight or any heat source.
•Do not expose discs to excess humidity or dust.
•Do not expose discs to direct heat from heaters.
Cleaning
•To remove fingermarks and dust, use a soft cloth and wipe in a straight line from the center of the disc to the circumference.
•Do not use any solvents, such as commercially available cleaners, anti-static spray, or thinner to clean discs.
•After using special disc cleaner, let the disc dry off well before playing it.
•Never stick labels on the surface of the disc or mark the surface with a pencil or pen.
•Never play a disc with any cellophane tape or other glue on it or with peeling off marks. If you try to play such a disc, you may not be able to get it back out of the player or it may damage the player.
•Do not use discs that have large scratches, are misshapen, cracked, etc.
Use of such discs may cause misoperation or damage.
•To remove a disc from its storage case, press down on the center of the case and lift the disc out, holding it carefully by the edges.
•Do not use commercially available disc protection sheets or discs equipped with stabilizers, etc. These may damage the disc or cause breakdown of the internal mechanism.
On Discs
•Never turn off the power and remove the unit from the car with a disc loaded.
 CAUTION
For your safety, the driver should not insert or eject a disc while driving.
5. OPERATIONS
Basic Operations
Note:
•Refer to the diagrams in “3. CONTROLS” when reading this chapter.
 CAUTION
When the unit is turned on, starting and stopping the engine with its volume raised to the maximum level may harm your hearing. Be careful about adjusting the volume.
Power on / off
Notes:
•Start the engine before using this unit.
•Be careful about using this unit for a long time without running the engine. If you drain the battery too far, you may not be able to start the engine and this can reduce the service life of the battery.
1.Start the engine. The power button / knob illumination on the unit will light up.
Engine ON position
Volume adjustment
Rotate the [VOLUME] knob on the front panel or press the [ ] or [
 ] button on the remote control.
The adjustable range of volume is 0 to 40.
 CAUTION
While driving, keep the volume level at which external sounds can still be heard.
Playing source selection
Press [ / SRC] button on the front panel or remote control repeatedly to choose desired playing source.
Note:
Playing source selection means selecting which mode, such as DISC mode, RADIO mode and AUX mode.
Display system time
Press the [DISP] button on the front panel or remote control to change the display information from clock, station information (radio mode), or track information (CD mode).
2.Press the [ / SRC] button on the front panel or the remote control to turn on the power under standby mode. The unit goes back to the last status after power on.
3.Press and hold the [ / SRC] button on the front panel or the remote control to turn off the power.
Mute
Press the [MUTE] button on the remote control to mute the volume from the unit.
Note:
Doing the operation above again or adjusting volume will release muting.
RESET
If you have following problems, please press
[RESET] button.
•Unit can not power on
•Nothing happens when buttons are pressed
•Display is not accurate
Note:
*When the [RESET] button is pressed, preset radio stations, audio setting, etc. stored in memory are cleared.
RESET
CZ505
English
7
 Loading...