


Quick Start Guide
Guide de démarrage rapide Guía de iniciación rápida Guia de consulta rápida
ENGLISH
FRANÇAIS
ESPAÑOL
PORT DO BRASIL
 Precauciones de seguridad
Para utilizar el equipo en condiciones de plena seguridad, lea con detenimiento las advertencias que contiene este manual. No intente utilizarlo de un modo que no se describa en este manual.
Para obtener precauciones de seguridad más detalladas, consulte el manual en pantalla Guía del Usuario.
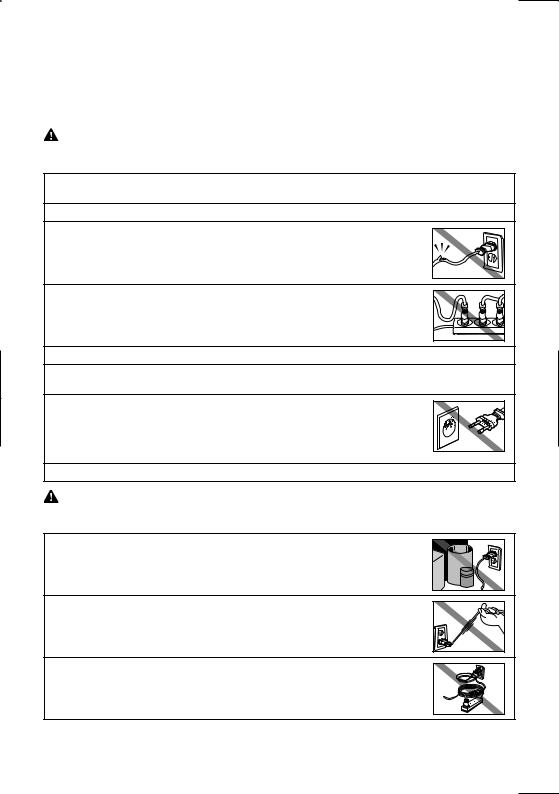
Advertencia
Podrá provocar descargas eléctricas/incendio o daños en el equipo si ignora cualquiera de estas precauciones de seguridad.
No intente jamás enchufar o desenchufar el dispositivo de la fuente de alimentación con las manos mojadas.
Introduzca el enchufe de la impresora en la toma de corriente hasta que haga tope.
No dañe, modifique, estire, curve o retuerza excesivamente el cable de alimentación eléctrica. No coloque objetos pesados sobre el cable de alimentación.
No enchufe nunca el dispositivo a una toma de alimentación compartida con otro dispositivo (prolongador, adaptador de 2 o 3 tomas, etc.).
No use el dispositivo si el cable de alimentación eléctrica está liado o tiene nudos.
Si detecta humo, olores extraños o ruidos raros en la máquina, desenchufe inmediatamente la máquina de la toma de corriente y llame al servicio técnico.
Desenchufe periódicamente el dispositivo y use un paño seco para limpiar el polvo y la suciedad acumulados en el enchufe y en la toma de alimentación. Si coloca el dispositivo en un lugar expuesto a polvo, humo o humedad excesivos, el polvo acumulado en el enchufe absorberá la humedad y podrá provocar una pérdida de aislamiento o un incendio.
Use el cable de alimentación incluido con la máquina.
Precaución
Podrá provocar daños tanto al usuario como al dispositivo si ignora cualquiera de estas precauciones de seguridad.
Asegúrese de que el área que rodea la toma de corriente esté despejada en todo momento para que el cable de alimentación se pueda desenchufar fácilmente en caso de necesidad.
No desenchufe la impresora tirando del cable.
No use alargadores.

ENGLISH
Quick Start Guide
Table of Contents
Introduction |
1 |
How to Use the Documentation Provided |
3 |
|
|
Preparing the Machine |
4 |
|
|
Installing the MP Drivers |
6 |
|
|
Reading the On-screen Manuals |
8 |
|
|
Loading Printing Paper |
9 |
|
|
How to Navigate Menus on the LCD |
11 |
|
|
Copying |
14 |
|
|
Printing from a Memory Card |
15 |
|
|
Photo Printing from Printed Photo |
19 |
|
|
Printing from Your Computer |
21 |
|
|
Scanning Images |
23 |
|
|
Printing Photographs Directly from a PictBridge Compliant Device |
25 |
|
|
Replacing an Ink Tank |
31 |
|
|
Specifications |
33 |
|
|
ENGLISH
European Union (and EEA) only.
This symbol indicates that this product is not to be disposed of with your household waste, according to the WEEE Directive (2002/96/EC) and your national law. This product should be handed over to a designated collection point, e.g., on an authorized one-for-one basis when you buy a new similar product or to an authorized collection site for recycling waste electrical and electronic equipment (EEE). Improper handling of this type of waste could have a possible negative impact on the environment and human health due to potentially hazardous substances that are generally associated with EEE. At the same time, your cooperation in the correct disposal of this product will contribute to the effective usage of natural resources. For more information about where you can drop off your waste equipment for recycling, please contact your local city office, waste authority, approved WEEE scheme or your household waste disposal service.
For more information regarding return and recycling of WEEE products, please visit www.canon-europe.com/environment.
(EEA: Norway, Iceland and Liechtenstein)
For Customers in Europe, Middle-East, Africa and Russia only
For Canon Customer Support contacts, please see the back cover of the European Warranty Systems (EWS) Booklet or visit www.canon-europe.com.

Introduction
This Quick Start Guide uses the following symbols to indicate important information. Always observe the instructions indicated by these symbols.
Warning
Instructions that, if ignored, could result in death or serious personal injury caused by incorrect operation of the equipment. These must be observed for safe operation.
Caution
Instructions that, if ignored, could result in personal injury or material damage caused by incorrect operation of the equipment. These must be observed for safe operation.
Important
Instructions that must be observed for safe operation.
Depending on your application program, operations may differ. For details, refer to the instruction manual of your application. The steps described in this manual are in Windows Vista™ operating system Ultimate Edition (hereafter referred to as “Windows Vista”) and Mac® OS X v.10.4.x.
Trademark Notices
z“Microsoft” is a registered trademark of Microsoft Corporation.
z“Windows” is a trademark of Microsoft Corporation, registered in the U.S. and other countries.
z“Windows Vista” is a trademark of Microsoft Corporation.
z“Macintosh” and “Mac” are trademarks of Apple Inc., registered in the U.S. and other countries.
z“Memory Stick”, “Memory Stick PRO”, “Memory Stick Duo” and “Memory Stick PRO Duo” are trademarks of Sony Corporation.
z“xD-Picture Card” is a trademark of Fuji Film Co. Ltd.
z“MultiMediaCard” is a trademark of the MultiMediaCard Association.
z“SD Card”, “miniSD Card” and “microSD Card” are trademarks of SD Association.
z“Bluetooth” is a trademark of Bluetooth SIG, Inc., U.S.A. and licensed to Canon Inc.
© CANON INC. 2007
All rights reserved. No part of this publication may be transmitted or copied in any form whatsoever without the express written permission.
Model Number: K10310 (MP520)
ENGLISH
Introduction 1

ENGLISH
 Exif Print
This machine supports Exif Print.
Exif Print is a standard for enhancing the communication between digital cameras and printers. By connecting to an Exif Print-compliant digital camera, the camera’s image data at the time of shooting is used and optimized, yielding extremely high quality prints.
 International ENERGY STAR® Program
As an ENERGY STAR® Partner, Canon Inc. has determined that this product meets the ENERGY STAR® guidelines for efficiency.
 Power Requirements
Be sure to use the power cable included with the machine.
Never use a power supply voltage other than that supplied in the country of purchase. Using the incorrect voltage could cause a fire or electric shock. The correct power supply voltages and frequencies are as follows:
AC 100-240V, 50/60Hz
 About Consumables
Consumables (ink tanks / FINE Cartridges) are available for 5 years after production has stopped.
Safety Precautions
Warning
zThis product emits low level magnetic flux. If you use a cardiac pacemaker and feel abnormalities, please move away from this product and consult your doctor.
zNever attempt to plug the power cord into the power outlet or unplug the power cord when your hands are wet.
zNever damage, modify, stretch, or excessively bend or twist the power cord. Do not place heavy objects on the power cord.
zNever use any power supply other than the standard power supply available in the country of purchase. Using the incorrect voltage and frequency could cause a fire or electric shock.
zAlways push the plug all the way into the power outlet.
Caution
zFor safety reasons, store ink tanks out of the reach of small children.
zDo not drop or shake ink tanks as this may cause the ink to leak out and stain your clothes and hands.
Also read the Safety Precautions in the User’s Guide on-screen manual. Observe the warnings and cautions to avoid personal injury or damage to the machine.
2 Introduction

How to Use the Documentation Provided
Printed Documentation Setup Sheet
Be sure to read this sheet first.
This sheet includes instructions for setting up your machine and getting it ready for use.
Quick Start Guide (This guide)
Read this guide when starting to use the machine.
After following instructions in your setup sheet, we recommend you read this guide to familiarize yourself with the basic operation of some of the main functions that can be performed on your machine.
ENGLISH
On-screen Manuals User’s Guide
Read this guide when starting to use the machine.
If the Quick Start Guide does not provide you enough information please refer to the User’s Guide which can be installed from the Setup CD-ROM. This guide provides detailed instructions for:
zcopying
zprinting from a memory card
zprinting from your computer
zscanning
Additional guides are also available for advanced features.
Scanning Guide
Refer to this guide for full instructions on scanning operation and settings.
PC Printing Guide
Refer to this guide for full instructions on printer driver setting.
PC Photo Printing Guide (Windows® only)
Refer to this guide for full instructions on using the various application software included on the Setup CD-ROM.
Bluetooth Guide
Refer to this guide for full instructions of printing from computers and devices that support Bluetooth communication, and on troubleshooting them.
How to Use the Documentation Provided |
3 |
ENGLISH
Preparing the Machine
Be sure to read your setup sheet first for setting up your machine and getting it ready for use.
Unpack the machine
Please confirm the included items against the illustration printed on the lid of the packing box.
Important
A USB cable is necessary to connect the machine with your computer.
1 Turn on the machine.
Caution
Be sure to remove the tapes before you turn on the machine.
Note
zPlug the power cord all the way in, since it may be difficult to plug.
zIf an unintended language is displayed on the LCD, press the Back button to return to the
Language selection screen.
2 Install the Print Head.
Caution
Do not touch internal parts other than the Print Head Lock Lever.
Important
zIf you could not install the Print Head properly, lift the Print Head Lock Lever, remove it, and then install it again properly.
zDo not reattach the protective cap once it has been removed.
Note
There might be some transparent or light blue ink on the inside of the bag the print head comes in, or the inside of the protective cap - this has no effect on print quality. Be careful not to get ink on yourself when handling these items.
3 Install the ink tanks.
Important
zIf the Scanning Unit (Printer Cover) is left open for more than 10 minutes, the Print Head Holder moves to the right side. Close and reopen the Scanning Unit (Printer Cover) to return the holder to the center.
zMake sure that all the ink tanks are installed in the correct position, matching the label. The machine cannot be used unless all the ink tanks are installed.
zWhen the “Perform head alignment if colors/lines are misaligned” message is displayed, then press the OK button. This message takes about two minutes until it is displayed. After pressing the OK button, the copy standby screen will be displayed.
zDo not squeeze the side of ink tanks as this may cause the ink to leak out and stain your clothes and hands.
zDo not reattach the protective cap once you have removed it.
Note
zBe sure to remove the clear film from the ink tank in the exact order as shown in step 3 of your setup sheet.
zAn error message will be displayed on the LCD if an ink tank is not installed properly. Open the Scanning Unit (Printer Cover) and make sure that position of all the ink tanks match the label.
zAfter prepared the machine, the preparation process takes one or two minutes at the first print or second print.
4 |
Preparing the Machine |

Selecting the Language for the LCD
1 |
Press the HOME button. Wait for about 5 seconds, select |
, and then press the |
|
|
OK button. |
|
|
2 |
Press the ] button to select |
, then press the OK button. |
|
3 |
Press the } button three times, then press the OK button. |
|
|
If the Bluetooth unit is connected to the machine, press the } button five times, and then press the OK button.
4 Press the { or } button to select the language for the LCD, then press the OK button.
ENGLISH
Preparing the Machine |
5 |

ENGLISH
Installing the MP Drivers
Information Common to Windows and Macintosh®
Notes on the Installation Process
zIf the Select Language screen appears, select a language, then click Next.
zIf the Select Your Place of Residence screen appears, select your place of residence, then click Next.
zThere are two ways of installing the MP Drivers and other software*:
Easy Install: the items included on the Setup CD-ROM are installed automatically Custom Install: you can select particular items to install
* The available software programs included on the Setup CD-ROM may vary depending on the country or region of purchase.
zWhen the User Registration screen appears, click Next. If your computer is connected to the Internet, the on-screen instructions to register your product will appear.
To register your product, you need the serial number inside of the machine.
Registration can also be performed from the icon on the desktop after installation is completed.
zThe User Registration screen will only be displayed when Europe, Middle East, Africa is selected on the Select Your Place of Residence screen.
Notes on the Print Head Alignment
zIf the straight line is misaligned or print quality is not satisfactory after installing the MP Drivers, you may need to align the Print Head. Refer to “Aligning the Print Head” in the User’s Guide on-screen manual.
Information for Windows
zLog into a user account with the administrator privilege.
zBefore installing the MP Drivers, disable all anti-virus programs and automatically loading programs.
zIf the Found New Hardware or Found New Hardware Wizard screen appears automatically, remove the USB cable connected to your computer. Click Cancel to quit the screen. In Windows Vista, the screen may close automatically when the USB cable is unplugged. Then turn off the machine and start the installation process again. For details on the installation process, refer to your setup sheet.
zIf the AutoPlay screen appears, click Run Msetup4.exe. In Windows XP and Windows 2000, this screen will not appear.
zIf the User Account Control screen appears, click
Continue. In Windows XP and Windows 2000, this screen will not appear.
zWhen a message asking for your confirmation to restart your computer appears during the installation process, click OK. The system is restarted automatically. While restarting, do not remove the Setup CD-ROM.
zWe would appreciate it if you would take part in the PIXMA Extended Survey Program regarding the use of Canon printers. For details, refer to the on-screen instructions.
zIf the connection is not recognized, refer to “Cannot Install the MP Drivers” in the User’s Guide on-screen manual.
Users in Asia
z Scan Soft OmniPage SE can be installed only on an English operating system.
6 |
Installing the MP Drivers |
Information for Macintosh
zSince Mac OS 9, Mac OS X Classic environments, or Mac OS X v.10.2.7 or earlier are not supported, do not connect the machine to these.
zBefore installing the MP Drivers, disable all anti-virus programs and automatically loading programs or remove them from your system folder.
When using Mac OS X v.10.2.8 to v.10.3.x:
zBefore using the Operation Panel on the machine to save originals scanned from the Platen Glass to the computer, it is necessary to select MP Navigator EX 1.0 or MP Navigator EX 1 as the launch application on Image Capture under Applications. For details, refer to “Scanning Images” in the User’s Guide on-screen manual.
When using Mac OS X v.10.2.8 to v.10.3.3:
zRestarting the computer while connected to the machine may cause the machine not to be detected. To resolve this, either unplug the USB cable then plug it back in again, or turn the machine off then back on again.
Users in Asia
zTo install the User’s Guide on-screen manual in a language other than the installed one, double-click the Manual folder in the Setup CD-ROM, Canon folder, and then copy a language folder to your hard disk.
ENGLISH
Installing the MP Drivers |
7 |

ENGLISH
Reading the On-screen Manuals
For detailed instructions on installing the on-screen manuals, refer to your setup sheet. You can view the on-screen manuals in the following way:
To view the on-screen manual, double-click the XXX On-screen Manual shortcut icon on the desktop, or click Start > All Programs (or Programs) > Canon XXX Manual > XXX On-screen Manual (where “XXX” is your machine’s name).
System Requirements
Browser: Windows HTML Help Viewer
Note
zMicrosoft® Internet Explorer 5.0 or later must be installed.
zThe on-screen manual may not be displayed properly depending on your operating system or Internet Explorer version. We recommend that you keep your system up to date with Windows Update.
To view the on-screen manual, double-click the XXX On-screen Manual alias (where “XXX” is your machine’s name) on the desktop.
Note
Users in Asia
If you installed the User’s Guide from the Manual folder in the Setup CD-ROM, open the folder in which you copied the User’s Guide and double-click top.htm.
System Requirements
Browser: Help Viewer
Note
zThe on-screen manual may not be displayed properly depending on your operating system. We recommend that you keep your system up to date.
zWe recommend using Safari as your Web browser to view the HTML format on-screen manuals. If Safari is not installed on your computer, download it from Apple Inc. website and install it.
8 |
Reading the On-screen Manuals |
Loading Printing Paper
This machine offers two paper sources to load printing paper; the Rear Tray, found at the top of the machine, and the Front Tray, found at the front of the machine.
Important
zWhen Printing for the first time
At purchase, the machine is set to feed from the Rear Tray.
If you are printing without changing paper source setting, load paper in the Rear Tray.
zIf you cut plain paper to 4" x 6" / 101.6 x 152.4 mm, 5" x 7" / 127.0 x 177.8 mm, or 2.13" x 3.39" / 54.0 x 86.0 mm (credit card-size) for a trial print, it can cause paper jams.
zAlways load paper in portrait orientation. Loading paper in landscape orientation can cause the paper to be jammed.
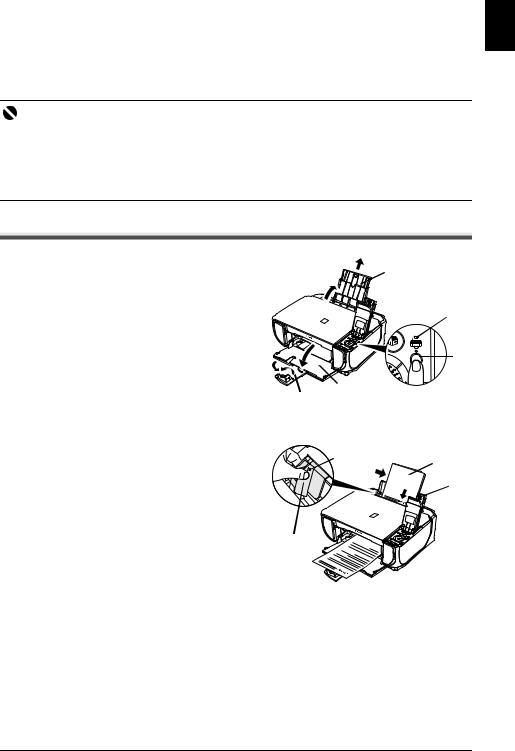
Loading Printing Paper in the Rear Tray
1 |
Open the Rear Tray, then pull out the |
1 |
|
|
Paper Support. |
||
2 |
Open the Front Tray. |
(B) |
|
3 |
Extend the Output Paper Support. |
||
|
|||
4 |
Press the Paper Feed Switch (A) so that |
(A) |
|
|
the Rear Tray lamp (B) lights. |
|
2
3
5 Load the paper in the Rear Tray with the print side facing UP.
Do not load higher than the Load Limit Mark
(C).
6 Align the paper stack against the Cover Guide on the right side of the Paper Support.
7 Pinch the Paper Guide and slide it against the left side of the paper stack.
(C) |
5 |
|
|
|
6 |
7 |
|
ENGLISH
Loading Printing Paper |
9 |

ENGLISH
Loading Printing Paper in the Front Tray
You can load A4, Letter, or B5-sized plain paper in the Front Tray. You cannot load any other paper in the Front Tray.
1  (B)
(B)
2
3
4 Load the paper in the Front Tray with the print side facing DOWN and the leading edge to the far side.
Do not load higher than the Load Limit Mark (C).
5 Align the paper stack against the right edge of the Front Tray, and the near and left edges with the Paper Size Mark (D).
6 Pinch the Paper Guide (E) and slide it against the left side of the loaded paper stack.
2 |
1 |
(A) |
|
|
(C)4
5
(E)
(D)
10 |
Loading Printing Paper |
How to Navigate Menus on the LCD
(1)HOME screen
(2)Function buttons
See “Operation of Other Buttons” on page 12.
(3)HOME button
(4){,},[, and]buttons
(5)Easy-Scroll Wheel
(6)Black button (left) / Color button (right)
(7)Back button
See “Operation of Other Buttons” on page 12.
(8)OK button
(9)NAVI button
See “Operation of Other Buttons” on page 12.
(1)
(9) |
(2) |
(3) |
|
(8) |
|
|
(4) |
(7) |
(5) |
|
(6)
Basic Operation
This section describes the operation to navigate menus with the Easy-Scroll Wheel, [, ], and OK buttons, taking the HOME screen as an example.
1 Press the HOME button.
The HOME screen will be appeared.
2 Turn the Easy-Scroll Wheel to select the mode, then press the OK button.
You can turn the Easy-Scroll Wheel left or right. |
|
You can also use the [ or ] button to select |
|
setting items. |
(A) |
Move the icon of the desired mode to position (A). |
|
The selected mode screen will be appeared. |
|
You can select the following modes on the HOME |
|
screen: |
|
ENGLISH
How to Navigate Menus on the LCD |
11 |
ENGLISH
Copy: |
You can copy in various layouts. See “Copying” on page 14. |
Scan: |
You can save the scanned data to a connected computer using the |
|
Operation Panel. See “Scanning Images” on page 23. |
Photo index sheet: |
You can easily print the photos from a memory card using the Photo |
|
Index Sheet. See “Printing by Using the Photo Index Sheet” on |
|
page 18. |
Settings: |
You can perform the maintenance or change the various settings of |
|
the machine. For details, refer to “When Printing Becomes Faint or |
|
Colors Are Incorrect”, “Cleaning Your Machine”, or “Changing the |
|
Machine Settings” in the User’s Guide on-screen manual. |
Easy photo reprint: |
You can scan printed photos and then print them. See “Photo |
|
Printing from Printed Photo” on page 19. |
Memory card: |
Print the photo data saved on a memory card of a digital camera. |
|
See “Printing from a Memory Card” on page 15. |
Operation of Other Buttons
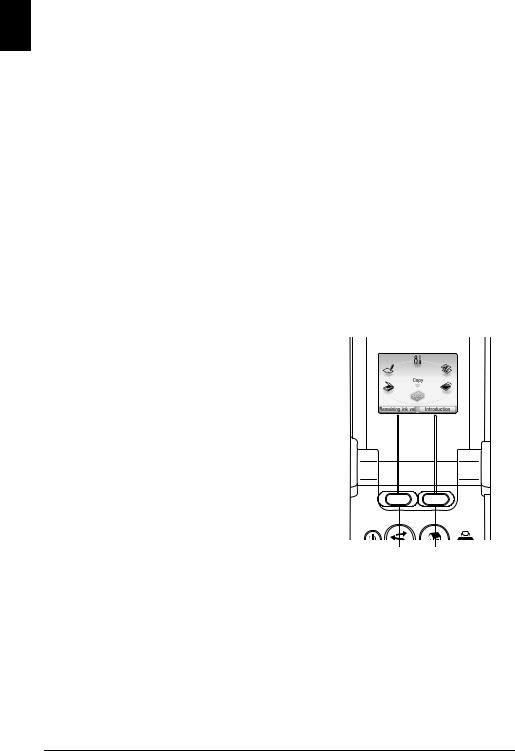
z Function Buttons
Two Function buttons enable you to select menus displayed at the bottom of the LCD.
The screen that appears when you press a Function button depends on the screen that is displayed and which Function button you press.
(1)Left Function button
When you press the left Function button on the HOME screen, the remaining ink volume screen is displayed.
(2)Right Function button
When you press the right Function button on the HOME screen, the introductions for the selected mode functions are displayed.
When you press them on screens other than the HOME screen, an operation procedure or menus is displayed.
(1) (2)
z Back Button
You can return the LCD to the previous screen.
12 |
How to Navigate Menus on the LCD |

z Display the Print Instruction Using the Navigation Menu
When you do not know how to use the print function for the frequent use or how to refill paper, you can easily get the explanation from the navigation menu.
1 Press the NAVI button.
The NAVI screen is displayed.
2 Select a menu you would like to use, then press the OK button.
The explanation about the work flow is displayed. Operate as the explanation.
You can select various menus on the NAVI screen.
ENGLISH
How to Navigate Menus on the LCD |
13 |
ENGLISH
Copying
Making Copies
This section describes the basic procedure to make copies. For details, refer to “Copying” in the User’s Guide on-screen manual.
1 Turn on the machine.
2 Make sure that Copy is selected on the HOME screen, then press the OK button.
3 Load paper.
4 Load the original document on the Platen Glass.
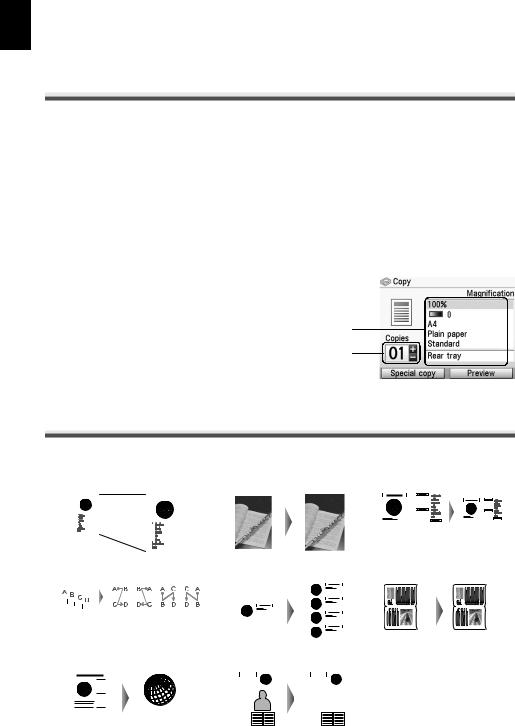
5 Specify copy settings.
(1) |
Confirm the paper source, page size, media |
|
|
|
type, and other settings. To change the |
|
|
|
settings, select the item and press the OK |
|
|
|
button. |
(1) |
|
(2) |
Press the [+] or [-] button to specify the number |
||
|
of copies. |
(2) |
|
6 Press the Color button for color copying, or the Black button for black & white copying.
Using Useful Copy Functions
For details, refer to “Using Useful Copy Functions” in the User's Guide on-screen manual.
Reduced/Enlarged copy |
Borderless copy |
|
|
|
|
|
2-on-1 copy |
||||||||||||||||||||||||
|
|
|
|
|
|
|
|
|
|
|
|
|
|
|
|
|
|
|
|
|
|
|
|
|
|
|
|
|
|
|
|
|
|
|
|
|
|
|
|
|
|
|
|
|
|
|
|
|
|
|
|
|
|
|
|
|
|
|
|
|
|
|
|
|
|
|
|
|
|
|
|
|
|
|
|
|
|
|
|
|
|
|
|
|
|
|
|
|
|
|
|
|
|
|
|
|
|
|
|
|
|
|
|
|
|
|
|
|
|
|
|
|
|
|
|
|
|
|
|
|
|
|
|
|
|
|
|
|
|
|
|
|
|
|
|
|
|
|
|
|
|
|
|
|
|
|
|
|
|
|
|
|
|
|
|
|
|
|
|
|
|
|
|
|
|
|
|
|
|
|
|
|
|
|
|
|
|
|
|
|
|
|
|
|
|
|
|
|
|
|
|
|
|
|
|
|
|
|
|
|
|
|
|
|
|
|
|
|
|
|
|
|
|
|
|
|
|
|
|
|
|
|
|
|
|
|
|
|
|
|
|
|
|
|
|
|
|
|
|
|
|
|
|
|
|
|
|
|
|
|
|
|
|
|
|
|
|
|
|
|
|
|
|
|
|
|
4-on-1 copy |
|
|
|
|
|
|
|
|
|
Image repeat |
|
|
Frame erase |
|||||||||||||||||||||||||
|
|
|
|
|
|
|
|
|
|
|
|
|
|
|
|
|
|
|
|
|
|
|
|
|
|
|
|
|
|
|
|
|
|
|
|
|
|
|
|
|
|
|
|
|
|
|
|
|
|
|
|
|
|
Trimming |
|
|
|
|
|
|
|
|
Masking |
|
||||||||||||||
|
|
|
|
|
|
|
|
|
|
|
|
|
|
|
|
|
|
|
|
|
|
|
|
|
|
|
|
|
|
|
|
|
|
|
|
|
|
|
|
|
|
|
|
|
|
|
|
|
|
|
|
|
|
|
|
|
|
|
|
|
|
|
|
|
|
|
|
|
|
|
|
|
|
|
|
|
|
|
|
|
|
|
|
|
|
|
|
|
|
|
|
|
|
|
|
|
|
|
|
|
|
|
|
|
|
|
|
|
|
|
|
|
|
|
|
|
|
|
|
|
|
|
|
|
|
|
|
|
|
|
|
|
|
|
|
|
|
|
|
|
|
|
|
|
|
|
|
|
|
|
|
|
|
|
|
|
|
|
|
|
|
|
|
|
|
|
|
|
|
|
|
|
|
|
|
|
|
|
|
|
|
|
|
|
|
|
|
|
|
|
|
|
|
|
|
|
|
|
|
|
|
|
|
|
|
|
|
|
|
|
|
|
|
|
|
|
|
|
|
|
|
|
|
|
|
|
|
|
|
|
|
14 Copying

Printing from a Memory Card
Inserting the Memory Card
1 Turn on the machine.
2 Open the Card Slot Cover.
ENGLISH
3 Insert one and only one memory card into the Card Slot.
z How to insert
Insert a memory card with the labeled side facing to the right.
Card Type |
Inserting Card |
|
z Compact Flash (CF) card |
The Access |
|
z Microdrive |
lamp lights |
|
z xD-Picture card*1 |
up. |
|
|
Insert into |
|
|
the left |
|
|
Card Slot. |
|
z SD Secure Digital memory card |
The Access |
|
z SDHC memory card |
||
lamp lights |
||
z miniSD Card*1 |
||
up. |
||
z microSD Card*2 |
||
|
||
z Memory Stick |
|
|
z Memory Stick PRO |
|
|
z Memory Stick Duo*1 |
|
|
z Memory Stick PRO Duo*1 |
Insert into the |
|
z MultiMediaCard |
right Card Slot. |
|
z RS-MMC*1 |
|
*1 Be sure to attach the memory card to the special adapter before inserting it into the Card Slot.
*2 Use “SD Card Adapter” provided with the card.
Printing from a Memory Card |
15 |

ENGLISH
Caution
zThe memory card will stick out of the Card Slot, but do not force it into the slot any further. Doing so damages the machine and the memory card.
zMake sure that the memory card is correctly oriented before inserting it into the Card Slot. If you force the memory card into the Card Slot in the wrong orientation, you may damage the memory card and/or the machine.
4 Confirm that the Access lamp has lit up.
5 Close the Card Slot Cover.
Removing the Memory Card
1 Open the Card Slot Cover.
2 Make sure that the Access lamp is lit, then remove the memory card.
3 Close the Card Slot Cover.
Important
The Access lamp flashes while the machine is reading or writing data from/to the memory card. Removing the memory card or turning off the machine while the Access lamp is flashing may damage the data saved on the memory card. Do not remove the memory card while the Access lamp is flashing.
Printing Photographs Saved on a Memory Card
1 Prepare for printing.
(1)Turn on the machine.
(2)Load paper.
2 Insert the memory card.
(1)Select Memory card on the HOME screen, then press the OK button.
(2)Insert the memory card into the Card Slot. See “Inserting the Memory Card” on page 15.
3 Select the print menu.
(1)Make sure that Select and print is selected, then press the OK button.
(2)Confirm the paper source, page size, media type, and other settings. To change the settings, select the item and press the OK button.
(3)Select Next, and then press the OK button.
4 Select the photo to print and specify the number of copies for each photo.
(1)Use the Easy-Scroll Wheel or the [ or ] button to display a photo to print.
(2)Press the [+] or [-] button to specify the number of copies.
(3)Repeat steps (1) and (2) to specify the number of copies for each photo.
(4)Press the OK button.
16 |
Printing from a Memory Card |
5 Start printing.
(1)Confirm the print setting.
To change the settings, select the item and press the OK button.
(2) Confirm the total number of copies for the |
(1) |
|
selected photos. |
||
|
||
|
|
|
Note |
(2) |
For details on the functions associated with
Advanced and Check photo, refer to “Printing
Photographs Saved on a Memory Card” in the
User’s Guide on-screen manual.
(3)Press the Color button.
The specified number of copies of each photo will be printed.
Using Useful Printing Functions
Layout print
Prints photos you pasted in the specified layout.
Sticker print
Prints your favorite photo with a frame on Canon Photo Stickers.
DPOF print
Prints according to the Digital Print Order Format (DPOF) settings on your digital camera, if you have specified them.
Captured info print
Prints information on photographs at the time of its shooting (Exif info) in the margin of Photo index print or selected individual photos.
Photo index print
Prints an index of all the photos saved on a memory card.
Print all photos
Prints all photos saved on the memory card.
Using Useful Display Functions
Change display
The display method of a photograph can be changed.
Trimming
Edits images displayed on the LCD by cropping them.
Search
When there are a lot of photos saved on the memory card, displays and prints only photos shot on the specified date or within the specified range of dates.
ENGLISH
Printing from a Memory Card |
17 |
ENGLISH
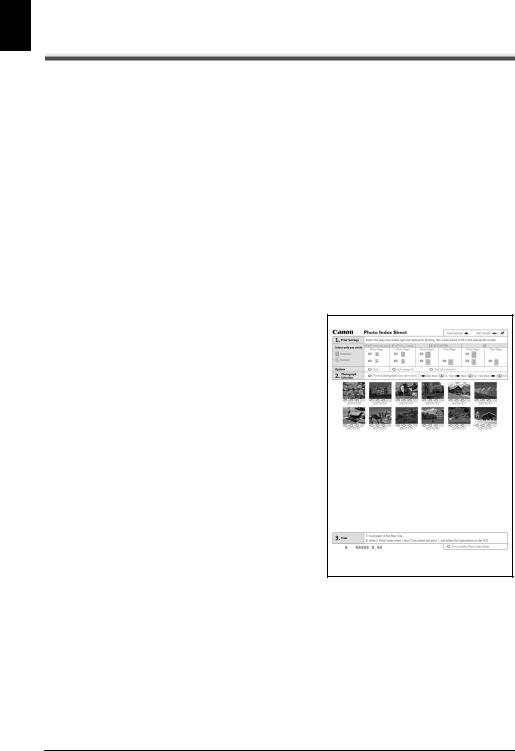
Printing by Using the Photo Index Sheet
1 Turn on the machine, and load A4 or Letter-sized plain paper.
2 Make sure that the proper paper source is selected.
3 Select Photo index sheet on the HOME screen, then press the OK button.
4 Make sure that Index sheet print is selected, then press the OK button.
5 Insert a memory card into the Card Slot.
See “Inserting the Memory Card” on page 15.
6 Select a range of images to include in the Photo Index Sheet, then press the OK button.
7 Press the Color button.
The Photo Index Sheet(s) will be printed.
8 Fill in the appropriate circles in the Photo Index Sheet.
9 Load paper as you specified in the Photo Index Sheet in the Rear Tray.
10 Make sure that Scan sheet and print is selected, then press the OK button.
11 Place the Photo Index Sheet face-down on the Platen Glass, then press the OK button.
18 |
Printing from a Memory Card |
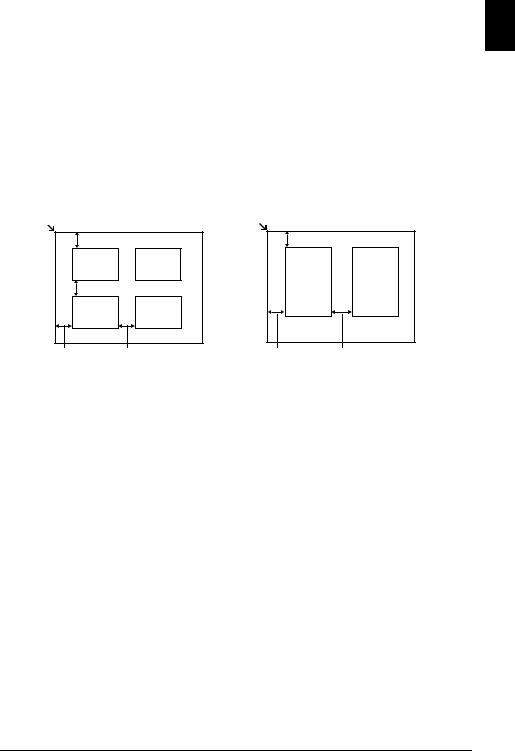
Photo Printing from Printed Photo
You can scan printed photos, specify the number of copies with viewing them on the LCD, and print them.
1 Turn on the machine.
2 Select Easy photo reprint on the HOME screen, then press the OK button.
3 Lift the Document Cover and load the photos on the Platen Glass.
Place the photos face down on the Platen Glass as follows.
Credit card-sized originals
0.4"/ 10 mm |
0.4"/ 10 mm |
0.4"/ 10 mm 0.4"/ 10 mm |
4"x 6"/ |
101.6 x 152.4 mm or |
|
5"x 7"/ |
127.0 x 177.8 mm originals |
|
0.4"/ 10 mm |
||
0.4"/ 10 mm |
0.4"/ 10 mm |
|
4 Gently close the Document Cover and press the OK button.
The photographs are scanned.
5 Load paper in the Rear Tray.
See “Loading Printing Paper” on page 9.
6 Select the print menu.
(1)Make sure that Select and print is selected, then press the OK button.
(2)Confirm the paper source, page size, media type, and other settings. To change the settings, select the item and press the OK button.
(3)Select Next, and then press the OK button.
7 Select the photo to print and specify the number of copies for each photo.
(1)Use the Easy-Scroll Wheel or the [ or ] button to display a photo to print.
(2)Press the [+] or [-] button to specify the number of copies.
(3)Repeat steps (1) and (2) to specify the number of copies for each photo.
(4)Press the OK button.
Photo Printing from Printed Photo |
19 |
ENGLISH
ENGLISH
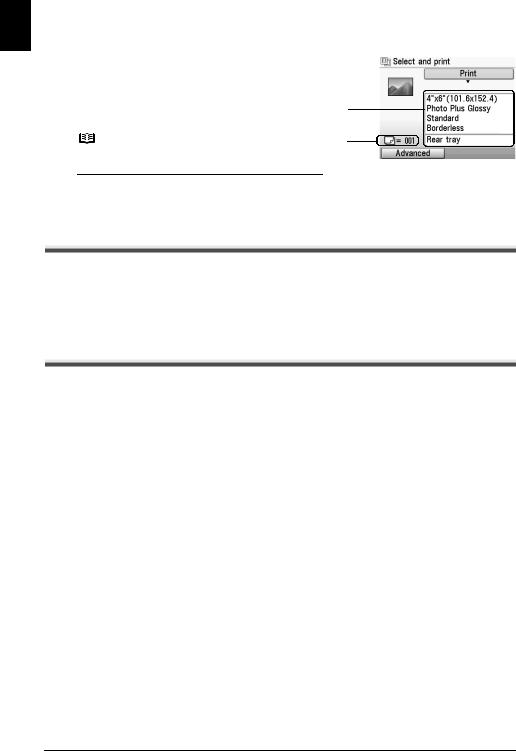
8 Start printing.
(1) |
Confirm the print setting. |
|
|
To change the settings, select the item and |
|
|
press the OK button. |
|
(2) |
Confirm the total number of copies for selected |
(1) |
|
photos. |
|
|
|
|
|
|
|
|
Note |
(2) |
For details on the function associated with Advanced, refer to the User’s Guide on-screen manual.
(3)Press the Color button to print in color, or the Black button to print in black & white. The specified number of copies of each photo will be printed.
Using Useful Printing Functions
Sticker print
Prints your favorite photo on Canon Photo Stickers to create your own stickers.
Print all photos
Prints all scanned photos.
Using Useful Display Functions
Change display
The display method of a photograph can be changed.
Trimming
Edits images displayed on the LCD by cropping them.
20 |
Photo Printing from Printed Photo |

Printing from Your Computer
This section describes procedure for basic printing.
Printing with Windows
1 Turn on the machine and load the paper in the machine.
2 Create a document or open a file to print using an appropriate application software.
3 Select Print on the application software’s File menu.
4 Make sure that Canon XXX Printer (where “XXX” is your machine’s name) is selected in
Select Printer, and click Preferences (or Properties).
ENGLISH
5 Specify the required settings and click OK.
You can change the paper source to be used with the printer driver as well as the Operation Panel on the machine. For details, refer to “Changing the Paper Source” in the User’s Guide on-screen manual.
Note
zIf you select Front for Plain Paper, the machine will automatically switch to the Front Tray when
Plain Paper is specified for Media Type. You cannot load paper other than A4, Letter, or B5-sized plain paper in the Front Tray.
zFor details on other printer driver functions, click Help or Instructions to view the online help or the PC Printing Guide on-screen manual. Instructions is only displayed when the on-screen manuals are installed.
6 Click Print (or OK).
Printing from Your Computer |
21 |
ENGLISH
Printing with Macintosh
1 Turn on the machine and load the paper in the machine.
2 Create a document or open a file to print using an appropriate application software.
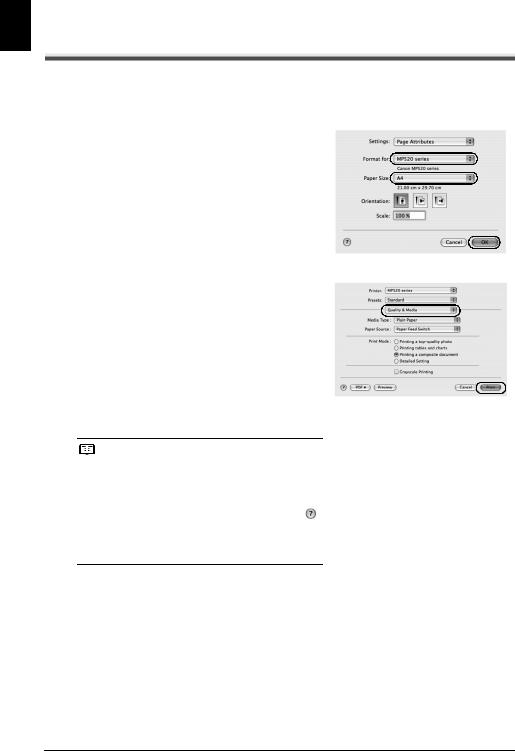
3 Select Page Setup on the application software’s File menu.
4 Make sure that your machine’s name is selected in Format for.
5 Select the page size of the loaded paper in
Paper Size.
6 Click OK.
7 Select Print on the application software’s File menu.
8 Select Quality & Media in the pop-up menu.
9 Specify the required settings.
You can change the paper source to be used with the printer driver as well as the Operation Panel on the machine. For details, refer to “Changing the Paper Source” in the User’s Guide on-screen manual.
Note
zIf you select Front for Plain Paper, the machine will automatically switch to the Front Tray when
Plain Paper is specified for Media Type. You cannot load paper other than A4, Letter, or B5-sized plain paper in the Front Tray.
zFor details on other printer driver functions, click
to view the PC Printing Guide on-screen manual. If the on-screen manuals are not installed, the PC Printing Guide on-screen manual is not displayed even if  is clicked.
10 Click Print.
22 |
Printing from Your Computer |

Scanning Images
You can scan images from the machine to a computer without printing them and save them in popular image types such as JPEG, TIFF, bitmaps, or PDF. If you are scanning printed text, you can use the OCR (Optical Character Recognition) software to convert it to text data.
Scanning Methods
You can select from the various scanning methods.
z If You Want to Scan Originals Easily From the Machine
You can scan originals by using the Operation Panel of the machine. See “Scanning Using the Operation Panel of the Machine” on page 23.
z If You Want to Edit or Print the Scanned Images
MP Navigator EX enables you to edit the scanned images, such as optimizing or trimming.
You can also start application software from MP Navigator EX to edit or print the scanned images.
For detailed operations of MP Navigator EX, refer to the Scanning Guide on-screen manual.
z If You Want to Scan Originals with Advanced Settings
ScanGear enables you to scan originals with advanced settings such as the resolution. For detailed operations of ScanGear, refer to the Scanning Guide on-screen manual.
Besides the above-mentioned methods, you can use a TWAINor WIA- (Windows Vista and Windows XP only) compliant application software and the Control Panel (Windows Vista and Windows XP only) to scan originals with this machine. For detailed operations, refer to the Scanning Guide on-screen manual.
Scanning Using the Operation Panel of the Machine
For details, refer to “Scanning Methods” in the User’s Guide on-screen manual.
1 (Macintosh only) Prepare your computer before scanning. This operation is not necessary for Mac OS X v.10.4.x.
For details, refer to “Scanning Methods” in the User’s Guide on-screen manual.
2 Turn on the machine.
3 Load the original document on the Platen Glass.
For scanning documents, refer to “Handling the Original Document” in the User’s Guide on-screen manual.
For scanning printed photos, see “Photo Printing from Printed Photo” on page 19.
4 Select Scan on the HOME screen, then press the OK button.
Scanning Images |
23 |
ENGLISH

ENGLISH
5 Select the document type, then press the OK button.
Important
Make sure that the document has been loaded correctly according to the document type that you have selected.
For details, refer to “Scanning Methods” in the User’s Guide on-screen manual.
6 Select the scan operation, then press the OK button.
7 Press the Color or Black button.
The operation to be performed after scanning the original depends on the scan operation setting you have selected in step 6. For details on how to modify the operation settings, refer to the Scanning Guide on-screen manual.
24 |
Scanning Images |

Printing Photographs Directly from a PictBridge Compliant Device
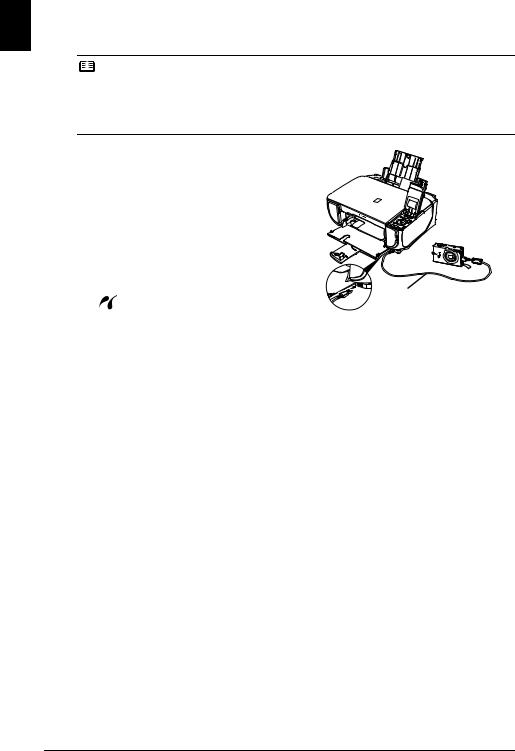
You can connect a PictBridge compliant device such as a digital camera, camcorder, or mobile phone using a USB cable recommended by the device’s manufacturer, and print recorded images directly without using a computer.
z Connectable Devices
PictBridge is an industry standard enabling a range of digital photo solutions, including the direct printing of photos from a digital still camera, camcorder or mobile phone* without the need to use a computer. A device can be connected to this machine for direct printing regardless of the manufacturer or the model as long as it complies with the PictBridge standard.
*PictBridge compliant digital still cameras, digital camcorders, and camera-equipped mobile phones are hereafter collectively referred to as “PictBridge compliant device”.
A device with this mark is PictBridge compliant.
z Printable Image Data Format
This machine prints images taken with a DCF (Design rule for Camera File system) ver. 1.0/2.0- compatible digital camera (Exif ver. 2.2/2.21 compliant), as well as PNG files.
Printing Photographs Directly from a PictBridge Compliant Device
To connect a PictBridge compliant device to this machine, use a USB cable recommended by the device’s manufacturer.
Warning
Do not connect any equipment other than PictBridge compliant devices or the optional Bluetooth Unit BU-20 to the Direct Print Port of the machine. If you do so, electric shock, fire, or damage to the machine could result.
Important
Never disconnect the USB cable during printing unless when explicitly allowed to by the PictBridge compliant device. When disconnecting the USB cable between the PictBridge compliant device and machine, follow the instructions given in the device’s instruction manual.
Note
When printing photos with the PictBridge compliant device connected to the machine, we recommend the use of the AC adapter supplied with the device. If you are using the device battery, be sure to charge it fully.
1 Prepare for printing.
(1)Turn on the machine.
(2)Load paper in the Rear Tray.
Note
When printing directly from a PictBridge compliant device, you can only use the Rear Tray as the paper source. Do not load paper in the Front Tray.
ENGLISH
Printing Photographs Directly from a PictBridge Compliant Device |
25 |
ENGLISH
2 Connect the PictBridge compliant device to the machine.
Note
Depending on the model or brand of your device, you may have to select a print mode compliant with PictBridge before connecting the device. You may also have to turn on the device or select Play mode manually after connecting the device to the machine.
Perform necessary operations on the PictBridge compliant device before connecting it to this machine according to instructions given in the device’s instruction manual.
(1)Make sure that the PictBridge compliant device is turned off.
(2) Connect the PictBridge compliant device to the machine using a USB cable recommended by the manufacturer of the device.
The device turns on automatically.
If your device does not turn on automatically, turn it on manually.
(3) Set up the PictBridge compliant device for |
|
direct printing. |
(2) |
will appear on the LCD of the device |
|
when the machine is correctly connected. |
|
3 Specify the print settings such as paper type and layout.
See “About PictBridge Print Settings” on page 27.
You can make settings using the menu on the LCD of your PictBridge compliant device. Select the size and type of paper that you loaded in the machine.
If your PictBridge compliant device does not have setting menu, change the setting from the machine. For details, see “Setting on the Machine” on page 29.
4 Start printing from your PictBridge compliant device.
26 |
Printing Photographs Directly from a PictBridge Compliant Device |
 Loading...