


Photo All-In-One
Foto todo en uno MP240 series
ENGLISH
ESPAÑOL
Getting Started
=Read Me First=
Guía de inicio
=Léame primero=
Make sure to read this manual before using the machine. Please keep it in hand for future reference.
Asegúrese de leer este manual antes de utilizar el equipo. Guárdelo para futuras consultas.

Contents
Contenido
Model Number: K10321(MP260)
Model Number: K10321(MP240)
Número de modelo: K10321(MP260)
Número de modelo: K10321(MP240)
■ Symbols
1 Remove the Protective Material
Retire el material protector
2 Turn the Power On
Encienda el equipo
3 Install the FINE Cartridges 


 Instale los cartuchos FINE (FINE Cartridges)


4 Install the Software
Instale el software
5 Loading Paper
Carga de papel
After Installing the Machine
Tras instalar el equipo
The following symbols are used to mark important instructions. Observe these instructions.
Instructions that, if ignored, could result in personal injury or material damage.
 Instructions that must be observed for safe operation.
 Additional explanations.
Descriptions for operations that take some time to complete.
■ Símbolos
Los siguientes símbolos se utilizan para indicar instrucciones importantes. Observe estas instrucciones.
Instrucciones, que si se ignoran, pueden provocar lesiones en las personas o daños materiales.
Instrucciones que deben seguirse para que el funcionamiento sea seguro.  Explicaciones adicionales.
Descripciones para operaciones que tardan en completarse.
For trademark information, refer to "Specifications" on page 32.
Si desea obtener información acerca de las marcas comerciales, consulte la sección "Especificaciones" en la página 33.
Remove the Protective Material |
1 |
2 |
3 |
4 |
5 |
|
1 Retire el material protector |
||||||
|
|
|
|
|
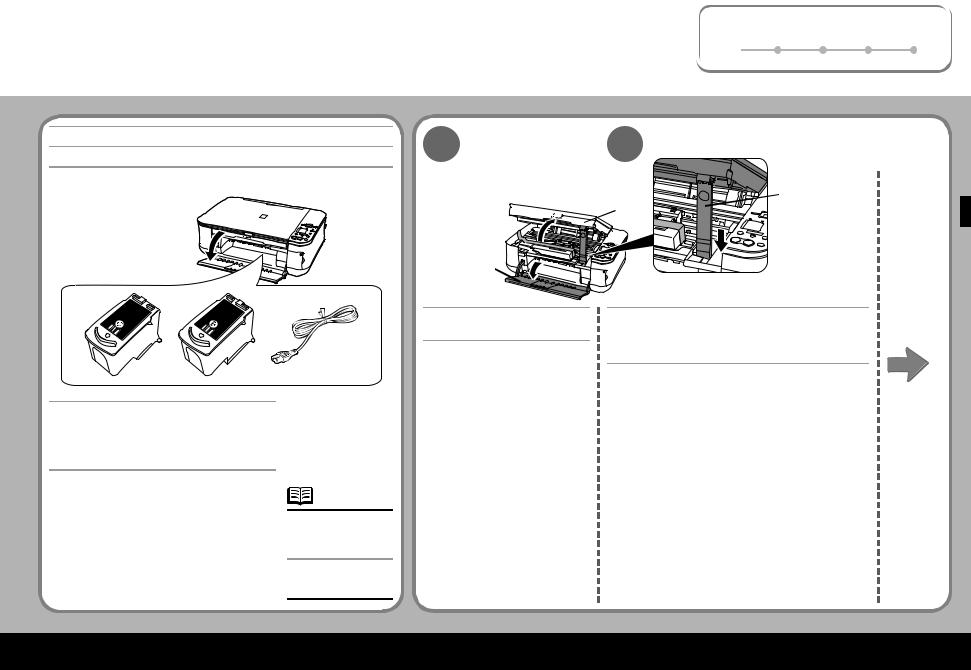
First, check the included items
En primer lugar, compruebe los elementos que se incluyen
•Manuals
•Setup CD-ROM (containing the drivers, applications and on-screen manuals)
•Warranty
•Manuales
•[Setup CD-ROM/CD-ROM de instalación] (contiene los controladores, aplicaciones y manuales en pantalla)
•Garantía
•A USB cable is necessary to connect the machine with your computer.
•Es necesario un cable USB para conectar el equipo al ordenador.
1 2
(C)
 (B)
(B)
(A)
Open the Paper Output Tray
(A).
Abra la Bandeja de salida del papel (A).
Lift the Scanning Unit (Cover) (B) until it locks into place.
The Scanning Unit Support (C) is fixed automatically.
Levante la Unidad de lectura (cubierta) (B) hasta que encaje en su sitio.
El Soporte de la unidad de lectura (C) se fija automáticamente.
1
|
Remove the Protective Material |
1 |
2 |
3 |
4 |
5 |
|
1 Retire el material protector |
|||||||
|
|
|
|
|
|||
3 |
(E) |
|
|
|
|
|
|
|
(B) |
(C) |
|
|
|
|
|
|
|
|
|
|
|
||
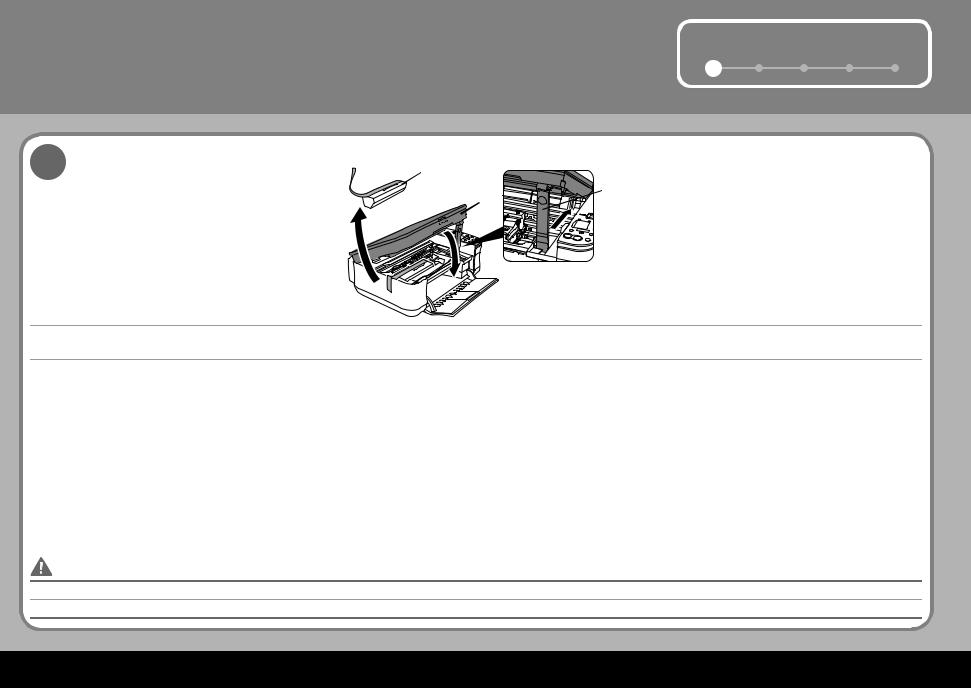
(D)
Pull the orange protective tape (D) and remove the protective material (E).
Then, lift the Scanning Unit (Cover) (B) slightly and fold the Scanning Unit Support (C), then gently close the Scanning Unit (Cover) (B).
Tire de la cinta protectora naranja (D) y retire el material protector (E).
A continuación, levante ligeramente la Unidad de lectura (cubierta) (B), doble el Soporte de la unidad de lectura (C) y, posteriormente, cierre suavemente la Unidad de lectura (cubierta) (B).
•Before turning on the machine, remove all the orange tapes and the protective sheets.
•Antes de encender el equipo, retire todas las cintas naranja y láminas protectoras del mismo.
2
Turn the Power On |
|
|
1 |
2 |
3 |
4 |
5 |
2 Encienda el equipo |
|
|
|||||
2 |
|
3 |
|
|
|
|
|
1 |
(A) |
|
|
(C) |
|
||
|
|
|
|
|
|
||
(2) |
|
|
|
|
|
|
|
|
|
(B) |
|
|
|
|
|
(1) |
|
|
|
|
|
|
|
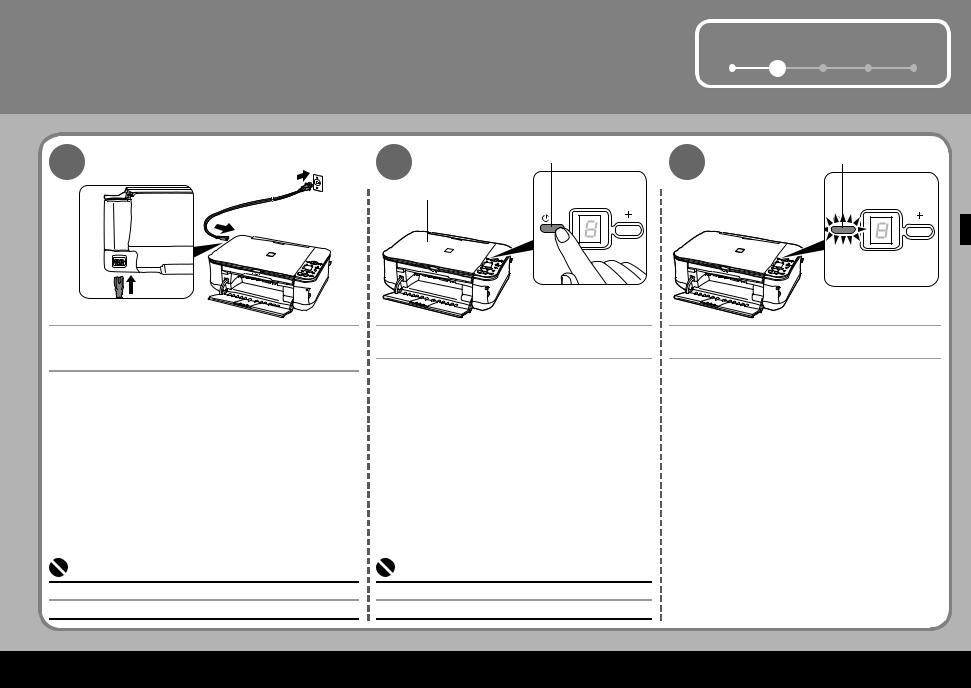
Plug in the power cord on the left side of the machine and connect the other end to the wall outlet.
Conecte el cable de alimentación en la parte izquierda del equipo y conecte el otro extremo al enchufe de la pared.
Press the ON button (A) to turn on the machine.
Pulse el botón [ON] (ENCENDER) (A) para encender el equipo.
Confirm that the POWER lamp (C) lights green.
Compruebe que la lámpara de ENCENDIDO (C) está iluminada en color verde.
•Do NOT connect the USB cable at this stage.
•NO conecte el cable USB en este punto.
•Make sure that the Document Cover (B) is closed.
•Asegúrese de que la Cubierta de documentos (B) está cerrada.
3

3 Install the FINE Cartridges
Instale los cartuchos FINE (FINE Cartridges)
•Do not handle the FINE Cartridges roughly such as applying them excessive pressure or dropping them.
•No maneje los cartuchos FINE (FINE Cartridges) bruscamente: intente no exponerlos a una presión excesiva y evite que se caigan.
•Be sure to use the supplied FINE Cartridges.
•Asegúrese de utilizar los cartuchos FINE (FINE Cartridges) que se suministran.
1 |
(A) |
(D) |
|
|
(E)
Lift the Scanning Unit (Cover) (A) until it locks into place.
The Scanning Unit Support (D) is fixed automatically. The FINE Cartridge Holder (E) comes out to the center. (This is where you install the cartridges.)
Levante la Unidad de lectura (cubierta) (A) hasta que haga tope.
El Soporte de la unidad de lectura (D) se fija automáticamente. El Contenedor del cartucho FINE (FINE Cartridge) (E) se desplaza hacia el centro. (Es ahora cuando debe instalar los cartuchos.)
•If the FINE Cartridge Holder returns to the right, close the Scanning Unit (Cover) and reopen it.
•If the FINE Cartridge Holder does not come out to the center, make sure that the power is turned on.
•Si el Contenedor del cartucho FINE (FINE Cartridge) vuelve a la derecha, cierre la Unidad de lectura (cubierta) y ábrala de nuevo.
•Si el Contenedor del cartucho FINE (FINE Cartridge) no se desplaza hacia el centro, compruebe que el equipo está encendido.
1 |
2 |
3 |
4 |
5 |
|
|
|
|
|
2 |
3 |
(F) |
|
|
(G) |
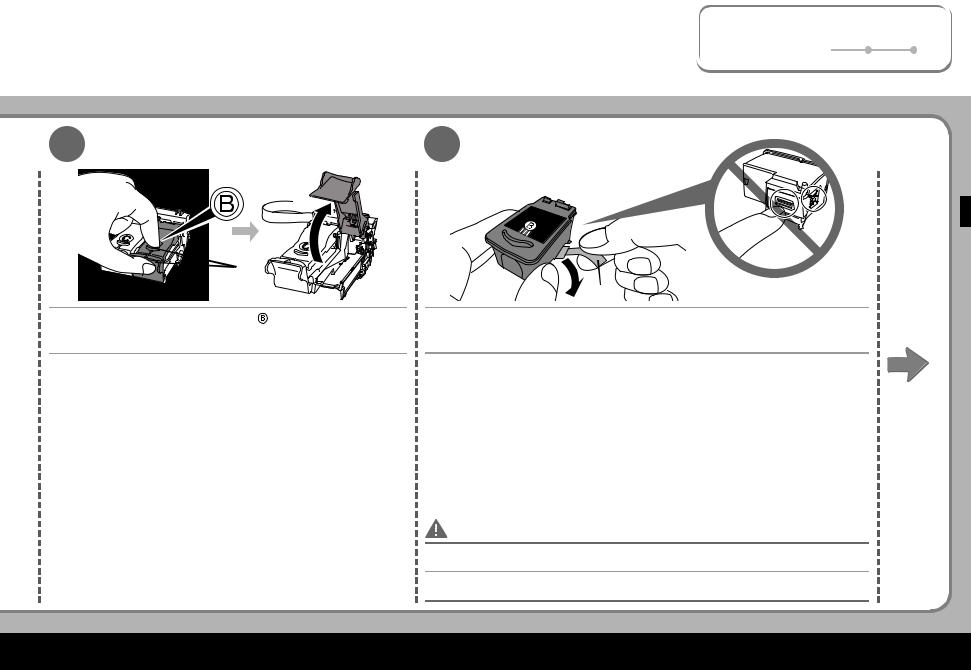
Open the Ink Cartridge Locking Cover ( ) on the right side. |
After removing the Black FINE Cartridge from its box, pull the orange protective |
|
tape (G) in the direction of the arrow and remove it gently. |
Pinch (F) firmly and pull up the cover.
Abra la Cubierta de bloqueo del cartucho de tinta ( ) situada a la derecha.
Sujete firmemente (F) y levante la cubierta.
Una vez que haya extraído el Cartucho FINE (FINE Cartridge) negro de su envoltorio, tire de la cinta protectora naranja (G) en la dirección que indica la flecha y retírela suavemente.
•Be careful not to stain your hands or surrounding work area with ink on the removed protective tape.
•Tenga cuidado de no mancharse las manos ni los elementos que tenga a su alrededor con la tinta de la cinta protectora que ha quitado.
5

|
Install the FINE Cartridges |
3 Instale los Cartuchos FINE (FINE Cartridges) |
|
4 |
5 |
Place the Black FINE Cartridge ( ) into the right slot (
 ).
).
Coloque el Cartucho FINE (FINE Cartridge) negro ( ) en la ranura derecha (
 ).
).
•Do not knock the FINE Cartridge against the sides of the holder.
•Also be sure to install it in a well-lit environment.
•No golpee el Cartucho FINE (FINE Cartridge) contra los laterales del contenedor.
•Asegúrese también de instalarlo en un entorno bien iluminado.
Push down (  ) until you hear a click to close the Ink Cartridge Locking Cover (
  ) completely.
View the Ink Cartridge Cover ( ) straight on and check that it is locked correctly (not at an angle). Insert the Color FINE Cartridge (
 ) into the left slot (
 ) in the same way.
Empuje (  ) hasta que oiga un clic para cerrar completamente la Cubierta de bloqueo del cartucho de tinta (
 ).
).
Compruebe que la Cubierta del cartucho de tinta (  ) está recta y que está bien cerrada (que no forma un ángulo).
Inserte el Cartucho FINE (FINE Cartridge) de color ( ) en la ranura izquierda (
 ) de la misma forma.
•Install the Black cartridge into the right holder, and the Color one into the left holder.
•Instale el cartucho negro en el contenedor derecho y el de color en el izquierdo.

1 |
2 |
3 |
4 |
5 |
|
|
|
|
|
6 |
|
(D) |
(H) |
|
|
(A) |
|
(I)
Lift the Scanning Unit (Cover) (A) slightly and fold the Scanning Unit Support (D), then gently close the Scanning Unit (Cover) (A).
Levante ligeramente la Unidad de lectura (cubierta) (A), doble el Soporte de la unidad de lectura (D) y, a continuación, cierre suavemente la Unidad de lectura (cubierta) (A).
• Wait until "1" appears on the LED (H) (about 1-2 minutes) and go to the next step.
• Espere a que aparezca "1" en el LED (H) (aproximadamente 1-2 minutos) y continúe con el paso siguiente.
•Once you have installed the FINE Cartridges, do not remove them unnecessarily.
•Cuando haya instalado los Cartuchos FINE (FINE Cartridges), no los extraiga si no es necesario.
•If the Alarm lamp (I) lights orange, make sure that the FINE Cartridges are correctly installed.
•Si la Lámpara de Alarma (I) se enciende de color naranja, compruebe que los Cartuchos FINE (FINE Cartridges) están instalados correctamente.
7
4 |
Install the Software |
Instale el software |
To use the machine by connecting it to a computer, software including the printer driver needs to be copied (installed) to the computer's hard disk.
The screens below are based on Windows Vista operating system Ultimate Edition (hereafter referred to as "Windows Vista") and Mac OS X v.10.5.x.
Para utilizar este equipo conectándolo a un ordenador, es necesario copiar (instalar) en el disco duro del ordenador el software que contiene el controlador de la impresora.
Las pantallas siguientes se basan en el sistema operativo Windows Vista Ultimate Edition (en adelante, "Windows Vista") y Mac OS X v.10.5.x.
•Quit all running applications before installation.
•You need to log on as the administrator (or a member of the Administrators group).
•Do not switch users during the installation process.
•It may be necessary to restart your computer during the installation process. Follow the on-screen instructions and click OK, and do not remove the Setup CD-ROM during restarting.
The installation resumes from where it left off when your computer has been restarted.
•Mac OS 9, Mac OS X Classic environments, or Mac OS X v.10.3.8 or earlier are not supported.
•Antes de comenzar la instalación, salga de todas las aplicaciones que estén en ejecución.
•Debe iniciar sesión como administrador (o como un miembro del grupo de administradores).
•No intercambie usuarios durante el proceso de instalación.
•Probablemente sea necesario reiniciar el ordenador durante el proceso de instalación. Siga las instrucciones que aparecen en pantalla, haga clic en [OK/Aceptar] y no extraiga el [Setup CD-ROM/CD-ROM de instalación] durante el reinicio.
La instalación se reanudará desde el punto en que se quedó cuando se tuvo que reiniciar el ordenador.
•Los entornos Mac OS 9, Mac OS X Classic, o los entornos Mac OS X v.10.3.8 o anteriores no son compatibles.
Windows :
Go to page 9
Consulte la página 9
Macintosh :
Go to page 17
Consulte la página 17
Windows |
1 |
2 |
3 |
4 |
5 |
|
|
|
|
|
|
|
|
|
|
|
|
If the Found New Hardware or Found New Hardware Wizard screen appears:
Si aparece la pantalla [Found New Hardware/Nuevo hardware encontrado] o [Found New Hardware Wizard/Asistente para hardware nuevo encontrado]:
1 |
Remove the USB cable connected to your computer. |
The screen may close. In this case, proceed from . |
|
|
Desconecte el cable USB del ordenador. |
|
Es posible que la pantalla se cierre automáticamente. En ese caso, continúe a partir |
|
de . |
2 |
Click Cancel to quit the screen. |
Haga clic en [Cancel/Cancelar] para salir de la pantalla. |
|
3 |
Proceed from . |
Continúe a partir de . |
1 |
(A) |
|
Press the ON button (A) to TURN OFF THE MACHINE.
Pulse el botón [ON] (ENCENDER) (A) para APAGAR EL EQUIPO.
•Operating noise continues for about 25 seconds until the machine turns off. Make sure that the POWER lamp stops fl ashing.
•El ruido de funcionamiento durará aproximadamente 25 segundos hasta que se desconecte el equipo. Compruebe que la Lámpara de ENCENDIDO está apagada.
9
 Loading...