


 Loading...
Starter Guide
Please read this guide before operating this product.
After you finish reading this guide, store it in a safe place for future reference.
ENG

Set Up the Machine
Unpacking the Machine
Remove all shipping tape and packing material from the machine.
Remove the vinyl-tie and label attached on the metal plate in each paper cassette.
Before Setting Up the Machine
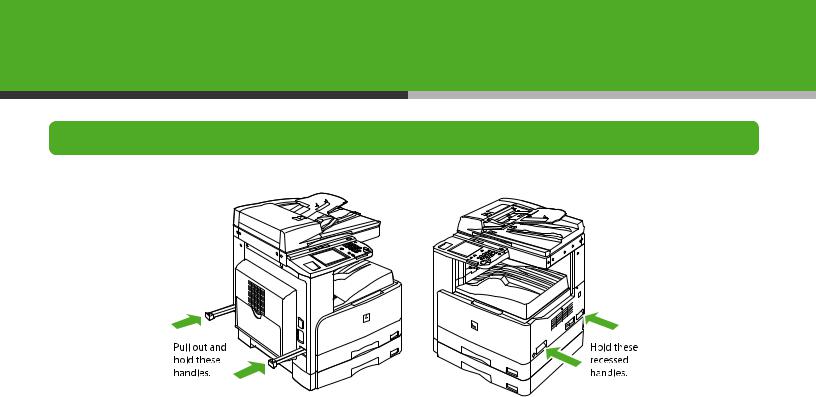
● When carrying the machine, be sure that it is carried by two or more people holding the parts indicated below.
● The shapes of your machine and supplies may differ slightly from those illustrations listed in this manual.
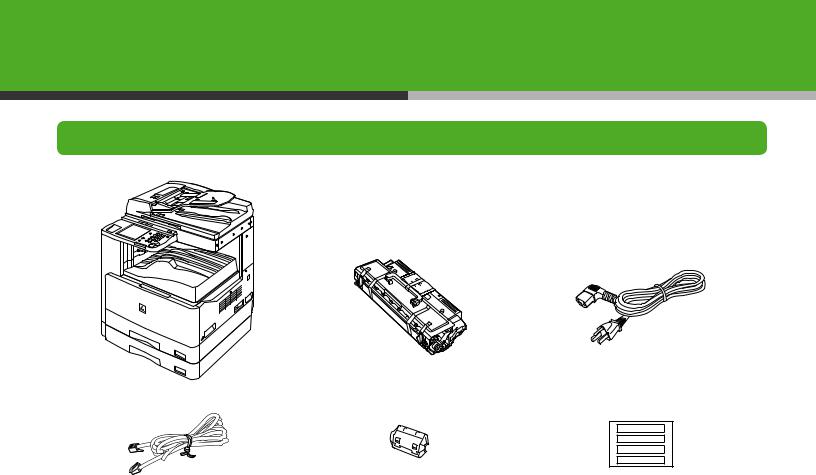
Do You Have Everything?
● Machine |
● Cartridge |
● Power Cord |
● Telephone Cable |
● Ferrite Core for USB Cable |
● Document Size Label |
● Starter Guide |
● Limited Warranty Notice |
● Paper Size Label |
● Basic Operation Guide |
● Cartridge Warranty Notice |
● Stamp Cartridge |
● UFRII LT/FAX User Software CD-ROM |
● Registration Card |
● Tweezers |
● PCL User Software CD-ROM* |
|
|
● Manual CD-ROM |
|
|
|
|
* MF7480/MF7470 only |

Manuals for the Machine
●Starter Guide (This Document): Machine set-up and software installation
●Basic Operation Guide: Basic features, maintenance, trouble shooting, and specifications
●Reference Guide (located on the Manual CD-ROM): Total operation features, network and remote user interface, system settings, reports and lists, and trouble shooting
●Color Network ScanGear User’s Guide (located on the User Software CD-ROM): Color Network ScanGear installation and instructions
●PCL Driver Guide (MF7480/MF7470 only. Located on the User Software CD-ROM): PCL printer driver installation and instructions
●UFR II Driver Guide (located on the User Software CD-ROM): UFRII LT printer driver installation and instructions
●Fax Driver Guide (located on the User Software CD-ROM): Fax driver installation and instructions
Assistance:
If you have a problem with your machine and you cannot solve it by referring to the manuals listed above, please contact our Canon Authorized Service Facilities or the Canon Customer Care Center at 1-800-828-4040 between the hours of 8:00 A.M. to 8:00 P.M. EST Monday through Friday and 10:00 A.M. to 8:00 P.M. on Saturday.
Install Cartridge
1
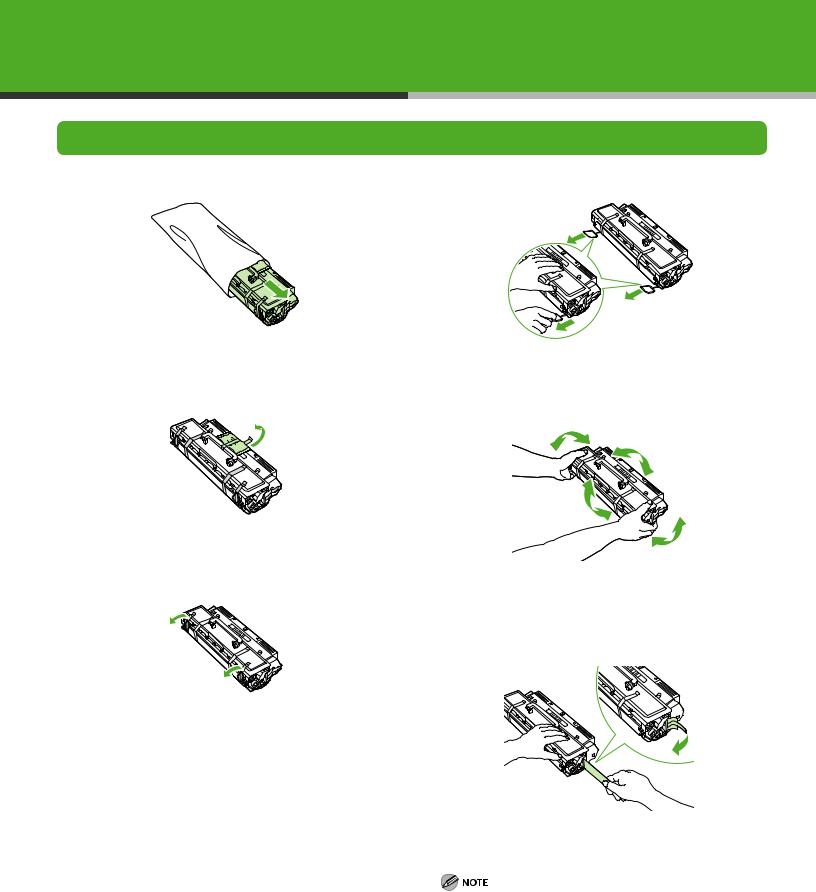
Remove the cartridge from the bag.
2
Remove the desiccant bag and the shipping tape.
3
Remove the short shipping tape.
4
Remove the packing materials.
5
Gently rock the cartridge several times to evenly distributed the toner inside.
6
Place the cartridge on a flat surface and pull the seal completely out.
Do not pull out the seal at an angle.
|
|
|
|
7 |
10 |
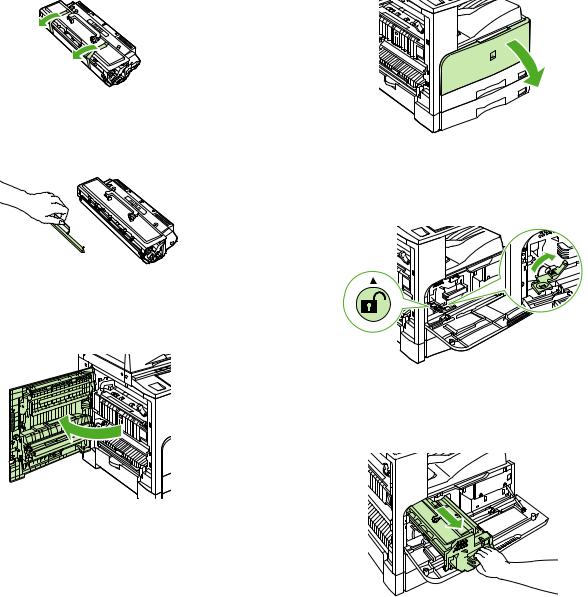
Remove the long shipping tape.
8
Remove the protective cover.
9
Push the release button on the left cover of the main unit to open the left cover.
Open the front cover.
11
Rotate the unlock lever until it clicks.
12
While grasping the handle of the cartridge holder, pull the cartridge holder out of the machine until it stops.

13 |
16 |
Hold the cartridge by its handle, then insert it into the cartridge holder.
14
Push the cartridge holder into the machine as far as it will go.
15
Rotate the lever to the locked position.
Close the front cover.
Be careful not to get your fingers caught.
17
Gently close the left cover until it clicks.
Be careful not to get your fingers caught.

Load Paper
1 |
4 |
Pull out the paper drawer until it stops.
2
Push down the metal plate to lock.
If you load LTR size paper, go to step 6, or otherwise go to step 3.
3
Detach the end guide (A) by pressing it down. Reattach the end guide into the desired paper size slots and tilt it backwards to its original upright position.
Lift the lock lever on the side guide to the upright position and slide the side guide to the groove marked for the desired paper size.
5
Lower the lock lever to the left to lock the side guide.
Be sure to set the lock lever correctly. If the lock lever is positioned incorrectly, the wrong paper type will be shown on the touch panel display. This may also cause paper jams, dirty prints, etc.
6
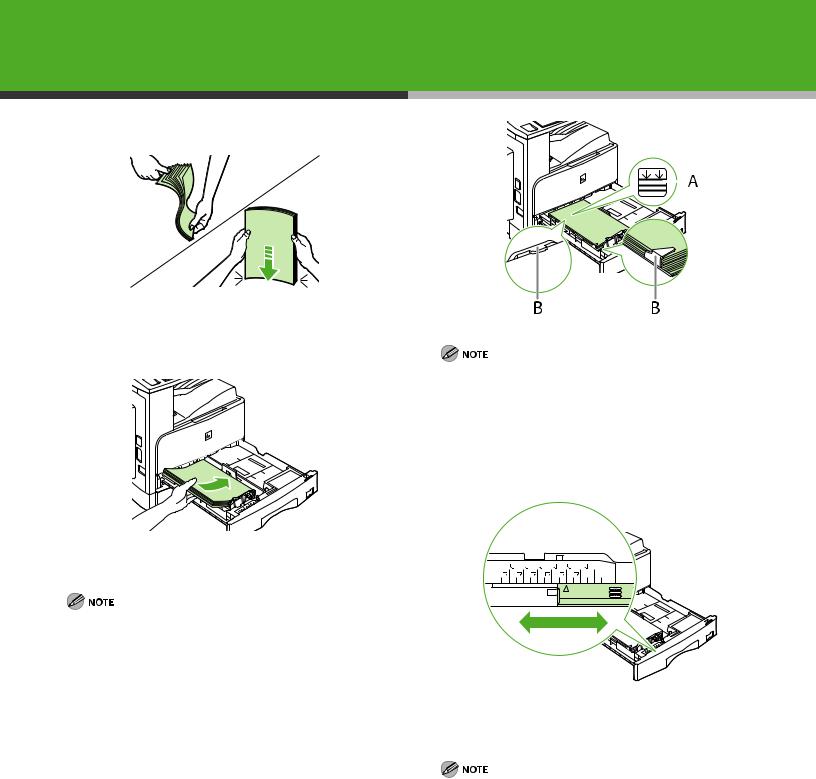
Fan the paper stack and even the edges.
7
–Make sure the paper stack does not exceed the load limit mark (A) and it is loaded under the small fins (B) on the paper guides.
–Each paper drawer holds approximately 250 sheets of paper (22 lb bond (80 g/m2)).
8
Load the paper stack of the appropriate size with the print side facing up.
When loading paper, be careful not to cut your fingers at the edges of the paper.
A4 |
A5 |
B5 |
LGL |
LTR |
STMT |
|
U2 |
|
A3 |
A4 |
B4 |
B5 |
11X17 |
|
LTR |
U1 |
U3 |
Set the paper-size detecting lever, located on the left side of the paper drawer, to match the size of the paper being loaded.
Be sure to set the paper-size detecting lever correctly. If the lever is positioned incorrectly, the wrong paper type will be shown on the touch panel display. This may also cause paper jams, dirty prints, etc.
9 |
12 |
Pull out the paper size plate (A) from the paper drawer.
10
Stick the appropriate paper size label on the paper size plate.
11
Reinsert the paper size plate into the paper drawer.
Push the paper drawer into the machine as far as it will go.
–Be careful not to get your fingers caught.
–For loading paper in the stack bypass, see Chapter 2, “Original and Paper,” in the Reference Guide.
10
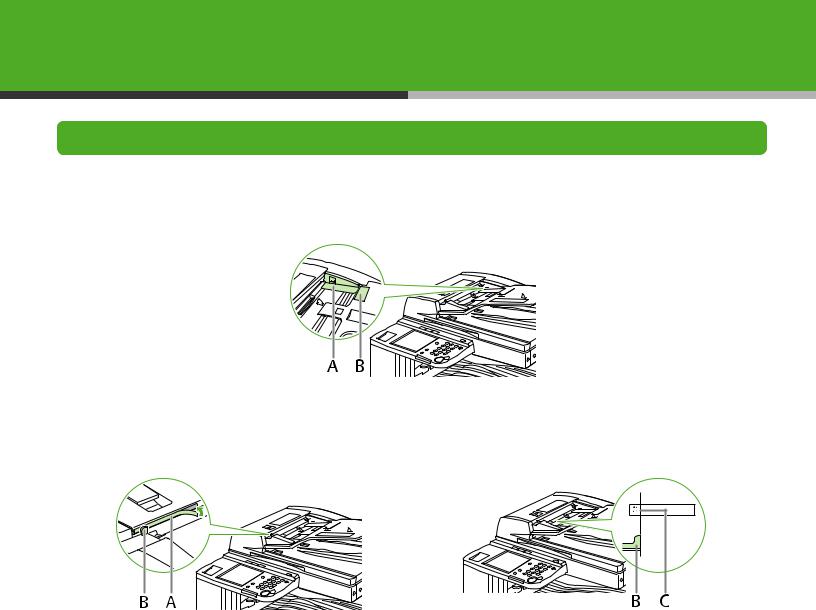
Affix Labels
Affix the supplied document size label to the specified location.
1
Align the slide guide (A) to the original size mark “A4/A3” (B).
2
Affix the document size label (A) to the feeder cover so that both indicators (B and C) on the side guide and the document size label are aligned properly, as shown on the right.
11
Loading...