


 Loading...
Overview of Machine Functions
Set Up the Machine to Suit Your Purposes
Set Up the Machine
Make Fax Settings
Set Up Network Connection (MF4370dn Only)
Set Up Computers and Software
Appendix
Please read this guide before operating this product.
After you finish reading this guide, store it in a safe place for future reference.

 Contents
|
Overview of Machine Functions..................................................................................................................... |
1 |
|
Available Features............................................................................................................................................................. |
1 |
1 Set Up the Machine to Suit Your Purposes................................................................................................... |
2 |
|
2 Set Up the Machine........................................................................................................................................... |
3 |
|
|
Items Included with the Machine............................................................................................................................... |
3 |
|
MF4370dn................................................................................................................................................................................. |
3 |
|
MF4350d.................................................................................................................................................................................... |
3 |
|
Items for All Models............................................................................................................................................................... |
4 |
|
Installation Space................................................................................................................................................................... |
4 |
|
Manuals for the Machine..................................................................................................................................................... |
5 |
|
Install Toner Cartridge..................................................................................................................................................... |
5 |
|
Set Up Paper Cassette and Load Paper..................................................................................................................... |
8 |
|
For MF4370dn.......................................................................................................................................................................... |
8 |
|
For MF4350d.......................................................................................................................................................................... |
10 |
|
Connect Power Cord and Turn On the Machine.................................................................................................. |
12 |
3 |
Make Fax Settings........................................................................................................................................... |
13 |
|
Connect Telephone Cables.......................................................................................................................................... |
13 |
|
Register User Telephone Number and Unit Name.............................................................................................. |
14 |
|
Information About the Keys............................................................................................................................................. |
14 |
|
About Sender Information................................................................................................................................................ |
15 |
|
Set Date and Time........................................................................................................................................................... |
16 |
|
Select the Receive Mode that Suits Your Needs................................................................................................... |
17 |
|
About the Receive Modes................................................................................................................................................. |
17 |
|
If You Need to Use Pulse Dialing..................................................................................................................................... |
19 |
4 Set Up Network Connection (MF4370dn Only)......................................................................................... |
20 |
|
|
Connect the LAN Cable................................................................................................................................................. |
20 |
|
Compatible LAN Cables..................................................................................................................................................... |
20 |
|
Connect the Machine to Network............................................................................................................................. |
21 |
|
Specify the IP Address Settings.................................................................................................................................. |
21 |
|
Automatic Setting................................................................................................................................................................ |
21 |
|
Check IP Address Setting................................................................................................................................................... |
21 |
|
Manual Setting...................................................................................................................................................................... |
22 |
5 Set Up Computers and Software.................................................................................................................. |
23 |
|
|
Types of Connection between Computers and the Machine......................................................................... |
23 |
|
Network Connection........................................................................................................................................................... |
23 |
|
USB Connection.................................................................................................................................................................... |
23 |
|
About User Software CD-ROM................................................................................................................................... |
24 |
|
Network Connection (MF4370dn Only).................................................................................................................. |
26 |
|
MF Drivers Installation........................................................................................................................................................ |
26 |
|
Color Network ScanGear Installation............................................................................................................................ |
28 |
|
Check Installation................................................................................................................................................................. |
30 |
|
USB Connection............................................................................................................................................................... |
31 |
|
MF Drivers & MF Toolbox Installation............................................................................................................................ |
31 |
|
Check Installation................................................................................................................................................................. |
34 |
6 |
Appendix.......................................................................................................................................................... |
35 |
|
User Manual CD-ROM (e-Manual)............................................................................................................................. |
35 |
System Requirements......................................................................................................................................................... |
35 |
Using the User Manual CD-ROM (e-Manual).............................................................................................................. |
36 |

Overview of Machine Functions
This manual describes how to set the required settings to set up the machine and install the software. After you set up the machine, you can use the functions described in the illustration bellow.
For the details of each function, refer to the Basic Operation Guide and e-Manual.
Illustrations used in this manual are the model MF4370dn. When there is any difference between MF4370dn and MF4350d, it is clearly indicated in the text, e.g., “For MF4370dn.”
For information on the standard features for each model, see “Available Features,” shown below.
The display used in this manual is the factory preset display for the MF4370dn in default setting. Depending on the system configuration and product purchased, the appearance of the display may differ.
Available Features
The table below shows the available features on a product basis.
 : available
—: not available
COPY |
SCAN |
FAX |
Remote UI |
Simplex ADF |
||
(Network Board) |
||||||
|
|
|
|
|
imageCLASS |
|
|
MF4370dn |
|
|
imageCLASS |
— |
|
MF4350d |
||
|

1 Set Up the Machine to Suit Your Purposes
Determine which machine functions (Copy, Fax, Print, PC Print, PC Fax, Scan, Remote UI) you intend to use, and make the settings according to the flowchart below.
For example, when you use copy function only, follow “Required Settings.”When you use both copy and fax functions, follow “Required Settings” and “Fax Settings.”
p. 5 p. 8 p. 12
p. 13 |
|
|
p. 14 |
p. 21 |
p. 31 |
p. 16 |
p. 21 |
p. 32 |
p. 17 |
|
|
|
p. 26 |
|


 (See “Connect Telephone Cables,” on p. 13.)
2 Set Up the Machine
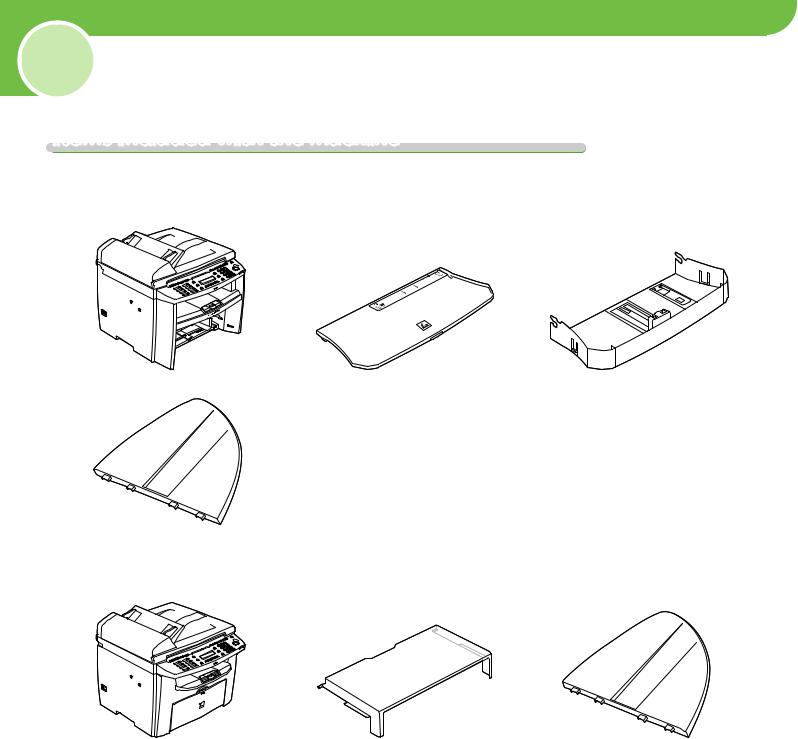
Items Included with the Machine
MF4370dn
●Machine |
●Dust Cover |
●Paper Cassette |
●Document Feeder Tray
MF4350d
●Machine |
●Dust Cover (enclosed in the machine) |
●Document Feeder Tray |
2 Set Up the Machine
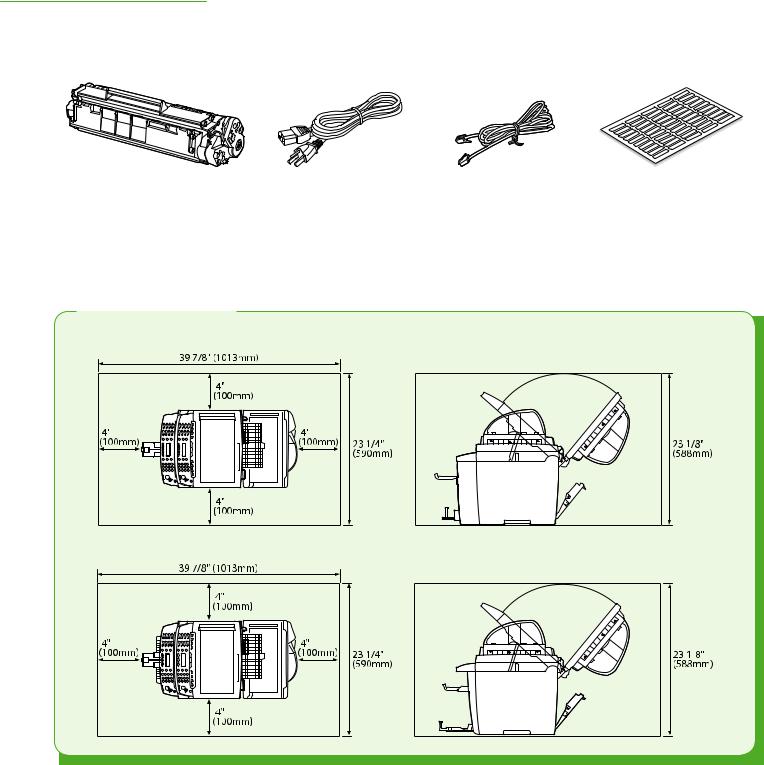
Items for All Models
●Toner Cartridge |
●Power Cord |
●Telephone Cable |
●Destination Labels |
●Starter Guide (This Document)
●Basic Operation Guide
●User Manual CD-ROM
●User Software CD-ROM
●Limited Warranty Notice
●Registration Card
Installation Space
● MF4370dn
● MF4350d
2 Set Up the Machine
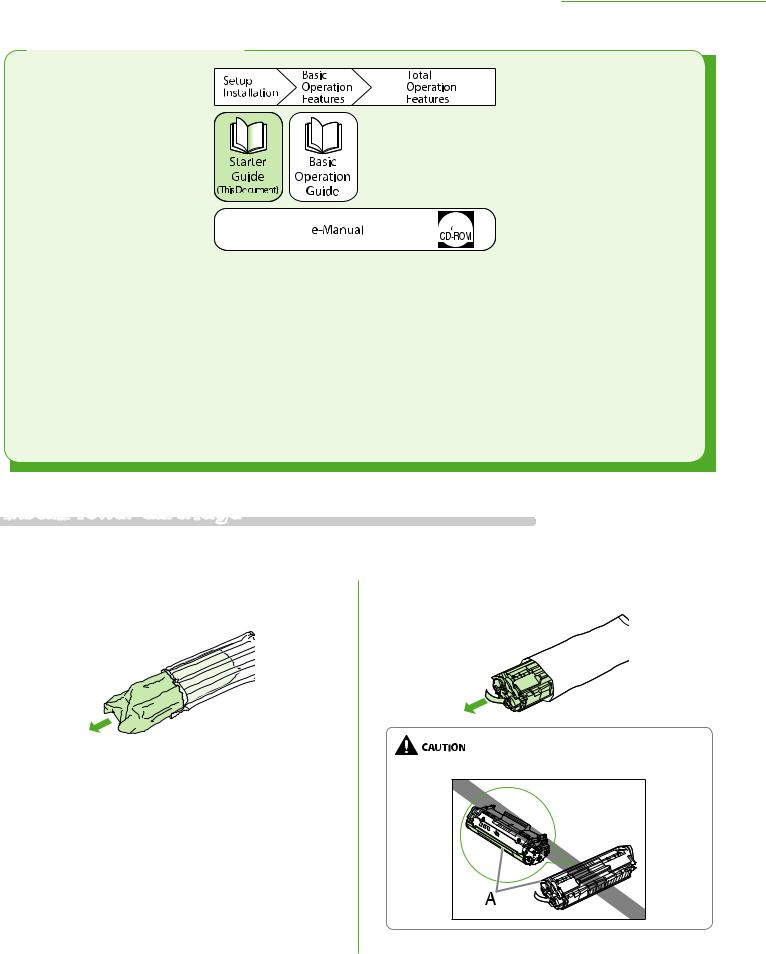
Manuals for the Machine
●Starter Guide (This Document):
The Starter Guide contains the machine setup and software installation. Read this guide before operating this product.
●Basic Operation Guide:
The Basic Operation Guide contains the basic operation features.
●e-Manual (located on the User Manual CD-ROM):
The e-Manual is a web browser-based manual that you can see on your computer. This guide contains total operation features. (Also includes the Starter Guide contents and the Basic Operation Guide contents.)
Install

 Toner Cartridge
This section describes the installation procedure for the toner cartridge.
1 Take out the bag of the toner cartridge from the cushioning material.
2 Take out the toner cartridge from the bag.
Do not open the drum protective shutter (A).
2 Set Up the Machine
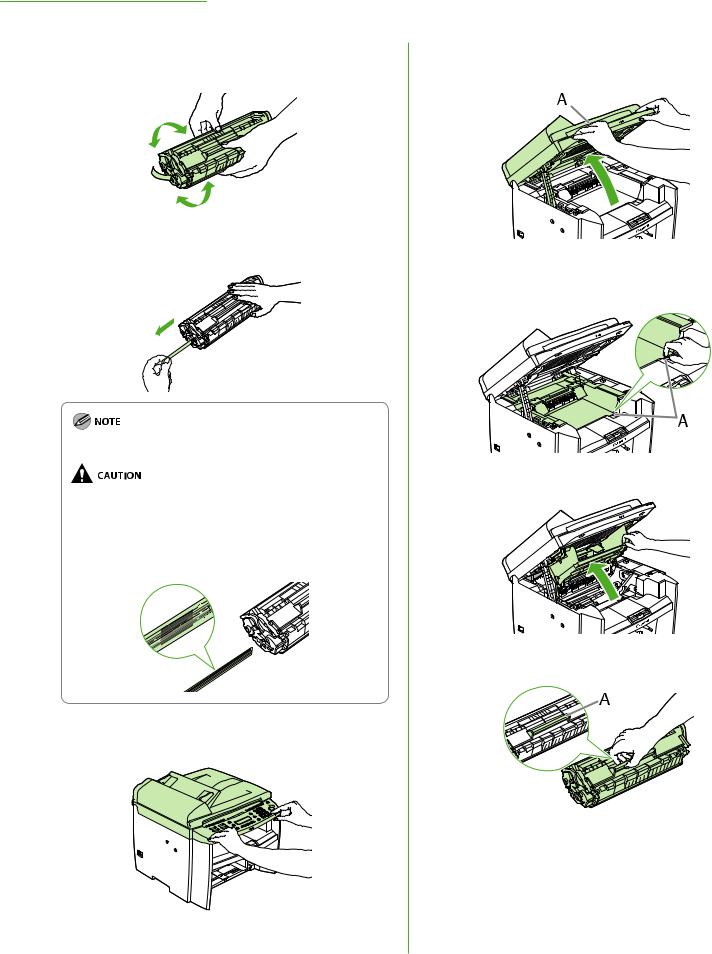
3 Gently rock the toner cartridge several times to evenly distribute the toner inside.
4 Place the toner cartridge on a flat surface and pull the seal completely out.
Do not pull the seal out at an angle.
–If toner is adhered on the removed seal, be careful that your hands or clothes do not get dirty from touching the toner.
–If your hands or clothes get dirty from touching the toner, wash them immediately in cold water. Do not use hot water. If you do, the toner may be set permanently.
5 Hold the front side of the operation panel with your hands.
6 Lift the scanning platform (A) until it is locked. (You will hear an audible “click.”)
7 Hold the grip (A) on the right front side of the toner cover.
8 Open the toner cover.
9 Hold the toner cartridge by its handle (A).
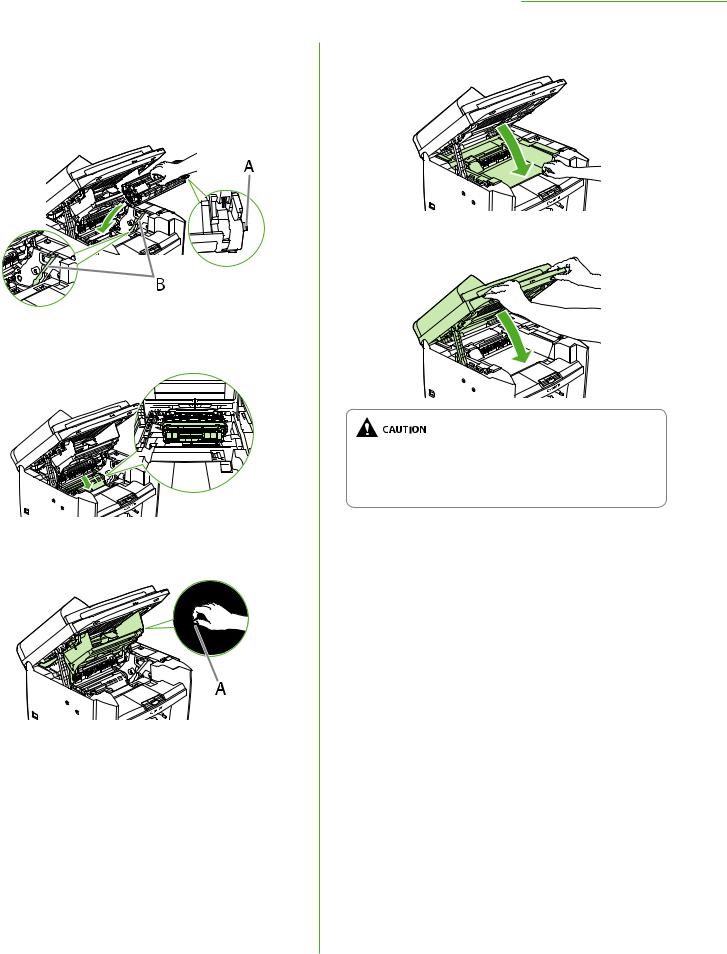
10 Insert the toner cartridge so that the protrusion on the right side of the toner cartridge (A) fits into the guide (B) located on the right side of the machine and slide it down parallel to the guide.
11 Push the toner cartridge to make sure it is properly set in the machine.
12 Hold the grip (A) on the right front side of the toner cover.
2 Set Up the Machine
13 Close the toner cover.
14 Lower the scanning platform.
–Be careful not to get your fingers caught.
–If you cannot close the toner cover, do not force it to close. Open the cover and make sure the toner cartridge is properly set in the machine.
2 Set Up the Machine
Set Up Paper Cassette and Load Paper
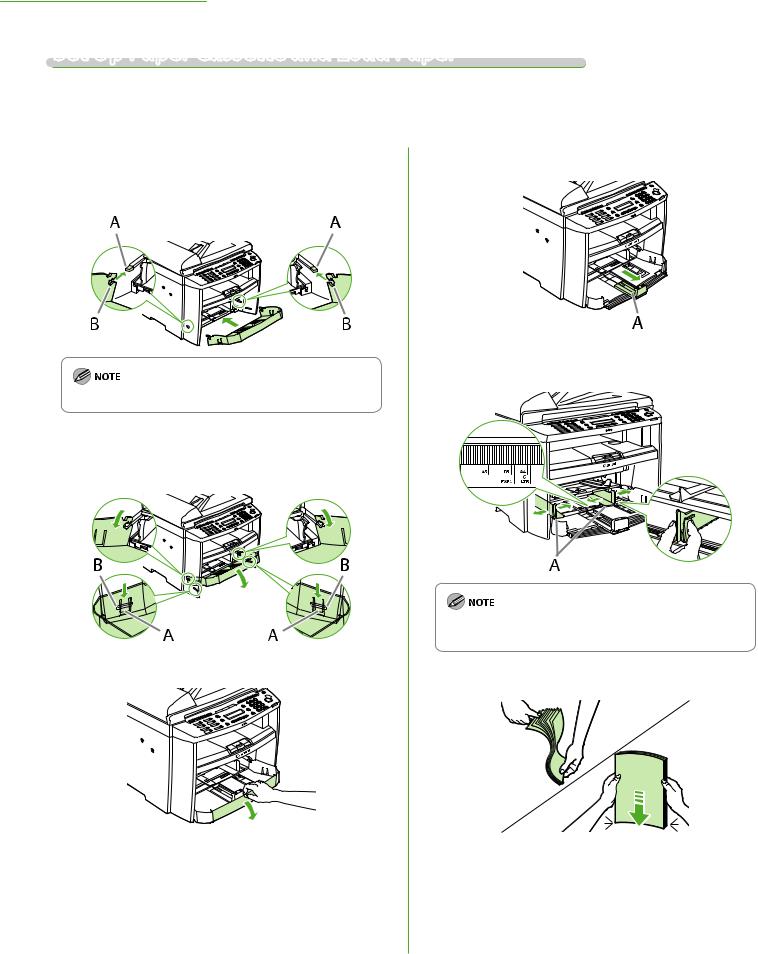
For MF4370dn
1 Align the guides (B) on the both edges of the paper cassette to the protrusions (A) inside the machine.
Install the paper cassette with the front end tilted upwards.
2 Push the paper cassette down until the hooks
(A) on both sides of the paper cassette engage the protrusions (B) inside the machine.
3 Open the front panel of the paper cassette.
4 Slide out the paper guide rail (A).
5 Slide the side paper guides (A) to match the size of paper.
If the paper guides do not fit the size of the paper, the printout may be skewed.
6 Fan the paper stack and even the edges.
7 Load the paper into the paper cassette with the print side up. Make sure the paper stack sits below the small fin (A) on the side paper guide.
8 Adjust the paper guide rail to match the size of paper.
9 Close the front panel of the paper cassette.
To load Legal-size paper, leave the front panel of paper cassette open and adjust the paper guide rail (A) for Legalsize paper.
2 Set Up the Machine
10 Match up the edge of the dust cover (A) and the edge of the paper cassette (B), and place the cover on top of the cassette.
11 Attach the document feeder tray on the document feeder.
–The default paper size/type is set to <LTR> and <PLAIN PAPER> in the setting menu. When you load other size and/or type of paper, change the paper size/type setting
by pressing  [Paper Settings]. For details, see “Introduction of the Machine,” in the e-Manual.
–For loading paper in the multi-purpose tray, see “Introduction of the Machine,” in the e-Manual.
–If a printout falls out of the output tray, extend the output tray extension on the front side of the machine and set the paper stopper upright.
2 Set Up the Machine
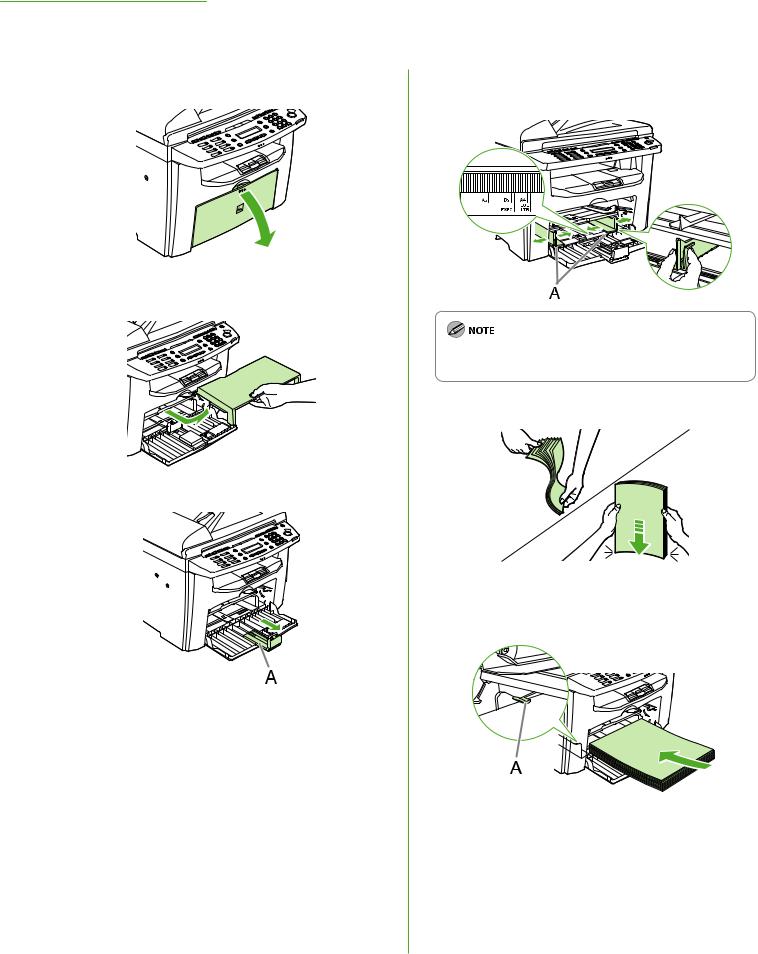
For MF4350d
1 Open the paper feeding tray.
2 Take out the dust cover from inside the machine.
3 Slide out the paper guide rail (A).
4 Slide the side paper guides (A) to match the size of paper.
If the paper guides do not fit the size of the paper, the printout may be skewed.
5 Fan the paper stack and even the edges.
6 Load the paper into the paper feeding tray with the print side up. Make sure the paper stack sits below the hook (A) on the side paper guide.
10
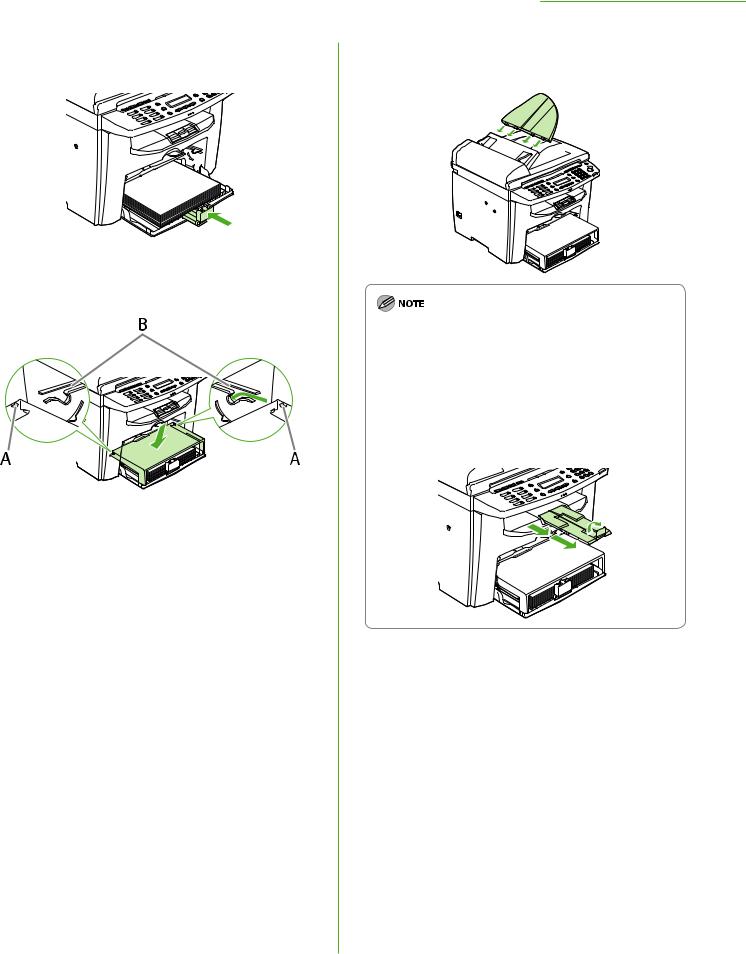
7 Adjust the paper guide rail to match the size of paper. 
8 Aligning the protrusions (A) on the both sides of the dust cover to the guides (B) inside the machine, set the dust cover.
2 Set Up the Machine
9 Attach the document feeder tray on the document feeder.
–The default paper size/type is set to <LTR> and <PLAIN PAPER> in the setting menu. When you load other size and/or type of paper, change the paper size/type setting
by pressing  [Paper Settings]. For details, see “Introduction of the Machine,” in the e-Manual.
–For loading paper in the multi-purpose tray, see “Introduction of the Machine,” in the e-Manual.
–If a printout falls out of the output tray, extend the output tray extension on the front side of the machine and set the paper stopper upright.
11

2 Set Up the Machine
Connect Power Cord and Turn On the Machine
1 Connect the power cord into the rear socket on the back side of the machine and the wall outlet, and press the [I] side of the main power switch (A) to turn ON.
Do not connect the machine and the computer with a USB cable at this time. Connect the machine and the computer with a USB cable only during the software installation procedure. (A USB cable is not used when the machine is used via a network connection.)
2 The machine enters the standby mode.
1 0 0 % |
L T R |
|
||
|
|
|
T E X T / P H O T O |
1 |
|
|
|
||
|
|
|
||
|
|
|
|
|
● The LCD display turned OFF:
The machine may enter the Sleep mode while you are performing setup. Press [Energy Saver] to turn the display back ON and continue the setup.
● <SET PAPER AGAIN/SET TONER AGAIN> is displayed:
Make sure that the toner cover and scanning platform are closed properly. (See “Install Toner Cartridge,” on p. 5.)
● <CLOSE COVER/TONER COVER> is displayed:
Check the installation of the toner cartridge and the placement of the paper. (See “Install Toner Cartridge,” on p. 5 and “Set Up Paper Cassette and Load Paper,” on p. 8.)
12
Loading...