


MF9280CDN
Table of contents
 Loading...
Starter Guide
Overview of Machine Functions
Set Up the Machine to Suit Your Purposes
Set Up the Machine
Set Up Computers and Software
Appendix
Be sure to read the manual before using the machine.
The remarks for important safety instructions are
described in "Basic Operation Guide." Read the
manual also.
Keep the manual for future reference.
Read this guide rst.

Contents
Overview of Machine Functions .................................................................................................................... 1
Manuals for the Machine.....................................................................................................................................................1
1 Set Up the Machine to Suit Your Purposes ................................................................................................. 2
2 Set Up the Machine ..........................................................................................................................................
Unpack the Machine .......................................................................................................................................................3
Items Included with the Machine ...............................................................................................................................7
Optional Items ........................................................................................................................................................................7
Connect the LAN Cable .................................................................................................................................................. 8
Compatible LAN Cables .......................................................................................................................................................8
Connect Power Cord and Turn on the Machine ....................................................................................................9
Start “Setup Guide” .........................................................................................................................................................11
Load Paper ........................................................................................................................................................................13
Optional Paper Drawer ......................................................................................................................................................16
Set Date and Time ..........................................................................................................................................................19
Make Fax Settings ...........................................................................................................................................................21
Register User Telephone Number and Unit Name ...................................................................................................22
Information About the Keys .............................................................................................................................................22
About Sender Information ...............................................................................................................................................24
Select the Receive Mode that Suits Your Needs .......................................................................................................25
About the Receive Modes .................................................................................................................................................25
Connect Telephone Cables .........................................................................................................................................28
If You Need to Use Pulse Dialing .....................................................................................................................................29
Adjust Color with “Auto Gradation Correction” ....................................................................................................30
Set Up Network Connection .......................................................................................................................................33
Set IP Address Manually ....................................................................................................................................................36
Finish “Setup Guide” .......................................................................................................................................................36
Change the Settings ...........................................................................................................................................................37
3 Set Up Computers and Software ................................................................................................................. 39
Types of Connection between Computers and the Machine .........................................................................39
About User Software CD-ROM ...................................................................................................................................40
Network Connection .....................................................................................................................................................42
Installation Procedure ........................................................................................................................................................42
Check Installation ................................................................................................................................................................50
Setting the ScanGear Tool ................................................................................................................................................50
USB Connection ..............................................................................................................................................................52
Installation Procedure ........................................................................................................................................................52
Check Installation ................................................................................................................................................................58
4 Appendix .......................................................................................................................................................... 59
User Manual CD-ROM (e-Manual) ............................................................................................................................59
System Requirements ........................................................................................................................................................59
Using the User Manual CD-ROM (e-Manual)..............................................................................................................59
3
Overview of Machine Functions
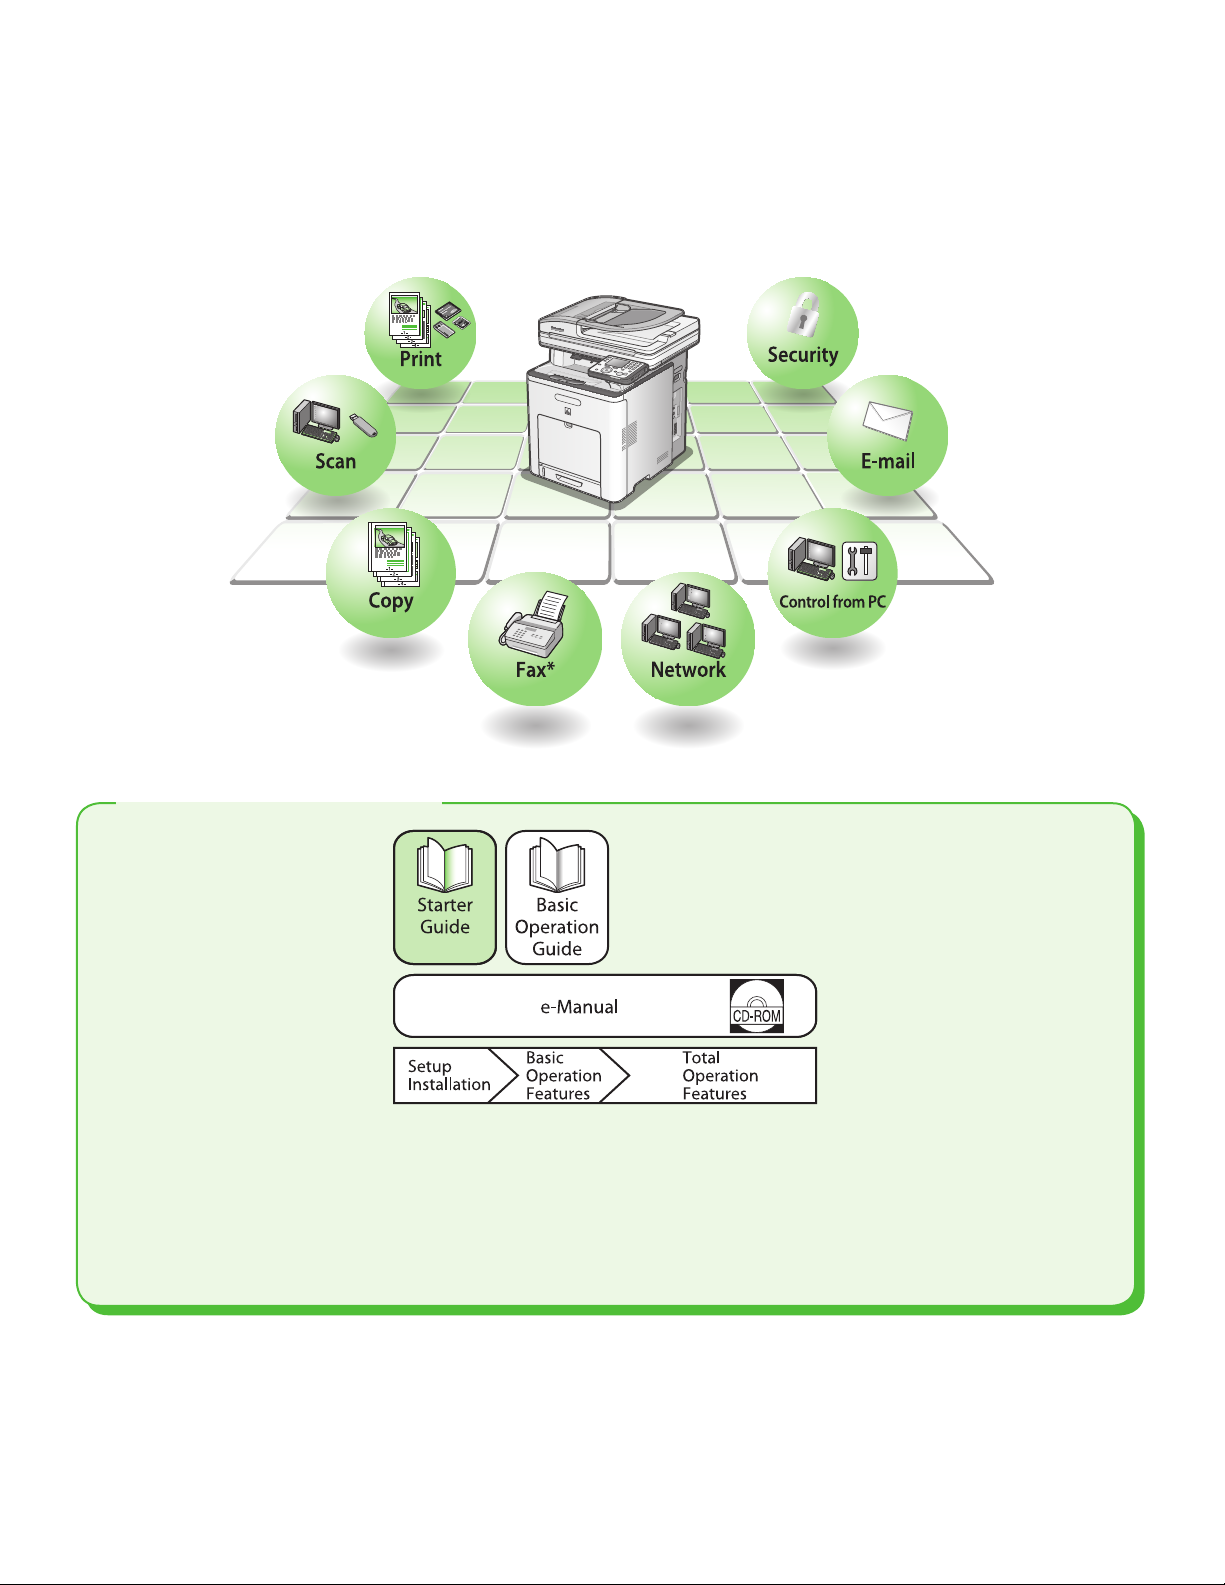
This manual describes how to set the required settings to set up the machine and install the software. After you
set up the machine, you can use the functions described in the illustration shown bellow.
For the details of each function, refer to the Basic Operation Guide and e-Manual.
Manuals for the Machine
Starter Guide (This Document): Machine setup and software installation. Read this guide before
●
operating this product.
Basic Operation Guide: Basic operation features.
●
e-Manual (located on the User Manual CD-ROM): Total operation features. (Also includes the Starter
●
Guide contents and the Basic Operation Guide contents.)
Unless otherwise mentioned, illustrations and screens used in this manual are those taken when no optional
equipment is attached to the Color imageCLASS MF9280Cdn or MF9220Cdn.
If there is any dierence between the Color imageCLASS MF9280Cdn and MF9220Cdn, it is clearly indicated in the
text for instance “Color imageCLASS MF9280Cdn Only.”
1
p. 8
p. 3
p. 9
p. 19
p. 11
p. 13
p. 22
p. 25
p. 28
p. 30
p. 33
p. 36
p. 42 p. 52
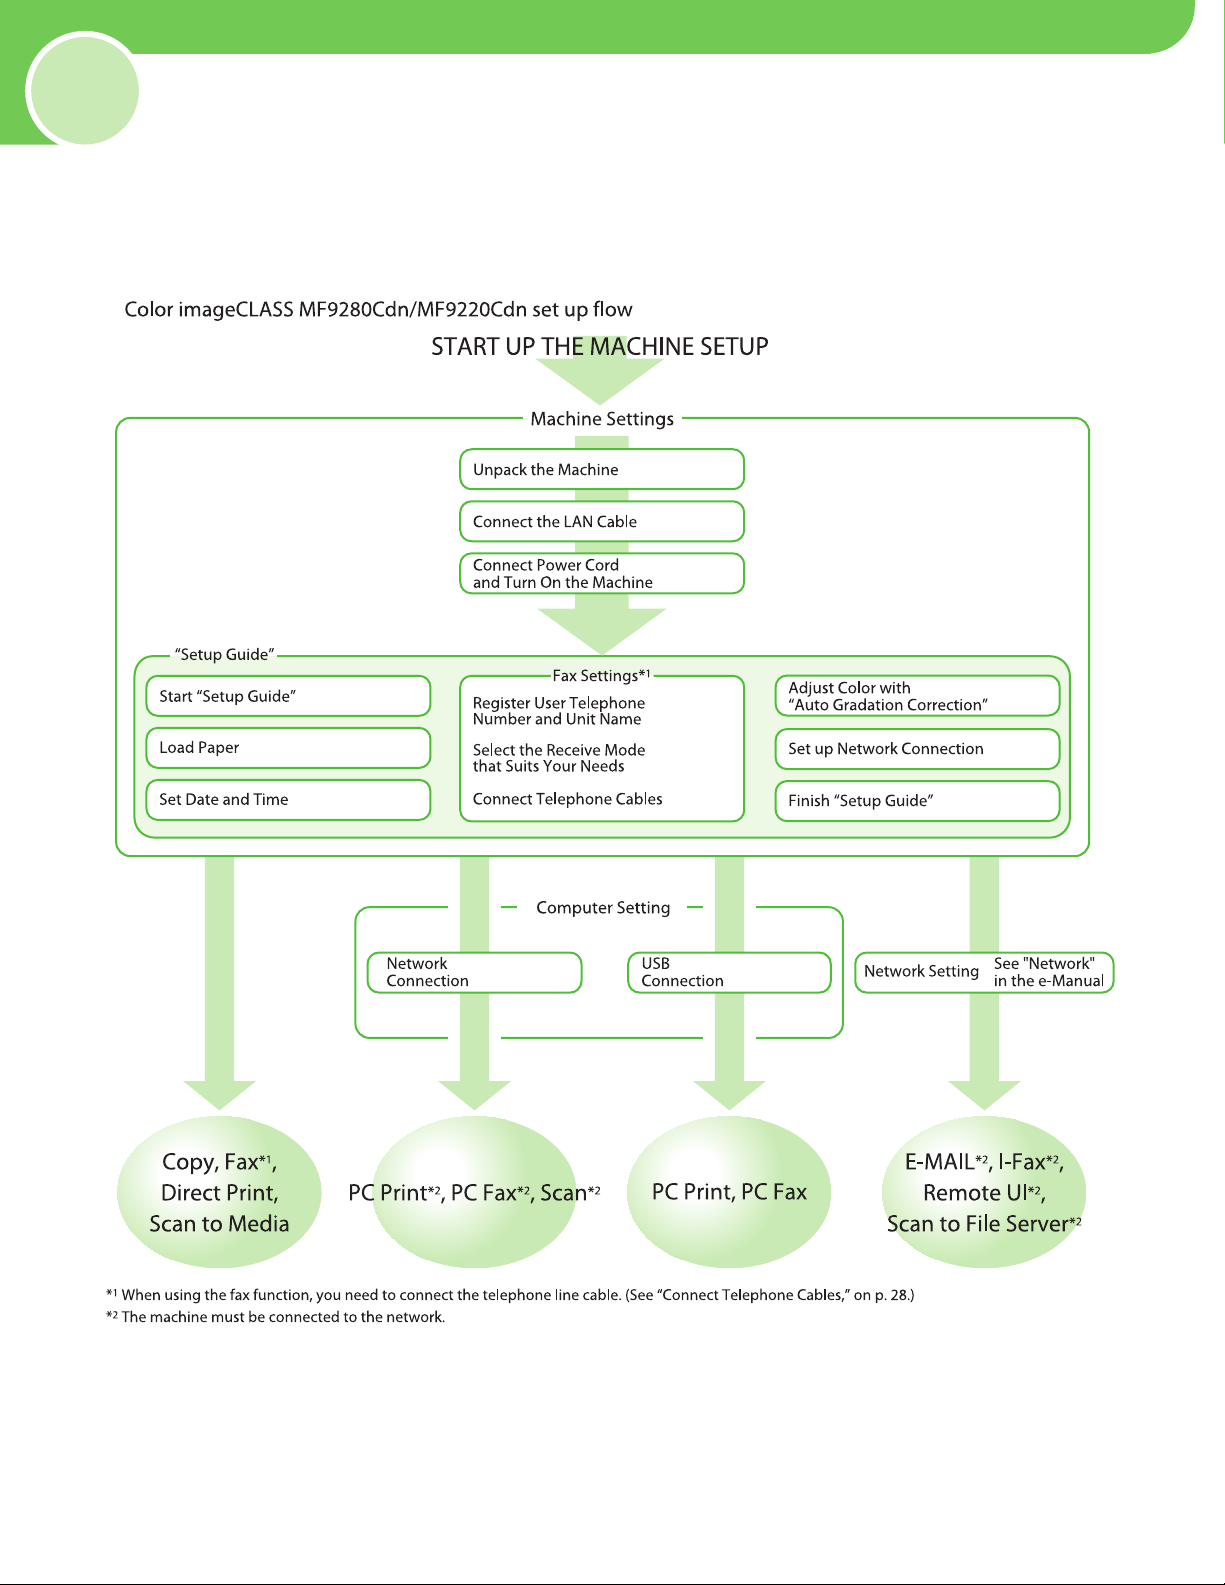
Set Up the Machine to Suit Your Purposes
1
To use the functions (Copy, Fax, Direct Print, Scan to Media, PC Print, PC Fax, Scan, E-Mail, I-Fax,
Remote UI, Scan to File Server) of the machine, you need to make the settings in the owchart below.
For example, if you intend to use the copy function, you need to make the settings in “Machine Settings.”
2
2
Set Up the Machine
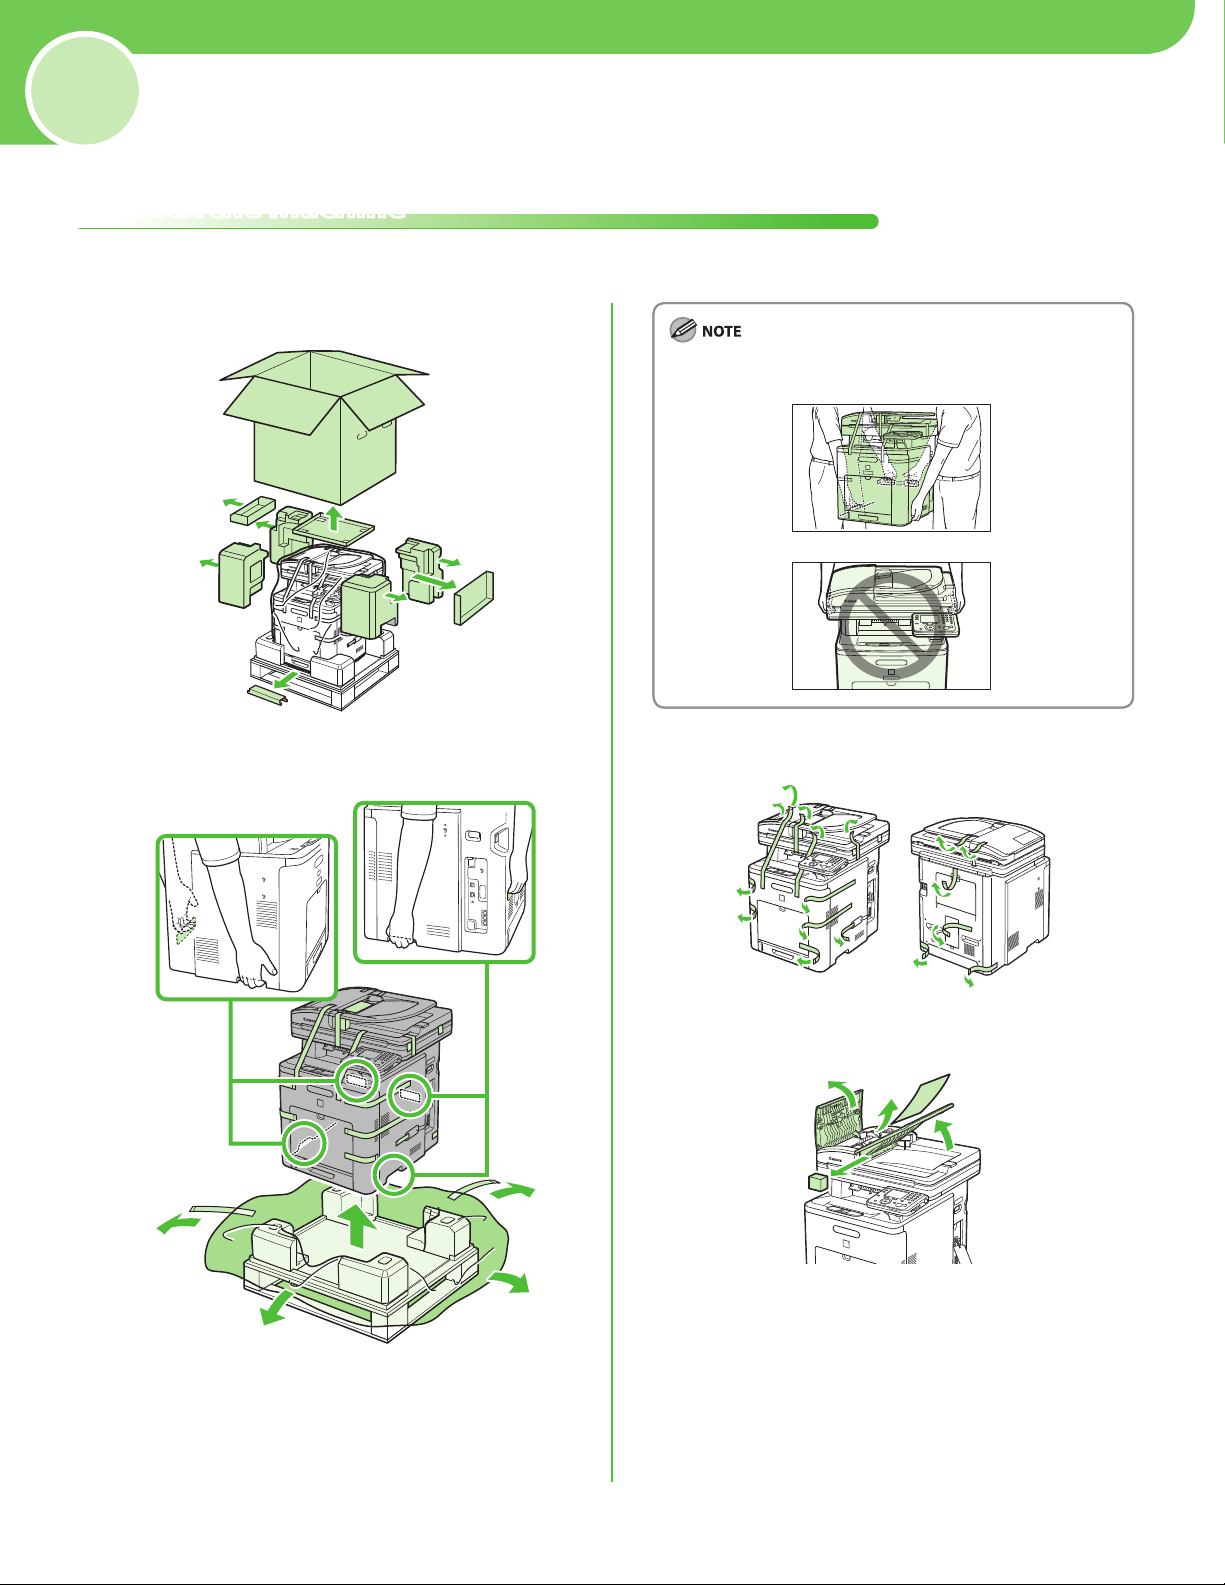
Unpack the Machine
Remove all shipping tape and packing materials from the machine.
1
2
Make sure that at least two people carry the machine.
3
4
3
1 Settings Necessary to Use the Machines Functions
5
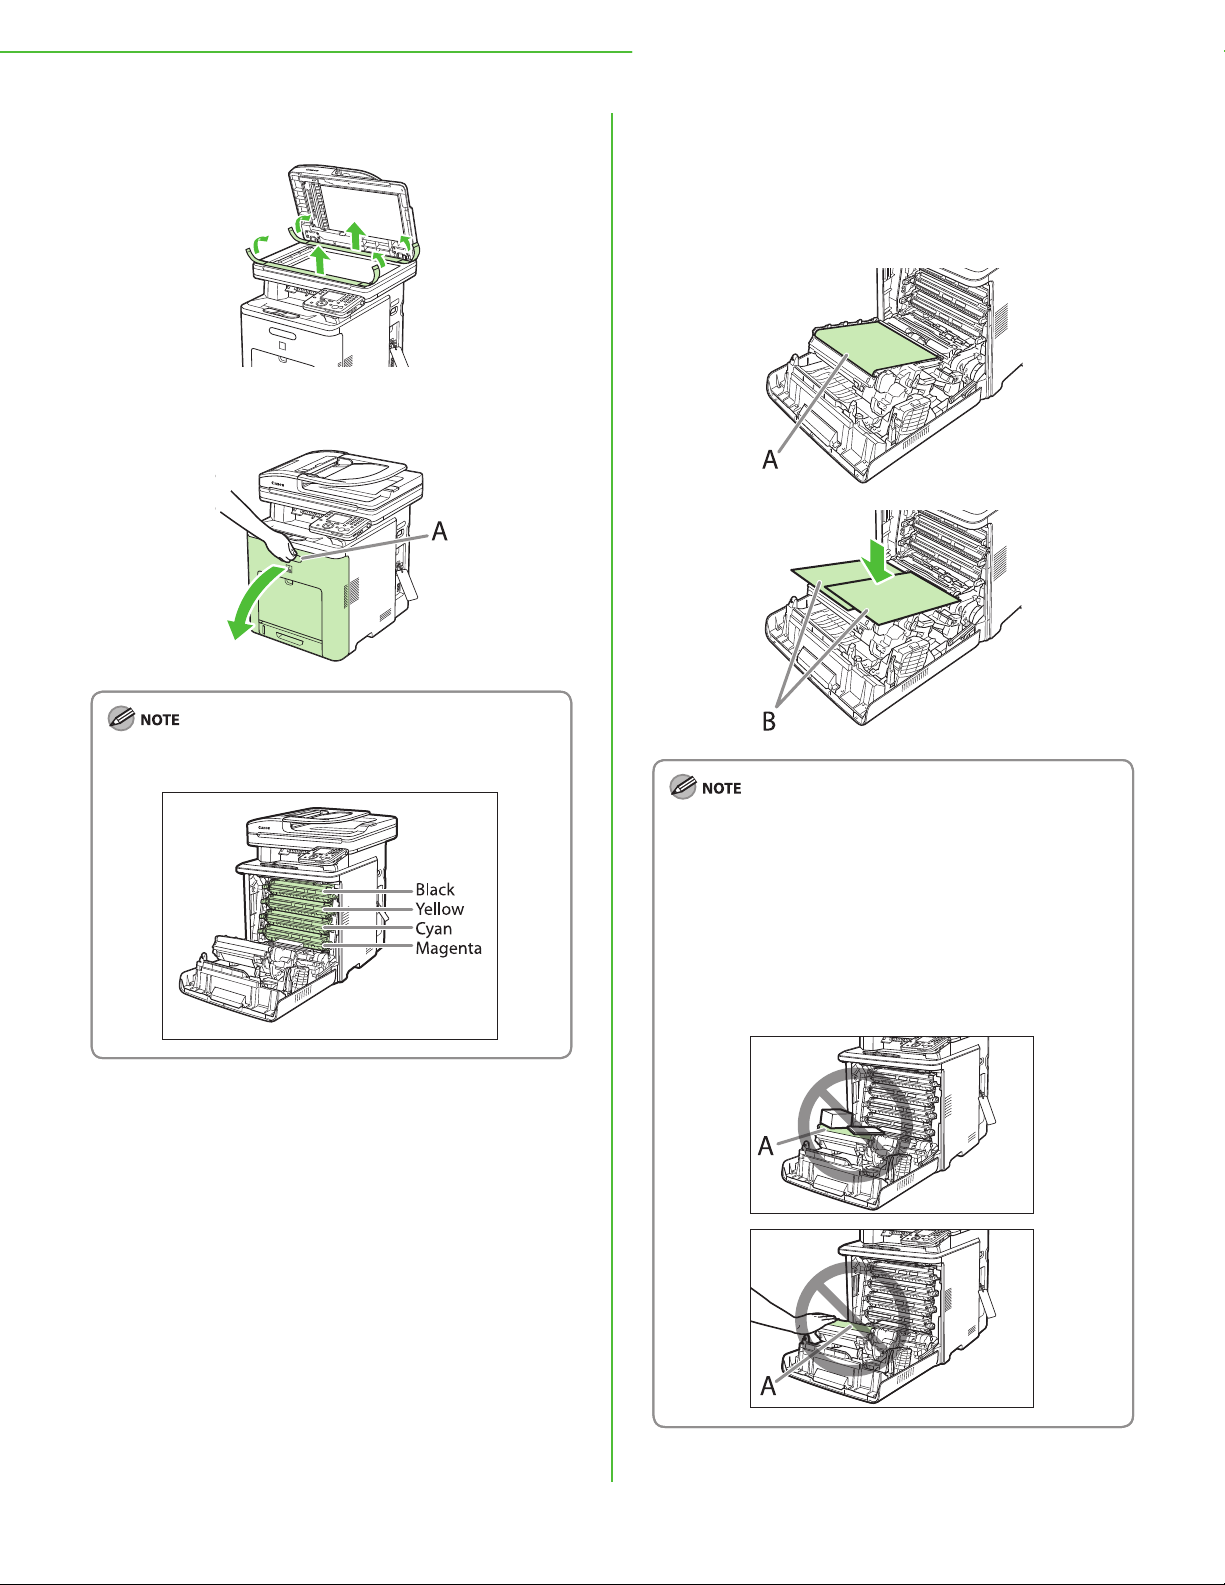
6 Open the front cover by using the handle (A).
7 To prevent damage to the transfer belt of the
delivery feeder unit (A), cover the thin plastic
belt with paper (LTR size paper is
recommended) as shown in the gure and be
sure that they do not move out of place.
The toner cartridges are installed in order of black, yellow,
cyan, and magenta.
When installing or removing the toner cartridges, be sure
–
to place the papers on the transfer belt (A) of the delivery
feeder unit to protect the belt.
Do not touch or place objects on the transfer belt (A) of
–
the delivery feeder unit. The transfer belt (A) comes with a
self cleaning function so do not wipe the transfer belt (A)
even when toner can be seen attached to the belt. If the
delivery feeder unit is broken or the transfer belt (A) is
damaged, this may result in misfeeds or deterioration in
print quality.
4
1 Settings Necessary to Use the Machines Functions
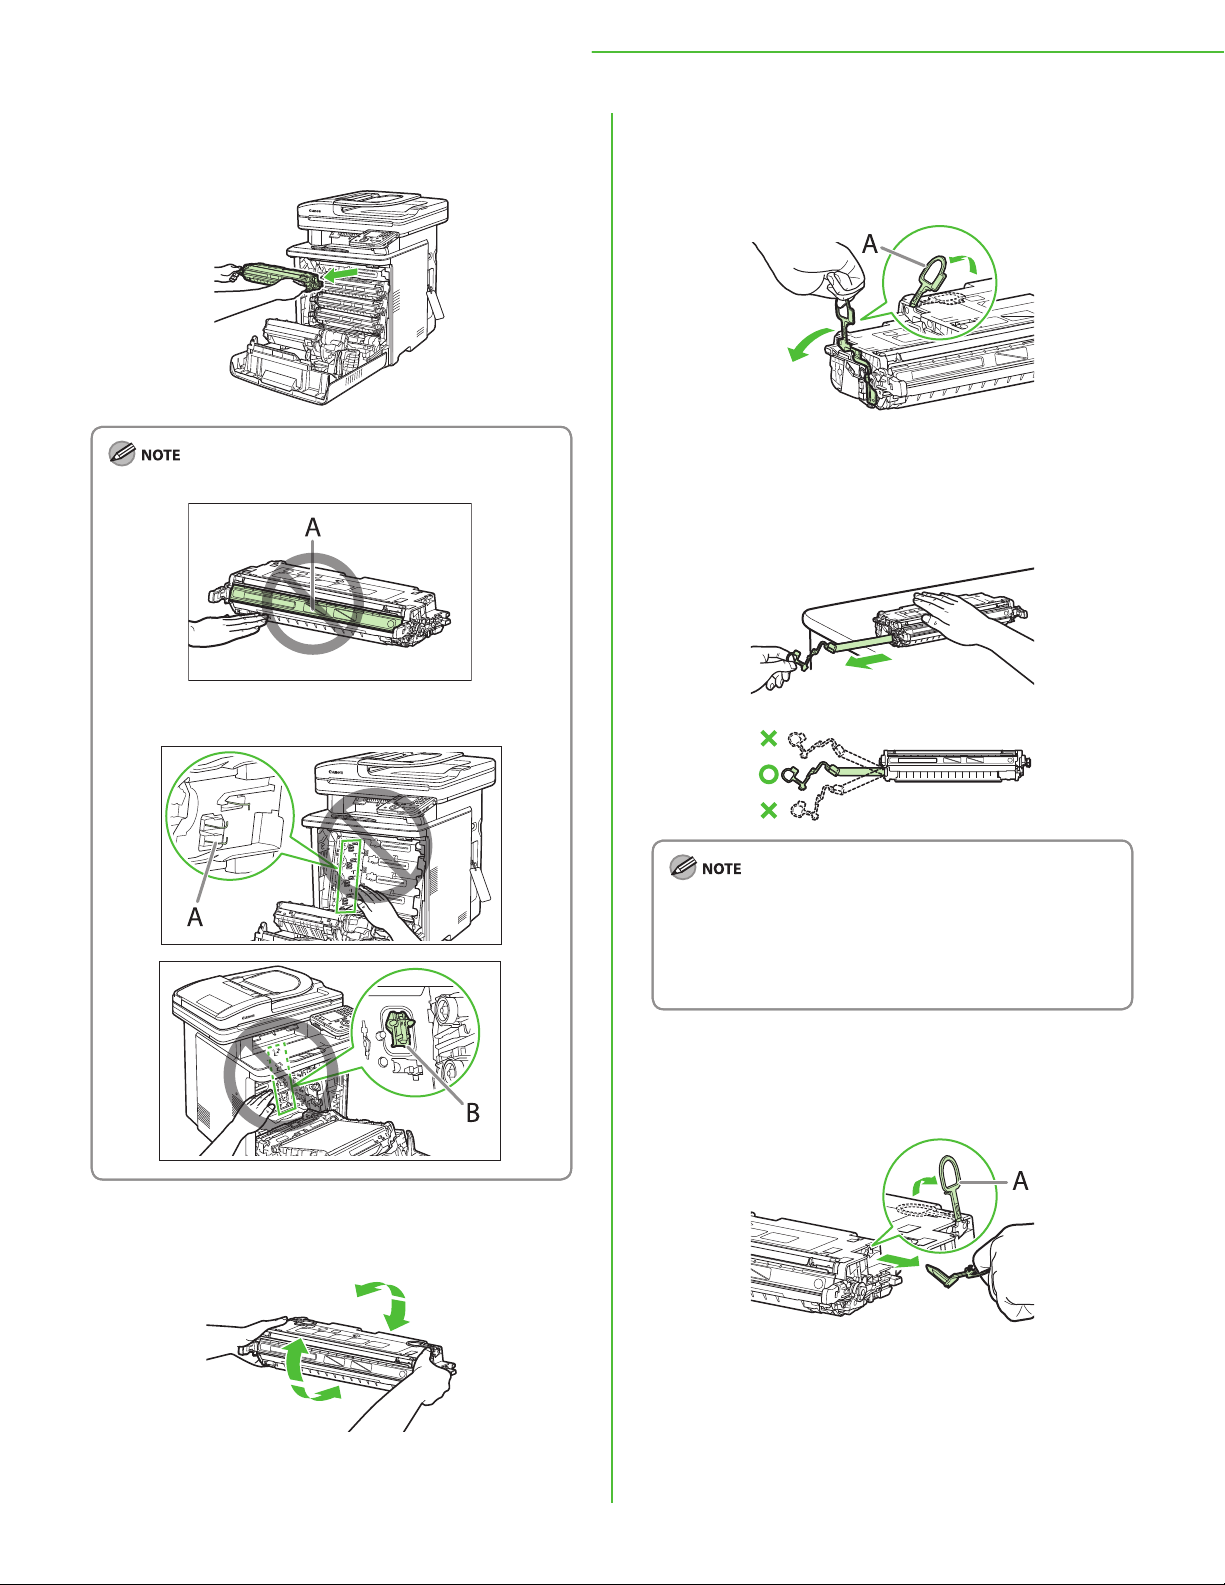
8 Hold the blue tabs on the both sides of toner
cartridge, and pull it horizontally.
Do not open the drum protective shutter (A).
–
Do not touch the high-voltage contact (A) or the electrical
–
contacts (B), as this may result in damage to the printer.
10 Place the toner cartridge on a at surface,
fold back the tab of the sealing tape (A)
located at left side of the toner cartridge.
11 Remove the sealing tape (approx. 18 7/8 inch
long) gently by hooking your nger into the
tab and pulling it out straight in the direction
of the arrow.
9 Gently rock the toner cartridge 5 or 6 times to
evenly distribute the toner inside.
If toner is not distributed evenly, this may result in
deterioration in print quality. Make sure to carry out this
procedure properly.
If toner is adhered to the removed seal, be careful not to
–
dirty your hands or clothing by touching it.
If your hands or clothes get dirty from touching the toner,
–
wash them immediately in cold water. Do not use hot
water. Doing so may cause the toner to set permanently.
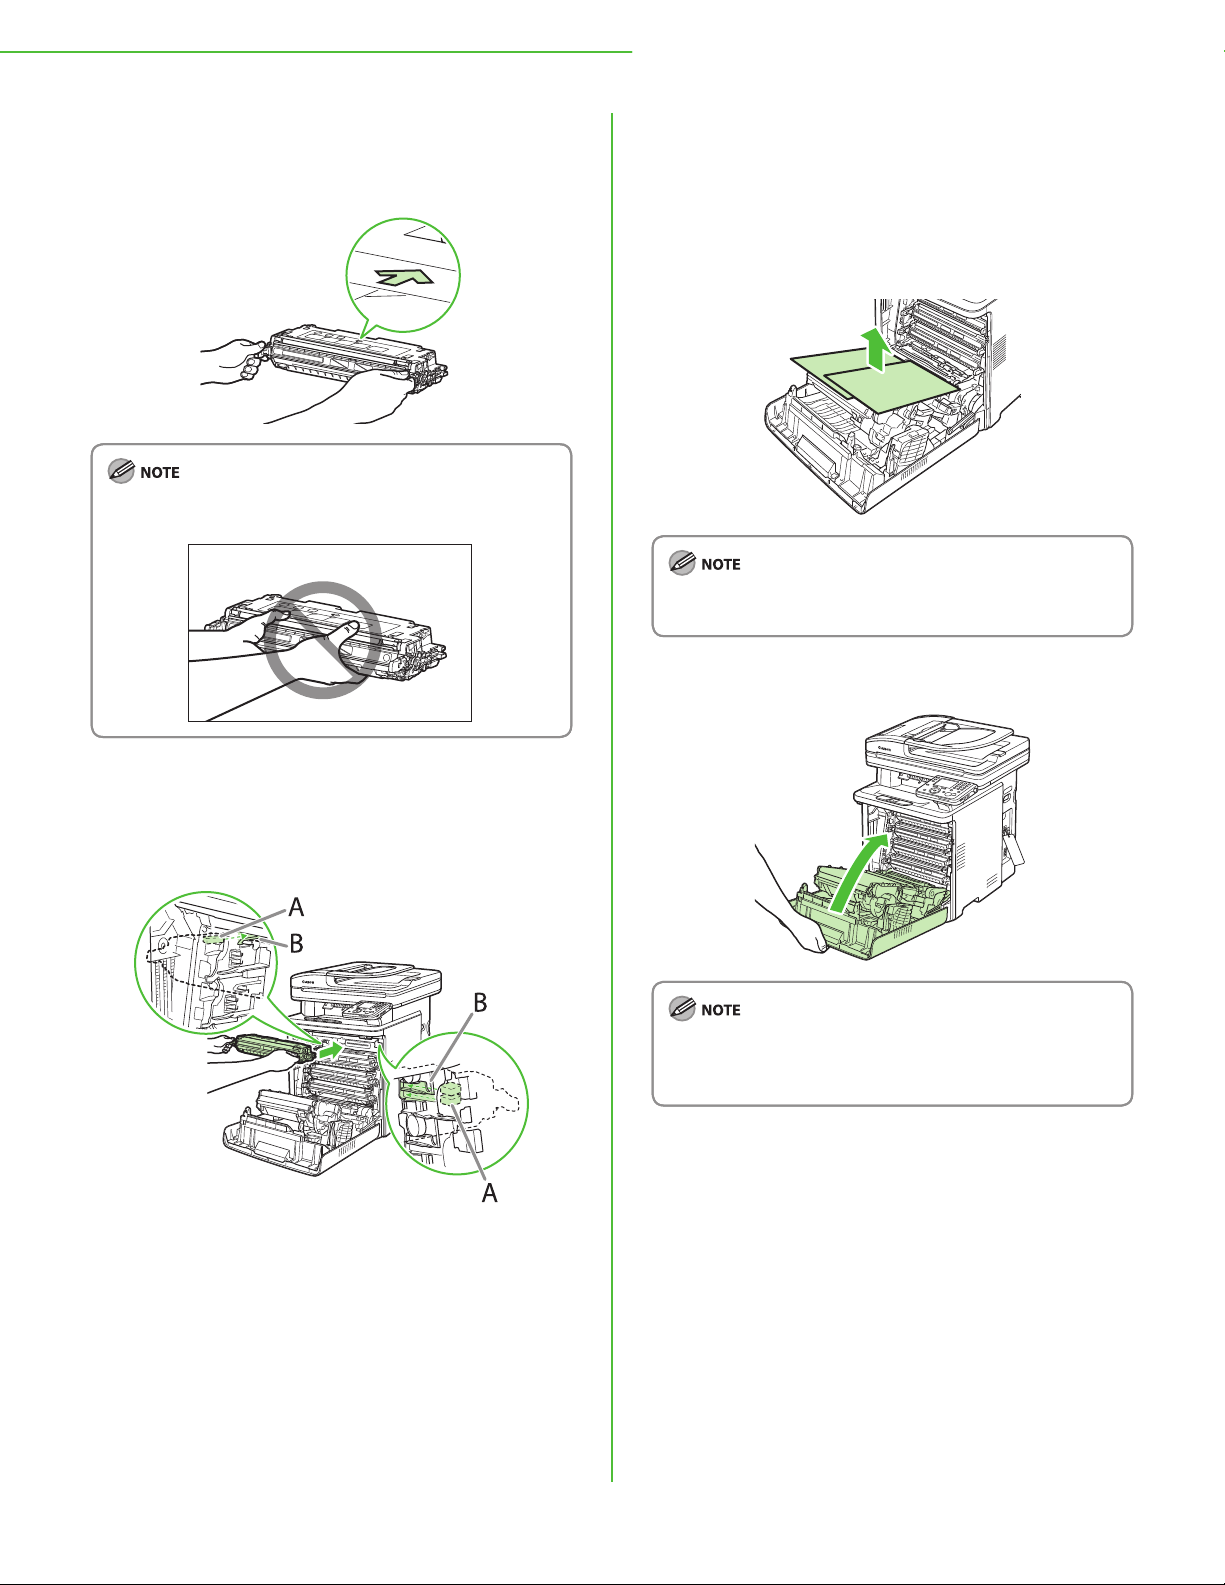
12 Hook your nger into the tab and remove the
packing material (A) located at right side of
the toner cartridge.
5
1 Settings Necessary to Use the Machines Functions
13 Hold the toner cartridge properly by the blue
tabs on the both sides with the arrowed side
facing up.
Do not hold the toner cartridge in a manner that is not
described in this procedure.
15 Repeat steps for all 4 cartridges.
16 After removing all the packing materials from
each toner cartridge and installing the
cartridges, remove the papers on the transfer
belt of the delivery feeder unit.
When removing the paper, be careful not to touch or
damage the transfer belt of the delivery feeder unit.
17 Close the front cover.
14 Align the guides (A) of the toner cartridge
that you want to replace with the slots (B) to
which the label of the same color is attached,
then insert the cartridge until it stops.
If the front cover does not close properly, do not force it to
close. Open the cover and make sure the toner cartridge is
properly set in the machine.
6
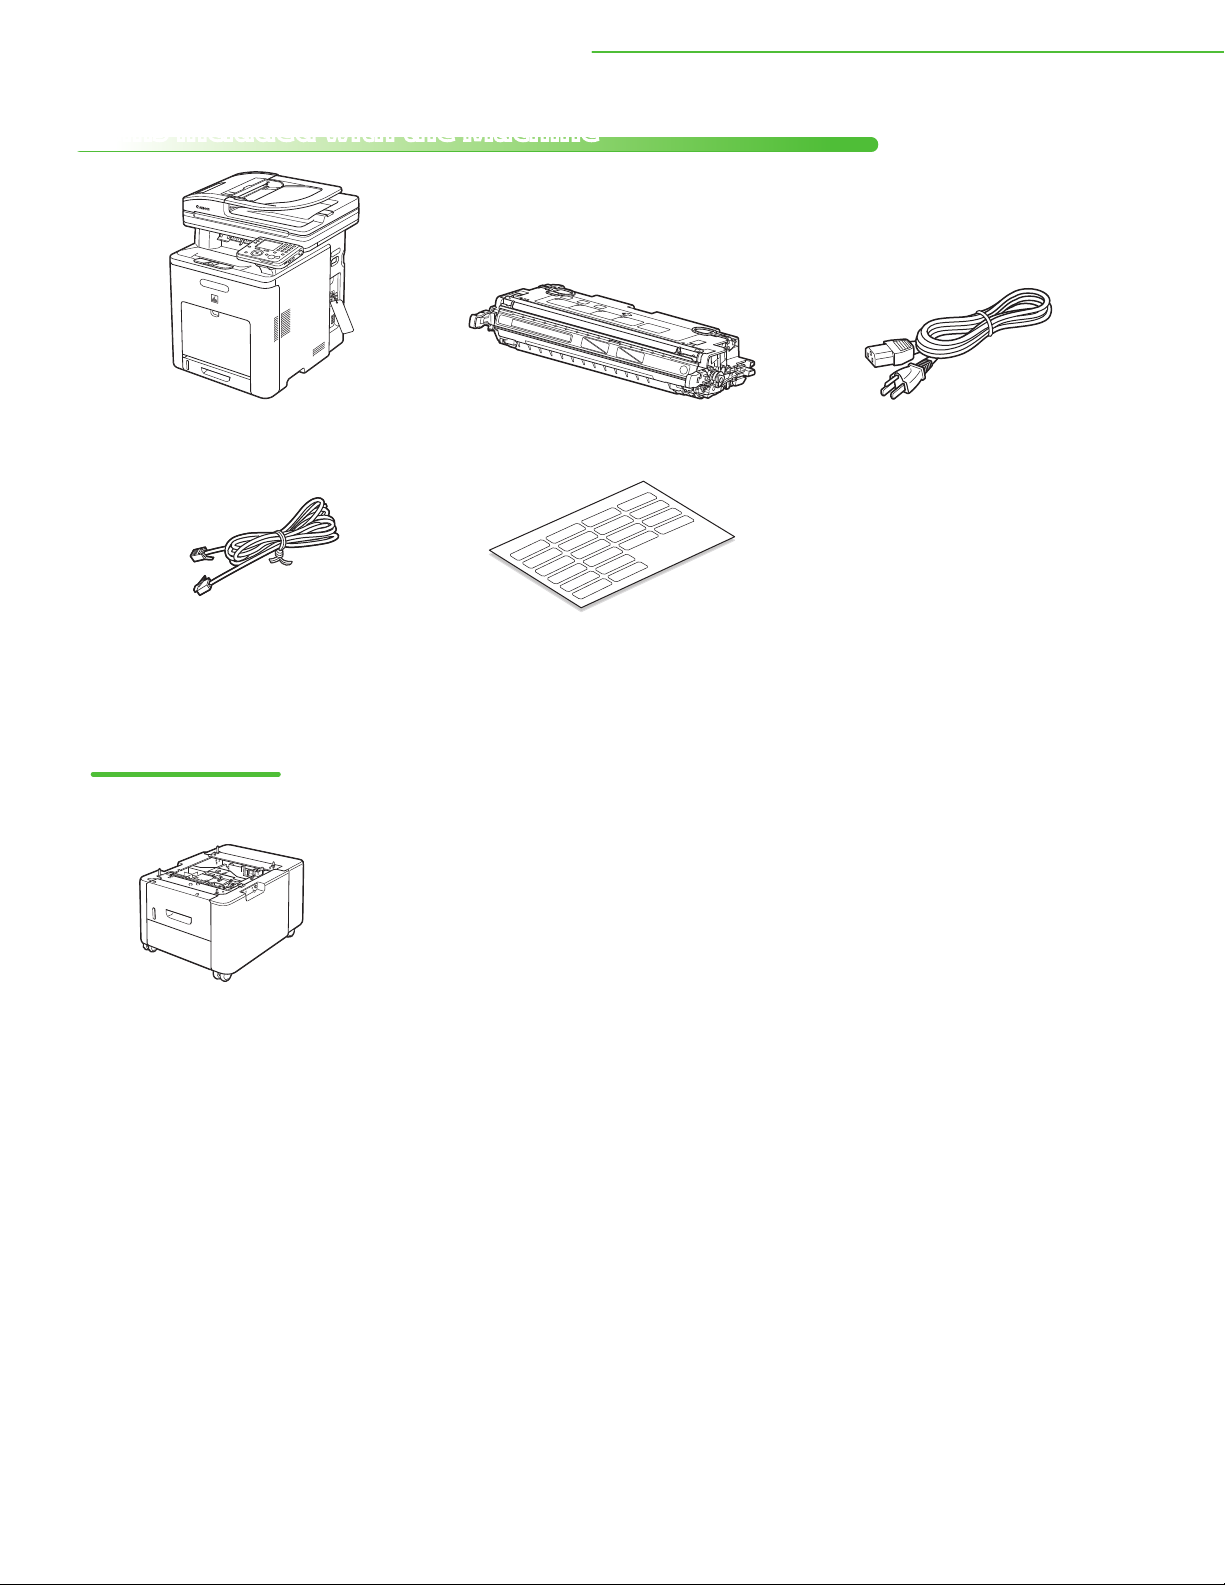
Items Included with the Machine
1 Settings Necessary to Use the Machines Functions
Machine● Toner Cartridge×4 (black, yellow, cyan,
● Power Cord●
magenta) (Stored in the machine)
Telephone Cable
●
Customize Labels
●
* Size and form of the customize labels may vary
depending on the countries or regions you
purchased.
Optional Items
Cassette Paper Drawer
Limited Warranty Notice
●
Cartridge Warranty
●
Starter Guide (This Document)
●
Basic Operation Guide
●
UFRII LT/FAX User Software CD-ROM
●
PCL/PS User Software CD-ROM (Color
●
imageCLASS MF9280Cdn Only)
User Manual CD-ROM
●
Registration Card
●
Power Switch Label
●
Cassette Feeding Unit-AC1● Cassette Feeding Unit-AC1
●
Setup Instruction
7
1 Settings Necessary to Use the Machines Functions
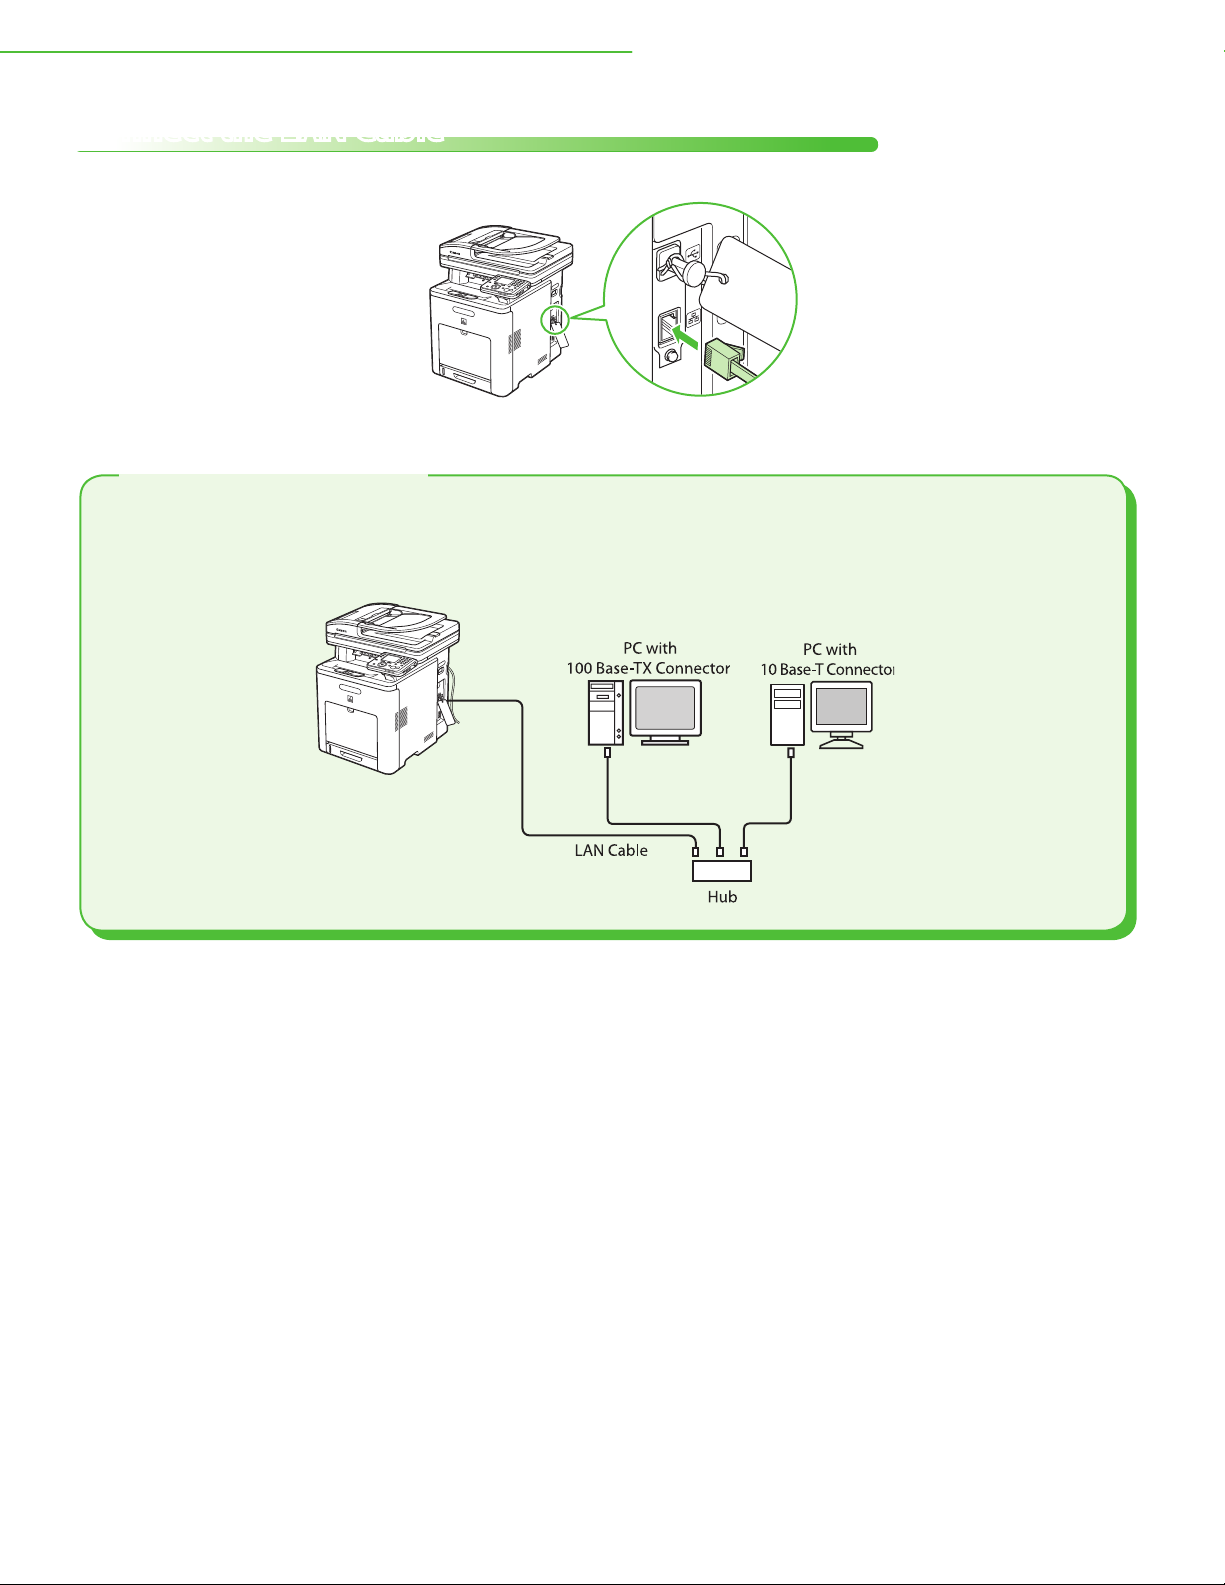
Connect the LAN Cable
Connect a LAN cable that is compatible with the LAN connector of this machine.
Compatible LAN Cables
A category 5 or greater twisted pair LAN cable is compatible with the machine. Connect one end to the
10 Base-T/100 Base-TX port on the right side of the machine and the other end to a network router or a
hub.
8

1 Settings Necessary to Use the Machines Functions
Connect Power Cord and Turn on the Machine
1 Connect the power cord to the rear socket on
the back side of the machine and to the wall
outlet, and press the [I] side of the main power
switch (A) to ON.
Make sure all shipping tape/packing materials on the
–
machine and tabs/tape on the toner cartridges have been
removed.
Do not connect the machine and the computer with a
–
USB cable at this time. Connect the machine and the
computer with a USB cable only during the software
installation procedure. (A USB cable is not used when the
machine is used via a network connection.)
If you want to use the optional paper drawer, connect the
–
Cassette Feeding Unit-AC1 to the machine before turning
on the machine. (For instructions on how to connect the
Cassette Feeding Unit-AC1, see “Cassette Feeding UnitAC1 Setup Instruction.”)
Apply the power switch label to the space above the main
–
power switch.
2 If the screen to select the language appears as
shown below, use [▼], [▲] or (Scroll Wheel)
to select a language, then press [OK].
The machine restarts automatically.
The language setting can be changed later.
Press (Main Menu) → <Additional Func.> → <Common
Settings> → <Language Switch> → <Done> → Select <On>
→ Select the desired language → Turn OFF the main power →
Restart the machine.
9
1 Settings Necessary to Use the Machines Functions
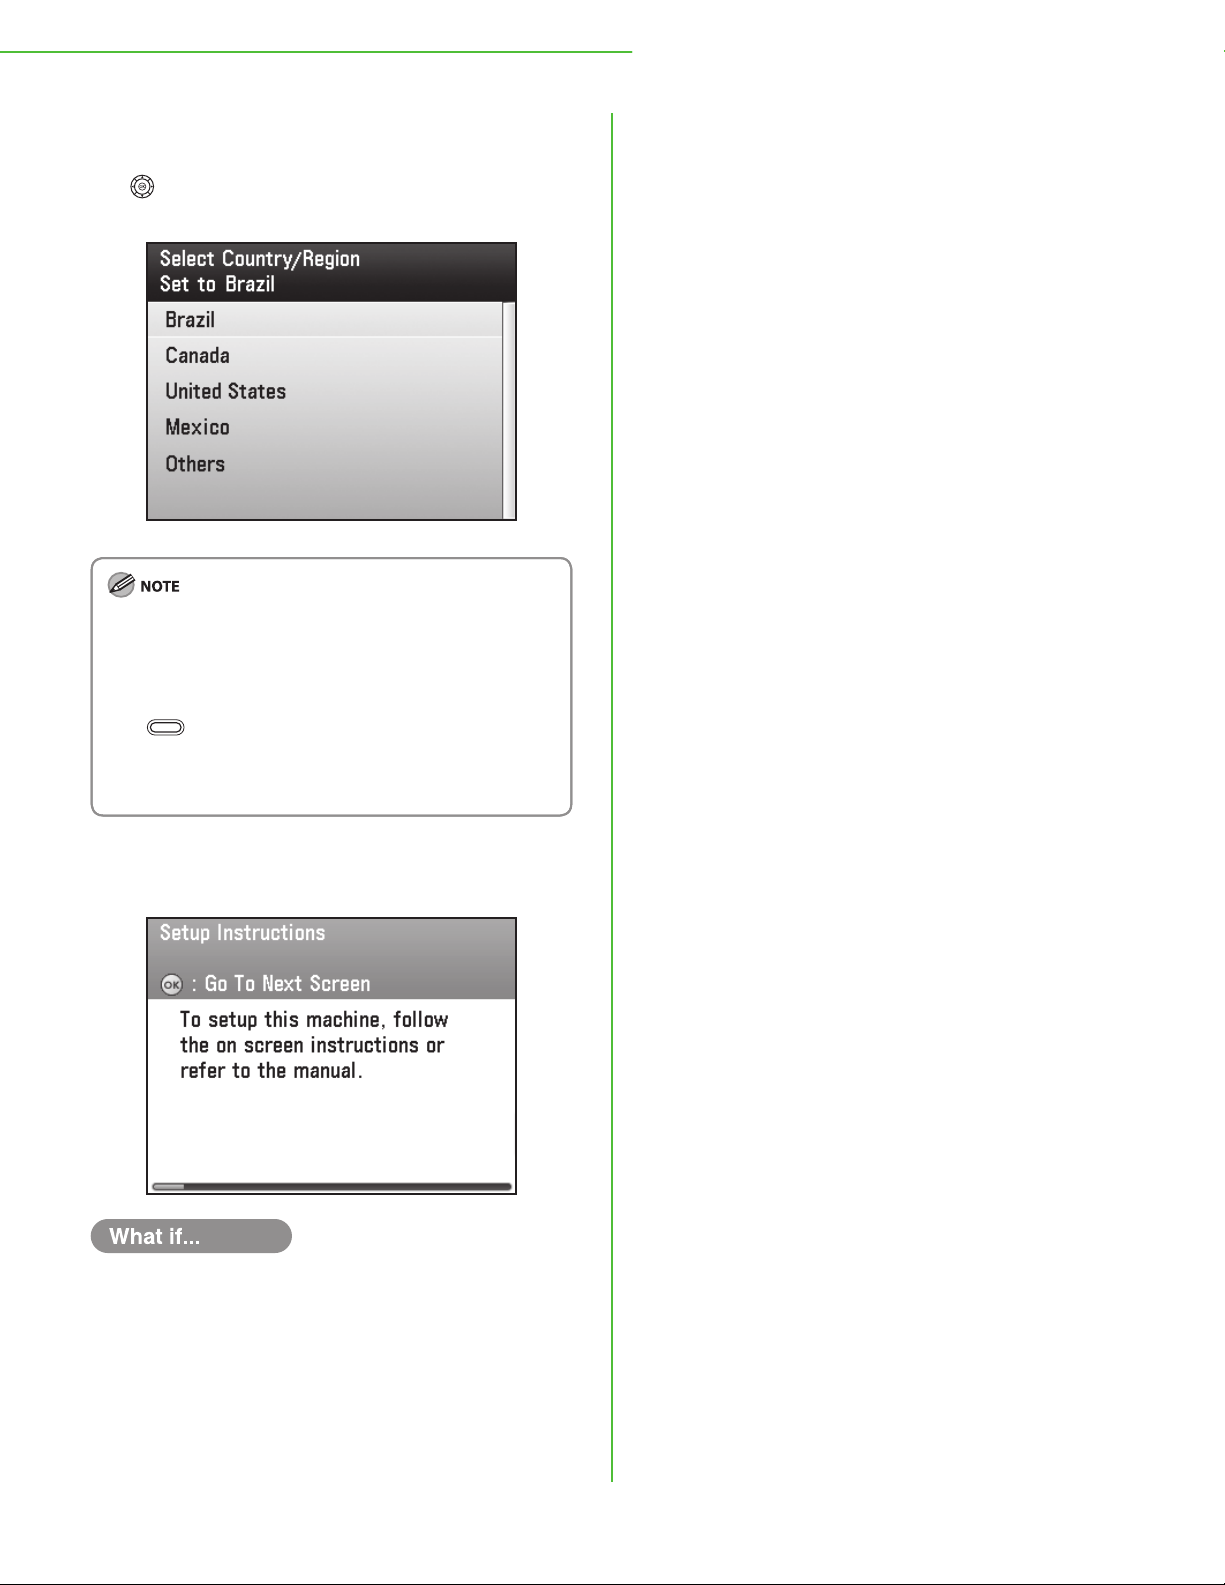
3 If the screen to select the country/region
appears as shown below, use [▼], [▲] or
(Scroll Wheel) to select a country/region,
then press [OK].
The machine restarts automatically.
Make sure that the country/region is set correctly for your
country/region.
If the country/region is not set or set incorrectly, you may
have problems in sending/receiving faxes.
The country/region setting can be changed later.
Press (Main Menu) → <Additional Func.> → <System
Management Set.> → <Communications Settings> →
<Select Country/Region> → <Done> → Select the country/
region → Turn OFF the main power → Restart the machine.
4 The “Setup Guide” automatically appears on the
display.
<Close the front cover.> is displayed:
●
Make sure that the front cover is closed properly. (See “Unpack the Machine,” on
3.)
p.
<Set Toner Cartridge Again> is displayed:
●
Make sure that the tabs are removed from the toner cartridges and toner
cartridges are properly installed to the machine. (See “Unpack the Machine,” on
3.)
p.
10
1 Settings Necessary to Use the Machines Functions
Start “Setup Guide”
The “Setup Guide” assists you in setting up the machine before using it.
–
When you turn on the machine for rst time, the “Setup Guide” automatically starts on the display.
–
Once the “Setup Guide” starts, it cannot be stopped.
–
If you turn o the machine while using the “Setup Guide,” turn on the machine and start the “Setup Guide” again.
–
Once you complete the “Setup Guide,” it does not start automatically when you turn on the machine.
–
You can restart the “Setup Guide” afterward from the user mode. (See “Change the Settings,” on p. 37.)
●
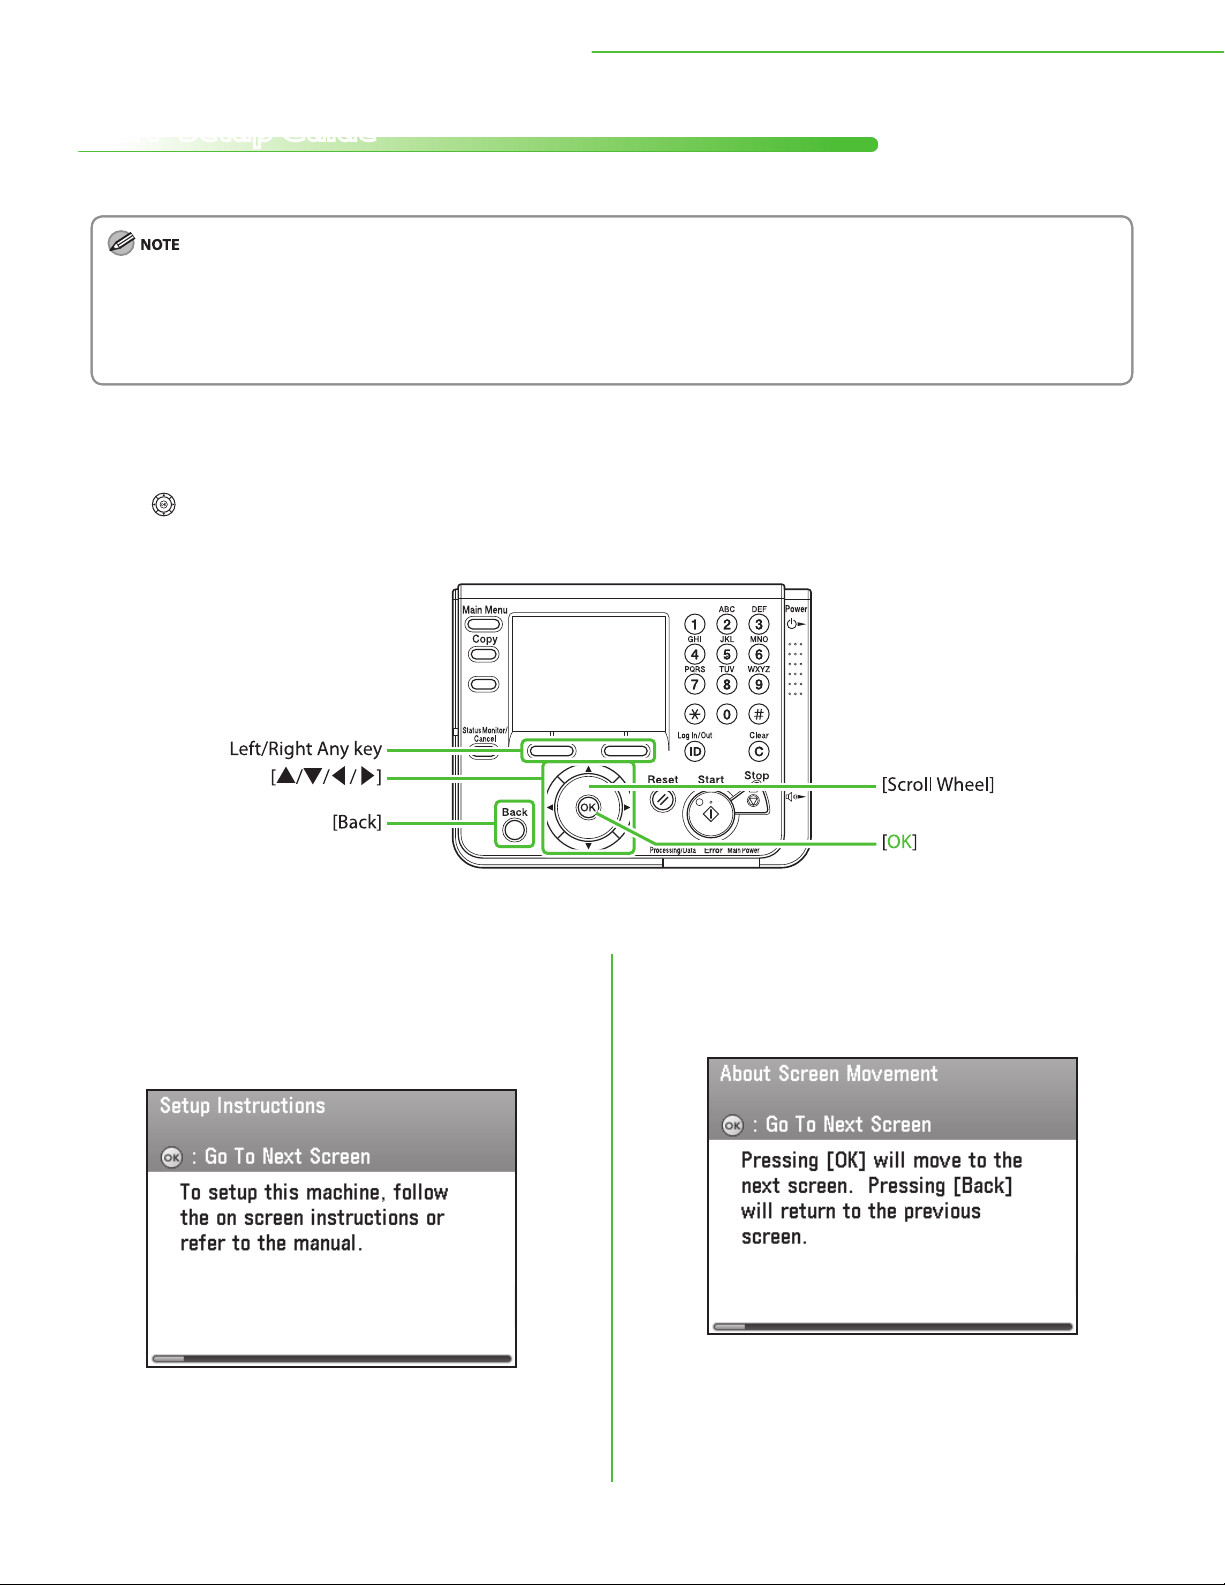
Information About the Keys
‒
Press the Left/Right Any key to select the alternative key at the bottom of the display.
‒
Press [▼] [▲] [◀] [▶] to move the cursor position.
‒
Use (Scroll Wheel) to move the cursor position.
‒
Press [OK] to set the entry or to proceed to the next screen.
‒
Press [Back] to return to the previous screen.
* The Color imageCLASS MF9280Cdn is used for illustration purposes in this section.
2 Make sure the following screen is displayed on
1 Make sure the following screen is displayed on
the display, then press [OK] to proceed to the
“Setup Guide.”
the display, then press [OK] to proceed to the
“Setup Guide.”
The screen explains how to operate the “Setup Guide”
using the keys on the operation panel.
For details on the key operation, see “Information About
the Keys,” above.
11

1 Settings Necessary to Use the Machines Functions
3 Make sure the following screen is displayed on
the display, then press [OK] to proceed to the
“Setup Guide.”
Check that all the packing materials are removed from the
main unit and the cartridges.
4 Make sure the following screen is displayed on
the display, then press [OK] to proceed to the
“Setup Guide.”
5 Make sure the following screen is displayed on
the display, then press [OK] to proceed to the
“Setup Guide.”
Do not connect the USB cable at this point even if you use
the machine as a local printer by directly connecting the
machine to the computer.
During the software installation procedure, you can connect
the USB cable. (When using the network function, the USB
cable is not required.)
The auto obtain IP address function will enables the
machine to get the IP address after connecting the LAN
cable to the machine.
If the LAN cable has not been connected yet, connect it as
–
described in “Connect the LAN Cable,” on p. 8.
Connect the LAN cable when you use the machine to
–
share with a group through the network.
Connect the LAN cable even if you do not use the auto
–
obtain IP address function, because your network
environment requires the IP address to be set manually.
6 Make sure the following screen is displayed on
the display.
Go to “Load Paper,” on p. 13.
If the toner cartridges have not been set in the machine or
the tabs and tape have not been removed from the toner
cartridges, the <Set Toner Cartridge Again> screen appears.
You will need to nish the cartridge installation before you
proceed. (See “Unpack the Machine,” on p. 3.)
12

1 Settings Necessary to Use the Machines Functions
Load Paper
This section describes the procedures for making paper and paper size settings in the “Setup Guide.” Animated
screens are included with each step described in the “Setup Guide.”
1 Make sure the following screen is displayed on
the display, then press [OK] to proceed to the
“Setup Guide.”
2 Pull out the paper drawer until it stops.
5 Hold the lock release lever of the side paper
guides (A) and slide the guides to the mark for
the size of the paper to be loaded. The side
paper guides move together.
Make sure to set the guides to the mark for the size of the
paper to be loaded correctly. If the guides are positioned
incorrectly, it may cause paper jams, dirty prints, etc.
6 Press [OK] to proceed to the “Setup Guide.”
3 Hold the paper drawer with both hands and
remove it from the machine.
4 Press [OK] to proceed to the “Setup Guide.”
7 Hold the lock release lever of the rear paper
guides (A) and slide the guides to the mark for
the size of the paper to be loaded.
Make sure to set the guides to the mark for the size of the
paper to be loaded correctly. If the guides are positioned
incorrectly, it may cause paper jams, dirty prints, etc.
8 Press [OK] to proceed to the “Setup Guide.”
13
1 Settings Necessary to Use the Machines Functions
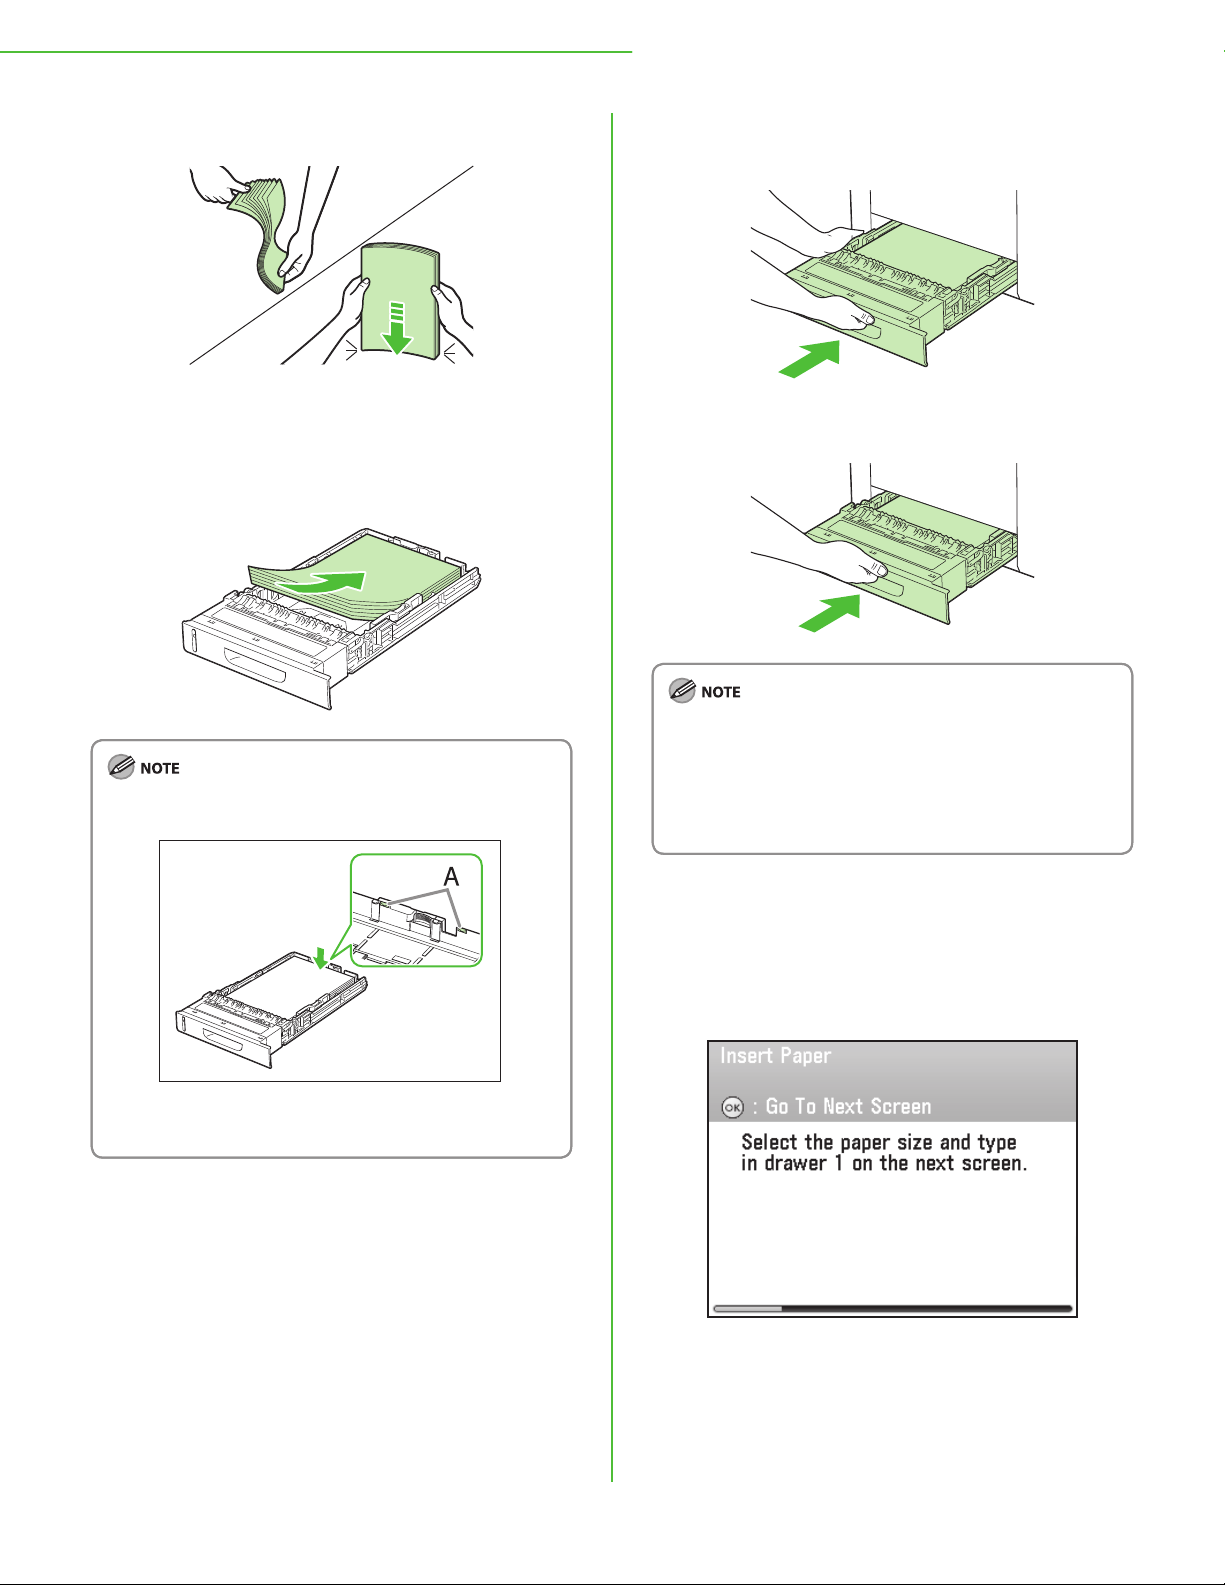
9 Fan the paper stack and even the edges.
10 Load the paper stack of the appropriate size
with the print side facing up. Align the rear
edge of the paper stack with the rear paper
guide.
12 Hold the paper drawer with both hands and
set it back into the machine.
13 Push the paper drawer as far as it will go.
Make sure the paper stack does not exceed the load limit
–
mark (A).
The paper drawer holds approximately 250 sheets of
–
paper (20 lb (75 g/m2)).
11 Press [OK] to proceed to the “Setup Guide.”
For details on loading paper in the stack bypass tray, see
–
“Introduction of the Machine,” in the e-Manual.
If you loaded a size and/or type of paper that is dierent
–
from what you registered in the “Setup Guide,” you need
to change the paper settings on the machine. See
“Change the Settings,” on p. 3
7.
14 Press [OK] to proceed to the “Setup Guide.”
15 Make sure the following screen is displayed
on the display, then press [OK] to proceed to
the “Setup Guide.”
14
1 Settings Necessary to Use the Machines Functions
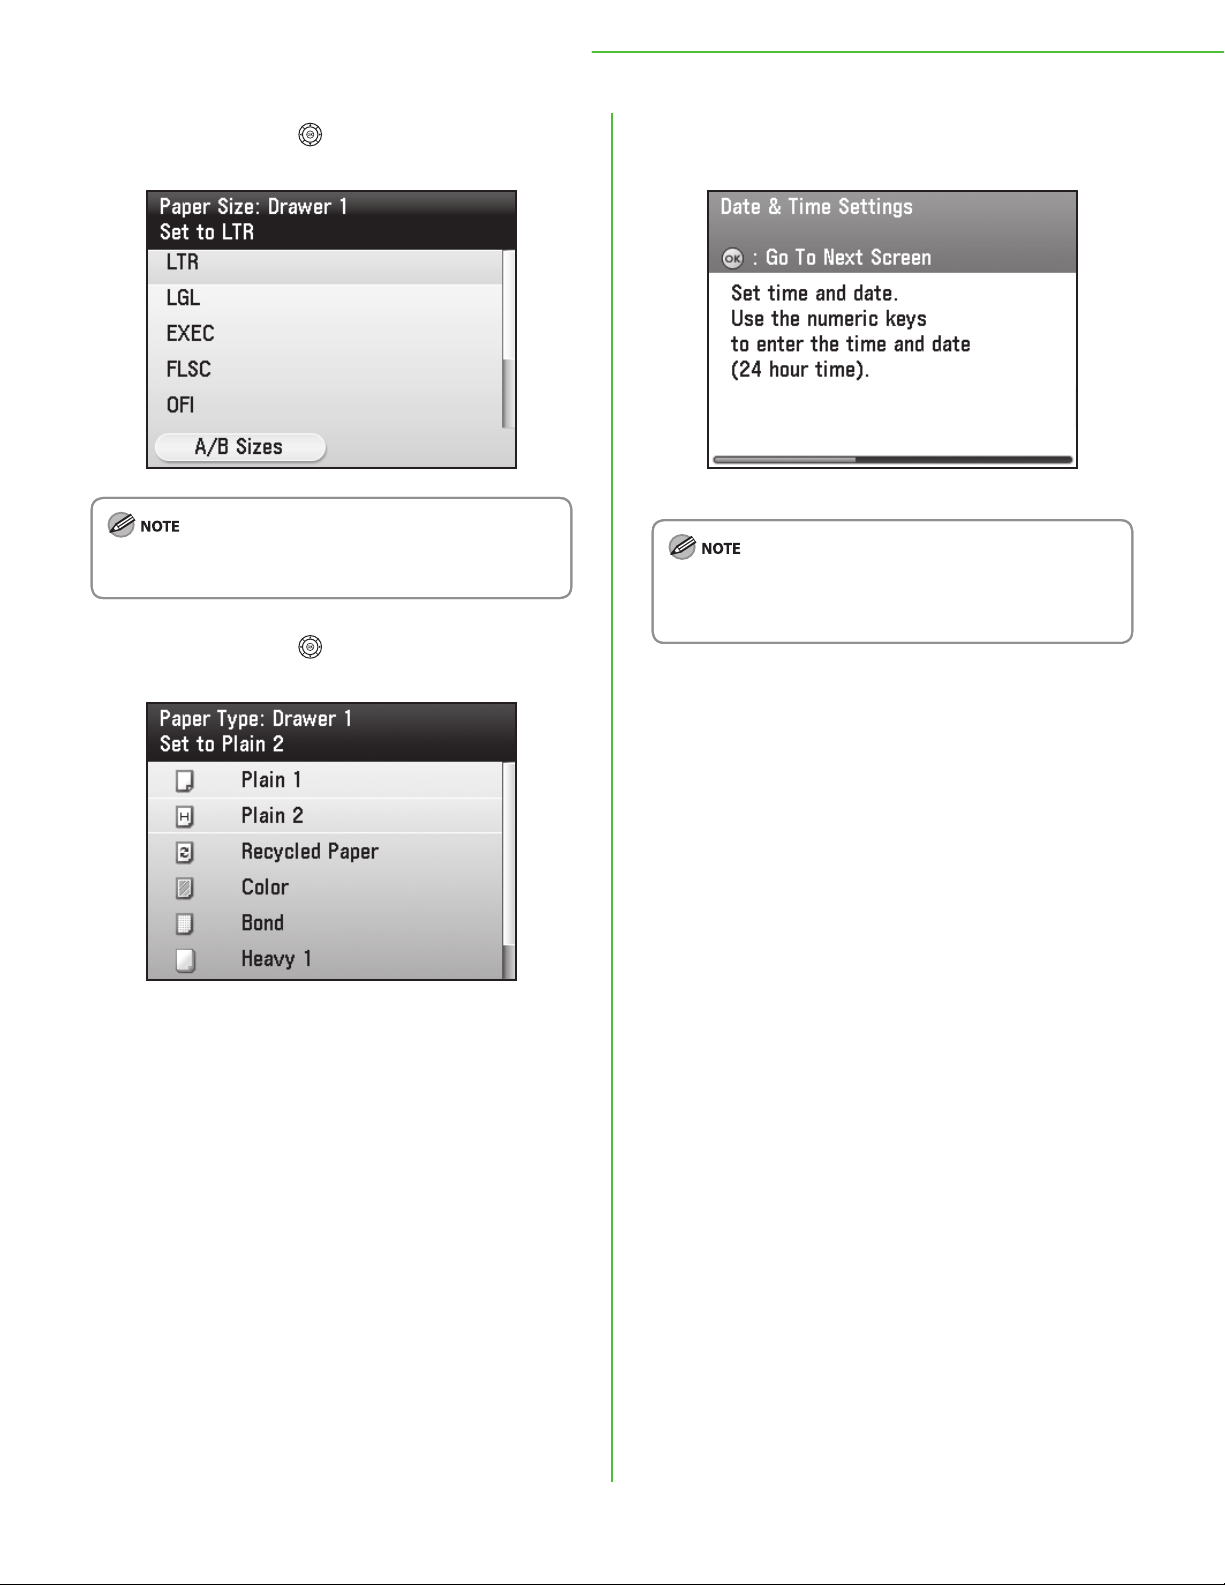
16 Use [
paper size you loaded, then press [OK].
If you use inch size paper, press the left Any key to select
<A/B Sizes> and the paper size you want to use.
17 Use [
paper type you loaded, then press [OK].
], [▲] or (Scroll Wheel) to select the
▼
], [▲] or (Scroll Wheel) to select the
▼
18 Make sure the following screen is displayed
on the display.
Go to “Set Date and Time,” on p. 19.
If the Optional Paper Drawer is installed in the machine, this
screen is not displayed. Go to “Optional Paper Drawer,” on
p. 1
6.
15

1 Settings Necessary to Use the Machines Functions
Optional Paper Drawer
When the Optional Paper Drawer is installed in the
machine, the procedure for setting up the Optional
Paper Drawer displays on the “Setup Guide.”
1 Pull out the optional paper drawer until it stops.
2 Hold the optional paper drawer with both
hands and remove it from the machine.
5 Press [OK] to proceed to the “Setup Guide.”
6 Hold the lock release lever of the rear paper
guides (A) and slide the guides to the mark for
the size of the paper to be loaded.
3 Press [OK] to proceed to the “Setup Guide.”
4 Hold the lock release lever of the side paper
guides (A) and slide the guides to the mark for
the size of the paper to be loaded. The side
paper guides move together.
IMake sure to set the guides to the mark for the size of the
paper to be loaded correctly. If the guides are positioned
incorrectly, it may cause paper jams, dirty prints, etc.
7 Press [OK] to proceed to the “Setup Guide.”
8 Fan the paper stack and even the edges.
9 Load the paper stack of the appropriate size
with the print side facing up. Align the rear edge
of paper stack with the rear paper guide.
Make sure to set the guides to the mark for the size of the
paper to be loaded correctly. If the guides are positioned
incorrectly, it may cause paper jams, dirty prints, etc.
16
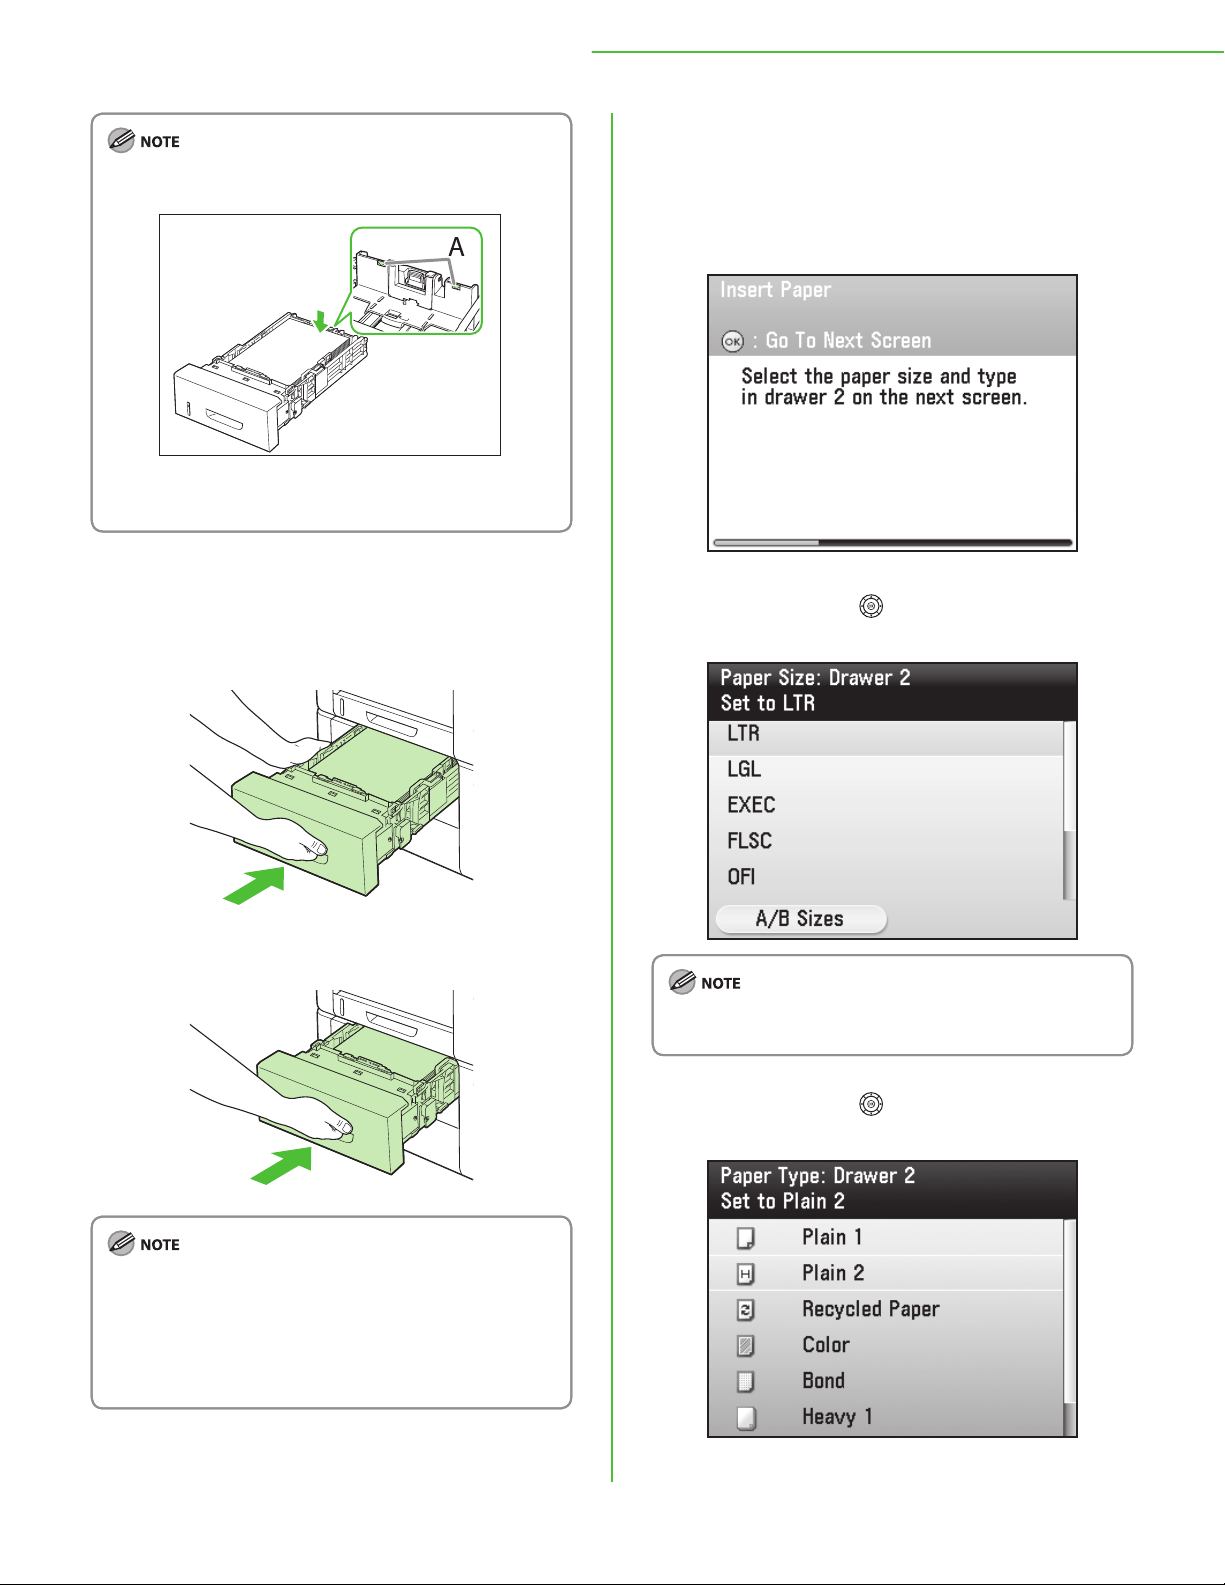
Make sure the paper stack does not exceed the load limit
–
mark (A).
The optional paper drawer holds approximately 500
–
sheets of paper (20 lb (75 g/m2)).
10 Press [OK] to proceed to the “Setup Guide.”
11 Hold the optional paper drawer with both
hands and set it back into the machine.
1 Settings Necessary to Use the Machines Functions
13 Press [OK] to proceed to the “Setup Guide.”
14 Make sure the following screen is displayed
on the display, then press [OK] to proceed to
the “Setup Guide.”
15 Use [
paper size you loaded, then press [OK].
], [▲] or (Scroll Wheel) to select the
▼
12 Push the paper drawer as far as it will go.
For details on loading paper in the stack bypass tray, see
–
“Introduction of the Machine,” in the e-Manual.
If you loaded a size and/or type of paper that is dierent
–
from what you registered in the “Setup Guide,” you need
to change the paper settings on the machine. See
“Change the Settings,” on p. 3
7.
If you use inch size paper, press the left Any key to select
<A/B Sizes> and the paper size you want to use.
16 Use [
paper type you loaded, then press [OK].
], [▲] or (Scroll Wheel) to select the
▼
17
1 Settings Necessary to Use the Machines Functions
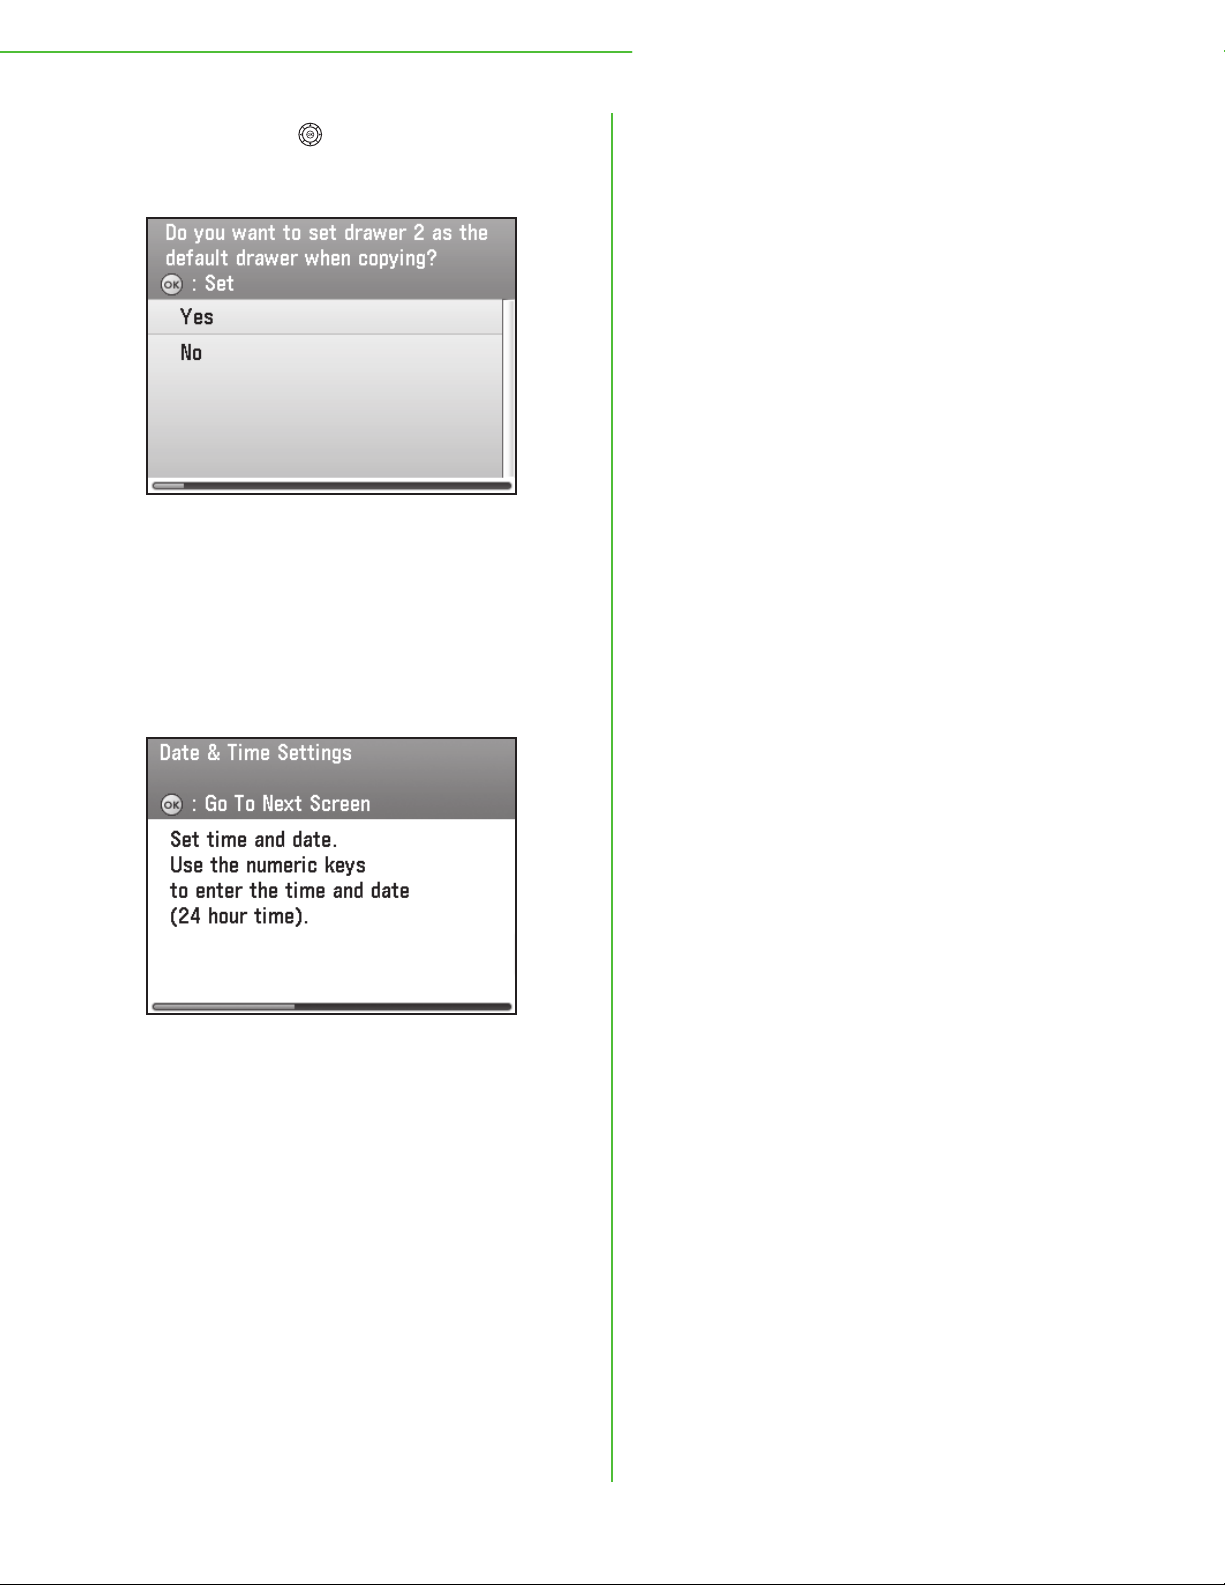
17 Use [
<Yes> or <No> for setting the default paper
drawer, then press [OK].
When you install paper drawer 2 (optional paper
drawer) that is usually used for copying, select <Yes>. If
you selected <No>, the default paper drawer (Standard
mode of copy) will be the paper drawer 1 (paper
drawer). (For details on the standard mode of copy, see
“Copy,” in the e-Manual.)
], [▲] or (Scroll Wheel) to select
▼
18 Make sure the following screen is displayed
on the display.
18
Go to “Set Date and Time,” on p. 19.
Loading...