


Canon MG5100 series On-screen Manual |
Page 1 of 941 pages |
 How to Use This Manual
 Printing This Manual
MC-4856-V1.00
Basic Guide |
Advanced Guide |
Troubleshooting |
Describes the summary of |
Describes the detailed |
|
this product. |
function of this product. |
|
MG5100 series Basic Guide |
Page 2 of 941 pages |
 How to Use This Manual
 Printing This Manual
MP-4719-V1.00
Contents
 Overview of the Machine
Main Components
How to Navigate Menus on the LCD
 Printing Photos
Printing Photos Saved on the Memory Card /
USB Flash Drive
Using Various Functions
Inserting the Memory Card
Inserting the USB Flash Drive
 Copying
Making Copies
Using Various Copy Functions
 Reprinting Photos from Printed Photos
Reprinting Printed Photos
Using Various Functions
 Scanning
Saving Scanned Data to the Computer Using Various Scan Functions
 Printing from Your Computer
Printing Photos (Easy-PhotoPrint EX)
Printing Documents
Printing Web Pages (Easy-WebPrint EX)
Starting Various Software Applications
 Advanced Guide
 Other Usages
Printing PDF Files Saved on the Memory Card /
USB Flash Drive
Printing the Template Forms such as Notebook Paper
Printing Photos Directly from Your Digital
Camera or Mobile Phone
Machine Settings
 Loading Paper / Originals
Loading Paper
Loading Originals
 Routine Maintenance
Replacing an Ink Tank
When Printing Becomes Faint or Colors Are
Incorrect
Cleaning the Paper Feed Roller
Cleaning the Pad in the Cassette
 Appendix
Legal Limitations on Use of Your Product and Use of Images
Tips on How to Use Your Machine
Overview of the Machine |
Page 3 of 941 pages |
 Advanced Guide
  Troubleshooting
Contents > Overview of the Machine
Overview of the Machine
This section shows the component names of the machine and describes the basic operations you need to know before using it.
Main Components
Front View
Rear View
Inside View
Operation Panel
How to Navigate Menus on the LCD
Selecting Menus on the HOME Screen
Selecting a Menu or Setting Item
Other Operations
 Page top
Main Components |
|
|
Page 4 of 941 pages |
||||
|
|
|
Advanced Guide |
|
|
|
|
|
|
|
|
Troubleshooting |
|
||
|
|
|
|
|
|||
|
|
|
|
|
|
|
|
|
Contents > Overview of the Machine > Main Components |
|
|
|
|
||
C001
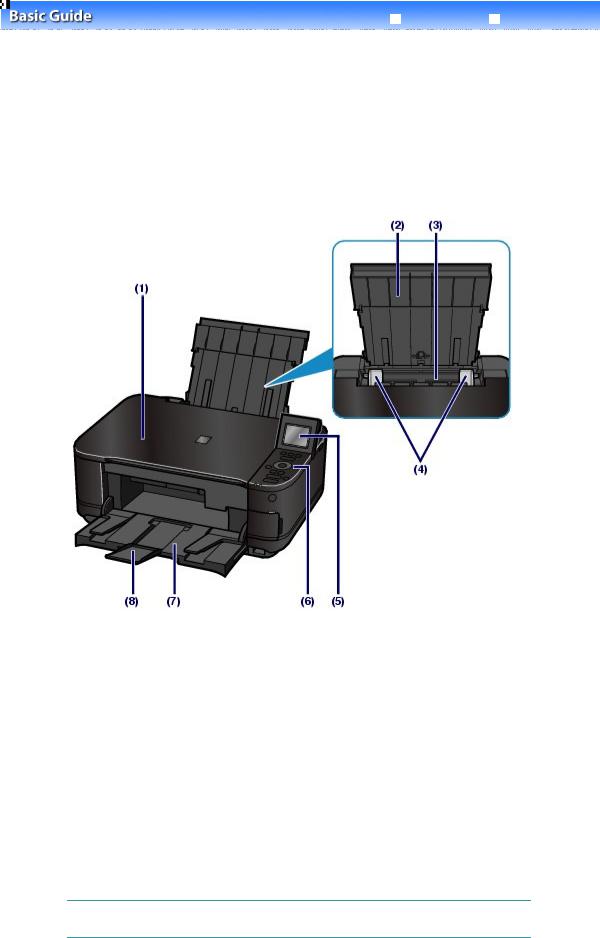
Main Components
 Front View
 Rear View
 Inside View
 Operation Panel
 Front View
(1) Document Cover
Open to load an original on the Platen Glass.
(2) Paper Support
Raise and tip back to load paper in the Rear Tray.
(3) Rear Tray
Load photo paper or envelopes which you can use on the machine. Two or more sheets of the same size and type of paper can be loaded at the same time, and fed automatically one sheet at a time.
See Loading Paper .
(4) Paper Guides
Slide to align with both sides of the paper stack.
(5) LCD (Liquid Crystal Display)
Displays messages, menu items, and the operational status. You can also preview photos on the LCD before printing.
 Note
Note
 The LCD will turn off if the machine is not operated for about 5 minutes. To restore the display, press any button except the ON button or perform the print operation.
(6) Operation Panel

Main Components |
Page 5 of 941 pages |
Use to change the settings of the machine or to operate it.
See Operation Panel .
(7) Paper Output Tray
Opens automatically when printing or copying starts and printed paper is ejected.
(8) Output Tray Extension
Open to support the printouts. Open it when printing or copying.
(9) Alarm lamp
Lights or flashes orange when an error occurs, such as paper-out or ink-out.
(10) ON button
Turns the power on or off. Before turning on the power, make sure that the Document Cover is closed.
 Important
Disconnecting the power plug
 When disconnecting the power plug after turning off the power, be sure to confirm that
the POWER lamp is not lit. If the power plug is disconnected from the wall outlet while the
POWER lamp is lit or flashing, the machine may become unable to print properly since the Print Head is not protected.
(11) POWER lamp
Lights green after flashing when the power is turned on.
(12) Direct Print Port
Connect a PictBridge compliant device such as a digital camera or the optional Bluetooth Unit BU-30* to print directly.
See Printing Photos Directly from Your Digital Camera or Mobile Phone.
You can also insert a USB flash drive to this port.
See Inserting the USB Flash Drive .
* The Bluetooth Unit is not available in some countries or regions depending on the local laws and regulations. For details, contact the service center.
 Warning
 Do not connect any equipment other than PictBridge compliant devices, the optional Bluetooth Unit BU-30, and USB flash drives to the Direct Print Port of the machine. This may cause fire, electric shock, or damage to the machine.
 Important
 Do not touch the metal casing.
(13) Cassette
Load A4, B5, A5, or Letter-sized plain paper and insert it into the machine. Two or more sheets of the same size of plain paper can be loaded at the same time, and fed automatically one sheet at a time.
Main Components |
Page 6 of 941 pages |
See Loading Paper .
(14) Platen Glass
Load an original to copy or scan.
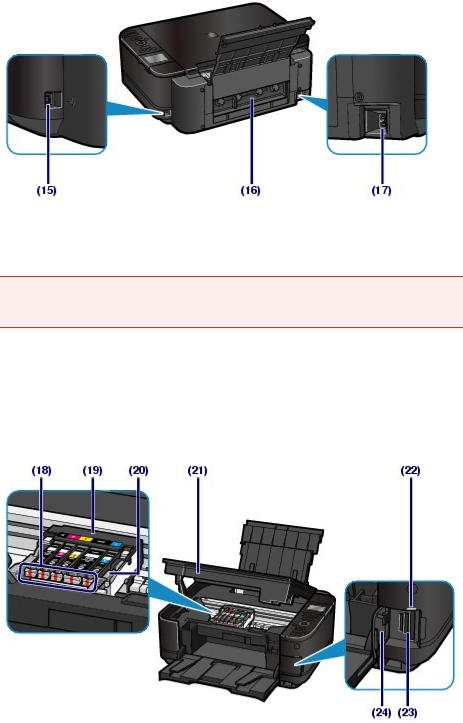
 Rear View
(15) USB Port
Plug in the USB cable to connect the machine with a computer.
 Important
 Do not touch the metal casing.
 Do not plug in or unplug the USB cable while the machine is printing or scanning originals with the computer.
(16) Rear Cover
Detach to remove jammed paper.
(17) Power Cord Connector
Plug in the supplied power cord.
 Inside View
(18) Ink lamps
Light or flash red to indicate the ink tank status.
See Checking the Ink Status .
(19) Print Head Holder
The Print Head is pre-installed.
(20) Print Head Lock Lever
Locks the Print Head into place.
Main Components |
Page 7 of 941 pages |
 Important
 Do not raise this lever.
(21) Scanning Unit (Cover)
Scans originals. Open it to replace ink tanks, to check ink lamps, or to remove jammed paper inside the machine. When opening the Scanning Unit (Cover), lift it with the Document Cover closed.
(22) Access lamp
Lights or flashes to indicate the memory card status.
See Inserting the Memory Card .
(23) Card Slot
Insert a memory card.
See Inserting the Memory Card .
(24) Card Slot Cover
Open to insert a memory card.
See Inserting the Memory Card .
 Note
Note
For details on installing ink tanks, refer to the printed manual: |
Getting Started . |
|
|
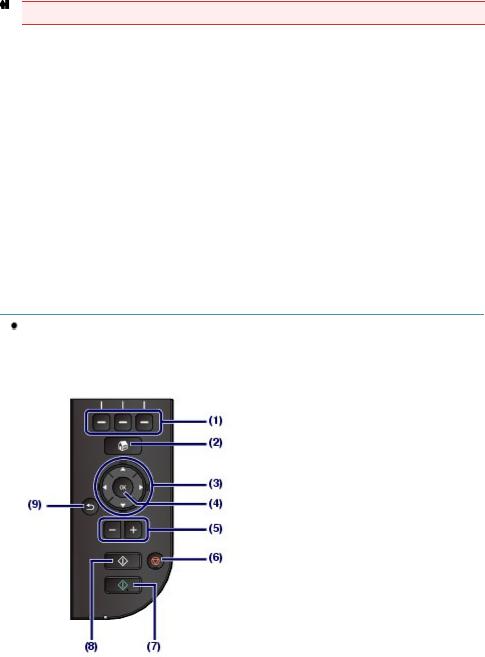
 Operation Panel
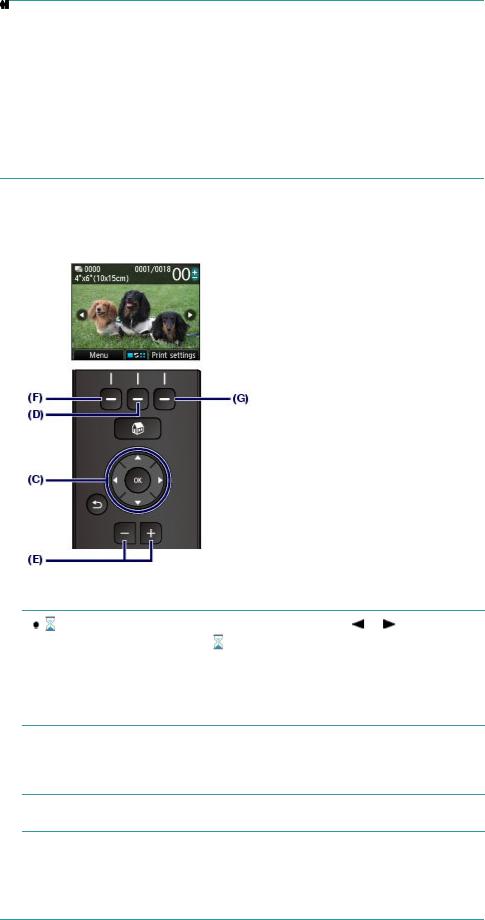
(1) Function buttons
Used to select menus on the HOME screen or select a function menu displayed at the bottom of the LCD.
See Selecting a Menu or Setting Item .
(2) HOME button
Used to display the HOME screen.
See Selecting Menus on the HOME Screen .
(3)  ,
,  ,
,  , and
, and  buttons (Scroll Wheel)
Used to select a menu or setting item.
See Selecting a Menu or Setting Item .
(4) OK button
Finalizes the selection of a menu or setting item.
Resolves an error when printing is in progress or resumes the machine's normal operation after removing jammed paper.
(5) [+] [-] buttons

Main Components |
Page 8 of 941 pages |
Specifies the number of copies to copy or print.
(6) Stop button
Cancels operation when print, copy, or scan job is in progress.
(7) Color button
Starts color printing, copying, or scanning. This button lights blue when available.
(8) Black button
Starts black & white copying, scanning, etc. This button lights blue when available.
(9) Back button
Returns the LCD to the previous screen.
 Page top

How to Navigate Menus on the LCD |
|
|
Page 9 of 941 pages |
||||
|
|
|
Advanced Guide |
|
|
|
|
|
|
|
|
Troubleshooting |
|
||
|
|
|
|
|
|||
|
|
|
|
|
|
|
|
|
Contents > Overview of the Machine > How to Navigate Menus on the LCD |
|
|
|
|
||
C002
How to Navigate Menus on the LCD
You can use the machine to print photos on a memory card or USB flash drive, make copies, or scan originals without a computer. You can also make good use of the various functions of the machine with the menu screen and the settings screen on the LCD.
This section describes the basic operation to navigate menus on the HOME screen and to select setting items necessary for printing.
 Selecting Menus on the HOME Screen
 Selecting a Menu or Setting Item
 Other Operations
 Selecting Menus on the HOME Screen
The HOME screen will appear when the power is turned on or when the HOME button is pressed.
The HOME screen consists of three screens, and the menus to make a copy, print photos, scan
originals, or etc. are displayed on the screens. The |
or button allows you to switch each screen. |
|
To select a menu, use the left, center, or right |
Function button. |
|
1.
2.
Press the HOME button (A).
The HOME screen will appear.
Use the  or
or  button (B) to display a desired menu, then press the Function button (C).
The selected menu screen will appear.
The following menus are available on the HOME screen.

How to Navigate Menus on the LCD |
Page 10 of 941 pages |
 Copy
Copy
You can change copy scale or erase dark frame or shade of bound part when copying a book. And also you can copy an original in various layouts.
See Copying .
Photo
You can print photos saved on a memory card of your digital camera or USB flash drive.
See Printing Photos .
Scan
You can save/forward scanned data to your computer or save them on a memory card or USB flash drive with the Operation Panel.
See Scanning .
Photo reprint
You can scan printed photos and print them easily.
See Reprinting Photos from Printed Photos .
Fun photo print
You can print stickers, calenders, and other photo items using photos on a memory card or USB flash drive.
See Functions in Fun photo print .
 Slide show
You can sequentially preview photos from a memory card or USB flash drive on the LCD. You can also select and print desired photos.
For details, refer to the on-screen manual:
 Document print
You can print documents (PDF files) that were scanned and saved by the machine. See Printing PDF Files Saved on the Memory Card / USB Flash Drive .
 Special print
You can print available template forms such as notebook paper, graph paper, etc. You can also print photos on a mobile phone using a wireless connection with optional Bluetooth Unit.
See Printing the Template Forms such as Notebook Paper or Printing Photos from a Wireless Communication Device .
 Setup
Setup
You can maintain the machine, or change settings of the machine.
See When Printing Becomes Faint or Colors Are Incorrect , Cleaning the Paper Feed Roller , or Machine Settings .
 Selecting a Menu or Setting Item
When you select a menu on the HOME screen, function menus (D) for that menu will appear at the bottom of the screen. Pressing a Function button (E) displays its corresponding menu or settings screen.
How to Navigate Menus on the LCD |
Page 11 of 941 pages |
On the menu screen or settings screen, use the  ,
,  ,
,  , or
, or  button ( Scroll Wheel ) (F) to select an item, then press the OK button (G) to proceed with the procedure. To return to the previous screen, press the Back button (H).
Be careful not to turn around the Scroll Wheel when you press the  ,
,  ,
,  , or
, or  button.
Using the  ,
,  ,
,  , or
, or  button (Scroll Wheel) (F)
(I)Press the  ,
,  ,
,  , or
, or  button to select items.
Or
(J)Turn around the Scroll Wheel with your finger to select items.
When it is indicated in this guide that the Scroll Wheel can be used, it is also described in the operation procedure, i.e., "the  ,
,  ,
,  , or
, or  button ( Scroll Wheel )".
Using the Function buttons
The following describes the operation on the photo selection screen as an example.
The functions and number of function menus vary depending on the screen. Check the items displayed at the bottom of the screen, then select the one desired.
How to Navigate Menus on the LCD |
Page 12 of 941 pages |
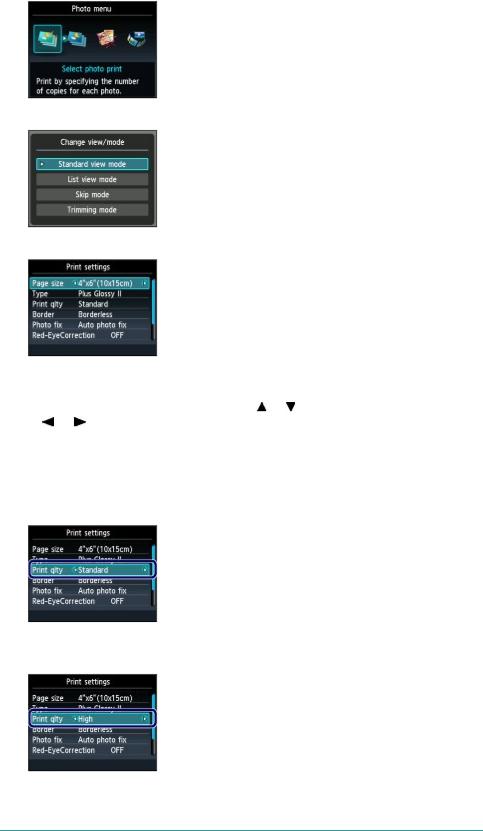
(K) Press the left Function button. The Photo menu screen will appear.
(L) Press the center Function button. The Change view/mode screen will appear.
(M) Press the right Function button. The Print settings screen will appear.
 Basic Operation on the Settings Screen
On screens for changing print settings, use the |
or button ( Scroll Wheel ) (F) to select an item, |
||
use the |
or |
button to select an option, then press the OK button (G). |
|
On the Print settings screen of Photo, for example, the procedure to change the print quality is as follows.
1. Use the  or
or  button ( Scroll Wheel ) to select Print qlty.
2. Use the  or
or  button to select High, and press the OK button.
The selected option will be set.
 Note
Note
 When the screen has a single setting item with two or more options
Use the  or
or  button ( Scroll Wheel) to select an option, and press the OK button.
How to Navigate Menus on the LCD |
Page 13 of 941 pages |
 When the screen has setting items displayed in a single row
Use the |
or |
button ( Scroll Wheel ) to select a menu, and press the OK button. |
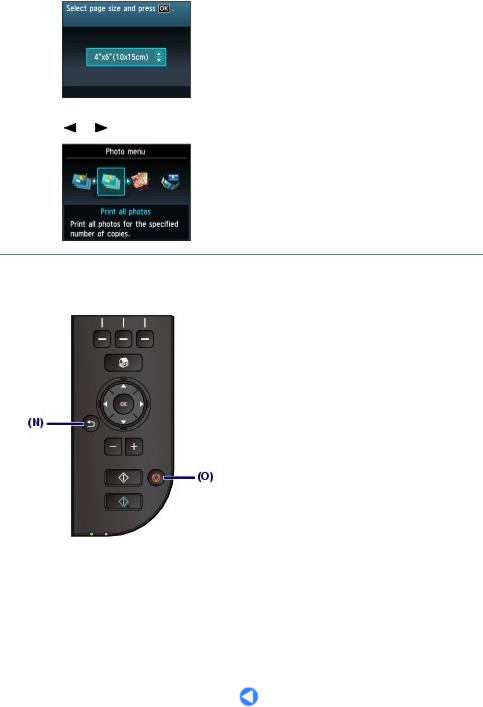
 Other Operations
 Returning to the Previous Screen
The screen will return to the previous screen every time you press the |
Back button (N). |
 Canceling a Copy, Print, or Scan Job
You can press the Stop button (O) to cancel a print, copy, or scan job in progress.
 Page top
Printing Photos |
Page 14 of 941 pages |
 Advanced Guide
  Troubleshooting
Contents > Printing Photos
Printing Photos
You can preview photos from a memory card or USB flash drive on the LCD, to select and print the desired photo.
You can also print your favorite photos in various layouts or use them for making a sticker.
Printing Photos Saved on the Memory Card / USB Flash Drive
Changing the Settings
Using Various Functions
Functions in Photo menu
Functions in Fun photo print
Other Useful Functions
Inserting the Memory Card
Before Inserting the Memory Card
Inserting the Memory Card
Removing the Memory Card
Inserting the USB Flash Drive
Inserting the USB Flash Drive
Removing the USB Flash Drive
 Page top
Printing Photos Saved on the Memory Card / USB Flash Drive |
Page 15 of 941 pages |
 Advanced Guide
  Troubleshooting
Contents > Printing Photos > Printing Photos Saved on the Memory Card / USB Flash Drive
C011
Printing Photos Saved on the Memory Card / USB Flash Drive
Preview each photo from the memory card or USB flash drive on the LCD, to select and print the desired photo.
This section describes the procedure to print borderless photos on 4" x 6" / 10 x 15 cm photo paper. For the operation, see the notes and operation procedure described in the reference page.
You need to prepare:
A memory card *1 with saved photos. See Before Inserting the Memory Card .
A USB flash drive *1 with saved photos. See Inserting the USB Flash Drive .
Photo paper for printing. See Media Types You Can Use .
*1 The machine can read up to 2000 photos.
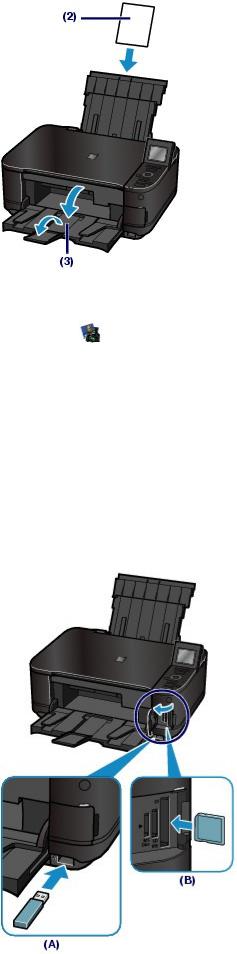
1. Prepare for printing.
(1) Turn on the power.
See Front View .
(2) Load paper.
See Loading Paper .
Here we load 4" x 6" / 10 x 15 cm photo paper in the Rear Tray.
 Note
Note
 When you print on A4 or Letter-sized plain paper, make sure that they are loaded in the
Cassette. Load other sizes or types of paper in the Rear Tray.
(3) Open the Paper Output Tray gently, and open the Output Tray Extension.
Printing Photos Saved on the Memory Card / USB Flash Drive |
Page 16 of 941 pages |
2. Insert a memory card or USB flash drive.
(1) |
Select Photo |
on the HOME screen. |
|
|
See Selecting Menus on the HOME Screen . |
|
|
|
The message "USB flash drive or memory card is not set." will appear. |
|
|
(2) |
Insert a memory card or USB flash drive. |
|
|
Memory card: |
|
|
|
Insert it WITH THE LABELED SIDE FACING TO THE LEFT into the Card Slot. |
|
||
For the types of memory card compatible with the machine and locations to insert them, see |
Inserting the |
||
Memory Card . |
|
|
|
USB flash drive:
Insert it into the Direct Print Port.
See Inserting the USB Flash Drive .
The photo selection screen in Select photo print will appear.
(A) USB flash drive
Printing Photos Saved on the Memory Card / USB Flash Drive |
Page 17 of 941 pages |
(B) Memory card
 Note
Note
 If a memory card or USB flash drive is inserted on the HOME screen, copy standby screen, etc., the photo selection screen in Select photo print will also appear.
For details, refer to the on-screen manual: Advanced Guide .
 Do not insert memory card and USB flash drive at the same time. Also do not insert two or more memory cards at the same time.
 When Read/write attribute is set to Writable from PC, you cannot print image data from the memory card using the Operation Panel on the machine. To print image data from the memory card, select Device user settings in Device settings of Setup on the HOME screen, and set Read/write attribute to Not writable from PC.
For details, refer to the on-screen manual: Advanced Guide .
* You can print image data from the USB flash drive regardless of the setting in Read/write attribute.
3. Select photos to print.
(1) Use the  or
or  button ( Scroll Wheel ) (C) to display a desired photo.
 Note
Note
may appear on the LCD while reading photos. If you use the |
or |
button ( Scroll |
|
Wheel ) to display the photo while |
appears on the LCD, the desired photo may not be |
||
selected. |
|
|
|
 If you press the center Function button (D), the Change view/mode screen will appear. This screen lets you change how photos are displayed. It also lets you select Trimming mode for cropping photos.
See Other Useful Functions .
(2) Use the [+] or [-] button (E) to specify the number of copies.
 Note
Note
 If you press the Color button without specifying the number of copies, one copy of the selected photo will be printed.
(3)Repeat the procedures of (1) and (2) to specify the number of copies for each photo.
 Note
Note
Printing Photos Saved on the Memory Card / USB Flash Drive |
Page 18 of 941 pages |
 If you press the left Function button (F) to select Menu, you can select various photo print functions other than Select photo print.
See Using Various Functions .
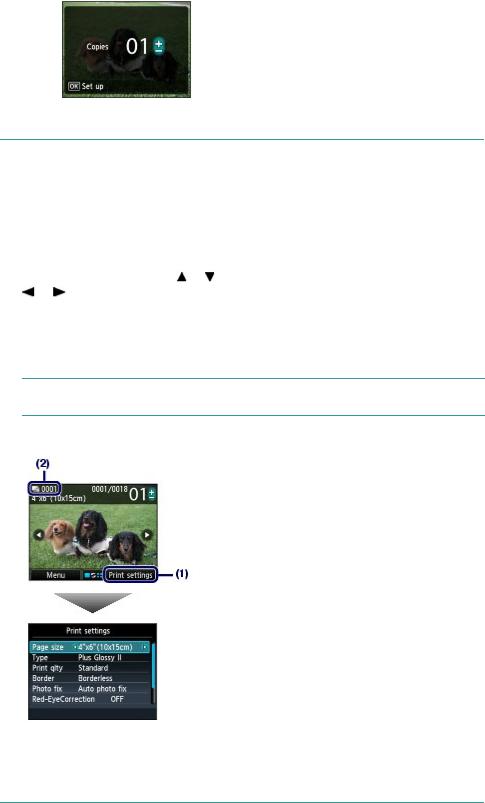
 If you select a photo for which the number of copies is not specified (copies "00") and press the OK button, "01" is set for the number of copies and the screen to change the number of copies will appear.
Use the [+] or [-] button or the Scroll Wheel to specify the number of copies, and press the OK button to return to the screen in (1).
4. Start printing.
(1) Press the right Function button (G) to select Print settings, and confirm the page size, media type, print quality, etc.
Here we confirm that 4"x6" (10x15cm) is selected for Page size and the type of loaded photo paper for Type.
To change the settings, use the |
or |
button ( Scroll Wheel) to select the item to change, and use the |
||
or |
button to select an option. After confirming or changing the settings, press the |
OK button to |
||
return to the photo selection screen. |
|
|
|
|
See Basic Operation on the Settings Screen and Changing the Settings .
 Note
Note
 You can specify Photo fix or Print date on the Print settings screen.
See Changing the Settings .
(2) Confirm the number of sheets to be used for printing the selected photos.
(3) Press the Color button.
The machine starts printing photos.
 Note
Note
 When you press the right Function button to select Queue print while printing, the screen will return to the photo selection screen. You can then continue selecting photos for printing.
For details, refer to the on-screen manual: Advanced Guide .  Press the Stop button to cancel printing.
 Printing does not start if you press the
 To remove the memory card, see Removing the Memory Card .
Printing Photos Saved on the Memory Card / USB Flash Drive |
Page 19 of 941 pages |
To remove the USB flash drive, see Removing the USB Flash Drive .
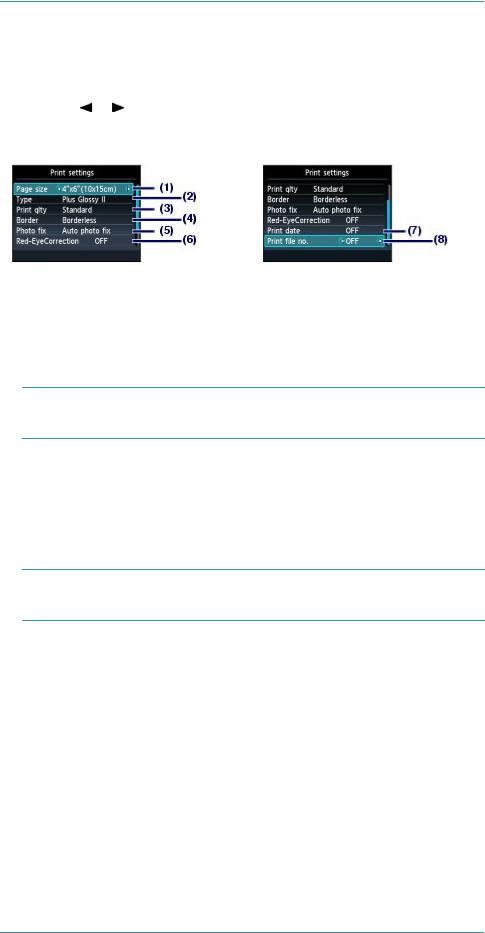
 Changing the Settings
If you press the right Function button to select Print settings on the photo selection screen, the Print settings screen will appear.
You can use the  or
or  button ( Scroll Wheel ) to select the item, such as page size, media type, or print
quality, and use the |
or |
button to change the setting. |
|
For the setting operation, see |
Basic Operation on the Settings Screen . |
|
|
For the print settings of Print all photos or Fun photo print, refer to the on-screen manual: |
Advanced |
||
Guide . |
|
|
|
(1) Page size
Select the page size of the paper to print: 4"x6" (10x15cm), A4, etc.
(2) Type (Media type)
Select the media type of the paper to print: Plus Glossy II, Glossy, etc.
 Note
Note
 If you do not select the page size and media type correctly, the machine may feed paper from the wrong paper source or may not print with the proper print quality.
See Paper Sources to Load Paper .
(3) Print qlty (Print quality)
Select the print quality: High or Standard.
(4) Border
Select bordered or borderless print: Bordered or Borderless.
 Note
Note
 If the ratio of the height to the width differs from the image data when Borderless is selected, a portion of the image may not be printed depending on the size of the media used.
(5) Photo fix
Correct photos: Auto photo fix or Manual correction. The photo can be also printed without correction.
When Manual correction is selected and the right Function button is pressed to select Advanced, brightness, contrast, color balance, etc. can be adjusted.
For details, refer to the on-screen manual: Advanced Guide .
(6) Red-EyeCorrection
Correct red eyes in portraits caused by flash photography.
(7) Print date
Print a photo with shot date.
See Printing Photos with Shot Date or File Number .
(8) Print file no.
Print a photo with file number.
See Printing Photos with Shot Date or File Number .
 Note
Note
 The settings of the page size, media type, print quality, photo fix, border, etc. are retained, and

Printing Photos Saved on the Memory Card / USB Flash Drive |
Page 20 of 941 pages |
these settings will appear next time when Photo is selected even if the power is turned off and on.
 If the combination of some setting items is invalid, the mark
  appears at the invalid item. Press the left Function button to select Error details and check the error message, then correct the settings.
 Page top

Using Various Functions |
Page 21 of 941 pages |
 Advanced Guide
  Troubleshooting
Contents > Printing Photos > Using Various Functions
C012
Using Various Functions
You can print photos in various ways when you use the left |
Function button to select Menu on the photo |
selection screen. You can also use the useful functions to print photos. For details, refer to the on-screen manual: Advanced Guide.
 Functions in Photo menu
On the Photo menu screen, you can select Select photo print, Print all photos, To fun photo print, or To slide show.
 Note
Note
 Fun photo print or Slide show can be also selected on the HOME screen.
See Selecting Menus on the HOME Screen .
 For details on Slide show, refer to the on-screen manual: Advanced Guide .
 Print All Photos
If Print all photos is selected, you can print all photos on the memory card or USB flash drive at one time. You can also print only photos in a specified date range.
Search for photos by date
You can specify a date range and print only the photos in that range.
 Functions in Fun photo print
You can select various layouts on the Fun photo print screen. You can also select DPOF print.
Layout print |
Sticker print |
Captured info print |
Using Various Functions |
Page 22 of 941 pages |
Photo Index print |
ID photo size print |
Calendar print |
 Other Useful Functions
Besides the functions selected on the Photo menu screen, you can specify the display style of photos, cropping, photo fix, date print, etc.
For details, refer to the on-screen manual: Advanced Guide.
 Changing the Display
To display the Change view/mode screen, press the center Function button on the photo selection screen.
The Standard view mode shows a single photo. The List view mode shows 9 thumbnails. The Skip mode lets you scroll in units of 10 or 100 photos, or by date. The Trimming mode lets you crop photos.
Standard view mode List view mode Skip mode Trimming mode
 Cropping Photos
On the Trimming screen, you can use the [+] or [-] button or the |
Scroll Wheel to change the cropping |
||
size and use the |
, , , or |
button to change the cropping area. Press the OK button to apply |
|
the changes, then return to the photo selection screen. |
|
||
 Correcting Photos
If Auto photo fix is selected for Photo fix on the Print settings screen, the selected photos will be corrected automatically.

Using Various Functions |
Page 23 of 941 pages |
Auto photo fix
 Printing Photos with Shot Date or File Number
If ON is selected for Print date or Print file no. on the Print settings screen, the selected photos can be printed with shot date or file number.
Print date |
Print file no. |
 Page top
Inserting the Memory Card |
Page 24 of 941 pages |
 Advanced Guide
  Troubleshooting
Contents > Printing Photos > Inserting the Memory Card
C013
Inserting the Memory Card
 Before Inserting the Memory Card
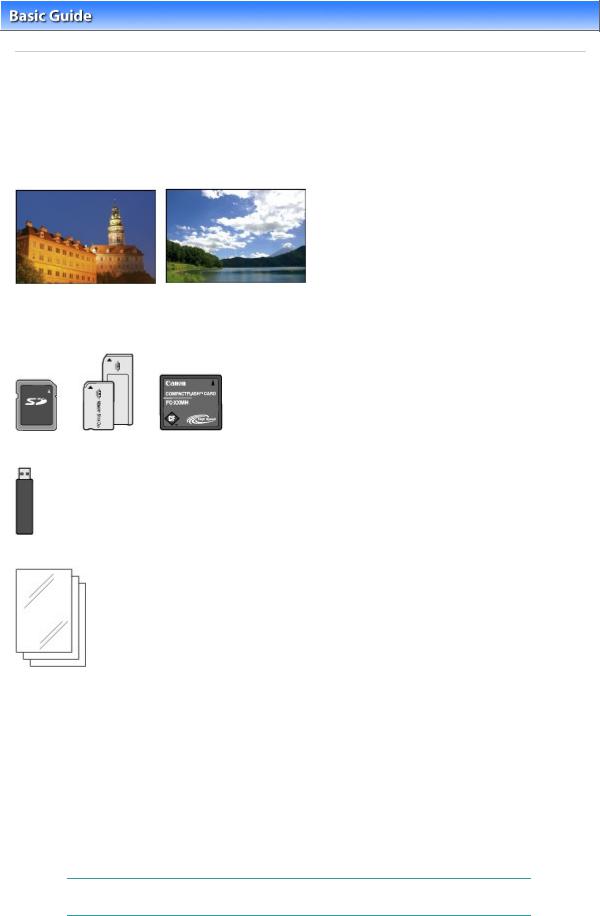
The following types of memory cards and image data are compatible with the machine.
 Important
Image data shot by the digital camera
 If you took and saved photos on a type of memory card that does not guarantee the operation on your digital camera, the image data may be unreadable on the machine or damaged. For information on memory cards that your digital camera guarantees operation, refer to the instruction manual supplied with your digital camera.
 Format the memory card with a digital camera compliant with the Design rule for Camera File system (Exif 2.2/2.21 compliant), TIFF (Exif 2.2/2.21 compliant). The memory card may not be compatible with the machine if it is formatted on a computer.
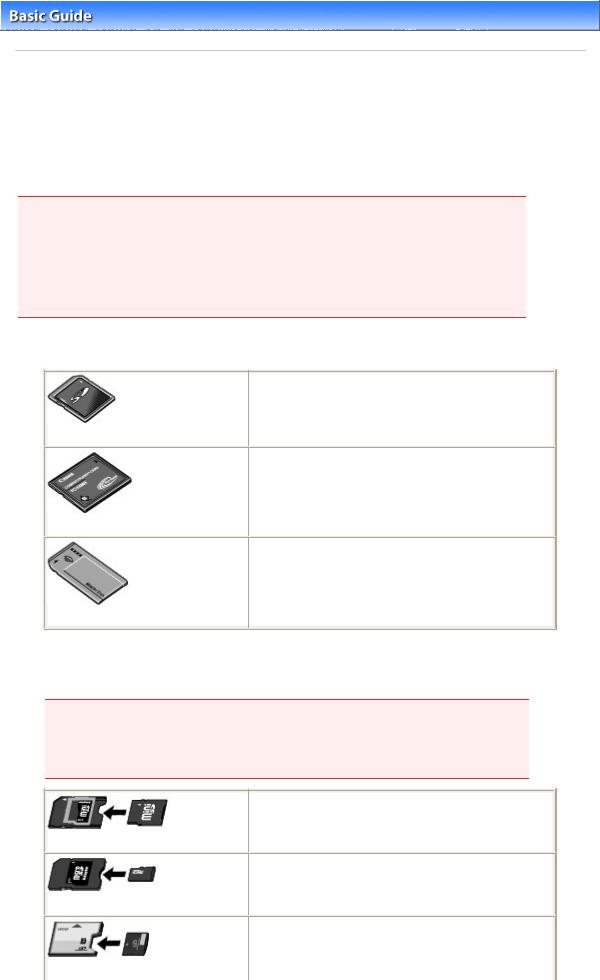
 Memory Cards that Do Not Require a Card Adapter
 SD Secure Digital memory card
 SDHC memory card
 MultiMediaCard
 MultiMediaCard Plus
 Compact Flash (CF) Card
Supports Type I/II (3.3 V)
 Microdrive
 Memory Stick
 Memory Stick PRO
 Memory Stick Duo
 Memory Stick PRO Duo
 Memory Cards that Require a Card Adapter
 Important
 Be sure to attach the special card adapters to the following memory cards before inserting to the Card Slot.
If one of the following memory cards is inserted without the card adapter, you may not be able to remove the memory card. In this case, refer to " Troubleshooting " in the on-screen manual:
Advanced Guide .
 miniSD Card*1
  miniSDHC Card *1
 microSD Card *1
  microSDHC Card *1
 xD-Picture Card *2
 xD-Picture Card Type M *2
 xD-Picture Card Type H *2
Inserting the Memory Card |
Page 25 of 941 pages |
 RS-MMC*3
 MMCmobile*3
 Memory Stick Micro *4
*1 Use the special "SD Card Adapter".
*2 Requires purchase of a separate compact flash card adapter for xD-Picture Card.
*3 Use the special card adapter.
*4 Use the special Duo size adapter or full size adapter.
 Printable Image Data
 This machine accepts images taken with a camera compliant with the Design rule for Camera File system (Exif 2.2/2.21 compliant), TIFF (Exif 2.2/2.21 compliant). Other image or movie types such as RAW images cannot be printed.
 The machine accepts images scanned and saved with the machine when Doc. type is set to Photo and Format is set to JPEG (file extension ".jpg").
 Inserting the Memory Card
 Important
 When a memory card is inserted into the Card Slot, the Access lamp is lit. When the Access lamp is flashing, the machine is accessing the memory card. In this case, do not touch the area around
the Card Slot.
 Note
Note
 When Read/write attribute is set to Writable from PC, you cannot print image data from the memory card or save scanned data on the memory card using the Operation Panel of the machine. After using the Card Slot as the memory card drive of a computer, remove the memory card, select Device user settings in Device settings of Setup on the HOME screen, then set Read/write attribute to Not writable from PC.
For details, refer to the on-screen manual: Advanced Guide .
 When you use a computer to edit or enhance photos saved on a memory card, be sure to print them from the computer. If you use the Operation Panel, the photos may not be printed properly.
1. Prepare your memory card.
Attach a special card adapter if your memory card requires one.
See Memory Cards that Require a Card Adapter .
2. Turn on the power, and open the Card Slot Cover.
Inserting the Memory Card |
Page 26 of 941 pages |
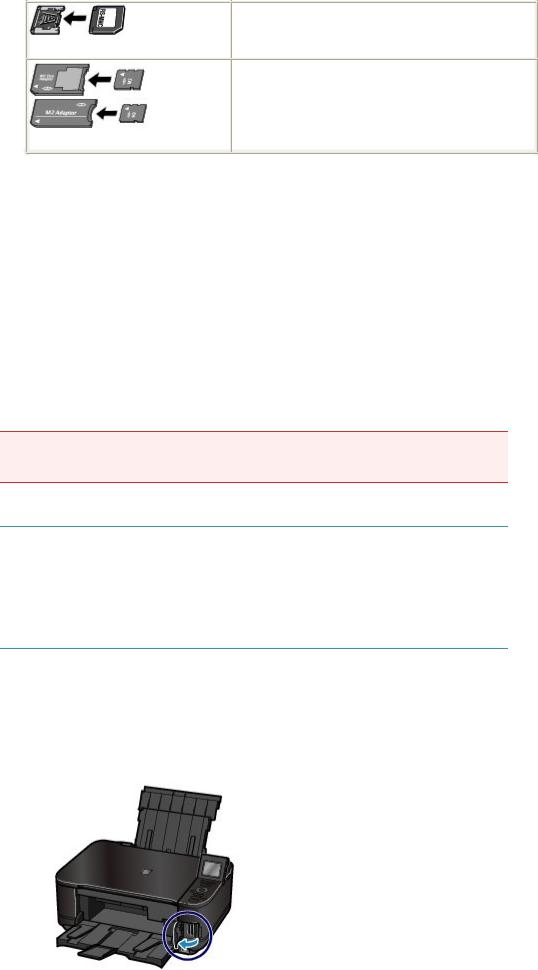
3. Insert only one memory card into the Card Slot.
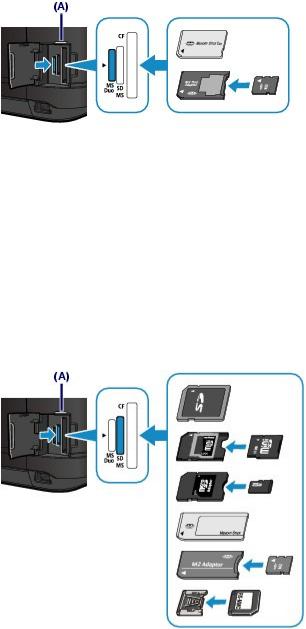
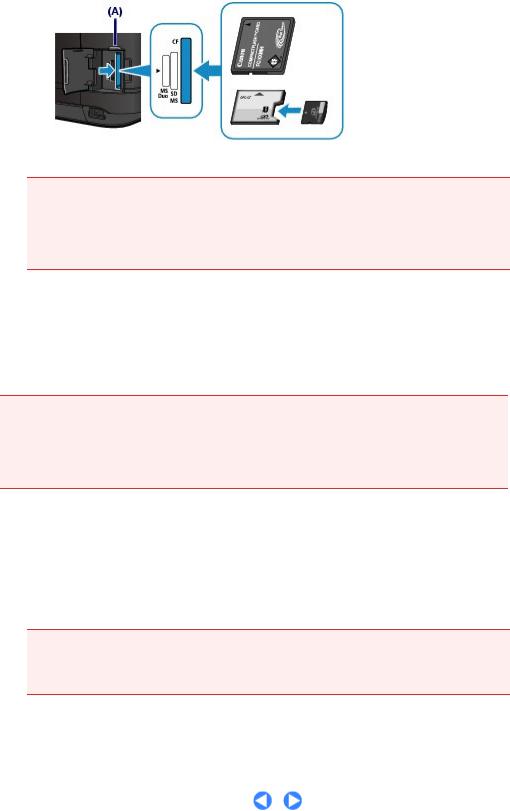
The location to insert a memory card varies depending on each type of memory card. Insert your memory card straightforward WITH THE LABELED SIDE FACING TO THE LEFT into the Card Slot, according to the insert location in the figure below.
When the memory card is inserted properly, the Access lamp (A) will light up.
Be sure to attach the card adapter for memory card with the mark  (asterisk), and then insert it into the Card Slot as shown below.
Insert the following types of memory cards into the left Card Slot:
 Memory Stick Duo, Memory Stick PRO Duo
 Memory Stick Micro (with the Duo size adapter)
Insert the following types of memory cards into the center Card Slot:
 SD Secure Digital memory card, SDHC memory card, MultiMediaCard, MultiMediaCard Plus
 miniSD Card
  , miniSDHC Card
 microSD Card
 , microSDHC Card
 Memory Stick, Memory Stick PRO
 Memory Stick Micro (with the full size adapter)
 RS-MMC
 MMCmobile
Insert the following types of memory cards into the right Card Slot:
 Compact Flash (CF) Card, Microdrive
 xD-Picture Card
 , xD-Picture Card Type M
  , xD-Picture Card Type H
Inserting the Memory Card |
Page 27 of 941 pages |
 Important
 Part of the memory card will protrude from the Card Slot, but do not force it into the slot any further. This can damage the machine or the memory card.
 Make sure that the memory card is correctly oriented before inserting it into the Card Slot. If you force the memory card into the Card Slot in the wrong orientation, the memory card or the machine can be damaged.
 Do not insert more than one memory card at a time.
4. Close the Card Slot Cover.
 Removing the Memory Card
 Important
 If you used the Card Slot as the memory card drive of a computer, you must perform the "safe removal" operation on your computer before physically removing the memory card from the machine.
If you are connecting the machine with a USB cable, right-click the removable disk icon and click Eject. If Eject does not appear on the screen, make sure that the Access lamp is lit, and then remove the memory card.
1.
2.
Open the Card Slot Cover.
Make sure that the Access lamp is lit, and remove the memory card.
Hold the part of the memory card that is protruding and remove it straightforward from the machine.
 Important
 Do not remove the memory card while the Access lamp is flashing. The Access lamp flashes while the machine is reading or writing data from/to the memory card. If you remove the
memory card or turn off the power while the Access lamp is flashing, the data saved on the
3.
 Page top
Inserting the USB Flash Drive |
Page 28 of 941 pages |
 Advanced Guide
  Troubleshooting
Contents > Printing Photos > Inserting the USB Flash Drive
C014
Inserting the USB Flash Drive
 Inserting the USB Flash Drive
 Note
Note
Before inserting the USB flash drive
 If your USB flash drive cannot be inserted into the Direct Print Port of the machine, you may be required to use an extension cable for the USB flash drive. Purchase it at electronics retail stores.
 Some USB flash drives may have recognition problem, and these devices may not guarantee proper operation of the machine.
 You may not be able to use USB flash drives with security function.
For information on the data that can be printed with this machine, see |
Printable Image Data in |
"Before Inserting the Memory Card". |
|
|
|
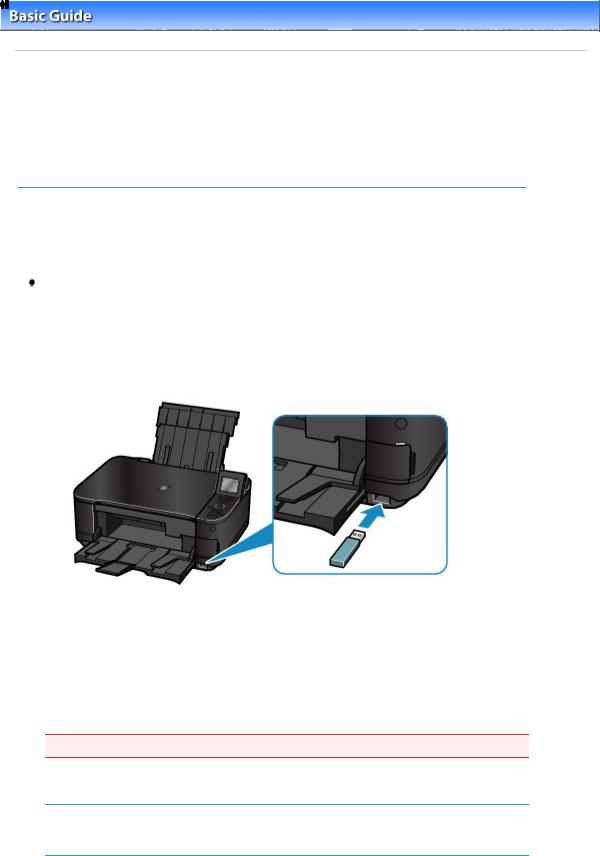
1. Insert the USB flash drive into the Direct Print Port.
Make sure that the USB flash drive is correctly oriented before inserting it straightforward into the Direct Print
Port.
 Removing the USB Flash Drive
1. Make sure that the machine is not reading or writing data from/to the USB flash drive.
Check if the reading or writing operation is completed on the LCD.
 Important
 Do not remove the USB flash drive or turn off the power while the machine is operating.
 Note
Note
 If your USB flash drive has the access lamp, refer to the instruction manual supplied with the USB flash drive to check if the reading or writing operation is completed on the USB flash drive.
2. Remove the USB flash drive.
Hold the USB flash drive and remove it straightforward from the machine.

Inserting the USB Flash Drive |
Page 29 of 941 pages |
 Page top
Copying |
Page 30 of 941 pages |
 Advanced Guide
  Troubleshooting
Contents > Copying
Copying
You can copy in the various methods such as enlarging/reducing or copying two original pages onto a single sheet of paper.
Making Copies
Changing the Settings
Using Various Copy Functions
 Page top
 Loading...