


 Loading...
PUB. DIE-0466-000B
HD Camcorder
Instruction Manual

Important Usage Instructions
COPYRIGHT WARNING:
Unauthorized recording of copyrighted materials may infringe on the rights of copyright owners and be contrary to copyright laws.
CAUTION:
TO REDUCE THE RISK OF ELECTRIC SHOCK AND TO REDUCE ANNOYING INTERFERENCE, USE THE RECOMMENDED ACCESSORIES ONLY.
CAUTION:
DISCONNECT THE MAINS PLUG FROM THE SUPPLY SOCKET WHEN NOT IN USE.
To reduce the risk of electric shock, do not expose this product to dripping or splashing.
The Mains plug is used as the disconnect device. The Mains plug shall remain readily operable to disconnect the plug in case of an accident.
While using the compact power adapter, do not wrap it or cover it with a piece of cloth, and do not place it in confined narrow spaces.
CA-110E identification plate is located on the bottom.
2

Only for European Union and EEA (Norway, Iceland and Liechtenstein)
These symbols indicate that this product is not to be disposed of with your household waste, according to the WEEE Directive (2012/
19/EU), the Battery Directive (2006/66/EC) and/or national legislation implementing those Directives.
If a chemical symbol is printed beneath the symbol shown above, in accordance with the Battery Directive, this indicates that a heavy metal (Hg = Mercury, Cd = Cadmium, Pb = Lead) is present in this battery or accumulator at a concentration above an applicable threshold specified in the Battery Directive.
This product should be handed over to a designated collection point, e.g., on an authorized one-for-one basis when you buy a new similar product or to an authorized collection site for recycling waste electrical and electronic equipment (EEE) and batteries and accumulators. Improper handling of this type of waste could have a possible impact on the environment and human health due to potentially hazardous substances that are generally associated with EEE. Your cooperation in the correct disposal of this product will contribute to the effective usage of natural resources.
For more information about the recycling of this product, please contact your local city office, waste authority, approved scheme or your household waste disposal service or visit www.canon-europe.com/weee, or www.canon-europe.com/battery.
REGIONS OF USE
The LEGRIA HF R68, LEGRIA HF R67 and LEGRIA HF R66 are in compliance (as of January 2015) with the radio signal regulations of the regions listed below. For details on other regions where they can be used, make inquiries with the contacts listed at the end of this instruction manual (A298).
REGIONS
Australia, Austria, Belgium, Bulgaria, Croatia, Cyprus, Czech Republic, Denmark, Estonia, Finland, France, Germany, Greece, Hong Kong S.A.R., Hungary, Iceland, Ireland, Italy, Latvia, Liechtenstein, Lithuania, Luxembourg, Malta, Netherlands, New Zealand, Norway, Poland, Portugal, Romania, Russia, Singapore, Slovakia, Slovenia, Spain, Sweden, Switzerland, United Kingdom
3

Statement on EC directive
Hereby, Canon Inc. declares that the ID0047 is in compliance with the essential requirements and other relevant provisions of Directive 1999/5/EC. Please contact the following address for the original Declaration of Conformity: CANON EUROPA N.V.
Bovenkerkerweg 59, 1185 XB Amstelveen, The Netherlands CANON INC.
30-2, Shimomaruko 3-chome, Ohta-ku, Tokyo 146-8501, Japan
Complies with |
This product is installed with the WLAN Module which is certified to |
|
standards set by IDA Singapore. |
||
IDA Standards |
||
|
||
DB00671 |
|
|
|
|
Model
ID0047: LEGRIA HF R68 / LEGRIA HF R67 / LEGRIA HF R66
4

Trademark Acknowledgements
•SD, SDHC and SDXC Logos are trademarks of SD-3C, LLC.
•Microsoft and Windows are trademarks or registered trademarks of Microsoft Corporation in the United States and/or other countries.
•App Store, iPad, iPhone, iTunes and Mac OS are trademarks of Apple Inc., registered in the U.S. and other countries.
•HDMI, the HDMI logo and High-Definition Multimedia Interface are trademarks or registered trademarks of HDMI Licensing LLC in the United States and other countries.
•“AVCHD”, “AVCHD Progressive” and the “AVCHD Progressive” logo are trademarks of Panasonic Corporation and Sony Corporation.
•Google, Android, Google Play, YouTube are trademarks of Google Inc.
•Manufactured under license from Dolby Laboratories.
“Dolby” and the double-D symbol are trademarks of Dolby Laboratories.
• Facebook is a registered trademark of Facebook, Inc.
• IOS is a trademark or registered trademark of Cisco in the U.S. and other countries and is used under license.
•The Twitter name and marks are trademarks of Twitter, Inc.
•Wi-Fi is a registered trademark of the Wi-Fi Alliance.
•Wi-Fi Certified, WPA, WPA2, and the Wi-Fi Certified logo are trademarks of the Wi-Fi Alliance.
•WPS as used on the camcorder’s settings, onscreen displays and in this manual signifies Wi-Fi Protected Setup.
•The Wi-Fi Protected Setup Identifier Mark is a mark of the Wi-Fi Alliance.
•The N-Mark is a trademark or registered trademark of NFC Forum, Inc. in the United States and in other countries.
•FlashAir is a trademark of Toshiba Corporation.
•Other names and products not mentioned above may be trademarks or registered trademarks of their respective companies.
•This device incorporates exFAT technology licensed from Microsoft.
•“Full HD 1080” refers to Canon camcorders compliant with high-definition video composed of 1,080 vertical pixels (scanning lines).
• This product is licensed under AT&T patents for the MPEG-4 standard and may be used for encoding MPEG-4 compliant video and/or decoding MPEG-4 compliant
video that was encoded only (1) for a personal and non-commercial purpose or (2) by a video provider licensed under the AT&T patents to provide MPEG-4 compliant video. No license is granted or implied for any other use for MPEG-4 standard.
5

About this Manual and Camcorder
Thank you for purchasing the Canon LEGRIA HF R68 / LEGRIA HF R67 / LEGRIA HF R66 / LEGRIA HF R606. Please read this manual carefully before you use the camcorder and retain it for future reference. Should your camcorder fail to operate correctly, refer to Troubleshooting
(A240).
Conventions Used in this Manual
|
Important precautions related to the camcorder’s opera- |
|
tion. |
|
Additional notes and topics that complement the basic |
|
operating procedures. |
|
Restrictions, requirements or preconditions regarding the |
|
function described. |
A |
Reference page number within this manual. |
HText that applies only to the model(s) shown in the icon.
>This arrow is used to abbreviate menu selections. For a detailed explanation on how to use the menus, refer to
Using the Menus (A44).
•The following terms are used in this manual:
HWhen not specified as “memory card” or “built-in memory”, the term “memory” by itself refers to both.
“Scene” refers to one movie unit recorded with a single recording operation.
6

•Brackets [ ] are used to refer to onscreen controls you need to touch (menus, buttons, etc.) and to messages as they are displayed on the screen.
•The photos included in this manual are simulated pictures taken with a still camera. Unless indicated otherwise, illustrations and menu icons refer to the J.
•Illustrations of the camcorder’s screen or a computer’s screen included in this manual may show only relevant parts of the screen.
•Navigation buttons: The navigation bar at the bottom of the page offers up to four buttons to let you get quickly to the information you want to find.
Jump to the general table of contents.
Go to a list of select functions grouped by their uses in reallife situations. This alternative index can be very useful for beginners who encounter a particular challenge but are not sure of what function to use.
Jump to the alphabetical index.
The button with a number in it will take you to the beginning of the current chapter, where you will find an overview of the information and related functions covered in that chapter.
Note that the icon itself will change depending on the chapter you are currently reading.
7

•Observe the following precautions while the camcorder’s ACCESS indicator is on or flashing. Failing to do so may result in permanent data loss or damage to the memory.
-Do not open the memory card slot cover.
-Do not disconnect the power source or turn off the camcorder.
-Do not change the camcorder’s shooting mode.
-Do not press the ^button.
-When a USB cable is connected to the camcorder, do not disconnect the USB cable.
8

Table of Contents |
|
Important Usage Instructions ................................................ |
2 |
About this Manual and Camcorder ....................................... |
6 |
The Camcorder’s Functions in Real-Life Situations ............ |
14 |
Unique functions for special cases...................................... |
14 |
Getting the look you want................................................... |
15 |
Challenging subjects and shooting conditions..................... |
16 |
Playback, editing and others............................................... |
17 |
HWireless functions......................................... |
18 |
Getting to Know the Camcorder.......................................... |
20 |
Supplied Accessories ......................................................... |
20 |
Names of Parts................................................................... |
22 |
Preparations ................................................................ |
27 |
Charging the Battery Pack................................................... |
28 |
Using a Memory Card.......................................................... |
32 |
Memory Cards Compatible for Use with the Camcorder ..... |
32 |
Inserting and Removing a Memory Card ............................. |
33 |
First Time Settings............................................................... |
36 |
Basic Setup........................................................................ |
36 |
Changing the Time Zone..................................................... |
39 |
Initializing the Memory......................................................... |
40 |
9

Basic Operation of the Camcorder...................................... |
43 |
Using the Touch Screen ..................................................... |
43 |
Using the Menus................................................................. |
44 |
Operating Modes................................................................ |
50 |
Basic Recording and Playback .................................. |
52 |
Basic Recording .................................................................. |
53 |
Recording Video ................................................................. |
53 |
Taking Photos .................................................................... |
55 |
AUTO Mode ....................................................................... |
57 |
Zooming ............................................................................. |
61 |
Basic Playback .................................................................... |
65 |
Playing Back Video............................................................. |
65 |
Viewing Photos................................................................... |
71 |
Deleting Scenes and Photos............................................... |
73 |
Advanced Recording Functions................................. |
77 |
Recording Settings and Shooting Modes............................ |
78 |
Selecting the Movie Recording Format (AVCHD/MP4) ........ |
78 |
Selecting the Video Quality ................................................. |
78 |
HSelecting the Memory (Built-in Memory/ |
|
Memory Card) for Recordings............................................. |
80 |
HDual Recording and Relay Recording............ |
81 |
Selecting the Shooting Mode.............................................. |
82 |
Baby Mode......................................................................... |
84 |
Cinema Mode and Cinema-Look Filters.............................. |
85 |
Special Scene Modes......................................................... |
86 |
Programmed AE Mode: Adjusting Settings to Match |
|
Your Needs ........................................................................ |
89 |
10
Convenient Functions.......................................................... |
90 |
Slow & Fast Motion Recording............................................ |
90 |
Decoration: Adding a Personal Touch................................. |
93 |
Video Snapshot ................................................................ |
101 |
Face Detection and Tracking ............................................ |
102 |
Faders .............................................................................. |
105 |
When You Want More Control........................................... |
107 |
Exposure .......................................................................... |
107 |
Focus ............................................................................... |
109 |
White Balance .................................................................. |
111 |
Frame Rate....................................................................... |
113 |
Tele Macro ....................................................................... |
114 |
Recording Audio ................................................................ |
115 |
Audio Scenes ................................................................... |
115 |
Using Headphones........................................................... |
116 |
Advanced Playback and Editing Functions ............. |
119 |
Advanced Playback Functions .......................................... |
120 |
Capturing Video Snapshot Scenes and Photos from |
|
a Movie............................................................................. |
120 |
Playback with Background Music ..................................... |
123 |
Selecting the Playback Starting Point................................ |
125 |
Photo Slideshow .............................................................. |
127 |
Editing Functions............................................................... |
129 |
Dividing Scenes................................................................ |
129 |
Trimming Scenes.............................................................. |
130 |
Changing the Thumbnail Image of a Scene....................... |
132 |
HCopying Recordings to a Memory Card ...... |
133 |
HConverting Movies to MP4 Format .............. |
136 |
11

External Connections................................................ |
141 |
Terminals on the Camcorder ............................................. |
142 |
Connection Diagrams ....................................................... |
143 |
Playback on a TV Screen................................................... |
147 |
Saving and Sharing Your Recordings................................ |
149 |
Saving Recordings on a Computer ................................... |
150 |
Saving Recordings on the Optional CS100 Connect |
|
Station (USB).................................................................... |
156 |
HMemory Save: Saving an Entire Memory onto an |
|
External Hard Drive........................................................... |
157 |
Copying Recordings to an External Video Recorder.......... |
162 |
HWi-Fi Functions.................................... |
164 |
Overview of the Camcorder’s Wi-Fi Functions.................. |
165 |
The Camcorder’s Wi-Fi Functions..................................... |
170 |
Using an iOS or Android Device as a Remote Control....... |
170 |
Playback via Browser: Viewing Recordings Using a |
|
Web Browser on an iOS or Android Device....................... |
181 |
Saving Recordings and Uploading Movies to the Web |
|
Using an iOS Device ......................................................... |
184 |
Saving Recordings on the Optional CS100 Connect |
|
Station (NFC+Wi-Fi) .......................................................... |
186 |
Sharing Recordings with CANON iMAGE GATEWAY........ |
188 |
Wireless Playback on a Computer .................................... |
195 |
Wi-Fi Connection and Settings.......................................... |
198 |
Wi-Fi Connection Using an Access Point .......................... |
198 |
Viewing and Changing Wi-Fi Settings................................ |
204 |
12

Additional Information............................................... |
208 |
Appendix: Menu Options Lists .......................................... |
209 |
Appendix: Onscreen Icons and Displays........................... |
232 |
Trouble?............................................................................. |
240 |
Troubleshooting................................................................ |
240 |
List of Messages............................................................... |
251 |
Do’s and Don’ts................................................................. |
269 |
Handling Precautions........................................................ |
269 |
Maintenance/Others .......................................................... |
275 |
Cleaning ........................................................................... |
275 |
Condensation ................................................................... |
275 |
Using the Camcorder Abroad ........................................... |
276 |
General Information ........................................................... |
278 |
Optional Accessories........................................................ |
278 |
Specifications ................................................................... |
282 |
Reference Tables............................................................... |
288 |
Index .................................................................................. |
293 |
13
The Camcorder’s Functions in
Real-Life Situations
Unique functions for special cases
Keep beautiful memories of baby’s most precious
moments and use the especially designed stamps to 9 keep track of baby’s growth.
X Baby Mode (A84)
Shoot a cool time-lapse video or use slow motion to check your golf swing.
X Slow & Fast Motion Recording (A90)
Decorate movies with graphics and stamps.
X Decoration (A93)
14
Create a dynamic montage sequence with short cuts.
X Video Snapshot (A101)
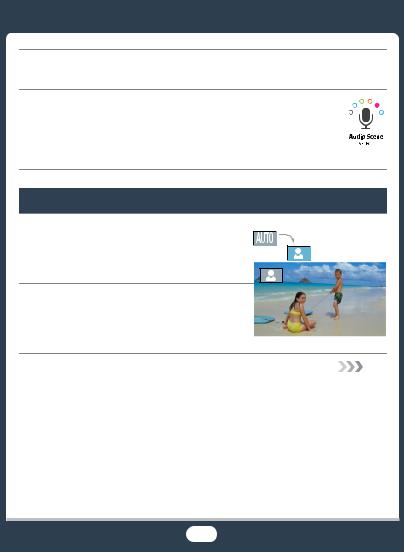
Record the best sound possible according to your shooting situation, such as when attending a speech or musical performance.
X Audio Scenes (A115)
Getting the look you want
Let the camcorder select the best settings according to the shooting scene to get beautiful video and photos.
X Nmode (A57)
Make the image brighter or darker than the exposure set by the camcorder.
X Exposure (A107)
15

Change how smooth or natural movement looks in your videos.
X Frame Rate (A113)
Give your recordings a professional cinematic look.
XCinema Mode and Cinema-Look Filters (A85)
Cinema-look filter [FILTER 2] (Vivid)
Choose whether to record in AVCHD or MP4 format.
X Movie Format (A78)
Challenging subjects and shooting conditions
Shoot great video of special scene situations with minimal settings.
X Shooting Modes (A82)
Obtain natural-looking colors even under special lighting conditions.
X White Balance (A111) |
Special Scene shooting |
|
mode [üNight Scene] |
||
|
Optimize the exposure for the desired subject just by touching the screen.
X Touch AE (A108)
16

Keep the subject in focus and the exposure optimized while shooting a moving subject.
X Face Detection and Tracking (A102)
Playback, editing and others
Save parts of your video as photos or short video snapshot scenes.
X Capturing Photos/Video Snapshot Scenes (A120)
HConvert your scenes into a smaller file size to upload to the Web.
X Converting Movies to MP4 Format (A136)
HSave all the recordings in a memory directly onto an external hard disk, even without a computer.
X Memory Save (A157)
Lock your files to avoid inadvertently deleting or changing them.
X Locking Files from Editing (A69)
Play back scenes or a slideshow of photos with background music.
X Playback with Background Music (A123)
Enjoy your recordings on a TV.
XHDMI Connection (A143)
XPlayback (A147)
17

Save recordings on your computer and upload them to the Web.
X Saving Recordings (A150)
Save your recordings effortlessly on the optional CS100 Connect Station.
X CS100 Connect Station (A156, 186)
HWireless functions
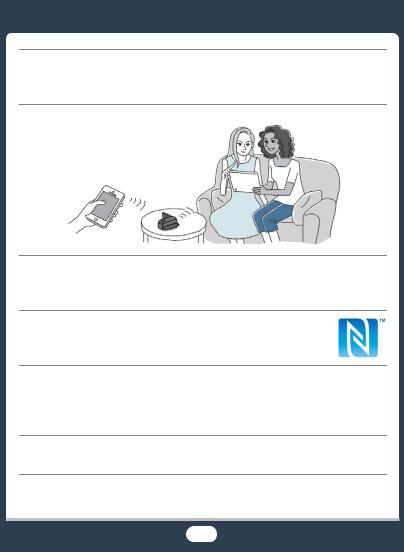
Use your smartphone or tablet as a remote control while recording.
X CameraAccess plus (A170)
Use a Web browser on your smartphone or tablet to access and play back the recordings in the camcorder.
X Playback via Browser (A181)
18
Use an iOS app to wirelessly transfer recordings to your iPhone/ iPad and upload them to the Web.
X Movie Uploader (A184)
Share your recordings with Web albums using CANON iMAGE GATEWAY.
X CANON iMAGE GATEWAY (A188)
Use the NFC function to effortlessly connect your camcorder to your NFC-enabled Android device.
X NFC (A171, 177, 181)
Connect the camcorder to your home network and wirelessly stream your recordings.
XMedia Server (A195)
XWi-Fi Connection to an Access Point (A198)
Review and change Wi-Fi settings (for advanced users).
X Wi-Fi Settings (A204)
19
Getting to Know the Camcorder
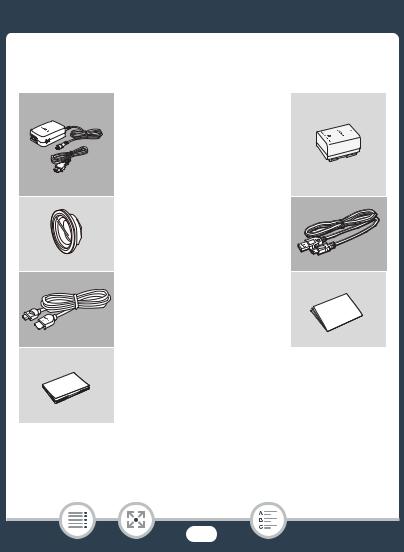
Supplied Accessories
The following accessories are supplied with the camcorder:
XCA-110E Compact Power
Adapter (incl. power cord)
BP-718 Battery PackW
XWA-H43 Wide Attachment
(Ionly)
IFC-300PCU/S USB CableW
XHTC-100/S High Speed
HDMI Cable
Getting Started LeafletW
XTransfer Utility LE
Startup Guide*
*This guide explains how to download PIXELA’s Transfer Utility LE software, which allows you to save AVCHD movies to a computer and to transfer music files to a memory card. For details on using the software, refer to the ‘Transfer Utility LE Software Guide’ included with the downloaded software.
20
•The camcorder may make a rattling sound if it is shaken (A246).
21
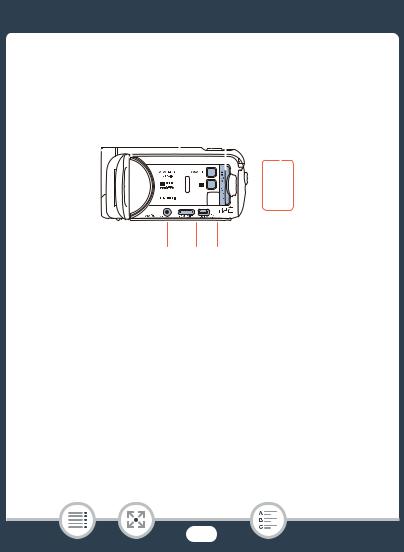
Names of Parts
Left side view
1 |
2 3 |
4 |
||||
|
|
|
|
|
|
|
|
|
|
|
|
|
|
|
|
|
|
|
|
|
|
|
|
|
|
|
|
5 6 7
1^(playback mode) button (A51)
2ON/OFF button
3Memory card slot cover (A33)
4Memory card slot (A33)
5AV OUT terminal (A142, 145)/×(headphones) terminal (A116)
6HDMI OUT terminal (A142, 143)
7USB terminal (A142, 146)
22
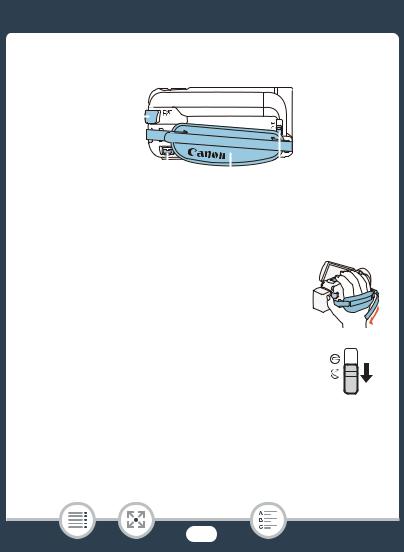
Right side view
|
|
|
|
|
|
|
|
|
|
|
|
|
|
|
|
|
|
|
|
|
|
|
|
|
|
|
|
|
|
|
|
1 |
2 |
3 |
4 |
||||
1START/STOP button (A53)
2DC IN terminal (A28)
3Grip belt
Adjust the grip belt so that you can reach the zoom lever with your index finger, and the Y button with your thumb.
4Lens cover switch
Move the lens cover switch down to  to open the lens cover.
23
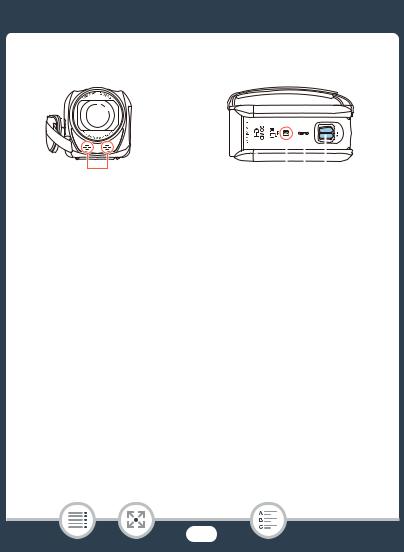
Front view |
Top view |
|
|
|
|
|
|
|
|
|
|
|
|
|
|
|
|
|
|
|
|
|
|
|
|
|
|
|
|
|
|
|
|
|
|
|
|
1 |
|
2 |
3 |
4 |
||||
1Stereo microphone (A115, 230)
2HNFC (near field communication) touchpoint (A173, 186)
3Speaker (A68)
4Zoom lever (A61)
24
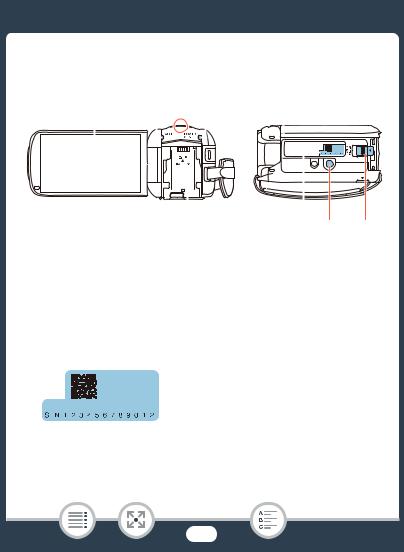
Back view |
|
|
|
|
|
|
|
|
Bottom view |
||||
1 |
2 |
3 |
4 |
|
|
||||||||
|
|
|
|
|
|
|
|
|
|
|
|
|
|
|
|
|
|
|
|
|
|
|
|
|
|
|
|
|
|
|
|
|
|
|
|
|
|
|
|
|
|
|
|
|
|
|
|
|
|
|
|
|
|
|
|
|
|
|
|
|
|
|
|
|
|
|
|
|
|
|
|
|
|
|
|
|
|
|
|
|
|
|
|
|
|
|
|
|
|
|
|
|
|
|
|
|
|
|
|
|
|
|
|
|
|
|
|
|
|
|
|
5 |
6 |
7 |
8 |
1LCD touch screen (A26, 43)
2ACCESS indicator (A8, 53, 55)
3HWi-Fi antenna (A169)
4POWER/CHG (charge) indicator: Green - On; Red - Charging (A28)
5Battery attachment unit (A28)
6Serial number
7Tripod socket (A271)
8BATTERY RELEASE switch (A29)
25

LCD touch screen
Open the LCD panel 90 degrees. By default, this will turn on the camcorder. The first time you open the LCD panel, the initial setup screens will appear and guide you through the basic settings (A36).
Adjust the position of the LCD panel according to the recording conditions.
180°
approx. 90°
•The screen is produced using extremely high-precision manufacturing techniques, with more than 99.99% of the pixels operating to specification. Less than 0.01% of the pixels may occasionally misfire or appear as black, red, blue or green dots. This has no effect on the recorded image and does not constitute a malfunction.
•For details about how to take care of the touch screen, refer to
Handling Precautions (A269), Cleaning (A275).
26
Preparations
Charging the Battery Pack
28The first step for using your camcorder is to prepare the power supply. This section explains how to charge a battery pack.
Using a Memory Card
32This section explains the types of memory cards that can be used and how to insert one into the camcorder.
First Time Settings
When you turn on the camcorder for the first time, you will need
36to complete the basic setup and set the camcorder’s language, date and time, movie format (AVCHD or MP4), and recording memory (Honly).
Basic Operation of the Camcorder
43
In this section you can learn more about basic operations, such as using the touch screen, changing operating modes and using the menus.
27

Charging the Battery Pack
Charging the Battery Pack
The camcorder can be powered with a battery pack or directly using the compact power adapter.
1 |
2 |
3
1
3
2
1Connect the power cord to the compact power adapter.
2Plug the power cord into a power outlet.
3Connect the compact power adapter to the camcorder’s DC IN terminal.
28

Charging the Battery Pack
5 |
4 |
5 |
4
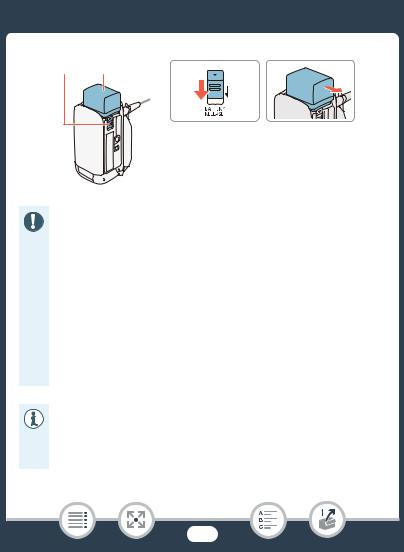
4Attach the battery pack to the camcorder.
•Press the battery pack softly into the battery attachment unit and slide it up until it clicks in place.
5Charging will start when the camcorder is turned off.
•If the camcorder was on, the green POWER/CHG indicator will go out when you turn off the camcorder. After a moment, the POWER/CHG indicator will turn on in red (battery pack charging). The red POWER/CHG indicator will go out when the battery pack is fully charged.
•If the indicator flashes, refer to Troubleshooting (A246).
•Fully charging the supplied battery pack will take approximately 5 hours and 35 minutes.
To remove the battery pack
1Slide din the direction of the arrow and hold it pressed down.
2Slide the battery pack and then pull it out.
29
Charging the Battery Pack
1 |
2 |
1 |
2 |
• Turn off the camcorder before connecting or disconnecting the compact power adapter. After turning off the camcorder, important data is updated in the memory. Be sure to wait until the green POWER/CHG indicator goes out.
•Do not connect to the camcorder’s DC IN terminal or to the compact power adapter any electrical equipment that is not expressly recommended for use with this camcorder.
•To prevent equipment breakdowns and excessive heating, do not connect the supplied compact power adapter to voltage converters for overseas travels or special power sources such as those on aircraft and ships, DC-AC inverters, etc.
•We recommend charging the battery pack in temperatures between 10 °C and 30 °C. If either the ambient temperature or the battery pack’s temperature is outside the range of approx. 0 °C to 40 °C, charging will not start.
30
Loading...