


Using BOSS TONE STUDIO for GP-10
This document explains operation of BOSS TONE STUDIO for GP-10 (subsequently referred to as “TONE STUDIO”).
Getting Ready to Use TONE STUDIO
Important terms in TONE STUDIO
Library
This is a storage area inside TONE STUDIO.
Patches (livesets) that you download from BOSS TONE CENTRAL (p. 12) and patches that you back up from the GP-10 are saved in the library.
Liveset
A liveset is a group of multiple patches.
Patches that you download from BOSS TONE CENTRAL and patches that you back up from TONE STUDIO are grouped as a liveset and saved in the library inside TONE STUDIO.
You can also collect your favorite patches to create an original liveset.
Installing the USB Driver
Before you use TONE STUDIO, the appropriate USB driver for the product you’re using must be installed on your computer.
1.From the product support page, download the GP-10 Driver.
To obtain the latest USB driver, access the following URL, and download and install the appropriate driver for the product you’re using.
http://www.boss.info/support/
2.Double-click the downloaded GP-10 Driver.
Installation begins.
Proceed with the installation as directed by the installation screens.
When the screen indicates “Installation has been completed.” click the [Close] button.
The GP-10 Driver has been installed on your computer.
Installing TONE STUDIO
MEMO
Before you install TONE STUDIO, the USB driver must be installed
Customers using TONE STUDIO v1.0.0
Note when updating TONE STUDIO, and how to check the version
If you’re using TONE STUDIO version “1.0.0,” you’ll need to uninstall it before you update to the new version.
Here’s how you can check the version of TONE STUDIO that you’re using.
1.Start TONE STUDIO (p. 2), and in the lower right of the screen, click the [SYSTEM] button.
The “SYSTEM” screen appears.
2.Click the [Device] button.
The version of TONE STUDIO that you’re using is displayed.
Uninstalling TONE STUDIO
MEMO
Even when you uninstall TONE STUDIO, the livesets saved in the library will remain.
Windows users
1.Click the Windows [Start] button.
2.Click to select [Control Panel]–[Uninstall a program] or [Control Panel]–[Programs and functions].
3.In the list, click “BOSS TONE STUDIO for GP-10” and then click the [Uninstall] button.
Mac OS users
1.In the Finder, click the “Applications” folder.
2.Drag and drop “BOSS TONE STUDIO for GP-10” into the trash.
Copyright © 2015 ROLAND CORPORATION |
1 |
03 |
|
Using BOSS TONE STUDIO for GP-10
Windows users
1.Download “BOSS TONE STUDIO for GP-10” from the product support page.
2.Double-click the downloaded file to decompress it.
3.Inside the folder created by decompressing the file, double-click “BOSS TONE STUDIO for GP-10.exe.”
Installation begins.
Proceed with installation as directed by the installation screens.
When the screen indicates “Installation has been completed.” click the [Close] button.
Mac OS users
1.Download “BOSS TONE STUDIO for GP-10” from the product support page.
2.Double-click the downloaded file to decompress it.
3.Double-click the decompressed file.
A “BOSS TONE STUDIO for GP-10” icon and “Applications folder” icon appear.
4.Drag and drop the “BOSS TONE STUDIO for GP-10” icon onto the “Applications folder” icon.
BOSS TONE STUDIO for GP-10 is added to the applications. Close the folder that you opened in step 3.
Starting TONE STUDIO
MEMO
Operation is described here using the example of the Windows version of TONE STUDIO.
1.Use a USB cable to connect the GP-10 to your computer, and then turn on the power of the GP-10.
MEMO
You can edit livesets and download livesets from BOSS TONE CENTRAL even if the GP-10 is not connected to your computer via a USB cable.
However, you can’t save the result of editing a patch. In order to save the edited patch, you’ll need to be connected to your computer.
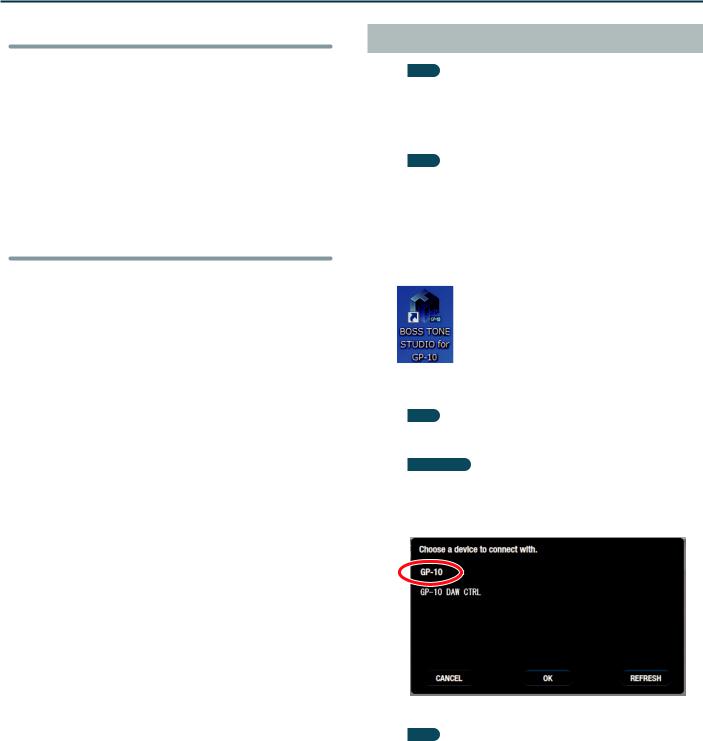
2. Double-click the TONE STUDIO shortcut icon.
The first time you start up, the dialog box “Choose a device connect with.” appears.
MEMO
On the second and subsequent startups, the device is selected automatically. Proceed to step 4.
Mac OS users
From the Finder, in the application folder, double-click [BOSS TONE STUDIO for GP-10].
3. Choose “GP-10,” and click the [OK] button.
TONE STUDIO starts.
MEMO
55 Since data will be loaded from the GP-10, it may take some time until you can use TONE STUDIO.
55 “GP-10 DAW CTRL” is shown only in the Windows version of TONE STUDIO.
55 If you accidentally selected “GP-10 DAW CTRL,” you can change your selection via [SYSTEM] – [Device] located in the lower right of TONE STUDIO screen.
2

Using BOSS TONE STUDIO for GP-10
Editing a Patch
As an example, we’ll explain how to edit the patch “01 DUAL SYNC.”
1.In the upper left of TONE STUDIO screen, click the [EDITOR] button.
2.Click the patch that you want to edit. In this example, click “01 DUAL SYNC.”
3.In the effect chain screen (the upper part of the screen), click the icon of the effect that you want to edit. In this example, click the [AMP] icon.
The icon of the effect you clicked is lit blue, and the effect settings are shown.
4. Edit the effect.
MEMO
55 If you want to change the type of preamp, click the [I] button located at the right of the amp name.
55 You can also change the placement of the various effect types in the effect chain screen. Drag and drop the effect that you want to move. (You can move it to the location shown in red.)
5. If you want to edit another effect, repeat steps 3–4.
Selected effect settings
3
Using BOSS TONE STUDIO for GP-10
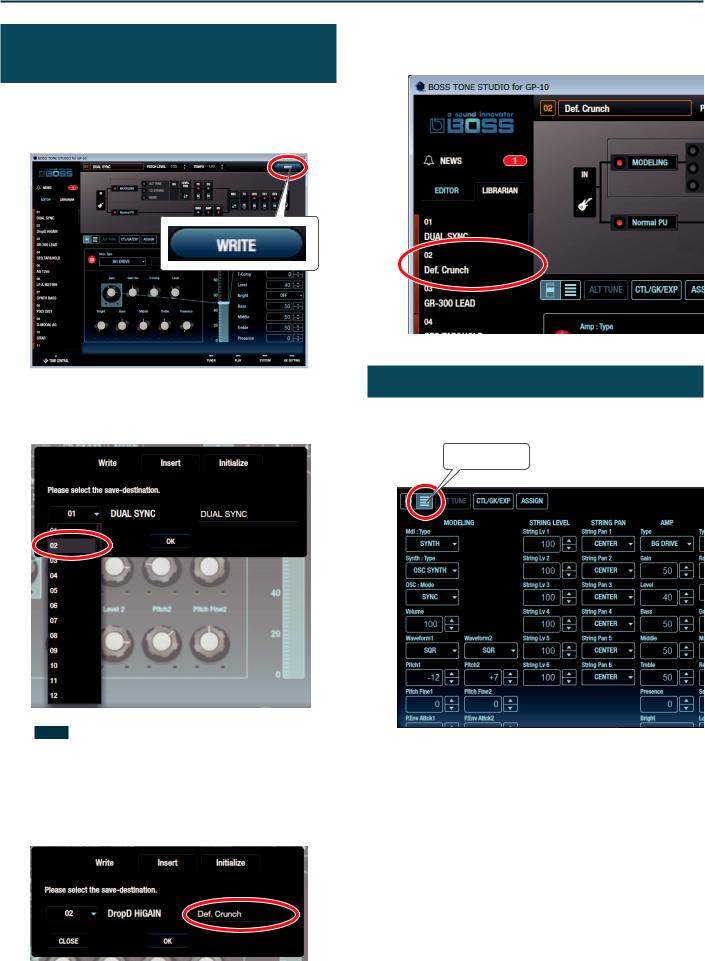
Saving an Edited Effect to the GP-10 (WRITE)
Here’s how to save the edited effect to the GP-10.
1.In the upper right of the TONE STUDIO screen, click the [WRITE] button.
The “Please select the save-destination” dialog box appears.
2.Select the save-destination patch number.
In this example, select “02.”
NOTE
When you save, the patch of the selected number is overwritten; the original settings cannot be recovered. Select a patch that you don’t mind overwriting.
3.If you want to change the name of the patch, click the patch name field. A cursor appears, and you can use your computer keyboard to enter a patch name.
4.Click the [OK] button.
The settings of the new patch are saved in TONE STUDIO’s patch list and in the GP-10.
Listing the Effect Settings
You can click the list button to see the effect settings as a list. You can also edit the settings here.
List button
4
Using BOSS TONE STUDIO for GP-10
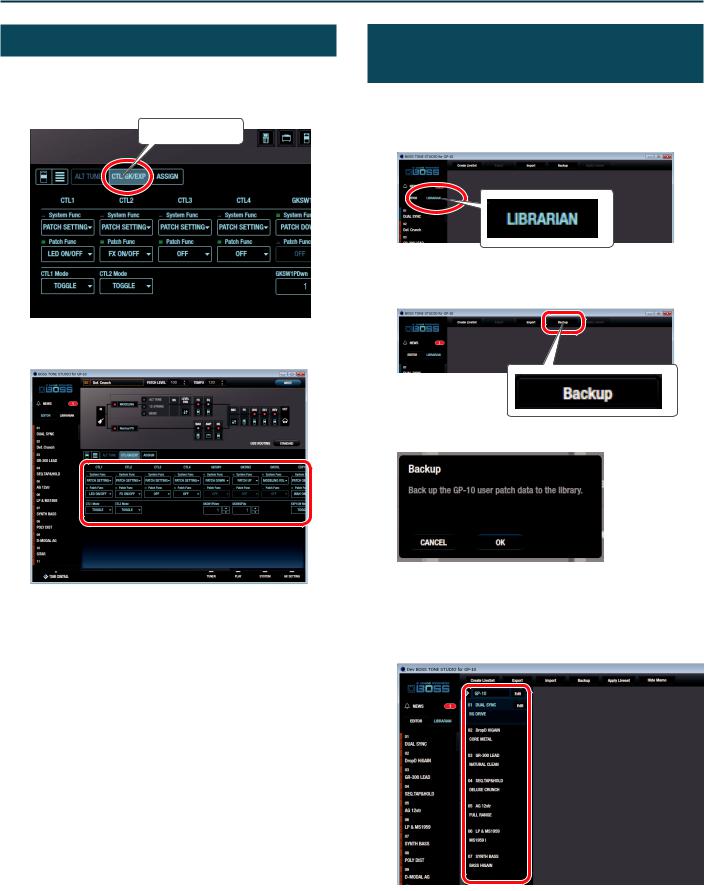
Editing the Controller Settings
You can click the [CTL/GK/EXP] button and edit the settings of a footswitch connected to the GP-10.
1. In the TONE STUDIO screen, click the [CTL/GK/EXP] button.
[CTL/GK/EXP] button
The controller assignment screen appears.
2. Assign the function.
Saving All GP-10 Patches to TONE STUDIO (Backup)
Here’s how all of the GP-10’s patches can be saved (backed up) to a TONE STUDIO library. All patches are saved as a liveset.
1. In TONE STUDIO screen, click the [LIBRARIAN] button.
2.At the top of the TONE STUDIO screen, click the [Backup] button.
The “Backup” dialog box appears.
3.Click the [OK] button.
The message “Completed.” appears.
4.Click the [OK] button.
The patches are saved as a liveset in TONE STUDIO’s library.
5
 Loading...