


 Loading...
Using BOSS TONE STUDIO for KATANA
This document explains basic operation of BOSS TONE STUDIO for KATANA (subsequently referred to as “TONE STUDIO”).
MEMO
Operation is described here using the example of the KATANA and the Windows version of TONE STUDIO. Replace the names given here with the names of the devices you’re using.
The explanations in this manual include illustrations that depict what should typically be shown by the display. Note, however, that your unit may incorporate a newer, enhanced version of the system (e.g., includes newer sounds), so what you actually see in the display may not always match what appears in the manual.
Getting Ready to Use TONE STUDIO
Important terms in TONE STUDIO
Library
This is a storage area inside TONE STUDIO.
Tone settings (livesets) that you download from BOSS TONE CENTRAL (p. 13) and tone settings that you back up from the KATANA are saved in the library.
Liveset
A liveset is a group of multiple tone settings.
Tone settings that you download from BOSS TONE CENTRAL and tone settings that you back up from TONE STUDIO are grouped as a liveset and saved in the library inside TONE STUDIO.
You can also collect your favorite tone settings to create an original liveset.
Installing the USB Driver
Before you use TONE STUDIO, the appropriate USB driver for the product you’re using must be installed on your computer.
1.From the product support page, download the KATANA Driver.
To obtain the latest USB driver, access the following URL, and download and install the appropriate driver for the product you’re using.
http://www.boss.info/support/
2.Double-click the downloaded KATANA Driver.
Installation begins.
Proceed with the installation as directed by the installation screens.
When the screen indicates “Installation has been completed.” click the [Close] button.
The KATANA Driver has been installed on your computer.
Installing TONE STUDIO
MEMO
Before you install TONE STUDIO, the USB driver must be installed in your computer as described in “Installing the USB Driver” (p. 1).
Windows users
1.Download “BOSS TONE STUDIO for KATANA” from the product support page.
2.Double-click the downloaded file to decompress it.
3.Inside the folder created by decompressing the file, double-click “BOSS TONE STUDIO for KATANA.exe.”
Installation begins.
Proceed with installation as directed by the installation screens.
When the screen indicates “Installation has been completed,” click the [Close] button.
Mac OS users
1.Download “BOSS TONE STUDIO for KATANA” from the product support page.
2.Double-click the downloaded file to decompress it.
3.Double-click the decompressed file.
A “BOSS TONE STUDIO for KATANA” icon and “Applications folder” icon appear.
4.Drag and drop the “BOSS TONE STUDIO for KATANA” icon onto the “Applications folder” icon.
BOSS TONE STUDIO for KATANA is added to the applications. Close the folder that you opened in step 3.
Copyright © 2016 ROLAND CORPORATION |
1 |
01 |
|

Using BOSS TONE STUDIO for KATANA
Starting TONE STUDIO
1.Use a USB cable to connect the KATANA to your computer, and then turn on the power of the KATANA.
MEMO
You can edit livesets and download livesets from BOSS TONE CENTRAL even if the KATANA is not connected to your computer via a USB cable.
However, you can’t save the result of editing a tone setting. In order to save the edited tone setting, you’ll need to be connected to your computer.
2. Double-click the TONE STUDIO shortcut icon.
The first time you start up, the dialog box “Choose a device connect with.” appears.
MEMO
On the second and subsequent startups, the device is selected automatically.
Mac OS users
From the Finder, in the application folder, double-click [BOSS TONE STUDIO for KATANA].
3. Choose “KATANA,” and click the [OK] button.
TONE STUDIO starts.
MEMO
55 Since data will be loaded from the KATANA, it may take some time until you can use TONE STUDIO.
55 “KATANA DAW CTRL” is shown only in the Windows version of TONE STUDIO.
55 If you accidentally selected “KATANA DAW CTRL” or “KATANA CTRL,” you can change your selection via [SYSTEM]–[Device] located in the lower right of TONE STUDIO screen (p. 17).
Editing a Tone Setting
As an example, we’ll explain how to edit the tone setting “CH1 KATANA.”
1.In the upper left of TONE STUDIO screen, click the [EDITOR] button.
2.Click the tone setting that you want to edit. In this example, click “CH1 KATANA CH1”
3.Edit the amp settings.
You can edit a value by using the mouse to grab the knob and moving it up/down, or by selecting the value shown above the knob and using the keyboard to enter the new value. You can select the AMP TYPE setting by clicking the type names at the left of the knob.
2

Using BOSS TONE STUDIO for KATANA
4.Assign effects to the [BOOSTER/MOD] knob, [DELAY/FX] knob, and [REVERB] knob.
6.Edit the effects that are assigned to the [BOOSTER/MOD] knob, [DELAY/FX] knob, and [REVERB] knob.
Select the effect when the [BOOSTER/MOD] button, [DELAY/FX] button, and [REVERB] button are lit green, red, or yellow. For details, refer to “Using Effects” (p. 8) in the owner’s manual.
5.Specify the placement of the effects.
You can specify the placement of each effect relative to the preamp.
Selected effect settings
Setting |
Explanation |
|
|
CHAIN 1 |
AMP0BOOSTER/MOD0DELAY/FX0REVERB |
CHAIN 2 |
BOOSTER/MOD0AMP0DELAY/FX0REVERB |
CHAIN 3 |
BOOSTER/MOD0DELAY/FX0AMP0REVERB |
*You can’t change the placement of the reverb. It is always placed after AMP and the other effects.
*The EFFECT LOOP SEND/RETURN jacks are always placed after AMP.
3
Using BOSS TONE STUDIO for KATANA
Using the NS (NOISE SUPPRESSOR)
NS (NOISE SUPPRESSOR) reduces the noise and hum picked up by guitar pickups. Since it suppresses the noise in synchronization with the envelope of the guitar sound (the way in which the guitar sound decays over time), it has very little effect on the guitar sound, and does not harm the natural character of the sound.
*This function can be specified only in TONE STUDIO. It cannot be specified on the KATANA unit itself.
7.Click the ON/OFF button in the screen to turn NS on.
8.Use the [THRESH] knob and [RELEASE] knob to adjust the noise.
Parameter |
Value |
Explanation |
|
|
|
|
|
|
|
Adjust this parameter as appropriate for the |
|
|
|
volume of the noise. If the noise level is high, a |
|
|
|
higher setting is appropriate. If the noise level is |
|
|
|
low, a lower setting is appropriate. Adjust this value |
|
THRESH |
0–100 |
until the decay of the guitar sound is as natural as |
|
|
|
possible. |
|
|
|
* High settings for the threshold parameter may |
|
|
|
result in there being no sound when you play |
|
|
|
with your guitar volume turned down. |
|
RELEASE |
0–100 |
Adjusts the time from when the noise suppressor |
|
begins to function until the noise level reaches “0.” |
|||
|
|
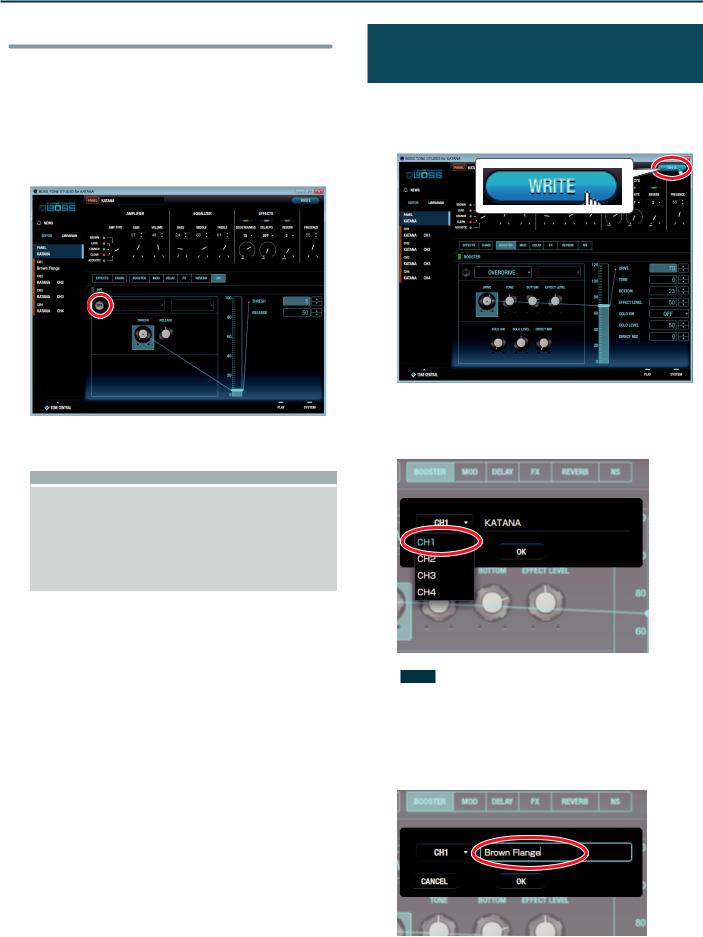
Saving an Edited Effect to the KATANA (WRITE)
Here’s how to save the edited effect to the KATANA.
1.In the upper right of the TONE STUDIO screen, click the [WRITE] button.
A dialog box appears.
2.Select the save-destination channel.
In this example, select “CH1.”
NOTE
When you save, the tone setting of the selected channel is overwritten; the original settings cannot be recovered. Select a tone setting that you don’t mind overwriting.
3.If you want to change the name of the tone setting, click the tone setting name field. A cursor appears, and you can use your computer keyboard to enter a tone setting name.
4

Using BOSS TONE STUDIO for KATANA
4.Click the [OK] button.
The the new tone setting are saved in TONE STUDIO’s tone setting list and in the KATANA.
Saving All KATANA Tone Settings to TONE STUDIO (Backup)
Here’s how all of the KATANA’s tone settings can be saved
(backed up) to a TONE STUDIO library. All tone settings are saved as
a liveset.
1.In TONE STUDIO screen, click the [LIBRARIAN] button.
2.At the top of the TONE STUDIO screen, click the [Backup] button.
The “Backup” dialog box appears.
3.Click the [OK] button.
The message “Completed.” appears.
4.Click the [OK] button.
The tone settings are saved as a liveset in TONE STUDIO’s library.
5

Using BOSS TONE STUDIO for KATANA
Restoring Backed-Up Liveset to the KATANA
Here’s how a liveset that you saved as a backup can be restored to the KATANA’s tone setting.
1. Click the liveset that you want to restore.
2.At the top of the TONE STUDIO screen, click the [Apply Liveset] button.
The “Apply Liveset” dialog box appears.
3.Click the [OK] button.
The selected liveset is written back into the KATANA.
Restoring a Tone Setting to the KATANA
Here’s how to select a tone setting from a liveset that you saved as a backup, and restore it back to the KATANA.
1.Drag and drop the tone setting that you want to restore onto the desired channel of the KATANA.
NOTE
When you drop a tone setting, it overwrites the tone setting of the selected channel; the original settings cannot be recovered. Select a tone setting that you don’t mind overwriting.
In this example, drag and drop the tone setting “01 Brown Flange” onto “CH2 KATANA CH2.”
On the KATANA, select TONE SETTING “CH2” and you’ll be able to use the restored tone setting.
MEMO
You can also select multiple tone settings as described in “Selecting multiple tone settings” (p. 9).
6
Using BOSS TONE STUDIO for KATANA
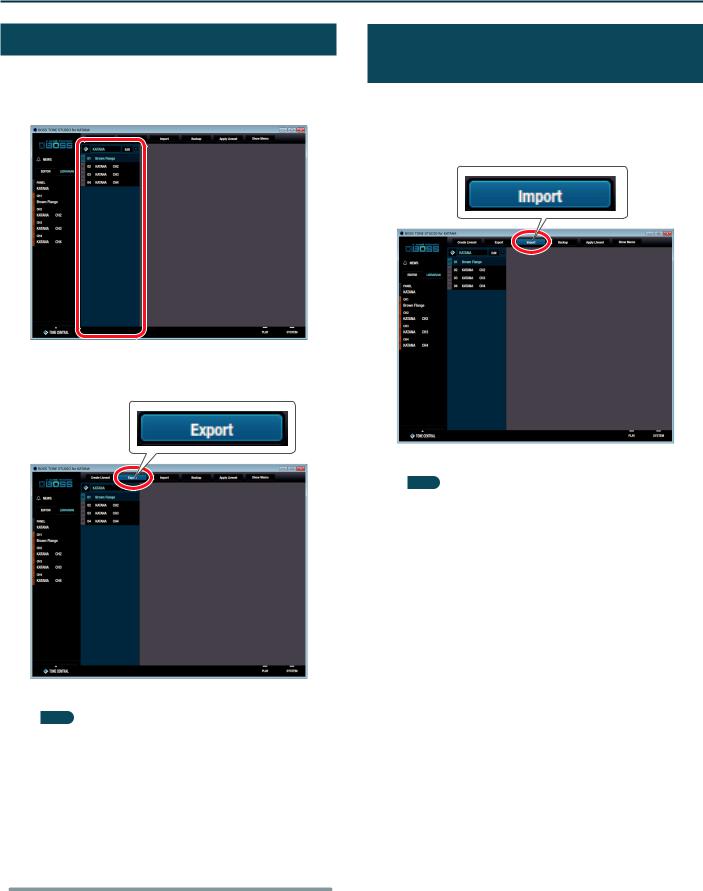
Saving a Liveset to a Computer (Export)
A liveset that you backed up can be exported to your computer (Export).
1. Click the liveset that you want to export to your computer.
2.At the top of the TONE STUDIO screen, click the [Export] button.
Importing a Liveset from a Computer into a Library (Import)
A liveset that you exported to a computer can be imported into a TONE STUDIO library (Import).
1.At the top of the TONE STUDIO screen, click the [Import] button.
The “Import” dialog box appears.
MEMO
The name of the liveset is automatically obtained from the file name. If the file name contains double-byte characters, they will not be reflected in the liveset name.
2. Select the liveset file (extension: .tsl) that you want to import into the library, and click the [Open] button.
The liveset is imported, and the message “Completed.” appears.
3. Click the [OK] button.
The liveset is imported into the TONE STUDIO library.
The “Export” dialog box appears.
MEMO
The file name will be the name of the liveset, but you can change this to a different file name if you like.
3.Enter a name and save-destination, and click the [Save] button.
The message “Completed.” appears.
4.Click the [OK] button.
A liveset file (liveset-name.tsl) is created at the save-destination.
Ways to use an exported liveset
55 Use a USB flash drive to copy the liveset to a different computer. 55 Sent the liveset via email to another KATANA user.
7

Using BOSS TONE STUDIO for KATANA
Creating an Original Liveset
You can collect your favorite tone settings to create an original liveset.
1.At the top of the TONE STUDIO screen, click the [Create Liveset] button.
The message “Completed.” appears.
2.Click the [OK] button.
An empty liveset containing no tone settings is created.
3.From the tone setting list at the left of the TONE STUDIO screen, drag and drop your favorite tone settings into the new liveset.
The selected tone settings are registered in the new liveset.
MEMO
55 A maximum of 400 tone settings can be registered in one liveset. If inserting tone settings would cause the liveset to exceed 400 tone settings, the tone settings that exceed 400 are not inserted (a message is displayed).
55 Tone settings that are registered in another liveset can also be dragged and dropped into the new liveset.
55 You can drag and drop the tone settings in the liveset to change their order.
8
Loading...