


Using BOSS TONE STUDIO for Pocket GT
This document explains basic operation of BOSS TONE STUDIO for Pocket GT (subsequently referred to as “TONE STUDIO”).
Getting Ready to Use TONE STUDIO
In addition to the Pocket GT unit and connection cables, you’ll also need to install a dedicated USB driver on your PC/Mac in order to use
TONE STUDIO.
55 USB Driver
55 BOSS TONE STUDIO
Installing the USB Driver
Before you use TONE STUDIO, the appropriate USB driver for the product you’re using must be installed on your computer.
1.From the product support page, download the Pocket GT Driver.
To obtain the latest USB driver, access the following URL, and download and install the appropriate driver for the product you’re
using.
http://www.boss.info/support/
2.Double-click the downloaded Pocket GT Driver.
Installation begins.
Proceed with the installation as directed by the installation screens.
When the screen indicates “Installation has been completed.” click the [Close] button.
The Pocket GT Driver has been installed on your computer.
Installing TONE STUDIO
MEMO
Before you install TONE STUDIO, the USB driver must be installed in your computer as described in “Installing the USB Driver” (p. 1).
Windows Users
1.Unpack the Zip file.
2.Double-click “BOSS TONE STUDIO for Pocket GT Installer. exe.”
Installation begins.
3.Proceed with installation as directed by the install screens.
4.When the screen indicates “Completing the
BOSS TONE STUDIO for Pocket GT Setup Wizard,” click the [Finish] button.
Mac Users
1.Unpack the Zip file.
2.Double-click “BOSS TONE STUDIO for Pocket GT Installer. pkg.”
Installation begins.
3.Proceed with installation as directed by the install screens.
4.When the screen indicates “The installation was successful. The software was installed.,” click the [Close] button.
Starting TONE STUDIO
1.Use a USB cable to connect the Pocket GT to your computer, and then turn on the power of the Pocket GT.
MEMO
You can edit livesets and download livesets from BOSS TONE CENTRAL even if the Pocket GT is not connected to your computer via a USB cable.
However, you can’t save the result of editing a user memory. In order to save the edited user memory, you’ll need to be connected to your computer.
2.Inthe[Start]menu,choose[AllPrograms]&[BOSSTONESTUDIO for Pocket GT] & [BOSS TONE STUDIO for Pocket GT].
The first time you start up, the dialog box “Choose a device connect with.” appears.
MEMO
On the second and subsequent startups, the device is selected automatically.
Mac OS users
From the Finder, in the application/BOSS/Pocket GT folder, doubleclick [BOSS TONE STUDIO for Pocket GT (.app)].
3. Choose “Pocket GT,” and click the [OK] button.
TONE STUDIO starts.
MEMO
Since data will be loaded from the Pocket GT, it may take some time until you can use TONE STUDIO.
© 2020 Roland Corporation |
1 |
01 |
|
Using BOSS TONE STUDIO for Pocket GT
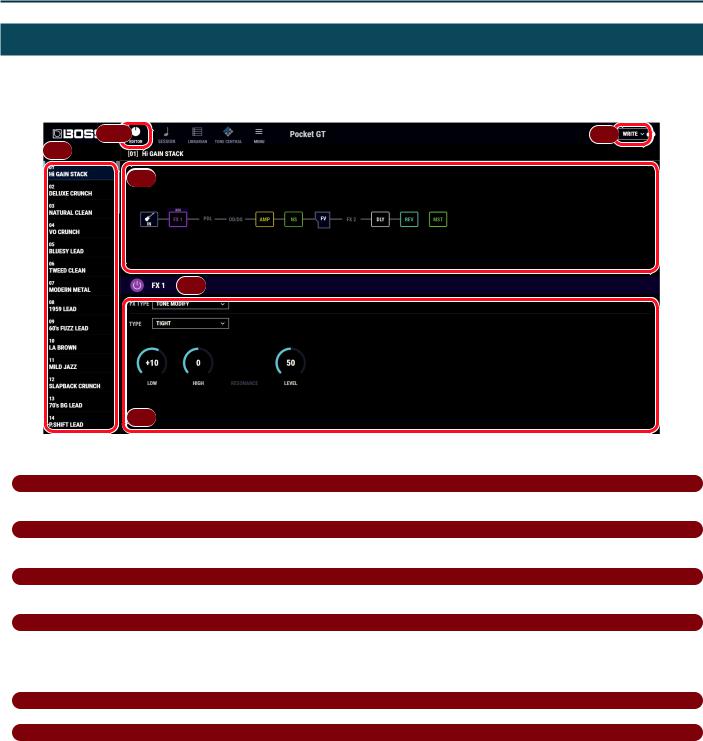
EDITOR Screen
Here you can use your PC/Mac to edit Pocket GT sounds.
1 3
2
4
 5
5
6
1 [EDITOR] button
If a different screen is shown, click this to access the EDITOR screen.
2 User memory select area
Shows a list of the user memories that are saved in the Pocket GT unit. To edit a user memory, click it.
3 [WRITE] button
Click this to access the WRITE or CLEAR list.
4 Effect select area
Click a block once to select an effect. The parameters of the selected effect are shown at the bottom of the screen. The second and subsequent clicks turn the effect on/off.
The selected block indicates , and you can move the effect by dragging and dropping it.
5Effect ON/OFF button
6Parameter editing area
Drag the dial of each parameter up or down to edit its value (you can also use the mouse wheel to edit the value).
You can double-click, and then enter a numeric value from your computer keyboard, or directly select a value from a list. When you click the [TYPE] box, a list appears, allowing you to choose the TYPE.
2
Using BOSS TONE STUDIO for Pocket GT
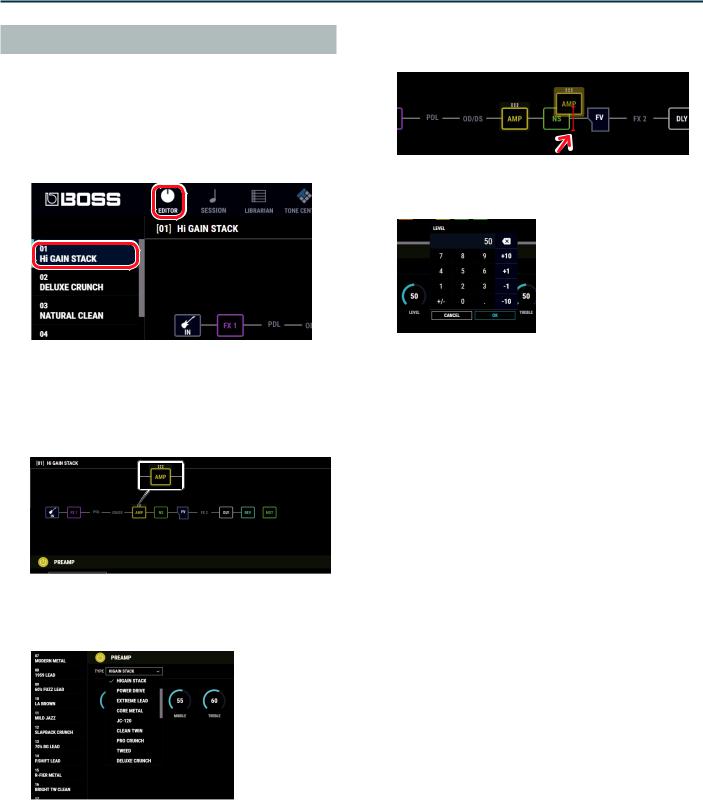
Editing a User Memory
As an example, we’ll explain how to edit the user memory “01 Hi GAIN STACK.”
1.At the top of TONE STUDIO screen, click the [EDITOR] button.
2.Click the user memory that you want to edit. In this example, click “01 Hi GAIN STACK.”
3.In the effect blocks of the effect chain screen (the upper part of the screen), click the effect block that you want to edit.
Here we will click the [AMP] (PREAMP) block.
A frame is shown on the effect block that you click, and the effect settings are shown in the lower part of the screen.
4. Edit the effect.
55 If you want to change the type of preamp, click the [TYPE] box and choose from the list.
55 You can also change the placement of the various effect types in the effect chain screen. Drag and drop the effect that you want to move. (You can move it to the location shown in red.)
55 You can drag a parameter’s dial up or down to edit its value (you can also use the mouse wheel to edit the value). You can also doubleclick, and then enter a numeric value from your computer keyboard.
5. If you want to edit another effect, repeat steps 4–5.
3
Using BOSS TONE STUDIO for Pocket GT
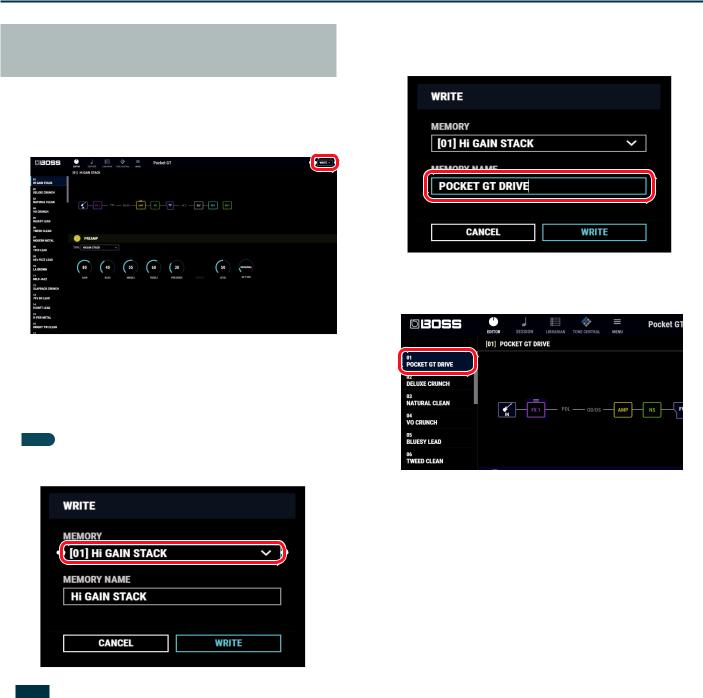
Saving an Edited Effect to the Pocket GT (WRITE)
Here’s how to save the edited effect to the Pocket GT.
1.In the upper right of the Editor screen, click the [WRITE] button.
2.Click “WRITE.”
The “WRITE” dialog box appears.
3.Select the save-destination user memory number.
In this example, select “01.”
MEMO
With the factory settings, user memories 91–99 are EMPTY (empty memories) for you to save sounds.
NOTE
When you save, the user memory of the selected number is overwritten; the original settings cannot be recovered. Select a user memory that you don’t mind overwriting.
4.If you want to change the name of the user memory, click the user memory name field. You can use your computer keyboard to enter a user memory name.
5.Click the [WRITE] button.
The settings of the user memory are saved in the Pocket GT.
4

Using BOSS TONE STUDIO for Pocket GT
SESSION Screen
You can enjoy jam sessions using the Pocket GT along with video from YouTube.
1
2 |
3 |
4 |
1 [SESSION] button
If a different screen is shown, click this to access the SESSION screen.
2 User memory list
Shows a list of the user memories that are saved in the Pocket GT unit.
3 Session list (maximum 100 songs)
Shows the songs in the session list. Tap to play back a song. You can drag songs to change their order.
Use the [+] button to add a YouTube video to the list.
6
5
|
MEMO |
|
NAME |
Edit the name of the song. |
|
Click the [...] button |
|
|
|||
COPY |
Copy the song. |
||||
in the session list |
|||||
|
|
||||
DELETE |
Delete the song. |
||||
to open the edit menu. |
|||||
4 Playback control area
Here are playback controls for the video or song.
You can use the menu to change the time length of the rewind or fast-forward that occurs when you tap twice. (p. 18)
v Play from the beginning.
x Rewind (tap twice to rewind 10 seconds)
p Play / pause
y Fast-forward (tap twice to fast-forward 10 seconds)
You can also use the Pocket GT unit to control this remotely.
x |
Rewind (tap twice to rewind 10 seconds) |
|
|
r |
Play / pause |
x+ r Play from the beginning.
y+ r Moves to the next song
[MARKER SET] button |
Sets a marker at the current position of the song. |
|||||
|
|
|
|
|
|
|
|
Each time you press the button during playback, operations 1–3 repeat. |
|||||
|
Points A and B are shown on the progress bar. |
|
||||
[AB repeat] button |
1. Set point A |
|
Sets point A. |
|
||
2. Set point B |
|
Sets point B. |
||||
|
|
|||||
|
|
Plays repeatedly from point A to point B. |
|
|||
|
|
|
||||
|
3. Cancel settings |
Cancels the settings. |
||||
|
|
|
|
|
|
|
[MEMORY SET] button |
Specifies a Pocket GT user memory at the marker. |
|||||
When the playback position passes the marker, the specified sound is |
||||||
|
selected. |
|
|
|
|
|
|
Selects how the song will play back. |
|
||||
[SONG] button |
1 time |
Play one song, and then stop. |
|
|||
repeat |
Play the same song from the beginning. |
|
||||
|
||||||
|
next |
Move to the next song in the list. |
||||
|
|
|
|
|
|
|
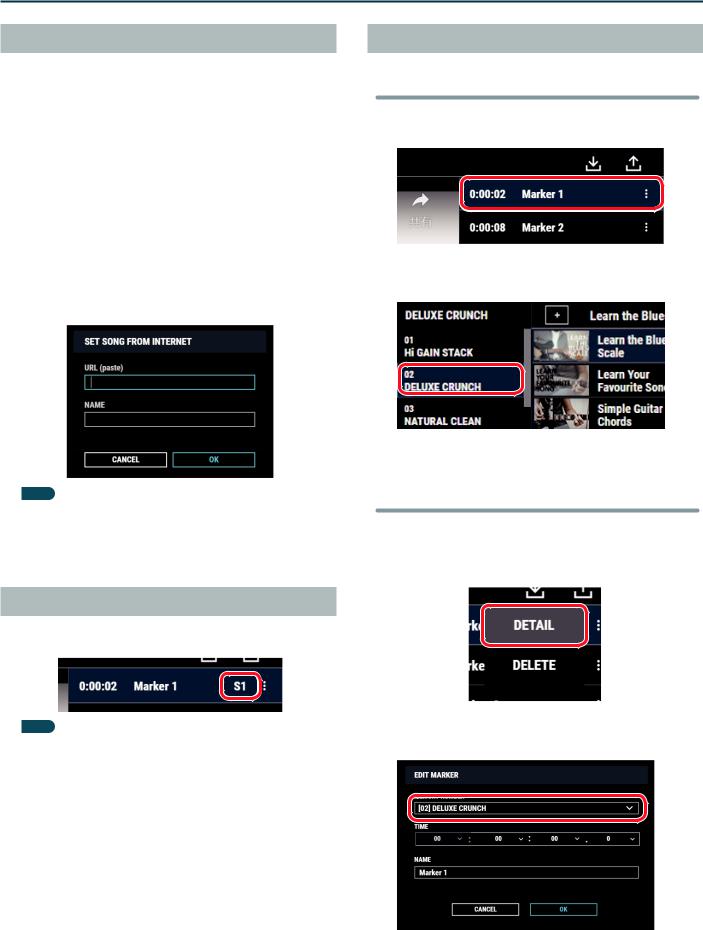
5 Session marker list
By placing a marker in a video or song, you can jump instantly to the playback location that you want to practice.
By assigning a Pocket GT user memory to a marker, you can automatically switch sounds in synchronization with the song.
MEMO
Click the [...] button in the session list to open the edit menu.
Lets you register user
DETAIL memories, or edit the locations and names of
markers.
DELETE Deletes the marker.
6 Import / Export button ([/] / [.] button)
You can import a song from your PC/Mac (IMPORT), or save individual a song to your PC/Mac (EXPORT).
5
Using BOSS TONE STUDIO for Pocket GT
Importing Video from YouTube
By registering a YouTube video in the session list, you can enjoy performing while the video plays.
*Depending on the video, importing might not be possible due to restrictions on embedding.
1.Use a YouTube on your browser to access the video that you want to import.
2.Press the [Share] button to copy the shortened URL.
3.In TONE STUDIO, click the [+] button located in the upper part of the session list.
4.Paste or input the URL that you copied into the “URL (paste)” field.
Press the [V] key while holding down the [Ctrl] key if you’re on Windows or the [Command] key if you’re on Mac.
5.Click the “NAME” field, and enter a name for the video.
MEMO
Depending on the video, the name of the video might be input automatically when you click the “NAME” field.
6. Click the “OK” button to import the video.
Sound Number “S*”
Sounds of an imported SESSION file or sound numbers of content that was downloaded from BOSS TONE CENTRAL are indicated as “S*.”
MEMO
55 If a sound “S*” is selected, it is shown as “OO.” on the Pocket GT.
55 Loading of S6 and subsequent sounds will be slower than S1–S5 sounds.
55 “S*” sounds are saved in the SESSION file.
55 If you want to use a “S*” sound in another song etc., save it to the unit.
1.Click the marker, and select the “S*” sound that you want to save.
The sound “S*” is now selected. This is not reflected in the user memory list.
2.In the EDITOR screen, tap the “WRITE” button and then select “WRITE.”
3.Select the save-destination user memory number.
4.Click the [WRITE] button.
Specifying the Sound at a Marker
Registering a sound at a marker
1.In the session marker list, click the marker that you want to assign.
2.Select the sound that you want to register at the marker, either by clicking it in the user memory list, or by selecting it on the Pocket GT unit.
3.Click the [MEMORY SET] button to register the user memory.
Editing a registered sound
1.In the session marker list, select the marker in which a sound is registered, and then click the [...] button.
2.From the pulldown menu, click “DETAIL.”
3.Click the “MEMORY NUMBER” item, and select the user memory that you want to register.
If you select “OFF,” the user memory registration is deleted.
4.If you want to edit the marker’s time location or name, click “TIME” or “NAME” and edit them.
5.Click “OK” to register the user memory.
6
 Loading...