Boss BE10ACP User manual


IMPORTANT! Fill Out And Keep For Your Records.
IMPORTANT
Record the serial number of the product:
Model:
Serial Number: Date of Purchase:
The serial number is located on the top part of the chassis.
1

 ontents
Contents………………………………………....2
Notes…………………………………………………………….4
 5-7 About this Manual………………………………..………7 California Prop. 65…..……………………………………7
Basic Product Opera on ………………. 8
What comes in the box……………………………….8
Product Basics……………………..……..…………..9-16 Unit Installa on ....……....…………......…………..11 Operation instruction.......………….....…………..12 Display screen disassembly instructions……..13 Using and Caring for the Touchscreen………..14 Product Setup……………………………………..………15  16
16
Apple CarPlay ………………………………..17
Warnings……….…………………...……………………...17 Using CarPlay……………………...……………………...18
Gestures & Control……………………………………..17
CarPlay Display…………………………………………...18
Disable Apps……………………………………………….18
Android Auto…..…………………………....19
Warnings……………..………………………………….….19
Using Android Auto……………………………….......19
Bluetooth® ……………….…………………..20
 20
20
 20 Phonebook………………………………………………….20 Device Status……………………………………………...20 Calling..…………………………………………………….…21 History………………………………………………………..21 Private Mode……………………………………………...21 Audio…………………………………………………………..22 Track Control……………………………………………....22
Media Player Source Switching……………….…..22
Media …………………………………………..23
Warnings……….…………………...……………………..23
USB Playback……………………...……………………..23
 23 Photos………………………………………………………..23
Radio………………………………………….....24
Display Overview………………………………………...24
Controls……….…………………...…………………….….24
Tuning……………………...…………………………….…..24
Bands……………………………………………..…..….…..24
Presets…………………………………………………….….24
Favorites…………………………………………………….24
2

Contents
AV IN …………………………………………....25
Playback…….…………………………………………….….25
Camera.………………………………………...25
Warnings….……………………………………………..….25
Reverse View……………………………………………..25
General Se ngs.……………………….…..26
|
26 |
System Language.………………………………….…….26 |
|
Time Zone……………………………………………........26 |
|
Date & Time…..………………………………………..….26 |
|
Auto Adjust Daylight Saving…..………...…….….26 |
|
System Tone…..……………………………………...….26 |
|
Power O Delay…………………………………………..26 |
|
Parental Disc Lock........................................... |
26 |
Audio………….…………………………….…..27
EQ.………………………………………………………….…..27
Balance/Fader……………………………………………..27
Subwoofer……………………………………………….….27
Loudness……………………………………………………..27
Internal Amp…………………………………………….…27
Volume……………………………….....……………….….27
Source level……………………………...…………….….27
Display Se ngs.…………………………….28
 28 Gamma……………..……………………………………….28
  28 LED Anima on..
 28
28
Bluetooth® Sengs.……………………….29
Device Name………………………………………….……29
Camera......................................... |
29 |
Rear Camera input………………....…………….……29 |
|
Front Camera input……………………………….……29 Rear View pelay…………………………………….……29
Radio Sengs.………………………….……29
Region……………………………….………………………..29
RDS/RBDS...…………..………………………………….…29
 29 Tra c Announcement (TA)………………………....29
Connec ons……………………………….….30
 30-35
30-35
Power/SWC …………………………….…………….…..30
Speaker…….………………………………………………...31
Audio Pre-amp/AV IN/ Radio………………...…....32
Camera/USB/MIC………………………………………...33
Parking Brake…………………………………………….…34
Hands-free Mic……………………...............………..35
Troubleshoo ng…………………………….36 Speci
 ca
ca ons…..……………………….……38
3

Important
This symbol with “WARNING” is intended to
injury, death, damage to the product and/or property.
 ARNING
This symbol with “CAUTION” is intended to alert the user to the presence of important
injury or damage to the product and/or property.

 AUTION
Use of the Apple CarPlay logo means that a vehicle user interface meets Apple performance standards.
this vehicle or its compliance with safety and regulatory standards. Please note that the use of this product with iPhone or iPod may a ect wireless performance.
ipone is trademark of Apple Inc.,registered in the U.S.and other countries.
Apple CarPlay is a trademark of Apple Inc. Android Auto is a trademark of Google LLC. The Bluetooth® word mark and logos are registered trademarks owned by Bluetooth SIG, Inc. and any use of such marks by Boss Audio Systems is under license.
Other trademarks and trade names are those
4

BE SURE TO OBSERVE THE FOLLOWING GUIDELINES: Do not turn up the volume so high that you can’t hear what’s around you.
Do not operate mobile video equipment while driving a motorized vehicle – |
always be your highest |
priority. |
|
, or ear discomfort.
o the power and consult your
dealer or the nearest authorized BOSS AUDIO SYSTEMS Service Center.
Boss Audio Systems does not recommend to install the product yourself.
Always consult with a professional installer .
experience in electronic equipment and motorized vehicle accessories may be dangerous and could expose you to the risk of electric shock, injury or other hazards
Refer any repairs to a quali ed BOSS AUDIO SYSTEMS Service Center
5

Before Installing
 –
–
Use this unit with a 12-
CAUTION
RISK OF ELECTRIC SHOCK
DO NOT OPEN
CAUTION: TO REDUCE THE RISK OF ELECTRICL SHOCK,
DO NOT REMOVE COVERS.
NO USER SERVICABLE PARTS INSIDE. REFER SERVICING
TO A QUALIFIED SERVICE PROFESSIONAL
Product Safety
was intended to be used with the g this feature will void any
and all warranty. Please check with a professional installer to have your product installed properly.
Important Note
Due to ongoing enhancements, example images on screens may slightly di r from actual product.
6

Images and Video
Watching video while driving is against Federal, State, and Local laws.
Check surroundings for safety while camera images are displayed.
ident.
 n of smartphone Apps accessible d c
About this manual
keep it in a safe place for future
reference.
- -Keep the manual
- -Clean with a dry cloth only
-Do not use or operate near water -Do not defeat any safety features
.
7

What comes in the box
Hardware
Qty 1 |
|
BE10ACP |
|
Qty 1 |
|
Tapping Screw 5X18 B/A |
Qty 2 |
Brackets |
|||||||||||||||||||||||||
Qty 1 |
Rubber Grommet |
|
Qty 1 |
|
Spring Washer |
|
|
||||||||||||||||||||||||||
Qty 1 |
Hex Bolt |
|
Qty 2 |
|
Plain Washer |
Qty 1 |
Power/Harness |
||||||||||||||||||||||||||
Qty 1 |
Hex Nut |
|
Qty 2 |
|
Key |
Qty 1 |
Hands-free Microphone |
||||||||||||||||||||||||||
Qty 8 |
|
Screw M5x6 |
|
Qty 1 |
|
Moun ngBracket |
|||||||||||||||||||||||||||
|
|
|
|
|
|||||||||||||||||||||||||||||
|
|
|
|
|
|
|
|
|
|
|
|
|
|
|
|
|
|
|
|
|
|
|
|
|
|
|
|
|
|
|
|
|
|
|
|
|
|
|
|
|
|
|
|
|
|
|
|
|
|
|
|
|
|
|
|
|
|
|
|
|
|
|
|
|
|
|
|
|
|
|
|
|
|
|
|
|
|
|
|
|
|
|
|
|
|
|
|
|
|
|
|
|
|
|
|
|
|
|
|
|
|
|
|
|
|
|
|
|
|
|
|
|
|
|
|
|
|
|
|
|
|
|
|
|
|
|
|
|
|
|
|
|
|
|
|
|
|
|
|
|
|
|
|
|
|
|
|
|
|
|
|
|
|
|
|
|
|
|
|
|
|
|
|
|
|
|
|
|
|
|
|
|
|
|
|
|
|
|
|
|
|
|
|
|
|
|
|
|
|
|
|
|
|
|
|
|
|
|
|
|
|
|
|
|
|
|
|
|
|
|
|
|
|
|
|
|
|
|
|
|
|
|
|
|
|
|
|
|
|
|
|
|
|
|
|
|
|
8

Front Detail
BE10ACP
MOOE BAND
2 3 4 5
6
Reset Pinhole
1.Menu Button
Touch to return to the home menu or the previously selected source.
2.Voice Assistant
Touch to command
3.Power/Volume Knob
1.Press and hold to turn the unit on or o .
2.Press to mute or restore volume. 3.Rotate to increase or decrease volume.
4.MODE Button
Touch to select a system mode.
5.BAND Button
Touch to select FM or AM tuner.
6.Reset Pinhole
Press with a pin to restore the factory se ngs.
9

Rear Detail
|
|
|
|
|
|
|
|
|
|
|
|
|
|
|
|
|
|
|
|
|
|
|
|
|
|
|
|
|
|
|
|
|
|
|
|
|
|
|
|
|
|
|
|
|
|
|
|
|
|
|
|
|
|
|
|
|
|
|
|
|
|
|
|
|
|
|
|
|
|
|
|
|
|
|
|
|
|
|
|
|
|
|
|
|
|
|
|
|
|
|
|
|
|
|
|
|
|
|
|
|
|
|
|
|
|
|
|
|
|
|
|
|
|
|
|
|
|
|
|
|
|
|
|
|
|
|
|
|
|
|
|
|
|
|
|
|
|
|
|
|
|
|
|
|
|
|
|
|
|
|
|
|
|
|
|
|
|
|
|
|
|
|
|
|
|
|
|
|
|
|
|
|
|
|
|
|
|
|
|
|
|
|
|
|
|
|
|
|
|
|
|
|
|
|
|
|
|
|
|
|
|
|
|
|
|
|
|
|
|
|
|
|
|
|
|
|
|
|
|
|
|
|
|
|
|
|
|
|
|
|
|
|
|
|
|
|
|
|
|
|
|
|
|
|
|
|
|
|
|
|
|
|
|
|
|
|
|
|
|
|
|
|
|
|
|
|
|
|
|
|
|
|
|
|
|
|
|
|
|
|
|
|
|
|
|
|
|
|
|
|
|
|
|
|
|
|
|
|
|
|
|
|
|
|
|
|
|
|
|
|
|
|
|
|
|
|
|
|
|
|
|
|
|
|
|
|
|
|
|
|
|
|
|
|
|
|
|
|
|
|
|
|
|
|
|
|
|
|
|
|
|
|
|
|
|
|
|
|
|
|
|
|
|
|
|
|
|
|
|
|
|
|
|
|
|
|
|
|
|
|
|
|
|
|
|
|
|
|
|
|
|
|
|
|
|
|
|
|
|
|
|
|
|
|
|
|
|
|
|
|
|
|
|
|
|
|
|
|
|
|
|
|
|
|
|
|
|
|
|
|
|
|
|
|
|
|
|
|
|
|
|
|
|
|
|
|
|
|
|
|
|
|
|
|
|
|
|
|
|
|
|
|
|
|
|
|
|
|
|
|
|
|
|
|
|
|
|
|
|
|
|
|
|
|
|
|
|
|
|
|
|
|
|
|
|
|
|
|
|
|
|
|
|
|
|
|
|
|
|
|
|
|
|
|
|
|
|
|
|
|
|
|
|
|
|
|
|
|
|
|
|
|
|
|
|
|
|
|
|
|
|
|
|
|
|
|
|
|
|
|
|
|
|
|
|
|
|
|
|
|
|
|
|
|
|
|
|
|
|
|
|
|
|
|
|
|
|
|
|
|
|
|
|
|
|
|
|
|
|
|
|
|
|
|
|
|
|
|
|
|
|
|
|
|
|
|
|
|
|
|
|
|
|
|
|
|
|
|
|
|
|
|
|
|
|
|
|
|
|
|
|
|
|
|
|
|
|
|
|
|
|
|
|
|
|
|
|
|
|
|
|
|
|
|
|
|
|
|
|
|
|
|
|
|
|
|
|
|
|
|
|
|
|
|
|
|
|
|
|
|
|
|
|
|
|
|
|
|
|
|
|
|
|
|
|
|
|
|
|
|
|
|
|
|
|
|
|
|
|
|
|
|
|
|
|
|
|
|
|
|
|
|
Main |
|
|
|
|
|
|
|
|
|
|
|
|
|
|
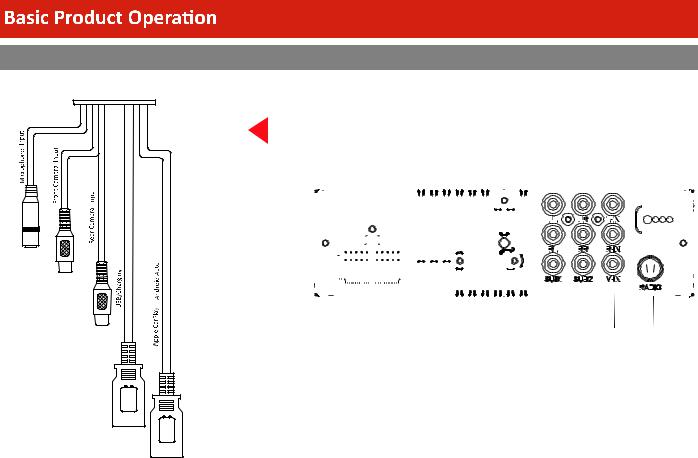
Pre-Amp Output |
|
A/V Input AM/FM |
|
||||||||||||||||||||||||||||||||||||||||||||||||
|
|
|
|
|
|
|
|
|
|
|
|
Harness |
|
|
|
|
|
|
|
|
|
|
|
|
|
|
|
|
||||||||||||||||||||||||||||||||||||||||||||||||||
|
|
|
|
|
|
|
|
|
|
|
|
|
|
|
|
|
|
|
|
|
|
|
|
|
|
|
|
|
|
|
|
|
|
|
|
|
|
|
|
|
|
|
|
|
|
|
|
|
|
|
|
|
|
|
|
|
|
|
|
|
Antenna |
|
||||||||||||||||
|
|
|
|
|
|
|
|
|
|
|
|
|
|
|
|
|
|
|
|
|
|
|
|
|
|
|
|
|
|
|
|
|
|
|
|
|
|
|
|
|
|
|
|
|
|
|
|
|
|
|
|
|
|
|
|
|
|
|
|
|
|
|
|
|
|
|
|
|
|
|
|
|
||||||
USB2
USB1 |
10 |
|

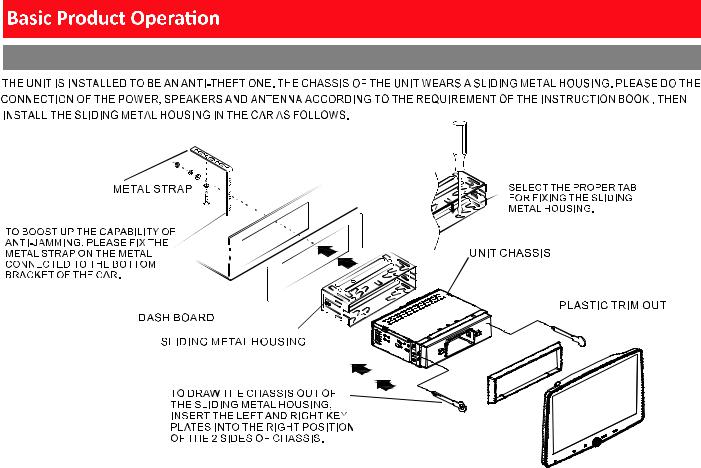
Unit Installa on
11

Opera on instruc on
The display screen can be freely adjusted 25 degrees back or forth
The display screen can be freely adjusted 15 degrees right or le
The up and down posi on of the display screen can be freely adjusted
12
 Loading...