


Owner’s Manual
Copyright © 2017 ROLAND CORPORATION
The AD-10 is designed for the acoustic guitarist who performs live; in a single unit, it combines a preamp, effects, looper, and direct box.
Contents
Getting Ready. . . . . . . . . . . . . . . . . . . . . . . . . . . . . . . 2
Connecting the Equipment. . . . . . . . . . . . . . . . . . . . . 2
Connecting a Footswitch or an Expression Pedal.. . . . 3
Turning On/Off the Power. . . . . . . . . . . . . . . . . . . . . 3 Input Settings. . . . . . . . . . . . . . . . . . . . . . . . . . . . . . . 4
Adjusting the Input Sensitivity. . . . . . . . . . . . . . . . 4 Switching Between GUITAR IN 1/2 and
Adjusting the Balance. . . . . . . . . . . . . . . . . . . . . . . 4 Tuning the Guitar (Tuner) . . . . . . . . . . . . . . . . . . . . . . 4
Manual/Memory Mode. . . . . . . . . . . . . . . . . . . . . . . 5
Manual Mode . . . . . . . . . . . . . . . . . . . . . . . . . . . . . . . 5
Memory Mode.. . . . . . . . . . . . . . . . . . . . . . . . . . . . . . 5
Saving a Memory . . . . . . . . . . . . . . . . . . . . . . . . . . 5
Initializing Memory Settings. . . . . . . . . . . . . . . . . . 5
Editing the Effects.. . . . . . . . . . . . . . . . . . . . . . . . . . . 6 EQ (Equalizer) . . . . . . . . . . . . . . . . . . . . . . . . . . . . . . . 6 BOOST. . . . . . . . . . . . . . . . . . . . . . . . . . . . . . . . . . . . . 6 FX LOOP . . . . . . . . . . . . . . . . . . . . . . . . . . . . . . . . . . . 6 ANTI-FEEDBACK. . . . . . . . . . . . . . . . . . . . . . . . . . . . . 7 ACOUSTIC RESONANCE. . . . . . . . . . . . . . . . . . . . . . . . 7 COMP (Compressor) . . . . . . . . . . . . . . . . . . . . . . . . . . 7 DELAY/CHORUS.. . . . . . . . . . . . . . . . . . . . . . . . . . . . . 7 AMBIENCE. . . . . . . . . . . . . . . . . . . . . . . . . . . . . . . . . . 7 Sub-Parameter Settings.. . . . . . . . . . . . . . . . . . . . . . . 8
Looper. . . . . . . . . . . . . . . . . . . . . . . . . . . . . . . . . . . . . . 9
Advanced Settings. . . . . . . . . . . . . . . . . . . . . . . . . . . 10
Output Setting . . . . . . . . . . . . . . . . . . . . . . . . . . . . . . 10
Ambience Output Settings. . . . . . . . . . . . . . . . . . . 10
Stomp Pedal Setting. . . . . . . . . . . . . . . . . . . . . . . . . . 11
System Settings. . . . . . . . . . . . . . . . . . . . . . . . . . . . . . 11
Making Independent EQ Settings for GUITAR
IN 1 and 2. . . . . . . . . . . . . . . . . . . . . . . . . . . . . . . . 11
Assigning the Functions of the Pedals. . . . . . . . . . 12
Other Functions . . . . . . . . . . . . . . . . . . . . . . . . . . . 12
Restoring the Factory Settings (Factory Reset).. . . . . . 13
Appendices . . . . . . . . . . . . . . . . . . . . . . . . . . . . . . . . . 14
Main Specifications. . . . . . . . . . . . . . . . . . . . . . . . . . . 14
USING THE UNIT SAFELY . . . . . . . . . . . . . . . . . . . . . . . 14
IMPORTANT NOTES. . . . . . . . . . . . . . . . . . . . . . . . . . . 14
Before using this unit, carefully read “USING THE UNIT SAFELY” and “IMPORTANT NOTES” (the leaflet “USING THE UNIT SAFELY” and the Owner’s Manual p. 14)). After reading, keep the document(s) where it will be available for immediate reference.

Getting Ready
LINE OUT (L/PHONES, R/MONO) jacks
Connect these jacks to your guitar amp or headphones.
*Connect your headphones to the L/PHONES jack.
*If using a mono connection, use only the R/MONO jack.
Rear Panel
GUITAR IN (1, 2) jacks
Connect your guitar.
You can use the two jacks to blend two different types of pickups, or to connect two guitars.
Subsequently attached pickup
Built-in pickup
XLR OUT (L, R) jacks
Connect to the PA etc.
* Pin assignment of XLR OUT (L, R) jack.
1 GND |
2 HOT |
3 COLD
DC IN jack
Connect the included AC adaptor here.
* We recommend that you keep batteries installed in the unit even though you’ll be powering it with the AC adaptor. That way, you’ll be able to continue a performance even if the cord of the AC adaptor gets accidentally disconnected from the unit.
USB COMPUTER port
Use a commercially available USB 2.0 cable to connect this port to your computer so that audio can be sent and received between the AD-10 and the computer. You can
SEND, RETURN jacks
Connect an external effect device (mono).
Connect the SEND jack to the input of your external effect device, and connect the output of your external effect device to the RETURN jack.
RETURN1OUTPUT
SEND0INPUT
* |
the |
. |
2

Getting Ready
Connecting a Footswitch or an Expression Pedal
If you connect a footswitch (FS-5U, FS-6, FS-7: sold separately) or expression pedal (FV-500H, FV-500L, EV-30, Roland EV-5: sold separately) to the CTL1,2/EXP jack, you'll be able to assign a variety of functions to it. “Assigning the Functions of the Pedals” (p. 12)
*Use only the specified expression pedal. By connecting any other expression pedals, you risk causing malfunction and/or damage to the unit.
1/4” phone type |
Stereo 1/4” phone type |
Stereo 1/4” phone type |
||||||||||
10 |
10 |
|
|
10 |
|
|
|
|
||||
1/4” phone type |
1/4” phone type x 2 |
Stereo 1/4” phone |
||||||||||
|
|
|
|
|
|
|
|
|
|
|
|
|
|
|
|
|
|
|
|
|
|
|
|
|
|
|
|
|
|
|
|
|
|
|
|
|
|
|
|
|
|
|
|
|
|
|
|
|
|
|
|
FS-5U |
FS-5U |
30, EV-5 |
FS-7
Turning On/Off the Power
Before you make connections, make sure that the input gain or volume of your mixer or amplifier is turned down.
By turning on devices in the wrong order, you risk causing malfunction and/or damage to speakers and other devices.
*Before turning the unit on/off, always be sure to turn the volume down. Even with the volume turned down, you might hear some sound when switching the unit on/off. However, this is normal and does not indicate a malfunction.
*When the batteries run low, the display indicates “BT”When this occurs, install fresh batteries.
3
Getting Ready
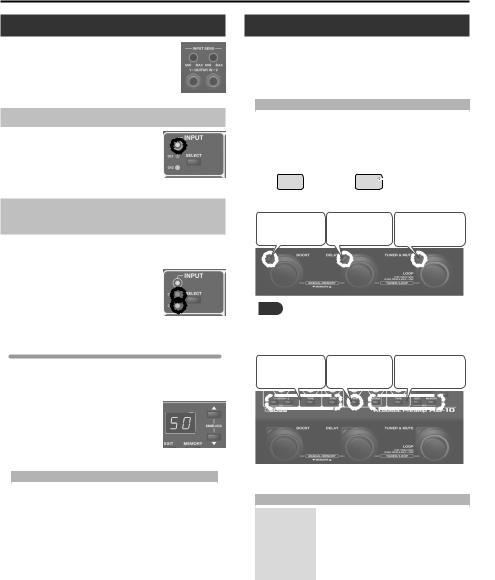
Input Settings
The AD-10 is equipped with two channels of input jack (GUITAR IN 1, 2). You can use these to blend two different types of pickup, such as piezo + magnetic, in the desired balance, or to switch between two connected guitars that you’re using in a live performance.
Adjusting the Input Sensitivity
Use the rear panel [INPUT SENS] knobs to adjust the input sensitivity. Adjust the sensitivity so that the top panel INPUT
indicators light orange when the maximum input occurs. If the input level is excessive, the INPUT indicators light red.
Switching Between GUITAR IN 1/2 and Adjusting
the Balance
If you’re using both the GUITAR IN 1 and 2 jacks, you can switch jacks 1 and 2 on/off, or turn them both on and adjust the mix balance.
1. Press the [SELECT] button.
Each time you press this button, the input selection switches between 1, 2, and 1+2 (MIX). The indicator (CH1, CH2) of an input that’s on is lit.
Adjusting the CH1/CH2 balance
If you select 1+2 (MIX), the CH1 and CH2 indicators are both lit, and you can adjust the balance.
1.Press the [SELECT] button several times to select 1+2 (MIX).
The CH1 and CH2 indicators are both lit. The display shows the value of the balance setting between inputs 1 and 2.
2.Use the [?] [=] buttons to adjust the value.
Display |
CH1: CH2 mix balance |
|
|
|
|
0–50–GG |
100: 0–50: 50–0: 100 |
|
(Default: 50) |
||
|
Tuning the Guitar (Tuner)
1.Press the [TUNER & MUTE] pedal.
Guitar is muted, the tuner is switched on.
2.Change the reference pitch by using the [?] [=] buttons.
Display |
Pitch |
|
|
35–45 |
435–445 Hz (default: 440 Hz) |
|
|
3.Play a single open note on the string to be tuned.
The name of the note closest to the pitch of the string played appears in the display.
* Ex. (E) |
E |
(C#) |
C# # symbol |
|
|
4. Tune so that the [DELAY] pedal light up.
Too low |
Tuned |
Too high |
MEMO
When the tuner is on, you can press the [MENU] button to switch the tuner’s display mode. The tuning status can also be shown by the buttons located above the pedals.
Too low |
Tuned |
Too high |
Each time you press the [MENU] button, the display mode changes as follows.
Display mode |
Explanation |
|
|
|
|
PP |
The pedal LEDs and the buttons both |
|
PANEL & PEDAL |
indicate the pitch. |
|
|
|
|
PD |
Only the pedal LEDs indicate the pitch. |
|
PEDAL |
||
|
||
PN |
Only the buttons indicate the pitch. |
|
PANEL |
||
|
5. To turn the tuner off, press any of the pedals.
4
Manual/Memory Mode
Manual Mode
When you start up the AD-10, it is in Manual mode. the sound and effects are applied according to the the panel knobs.
55 A dot is shown in the display. When you knob, the value of its setting is shown.
55 You can turn the effects on and off by using pedals (blue LED).
BOOST ON/OFF |
DELAY ON/OFF |
Memory Mode
When you press the [MEMORY] button to make it light red, the AD-10 is in Memory mode. In this mode you can save and recall 10 combinations of effects and settings (sounds) as “memories.”
You can also press the two pedals simultaneously to switch between Manual and Memory modes.
55 The memory number is shown in the display. |
01 |
*When you edit the setting, a dot appears in the display.
55 You can switch memories by using the pedals (red LED).
Memory number ?/=
Stomp Mode
In Memory mode, simultaneously long-pressing the two pedals shown in the illustration switches to Stomp mode. You can turn the effects on and off by using the pedals (blue LED).
BOOST ON/OFF |
DELAY ON/OFF |
Saving a Memory
Here’s how to save settings that you want to keep.
1.Hold down the [EXIT] button and press the [MEMORY] button.
The display blinks “ " (Write).
Press the [MEMORY] button.
The display indicates the memory number.
3.Use the [?] [=] buttons to choose the memory number where you’d like to save the memory.
4.Press the [MEMORY] button.
The [MEMORY] button and display indications blink rapidly.
MEMO
For each effect, you can specify whether to save it in memory or use it manually (knob positions) (p. 12).
Initializing Memory Settings
Initializes the settings of the currently selected memory.
1.Hold down the [EXIT] button and press the [MEMORY] button.
The display blinks “ ” (Write).
2. Press the [=] button to choose “IN” (Initialize).
Checking the Knob/Button
55 By operating a knob or button while you hold down the [EXIT] button, can see its current value the display without actually
changing the setting of that knob or button.
55 When you recall settings (sounds) in Memory
the values of the settings do not match the positions of the physical knobs. For example, if the value of a knob’s setting is 12 o’clock, but the physical knob is turned to the far left, the value will not change until you turn the knob through the 12 o’clock position.
* When you edit the setting, a dot appears in the display.
5
 Loading...