


Troubleshooting Tips
Lifestyle® SA-2 & SA-3 Amplifier
Refer to the Lifestyle® SA-2 & SA-3 Amplifier service manuals, part number 271720 for schematics, PCB layouts and parts lists.
Preventative Repair Measures
Note: Perform the following on all units returned for repair.
Product |
Check |
Action |
SA-2 & SA-3 |
N/A |
There is no preventative maintenance for this |
|
|
product. |
Troubleshooting Tips
Product |
Symptom |
Check |
|
|
|
Action |
|
|
SA-2 & SA-3 |
No Audio |
Remote |
The unit will not turn on if the remote dipswitch |
|||||
|
|
dipswitch |
settings are incorrect. See pages 2 – 12 of this |
|||||
|
|
settings |
document for instructions. |
|
|
|||
SA-2 & SA-3 |
No Power |
AMP IC’s and |
Amplifier IC’s U150 and U250 may be defective. |
|||||
|
|
fuse |
Check for visible damage or shorts between |
|||||
|
|
|
pins 7&8 and pins 14&15. AC mains fuse F1 |
|||||
|
|
|
may also be open. |
|
|
|
||
|
|
|
|
|
|
|
|
|
|
|
|
|
U150,U250 |
|
170156 |
SA2 Only |
|
|
|
|
|
U150, U250 |
|
275177-001 |
SA3 Only |
|
|
|
|
|
F1 |
|
177311- |
SA2 & |
|
|
|
|
|
|
|
03150 |
SA3 |
|
|
|
|
|
|||||
SA-2 & SA-3 |
No Power |
U4 |
The +5V supply voltage may be shorted to |
|||||
|
|
|
ground through U4 pin 1. Replace IC with part # |
|||||
|
|
|
303687-001. |
|
|
|
|
|
SA-2 & SA-3 |
No Power |
R10 |
Check for open 220 ohm resistor R10. |
|||||
|
|
|
Part # 181895-2200. |
|
|
|||
SA-2 & SA-3 |
Unit operates at full |
C14 |
Capacitor C14 may be defective. |
|
|
|||
|
volume, unable to |
|
Part # 191470-473. |
|
|
|
||
|
control volume |
|
|
|
|
|
|
|
SA-2 & SA-3 |
Amp causes media |
U9 and D14 |
Check for -8Vdc at regulator U9. If missing |
|||||
|
center display to lock |
|
replace U9 (260688-08). D14 (135247-5231) |
|||||
|
up and read BOSE |
|
may also be shorted. |
|
|
|||
|
LIFESTYLE |
|
|
|
|
|
|
|
SA-2 & SA-3 |
Distorted audio / |
U3 |
Volume control IC U3 (188941-001) may be |
|||||
|
audio fades after a |
|
defective. |
|
|
|
||
|
few seconds |
|
|
|
|
|
|
|
SA-3 |
No audio, led blinks |
Software |
The software may need to be updated, Refer to |
|||||
|
rapidly |
|
pages 13 - 15 for procedure. |
|
|
|||
SA-3 |
No Power |
Q155 and |
To determine if the amp IC’s U150 and U250 |
|||||
|
|
Q255 |
are defective, check for shorts on Q155 and |
|||||
|
|
|
Q255. If they measure a short, remove the amp |
|||||
|
|
|
IC’s and measure again. If the short is still |
|||||
|
|
|
present, replace the transistors in addition to the |
|||||
|
|
|
amp IC’s |
|
|
|
||
1
English
Setting Up Your Lifestyle |
® Stereo Ampli er |
|
|
Model AV-18/38/48 media center setup
 CAUTION: Before making connections, turn the Lifestyle ® system o
 and disconnect the media center from the AC (mains) power outlet. DO NOT plug the ampli
 er into an outlet until you have completed all other connections.
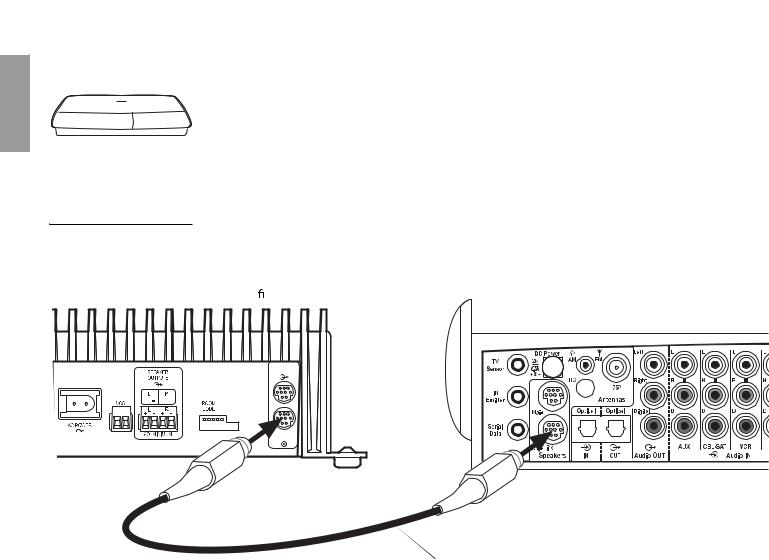
1. Insert one end of the Bose ® link A cable into the Bose ® link output connector on the rear panel of the media center (Figure 5).
2. Insert the other end of the Bose ® link A cable, into the Bose ® link input connector on the rear panel of the Lifestyle ® stereo ampli er.
er.
Figure 5
Lifestyle® stereo ampli er to AV-18/38/48 media center connections
Lifestyle ® stereo ampli er rear panel |
AV-18/38/48 media center rear panel |
|
|
|
|
BoseLink
OUTPUT
BoseLink
INPUT
20-ft Bose ® link A cable
2
Setting Up Your Lifestyle |
® Stereo Ampli er |
|
|
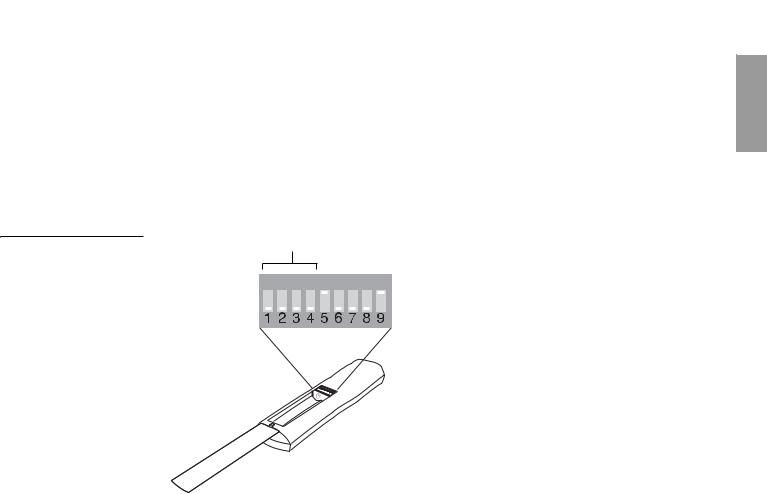
Figure 6
Remote microswitches
Setting up RC-18S and RC-38S remotes
Your additional remote is shipped from the factory already set up for a second room (room B). To make sure that this remote will work with your home entertainment system, do the following to check the house code setting.
1.Remove the remote control battery cover and locate the microswitches (Figure 6).
2.Make sure that the house code settings (switches 1, 2, 3, and 4) match the house code settings in your main room remote.
 Note: If this remote is to be used beyond a second room, other switch settings will need to be changed. See “Setting Up Additional Rooms For Sound” on page 22.
House code switches must match main room remote
ON
Check the expansion protocol setting in your system
For the Lifestyle ® stereo ampli er to work properly with your home entertainment system, the expansion protocol menu item must be set to Bose ® link. To verify this:
1.Turn on your Lifestyle ® DVD home entertainment system and your TV.
2. |
Press the |
System button on your main room remote. |
3. |
Select the |
Audio tab and navigate down to Expansion Protocol. |
4. |
Verify that the setting Bose ® link is selected. If not, select Bose ® link now. |
|
5. |
Press the |
Exit button on the remote. |
hsEngli
3

English
Setting Up Your Lifestyle |
® Stereo Ampli er |
|
|
Model AV-28 media center setup
 CAUTION: Before making connections, turn the Lifestyle ® system o
 and disconnect the media center from the AC (mains) power outlet. DO NOT plug the ampli
 er into an outlet until you have completed all other connections.
1. |
Insert the 8-to-9-pin adapter into the SPEAKER ZONES 2 output connector on the rear |
|
|
panel of the media center (Figure 7). |
|
2. |
Insert one end of the Bose |
® link A cable into the 8-to-9-pin adapter. |
3. |
Insert the other end of the Bose ® link A cable, into the Bose ® link input connector on the |
|
|
rear panel of the Lifestyle |
® stereo ampli er. |
Figure 7
Lifestyle® stereo ampli er to AV-28 media center connections
Lifestyle ® stereo ampli er rear panel
AV-28 media center rear panel
BoseLink
OUTPUT
BoseLink
INPUT
 8-to-9-pin
DIN adapter
 20-ft Bose ® link A cable
4
Setting Up Your Lifestyle |
® Stereo Ampli er |
|
|
Figure 8
Remote microswitches
Setting up the RC-28S remote
Your second remote is shipped from the factory already set up for Zone 2. To make sure that this remote will work with your home entertainment system, do the following to check the house code setting.
1.Remove the remote control battery cover and locate the microswitches (Figure 8).
2.Make sure that the house code settings (switches 1, 2, 3, and 4) match the house code settings in your main room remote.
3.Make sure switches 5, 7, and 8 are up, and switches 6 and 9 are down.
 Note: Refer to your Lifestyle ® system owner’s guide for more information on operating your system in more than one room.
House code switches must match main room remote
ON
hsEngli
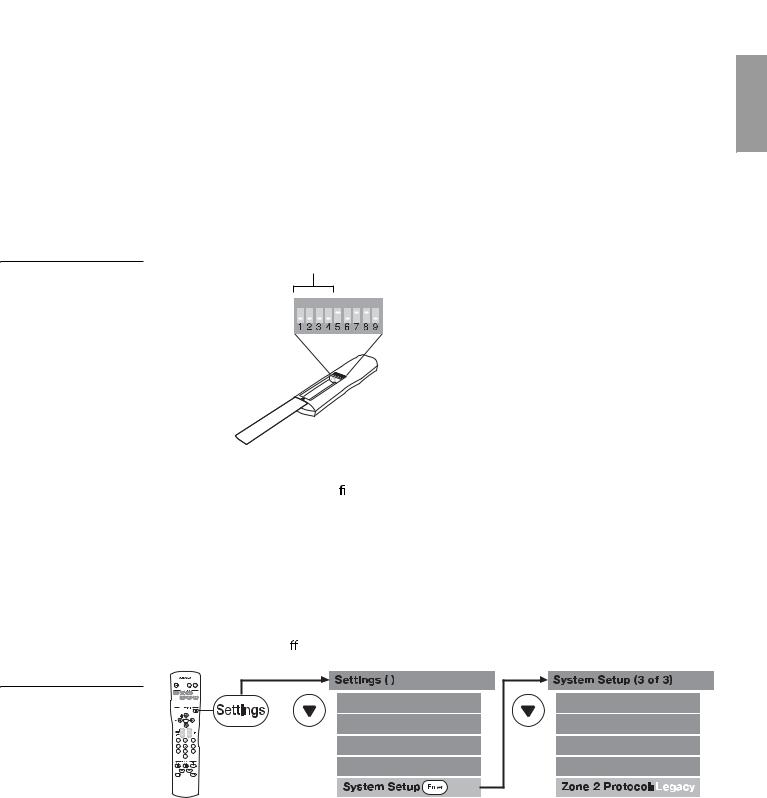
Setting the Zone 2 Protocol in your home entertainment system
For the Lifestyle |
® stereo ampli er to work properly with a Lifestyle ® media center, you will |
|
need to set the |
Zone 2 Protocol |
to Legacy mode (Figure 9). |
1.Turn on your Lifestyle ® DVD system and your TV.
2. |
Press the Settings button on your main room remote control. |
|
||
3. |
Scroll down the menu to System Setup |
and press the Enter |
button. |
|
4. |
Scroll down the menu to the last item, |
Zone 2 Protocol. |
|
|
5. |
Press the right arrow remote button to change the protocol from |
Normal to Legacy. |
||
6. |
Turn the system o and on again to ensure that the |
Zone 2 Protocol is reset to Legacy. |
||
Figure 9
Setting Zone 2 Protocol
5
 Loading...