


PM8250
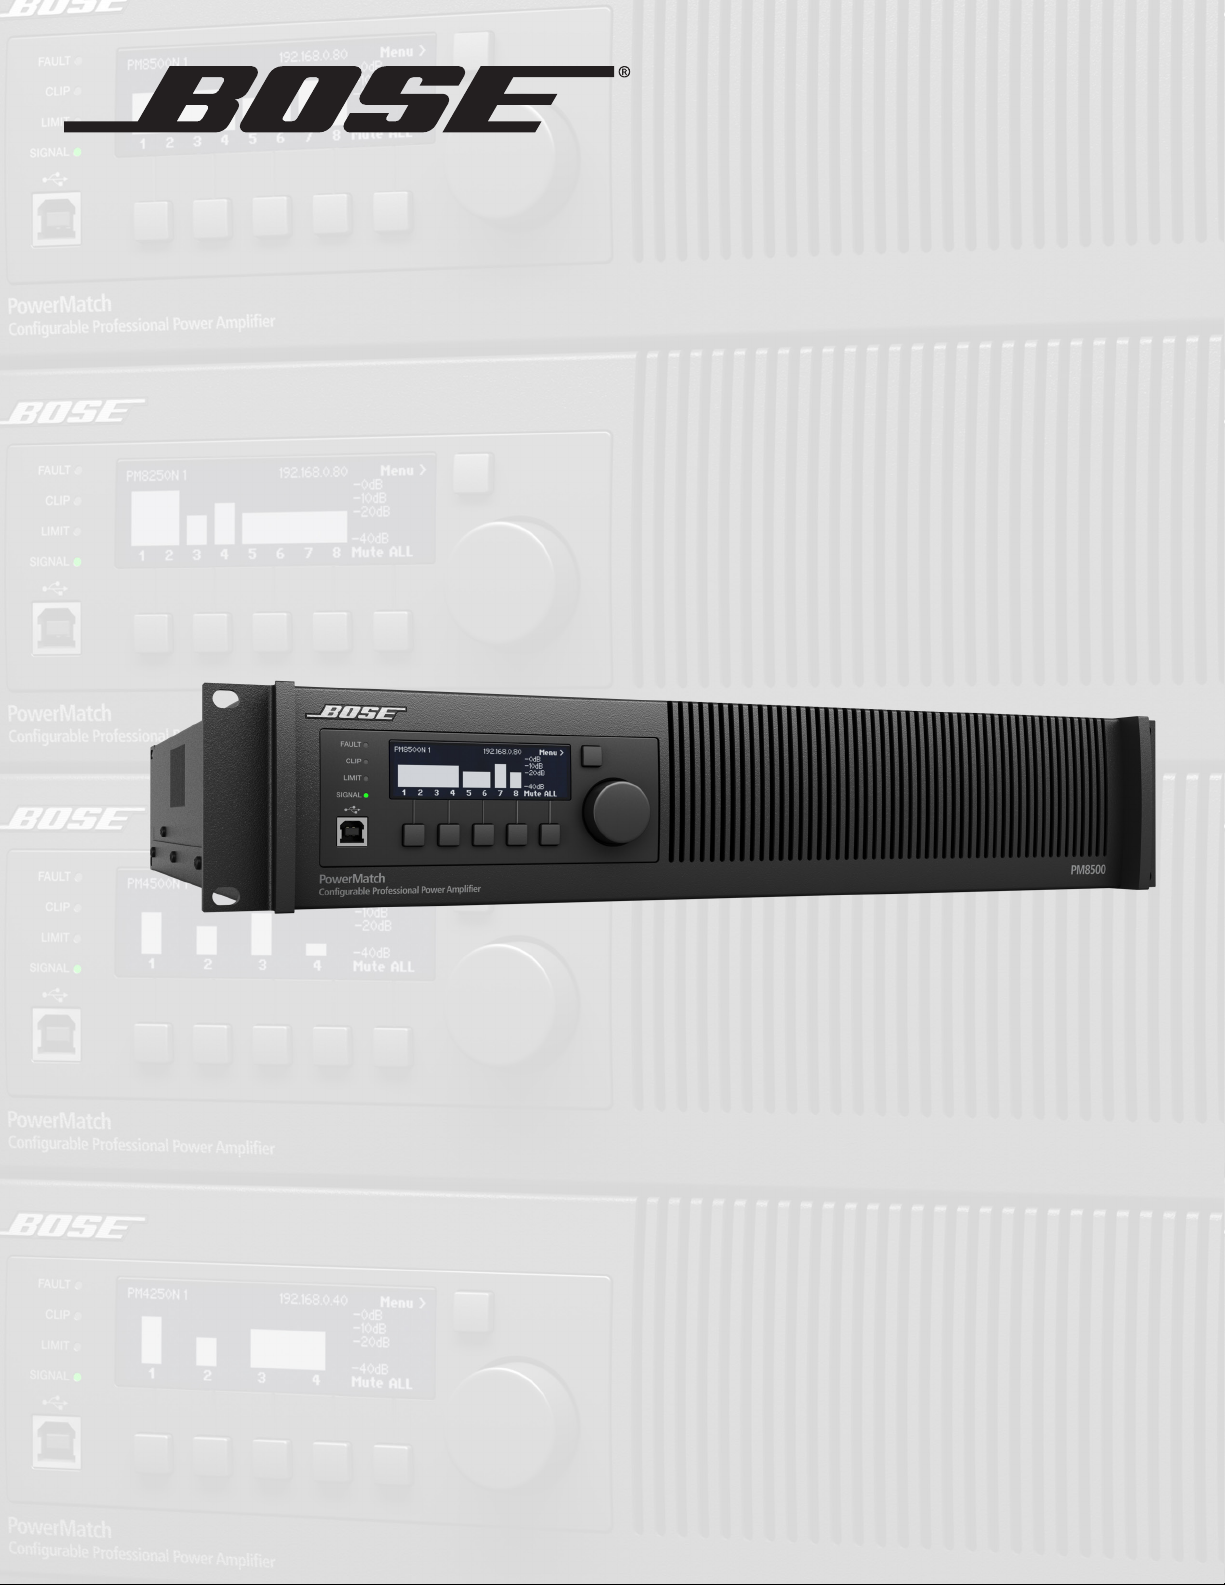
PowerMatch
®
Configurable Professional Power Amplifiers
Installation and Operating Guide
PM8500 / PM8500N
PM8250 / PM8250N
PM4500 / PM4500N
PM4250 / PM4250N


English User Guide Page 3
pro.Bose.com Contents
Introduction .................................................................................................................................................... 12
Product Features .......................................................................................................................................... 12
PowerMatch
®
Amplifier Line Overview ................................................................................................. 13
PowerMatch configurable professional power amplifiers ...................................................................... 13
Onboard Loudspeaker Processing and Front Panel Interface ............................................................... 13
Accessory Cards .................................................................................................................................... 13
Ideal for use with RoomMatch
®
array module loudspeakers .................................................................. 13
Interfacing with ControlSpace
®
engineered sound processors .............................................................. 13
Controls, Display, and Connectors ......................................................................................................... 14
Hardware Installation .................................................................................................................................. 15
Unpacking............................................................................................................................................... 15
Ventilation ............................................................................................................................................... 15
AC Mains Outlet Requirements .............................................................................................................. 15
Making Connections ................................................................................................................................... 16
Connection and Configuration Steps ..................................................................................................... 16
Power (Mains) Connection ...................................................................................................................... 16
Standby Mode ........................................................................................................................................ 16
Wiring Input Connectors ......................................................................................................................... 17
Wiring Output Connectors ...................................................................................................................... 17
Fault Notification Output ........................................................................................................................ 19
Serial over Ethernet ................................................................................................................................ 19
Setup and Configuration ........................................................................................................................... 20
Configuration Methods ........................................................................................................................... 20
Control Panel Description ....................................................................................................................... 21
Front Panel Control Menu Structure ....................................................................................................... 22
Control Menu Descriptions ..................................................................................................................... 22
Setting the Limiting Function for use with 3rd Party Loudspeakers ....................................................... 34
Sample Output Configurations for Different Loudspeaker Loads ............................................... 35
Configuration of a RoomMatch Two-Module Array (Example 1) ............................................................ 35
Configuration of a RoomMatch RMS215 Subwoofer Module (Example 2) ............................................ 35
Maintenance Operations ........................................................................................................................... 36
Updating Firmware and Speaker EQ Presets ......................................................................................... 36
Saving and Recalling Amplifier Settings (USB-only version amplifiers) ................................................. 37
Saving and Recalling Amplifier Settings (network version amplifiers) .................................................... 37
About the Alarm Log and Fault Indicator ................................................................................................ 38
Troubleshooting ............................................................................................................................................ 39
Appendix ......................................................................................................................................................... 40
Interface Comparison Table .................................................................................................................... 40
Technical Specifications ........................................................................................................................ 41
AC Current Draw and Thermal Dissipation Information ......................................................................... 46

Important Safety Information pro.Bose.com
Page 4 Installation and Safety Guidelines English
WARNING: This product is intended for installation by professional installers only.
Thank you for selecting Bose
®
PowerMatch
®
amplifiers for your sound reinforcement system. This document is intended to provide
professional installers with basic installation and safety guidelines for Bose PowerMatch amplifiers in typical fixed-installation systems.
Please read this document before attempting installation.
WARNING: Do not expose this apparatus to dripping or splashing, and do not place objects filled with liquids such as vases,
on or near the apparatus. As with any electronic products, use care not to spill liquids into any part of the system. Liquids can
cause a failure and/or a fire hazard.
WARNING: To reduce the risk of fire or electric shock, do not expose this apparatus to rain.
WARNING: Do not place any naked flame sources, such as lighted candles, on or near the apparatus.
Note: The product must be used indoors. It is neither designed nor tested for use outdoors, in recreational vehicles, or on boats.
The lightning flash with arrowhead symbol, within an equilateral triangle, is intended to alert the user to the presence of uninsu-
lated dangerous voltage within the system enclosure that may be of sufficient magnitude to constitute a risk of electrical shock.
Do not touch the output terminals while amplifier power is ON. Make all connections with amplifier OFF.
The exclamation point within an equilateral triangle, as marked on the system, is intended to alert the user to the presence of
important operating and maintenance instructions in this installation guide.
CAUTION: Make no modifications to the amplifier or accessories. Unauthorized alternations may compromise safety, regulatory
compliance, and system performance.
CAUTION: This product shall be connected to an AC mains socket outlet with a protective earthing (grounding) connection.
CAUTION: Where the AC mains plug is used as the disconnect device, such disconnect device shall remain fully operable.
Important Safety Instructions
1. Read these instructions.
2. Keep these instructions – for future reference.
3. Heed all warnings – on the product and in all product documentation.
4. Follow all instructions.
5. Do not use this apparatus near water or moisture.
6. Clean only with a dry cloth.
7. Do not block any ventilation openings. Install in accordance with the manufacturer’s instructions. To ensure reliable
operation of the product and to protect it from overheating, put the product in a position and location that will not interfere
with its proper ventilation.
8. Do not install near any heat sources, such as radiators, heat registers, stoves, or other apparatus (including amplifiers) that
produce heat.
9. Do not defeat the safety purpose of the polarized or grounding-type plug. A polarized plug has two blades with one
wider than the other. A grounding-type plug has two blades and a third grounding prong. The wider blade or third prong
is provided for your safety. If the provided plug does not fit in your outlet, consult an electrician for replacement of the
obsolete outlet.
10. Protect the power cord from being walked on or pinched, particularly at plugs, convenience receptacles, and the point where they
exit from the apparatus.
11. Only use attachments/accessories specified by the manufacturer.
12. Use only with the cart, stand, tripod, bracket, or table specified by the manufacturer or sold with the apparatus.
When a cart is used, use caution when moving the cart/apparatus combination to avoid injury from tip-over.

English Installation and Safety Guidelines Page 5
pro.Bose.com Important Safety Information
13. Unplug this apparatus during lightning storms or when unused for long periods of time to prevent damage to this product.
14. Refer all servicing to qualified service personnel. Servicing is required when the apparatus has been damaged in any
way such as power-supply cord or plug is damaged; liquid has been spilled or objects have fallen into the apparatus; the
apparatus has been exposed to rain or moisture, does not operate normally, or has been dropped. Do not attempt to service
this product yourself. Opening or removing covers may expose you to dangerous voltages or other hazards. Please call Bose to be
referred to an authorized service center near you.
15. To prevent risk of fire or electric shock, avoid overloading wall outlets, extension cords, or integral convenience receptacles.
16. Do not let objects or liquids enter the product – as they may touch dangerous voltage points or short-out parts that could result
in a fire or electric shock.
17. See product enclosure for safety-related markings.
18. The front panel LCD screen will illuminate when the product has mains power. If power is applied and the LCD screen is not
illuminated, please send the unit for service.
19. Do not allow the unit to exceed the maximum operating ambient temperature of 40° C. Be aware of conditions in an
enclosed rack that may increase the temperature above room ambient conditions.
This product conforms to all applicable EU directive requirements. The complete declaration of conformity can be found at
www.Bose.com/compliance.
This Product meets the immunity requirements for the E2 class EN55103-2 directive.
Initial turn on inrush current: 14.8 Amps (230V / 50 Hz)
Inrush current after 5 seconds AC mains interruption: 15.4 Amps (230V / 50 Hz)
Information About Products That Generate Electrical Noise (FCC Compliance Notice for U.S.)
Note: This equipment has been tested and found to comply with the limits for a Class A digital device, pursuant to part 15 of the FCC
Rules. These limits are designed to provide reasonable protection against harmful interference when the equipment is operated in a
commercial environment. This equipment generates, uses, and can radiate radio frequency energy and, if not installed and used in
accordance with the instruction manual, may cause harmful interference to radio communications. Operation of this equipment in a
residential area is likely to cause harmful interference in which case the user will be required to correct the interference at one’s own
expense.
This product complies with CAN ICES-3 (A)/NMB-3 (A).

Información de seguridad importante pro.Bose.com
Página 6 Instrucciones de instalación y de seguridad Español
WARNING: This product is intended for installation by professional installers only.
Thank you for selecting Bose
®
PowerMatch
®
amplifiers for your sound reinforcement system. This document is intended to provide
professional installers with basic installation and safety guidelines for Bose PowerMatch amplifiers in typical fixed-installation systems.
Please read this document before attempting installation.
WARNING: Do not expose this apparatus to dripping or splashing, and do not place objects filled with liquids such as vases,
on or near the apparatus. As with any electronic products, use care not to spill liquids into any part of the system. Liquids can
cause a failure and/or a fire hazard.
WARNING: To reduce the risk of fire or electric shock, do not expose this apparatus to rain.
WARNING: Do not place any naked flame sources, such as lighted candles, on or near the apparatus.
Note: The product must be used indoors. It is neither designed nor tested for use outdoors, in recreational vehicles, or on boats.
The lightning flash with arrowhead symbol, within an equilateral triangle, is intended to alert the user to the presence of uninsu-
lated dangerous voltage within the system enclosure that may be of sufficient magnitude to constitute a risk of electrical shock.
Do not touch the output terminals while amplifier power is ON. Make all connections with amplifier OFF.
The exclamation point within an equilateral triangle, as marked on the system, is intended to alert the user to the presence of
important operating and maintenance instructions in this installation guide.
CAUTION: Make no modifications to the amplifier or accessories. Unauthorized alternations may compromise safety, regulatory
compliance, and system performance.
CAUTION: This product shall be connected to an AC mains socket outlet with a protective earthing (grounding) connection.
CAUTION: Where the AC mains plug is used as the disconnect device, such disconnect device shall remain fully operable.
Important Safety Instructions
1. Read these instructions.
2. Keep these instructions – for future reference.
3. Heed all warnings – on the product and in all product documentation.
4. Follow all instructions.
5. Do not use this apparatus near water or moisture.
6. Clean only with a dry cloth.
7. Do not block any ventilation openings. Install in accordance with the manufacturer’s instructions. To ensure reliable
operation of the product and to protect it from overheating, put the product in a position and location that will not interfere
with its proper ventilation.
8. Do not install near any heat sources, such as radiators, heat registers, stoves, or other apparatus (including amplifiers) that
produce heat.
9. Do not defeat the safety purpose of the polarized or grounding-type plug. A polarized plug has two blades with one
wider than the other. A grounding-type plug has two blades and a third grounding prong. The wider blade or third prong
is provided for your safety. If the provided plug does not fit in your outlet, consult an electrician for replacement of the
obsolete outlet.
10. Protect the power cord from being walked on or pinched, particularly at plugs, convenience receptacles, and the point where they
exit from the apparatus.
11. Only use attachments/accessories specified by the manufacturer.
12. Use only with the cart, stand, tripod, bracket, or table specified by the manufacturer or sold with the apparatus.
When a cart is used, use caution when moving the cart/apparatus combination to avoid injury from tip-over.
pro.Bose.com

Español Instrucciones de instalación y de seguridad Página 7
pro.Bose.com Información de seguridad importante
13. Unplug this apparatus during lightning storms or when unused for long periods of time to prevent damage to this product.
14. Refer all servicing to qualified service personnel. Servicing is required when the apparatus has been damaged in any
way such as power-supply cord or plug is damaged; liquid has been spilled or objects have fallen into the apparatus; the
apparatus has been exposed to rain or moisture, does not operate normally, or has been dropped. Do not attempt to service
this product yourself. Opening or removing covers may expose you to dangerous voltages or other hazards. Please call Bose to be
referred to an authorized service center near you.
15. To prevent risk of fire or electric shock, avoid overloading wall outlets, extension cords, or integral convenience receptacles.
16. Do not let objects or liquids enter the product – as they may touch dangerous voltage points or short-out parts that could result
in a fire or electric shock.
17. See product enclosure for safety-related markings.
18. The front panel LCD screen will illuminate when the product has mains power. If power is applied and the LCD screen is not
illuminated, please send the unit for service.
19. Do not allow the unit to exceed the maximum operating ambient temperature of 40° C. Be aware of conditions in an
enclosed rack that may increase the temperature above room ambient conditions.
This product conforms to all applicable EU directive requirements. The complete declaration of conformity can be found at
www.Bose.com/compliance.
This Product meets the immunity requirements for the E2 class EN55103-2 directive.
Initial turn on inrush current: 14.8 Amps (230V / 50 Hz)
Inrush current after 5 seconds AC mains interruption: 15.4 Amps (230V / 50 Hz)
Information About Products That Generate Electrical Noise (FCC Compliance Notice for U.S.)
Note: This equipment has been tested and found to comply with the limits for a Class A digital device, pursuant to part 15 of the FCC
Rules. These limits are designed to provide reasonable protection against harmful interference when the equipment is operated in a
commercial environment. This equipment generates, uses, and can radiate radio frequency energy and, if not installed and used in
accordance with the instruction manual, may cause harmful interference to radio communications. Operation of this equipment in a
residential area is likely to cause harmful interference in which case the user will be required to correct the interference at one’s own
expense.
This product complies with CAN ICES-3 (A)/NMB-3 (A).

Informations importantes pour la sécurité pro.Bose.com
Page 8 Installation et instructions de sécurité Français
WARNING: This product is intended for installation by professional installers only.
Thank you for selecting Bose
®
PowerMatch
®
amplifiers for your sound reinforcement system. This document is intended to provide
professional installers with basic installation and safety guidelines for Bose PowerMatch amplifiers in typical fixed-installation systems.
Please read this document before attempting installation.
WARNING: Do not expose this apparatus to dripping or splashing, and do not place objects filled with liquids such as vases,
on or near the apparatus. As with any electronic products, use care not to spill liquids into any part of the system. Liquids can
cause a failure and/or a fire hazard.
WARNING: To reduce the risk of fire or electric shock, do not expose this apparatus to rain.
WARNING: Do not place any naked flame sources, such as lighted candles, on or near the apparatus.
Note: The product must be used indoors. It is neither designed nor tested for use outdoors, in recreational vehicles, or on boats.
The lightning flash with arrowhead symbol, within an equilateral triangle, is intended to alert the user to the presence of uninsu-
lated dangerous voltage within the system enclosure that may be of sufficient magnitude to constitute a risk of electrical shock.
Do not touch the output terminals while amplifier power is ON. Make all connections with amplifier OFF.
The exclamation point within an equilateral triangle, as marked on the system, is intended to alert the user to the presence of
important operating and maintenance instructions in this installation guide.
CAUTION: Make no modifications to the amplifier or accessories. Unauthorized alternations may compromise safety, regulatory
compliance, and system performance.
CAUTION: This product shall be connected to an AC mains socket outlet with a protective earthing (grounding) connection.
CAUTION: Where the AC mains plug is used as the disconnect device, such disconnect device shall remain fully operable.
Important Safety Instructions
1. Read these instructions.
2. Keep these instructions – for future reference.
3. Heed all warnings – on the product and in all product documentation.
4. Follow all instructions.
5. Do not use this apparatus near water or moisture.
6. Clean only with a dry cloth.
7. Do not block any ventilation openings. Install in accordance with the manufacturer’s instructions. To ensure reliable
operation of the product and to protect it from overheating, put the product in a position and location that will not interfere
with its proper ventilation.
8. Do not install near any heat sources, such as radiators, heat registers, stoves, or other apparatus (including amplifiers) that
produce heat.
9. Do not defeat the safety purpose of the polarized or grounding-type plug. A polarized plug has two blades with one
wider than the other. A grounding-type plug has two blades and a third grounding prong. The wider blade or third prong
is provided for your safety. If the provided plug does not fit in your outlet, consult an electrician for replacement of the
obsolete outlet.
10. Protect the power cord from being walked on or pinched, particularly at plugs, convenience receptacles, and the point where they
exit from the apparatus.
11. Only use attachments/accessories specified by the manufacturer.
12. Use only with the cart, stand, tripod, bracket, or table specified by the manufacturer or sold with the apparatus.
When a cart is used, use caution when moving the cart/apparatus combination to avoid injury from tip-over.

Français Installation et instructions de sécurité Page 9
pro.Bose.com Informations importantes pour la sécurité
13. Unplug this apparatus during lightning storms or when unused for long periods of time to prevent damage to this product.
14. Refer all servicing to qualified service personnel. Servicing is required when the apparatus has been damaged in any
way such as power-supply cord or plug is damaged; liquid has been spilled or objects have fallen into the apparatus; the
apparatus has been exposed to rain or moisture, does not operate normally, or has been dropped. Do not attempt to service
this product yourself. Opening or removing covers may expose you to dangerous voltages or other hazards. Please call Bose to be
referred to an authorized service center near you.
15. To prevent risk of fire or electric shock, avoid overloading wall outlets, extension cords, or integral convenience receptacles.
16. Do not let objects or liquids enter the product – as they may touch dangerous voltage points or short-out parts that could result
in a fire or electric shock.
17. See product enclosure for safety-related markings.
18. The front panel LCD screen will illuminate when the product has mains power. If power is applied and the LCD screen is not
illuminated, please send the unit for service.
19. Do not allow the unit to exceed the maximum operating ambient temperature of 40° C. Be aware of conditions in an
enclosed rack that may increase the temperature above room ambient conditions.
This product conforms to all applicable EU directive requirements. The complete declaration of conformity can be found at
www.Bose.com/compliance.
This Product meets the immunity requirements for the E2 class EN55103-2 directive.
Initial turn on inrush current: 14.8 Amps (230V / 50 Hz)
Inrush current after 5 seconds AC mains interruption: 15.4 Amps (230V / 50 Hz)
Information About Products That Generate Electrical Noise (FCC Compliance Notice for U.S.)
Note: This equipment has been tested and found to comply with the limits for a Class A digital device, pursuant to part 15 of the FCC
Rules. These limits are designed to provide reasonable protection against harmful interference when the equipment is operated in a
commercial environment. This equipment generates, uses, and can radiate radio frequency energy and, if not installed and used in
accordance with the instruction manual, may cause harmful interference to radio communications. Operation of this equipment in a
residential area is likely to cause harmful interference in which case the user will be required to correct the interference at one’s own
expense.
This product complies with CAN ICES-3 (A)/NMB-3 (A).
Wichtige Sicherheitshinweise pro.Bose.com
Seite 10 Installations- und Sicherheitshinweise Deutsch
WARNING: This product is intended for installation by professional installers only.
Thank you for selecting Bose
®
PowerMatch
®
amplifiers for your sound reinforcement system. This document is intended to provide
professional installers with basic installation and safety guidelines for Bose PowerMatch amplifiers in typical fixed-installation systems.
Please read this document before attempting installation.
WARNING: Do not expose this apparatus to dripping or splashing, and do not place objects filled with liquids such as vases,
on or near the apparatus. As with any electronic products, use care not to spill liquids into any part of the system. Liquids can
cause a failure and/or a fire hazard.
WARNING: To reduce the risk of fire or electric shock, do not expose this apparatus to rain.
WARNING: Do not place any naked flame sources, such as lighted candles, on or near the apparatus.
Note: The product must be used indoors. It is neither designed nor tested for use outdoors, in recreational vehicles, or on boats.
The lightning flash with arrowhead symbol, within an equilateral triangle, is intended to alert the user to the presence of uninsu-
lated dangerous voltage within the system enclosure that may be of sufficient magnitude to constitute a risk of electrical shock.
Do not touch the output terminals while amplifier power is ON. Make all connections with amplifier OFF.
The exclamation point within an equilateral triangle, as marked on the system, is intended to alert the user to the presence of
important operating and maintenance instructions in this installation guide.
CAUTION: Make no modifications to the amplifier or accessories. Unauthorized alternations may compromise safety, regulatory
compliance, and system performance.
CAUTION: This product shall be connected to an AC mains socket outlet with a protective earthing (grounding) connection.
CAUTION: Where the AC mains plug is used as the disconnect device, such disconnect device shall remain fully operable.
Important Safety Instructions
1. Read these instructions.
2. Keep these instructions – for future reference.
3. Heed all warnings – on the product and in all product documentation.
4. Follow all instructions.
5. Do not use this apparatus near water or moisture.
6. Clean only with a dry cloth.
7. Do not block any ventilation openings. Install in accordance with the manufacturer’s instructions. To ensure reliable
operation of the product and to protect it from overheating, put the product in a position and location that will not interfere
with its proper ventilation.
8. Do not install near any heat sources, such as radiators, heat registers, stoves, or other apparatus (including amplifiers) that
produce heat.
9. Do not defeat the safety purpose of the polarized or grounding-type plug. A polarized plug has two blades with one
wider than the other. A grounding-type plug has two blades and a third grounding prong. The wider blade or third prong
is provided for your safety. If the provided plug does not fit in your outlet, consult an electrician for replacement of the
obsolete outlet.
10. Protect the power cord from being walked on or pinched, particularly at plugs, convenience receptacles, and the point where they
exit from the apparatus.
11. Only use attachments/accessories specified by the manufacturer.
12. Use only with the cart, stand, tripod, bracket, or table specified by the manufacturer or sold with the apparatus.
When a cart is used, use caution when moving the cart/apparatus combination to avoid injury from tip-over.

Deutsch Installations- und Sicherheitshinweise Seite 11
pro.Bose.com Wichtige Sicherheitshinweise
13. Unplug this apparatus during lightning storms or when unused for long periods of time to prevent damage to this product.
14. Refer all servicing to qualified service personnel. Servicing is required when the apparatus has been damaged in any
way such as power-supply cord or plug is damaged; liquid has been spilled or objects have fallen into the apparatus; the
apparatus has been exposed to rain or moisture, does not operate normally, or has been dropped. Do not attempt to service
this product yourself. Opening or removing covers may expose you to dangerous voltages or other hazards. Please call Bose to be
referred to an authorized service center near you.
15. To prevent risk of fire or electric shock, avoid overloading wall outlets, extension cords, or integral convenience receptacles.
16. Do not let objects or liquids enter the product – as they may touch dangerous voltage points or short-out parts that could result
in a fire or electric shock.
17. See product enclosure for safety-related markings.
18. The front panel LCD screen will illuminate when the product has mains power. If power is applied and the LCD screen is not
illuminated, please send the unit for service.
19. Do not allow the unit to exceed the maximum operating ambient temperature of 40° C. Be aware of conditions in an
enclosed rack that may increase the temperature above room ambient conditions.
This product conforms to all applicable EU directive requirements. The complete declaration of conformity can be found at
www.Bose.com/compliance.
This Product meets the immunity requirements for the E2 class EN55103-2 directive.
Initial turn on inrush current: 14.8 Amps (230V / 50 Hz)
Inrush current after 5 seconds AC mains interruption: 15.4 Amps (230V / 50 Hz)
Information About Products That Generate Electrical Noise (FCC Compliance Notice for U.S.)
Note: This equipment has been tested and found to comply with the limits for a Class A digital device, pursuant to part 15 of the FCC
Rules. These limits are designed to provide reasonable protection against harmful interference when the equipment is operated in a
commercial environment. This equipment generates, uses, and can radiate radio frequency energy and, if not installed and used in
accordance with the instruction manual, may cause harmful interference to radio communications. Operation of this equipment in a
residential area is likely to cause harmful interference in which case the user will be required to correct the interference at one’s own
expense.
This product complies with CAN ICES-3 (A)/NMB-3 (A).

Page 12 User Guide English
Installation and Operating Guide pro.Bose.com
Introduction
Thank you for choosing Bose
®
PowerMatch
®
configurable professional power amplifiers.
PowerMatch
®
power amplifiers deliver concert-quality sound for a wide variety of fixed-installation sound reinforcement systems and
provide class-leading efficiency, sound quality, and reliability.
Two documents are available to assist with amplifier installation and configuration. This document delivers detailed installation and
standalone configuration information. A separate document, the ControlSpace
®
Designer™ Software Guide (downloadable from pro.
Bose.com), provides detailed instructions on how to use ControlSpace Designer software to fully configure, monitor, and update
PowerMatch amplifiers. For network version amplifiers, Designer software provides additional network setup, control, and monitoring
capabilities.
Information furnished in these guides is intended to help professionals install and set up the product, but does not include all details of
design, production, or variations of equipment. Nor does it cover every possible situation that may arise during installation, operation,
or maintenance. If assistance is required beyond the scope of these documents, please contact your local Bose Representative or
Technical Support specialist.
Product Features
• PowerMatch amplifier series
Four amplifier models provide multiple channel and power options to satisfy the needs of almost any audio installation. Models
include options for 4 or 8 channel versions and 250 or 500 watt per channel power levels. Additionally, network versions add control
and monitoring functionality over standard Ethernet networks.
• PowerMatch Class-D Amplifier
Proprietary design combines Class-D efficiency with a dual current and voltage feedback loop circuit that continuously monitors
and controls both the current and voltage delivered to the loudspeaker load. This combination allows the amplifier to consistently
deliver the widest possible dynamic range, frequency response, and lowest possible distortion, independent of power level and load
impedance.
• QuadBridge
™
Output Configuration
Each loudspeaker output terminal can be configured as Mono, V-Bridge, I-Share or Quad, allowing the total available power of the
amplifier bank to be allocated to one or more output channels. V-Bridge and Quad modes can drive either low-impedance or 70/100V
loads. Configuration of the loudspeaker output can be accessed from either the front panel of the amplifier or using ControlSpace
Designer software.
• PeakBank
™
Power Supply
Regenerative 4-quadrant power supply with fast-tracking Power Factor Correction (PFC) supports high efficiency while delivering
sustainable and repeatable low frequency response.
• Integrated DSP
A configurable fixed-architecture DSP provides multiple EQ stages, crossovers, delays, limiters, and matrix mixing. While PowerMatch
can drive nearly any loudspeaker for the installed sound market, pre-loaded loudspeaker EQs and limiting presets for Bose
loudspeakers provide an additional layer of simplified setup and premium sound. Amplifier models PM8500 and PM4500 feature
power levels and array EQ features ideal for use with RoomMatch
®
array module loudspeakers and subwoofers.
• ControlSpace
®
Designer
™
Software Setup
All models offer front panel USB connectivity for Bose ControlSpace Designer software programming, with network versions adding
Ethernet network setup, control, and monitoring.
• Front Panel User Interface
Combined front panel LCD and user controls provide useful visual information and access to a subset of amplifier settings suffi-
cient for basic amplifier output configuration and status/fault monitoring. A convenient panel lock can be set to prevent access to
unauthorized users.
• Network Control and Monitoring
Network versions support a set of remote monitoring and fault reporting capabilities via the rear panel RJ45 Ethernet connection and
Bose ControlSpace Designer software. A fault reporting and control protocol using Serial over Ethernet allows third party control and
monitoring systems to communicate easily with one or many PowerMatch amplifiers.
• Load Sweep Tool
Using ControlSpace Designer software, the amplifier can measure the load impedance of each low impedance-configured output for
system diagnostic and documentation purposes. The load measurement can be stored inside the amplifier and recalled as a reference
curve for future comparisons to determine if the system is still operating as expected.
• Digital Expansion Slot
Optional digital cards expand the input capabilities of PowerMatch
®
amplifiers, enabling the amplifiers to receive digital audio from
Bose ESPLink-equipped devices and popular digital audio networks.
• Auto-Standby / Auto-Wake
Energy saving feature that allows PowerMatch amplifiers to automatically go into a lower power Standby Mode when audio signal
falls below a set threshold, and wake up when audio signal is above threshold. All parameters, including time and audio detection
levels are adjustable from within ControlSpace
®
Designer
™
software.

English User Guide Page 13
pro.Bose.com Installation and Operating Guide
PowerMatch
®
Amplifier Line Overview
PowerMatch configurable professional power amplifiers
PowerMatch multi-channel power amplifiers are highly efficient, reliable and configurable. Four amplifier models provide channel and
power options for most fixed-installation audio systems. Each model offers front panel USB connectivity for full access to settings
using ControlSpace Designer software. Network versions of each amplifier feature a rear panel RJ45 connector, allowing network setup,
control, and remote monitoring of one or more PowerMatch amplifiers using ControlSpace Designer software and standard network
equipment.
Onboard Loudspeaker Processing and Front Panel Interface
All amplifier models share the same onboard loudspeaker processing and front panel interface but vary in channel count, power, and
Ethernet connectivity.
The following table summarizes the key differences between the PowerMatch amplifier models:
PowerMatch amplifier models Total Rated Power Channels (max.) Output Connectors Power per Output Block (max.) IEC Power Cord
PM8500 / PM8500N 4000 watts 8 2 2000 W C19
PM8250 / PM8250N 2000 watts 8 2 1000 W C13
PM4500 / PM4500N 2000 watts 4 1 2000 W C13
PM4250 / PM4250N 1000 watts 4 1 1000 W C13
Accessory Cards
PowerMatch amplifiers feature a digital expansion slot for accessory plug-in cards. These cards allow for added I/O flexibility. For
example, the Bose
®
PM ESPLink card provides a shared 8-channel uncompressed digital audio bus between one or more PowerMatch
units and a ControlSpace ESP engineered sound processor. Visit pro.Bose.com for information on other available accessory cards that
support popular digital audio distribution protocols.
Ideal for use with RoomMatch
®
array module loudspeakers
RoomMatch loudspeakers connect and configure easily to PM8500 and PM4500 amplifiers. Built-in loudspeaker and array EQs together
with suitable output power ratings make these amplifiers ideal for use in designs with RoomMatch array module loudspeakers.
Interfacing with ControlSpace
®
engineered sound processors
PowerMatch amplifiers are designed to be used independently or in any system with most professional audio processing equipment
and loudspeakers. However, there are unique advantages to using PowerMatch with Bose ControlSpace ESP engineered sound
processors. These processors enable multi-channel input options, mixing, routing, processing, and distribution capabilities – all using a
single configuration tool, ControlSpace Designer software.
Using a Bose ESPLink connection, a ControlSpace ESP engineered sound processor can route 8 digital audio channels to multiple
PowerMatch amplifiers for low latency in-rack audio distribution. For wiring digital audio between racks or for use in larger distributed
systems, Audio over Ethernet expansion cards are also available for use with the PowerMatch and ControlSpace ESP processors.
Page 14 User Guide English
Installation and Operating Guide pro.Bose.com
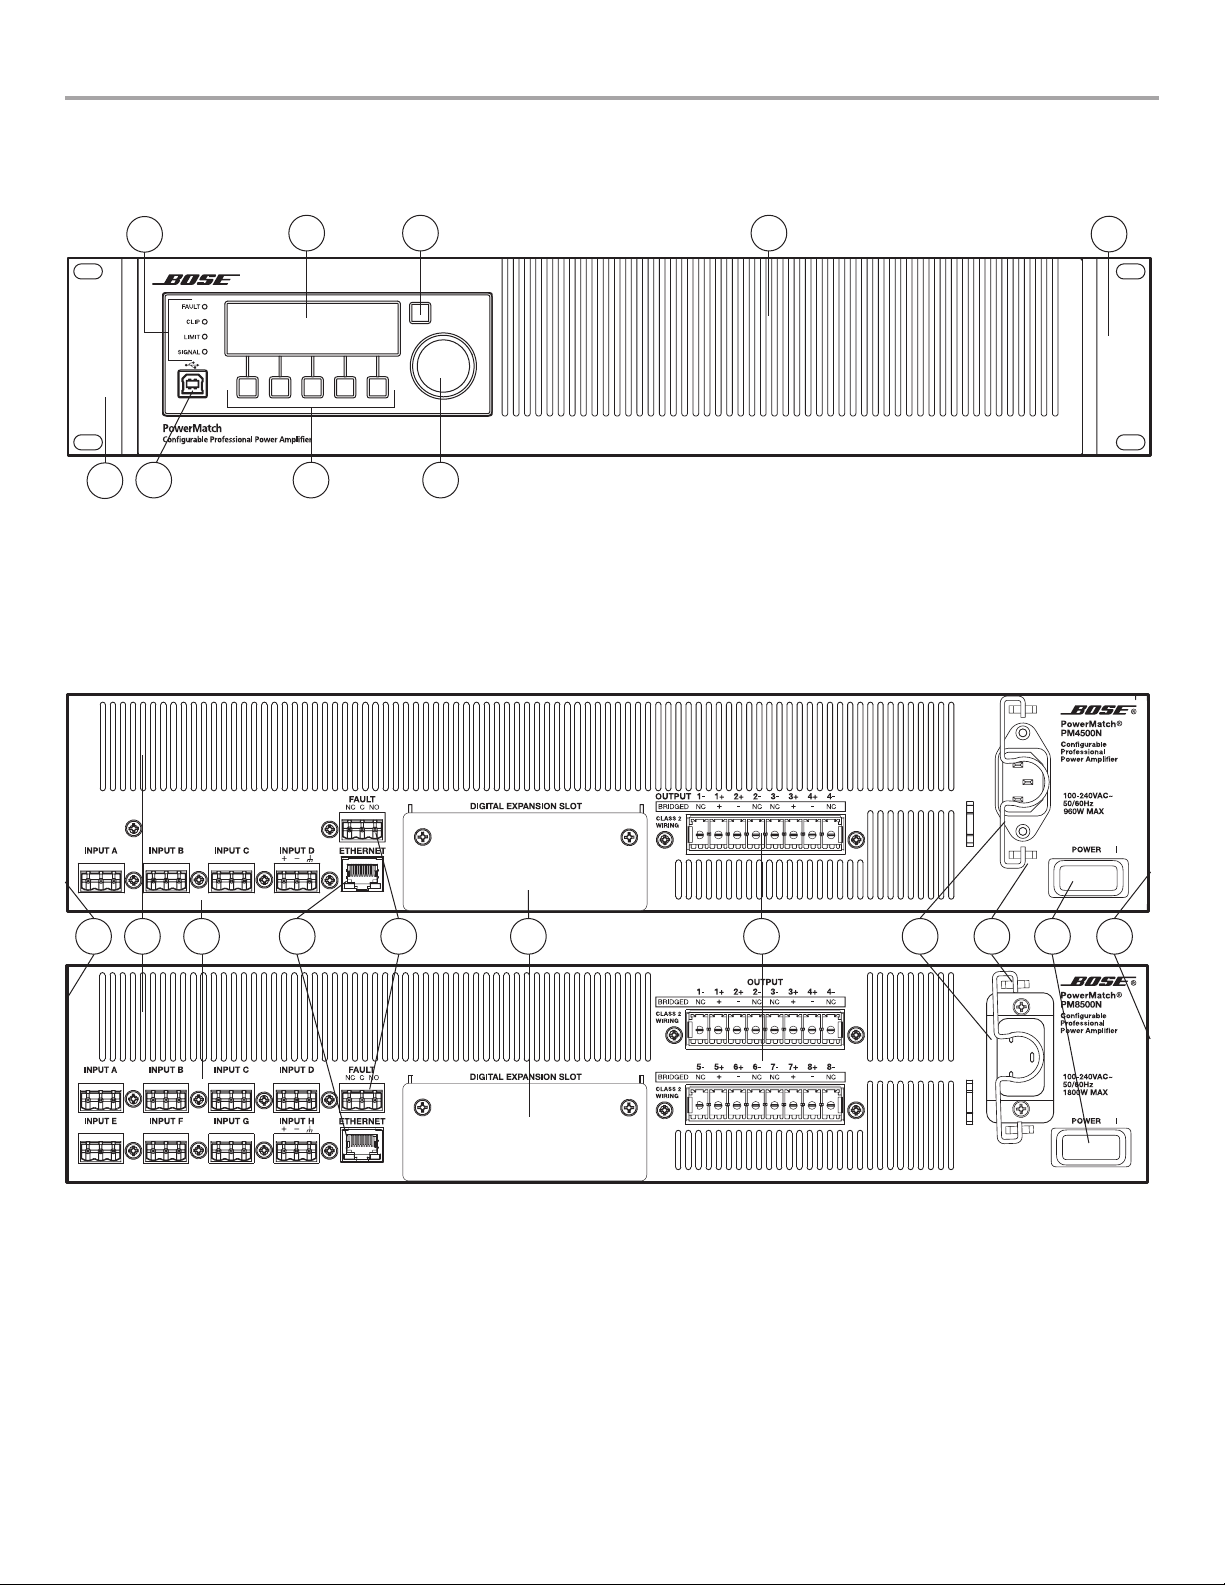
Controls, Display, and Connectors
Figures 1 and 2 detail the various elements found on the front and rear panels of PowerMatch amplifiers.
Figure 1. Front Panel View
1. LED Indicators
2. LCD Screen
3. Navigation Soft Key
4. Rotary Encoder
5. Menu Soft Keys (1-5)
6. USB connector
7. Front airflow intake vents
8. Front rack-mount ears
Figure 2. 4-channel and 8-channel Rear Panel Views
9. Analog Input connectors
10. Fault Notification Output
11. Ethernet RJ-45 network connector
(Network versions only)
12. Rear airflow exhaust vents
13. Digital expansion card slot cover
14. Loudspeaker output connectors
15. AC Mains receptacle
16. AC Mains retention clip
17. Power Switch/Resettable Circuit Breaker
18. Rear rack-mount support tabs
3
1
2
456
7
8
8
9 141112 15 17131018 1816
English User Guide Page 15
pro.Bose.com Installation and Operating Guide
Hardware Installation
Unpacking
The product box includes the following items:
Figure 3. Contents
PowerMatch
®
amplifier Installation and Operating Guide Detachable IEC power
cord
Connector Accessory Pack (contents vary according to model number):
PowerMatch models
Input
connectors
Output
connectors
Shorting
jumpers
Fault
connector
Plastic wire
tie-wraps Accessory Kit PN
PM8500, PM8500N
8 2 4 1 9 343511-0010
PM8250, PM8250N
PM4500, PM4500N
4 1 2 1 5 343511-0020
PM4250, PM4250N
Rack Mounting
PowerMatch amplifiers are designed to fit standard 19-inch (48 cm) rack equipment, occupying 2 rack-units (RU) in height, requiring a
mounting depth of 21 inches (53 cm) from the front rack rail. Use four fasteners with washers (not supplied) to mount the amplifier front
panel rack ears to the equipment rack rails. Rack-mount tabs are also provided on the rear of the chassis to secure the amplifier using
rear rack mount ears (not provided). Rear rack mounting is recommended in cases when pre-assembled racks with amplifiers are trans-
ported to installation venues.
Ventilation
PowerMatch amplifiers are designed to operate under a wide range of conditions, with continuous operation up to 104° F (40° C)
ambient temperature. To ensure safe operation, the front and rear airflow vents should never be blocked. Air flows into the front of the
unit and exits the rear vents. The internal fans automatically increase speed when the amplifier is generating more heat. Should the unit
exceed safe operating temperature, a gradual reduction of gain will automatically be applied for thermal protection. If the automatic
gain reduction does not reduce operating temperatures to safe conditions, the unit will mute all outputs and the red FAULT LED will
illuminate on the front panel.
AC Mains Outlet Requirements
PowerMatch amplifiers feature an efficient, universal switch-mode power supply with fast-tracking Power Factor Correction (PFC)
and can operate with AC mains line voltages from 100 to 240 volts at 50/60 Hz. With typical music program material, amplifier model
PM8500 provides full rated power from a single 20-amp, 120V (common in USA) AC mains outlet, or single 16-amp, 230V (common
in Europe) mains outlet. The mains circuit requirement for models PM8250, PM4500, and PM4250 is lesser, as full rated power can be
achieved using a 15-amp, 120V (USA) AC mains outlet or a 10-amp, 230V (Europe) AC mains outlet.
High-power amplifiers draw large amounts of current from the AC mains. Use of extension cords to power the amplifier could introduce
significant impedance and a resulting voltage drop on the mains that may interfere with normal operation of the amplifier.
In countries like Japan where 100V AC mains are used, the following guidelines will be helpful to ensure optimal performance:
• Ensure a minimum of 100V AC at the amplifier plug when the amplifier is idle.
• Use a dedicated mains circuit for each amplifier.
• Locate the amplifiers as close as possible to the mains outlet.
• If used, extension cords should be 14 AWG (2 mm
2
) or larger, and less than 6.6 ft (2 m) in length.
Page 16 User Guide English
Installation and Operating Guide pro.Bose.com
Making Connections
Connection and Configuration Steps
Use the following procedure when setting up a PowerMatch
®
amplifier for the first time.
1. Install any digital expansion cards (optional)
2. Mount the amplifier into the rack
3. Connect power cable and retaining clip
4. Turn on amplifier
5. Enable Standby Mode from the front panel of the amplifier (See page 30.)
6. Configure amplifier (use front panel or ControlSpace
®
Designer
™
software)
7. Wire input connection from source device(s)
8. Wire output connectors to speakers
9. Disable Standby Mode
10. Connect Fault Notification Output to management system or device (optional)
11. Clear alarms (See page 31.)
12. Test system
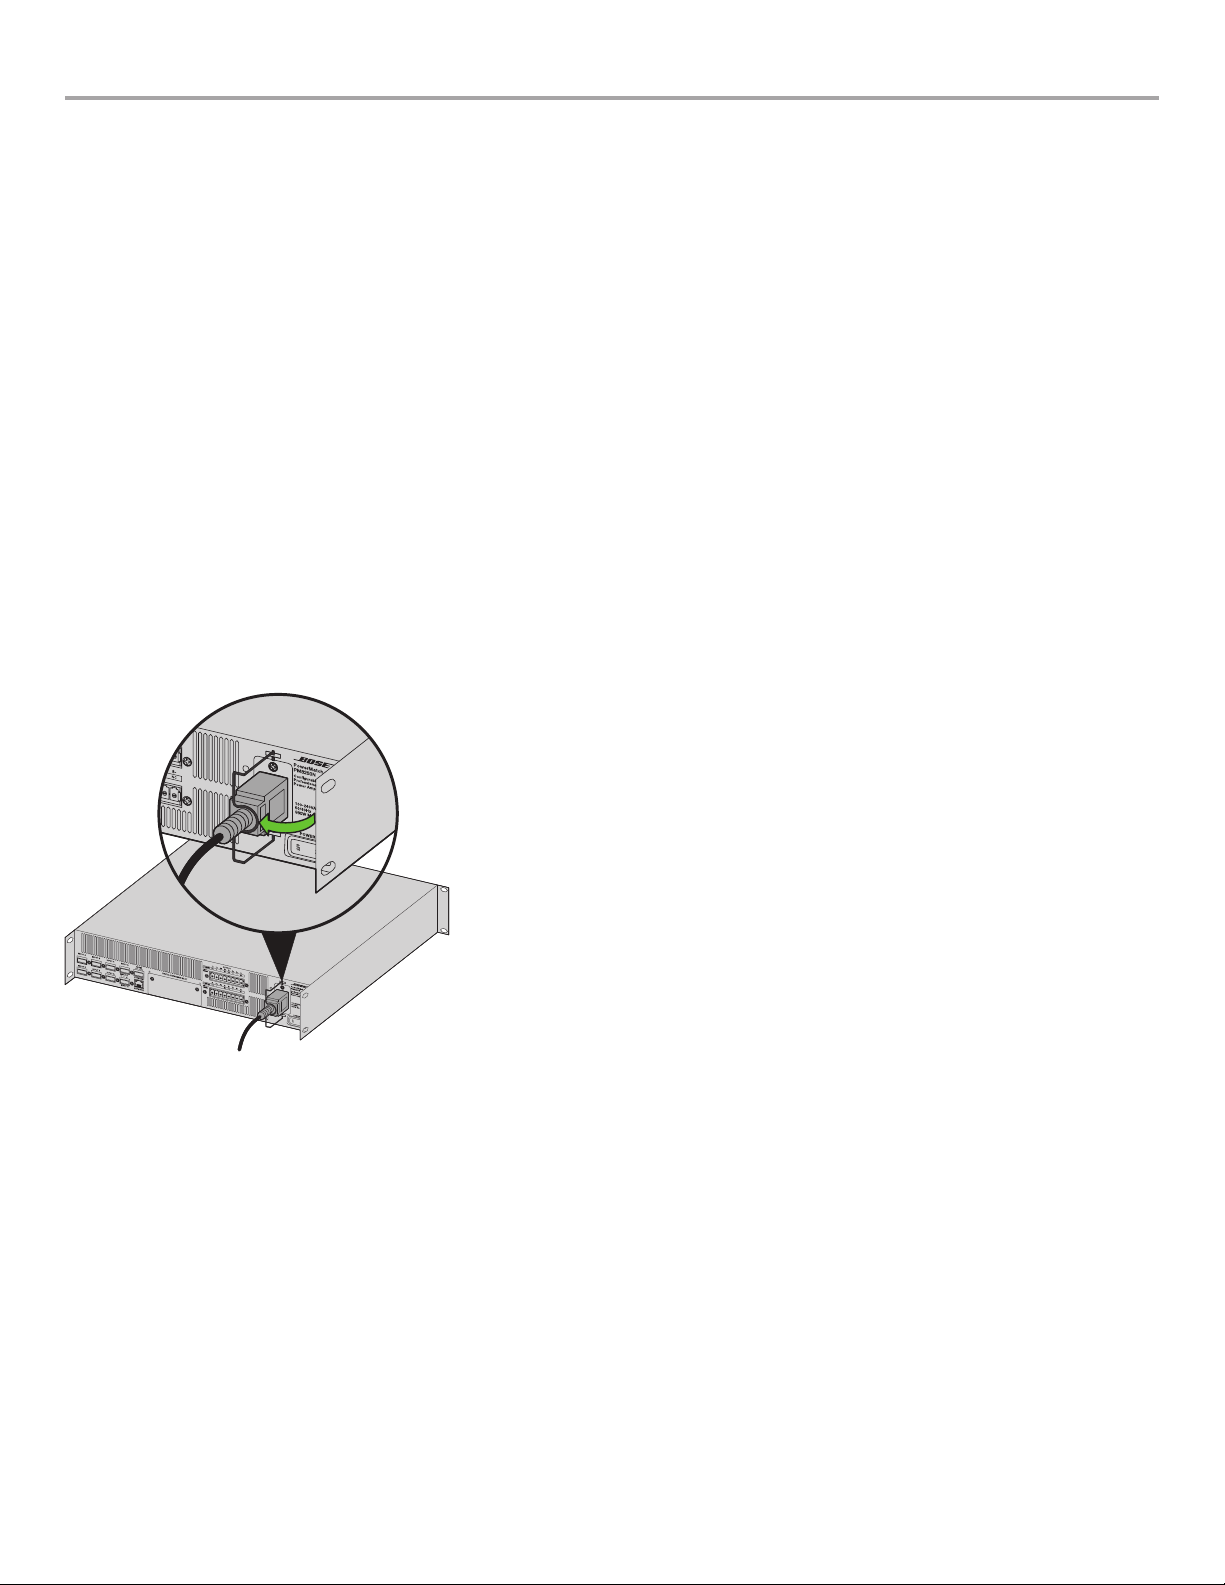
Power (Mains) Connection
Power connection is made using the included IEC power cord. The amplifier also includes a retaining clip to help secure the power
connection to the amplifier. To install, place the retaining clip toward the center of the amplifier, plug in the IEC power cord, then swing
the retaining clip so it locks behind the IEC connector.
Figure 4. IEC Connector retaining clip in place.
Standby Mode
Enabling Standby Mode decouples the amplifier section from the loudspeaker output. In this state the product also consumes less
power. Standby Mode can be entered manually from the front panel using the following steps:
MAIN MENU > UTILITY > STANDBY MODE > press ENTER STANDBY
While in Standby, front panel options and loudspeaker output configurations can be changed without directly affecting the loudspeaker
load.
Standby Mode can be automatically entered and exited using the Auto-Standby/Auto-Wake function as a method to help reduce energy
usage during times when audio is not required. Refer to the ControlSpace Designer Software Guide for details on this feature.
 Loading...