


BlackBerry ITC100-1 User Manual
BLACKBERRY RADAR H2 ITC100-1 INSTALLATION GUIDE 31
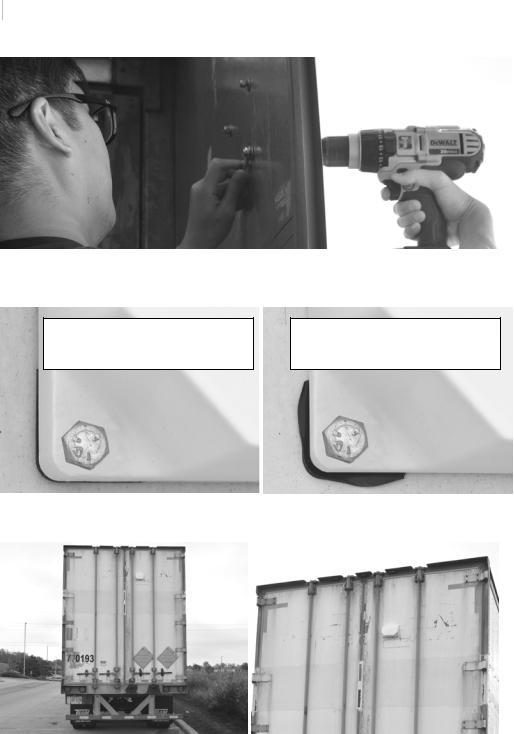
It is recommended that you install the module as level as possible on the asset. To help ensure the device is level, you may try one of the following techniques.
Technique 1: Position the T-square along the edge of the door. Using the T-square as a guide, draw a horizontal line approximately 5” (13 cm) in length, in the area you plan to install the device, with your pencil or marker. Align the bottom edge of the template to the line.
Tip: To avoid leaving a permanent mark on your trailer or container after the device installation is complete, we recommend using a pencil or non-permanent marker to create the guideline.
Technique 2: Visually, place the template in the desired installation location. Using a level, check that the template is level.

32BLACKBERRY RADAR H2 ITC100-1 INSTALLATION GUIDE
4.Using a drill bit, drill a hole through each of the cross hairs on the template. This will create four holes you will use to mount the module.
Drilling tips for intermodal installations
Due to the thicker, harder steel used on intermodal containers, you may wish to follow these suggestions.
Tip 1: To shorten drilling time and prolong the life of your drill bit, you may wish to use cutting tool lubricant during the drilling process.
Tip 2: For most precise hole drilling, before drilling your hole, you may wish to use a punch and hammer to help place the drill bit. This will prevent the bit from “walking” during the drilling operation.

BLACKBERRY RADAR H2 ITC100-1 INSTALLATION GUIDE 33
5.Remove the template. You now have four holes in the door. If there are any burrs around the holes, remove them at this time. Also, remove any dust or debris left over from the drilling or de-burring operations.
6.Place the module on the door, aligning the holes on the module with the holes you drilled into the door.
7.Insert your fastener of choice into the holes and use the appropriate tools to secure the module to the asset.
34 BLACKBERRY RADAR H2 ITC100-1 INSTALLATION GUIDE
Do not over-tighten the fastener. Over-tightening can over-compress the mounting gasket, which can damage the gasket. Do not tighten fastener beyond 3lb-ft. (4Nm).
Gasket Compression Level
Recommended
Gasket Compression Level
Not Recommended
8. Close both doors. Installation is complete.

BLACKBERRY RADAR H2 ITC100-1 INSTALLATION GUIDE 35
3.4.6 Roll-up door installation procedure
If you wish to monitor door open/close events with your BlackBerry Radar-L module, you will need to mount it on the door. Recommended module placement on roll-up doors is as follows.
•The unit should be installed as close to the center of the trailer/container as possible.
•The module should be placed as high on the door as possible for optimum antenna performance. In some cases, where there is limited clearance between the interior of the roof and the top surface of the module when the door is opened, you can create more space for door operation by mounting the module lower on the door.
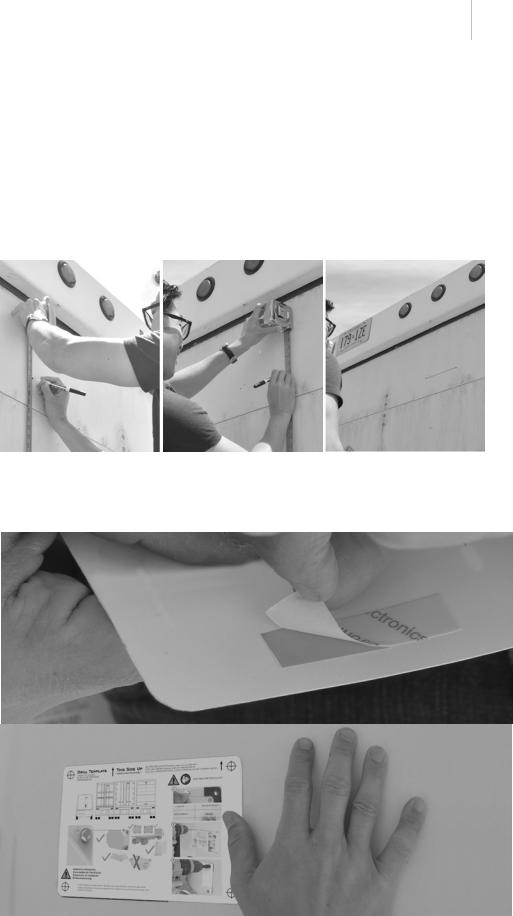
1.As indicated in Section 3.3 of this guide, record the module identifier and the asset identifier the module will be paired with. For your convenience, you may quickly create a record of the module and asset identifier pairings by removing the partially attached label from the rear housing of the module and placing it on the installation worksheet, next to the asset that will be tracked by this module.

36BLACKBERRY RADAR H2 ITC100-1 INSTALLATION GUIDE
2.Evaluate the amount of clearance you will have once your module is installed. This will help you determine the best mounting location for your asset. You can perform a clearance check, prior to drilling any mounting holes in your door, by securing the module to the door with tape and moving the door through its complete range of travel, to ensure there is no interference.
Tips for roll-up door installation
Tip 1: If you have tried a higher mounting position, and found you did not have enough clearance to allow uninterrupted door travel, try moving the module lower on the door. Lower door placements can help address some clearance issues by reducing the distance the module has to travel inside the trailer, past potential interference points.
Tip 2: When determining your preferred mounting location, consider the climate conditions your asset may encounter. For example, if you routinely run your vehicle in very cold climates, where ice accumulation on the rear of the trailer is an issue, you will want to consider the typical ice accumulation thickness your asset may see when determining how much clearance is acceptable. Also consider your ability to remove such accumulations should they occur.
BLACKBERRY RADAR H2 ITC100-1 INSTALLATION GUIDE 37
3.Once you have identified the desired mounting location for your asset, mark the height where the device will be installed on the door of the trailer/container.
It is recommended that you install the module as level as possible on the asset. To help ensure the device is level, you may try this technique.
•Make one mark at the desired placement height.
•Make a second mark, at the same height, approximately 4 inches (100mm) to the side of the first mark.
•Draw a straight line between the two points. This will help ensure your line is parallel to the bottom of the door.
4.Remove the adhesive from the rear of the template and place the template in the desired installation location. The adhesive at the back of the template ensures that it stays on the door surface for accurate drilling of your holes.

38BLACKBERRY RADAR H2 ITC100-1 INSTALLATION GUIDE
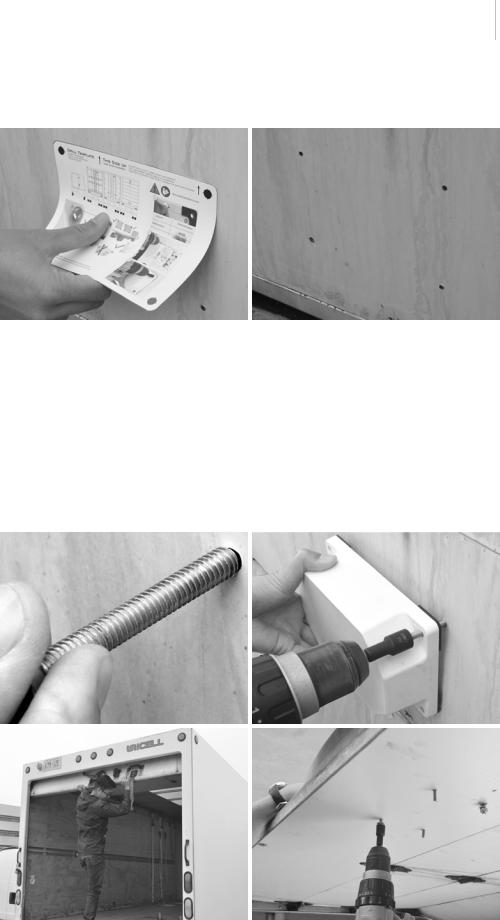
5.Using a drill bit, drill a hole through each of the cross hairs on the template. This will create four holes you will use to mount the module.
Drilling tips for one person installation on a roll-up door
If you are installing the module high on the door-- and have selected nuts, bolts, and washers as your fasteners -- you will need to install the bolt from the exterior side, then enter the trailer to install the nut from the interior side.
To help keep the device in place, while allowing a single installer to open the door and enter the trailer to install the nut, you may wish to:
•Drill a hole one size below your fastener diameter.
•Use a drill and nut driver to drive the bolt through the door. This will allow the threads to hold the device in place while you open the door.
•Enter the trailer and install the nut and washer to the rear of the bolt.
BLACKBERRY RADAR H2 ITC100-1 INSTALLATION GUIDE 39
6.Remove the template. You now have four holes in the door. If there are any burrs around the holes, remove them at this time. Also, remove any dust or debris left over from the drilling or de-burring operations.
7.Mount the module to the door using one of the approaches below. The recommended procedure will differ slightly based on door placement.
Higher door placement
•Having drilled a hole slightly smaller than your fastener, use a drill and nut driver to drive the bolt through the door. This will allow the threads to hold the device in place while you raise the door.
•Enter the trailer and install the nut and washer to the rear of the bolt—using the appropriate tools to complete the fastening operation. Do not tighten fastener beyond 3lb-ft. (4Nm) to avoid over compressing the mounting gasket.
 Loading...