

Page 1
Soundtrack Pro 2
User Manual
Page 2

K
Apple Inc.
Copyright © 2007 Apple Inc. All rights reserved.
Your rights to the software are governed by the
accompanying software license agreement. The owner
or authorized user of a valid copy of Soundtrack Pro
software may reproduce this publication for the purpose
of learning to use such software. No part of this
publication may be reproduced or transmitted for
commercial purposes, such as selling copies of this
publication or for providing paid for support services.
The Apple logo is a trademark of Apple Inc., registered
in the U.S. and other countries. Use of the “keyboard”
Apple logo (Shift-Option-K) for commercial purposes
without the prior written consent of Apple may
constitute trademark infringement and unfair
competition in violation of federal and state laws.
Every effort has been made to ensure that the
information in this manual is accurate. Apple is not
responsible for printing or clerical errors.
Note:
Because Apple frequently releases new versions
and updates to its system software, applications, and
Internet sites, images shown in this book may be slightly
different from what you see on your screen.
Apple Inc.
1 Infinite Loop
Cupertino, CA 95014–2084
408-996-1010
www.apple.com
Apple, the Apple logo, Apple Cinema Display,
AppleScript, DVD Studio Pro, Final Cut, Final Cut Pro,
Final Cut Studio, FireWire, iPhoto, iPod, iTunes, Logic,
Mac, Macintosh, Mac OS, QuickTime, and Soundtrack are
trademarks of Apple Inc., registered in the U.S. and
other countries.
Finder and Apple TV are trademarks of Apple Inc.
AppleCare and Apple Store are service marks of Apple
Inc., registered in the U.S. and other countries.
iTunes Store is a service mark of Apple Inc.
Dolby Laboratories: Manufactured under license from
Dolby Laboratories. “Dolby,” “Pro Logic,” and the
double-D symbol are trademarks of Dolby Laboratories.
Confidential Unpublished Works, © 1992–1997 Dolby
Laboratories, Inc. All rights reserved.
NeXT is a trademark of NeXT Software, Inc., registered in
the U.S. and other countries.
Other company and product names mentioned herein
are trademarks of their respective companies. Mention
of third-party products is for informational purposes
only and constitutes neither an endorsement nor a
recommendation. Apple assumes no responsibility with
regard to the performance or use of these products.
Production stills from the film “Koffee House Mayhem”
provided courtesy of Jean-Paul Bonjour. “Koffee House
Mayhem” © 2004 Jean-Paul Bonjour. All rights reserved.
http://www.jbonjour.com
Page 3

1
Contents
Preface 11 An Introduction to Soundtrack Pro
11
Overview of Soundtrack Pro
13
Using Soundtrack Pro in Your Post-Production Workflow
15
Notable Features in Soundtrack Pro
18
Resources for Learning About Soundtrack Pro
18
About This Soundtrack Pro Onscreen User Manual
19
Apple Websites
Chapter 1 21 Setting Up Your System
21
System Considerations
23
Connecting Equipment
24
Video and Audio Input and Output Devices
25
Video and Audio Interfaces
25
External Audio and Video Monitoring
27
Example Hardware Setups
32
Setting Up a System for Stereo Mixing
32
Setting Up a System for Surround Mixing
Chapter 2 33 The Soundtrack Pro Interface
34
Soundtrack Pro Window Organization
37
Project Pane
38
Toolbar
38
Transport Controls
39
Timeline
43
File Editor
44
Mixer
46
Multitake Editor
47
Conform
Bin
48
49
Meters Tab
50
Recording Tab
51
Browser
52
Search Tab
3
Page 4

54
Favorites Tab
55
Video Tab
55
Project Tab
57
Details Tab
60
Effects Tab
61
Tracks Tab
62
Actions Tab
63
Analysis Tab
64
HUDs
Chapter 3 65 Setting Up Soundtrack Pro
65
Two Kinds of Projects
67
Setting Up Your Workspace
71
Playing Projects
75
About Changing Values and Timecode Entries
78
Locating and Adding Audio Files
91
Previewing Audio Files
93
Using Undo and Redo
94
Using Snapping
96
Reconnecting Media Files
97
Setting Soundtrack Pro Preferences
Chapter 4 105 Working with Multitrack Projects
10 5
Creating and Opening Multitrack Projects
10 6
Creating a Multitrack Project from Final Cut Pro Clips or Sequences
10 6
Closing Multitrack Projects
10 6
Setting Project Properties
11 0
Setting the Project Length
111
Saving Multitrack Projects
112
Setting Default Locations for Saving Media Files
113
Adding Files to a Multitrack Project
11 4
Viewing and Editing Clip and Track Properties
12 4
Tracks, Busses, Submixes, and the Master Bus
Chapter 5 127 Working in the Timeline
12 7
Working in the Timeline
12 8
Moving Around in the Timeline
13 5
Working with Tracks, Busses, and Submixes in the Timeline
14 7
Selecting Audio Clips in the Timeline
14 9
Selecting the Entire Contents of a Track
15 0
Selecting Partial Contents of One or More Tracks
151
Cutting, Copying, and Pasting Audio Clips
15 3
Spotting Clips to the Timeline
4
Contents
Page 5

15 4
Moving Clips
15 6
Snapping Clips to Clips on Adjacent Tracks
15 6
Resizing Audio Clips
157
Changing the Offset of an Audio Clip
15 8
Creating Fades and Crossfades in the Timeline
162
Truncating Overlapping Audio Clips
162
Editing Audio Clips in the Multitrack Timeline
164
Using the Timeline Editing Tools
165
Timeline Editing Tools HUD
166
Editing in Place
166
How Clips Are Affected by Media File Editing
166
How Source Audio File Editing Works in a Soundtrack Pro Multitrack Project
167
Modifying a Clip Without Affecting Its Source Media
168
Using the Multitrack Timeline and the File Editor Together
17 0
Spotting Sound Effects from the File Editor to the Timeline
17 0
Splitting and Joining Audio Clips
174
Editing with the Timeslice Tool
17 9
Using the Lift and Stamp Tools
183
Working with Markers
185
Using Markers with Video
18 8
Working with Tagged and Looping Clips
18 9
Replacing the Source Audio in a Clip
Chapter 6 191 Editing Audio Files
19 3
Audio File Projects
19 3
Editing Audio Files Directly in a Multitrack Project
Editing in Place
19 5
19 5
How Clips Are Affected by Media File Editing
19 6
How Media File Editing Works in a Multitrack Project
19 6
How Source Audio File Editing Works in an Audio File Project
19 7
Modifying a Clip Without Affecting Its Source Media
19 8
Editing Audio Files in the File Editor
19 8
Opening Audio Files in the File Editor Tab
19 9
Playing Audio Files in the File Editor
19 9
Soloing an Audio File in the File Editor
200
Linking the File Editor Selection and the Cycle Region
200
Scrubbing Audio Files
202
Selecting Part of an Audio File
206
Cutting, Copying, and Pasting in the File Editor
207
Zooming In and Out in the File Editor
208
Editing Audio Files Graphically with Waveform Editing Tools
212
Choosing the Sample Units in the File Editor
212
Editing Multichannel Files
Contents
5
Page 6

214
Using Frequency Spectrum View
219
Processing Audio Files
230
Working with Actions
236
Analyzing an Audio File
240
Using the File Editor Project View
Chapter 7 251 Using the Multitake Editor
251
About the Multitake Editor
252
What Is ADR?
252
Multitake Clips
252
Creating Multitake Clips
253
Overview of the Multitake Editor
254
Editing in the Multitake Editor
255
Slipping Take Regions
256
Adding and Deleting Takes
256
Renaming Takes
257 Reordering Takes
257 Example: A Multitake Editing Workflow
Chapter 8 261 Basic Mixing in Soundtrack Pro
262 Steps in Mixing
263 Structuring an Audio Post-Production Project
263 What Is a Submix and How Do You Use It?
263 Basic Signal Routing in Soundtrack Pro
266 Example: Mixing a Project with Dialogue, Music, and Effects Submixes
270 Using Sends and Busses
273 Using the Mixer
273 Working with Channel Strips in the Mixer
284 Working with Effects in the Mixer
286 Working with Sends and Busses in the Mixer
288 Setting the Overall Project Volume Level
290 Using the Master Bus
290 Listening to a Temporary Mono Mix
291 Recording Audio in the Mixer
291 Recording Automation in the Mixer
292 Creating Multiple Mixes
292 Things to Keep in Mind While Mixing
Chapter 9 293 Mixing Surround Sound
What Is 5.1 Surround?
293
294 Creating a Surround Project
294 Setting Up for Surround
294 Setting Up Soundtrack Pro for Surround
6
Contents
Page 7

298 Surround Speaker Placement
299 Using Surround Panners to Create a Surround Mix
299 The Mini Surround Panner
300 The Surround Panner HUD
303 Surround Panner Automation
303 Modifier Keys for Moving the Puck
304 Surround Metering
306 Surround Mixing Strategies
306 Mixing Surround Files
307 Converting a Stereo Mix to 5.1 Surround
309 Placing Dialogue and Voiceover in a Surround Mix
310 Placing Stereo Music in a Surround Mix
310 Using the Center Channel
310 Using Surround Channels
311 Using Surround Effect Plug-ins
311 Limitations of the LFE Channel
312 Accommodating Stereo Playback
312 Exporting and Delivering 5.1 Surround Projects
312 Mixdowns
313 Project Files
Chapter 10 315 Working with Video in Soundtrack Pro
315 Supported Video File Formats
316 Adding a Video to a Project
317 Playing the Video
320 Viewing Video Details
321 Working with a Video’s Audio
321 Using the Time Display and Time Ruler with Video
322 Scrubbing and Spotting with the Multipoint Video HUD
325 Removing a Video from a Project
Chapter 11 327 Working with Audio Effects
327 Processing Effects and Realtime Effects
330 Working with Effect Presets
331 Audio Effects Included with Soundtrack Pro
343 Working with Realtime Effects
353 Working with Processing Effects
Chapter 12 355 Working with Automation
355 Working with Envelopes
365 Recording Automation Data
Chapter 13 367 Recording Audio in Soundtrack Pro
367 Getting Ready to Record
Contents 7
Page 8

368 Recording Audio in the Timeline
374 Recording Audio in the Mixer
375 Recording Audio in the File Editor Project View
Chapter 14 377 Creating Podcasts in Soundtrack Pro
378 Podcasting Media Production
379 Using the Podcast Track and Podcast Markers
379 Displaying the Podcast Track and the Details Tab
380 Podcast Marker Information in the Details Tab
381 Adding Markers to a Podcast
384 Adding Images to a Podcast
387 Exporting Podcasts
387 Exporting Audio Podcasts
388 Exporting Video Podcasts
390 Using Post-Export Actions for Podcast Production
Chapter 15 391 Using Control Surfaces with Soundtrack Pro
391 Connecting Control Surfaces
392 Adding and Deleting Control Surfaces
393 Premapped Controls
393 Mapping Commands to Control Surface Buttons
394 Recording Control Surface Automation
Chapter 16 395 Exporting Multitrack Projects
396 About the Export Dialog
397 Exporting and the Cycle Region
397 Exporting a Master Mix
414 Exporting Tracks, Busses, and Submixes Separately
415 Exporting Multiple Mono Files
416 Using Post-Export Actions
418 Using Export Presets
419 Exporting to AAF
419 Saving Multitrack Projects
419 Distributing a Multitrack Project and Its Media Files Together
Chapter 17 421 Using Soundtrack Pro with Other Applications
421 Using Soundtrack Pro with Final Cut Pro
421 About Soundtrack Pro Audio File Projects
422 Methods for Sending Audio from Final Cut Pro to Soundtrack Pro
422 Sending Individual Audio Clips from Final Cut Pro to Soundtrack Pro
428 About Soundtrack Pro Multitrack Projects
428 Creating Soundtrack Pro Multitrack Projects from Final Cut Pro Clips or Sequences
432 Using Soundtrack Pro with DVD Studio Pro
434 Using Soundtrack Pro with Motion
8 Contents
Page 9

435 Using Soundtrack Pro with Third-Party Applications
435 Exchanging OMF and AAF Files with Other Applications
437 Exporting Audio Files
Chapter 18 439 Using Conform with Final Cut Pro
439 About Conforming Manually
439 Using Soundtrack Pro Conform
444 Reviewing and Approving the Changes in the Conform Result Project
Appendix A 449 Soundtrack Pro Keyboard Shortcuts
449 General and File
450 Layouts, Tabs, and HUDs
451 Navigating the Timeline
451 Project Playback
452 Cycle Region
453 General Editing
453 Editing Audio Clips in the Timeline
454 Moving Audio Clips and Envelope Points
455 Viewing the Timeline
456 Timeline Tools
456 File Editor Project View Tools and Commands
457 Processing and Editing Audio Files
458 Tracks, Busses, and Submixes
459 Markers
459 Selecting Audio Clips in the Timeline
460 Video Out
460 Recording
461 Using Arrow Keys to Move the Playhead
461 Working with Timeslices
Appendix B 463 Audio Fundamentals
463 What Is Sound?
463 Fundamentals of a Sound Wave
465 Frequency Spectrum of Sounds
467 Measuring Sound Intensity
469 Signal-to-Noise Ratio
470 Headroom and Distortion
470 Dynamic Range and Compression
471 Stereo Audio
473 Digital Audio
474 Sample Rate
474 Bit Depth
Appendix C 477 Working with Professional Video and Audio Equipment
Contents 9
Page 10

477 About Video Interfaces, Signals, and Connectors
477 Video Interfaces
480 Video Signals and Connectors
485 About Audio Interfaces, Signals, and Connectors
485 Setting Up an Audio Interface
490 Audio Connectors, Cables, and Signal Formats
494 About Balanced Audio Signals
496 Tips for Choosing Speakers and an Amplifier
497 Frequency Response and Dynamic Range
497 Self-Powered Versus Passive Speakers
498 Amplifiers and Signal Levels for Unpowered Speakers
498 Connecting Professional Video Devices
498 Connecting Professional SD Video Devices
501 Connecting Professional Component Analog Video Devices
501 Connecting Consumer Analog Video Devices
501 Connecting Non-DV Devices to a DV Converter
503 Connecting Professional Audio Devices
503 Connecting Professional Digital Audio Devices
503 Connecting Consumer Digital Audio Devices
503 Connecting Professional Analog Audio
504 Synchronizing Equipment with a Blackburst Generator
506 Synchronizing Soundtrack Pro to External Timecode
Appendix D 509 Working with Apogee Hardware in Soundtrack Pro
510 Global Parameters
511 Units Parameters
514 Setup Buttons
Appendix E 515 Solutions to Common Problems and Customer Support
516 Solutions to Common Problems
517 Calling AppleCare Support
Appendix F 519 Using Apple Loops Utility
519 What Is Apple Loops Utility?
520 The Apple Loops Utility Interface
526 Opening Files in Apple Loops Utility
527 Tagging Files in Apple Loops Utility
528 Working With Transients
530 Saving Changes to Files
530 Removing Files From the Assets Drawer
531 Apple Loops Utility Preferences
532 Apple Loops Utility Keyboard Shortcuts
Index 537
10 Contents
Page 11

An Introduction
to Soundtrack Pro
Soundtrack Pro gives you the tools you need to create
high-quality soundtracks for your film and video productions.
Most experienced film and television producers know that “audio is more than half the
picture.” The art and techniques of sound recording, dialogue editing, sound effect
recording and placement, mixing, and sound design play a substantial role in how
audiences perceive the (visual) quality of a film or video.
Soundtrack Pro is designed to serve the art of motion picture sound post-production.
Like the other applications in Final Cut Studio, Soundtrack Pro was created for the film
and video industry. Soundtrack Pro gives you many specialized tools and powerful
features that you can use to create high-quality audio.
Overview of Soundtrack Pro
Soundtrack Pro provides film and video professionals streamlined workflows for editing
everything from individual audio files to large multitrack sound projects, including
synchronizing audio and video, editing sound in place, working with automatic
dialogue replacement (ADR), analyzing and fixing common audio problems like clicks
and pops, and creating stereo and surround sound design. Add interoperability with
the other applications in Final Cut Studio to this list of features, and you have a
professional-quality audio application designed to meet the needs of the most
discerning audio editors and mixers.
Preface
Soundtrack Pro features two types of projects: audio file projects and multitrack projects.
You use audio file projects to edit individual audio files. This is sometimes known as
waveform editing. However, unlike most waveform editing applications, Soundtrack Pro
allows you to edit your audio files nondestructively by keeping track of the actions you
have performed on your audio file. You can edit down to the file’s individual sample level
and perform tasks ranging from audio repair to sound design. You can perform edits
nondestructively using actions, which include processing effects and other operations.
You can analyze audio files for a range of common audio problems, including clicks and
pops, hum, and phase issues, and automatically fix problems that are found.
11
Page 12

Multitrack projects look and function similarly to Final Cut Pro projects. You arrange a
multitrack project’s audio clips on the tracks in the Timeline. Multitrack projects contain
the features you expect from a high-performance and professional-quality audio editor,
including features to synchronize audio and video, work with ADR and multitake
editing, and automate volume, pan, and other changes over time using envelopes. You
can record over multiple channels to the Timeline or the File Editor or to multiple tracks
in the Timeline.
Most audio applications focus on multitrack editing or waveform editing, but not both.
Furthermore, most waveform editing applications handle media destructively—making
permanent changes to your media files. Soundtrack Pro provides the best of both
worlds: nondestructive waveform editing while working in a multitrack project.
You can edit audio clips in a variety of ways in the Timeline. You can select, cut, copy,
and paste clips; move, resize, transpose, split, and join them; and edit them in other
ways. You can also apply any actions to and process menu operations for any clip
directly in the Timeline.
You can organize your multitrack project for the final mix by creating busses and
submixes, adding realtime effects and actions, and adding surround panning. When
you’re ready to mix, you can mix in the Timeline or in the Soundtrack Pro Mixer. The
Mixer models a traditional hardware mixing board and includes a channel strip for each
track, bus, and submix in the project.
Soundtrack Pro includes a large library of stereo and surround sound effects and music
beds that you can use for Foley effects, background ambience, sound effects, and
music transitions in your audio and multitrack projects. Soundtrack Pro also includes a
generous selection of professional-quality effects plug-ins, like Space Designer and
Channel EQ that you can add to tracks, busses, and submixes.
You have numerous options for exporting your project. You can export your mix (or
selected tracks, busses, or submixes) in a variety of audio file types including WAVE,
AIFF, MP3, AAC, Dolby Digital Professional, and as a QuickTime movie. You can export
your mix with Compressor, Apple’s high-performance encoding application. You can
also pick from a variety of post-export actions that automatically open the mix in a
Final Cut Pro sequence, or export it to Motion, Logic, or Waveburner.
12 Preface An Introduction to Soundtrack Pro
Page 13

Using Soundtrack Pro in Your Post-Production Workflow
On its own, Soundtrack Pro is a powerful audio editing application. As part of
Final Cut Studio, Soundtrack Pro becomes an integral part of your post-production
workflow.
You can easily share media projects between Final Cut Pro and Soundtrack Pro. When
you send a sequence from Final Cut Pro, your audio files and a compiled video file
arrive in a Soundtrack Pro multitrack project, ready for you to edit. After editing and
creating your final mix, you can automatically send a mixdown back to the original
Final Cut Pro sequence. The Soundtrack Pro Conform feature allows you to quickly sync
up the picture editor’s cut with the sound editor’s version of the same sequence.
Unlike many audio editing applications, Soundtrack Pro was created specifically to
produce sound for motion picture audio projects. This means it has many specialized
tools and features that simplify and enhance the sound-for-picture editing process.
Here are some examples of how you can use Soundtrack Pro to enhance your motion
picture sound editing and mixing experience:
 To quickly synchronize a sound effect with the picture using the Multipoint Video HUD
For more information, see “Scrubbing and Spotting with the Multipoint Video HUD”
on page 322.
 To edit audio dialogue replacement (ADR) recordings, combine them with
production sound files, and create perfect voiceover narration
For more information, see Chapter 7, “Using the Multitake Editor,” on page 251.
 With the Soundtrack Pro Conform feature, to quickly merge two versions of the same
sequence: the picture edit (from Final Cut Pro) and the sound edit/mix (from
Soundtrack Pro)
For more information, see Chapter 18, “Using Conform with Final Cut Pro,” on
page 439.
 To perfect and clean up individual audio files. You can go straight into a clip’s
waveform to correct a click or pop or add an effect. Soundtrack Pro makes it easy for
you to move between editing individual clips and arranging your overall multitrack
project for a quick back-and-forth workflow.
To learn more about editing individual audio files, see “Editing Audio Clips in the
Multitrack Timeline” on page 162 and Chapter 6, “Editing Audio Files,” on page 191.
 To lift effects from one clip and apply them to other clips using lift-and-stamp tools
and the Sound Palette, and to create palettes of sound processing for future use
For more information, see “Using the Lift and Stamp Tools” on page 179.
 To organize your multitrack project for professional sound effect editing and mixing
For more information, see “Basic Signal Routing in Soundtrack Pro” on page 263 and
“Using Sends and Busses” on page 270.
Preface An Introduction to Soundtrack Pro 13
Page 14

 To prepare your multitrack project for distribution and final delivery, such as foreign
language versions (for example, to create separate submixes for dialogue, sound
effects, and music)
For more information, see “What Is a Submix and How Do You Use It?” on page 263
and “Example: Mixing a Project with Dialogue, Music, and Effects Submixes” on
page 266.
 To use advanced editing techniques and tools in the multitrack Timeline for
streamlined sound editing
For more information, see “Using the Timeline Editing Tools” on page 164, “Moving
Around in the Timeline” on page 128, “Selecting Audio Clips in the Timeline” on
page 147, and “Editing with the Timeslice Tool” on page 174.
 To create a podcast from a video edited in Final Cut Pro
For more information, see Chapter 14, “Creating Podcasts in Soundtrack Pro,” on
page 377 and “Exporting Video Podcasts” on page 388.
 To create stereo and surround mixes for the same project
For more information, see “Mixing Surround Sound” on page 293 and “Converting a
Stereo Mix to 5.1 Surround” on page 307.
 To set up your sound-for-picture editing system to display video on an external video
monitor or use Digital Cinema Desktop on the Apple Studio and Apple Cinema Displays
For more information, see “Setting Up a System Using a Video Output Device” on
page 30 and “Video Out Preferences” on page 103.
 To adjust the selection for an action. For example, you may have applied an effect to a
portion of a file, and you might like to move that effect to a different portion of the file.
For more information, see “Selecting Part of an Audio File” on page 202, “Editing with
the Timeslice Tool” on page 174, and “Working with Actions” on page 230.
 To use the resizable Timecode HUD to display the current project timecode (for a
client sitting across the room)
For more information, see “Timecode HUD” on page 64.
 With the Frequency Spectrum view and the Frequency Selection tool, to make
selections of frequency ranges as well as copy, paste, delete, and adjust the
amplitude of frequency selections
These tools help you visually pinpoint specific frequencies, for example, some noise
that you want to remove. For more information, see “Using Frequency Spectrum
View” on page 214.
 To send a mixdown back to Final Cut Pro automatically
Soundtrack Pro can send a new copy of the Final Cut Pro sequence that looks just
like the original sequence but has additional audio tracks that contain your mixdown.
For more information, see “Sending a Mixdown Back to Final Cut Pro Automatically”
on page 430.
14 Preface An Introduction to Soundtrack Pro
Page 15

 As you drag clips to the Timeline, to separate the channels of stereo and
multichannel clips into individual clips, or combine separate clips into single stereo
or multichannel clips
For more information, see “Separating Channels by Option-Dragging” on page 122
and “Combining Separate Clips to Create Multichannel Clips” on page 123.
 To arrange background music or add FX and Foley in stereo or surround sound
For more information, see Chapter 18, “Using Conform with Final Cut Pro,” on
page 439.
Combining these Soundtrack Pro features creates your sound-for-picture project, a
balanced sound design that enhances your video or film project using tools that look
like and function similarly to the tools you know from using Final Cut Pro.
Notable Features in Soundtrack Pro
Soundtrack Pro provides a powerful set of tools for your motion picture sound editing
and mixing projects, including the following features.
Audio editing features:
 Powerful audio editing: You can edit audio files nondestructively in Soundtrack Pro.
You can edit audio files graphically with sample-accurate precision and process files
using actions, which can be reordered and turned on or off individually.
 Analysis and repair of common audio problems: You can choose which problems to
analyze the file for, then fix the problems detected by analysis either individually or
in a single operation. Selected problems are highlighted in the waveform display for
easy viewing.
 Multitake Editor: Use the Multitake Editor to edit multitake and synced audio that is
created by performing multitake recording (such as in automatic dialogue
replacement, or ADR).
 Edit in place: Edit and process a file’s waveform directly in the Timeline and hear the
changes in the context of your whole multitrack project. Simply select a clip in the
Timeline and it appears in the File Editor tab below. Any changes you make to the
media file are updated in the Timeline immediately.
 Ability to add professional-quality effects: Soundtrack Pro includes high-quality effects
plug-ins from the Logic Pro effects library that you can use in your projects, including
the Space Designer convolution reverb. You can also install third-party effects in the
Audio Units plug-in format.
 Frequency Selection tool and Spectrum View HUD: Use the Frequency Selection tool in
the Frequency Spectrum view to make selections of frequency ranges as well as
copy, paste, delete, and adjust the amplitude of frequency selections. The new
Spectrum View HUD provides extensive controls.
Preface An Introduction to Soundtrack Pro 15
Page 16

 Tape-style scrubbing: The Scrub tool provides detailed scrubbing that realistically
approximates the “rock-the-reels” scrubbing on analog tape decks to help you
quickly find a particular sound or event in a long audio file.
 Multichannel support: You can edit up to 24 channels in a single audio file, and play
back and record up to six channels in a single audio file in the Timeline.
Soundtrack Pro 2 supports the following types of multichannel files: AIFF, WAVE,
Broadcast Wave, QuickTime, CAF, and single folder/multi-mono file AIFF.
Multitrack project features:
 Advanced multitrack editing features: Soundtrack Pro includes the ability to lock/unlock,
enable/disable, and color-label clips and tracks in the Timeline; an advanced Timeslice
tool for marquee time selections; enhanced marquee clip selection; Final Cut Pro–style
J-K-L transport controls; the ability to spot clips from various media tabs to the
Timeline; the ability to move clips numerically; blade tools for splitting clips; region
markers; and a mode for selecting and moving envelope points with clips.
 Record and edit automation tools: You can record movements to sliders and other
onscreen controls, play back the automation, and edit it in the Timeline.
 OMF and AAF support: Soundtrack Pro can use these industry-standard project
interchange formats to import the editing decisions from other video and audio
editing applications. You can also export a multitrack project from Soundtrack Pro
as an AAF file.
 Sophisticated export options: You can export an entire project, or selected portions of
it, to a mono, stereo, or multichannel audio file using the following audio file types:
AIFF, WAVE, NeXT, Sound Designer II, MP3, AAC/Podcast, and Dolby Digital Professional
(AC-3). Soundtrack Pro has a direct link to Compressor, the Final Cut Studio
transcoding application, for exporting to numerous other audio and video formats.
Other options include a variety of post-export actions, the ability to add your own
custom AppleScript actions using the Export dialog, as well as custom export presets.
 Lift and Stamp tools and the Sound Palette: Soundtrack Pro includes time-saving tools
for applying work you have done on one clip to one or more other clips. Use the Lift
tool to copy properties from selected clips. Create a processing template in the
Sound Palette that can be applied to other clips with the Stamp tool.
Final Cut Studio workflow features:
 Send clips: You can send clips from the Final Cut Pro Timeline to Soundtrack Pro and
edit the clips in the File Editor. When you save the clip, it is automatically updated in
your Final Cut Pro project. Soundtrack Pro includes similar support for Motion and
DVD Studio Pro.
 Send sequences: You can also send clips or entire sequences to a Soundtrack Pro
multitrack project to complete your final mix, adding additional tracks of sound
effects, voiceover, and music. Both stereo and surround sound mixing are supported.
16 Preface An Introduction to Soundtrack Pro
Page 17

 Conform: You can use the Conform feature in Soundtrack Pro to quickly merge two
versions of the same sequence: the picture edit (from Final Cut Pro) and the sound
edit/mix (from Soundtrack Pro).
 Automatic mixdown return: When you export a mixdown of the multitrack project
originally sent from Final Cut Pro, you can choose to open a new copy of the
Final Cut Pro sequence that looks just like the original sequence but has additional
audio tracks that contain your mixdown.
Mixing features:
 Advanced mixing capabilities: You can mix multitrack projects in the Mixer, which
displays a virtual mixing console for a project. Using the channel strips in the Mixer,
you can adjust levels, mute and solo tracks, and add realtime effects. You can create
submixes using busses, and send audio to multiple physical outputs using submixes.
 Surround editing and mixing: Soundtrack Pro provides an elegant and easy-to-use
toolset for creating and adjusting projects in 5.1 discrete surround audio including
surround panning, mixing, and automation; unparalleled flexibility with surround
sources; and the ability to easily switch between stereo and surround mixes.
 Support for control surfaces: In addition to recording movements of onscreen
controls, you can connect a supported control surface and record automation of
control surface movements.
 Synchronized video display: You can add a video to a project and view it in the Video
tab or display the video on an external video monitor. Audio/video synchronization is
accurate both onscreen and on the external monitor, up to HD resolutions. You can
accurately place audio clips to sync with specific frames or points in time in the video.
Other features:
 Audio recording capability: You can record audio directly into multiple tracks in the
Soundtrack Pro Timeline, including recording multiple takes.
 Powerful Inspector tabs: These include the Tracks tab for easily viewing, selecting, and
grouping tracks, busses, and submixes, and the Bin, a hierarchical display of
information about all open projects.
 HUDs: Heads-up displays (HUDs) are semi-transparent floating windows with
controls and displays that you can use to accomplish specific tasks. The HUDs include
the Fade Selector HUD for quickly applying and adjusting fades and crossfades, the
Multipoint Video HUD for providing visual context when you are positioning audio
clips in a video-based project, and the Timecode HUD, which displays the current
project timecode.
 Podcasting: With Soundtrack Pro, audio creators can quickly and easily produce extremely
high-quality audio and video podcasts directly from their Soundtrack Pro projects.
Preface An Introduction to Soundtrack Pro 17
Page 18

Resources for Learning About Soundtrack Pro
This manual describes the Soundtrack Pro interface, commands, and menus, and gives
step-by-step instructions for creating Soundtrack Pro projects and for accomplishing
specific tasks. It also includes information on setting up your system and on audio
basics. It is designed to provide the information you need to get up to speed quickly so
you can take full advantage of the intuitive interface and powerful features of
Soundtrack Pro.
If you want to start by learning how to set up audio hardware to use with
Soundtrack Pro, read Chapter 1, “Setting Up Your System,” on page 21. If you want to
learn about the features and controls in the Soundtrack Pro interface, read Chapter 2,
“The Soundtrack Pro Interface,” on page 33. If you want to jump right in and start using
the application, skip ahead to Chapter 3, “Setting Up Soundtrack Pro,” on page 65. If
you want to read about editing audio files, turn to Chapter 6, “Editing Audio Files,” on
page 191. If you want to start using the multitrack Timeline, read Chapter 5, “Working in
the Timeline,” on page 127.
Soundtrack Pro provides several different sources of support.
About This Soundtrack Pro Onscreen User Manual
The Soundtrack Pro onscreen user manual allows you to access information directly
onscreen while you’re working in Soundtrack Pro. To view this information, choose
Help > Soundtrack Pro User Manual. The Soundtrack Pro onscreen user manual is a fully
hyperlinked version of the Soundtrack Pro User Manual, enhanced with many features
that make locating information quick and easy.
 The homepage provides quick access to various features, including Release Notes,
the index, and the Soundtrack Pro website.
 A comprehensive bookmark list allows you to quickly choose what you want to see
and takes you there as soon as you click the link.
In addition to these navigational tools, the Soundtrack Pro onscreen user manual gives
you other means to locate information quickly:
 All cross-references in the text are linked. You can click any cross-reference and jump
immediately to that location. Then, you can use the Preview Back button to return to
where you were before you clicked the cross-reference.
 The table of contents and index are also linked. If you click an entry in either of these
sections, you jump directly to that section of the user manual.
 You can also use the Find dialog to search the text for specific words or a phrase.
18 Preface An Introduction to Soundtrack Pro
Page 19

Apple Websites
There are a variety of Apple websites that you can visit to find additional information.
Soundtrack Pro Website
For general information and updates, as well as the latest news on Soundtrack Pro, go to:
 http://www.apple.com/finalcutstudio/soundtrackpro
Apple Service and Support Website
Go here for software updates and answers to the most frequently asked questions for all
Apple products, including Soundtrack Pro. You’ll also have access to product specifications,
reference documentation, and Apple and third-party product technical articles.
To access the Apple Service and Support webpage, go to:
 http://www.apple.com/support
To access the Soundtrack Pro support webpage, go to:
 http://www.apple.com/support/soundtrackpro
To access the Soundtrack Pro discussion webpage, go to:
 http://discussions.info.apple.com
Other Apple Websites
Start at the Apple homepage to find the latest and greatest information about
Apple products:
 http://www.apple.com
QuickTime is industry-standard technology for handling video, sound, animation,
graphics, text, music, and 360-degree virtual reality (VR) scenes. QuickTime provides a
high level of performance, compatibility, and quality for delivering digital video. Go to
the QuickTime website for information on the types of media supported, a tour of the
QuickTime interface, specifications, and more:
 http://www.apple.com/quicktime
FireWire is one of the fastest peripheral standards ever developed, which makes it great
for use with multimedia peripherals, such as video camcorders and the latest high-speed
hard disk drives. Visit this website for information about FireWire technology and
available third-party FireWire products:
 http://www.apple.com/firewire
Preface An Introduction to Soundtrack Pro 19
Page 20

For information about seminars, events, and third-party tools used in web publishing,
design and print, music and audio, desktop movies, digital imaging, and the media arts,
go to:
 http://www.apple.com/pro
For resources, stories, and information about projects developed by users in education
using Apple software, including Soundtrack Pro, go to:
 http://www.apple.com/education
Go to the Apple Store to buy software, hardware, and accessories direct from Apple
and to find special promotions and deals that include third-party hardware and
software products:
 http://www.apple.com/store
20 Preface An Introduction to Soundtrack Pro
Page 21

1 Setting Up Your System
1
The way you set up your system depends on the audio
equipment you plan to use.
You can use your computer’s speaker or headphone jack to monitor the audio output
from Soundtrack Pro. For better results, you may want to connect external monitors or
speakers to your system, so that you can monitor the audio output at a higher level of
quality. You may want to connect other external audio equipment such as an audio
interface or a mixer, particularly if you plan to record your own audio in Soundtrack Pro.
 For information on system and hardware requirements, see the Read Before You
Install document on the installation DVD.
 For information on installing the software, see the Installing Your Software booklet.
System Considerations
To achieve the most effective results, you should consider the following issues when
setting up your system.
Processor Speed and RAM
Digital audio files require intensive processing by your computer. If you plan to work on
longer or more complex projects, or use multiple effects plug-ins in your projects, a
computer with a faster processor can facilitate your productivity.
Soundtrack Pro is optimized for use with computers that have a multiprocessor
architecture. Working with Soundtrack Pro projects on a multiprocessor-equipped
computer can make your workflow more efficient, especially when creating longer or
more complex projects.
If you plan to work on large projects, it’s useful to have extra random-access memory,
or RAM, installed in your computer. Additional RAM allows you to play back more files
simultaneously, use a greater number of effects plug-ins, and keep several multimedia
applications open at the same time.
21
Page 22

Hard Disks
It’s also a good idea to have a large hard disk with plenty of available space to store
the media (audio and video) files you use with Soundtrack Pro. As you work with the
application, you’ll likely want to acquire a large collection of sounds to use in your
Soundtrack Pro projects. Hard disk performance is a critical aspect of your editing
system: the storage capacity and data rate of your disks must match or exceed the
requirements of the audio (and video) formats you are using.
If you store media files on an external hard disk, make sure the disk has a fast enough
seek time and a high enough sustained data transfer rate for use with video and audio
files. Consult the manufacturer’s specifications.
Dedicated Hard Disk
Every minute of stereo digital audio (recorded using a 44.1 kHz sample rate and 16-bit
depth) requires roughly 10 MB of hard disk space. If you plan to record large amounts
of audio in Soundtrack Pro, you may want to record to a hard disk dedicated to storage
for your Soundtrack Pro projects.
Setting the Audio Input and Output
You can set the default input and output devices for Soundtrack Pro with the Audio
MIDI Setup utility.
To select a default output device:
1 Double-click Audio MIDI Setup in the Utilities folder.
2 Choose the device from the Default Output pop-up menu.
Note: Optionally, you can choose Apple menu > System Preferences, click Sound, then
click Output. Select the audio interface in the list that appears.
To select a default input device:
1 Double-click Audio MIDI Setup in the Utilities folder.
2 Choose the device from the Default Input pop-up menu.
Note: Optionally, you can choose Apple menu > System Preferences, click Sound, then
click Input. Select the audio interface in the list that appears.
22 Chapter 1 Setting Up Your System
Page 23

Audio MIDI Setup
The Audio MIDI Setup utility is a program that comes with the Mac OS X for adjusting a
computer’s audio input and output settings and managing MIDI devices. You can select
audio channel input and output devices, configure output speakers, set clock rates, and
control levels. You may also be able to open a configuration utility provided by your
audio device.
For more information, go to:
http://www.apple.com/macosx/features/coreaudio
Adding Audio Units Plug-ins to Your Computer
Soundtrack Pro includes an extensive set of professional-quality effects plug-ins.
Soundtrack Pro uses effects in the Audio Units plug-in format, the native plug-in format
of Mac OS X.
Audio Units plug-ins are also available from third-party manufacturers. When adding
third-party effects to your computer, be sure to read the documentation, including any
Read Me and installation files, that came with the plug-in. Supported Audio Units
effects plug-ins appear in the Effects window under the manufacturer’s name.
Soundtrack Pro does not support VST, ASIO, MAS, or RTAS effects plug-ins.
Connecting Equipment
You can use a variety of audio equipment with Soundtrack Pro for both recording and
playback. For information on connecting a specific piece of equipment to your
computer, read the documentation that came with the equipment.
Final Cut Studio editing systems can be configured to meet the most demanding
professional requirements. An advanced editing system can be built by expanding the
basic system described in the Final Cut Pro User Manual. The following list includes
equipment commonly used in Final Cut Studio editing systems:
 Macintosh computer with Final Cut Studio installed: The core of your editing system
 Professional video and audio devices: For capturing footage and outputting finished
projects. (For more information about video and audio devices, see Appendix C,
“Working with Professional Video and Audio Equipment,” on page 477.)
 External video and audio monitors: For viewing and listening to your program in its
final image and audio quality
 Video and audio interfaces: For connecting professional and non-FireWire devices to
your editing system
 RS-422 serial device control interfaces: For remote device control during capture
and output
Chapter 1 Setting Up Your System 23
Page 24
 Video, audio, and remote device control cables: For separate video, audio, and remote
device control connections. Unlike a basic DV editing system that uses a solitary
FireWire cable to transfer video, audio, and remote control signals, many professional
configurations require separate cables for each of these signals.
 Additional scratch disks: One or more internal or external hard disks, a RAID, or a
connection to a storage area network (SAN)
 Control surfaces: Hardware controls that let you mix and edit your projects with
greater flexibility and precision than using a mouse to move onscreen controls
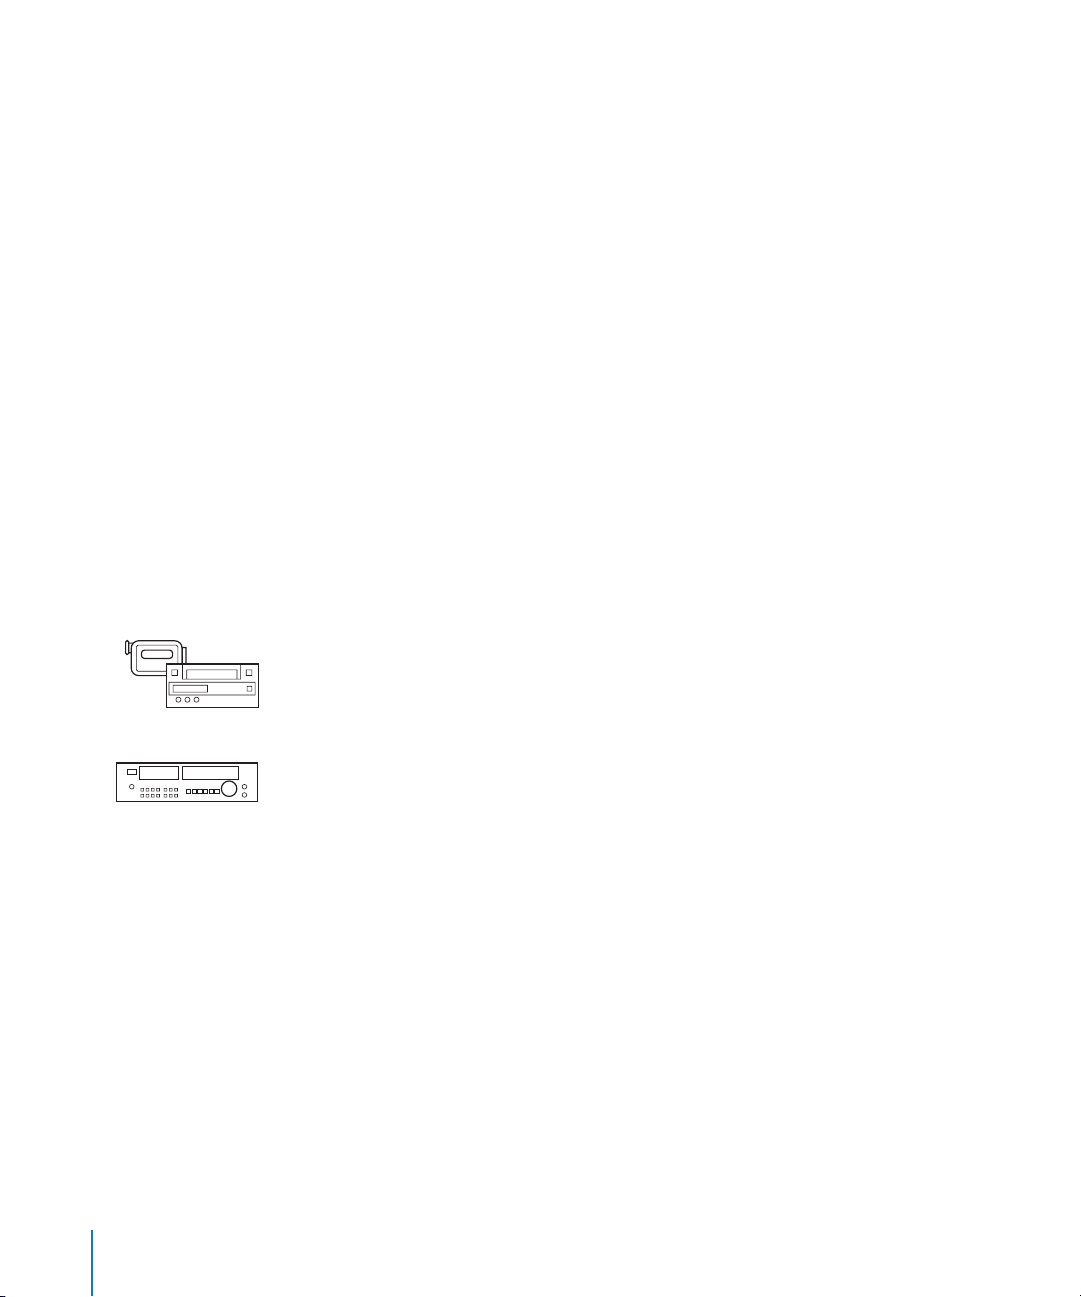
Video and Audio Input and Output Devices
An input device is used to transfer footage into your computer. For output, you record
your finished movie to an output device. Basic editing systems use a DV camcorder or
deck as both an input and output device. Professional editing systems may use
multiple video decks to capture and output to different video formats. While
Soundtrack Pro does not support video capture from devices such as camcorders or
VTRs, it does support recording from a variety of digital audio devices.
To connect non-FireWire devices to your computer, you also need a third-party video or
audio interface. For more information, see “About Video Interfaces, Signals, and
Connectors” on page 477.
Video Device
This is a VTR or camcorder you connect to your computer to capture and output media.
The connectors and signal format on your video device determine what kind of video
interface your computer needs to connect to your device.
Audio Device
This is a device, such as a digital audio tape (DAT) recorder or multitrack audio recorder,
that lets you capture or output audio independently from video.
Note: When using external audio devices, it’s a good idea to connect them before
opening Soundtrack Pro.
24 Chapter 1 Setting Up Your System
Page 25

Video and Audio Interfaces
An interface is a device that adds physical video or audio connectors to your computer
so that you can connect your Final Cut Studio system to other professional equipment
(such as video or audio decks and monitors).
Interfaces provide input and output connectors that aren’t included with your
computer. For example, if you want to output multiple audio channels to an analog
audio mixer or digital multitrack, you need an audio interface that has XLR, 1/4”
tip-ring-sleeve (TRS), AES/EBU, or ADAT Lightpipe output connectors.
You may also want to consider adding a third-party interface to your system if:
 You need to capture or output many audio channels at once
 You are integrating Final Cut Studio into a professional broadcast environment that
requires SDI, HD-SDI, or other non-FireWire video and audio connections
 You need to capture, edit, and output full-resolution, uncompressed video signals
instead of DV video (which is compressed)
 You are digitizing video from an older analog VTR (such as a Betacam SP deck) that
does not have digital video outputs or remote control via FireWire
Third-party video and audio interfaces can be installed in one of your computer’s PCI
slots, connected to the USB port, or connected via FireWire.
For more information about selecting and connecting an audio interface for use with
Soundtrack Pro, see “Setting Up an Audio Interface” on page 485.
External Audio and Video Monitoring
In the final stages of post-production, external video and audio monitors are essential
to ensure the quality of your movie. Editing systems focused on these final phases of
post-production are often called finishing systems.
External Audio Speakers and Monitors
You can play back audio through your computer’s speakers or headphone jack, but the
audio output may not be high enough for you to evaluate your music at a professional
level of quality. Connecting external speakers or monitors to your system allows you to
hear the audio output with greater fidelity and a wider dynamic range. During the final
mix, it is important to monitor your audio so that it matches the listening environment
where the final project will be shown. For detailed information on connecting external
speakers to your audio interface, see the documentation that came with the speakers.
Chapter 1 Setting Up Your System 25
Page 26

Setting Up a Proper Audio Monitoring Environment
Room shape and material are just as important as the quality of the speakers
themselves. Every surface in a room potentially reflects sound, and these reflections
mix together with the sound originating from the speakers. Rooms with parallel walls
can create standing waves, which are mostly low-frequency sound waves that reinforce
and cancel each other as they bounce back and forth.
Standing waves cause some frequencies to be emphasized or attenuated more than
others, depending on your listening position. When you mix in a room that creates
standing waves, you may adjust certain frequencies more than necessary. However, you
may not notice until you play back your audio in a different listening environment, in
which those frequencies may sound overbearing or nonexistent.
∏ Tip: A much cheaper alternative to building new walls is to mount angled pieces of
material to the existing walls to eliminate parallel surfaces.
If the material in a room is very reflective, the room sounds “brighter” because high
frequencies are easily reflected. Mounting absorbing material (such as acoustic foam)
on the walls can reduce the brightness of a room. A “dead room” is one that has very
little reflection (or reverberation). Try to cover any reflective surfaces in your
monitoring environment.
Amplifiers
If you are recording audio from microphones and are not running the microphone’s
signal through a mixer with a microphone pre-amplifier, you need to connect an
amplifier to boost the microphone’s signal before sending it to the computer. If you are
connecting monitors or speakers that are not self-powered, you also need to connect
them through an amplifier.
Mixers
Connecting a mixer to your system allows you to record audio from multiple
microphones or instruments simultaneously, to play back the output from your computer
through connected monitors or speakers, and to control the volume levels of both the
audio input and output. Professional-quality mixers have a number of additional features,
including equalization (EQ) controls, auxiliary sends and returns for adding external
effects, and separate monitor and mix level controls. Mixers may also include inboard
pre-amplification for microphones, making the use of a separate amplifier unnecessary.
Control Surfaces
Soundtrack Pro supports control surfaces that use the Mackie Control and Logic
Control protocols. For information on connecting and using control surfaces, see
Chapter 15, “Using Control Surfaces with Soundtrack Pro,” on page 391.
26 Chapter 1 Setting Up Your System
Page 27
External Video Monitors
When you design and edit a video soundtrack, it’s ideal to watch the video on a
monitor similar to the one you will use for the final screening. An external video
monitor can display color, frame rate, and interlaced scanning more accurately than
your computer display. (For information on connecting professional video devices, see
“Connecting Professional Video Devices” on page 498.)
If you are working on an NTSC or a PAL project, you should watch it on an external
video monitor that shows the video interlaced. For more information about external
video monitoring, see the Final Cut Pro User Manual.
Example Hardware Setups
The following sections provide several examples of different hardware setups.
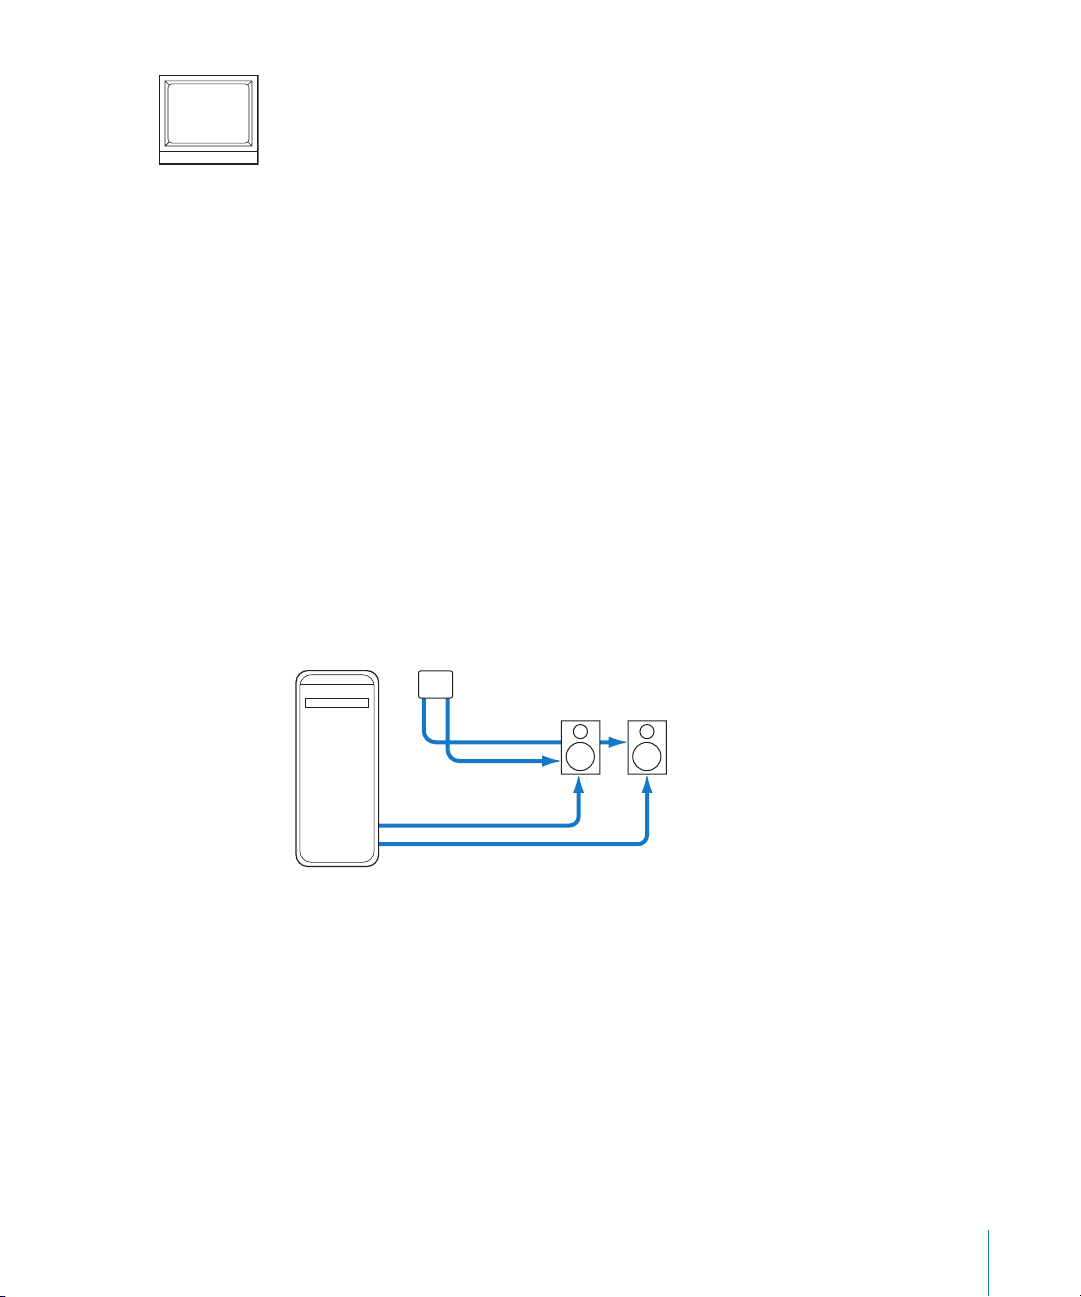
Setting Up a System Using Powered Speakers
With this setup, you can monitor the audio output through a set of connected
powered speakers.
This setup uses the following equipment:
 Your computer and display
 A set of powered speakers, including speaker wire and a power adaptor
Speakers
Power cables
Speaker cables
Computer
Chapter 1 Setting Up Your System 27
Page 28
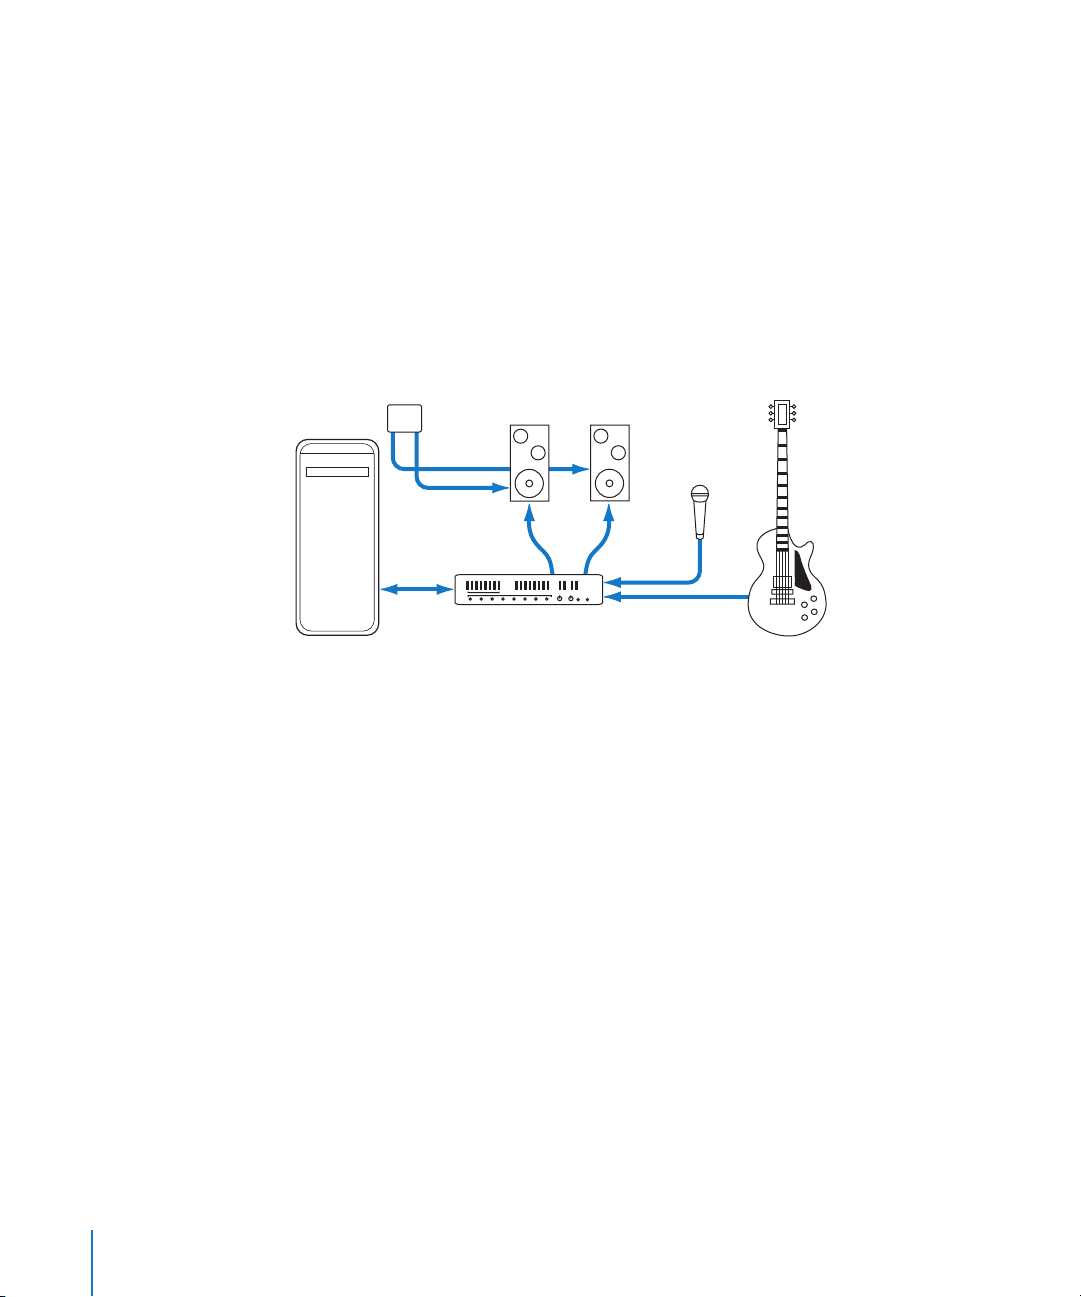
Setting Up a System Using a USB Audio Interface
With this setup, you can record audio input from microphones and musical
instruments, and monitor audio output, through a USB audio interface.
This setup uses the following equipment:
 Your computer and display
 USB audio interface (from 2 to 8 channels) with USB cable to connect to your computer
 Microphone
 Musical instruments (guitar, bass, and keyboard)
 Cables to connect microphones and instruments to the audio interface
 Set of monitors or speakers
Monitors
Microphone
Power cables
USB
cable
Speaker
cables
Computer
Audio interface
Instrument
28 Chapter 1 Setting Up Your System
Page 29
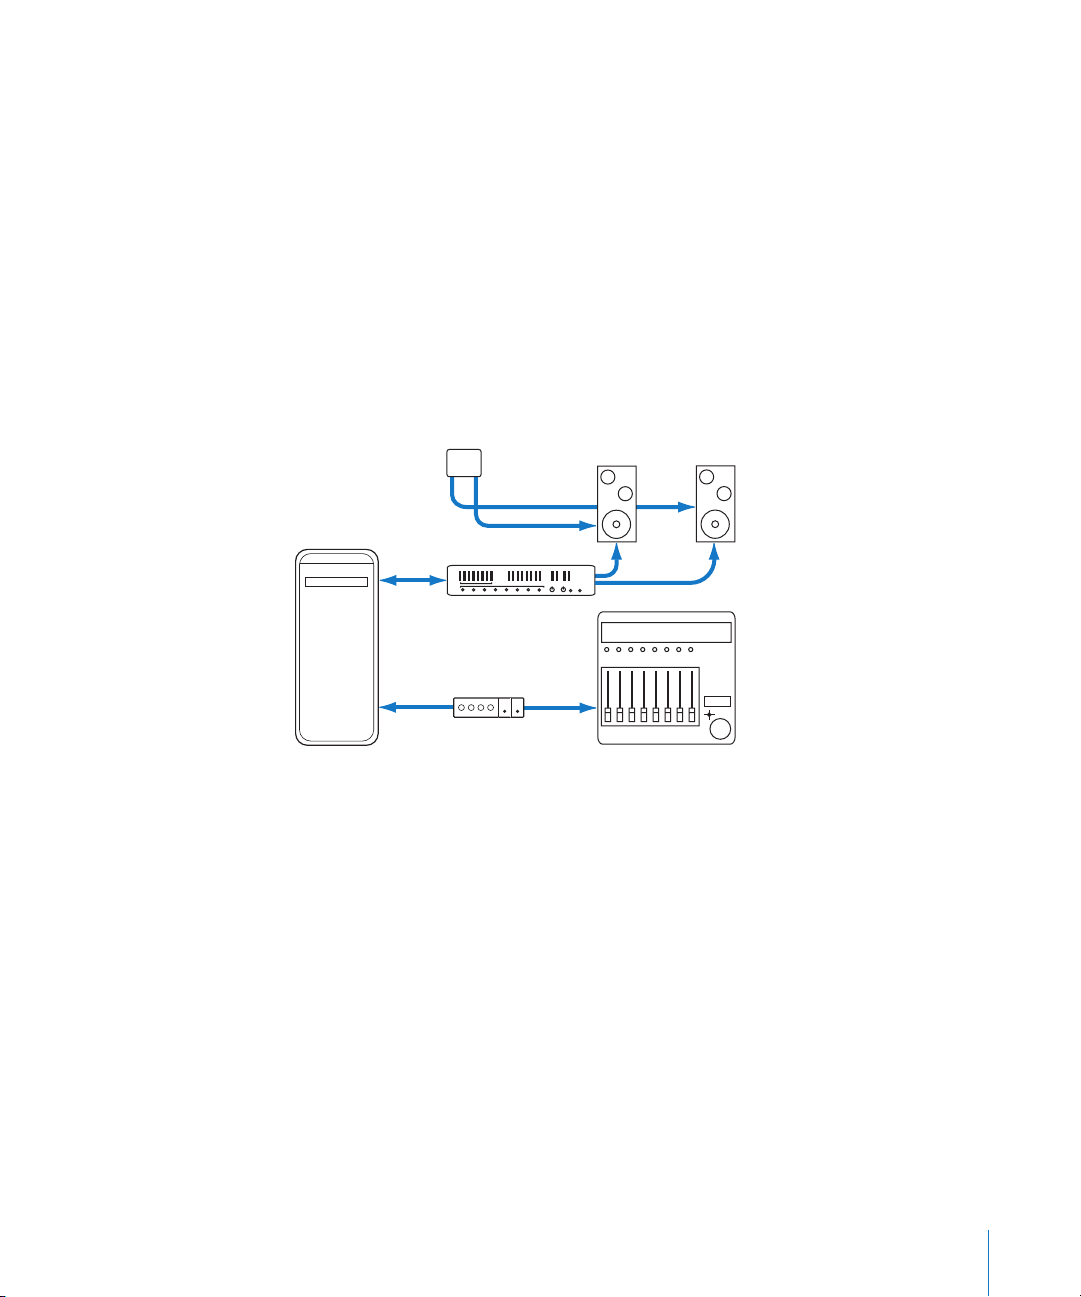
Setting Up a System Using a FireWire Interface and a Control Surface
With this setup, you can record audio input from several sources simultaneously and
monitor audio output channels independently, through a mixer connected to a
FireWire audio interface.
This setup uses the following equipment:
 Your computer and display
 FireWire audio interface with FireWire cable to connect to your computer
 Control surface and MIDI interface with USB cable to connect MIDI interface to
your computer
 MIDI cables to connect control surface to MIDI interface
 Set of powered monitors or speakers
 Speaker cables
Monitors
Power cables
Audio interface
Computer
FireWire
cable
Speaker cables
Midi interface
Control surface
Chapter 1 Setting Up Your System 29
Page 30
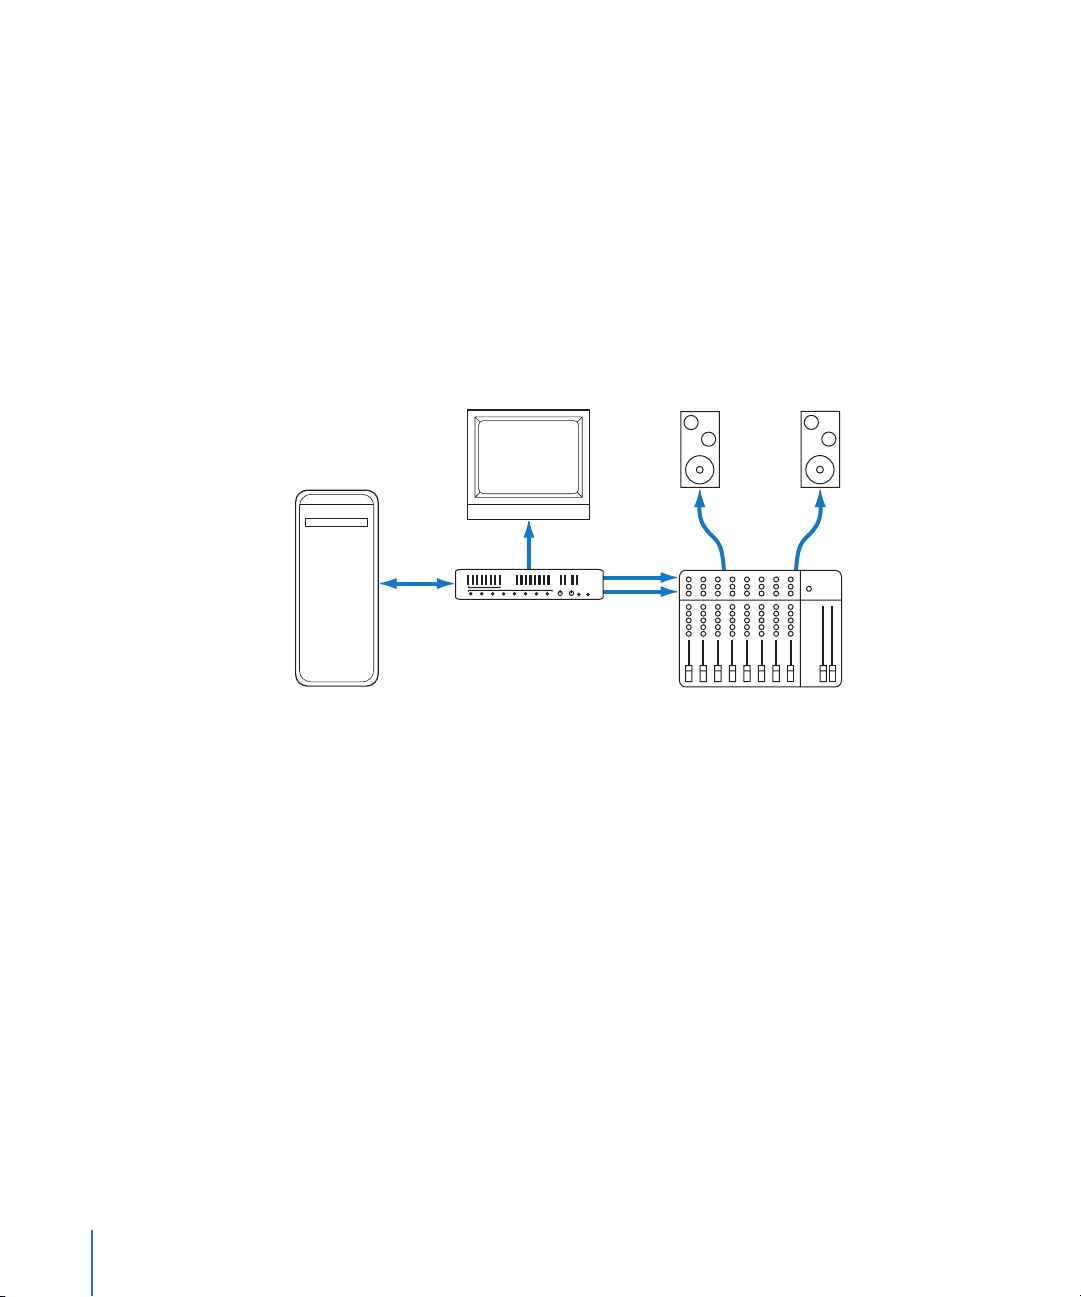
Setting Up a System Using a Video Output Device
With this setup, you can play video and audio through an external video output device.
Because using a video output device can result in increased latency, you may want to
combine this setup with an audio-only setup (as shown in the preceding pages), and
switch between the two setups.
This setup uses the following equipment:
 Your computer and display
 Video output device (FireWire device or PCI card)
 High-quality video monitor
 Audio monitors
Computer
FireWire
cable
Video monitor
Video output device
Audio monitors
Speaker
cables
Mixer
30 Chapter 1 Setting Up Your System
Page 31

(
Setting Up a System Using a PCI Video Interface Card
with Breakout Box
Many PCI cards aren’t big enough to fit all of the necessary video and audio
connectors. In these situations, a breakout box is connected to the PCI card via a
multipin connector on a long cable, and the connectors are accessible on the breakout
box instead of on the back of the PCI card. A breakout box is also useful because it
allows you to place the connectors somewhere more convenient than the back of your
computer, such as on an equipment rack or a desktop.
This setup uses the following equipment:
 Your computer and display
 Video interface (PCI card with breakout box)
 High-quality video monitor
 Audio speakers
BNC connector
Computer
with PCI card)
Breakout box
Analog or digital VTR
Chapter 1 Setting Up Your System 31
Page 32

Setting Up a System for Stereo Mixing
By default, Soundtrack Pro is set up for stereo mixing.
Stereo Speaker Placement and Listening Position
Most video editing suites use nearfield monitors, which are speakers designed to be
listened to at fairly close range. Speakers should be at least a foot or two away from
any walls to prevent early reflections of sound that combine with and muddy the
original sound.
Position the speakers as far from your listening position as they are from each other
(forming an equilateral triangle). For example, if the distance between the speakers is
six feet, you should place yourself six feet from each speaker. The apparent width of the
sound stage, or stereo image, increases as the distance between the speakers increases.
However, if the two speakers get too far apart, sound information appearing in the
center (between both speakers) starts to disappear.
Setting Up a System for Surround Mixing
For complete instructions on setting up the surround mixing tools in Soundtrack Pro,
see “Setting Up for Surround” on page 294.
32 Chapter 1 Setting Up Your System
Page 33

Video tab
Details tab
2 The Soundtrack Pro Interface
2
In Soundtrack Pro, you work in multiple windows and tabs
that you can arrange to suit your workflow.
Standard layout
Toolbar
Meters tab
Browser tab
Mixer tab
Soundtrack Pro is designed to handle every aspect of creating audio for a video or film
project, from multitrack recording to advanced audio processing and mixing. You can
use Soundtrack Pro together with Final Cut Pro as a complete audio post-production
solution that is powerful, yet also elegant and flexible.
33
Transport controls
Page 34

Soundtrack Pro Window Organization
The Soundtrack Pro window is arranged into several areas: the project pane and three
surrounding panes: the left pane, the lower pane, and the right pane. The project pane is
reserved as the central “canvas” for the multitrack Timeline and for individual audio file
projects. Use the transport controls at the bottom of the window to play back projects that
you open in the project pane. Task-specific tabs are docked in the left, lower, and right
panes. By default, the tabs are grouped by function and are laid out for a streamlined audio
post-production workflow. Nonetheless, you can easily rearrange the tabs and resize the
panes to suit your needs and then save the custom layouts for future use.
Project pane
Left pane
Lower pane
Transport controls (project pane)
Right pane
Showing and Hiding the Panes
The tabs are grouped by function to optimize your workflow. For example, the media
I O-related tabs (Meters, Recording, Search, Browser, and Favorites) are located in the
right pane by default. When you are finished with media input, you can close the entire
right pane by choosing Window > Toggle Right Pane, and thereby allow more
horizontal space for the project pane and the lower pane.
34 Chapter 2 The Soundtrack Pro Interface
Page 35

Or, for example, you may wish to work exclusively in the Timeline or the File Editor
project view and dedicate the entire Soundtrack Pro window to that view.
Chapter 2 The Soundtrack Pro Interface 35
Page 36

Because hiding and showing different panes of the Soundtrack Pro window is so
convenient, you will probably use this feature frequently during the course of a project.
Here are the keyboard shortcuts for hiding and showing the various panes.
Pane Keyboard Shortcut
Left pane
control A
The Meters, Search,
and Browser tabs have
been moved from the
right pane and docked
in the left pane.
Lower pane
Right pane
control S
control D
Rearranging Tabs
At any time, you can rearrange the layout by tearing off individual tabs and docking
them in other panes, or simply have them float over the Soundtrack Pro window. There
are numerous possible combinations. Mix and match the tabs to suit your particular
workflow needs.
Note: At any time, you can revert to the default layout by choosing Window >
Layouts > Standard, or pressing F1. Also, you can save any custom layouts you create.
For more information on managing layouts, see “Using Project Layouts” on page 68.
36 Chapter 2 The Soundtrack Pro Interface
Page 37

Project Pane
The project pane is the central “canvas” where you work on your projects in either the
multitrack Timeline or the File Editor project view. Use the Timeline (shown below) to
arrange audio clips in multitrack projects. Use the File Editor project view for individual
audio file projects.
Tabs
Monitor Volume slider
Mono Mix button
Toolbar
Playhead Location
value slider
Transport
controls
Selection Length
value slider
 Toolbar: Includes tools for common functions. You can customize which tools appear
in the Toolbar.
 Tabs: You can switch between any projects open in the Timeline or File Editor
project view.
 Transport controls: Control playback and the position of the playhead, and turn
recording on or off. (For more information, see “Transport Controls” on page 38.)
 Monitor Volume slider: Adjusts the overall monitor volume when you play the project.
The volume level defaults to 0 dB when you create a project. Adjusting the Monitor
Volume slider does not affect the mix signal or the export volume.
 Mono Mix button: Click to listen to a temporary mono mix of the project.
 Playhead Location value slider: Displays the current playhead position. You can move
the playhead by clicking the arrows, dragging, or typing a value.
 Selection Length value slider: Displays the length of the current Timeslice (in the
Timeline) or selection (in the File Editor). You can change the Timeslice or selection
length by clicking the arrows, dragging, or typing a value.
Chapter 2 The Soundtrack Pro Interface 37
Page 38

Toolbar
The Toolbar is located at the top of the Soundtrack Pro window. When you first open
Soundtrack Pro, the Toolbar includes buttons for creating a new project, creating a new
audio file, creating a new track, and other common functions. You can customize the
Toolbar, adding buttons for functions you want to access frequently. For information
about customizing the Toolbar, see “Customizing the Toolbar” on page 69.
Transport Controls
You use the transport controls to control playback, set the position of the playhead,
start recording, and activate the cycle region.
Play from
Record
Beginning
Go to End
Playhead Location
value slider
Selection Length
value slider
Go to Beginning
Play
Cycle
MIDI Sync
 Playhead Location value slider: Displays the current playhead position. You can move
the playhead by clicking the arrows, dragging, or typing a value.
 Record button: Starts and stops the recording process, and arms tracks for recording
when no tracks are pre-armed.
 Play from Beginning button: Starts playback from the beginning of the project.
 Go to Beginning button: Moves the playhead to the beginning of the project or to the
beginning of the cycle region if it is active.
 Play/Pause button: Starts playback at the current playhead position. If the project is
playing, stops playback.
 Go to End button: Moves the playhead to the end of the project or to the end of the
cycle region if it is active.
 Cycle button: Activates the cycle region, if one is set in the Time ruler. If no cycle
region is set, loops the project.
 MIDI Sync button: Synchronizes playback with incoming MIDI Clock and MIDI
Timecode (MTC) signals.
38 Chapter 2 The Soundtrack Pro Interface
Page 39

Previous and Next
Selection buttons
Timeline editing tools
 Selection Length value slider: Displays the length of the current Timeslice (in the
Timeline) or selection (in the File Editor). You can change the Timeslice or selection
length by clicking the arrows, dragging, or typing a value.
For information on using the transport controls, see “Controlling Playback with the
Transport Controls” on page 77.
Timeline
The Timeline gives you a visual representation of a multitrack project, showing the
position of clips, the playhead, and other items in time. The Timeline is organized into
three groups of horizontal rows called tracks, busses, and submixes, as well as a video
track, a podcast track, and a Master bus. You can add and arrange audio clips in the
audio tracks, use sends to create auxiliary busses, and route audio to physical output
channels using submixes. You can control the sound of each audio track, bus, and
submix using the controls in its header.
Automation Mode
pop-up menu
Project controls
Global Timeline view
Show pop-up menu
Time display
Track headers
Audio tracks, busses, and
submixes
Timeline controls
Time ruler
Track area
Scroll bar
 Previous and Next Selection buttons: Move backward and forward through Timeslice
selections you’ve made in the waveform display.
 Timeline editing tools: Select items using the Selection (arrow) tool, make time-based
selections with the Timeslice tool, split audio clips using the Blade and Blade All
tools, copy and paste attributes with the Lift and Stamp tools, and scrub the Timeline
with the Scrub tool. For more information, see “Using the Timeline Editing Tools” on
page 164.
 Automation Mode pop-up menu: Choose the mode for recording automation using
either the onscreen controls or an external control surface.
Chapter 2 The Soundtrack Pro Interface 39
Page 40

 Project controls: Set the project’s sample rate and other properties using these controls.
 Show pop-up menu: Choose whether the video track, podcast track, audio tracks,
busses, submixes, and master envelopes are visible in the Timeline.
 Global Timeline view: Shows a miniature view of the entire Timeline and the playhead
position, and lets you move quickly to different parts of a project.
 Time display: Shows the current playhead position in both Time-based and
Beats-based formats. You can set the playhead by typing a new playhead position in
the time display.
 Time ruler: You can precisely position clips, the playhead, and other items to a specific
point in time (minutes, seconds, frames) or to a musical beat using the Time ruler.
 Track area: Includes horizontal rows for tracks, busses, and submixes. Also includes
the playhead, envelopes, and markers.
 Headers: Each track, bus, and submix has a header with an icon, name, volume slider,
and other controls. (For more information, see the next section.)
 Timeline controls: Include controls to show the master envelopes, turn snapping on
or off, set the track height, and zoom in or out. (For more information, see “Timeline
Controls” on page 42.)
 Scroll bar: Moves the Timeline horizontally so you can see different parts of the project.
Headers
Each track, bus, and submix in the Timeline has a header that includes the track name,
track icon, and a set of track controls.
slider
Bypass
Effects
Mute
button
Panner
Name field
Volume
Envelopes
disclosure triangle
Icon
Color label
Input menu
 Color label: Indicates the track color, which is applied to any clips on the track (unless
you choose to override the color for individual clips).
 Icon: You can choose an icon for the track, bus, or submix, making it easy to quickly
distinguish it in a large project.
 Name field: You can type a new name for the track, bus, or submix in the name field.
You cannot rename the Master bus.
 Bypass Effects button: Select this button to hear the track without any of the applied
realtime effects.
40 Chapter 2 The Soundtrack Pro Interface
Solo button
Arm for Recording
Submix pop-up menu
Input Routing buttons
Page 41

 Arm for Recording button: Enables (or disables) the track for recording when you click
the Record button. Only tracks have Arm for Recording buttons, not busses or submixes.
 Mute button: Mutes (or unmutes) the track, bus, or submix.
 Solo button: Solos (or unsolos) the track, bus, or submix. Soundtrack Pro supports
both multiple solo and exclusive solo.
 Envelopes disclosure triangle: Shows the track, bus, or submix envelopes in the area
directly below the track.
 Volume slider: Sets the track, bus, or submix relative volume in the overall mix.
 Submix pop-up menu: Choose a submix for the track or bus from the menu. (Tracks
and busses only.)
 Input Device pop-up menu: Use the Input Device pop-up menu to choose the recording
input device, and its Channels submenu to choose the channel (or set of channels).
 Input Routing buttons: Use the Input Routing buttons to confirm or change recording
input signal routing.
 Output pop-up menu: Choose the physical outputs for the submix from the menu.
Submixes only. (Not shown in the illustration.)
 Panner: Sets the pan position of the track or bus. Has two modes: stereo slider or
surround panner. Appears in track and bus headers only, not in submix headers or
the Master bus header.
Note: The Input Device pop-up menu and Input Routing buttons are visible only when
the track height is set to Medium or Large.
For detailed information on using the track controls, see “Using the Track Controls” on
page 142.
Chapter 2 The Soundtrack Pro Interface 41
Page 42

Timeline Controls
The lower-left corner of the project pane contains controls for various aspects of
Timeline display and operation.
Snap to Value
pop-up menu
Master Envelopes button
Snapping button
Zoom control
Height control
 Master Envelopes button: In the Timeline, shows or hides the master envelopes. In the
File Editor project view, shows or hides the envelopes for the current audio file project.
 Snapping button: Turns snapping on or off.
 Snap To Value pop-up menu: Sets the value to which items in the Timeline snap.
 Height control: Sets the height of tracks, busses, and submixes to one of four settings,
from Reduced to Large. In the File Editor project view, sets the height of the envelopes
for the current audio file project to one of four settings, from Reduced to Large.
 Zoom control: Click the control or drag the slider to change the zoom level. You can
zoom in to edit clips precisely, or zoom out to display more of the Timeline.
For information about using master envelopes, see “Master Bus” on page 364. For
information about snapping, see “Using Snapping” on page 94. For information about
using the Height control and Zoom control, see “Moving Around in the Timeline” on
page 128.
42 Chapter 2 The Soundtrack Pro Interface
Page 43

File Editor
You can edit individual audio files in the File Editor using actions. Actions give you a
powerful and flexible way to edit audio files nondestructively using professional audio
processing effects and other operations. You can turn individual actions on or off,
reorder actions, flatten actions, and compare the project with and without actions. You
can also analyze audio files in the File Editor and fix common audio problems, including
clicks and pops, hum, and phase problems. The File Editor can take two forms: the File
Editor project view, for detailed work on individual audio files, and the File Editor tab,
for convenient editing within the context of a multitrack project.
Waveform editing tools
Time display
Actions tab
Monitor volume slider
Previous and Next
Selection buttons
Playhead Location
value slider
Automation mode
pop-up menu
Transport controls
Global Waveform view
Waveform View and
Frequency Spectrum
View buttons
Playhead
Waveform display
 Waveform editing tools: Include the Selection, Sample Edit, Audio Stretching, and
Zoom tools that you can use to graphically edit audio files.
 Automation Mode pop-up menu: Choose the automation mode from the pop-up menu.
 Previous and Next Selection buttons: Move back and forward through selections
you’ve made in the waveform display.
 Waveform View and Frequency Spectrum View buttons: Change the display between
Waveform view and Frequency Spectrum view.
 Time display: Shows the current position of the playhead.
 Global Waveform view: Shows you a miniature view of the entire waveform and the
playhead position, and lets you move quickly to different parts of an audio file.
 Waveform display (and editing area): Shows the waveform of the audio file (or its
frequency spectrum in Frequency Spectrum view). You can select parts of the audio
file to apply different actions to.
Chapter 2 The Soundtrack Pro Interface 43
Page 44

 Transport controls: Control playback and the position of the playhead, and turn
recording on or off. (For more information, see “Transport Controls” on page 38.)
 Playhead: Shows the part of the audio file currently playing.
 Monitor Volume slider: Adjusts the overall monitor volume when you play the project.
The volume level defaults to 0 dB when you create a project. Adjusting the monitor
volume slider does not affect the mix signal or the export volume.
 Mono Mix button: Click to listen to a temporary mono mix of the project.
 Playhead Location value slider: Displays the current playhead position. You can move
the playhead by clicking the arrows, dragging, or typing a value.
 Actions tab: Displays the currently applied actions.
Mixer
You mix your project in the Mixer. All tracks, busses, and submixes (as well as the
Master bus) have channel strips in the Mixer with volume controls, mute and solo
buttons, slots for adding effects, and other controls. You can view the levels for tracks,
busses, submixes, and the Master bus using level meters in their channel strips. You can
also record audio and automate volume and pan changes in the Mixer.
Channel strips
Automation Mode
pop-up menu
Channel Strip and Mixer
pop-up menus
 Automation Mode pop-up menu: Choose the automation mode from the pop-up menu.
 Channel Strip and Mixer pop-up menus: Show or hide different sections of the channel
strips and of the Mixer window.
 Channel strips: Each track, bus, and submix has a channel strip with controls and
level meters.
44 Chapter 2 The Soundtrack Pro Interface
Page 45

Each channel strip includes the following controls:
Color label
Panning controls
Arm for Recording button
Level meters and
peak indicator
Volume value slider
Name
Icon
Effects slots
Mute button
Solo button
Volume fader
Submix pop-up menu
 Color label: Indicates the track color, which is applied to any clips on the track (unless
you choose to override the color for individual clips).
 Name field: You can type a new name for the channel strip.
 Icon: Icons let you visually distinguish channel strips in the Mixer. Double-click an
icon to change it.
 Effects slots: Show the effects and sends for the channel strip, and let you add effects
and sends.
 Panning controls: Set the pan position of a track or bus. In surround mode, drag
anywhere inside the black circle to position the puck. In stereo mode, drag the pan
slider left or right or change the value in the value slider. You can automate pan
changes by setting the appropriate automation mode for the project. These appear
in track and bus channel strips only, not in submix channel strips.
 Volume fader and value slider: Set the channel strip’s volume level by dragging the
fader or changing the value in the value slider. You can automate volume changes by
dragging the slider with the project set to the appropriate automation mode.
 Level meters with peak indicator: Show the volume level of the channel strip in real
time as the project plays. The peak indicator shows the highest level played and
changes color to indicate that clipping has occurred.
 Arm for Recording button: Click to enable the track for recording. When you click a
track’s Arm for Recording button, the Recording tab appears, showing the track’s
current recording settings. The button appears in track channel strips only, not in bus
or submix channel strips.
Chapter 2 The Soundtrack Pro Interface 45
Page 46

 Mute button: Click to mute (or unmute) the channel strip.
 Solo button: Click to solo (or unsolo) the channel strip.
 Submix pop-up menu: Choose a submix for the track or bus from the menu. (Tracks
and busses only.)
 Output pop-up menu: Choose the outputs for the submix from the menu. Submixes
only. (Not shown in the illustration.)
Multitake Editor
Use the Multitake Editor to edit multitake and synced audio that is created by
performing multitake recording (such as in automatic dialogue replacement, or ADR).
This tool allows you to easily mix and match parts of different takes. Once you are done
editing a multitake clip, you can collapse it into a single clip, hiding the constituent
edits that are not relevant to the surrounding multitrack Timeline.
For more information about the Multitake Editor, see Chapter 7, “Using the Multitake
Editor,” on page 251.
Take editing tools
Comp track
46 Chapter 2 The Soundtrack Pro Interface
Take tracks
Page 47

Conform
The Conform tool helps sound editors handle picture changes. Conforming a sequence
is the act of incorporating changes sent from the picture editor into a different,
changed version of a sequence being used by the sound editor. The sound editor
revisits all of the audio edits, ensuring that they line up with new video footage and
inserting or deleting any added or deleted media. Soundtrack Pro Conform makes this
merging procedure more efficient and less tedious.
For more information about the Conform tool, see Chapter 18, “Using Conform with
Final Cut Pro,” on page 439.
Chapter 2 The Soundtrack Pro Interface 47
Page 48

Items pop-up menu
Bin
The Bin tab lists information about items in all open projects. The Bin provides a
hierarchical display of projects, their media files, and other information about each
item, including duration, timecode, sample rate, Timeline information, and so on. You
can drag files from the Bin tab to the Timeline. You can add files to the Bin for easy
access at any time. The Bin also features sort and search functions to help you locate an
item in any open project.
For more information about the Bin, see “Using the Bin” on page 87.
Columns pop-up menu
Item list
Preview controls
Media pop-up menu
 Item list: Displays the files, clips, markers, and podcasts in the currently open projects.
 Items pop-up menu: Choose what types of items (files, clips, markers, or podcasts) to
display in the Bin.
 Columns pop-up menu: Choose what types of columns of information (Timeline
information, audio clip information, file information, metadata tags, or music
information) to display in the Bin.
 Preview controls: Include a Play button, a volume slider, and a “Preview on selection”
button. For information on using the preview controls, see “Using the Preview
Controls” on page 91.
 Media pop-up menu: Choose menu items to Show in Timeline, Spot to Timeline, open
a file in the File Editor, and perform other functions.
48 Chapter 2 The Soundtrack Pro Interface
Page 49

Meters Tab
The Meters tab displays mono, stereo, multichannel, and surround level meters that
you can use to observe the volume of all submixes assigned to physical outputs or the
overall output for an audio file project.
Reset button
Peaks Value and
Location display
Level meters
6-channel meter2-channel meter
 Level meters: Show the output volume of the overall project as the project plays.
 Peaks Value and Location display: Displays the highest (peak) value played for each
jack, and its timecode. Double-click any item in the Peaks Value and Location display
to move the playhead to that point in the Timeline.
 Reset button: Resets all items in the Peaks Value and Location display.
Chapter 2 The Soundtrack Pro Interface 49
Page 50

Recording Tab
The Recording tab is where you edit a track’s recording settings. When you click a
track’s Arm for Recording button, the Recording tab appears, displaying the track’s
current recording settings.
Peak indicator
Input Routing buttons
Level meter
Track pop-up menu
Input device pop-up menu
Input channel pop-up menu
Configure Device button
Monitor Device pop-up menu
Mute Project checkbox
 Peak indicator: Shows the highest level reached by the recording input signal. If the
level rises above 0 dB, the peak indicator becomes red to indicate clipping.
 Track pop-up menu: Displays the recording settings for the selected track.
 Level meter(s): Show the input volume for the selected track during recording. Adjust
automatically to the number of channels and the channel valence selected in the
Input Channel pop-up menu.
 Input Device pop-up menu: Choose the input device for recording.
 Input Channel pop-up menu: Choose the input channel (or channels) for recording.
 Input Routing buttons: Use the Input Routing buttons to route the input signal to
different channels.
 Configure Device button: Opens the Audio MIDI Setup utility for adjusting the
computer’s audio input and output configuration settings, or setting up software
specific to your audio interface.
 Monitor Device pop-up menu: Choose the output device and output channel (or
channels) for monitoring during recording.
 Mute Project checkbox: Select to mute the project during recording, so you hear only
the sound being recorded.
50 Chapter 2 The Soundtrack Pro Interface
Page 51

Browser
The Browser tab displays the disks connected to your computer in a view similar to
the Finder’s list view. You can also preview files in the Browser tab and drag them
to the Timeline.
Tabs
Back and Forward
buttons
File list
Preview controls
Computer and
Home buttons
Path pop-up menu
Media pop-up menu
 Back and Forward buttons: Move through previously viewed levels of the folder hierarchy.
 Computer button: Displays your computer’s hard disk and other storage media
connected to your computer.
 Home button: Displays the contents of your home directory.
 Path pop-up menu: Displays the levels of the file path to the current location, letting
you move back to a previous level.
 File list: Displays the files and folders at the current location.
 Preview controls: Include a Play button, a volume slider, and a “Preview on selection”
button. For information on using the Preview controls, see “Using the Preview
Controls” on page 91.
 Media pop-up menu: Choose menu items to add a Favorite, add a file to the Bin,
open a file in the File Editor, and perform other functions.
Chapter 2 The Soundtrack Pro Interface 51
Page 52

Search Tab
The Search tab lets you locate audio files using a variety of criteria. You can perform
text searches and search for Apple Loops and other tagged file formats using keywords
for instrument, genre, mood descriptors, and other categories. Matching files are
displayed in the Search Results list. Once you locate the files you want to use, you can
preview them in the Search Results list or drag them to the Timeline.
Category pop-up menu
Button and Column View
buttons
Keywords list
Time Signature
pop-up menu
Search Text field
Search Results list
Preview controls
Setup button
Matches list
Scale Type pop-up menu
Nearby Keys button
File Type pop-up menu
Media pop-up menu
The Search tab has two views, Column view and Button view. Column view features a
Keywords list containing keywords and a Matches list with subcategories you can use
to refine your searches. Button view displays a matrix of keyword buttons you can click
to see matching files.
Keyword buttons
 Button and Column View buttons: Change the view to either Button or Column view.
 Category pop-up menu: Restricts the available keywords to a particular category.
52 Chapter 2 The Soundtrack Pro Interface
Page 53

 Setup button: Displays the Search Setup dialog, from which you add items to the
Search database.
 Time Signature pop-up menu: Restricts search results to files with the selected time
signature.
 File Type pop-up menu: Choose whether to display all files, or only looping or
non-looping files.
 Scale Type pop-up menu: Restricts search results to audio files using the selected scale.
 Keyword buttons (Button view only): Displays files matching the keyword in the
Results list.
 Keywords list (Column view only): Displays files matching the keyword in the Results
list, and displays subcategories in the Matches list.
 Matches list (Column view only): Displays subcategories of the selected keywords.
 Search Text field: Type text in the field to display matching files whose filename or
path contains the search text.
 Nearby Keys button: Restricts search results to keys within two semitones above or
below the project key.
 Search Results list: Displays the files matching the selected search criteria, in
alphabetical order. Includes columns displaying the tempo, key, and number of beats
of each file. You can click files to preview them.
 Preview controls: Include a Play button, a volume slider, and a “Preview on selection”
button. For information on using the preview controls, see “Using the Preview
Controls” on page 91.
 Media pop-up menu: Choose menu items to add a Favorite, add a file to the Bin,
open a file in the File Editor, and perform other functions.
Chapter 2 The Soundtrack Pro Interface 53
Page 54

Favorites Tab
You can store frequently used items in Favorites so that you can easily access them
directly. You can also preview files in Favorites and drag them to the Timeline.
Button and Column View
buttons
Favorites list
Preview controls
Path pop-up menu
Media pop-up menu
 Back and Forward buttons: Move through previously viewed levels of the folder hierarchy.
 Path pop-up menu: Displays the levels of the file path to the current location, letting
you move back to a previous level.
 Favorites list: Displays the files and folders at the current location.
 Preview controls: Include Play button, a volume slider, and a “Preview on selection”
button. For information on using the preview controls, see “Using the Preview
Controls” on page 91.
 Media pop-up menu: Choose menu items to remove a Favorite, add a file to the Bin,
open a file in the File Editor, and perform other functions.
54 Chapter 2 The Soundtrack Pro Interface
Page 55

Video Tab
Use the Video tab to add a video to a project and view the video.
Video Scale pop-up menu
Video viewing area
 Video Scale pop-up menu: Choose the scale of the video in the Video tab from the
pop-up menu.
 Video viewing area: You add a video by dragging it into the viewing area, where you
may also watch it play.
Note: You control playback of the video within the project using the transport controls
at the bottom of the Soundtrack Pro window. For more information about the
transport controls, see “Transport Controls” on page 38.
Project Tab
This tab contains controls and information for the currently active project as well as any
metadata (tags) associated with the project.
Chapter 2 The Soundtrack Pro Interface 55
Page 56

The Project tab features the following controls and categories of information:
 General project information: This information includes file size, creation and
modification dates, and location on the hard drive.
 Pullup/Pulldown pop-up menus: Use these menus to adjust the video and audio
playback to compensate for film-to-video and video-to-film conversions as well as
international television standards conversions.
 Project properties: Includes project length (duration) and sample rate.
 Initial Timecode value slider: Use this slider to set the timecode for the first frame of
the project. For more information about value sliders, see “About Changing Values
and Timecode Entries” on page 75.
 Ruler Units pop-up menu: Use this menu to set the project ruler to be either Time-
based or Beats-based.
Each multitrack project has a project time format, which can be either Time
(seconds)–based or Beats-based. Setting the time format controls the appearance of
the Time display, Time ruler, Timeline gridlines, and available Snap To values. For
projects set to Time-based format, time is displayed using the Time Ruler units
chosen in the View menu. For projects set to Beats-based format, the time is
displayed in measures, beats, and beat divisions. The default format is Time-based.
For information on setting the project time format, see “Project Time Format” on
page 109.
 Document file management: Use these controls to set project preferences for file
saving and media management. These controls are available for multitrack projects
only. For more information, see “Saving Multitrack Projects” on page 111.
56 Chapter 2 The Soundtrack Pro Interface
Page 57

 Metadata: Use this area to add metadata to your project or to view your project’s
metadata. If you export this project to certain output formats (such as a podcast),
Soundtrack Pro passes through the metadata to the target output file. Metadata
categories include Name, Copyright, Origination Date, Keywords, and so on.
 Music settings: Use the controls in this area to set music properties (including tempo,
time signature, and key) for the currently active project. Tempo, time signature, and key
are important for projects set to Beats-based format. For projects set to Time-based
format, you can usually leave the tempo, time signature, and key properties at their
default settings. For more information, see “Setting Project Properties” on page 106.
Details Tab
The Details tab shows information about the currently selected media file, clip, marker,
envelope point, cycle region, or Timeslice selection, and gives you a way to edit details
about each. You can also view and edit details for a selection in the File Editor.
File and Clip Details
 Name: Name of the selected clip.
 Position value slider: Sets the position (start point) of the selected clip.
 Duration value slider: Sets the duration (length) of the selected clip.
 Offset value slider: Sets the offset of the selected clip.
 Measure in pop-up menu: Sets the units shown in the Position, Duration, and Offset
value sliders.
 Color pop-up menu: Sets the color of the selected clip.
Chapter 2 The Soundtrack Pro Interface 57
Page 58

 Enabled checkbox: Enables or disables the selected clip. For more information, see
“Enabling and Disabling Clips” on page 118.
 Locked checkbox: Locks or unlocks the selected clip. For more information, see
“Locking and Unlocking Clips and Tracks” on page 118.
 Transpose pop-up menu: Sets the number of semitones to transpose a looping clip.
 Clip Speed pop-up menu: Sets the playback speed for a looping clip.
 Created: Displays the creation date.
 Modified: Displays the modification date.
 Size: Displays the file size.
 Properties: Displays the following information for the clip or file: duration, sample rate,
the timecode for the first frame of the clip or file, bit depth, and channel valence.
 Metadata: Use this section to view the metadata for a file or a clip. Metadata
categories include Name, Copyright, Origination Date, Keywords, and so on.
 Music: Use to view music information for a clip or file, primarily music loops in the
Search tab. The music information includes tempo, time signature, key, scale type,
looping (yes or no), beats, instrument, and loop genre.
58 Chapter 2 The Soundtrack Pro Interface
Page 59

Marker Details
 Type buttons: Select whether the marker is a beat marker or a time marker.
 Name field: Enter a name for the marker.
 Position value slider: Sets the time position of the selected marker.
 Duration value slider: Sets the duration for the selected marker.
 Comment: Enter comments or notes for the marker.
Envelope Point Details
 Position value slider: Sets the time position of the selected envelope point.
 Measure in pop-up menu: Sets the units shown in the Position value slider.
 Value value slider: Sets the value of the selected envelope point. In some cases, this
control is a pop-up menu (for envelope types that only allow specific values).
 Minimum and Maximum value: Displays minimum and maximum values for the
selected envelope point.
 Copy from Previous Point button: Sets the value of the selected envelope point to the
value of the preceding one in the envelope.
 Copy from Next Point button: Sets the value of the selected envelope point to the
value of the next one in the envelope.
File Editor Selection Details
 Measure in pop-up menu: Sets the units shown in the Beginning, End, and Duration
value sliders.
 Beginning value slider: Sets the start position of the selection.
 End value slider: Sets the end position of the selection.
 Duration value slider: Sets the duration (length) of the selection.
Chapter 2 The Soundtrack Pro Interface 59
Page 60

Effects Tab
You add effects and sends to your project and adjust effect parameters in the Effects tab.
When you select a track or a bus in the Timeline or the Mixer, you can add and adjust
the following effects and send settings. You can also apply effects to audio file projects.
Category list
Effect Parameters area
Add Send button
Effect list
Add Effect button
Remove Effect button
Reset Effect button
 Category list: Lists the categories of available effects. Click a category to see the
effects for that category in the Effect list.
 Effect list: Lists the effects in the selected category. Double-click an effect to add it to
the track, bus, or submix.
 Add Effect (+) button: Adds the selected effect to the current effects chain.
 Remove Effect (–) button: Removes the selected effect from the current effects chain.
 Effect Parameters area: Displays the parameters for effects in the current effects
chain. Click an effect’s disclosure triangle to see its parameters. You can adjust effect
parameters using the controls in the Effect Parameters area.
 Add Send button: Adds a send to the end of the current effects chain for the track.
You can add sends only to tracks, not to busses or submixes.
 Reset Effect button: Resets the selected parameter or group of parameters to the
default value (or values).
60 Chapter 2 The Soundtrack Pro Interface
Page 61

Mixer Objects outline
Groups outline
Tracks Tab
Use the Tracks tab to easily view, select, and group tracks, busses, and submixes.
Groups provide another layer of organization and a way to easily make changes (such
as volume adjustments) to many tracks, busses, or submixes at once.
Channel strip
 Mixer Objects outline: Displays an outline view of the Timeline.
 Groups outline: Displays an outline view of any grouped tracks, busses, or submixes
in the project. You can use the Groups outline to group Mixer objects, disable or
enable groups, rename groups, delete groups, and delete items from groups.
 Channel strip: The Tracks tab channel strip is a quick way to access the mixing
controls for a particular Mixer object. This channel strip is identical to the
corresponding channel strip in the Mixer in every way, including all controls and
current settings.
Chapter 2 The Soundtrack Pro Interface 61
Page 62

Actions Tab
Use the Actions tab to perform edits nondestructively using actions, which include
processing effects and other operations. You can also turn off or completely reorder actions.
 Actions list: You can add, select, and reorder actions in the list.
Actions list
Action Insert bar
Actions pop-up menu
 Actions pop-up menu: Choose menu items to flatten actions, delete actions, and
perform other operations.
 Actions list: Shows the actions you apply to the project. You can add, select, and
reorder actions in the list.
 Action Insert bar: Shows where new actions will be added in the Actions list and
which actions are heard when you play the project.
62 Chapter 2 The Soundtrack Pro Interface
Page 63

Analysis Tab
Use the Analysis tab to analyze audio files for a range of common audio problems,
including clicks and pops, hum, and phase issues. You can fix the problems detected by
analysis either individually or in a single operation. Selected problems are highlighted
in the File Editor waveform display for easy viewing.
Parameter list
Analysis Type list
Analyze button
Analysis Results list
Clear Fixed button
Fix button
Magnify button
Fix All button
 Analysis Type list: Lists the types of analysis you can select.
 Parameter list: Some analysis types (Click/Pop and Silence) have parameters you can
adjust before analyzing the file. The parameters appear in this list.
 Analyze button: Click to analyze the file for the problems selected in the Analysis
Type list.
 Analysis Results list: Lists items found by analyzing the file.
 Clear Fixed button: Removes fixed items from the Analysis Results list.
 Magnify button: Zooms in on the selected item in the Analysis Results list for as long
as you hold down the button.
 Fix All button: Fixes all items in the Analysis Results list.
 Fix button: Fixes the selected items in the Analysis Results list.
Chapter 2 The Soundtrack Pro Interface 63
Page 64

HUDs
A heads-up display (HUD) is a semi-transparent floating window with controls and
displays that you can use to accomplish specific tasks. All of these windows float over the
main Soundtrack Pro window. To open any of these windows, choose Window > HUDs.
Timecode HUD
The resizable Timecode HUD makes reading current timecode very easy, particularly
from a distance. You can also use the Timecode HUD to navigate in the Timeline or the
File Editor by dragging the displayed hours, minutes, seconds, or frames up or down.
Sound Palette
You can use the Sound Palette HUD to lift attributes from selections in the Timeline and
apply them to one or more clips (or regions of clips). For more information on the
Sound Palette HUD, see “Using the Lift and Stamp Tools” on page 179.
Multipoint Video HUD
You can use the resizable Multipoint Video HUD as a visual guide for precisely spotting
(placing) sound effects and other audio clips to specific frames of a video program. For
more information on the Multipoint Video HUD, see “Scrubbing and Spotting with the
Multipoint Video HUD” on page 322.
64 Chapter 2 The Soundtrack Pro Interface
Page 65

3 Setting Up Soundtrack Pro
3
This chapter describes two kinds of projects you can create
in Soundtrack Pro and how to work with windows, use
layouts, play projects, and set Soundtrack Pro preferences.
Two Kinds of Projects
Soundtrack Pro has two native project file formats to support state-of-the-art multitrack
audio editing and powerful nondestructive audio waveform editing.
Project File extension Description
Multitrack project .stmp Similar to a Final Cut Pro project, this file
contains multiple tracks with clips that refer to
media files elsewhere on your disk.
Audio file project .stap Allows nondestructive editing of audio files.
Multitrack Projects
Multitrack projects contain multiple audio tracks in the Timeline. As in a Final Cut Pro
project, importing a media file creates a clip in Soundtrack Pro that then refers to the
original media file. You can arrange audio clips within tracks and synchronize them to a
single video clip in the video track.
You can mix a multitrack project using track controls for volume, pan, mute, solo,
effects, and effect parameters. These controls are available both in the Timeline and in
channel strips in the Mixer. You can create additional audio busses for effect sends. You
can group audio track outputs together with submixes. Tracks, busses, and submixes
can be exported to individual audio files, or a mixdown of all the tracks can be
exported to a stereo or multichannel audio file. These exported files can then be
imported into Final Cut Pro.
65
Page 66

For more information, see:
 “Creating and Opening Multitrack Projects” on page 105
 Chapter 5, “Working in the Timeline,” on page 127
 Chapter 8, “Basic Mixing in Soundtrack Pro,” on page 261
Audio File Projects
Soundtrack Pro allows you to edit individual audio files (sometimes known as waveform
editing) using Soundtrack Pro audio file projects. However, unlike most waveform editing
applications, Soundtrack Pro allows you to edit your audio files nondestructively by
keeping track of the actions you have performed on your audio file.
For more information about Soundtrack Pro audio file projects, see Chapter 6, “Editing
Audio Files,” on page 191.
You can remove, disable, or reorder past actions at any time or save actions as AppleScript
documents that you can use to batch process other audio files. Actions you can perform
include trimming audio, copying and pasting parts of the waveform, normalizing or
amplifying levels, applying effects, and applying noise, pop, and click reduction.
Soundtrack Pro audio file projects are stored in Mac OS X packages (or bundles). A
package appears to be a single file in the Finder but actually contains a collection of
files such as the original audio file, temporary render files, and the list of actions
applied to your audio file.
Important: So that you benefit from nondestructive editing, the default option for
saving edited audio files is as a Soundtrack Pro audio file project. Soundtrack Pro
usually does this automatically any time you apply any command or effect from the
Process menu or the Edit menu to a clip in the Timeline. For more information on when
Soundtrack Pro automatically creates audio file projects, see “How Source Audio File
Editing Works in a Soundtrack Pro Multitrack Project” on page 166.
You can open the following audio file formats in the File Editor:
 Soundtrack Pro audio file project
 AIFF
 WAVE
 Sound Designer II
 NeXT
 QuickTime movie containing audio tracks
 CAF (Apple Core Audio Format)
66 Chapter 3 Setting Up Soundtrack Pro
Page 67

Compressed formats such as MP3 and AAC files are also supported, although these
must be internally decompressed to a linear PCM format.
Soundtrack Pro supports audio files with any sample rate between 8 kHz and 192 kHz
and any of the following bit depths: 8, 16, 24, 32, and 32-bit floating point. Up to 24
audio channels are supported in a single file. Audio files can be a maximum of 4 hours
in length.
Note: When you set a sample rate and play a file, Soundtrack Pro plays at the nearest
sample rate your hardware can support.
Setting Up Your Workspace
You can choose from several ways to set up the Soundtrack Pro workspace to suit your
display size and workflow, depending on the type of project you are creating. You can
arrange, reorder, and detach tabs throughout Soundtrack Pro and add and reorder
buttons in the Toolbar. You can show and hide different panes (areas) of the
Soundtrack Pro window. You can also create layouts for different tasks and switch
between them.
Basic Window Controls
You can move, resize, or minimize a project’s windows. Most windows feature tabs,
which give you flexibility in arranging the visual elements of a project.
To move a window:
m Drag the window by its title bar to a new location.
To resize the Soundtrack Pro window:
m Drag the resize control in the lower-right corner of the window until the window is the
desired size.
To minimize the Soundtrack Pro window to the Dock:
m Click the minimize button in the window’s title bar.
To close the Soundtrack Pro window:
m Click the window’s close button (or press Command-W with the window active).
Chapter 3 Setting Up Soundtrack Pro 67
Page 68

Using Tabs
Soundtrack Pro uses tabs so you can quickly access different project views and controls.
You can switch between projects and between different tabs. Clicking the tab you want
makes it active and brings it to the front. You can rearrange and reorder the tabs to
easily access the ones you use frequently.
To reorder tabs:
m Drag a tab left or right in the window’s tab area.
You can also detach a tab from its docked position, which creates a separate resizable
window for the tab that can be dragged or resized. For example, you can drag the
Favorites tab to a new location so that you can easily move items from the Search tab
to the Bin tab.
To detach a tab:
m Drag the tab out of its docked position in the window to create a separate window for
the tab.
To attach (dock) a tab:
m Drag the tab to the top of any pane of the Soundtrack Pro window (except the top-center
project pane, which is reserved for the Timeline and the File Editor project view).
Using Project Layouts
Soundtrack Pro lets you save and recall preset window arrangements called layouts, so
that you can optimize your workspace for different tasks and different display sizes. You
can show, hide, and resize windows, then save each window arrangement as a layout.
To save a project layout:
1 Arrange the application windows as you want them to appear.
2 Choose Window > Save Layout.
3 In the Save dialog, type a name for the layout, then click Save.
The layout is saved, and appears in the Layouts submenu.
Note: By default, layouts are saved to the location /Users/username/Library/Application
Support/Soundtrack Pro/Layouts/. Do not change the location or Soundtrack Pro may
not be able to find and use your saved layouts.
68 Chapter 3 Setting Up Soundtrack Pro
Page 69

To switch to a saved project layout:
m Choose Window > Layouts, then choose the layout you want to use from the submenu.
To delete a saved layout:
1 Choose Window > Manage Layouts.
2 In the Manage Layouts dialog, select the layout you want to delete.
3 Click the – (minus) button to delete the layout, then click Done.
To transfer a saved project layout file to another computer:
1 Locate the layout file in /Users/username/Library/Application Support/Soundtrack Pro/
Layouts/.
2 Transfer a copy of the file to the corresponding location in the second computer.
Customizing the Toolbar
The Toolbar at the top of the Soundtrack Pro window contains buttons for frequently
used commands. You can customize the Toolbar, adding buttons for the actions you
use most often, and can return to the default set later.
The default set of Toolbar buttons includes buttons for creating new projects, opening
project tabs, adding markers, and other common commands. You can customize the
Toolbar with additional buttons for adding fade-ins and fade-outs, processing an audio
file, playing the current project through a video output device, and other commands.
You can also hide the Toolbar to maximize available screen space. You customize the
Toolbar by dragging items from the Customize dialog to the Toolbar.
Chapter 3 Setting Up Soundtrack Pro 69
Page 70

To show the Customize dialog, do one of the following:
m Choose View > Customize Toolbar.
m Control-click the Toolbar, then choose Customize Toolbar from the shortcut menu.
The Customize dialog appears, and spaces between buttons in the Toolbar are
outlined in gray.
To add a button to the Toolbar:
m Drag a button from the Customize dialog to the Toolbar.
If you drag a button between two existing buttons, the buttons move to make room
for the new button.
To move a button in the Toolbar:
m Command-drag the button to a new location on the Toolbar.
You can also rearrange the Toolbar using set-width spaces, flexible spaces, and separators.
To add space or a separator to the Toolbar:
m Drag a space, flexible space, or separator from the Customize dialog to the Toolbar.
To return the Toolbar to the default set of buttons:
m Drag the default button set, located at the bottom of the Customize dialog, to the Toolbar.
You can also change the Toolbar so that it shows only icons or only text.
To show only icons in the Toolbar, do one of the following:
m Control-click the Toolbar, then choose Icon Only from the shortcut menu.
m In the Customize dialog, choose Icon Only from the Show pop-up menu.
70 Chapter 3 Setting Up Soundtrack Pro
Page 71

To show only text in the Toolbar, do one of the following:
m Control-click the Toolbar, then choose Text Only from the shortcut menu.
m In the Customize dialog, choose Text Only from the Show pop-up menu.
To show both icons and text in the Toolbar, do one of the following:
m Control-click the Toolbar, then choose Icon & Text from the shortcut menu.
m In the Customize dialog, choose Icon & Text from the Show pop-up menu.
To dismiss the Customize dialog:
m When you have finished customizing the Toolbar, click Done.
To hide the Toolbar:
m Choose View > Hide Toolbar. When the Toolbar is hidden, the menu item becomes
Show Toolbar.
Using the Shortcut Menu
You can quickly and easily access many Soundtrack Pro features with the shortcut menu
(also known as the contextual menu). Using the shortcut menu by Control-clicking
items in the Soundtrack Pro interface is often more convenient than using the menu
bar at the top of the screen. If you have a three-button mouse connected to your
computer, you can right-click to access the same controls specified by the Control-click
commands in the user documentation (for example, “Control-click the Toolbar, then
choose Customize Toolbar from the shortcut menu”).
Playing Projects
You can play both multitrack and audio file projects as you work, so you can hear the
audio in the project along with the changes you’ve made.
To play the project:
m Click the Play button in the transport controls (or press the Space bar). Click the Play
button (or press the Space bar) again to stop playback.
As the project plays, the playhead shows the point in the project currently playing.
Soundtrack Pro lets you set the playhead and control playback of your projects in
several different ways. You can use the transport controls or keyboard commands to
start and stop playback and set the playhead to different points in time. You can also
set a cycle region to repeat playback of a specific part of the project.
Chapter 3 Setting Up Soundtrack Pro 71
Page 72

Setting the Playhead Quickly
The playhead appears as a thin black line running vertically through the Timeline in
multitrack projects, and through the waveform display in audio file projects. Where it
crosses the Time ruler, the top of the playhead has a triangular handle that makes it
easier to see its position onscreen and drag the playhead.
To set the playhead, do one of the following:
m Click anywhere in the Timeline (in a multitrack project) or the File Editor (in an audio
file project) to set the playhead to that position.
m Drag the triangular handle at the top of the playhead to the position you want to set it.
As you drag the playhead, you hear the audio at the current playhead position.
Drag the playhead where
you want it or click in the
Timeline.
When you set the playhead, it snaps to the nearest Snap To position if snapping is
turned on. For information on setting the Snap To value, see “Using Snapping” on
page 94. You can also set the playhead by using the transport controls or the Playhead
Location value slider.
Note: If you click the Time ruler, you may accidentally activate the cycle region. Press
Option-X to remove the cycle region. Press C to turn the cycle region on or off. For
more information about using the cycle region, see “Working with the Cycle Region”
on page 134.
72 Chapter 3 Setting Up Soundtrack Pro
Drag the playhead where
you want it or click in the
waveform display.
Page 73

Setting the Playhead Using the Time Display
When a project is playing, the Time display constantly updates to show the current
position of the playhead in both Time-based and Beats-based formats. You can also set
the playhead to a new position by entering the position in the Time display.
The arrangement of the Time-based and Beats-based positions in the Time display
changes depending on the time format of the project. The position matching the time
format of the project appears in large, white numerals in the upper part of the Time
display, and the other position appears below it in smaller, gray numerals. Each position
is labeled for quick visual recognition.
For information on setting the project time format, see “Setting Project Properties” on
page 106.
To set the playhead using the Time display:
m Select either the Time or Beats position in the Time display, then enter a new position.
You can select the entire position or part of the position.
Enter a time position in
the Time area.
Enter a beat position
in the Beats area.
Entering Time-Based Units
When you set the playhead by entering a Time-based position in the Time display, you
don’t need to enter all of the punctuation. Soundtrack Pro automatically adds the
correct punctuation for the format of the Time display.
For example:
 If you enter 01234321, Soundtrack Pro interprets it as 01:23:43;21. This stands for 1
hour, 23 minutes, 43 seconds, and 21 frames.
If you enter a partial number, Soundtrack Pro formats it with the rightmost pair of
numbers as frames and with each successive pair of numbers to the left as seconds,
minutes, and hours. Numbers omitted from a complete time position are interpreted as
zeros. For best results, always enter delimiters to separate each division of time.
For example:
 If you enter 01.23, Soundtrack Pro interprets it as 00:00:01;23. This stands for 1 second
and 23 frames.
You can select only part of the position in the Time display and enter a new number for
that position. For example, you can select only seconds, or minutes and seconds. The
other categories keep their present values. You can enter a time position in timecode
format, in a way similar to the way you enter timecode in Final Cut Pro.
Chapter 3 Setting Up Soundtrack Pro 73
Page 74

Entering Beats-Based Units
When you set the playhead by entering a Beats-based position in the Time display, you
enter periods between numbers to separate measures, beats, and beat divisions.
Soundtrack Pro fills out the digits in the beat division category with zeros.
For example:
 If you enter 123, Soundtrack Pro interprets it as 123.1.000. This stands for the 123rd
measure, 1st beat, with no added beat divisions.
 If you enter 12.3, Soundtrack Pro interprets it as 12.3.000. This stands for the 12th
measure, the 3rd beat, with no added beat divisions.
 If you enter 1.2.3, Soundtrack Pro interprets it as 1.2.300. This stands for the 1st measure,
the 2nd beat, and 300/1000ths of a beat (because each beat division is 1/1000 of a beat).
You can select only part of the position in the Time display and enter a new number for
that position. For example, you can select only measures, or measures and beats. The
other categories keep their present values.
Setting the Playhead Using the Playhead Location Value Slider
Below and to the left of the transport controls is the Playhead Location value slider.
When a project is playing, the Playhead Location value slider constantly updates to
show the current position of the playhead. You can set the playhead by entering a new
position in the Playhead Location value slider.
74 Chapter 3 Setting Up Soundtrack Pro
Page 75

About Changing Values and Timecode Entries
Soundtrack Pro includes several types of value entry methods. Most of them have
features that can make changing the values or timecode fields easy to do.
Using Value Sliders
There are two methods used to enter general numeric values: traditional sliders with
separate numeric entry fields and value sliders that combine the slider with the
numeric entry field.
Separate slider and
numeric entry field
Value slider with
combined slider and
numeric entry field
Value sliders allow you to enter a specific number in the value field or to drag in the
value field to set a value. When using the value sliders, you can use a modifier key to
make normal, small, or large value adjustments. Dragging in the middle area (where
the number is) works the same as an ordinary slider; dragging to the right increases the
value and dragging to the left decreases the value. Additionally, you can click the right
or left arrow to change the value one step at a time. You can also double-click the
number itself and type a new number to enter a specific number in the value field.
To change values in normal increments, do one of the following:
m Drag left or right in the value field.
m Click the left arrow to decrease a value, or click the right arrow to increase a value.
m If you have a three-button mouse with a scrollwheel, click in the value field and use the
scrollwheel on the mouse.
To change values in fine increments, do one of the following:
m Option-drag in the value field.
m Option-click the left arrow to decrease a value, or Option-click the right arrow to
increase a value.
m If you have a mouse with a scrollwheel, Option-scroll in the value field.
Chapter 3 Setting Up Soundtrack Pro 75
Page 76

To change values in coarse increments, do one of the following:
m Shift-drag in the value field.
m Shift-click the left arrow to decrease a value, or Shift-click the right arrow to increase
a value.
m If you have a mouse with a scrollwheel, Shift-scroll in the value field.
When a value slider or value field is active (highlighted), press Tab to move to the
next field.
Using Timecode Value Sliders
Soundtrack Pro uses timecode value sliders for timecode entry fields. In addition to
being able to enter timecode values directly, you are able to scrub the timecode value
by dragging.
If you place the pointer over a segment of the timecode, small arrows appear above
and below that segment.
You can drag up or to the right to increase the value in that segment (values in
segments to the left also increment if your dragging causes the selected segment to
roll over). Dragging to the left or down decreases the value. You can hold down the
Option key to make the value changes slower or the Shift key to make them faster.
Alternatively, you can click the up and down arrows on each side of the timecode
value or press the keyboard’s Up and Down Arrow keys to increase or decrease the
timecode value.
You can control which segment is affected by the up and down arrows by selecting a
segment so that a caret (^) appears below the segment. You can also use the
keyboard’s Left and Right Arrow keys to select other segments.
76 Chapter 3 Setting Up Soundtrack Pro
Page 77

Scrubbing Audio
You can scrub a multitrack project in the Timeline or scrub an audio file project in the
File Editor. Scrubbing the project lets you hear the audio at the playhead position as
you drag the playhead, so you can find a particular sound or event in the audio file.
You can scrub audio using either the Scrub tool or the playhead. For information about
scrubbing, see “Scrubbing Audio Files” on page 200.
Scrubbing Video
In projects containing a video file, the video scrubs in the Video tab in sync with the
audio as you scrub in the Timeline or the File Editor tab.
As you drag audio clips, markers, envelope points, or other items in the Timeline or the
File Editor tab, the video scrubs at the start point of the item being dragged. Dragging
multiple items scrubs the video at the start point of the item under the pointer.
You can use the Multipoint Video HUD as a visual tool for precisely positioning sound
effects and other audio clips in a video program. For more information, see “Scrubbing
and Spotting with the Multipoint Video HUD” on page 322.
Controlling Playback with the Transport Controls
You use the transport controls to control playback of your project. The transport
controls let you set the playhead to various points in time, start and stop playback,
activate the cycle region, and start a recording session to record your own audio.
Record
Go to Beginning
Play from Beginning
Previous Frame
Play
Go to End
Next Frame
Cycle
MIDI Sync
 Record: Starts recording at the playhead position on the track you have enabled for
recording. If no track is enabled, a new track is created when recording starts.
 Play from Beginning: Starts playback from the beginning of the project. Playback
begins immediately, whether the project is playing or is stopped when you click the
button.
 Go to Beginning: Sets the playhead to the beginning of the project. If the cycle
region is active, and the playhead is after the beginning of the cycle region in time,
the playhead is set to the beginning of the cycle region.
 Previous Frame: Moves the playhead backward by one frame.
 Play: Starts playing back the project from the current playhead position. Clicking the
Play button again stops playback at the current playhead position.
Chapter 3 Setting Up Soundtrack Pro 77
Page 78

 Next Frame: Moves the playhead forward by one frame.
 Go to End: Sets the playhead to the end of the project. If the cycle region is active,
and the playhead is before the end of the cycle region in time, the playhead is set to
the end of the cycle region.
 Cycle: If a cycle region is set, clicking the Cycle button toggles whether the cycle
region is active or inactive. If no cycle region is set, clicking the Cycle button sets the
project to repeat from the beginning when the playhead reaches the end of the
project. For information on setting the cycle region, see “Working with the Cycle
Region” on page 134.
 MIDI Sync: Synchronizes playback with incoming MIDI Clock and MIDI Timecode
(MTC) signals.
Controlling Playback Using Keyboard Shortcuts
There are a number of keyboard shortcuts you can use to control playback of your
project. To use keyboard shortcuts, the pointer cannot be in a text field.
 Space bar: Plays back the project from the current playhead position. If the project is
playing, pressing the Space bar sets the playhead back to the point from which the
project started playing. This is equivalent to clicking the Play button.
 Return: Sets the playhead to the beginning of the project. If the cycle region is
active, pressing Return sets the playhead to the beginning of the cycle region. This is
equivalent to clicking the Go to Beginning button.
 Shift-Return: Sets the playhead to the beginning of the project, and starts playback if
it is stopped. This is equivalent to clicking the Start from Beginning button.
 Option–Right/Left Arrow: Moves the playhead forward/backward by one frame.
For more tips on keyboard shortcuts for playback, see “Using the J, K, and L Keys for
Shuttling” on page 130. For a complete list of Soundtrack Pro keyboard shortcuts, see
Appendix A, “Soundtrack Pro Keyboard Shortcuts,” on page 449.
Locating and Adding Audio Files
You can locate audio files to use in a project using the media tabs, or drag files from
the Finder. There are three media tabs for locating audio files: the Browser, Favorites,
and Search tabs. You can also store media files for a project in the Bin for easy
access in a project. The Bin also features a search function to help you locate an
item in any open project.
78 Chapter 3 Setting Up Soundtrack Pro
Page 79

Supported Audio File Formats
You can add audio files in the following formats: AIFF, WAVE, Broadcast WAVE, Sound
Designer II, NeXT, QuickTime (.mov) audio files, and CAF (Apple Core Audio Format).
Compressed formats such as MP3 and AAC (except protected AAC) files are also
supported, although these must be internally decompressed to a linear PCM format.
You can also add the following types of multichannel files: AIFF, WAV, Broadcast WAVE,
QuickTime, and Single Folder Multi-mono AIFF and WAV. You can import audio files
with any combination of the following sample rates and bit depths:
Sample Rates
 Any sample rate from 8 kHz to 192 kHz
Bit Depths
 8 bit
 16 bit
 24 bit
 32 bit (both integer and floating point)
Note: Files with lower bit depths or sample rates do not have the same playback
quality as formats with higher bit depths or sample rates.
Supported Video File Formats
Soundtrack Pro supports standard QuickTime-compatible file formats. You can import a
QuickTime movie (.mov) file into a Soundtrack Pro project, and you can import an
MPEG-2 (.m2v) file if you have installed the QuickTime MPEG-2 Playback Component.
Video files using NTSC, PAL, HD, and other formats supported by QuickTime can be
imported into Soundtrack Pro. Imported video files can be up to four hours in length.
For more information about importing video files, see Chapter 10, “Working with Video
in Soundtrack Pro,” on page 315.
Looping and Non-Looping Files
Soundtrack Pro supports two types of audio files: looping and non-looping files. Most audio
files are non-looping files unless they contain tags for tempo, key, and other information.
Many of the Apple Loops that come with Soundtrack Pro, as well as other tagged audio
files, can be looping files. Looping files may contain music, rhythmic sounds, or other
repeating patterns. You can resize a looping file to fill any amount of time. Looping files
adjust to the project tempo and key, letting you use loops recorded in different keys
and at different tempos in the same project.
Chapter 3 Setting Up Soundtrack Pro 79
Page 80

Double-click a folder to
view items inside.
Non-looping files do not adjust to the project tempo and key. You can shorten or
lengthen a non-looping file, but lengthening it beyond the size of the original file adds
only silence to the lengthened part. You can search for non-looping files in the Search
tab using the Search text field.
Both looping and non-looping files can contain tags with information about the file,
including mood, genre, and musical instrument. Soundtrack Pro recognizes tags in
audio files intended for use with loop-based music applications. You can open an audio
file in Apple Loops Utility and add tags, and can convert a looping file to a non-looping
file, or convert a non-looping file to a looping file. For information about tagging audio
files using Apple Loops Utility, see the Apple Loops Utility User Manual.
Using the Browser to Locate Files
The Browser tab shows the hard disks and other storage media connected to your
computer, and lets you browse through the file hierarchy to find audio files located on disk.
To locate audio files using the Browser:
m Double-click a volume or folder in the Browser to view its contents.
You can move back through the previous locations in the Browser using the Forward and
Back buttons, or through the levels of the file hierarchy using the Path pop-up menu.
80 Chapter 3 Setting Up Soundtrack Pro
Page 81

Using Favorites to Locate Files
Favorites let you store frequently used file locations, so that you can access them directly.
You can add and remove Favorites from the Media pop-up menu at the lower-right
corner of the Favorites tab.
To locate audio files in Favorites:
m Double-click the disk or folder you want to open.
Double-click an
item to open it.
You can move back through the previous locations in the Favorites tab using the
Forward and Back buttons, or through the levels of the file hierarchy using the Path
pop-up menu.
Using Search to Locate Files
Using Search, you can search for media files to add to your project. Search has two
views: Column view and Button view. You choose which view to display by clicking the
Columns View or Button View button in the upper-left area of the window. In both
views, the files matching your search criteria appear in the Search Results area, along
with columns displaying additional information for tagged files. You can sort these
columns by clicking the heading on top of each column. You can also perform text
searches in both views, and refine your searches.
If you use Apple Loops or other tagged audio files in a project, you can search based
on a variety of criteria, including musical instrument, genre, time signature, mood
descriptor, and scale type. You can also search using specific keywords.
To search for items:
m Click the Search tab.
The Search tab becomes active.
Chapter 3 Setting Up Soundtrack Pro 81
Page 82

Select a keyword
matching files in the
Search Results area.
Searching for Files in Column View
In Column view, the upper area of the Search tab displays two columns: Keywords
shows the categories of files that meet the search criteria, and Matches shows the total
number of matching files and any subcategories containing matching files, with the
number of matching files in each.
Clicking a keyword displays the files matching that keyword in the Search Results area.
You can refine your search results by narrowing the criteria using the subcategories in
the Matches column.
To search for files in Column view:
1 Choose the type of keywords to display in the Keywords list from the Keywords
pop-up menu.
You can use the Time Signature and Scale Type pop-up menus to restrict matches by
those categories.
2 Select a keyword in the Keywords list to display matching files in the Search Results area.
to display the
Search Text field
The hints, tempo, key, and number of beats for each matching file are also displayed.
You can also perform text searches, which can be especially helpful for non-tagged
files. When you type text in the Search Text field, any files with the text in their file path
or filename appear in the Search Results list. The number of files appears in the
Matches column under “No Category.”
To search using the Search Text field:
m Enter text in the Search Text field.
As you type, files matching the characters you type appear in the Search Results field.
82 Chapter 3 Setting Up Soundtrack Pro
Page 83

Refining a Search in Column View
There are several ways you can refine your searches in Column view. You can select
items in the Matches column to add the matching files for each category to the search
results, and you can enter text in the Search Text field to narrow your search to files
that include the text in their file path. Selecting multiple keywords in the Keywords list
narrows the search results to files matching all the selected keywords.
To refine your search using the Matches column:
m Click to select a match category, or Command-click to select multiple match categories.
Click a match category
to refine your search.
Search Text field
These are files that match
the category selected
above.
To refine your search by selecting multiple keywords:
m Shift-click to select adjacent keywords, or Command-click to select nonadjacent keywords.
Searching for Files in Button View
In Button view, the upper area of the Search tab displays a grid of buttons, each of which
is labeled with a keyword. The keywords displayed are determined by the Keywords
pop-up menu; the choices are Music Beds, Instruments, Genre, Descriptors, and Custom.
The keywords for each choice are fixed, and appear whether or not matching files for the
keyword exist. Keywords for which no matching files exist are dimmed.
Chapter 3 Setting Up Soundtrack Pro 83
Page 84

Click a button to display
the matching files in the
Search Results area.
Search Text field
To search for files in Button view:
1 Choose the type of keywords to display on the keyword buttons from the Keywords
pop-up menu.
2 You can optionally use the File Type, Time Signature, and Scale Type pop-up menus to
restrict matches by those categories.
3 Click a keyword button to display matching files in the Search Results area.
You can also perform text searches, which can be especially helpful for non-tagged
files. When you type text in the Search Text field, any files with the text in their file path
or filename appear in the Search Results list.
To search by file path or filename:
m Enter text in the Search Text field.
As you type, files matching the characters you type appear in the Search Results field.
Refining a Search in Button View
There are several ways you can refine your searches in Button view. You can select
multiple keyword buttons to narrow your search results to files matching all the
selected keywords, and you can enter text in the Search Text field to narrow your
search to files that include the text in their file path.
84 Chapter 3 Setting Up Soundtrack Pro
Page 85

To refine your search using multiple keywords:
m Click multiple keyword buttons.
Select additional
keywords to refine
your search.
These are files that match
both of the keywords
selected above.
Adding Custom Keywords
You can add custom keywords, which appear in the Keywords list in Column view
and on the keyword buttons in Button view. Custom keywords can be added only in
Button view.
Choose Custom from
this pop-up menu.
To add a custom keyword:
1 Choose Custom from the Keyword Type pop-up menu.
2 Control-click one of the buttons in the grid, then choose a custom keyword from the
shortcut menu.
Control-click a button,
then choose the desired
keyword from the
submenu.
Chapter 3 Setting Up Soundtrack Pro 85
Page 86

Click the Add Directory
button, then select a
directory to add.
Adding a Directory to the Search Database
Search looks through all indexed directories (volumes and folders) for files that match
your search criteria. Before a file can appear in Search, you must add the directory
containing the file to the Search database and index the directory.
Note: The Search database does not update automatically. If you add files to an
indexed directory, you must index the directory again before the files will appear in the
Search tab.
To add a directory to the Search database:
1 Click the Setup button at the top of the Search tab.
Click here to display the
Setup dialog.
2 In the Setup dialog, click the Add Directory button.
Click here to index
the directory.
3 In the file dialog, navigate to the directory you want to add, then click Open.
The directory appears in the list in the Setup dialog. You can resize the Search dialog if
you need to see more items in the list.
4 Select the directory in the list, then click the Index Now button.
Note: Indexing a large collection of files may take several minutes. The bottom of the
Add Directory dialog displays the progress of the directory being indexed. If you need
to interrupt the indexing process, click the Stop Indexing button. You can re-index the
directory later. You can deselect items you do not wish to re-index.
5 When Soundtrack Pro is finished indexing the directory, click Done to return to the
Search tab.
86 Chapter 3 Setting Up Soundtrack Pro
Page 87

Click the Remove
Directory button to
remove the selected
Removing a Directory from the Search Database
If you move or change your collection of audio files, you can remove a folder from the
Search database. Removing unneeded folders from the database can shorten search
times and eliminate extraneous results.
To remove a folder from the Search database:
1 Click the Setup button at the top of the Search tab.
2 In the Setup dialog, select the directory you want to remove, then click the Remove
Directory button.
directory.
3 Click Done to return to the Search tab.
Once you have added the folders containing your audio files to the Search database
and indexed them, you can use Search to find the files. In both Column view and
Button view, the audio files that match the search criteria appear in the Search Results
area in alphabetical order. You can preview files in the File list and drag them to the
Timeline. You can also add a folder to your Favorites from the Search tab.
Using the Bin
The Bin is a hierarchical list of all of the items in each open project. You can also add
files to the Bin for easy access at a later time. Files appear in the Bin alphabetically by
project and hierarchically within each project.
Chapter 3 Setting Up Soundtrack Pro 87
Page 88

The Bin Hierarchy
The items in the Bin are organized by project. In this hierarchy, projects contain media
files, and media files contain clips.
Objects Description Contents
Projects Projects make up the top level
of the hierarchy. You can view
multiple projects at once.
Media files Audio and video source files Clips
Clips If the source media file is used
ten different times in the
Timeline, it will have ten clips
nested in the Bin.
Media files
Project markers
Markers (File Editor only)
None
To add a file to the Bin, do one of the following:
m Drag the file from the Finder to the Bin.
m Drag the file from the Browser, Favorites, or Search tab to the Bin.
Viewing and Editing Projects in the Bin
The Bin can display the following categories of information: audio clip information
(looping, transposition, and so on), file information (timecode, sample rate, file size, and
so on), Timeline information (duration, position, and so on), metadata tags (author,
copyright, and so on) and music information (beats, key, and so on).
To control the display of information categories in the Bin:
m Choose a category from the Columns pop-up menu.
Searching Bin Information
You can search across all information displayed in the Bin. Matching text and numbers
from any of the fields causes that item to appear in the list.
To search information categories in the Bin:
1 Click the Bin’s Search field.
2 Enter the search text.
3 Press Return.
88 Chapter 3 Setting Up Soundtrack Pro
Page 89

Using the Shortcut Menu and the Media Pop-Up Menu in the Bin
You can use the shortcut menu and the Media pop-up menu in the Bin for a variety of
tasks. One of the most common tasks involves removing unused items from a project.
This simple step will keep the media associated with a project to a minimum. You can
also rename clips, markers, and podcast region markers that you’ve selected in the Bin.
To use the shortcut menu or the Media pop-up menu to affect an entire project:
1 Select a project file in the Bin.
2 Do one of the following:
 Choose Removed Unused from the Media pop-up menu.
 Control-click the item, then choose Removed Unused from the shortcut menu.
To use the shortcut menu or the Media pop-up menu to affect an individual
item in the Bin:
1 Select an item in the Bin.
2 Choose an option from the Media pop-up menu. You can also Control-click the item,
then choose an option from the shortcut menu.
 Show in Timeline: Selects the corresponding clip in the Timeline.
 Spot to Timeline: Spots the clip to the Timeline with the Spot to Timecode dialog.
 Spot to Playhead: Spots the clip to the playhead position in the Timeline.
 Open in Editor: Opens the file in the File Editor project view.
 Reconnect: Allows you to locate and reconnect any offline files.
 Rename: Selects the item in the Bin so that you can enter a new name.
 Reveal in Browser: Selects the item in the Browser tab.
 Show in Finder: Selects the item in the Finder.
 Replace Selected Clips with: Replaces the clip with a clip of your choosing.
Chapter 3 Setting Up Soundtrack Pro 89
Page 90

Bin Column Information
The following list describes the contents of the various Bin columns. Many Bin columns
change their display style to match the settings of the dominant ruler (such as drop
frame, non-drop frame, and so on). Much of this information can also be seen in the
Details tab.
 Name: Displays the icon and name for the various objects (projects, files, clips,
markers, and podcast marker regions).
 Position: Displays the position of the object, in the dominant ruler setting. Displays
values for projects, clips, markers, and podcasts. Some items do not have a position.
Others do not always display a position. (For example, a multitrack document only
shows the position when the Initial Timecode value in the Project tab has been
changed from the default 0 value.)
 Duration: Displays the duration information for projects, files, clips, markers, and
podcasts.
 Track name: Lists the current track name for audio clips.
 Offset: Shows the slip offset value: the difference between the start of the original
file and the start of the clip (using the dominant ruler setting). Clips that start from
the beginning show 0; others have a positive time value.
 Sample rate: Shows the native sample rate of the item, in Hz (projects, files, and clips).
 Timecode: This is the embedded timecode of the file, if present (in the dominant
ruler setting). Displays the initial timecode for items (projects, files, clips).
 Channels: The number of channels in the item (files, clips)
 Takes: The number of takes in the item (files, clips)
 File size: The disk size of the item (projects, files)
 Path: The path to the item on disk (projects, files)
 Annotation: Displays annotation metadata (projects, files, clips).
 Author: Displays author metadata (projects, files, clips).
 Copyright: Displays copyright metadata (projects, files, clips).
 Tempo: The tempo of the item, in beats per minute (projects, files, clips)
 Time Signature: Displays time signature data (projects, files, clips).
 Key: Displays the musical key of the item, being the letter (A, A#, B, and so on), or
“None” (projects, files, clips).
 Scale: Displays musical scale type (projects, files, clips).
 Looping: Indicates a looping file (Yes/No) (files, clips).
 Beats: Displays the number of beats in the file (projects, files, clips).
 Instrument: Displays instrument type, from Apple Loop tagged information (files, clips).
 Genre: Displays genre name, from Apple Loop tagged information (files, clips).
 Hint Quality: Displays the quantitative display of the amount of information saved in
the file—keywords, beat information, and transients (files, clips).
90 Chapter 3 Setting Up Soundtrack Pro
Page 91

Previewing Audio Files
You can preview files in the Bin or any of the media tabs. When you preview files,
Soundtrack Pro matches the sample rate of the file to the project sample rate. When
you preview looping files, Soundtrack Pro matches their tempo and key to the project
tempo and key.
To preview an audio file:
m Select the file in the Bin or any of the media tabs.
The selected file starts playing. If the project is playing when you preview a file,
Soundtrack Pro starts playback of the previewed file on the downbeat of the next
measure of the project. You can turn preview playback on and off by holding down
Option and pressing the Space bar.
Select an audio file in the
Search tab to preview it.
Play button
Audio files tagged as loops play back repeatedly when previewed. You can control the
playback of the file being previewed using the preview controls. You can only preview
one audio file at a time.
Using the Preview Controls
The preview area at the bottom of the Bin and the media tabs contains controls you
can use when previewing audio files.
Media pop-up menu
Volume slider
Preview on selection button
Chapter 3 Setting Up Soundtrack Pro 91
Page 92

 Play button: Starts playback of the preview file. If the file is playing, stops playback.
 Volume slider: Sets the playback volume of the preview file.
 Preview on selection button: When activated, triggers immediate playback of the
selected clip.
 Media pop-up menu: Choose whether to add the file to Favorites, open it in the File
Editor or Apple Loops Utility, or reveal it in the Finder.
To preview an audio file with a project:
1 Click the Play button in the transport controls to play the project.
2 When the project reaches the point in time where you want to hear the preview file,
select the file in the Search tab.
To preview a file without the project (solo):
1 If the project is playing, click the Stop button in the transport controls to stop playback
of the project.
2 Select the file in the Search tab to preview the file.
You can also preview a video file using the preview controls. For information about
previewing a video file, see “Playing the Video” on page 317.
Viewing File and Clip Information
You can view information in the Details tab about audio and video files and clips in the
Bin, the media tabs, and the Timeline. When you select a file or clip in the Bin, the
media tabs, or the Timeline, the Details tab displays the file path and other information
about the item.
92 Chapter 3 Setting Up Soundtrack Pro
Page 93

For a complete description of the items listed in the Details tab, see “Details Tab” on
page 57 and “Viewing and Editing Clip and Track Properties” on page 114.
Note: The information that is displayed depends on whether or not the file is tagged.
Untagged files may not display information for all categories.
Using Undo and Redo
As you edit clips and perform other operations in both multitrack and audio file
projects, you might need to use the Undo and Redo commands. For example, if you
don’t like the last change you’ve made to a project, it can usually be undone. Then, if
you decide you prefer to keep the change you just undid, you can redo the command
immediately after using Undo.
You can also use the Undo and Redo commands as a quick way of trying out changes
to your project. You can make changes to any aspect of the project, then use Undo to
step back through changes you don’t like to the project’s previous state. If you change
your mind after undoing a change or set of changes, you can always use Redo to
recover the changes. At any point, you can save a new version of the project using the
File > Save As command.
You can use the Undo command repeatedly to undo every change made since the
project was last saved.
To undo the last change:
m Choose Edit > Undo [item] (or press Command-Z).
The [item] in the menu changes to show the last command or operation.
You can use the Redo command repeatedly to redo every undone change since the
project was last saved.
To redo the last change:
m Choose Edit > Redo [item] (or press Command-Shift-Z).
The [item] in the menu changes to show the last command or operation.
Chapter 3 Setting Up Soundtrack Pro 93
Page 94

Using Snapping
When you move and resize clips in the Timeline, or select part of an audio file in the
File Editor, you usually want them to start and end at a specific point in time. To
synchronize clips with a video, you may want to position them in line with a specific
frame. In a music-based project, you may want to align clips with measures and beats.
Soundtrack Pro includes a snapping feature that causes clips, the playhead, and other
items in the Timeline and File Editor to “snap” to the nearest Snap To position.
Snapping applies to the following operations:
 Dragging audio clips to the Timeline
 Moving audio clips
 Resizing audio clips
 Setting the playhead
 Setting the cycle region
 Inserting markers
 Moving markers
 Selecting Timeslices
 Adding envelope points
 Moving envelope points
 Moving crossfade edges
You can use snapping to ensure that audio clips are synchronized to a measure or beat,
that they begin playing back at a precise point in time, and that they are precisely
aligned with other clips in the Timeline.
When you turn on snapping, the item you are moving snaps to the nearest Snap To
position in the Timeline. The available Snap To values depend on the time format of the
project. For projects set to Time-based format, the available Snap To values are:
 Ruler ticks
 Seconds
 Frames
 Clips on Adjacent Tracks
 Markers
94 Chapter 3 Setting Up Soundtrack Pro
Page 95

For projects set to Beats-based format, the available Snap To values are:
 Ruler ticks
 1/4 notes
 1/8 notes
 1/16 notes
 1/32 notes
 1/64 notes
 Markers
 Clips on Adjacent Tracks
To turn snapping on:
m Choose View > Snap (or press G).
A checkmark next to the menu item indicates that snapping is turned on. Choose
View > Snap again to turn snapping off.
To set the Snap To value:
m Choose View > Snap To, then choose a value from the submenu.
You can temporarily reverse the current snapping state while you work in the Timeline.
When snapping is turned on and Markers is chosen in the Snap To submenu, clips in
the Timeline snap to the playhead as well as to markers.
To temporarily reverse the snapping state:
m Select the item in the Timeline, then hold down the Command key as you drag the item.
If snapping is turned on, Command-dragging lets you move the item without having it
snap to the nearest Snap To position. If snapping is turned off, the item snaps to the
nearest Snap To position. When you release the Command key, items moved in the
Timeline follow the normal snapping state.
Chapter 3 Setting Up Soundtrack Pro 95
Page 96

Reconnecting Media Files
Because Soundtrack Pro multitrack projects contain references to media files, and not
the files themselves, a multitrack project cannot play back if the media files it uses are
erased or moved. When you open a multitrack project in Soundtrack Pro, the
application checks to see if the media files it uses exist in the same location as they did
when the project was last opened. If the media files are not in the expected location,
Soundtrack Pro displays a Can’t Find File dialog with three choices:
 Skip All: Opens the project without reconnecting any missing files.
 Skip File: Opens the project without reconnecting the missing file.
 Locate: Presents a dialog that lets you locate the missing file and reconnect it to
the project.
If you choose to open the project without reconnecting its files, you can reconnect
individual audio files from the Timeline or the Bin tab and reconnect a video file in the
video track in the Timeline.
To reconnect an audio file:
1 Do one of the following:
 Select the clip in the Timeline, then choose Clip > Reconnect [filename].
 Control-click the clip in the Timeline, then choose Reconnect [filename] from the
shortcut menu.
 Select the clip in the Bin tab, then choose Reconnect [filename] from the Media pop-
up menu.
 Control-click the audio file in the Bin tab, then choose Reconnect [filename] from the
shortcut menu.
2 In the dialog that appears, locate the audio file you want to reconnect.
3 Click Open to reconnect the file.
To reconnect a video file:
1 Control-click the video clip in the video track, then choose Reconnect Media Files from
the shortcut menu.
2 In the dialog that appears, locate the video file.
3 Click Open to reconnect the file.
96 Chapter 3 Setting Up Soundtrack Pro
Page 97

Setting Soundtrack Pro Preferences
You set preferences for various aspects of both the appearance and operation of
Soundtrack Pro in the Preferences window. Some preferences apply to the current
project, and some apply to new projects you create. You may want to specify some
preferences before you begin working in Soundtrack Pro.
To open the Preferences window:
m Choose Soundtrack Pro > Preferences.
General Preferences
The General preferences include program startup behavior, Timeline defaults, and
options for alerts, saving, fades, and handles.
Startup
These preferences let you set the startup behavior when you open Soundtrack Pro.
 Last Project: Reopens the last project on startup.
 New Multitrack Project: Creates a new, blank multitrack project on startup. This is the
default behavior.
 New Audio File Project: Creates a new, blank audio file project on startup.
 Meters Channel Display pop-up menu: Choose whether meters display labeled
channels in surround order (Ls, L, C, R, Rs, LFE) or output order (1, 2, 3, 4, 5, 6).
Chapter 3 Setting Up Soundtrack Pro 97
Page 98

Timeline
 Move playhead by clicking pop-up menu: Choose whether you can move the playhead
by clicking in both the Timeline and the Time ruler or only in the Time ruler.
 Scrollwheel pop-up menu: Choose whether an attached mouse with a scrollwheel
scrolls the Timeline or zooms in or out at the playhead position.
 Use ellipses(...) in clip names checkbox: When selected, clips in the Timeline with long
names are center-truncated with an ellipsis. “Use ellipses (...) in clip names” is
deselected by default.
Note: Selecting “Use ellipses (...) in clip names” can impact the speed at which the
screen is redrawn during playback.
 Automation Recording Sensitivity slider: Drag to set the level of sensitivity with which
onscreen and control surface movements are recorded. Setting the slider to High
results in all movements being recorded.
Alerts and File Management
 Show Alerts pop-up menu: Choose whether to show the alerts when various
conditions occur (such as disk overload, unsupported sample rates, and so on).
 Save Audio File Project pop-up menu: Choose whether saved audio file projects
include the source audio file in the project or reference it. Note that if you move or
delete the source audio file from a project that references source audio, the project
cannot play.
 Scratch Location button and display: Click this button, then browse to the location of
the disk or folder you want to use as the location for storing temporary files. The
current location is shown in the Scratch Location display.
 Edited Media Location button and display: Click this button, then browse to the
location of the disk or folder you want to use as the location for edited media such as
audio file projects. The current location is shown in the Edited Media Location display.
 New File Handle Length value slider: Enter a handle length (in seconds) for new
files. For more information, see “Modifying a Clip Without Affecting Its Source
Media” on page 197.
98 Chapter 3 Setting Up Soundtrack Pro
Page 99

Project Preferences
These preferences let you set project properties and other default settings for new
projects you create.
 Tracks pop-up menu: Sets the default number of tracks for a new multitrack project.
 Track Height pop-up menu: Sets the default track height for new multitrack projects.
The choices are Mini, Small, Medium, and Large.
 Snapping: Sets the default snapping mode for a new project.
 Move Envelope Points with Clips checkbox: Sets the default envelope selection mode.
 Overlap Mode pop-up menu: Sets whether overlapped clips are crossfaded or
truncated for new multitrack projects.
 Default Fade Type pop-up menu: Sets default fade type.
 Audio Pulldown pop-up menu: Sets default audio playback compensation.
 Video Pulldown pop-up menu: Sets default video playback compensation.
 Sample Rate pop-up menu: Sets the default sample rate for new projects. The choices
range from 32 kHz to 192 kHz.
 Starting Timecode field: You can set the starting timecode for new projects to a value
other than 00:00:00;00 by entering a timecode value in the Starting Timecode field.
You can only enter positive values in the field. When you open the project, the Time
ruler and time display start from the starting timecode value.
 Timescale pop-up menu: Choose whether the overall project uses Time-based or
Beats-based time format.
 Export Bit Depth pop-up menu: Sets the export bit depth for the current project and
new projects. The choices are 16-bit (CD-quality audio) and 24-bit.
 Video Frames per Second pop-up menu: Choose which video frame rate to use for
new projects.
Chapter 3 Setting Up Soundtrack Pro 99
Page 100

 Tempo value slider: Sets the default tempo for new projects in beats per minute
(bpm). The range is 60 to 200 bpm.
 Key pop-up menu: Sets the default key for new projects. The range is any key in the
chromatic scale from A to G#, or None.
 Time Signature pop-up menu: Sets the default time signature for new projects. The
choices are 3/4, 4/4, 5/4, 6/8, and 7/8.
Recording Preferences
These preferences let you specify settings for recording audio.
 Input pop-up menu: Displays the available devices for audio input. Choose an input
device from the pop-up menu.
Note: For more information about setting inputs and outputs, see “Setting the Audio
Input and Output” on page 22.
 Channels: Use these buttons to confirm or change default input signal routing settings.
 Monitor pop-up menu: Displays the available devices for monitoring audio output.
Choose an output device from the pop-up menu.
 Latency Compensation slider: Sets the amount of latency compensation in
milliseconds. If recorded audio is late, drag the slider right. If the recorded audio is
early, drag the slider left.
For information on eliminating latency, see “Eliminating Recording Latency” on
page 516.
 Recordings Location display: Displays the default location to which recording sessions
are saved. You can set the save location by clicking the Choose button and
navigating to a new location.
To select an audio interface as the output device:
m Choose Apple menu > System Preferences, click Sound, then click the Output button.
Select the audio interface in the list that appears.
100 Chapter 3 Setting Up Soundtrack Pro
 Loading...