

Page 1

Soundtrack Pro 2
Getting Started
Page 2

K
Apple Inc.
Copyright © 2007 Apple Inc. All rights reserved.
Your rights to the software are governed by the
accompanying software license agreement. The owner
or authorized user of a valid copy of Soundtrack Pro
software may reproduce this publication for the purpose
of learning to use such software. No part of this
publication may be reproduced or transmitted for
commercial purposes, such as selling copies of this
publication or for providing paid for support services.
The Apple logo is a trademark of Apple Inc., registered
in the U.S. and other countries. Use of the “keyboard”
Apple logo (Shift-Option-K) for commercial purposes
without the prior written consent of Apple may
constitute trademark infringement and unfair
competition in violation of federal and state laws.
Every effort has been made to ensure that the
information in this manual is accurate. Apple is not
responsible for printing or clerical errors.
Note:
Because Apple frequently releases new versions
and updates to its system software, applications, and
Internet sites, images shown in this book may be slightly
different from what you see on your screen.
Apple Inc.
1 Infinite Loop
Cupertino, CA 95014–2084
408-996-1010
www.apple.com
Apple, the Apple logo, AppleScript, Final Cut,
Final Cut Pro, Final Cut Studio, Logic, Mac, Mac OS,
QuickTime, and Soundtrack are trademarks of Apple
Inc., registered in the U.S. and other countries.
Finder and NeXT are trademarks of Apple Inc.
AppleCare is a service mark of Apple Inc., registered
in the U.S. and other countries.
Other company and product names mentioned herein
are trademarks of their respective companies. Mention
of third-party products is for informational purposes
only and constitutes neither an endorsement nor a
recommendation. Apple assumes no responsibility with
regard to the performance or use of these products.
Production stills from the film “Koffee House Mayhem”
provided courtesy of Jean-Paul Bonjour. “Koffee House
Mayhem” © 2004 Jean-Paul Bonjour. All rights reserved.
http://www.jbonjour.com
Page 3

2
Contents
Preface 5 Welcome to Soundtrack Pro
5
About Soundtrack Pro
5
About This Book
6
What You’ll Need
Chapter 1 7 Starting Your Project and Assembling Media
8
Opening Soundtrack Pro
9
Setting Up Your Computer’s Audio System
10
Creating a New Multitrack Project
12
Assembling Media in Soundtrack Pro
Chapter 2 17 Assembling Your Multitrack Project
18
Working with Multitrack Projects
19
Playing and Saving a Multitrack Project
22
Creating a Soundtrack Pro Multitrack Project from a Final Cut Pro Sequence
23
Adding Clips to the Timeline
24
Editing Clips in the Timeline
26
Adding Markers to the Timeline
28
Creating a Fade in an Audio Clip
29
Adding a Crossfade Between Two Clips
30
Adding Tracks, Busses, and Submixes to a Multitrack Project
32
Working with Stereo and Surround Track Panners
35
Routing Your Multitrack Project
36
Adding Effects to Your Multitrack Project
39
Automating Track, Bus, Submix, and Master Bus Parameters with Envelope Points
Chapter 3 41 Working with Individual Audio Files
41
Editing Audio Files
42
How Soundtrack Pro Processes Audio Files
42
Where to Edit Audio Files
46
Opening a Logic Pro Audio File in Soundtrack Pro
47
Adding Processes and Effects to a File with Actions
50
Using the File Editor Tools
3
Page 4

Chapter 4 57 Solving Audio Problems
57
Analyzing and Fixing Problems in an Audio File
60
Creating an AppleScript Droplet to Analyze and Fix Audio Files
Chapter 5 61 Mixing Stereo
and Surround Projects
61
Fundamentals of Mixing
62
Working in the Soundtrack Pro Mixer
64
Steps for Mixing a Project
Chapter 6 73 Exporting Your Multitrack Project
74
The Export Dialog
75
Exporting a Final Mix
76
Exporting a Submix
76
Exporting a Multitrack Project to Final Cut Pro
77
Exporting a Podcast
79
Saving a Multitrack Project with Its Media Files
Chapter 7 81 What’s Next?
81
More Soundtrack Pro Resources
Appendix 83 An Introduction to the Soundtrack Pro Interface
84
Working with Tabs
85
The Timeline
86
The File Editor
87
The Multitake Editor
87
Conform
88
The Mixer
89
The Bin
89
The Toolbar
90
Tabs in the Left Pane
91
Tabs in the Right Pane
92
Arranging the Soundtrack Pro Interface
4
Contents
Page 5

Welcome to Soundtrack Pro
About Soundtrack Pro
Soundtrack Pro is a professional digital audio application designed for film and video
post-production. As a Logic Studio owner, you will use Logic Pro to create, compose,
and score your music, and Soundtrack Pro to edit and restore dialogue, create and edit
sound effects and backgrounds, and mix a full soundtrack. The advanced integration of
Soundtrack Pro and Final Cut Pro allows you to easily import and export audio projects,
giving you the ability to collaborate with the world of Final Cut Studio editors.
Additionally, the advanced multichannel waveform editor in Soundtrack Pro can be
used as a powerful external sample editor with Logic Pro.
About This Book
This book takes you on a guided tour of Soundtrack Pro. It begins by explaining how to
set up a multitrack project and import audio files, then walks you through building a
multitrack project, working with audio clips, and correcting common problems in audio
clips. Then it explains how to mix and export your final mix, create a podcast, and send
your mix back to Final Cut Pro.
Preface
After you’re done reading this
understanding of what you can do with Soundtrack Pro. You can then continue to
explore and learn by working with Soundtrack Pro and referring to the user manual.
Getting Started
book, you should have a basic
5
Page 6

What You’ll Need
Simply reading this book will give you enough information to get you working
confidently in Soundtrack Pro. However, having Soundtrack Pro open on your computer
and using some audio files—either your own or the audio files provided with
Soundtrack Pro—will make some of the tasks described in these pages easier to master.
If you want to be able to practice the steps as you read, you will need:
Â
Your computer, running Soundtrack Pro
Â
Audio files (if you don’t have any, you can use the audio content that you installed
with Soundtrack Pro)
Â
A video file (to play along with your project)
Now you can start exploring Soundtrack Pro.
6 Preface
Welcome to Soundtrack Pro
Page 7

1
Starting Your Project
and Assembling Media
In Soundtrack Pro, you can create audio projects for a variety of uses: audio for video
and film, submixes for DVD and other video needs, sound design, podcasts, and more.
Before you can start editing your project, you need to set up your computer’s audio
system and assemble your media files.
In this chapter, you’ll learn about:
Â
Opening Soundtrack Pro (p. 8)
Â
Setting Up Your Computer’s Audio System (p. 9)
Â
Creating a New Multitrack Project (p. 10)
Â
Assembling Media in Soundtrack Pro (p. 12)
1
7
Page 8
Opening Soundtrack Pro
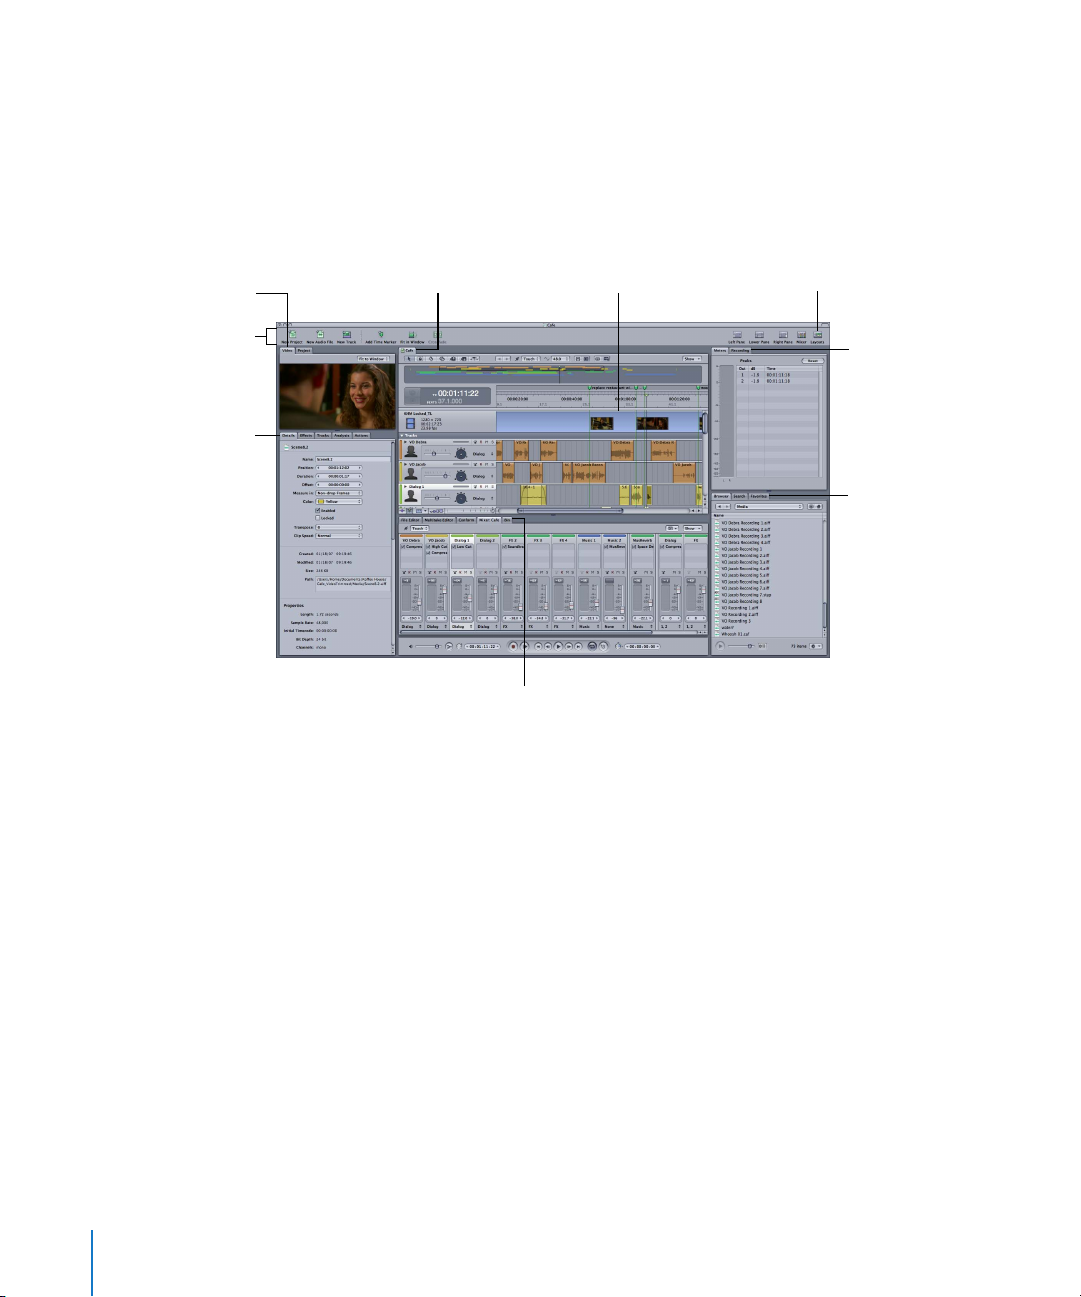
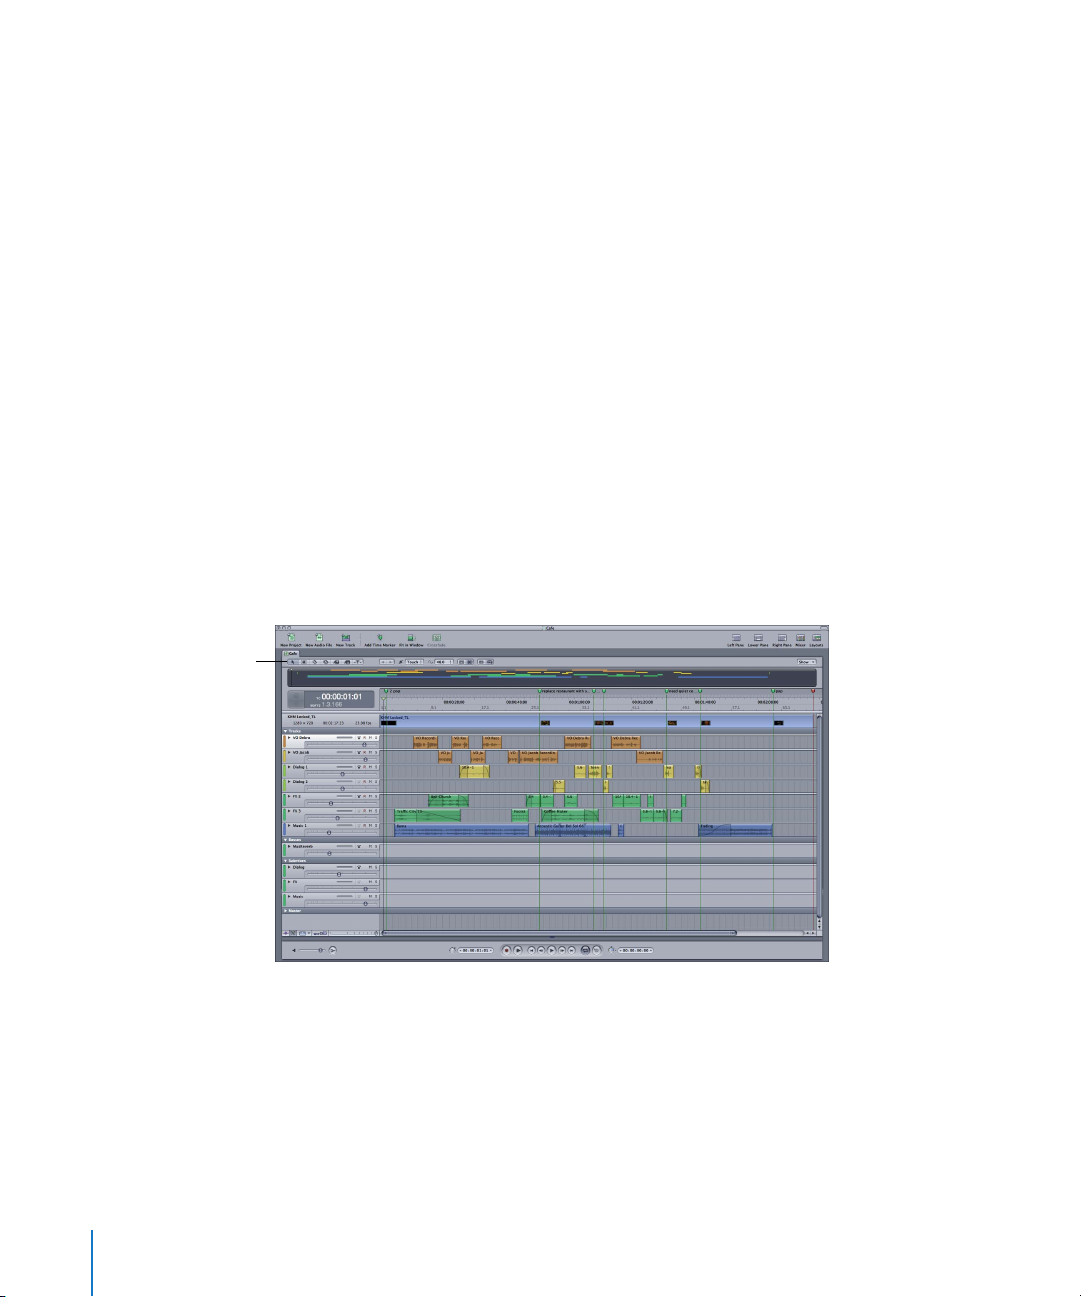
The Soundtrack Pro interface is divided into several panes, each of which contains
multiple tabs. These tabs contain all of the controls in Soundtrack Pro. As you’re
working, you can show and hide the left, right, and lower panes of the interface using
the buttons in the top-right corner of the Soundtrack Pro Toolbar.
If you add a video file to
the video track, it’s
displayed in the
Video tab.
The Toolbar contains
buttons for common
commands.
These tabs contain
information about the
clips, tracks, and other
contents of a multitrack
project.
These buttons show and
hide the left, right, and
lower panes of the
interface.
These tabs show
input and output
levels and settings.
These tabs help you
locate media files.
You can store
frequently used files
in the Favorites tab.
Each project has
its own tab.
The Timeline is where
you create a multitrack
project with video and
audio clips.
These tabs help you edit and
mix your project.
You can learn more about the Soundtrack Pro interface in the Appendix , “An
Introduction to the Soundtrack Pro Interface,” on page 83.
To open Soundtrack Pro:
m
Double-click the Soundtrack Pro icon located in your Applications folder.
When you open Soundtrack Pro, a new, untitled multitrack project is automatically created.
8 Chapter 1
Starting Your Project and Assembling Media
Page 9

Setting Up Your Computer’s Audio System
The sound from your audio files is output through the speaker or headphone jack that
comes with your computer.
If you have external monitors, speakers, or other audio equipment, you’ll want to
connect them through the speaker jack so you can monitor your project’s audio
output. You can also connect other external audio equipment such as an audio
interface or a mixer and use these audio tools to mix and listen to your project.
To view the audio input and output settings for your computer:
m
Open the Audio Midi Setup utility (located in /Applications/Utilities/Audio Midi Setup).
To view the audio input and output settings for Soundtrack Pro:
m
Select the Recording tab in the right pane of the Soundtrack Pro interface.
To learn more about working in the Recording tab, see the
Soundtrack Pro User Manual
Do You Need More Equipment?
By default, Soundtrack Pro uses the input and output devices that are defined in your
computer’s System Preferences.
For basic mixing, you can connect the built-in audio output on your computer to a
pair of external speakers. This gives you two output channels for stereo playback.
For 5.1 surround mixing, you will need to connect an audio I/O device with six output
channels to your computer to monitor the surround sound. The six output channels
need to be connected to a discrete 5.1 surround speaker system for you to hear the
surround sound.
To learn more about stereo and surround audio systems, control surfaces, and other
audio equipment, see the
Soundtrack Pro User Manual
.
.
Chapter 1
Starting Your Project and Assembling Media
9
Page 10
Creating a New Multitrack Project
A multitrack project contains multiple audio files and an optional video clip. Multitrack
projects are used exclusively by Soundtrack Pro and are compatible with other
Final Cut Studio applications.
When you open Soundtrack Pro, a new multitrack project is automatically created. You
can also create a new project at any time while working in Soundtrack Pro.
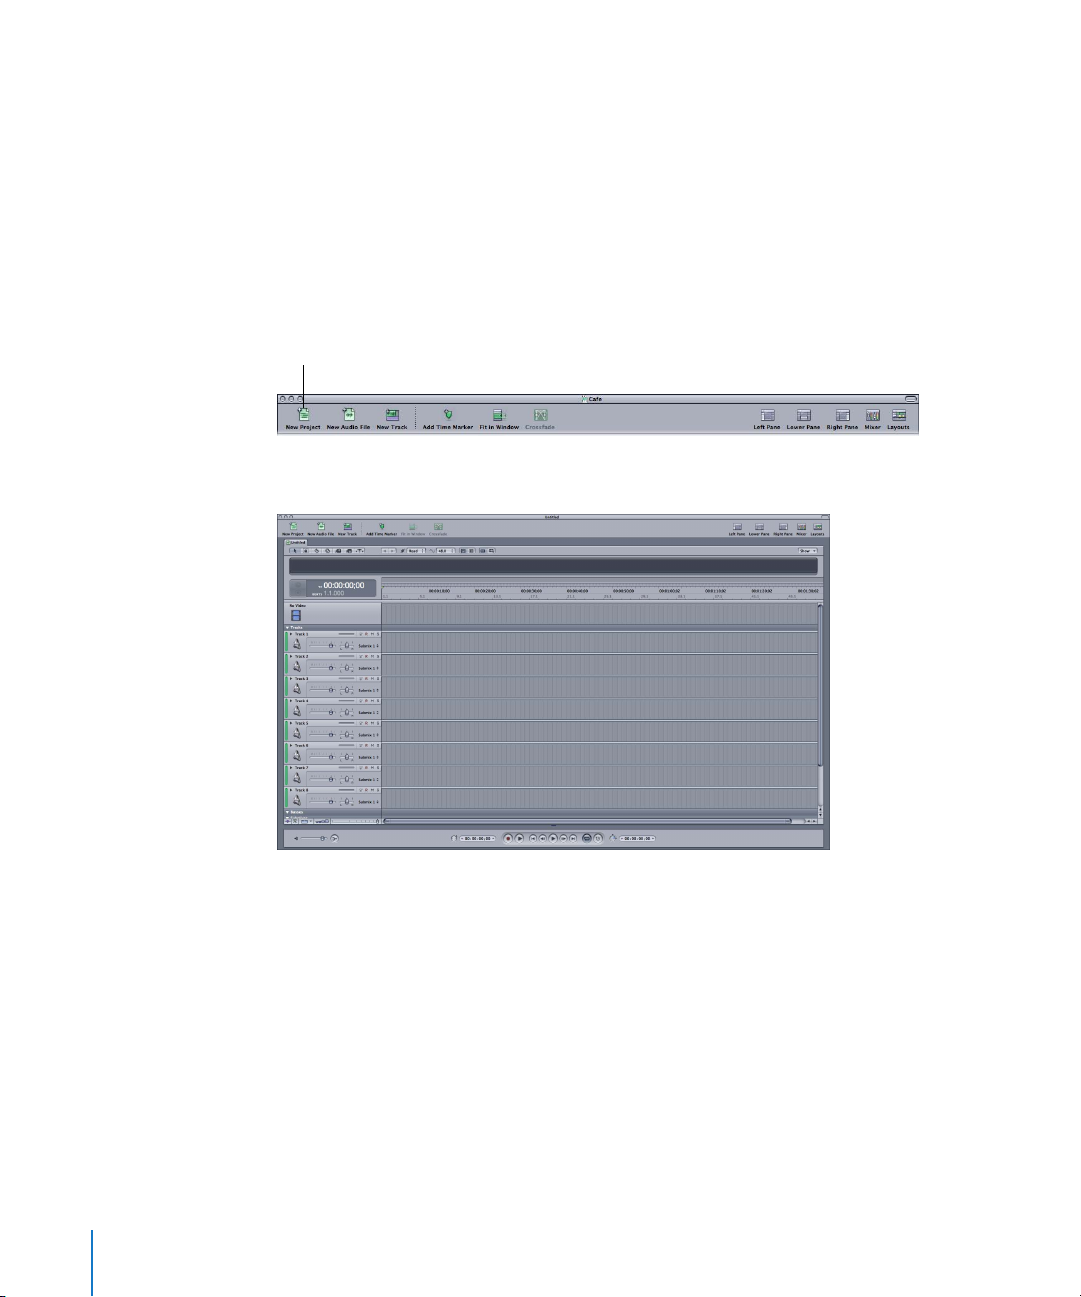
To create a new multitrack project:
m
Click the New Project button in the Toolbar.
Click this button to
create a new project.
A new, empty multitrack project appears.
New Soundtrack Pro projects are, by default, set with a sample rate of 48 kilohertz (kHz).
Soundtrack Pro multitrack projects can have a sample rate of 32 to 192 kHz. Standard
CD-quality audio uses 44.1 kHz; standard digital video–quality audio uses 48 kHz.
10 Chapter 1
Starting Your Project and Assembling Media
Page 11
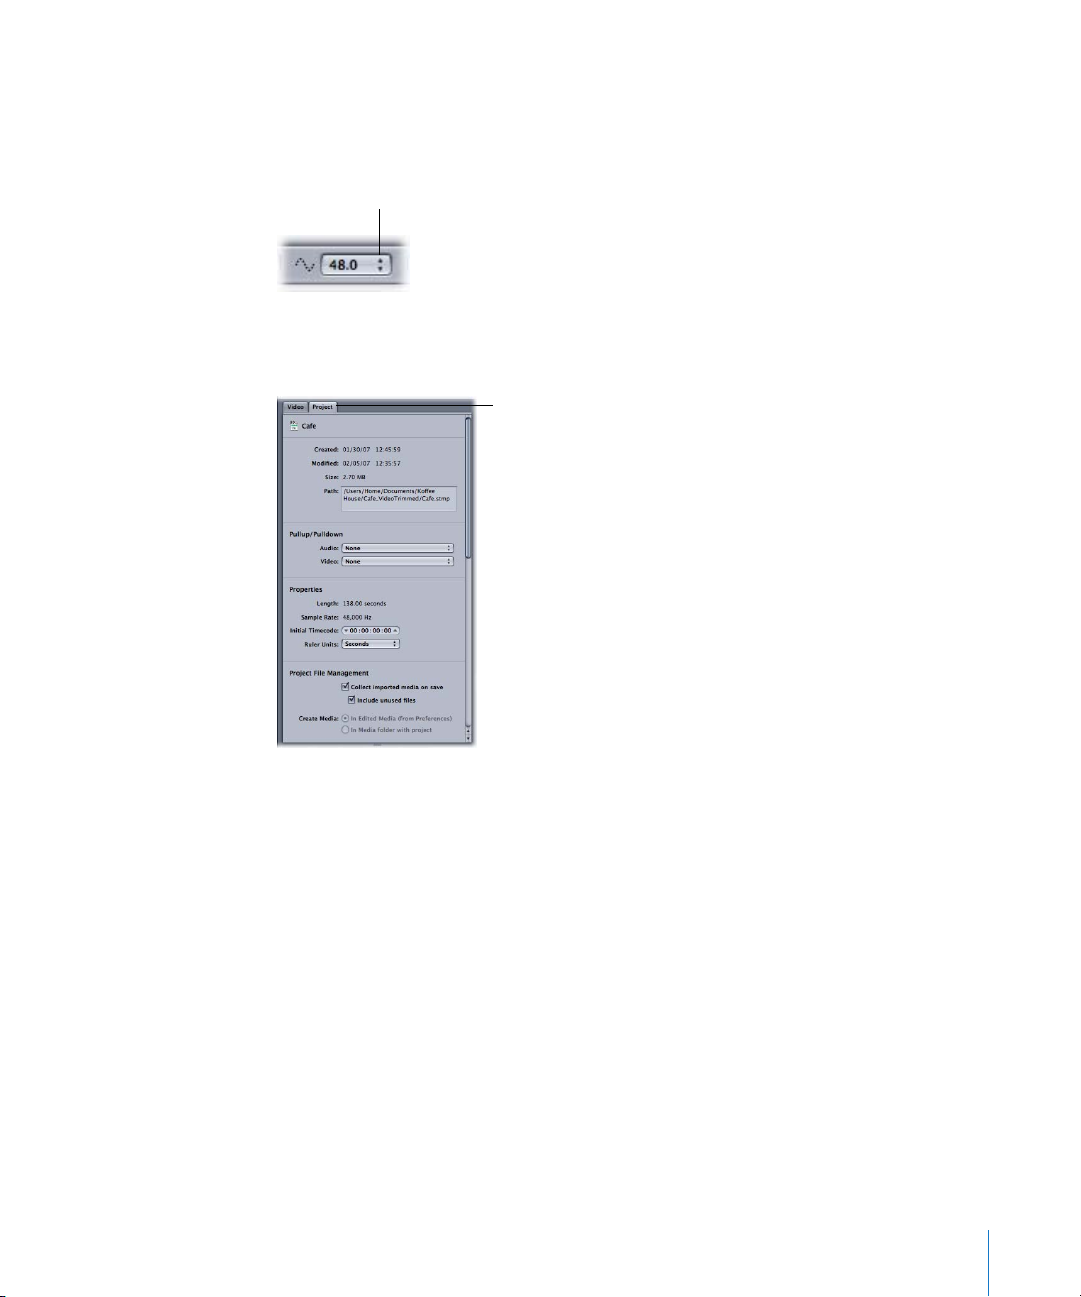
To set a project’s sample rate:
m
Choose a value from the Sample Rate pop-up menu.
Choose a sample rate for
your multitrack project
from the Sample Rate
pop-up menu.
To configure other project properties, including metadata and music settings:
m
Click the Project tab and enter settings for your project.
The Project tab contains
various settings and
properties for the
selected project.
Chapter 1
Starting Your Project and Assembling Media
11
Page 12
Assembling Media in Soundtrack Pro
Now that you’ve created your project and configured its settings, it’s time to assemble your
media files. Soundtrack Pro has several tabs dedicated to locating your audio files and a
method for indexing the folders of media stored on your hard drive or other volumes.
Use the Browser and
Search tabs to locate
your media.
Browsing for Media
The Browser tab works like the Mac OS X Finder; in it, you can look through your
computer’s hard disk, external hard drive, or any other connected media device for files
to use in Soundtrack Pro.
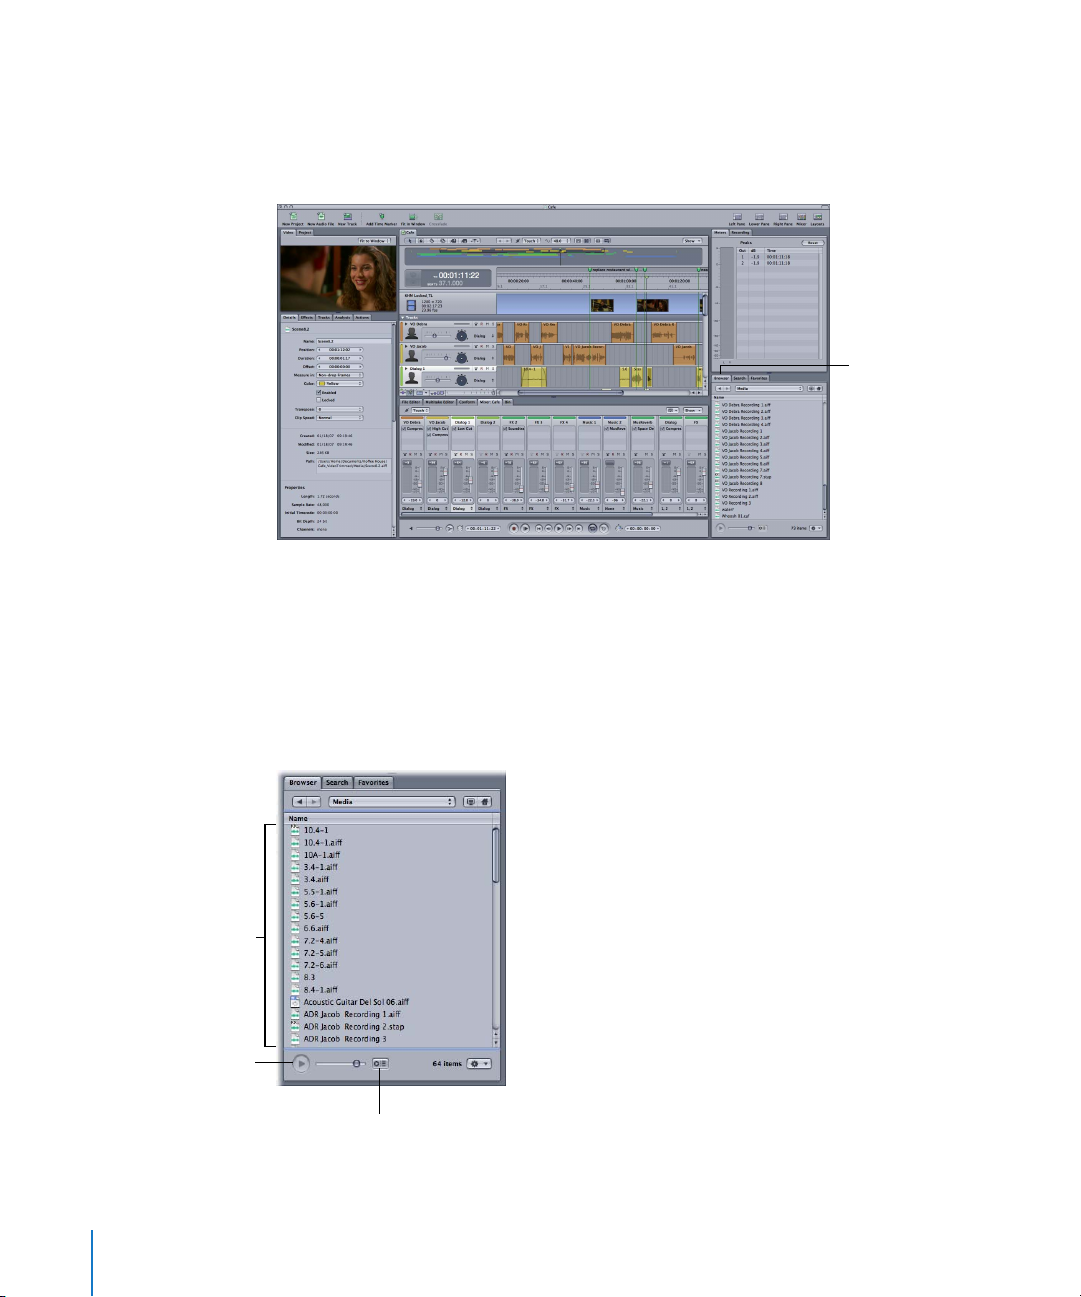
To locate files using the Browser:
m Select the Browser tab, then navigate through the file structure to find your file.
Click to select the file
you want.
The Play button
12 Chapter 1
The “Preview on
selection” button
Starting Your Project and Assembling Media
Page 13
You can change the
layout of the Search tab
using the Column View
and Button View buttons.
By default, any file you select will play automatically. To turn preview selection off,
deselect the “Preview on selection” button. Then you can preview a selected file
manually by clicking the Play button.
When you’ve located the media you’ll use in your project, you can store it in the
Favorites tab. The Favorites tab is a handy container in which you can put references to
clips and files.
The Bin tab is also useful for locating audio files. By default, the Bin shows the media
files associated with each open project.
Searching for Files
You can search for audio files using the metadata categories that are tracked by
Soundtrack Pro.
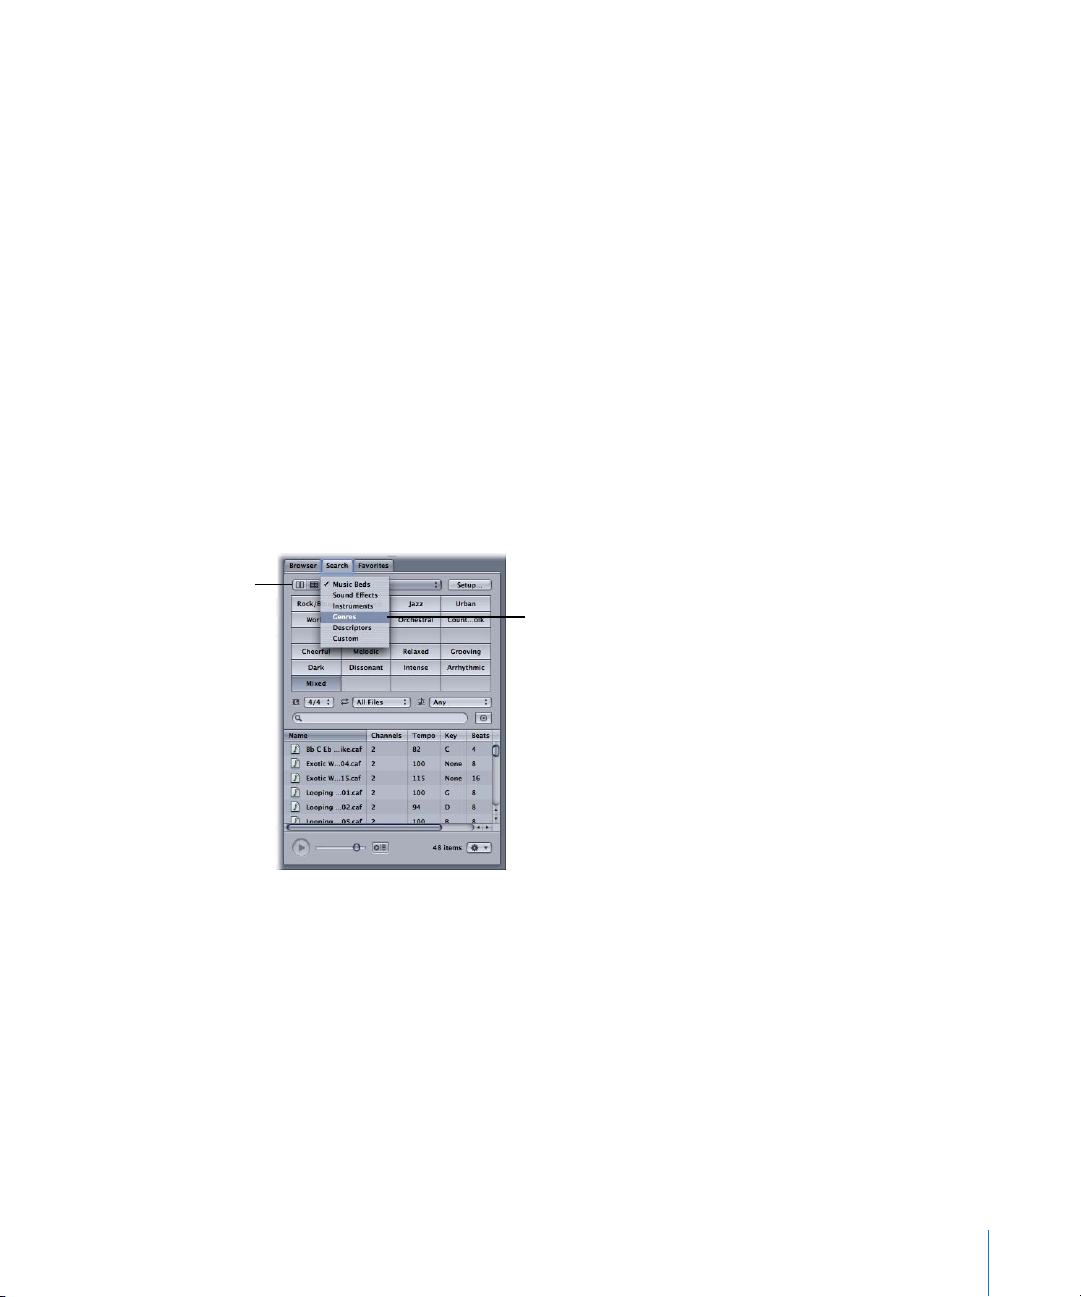
To search for files using the Search tab:
1 In the Search tab, choose the type of metadata to search for from the Keywords
pop-up menu. (For example, you can choose All to see every keyword in your file’s
metadata, or you can search with categories like Instruments, Genres, and so on.)
Narrow your metadata
search using the
Keywords pop-up menu.
You can change the layout of the Search tab using the Column View and Button View
buttons at the left of the Keywords pop-up menu.
Chapter 1 Starting Your Project and Assembling Media 13
Page 14
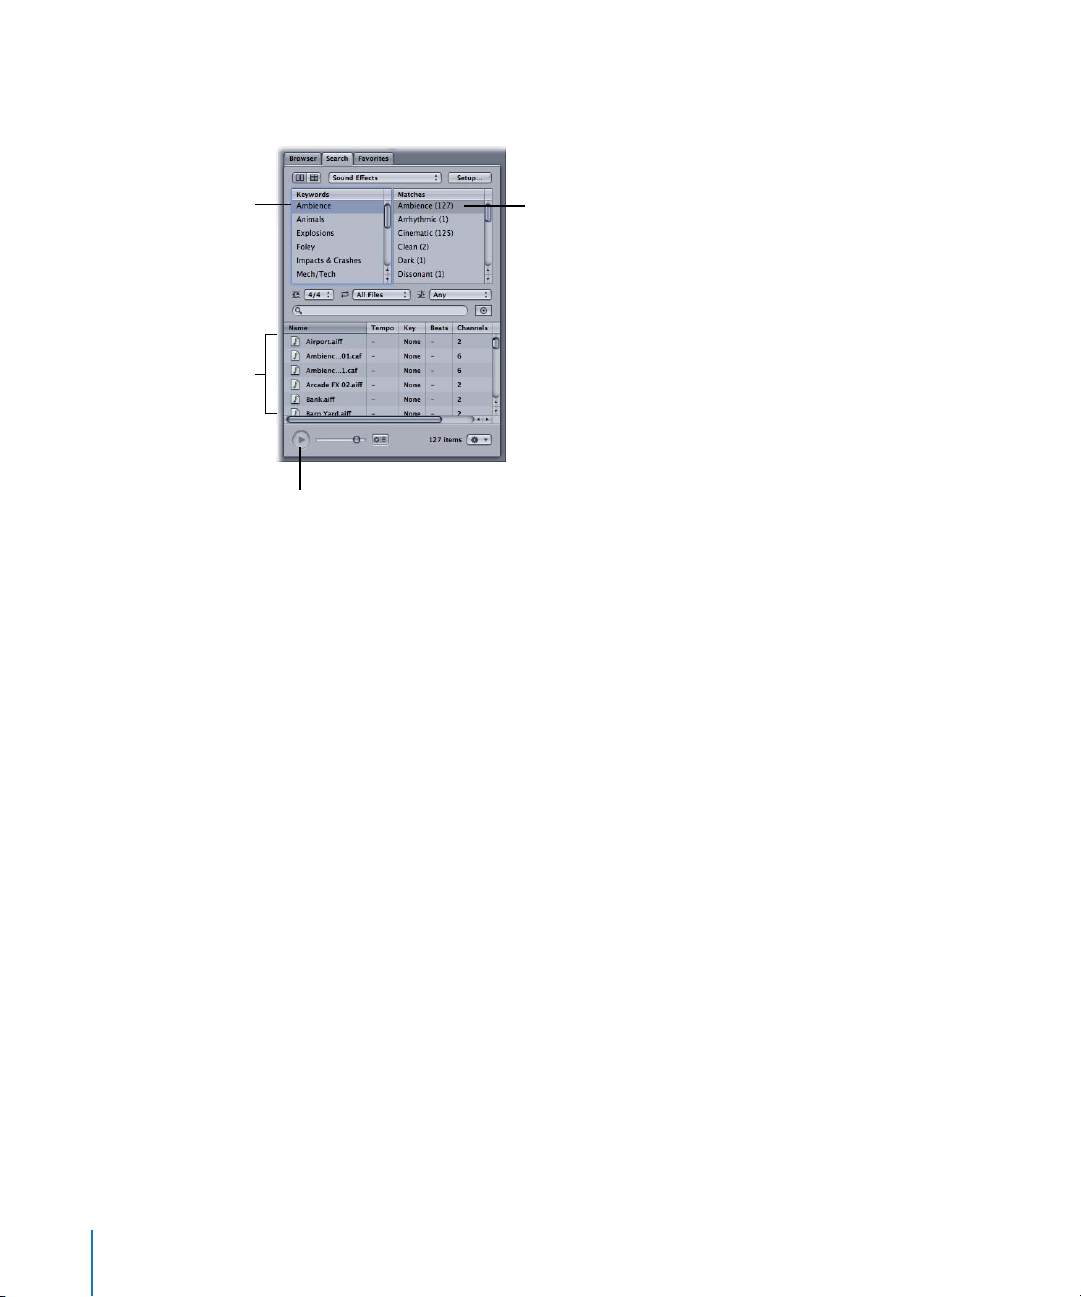
2 Select a keyword. The files that contain the keyword you selected appear in the list at
the bottom of the Search tab.
“Ambience” is selected.
The keyword
The matches for
“Ambience” are
displayed here.
Over a hundred audio
clips have the keyword
“Ambience.”
To preview an audio clip,
select it and then click
the Play button.
If you want to listen to an audio file, select it and then click the Play button in the
bottom-left corner of the Search tab.
Adding Files to the Favorites Tab
You can put references to frequently used files and folders in the Favorites tab. The
Favorites tab is a good place to put references to files or folders you’ll want to use in
multiple projects.
To add a file to the Favorites tab:
m Control-click the file, then choose Add to Favorites from the shortcut menu.
14 Chapter 1 Starting Your Project and Assembling Media
Page 15

Indexing Your Personal Media Files
The audio files that come with Soundtrack Pro are already indexed and ready to search.
If you have a collection of audio files that are tagged with compatible metadata,
including filename, genre, keyword, date, and so on, you can index them so you can
search for them in the Soundtrack Pro Search tab.
For instructions on indexing your media files, see the Soundtrack Pro User Manual.
Where’s Your Media?
Soundtrack Pro can process the following file types: AIFF, CAF, WAVE, Sound Designer II,
NeXT sound files, and QuickTime movies. Soundtrack Pro can also decompress and
process compressed file formats, including MP3 and AAC, and play QuickTime movies.
If a file you want to use is not in one of the supported file types, you can convert it.
An easy way to convert a file is to open it in its original application and then export it
as one of the Soundtrack Pro–compatible file types listed here.
Chapter 1 Starting Your Project and Assembling Media 15
Page 16

Page 17

2 Assembling Your Multitrack Project
2
You start building a multitrack project by arranging the project’s audio files on tracks in
the Timeline. As you arrange the clips, you can cut, crossfade, and otherwise edit them
in the Timeline.
In this chapter, you’ll learn about:
 Working with Multitrack Projects (p. 18)
 Playing and Saving a Multitrack Project (p. 19)
 Creating a Soundtrack Pro Multitrack Project from a Final Cut Pro Sequence (p. 22)
 Adding Clips to the Timeline (p. 23)
 Editing Clips in the Timeline (p. 24)
 Adding Markers to the Timeline (p. 26)
 Creating a Fade in an Audio Clip (p. 28)
 Adding a Crossfade Between Two Clips (p. 29)
 Adding Tracks, Busses, and Submixes to a Multitrack Project (p. 30)
 Working with Stereo and Surround Track Panners (p. 32)
 Routing Your Multitrack Project (p. 35)
 Adding Effects to Your Multitrack Project (p. 36)
 Automating Track, Bus, Submix, and Master Bus Parameters with Envelope
Points (p. 39)
17
Page 18
Working with Multitrack Projects
You build a multitrack project in the Soundtrack Pro Timeline. The Timeline contains
tracks for arranging files; after the clip tracks, there are additional rows for busses
(which are predominantly used to share effects to groups of tracks), submixes (which
are used to create groups of like audio and to route these groups to physical outputs),
and the Master bus (the final mix control).
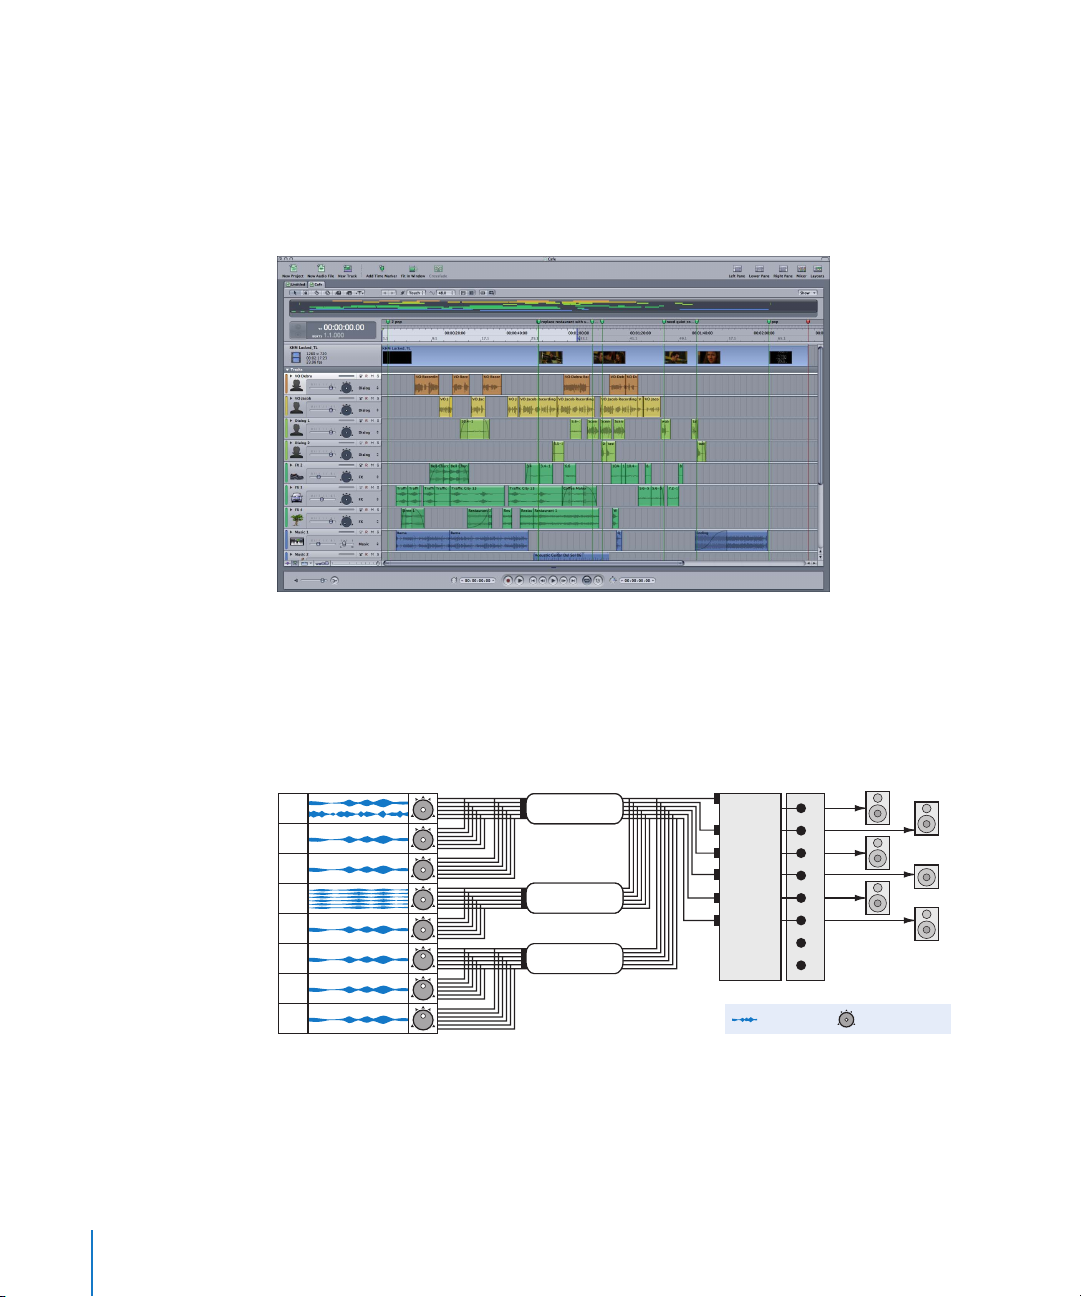
Here is a typical organization for a film or video project that has submixes for effects,
music, and dialogue. While this illustration doesn’t mirror the Timeline’s organization, it
does show how to route signals from beginning to output using tracks, submixes, and
the Master bus.
Master
Master
bus
bus
Hardware
outputs
Audio clip
1
1
2
2
3
3
Center
4
4
5
5
6
6
7
7
8
8
Left
Right
LFE
Left
surround
Right
surround
Surround panner
Tracks
1
2
Submix
Effects
Effects
Channels 1–6
3
4
5
6
7
Music
Music
Channels 1–6
Dialogue
Channels 1–6
8
The Soundtrack Pro multitrack project shown above has eight tracks, which are routed
to three surround submixes.
18 Chapter 2 Assembling Your Multitrack Project
Page 19

Each track in this multitrack project has a surround panner that feeds into one of the
three surround submixes. These submixes are then routed to the Master bus, which
feeds an 8-channel audio interface that connects to six surround sound speakers.
Don’t let this illustration and explanation worry you—assembling a multitrack project is
easy. You just drag audio clips from the Browser, Favorites, Search, or Bin tab directly
into any track in the Timeline. You can also drag audio clips directly into the
Soundtrack Pro Timeline from your hard disk or any external drives you have connected
to your system. When you’ve assembled your audio clips, you can edit them and route
them to the Master bus using some of the techniques explained in this chapter.
Playing and Saving a Multitrack Project
Before you learn about editing techniques, here are the basics of playing and saving
multitrack projects.
You can play your project at any time while editing your multitrack project.
You can position the
playhead by entering a
timecode here.
You can use the
transport controls to
play, pause, and move to
the beginning and end
of the Timeline.
While you can use the transport controls to play your project, it’s often easier to use
keyboard shortcuts.
To play your project:
m Press the Space bar.
The project starts playing at the playhead’s location.
Chapter 2 Assembling Your Multitrack Project 19
Page 20

To stop playback:
m Press the Space bar again.
Here are a few more keyboard shortcuts to use for playing a multitrack project.
To do this Do this
To play your project at normal
(1x) speed
To pause playback Press K.
To play your project in reverse at
normal (1x) speed
To double, triple, or quadruple
the current playback speed
To move the playhead to the
beginning of clip cycle regions
To move the playhead to the
beginning of the Timeline
and immediately start playing
the project
To move the playhead to the
previous edit
To move the playhead to the
next edit
To solo a track Click the Solo button on the appropriate track, then press the
To mute a track Click the Mute button on the appropriate track, then press the
Press L.
Press J.
Press L or J two, three, or four times.
Press Return.
Press Shift-Return.
Press the Up Arrow key.
Press the Down Arrow key.
Space bar to play only the soloed track.
Space bar to play the project without the muted track.
As you know, you should save your project and save it often! A Soundtrack Pro
multitrack project (.stmp) contains information about the clips it contains and how
those clips are arranged and edited.
A multitrack project file does not include the audio files used in the project; instead, it
refers to the files in their saved locations. This keeps the project file size relatively small.
Once you’ve specified a project’s name and location, saving can be as easy as playing
a project.
20 Chapter 2 Assembling Your Multitrack Project
Page 21

To save your project:
1 Choose File > Save (or press Command-S).
The Save dialog appears.
2 Enter a name for your file and a location to save it in, and configure any other
Save options:
 Save Compacted: Saves the project without display data, which can save disk space
but may cause the project to take longer to open.
 Collect Audio Files: Saves the project file, and a copy of every audio file the project
uses, to the selected location.
 Collect Unused Audio Files: Copies every audio file associated with the project
(whether it is used in the project or not) to the selected location.
 Collect Video File: Copies the project’s video file to the selected location.
 Save Edited Media Locally: Saves the project’s edited audio files in the same folder as
the project. If this checkbox is not selected, edited media will be saved to the Edited
Media Location defined in Soundtrack Pro preferences.
3 Click Save.
After you initially save your project, choosing File > Save (or pressing Command-S)
saves your project without opening the Save dialog.
Note: To change your Save preferences after setting them up, choose File > Save As.
Chapter 2 Assembling Your Multitrack Project 21
Page 22

Creating a Soundtrack Pro Multitrack Project
from a Final Cut Pro Sequence
You can select one or more audio clips or entire sequences in Final Cut Pro and send
them to Soundtrack Pro as a multitrack project.
To open a group of Final Cut Pro audio clips or a Final Cut Pro sequence in
Soundtrack Pro:
1
Select multiple clips in the Final Cut Pro Timeline or a sequence in the
Final Cut Pro Browser.
2
Control-click the selection, then choose Send To > Soundtrack Pro Multitrack Project
from the shortcut menu.
A dialog appears with several settings.
3
If you want to bring associated video into the multitrack project, select Include
Background Video to include the sequence’s background video with the project.
4
Verify that “Save project with latest clip metadata” is selected so that the metadata
is included.
5
Enter a project name or use the default name, then click Save.
This saves the content as a Soundtrack Pro multitrack project.
From here, you can modify the audio using Soundtrack Pro.
To learn how to export a Soundtrack Pro multitrack project to Final Cut Pro, see
Chapter 6, “Exporting Your Multitrack Project,” on page 73.
22 Chapter 2
Assembling Your Multitrack Project
Page 23
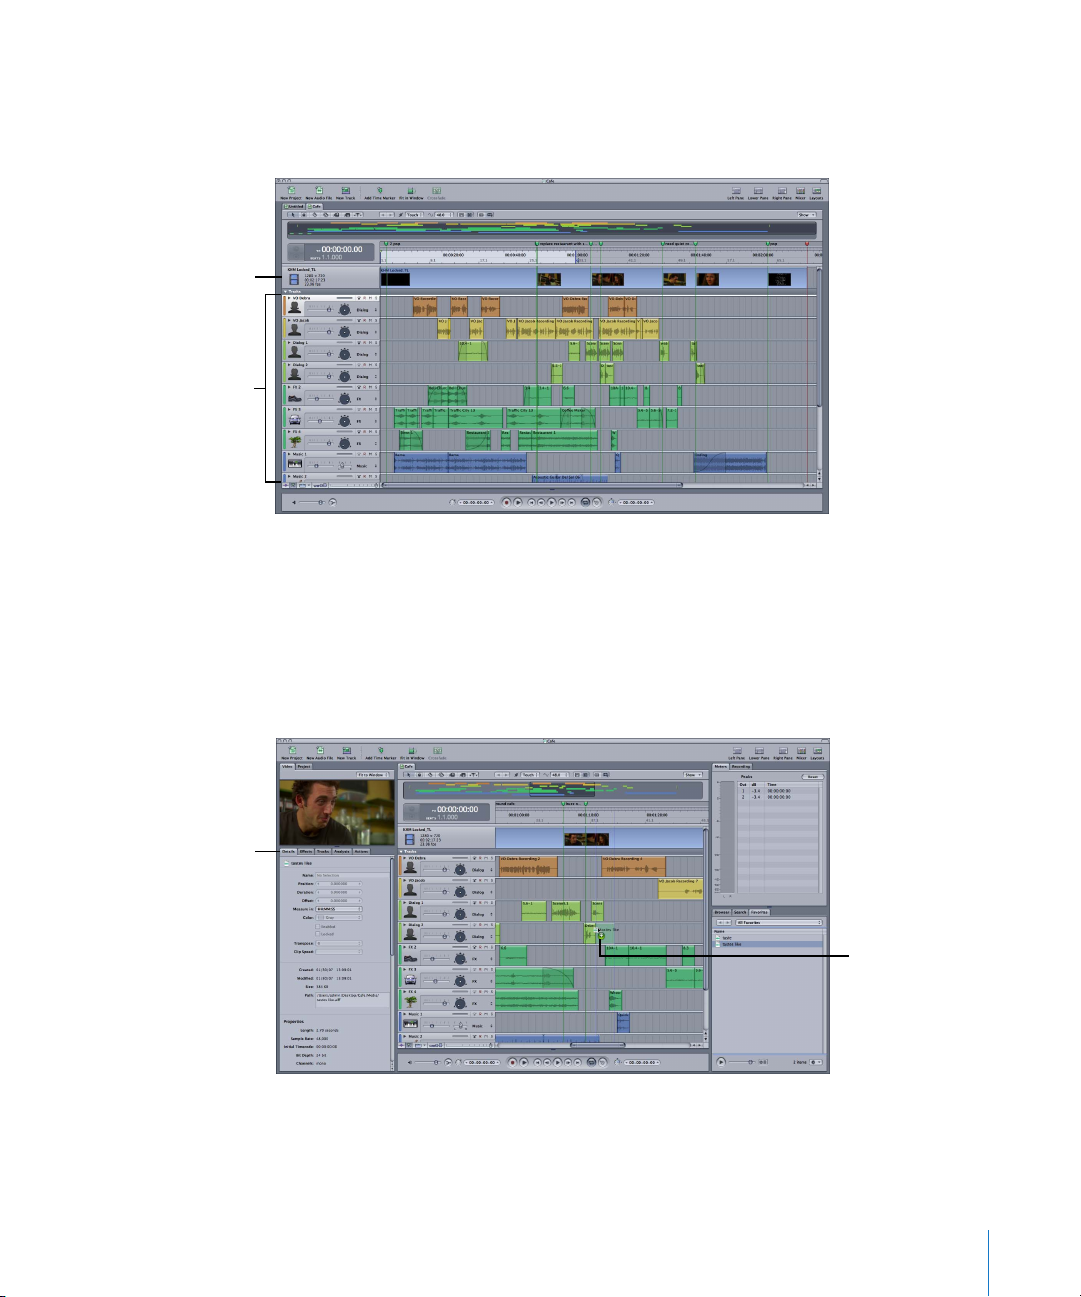
The video track
The audio tracks shown
are organized by
function: orange and
yellow for voiceover, lime
for dialogue, green
for effects, and blue
for music.
Adding Clips to the Timeline
A typical Soundtrack Pro multitrack project contains multiple audio clips on several
audio tracks. It can also contain one video file on the video track.
After you add an audio clip to a multitrack project, you may want to modify it. When
you cut or otherwise modify audio clips in the Timeline, the original media file is not
affected; instead, the edits are saved as nondestructive Soundtrack Pro actions.
Information about the
clip is shown in the
Details tab.
To add an audio clip to a track:
m Locate the file you want to use (the Browser or Search tab is a good place to start
looking for files), then drag the file into an audio track in your project’s Timeline.
Drag the file from
the Browser, Search,
or Favorites tab into
an audio track in the
Timeline.
Chapter 2 Assembling Your Multitrack Project 23
Page 24
If you have a video file for your project, it’s easy to add it to your project’s video track.
You can add one QuickTime movie (or a file in any other video format that QuickTime
supports) to the video track. When you drag the video to the track, it automatically
appears at the beginning of the Timeline. If the video has an audio track, that appears
on the first audio track of the Timeline. Soundtrack Pro also automatically applies the
movie’s frame rate setting to the open audio project.
To add a video file to the video track in your project:
m Find the file you want to use, then drag it to the project’s video track.
The video file appears in the Video tab and at the beginning of the video track of your
project’s Timeline.
Editing Clips in the Timeline
When you create a multitrack project, you should take a minute to consider how you
will organize your clips on your project’s tracks. For example, you may want to arrange
clips on different tracks based on their content: dialogue, effects, and music is a
common pattern for grouping clips on tracks.
While arranging your audio clips, you might have to resize, cut, paste, delete, or
otherwise manipulate your clips. These basic edits are explained next.
Each of these tools can be
used to edit audio files.
24 Chapter 2 Assembling Your Multitrack Project
Page 25
To move a clip on a track:
m Drag the clip left or right on the track, or up or down to another track.
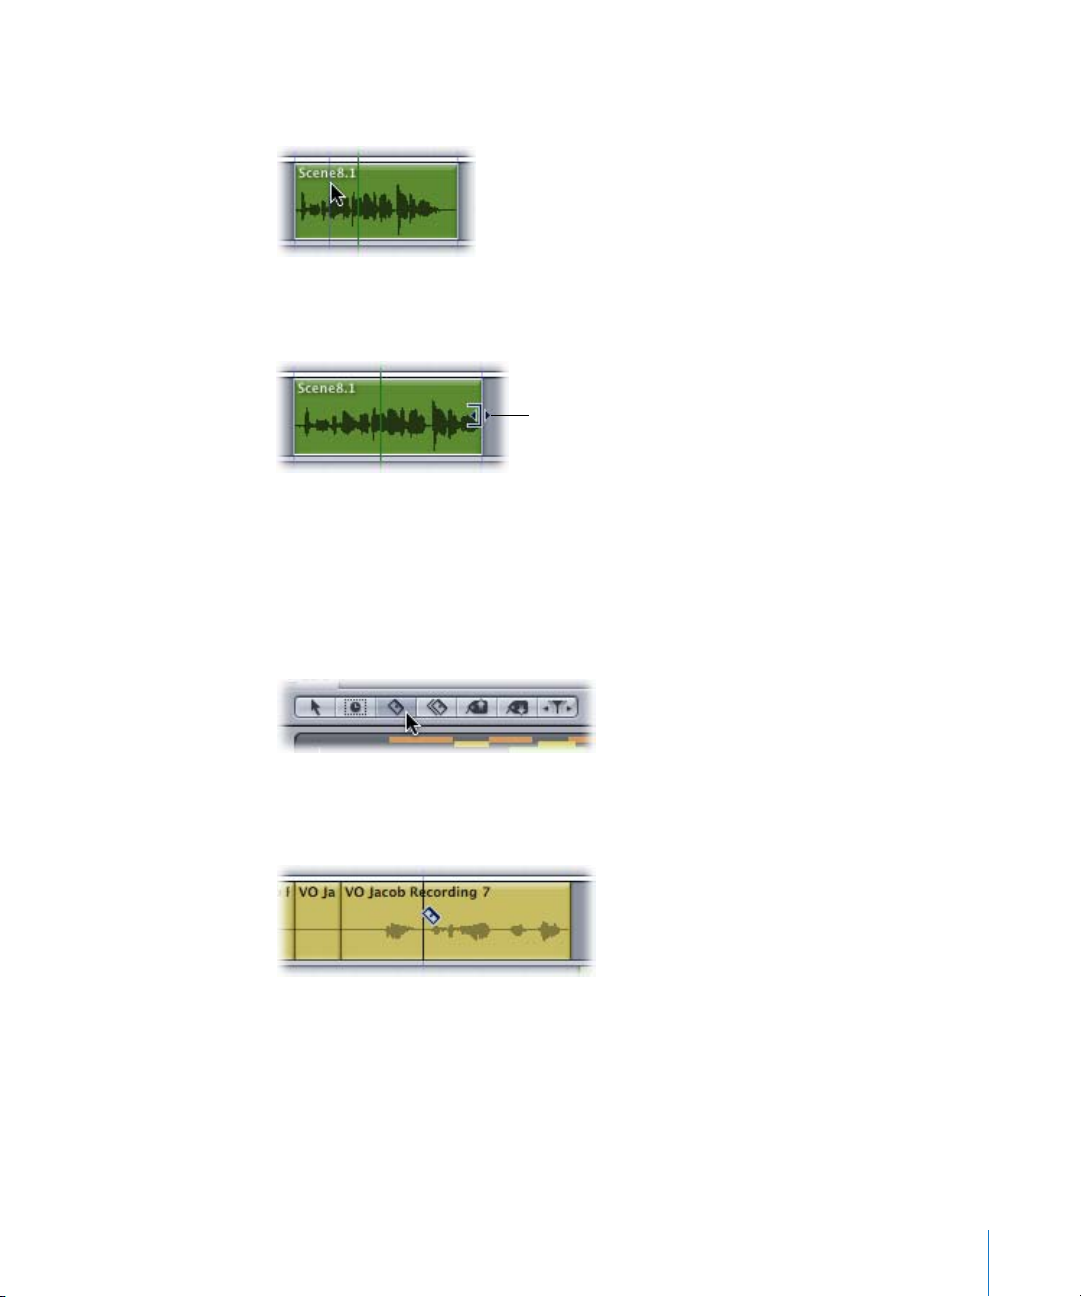
To change the length of a clip:
m Place the pointer at the edge of the clip and then drag it left or right.
You know you can change
the length of a clip when
the resize pointer replaces
the pointer.
To delete a clip:
m Select the clip, then press Delete.
The clip disappears from the track.
To cut a clip into several segments:
1 Select the Blade tool in the Toolbar.
The arrow pointer becomes a blade to indicate that you’re cutting, not selecting, the clip.
2 Position the blade pointer over the clip you want to cut, then click.
Each time you click, the clip is cut.
When you’re done cutting the clip, you can select the Selection tool to move, resize, or
delete any leftover bits of the clip that you don’t need.
You can also cut all the clips in a project.
Chapter 2 Assembling Your Multitrack Project 25
Page 26
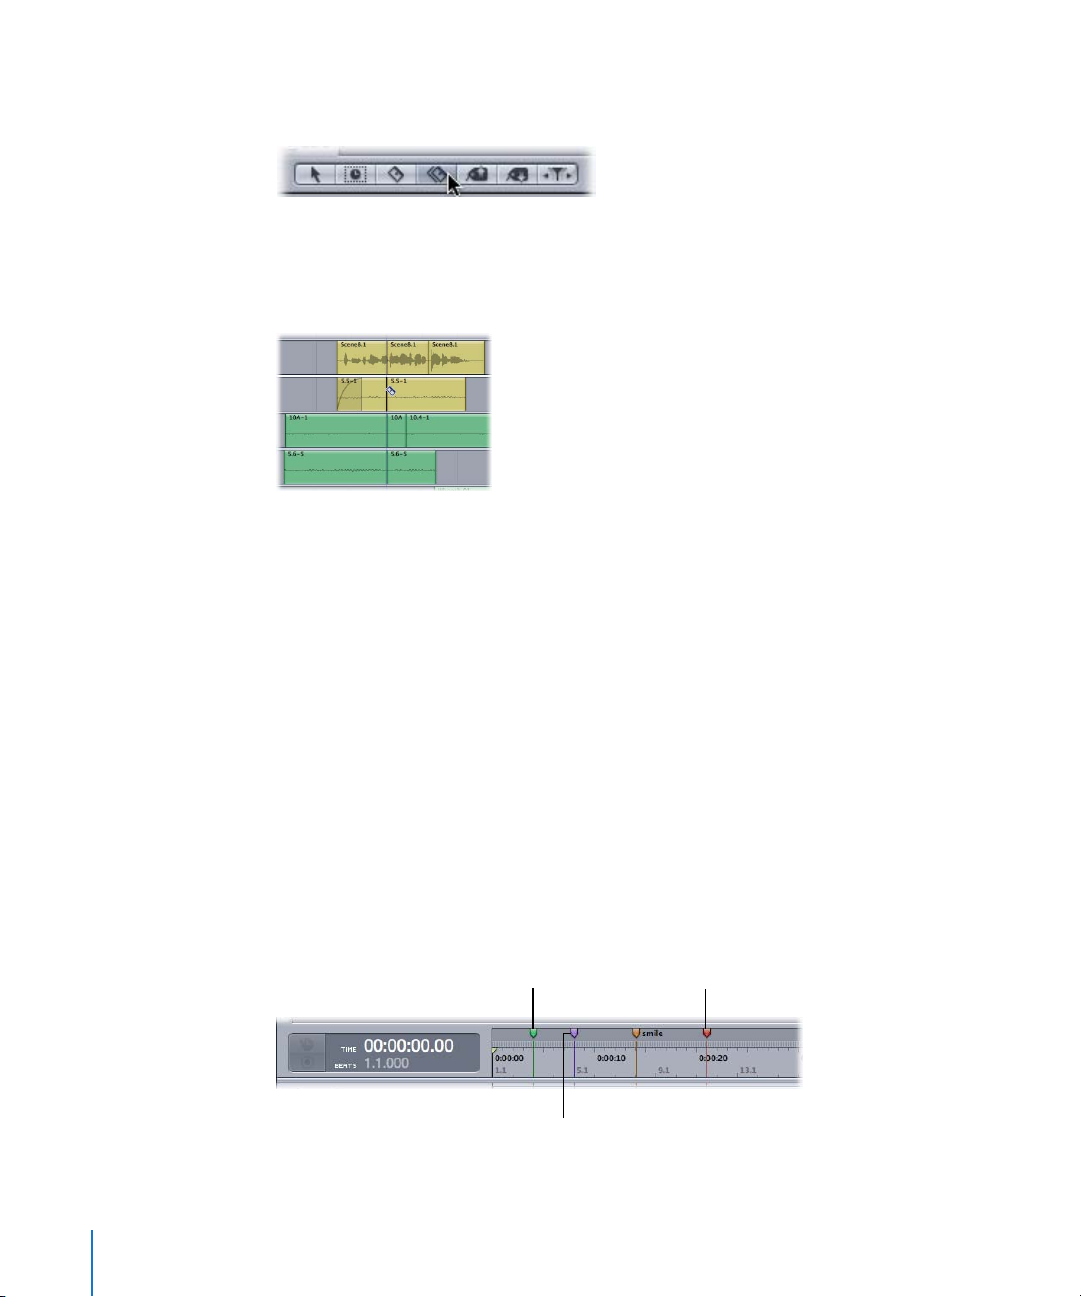
To cut all clips down the length of the Timeline:
1
Select the Blade All tool in the Toolbar.
The pointer becomes a double blade.
2
Position the double blade pointer at the location in the Timeline where you want to
vertically cut, then click.
The clips are cut down the length of the Timeline.
When you’re done cutting your clips, you can select the Selection tool to move, resize,
or delete any leftover bits of the clips that you don’t need.
Adding Markers to the Timeline
Soundtrack Pro markers are used to mark specific points in a multitrack project. They’re
often used to mark scoring and editing points in a project. Soundtrack Pro has four
types of markers: beat, time, end of project, and podcast markers. This section
describes the first three; to learn about podcast markers, see Chapter 6, “Exporting Your
Multitrack Project” on page 73.
You can generally tell markers apart by their color: time markers are green, beat
markers are purple, and end of project markers are red. If a project has many of the
same type of markers, you can name individual markers with label tags. You can also
attach comments to markers.
26 Chapter 2
Time marker
(green)
Beat marker
(purple)
Assembling Your Multitrack Project
End of project marker
(red)
Page 27
To add a marker to the Timeline:
1 Position the playhead where you want the marker.
2 Do one of the following:
 Choose Mark > Set End of Project.
 Click the Add Time Marker or Add Beat Marker button in the Toolbar.
The marker type you added appears in the Timeline.
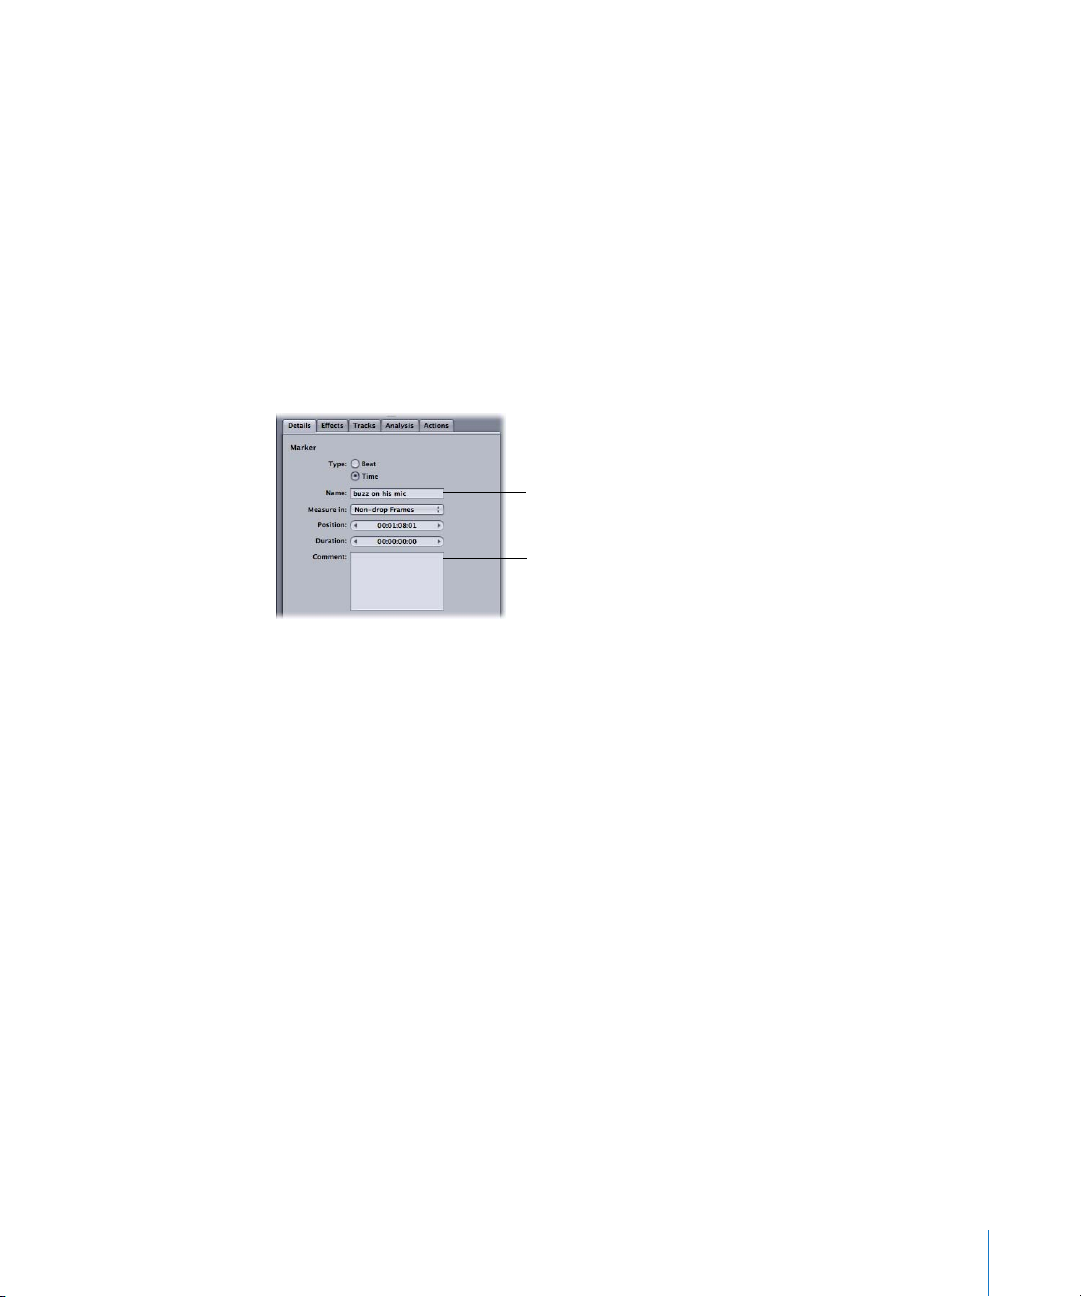
To add name or comment text to a marker:
1 Select the marker to which you want to add text.
2 Display the Details tab by clicking it. Then type a name or comments for the marker
you’ve selected in the appropriate fields and press Return.
Type a name in the
Marker Name field.
Add any comments here.
The marker’s name appears next to the marker in the Timeline. When you hold the
pointer over the marker, the comment text appears onscreen.
You can easily navigate between markers in the Timeline.
To move the playhead between markers:
m Press Option-M to move to the next marker (to the right).
m Press Shift-M to move to the previous marker (to the left).
Chapter 2 Assembling Your Multitrack Project 27
Page 28
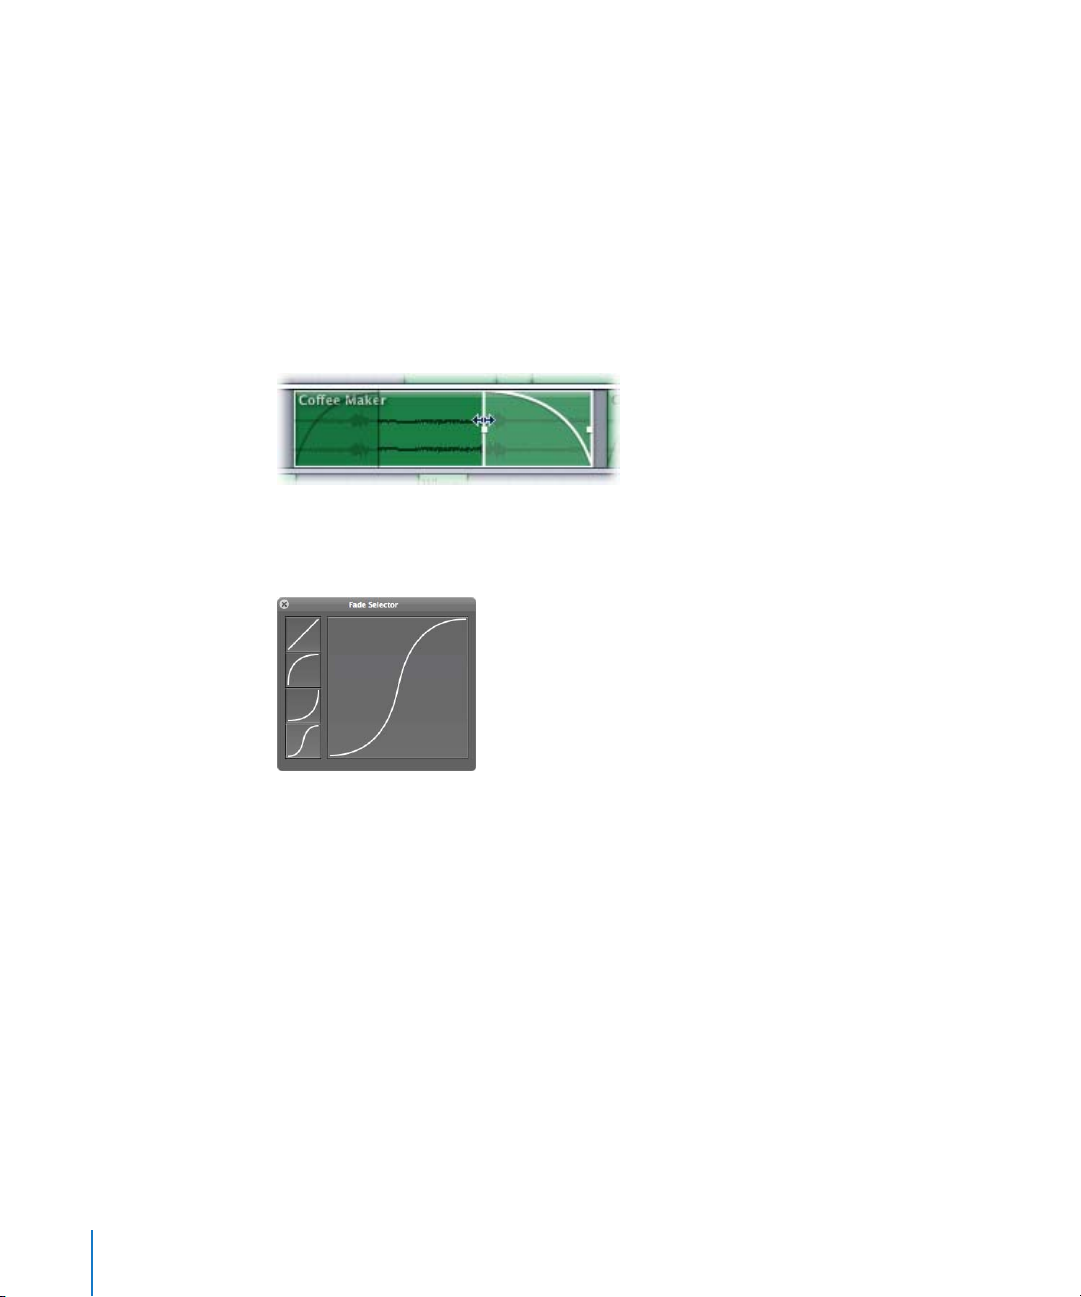
Creating a Fade in an Audio Clip
It’s simple to add a fade to an audio clip. After the fade is placed, you can use the Fade
Selector HUD to reshape it as appropriate.
To create a fade in a clip in the Timeline:
1 Using the Selection tool, position the pointer over the top-left or top-right edge of
the clip.
The pointer becomes a fade pointer.
2 Drag from the corner toward the center of the clip.
A fade is superimposed over the clip.
3 To lengthen or shorten the fade, drag the edge of the fade left or right.
You can use the Fade Selector HUD to reshape your fade.
To reshape a fade’s contour using the Fade Selector HUD:
1 Double-click the fade you want to adjust to display the Fade Selector HUD.
2 Select a fade shape to apply.
To learn more about the Fade Selector HUD, see the Soundtrack Pro User Manual.
28 Chapter 2 Assembling Your Multitrack Project
Page 29
Adding a Crossfade Between Two Clips
A crossfade creates a smooth, even transition between two overlapping audio clips by
blending the crossfaded area together. Crossfades are often used to reduce the sudden
changes in loudness that can result between clips.
After you apply a crossfade to two clips, you can adjust the crossfade’s length, position,
and curve.
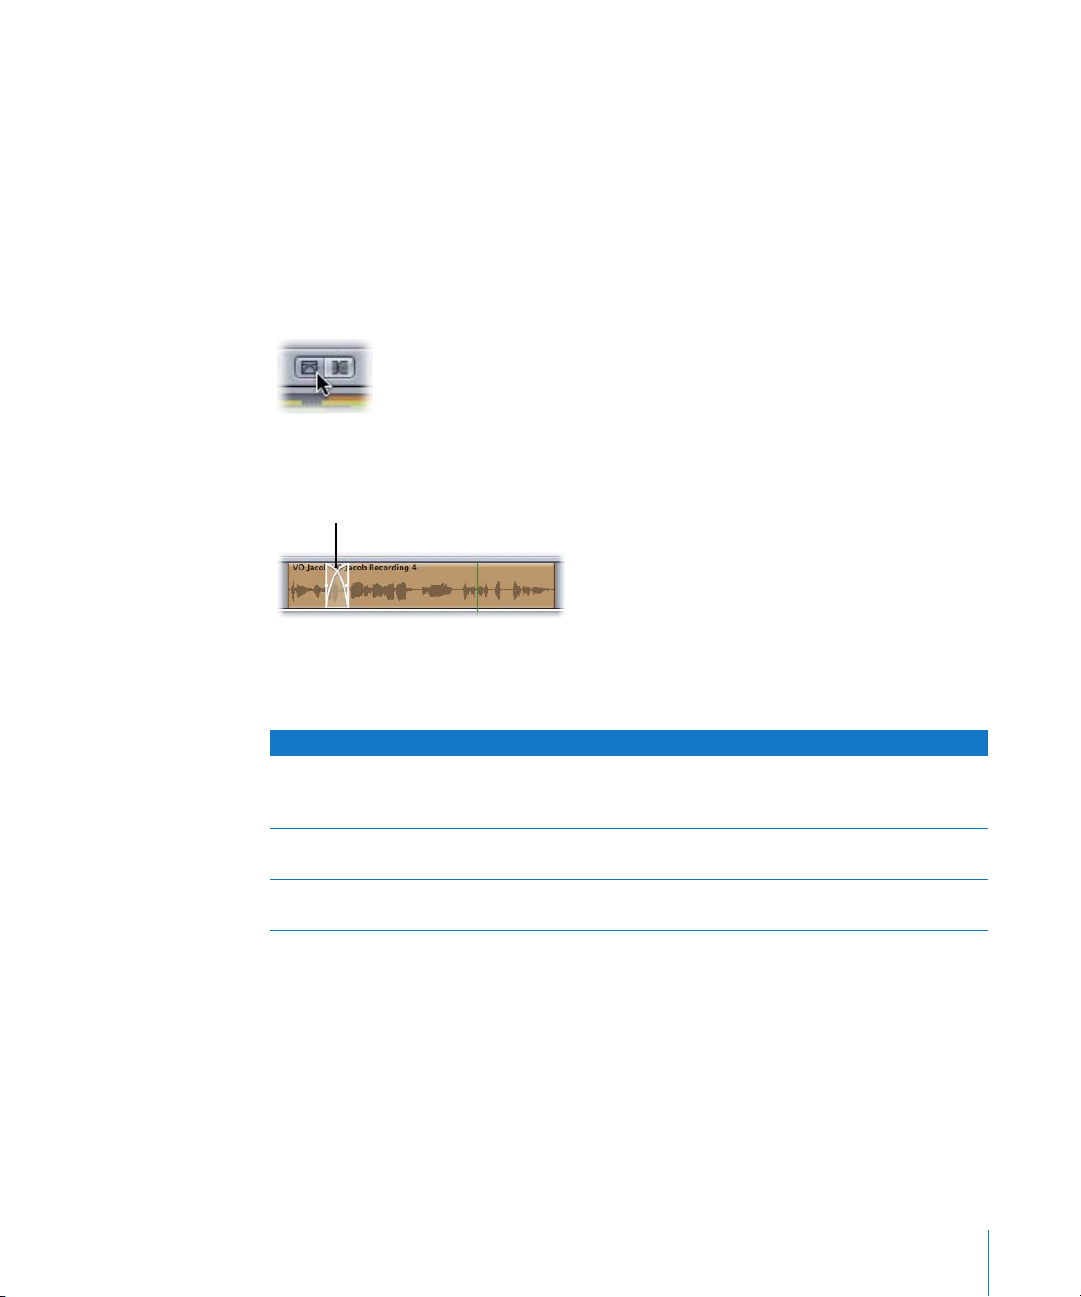
To add a crossfade between two audio clips:
1 Verify that the Crossfade Mode button in the Timeline is selected.
2 Drag the first clip over the second clip. The more you overlap the clips, the longer the
crossfade will be.
Crossfade
The crossfade appears on top of the clips.
Here are a few more ways to work with crossfades.
To do this Do this
To adjust a crossfade’s length Hold the pointer over the crossfade’s left or right edge until you
see the crossfade pointer, then drag the crossfade’s edge to a
new location.
To adjust a crossfade’s position Hold the pointer over the top or bottom edge of the crossfade until
the hand pointer appears, then drag the crossfade to a new location.
To adjust a crossfade’s curve Double-click the crossfade to display the Fade Selector HUD and
then click to select a shape.
Chapter 2 Assembling Your Multitrack Project 29
Page 30

Adding Tracks, Busses, and Submixes to a Multitrack Project
Tracks, busses, and submixes are all organized in rows in the Timeline and they all
function in a similar way. You can add multiple tracks, busses, and submixes to a project
and change both their look and some of their functions.
Adding, Moving, and Removing Tracks, Busses, and Submixes
You add, move, and delete tracks, busses, and submixes using similar commands.
To add a track, bus, or submix to the Timeline:
m Choose Multitrack > Add Track, Add Bus, or Add Submix.
To move a track, bus, or submix to a different position in the Timeline:
m Drag the track, bus, or submix row to a new position within its category.
To remove a track, bus, or submix from the Timeline:
m Select the track, bus, or submix that you want to remove, then choose Multitrack >
Remove Track, Remove Bus, or Remove Submix.
Customizing a Track, Bus, or Submix
You can give tracks, busses, and submixes custom names, icons, and colors to help you
organize and sort them within the Timeline.
To change the name of a track, bus, or submix:
1 Select the name.
The name is highlighted, and a text field appears.
2 Enter a new name and then press Return.
The name of the track, bus, or submix changes.
30 Chapter 2 Assembling Your Multitrack Project
Page 31

To change the icon for a track, bus, or submix:
1 Double-click the icon.
The icon menu appears.
2 Select an icon to represent the track, bus, or submix.
The icon you selected replaces the previous icon.
You can also change the color of a track or bus.
To change the color of a track or bus:
m Control-click the track or bus, then choose Track Color and the color you want from the
shortcut menu.
The color bar and clips on the track or bus change to the color you indicated. Any clips
that you add to the track or bus will also take on the new color.
Chapter 2 Assembling Your Multitrack Project 31
Page 32

Working with Stereo and Surround Track Panners
By default, tracks in Soundtrack Pro are set to stereo (two-channel) panning. You can
switch from stereo to surround (5.1-channel) panning. If you need more control than the
track’s surround panner provides, you can pan a track using the Surround Panner HUD.
This track has a
surround panner.
These tracks have
stereo panners.
The panners and panning
values match in the
Timeline and the Mixer.
To adjust stereo panning on a track:
m Drag the panning slider left or right.
As you drag, the pan value is shown above the slider.
A stereo panner appears, by default, in new tracks and busses in Soundtrack Pro. You
can easily switch a track or bus panner from stereo to surround. You can also display a
Surround Panner HUD if you want to make fine adjustments to the sound’s location.
32 Chapter 2 Assembling Your Multitrack Project
Page 33

To switch a track or bus panner to surround:
m Control-click the track or bus, then choose Use Surround Panner from the shortcut menu.
The surround panner replaces the stereo panner.
Switching from a surround panner to a stereo panner uses the same process; instead of
Use Surround, Use Stereo Panner appears in the shortcut menu.
Understanding Surround Sound
In Soundtrack Pro, the difference between mixing stereo and surround sound hinges on:
 The panner type you assign to the track
 The submix output you assign to the submix
 The audio hardware outputs you have connected to Soundtrack Pro
When mixing in stereo, you use two channels: L (left) and R (right). This is your typical
configuration for car audio, headphones, and so on.
When mixing in 5.1 surround, you use six channels: L (left), R (right), C (center), Ls (left
surround), Rs (right surround), and LFE (Low-Frequency Effects).
This is a typical 5.1 surround speaker configuration:
C
L
30˚
30˚
80˚
Ls
LFE
R
80˚
Rs
Chapter 2 Assembling Your Multitrack Project 33
Page 34

To adjust surround panning on a track:
m Move the puck to determine where the sound goes.
Drag to move the puck in
the surround panner to
relocate the track’s sound.
Surround sound creates a sense of perspective by placing sounds in circular space;
therefore, adjusting panning changes where the sound goes. You can pan a track’s
sound through any of the 5.1 surround channels: L (left), R (right), C (center), Ls (left
surround), Rs (right surround), and LFE (Low-Frequency Effects). The LFE channel is
controlled with its value slider at the bottom of the Surround Panner HUD.
If you want to make fine surround adjustments, you can use the Surround Panner HUD.
The Surround Panner HUD includes controls both for balancing the channel to which
the sound goes and for how the channels interact.
C (center) channel
L (left) channel
Ls (left surround)
channel
R (right) channel
Move the puck to
determine where the
sound goes.
Rs (right surround)
channel
To display the Surround Panner HUD for fine panning adjustments:
m Double-click the surround panner.
The Surround Panner HUD appears.
34 Chapter 2 Assembling Your Multitrack Project
Page 35

To do this Do this
To move the puck Click anywhere in the panner and drag the puck to the desired
location.
To automatically move the puck
to the center
To hold the speaker angle static
Double-click anywhere in the panner. The puck automatically goes
to the center of the panner.
Hold down the Option key while dragging the puck.
while adjusting the puck’s
distance from the center
To hold the distance from the
Hold down the Command key while dragging the puck.
center static while adjusting the
speaker angle
To learn more about the Surround Panner HUD, including how to use its advanced
controls, see the Soundtrack Pro User Manual.
Important: Using a surround panner on a track is just one step in achieving a surround
signal output. Assigning surround sound to a track requires the surround panners to be
assigned to the track, the correct submix output to be assigned to the submix, and the
surround audio hardware outputs to be connected to Soundtrack Pro. Without these
three elements correctly assigned, your surround mix will not work correctly. For more
information on configuring surround sound, see the Soundtrack Pro User Manual.
Routing Your Multitrack Project
A simple multitrack project contains several tracks and a submix; the signal is then
routed through the Master bus and out the hardware outputs.
Master
bus
Hardware
outputs
1
2
Left
Right
Stereo panner
Tracks Submix
1
2
3
4
5
6
7
8
Chapter 2 Assembling Your Multitrack Project 35
Page 36

You can easily create multiple submixes of the same project by adding busses and
submixes and then routing the appropriate tracks through them.
Master
Master
bus
bus
Hardware
outputs
Audio clip
1
1
2
2
3
3
Center
4
4
5
5
6
6
7
7
8
8
Left
Right
LFE
Left
surround
Right
surround
Surround panner
Tracks
1
2
3
4
5
6
7
8
Submix
Effects
Effects
Channels 1–6
Music
Music
Channels 1–6
Dialogue
Channels 1–6
As shown in the illustration above, you can route tracks to various submixes; in the
illustration, tracks 1–3 contain effects, 4–5 contain music, and 6–8 contain dialogue.
Then you can adjust the volume or add effects to each of the three submixes. Finally, all
three submixes are combined and output through the Master bus.
To learn about routing tracks, see the Soundtrack Pro User Manual.
Adding Effects to Your Multitrack Project
Soundtrack Pro comes with an impressive collection of effects, including the following:
 Delay, which can be used to add echoes and other recurring sounds
 Distortion, which change the tone of the audio signal to re-create the sound of
overdriven tube amplifiers or digital distortion
 Dynamics, which let you shape the volume of your projects over time
 EQ (equalization) and Filter, which let you change the level of selected frequencies. EQ
provides a powerful way of shaping the sound of your projects.
 Imaging, which let you make certain sounds or the overall mix seem wider and
more spacious
 Modulation, which delay an audio signal and shift when the delayed signal plays back
relative to the original signal
 Pitch, which transposes or creates unity, thickness, or harmony on audio tracks
 Reverb, which can be used to simulate the sound of acoustic spaces
36 Chapter 2 Assembling Your Multitrack Project
Page 37

 Specialized, a collection of effects which help you reduce noise or add high frequency
components or bass signals
 Utility, a collection of effects which help you handle routine tasks
Note: The Soundtrack Pro User Manual and the Soundtrack Pro Effects Reference
(available in the Help menu) provide in-depth information about the various effects
available in Soundtrack Pro.
You can add an effect to any track, bus, or submix as a realtime effect. A realtime effect
modifies the audio signal as it passes through the effect. Applying an effect as a realtime
effect is useful because you can immediately identify the effect’s influence on the project.
You can add realtime effects to a track, bus, or submix, or to a project’s Master bus.
To add a realtime effect to a track, bus, or submix, or to the Master bus:
1 Select the track, bus, submix, or Master bus to which you want to apply the effects.
2 In the Effects tab of the Inspector, select the effect you want to apply from the Effects
list. Then click the Add (+) button in the Effects tab to apply the effect.
The Compressor effect
Click the Add button
to add the effect to the
is selected.
track you selected in
the Timeline.
Chapter 2 Assembling Your Multitrack Project 37
Page 38

Make any required
changes, then click the
close button.
3 The effect’s Advanced Settings window appears. If necessary, adjust the effect, then
click the Advanced Settings window’s close button.
The Compressor
Advanced Settings
window
After you apply the effect, you can also adjust its parameters in the Timeline or Effects
tab, and turn it on or off by selecting or deselecting its checkbox in the Effects tab.
Click the disclosure
triangle next to the track
name to view the effect.
you added.
You can also click the
effect’s disclosure
triangle in the Effects tab
and adjust the effect
parameters.
38 Chapter 2 Assembling Your Multitrack Project
Page 39

Automating Track, Bus, Submix, and Master Bus Parameters with Envelope Points
Each track, bus, and submix in your Timeline, as well as your project’s Master bus, has a
set of envelopes for volume, pan, and other parameters. Creating and adjusting
envelope points is also often described as automating an envelope or using automation.
When you add an effect to a track, a bus, a submix, or the Master bus, it automatically
gets envelopes for each parameter that can be automated and that is associated with
the effect. To automate the envelope line, you can add points to the envelope line and
move the points up and down to change the parameters of the track, bus, submix, or
Master bus over time.
To automate a track’s parameters:
1 Select the track that contains the effect parameters that you want to automate.
2 In the Effects tab, click the disclosure triangle next to the effect you want to
automate and verify that the Auto checkbox for each parameter that you want to
automate is selected.
3 In the Timeline, click the track’s disclosure triangle to display the track’s envelopes.
The envelope parameters for the effects that are applied to the track appear as
straight lines.
4 To add an envelope point anywhere on the line, double-click the envelope line.
As you double-click the envelope, envelope points appear; a number, indicating the
envelope point’s level, also appears. You can drag the envelope points up and down
to adjust their levels. You can also drag the envelope points left and right to adjust
their positions.
Double-click the
envelope line to create a
movable envelope. point.
5 To make finer adjustments to an envelope, zoom in to the track using the Zoom slider,
then continue to add and move the envelope points.
6 When you’re done automating the envelope, play the track to hear the effects of the
automation you applied.
Chapter 2 Assembling Your Multitrack Project 39
Page 40

Here are more ways to work with envelopes and envelope points.
To do this Do this
To select an envelope point  Click it.
To select multiple
envelope points
To move one or more
envelope points
To set the value of an envelope
point numerically
To nudge an envelope point left
or right
To nudge an envelope’s value
up or down
To copy and paste a sequence of
envelope points
To delete one or more
envelope points
 Drag across multiple points.
 Drag the selected envelope point or points left or right to a new
position or up or down to a new value.
 Control-click the envelope point, choose Set Value from the
shortcut menu, then, in the dialog that appears, enter a new value.
 Select an envelope point or points and then press Command–
Left Arrow or Command–Right Arrow to move the envelope
point or points to the next or previous gridline.
 Select an envelope point or points and then press Command–
Option–Left Arrow or Command–Option–Right Arrow to move
the envelope point or points to the previous or next pixel.
 Select an envelope point or points, then press Command–Up
Arrow or Command–Down Arrow to move the envelope point or
points up or down by five pixels.
 Select an envelope point or points, then press Command–
Option–Up Arrow or Command–Option–Down Arrow to move
the envelope point or points up or down by one pixel.
 Select the envelope points you want to copy and paste. Press
Command-C to copy the envelope points, and then position the
pointer where you want to paste the envelope points and press
Command-V to paste.
 Select the envelope points you want to delete, then press Delete.
40 Chapter 2 Assembling Your Multitrack Project
Page 41

3 Working with Individual
Audio Files
In Chapter 2, you learned how to assemble and arrange files in a multitrack project.
This chapter explains how Soundtrack Pro processes different audio files and how to
edit and apply effects to a single audio file.
In this chapter, you’ll learn about:
 Editing Audio Files (p. 41)
 How Soundtrack Pro Processes Audio Files (p. 42)
 Where to Edit Audio Files (p. 42)
 Opening a Logic Pro Audio File in Soundtrack Pro (p. 46)
 Adding Processes and Effects to a File with Actions (p. 47)
 Using the File Editor Tools (p. 50)
3
Editing Audio Files
The File Editor project view and the File Editor tab are good places to edit an audio file’s
waveform, correct common audio problems, and use nondestructive actions to apply
processes like EQ and noise reduction to a file.
Use these tools to
stretch, zoom, scrub,
and otherwise edit the
file you selected in
the Timeline.
An audio file
open in File Editor
project view
41
Page 42

The Actions tab lists the
actions applied to “ Traffic
City,” the file that’s open
in the File Editor.
When editing an individual audio file, some edits, including normalizing or amplifying
levels, applying effects, and applying noise, pop, and click reduction, are applied as
nondestructive actions. Actions can be reordered, turned on or off, and removed at any
time using the Actions tab.
This chapter is divided into two sections. The first section explains the different ways
that Soundtrack Pro processes audio files associated with multitrack projects and single
audio files that are not associated with multitrack projects. The second section explains
how to perform specific edits and apply effects to audio files in both the File Editor tab
and in File Editor project view.
How Soundtrack Pro Processes Audio Files
Soundtrack Pro can process a variety of audio file types, including AIFF and WAV files. To
allow you to nondestructively edit a file using Soundtrack Pro actions, Soundtrack Pro
will often automatically save a copy of your file as an audio project (.stap) file. This lets
you immediately start nondestructively editing your file.
Any changes you make to a file’s frequency spectrum or waveform, any sample edits,
audio stretching, or processing effects you add to a file are applied as actions. After
adding actions to a file, you can change the order in which they are applied, turn them
on or off, or remove them in the Actions tab.
Actions are useful because they are nondestructive, and you can easily preview,
reorder, and remove them in the Actions tab.
Where to Edit Audio Files
You can work with an individual audio file in two locations in Soundtrack Pro. You edit
files that are part of a multitrack project in the File Editor tab. You edit files that are not
connected to a multitrack project in the File Editor project view.
42 Chapter 3 Working with Individual Audio Files
Page 43

The File Editor tab,
displaying a file selected
in the Timeline
(not shown)
Editing Files That Are Associated with a Multitrack Project
in the File Editor Tab
You can nondestructively edit and apply effects to audio files used in a multitrack
project in the File Editor tab. It is easy to open a single file from the Timeline of a
multitrack project—simply click that file in the Timeline, and it appears in the File Editor
tab below the Timeline.
When you work on individual files in the File Editor tab, you don’t need to save or
update individual audio files. Saving the multitrack project automatically saves all the
individual audio files associated with the multitrack project.
Tracking File and Clip Relationships
One thing you do need to keep track of is the relationships between multiple clips that
refer to the same audio file.
If you apply an effect to an .aiff file in a multitrack project, Soundtrack Pro creates an
audio file project (.stap) from the original file to allow you to edit the file
nondestructively, and the effect is applied as an action to the new .stap file.
The situation is complicated when multiple clips refer to the same audio file.
For example, if you drag three copies of a .wav file into the Timeline of a multitrack
project, you create three new clips, each pointing to the original .wav file. When you
select one of the new clips to begin editing it, a new audio file project is created from
the .wav file that the clip refers to. Any edits you make are applied to the new audio
file project, and then all three clips are updated to point to the new audio file project
that was created.
The example above is useful when you want to do file cleanup operations such as
noise reduction across multiple clips that share the same file. Applying an effect to any
one of the clips will edit all the clips that point to that file. However, what if you want to
edit the audio in a single clip?
To edit a single clip (and not the rest of the clips associated with the source file), you
create an independent audio file project. This makes a new audio file for each selected
clip. Creating an independent audio file also conveniently trims the file to match the
original clip’s length.
Chapter 3 Working with Individual Audio Files 43
Page 44

To open a file (or the file a clip refers to) in the File Editor tab, do one of the following:
m Click the file. When the file (or clip that refers to a file) is selected in the Timeline, it
appears in the File Editor tab below the Timeline.
m Drag a file from the Browser tab, Search tab, Favorites tab, or Bin tab into the File Editor
or Timeline. The file’s waveform appears in the File Editor tab below the Timeline.
Important: Remember that when you work in the File Editor tab, you don’t need to
worry about saving audio files associated with a multitrack project because all the
individual audio files in the multitrack project are automatically saved.
To open a file (or the file a clip refers to) as an independent audio file project:
m Select the clip, then choose Clip > Replace with Independent Audio File Project.
The selected clip is replaced with a new independent audio file project.
Editing Single Audio Files in File Editor Project View
If you are not working in a multitrack project and want to edit single audio files, you
can edit in the File Editor project view. A single audio file, opened from the Browser,
Search, or Favorites tab appears in the File Editor project view. You may have several
audio files open simultaneously; when you do, each file has its own File Editor tab.
If you double-click a file,
it appears in the
full-screen File Editor.
When you edit or apply an edit or effect to a file, Soundtrack Pro automatically converts
the file from its original file format to an audio file project. This conversion allows the
edits to be applied to the file as nondestructive actions. By default, Soundtrack Pro
chooses the audio file project format so that it can save your actions nondestructively.
Unlike when editing files associated with a multitrack project, you must save the edits
you apply to an audio file project or other file type.
44 Chapter 3 Working with Individual Audio Files
Page 45

To open an audio file project or other single audio file in the File Editor project view,
do one of the following:
m Double-click a file in the Browser, Search, or Favorites tab.
m Open a file from Final Cut Pro or another audio application.
Note: A single file from a multitrack project also appears in the File Editor project view
when you double-click that file in the Timeline.
To save an audio file project or other single audio file:
1 Choose File > Save.
A Save dialog appears.
2 Enter a name for your file in the Save As field and define where to save it using the
Where pop-up menu.
3 Choose a file type for saving your audio file project and select any other
applicable options.
 Bit Depth: Choose between 8-bit and 32-bit integer or floating point bit rate.
 Sample Rate: Choose between 32,000 and 192,000 Hz.
 Dither: Reduces quantization errors in low-level audio signals, such as the end of a
fade-out or the last trailing moments of a reverb effect. Dithering is useful when
saving a project at a lower bit depth or sample rate.
 Include Source Audio: Includes a copy of the source audio files in the audio file
project. Not selecting the checkbox includes a link to, instead of a copy of, the
original source audio.
Note: If you don’t select the Include Source Audio checkbox, the original audio file is
not saved as part of the project file and your project will not play unless the original
file is available in its original location.
Chapter 3 Working with Individual Audio Files 45
Page 46

 Update Multitrack Projects: If you have used a file associated with the multitrack
project you are saving in one or more multitrack projects, Soundtrack Pro can replace
every instance of the old file with the file you are currently saving. To enable this
switch, select the Update Multitrack Projects checkbox.
Important: To write over the original file destructively, save the file using the original
file type, not the new audio file project.
4 Click the Save button.
Your file is saved.
Opening a Logic Pro Audio File in Soundtrack Pro
The Open in External Editor feature allows you to edit or process mono, stereo, and
multichannel files using the editing tools and features in Soundtrack Pro.
To open a Logic Pro audio file in Soundtrack Pro:
1 Select an audio region in the Logic Pro Arrange window.
2 Choose Option > Audio > Open in c.
Soundtrack Pro opens and displays the audio file associated with the selected
audio region.
Note: Logic Pro allows you to select any external editing application you wish to use.
Logic Pro ships with Soundtrack Pro as the default external editing application. If you
previously selected a different application, that name will be seen in the Logic Pro
Options menu. To learn how to change an external editor in Logic Pro, see the
Logic Pro User Manual.
To send the edited audio back to Logic Pro:
1 After you’ve edited the audio in Soundtrack Pro, choose Process > Flatten All Actions to
render your changes.
2 Save the file by choosing File > Save.
Note: Logic Pro cannot read Soundtrack Pro project files directly. Files must always be
saved as flattened audio files.
3 Return to Logic Pro. The audio file that you edited in Soundtrack Pro automatically
updates.
For more information, see the Logic Pro User Manual and the Soundtrack Pro User Manual.
46 Chapter 3 Working with Individual Audio Files
Page 47

When you add any
process or effect from the
Process menu, it is
applied as an action.
Adding Processes and Effects to a File with Actions
When you add a process or effect, like EQ or reverb, to an audio file, it is applied as an
action. Actions are useful because they are nondestructive and easy to work with; you
can easily preview, reorder, and remove them in the Actions tab. When you’re happy
with the actions applied to a file, you can flatten the actions onto the audio file to
which they are applied. This applies all of the actions in your list as a single action.
While this makes the actions uneditable, it reduces the size of the audio file.
Any of the Soundtrack Pro processes or effects can be applied to an audio file as an
action. Take a minute to check out the variety of processes and effects available in the
Process menu.
You can add processes and effects to a file in several ways. Here’s an easy way to add a
process or effect to a file.
To add a process or effect to a file (or a section of a file) as an action:
1 Select the file (or section of the file) you want to add the effect to in the File Editor.
2 Choose Process, then choose the process you want to apply as an action.
3 Some actions have a dialog that contains setting options. Choose the settings you
want, then click Apply.
The action appears in the Actions list.
Chapter 3 Working with Individual Audio Files 47
Page 48

Deselecting an action’s
checkbox turns the
action off.
The Action Insert bar
determines where new
actions are inserted.
When you add an action, it automatically appears above the Action Insert bar.
The Soundtrack Pro
Reverb and Denoiser
effects were added to
the file as actions.
Actions pop-up menu
Here are some easy ways to work with actions.
To do this Do this
To edit an action’s settings Double-click the action in the Actions list. The settings appear.
To turn an action on or off Select or deselect the action’s checkbox.
To reorder a list of actions Select an action, then drag it up or down to a new location in the
Actions list.
To define where new actions are
added to the Actions list
To delete an action from the
Actions list
Drag the Action Insert bar up or down to a new location in the
Actions list.
Select the action, then press Delete.
48 Chapter 3 Working with Individual Audio Files
Page 49

Make sure the Action
Insert bar is below the
last action you want to
Flattening an Actions List
You can flatten all the actions in an Actions list into a single action. Flattening actions
renders the actions into the file, reducing the file’s complexity and size. Remember,
however, that once you flatten an Actions list, you cannot reorder or edit the actions:
after flattening, the actions you flattened become one action.
To flatten your Actions list:
1 Move the Action Insert bar directly below the last action you want to flatten.
2 Choose “Flatten audible actions” or “Flatten all actions” from the Actions pop-up menu.
 Flatten audible actions: Flattens only the actions above the Action Insert bar.
 Flatten all actions: Flattens all the actions in the Actions list, regardless of the location
of the Action Insert bar.
flatten.
Then choose a flatten
actions option from the
Actions pop-up menu.
The actions are flattened.
Chapter 3 Working with Individual Audio Files 49
Page 50

The File Editor
tab’s toolset
The File Editor project
view's toolset
Using the File Editor Tools
The File Editor tab and the File Editor project view have their own special toolsets for
performing precise waveform edits.
Scrubbing a File
When you scrub an audio file, you play through it, hearing the audio at an accelerated
or decelerated speed. If you need to find a specific sound in a file—for example, a
crash—scrubbing can come in handy.
50 Chapter 3 Working with Individual Audio Files
Page 51

To scrub a file:
1 Select the Scrub tool at the top-left corner of the File Editor.
The pointer becomes a scrubber.
2 Drag the scrubber left or right in the File Editor or Timeline.
The file plays at an accelerated rate.
3 When you find the sound you were listening for, release the mouse button.
You can also shuttle through a file using the J, K, and L keys on your keyboard.
To do this Do this
To play your project at normal
(1x) speed
To play your project in reverse at
normal (1x) speed
To double, triple, or quadruple
the current playback speed
To pause playback Press K.
Press L.
Press J.
Press L or J two, three, or four times.
Chapter 3 Working with Individual Audio Files 51
Page 52

Zooming In to a File
Like the Timeline, the File Editor has a Zoom slider to help you see the details of your
file. It also has a Zoom tool.
To zoom in to a file:
m Drag the Zoom slider at the bottom of the File Editor.
Drag this slider to see
more detail in your file.
As you can see, the Zoom slider shows you more file detail, but it usually will not zoom
in far enough to reveal your file’s samples.
To increase or decrease the zoom level, do one of the following:
m Select a section of the waveform with the pointer. The waveform is automatically
zoomed in to the selected section.
m Select the Zoom tool at the top-left corner of the File Editor, and then click the
waveform repeatedly.
Select the Zoom tool and
then click to zoom in to
the waveform.
To zoom out and make the waveform smaller, press Option while clicking the waveform.
When you can no longer zoom in, you have reached the file’s samples.
52 Chapter 3 Working with Individual Audio Files
Page 53

What Is a Sample?
A
sample
is the smallest measure of digital audio. To understand how small a sample is,
consider this: one second of audio requires thousands of samples. Commonly used
sample rates include 44.1 kHz for CD-quality audio and 48 kHz for digital video–quality
audio files.
Each solid dot in
the waveform at
the left represents
a digital sample.
Samples are produced by analog-to-digital converters that measure (sample)
continuously changing analog audio strength and that output discrete numbers at
regular intervals of time.
In Soundtrack Pro, you define your sample rate, the size of the digital samples used in
your project, when you configure your project settings.
Editing a File’s Samples
While most edits don’t require moving samples individually, some sound editors prefer
to work at the sample level. You can easily edit the individual samples of an audio file,
changing the amplitude of one or several samples.
Chapter 3
Working with Individual Audio Files
53
Page 54

Drag the Zoom slider to
the far left to view a
waveform’s samples.
To edit a file’s samples:
1 In the File Editor project view, use the Zoom tool or drag the Zoom slider to zoom in to
the file and reveal its waveform’s samples.
2 Select the Sample Edit tool at the top-left corner of the File Editor.
The pointer becomes a pencil.
3 To change the amplitude of a series of samples, drag left or right with the
Sample Edit tool.
To increase or decrease a single sample’s amplitude, drag the sample up or down.
Each edit you make
appears as an action in
the Actions list.
As you edit your file’s samples, actions appear in the Action list.
54 Chapter 3 Working with Individual Audio Files
Drag horizontally to
draw new samples, or
drag an individual
sample up or down.
Page 55

Time Stretching an Audio File
Time stretching a section of an audio file alters its length. Time stretching is particularly
useful when editing dialogue because you can alter the timing of the dialogue without
affecting its pitch.
To time stretch a file:
1 View the file in the File Editor project view.
2 Select the Audio Stretching tool.
The pointer becomes a stretcher.
3 Select the portion of the file that you want to stretch or contract.
4 Position the stretcher over the right edge of the selection. When the stretcher pointer
appears, stretch the file farther to the right to lengthen the audio or to the left to speed
up the audio.
Note: If you don’t want to overwrite nearby audio files, hold down the Option key
while stretching or contracting the file. This lengthens or shortens the file instead of
overwriting any nearby files.
When you release the mouse button, the File Editor updates the waveform to show the
new, stretched audio.
Chapter 3 Working with Individual Audio Files 55
Page 56

Editing a File in Frequency Spectrum View
In some editing situations, you may want to view a file’s frequency spectrum instead of
its waveform. For example, if you’re looking for a specific frequency of camera noise,
you can easily find it using Frequency Spectrum view.
To view a file’s frequency spectrum:
m Click the Frequency Spectrum View button at the top-right corner of the File Editor.
Use these buttons
to switch between
Waveform and
Frequency Spectrum
view.
Frequency Spectrum
view
To select a frequency region:
m Select the Frequency Selection tool and then select a portion of the frequencies.
Soundtrack Pro has advanced controls that allow you to adjust the spectrum view and
switch between a linear and logarithmic frequency scale.
To view the Soundtrack Pro advanced frequency controls:
m Control-click anywhere in the frequency spectrum, then choose Show Spectrum
Controls from the shortcut menu to display the Frequency Spectrum HUD.
To learn more about working with frequency spectrum and about the Frequency
Spectrum HUD, see the Soundtrack Pro User Manual.
56 Chapter 3 Working with Individual Audio Files
Page 57

4 Solving Audio Problems
4
Audio files are sometimes less than perfect. You can correct annoying clicks, hum, and
other file problems you find in your audio files with the Soundtrack Pro Analyze and
Repair feature.
In this chapter, you’ll learn about:
 Analyzing and Fixing Problems in an Audio File (p. 57)
 Creating an AppleScript Droplet to Analyze and Fix Audio Files (p. 60)
Analyzing and Fixing Problems in an Audio File
Soundtrack Pro can analyze and correct audio files for a variety of common audio issues:
 Clicks and pops: Sudden, short peaks in the waveform can make clicking and
popping sounds when played. You can increase the threshold parameter for
searching to find fewer clicks and pops.
 Power line hum: Power line hum (usually occurring at 50 to 60 Hz) can be found
and corrected.
 DC offset: DC offset, which is when the samples are not centered around zero, can be
found and corrected.
 Phase: Usually caused by a distorted or inaccurate stereo image, phase issues usually
show up as partial or complete cancelation of the left and right channels.
 Clipped signal: Signal overloading, resulting in cut-off audio, can be caused by poor
gain staging, surface damage to an analog recording, or other reasons.
 Silence: Silent sections of an audio clip can be found and corrected. You can define
the silence by threshold or duration.
57
Page 58

To analyze an audio file for problems:
1 Select the file in the Timeline to display it in the File Editor.
If you want to analyze just a section of the file, select just that section in the File Editor tab.
The Analysis tab
Select one or more
problems to look for on
the clip.
This clip is selected;
it appears in the
File Editor below.
2 In the Analysis tab, select one or more audio problems from the Analysis Type list and
then click the Analyze button.
Then click the
Analyze button.
58 Chapter 4 Solving Audio Problems
Page 59

Soundtrack Pro analyzes the file and then reports each problem it detects in the
analysis results list. It also marks the problem area of the waveform in red.
The analysis results list
reports the problems
found in the order they
appear on the waveform.
The problem (and
problem area) selected
in the Analysis tab is
identified and displayed
in red.
 Status: Indicates whether the problem exists or has been fixed.
 Problem: Indicates the problem type.
 Start: Indicates when the problem begins.
 Length: Indicates the problem’s duration.
 Channel: Indicates where the problem occurs: in the left channel (L), right channel
(R), both channels (LR), or other (-).
After identifying a problem, you might want to view it in detail on the waveform.
To examine a found problem:
1 Select the problem in the analysis results list.
The problem area of the waveform is automatically selected.
2 Click and hold the Zoom button at the bottom of the Analysis tab to zoom in to the
problem you selected.
Now you can fix the problem manually, or you can have Soundtrack Pro fix it for you.
You can choose to fix all the problems listed in the analysis results list, or correct the
problems one at a time. Of course, you can also choose to leave a problem uncorrected.
Chapter 4 Solving Audio Problems 59
Page 60

To fix all the problems displayed in the analysis results list:
m Click the Fix All button.
The problems are fixed in the waveform, and the problems’ status in the analysis results
list changes to Fixed.
All of the problems in the
list are fixed.
To fix problems one at a time:
1 Select the problem you want to fix in the analysis results list.
2 Click the Fix button.
The problem is fixed in the waveform, and the problem’s status in the analysis results
list is reported as Fixed.
Creating an AppleScript Droplet to Analyze
and Fix Audio Files
You can save a series of Soundtrack Pro actions, including analyzing and fixing a variety
of problems, as an AppleScript droplet. After you’ve saved the droplet, you can simply
drag the files you want to process onto the droplet.
You can get instructions for creating AppleScript droplets to use with Soundtrack Pro in
the Soundtrack Pro User Manual.
60 Chapter 4 Solving Audio Problems
Page 61

5 Mixing Stereo
and Surround Projects
Mixing involves balancing the items in a project to create a full, complete sound. This
chapter takes you through a simple mixing process to teach you the basic principles
of mixing.
In this chapter, you’ll learn about:
 Fundamentals of Mixing (p. 61)
 Working in the Soundtrack Pro Mixer (p. 62)
 Steps for Mixing a Project (p. 64)
5
Fundamentals of Mixing
You follow the same basic steps to mix both stereo and surround sound projects:
 Balancing tracks’ relative volume levels
 Panning tracks to create a balanced stereo or surround spread
 Adding EQ, compression, and other final processing effects
 Setting the project’s final volume and eliminating clipping
You can perform these steps in any order, moving between steps as appropriate for
your specific project. However, in most situations it makes sense to first finish mixing
your project’s tracks and then adjust the entire project’s levels.
After working through the mixing process described in this chapter, you’ll have created
your final mix.
61
Page 62

Working in the Soundtrack Pro Mixer
In the Soundtrack Pro Mixer tab, you can easily compare and adjust volume for each
track, bus, and submix. If you’d rather work with a floating Mixer window, you can drag
the Mixer tab off to display a separate Mixer window. You may want to do this when
you want to make fine adjustments to a track’s volume. You can then manually stretch
the Mixer window to the length of the Soundtrack Pro window.
The Soundtrack Pro Mixer mimics a hardware mixing board. The order of the Mixer’s
channel strips follows the order of the tracks, busses, and submixes in your multitrack
project’s Timeline. The Master bus is always the last channel strip in the Mixer (and last
track in the Timeline).
When you make changes to controls such as volume and pan in the Mixer, the
corresponding levels automatically update in the Timeline’s header controls. The Mixer’s
vertical channel layout makes it easy for you to see the relative volume levels of each of
the tracks.
The Mixer has a channel
strip for each track, bus,
and submix, and the
Master bus in your
project’s Timeline.
Each track channel strip contains the track’s name and icon, effects slots, panners (for
stereo or surround), buttons for bypassing effects, an Arm for Recording button,
buttons for muting and soloing the track, volume faders, meters, and a Submix pop-up
menu. While the channel strips for tracks, busses, submixes, and the Master bus have
slightly different controls, they share many common controls.
 The channel’s icon and color correspond with the track icon and color in the Timeline.
 Effects that have been applied to the tracks, busses, submixes, or Master bus appear
in the Effects list. You can add effects here or in the Timeline.
 The panner can be round (for surround) or horizontal (for stereo).
62 Chapter 5 Mixing Stereo and Surround Projects
Page 63

A surround panner;
if the channel is in
stereo, a stereo panner
appears here.
Volume can be set by
dragging the volume
fader or by entering a
number in the value
slider below.
 You can set a track’s volume using the vertical volume fader or by entering a number
in the volume value slider.
 You can route a track, bus, or submix channel using the pop-up menu at the bottom
of the channel. This pop-up menu corresponds with the Routing pop-up menu in
the Timeline.
The Effects list shows all
the effects applied to the
track, bus, or submix.
Playback controls,
including mute and solo
Specify the submix to
send the track to (or, in a
submix, the channels to
send to the submix) from
this pop-up menu.
You can reorder your channel strips by dragging them to a new order at any time in
the same way you can move the tracks, busses, and submixes in the Timeline.
To do this Do this
To reorder a channel strip Drag the channel strip by its drag handle left or right to a
new position.
To copy a channel strip Option-click the channel strip’s drag handle, then drag it left
or right.
To remove a channel strip from
Select the channel strip, then choose Multitrack > Remove [item].
the Mixer
Note: If you prefer to mix your project using hardware control surfaces, you can add
surfaces that use the Mackie Control and Logic Control protocols to communicate with
your computer.
Chapter 5 Mixing Stereo and Surround Projects 63
Page 64

Steps for Mixing a Project
This section takes you through a generic mixing process for a film project made of
voiceover, dialogue, effects, and music tracks. This mini-tutorial is intended to give you
a general sense of the goals and outcome of mixing a film audio project: to adjust the
individual audio tracks and create a balanced master mix.
Step 1: Mix the voice tracks
Adjust the volume and balance of the voiceover and dialogue tracks.
Step 2: Mix the effects and music tracks
Adjust the volume of the effects and music tracks.
Step 3: Adjust the overall mix
Make overall adjustments to the project.
Step 4: Correct clipping on the Master bus or for exported items
Verify that none of the audio exceeds the maximum volume.
Step 5: Listen one more time
Listen one more time, just in case.
Mixing the Voice Tracks
In this step, you check the volume and balance of the voice tracks.
Click the Solo button to
solo one or more tracks.
In the Cafe example, there are two groups of voice tracks: the primary voice (VO Debra
and VO Jacob) and the secondary voice (Dialog 1 and Dialog 2).
To mix the first set of voice tracks:
1 Solo each main voice track by clicking its Solo button.
64 Chapter 5 Mixing Stereo and Surround Projects
Page 65

2 Pan, or move, each of the soloed main voice tracks to center (0).
3 Play the primary voice tracks again. How does the playback sound?
4 Adjust the panning as appropriate for your mix, depending on the type of panner the
tracks have and the location from which you want the sound to emerge. Typically,
dialogue is mixed almost exclusively in the center channel.
Adjust each track’s
panning.
5 Press the Space bar to play the primary voice tracks again. How does it sound?
6 If necessary, add any EQ, compression, or other processing effects to complete the
sound of your main voice channels.
7 Adjust the relative volume of the main voice tracks, leaving some cushion (typically
around –6 dB) in case you need to raise the levels later.
Adjust each track’s
volume, leaving some
headroom at the top.
Chapter 5 Mixing Stereo and Surround Projects 65
Page 66

To mix the dialogue tracks (Dialog 1 and Dialog 2):
m Repeat the mixing process for the other voice tracks in your project. For the Cafe project
shown in this example, you would repeat the process on the Dialog 1 and Dialog 2 tracks.
In this example,
you would repeat the
mixing process for
the secondary tracks,
Dialog 1 and Dialog 2.
Mixing the Effects and Music Tracks
This step repeats the mixing process on your project’s other tracks. Background tracks,
like music, require a bit more attention because they do not automatically blend
together in the way the voice tracks can. For this step, you’ll repeat the mixing process
on each individual track.
All of the effects and
music tracks
66 Chapter 5 Mixing Stereo and Surround Projects
Page 67

To mix an effects or music track:
1 Solo the first of your effects and music tracks (in this example, the first FX track), then
adjust its pan to center and play the track. How does it sound?
2 Play the track again, then adjust the panning as appropriate for your mix, depending
on the type of panner the track has and the location from which you want the sound
to emerge.
3 Play the track again. If necessary, add any EQ, compression, or other processing effects
to complete the sound of the track.
4 Adjust the relative volume of the track, leaving some cushion (typically around –6 dB)
in case you need to raise the levels later.
Repeat this process on each of the remaining tracks.
Now all the tracks in your project should be adjusted for volume, pan, and required
surround panning.
Adjusting the Entire Mix
Once you have mixed all the individual tracks in your project, you should listen to all
the tracks at least a few more times. Then, if necessary, add any EQ, compression, or
other processing to the overall project in the submix channel.
Note: It’s helpful to have all the meters in the Mixer, as well as the project audio meter
in the Utility tab, showing for this final step.
Important: Before you begin this step, verify that none of the tracks are soloed or muted.
Chapter 5 Mixing Stereo and Surround Projects 67
Page 68

When you select the
submix track in the Mixer,
the submix track in the
Timeline is also selected.
To make changes to the overall mix:
1 Press Shift-Return to play your project. Listen to it. Does it need any final adjustments?
For this example, a compressor will be added to the Cafe project’s submix track to even
out the final mix.
2 Select the submix track in the Mixer. When you do, the submix track in the Timeline is
automatically selected.
Select the submix
track. In this example,
the Mixer tab is a
floating window and
has been resized.
Select Dynamics and
Compressor in the
Effects tab.
Click the Add (+) button.
3 To add a compressor to the submix track, select the Effects tab, select Dynamics and
Compressor, and click the Add (+) button.
68 Chapter 5 Mixing Stereo and Surround Projects
Page 69

The compressor appears
in the Effects list.
The compressor also
appears in the submix
track of the Timeline.
The compressor is added to the Effects list in the Effects tab; it also appears in the
Effects list in the submix track in the Timeline and in the Mixer.
4 Press Shift-Return to play your project again. How does the compressor effect change
the sound of your final mix?
If you want to further adjust the compressor, you can display it by clicking the
Advanced button in the Effects tab; you can also automate the compression envelope
on the submix track in the Timeline.
Play the project once again. As the project plays, watch your project’s audio meter (in
the Meters tab), especially the clipping meter, which lights up any time the levels are
loud enough to distort the audio.
Use the Meters tab to
watch for clipping.
Note: Soundtrack Pro projects clip whenever the output displayed in the level meters
exceeds zero decibels (0 dB).
Watch the audio while the project plays through to its end. If you saw any clipping,
you’ll need to remove it.
Chapter 5 Mixing Stereo and Surround Projects 69
Page 70

Correcting Clipping on the Master Bus or for Exported Items
Clipping occurs whenever the output displayed in the level meters exceeds zero
decibels (0 dB). Because Soundtrack Pro uses floating point digital audio, clipping only
needs to be corrected on a multitrack project’s Master bus.
To fix clipping, you simply adjust the volume until the clipping ceases.
The peak indicator
To find and correct clipping:
1 Reduce the volume by the amount shown in the peak indicator using the volume fader
or volume value slider.
2 Replay the project from the beginning (starting from the beginning resets the peak
indicators in your project).
3 If clipping still occurs, continue to reduce the volume until the project does not clip.
Listening One More Time
To be safe, listen to your project again (or a few more times). Is this your final mix?
If so, your mixing process is complete.
In some situations, you may also want to listen to a mono mix of your project. For
example, if your final project will be listened to on a single speaker or other nonstereo
output, you might want to test the mono mix for phasing and other playback issues.
70 Chapter 5 Mixing Stereo and Surround Projects
Page 71

To listen to a temporary mono mix:
m Press Shift-Return to play your project from the beginning, then click the Mono Mix
button, located to the right of the Monitor Volume slider and to the left of the
transport controls.
Click and hold the
Mono Mix button while
the project is playing to
hear a mono mix.
You can also Option-click the Mono Mix button to play back a temporary mono mix
without having to hold down the button.
To stop listening to the mono mix, release the mouse button.
Chapter 5 Mixing Stereo and Surround Projects 71
Page 72

Page 73

6 Exporting Your Multitrack Project
6
This chapter explains three ways to export a project: as a final mix, as several split
mixes, and as a podcast. It also explains how to save a final project with media, a good
alternative to exporting if you want to continue to work on your project files, and
discusses how to send a multitrack project to Final Cut Pro.
In this chapter, you’ll learn about:
 The Export Dialog (p. 74)
 Exporting a Final Mix (p. 75)
 Exporting a Submix (p. 76)
 Exporting a Multitrack Project to Final Cut Pro (p. 76)
 Exporting a Podcast (p. 77)
 Saving a Multitrack Project with Its Media Files (p. 79)
73
Page 74

Access export presets
with this pop-up menu.
Define the exported file
type here.
Choose to open
another application, like
Final Cut Pro or Logic, or
choose other options.
The Export Dialog
The Export dialog in Soundtrack Pro is a flexible tool that provides numerous options
for your workflow and distribution needs.
Use this pop-up menu to
export your master mix,
submix, and so on.
This section updates to
display parameters
specific to the file type
chosen in the File Type
pop-up menu.
 Preset pop-up menu: Create custom export presets with any combination of exported
items, file types, bit depths, sample rates, and post-export actions.
 Exported Items pop-up menu: Choose to export a master mix or export the
component parts of your multitrack project as individual files or as groups of files.
 File Type pop-up menu: Choose the file type for the exported audio file or files.
 “Create multiple mono files” checkbox: Select this checkbox to export a separate audio
file for each output channel in your multitrack project.
 Bit Depth pop-up menu: Choose a bit depth for the exported file.
 Sample Rate pop-up menu: Choose a sample rate for the exported file.
 After Export pop-up menu: Choose a post-export action.
74 Chapter 6 Exporting Your Multitrack Project
Page 75

Exporting a Final Mix
Here’s a set of basic export instructions to export a completed multitrack project. Make
sure that the multitrack project you want to export is open and ready to be exported.
To export a master mix of a multitrack project:
1 Choose File > Export.
The Export dialog appears.
2 Enter a name for your mix in the Save As field.
3 If you want your file to be exported somewhere other than your desktop, choose a
location from the Where pop-up menu.
Click this button to
navigate to where you
want to locate your
exported files.
4 Choose Master Mix from the Exported Items pop-up menu.
5 Choose a file type from the File Type pop-up menu.
6 Make any other changes, including setting parameters specific to a file type.
Sample export master
mix options
7 When you’re ready to export your mix, click Export.
Your master mix is exported to the location and with the criteria you specified.
Chapter 6 Exporting Your Multitrack Project 75
Page 76

Exporting a Submix
You can also easily export submixes of your multitrack project. The standard splits for
creating multiple language tracks on DVDs include separate dialogue (D1), music (M1),
and effects (E1) mixes; however, you can export any combination of tracks, busses, and
submixes by following the basic steps explained below.
To export a submix:
1 In the Timeline or the Mixer, select the tracks as well as any busses or submixes you
want to export.
2 Choose File > Export.
3 Choose Selected Tracks, Busses, and Submixes from the Exported Items pop-up menu.
4 Choose a file type for your exported files from the File Type pop-up menu.
5 Click Export.
The submix is exported to the location you specified.
Exporting a Multitrack Project to Final Cut Pro
If you brought a Final Cut Pro audio sequence into Soundtrack Pro, you can easily send
a mixdown of the project you are editing in Soundtrack Pro back to Final Cut Pro.
To update a Final Cut Pro project with a mixdown from Soundtrack Pro:
1 When your multitrack project is completed, choose File > Export.
2 Define your export options.
3 Choose “Send files to Final Cut Pro sequence” from the After Export pop-up menu.
4 Click Export.
76 Chapter 6 Exporting Your Multitrack Project
Page 77

If you have Final Cut Pro installed on your system, the multitrack project automatically
opens as a sequence in Final Cut Pro, with the mixdown correctly positioned in the
Timeline and the original audio tracks muted.
If you do not have Final Cut Pro installed on your system, you can save the project
and later import the resulting Soundtrack Pro project into the original Final Cut Pro
project with the mixdown correctly positioned in the Timeline and the original audio
tracks muted.
More shortcuts have been designed to help you repeatedly move audio clips between
Soundtrack Pro and Final Cut Pro. For more information, see the Final Cut Pro User Manual
and the Soundtrack Pro User Manual.
Exporting a Podcast
Exporting a podcast from Soundtrack Pro files is easy. You simply mark your multitrack
project with podcast markers and then export your podcast.
To add podcast markers to your project:
1 To display the podcast track in the Timeline, choose Podcast Track from the Show
pop-up menu in the upper-right corner of the Timeline.
Video track
Podcast track
Choose Podcast Track
from the Show
pop-up menu.
The podcast track appears near the top of the Timeline.
By default, the podcast track appears just below the video track (if you have one in your
project) with a single blue podcast region that spans the entire length of the project.
2 Find the location in your project where you want the podcast to begin.
Chapter 6 Exporting Your Multitrack Project 77
Page 78

3 To add a podcast marker, cut the clip with the Blade tool.
a Select the Blade tool.
b Click the clip; as you click, a podcast marker appears. Each marker defines a chapter.
c Add any necessary details for the podcast marker in the Details tab.
This example
has two
podcast regions
(or chapters).
When you’ve applied two or more podcast markers to your project, a podcast region
appears in the podcast track.
4 Choose File > Export.
5 Choose Master Mix from the Exported Items pop-up menu.
6 Choose AAC/Podcast File from the File Type pop-up menu.
The AAC Audio export options dialog appears.
The default options are good choices for a first attempt at creating a podcast, so leave
them at their default settings.
78 Chapter 6 Exporting Your Multitrack Project
The Audio, Streaming,
and Podcast tabs
contain AAC/Podcast
export options.
Page 79

7 If you want to export the video with the podcast, click the Podcast button and then
select Video Track.
Click the Podcast
button and then select
Video Track.
8 When you’re ready, click Export.
The podcast appears in the location you specified.
There’s a lot more you can do with podcasts. To learn more, see the Soundtrack Pro
User Manual.
Saving a Multitrack Project with Its Media Files
As you learned earlier, you can export your project with all of its media files. You can
also save your project and all of the media files it uses in the same folder. Saving the
project and its media files together is useful when you want to move the project from
one computer to another to continue working on it or to archive the project and media
for later use.
Be sure the project you are about to save is open.
Chapter 6 Exporting Your Multitrack Project 79
Page 80

To save a project and its media files together:
1 Choose File > Save As.
2 Enter a name for your multitrack project in the Save As field.
3 In the Save dialog, create a new folder to hold the collected project files.
4 Choose the new folder from the Where pop-up menu.
5 Select the Collect Audio Files and Collect Unused Audio Files checkboxes. If the project
includes a video track, select the Collect Video File checkbox to save the video in the
selected folder.
6 Click Save.
The project file and a copy of every audio file associated with the project are saved in
the selected location.
Note: Because video files are typically very large files, saving a copy of the video file
may take several minutes and may require a large amount of disk space.
80 Chapter 6 Exporting Your Multitrack Project
Page 81

7 What’s Next?
7
More Soundtrack Pro Resources
Now that you’ve completed this guided tour, you should have a basic understanding of
what you can do with Soundtrack Pro.
There is much more information available for you to learn about using Soundtrack Pro.
 The Soundtrack Pro User Manual contains detailed information about each of the
Soundtrack Pro features. To access the user manual, choose Help > Soundtrack Pro
User Manual.
 Apple’s Soundtrack Pro site contains links to tips, tutorials, and more. To access the
site, choose Help > Soundtrack Pro on the Web.
 AppleCare maintains a Soundtrack Pro Support site that provides KnowlegeBase
articles, forums, documentation, updates, and more. To access this site, choose
Help > Soundtrack Pro Support, or go to
http://www.apple.com/support/soundtrackpro.
 Apple’s Pro site keeps you aware of the latest tips, tools, and techniques for using
Apple’s professional applications. Visit it at http://www.apple.com/pro.
81
Page 82

Page 83

An Introduction to the
Soundtrack Pro Interface
This appendix provides an overview of the Soundtrack Pro interface—the tabs, buttons,
pop-up menus, and other elements that make up Soundtrack Pro.
In this appendix, you’ll learn about:
 Working with Tabs (p. 84)
 The Timeline (p. 85)
 The File Editor (p. 86)
 The Multitake Editor (p. 87)
 Conform (p. 87)
 The Mixer (p. 88)
 The Bin (p. 89)
 The Toolbar (p. 89)
 Tabs in the Left Pane (p. 90)
 Tabs in the Right Pane (p. 91)
 Arranging the Soundtrack Pro Interface (p. 92)
Appendix
Important: You can also use tooltips—the descriptive phrases that appear when you
hold the pointer over a button or icon for a few seconds—to identify an element. Then
you can learn more about that element in the Soundtrack Pro User Manual.
83
Page 84

Working with Tabs
Soundtrack Pro is a collection of tabbed workspaces. You can hide and display the right,
left, and lower panes of the Soundtrack Pro workspace using the interface buttons in the
top-right corner of the Toolbar. You can also tear off any tab and create a floating window.
When you first open a multitrack project in Soundtrack Pro, it displays the Standard
layout, a single-window layout with multiple tabs.
The Toolbar contains
buttons for common
commands, like creating
a new project.
These tabs contain
specific details about
clips, tracks, and effects
used in a project.
These tabs contain
multitrack or audio file
project details and the
video clip associated
with a multitrack project.
These tabs help you edit
your project, providing a
Mixer, various editors, and a
Bin for project-specific
media storage.
Each project has its own
pane. A project contains
one video track and
multiple audio tracks.
These tabs provide
audio meters.
The Toolbar also
contains buttons for
configuring the
interface.
These tabs allow
you to locate media
files by browsing
and searching. You
can store frequently
used files in the
Favorites tab.
The Timeline is where you
create your project with
video and audio clips.
The Timeline is located in the center of the Soundtrack Pro window. Most of your audio
editing will be done in the Timeline, the File Editor tab, the File Editor project view, and
the Mixer.
Below the Timeline is an area that can display a Mixer, a File Editor, a Multitake Editor, a
Conform tab, or a Bin tab. To view a tab, click it. If you want to view a clip in the File
Editor, make sure you’ve selected the clip you want to view in the Timeline.
The tabs to the left of the Timeline display information about the selected
Soundtrack Pro project. You can watch the video clip associated with a multitrack
project in the Video tab and get project information in the Project tab. You can also get
specific information about project tracks by viewing the Track tab and get specifics
about a clip by viewing the Effects, Details, and Analysis tabs.
84 Appendix An Introduction to the Soundtrack Pro Interface
Page 85

The Timeline editing
tools let you select, scrub,
lift, stamp, and more.
Every track, bus, and
submix in the Timeline
can be opened to reveal
envelopes associated
with that element, like
volume and pan.
You set project controls
like snapping parameters,
track height, and
Timeline zoom using the
Timeline controls.
The tabs to the right of the Timeline include the output and recording meters, which
are used for monitoring audio output, and the Browser, Search, and Favorites tabs,
where you can locate and search for audio files on your hard disk, portable drives, and
other storage volumes.
Important: Are you seeing an interface other than the one shown above? You might
have switched layout views or created a new layout while working in Soundtrack Pro.
To view the interface shown above, choose Window > Layouts > Standard (or press F1).
For more information about window layouts, see “Arranging the Soundtrack Pro
Interface” on page 92.
The Timeline
In the Timeline, you control everything from project settings to track display
information to specific clip details. The Timeline also contains buttons for functions, like
playing, that you can also easily initiate with keyboard shortcuts.
Choose track elements
Define project
settings here.
to display from the
Show pop-up menu.
The Global Timeline
view shows a global
view of the project
and the playhead’s
location.
The transport controls
position the playhead
and allow you to play
your project.
Appendix An Introduction to the Soundtrack Pro Interface 85
Page 86

The file selected in the
Timeline above is
displayed here in the
File Editor tab.
The File Editor
You can view an individual clip in the File Editor tab or in the File Editor project view.
Both spaces contain similar buttons and tools; the exceptions include an Automation
pop-up menu in the File Editor project view and linking, Solo, and Spot to Playhead
buttons and playback controls in the File Editor tab.
You can edit files that are part of a multitrack project in the File Editor tab. When you
select a file in the Timeline of a multitrack project, it is shown in the File Editor tab just
below the Timeline.
You can edit single audio files in the File Editor project view. A single audio file, opened
from the Browser tab, Search tab, or Favorites tab, appears in the File Editor project view.
If you double-click a file,
it appears in the
full-screen File Editor
project view.
86 Appendix An Introduction to the Soundtrack Pro Interface
Page 87

Waveform editing tools
The Multitake Editor
The Multitake Editor is a powerful tool used for mixing and syncing multitake
recordings and automatic dialogue replacement (ADR).
Comp track
Take tracks
The Multitake Editor tab is not covered in this Getting Started book. To learn how to use
the Multitake Editor, see the Soundtrack Pro User Manual.
Conform
The Conform tab allows you to update your audio project to match video project changes.
The Conform tab is not covered in this Getting Started book. To learn how to use the
Conform tab, see the Soundtrack Pro User Manual.
Appendix An Introduction to the Soundtrack Pro Interface 87
Page 88

The Mixer
When you click the Mixer tab, a project Mixer like the one shown below appears. It
contains a channel for each track in your project.
Each track in your
project’s Timeline
corresponds to a channel
strip in the Mixer.
Set the Automation Mode
pop-up menu.
Customize the controls
shown in the Mixer using
this pop-up menu.
Show and hide audio
tracks, busses, and
submixes from this
pop-up menu.
Tracks and busses contain the same controls: an Effects list, a panner, playback and
volume controls, and a Routing pop-up menu. Submixes and the Master bus do not
have panners.
A surround panner;
if the channel is in
stereo, a stereo panner
appears here.
Volume can be set by
dragging the volume
fader or entering a
number in the value
slider below.
The Effects list shows all
the effects applied to the
track, bus, or submix.
Playback controls,
including mute and solo
The channel Routing
pop-up menu
88 Appendix An Introduction to the Soundtrack Pro Interface
Page 89

Items pop-up menu
The Bin
The Bin tab lists information about each of the items in every open project. The Bin also
features sort and search functions to help you locate an item in any open project. You can
use this tab to track the files and clips in your project, get file information, and so on.
Columns pop-up menu
Item list
Preview controls
Media pop-up menu
The Toolbar
You can customize the Toolbar to contain the buttons you choose. Here’s an overview
of the Toolbar’s default buttons.
Start a new project
with this button.
Add new files, tracks,
and markers, resize a track,
and add crossfades to
an existing project with
these buttons.
Switch between saved
interface layouts or save new
ones by clicking this button.
Display and hide a
pane or the Mixer by
clicking its button.
Appendix An Introduction to the Soundtrack Pro Interface 89
Page 90

Video you’ve added
to your project is
displayed here.
View clip details or
effects, actions, or track
details by selecting a tab.
Tabs in the Left Pane
The tabs at the left of the Timeline reveal details about various parts of your project. If
your multitrack project contains a video clip, it is displayed in the Video tab.
The Details, Effects, Tracks, and Actions tabs all update to show the relevant details for
the clip you select in the Timeline. The Effects tab shows parameters for any effects
added to a selected clip, the Actions tab provides an editable list of the actions applied
to the selected clip or file, and so on. The Analysis tab helps you find and fix common
audio problems in a file.
90 Appendix An Introduction to the Soundtrack Pro Interface
Page 91

Tabs in the Right Pane
You can view audio meters, record audio, and browse, index, find, and organize your
audio clips using the Meters, Recording, Browser, Search, and Favorites tabs.
The Meters and Recording tabs show the levels of audio coming in, when audio is
being recorded by Soundtrack Pro, and out, when audio is being played.
The Browser tab works like a Finder window, allowing you to browse through your hard
disk and external volumes. In the Search tab, you can index your audio files, then search
for them by criteria including names, keywords, and other metadata. When you find a
clip you want to use, you can put it in your Favorites tab so you can easily find it later.
The Meters and
Recording tabs display
levels for media being
played or recorded.
The Browser, Search,
and Favorites tabs are
located here.
Appendix An Introduction to the Soundtrack Pro Interface 91
Page 92

Arranging the Soundtrack Pro Interface
Soundtrack Pro is customizable: you can rearrange the Soundtrack Pro tabs, hide and
display areas of the interface, and save custom Soundtrack Pro layouts.
Arranging Tabs
The Soundtrack Pro interface is made up of tabs. You can tear off any tab to create a
separate floating window. This window can be resized or hidden. When you’re done
using the window, you can easily return the tab to its original location.
To tear off a tab:
m Select the tab, then drag it out of the area where it was nested.
To resize a window:
m Position the pointer at the edge of the window, then drag the edge to a new size.
To return a tab to its original location in the Soundtrack Pro interface:
m Drag the tab into the interface.
Using Preconfigured Interface Layouts
Soundtrack Pro comes with two preconfigured interface layouts.
Standard layout is the Soundtrack Pro default layout. It is shown throughout this book.
Separate Mixer and Video, the other interface layout, has three windows: a Standard
layout window, a floating Mixer window, and a floating Video window.
To view the Separate Mixer and Video layout:
m Choose Window > Layouts > Separate Mixer and Video (or press F2).
The Separate Mixer and Video layout puts the Video and Mixer tabs in separate,
floating windows.
To switch back to Standard layout:
m Choose Window > Layouts > Standard (or press F1).
92 Appendix An Introduction to the Soundtrack Pro Interface
Page 93

When you hide the
left and right panes,
only the Timeline and
Toolbar remain.
Customizing Your Interface
You can choose to display any tab in Soundtrack Pro in its own window.
To put any Soundtrack Pro tab in its own floating window:
m Drag the tab off its location in the Soundtrack Pro interface.
The tab appears in its own window.
You can also show or hide the areas of the Soundtrack Pro interface.
To show or hide the left, lower, or right pane of Soundtrack Pro, do one of the
following:
m Choose Window > Toggle Left Pane, Toggle Lower Pane, or Toggle Right Pane.
m Click one of the Pane buttons at the right of the Toolbar.
You can view or hide
sections of the interface
and the Mixer by clicking
these buttons.
Appendix An Introduction to the Soundtrack Pro Interface 93
Page 94

Saving Your Own Custom Layouts
If you find yourself working in a particular interface layout, you can save it. Then,
instead of showing and hiding interface elements to create the layout, you can access it
later by choosing the layout’s name.
To save an interface setup as a custom layout:
1 Click the Layouts button at the right of the Toolbar.
The Layouts dialog appears.
2 Click the Add (+) button.
A new, untitled layout appears in the Layouts list.
3 Type a name for your new layout.
4 Click Done.
To access your new layout:
m Choose Window > Layouts, then choose the layout you created from the submenu.
The Soundtrack Pro window changes to your custom layout.
94 Appendix An Introduction to the Soundtrack Pro Interface
 Loading...