


 Loading...
Apple MK452LL-A, Z0RS-MK4521-BH, Z0RR-MK4421-BH, Z0RS-MK4524-BH, Z0RS-MK45211-BH User manual
...iMac Essentials
Contents
4 Chapter 1: iMac at a glance
4Say hello to iMac
5Take a tour
6Connect accessories
9Use an external display
10Chapter 2: Get started
10Set up
11Find your way around
13Quickly open apps
14Search with Spotlight
15Access all your content anywhere with iCloud
16Use your iMac and iOS devices together
18 |
AirDrop |
18 |
AirPrint |
18AirPlay
19Migrate your data
20Back up and restore
21Chapter 3: Apps
21About apps
21Safari
22Mail
23Notes
24Messages
25Calendar
26Photos
27iTunes
28FaceTime
29Maps
30iBooks
31Pages
32Numbers
33Keynote
34iMovie
35GarageBand
37App Store
2
38 Chapter 4: Explore iMac
38Get answers in Mac Help
39Learn more
40Replace memory
44 Chapter 5: Safety, handling, and support
44 Important safety information
46Important handling information
47Understanding ergonomics
48Learning more, service, and support
49FCC regulatory compliance
49Canadian regulatory compliance
50Europe—EU Declaration of Conformity
50ENERGY STAR® Compliance Statement
51Apple and the environment
51 Disposal and recycling information
51 Software License Agreement
Contents |
3 |
iMac at a glance |
1 |
|
|
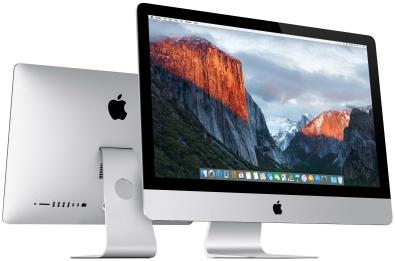
Say hello to iMac |
|
Take a look around. Want a quick intro to the features of your iMac? Go to Take a tour.
Get started. Press the power button on the back of your iMac, and you’re up and running. See Set up for more details.
Stay in sync. Access your documents, photos, music, apps, contacts, and calendars across all your devices with iCloud. And use your iMac with your iOS devices to make and receive phone calls and texts, or create an Instant Hotspot. Learn more in Access all your content anywhere with iCloud.
Unleash your creativity. Plan events and share info and photos with Notes; organize and listen to music, books, movies, and more with iTunes; create presentations with Keynote; and check out all the apps available on App Store, to express yourself in as many ways as you have ideas.
Dig deeper. Explore your iMac and get your questions answered. Go to Get answers in Mac Help.
4
Take a tour
Your iMac is packed with advanced technologies and a beautiful reflection-reducing display in a remarkably thin design.
SDXC |
|
USB 3 |
|
|
|
Thunderbolt 2 |
||
|
|
|||||||
|
|
|
|
|
|
|
|
|
|
|
|
|
|
|
|
|
|
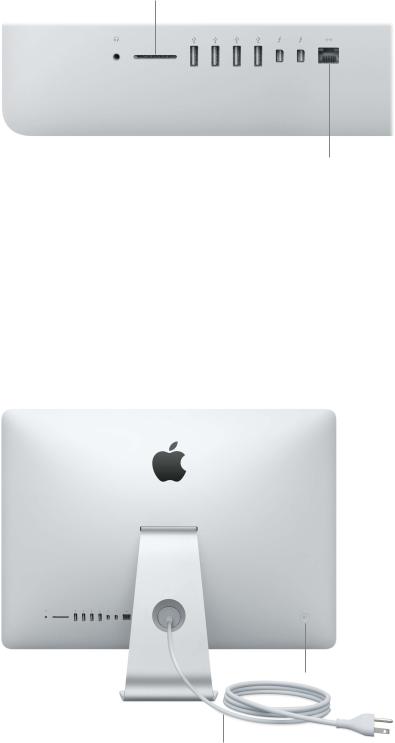
3.5 mm Headphone Jack |
|
Gigabit Ethernet |
|
••
••
••
••
••
3.5 mm Headphone Jack: Plug in stereo headphones or a digital 5.1 surround-sound speaker system and experience high-quality sound while watching movies or listening to your favorite music.
SDXC card slot: Easily transfer photos, videos, and data to and from your iMac, with the latest high-capacity SD cards.
USB 3 ports: Connect an iPad, iPhone, iPod, digital camera, camcorder, external storage, or printer quickly and easily. The iMac USB 3 ports support USB 3 and USB 2 devices.
Thunderbolt 2 ports: This ultrafast and ultraflexible technology lets you connect high-speed peripherals such as RAID arrays, external displays, and docking stations. Thunderbolt 2 supports adapters (sold separately) for technologies like FireWire or HDMI, for increased connectivity.
Gigabit Ethernet port: Connect a router or modem to get on the Internet, or connect to another computer to transfer files without using Wi-Fi.
Power button
AC power cord
••
••
AC power cord: Pass the power cord through the hole in the stand, plug it into the power port on the back of your iMac, then plug the cord into a power outlet.
Power button: Press and hold for three seconds to turn your iMac on or off, or press to put it to sleep.
Chapter 1 iMac at a glance |
5 |
Connect accessories
Work wirelessly
Using Bluetooth® technology, your iMac can connect wirelessly to devices such as the included Magic Mouse 2 and Magic Keyboard (described below), and to optional devices like the
Magic Trackpad 2, peripheral devices, wearable sport accessories, and others. Use the Bluetooth menu  at the top of your screen to connect to, pair, and transfer information between your iMac and the device.
What’s included
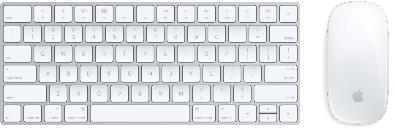
To use your iMac, you need two accessories included in the box—the Magic Keyboard and the Magic Mouse 2.
Important: To begin using your Magic Keyboard and Magic Mouse 2, simply make sure the on/off switches on both devices are on (green is visible).The devices connect to your iMac automatically.
••
••
Magic Keyboard: Your rechargeable Magic Keyboard is already paired with your iMac and is ready to use. If you ever need to charge or pair the keyboard again, connect it to your iMac using the included Lightning to USB cable.
To customize how your keyboard works, use the Keyboard pane of System Preferences. Choose
Apple menu > System Preferences, click Keyboard, then click the buttons at the top to see the options available for keyboard, text, shortcuts, and input sources. Read on to learn what the function keys on the Magic Keyboard do.
Magic Mouse 2: Like the Magic Keyboard, your rechargeable Magic Mouse 2 is already paired with your iMac out of the box; you can use it anywhere within range of your computer. If you need to charge the Magic Mouse 2, or if you unpair it and need to pair it again, connect it to your iMac using the included Lightning to USB cable.
To customize your gestures, use the Mouse pane of System Preferences. Choose Apple menu > System Preferences, click Mouse, then click the buttons at the top to see all the scrolling, clicking, swiping, and tapping options.
Chapter 1 iMac at a glance |
6 |
If you configured your iMac with the optional Magic Trackpad 2, it comes paired with your iMac and ready to use. If you purchased a Magic Trackpad 2 separately, connect it to your iMac with the included Lightning to USB cable to pair it automatically. Use this same cable to charge your trackpad as necessary, then unplug it to use in the location that works best for you.
Magic Trackpad 2, adapters, and other accessories are sold separately at apple.com or your local Apple Store. Be sure to review the product information on the Apple website, or on the accessory packaging, to make sure you choose the right product for your iMac.
Keyboard
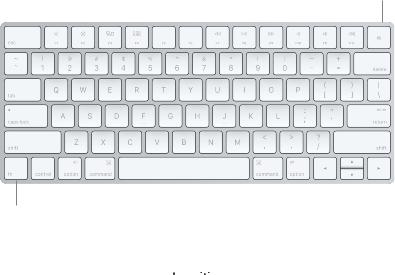
The function keys on your Magic Keyboard provide shortcuts for common functions, such as increasing the volume or screen brightness.
|
Function keys (F1 to F12) |
Power switch |
||
|
|
|
|
|
Function (Fn) key
•• Power switch: Slide the power switch on the back edge of the keyboard to turn it on
(green is visible) or off.
•• Brightness keys (F1, F2): Press 

 or
or 

 to increase or decrease the brightness of the screen.
•• Mission Control key (F3): Press 
 to view what’s running on your iMac, including all your spaces and open windows.
•• Launchpad key (F4): Press 
 to instantly see all the apps on your iMac. Click an app to open it.
•• Media keys (F7, F8, F9): Press  to rewind,
 to play or pause, or
  to fast-forward a song, movie, or slideshow.
•• Mute key (F10): Press  to mute the sound from the built-in speakers or 3.5 mm Headphone Jack.
•• Volume keys (F11, F12): Press 
 or
or  to increase or decrease the volume of sound from the built-in speakers or 3.5 mm Headphone Jack.
•• Function (Fn) key: Each function key (on the top row) can also perform other functions— for example, the F12 key can open Dashboard. Hold down the Fn key while you press a function key to trigger the action associated with the key.
To set keyboard preferences, use the Keyboard pane of System Preferences (choose Apple menu > System Preferences, click Keyboard, then click the buttons at the top to see the available options).
Chapter 1 iMac at a glance |
7 |

Mouse
Here are some common gestures you can use with your Magic Mouse 2. To set preferences and enable gestures, use the Mouse pane of System Preferences (choose Apple menu > System
Preferences, click Mouse, then click the buttons at the top to see the available options).
Gesture |
Action |
|
Turn on/off:Slide the power switch on the bottom of the mouse to turn it |
|
on (green is visible). |
|
|
|
Click: Press anywhere on the mouse surface to click or double-click. |
Secondary click: Press the left or right side of the mouse to perform a “secondary click.”To turn on Secondary Click, use the Mouse pane of System Preferences.
360º scroll: Brush one finger along the surface to scroll or pan in any direction.
Smart zoom: Hold down the Control key and scroll with one finger to enlarge items on your screen.
Two-finger swipe: Swipe left and right to move through pages, photos, and more.
Charge the batteries
Your Magic Keyboard and Magic Mouse 2 have built-in rechargeable batteries.
Charge the battery. Connect your Magic Keyboard or Magic Mouse 2 to your iMac with the included Lightning to USB cable. To check the charge level, click  in the menu bar at the top of the screen, then choose your device.
To charge the battery faster, be sure your input device is switched on when you connect it to your iMac.
For more information about the rechargeable batteries in your Magic Keyboard or Magic Mouse 2, go to www.apple.com/batteries.
Chapter 1 iMac at a glance |
8 |

Use an external display
The Thunderbolt 2 ports on your iMac support video output. You can use an external display, a projector, or an HDTV with your iMac.
To connect |
Do this |
|
Apple Thunderbolt Display |
Plug the display’s cable directly into the Thunderbolt 2 port on your |
|
|
iMac. |
|
|
|
|
DisplayPort or Mini DisplayPort |
Plug the display’s Mini DisplayPort cable directly into the Thunderbolt 2 |
|
display |
port on your iMac. |
|
|
|
|
VGA display or projector |
Use a Mini DisplayPort to VGA Adapter to connect the display to the |
|
|
Thunderbolt 2 port |
on your iMac. |
|
|
|
DVI display or projector |
Use a Mini DisplayPort to DVI Adapter to connect the display to the |
|
|
Thunderbolt 2 port |
on your iMac. |
|
|
|
HDMI display or HDTV |
Use a Mini DisplayPort to HDMI adapter and an HDMI cable to connect |
|
|
the HDMI display or HDTV to the Thunderbolt 2 port on your iMac. |
|
|
|
|
Adapters and other accessories are sold separately at apple.com or your local Apple Store. Review the documentation or check with the manufacturer to make sure you choose the right adapter.
Chapter 1 iMac at a glance |
9 |
Get started |
2 |
|
Set up
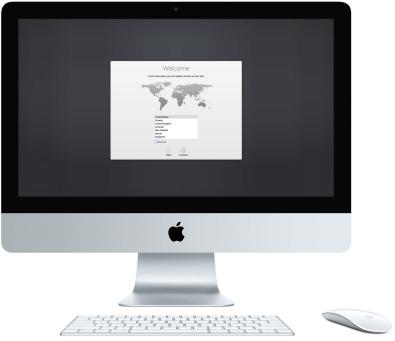
The first time you turn on your iMac, Setup Assistant walks you through the simple steps needed to start using your new iMac.
To get the most out of iMac, be sure to connect to Wi-Fi and turn on Bluetooth, get an Apple ID, then sign in to iCloud. You can do these steps quickly and easily with Setup Assistant—but if you want to do them later, here’s how:
Connect to Wi-Fi. Click the Wi-Fi status icon  in the menu bar, then choose a Wi-Fi network and enter the password, if necessary.
If you don’t see the Wi-Fi status icon  , choose Apple menu > System Preferences, then click Network. Click Wi-Fi in the list on the left, then select“Show Wi-Fi status in menu bar.”
Turn offWi-Fi.Click the Wi-Fi status icon  in the menu bar, then choose Turn Wi-Fi Off.
Turn Bluetooth on or off.Click the Bluetooth icon  in the menu bar, then choose Turn
Bluetooth On or Turn Bluetooth Off.
If you don’t see the Bluetooth icon  , choose Apple menu > System Preferences, click
Bluetooth, then select “Show Bluetooth in menu bar.”
10

Get an Apple ID. Your Apple ID is the account you use for just about everything you do with Apple, including buying or subscribing to music, movies, and TV shows from the iTunes Store, getting books from the iBooks Store, downloading apps from the App Store, and storing your content in iCloud.
If you don’t already have an Apple ID, you can create one (it’s free). Choose Apple menu >
System Preferences, click iCloud, then click Create Apple ID.
Set up iCloud on your iMac. With iCloud, you can store all of your content—documents, movies, music, photos, and more—in the cloud, and access it anywhere you go.
To set up iCloud, choose Apple menu > System Preferences, then click iCloud. In the window that appears, enter your Apple ID and password.Then select the features you want to use.To find out more, see Access all your content anywhere with iCloud.
Important: Be sure to use the same Apple ID for iCloud on all your devices.
Find your way around
The desktop
The first thing you see on your iMac is the desktop, where you can organize your files, quickly open apps, search for anything on your iMac and the web, and more.
Help menu |
|
|
|
Menu bar |
|
The desktop |
Wi-Fi |
|
|
|
|||||
|
|
|
|
|
|
|
|
|
|
|
|
|
|
|
|
Dock |
|
|
Finder icon |
System Preferences icon |
|
|
Finder
The Finder  is an app that’s always open. Use the Finder to organize and find your files.
Open a Finder window. Click the Finder icon  in the Dock, at the bottom of the screen.
Chapter 2 Get started |
11 |

The Dock
The Dock, at the bottom of the screen, is a convenient place to keep the apps and documents you use frequently. You can make the Dock larger or smaller, add or remove items, move it to the left or right side of your screen, or even set it to hide when you’re not using it.
Go to the Finder. |
Open System Preferences. |
Files and folders go on the right side of the line; apps on the left.
Open an app or file.Click its icon in the Dock.
Add an item to the Dock. Drag the item and drop it where you want it. Place apps to the left of the line in the Dock, and files or folders to the right.
Remove an item from the Dock. Drag it out of the Dock. The item isn’t removed from your iMac—just from the Dock.
Change how the Dock looks. Choose Apple menu > System Preferences, then click Dock.
System Preferences
System Preferences is where you personalize your iMac settings. For example, use Energy Saver preferences to change sleep settings. Or use Desktop & Screen Saver preferences to add a desktop background or choose a screen saver.
Customize your iMac. Choose Apple menu > System Preferences, or click the System
Preferences icon  in the Dock. Then click the preference you want to set.
Menu bar
Use the menus and icons along the top of the screen to open new windows, connect to a Wi-Fi network, check your Wi-Fi status  , change the volume
 , and perform other tasks.
Search Mac Help. |
|
Back up your Mac. |
|
Open Spotlight. |
|
|
|||
|
|
|
|
|
View Notifications.
Spotlight
Find anything on your Mac—and beyond. Spotlight  searches your iMac, as well as other sources like Wikipedia, Maps, weather, stocks, and sports. For information on what you can do with Spotlight, see Search with Spotlight.
Help
Help for your iMac and apps is always available.
Get help. Click the Finder icon  , then click the Help menu and choose Mac Help. Or type in the search field and choose a suggestion.
To learn more, see Get answers in Mac Help.
Chapter 2 Get started |
12 |
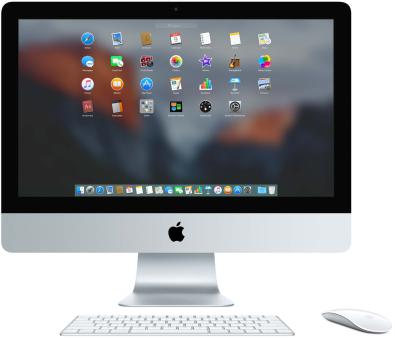
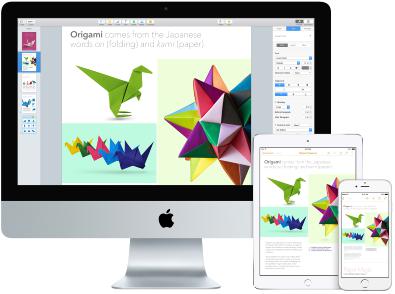
Quickly open apps
Your iMac comes with apps for all the things you love to do—browse the web, check email, share photos, enjoy movies, and more.
|
|
|
|
Launchpad arranges your apps in |
|
|
|
|
|
Folder containing apps |
|
|
|
a grid. Click an app icon to open it. |
|
||||
|
|
|
|
|
|
|
|
|
|
Launchpad icon |
|
App Store icon |
Open an app. Click an app icon in the Dock, or click the Launchpad icon  in the Dock, then click the app you want. You can also search for an app using Spotlight, then open the app directly from your Spotlight search results.
Organize apps in Launchpad. Launchpad organizes your apps in a grid, similar to iPhone and iPad. Drag an app onto another app to create a folder. Drag more apps to the new folder to add them. To remove an app from a folder, just drag it out.
Get more apps. Click the App Store icon  in the Dock. Apps you download from the App Store automatically appear in Launchpad. To quickly get updates to apps and OS X, click Updates in the App Store.
Chapter 2 Get started |
13 |
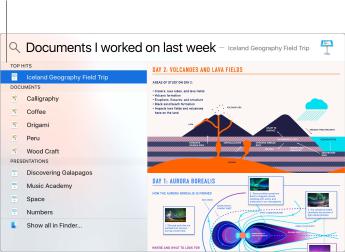
Search with Spotlight
Spotlight  is an easy way to find anything on your iMac, such as documents, contacts, calendar events, and email messages. Spotlight Suggestions offer info from Wikipedia articles, Bing search results, news, sports, weather, stocks, movies, and other sources.
When you search with Spotlight, the preview area on the right provides search results you can interact with—make a call, send an email message, play a song, get directions, even convert currencies. Spotlight can provide answers to math questions or define words, all on your desktop.
Get weather, stocks, sports, |
|
Interact with the |
|
||
transit info, and more. |
|
preview in Spotlight. |
|
|
|
Search for anything. Click  at the top right of the screen or press Command–Space bar, then start typing.
Preview your results. Click a search result and view it in the preview on the right. Sometimes that’s all you need to do—click items or links right in the preview.You can also double-click a result to open it.
Find your files fast.Scroll to the bottom of the results list, then double-click“Show all in Finder.”
Open an app. Type the app name in Spotlight, then press Return.
Turn offSpotlight Suggestions.If you want Spotlight to search only for items on your iMac, you can turn off Spotlight Suggestions in Spotlight preferences. Click the System Preferences icon  in the Dock, click Spotlight, then click to deselect Spotlight Suggestions. Make any other changes you want to the list of categories Spotlight searches.
Note: Not all features of Spotlight Suggestions are available in all languages or regions, and some features may vary by region.
Chapter 2 Get started |
14 |
Access all your content anywhere with iCloud
iCloud is the easiest way to make sure all your important content is everywhere you are. iCloud stores your documents, photos, music, apps, contacts, and calendars, so you can access them any time you’re connected to Wi-Fi.
An iCloud account is free, and it comes with 5 GB of free storage space. Purchases you make from the iTunes Store, App Store, or iBooks Store don’t count toward your available space.
iCloud also keeps everything up to date on all your devices. So if you have an iPhone or iPad, just sign in to iCloud using the same account and you’ll have everything you need, everywhere.
Here are some of the things you can do with iCloud.
Save your files in iCloud Drive.iCloud Drive is like your own private storage area in the cloud.
Store any file in iCloud Drive, then access it anywhere—from work or home, or on the road.To save a file to iCloud Drive, open a Finder window, then drag the file to iCloud Drive in the sidebar. When you edit a file in iCloud Drive, your edits show up on any device you use with iCloud.
Share purchases with Family Sharing. Let up to six family members share their purchases from the iTunes Store, App Store, and iBooks Store—even if they all use different iCloud accounts. Pay for family purchases with one credit card, and approve kids’ spending right from your iMac or iOS device. Plus, share photos, a family calendar, reminders, and locations. To set up Family Sharing, click the System Preferences icon  in the Dock, click iCloud, then click Set Up Family.
Share photos using iCloud Photo Sharing. Share photos and video with only the people you choose, and let them add their own photos, video, and comments. To get started, click the System Preferences icon  in the Dock, click iCloud, then click Photos.
Enjoy your purchases anywhere. When you’re signed in to iCloud, purchases you’ve made from the iTunes Store, App Store, and iBooks Store are available at any time, no matter which computer or device you used to purchase them. So all your music, movies, books, and more are available wherever you go.
Locate your iMac with Find My Mac. If your iMac is stolen, you can easily locate it on a map, lock its screen, or even erase its data remotely if you have Find My Mac turned on. To turn on Find My Mac, click the System Preferences icon  in the Dock, click iCloud, then click Find My Mac.
Chapter 2 Get started |
15 |
For more information about what you can do with iCloud, go to Mac Help (see Get answers in Mac Help) and search for “iCloud,” or go to www.apple.com/icloud.
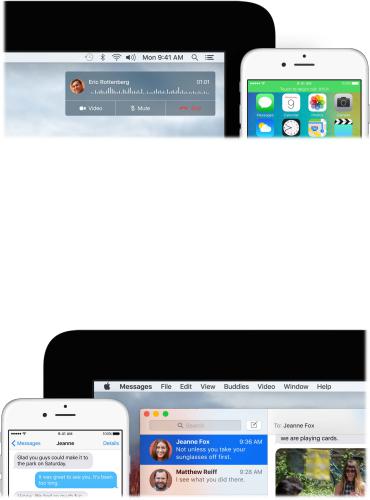
Use your iMac and iOS devices together
Overview
If you have an iOS device, such as an iPhone, iPad, or iPod touch, it works seamlessly with your iMac. Just sign in to your iCloud account on your iMac and your iOS devices, and whenever they’re near each other, they work together in great ways.
Phone calls
You can take calls—and make them—right from your iMac.
Take a call. When someone calls your iPhone, click the notification that appears on your iMac screen. Your iMac becomes a speakerphone.
Make a call. Click a phone number in a Spotlight search or in an app such as FaceTime, Contacts, Safari, or Calendar.
Text messages
Send and receive SMS and MMS text messages right from your iMac. When friends and family text you, you can respond with whichever device is closest. All messages appear on your iMac, iPhone, and iPad.
Chapter 2 Get started |
16 |
Loading...