


C H A P T E R
1
Setting Up
Read this chapter for important safety information and to set up and connect the Apple
Multiple Scan 720 Display to your computer.
Important safety instructions
Warning Do not clean your display screen with a cleaner that contains alcohol or acetone, and never spray cleaner directly onto the screen. For more information about cleaning your display, see “Care and Cleaning” in Chapter 4.
For your own safety and that of your equipment, always take the following precautions.
Disconnect the power plug (by pulling the plug, not the cord) if any of the following conditions exists:
mthe power cord or plug becomes frayed or otherwise damaged
myou spill something into the case
myour display is exposed to rain or any other excess moisture
myour display has been dropped or the case has been otherwise damaged
myou suspect that your display needs service or repair
myou want to clean the case or screen (use only the recommended procedure described in “Care and Cleaning” in Chapter 4)
Important The only way to disconnect power completely is to unplug the power cord. Make sure at least one end of the power cord is within easy reach so that you can unplug the display when you need to.
1

Be sure that you always follow these instructions:
mKeep your display away from sources of liquids and moisture.
mDon’t set anything on top of the display.
mKeep the display’s vents free from obstruction.
mRead all the installation instructions carefully before you plug your display into a power source.
Warning Never remove the case from the monitor! You could come in contact with hazardous voltage.
Electrical equipment may be hazardous if misused. Operation of this product, or similar products, must always be supervised by an adult. Do not allow children access to the interior of any electrical product and do not permit them to handle any cables.
What about electromagnetic emissions?
There has been recent public discussion of the possible health effects of prolonged exposure to extremely low frequency (ELF) and very low frequency ( VLF) electromagnetic fields. Such fields are associated with electromagnetic sources such as television sets, electrical wiring, and some household appliances—as well as computer displays.
Apple has reviewed scientific reports and sought the counsel of government regulatory agencies and respected health organizations. Based on the prevailing evidence and opinions, Apple believes that the electric and magnetic fields produced by computer displays do not pose a health risk.
In response to those customers who wish to reduce their exposure to electromagnetic fields, Apple has lowered the emission levels of our products. We are also actively encouraging further scientific research so we can continue to promote the health and safety of our customers and employees.
2Chapter 1
Getting ready to set up
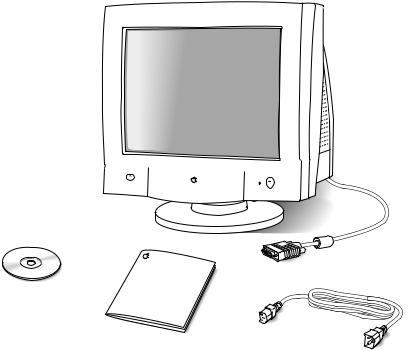
As you begin to set up your display system, be sure you have easy access to the following items.
Apple Multiple
Scan 720 Display
Monitor cable
Software
User’s manual |
Monitor power cord |
Note: If you are connecting the display to an IBM PC-compatible computer, you also need an adapter, available from your Apple-authorized dealer or from Apple. (See the service and support information that came with your monitor for information on contacting Apple directly.)
Do you need a graphics card?
Your monitor works with any Mac OS–based or PC-compatible computer with either a builtin graphics adapter or a compatible graphics card. The Apple Multiple Scan 720 Display is capable of supporting any resolution and scan rate within certain ranges.
If you’re not sure your computer or graphics card will work with the monitor, check to see that their video circuitry operates within the ranges specified here.
Tip: If no image appears on your monitor after you have completed the instructions in this chapter, you may need a compatible graphics card.
Setting Up 3

The monitor works with video circuitry that operates within these ranges:
mhorizontal scan rate of 30–69 kilohertz
mvertical refresh rate of 48–160 hertz
Common video modes ranges*
Resolution |
Vertical refresh rate (hertz) |
640 x 480 |
60-85 |
800 x 600 |
60-85 |
832 x 624 |
75 |
1024 x 768 |
60-85 |
1152 x 870 |
75 |
1280 x 1024 |
60 |
*These are ranges only; the actual resolutions and vertical refresh rates that are available to you depend on your computer or graphics card. See the manual that came with your computer or graphics card for more information.
If your computer supports any of these ranges, you don’t need a graphics card. If your computer supports none of these video mode ranges, you need to install a compatible graphics card in your computer and connect the monitor to the video card.
Note: The Apple 8•24, Apple 8•24GC, some NuBus™ graphics cards, and some third-party PCI cards are not fully compatible with your monitor. If a card is not fully compatible, the software cannot be used to adjust the screen image or change resolutions, but the controls on the front of the monitor may be used to adjust some setttings.
Your Apple-authorized dealer can help you select a compatible graphics card. Keep this information, the information in the Appendix, “Technical Information,” and your computer manual handy when selecting a card.
Note: This monitor is preadjusted at common resolution and vertical refresh rate settings (see “Active Video Image Area” in the Appendix). If you don’t use a preadjusted resolution, you’ll need to adjust the screen geometry; to learn how to adjust the screen geometry, see Chapter 3, “Using Manual Controls and the On-Screen Display.”
Using more than one monitor
If your computer has expansion slots, you can use your Apple Multiple Scan Display with one or more additional monitors connected to your computer. You may need a graphics card for each additional monitor you are using. See the manual that came with your computer for information on working with additional monitors.
4Chapter 1

Your Apple Multiple Scan Display at a glance
 On-Screen Display Enter button
On-Screen Display Select/Adjust control
® Power button
OContrast control
¤Brightness control
F Security slot
≤ Power cord receptacle
Monitor cable
Setting Up 5
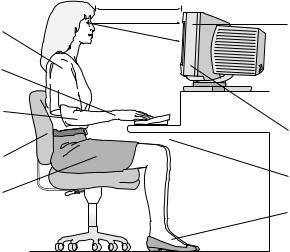
Shoulders relaxed
Forearms and hands in a straight line
Forearms level or tilted up slightly
Lower back supported
Thighs horizontal
Positioning your Apple Multiple Scan Display
Here are some key factors to consider when determining where to place your monitor:
mBe sure that the desk or table can support the Apple Multiple Scan Display’s weight— 37.5 pounds (17 kg).
mMake sure that the monitor power cord reaches your computer. The cord should be unobstructed when you swivel and tilt the monitor, so allow at least 6 inches (15 cm) of clearance in the back. If you don’t allow enough clearance, the monitor connector might be damaged when the cable hits an obstruction.
Once your monitor is in place, position it so that it faces you. Then adjust the viewing angle of the monitor by tilting it up or down and turning it left or right on its stand.
Position the monitor so that when you use it, no bright light is behind the monitor or reflected on the screen. Your eyes should be about level with the top edge of the screen and between 18 and 28 inches (45 to 70 cm) away. Take occasional breaks when using your computer, to focus your eyes on a distant object.
For your greatest comfort, use the following illustration to help you in positioning your monitor.
45–70 cm (18–28 in.)
Top of the screen at or slightly below eye level (You may need to adjust the height of your monitor by placing something under it or by raising your work surface.)
Screen positioned to avoid reflected glare
Clearance under work surface
Feet flat on the floor
6Chapter 1
Connecting the Apple Multiple Scan Display to your computer
Important Before you connect any cords or cables, make sure that your computer is turned off and unplugged.
1Connect the socket end of the monitor power cord to the power cord receptacle on the back of the display.
2Plug the other end of the monitor power cord into the power socket on your computer.
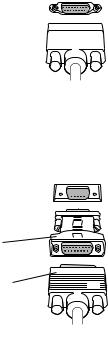
3If you are connecting the monitor to a Mac OS–based computer, insert the monitor connector into the monitor port (marked with ™) on the back of the computer and tighten the thumbscrews.
Monitor port icon 


Connector on 
 monitor cable
4 If you are connecting to an IBM PC-compatible computer, connect the adapter that you acquired from your dealer to the monitor connector on the monitor cable, and tighten the thumbscrews. Then insert the monitor connector with the adapter into the monitor port on your computer.
Monitor port on


 IBM PC-compatible
computer PC adapter
Connector on monitor cable
If you installed a in your computer, connect the monitor cable to the graphics card’s port instead. For information about installing graphics cards, see the manual that came with your computer or graphics card.
Setting Up 7

Turning the Apple Multiple Scan Display on
To turn on the monitor for the first time:
1Press the power button on the front right side of the display.
®
¤O
Power indicator light |
Power button |
2Plug your computer’s power cord in the power outlet and start up your computer.
The monitor’s green power indicator light goes on. If the green light does not go on, press the power button again. If this doesn’t work, shut down and unplug your computer and make sure you’ve connected the monitor to your computer properly (see “Connecting the Apple Multiple Scan Display to Your Computer” earlier in this chapter).
3If you are using any of the following computer models or graphics cards, reset the DDC control to ensure that the maximum number of resolution settings are available to your monitor:
m Power Macintosh 9600 computer (with built-in graphics card) m IBM PC-compatible computer
m IMS (or IX) Twin Turbo graphics card m ATI XCLAIM graphics card
You may also need to reset the DDC control if you have another kind of graphics card.
For instructions on resetting the DDC control, see “Information: Mode, Absence, DDC” in Chapter 3 (in the “Adjusting the On-Screen Display Controls” section).
If you are not using any of the computer models or graphics cards listed here, you do not need to reset the DDC control. You are finished setting up your Apple Multiple Scan Display.
8Chapter 1

Finding answers
When you have questions about using your monitor, there are several places you can look for answers.
This manual
Use this manual to set up your monitor, install software, use the
On-Screen Display, and find solutions to common problems.
Apple Guide for Mac OS–based computers
If you need help or experience a problem while using the Apple Displays Software, open the Guide (h) menu (or Help menu in System 8.0
and later) and choose Macintosh (or Mac OS) Guide or Monitors & Sound Guide. The Guide menu is the main source for information about the Apple Displays Software and your Mac OS–based computer. See Chapter 2 for more information.
Obtaining online support and updated Apple software
Apple technical support information and software updates are available from online services. You can get troubleshooting and other important information by using these services. You can also get the latest versions of Apple software, including most printer drivers, system enablers, and updates to utilities and networking and communications software.
Support information and Apple software updates are available via Apple’s World Wide Web site:
m http://www.info.apple.com
Setting Up 9
C H A P T E R
2
Installing and Using
the Apple Displays Software
This chapter explains how to install the Apple Displays Software on your Mac OS–based computer and provides an overview of the software’s features.
If you’re using your monitor with an IBM PC-compatible computer, you cannot install the Apple Displays Software. However, if you are using a Windows-based computer, you may need to install one file, included on the Apple Displays Software CD-ROM disc, so that your computer can identify your monitor. Mac OS–based and PC-compatible computers can also use manual controls on the monitor and the On-Screen Display to adjust settings that the Apple Displays Software does not affect. (For more information, see Chapter 3, “Using Manual Controls and the On-Screen Display.”)
What’s included in the Apple Displays Software?
The Apple Displays Software consists of several applications for adjusting basic picture and sound settings, adjusting the color on your monitor, and saving energy. These applications include
mMonitors & Sound control panel software, which you use to adjust basic image and sound settings
mControl Strip software, which you use to easily change screen resolution and color depth
mDigitalColor Meter, which you use to magnify pixels and obtain RGB values
mPANTONE® Color Picker, which you use to set PANTONE® values for colors
mColorSync, which helps you synchronize on-screen color with print color
mEnergy Saver, (Energy Saver may already be installed on your computer) which automatically turns off your monitor when it’s not in use
11
Installing the Apple Displays Software on Mac OS–based computers
You need system software version 7.5 or later on your computer to use the Apple Displays Software. If you don’t have System 7.5 or later, contact an Apple-authorized dealer or service provider.
If you do not have a CD-ROM drive, see the service and support information that came with your monitor for information on how to contact Apple.
Note: Make sure you use the Installer to install the software. Do not install the software by dragging files.
To install the Apple Displays Software, follow these steps:
1Insert the Apple Displays Software CD-ROM disc into the computer’s CD-ROM drive. The floppy disk icon appears on the desktop.
2Double-click the CD-ROM icon.
The Apple Displays Software window opens.
3Double-click the folder that contains the language you want the software to appear in.
4Double-click the Apple Displays Software folder.
5Double-click the Apple Displays Software Read Me file and read the document that appears.
The Read Me file contains important information about the applications included with your software. It also provides a list of the Apple Displays Software applications.
6Choose Quit from the File menu when you’re finished reading.
7Double-click the Installer icon to start the Installer program. A Welcome screen appears.
8Click Continue.
The software license agreement dialog box appears.
Note: Be sure you’re acting within the terms of the software license agreement before you agree to install this software on your computer. The license agreement specifies how many copies of the program you can make for yourself and others.
9Click Agree once you’ve read and agreed to the terms in the license agreement. The Install Apple Displays Software dialog box appears.
10Make sure the destination disk named is the startup disk of your computer. If it isn’t, click Switch Disk until you see the name of your startup disk.
12 Chapter 2
11Click Install.
The Installer takes a few moments to calculate what needs to be done and then begins to copy files. If other applications are open, a message asks you to quit them. Click Continue to quit the applications and continue with the installation.
12Follow the instructions on the screen until the installation is complete.
The Installer checks to make sure you have the system software you need to use the monitor. If anything is missing, a message tells you what you need. You won’t be able to install the software until you correct the problem. If a message says you don’t have the correct system software, you can purchase a new version from an Apple-authorized dealer.
After the installation, the Installer tells you to restart your computer.
13Click Restart.
The software is now installed and the monitor is ready for use.
Important If you ever reinstall system software on your computer, you must reinstall the Apple Displays Software.
Installing setup information on Windows-based computers
On Windows-based computers, a new device is usually detected automatically when it is connected to your computer. To determine that Windows has correctly identified your monitor, check Monitor Type in the Display Properties dialog box. If the Apple Multiple Scan 720 Display is not listed, you need to install setup information; otherwise, some resolutions and refresh rates may not be available on your monitor.
To see whether Windows has identified your monitor, follow these steps:
1Open the Start menu and choose Settings.
2Open the Control Panel and double-click the Display icon. The Display Properties dialog box appears.
3Click the Settings tab at the top of the dialog box. The Settings panel appears.
4Click the Change Display Type button in the lower-right corner to display the current Monitor Type.
If the Monitor Type shown is the Apple Multiple Scan 720, your computer has correctly identified your monitor. You are ready to use your Apple Multiple Scan 720 Display with your computer.
If the Monitor Type shown is not the Apple Multiple Scan 720, continue with step 5.
Installing and Using the Apple Displays Software |
13 |

5Press the Change button next to the Monitor Type field; then select Apple Multiple Scan 720 and click OK.
If Apple Multiple Scan 720 is not in the list displayed, the setup information file needs to be installed. Continue with step 6.
6Insert the Apple Displays Software CD-ROM into your CD-ROM drive.
If you do not have a CD-ROM drive, see the service and support information that came with your monitor for information on how to contact Apple.
7Click the Have Disk button.
8Choose the CD-ROM disc drive and click OK.
If an error occurs, make sure you’ve selected the correct disc drive.
9Choose Apple Multiple Scan 720 in the Monitor Type field and click OK.
You’re now ready to use the Apple Multiple Scan Display with your computer. See Chapter 3 if you want to learn how to use your monitor’s manual controls and On-Screen Display to adjust your picture.
Learning about the Apple Displays Software with Monitors & Sound Guide
This section explains how to open Monitors & Sound Guide for information about using the Apple Displays Software with your monitor. The Monitors & Sound Guide is your main source of information about Apple Displays Software.
To open Monitors & Sound Guide, open the Apple (K) menu and choose Monitors & Sound from the Control Panels folder. Then click the Guide (h) icon in the top-right corner of the control panel to open Monitors & Sound Guide.
The Monitors & Sound Guide, or the Monitors & Sound Guide section of the Macintosh (or Mac OS) Guide, appears.
14 Chapter 2
 Loading...