


 Loading...
Motion basics
What is Motion?
Motion is a behavior-driven motion graphics application used to create stunning imaging effects in real time for a wide variety of broadcast, video, and film projects.
In Motion, you can:
Create sophisticated animations on the fly using any of more than 200 built-in motion and simulation behaviors, such as Spin, Throw, or Orbit, which allow you to add dynamic motion to your projects in real time, with no preview rendering time necessary.
Build complex visual effects using one or more of nearly 300

filters such as Glow, Strobe, or Bleach Bypass.
Animate the traditional way, using keyframes and modifiable curves, to create precise timing effects.
Create polished text effects, from the simple (lower-thirds and credit rolls) to the complex (3D titles, animated effects, sequencing text).
Create custom effect, transition, title, and generator templates for automatic export to Final Cut Pro X. You can also modify the effects, transitions, titles, and generators that ship with Final Cut Pro.
Use rigging to map multiple parameters to a single control (for example, a slider that simultaneously manipulates size, color, and rotation of text) in Motion compositions or in templates exported to Final Cut Pro X.
Build compositions by selecting from royalty-free content, such as vector artwork, animated design elements, and highresolution images.
Retime footage to create high-quality slow-motion or fastmotion effects.
Stabilize camera shake or create complex motion-tracking effects such as match moves and corner-pinning.
Perform advanced compositing and green screen effects.
Build fluid 3D motion graphics for show intros, bumpers, commercials, or title sequences.
Create sophisticated particle systems involving large numbers of automatically animated objects in 2D or 3D space.
Build complex patterns of repeating elements using the

powerful replicator tool, then animate the resulting collages in 2D or 3D space.
Publish your projects directly to websites such as YouTube and Facebook, or send your motion graphics to iTunes for syncing with Apple devices such as iPad, iPhone, and Apple TV.
Motion workflow
The basic process of working in Motion is described below. You don’t have to do every step, and you might do other tasks that aren’t listed here.
Create a project
You can create a blank project, open a preset composition, or create a template for use in Final Cut Pro X.
Add media
Typically, you import media to create a composition. You can, however, create entire projects using the built-in content that comes with Motion, such as preset particle emitters, text, or generators. Each media item added to your project becomes a layer in your composite.
Add or create effects
Now the fun really begins. Whether you’re building simple animated backgrounds, creating green screen composites or 3D composites, or assembling complex motion-graphics animations, the effect possibilities are nearly limitless.
Share your composition
When your project is finished, you can publish your movie right from Motion to the web, or send it to iTunes, iPad, iPhone, iPod, or Apple TV. You can also burn a disc to give to others.
Motion interface at a glance
The Motion interface is divided into several functional areas.
Project Browser
When you open Motion, the Project Browser appears. Use this window to create new projects or open existing projects.

For more information, see Create a new project.
Main workspace
After you open a project via the Project Browser, the main workspace appears. Use this window to build, modify, and preview your motion graphics projects. The main workspace is divided into several functional areas, described in detail below.

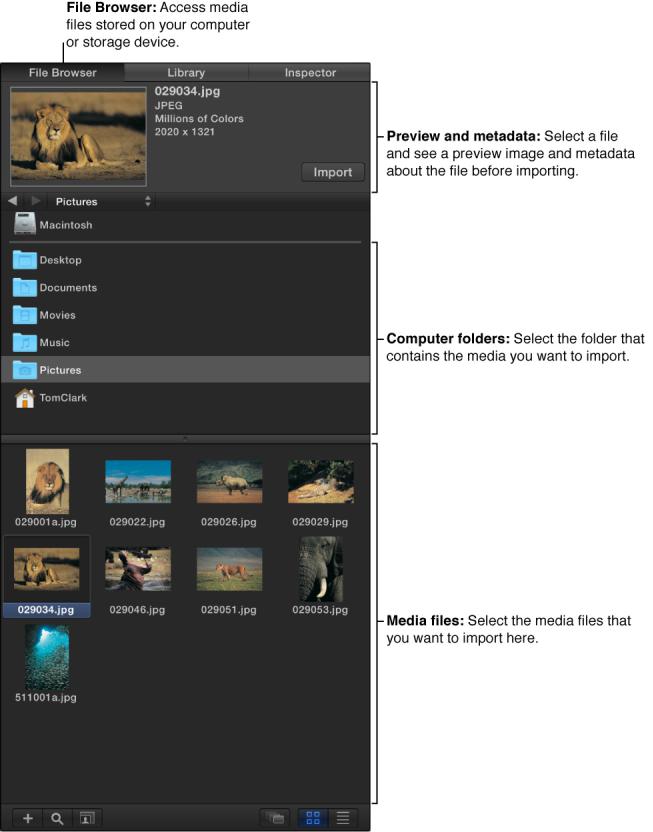
File Browser
The File Browser, located on the left side of the main workspace, displays all files on your computer and networked disks. Navigating the File Browser is similar to navigating a window in the Finder.
When you select a file in the File Browser, a visual preview appears in the top-left corner of the Motion workspace, along with the file’s metadata.
Library
The Library, located on the left side of the main workspace, contains effects, content, presets, behaviors, filters, and other
elements available in Motion. You can expand the Library content by adding fonts, music, or photos, or by saving content and effects that you create in Motion.
When you select an item in the Library, a visual preview appears in the top-left corner of the Motion workspace. The preview area also contains text information for the selected item, such as a description of the behavior, filter, or generator.

Inspector
When you select an object in your Motion project—an image, video clip, or effect—its parameter controls become available in

the Inspector, located on the left side of the main workspace, ready for adjustment.
There are four Inspector categories, each of which displays parameter controls for the selected object:
Properties Inspector: Contains controls for setting basic
attributes of the selected object, such as position, scale, and blending.
Behaviors Inspector: Contains controls for adjusting attributes of behaviors—animation and simulation effects that you can apply to objects in your project.
Filters Inspector: Contains controls for adjusting attributes of filters—visual treatments that you can apply to objects in your project.
Object Inspector: Contains controls that vary depending on the type of object selected. The name of this Inspector is also context-sensitive, changing depending on the type of object selected, such as Camera, Text, or Shape.
Heads-up display (HUD)
The most commonly used Inspector controls are also available in the heads-up display (HUD), a floating window that you can show or hide. For more information, see Transform layers in the HUD.
Project pane
The Project pane (located between the File Browser, Library, or Inspector and the Canvas) contains three lists, each of which
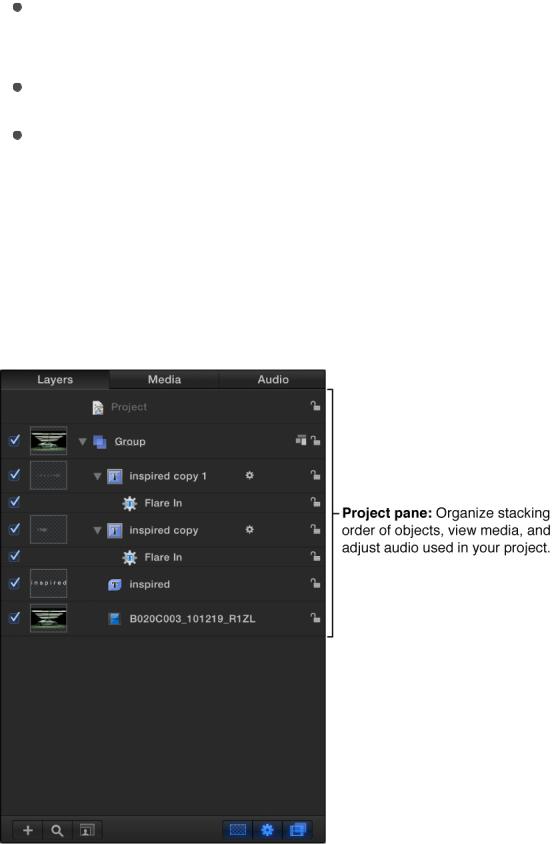
provides access to a different aspect of your project:
Layers list: Displays the hierarchy of objects (groups, layers, cameras, lights, behaviors, filters, and so on) in your project.
Media list: Shows the files imported into your project.
Audio list: Provides access to, and control of, audio files in your project.
More than simple lists of items in a project, these panes let you organize key attributes of a motion graphics composition, including the stacking order of image layers, audio settings, and source media settings.
Canvas
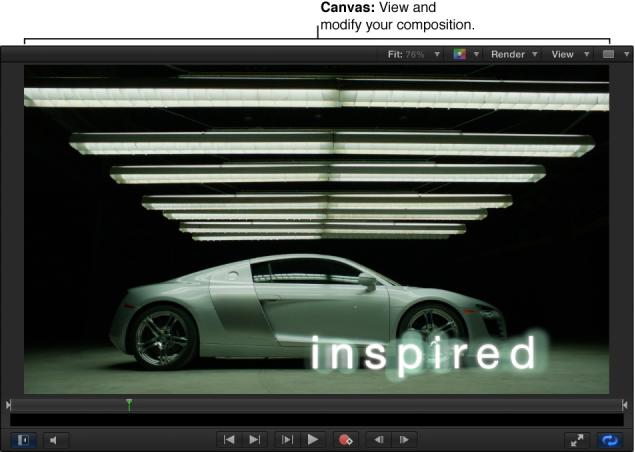
The Canvas is the visual workspace where you modify and arrange objects in your composition. Adding layers and effects to your project is as simple as dragging them from the Library or File Browser to the Canvas. The composition in the Canvas is what will be output when you share a project.
The buttons centered at the bottom of the Canvas are transport controls. Use them to play your project and see how it looks over time.
Toolbar
You can access tools for editing and creating objects in the toolbar, located in the center of the Motion workspace. There are tools that transform objects in 2D or 3D space; tools that create text, shapes, and masks; buttons that add cameras, lights,

generators, particle systems, and replicators; and pop-up menus that apply filters and behaviors to objects.
Timing pane
The Timing pane, located at the bottom of the Motion workspace, lets you view and modify the time component of a project’s contents. There are three panes that control a different timing aspect of a project:
Video Timeline: Provides an overview of objects in the project and how they’re laid out over time.
Audio Timeline: Provides an overview of audio components in the project and how they are laid out over time.
Keyframe Editor: Displays the animation curves for animated parameters and effects.

Basic components of Motion
The composition you build in Motion, then save and share, is called a project. The basic components of your project—images, video clips, applied special effects, and so on—are represented in the interface as objects that you can select, drag, and manipulate in various ways. There are several categories of objects that you’ll use in every project:
Groups: The basic containers used in a project to organize imported media and Motion content and effects. A group can contain one or more objects, as well as other, nested groups.
Layers: A specific kind of object that you can see in the Canvas, including:
Images or video clips: Still pictures and movies that you import into Motion. See Add and manage content overview.
Shapes: Rectangles, circles, lines, and more complex

shapes that you create in Motion using the shape tools. See Shapes, masks, and paint strokes overview.
Masks: A special type of shape used to create regions of transparency in layers. See Shapes, masks, and paint strokes overview.
Paint strokes: Freehand shapes drawn in a single, continuous movement. See Shapes, masks, and paint strokes overview.
Text: Type that you can add and animate in a project. See Basic text overview.
Particle systems: Sophisticated animation effects composed of swarming small particles. You can create your own particle systems or apply the pre-built particle systems that come with Motion. See Particles overview.
Replicators: Patterns of repeating visual elements you can create or apply to build cascading arrays of kaleidoscopic imagery. See Replicator overview.
Generators: Graphical images that come with Motion, including colors, bars, stripes, and gradients that you can add to your project. See Generators overview.
Effects objects: Special effects that you apply to visual layers. Effects objects are not visible in the Canvas on their own; rather, they modify the visual layers you see in the Canvas. Motion includes the following effects objects:
Cameras: An angle of view that you can adjust or animate to create the illusion of panning, dollying, or zooming through your composition. See Add a camera.
Lights: Simulated illumination sources that you can direct

at any visible layer in the canvas. See Add lights.
Behaviors: Sophisticated animation and simulation effects that you can apply to the visual layers in your project. For example, you can use the Spin behavior to make a shape rotate over time at a rate you specify. See Behaviors overview.
Filters: Special visual effects used to modify the appearance of visual layers in Motion. For example, you can use a blur filter to make an image or shape appear to be out of focus. You can also animate filters. See Filters overview.
In Motion Help, the term object is often used to describe the superset of all elements (groups, layers, and effects objects) that comprise and act upon a composition. Layer, however, always refers to the image-based elements acted upon—the visual media you see in the Canvas.
About mice, keys, and multi-touch devices
If you have a twoor three-button mouse connected to your computer, you can right-click to access the same controls specified by the Control-click commands in this documentation.
Some keyboard shortcuts require you to use the Function key (Fn —next to the Control key) in conjunction with the keys specified in the user documentation. For more information about keyboard shortcuts in Motion, see Keyboard shortcuts overview.
If you have a multi-touch device, such as a Magic Mouse or trackpad, you can use various gestures for interface navigation, scrolling, frame-scrubbing, and zooming. You can also use gestures to change the size of icons in the File Browser and Library. These gestures are discussed in their relative sections of the documentation.
Create and manage projects
Create and manage projects overview
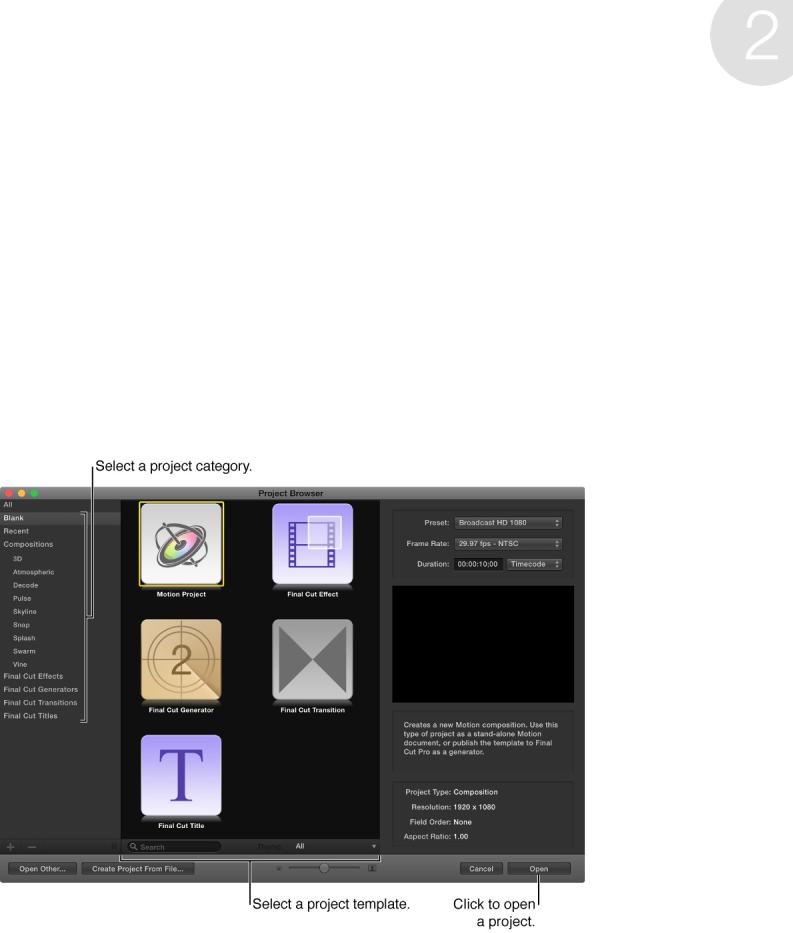
Creating a project is the first step in the Motion workflow. The easiest way to create a new project (or to open an existing project) is to use the Project Browser window. When you open Motion, the Project Browser appears.
Use the options in the browser to specify the type of project you want to open:

A new standard (“blank”) Motion project
A previously opened Motion project
A predesigned composition template that you can customize
A new blank project based on one of the supplied
Final Cut Pro templates (effects that you build in Motion for use in Final Cut Pro X)
Before opening the new project, you can also use the Project Browser to modify your project properties—resolution (width and height), frame rate, and duration. For example, you might want to choose properties that will match your planned output format.
Regardless of the project properties you choose, after you create a project, Motion lets you import nearly any kind of media file supported by QuickTime. Further, you can mix media files with different properties in the same project. For example, you can combine video clips of different frame sizes with graphics files. In the end, the file you output uses the frame size and frame rate specified by the project properties.
After you create a project, you can or save or revert it, play it back, or modify its properties.
Create a new project
You can create a Motion project from scratch, using the standard project settings in the preview area of the Project Browser. If none of the presets meets your needs, you can create a project with custom properties. You can also create projects prepopulated with selected media. Additionally, you can create projects based
on predesigned motion graphics templates or on special templates for use as effects in Final Cut Pro X.
Create a basic project
1.Open Motion or, if it’s already open, Choose File > New (or press Command-N).
2.In the Project Browser, select the Blank category in the sidebar, then click the Motion Project icon.
3.Choose a resolution from the Preset pop-up menu and a frame rate from the Frame Rate pop-up menu in the right column, then click Open.
Important: Frame rates cannot be changed for existing projects.
A new, untitled Motion project opens. The project is not saved to your storage device until you choose a save command from the File menu. For more information on saving project files, see Save, autosave, and revert projects.
Create a project with custom properties
1.Open Motion or, if it’s already open, Choose File > New (or press Command-N).
2.In the Project Browser, select the Blank category in the sidebar, then click the Motion Project icon.
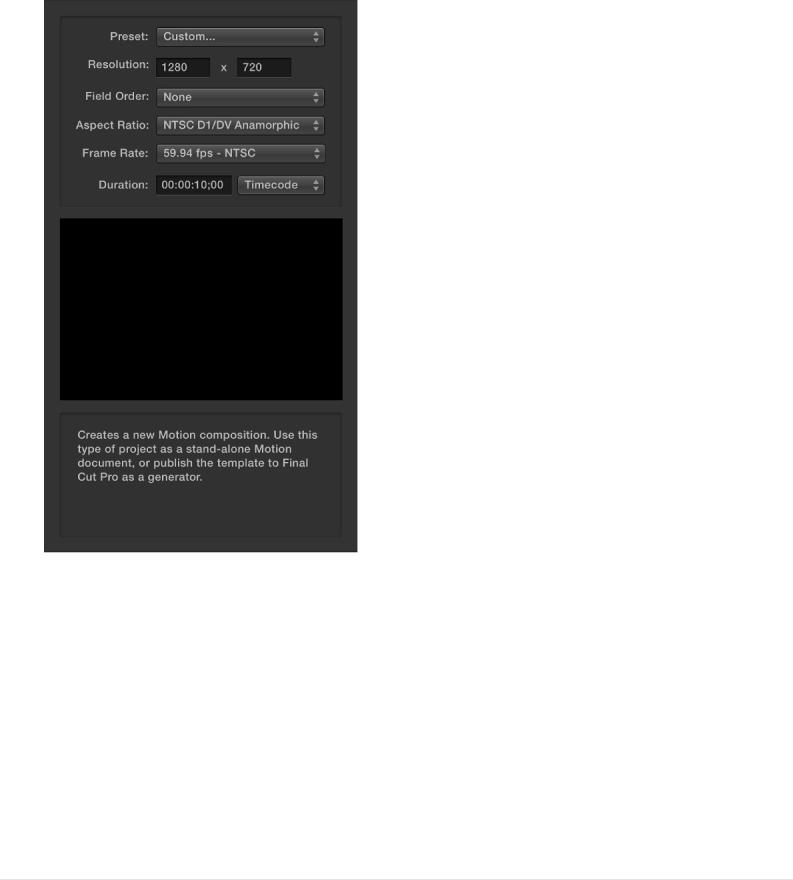
3.Click the Preset pop-up menu on the right side of the browser, then choose Custom.
Additional properties controls appear.
4.Set the resolution (width and height), field order, aspect ratio, frame rate, and default duration for your custom project.
5.Click Open.
A new, untitled Motion project opens using the custom properties you specified.
Create a project prepopulated with specific

media files
1. Do one of the following:
Choose File > Import as Project or press Shift-Command-I.
Open the Project Browser, then click Create Project From File.
The Import Files as Project dialog appears.
2.Navigate to and select the one or more media files, Shiftclicking to select contiguous items or Command-clicking to select noncontiguous items.
As you select files, format settings at the bottom of the dialog become available. Settings inherent to the selected files remain dimmed, but propagate to the new project. For

example, because movie files have an inherent frame rate, aspect ratio, and field order, those settings are dimmed in the Import Files as Project dialog.
3.If needed, set the frame rate, aspect ratio, field order, and audio mix settings.
Except for the Frame Rate parameter, these settings can be modified after the project is created, in the Properties Inspector. For more information, see Project properties overview.
Note: If you selected an item from an image sequence, select the Image Sequence checkbox to have Motion use each image as a frame in a movie clip. For more information, see About image sequences.
4.Click Import as Project.
A new project populated with the media you selected opens.
SEE ALSO
Use templates overview
Final Cut Pro templates overview
Open an existing project
There are many ways to open an existing Motion project. You can open projects and templates via the Project Browser, the Motion

File menu, or the Finder.
Open a project from the Project Browser
1.In the Project Browser (press Command-N), then select a category in the sidebar to limit which items are displayed in middle of the browser.
2.Select an item from the middle of the browser.
A video preview, if available, plays in the preview area on the right.
3.If necessary, modify the resolution, frame rate, and default duration using the pop-up menus above the preview area.

4. Click Open.
The Project Browser closes and the project you selected opens in the Motion workspace.
Open a project file from within Motion using the Open command
1.With Motion open, choose File > Open (or press Command-O). The Open dialog appears.
2.In the Open dialog, navigate to the project file you want, then click Open.
Open an existing Motion project file that does not appear in the Project Browser
Using the buttons at the bottom of the Project Browser, you can also open a specific project that doesn’t appear in the Project Browser, but is accessible through the Finder.
1.In the Project Browser, click Open Other (or press Command- O).
The Open dialog appears.
2.In the Open dialog, navigate to a Motion project file, select it, then click Open.

Open a recent project
Do either of the following:
In Motion, choose File > Open Recent, then choose a project from the submenu.
From the Project Browser, click Recent in the sidebar, select a project from the center of the browser, then click Open.
Open a project file from the Finder
From the Finder, do one of the following:
Double-click a Motion project file.
Select a Motion project file, then drag it onto the Motion application icon in the Applications folder or in the Dock (if you’ve placed a Motion application icon in the Dock).
Select a Motion project file, then choose File > Open (or press Command-O).
Control-click a Motion project file, then choose Open from the shortcut menu.
The project you selected opens in Motion workspace.
Tip: You can search for Motion projects via Spotlight in the Finder. For more information, see Search for projects using the Finder.

Close a project
Click the close button in the top-left corner of the project window (or press Command-W).
Search for projects using the Finder
Spotlight indexes the following properties of Motion projects, allowing you to perform advanced searches. Use Spotlight in the Finder (the magnifying glass icon in the OS X menu bar) to take advantage of this feature.
Project property |
Description |
|
|
Layer name |
The name of a layer in a |
|
project |
Media name |
The name of a media |
|
object in a project |
Pathname |
The path to a media object |
|
in a project |
Text |
The content of a text |

object in a project
Description |
Text in the Project |
|
Description field in the |
|
Properties Inspector |
Marker name |
The name of a marker in |
|
the Timeline of a project |
Marker comment |
Text of a marker comment |
|
in a project |
|
|
Bypass the Project Browser
If you consistently create projects with a specific preset, template, or other starting project, you can bypass the Project Browser. This way, when you create a project, it’s opened in the Motion workspace with the settings you established.
1.Choose Motion > Preferences (or press Command-Comma). The Motion Preferences window appears.
2.Click Project.

3.In the For New Documents area, click Use Project.
Note: If you haven’t assigned a preset project, the setting reads: Use Project: Nothing Selected. When you choose a project, the text updates to reflect the name of the selected project.
4.Click Choose.
A window opens containing the contents of the Project Browser.
5.Select a category in the sidebar and a project type from the center area, then choose a preset (if available) from the right column.
6.Click Open.
The selected project is assigned to the Use Project option in the Project pane of the Preferences window. From now on, the Project Browser does not appear when you choose File > New (or press Command-N). Instead, a new project opens in the format set in Motion Preferences.
Create, edit, and delete project presets
If you commonly create projects using properties that don’t match any available preset, you can create a custom preset for future use. Presets are created, modified, and deleted in the Presets
Loading...