


ENGLISH
 WARNINGS AND IMPORTANT ADVICE
These warnings are provided in the interest of safety. You MUST read them carefully before installing or using the appliance.
It is most important that this instruction book should be retained with the appliance for future reference. Should the appliance be sold or transferred, always ensure that the book is left with the appliance in order that the new owner can get to know the functions of the appliance and the relevant warnings.
•This appliance has been designed to be operated by adults and children under supervision. Young children MUST NOT be allowed to tamper with the controls or play
near or with the oven.
•This appliance has been designed for cooking edible foodstuff only and MUST NOT be used for any other purposes.
•It is dangerous to alter the specification in any way.
•For hygiene and safety reasons, this appliance should be kept clean at all times. A build-up of fats or other foodstuff could result in a fire.
•Accessible parts of this appliance may become hot when it is in use. Children should be KEPT AWAY until it has cooled.
•Under no circumstances should you attempt to repair the appliance yourself. Repairs carried out by unexperienced persons may cause injury or serious malfunctioning. Refer to your local Zanussi Service Centre. Always insist on genuine Zanussi spare parts.
•Ensure that all control knobs are in the OFF position when not in use.
•Should you connect any electrical tool to a plug near this cooking appliance, ensure that electric cables are not in contact with it and keep them far enough from the heated parts of this appliance.
•If the appliance is out of order, disconnect it from the electric supply.
•Do not leave untensils containing foodstuffs, e. g. fat or oil in or on the appliance. This could cause damage in case the appliance is inadvertently switched on.
•Always place the dripping pan in position to collect fat when using the grill or when cooking meat. Pour a little water into the dripping pan to avoid smoke and unpleasant smells.
•Always use oven gloves to remove pans from the oven.
•It is mandatory that all operations required for the installation are carried out by a qualified or competent person, in accordance with existing rules and regulations.
•Disconnect the appliance from the electrical supply, beforecarryingoutanycleaningormanteinancework.
•Some parts of the appliance are covered by a shockproof plastic film. Remove this film before using the oven.
•Once you removed all packaging from the appliance, ensure that it is not damaged and the electric cable is in perfect conditions. Otherwise, contact your dealer before proceeding with the installation.
•This appliance is meant to operate with a singlephased connection to 230V electrical supply. An eventual 400V poliphasic connection without earth wire will destroy the oven and the hob, if fitted.
•The manufacturer disclaims any responsability should all the safety measures not be carried out.
Environmental Information
•After installation, please dispose of the packaging with due regard to safety and the environment.
•When disposing of an old appliance, make it unusable, by cutting off the cable.
OVENDOORPROTECTIONDEVICE
All our appliances comply with the European Safety Standards. Nevertheless, in order to ensure the highest safety level, and avoid little children to be exposed to the heat when the appliance is operated, it is possible to fit a special protection device to the oven door. This device can be purchased in our Service Force Centres, specifying the relevant code ( 3 5 7 9 1 ) and the Product No. shown on the rating plate. Fitting instructions are provided with the kit package.
46
CONTENTS
Warnings and important advice |
46 |
Using the oven |
47 |
When the oven is first installed |
49 |
End of cooking programmer |
49 |
How to set the electronic timer |
50 |
Cooking with the multifunction oven |
51 |
Cooking tables |
52 |
Using the Grill |
53 |
Cleaning and Maintenance |
54 |
If something goes wrong |
56 |
Assistance and spare parts |
56 |
Guarantee conditions |
57 |
Technical data |
58 |
To the attention of the installer |
58 |
Electrical connection |
59 |
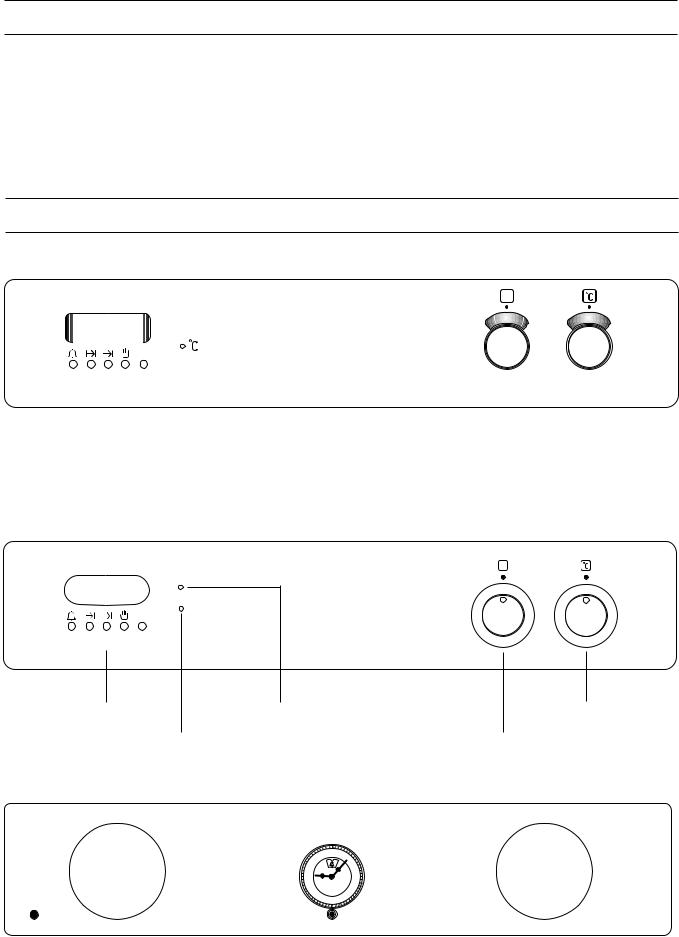
USING THE OVEN
ZBM 762
- +
|
|
|
|
|
|
|
|
|
|
|
|
Electronic Timer |
|
|
Thermostat Control Knob |
||
|
|
|
|
|
|
|
Thermostat Control Light |
Oven Function Control Knob |
|||
ZBM 762 X - ZBM 742 |
|
|
|
||
- +
Electronic Timer |
Oven Control Light |
Thermostat Control Light
ZBC 741 - ZBC981
0
11 |
12 |
1 |
10 |
|
2 |
9 |
|
3 |
8 |
|
4 |
7 |
6 |
5 |
|
|
Thermostat Control Knob
Oven Function Control Knob
|
|
0 |
50 |
|
|
100 |
|
MAX |
|
|
|
|
150 |
200 |
|
|
|
|
|
|
|
|
|
Thermostat |
|
|
|
|
|
|
|
End of Cooking |
|
|
|||
Control Light |
|
Oven Function Control |
||||
|
|
|
Programmer |
Knob |
||
|
ThermostatControl |
|||||
|
|
|
|
|
||
|
Knob |
|
|
47 |
||
|
|
|
|
|
||
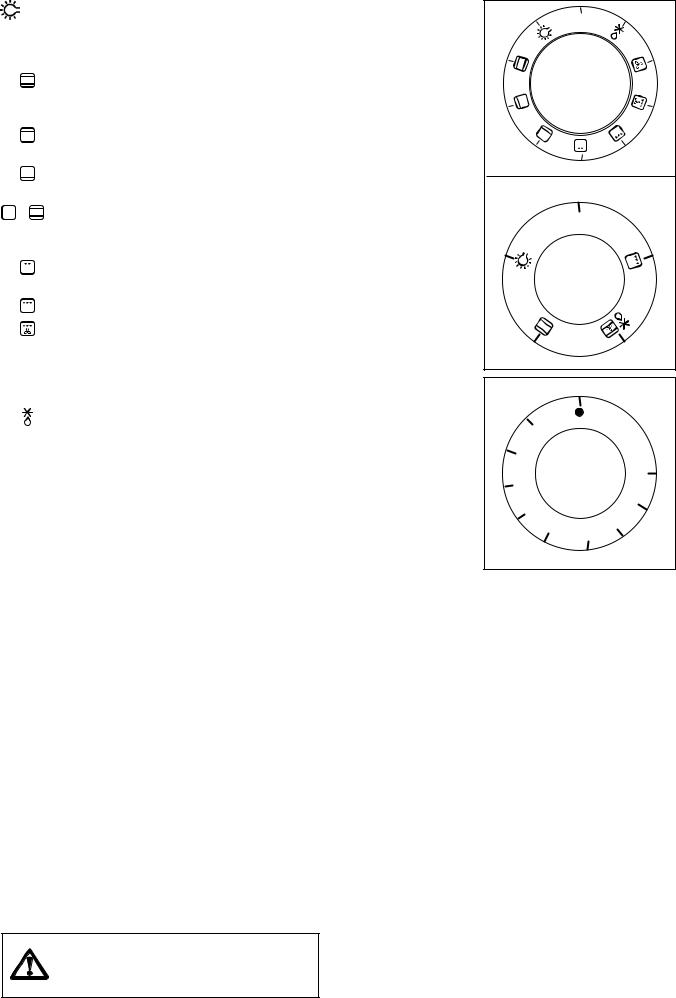
OVEN FUNCTION CONTROL KNOB (FIG. 1)
Oven Light - The oven light will be on without any cooking function
Conventional cooking - The heat comes from both the top and bottom element, ensuring even heating inside the oven.
Top heating element - The heat comes from the top of the oven only.
Bottom heating element - The heat comes from the bottom of the oven only.
 -
-  Fan cooking - This allows you to roast or roast and bake simoultaneously using any shelf, without flavour transference.
Inner grill element only - can be used for grilling small quantities.
Double Grill - The full grill element will be on.
Thermal Grilling - This function offers an alternative method of cooking food items, normally associated with conventional grilling. The grill element and the oven fan operate together, circulating hot air around the food.
Defrost Setting - This setting is intended to assist in thawing of frozen food.
THERMOSTAT CONTROL KNOB (FIG. 2)
Turn the thermostat control knob clockwise to select temperatures between 50°C and 250°C (MAX).
OVEN CONTROL LIGHT (if present)
This yellow light will come on when the oven function control knob is set on a function.
THERMOSTAT CONTROL LIGHT
Once the oven temperature has been selected, the Themostat Control Light will come on and remain on until the oven has reached the correct setting; after that, it will go on and off with the thermostat, showing how the temperature is being maintained.
THE SAFETY THERMOSTAT
This oven is provided with a safety thermostat. In case of malfunctioning of the main thermostat, and consequent over-heating, the safety device will stop the power supply to the appliance. If this happens, call your local Zanussi Service Centre. Under no circumstances should you attempt to repair the appliance yourself.
All cookings must be carried out with the oven door closed
0
FO0347
0
Fig. 1 FO0293
|
50 |
|
100 |
|
MAX |
|
|
|
|
150 |
200 |
|
|
Fig. 2 FO0282
THE COOLING FAN FOR THE CONTROLS
Thisovenisprovidedwithacoolingfan,meanttokeepthe front panel, the knobs and the oven door handle cool. This fan may run on after the oven or grill is switched off, until a normal temperature is reached.
CATALYTIC SELF-CLEANING SIDE
PANELS(ZBC741)(accessoryavailableonrequest)
Catalytic self cleaning panels can be installed onto the sides of the oven. These panels, at normal cooking temperature, can turn the splashes of fat into a light residual powder.
This powder must be removed with a damp sponge after the oven has cooled down, in order to keep the catalytic panels in good condition.
48

WHEN THE OVEN IS FIRST INSTALLED
Once the oven has been installed:
a)set the thermostat knob to MAX;
b)switch the oven function control knob to conventional cooking ( );
);
c)allow the oven to run empty for approximately 45 minutes;
d)open a window for ventilation.
During this time, an unpleasant odour may be emitted. This is absolutely normal, and is caused by residues of manufacturing.
Once this operation is carried out, let the oven cool down, thencleantheovencavitywithasoftclothsoakedinwarm soapy water.
Before cooking for the first time, carefully wash the shelf and the dripping pan.
To open the oven door, always catch the handle in its central part (Fig. 3).
Fig.3 |
FO 2161 |
|
END OF COOKING TIMER (MOD. ZBC 741 - 981)
SETTING THE TIME OF DAY
Push in completely the timer knob and at the same time turn it anti-clockwise, until the clock shows the correct time of day. Then pull the knob outwards to its original position.
11 |
12 |
1 |
|
10 |
|
2 |
WINDOW |
9 |
|
|
3 |
8 |
|
4 |
|
7 |
6 |
5 |
|
|
|
|
MANUAL FUNCTION
Pull the timer knob outwards and at the same time turn
it clockwise, until the symbol |
appears in the timer |
window. This setting allows you to operate the oven manually, i. e. without any programme.
AUTOMATIC OPERATION
Pull the timer knob outwards and at the same time turn it clockwise, until the required cooking time is displayed in the timer window. This setting allows you to operate the oven manually, i. e. without any programme.
The diagram shows the timer set for 75 minutes of cooking.
When the required cooking time is up, the oven will switch off automatically, and an acoustic alarm will sound. To switch the alarm off, pull the timer knob outwards and at the same time turn it clockwise until
symbol  is displayed in the timer window.
54
KNOB
11 12
 10
10
 9
9
|
|
3 |
12 |
|
75 |
4 |
11 |
1 |
|
6 |
5 |
0 |
|
|
|
|
|
|
|
|
|
|
|
49 |
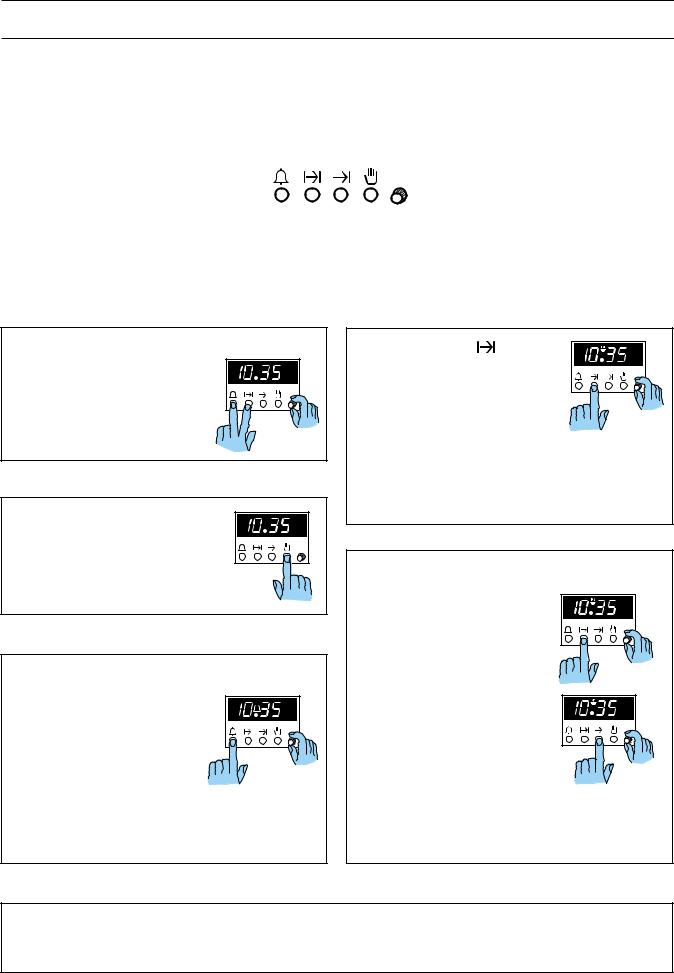
ELECTRONIC TIMER (MOD. ZBM 762 - 742)
Program On |
|
|
|
|
|
|
|
|
|
|
|
|
|
||
|
|
|
|
|
|
|
|
|
|
|
|
|
|||
Light |
|
|
|
|
|
|
|
|
|
|
Automatic |
||||
|
|
|
|
|
A |
|
|
|
|
||||||
|
|
|
|
|
|
|
|
|
|
|
|
|
|||
|
|
|
|
|
|
|
|
|
U |
|
|
|
|
Operation |
|
|
|
|
|
|
|
|
|
|
|
|
|
|
|||
|
|
|
|
|
|
|
|
|
T |
|
|
|
|
Light |
|
|
|
|
|
|
|
|
|
|
O |
|
|
|
|
||
A button: Minute Minder |
- |
+ |
|
|
|
|
|||||||||
|
|
|
|
|
|
|
|
|
|
|
KNOB (E) |
||||
Acoustic Signal Off |
|
|
|
|
|
|
|
|
|
|
|
|
|
|
|
B button: |
|
|
|
|
|
|
|
|
|
D button: |
|||||
|
|
|
|
|
|
|
|
|
|||||||
Cooking Time |
|
|
|
|
|
|
|
|
|
|
|||||
|
|
|
|
|
|
|
|
|
|
Manual Operation |
|||||
|
|
|
|
|
|
|
|
|
|
|
|
|
|||
|
|
|
|
|
|
|
|
|
|
|
|
|
|
|
|
|
|
|
|
|
|
C button: |
|
|
|
|
|
|
|||
|
|
|
|
|
End of Cooking |
|
|
|
|
|
|
||||
SETTING THE TIME OF DAY (24 H CLOCK)
Press buttons A and B at the
- +
same time and while turning knob E enter the time of day.
MANUAL OPERATION 
- +
To set oven for manual operation, press button D.
SETTING THE MINUTE MINDER 
Press button A and while |
|
turning knob E enter the |
|
required time (maximum 23 h |
- + |
59 min.) After required time |
|
has been selected the clock |
|
will revert to the time of day. |
|
When time is up an audible |
|
signal will be heard for approximately 2 minutes. To cancel press button A and return control and thermostat knobs to the OFF position.
COOKING TIME |
U |
|
A |
|
T |
Press button B and while turning |
O |
- + |
|
knob E enter the required time. |
|
The "AUTO" signal will appear on |
|
the right hand side of the clock. |
|
Then, select the required temperature and the oven function. When cooking is completed, an audible signal will be heard for approximately 2 minutes. To cancel press button A and return control and thermostat knobs to the OFF position.
SETTING THE AUTOMATIC TIMER 


Press button B and while
turning knob E enter the required cooking time. Then press button C and while turning knob E enter the end of cooking time.
Turn the thermostat and function control knobs to the
required settings. The oven temperature light nor oven light will not come on until the oven switches on. When cooking is
completed, the "AUTO" signal will flash an audible signal will be heard for approximately 2
minutes. To cancel press button A and return control and thermostat knobs to the OFF position.
In case of loss of power, all the settings (time of day, setted programs or programs in operation) will be cancelled. When the power is restored, the numbers on the display will flash, and the timer has to be reset.
50
 Loading...